
MORE HANDBOOKS ARE ON THEIR WAY! We will let you know when they get here.
×


Peanut6
-
Posts
342 -
Joined
-
Last visited
Content Type
Profiles
Forums
Gallery
Events
Everything posted by Peanut6
-
 I haven't abandoned my little Jolly Boat. Just ran into a few obstacles, finally got a job after a very long lay-off which cuts into work at the shipyard. But the biggest hurdle is the weather, 85+ with humidity not far behind makes it just way too hot to be working in the garage. The heat index has had us pushing 100 if not exceeding it most days over the last 3 weeks. Moving the shipyard indoors is out of the question because I'm afraid our 2 cats would insist upon adding their own bashing ideas to my project.
- 129 replies
-
- 1
-

-
- Bounty Jolly Boat
- Artesania Latina
- (and 1 more)
-
Having a very very tough day so I decided to walk away and find my happy place. While positioning the top gudgeon the aft bulwark popped off, CA doing wonders for me again. Shook my head, said a few bad words and tried to continue forward. Finally got the top gudgeon positioned and nailed in. I had been putting my little Jolly Boat on the stand and removing it multiple times while trying to position the bottom gudgeon. I had finally got it positioned correctly and set it back on the stand and noticed the right pedestal wobble just a bit, CA doing wonders for me again. Immediately looked thru my scrap bin of wood screws and found 2 of the right length and diameter to seriously attach the pedestals when they finally come loose, which I know they will. I continued with the bottom gudgeon and got the first nail location marked when a nail of the top gudgeon had worked it's way loose. I grabbed some CA and applied just the tiniest of dots to the nail end. By the time I got the nail started back into its hole the glue was setting up and I still had about 1/64" to go, CA doing wonders for me again. Just enough space to make the gudgeon wiggle. Grabbed the needle nose and was able to remove the nail and of course the other nail came loose. So far, in trying to get the gudgeons installed, I've made negative progress. I believe I'll spend the rest of the day adjusting my attitude in hope that tomorrow will be a bit more gentle and kind. As I'm getting closer finishing my Jolly Boat I can see the light at the end of the tunnel. But after days like this, I'm starting to believe that what I'll find at the end is a gorilla holding a flashlight.
- 129 replies
-
- 2
-
-
- Bounty Jolly Boat
- Artesania Latina
- (and 1 more)
-
Since my last update post I’ve made some progress though it doesn’t deserve any photos. The bowsprit has been stained. The boom and gaff halyard have been stained and their jaws attached. The mast has been stained and now has the cheeks and bowsprit support installed including a spacer I had to fabricate. All metal work for mast attachment has been completed. The metal bowsprit support at the bow has been formed but not cut to length nor the attachment hole(s) installed. The supports for the display stand have been stained and attached (name plate still go go). The oars have been shaped with a handle and stained, the blades have been stained and attached. The rudder has been stained and the pintles have been attached. The top gudgeon is in place. I’m having a bit of an issue with the bottom gudgeon. There is a step between the hull planking and the stern post due to a rabbit not being present. I just know that if I try to bend the gudgeon to fit, I’ll wind up really messing things up and probably breaking the gudgeon. And of course the thru holes for attaching the gudgeon are hitting way too close to joins between the planking and also at the stern post and false keel for my liking. I’m very concerned about splitting when the nails are installed. I’m hoping that when I even up the distance between the rudder and the transom down the length it puts these holes in a better position. To handle the the step I’m thinking of tapering the plank area down to the stern post only where the gudgeon is, and doing so ever so slightly. Trying to make the transition a little less drastic. I’m having minimal success using CA on the metal work, even though I’ve tried to ensure that the surfaces are clean and “finger oil” free. As much as I don’t like it, I’m counting on the nails to secure these pieces. The fact that I’ve had to trim the nails to length to ensure they don’t pass thru the material also adds to my worries. The troubles I’ve dealt with are self imposed and/or from the lack of clarity in the instruction manual. I’ve gone back to previous posts to add “Advisory Notes” where the instructions, IMHO, caused me problems in hope that it might help others. I’ll go into more detail on self imposed problems in my next update where pictures will be necessary to fully explain. I plan on doing that when the rudder, mast and bowsprit are attached.
- 129 replies
-
- 1
-
-
- Bounty Jolly Boat
- Artesania Latina
- (and 1 more)
-
The gentle mineral spirit rub down has been completed and it worked better than I could have hoped. The pieces are already dry and feel exactly as they should. I could have lived with the extra dark hue my mistake created but just enough stain was removed to really high light the wood grain. I think I'll give them an over night rest before I move on with them, I'm sure they have to be as traumatized as I was. I can't tell you how much I was dreading spending the next 2-3 days to replace what I had redone from my first go around on my little Jolly Boat. Johnny and Roger thank you so much for your guidance, it is greatly appreciated.
-
Johnny, thanks for the information. I too have experienced numerous products that "aren't what they used to be". I can understand why formulations have changed but it's still frustrating not to get the same results one has come to know and count on. I do know the stain is good since an item I stained at the same time, and did get wiped off, turned out just fine. Unless some other information comes around, I don't see how another day or two of drying could hurt. If I do have to resort to the mineral spirits rub down I really am concerned what it might do to the PVA. In the mean time I'll continue with my oars, have 4 of the eight handles shaped and lots more I would like to do to them.
-
James, The wood is Ramin and the stain is an oil based MinWax. I just read a little sentence tucked in a corner of the label that mineral spirits or paint thinner is to used for clean up. I was just mulling it thru my mind to do just what you said using a rag and mineral spirits. Assuming that this works, would anybody have an idea of what mineral spirits will do to PVA? My concern is with the cheeks, bowsprit support and of the utmost importance is the spacer. It is 2 pieces glued together to get the height I needed and is in the shape of a half circle with on ID of 11/64" and maybe 1.5 MM thick.
-
After 24 hours drying time my mast, bowsprit, boom and gaff halyard are just a bit tacky. Going back and reliving yesterday afternoon, I can only guess that I didn't wipe off the excess stain and it dried. I stained the items mentioned above plus my rudder. After staining I wiped the excess off the rudder and was called away from the shipyard. I remembered the pieces hours later and thought I was okay because I remembered wiping down the rudder. The rudder is just fine so I know it isn't the stain. As I said, the pieces feel just the tiniest bet tacky, running my fingers over the pieces leaves no marks and no stain comes off onto my hands. I'm know it must be handled but I have no clue how to go about it. Any insights or solutions would be greatly appreciated. I'm desperate as a spacer I had to make a attach to the mast so it would fit properly took me an entire day to fabricate.
-
Ladder steps
Peanut6 replied to allanyed's topic in Discussion for a Ship's Deck Furniture, Guns, boats and other Fittings
What I have to share is based upon my facilities drafting days of yore. It doesn't directly apply to ships, of any era, but I can't see how the logic could not be carried over. Yes there is a strict code for stairs. But it does have flexibility built into it in order to handle all situations. There is a min/max for tread depth and a min/max for riser height. What those numbers are have escaped me after all these years. The number of steps, odd or even, is not a factor. The key factor is that the riser distance must be consistent for that particular flight of stairs. This distance is to include the surface you are standing on to the top of the first step and the surface of the last step to the destination surface. There are other factors that affect rise and run in a flight of stairs but I won't go into that now. The one consistency I've seen in all the build logs I've read is the inconsistency in the distance from one deck to another. Not only between ships of different eras, but within different types of ships within the same era to even the decks within the same ship. IMHNO (In My Humble Newbie Opinion) I would think that if one would follow the guideline of a consistent riser distance of a "realistic stride/step to scale" you couldn't be faulted. I'd bet that is the "general rule" the shipwrights of old followed. -
HHH, I did consider using the "headless nail" method but I can't drill a straight hole to save my life. Maybe better stated, the hole is always straight because the bit is, but it's never in the proper alignment. Always cocked/tilted one way or another. So for me, that method went out the window. The way you handled the oars is an interesting touch, something I wouldn't have thought of. I'm not sure what I'm going to do with mine. I read your current build log and look forward to following you along your journey. I am always receptive to anyone who offers help, tips, suggestions, hints, clues and any reference materials. As this is my build log, I have no problem with others adding photos. I know that a picture can jog a memory better than a title and author's name so if it helps me it may very well help someone else who might visit my build log. Thank you. Not being the tightest shroud on deck, the second photo looks as it shows the basic details of each line. That is the information this newbie needs the most. Most everything I find seems to be directed towards those who know what is going on and just need a quick/simple reminder. I look at it like this, if I don't know/understand the most basic rigging how can I understand the more complex situations. Anyway, thanks again for your comments as they are greatly appreciated.
- 129 replies
-
- 1
-
-
- Bounty Jolly Boat
- Artesania Latina
- (and 1 more)
-
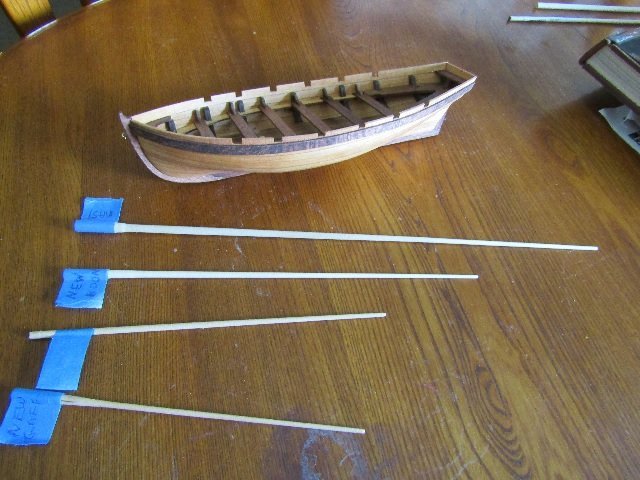
A little update. I’ve installed the aft most thwart, transom bulwark, thwart braces, the bow ring-eye and made the cutouts for the oars (which I stained afterwards). From top to bottom is the newly turned one piece mast, newly turned boom, previously turned bowsprit, newly turned gaff. All but the bowsprit still need to be cut to length. I've also shaped the cheeks and bowsprit support that attach to the mast. The instructions tell you to fabricate the sails based upon the plans. My kit, as with other Jolly Boat builders, came with pre-made sails which are larger than those shown in the plans. But the plans don’t make the necessary adjustments in the boom, gaff, mast and bowsprit lengths. So I had to re-turn my gaff and boom. I hadn’t cut my bowsprit to length yet so I was able to use it as it was. The instructions have you make a 2 piece mast. At the time I couldn’t understand why. How was one to create a perpendicular cut to the axis of two tapered pieces at the exact diameter of 2 dowels to create a butt joint which presents such a weak point in an important piece. This sure seemed to be an unnecessary exercise in model building. At the time, after the fact as my luck goes, it was suggested that I could/should get a length of dowel and make a single piece mast. That is indeed what I did this time around. Based upon my career experience, I’m now of the belief that AL’s decision to go with a two piece mast was simply a cost savings for them. If the box is of industry standard size, flute and configuration (which I strongly suspect), if the insert can be used for more than one model (which is probable) then the savings to use the same box and insert for multiple models far outweighs the cost of a possible extra photos and paragraphs per applicable model instructions.
- 129 replies
-
- 5
-
-
- Bounty Jolly Boat
- Artesania Latina
- (and 1 more)
-
HHH, your post of encouragement is ever so timely. As I read thru every sentence I found myself nodding in agreement. In sharing your experiences, it's as if you were looking over my shoulder as I've traveled down this path of my first build. I also seemed to have the light bulb of understanding come on out of nowhere regarding my rigging. Though I've asked for input regarding my plan, what I'm thinking makes sense to me as I understand things and unless someone speaks up I'm going with it. Research can be very difficult when one doesn't have a firm grasp of the terminology of the craft. I start looking into something and find a word I don't understand who's definition contains another word I don't understand which contains . . . . on and on until I finally get to the end. By that time I can't seem to retrace my steps to where I ran down the rabbit hole. And I've actually come across the statement "same as 'fill in the blank" only simpler". If you happen to have any suggestions regarding my rigging thoughts that you would like to share, I sure would be greatly appreciative.
- 129 replies
-
- 2
-
-
- Bounty Jolly Boat
- Artesania Latina
- (and 1 more)
-
boom rigging on a ship's launch boat
Peanut6 replied to Peanut6's topic in Masting, rigging and sails
Wefalck, thank you for that piece of wisdom. I posted a picture in my build log of the cleats I made the other day. I figured I would need 7 do rig my Jolly Boat. The method I used produced 8, and if I didn't miss anything and don't break or lose any, they are all accounted for. Again I thank everyone who has replied with their guidance as it is greatly appreciated. -
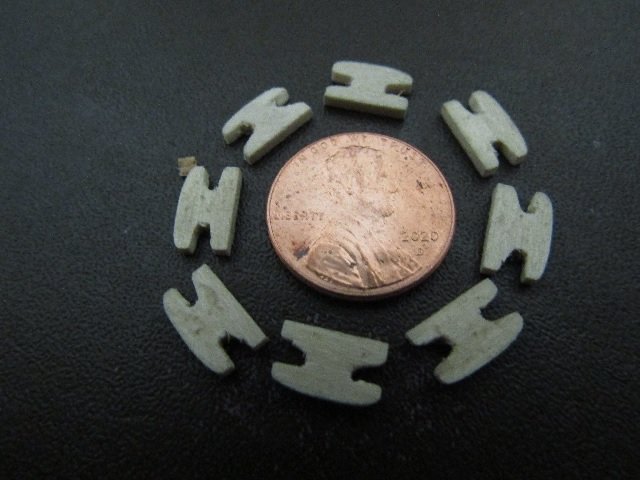
Got come cleats made yesterday in between thwart bracket attachments (only one more to go). Obviously not all that good and I’m sure they are out of scale. But IMHO not too terribly bad for a first attempt considering it was freehand. Need to clean them up just a bit and hope I don’t break any. I’m praying they look half way acceptable when I dry-locate a couple in the boat.
-
Just realized I can't put the cleats on the mast, they will interfere with the rings for the gaff sail. Guess I'll have to put them on the deck (item 13). Go with a pair port and a pair starboard. Already trying to make some cleats while my thwart braces are drying. Crossing my fingers they turn out decent. Also figured out what I'm going to do regarding my little sketch above. Do as initially planned but I'll be putting the cleat on the aft thwart (item 19).

-
boom rigging on a ship's launch boat
Peanut6 replied to Peanut6's topic in Masting, rigging and sails
A major thank you to everyone who replied. The feedback, pictures and links all contain a tremendous about of information. I never would have guessed that my "little situation" had been such a debatable topic in the past. I've decided to go with my initial sketch except my belaying point will to a cleat located on the starboard bulwark or starboard stern thwart (item 19) in the picture below. I agree that I could get away with two single blocks rather than a single and double block. But that is what came with the kit, and this whole unemployment thing makes it impossible to add stock the shipyard. I don't even want to try and make one to match those that came with the kit, they are just way too small. Your help, as always, is greatly appreciated. I do have some other rigging questions I asked in my build log . . . so if maybe anyone might want to take a gander and redirect me or confirm what I"m thinking that would great.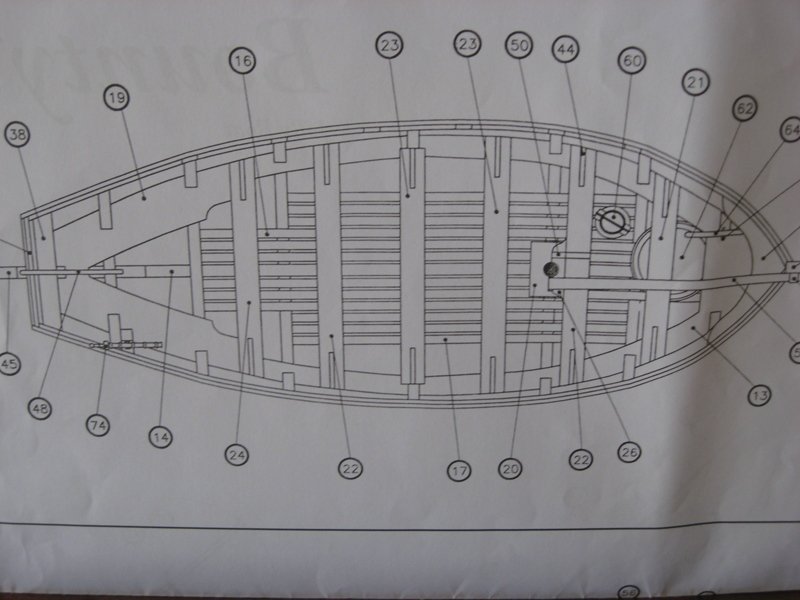
-
boom rigging on a ship's launch boat
Peanut6 replied to Peanut6's topic in Masting, rigging and sails
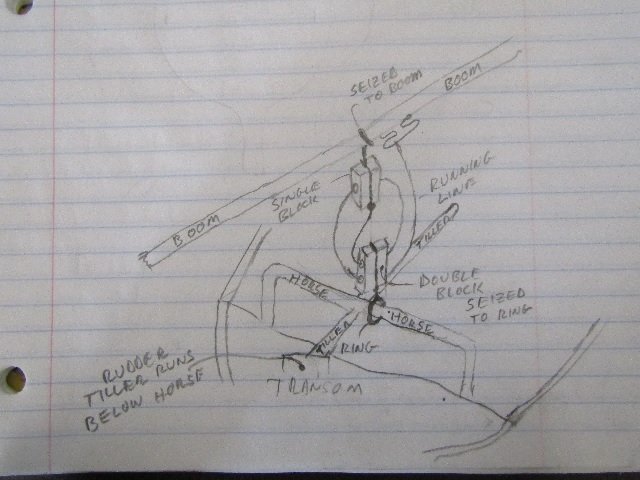
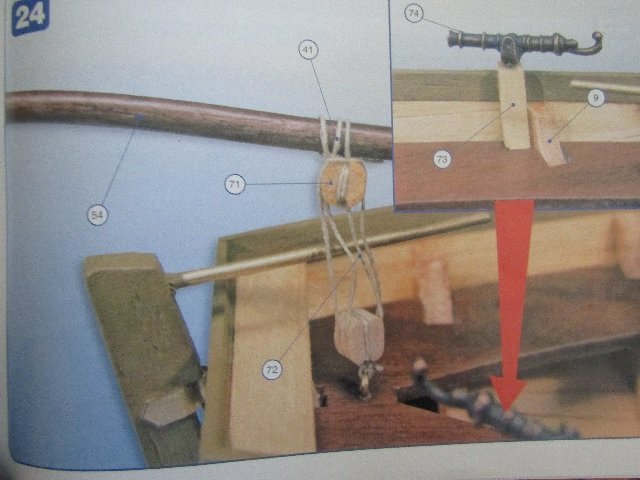
I think I need to add some info for clarification purposes. Here is a snipit from part of my lost post on my build log. Here is the running rigging diagram from the instructions. This is the picture of step 24 shown in the instructions that I'm having difficulty getting worked out. I understand it is to keep the boom restricted to a functional arc but the location has got to be all wrong. It interferes with the tiller. I’ve decided I want to copy JMaitri’s lead in his Jolly Boat build log where he installed horse on the aft thwart right at the transom. I wasn’t able to see a good close up to find out how he handled the entire situation. I thought I had come up with a plan, and I’m aware that the double block is oriented incorrectly but it made following the running line easier to follow. And this brought about my original question regarding a cleat being placed on the boom. Again, I'm aware that the double block is sketched incorrectly but it did make following the running line clear, at least to me in my mind. From everything I've been able to find, it is common knowledge that this model is a fictitious representation of Bounty's Jolly Boat. There are other kits much more representative of the actual boat. That being the case, one would have a bit more latitude as to how the end product looks. I could create the "nasty looking fishing line tangle mess thing" they got going on between the top block and the boom. But I want to do something better than that. Plus I want to be able to show some aspects of the build in a period accurate fashion, as best as my skills enable me. Roger, the instructions do indeed have me attaching the clews of gaff sail to the boom and I was going to do some serving to accomplish that. If you take a look-see at my lost post of my build log (page 2) I have asked for help/opinions on how I'm thinking of doing the rigging in greater detail. Everybody's help and suggestions are greatly appreciated. With the poorly/incomplete instructions and this being my first build of a boat of any kind I need all the help I can get.

-
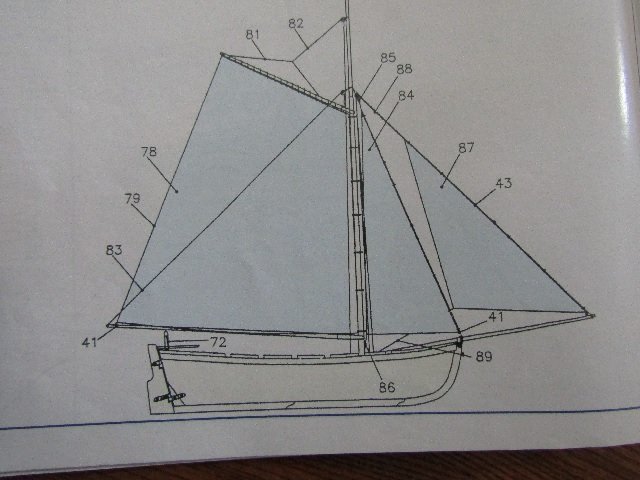
Went ahead and stained the inboard planking to match the outboard side. It looks better than the blotchy condition I had but it sure gives the entire boat a darker look. I’ve found that if I’m having a difficult time with something I tend to procrastinate a bit, but I finally got the aft bulwark and aft thwart installed. Now I’m working on the thwart brackets. It’s not difficult but each one needs some shaping to match up with the inboard side of the planking. And with the pieces being so small it is a bit tedious. Since my Jolly Boat is of a darker hue due to everything being stained or a dark wood, I’m thinking that it might not be a bad idea to paint the mast, bowsprit, boom and gaff in an aged white color. From what I’ve seen this isn’t an unheard of thing. My youngest daughter is an artist and she said she knows what colors we need to mix with the white to get the affect I’m after. Acrylic is her favorite medium so I’m all set there. What are your thoughts on this, o’ thee of greater ship building experience? I’ve been thinking ahead about the rigging and sails. The instruction book,IMHO, really leaves a lot to be desired. Many times it instructs the builder to refer to the “Basic Tips” section for more detailed information on the topic at hand. And of course that issue isn’t address in the slightest. I think I have a plan based upon reading all my model ship building reference books, reading a kajillion build logs, watching just as many YouTube videos, and anything else I could find online. But I could really use the help and advice for those more experienced than I. In many build logs I’ve seen the shrouds are twisted 2+ times around the mast then down to the dead-eyes. Has this become a common modeler’s practice? Every reference I’ve found as to what was actually done is the they were seized at the mast. And that is how I think I would like to handle the shrouds and stays on my Jolly Boat. Your thoughts? The instructions make no mention of belaying points. They do point out 3 locations for lashing (item 41) shown in the running rigging photo shown and a third location at the leading jib sail clew to the bowsprit in the plans. Yet the instructions call out 16 locations. At most I can only come up 6. The other 3 would be at the remaining clews of the gaff sail. Where would the 10 be located? The plans do call for attaching the head of the gaff sail to the gaff using a sail snake, other references call it lacing. So that can’t be it. I’ve seen other typos within the instructions so maybe this is another one. My plan here is to seize a line to each clew and then seize the other end at their appropriate locations on the bowsprit, boom and gaff. What do you think? As for the sails, my Jolly Boat came with pre-made sails. They already have a bolt rope attached around the perimeter with preformed clews at each corner. The bolt rope is sewn/basted to the sails using an approximate 1/4” pitch stitch. They say to use rings (item 43) to attach the jib sail (item 87) and fore top mast stay sail (item 84) to their appropriate stays. They use a different set of rings to attach the gaff sail to the mast. The jib and fore top mast stay sail halyards (items 88 and 85) run thru a double block attached just above the mast cheeks. The jib and fore top mast stay sheets attach to their respective trailing clews while their leading clews are lashed (item 41) to the bowsprit. The gaff halyard (item 82) attaches to the gaff halyard ring (item 81) and runs thru a single block attached higher up the mast. The boom lift runs thru a single block attached to the mast just above the cheeks. I’ve all that figured out and I believe I understand how and why it works. Is it safe to assume that the rings encompass the accessible sections of the bolt rope between the sewn/basted stitches? Back to the belaying points. My research leads me to firmly believe that my Jolly Boat was too small to warrant a fife rail with belaying pins and maybe, just maybe, it might have possibly used belaying pins, but not very likely. So what I’m thinking of using are cleats. What if I run the jib and fore tap mast stay sheets to two cleats mounted at the bow end just aport of the mast on the mast thwart? The bowsprit anchors to the mast atop a bowsprit support on the starboard side and I think this location balances things a bit. Now for the halyards and lift lines. I’m thinking of attaching 4 cleats on the mast 90 degrees apart oriented 45 degrees of the center line, low but above the bowsprit. I can run the jib and fore top mast stay halyards on the port side. I would think they should be together so they are not fighting each other against the double block. Then run the gaff halyard and boom lift lines on the 2 cleats on the starboard side. How does that sound? I believe all that is left is this situation. I understand it is to keep the boom restricted to a functional arc but the location has got to be all wrong. It interferes with the tiller. I’ve decided I want to copy JMaitri’s lead in his Jolly Boat build log where he installed horse on the aft thwart right at the transom. I wasn’t able to see a good close up to find out how he handled the entire situation. I thought I had come up with a plan, and I’m aware that the double block is oriented incorrectly but it made following the running line easier. I asked a question in the rigging section and that is where I found that a cleat wouldn’t appear on the boom of a boat like this. So I don’t know what to do. Anybody have any suggestions?

-
boom rigging on a ship's launch boat
Peanut6 replied to Peanut6's topic in Masting, rigging and sails
Even on the boom of my little Jolly boat? I'm trying to figure out a way around an obvious error in the kit and just trying to be somewhat realistic. -
Bob, thank you for the kind words, they are very encouraging. ERS Rich, thank you for your encouraging words as well, they give me hope for my next build (whatever that may be). Odd the think that staining is more difficult than painting and just my luck to have my heart set on the tough one for my first build. I did learn a lot from my first planking, even though it took me two attempts to get it completed. But I'm sure that I'll do better planking my next model. Next major effort will be the rigging and getting that figured out. I've got the "need to know why" set of mind. I firmly believe that if you know "the why" part about something it is so much easier to figure out "the how" part. So rigging could take me a while even though my Jolly boat has minimal rigging. Yes, the exterior of the hull was flooded with stain. I had never thought of using inexpensive paint brushes and I'll be sure that some find their way to my hobby tool box. The ones I currently have are way to expensive to be considered expendable for staining purposes. Your advice on a gel CA is also greatly appreciated and the term "open time" fits the situation perfectly. I may have to suspend attachment of the thwart supports until I get some as darn near everything is stained. They are bare walnut and their attachment surfaces are stained so maybe I'll have some luck using PVA. I didn't have any issues with my bare planks attaching to my stained frames. But maybe the tight grain of the walnut, even though it is plain, could pose a problem. Thanks again everyone.
- 129 replies
-
- 1
-
-
- Bounty Jolly Boat
- Artesania Latina
- (and 1 more)
-
Would one ever find a cleat on the boom of a launch boat?
-
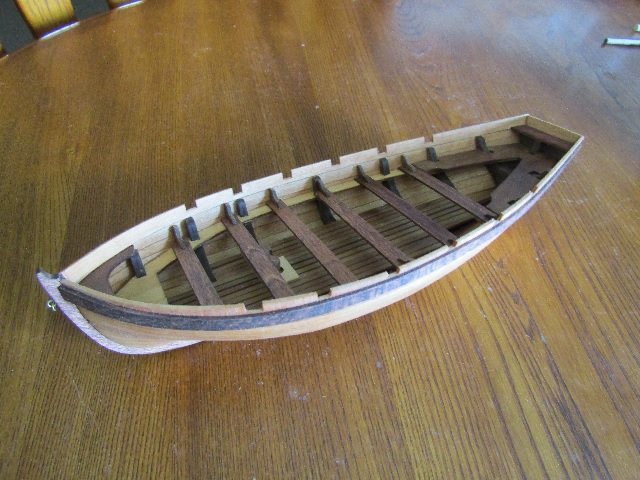
Here is the current status of my little Jolly Boat. I apologize in advance for the poor quality of the photos. Some days I’m able to get decent close ups and good color and other days it just isn’t happening. These have good color but just couldn’t seem to get good close ups. At least that way you can’t really see how poorly the wales and bulwarks came out. Now begins my “1 step forward, 2 steps back” series of events. Went thru a few rounds of applying wood filler and sanding the hull before I applied Minwax Golden Pecan #245 stain to the hull. Got the keel pieces installed after staining with Minwax Red Oak #215 to match the false keel, frame members and transom. Shaped and trimmed the wales prior to applying Minwax Red Oak #215 to match the false keel, frame members, transom and keel pieces. Bulwarks were shaped, trimmed and then stained using Minwax Golden Pecan #245 to match the hull prior to installation. Without going into detail (if desired they can be provided so we all can have a good laugh and roll of the eyes), here are some things that I learned, relearned or that came up during this phase of my build. Know the product you’re using. Read and remember all of the manufacturer’s instructions and guidelines. Such as, does the wood filler you’re using take a stain? And when the instructions tell you not to sand between stain coatings there is a good reason, even if it has had 24 hours to dry since the last application. Does the CA you’re using really grab a hold after just a couple seconds even though the instructions say it takes 30 seconds to set and 30 minutes to cure? Be aware that what ever condition the exterior of the hull is in, the interior will be a mirror image. What is a high spot on the exterior will be a low spot on the interior, a gap filled on the exterior will still be present on the interior, etc. These things are very visible with an open interior hull such as my Jolly Boat. PVA doesn’t adhere for very long on oil based stained pieces. It seems to do fine when one piece is stained and the other piece is bare wood as I had no problem using it to attach bare wood hull planks to the stained frame members, false keel and transom. Stain can actually bleed thru 1/16” thick basswood clear to the other side. This can be seen in the following photo. My intention was to only stain the exterior of the bulwarks but the stain bled through. Then I hoped I could get away with both sides being stained. But then I finally saw other sections of the hull where the stain bled through and it just looked awful. So I’m going to try and stain the interior of the planks and the deck using cotton swabs (Q-Tips). I hope that I can remove any stain that gets on other pieces quickly so that it doesn’t foul up their appearance. I’m currently fiddling with the aft thwart and bulwark. I got the thwart cut to perfect size (IMHO) by making a template out of card and using it to cut the thwart. Surprised myself by getting it done the first time. Now the aft bulwark is a different story. I’ve made 4 attempts and just don’t have it quite right. I know I’ve got to use CA to attach it. So I’ve got to get the perfect fit such that it will just slip right in first try without leaving any gaps. I won’t have time for any adjustment because the CA grabs it so quickly. I’m think I’ll try to figure out a way I can make a template, similar to the thwart process, and see if that helps. I’m walking the fine line of major disappointment and convincing myself that since this is my first build things aren’t going to be perfect. And above all else to have fun and enjoy the project to completion in spite of myself. Asked the Boss’s opinion regarding the interior staining mentioned earlier. During the conversation she said that I should probably pick out another boat as a Christmas present, just so that I'd have something to do. Ya’ gotta love that! I told her I had the Oseberg sitting on my hobby tool chest but I didn’t think I was near ready to take on that project and I should pick something a bit easier. She told me to let her know what I’ve decided. As always, I’m open to any and all questions plus eager to hear your feedback and/or suggestions which would be greatly appreciated.

- 129 replies
-
- 9
-
-
- Bounty Jolly Boat
- Artesania Latina
- (and 1 more)
-
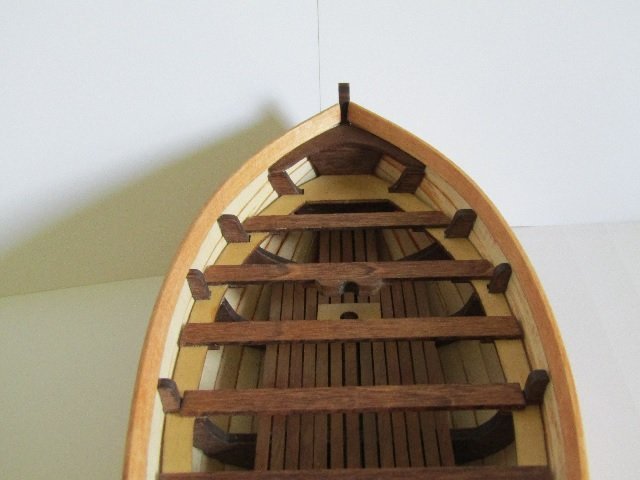
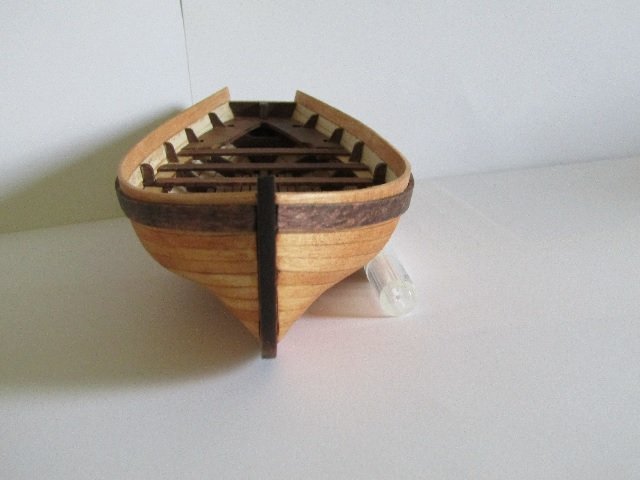
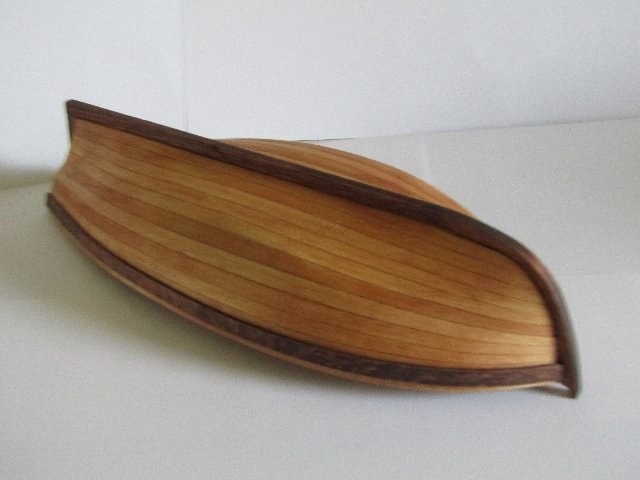
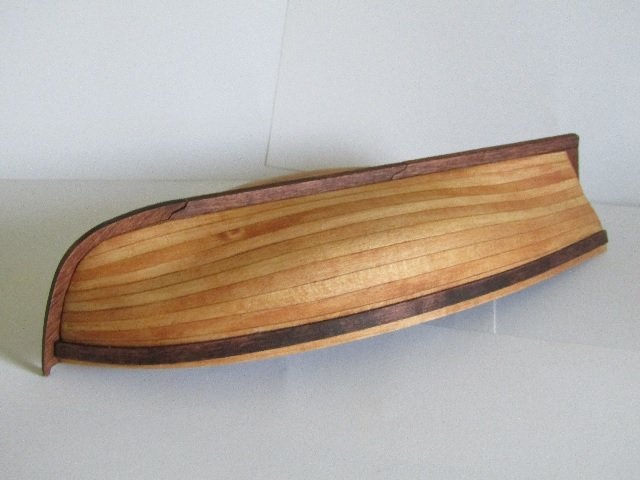
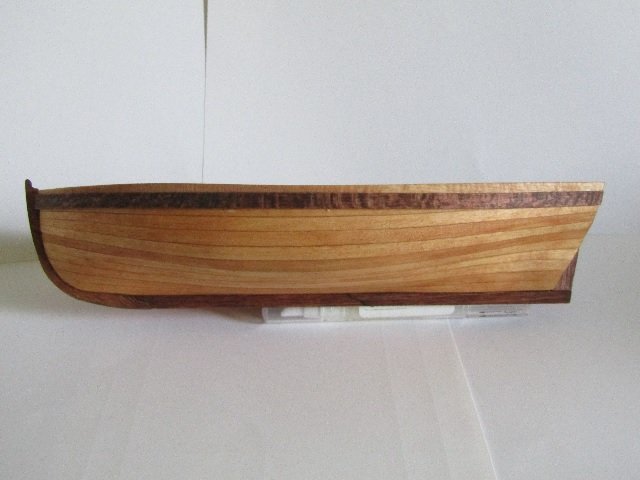
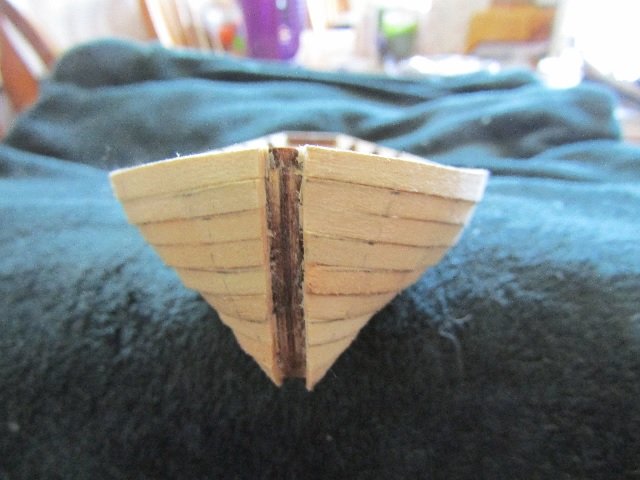
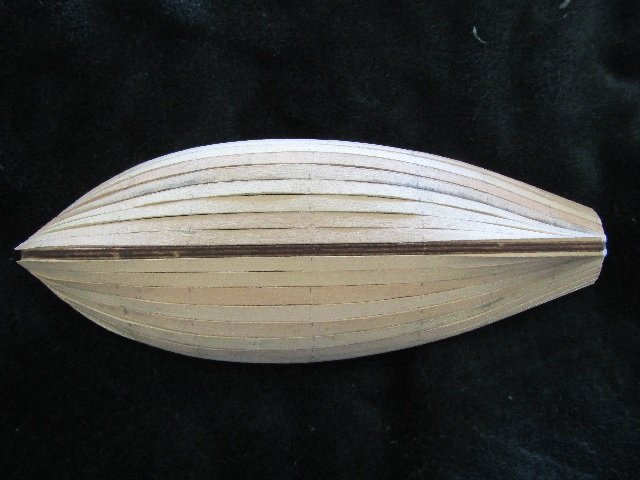
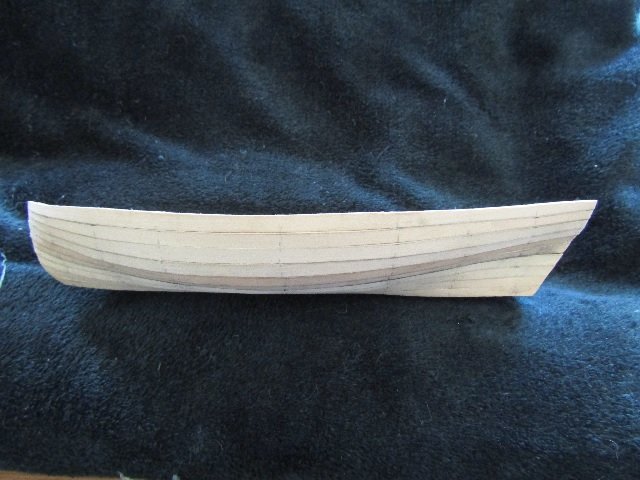
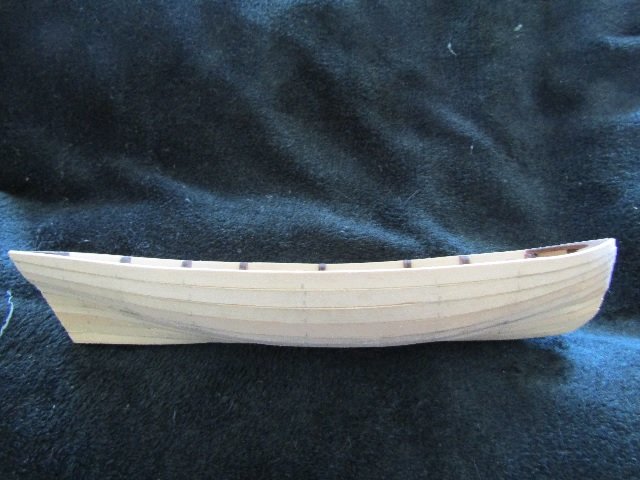
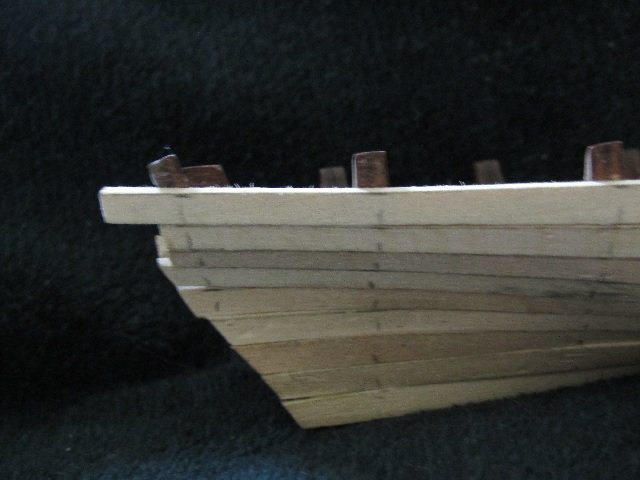
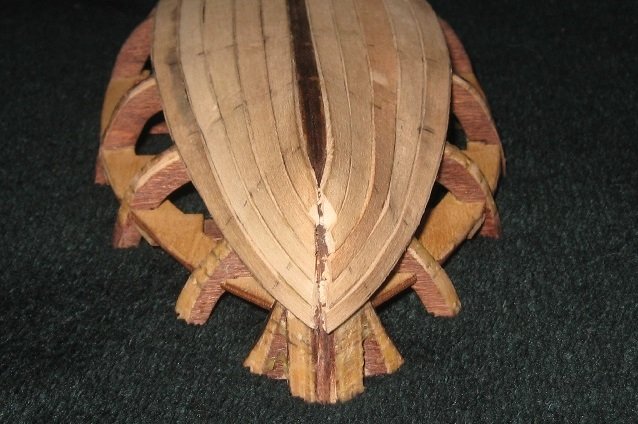
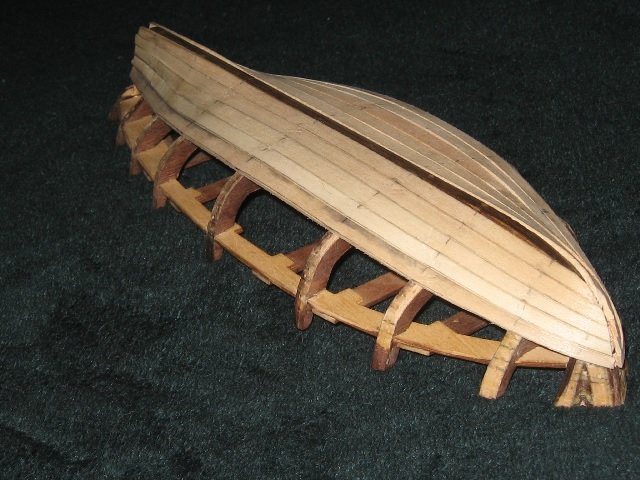
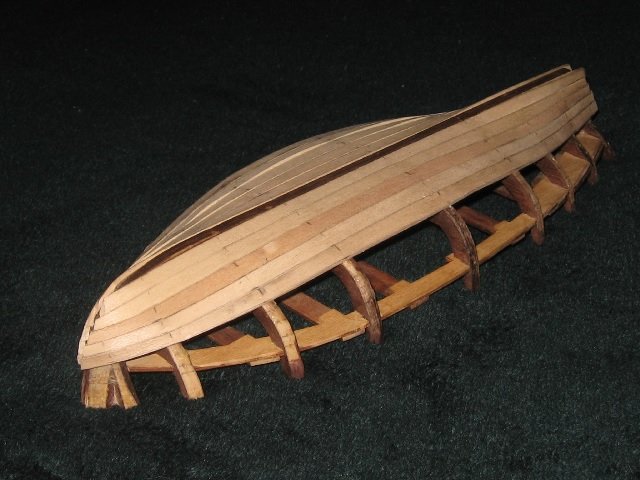
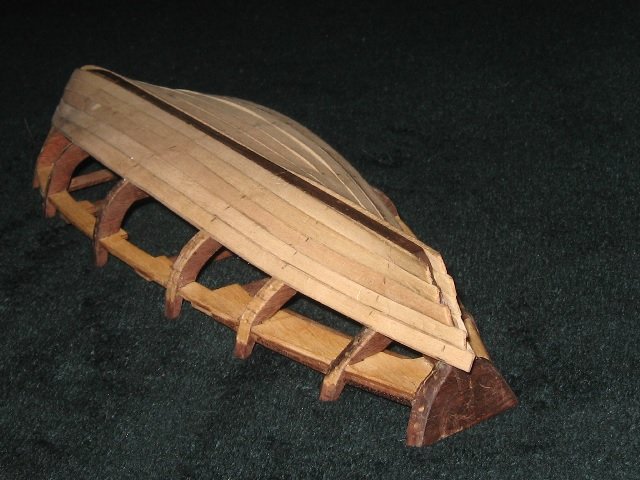
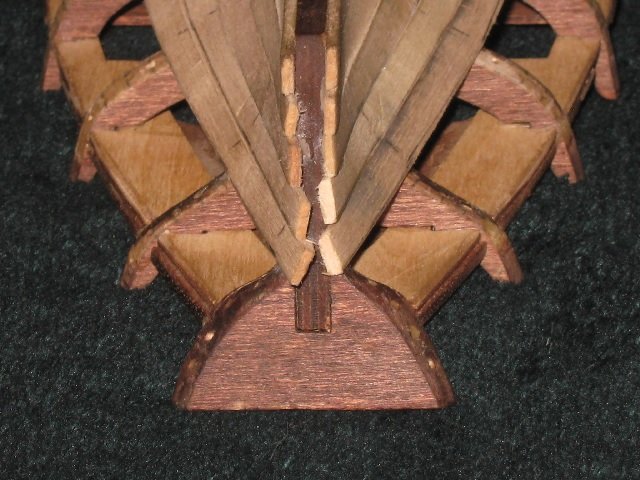
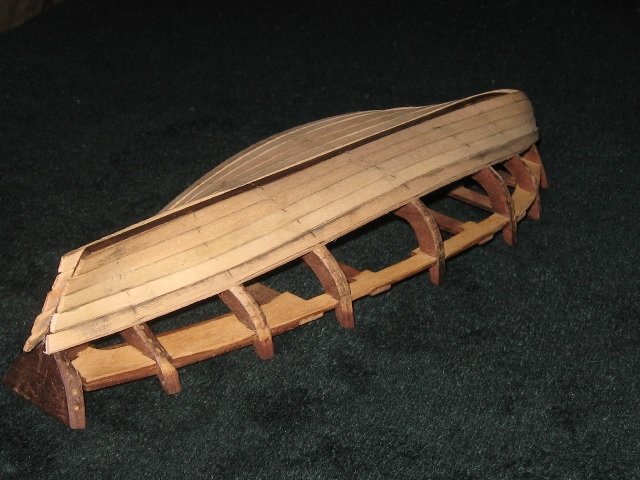
FINALLY!!! I got the whiskey plank installed. As I had hoped, once I got past the flat portion of the keel and onto the transom, the planking went much easier. I’m of the belief that the difficulty I was having with the first few planks was due to the contours of the hull rather than the difference in the wood from 1st attempt and this time. I wound up having to use CA at all points on the last 2 planks per side because there just wasn’t any place for clamps. I went ahead and trimmed the planking even with the transom and the slot at the bow for the keel installation. Even though I still have the wales and bulwarks to install I’m calling the hull planking complete. It isn’t all that good but I did achieve my goal of not using any steelers or drop planks plus I believe the symmetry isn’t that bad. Still had a few stretches where I must have not faired the frames as well as I should have because there is a bit of clinkering. I hope it comes out nicely when I do the sanding and doesn’t leave some areas too thin. I'll begin the gap filling, sanding and some touch-up staining in a couple spots tomorrow. Would greatly appreciate any comments and/or suggestions. And another advisory note: At this point I would suggest the builder strongly consider tapering-sanding down the planks that attach at the false keel to be even/level with the false keel. I'm talking the bottom 5 planks shown in the aft view above. The reason for my suggestion comes at a later step where you are installing the gudgeons for the rudder. In my build I just couldn't position the bottom gudgeon due to the geometry at that location. The surface differential from the stern post to the planks kept pushing the gudgeon off the back end and making is slip down towards the keel. In other builds I've those who possess mad metal bending skills where they were able to bend the gudgeon at just the right spot and at just the perfect angle to enable the gudgeon to sit so nice . . . . I don't possess those skills. I decided to sand down the planks from the transom down toward the keel to give a smooth transition from the stern post to the planks and the gudgeon just slipped into place like it belonged there, which of course it does. I scruffed up my stern post and keel just a bit during the sanding process, which required some staining touch up after the fact. So unless you also possess mad metal working skills, now is the time to do that sanding before the keel and stern post are installed. Here is a pic of what I'm talking about. You can really see the difference between this view and the aft view in the picture above. Hope this helps.

- 129 replies
-
- 5
-
-
- Bounty Jolly Boat
- Artesania Latina
- (and 1 more)
-
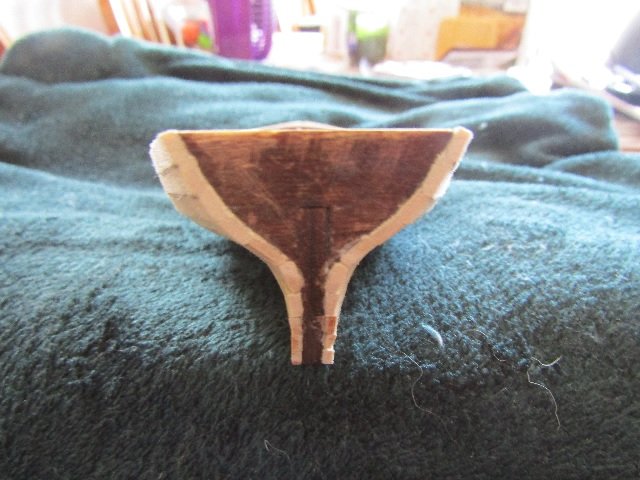
Oh there’s trouble in paradise. I was in the process of installing plank 18 of 20 when I noticed something at the transom didn’t look quite right. Take notice of the chamfer at the top of the transom. Yup, I installed the transom backwards. The lower edge of the chamfer should be on the inboard side, not on the outboard side. This is important because in a couple steps the aft thwart is installed, it needs to rest upon transom and keel upright. I realized that if the orientation of the transom is important, what about the frames. Yup, sure enough, there is a slight angle at the top of each one except #5 which is horizontal. You can see on frames #8 and #7 in the picture. Other than aesthetics, I don’t see a structural purpose except for #2 and the transom. The bow cap attaches to #2. Somehow I got that one correct and you can’t get #5 wrong, all the others are installed backwards. I’ll go back and edit my frame to keel step to inform future builders what to look for. The angle is very subtle and it can be seen in the plans but, if you’re paying more attention to getting the frames in the correct order as I was, you won’t notice it. There isn’t a mention of this subtlety in the instructions nor do I recall it being brought up in any build logs I’ve read on the Jolly Boat. It really makes me wonder how many others made this mistake and didn’t notice or just knew what to look out for. After much thought and looking thru the next few steps, I’ve decided to leave the frame members be. I think that if I try to modify them I’ll make a mess of things and that would be noticed but only an experienced eye would catch things as they are. As for the transom, the only thing I see is using my Dremel with the same sanding disc I use for trimming my planks and sand down the inboard edge to match the angle of the keel upright. I’m going to do this before I install the last two planks so that I have complete and easy access to the transom. I was thinking I’d have to restain the exposed surface but I believe all of it will be covered. Guess I’ll know when I get it done.
- 129 replies
-
- 1
-
-
- Bounty Jolly Boat
- Artesania Latina
- (and 1 more)
-
I was able to get the first 2 planks (2 on each side) shaped by just soaking and glued down using PVA just as I wanted. Planks 3 and 4 were more difficult. I still was able to get them shaped by soaking. But my frames were starting to look like Swiss cheese with all the push pin holes and I could see that they were wanting to split. Trying to get the aft end to snug up to the previous plank was tough and wound up popping of 7 flooring pieces, 1 thwart and the bow cap. Getting that twist in the plank to attach to the aft end of the keel below the transom was a bear of a job. I didn’t have the right size and/or strong enough clamps to hold it in place. I finally resolved myself to accepting the fact that I was going to have to use CA, but only at the aft end. I Strongly suggest builders of the Jolly Boat follow JMaitri’s lead in his build log where he didn’t install the flooring and thwarts until after the planking was complete. With those items installed it really limits areas where you can use a clamp. The flip side of course is that it will be harder to install them after the planking is done. So you can pick your poison. I asked a question on the wood discussion folder regarding the difference between the kit supplied Ramin wood and the basswood I’m using for my second planking. I was wondering if what I was experiencing was the possible difference in characteristics of the wood or if it was due to planking from garboard up this time. You can check that out if you wish as there are some details in there I didn't carry over here and vice versa, but the long and short of that thread is I’m now using Chuck’s edge bending technique and "beginners" success. I showed the Boss what I had achieved in bending the plank (couldn’t help myself) but how it was discoloring the wood which was easily sanded off. I told her I knew it wasn’t because of the wood and that I did everything I could think of to clean up the plate on the iron. I knew for sure I was in for it, but she said she was glad to learn about it this way rather than ruining something important next time it was used. Whew did I get off lucky. 2 days later I got an early Father’s Day present, a travel iron with all the bells and whistles plus a silicone coated plate. I got plank #5 on combining Chuck’s edge bending technique and a little plank soaking where I couldn’t quite get it right. The discoloration on the port side #5 plank is the oxidation from the old iron. Here is where I’m at right now. I think I’ve got some good symmetry going as seen in the bow and transom shots. Off just a bit but I think once the keel pieces are in place to break things up only an experienced calibrated eye would pick it up. I’ve got slightly larger gaps between the planks this go around. I’m guessing my mindset is/was seeing what some wood filler and sanding can accomplish, from my practice on the old hull, things will take care of themselves when that time comes. Measurements and math say that I’m still on track to do this in 10 planks per side and not have to violate the “no narrower than half a plank” rule or use any steelers. Now that I’m past the need to twist the planks at the aft end I’m hope things more along a bit faster. Though I've found that if I have too many consecutive successes, I get to going to fast and have way too many "senior moments" so I have to pace myself just so I don't create more work. Any comments would be greatly appreciated.
- 129 replies
-
- 3
-
-
- Bounty Jolly Boat
- Artesania Latina
- (and 1 more)
-
I had every intention of getting back sooner, but life happened and had to deal with it. First I want to thank Gregory for pointing out Chuck's edge bending technique plus taking the time, effort and his supplies to run the tests he did showing his bending technique. I can't express my appreciation and patience, thank sir you went above and beyond. With what I have available to me right now I wasn't able to duplicate Gregory's results thou. I'm sure that my 1600 watt 20+ year old hair dryer was the issue. I'll try to make rest of this as short as possible. I started to bend my 5th plank on my Jolly Boat using only the soaking method while I waited for Gregory's test results. It just wasn't going to happen no matter how much coaxing. Then I started looking around to see what I had that might enable me to experiment with Chuck's edge bend technique. After I found a suitable platform to use and clamps strong enough to hold my plank in place I gave it a shot. I can only say that his method is some kinda' wicked magic right there. Even though I shouldn't have doubted it, I was amazed at what I was able to achieve. I'll go into more detail in my build log on my next posting there. I would again like to thank everyone for their input. The knowledge I've obtained is priceless. Would I be the only one to wonder how my initial question about the difference in wood types would lead to me learning a superior technique in bending wood?