
HOLIDAY DONATION DRIVE - SUPPORT MSW - DO YOUR PART TO KEEP THIS GREAT FORUM GOING! (Only 13 donations so far - C'mon guys!)
×


Peanut6
-
Posts
342 -
Joined
-
Last visited
Content Type
Profiles
Forums
Gallery
Events
Everything posted by Peanut6
-
 We had a little bit of a warm spell last week and the boatyard wasn't all that bad. I prepared to reattach a section of the keel that had popped off, and of course the next section was loose and just fell off into my hands. All that was left was the bow section which is firmly attached. Cleaned up everything once again, reattached the keel pieces and the transom post and let it sit over night. I was able to position the rudder and the the bottom gudgeon so I could mark and predrill for the nails holding on the gudgeon. Didn't quite get the gudgeon positioned exactly how I would have liked but just went with it as I've been struggling with this step for far too long and just want to get past it. Trimmed my nails to the proper length and attempted a dry fit. In the process of installing the rudder into the gudgeons the top pintal and the transom post broke free, the transom post is loose again and it looks like the same secion of keel is also loose. Saw why I was having such a difficult time getting the rudder into the gudgeons. The top pin was just a bit too long and evidently the extra tweeking to get it into place was enough to break things loose again. But I got to thinking about how much I was able to man handle things while I was planking and really couldn't understand why I was having such a tough time getting things to stay together. I've decided it is one of two things, if not a little of both. Could be that my PVA is past its shelf life plus trying to glue stained surfaces together. I really don't want to use CA so I'm going to try one more thing before I replace my PVA. I'm going to get the smallest Dremel ball end bit (maybe 1/32" diameter) and carve a snake track into the interfacing surfaces of all problem pieces. My thinking/hope is that the main problem is the stain. If I create this serpantine trough down the middle of the pieces, just deep enough to get past the stain it will give fresh wood for the PVA to soak into. The troughs will be mirror image to eachother so there could/should be a handful of intersecting points to hold things together. If that doesn't work than it has to be my PVA is too old and getting past the stain probably was needed regardless. If all goes well my next post will have pics of the rudder installed and even the aft bulwark reinstalled. kev
 -
Gregory, I checked out the Tender AVOS build log, very impressive kit and hats off to Peta for a great build. Thank you for the suggestion, one for consideration. The sail making tutorial is fantast, thank you so much for that link. kev
-
Dave, went back and read your Rattlesnake post. You got much more mileage than I've recieved. Went back again looking for build logs of the Albatros in any/all of the kits listed and didn't see many comments regarding my concerns. I also tried to get some information by looking at the questionair post regarding best kits. Interesting info but not an "aha moment" for me. I really liked the aft deck of the Occre kit priced at $110 US but the 1:100 scale counts that one out. The Mantua kit at 1:40 scale was the most expensive priced at $159 US but the sails needed to be purchased separately at $40 US. This posed many questions/concerns regarding attaching the sails, not thinking the kit instructions would include anything addressing the sails as they don't come with the kit. The "sail kit" is actually a collection of sails for multiple ships of same or similar design. So then I'm wondering if any instructions would be included, and if so how detailed they could be to cover a number of ships. The sails of the Albatros is definately a step up from my Jolly Boat so I want to be taking baby steps in that discipline. So that counts Mantua out. That leaves the Constructo kit at 1:55 scale and priced at $142 US. There was one build log that had the plans/instrucions visible in the back ground and from what I saw they appeard to be pretty good, based upon my limited experience of course. As I said earlier, I'm very open to another model of similar appearance and have zero regard to historical accuracy. So please feel free to offer suggestions for alternative consideration. kev
-
Chris, in response to your questions, historical accuracy is not a concern at all. My knowledge base, and anyone who would see this model, wouldn't know a historical inaccuracy to save our life. I just really like the look of the Albatros and believe it, or something similar, would be a good "next step up" from my Jolly Boat. Not to complex but the new features would enable me to learn new skills without being overwhelmed. The budget it a gray window so to speak. This family has been known to pool individual resources in order to present a single gift from everyone if you know what I mean. Phil, in response to your comments, a plastic model is out of the question. I'm committed to wooden ships and have been slowly building up my tool collection, with the help of gifts from the family. No major purchases, rather the little things that can add up quickly. I don't need a "Betty Crocker" ultradetailed set of instructions but do need more than just a clue of what to do. I looked thru your build log, very impressisve I must say. With that being said, I'm open to suggestions of a different kit of similar appearance (the Boss really likes the look as much as I). My main concern is quality materials and decient instructions without regard to historical accuracy or 100% conformity to fitting scale accuracy. If the instructions are a bit vague or incomplete in some areas I always have you folks to ask questions and get help.
-
I've been looking towards my next build, even though I haven't finished my Jolly Boat. The Boss asked me to pick out a kit for the future. I asked her what types of ships she liked. She said she likes the ones with all the sails, masts and rigging. With that in mind and my skill level, or lack there of, I believe I'm seriously looking at the Albatros. I've looked thru many a build log and really do like the looks of her. My problem is I just don't know which kit to get. I find the Occre at 1:100 scale, the Constructo at 1:55 scale and the Mantua at 1:40 scale. I think the larger scale would be better for me as I hope the rigging would/could be easier than the others. But my primary concern is a kit with quality materials and instructions than can be followed with having to be related to Sherlock Holmes. So I turn to you sagious shipwrights for you input, suggestions and guidance. Thank you in advance. kev
-
Hey HHH, just checking in. Had 70's in the ship yard today and had me itchin' to fixin' my FUBARS so I can move on but . . . . there is a tradition here in central Indiana. There is always a big cold snap/snow storm during the high school basketball playoffs and we are there right now. Enjoy seeing your progress and does keep me inspired to finish for the same reasons you have stated. Regardless of what/how you feel about your cannons I'm impressed with what you have done. '
-
Haven't gotten back to my Jolly Boat after cleaning up the pieces getting them ready for reattachment. Work has really picked up and it's just gotten way to cold to be working in the garage (mid to high 30's max). Guess I'll be waiting till spring.
- 129 replies
-
- 1
-

-
- Bounty Jolly Boat
- Artesania Latina
- (and 1 more)
-
I'm building the same kit, my first, and have enjoyed your build log as it helped me out quite a bit. Hope you don't mind, but I will be using some of your bashing ideas along the way. Looking forward to seeing the finished product. Me being a newb, where do you get the inspiration to alter the standing rigging? It really looks great along with the horse for the boom.
-
Same here, can't find anything about the launch after Kupang.
-
Looking good. The windlass and bellfry really "cleaned up" nice and looks pretty sharp.
-
The iron you used is the same as the one the Boss got me as a Father's Day present when I went the edge bending route for planking my Jolly Boat over the summer. I use my Dremel with the sanding disc for tapering and chamfering my hull planks which gives me 100% control. I mark the plank width at each frame member and connect the dots using a straight edge. I sand down just shy of the line and hand sand as needed to fine tune the fit. Knocking off the edge takes just a minute. Hope you don't mind me following along, this is another I'm considering for my second build.
- 91 replies
-
- 1
-
-
- Speedy
- Vanguard Models
- (and 1 more)
-
Thudydides, that was exactly what I needed and couldn't be more clear to me now. Thank you so much for your patience and extra time, it is greatly appreciated.
- 562 replies
-
- 3
-
-
- vanguard models
- alert
- (and 2 more)
-
I must be dense or too old to see the obvious, I see the rotated tick strip in the earlier photo and I see the planks getting gradually wider in the photo above. I'm just not getting the connection, even with the worded explanation. I think the only way it is going to get thru to me would be to identify a plank in the above photo and the corresponding marks on the rotated tick strip in the earlier photo. I'm sure it is another example of a very simple and logical solution to a complicated problem our forefathers came up with that some of us modern people can't quite grasp. We don't give our ancestors the due credit and respect they deserve for their ingenuity and resourcefulness, IMHO.
- 562 replies
-
- 1
-
-
- vanguard models
- alert
- (and 2 more)
-
Thukydides, I've been reading your build log because the Alert is a possible choice for my second build and I'm looking to see what I would be getting into. I think you're doing a fantastic job. I especially appreciate your explanation in fabricating the drop plank. It gave me a major "Aha" moment. I could never wrap my head around that technique, it just didn't make any sense to me. But when you mentioned the recalculation from 7 planks to 6 planks at the bow, the megawatt light bulb in my pea brain clicked on and everything made perfect sense. Now I just need to understand the method you used for the gradual increase of plank width at the stern. I see the photo and read your description but the two aren't meshing at the moment. I hope when you finish up the 2nd planking and show a nice close up of the stern (hint, hint, hint) I can see the end result and understand how the method you used works.
- 562 replies
-
- 2
-

-
-
- vanguard models
- alert
- (and 2 more)
-
Ok HHH, you made me laugh, thanks. If there is any positive from the afternoon, the Colts won and it looks like my underdog pick of the weekend is going to come thru for me. But honestly I'd rather have my rudder in place. Got the glue remnants cleaned off the parts and decided to give it a rest for the night. Tomorrow I'll try to reattach my aft keel portion so I can re-reattach my stern post (yes, its come loose before) and then I can get back to working on the gudgeon. And if I'm lucky get the transom bulwark back on to boot. Ah, maybe getting the bulwark may be to much to hope for.
- 129 replies
-
- 1
-
-
- Bounty Jolly Boat
- Artesania Latina
- (and 1 more)
-
AAARRRGGGHHHH!!! I can't win for losing. Got the hull, keel, stern post touched up with stain and let it dry. Fixed my stand by pulling off both pedestals which were glued on and used screws to attach them securely to the base. Got the rudder clamped in place so I could get the bottom gudgeon properly positioned. The first nail I tried to use shot out of my tweezers into the Twilight Zone. No problem because I've got more than enough, just trim another one and I'm good to go. I get the first nail installed into the stern post and feeling pretty good at this point. Then, as I'm positioning the second nail the stern post just comes loose. As I remove the clamp and rudder the stern post falls onto my work bench as well as the aft portion of my keel. Lately I just can't seem to avoid the "one step forward, two steps behind" scenario. It's driving me bonkers.
-
At a loss for words (for a change). All I can say is - WOW, what a beautiful ship and awesome build log.
- 436 replies
-
- 2
-
-

-
- vanguard models
- alert
- (and 1 more)
-
Was looking at build logs in trying to help me decide what my next build would be. This build used the same wood as my Jolly Boat, ply for the frame, basswood for the hull and walnut elsewhere (I also have ramin according to the parts list but have been informed that it can't be ramin as it is an endangered species and no longer harvested, if so why would manufacturers still advertise it as being available?) and the builder used Danish oil to treat the wood . . . . . WOW, that is exactly the look I'm after. Maybe that could be serious option. Still need to decide though, don't want to miss any suggestions.
-
VTHokiEE and HHH, I also use either a needle or a toothpick to apply glue, PVA or CA. The masking is an excellent idea, again where is my head? I have nearly an entire roll so no worries there. Don't know where I'd without both of you guys help today. Earlier today I hit the affected areas of the planks with 220 grit sandpaper to match what I used prior to staining the hull. Since then I've done 2 rounds of stain application to match the rest of the hull. Got my son to take a look and confirm I'm not quite there yet. If I remember correctly I did either 3 or 4 when I thought I was done with the hull. But now I'm just going to go till it matches. The red oak stain, the darker hue, should only take one application. Crossing my fingers I'll have the rudder installed in a few days. I want to make sure the newly stained hull area is completely dry before I use any CA. Thanks again, your visits and comments are greatly appreciated.
- 129 replies
-
- 2
-
-
- Bounty Jolly Boat
- Artesania Latina
- (and 1 more)
-
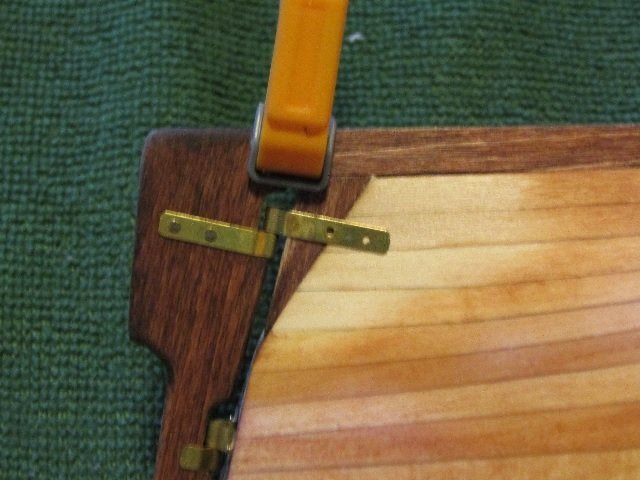
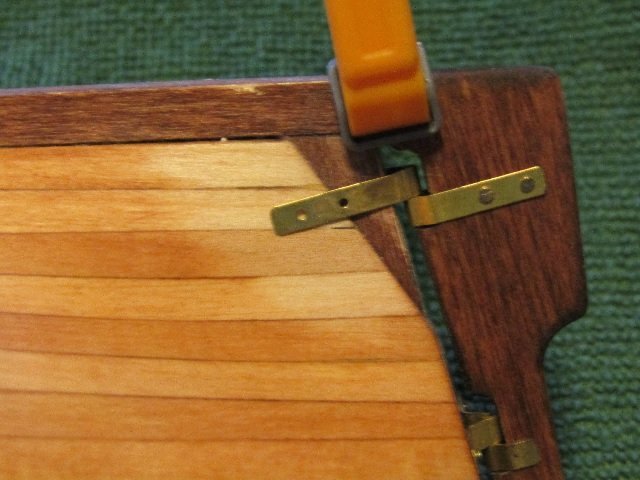
VTHokiEE, thank you for visiting my build log and especially giving me a suggestion, I greatly appreciate it. I am going to have to trim the nails down regardless, those provided with the kit are nearly as long as the thickness of the wood. I don't know where my mind is at, of course pre-drilling will solve the potential problem. I have pre-drilled every nail/eye insertion up to this point. I do have tendency to over think things and/or get hung up about something such that I just don't see the obvious, kind of a "can't see the forest for the trees" thing. I guess that when I saw how close the hole was to the edge my mind just quit processing. I would love to use CA to help hold things together but I've had varied success using it on the brass to wood interfaces and I'm concerned that it'll get smeared all over the place while I position the gudgeon correctly and/or set up before I do get it into place. I plan on getting things positioned properly and using a bit of CA on the length of the nail and hope just a tidge rides up to the head of the nail to help affix it to the gudgeon.
- 129 replies
-
- 1
-
-
- Bounty Jolly Boat
- Artesania Latina
- (and 1 more)
-
Hey HHH, As I said in our DM conversation, I never had the Granado on my build wish list but your build log has made me reconsider that decision. I took a quick scan of a completed Granado build log. I must say that you are so much more brave than I as to select the Granado for a second build. I'm struggling thru our little Jolly Boat and I haven't quite got to the rigging yet. I don't even want to think about the fits I'd have with this for a second build. I think you're doing a great job and look forward to tagging along with you to completion. BTW, it does look pretty nice sitting next to our Jolly Boat, IMHO. I want to thank you again for your interest in my build and your support provides encouragement and gives me confidence in completing my build.
-
Thank you to all who have commented, it is greatly appreciated. And thank you Roger for taking the time to find that I am building an open boat. I completely agree with you in the use of any wipe on/wipe off product at this point, as it was a concern of mine for the reason you pointed out. Obviously I should have addressed this issue at various steps of my build but it is too late for that now. I never thought it could/would be a problem, but what did I know as this is my first build. I'm reluctant to use any type on spray-on product for fear of over spraying some surfaces while trying to get to the nooks and crannies which are visible. I'm after a look of warmth and depth that enhances the natural beauty of the wood without any shine, gloss or reflection nor would it have a flat or matted look. From what I've read here and other places, and based on my current situation/condition, I'm leaning towards some type of oil product. I understand that certain types of oil don't need to be wiped off or rubbed in if applied sparingly, as it is absorbed into the wood. I could use a lint free cloth for all the easily accessible areas and a small paint brush for the tight spots. The only down side I'm finding is determining which one to use since it appears there is a never ending variety available. I would like to select one not just for this instance but one that would be applicable/acceptable for future builds. If I'm heading in the wrong direction by all means set me straight. And in the off chance I might be headed down an acceptable path any suggestions would be most helpful. I do apologize if my questions are too broad or vague due to lack of context. I've taken to posting my questions in the tips/techniques section of MSW because when asked in my build log they don't seem to get answered.
-
Got on the busy side of the sandpaper and worked the appropriate planks as needed. As you can see, even thou I was careful, I scuffed up the stern post and keel just a bit. It slid right into place, and more importantly stayed right where I had positioned it. A bit of touch up with the appropriate stains and I think I'm good to go. As I mentioned in an earlier post, I'm still concerned about how close the one clearance hole is to the edge of the stern post. I hope it doesn't split on me when I install the nails. I've done things such that the rudder can be removed from the boat. One of the things I did was elongate the the slots in the rudder so it can be pulled so that there is clearance of the pin bottom and the gudgeon. And the other was not reducing the pin opening in the gudgeon, thus giving a bit more clearance for installation/removal. The remainder of the brass rod the pins were cut from is intended to be used for the tiller on the rudder. But I'll be using that to make a horse for the boom tackle, rather than the method shown in the instructions. And not wanting to buy more, I've got to come up with something else (not to mention the fact that I can't drill a hole without getting it cocked every which way but straight). I've got a plan which I think will work, and it will also be removable. So what's with the moving/removable parts you might ask. I believe it all goes back to my plastic model building days as a kid. Back then you proved you building skills to your buddies (and of course you had to do that) if you could make all of the movable features of the model work flawlessly and not look goofy. Say with a model car, do the wheels spin true, can you open the hood and is it installed squarely, if it was a convertible are there ugly gaps when the top was in place and could you remove it, if available can you turn the wheels with the steering wheel without it catching or getting stuck. My pride and joy was my Vought F4 Corsair model. Of course the propeller turned, the canopy opened, the wheels spun true, the landing gear could be extended and retracted with the cover fitting flush, the rudder moved and all the flaps flapped, but best of all not only did the wings fold up but also would fold back for storage below deck. I saved up a long time to be able to buy that kit. Well the only thing I could come up with on my Jolly Boat was the rudder, the oars don't count. The Jolly Boat being what is, I just couldn't envision seeing it stowed on deck with the rudder in place, so I've got to make it possible to remove it. There ya' go, the silly story behind my fixation which I'm sure nobody cares about nor wanted to read, as if anyone made it this far into my build log.
- 129 replies
-
- 5
-
-
- Bounty Jolly Boat
- Artesania Latina
- (and 1 more)
-
At this point in time the only wood treatment my Jolly Boat has received is stain on various parts and the only metal install are the gudgeons. I was hoping to find a treatise, a when-where-how-why or just a general overview of this topic. But after going thru all 20 pages in this folder I'm more confused than when I started. Finding all kinds of various oils, shellacs, varnishes, wipe on poly (oil based and water based) and home recipes that people use. And just as varied are the procedures - treat before you build-paint-stain, treat after you build-paint-stain, use a paint brush, use a sponge, use a cloth, apply sparingly and let it dry, apply generously and let it sit a while then wipe off with a clean cloth, apply generously and wipe off with a clean cloth immediately, the matte finish, semi-gloss finish, gloss finish, high-gloss finish, and the list goes on. All I know is that in nearly all build logs whatever is used and however it is applied, makes things just pop. There is a depth and warmth that wasn't present before. Granted my little Jolly Boat is at the lower end of spectrum in cost, complexity and grandeur, but I still would like to give it that depth and warmth that I've seen in so many far more grandiose builds. I can only assume that different products and processes give different affects, which are so subtle that an experienced master crafts person would pick up in a second but the casual viewer would never notice. And probably that when all is said and done it really comes down to personal preference. Basically I'm looking for a "well if you use this you can't go wrong" type of thing, something inexpensive and easy to use. Any suggestions would greatly be appreciated as I'm figuring something would be better than just letting it go as bare wood.
-
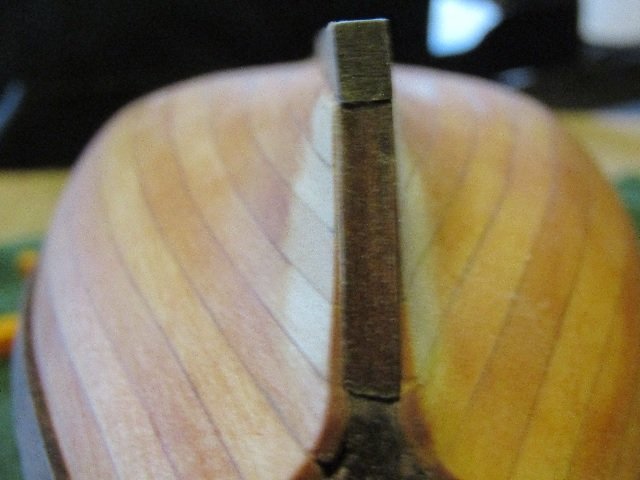
Well temperature and humidity have dropped to a comfortable level again so I'm back at it. As I'm getting older I find I can no longer handle those conditions like I once could. Ok, got the top gudgeon reattached. I'm having a bear of a time getting the bottom gudgeon positioned. Even with clamping the rudder to keel, I just don't have enough hands to keep the gudgeon in the proper position and get a nail started. I convinced myself that I could conquer this problem and would just power thru it. The problem for me is the step from the planking down to the stern stem compounded by the geometry in the area just wants to make the gudgeon push back towards the rudder and slide down towards the keel. After many failed attempts causing my frustration level to rise, once again I stepped back. I logged into MSW to see how others handled this situation. During a "Jolly Boat" search where I could find close up photos of the stern/rudder I noticed 2 things. About half of the modelers either formed a rabbit or thinned the planks to give that appearance, the other half had some very good metal skills to bend the brass just right. I had thought of trying to make the necessary bends in my gudgeon but after my mast truss experience I knew that approach was beyond my skill level. I half thought of trimming down the area just under the gudgeon location to help my cause but quickly decided against it. So I'm thinking the best way to go is break out the sandpaper and work the aft end of my planks to make the transition acceptable. I just wished I had known this was going to be an issue before I installed the keel and stern stem. I probably should go back and add another advisory note for future builders.