HOLIDAY DONATION DRIVE - SUPPORT MSW - DO YOUR PART TO KEEP THIS GREAT FORUM GOING! (Only 13 donations so far - C'mon guys!)
×


Peanut6
-
Posts
342 -
Joined
-
Last visited
Content Type
Profiles
Forums
Gallery
Events
Everything posted by Peanut6
-
 All is good in our little world
 -
Got the same here in Indiana, immediately reminded of the great crash. I hoped it was nothing more than a down server and nothing would be lost, looks like wish came true.
-
Getting so close to finishing my Jolly Boat and the Boss had previously asked me what I'm thinking of doing next. The general consensus of the family leads me to believe the Scottish Maid fits their aesthetic pleasure, agrees with whatever the Boss's plan might be for my creations and step up from my Jolly Boat without advancing too far beyond my current skill set. This choice would be my second build and second AL kit so I think I have a decent idea of what to expect kit wise. Yet, hopefully, I would like to get some input from those who have some experience/knowledge with this kit. And if you have a suggestion of a different/better kit along the same type and price range for a second build, I would greatly look into them as well.
-
Yea, what Chuck said. I've got 3 spools of fly tying line from Grandpa's fly tying kit I inherited when he passed away. It will be awhile before I'll be needing to get more or try something else, so I'll add this thread information to my ever growing reference book for future consideration.
-
Excellent call Mark. The "in stock" vs. "we can order" issue flew thru my mind but didn't make it to the keyboard. That is exactly how I got my Jolly Boat, my preferred hobby shop told me that they could order anything from anybody. The bit of research Farmer could do is the cost differential of purchasing thru a hobby store rather than buying directly from the manufacturer. I'm aware of extra delays/taxes etc. in certain areas of the world, but I'm sure a 3rd party (hobby store) takes their cut as well.
-
Farmer, welcome aboard. You've received some very good advice. I understand the model shipways starter kits are excellent for learning the basics, though I've never looked into them. Everyone has their opinions, preferences and allegiances but the ultimate decision is yours. I would like to suggest a few things for you to consider before you purchase your first kit. First off, I believe you need to decide what type and/or style ship you like, which one grabs you and sparks your interest. This goes a long way in maintaining enthusiasm during your build as you come across some difficulties and setbacks. It's so much easier to throw in the towel when you're struggling over something you really don't have an interest in. Once you decide on the type/style, then start looking at what is available in that genre as a beginner/starter kit, regardless of the kit manufacturer. I say that because there is not a single manufacturer that fulfills every single demand of the modeler, whether it be selection, quality, customer service, instruction completeness/clarity, price, historical accuracy or what ever else. Specialty sources are a different story. You need to know that MSW is comprised of some of most knowledgeable, skillful and experienced builders in the world (but don't be intimidated, they're awesome folks and at one time were just like you - deciding what to build first). And the icing on the cake is they are so eager to share their knowledge with others and to help you along anyway they can, sometimes I think they enjoy that more than actually building. My experience has been there isn't a single topic they haven't been able to provide an answer. After all that, my short reply is get what you want because you like it and want to build it (and is skill appropriate), not because somebody told you that is what you should get. Once you decide what you're going to build I would suggest you check out all the build logs you can so you've got a better idea of what you can expect. Start your own build log, not only for others to follow but for yourself, there's no better way to show your progress and provide information if/when you need help. And if you do have problems/difficulties/setbacks, don't fret it since there is bound to more than a few of the 42,000+ MSW members who would be eager and more than happy to help you out. Lastly, take your time, be patient and enjoy the voyage. Look forward to following along your first build.
-
I'm using fly tying line. No fuzz, very strong and has been working great for me.
-
Allan, long ago The Boss defined me as stubborn and a perfectionist so I thought they could be positive attributes for this hobby. If a few days shy of 62 labels me as a youngster, I'll take it. The closest I've been to Florida is a red-eye layover in Atlanta from Indy to LAX, but I'll be sure to look you up if I ever find myself in you part of the country. EZ, your time frame is my hope as I just can't stand the thought of mixing the lines. The ever so brief image that made it's way into my mind is something I just can't unsee. I'm getting closer to cutting it loose, I did bring the boat to the shipyard and removed the cap from my hobby knife yesterday. But just as I was getting ready to cut the first lanyard loose something interrupted me and had to set things down.
- 129 replies
-
- 2
-

-
- Bounty Jolly Boat
- Artesania Latina
- (and 1 more)
-
A homemade tool that can be used again is always welcome in any tool box
-
Allan, thank you for your kind words, they are greatly appreciated. My first, and extended hiatus, was due to my "Hey Daddy" button being located in the chair I used while at the shipyard. The starts and stops the last couple years have been to due to work, or lack there of. I do have to admit that I'm a bit proud of my first build so far (except for the bottom gudgeon). I can't count the skills and lessons I've learned with my little Jolly Boat. It looks like this build, when completed, will reside on the fireplace mantle since The Boss has already decided the tops of the 3 pieces that make up our entertainment center are perfect places for my Oseberg and 2 more builds. I mentioned that total ship height would need to be considered, she then mentioned that the top of our antique piano would be a good place to handle one of those. I will have to seriously consider The Boss's opinion in the selections of my future builds. I mean, if she has selected places for display she probably has some type/style in mind. The next step is removing and redoing my standing rigging and stays with my new line. I thought it came out pretty good for my first attempt so cutting them loose is tough. I plan on taking them down in such a way I can use them as a guide in determining length(s), which was of the upmost concern first time around. Thanks again for visiting my log, all comments are always welcome and greatly encouraged.
- 129 replies
-
- 2
-
-
- Bounty Jolly Boat
- Artesania Latina
- (and 1 more)
-
EZ, they are similar but serve (pun not intended) different purposes. As I'm sure you know that serving is done to protect a line from wear and tear while seizing is used to secure the line upon itself. I tried to serve using the same method I seize and found that the length I was traveling was a bit too much (because the wrapping happens upon itself over the entire length) to be able to pull both ends tight and snug everything up. The shroud/stay had a tendency to pucker up a bit or just couldn't be tighten it up sufficiently. I can understand not being able to get excited about something you have no interest in (or at least at the time), especially if you have a hole in your hungry spot.
- 129 replies
-
- 1
-
-
- Bounty Jolly Boat
- Artesania Latina
- (and 1 more)
-
I've never seen cross members on deck as you're showing.
-
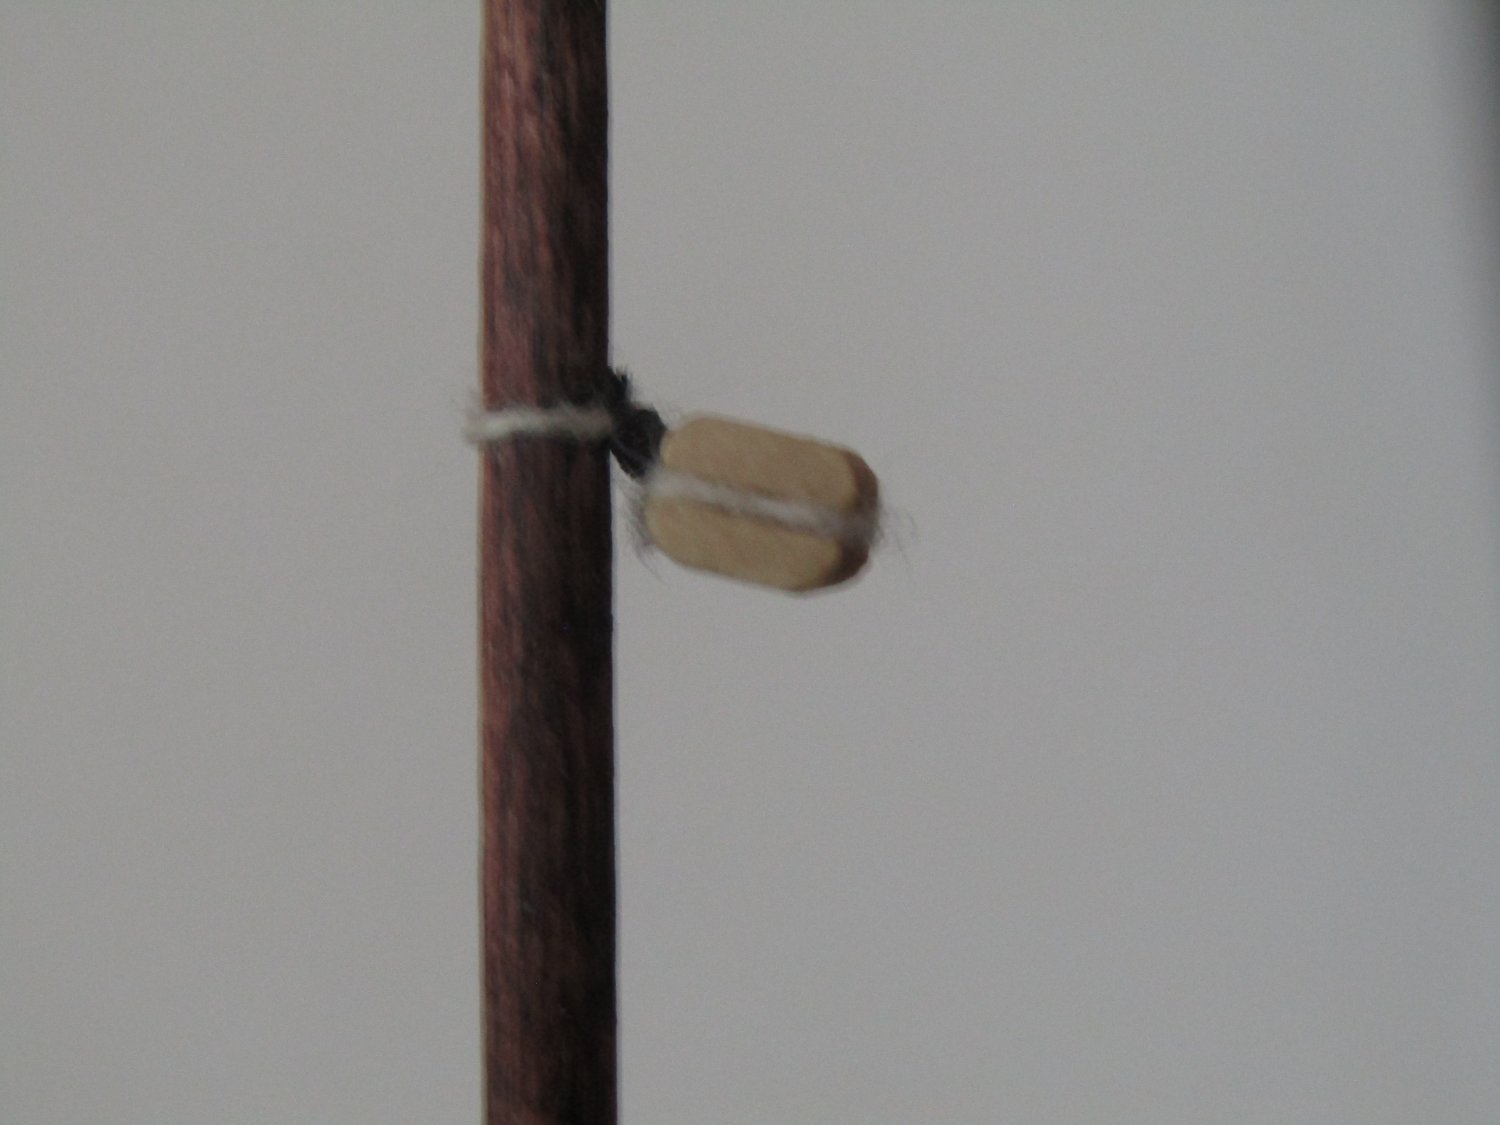
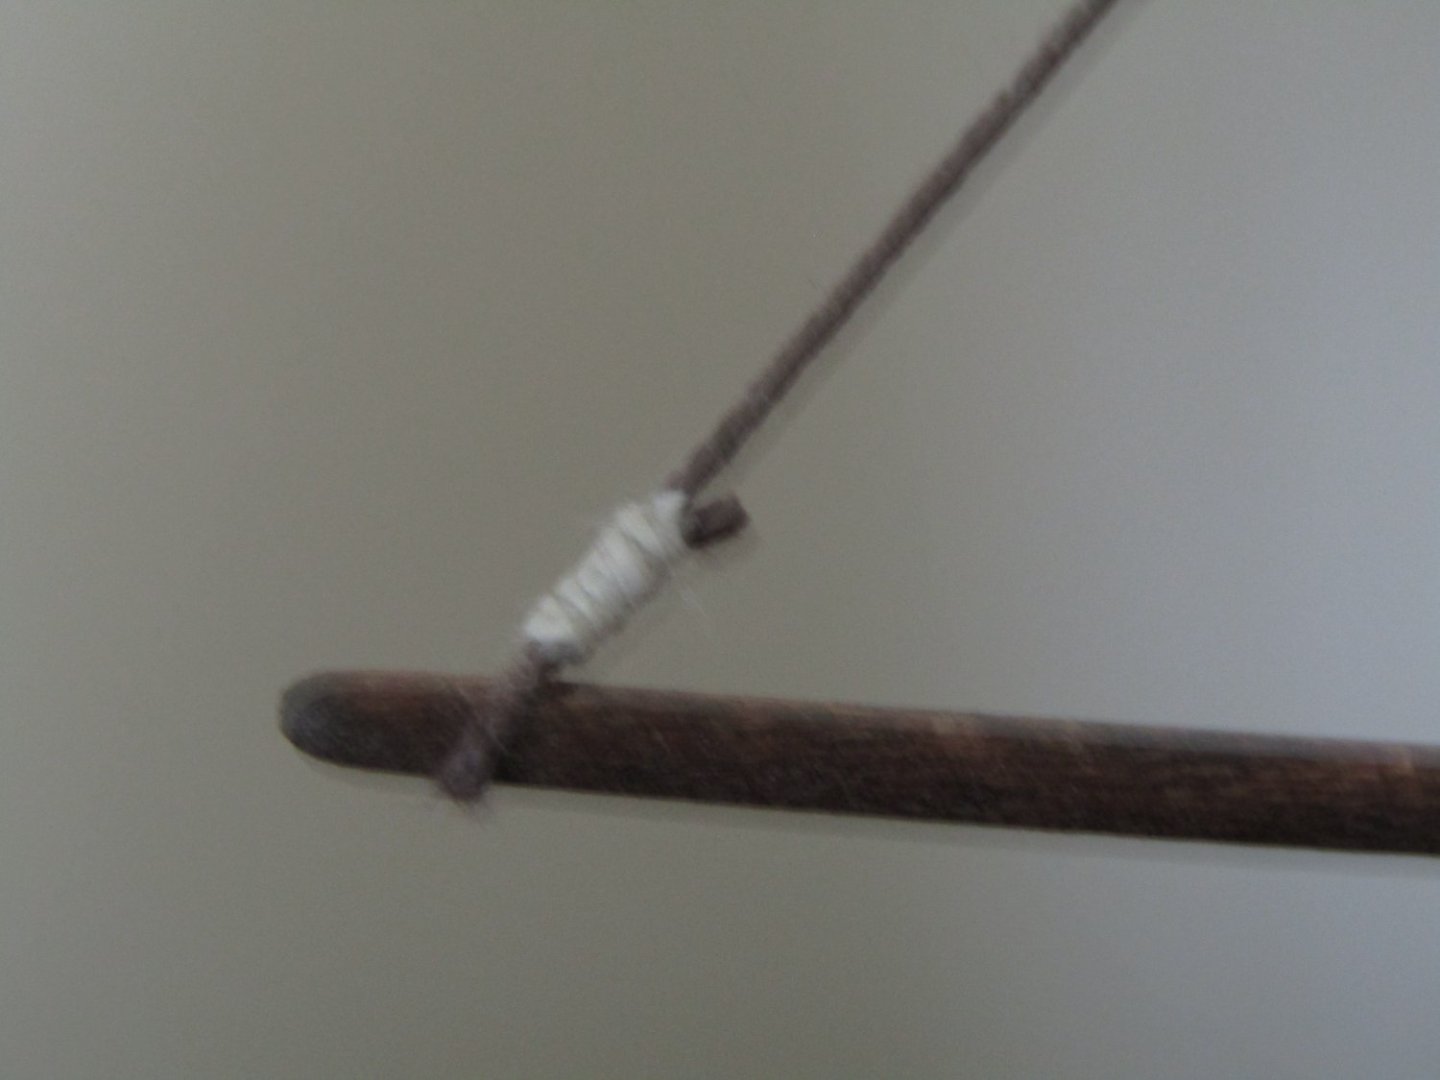
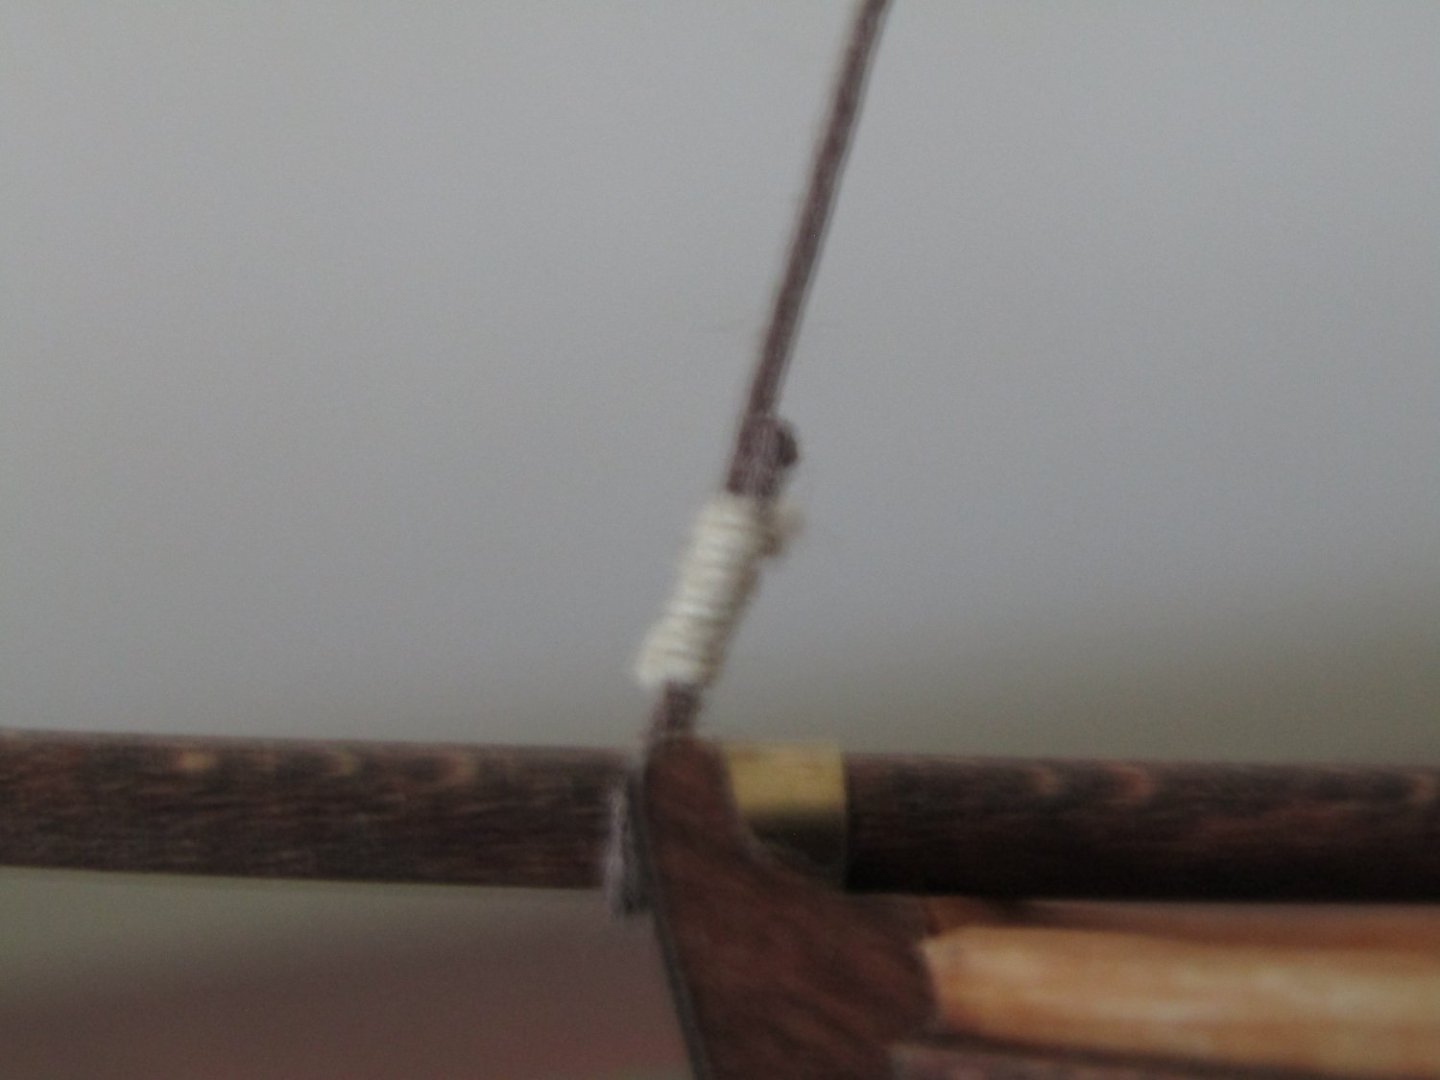
EZ, I can't express the difference in the AL kit supplied line quality versus what I got from Ropes of Scale. I don't have a "serving machine" so I have to do mine manually. The process I use is very similar to how archers serve their bow strings. For serving/seizing I use black polyester fly tying line from my Grandpa's fly tying set-up (haven't quite yet figured how the vices will be helpful, but I'm sure the ideal opportunity will present itself one day) I inherited when he passed away. I start by tightly wrapping the line over itself along the shroud/stay for a handful of turns to secure one end of the serving (pulling the loose end to snug up the first wrap-around). I pull that first end out of the way and continue wrapping the line tightly as far as I'm going. I leave the last handful of wrappings a bit loose so I can thread the second end of the line back thru them toward the direction I started, work on tightening up the loose wrappings and finally pulling tight the second end to snug things up. Finishing off like this can be tricky, you need to get the wrappings snug together and at the same time tighten them up. Sometimes I get them tight before I can get them snug and have to back things off a bit and try again. An alternate method to finish it off is to tie a half hitch followed by a second half hitch (a double half hitch I think is too bulky), pulled tightly, the scale is so small it can be extremely difficult to see. Very carefully trim both loose ends close to the serving, being extra careful not to nick what I've just created. Hit each end of the serving and the trimmed end locations with a hint of CA and call it done. I had no problem seizing/serving of the kit supplied shroud/stay line of that supplied with the kit. But the kit supplied running rigging line couldn't withstand the tension/pulling/snugging of wrapping the seizing/serving line and just pulled apart. Seeing the Oseberg in person, oh you lucky man. I've had the kit for about 10 years knowing, it would be at least a 3rd build if not later, and it was old then. There have been numerous "versions" between that kit and what is offered today. From looking at build logs I realized my shipwright skills would need to improve before I would be comfortable attempting the Oseberg and the time gets closer I'll then start/do more research on Viking ships.
- 129 replies
-
- 2
-
-
- Bounty Jolly Boat
- Artesania Latina
- (and 1 more)
-
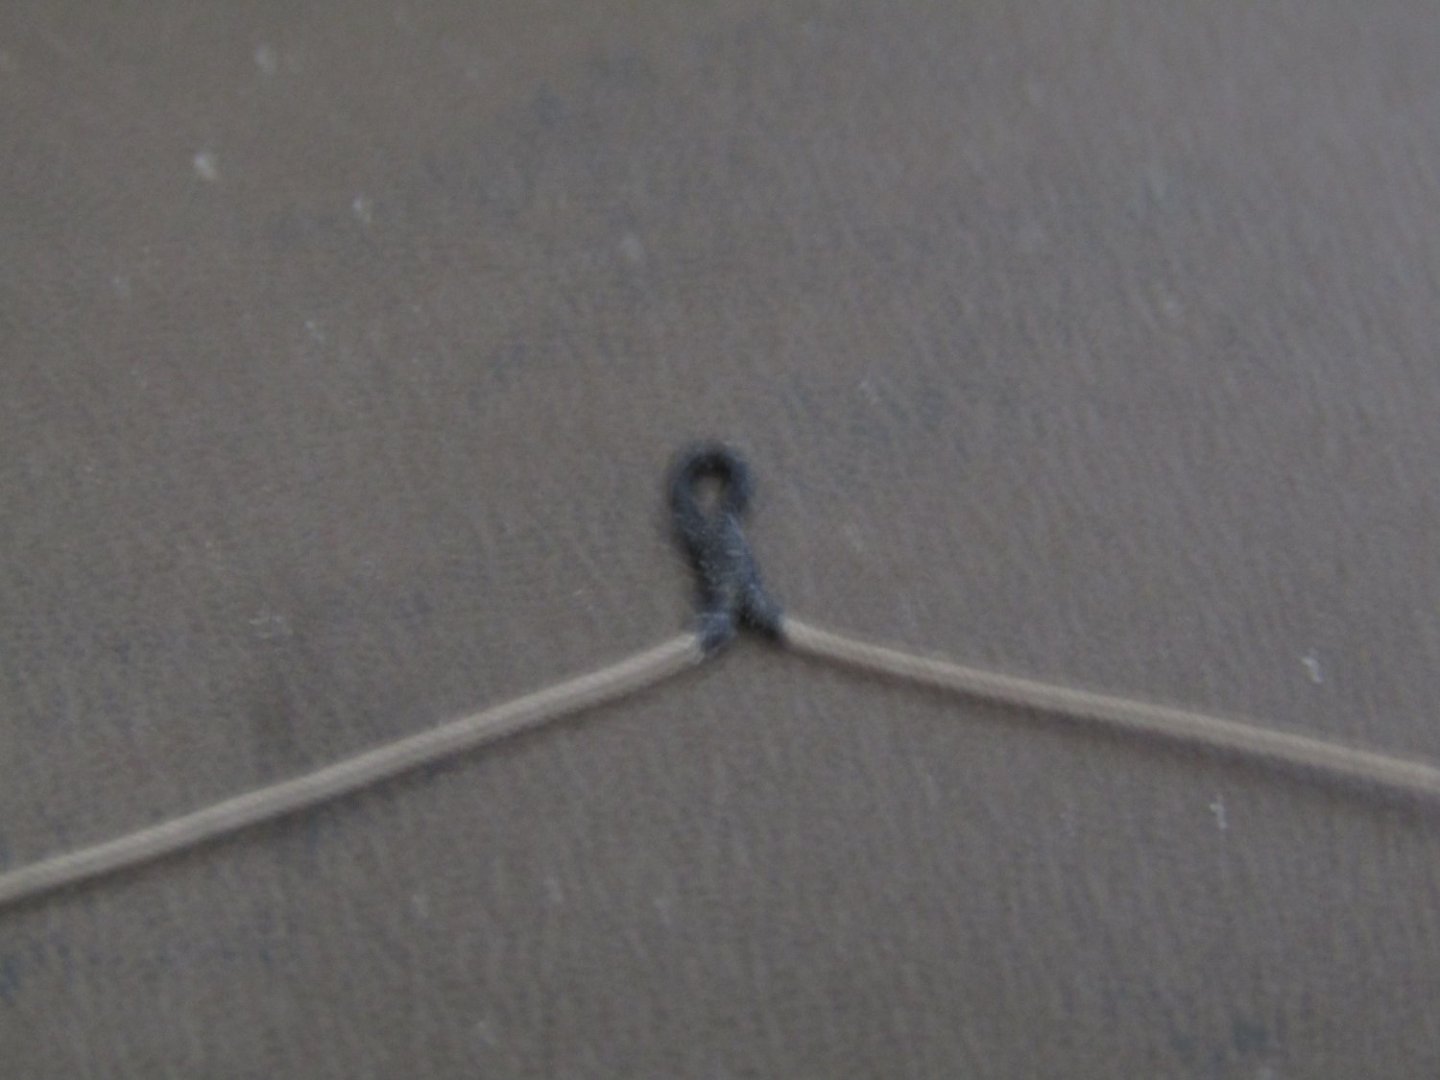
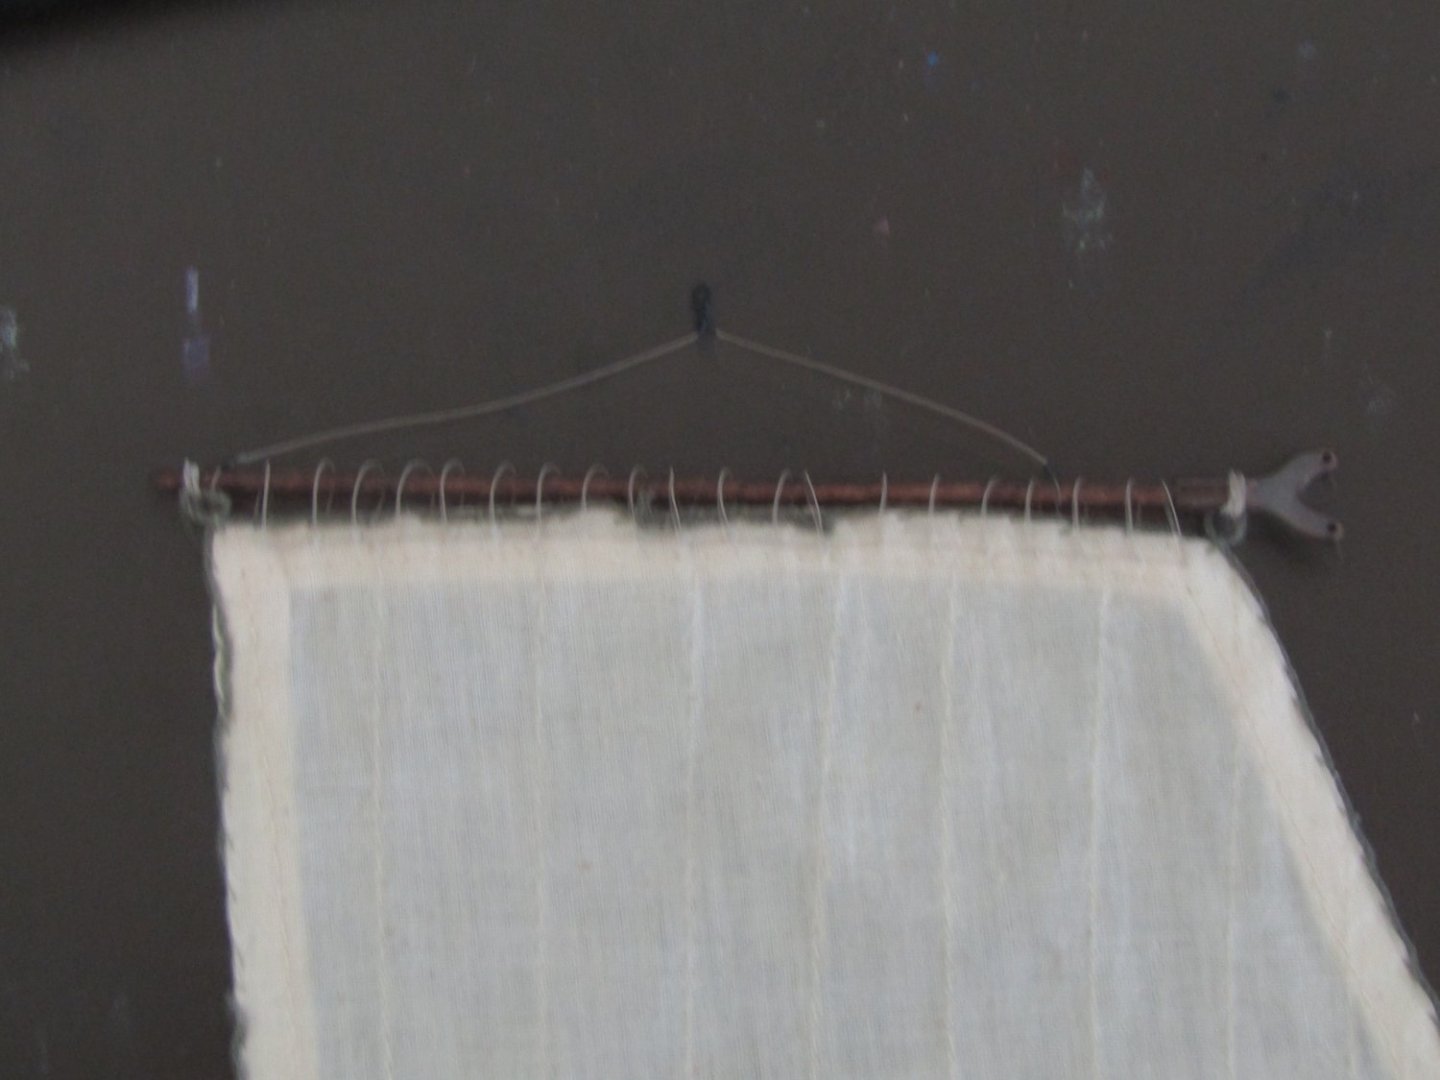
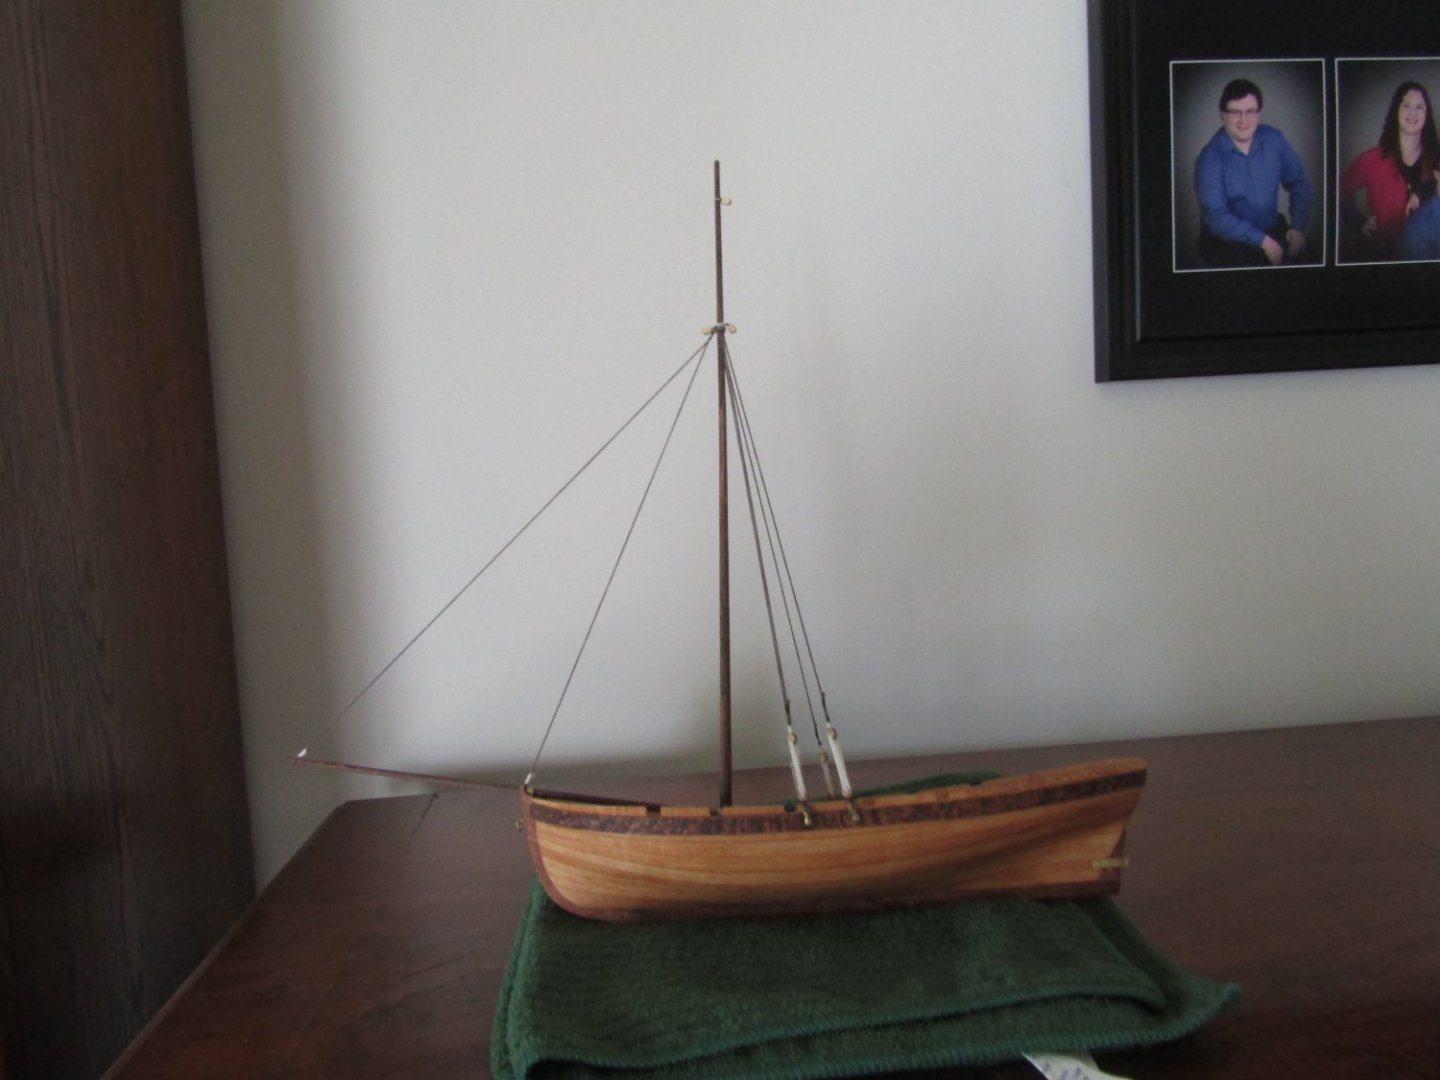
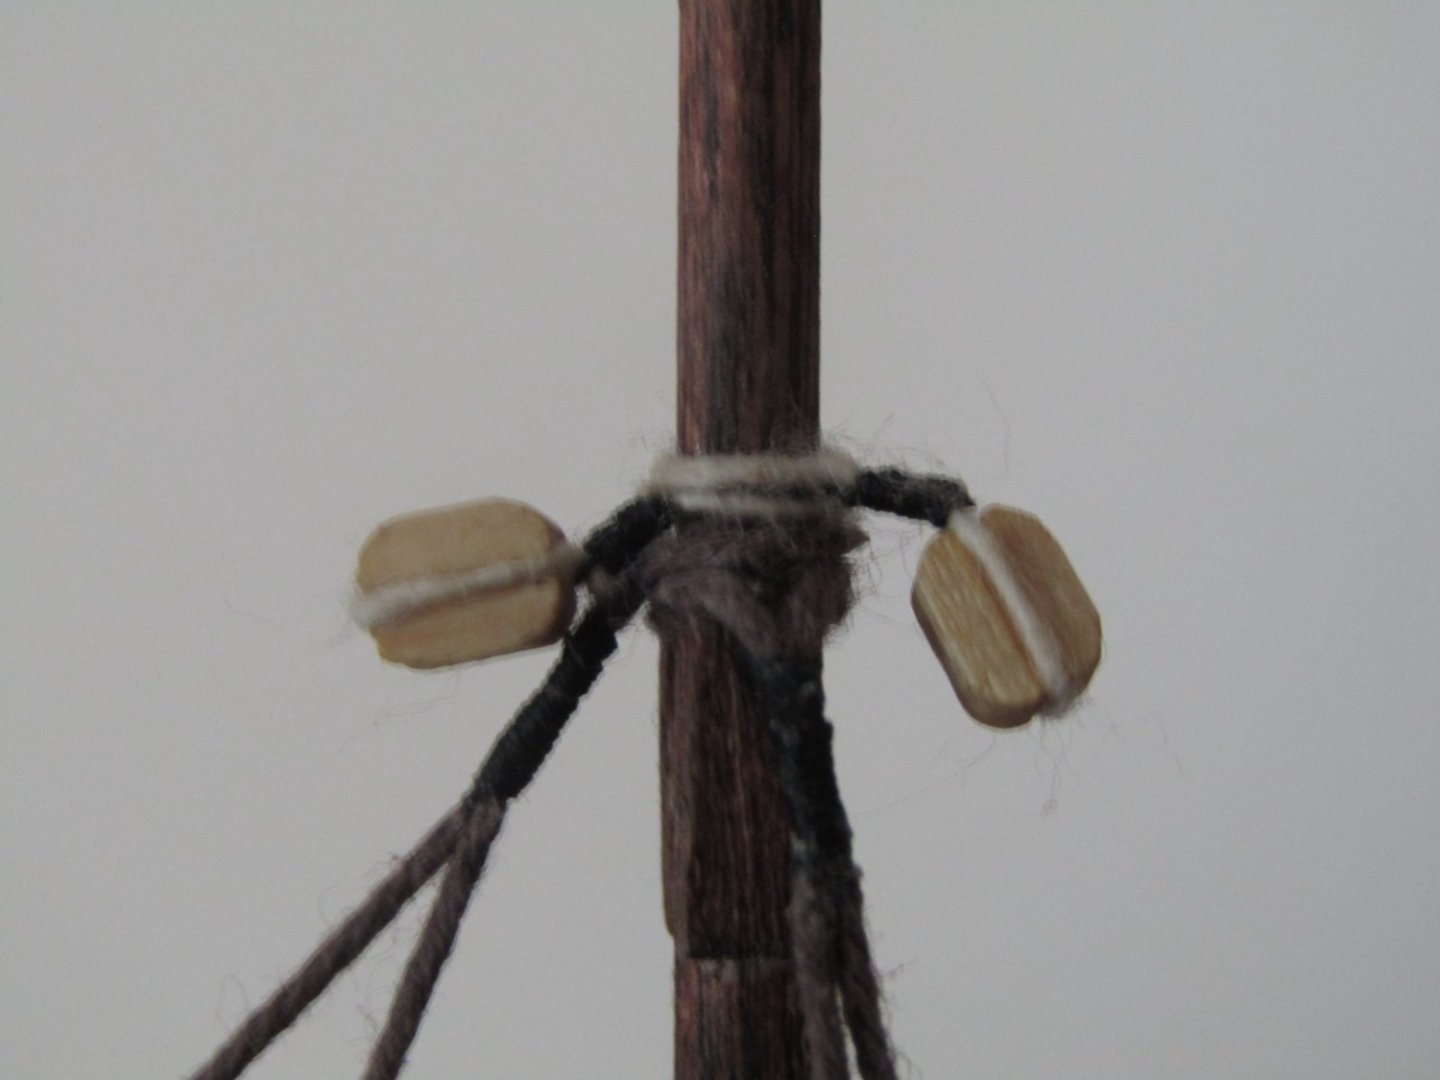
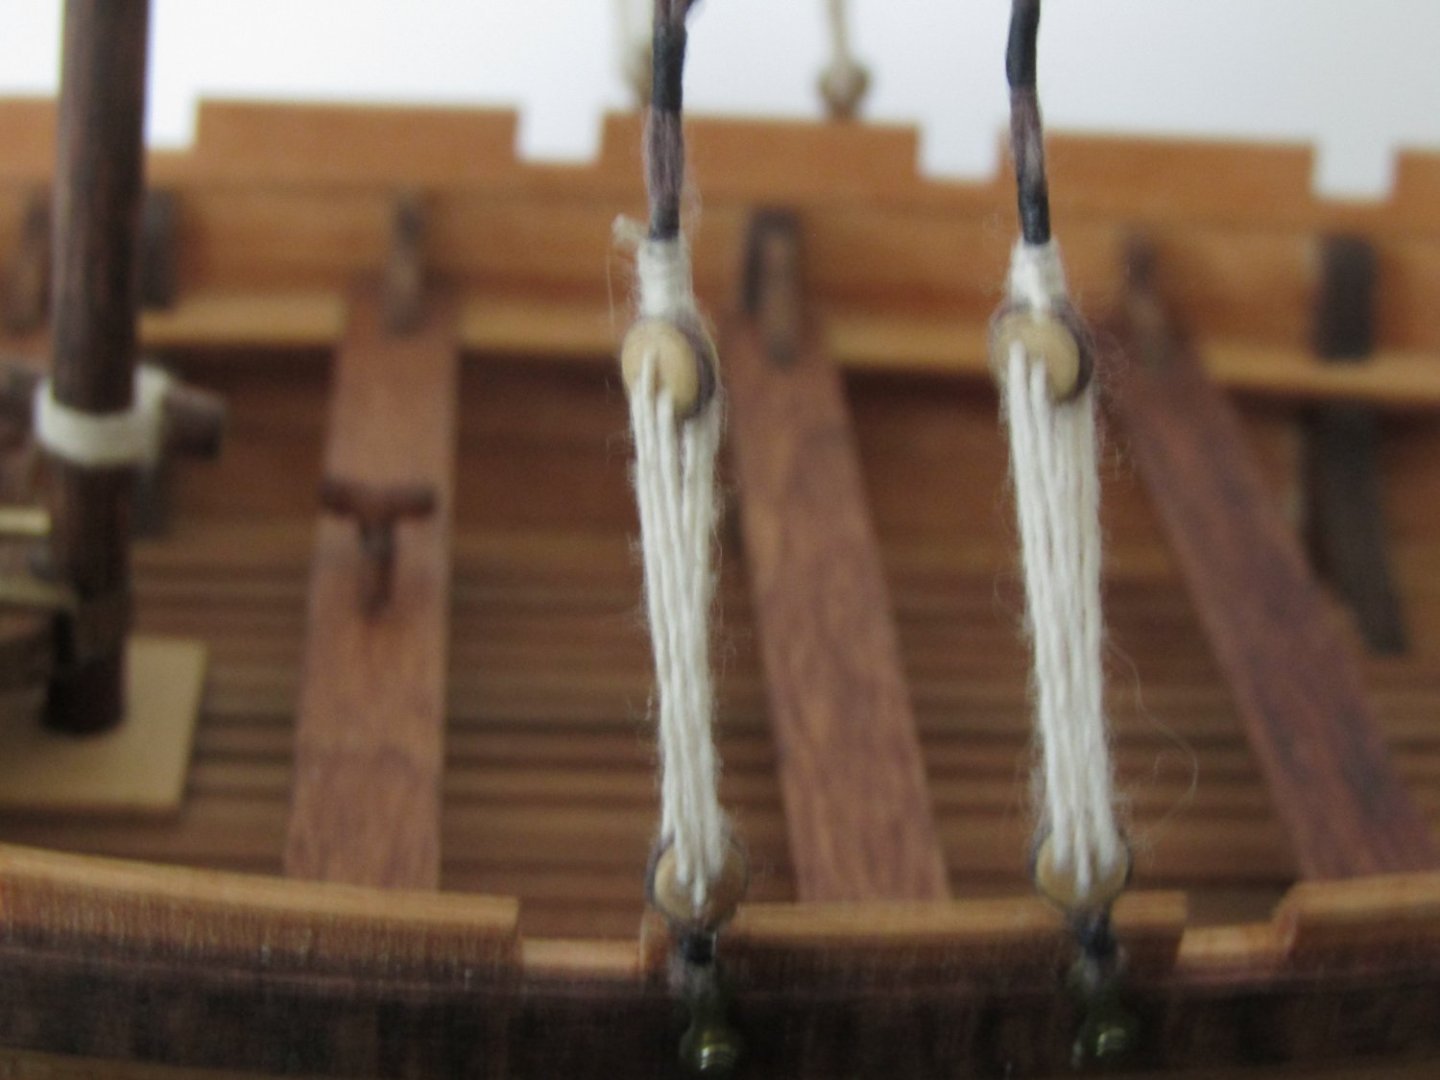
It was a few weeks ago that I secured my standing rigging. I don’t think it turned out too bad for a first attempt, even though the top dead eyes are a bit twisted. But I understand it is a natural occurrence, especially in my situation. I started on the halyard rigging and sail installation. I wanted so show the completed standing rigging and completed halyard rig in a single post. My plan was to use hooks for my running rigging of the sails. I wanted to serve and seize a loop for the halyard lift since the other rigging attaches to sail eyes. In my “Dead eye Twist” thread I commented on my dissatisfaction in the kit supplied line and current inability to replace it. And as such, decided to abandon my desire to use hooks for my running rigging because the supplied line couldn’t withstand my attempts of serving and seizing a loop for the halyard lift. It was shortly after that post I was propositioned with the most gracious “Care Package” offer. Ben, from “Ropes of Scale” read about decision due to my predicament and offered me samples of his 0.25mm, 0.35mm and 0.50mm line to help me out. With the utmost gratitude and humility I accepted his offer and a week later received his envelope in the mail. This being my first build, I could only guess at the improvement of the kit supplied line and his line based his web site photos vs what I was holding in my hands. The difference between the kit supplied line and Ben’s line is like SPAM to a perfectly cooked porterhouse steak. I couldn’t believe it, now I fully appreciate and understand all the posts I’ve read where the builder has already ordered new line even before the kit has arrived. With this new line I was able to create the served/seized loop I so wanted and finished up my halyard and sail set up. I’m going to redo my my standing rigging and stays using Ben’s line. This will give me the opportunity to serve the standing rigging and stays prior to seizing them at the mast, which I forgot to do the first time around. Also, from what I think I’ve learned from my “Dead eye Twist” post, I hope to reduce if not eliminate the twist of my top dead eyes. Man that post got a ton of traction and a surprising amount of information came of it, so glad I asked. And finally I can do my blocks correctly. The photo’s don’t show it, but I attached my blocks upside down. I learned this from reading another post here at MSW. Probably nobody would have noticed unless I shared a picture at just the right angle, but I would know and that’s what counts. So another situation of 1 step forward and 2 steps back for me. But I feel very confident that I can redo the work in less actual time spent working and it will look a ton better due to Ben’s line. Once again I must apologize about the photo quality, they always look nice and clear in the preview but sometimes come out a blurry. I think I may go back to the camera I was first using, even though it eats batteries just for snacks, and see if they come out any better.


- 129 replies
-
- 8
-
-

-
- Bounty Jolly Boat
- Artesania Latina
- (and 1 more)
-
Carlo, I took a look at a couple of your videos. Sure wish you were around when I had to fabricate my bow sprit support out of a brass strip for my Jolly Boat. You made it look so easy. I found out I was using the correct tools but I was fighting myself by not using them to my full advantage. And your seizing of blocks to masting sure looks a lot easier than the method I've been using. Look forward to watching more or your videos and learning additional skills. Thank you for joining the group.
-
Welcome aboard Carlo. I'll have to check out your videos and look forward to seeing you post your work here at MSW.
-
Allan, sorry to be so late in replying to your question, actually been getting stuff done on my build if you can believe that. After I realized my Jolly Boat is only a fictitious representation of Bligh's craft and hopefully convincing commenters that I'm aware of that fact, I tried to do some research. Based upon what I've read, there isn't any definitive detailed description, plans, drawings or complete references to the configuration of Bligh's launch. Any "actual representation", from what I understand, is based upon comments found in Bligh's log and an accumulation of guesses/assumptions of the standard/typical configuration(s) of boats built during that era (is that vague enough?). I've read that boats built for that intended purpose were either already existing on the ship and may have been refitted or built anew per the new captains requirements/orders. I've also read that once Bligh reached land, his launch just kinda' seemed to go away with no real information as to what actually happened to it. I apologize I'm of no help to you but this is about all I know.
- 129 replies
-
- 3
-
-
- Bounty Jolly Boat
- Artesania Latina
- (and 1 more)
-
Welcome aboard Rich and ditto to what everyone else has said. I would have to agree with EZ, you have a fleet in the making. Great group of people here at MSW and will do everything possible to help you along your voyage into the hobby. I would think that the best kit to start with is your first one. Your first kit will get you hooked and as you work your way thru the fleet, your next big decision will be how to rearrange the furniture to make room for the fleet's display case
-
CPDDET, I've found Ben to be a fountain of rope information. He has a thread regarding rope making history where he's attached videos that I find very educational. informative, interesting and just enjoyable to watch. He obviously has a passion for rope and this truly shows in his knowledge and the quality of his product.
-
Yes, Ben at Ropes of Scale produces an exceptional product. I haven't had the chance to sample Chuck's product but I've heard it is excellent as well. I run my line a few times over some bee's wax. In addition to protecting the line long term, taking the fuzzies out of cotton line, it also helps to make the line run/lay in a more natural fashion which takes the "mind of it's own" attitude out of the line. The poor quality line supplied with my Jolly Boat kit was tough to work with in all aspects and I actually had to abandon some rigging features I really wanted to incorporate. Now using Ben's line has been like night and day. I've been able to incorporate the rigging features I couldn't before, experience zero stretch, knots easily and securely, and a touch of bee's wax eliminates the already reduced "mind of it's own" attitude.
-
I agree that the Dremel can be pretty aggressive, even at the lowest speed. That is why I'm very selective when and where I use it. And I'll be the first to say it isn't a "necessary tool" for building. There is nothing the Dremel can do that hand tools can't (except in my case for drilling a perpendicular hole ), it's just a bit faster. The setup I have was a present from my wife years before I started this hobby. I've just found occasions where it has been very helpful.
-
Daniel, welcome aboard. What a beautiful view you have out your window. It reminds me of the areas where I spent so many summers fishing with my Grandpa. I can't add anything to the great advice/suggestions you've already received. I can only reinforce that starting a build log really is a great tool to share your progress and also to get help if/when you might need it. We are all eager to help where we can and enjoy recognizing the success of others. You've found a great group of people who will support and encourage you in each and every build. Remember to take your time and enjoy the voyage.
-
I use the paper sanding disc at the lowest speed to taper my hull planks. I can taper a plank rather quickly with 100% control without using any jigs, risk splitting the plank, having a straight edge slip/creap off line, or even worse is cutting myself. I'm making a small chest to go inside my little Jolly Boat. I cut the side slats a bit long intentionally knowing I could use the paper sanding disc to get them closer to finished length when assembled, where I then manually sanded them down. I used a sanding drum to create a jig for bending a strip of brass to the desired radius. I used a small ball end carving bit to hog-out the cleats I made because sanding discs, sanding drums or needle files couldn't fit into the tiny space. I can't drill a perpendicular hole to save my life. The micro bits used in our hobby are too small to use in a Dremel even at it's lowest speed. So I set up my Dremel in my Dremel work station. I'm able to manually turn the chuck of the Dremel tool and use to depth lever of the Dremel work station to drill perpendicular holes into pieces clamped in place. That's what comes to mind at the moment. I always keep the Dremel in the back of my mind, can't always use it but when I can I'm glad I have it.
-
Wow, this got complicated in a hurry. I'm curious how the terms "cable laid' and "shroud laid" came about, why there are both types and if there are ideal/specific occasions where one is used rather than the other. At first glance at Allan's picture you would say they are mirror images, but there is one difference that I see. In the cable laid view the last run of the reeving passes over the previous runs but on the shroud laid view the last run of the reeving passes under the previous run, why is that? I realize we are way deep into the weeds on this but I think it proves how intelligent are ancestors truly were. First off, just coming up with this system to begin with. Obviously they faced the same issue I did, but to analyze the situation and find a solution(s) is sheer genius. I'm sure there is a practical/functional reason to keep the deadeyes aligned rather than aesthetics. I've learned enough to know that every feature on a ship has a specific purpose and how it was made was developed over years for solid reasons.
-
How was a ship's launch boat prepped to sail?
Peanut6 replied to Peanut6's topic in Masting, rigging and sails
wefalck, thank you for the information, it confirms much of what I was thinking.