
MORE HANDBOOKS ARE ON THEIR WAY! We will let you know when they get here.
×


Peanut6
-
Posts
342 -
Joined
-
Last visited
Content Type
Profiles
Forums
Gallery
Events
Everything posted by Peanut6
-
 Gregory, that is a pretty snazzy and versatile set up. I can definitely see how an experienced calibrated eye can achieve any bend desired. Now if you would, please indulge me in answering another question. Can you put a dry (unsoaked) plank in your plank bending jig as shown in the second picture?
 -
mnl, thanks for the input. At this point I can only see myself using the micro bits for use in model ships. Cleaning/clearing the holes in blocks, dead-eyes, making holes in wood to install eye bolts and thin sheet metal used for rudder hinges.
-
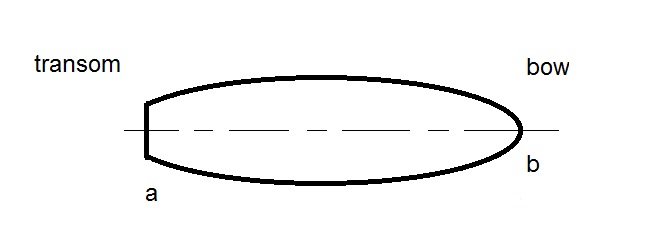
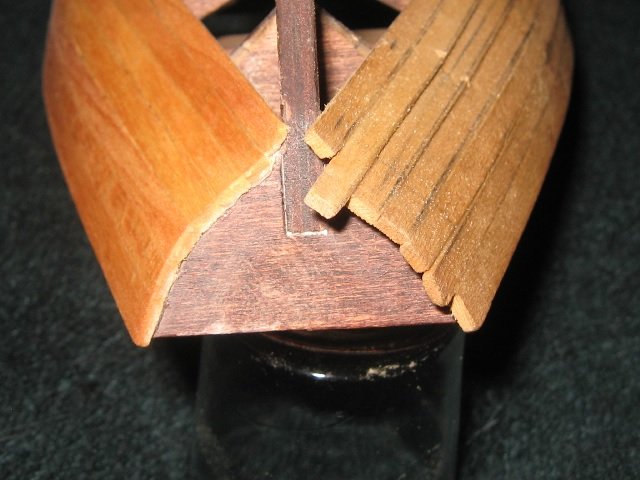
I believe my original question has become a moot point. Can’t really compare Ramin wood to basswood since I probably didn’t have Ramin wood to begin with. The kit is 11 years old and I have no clue when Ramin hit the endangered species list. Jaager, thank you for the wood information. I’ll keep that in mind for when my skill level, budget and build project warrant the desire for a change. Reklein, yes I am experiencing what you describe on the garboard side. But it is minimal, say 1/32” and I’m able to scrunch up the plank to cover that little distance. Once I hit the actual transom I shouldn’t have that problem since I’ll no longer need to twist the plank. As for bending guidance. The video I mentioned in fact was the one Chuck created to show his edge bending technique. I did go back and read Chuck’s edge bending post and found that I missed the very important reference in the video of the edge lift at clamping prior to applying heat. That one’s on me, my bad. I fully understand the geometry and biology aspects of this technique and its a very ingenious way to address the situation. Mark and Nirvana, please indulge me here. The sketch is meant to represent the top view of my Jolly Boat. I want to run a single plank from point “a” to point “b”. We are only talking about the viewing plane shown. So how do you use heat to make that bend?
-
Bob, that is the plan, get a decent set for the money to get started and then stock up on my own as necessary. My pin vise looks very similar to the silver one above and it has a dual collet. And I misspoke in my last post, I should have said my pin vise can hold a bit up to 3/32". I already have four #60 bits (how they got into my hobby tool box I'll never know) and my pin vise handles those just fine. Thanks again.
-
My Jolly Boat BOM listed the planking material as Ramin, whether it is or not I have no clue. I selected basswood because I read it was a suitable choice, readily available and within my budget. And I know what you mean with basswood being prone to splintering and rolling fibers. I just wasn't sure if there was a difference between the two or if what I was experiencing was do to the entirely different bending requirements needed between the two sections of the hull. I understand how heat works better than soaking. The only videos I've seen using heat is with a jig, where the bend radius is known and the wood is already flexible enough to fit the jig. Heat is being used to change the wood's mind that this is the new shape it wants to be. My instance is an ever changing bend radius from bow to stern with a 90 twist at the transom post until you hit the transom itself. Even if I did know the various radii to be able to set up a jig, the wood isn't flexible enough to make the contours. That is why I've been soaking my planks in hot water to transfer some heat into the wood, the moisture makes the wood flexible enough for me to clamp it down securely to my contact points. Then I use a hair blow dryer with both heat and fan setting on high to dry out the plank. Once it is shaped I trim it down and glue it on. I can't figure out how to use heat, what ever the source, to bend the plank frame to frame in my situation, I just don't have enough hands. What I'm doing seems to be working for me, though it can be difficult at times. I suppose it is obvious that my "newbieness" is showing. Thank you for your patience.
-
Thank you to everyone for your suggestions and guidance, I do appreciate it. I do own a pin vise with a double collit that I'm believe can handle an 1/8" diameter shaft, 3/16" for sure. My Dremel kit with the flexible shaft is the only mini power tool I have and others will have to wait until my craftsmanship warrants the cost. The sources you all have given will be of great assistance when its time for bit replacement as I'm sure I'll continue to break more bits. Thanks again.
-
My daughter has asked me to fill out a wish list for Father's Day and my Birthday. So I was wondering what are the most common micro drill bit sizes used for the many sized blocks and dead-eyes? Looking to get a selection that could/would/should get me started and cover most instances in future builds? Thank you in advance for your input.
-
What is the difference between Ramin (supplied for hull planking my Jolly Boat) and basswood (my purchase for replanking the hull of my Jolly Boat)?. I think I'm finding that the basswood isn't as forgiving/flexible as the Ramin. But I can't be sure since my first planking attempt was using the Ramin and I started from the top toward the keel with no twist. I'm now replanking using basswood starting at the keel and working my way up. I'm not sure if the difference I'm seeing is due to the severe twist required at the aft end keel until I get to the transom. I'm also experiencing more "fold-over" of the plank at the bow where I'm trying to make the bend required. I am soaking my planks in hot water to preform them to the hull shape prior to gluing and, as best as I can remember, seem to be having a bit more difficulty using the basswood than I did with the Ramin. Any input and/or information would be greatly appreciated for future reference.
-
Joseph, a welcome from the Midwest. You've received good advice from some very skilled modelers. In addition to all the various clamps available I've found that in planking my Jolly Boat, push pins are a must. There are a few spots that I just can't get a clamp, of any kind, on nor can I find a way to get a rubber band to get the job done. I used a grinding disc on my Dremel to shorten the pins and reduce the diameter to my liking. I had to be very careful not to over heat the pin as it would melt the plastic. I did this because when using unmodified pins I split my transom The pins were just too big, this of course was just my case on my Jolly Boat.
-
Glue question
Peanut6 replied to Peanut6's topic in Building, Framing, Planking and plating a ships hull and deck
Thank you all for your input and suggestions, it is greatly appreciated. It is comforting to know that some of the things I do are also practiced by more skilled builders than I. Now to clarify a couple things. I said I used Titebond white glue only because it comes out of the bottle white. When it dries it is yellow so I guess it is yellow glue. I had never seen yellow glue as it comes out of the bottle, so I was expecting some special something-something. I also use Elemer's carpenters glue and to be honest, I use which ever bottle I grab first as they sit side by side. I do pre-bend my planks before gluing them down. So they are under no stress while the glue is drying. I actually chamfer the one edge before I soak my planks. And using the hair dryer with both settings on high really speeds up that process, thanks for the thumbs up on that one Jaager. During my first planking attempt I did do some building forward while I was waiting. There isn't really much left to do without having the hull complete so I'm trying to only concentrate on the re-planking right now. The one thing that wasn't touched on I believe has become a moot point. If the glue sets up in about 30 minutes, using a the hair dryer doesn't really gain me anything. Thanks again everyone. -
I'm using Titebond white wood glue on my Jolly Boat. I really want to avoid using CA glue if at all possible. The instructions for Titebond say to clamp for 30 minutes and not to stress the joint for 24 hours. How long do you folks let the glue dry before you feel good about "stressing the the joint"? I'm planking the hull now and would like to get more than one plank glued down a day. The stress that I would be applying is trimming the plank at the bow so there is room for the bending/gluing of its counter part on the other side and just normal handling while I continue planking. I vaguely think I want to believe that I might have possibly read somewhere that using a hair dryer on a warm/hot setting could speed up the dry time considerably. Is that true? And if it is, how significant does it reduce the drying time? I currently use a hair drying on my soaked planks after they are pinned/clamped into place as heat and air flow really speed things up. During my first planking attempt years ago I was working full time so it wasn't a big deal at the end of the evening to do up a plank. This time around I'm unemployed and it's driving me batty to just sit and watch glue dry during the day. Your guidance would be greatly appreciated.
-
Thank you very much David, I was very surprised and pleased with how it turned out. I just hope I can replicate it this go around, without the mistakes of course. If so, it would really coax me to stain the hull rather than paint it, which was my desire from the start. My new planking material came in late last week. I spent one day pulling off what I had and cleaning off the glue residue. Once I had the frame members all cleaned up I double checked my fairing using a batten I made as described in an earlier post. Everything seemed to line up/work out fine. Now with a clean slate I started all over again. I tried something new. Or better said, new to me since I'm sure a better mind thought of it first. I took one of my battens, squared the an end and ran it the full length of each frame, marked the end and cut it off. Now I had a physical representation of the entire length of each frame member. I triple checked each batten to make sure I had the correct length cut for each frame this time. I measured each one . . . twice. Attached them to a sheet of paper, using clear tape, in order from transom to bow. With this master reference sheet I figured out how many planks I was going to need and the width of the plank at each frame. I worked out pretty nice for me as I still had plenty of room for recording measurements and notes/reminders. Mr. Murphy must live in my attic because nothing is ever easy. A quick rundown of what I mean: I couldn't find my scale at .01” increments, nor could I find my box of drafting tools and couldn’t print out my pdf of the planking fan template. Eventually I was able to scrounge up a protractor (found one in the Boss’s desk, she’ll never miss it) to make my own planking fan and a set of dividers. My Dad passed away a few months ago and one of the things handed down to me was the compass and divider set he used in high school. I wouldn’t be surprised if this set is close to 100 years old, as I’m sure he wouldn’t have been able to buy a new set during that time. I would prefer to use my own but I don’t have much choice, and I’m sure he’s happy knowing it is getting used rather than just sitting in the box at the bottom of some drawer. So with that, I’ve got the garboard planks on and will have the second starboard plank glued on this afternoon. Being how the planks sit during bending and gluing at the bow, I can only do one plank a day. Unless I can find some way to speed up the set time for the wood glue. With so little done at this point on the replanking, I think I’ll wait to post pics until I reach the same point as on the first go round.
- 129 replies
-
- 1
-

-
- Bounty Jolly Boat
- Artesania Latina
- (and 1 more)
-
Ill-advised or not, I decided to “practice”. I took a very serious look at the ugliness on the port side and determined that the cause of the clinkering I was getting was not due to inadequate faring. It was actually because the strakes in question were not adhering to the frame member. So I went to the starboard side and started my sanding/shaping/trimming. I was honestly surprised how it turned out. Then I went on to filling the gaps between the planks. From mid-ship to bow I used the sawdust and diluted wood glue method. Wasn’t very excited about how that went. I wasn’t wasting any time in applying it, but I was having a bear of a time getting it on and worked it into gaps before it started setting up.. In hind sight I’m sure my “paste” was a little too thick. From mid-ship aft I used Elmer’s Interior wood filler. It also started setting up faster than I wanted. Sanded everything down again and decided to try something I read in another thread. I wet the wood just a bit before a second application of wood filler This still didn’t get every little thing but was much better. I think next time I’ll actually dilute the wood filler to a slurry consistency as I also read elsewhere. Again I was honestly surprised how it turned out. But I came into a little something-something at the bow I’ll have to look into, once I’ve removed all the planking. And for smiles and grins, I applied a coat of Minwax Golden Pecan #245 just to see what that would look like. Well this is what I ended up with. I apologize for the inconsistent photography, still leaning how changing one little setting on this camera or an open window curtain can really affect the outcome. I’ll get better, I promise.
- 129 replies
-
- 4
-
-
- Bounty Jolly Boat
- Artesania Latina
- (and 1 more)
-
The CFO punched my ticket and the order for my new planking lumber was made Wednesday and processed yesterday. The company is only 145 miles away so I’m expecting the delivery within the next few days. Since I restarted this build log I’ve been rereading and restudying any planking literature I can find. And I’ve picked up many tips and insights from the numerous build logs that I’ve been reading. If you look carefully at the last set of pictures I posted you can see a few planks where I was getting a clinker affect. In one of the build logs I read, the builder was having the same issue and a poster informed them that the framing was faired insufficiently. I went and looked at my Jolly Boat with a more educated eye and could definitely see where my fairing job was lacking. I can confirm a comment I read basically saying, when you’re done fairing the frame, you only think your done so go back and do it again. I believe that I want to try and remove the planking one strip at a time. It would give me a perfect view at each plank/frame union to see exactly where additional fairing is required. If it came off as a shell I would miss that opportunity. I had a thought yesterday and believe now would be an ideal time to do it but would like to hear what others have to say. What if I took this opportunity to practice filling in the gaps and sanding/shaping the part of the hull in place? Since I’ve never done that before and this planking will be removed anyway, I see this as a perfect chance to get my feet wet in this exercise. Plus I can see if the Elmer’s Interior Wood Filler I have on hand is sufficient to the task. Any comments would be greatly appreciated.
- 129 replies
-
- 2
-
-
- Bounty Jolly Boat
- Artesania Latina
- (and 1 more)
-
Not abandoning this renewed effort, just waiting on the additional funds necessary, that has been approved by the CFO, to find their way to the dry dock coffers (aka, when Uncle Sam makes our federal tax return a reality or the pandemic stimulus check finds its way to our mail box). I'm so anxious to get back to the project, but as they say patience is a virtue.
- 129 replies
-
- 3
-
-
- Bounty Jolly Boat
- Artesania Latina
- (and 1 more)
-
Eric, you might want to take a look at my post in the Rivets thread in the painting and finishing topic. Your rivet decision got me to thinking and you can read about what I did if you care. Love your work and looking forward to seeing the end product. My Oseberg is in my future and want to get as much insight for this type of ship as I can. Take care and be safe. kev
-
Rivets?
Peanut6 replied to Nirvana's topic in Painting, finishing and weathering products and techniques
I was reading a build log and the builder decided not to add the rivets due to the sheer number required, estimated to be about 4000. That got me to thinking (this is where the Admiral usually says "Uh-oh") that there must be an easy and fast way to simulate rivets. So I ran a test yesterday afternoon and, in my case, it worked. I knew I couldn't have come up with this idea on my own so I did a search and found this thread. This is what I did, I mixed Titebond white glue with Model Master black acrylic paint in a 50/50 ratio. As I mixed it up the glue appeared to curdle and the mixture turned a dark slate gray. I figured this wasn't going to work at all. The glue and the paint don't want to play together and the color was wrong, but ya' never know. I grabbed a couple small pieces of scrap untreated ply I had from another project. Applied a small dot, about 1/8" diameter using a tooth pick to one piece of ply and set it down flat. Did the same to the other piece of ply and propped up to about 45 degrees. Both dots had a nice little dome to them. I figured the 45 degree lean would cause the dot to run but it didn't, it held it's shape. I checked on them in an hour, they both dried, black not dark slate gray, and they both had a very very small "orange peel" surface texture, perfect for rivets. Oh my gosh, I was so excited . . . but then I noticed that they had lost the dome shape. In a what the heck moment I just added another dab onto each dot and came back in an hour. They both had dried and this time kept the dome shape. I could run my finger nail over them with no rub-off onto my finger or them dislodging from the ply. This morning I went out to double check and saw that I had left my glue/paint mixture uncovered over night. I figured that it would have dried up or at least skinned over. But neither happened, it just got a bit thicker. So another what the heck moment and I applied a dot about 3/16" diameter to the ply and propped it up to 45 degrees, this time it wanted to run. I laid it flat and checked it again after 2 hours. It hasn't fully dried yet but is getting close and it is still holding it's dome shape. Now I'm guessing that the reason the first dots lost their dome shape is because the ply was untreated and all the moisture from the mixture leached into the wood. Since the second application was applied over the first, it kept the dome shape because the underlayer had sealed the wood. I can only guess that the reason the glue/paint mixture didn't dry, and the dots did, is because of the volume of the mixture versus the size of the dots. Obviously there needs to be more testing done, different wood types in various degrees of preparation. I don't have the materials required to do more that what I've done. But if this process/method gets refined a bit it could be a possibility for simulating rivets if it fits ones situation and/or desired effect. 3-5 seconds a dot, even if it turns out you do have to do it twice, is faster and easier that drilling holes and trimming pins I would think. I know this got long and I'm sorry, but I wanted to be sure to that the materials I used and my process was completely covered. Take care and be safe. kev -
After long consideration, and taking everything into account, I've decided that I'm going to replank the hull. As soon as I run my dry dock purchase order request thru the CFO, I'll be placing my order for the planking material. Ultimately I feel that getting the planking done properly is more important than just getting the planking done. I don't want to get into any bad habits or practices that could/would be more costly in a future build than what this little setback will be. Crossing my fingers I'll be making sawdust (aka man-glitter) in the not to distant future. Take care and be safe. kev
- 129 replies
-
- 3
-
-
- Bounty Jolly Boat
- Artesania Latina
- (and 1 more)
-
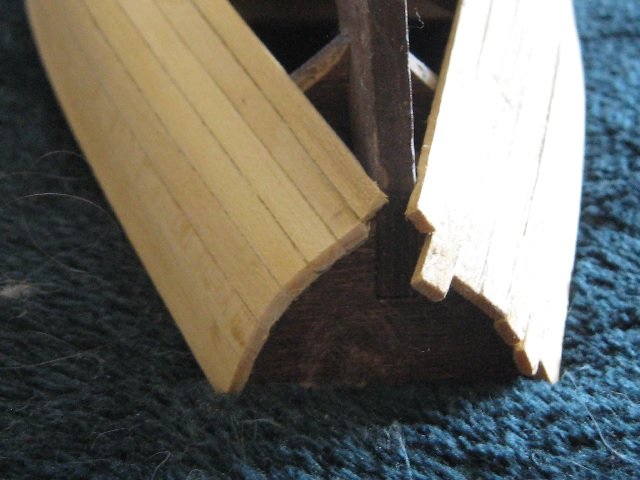
Duanelaker, thanks for the info. It sure looks like you were able to get a nice clean edge to snug up against the bow keel portion. I figured you had some little trick/secret other than patience and a steady hand, nice job. Hope I can do the same. I think I may have a bit of a plan which I'll explain in a future post. ERS Rich, I appreciate your insight and advice. Especially in the preparation for and painting, definitely processes I will follow . I had dreams of just staining the exterior hull but that attempt will have to wait for a future build. I need my skill level to be a lot closer to my dream level. I was aware of, and had been, tapering my planks. The cause of the pickle I found myself in was an accumulation of errors on my part. It really helps to be sure one is measuring the correct span (my major FUBAR committed at the bow end) the proper way (not that big a deal but could have been done better) and accurately (obviously the few hundredths add up quickly on top of the other errors). Thanks again folks, it is greatly appreciated. Take care and be safe. kev
- 129 replies
-
- 3
-
-
- Bounty Jolly Boat
- Artesania Latina
- (and 1 more)
-
I believe I see the pros and cons of the two options as I see them. I could carry on with what I have. That would require me to remove the two planks on the port side and fiddle with them to make it match the starboard side. The pros would be not wasting the lumber and time I’ve already invested. The cons would be continuing to chase my error down the rabbit hole hoping to correct it before the final plank. I’ve been using push-pins to hold the planks in place during bending and gluing. I really don’t want to continue on with that method as I’ve already split one frame that I had to fix and I’m very concerned it will happen again. But with the flooring in place and the relationship to the frames I just don’t have any other option that I can see. Finally the garboard plank just won’t look right and I’m not sure if I’ll have enough plank width for the bending and twisting required. Plus I’m seeing that trying to trim the plank ends at the bow to accept that piece of the keel will be very challenging to say the least. My other choice would be to remove what I’ve done and start over. The cons are the time and lumber wasted and I don’t have enough 0.5mm X 5.0mm Ramin strips that came with the kit. The pros are that I will be able to do it as I should have been done it to begin with. Starting at the garboard plank and banding to hull in half. My method of trimming and applying the chamfer to the inside edge was using worked quite well for me. So I think I only have to knock off the rust, so to speak, to come back up to speed on that. Finally figuring out my measurement error should enable me not to make the same mistake again, especially if I use the proper techniques in measuring. And I believe that if I use the flat part of the false keel as a reference point starting at the garboard plank to trim the planks at the bow I’ll establish enough of a run to follow as I get towards the top of the bow where the flat runs out. I can’t seem to find Ramin wood at all let alone strips of any kind to match to match the measurements of those provided in the kit. I have found a source for a 42 count of 1/16” X 1/4” X 24” Basswood for roughly $20US plus tax and shipping. The thickness difference IMHO is negligible and I think that the little extra width is not a problem at all, you can always take some away but can’t always put back. Please share you thoughts regarding the replacement wood choice. Duanelaker, if you could share your method of trimming the planks at the bow to accept the that portion of the keel, it would be greatly appreciated. I would hate to finally get the planking done to an acceptable level and then mess it all up at that point. Thank you all in advance for your insights/advice, it is greatly appreciated. Take care and be safe. kev
- 129 replies
-
- 2
-
-
- Bounty Jolly Boat
- Artesania Latina
- (and 1 more)
-
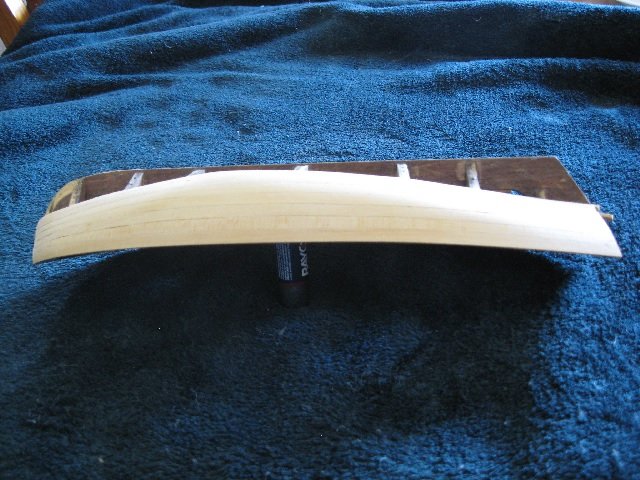
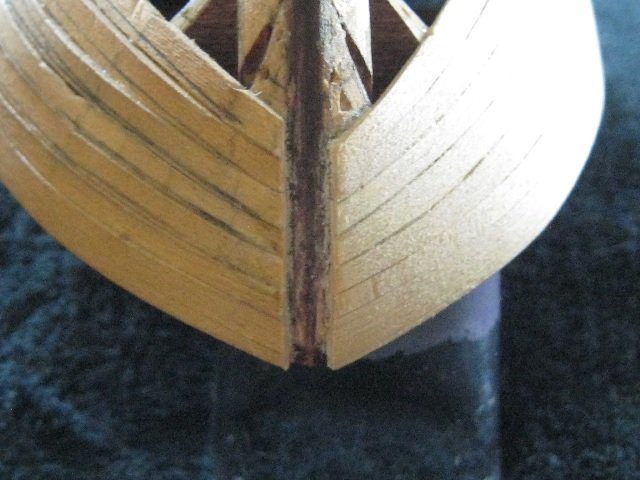
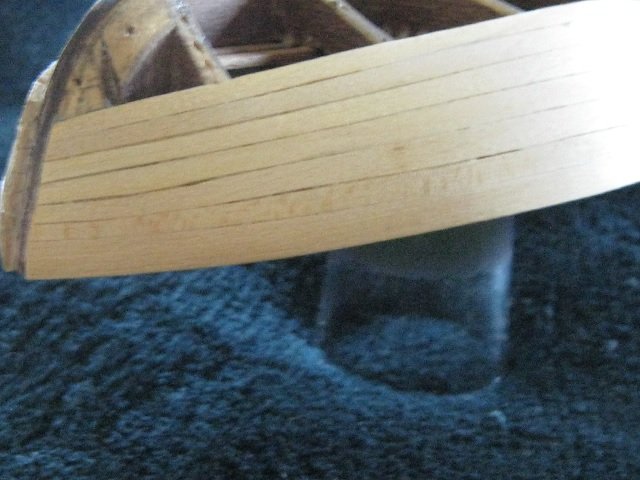
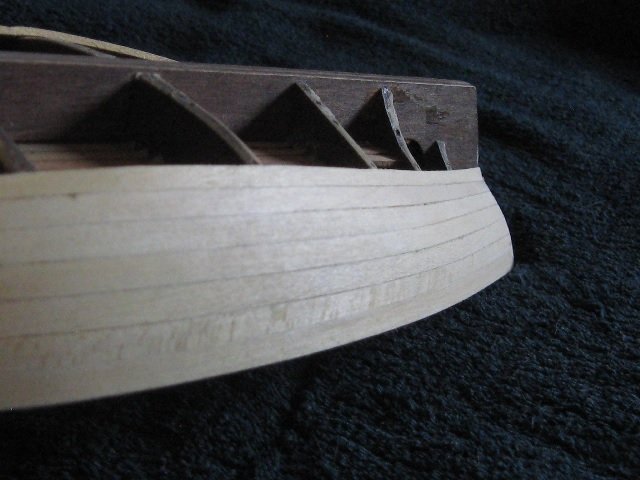
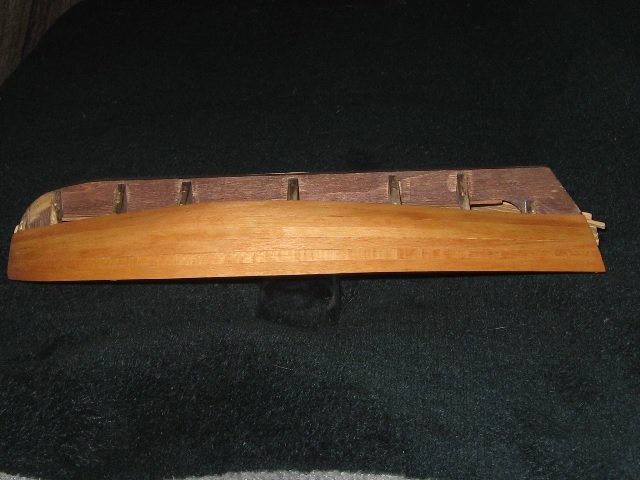
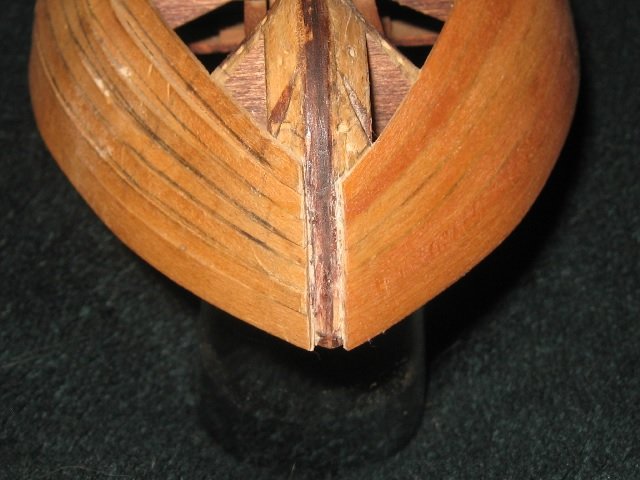
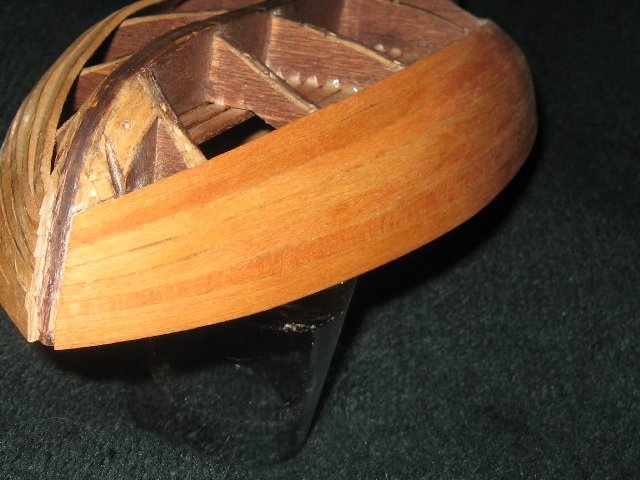
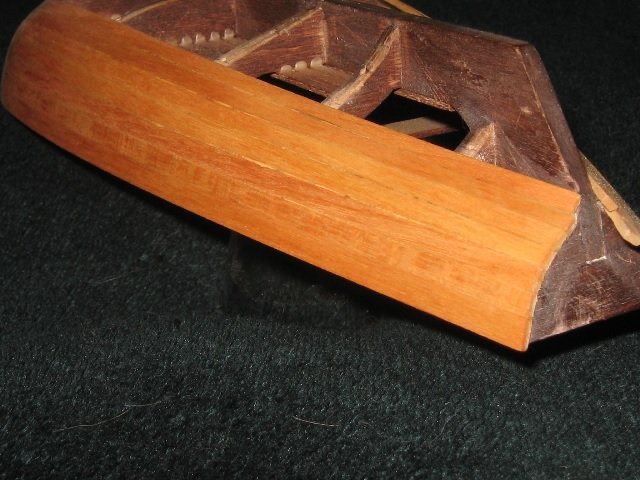
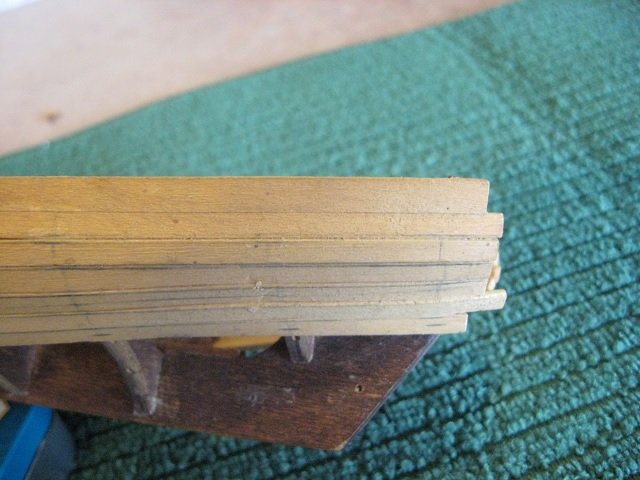
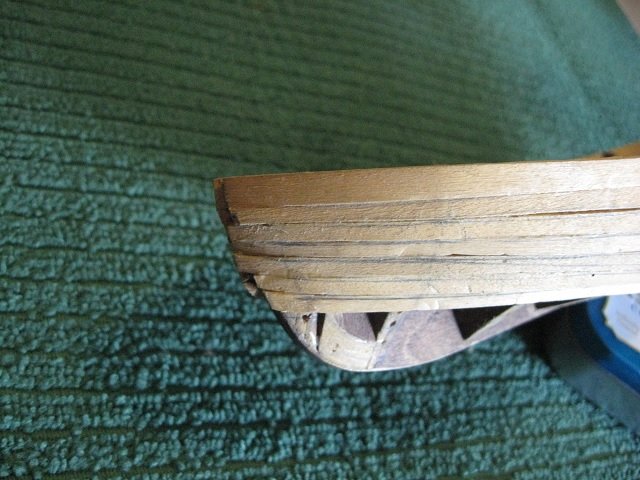
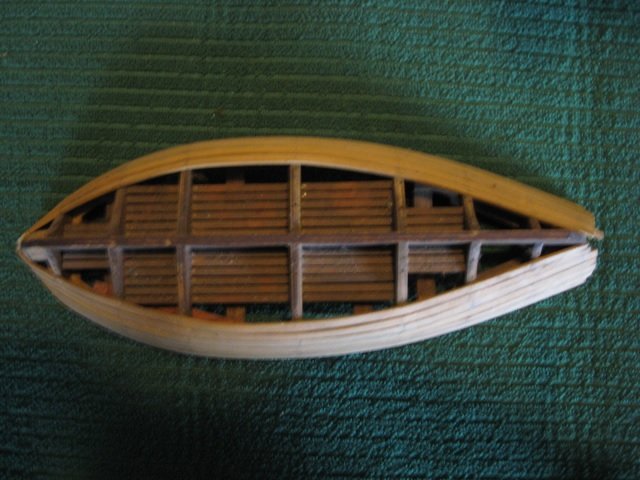
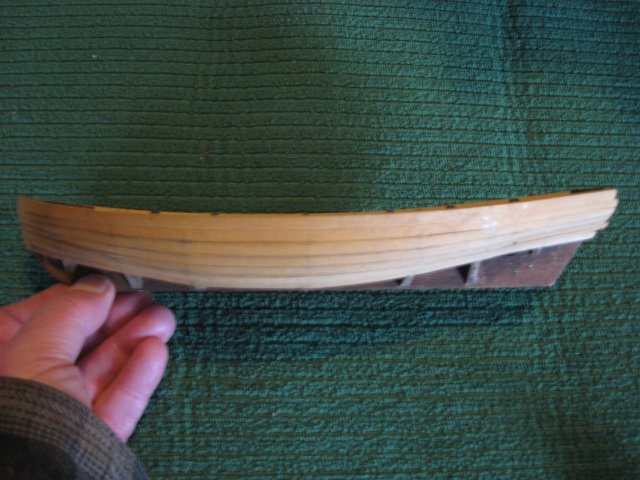
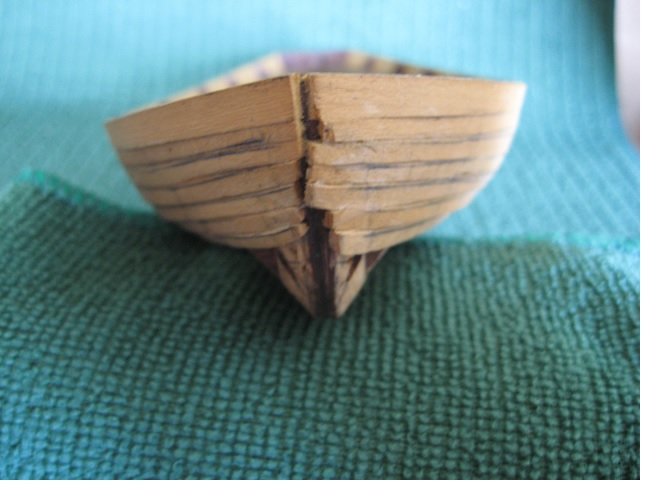
Have you ever wondered how you got from where you were to the situation you currently find yourself in? Well that is me at this moment. When I got ready to start this post I went back to my text file so that I could continue and that is where I found about a page of gibberish that I couldn’t make heads nor tails of. The sad thing is I’m the one who wrote it. I can only guess I was throwing down some thoughts before I took some photos and just stopped right there on the project. I’ll do my best to back fill some info without getting too long. So it appears I decided to start my planking at the keel, got the garboard planks plus one more on each side. Also decided I didn’t like the idea of trimming the top plank even with the top of the frames. Evidently I changed my mind and started going from frame top to keel on my planking and removed my 4 planks from the keel side. Got the first 7 planks installed and realized/thought I was in deep yogurt, so I took a step back to figure out what I was going to do and/or how to fix my problem . . . . and that is where we are now. I’ve made a post or three in my reintroduction thread addressing this situation. Since the time of my last post I’ve been cleaning garage dust, spider webs and overall general gunk off my Jolly boat that has accumulated over the last 10 years where she sat in the dark back corner of the workbench that hasn’t seen a cleanliness committed on it’s behalf in far too long. Also had to find the camera, relearn how to use it. So here are the pictures of where I sit right now. You can see in the straight on shot of the bow there is an ugliness going on with the last 2 planks on the port side. No explanation as to why that happened. If one were to look, you would clearly see that I just didn’t trim down to my marked trim lines and that is why they sit lower to their counterparts on the starboard side. At this point, I believe I know what I could/should do. But would really like to get some honest feedback and advice from the more experienced modelers here. Your wisdom is priceless and greatly appreciated.
- 129 replies
-
- 3
-
-
- Bounty Jolly Boat
- Artesania Latina
- (and 1 more)
-
That makes sense, now that it has been explained. How were you able to prevent bleeding from one plank to another? I really like the effect you were able to achieve and if I'm able to do a decent job of planking on my Jolly Boat I would like to stain my hull and get the same effect on my wale. And possibly other areas where, in hind site, I wished I had stained them earlier. Thanks for your knowledge and advice, it is greatly appreciated. Take care and be safe. kev
-
Rodolfo, such beautiful work, I'm in awe. How did you stain your second hull planking? I can tell you used multiple wood types but I can't imagine getting such a color differential using a single stain color. Is it some sort of magic? Take care and be safe. kev
-
Permission to come aboard . . . . again
Peanut6 replied to Peanut6's topic in New member Introductions
Thanks Mark, still can't figure out what I was thinking to make such a silly error. Evidently I wasn't thinking and that is how it happened. All's not lost as I learned a good lesson and again so very thankful for isopropyl alcohol. I've just completed my recreation of my Jolly Boat build log for those who care to take a look. Take care and be safe. kev -
Well that recreates my original build log as best as can be done. All my additional posts here will be new content. Next thing to do is take a few photos showing the additional work done since the last post. This will represent the current status , and I need to figure out the dialog to accompany them. All comments are welcome and strongly encouraged. I Hope my build log style isn’t too cumbersome to read thru. Take care and be safe. kev
- 129 replies
-
- 1
-
-
- Bounty Jolly Boat
- Artesania Latina
- (and 1 more)
