HOLIDAY DONATION DRIVE - SUPPORT MSW - DO YOUR PART TO KEEP THIS GREAT FORUM GOING! (Only 13 donations so far - C'mon guys!)
×


Peanut6
-
Posts
342 -
Joined
-
Last visited
Content Type
Profiles
Forums
Gallery
Events
Everything posted by Peanut6
-
 Glomar, I hope this gets you there sawdust filler if not, it is the Scottish Maid build by JesseLee, post #119. As a whole, his build log is remarkable and has numerous solutions to all kinds of problems many of us have come across. Worth a read even if you're not interested in the Scottish Maid.
 -
Digital compass / dividers?
Peanut6 replied to CPDDET's topic in Modeling tools and Workshop Equipment
Bob, sounds like you grabbed the Brass Ring with your set, good for you. eBay will be the route I take to acquire my set but I need to wait until the shipyard coffer is suitably filled. From some of the deals I've seen for this type of equipment, I've come to believe most of the sellers fall into any one or combination of the following: don't know what it is, don't know how to use or have a use for it, don't know the quality of the item compared to what is available new. -
Glomar, you may want to consider saving some sawdust from your hull sanding. I've read that mixing sawdust (of the same wood) with a diluted PVA solution and working it into the gaps works for many builders. I tried it on my planking, in a test prior to deconstruction, and I wasn't too pleased with the results. I wasn't going to paint my hull and there was just enough PVA exposed that things looked blotchy when applied stain. I can't see how this method works better than wood filler especially if it will be painted, but to each their own. I just read a build log where the shipwright took a lightly different approach using the same materials. He very carefully and sparingly filled the gaps with PVA and then pushed/worked sawdust into the gap until he had (what I'll call) a sawdust ant hill. He then came back after it had dried and carefully sanded it down. His results were very impressive and sure seemed to work for him. He wasn't going to paint his hull either and I can see how this method could work better because, in theory, you would have a layer of of like wood sawdust that could take a stain rather than a combination of PVA and sawdust. Again, to each their own and I'm just sharing some information that I've come across.
-
Digital compass / dividers?
Peanut6 replied to CPDDET's topic in Modeling tools and Workshop Equipment
I use the dividers from my antique Kern Swiss drafting set and compasses from my manual drafting days. I have numerous scales I use for measuring and rely heavily on my digital calipers. I also have an antique L.B. Starrett Co. set of mechanical calipers but I keep them in the box. I would like to get may hands on a good set of proportional dividers though. The cost of quality new proportional dividers is beyond my budget but I've seen antiques on ebay that are considerably less expensive. I would rather have those anyway. -
Ken_2, it gives me warm fuzzies to know there is the slight possibility I was of help to you. Your filler block from #9 to the transom is great, plus it can't be seen from above, nice job. And your plank width adjustment at the transom/keel union is great foresight, again nice job. Obviously you saw I kinda' smusched/smashed that plank into place at that location. If you're still referring to my build log, be sure to check out what I said about sanding down the planks along the keel upright (once hull planking is completed) before attaching the keel and keel post. That is unless you have mad metal bending skills I don't possess. And we still don't look at my bottom gudgeon.
-
Nice and clean looking. Should make 2nd planking so much easier. The first few strakes are showing the benefits of your wise choice to restart and improving your work with what you learned the first go-around. Out of curiousity, how did you decide to remove the nails? I went totally off script planking my Jolly Boat so I don't have any experience using nails in that discipline.
-
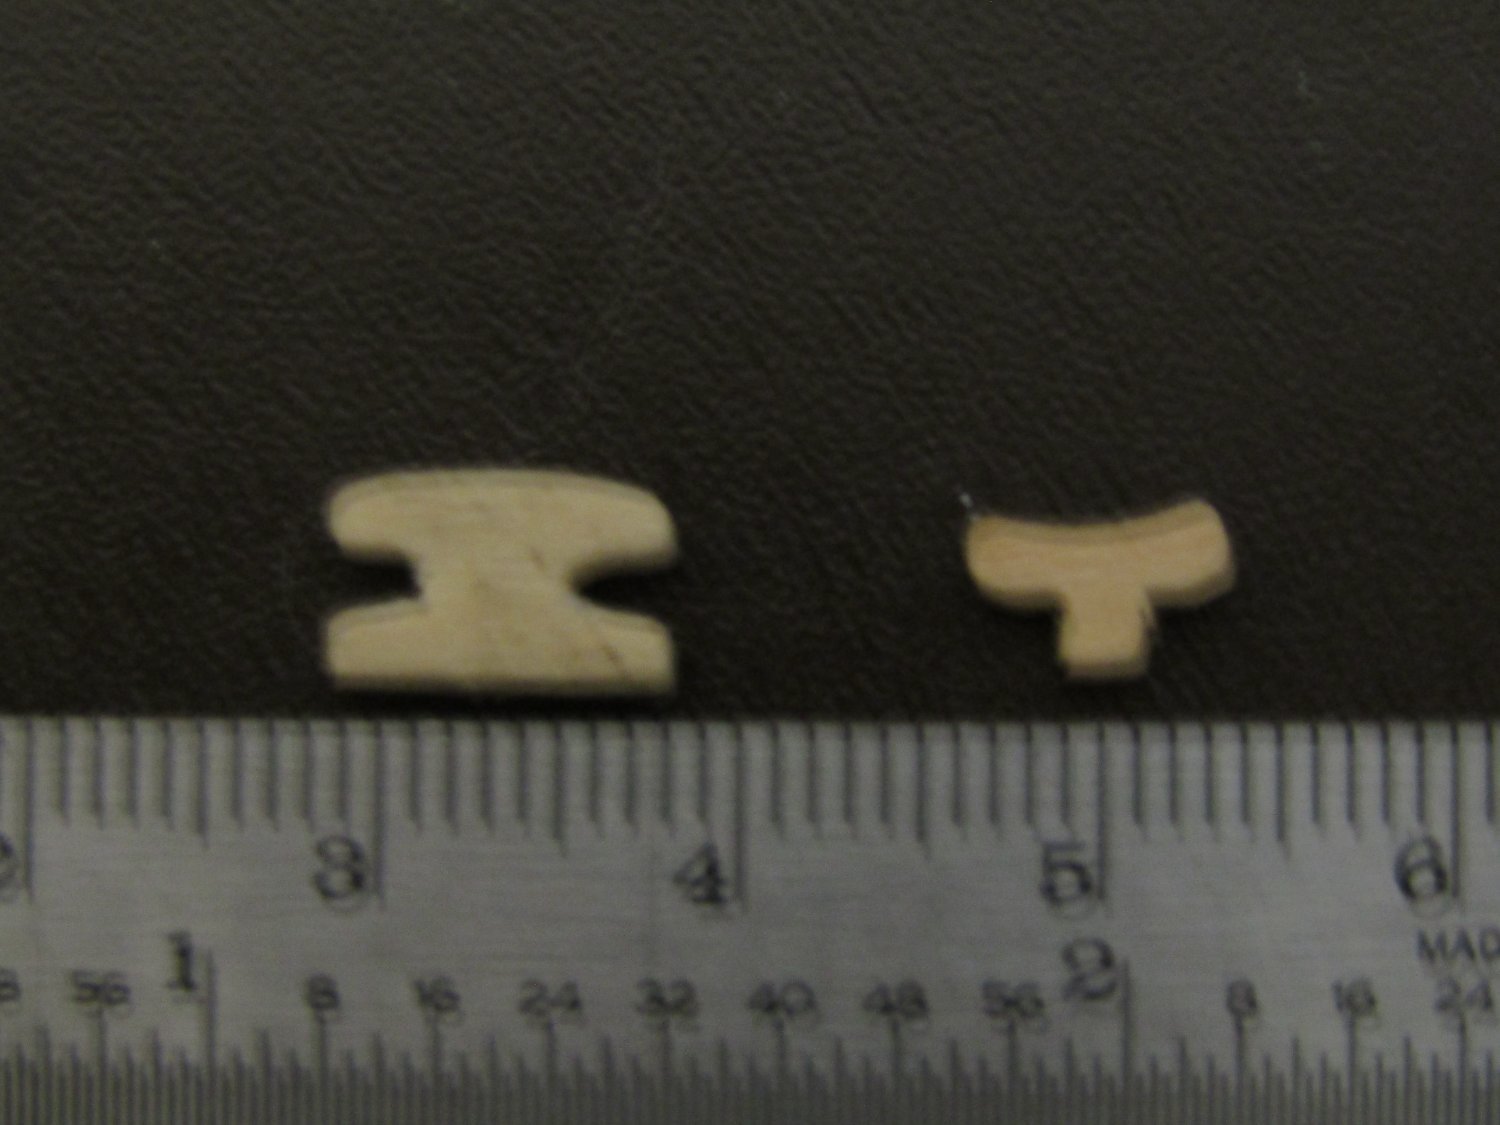
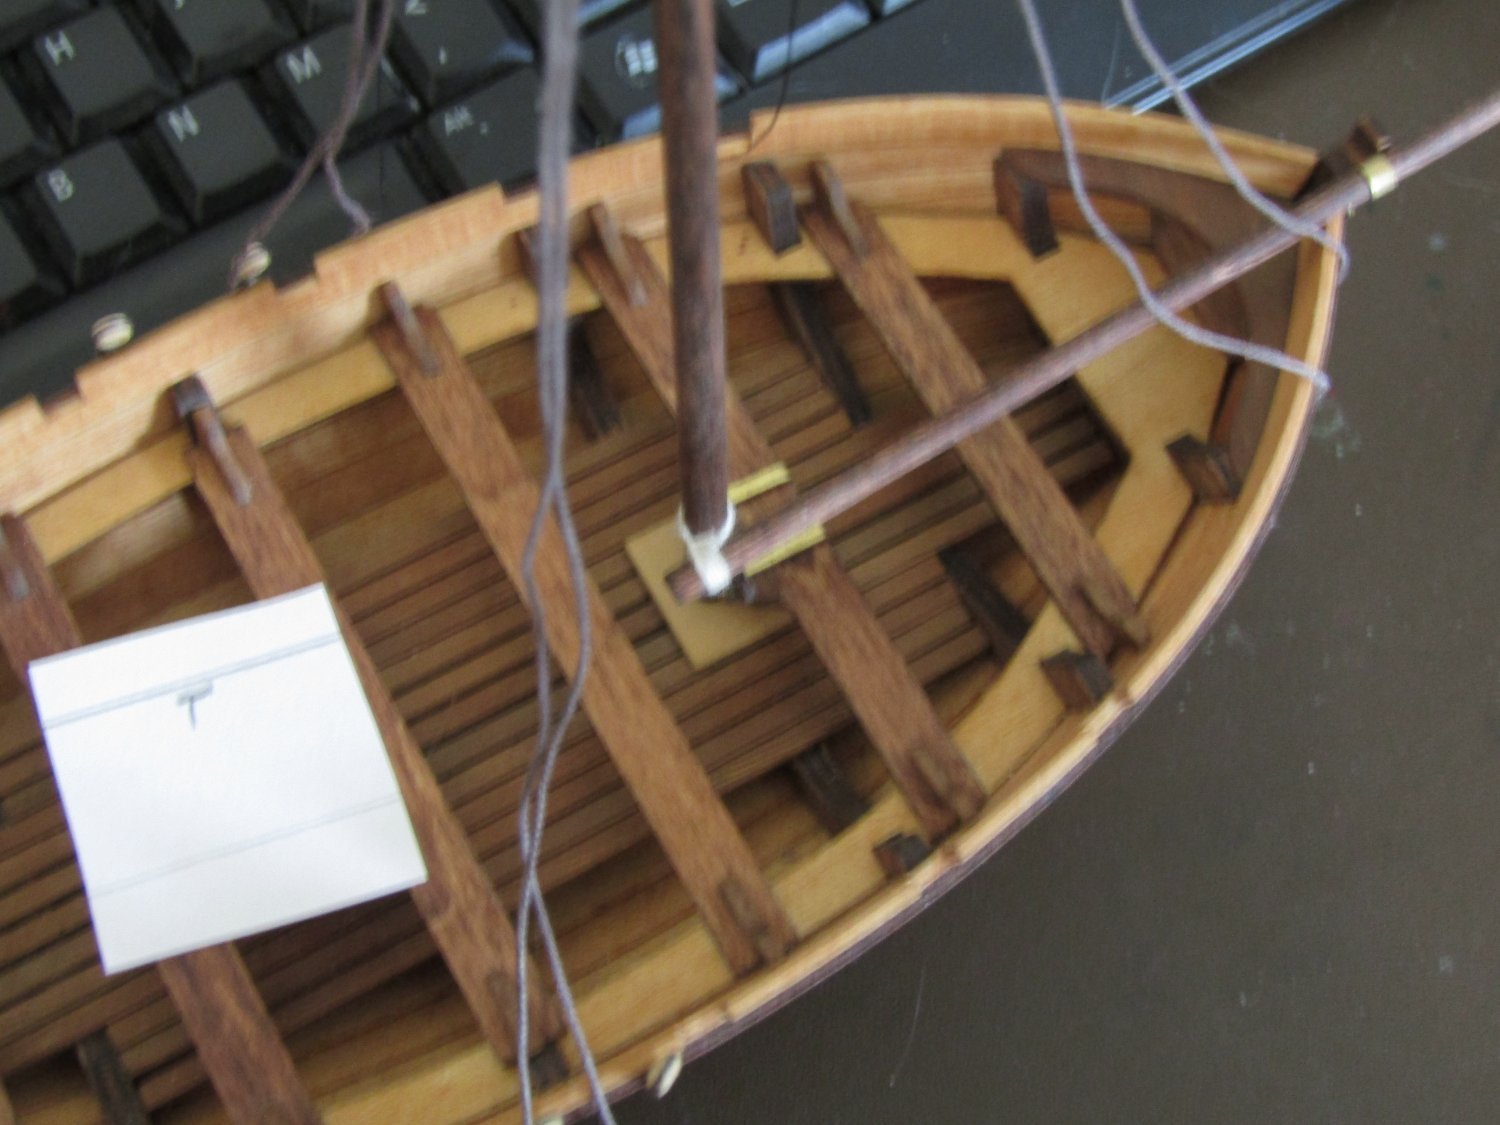
I'm at the point of the running rigging in my AL Jolly Boat. The instructions and plans make no mention of termination points nor are there any parts in the kit for such. I'm not too terribly concerned about historical accuracy, as we know this is a fictious representation of the boat Bligh and his crew didn't use when set adrift. I've decided to use cleats of my own creation, as best as I could come up with. The one on the left is my first attempt from last spring, and will not be used, the one on the right is what I will be using, shown prior to staining and inserting the nails. Sorry for the poor quality photo. Now I just need to decide where to put the cleats for my belaying points. I think placing them now will be easier than after I set the shrouds and stays. The tacks of the stay sail and jib sail are attached to the boom. I’m thinking the clews lines can run to cleats on the thwart just to the starboard side of the jib/mast lashing, shown in green. The peak lines run thru a double block up the mast and I’m thinking they can be secured to cleats on the thwart just to the port side of the jib/mast lashing, shown in red. That leaves the gaff halliard and boom lift lines. From what I’ve read, these lines need to be secured as close to the mast as possible. The only place I can see would be the mast hole cover, just aft of the mast with one port and one starboard, shown in blue. Not too terribly excited about that location but I think its better than the thwart aft of the mast as I think that location would/could interfere with the boom sail (spanker) and I believe the jib/mast lashing thwart is busy enough. Here is a top view to help you see what I’m talking about. Your thoughts, suggestions, instructions or great pieces of wisdom are readily accepted and greatly appreciated. If I’m making a major error (such as AL's instructions for the boom tackle) I sure would like to know now than after I’ve drilled holes and applied CA.
-
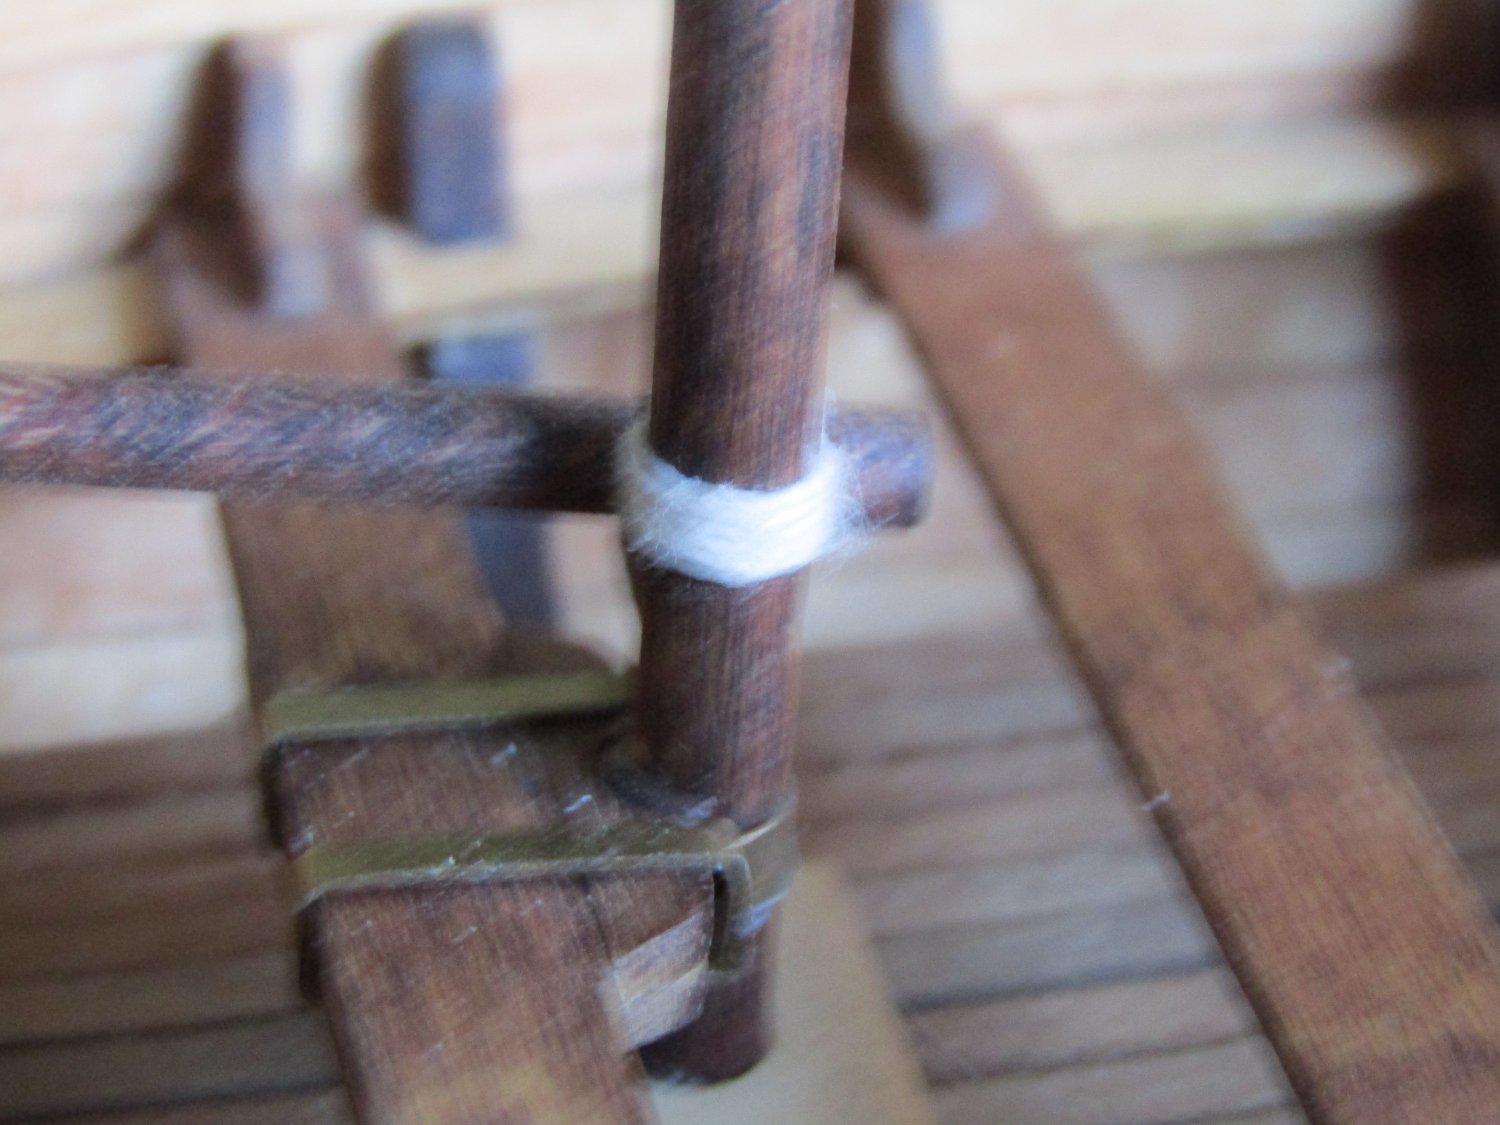
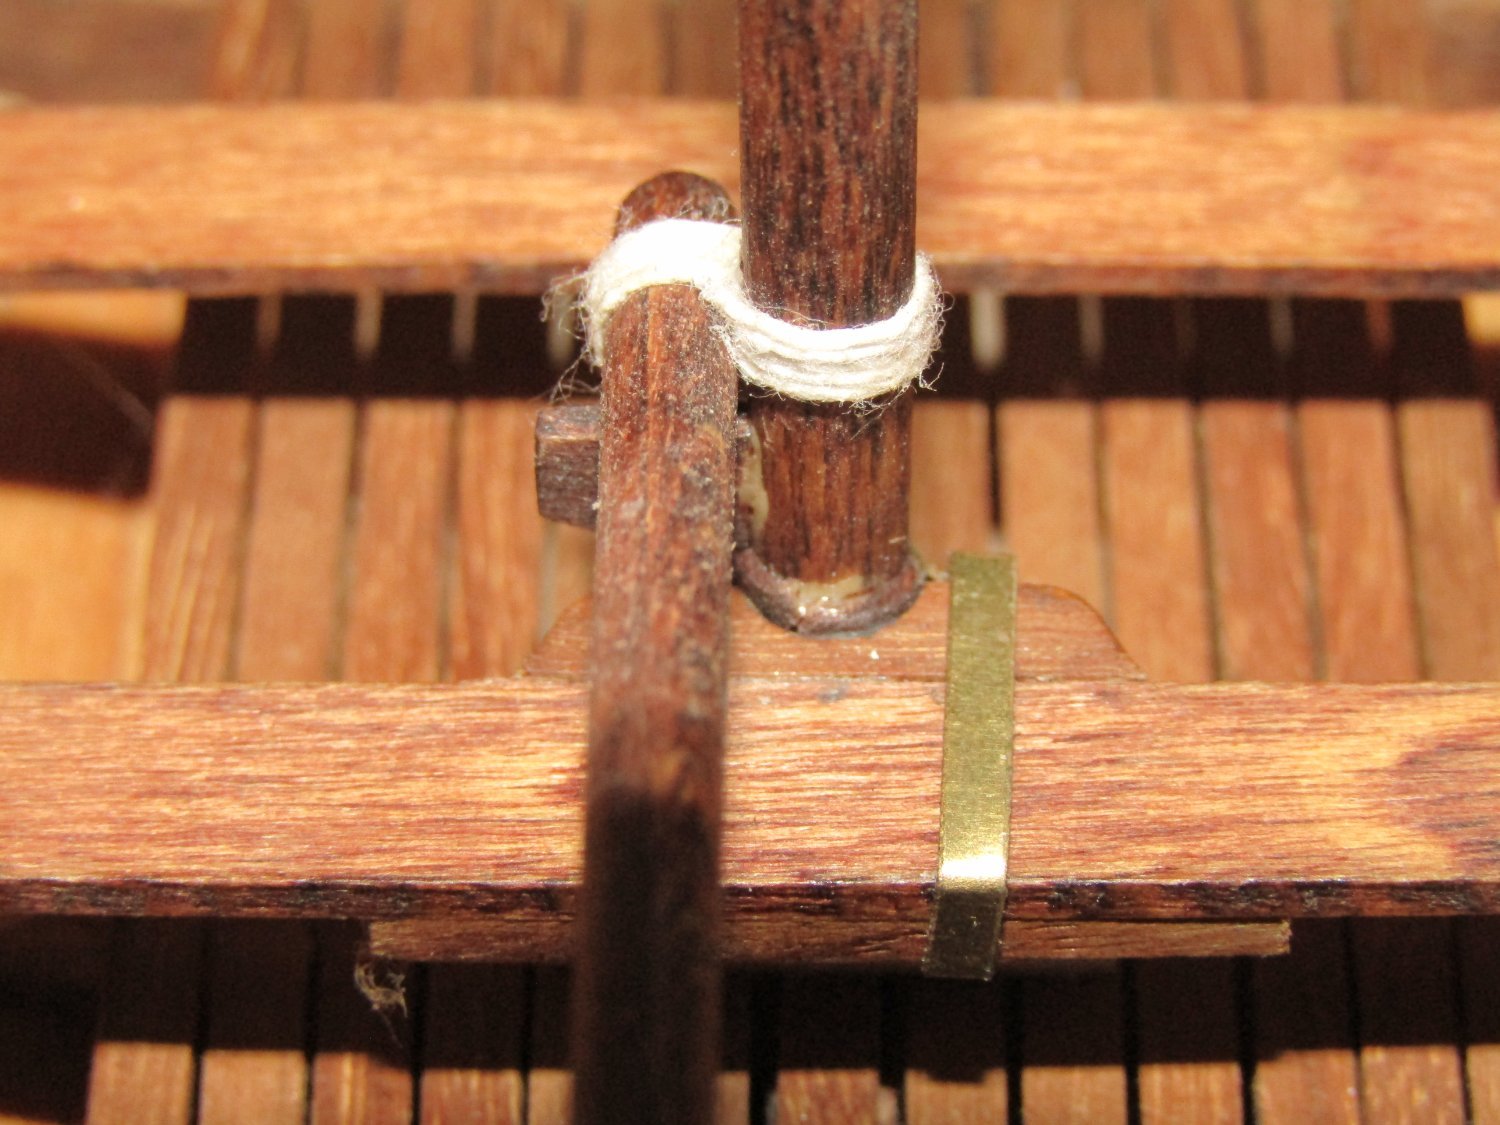
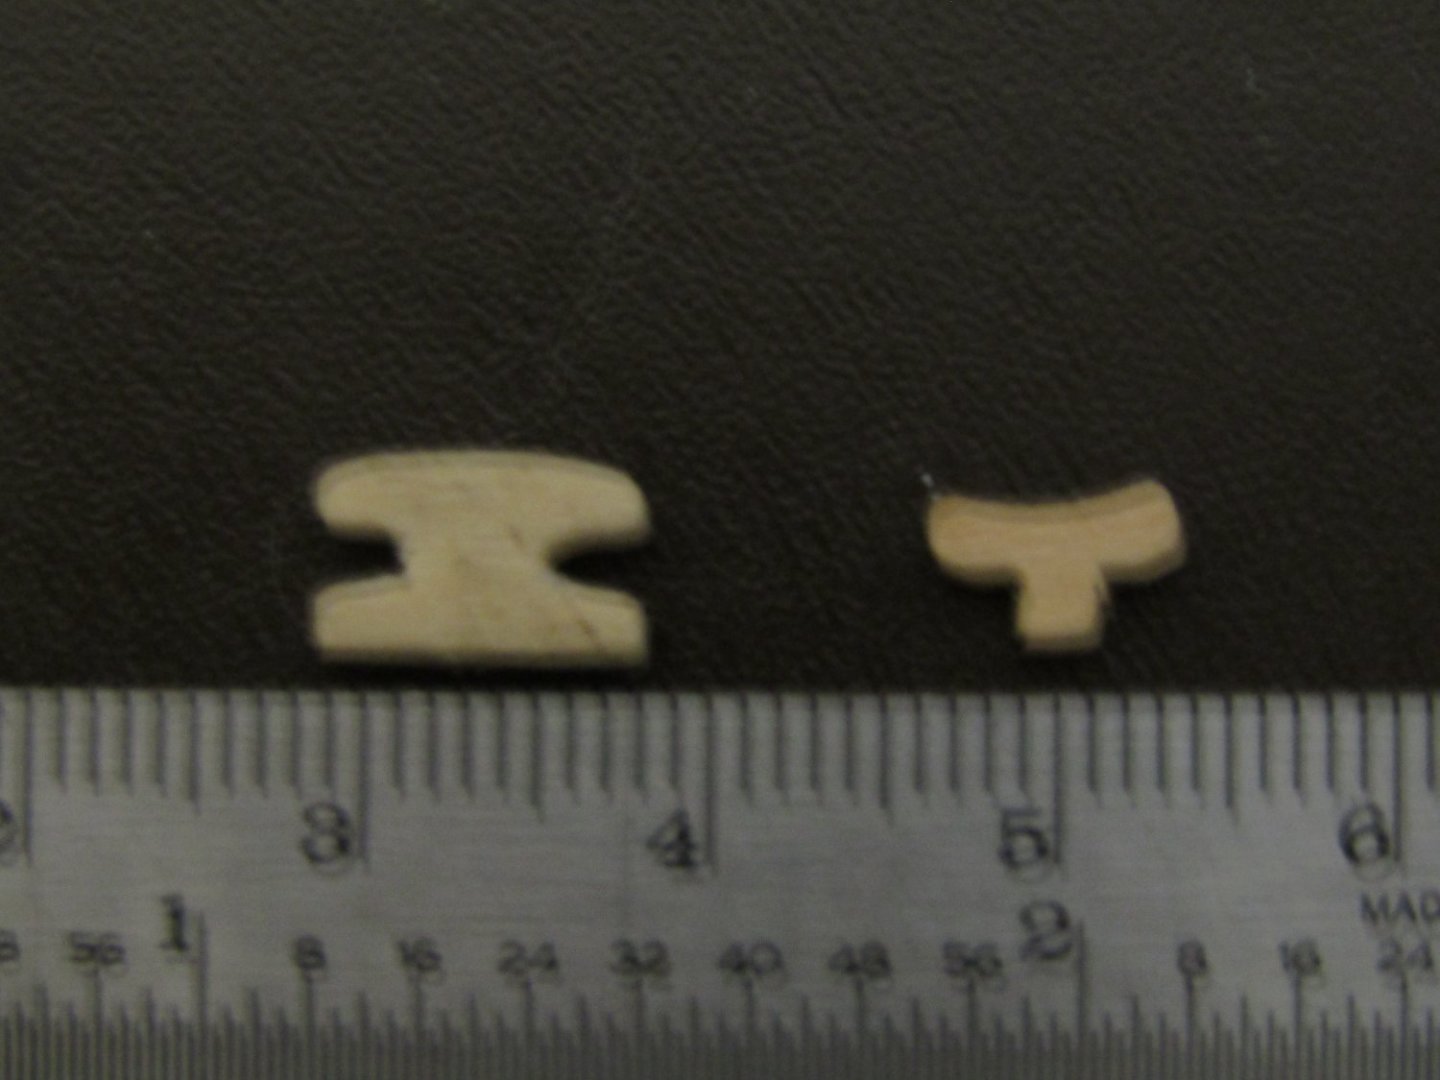
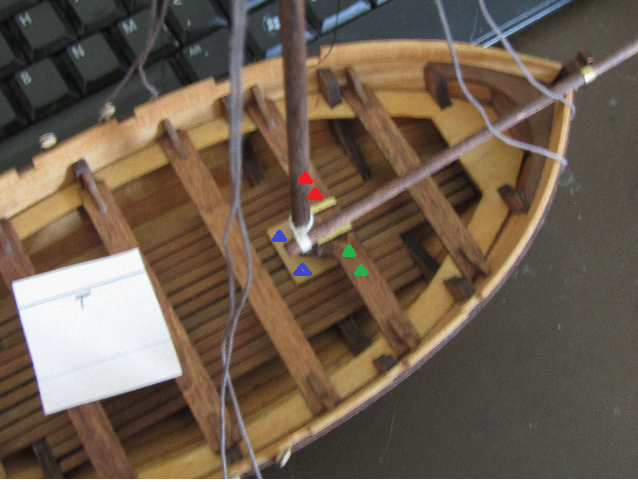
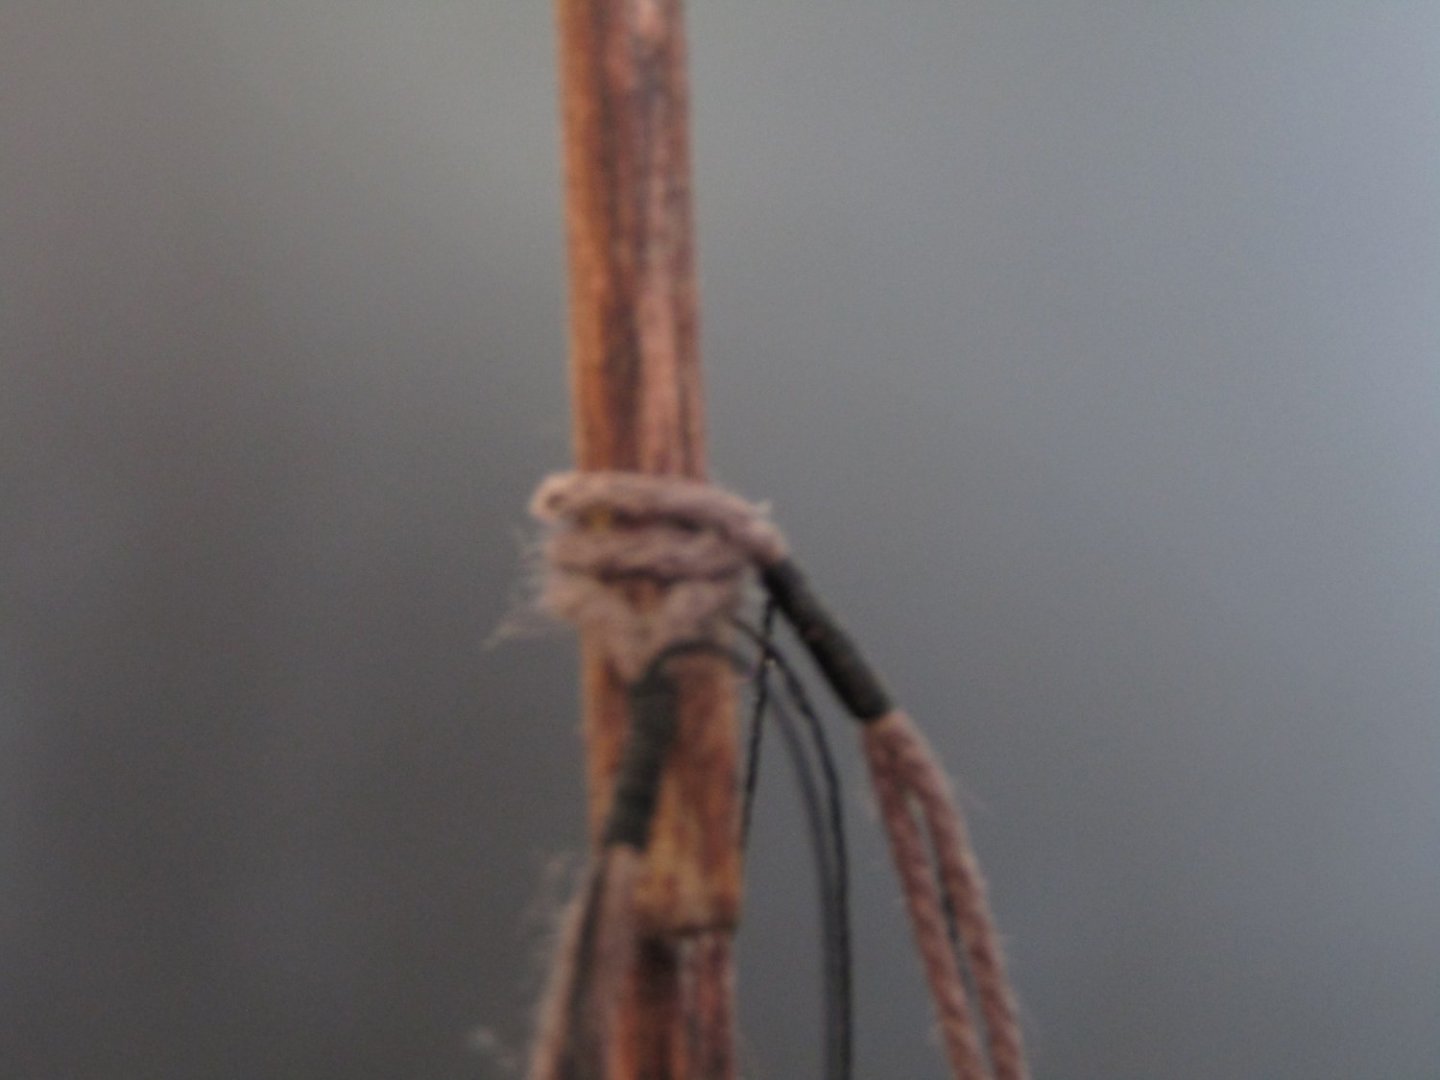
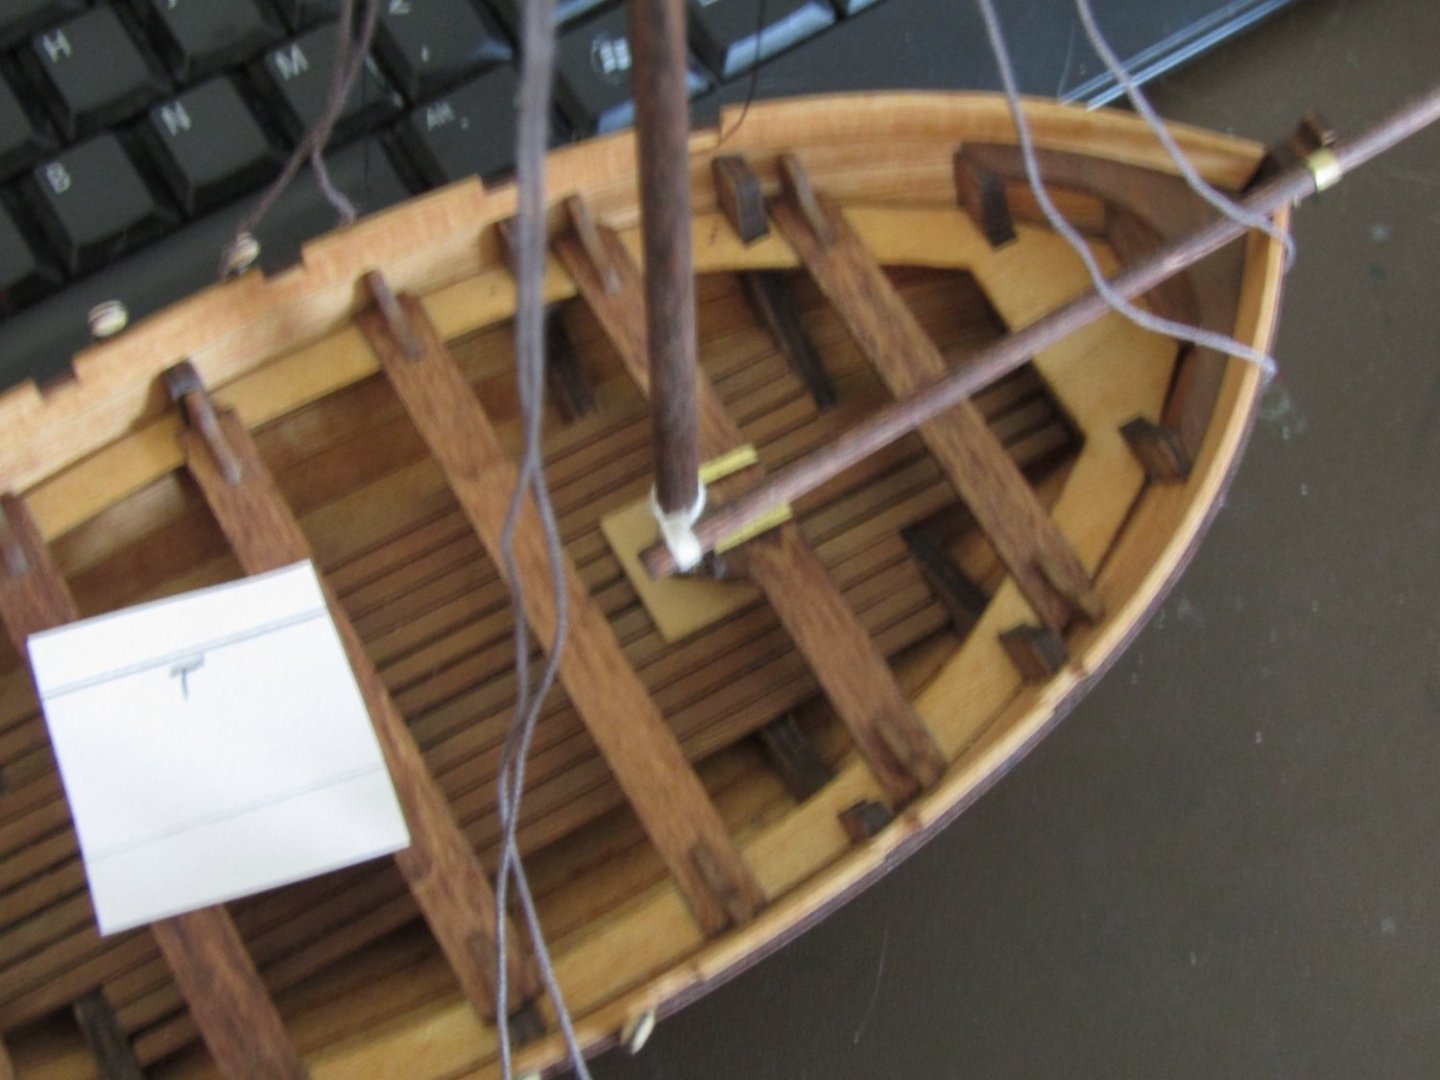
Got the shrouds and stays seized as mentioned in my previous post. Here is the obligatory photo of hanging shrouds and stays. I haven’t trimmed the seizing line nor applied just a hint of CA yet. In hind sight I think I should have served the line prior to seizing them. I could remove the seizing but since they’ve been tightened up, I’m afraid of getting a little nick in the line which would make it unusable. I have enough line for another shroud but not enough for two. And with my luck I don’t want to take the chance. I pulled out the cleats I so proudly made last spring and set one on a thwart. I immediately realized they would not do at all. I thought about trying to see if I could salvage them but decided there was no way I was going to get all 8 of them to be consistent in appearance. So I decided to make new ones of a different style. I used the same method as before but this time I have new tools I didn’t have before, which made things so much easier. I also switched from my new planking material, 1/16” X 1/4”, to a piece of the kit supplied planking material, 1.5mm X 5.0mm, after testing that it was thick enough to use a kit supplied trimmed nail for added strength when attaching them. The one on the left is the first go-around and the one on the right is what I will be using, prior to staining and inserting the nails. A bit fuzzy, sorry. Now I just need to decide where to put the cleats for my belaying points. The cleats for the boom tackle will be on the stern thwarts, one port and one starboard. The tacks of the stay sail and jib sail are attached to the boom. I’m thinking the clews lines can run to cleats on the thwart just to the starboard side of the jib/mast lashing. The peaks lines run thru a double block up the mast and I’m thinking they can be secured to cleats on the thwart just to the port side of the jib/mast lashing. That leaves the gaff halliard and boom lift lines. From what I’ve read, these lines need to be secured as close to the mast as possible. The only place I can see would be on the mast hole cover, just aft of the mast with one port and one starboard. Not too terribly excited about that location but I think its better than the thwart aft of the mast as I think that location would/could interfere with the boom sail (spanker) and I believe the jib/mast lashing thwart will be busy enough. Here is a top view to help you see what I’m talking about. BTW, the white card is my guide for spacing my dead eyes. Any thoughts, suggestions, instructions or great pieces of wisdom are readily accepted and greatly appreciated. If I’m making a major error I sure would like to know now than after I’ve drilled holes and applied CA.

- 129 replies
-
- 3
-

-
- Bounty Jolly Boat
- Artesania Latina
- (and 1 more)
-
Good start on the planking. Starting with the 3rd plank, I would suggest you really look at how much you've faired frame #9, per your chart. The reason I say this is because the first couple planks don't touch #9 and getting a nice transition and good contact with the keel upright from frame #8 is pretty easy. I had a very difficult time getting a smooth transition from #8 thru #9 to get sufficient contact with the keel upright until I got to the transom. I was only catching the very end. And really didn't see the high spot, hard transition and lack of surface contact for a few planks. On my second planking go-around I faired #9 to the point I was afraid I'd gone too far, though things smoothed out considerably and was able to get a better purchase on the keel upright. Another thing, if you plan on staining the hull, be sure the wood filler you get is stainable. I didn't and wished I had, check out my build log to see my problems. Since then I've learned that Elmer's makes an interior water based filler for light colored wood and another for dark colored wood that is stainable. Haven't tried it but plan on using it on my future builds.
- 62 replies
-
- 1
-
-
- Bounty Jolly Boat
- Artesania Latina
- (and 1 more)
-
Roger and Allan, thank you very much for the education. Very easy to see the consistency in teminology, once you get it explained in a straight forward manner. Greatly appreciated.
-
Henry, thank you for the information. My AL Jolly Boat does not make any accomidations for what you have described nor do I have the materials or desire to go to that extent in creating them. The instructions just show a single stay seized just ahead of the bowsprit support and the plans show the other stay seized near the bowsprit tip. Knowing this is a ficticious boat, I was just wanting to kinda' split the difference by adding some historical accuracy to some of the features which I know to be incorrect (the boom tackle situation, per the instructions, being one of them). Thanks again for your input, it is greatly appreciated, and will be remembered for my future builds.
-
Tom, yes to your question, "seized twice" meaning once at the deadeye and again farther up the shroud. Sorry I wasn't clear and using the incorrect terminology in my question. BTW, this is regarding my Jolly Boat build. Let me try again, would the bowsprit stays, without deadeyes, be seized once at the bowsprit or once at the bowsprit and a second time farther up?
-
I'm aware that the top deadeyes get seized twice. Does that also go for the bowsprit shroud, or they only seized once? Thank you in advance for your reply.
-
Glomar, looking much better. Your patience is paying off. I've read that nipper pliers can be used to coax those nails out when they are in as far as yours are. Remember that practiclly any oops can be fixed, so take your time. Gouges can be filled and sanded to that you never knew they were there, especially if you've got a second planking.
-
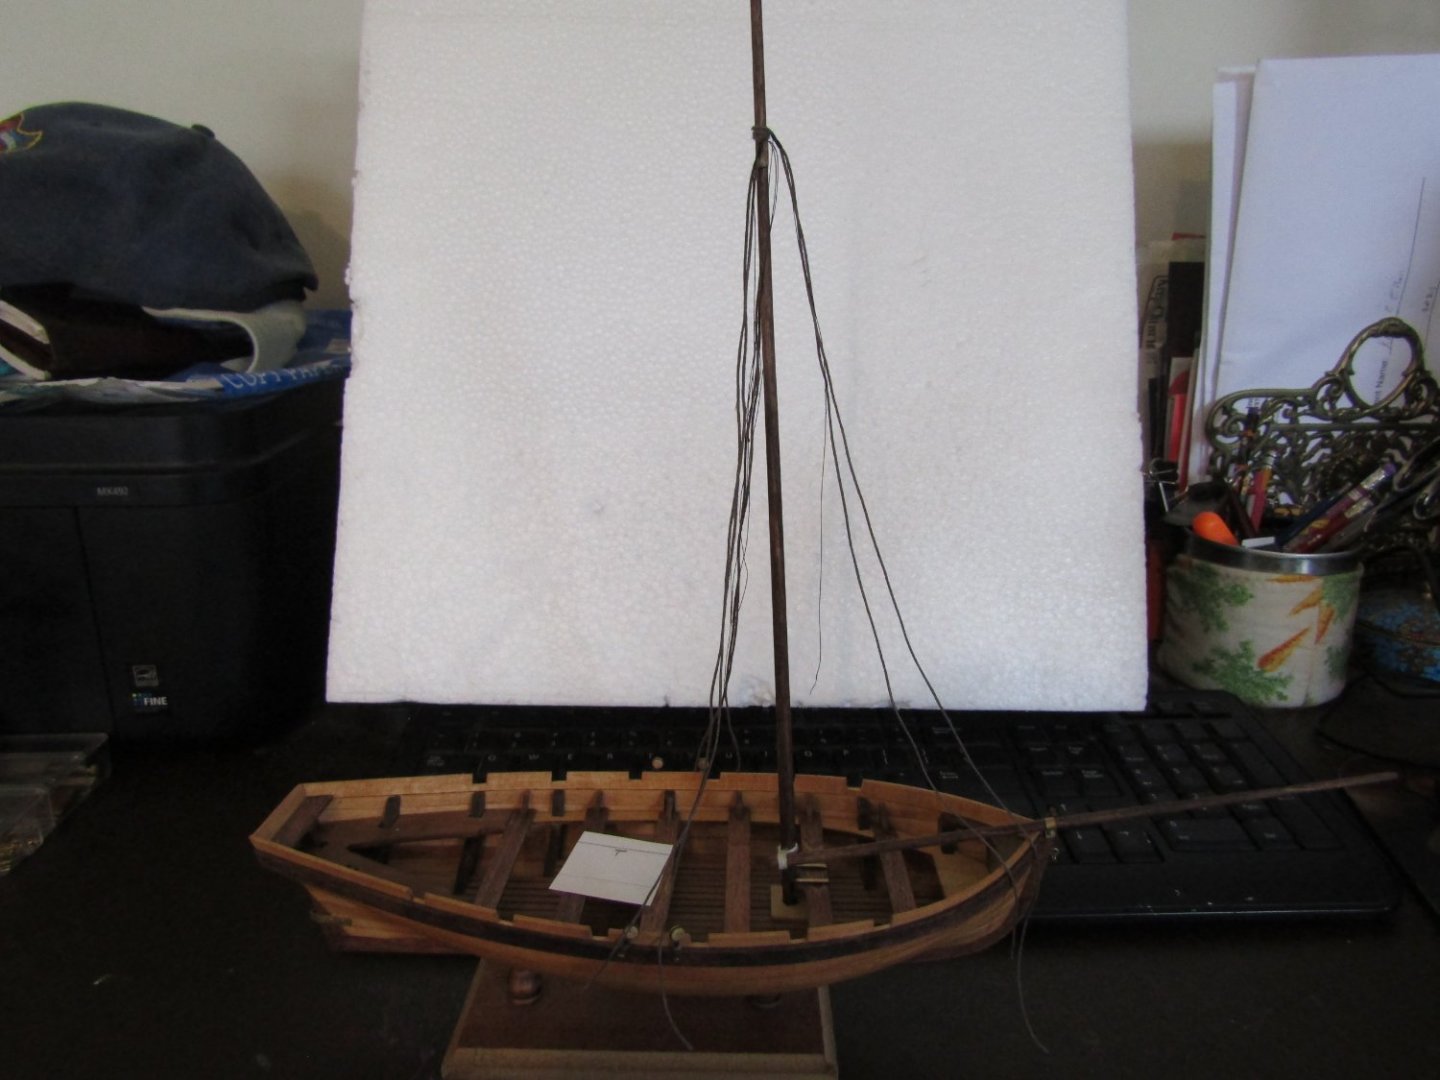
Yeah, I'm starting to realize the end isn''t too far down the road. One thing I've found is it is becoming more difficult to safely handle the boat. I don't have any type of keel clamp (as if my keel isn't compromised enough) nor do I have any type of resting/nesting outfit to set my boat into. I've seen setups from other modelers using cushion foam or pool noodles. Suppose I might need to look into something like that for my next build. I haven't affixed the boat to the stand and anytime I put any pressure bow or stern it lifts out of the pedistal at the opposite end. And then there is that whole mast and bowsprit sticking out which I'm not accustomed to. I'm so scared I'm going to bump into them and tip everything over causeing damage or breaking them. Only thing I can figure is to take a larger towel and roll it up such I can nestle the hull and keep the boat as secure/steady as possible. Another thing I've discovered is that the 0.15mm (the off-white) line for running rigging can't take too much abuse. I had to make two attempts at the bowsprit lashing and on the second attempt I must have nicked a section or pulled just a bit too hard as it just pulled apart. A small waste of line (which scares me, so afraid of running out of both types of line) but learned I need to be a bit more gentle and probably more decisive in what I'm doing. Don't think the line can take too many Mulligan's.
-
Standing Rigging, port or starboard first?
Peanut6 replied to Peanut6's topic in Masting, rigging and sails
Thank you Henry, I greatly appreciate it. I've come to the conclusion that every little thing that can be named on a ship/boat is there for a very specific purpose. And has been honed/perfected over many centuries. I agree that I don't see any advantage as to which goes first but somebody somewhere sometime determined it's best for starboard to be first. Thanks again, I greatly appreciate it. -
I've finally got to the standing rigging on my AL Jolly Boat. I've come to doubt the historical accuracy in some steps of the instructions. We all know this kit is of a ficticious boat or a "rough representation" at best. But showing the boom tackle located where they do just isn't right. But I digress, back to my question. I can't believe that the picture shown of the shrouds at the cheeks of the mast to be correct. I plan on seizing a loop in the shrouds around the mast for the port sided, the starboard side and those for the bowsprit. I believe the shrouds for the bowsprit would be on top, but does it make a difference if the first set go to port or to starboard?
-
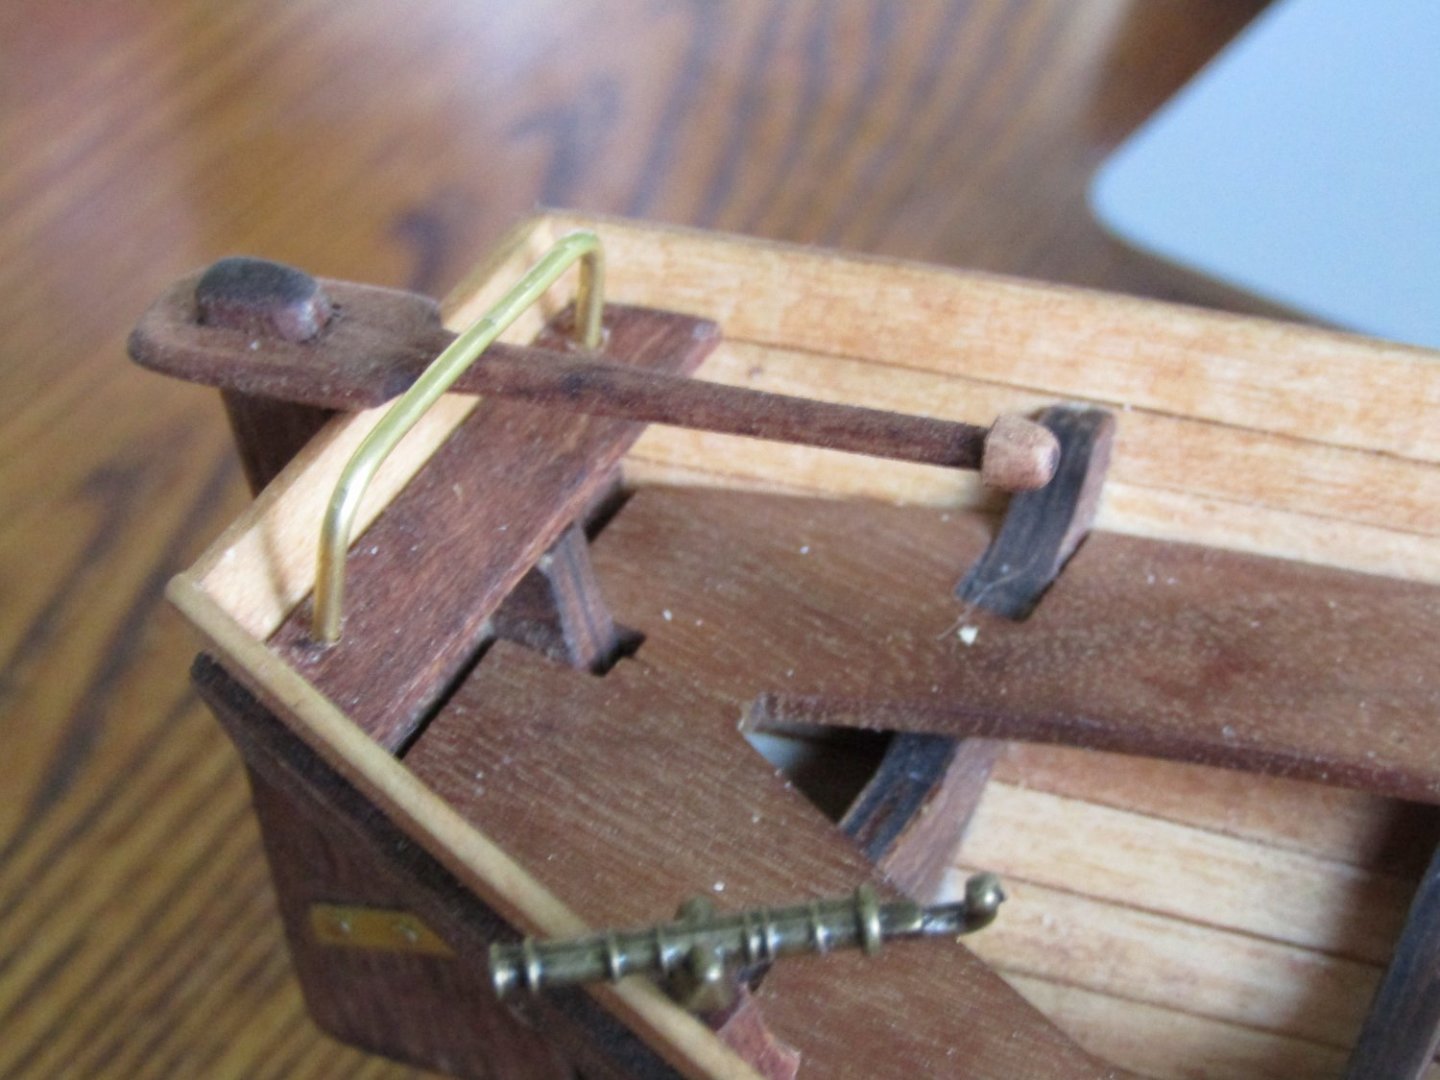
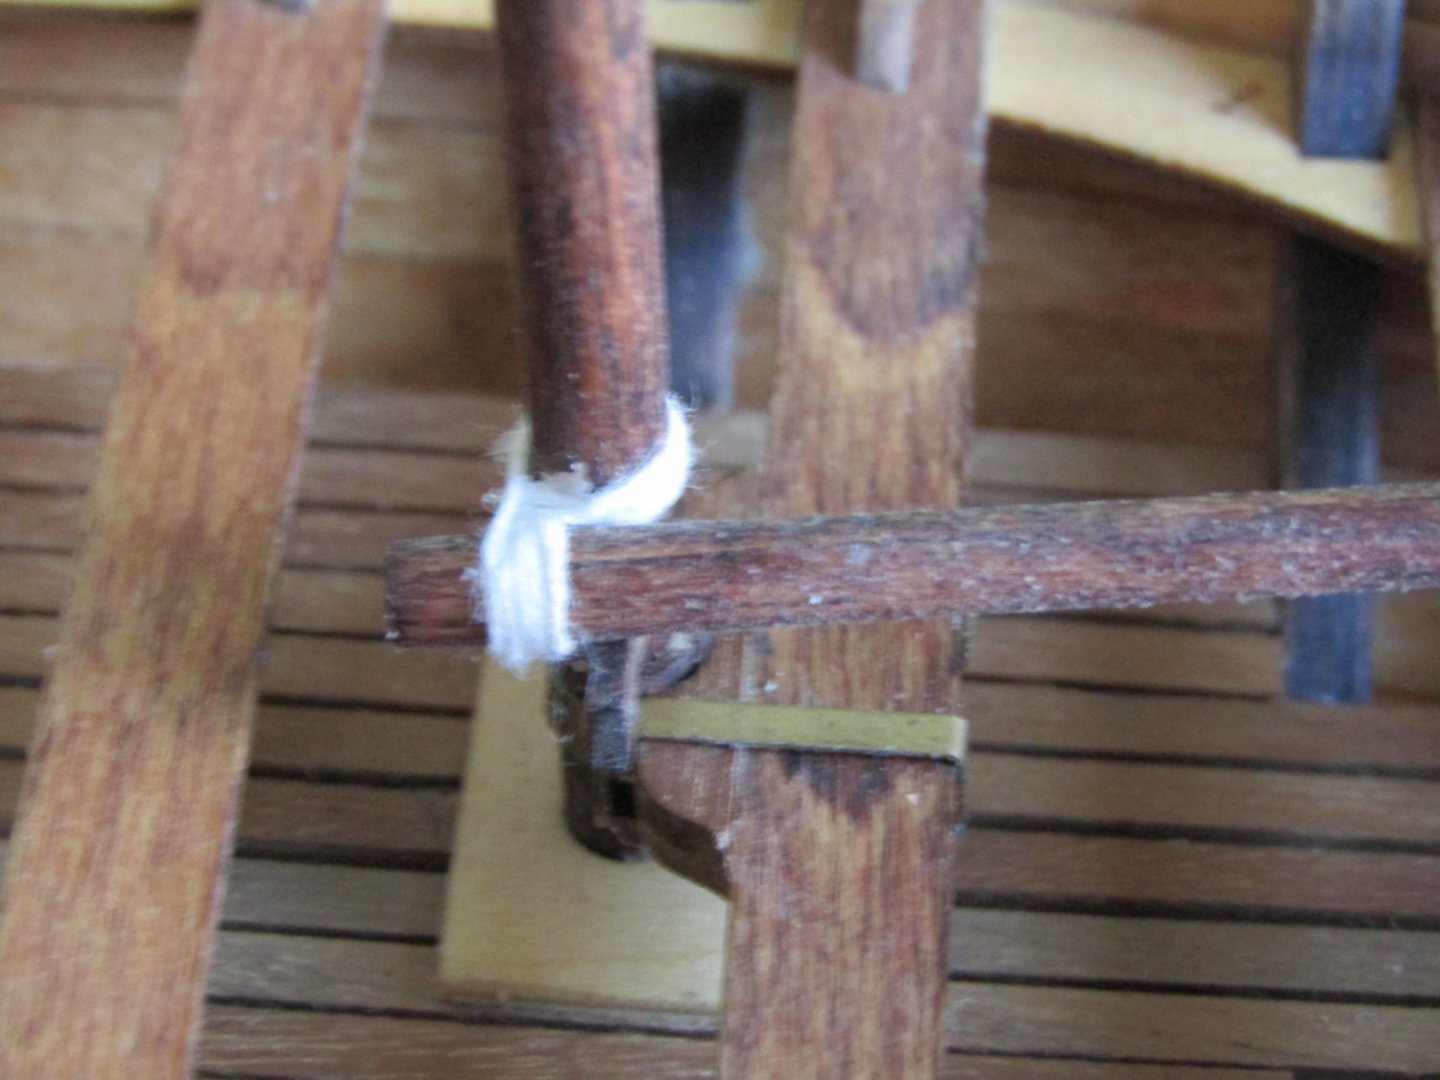
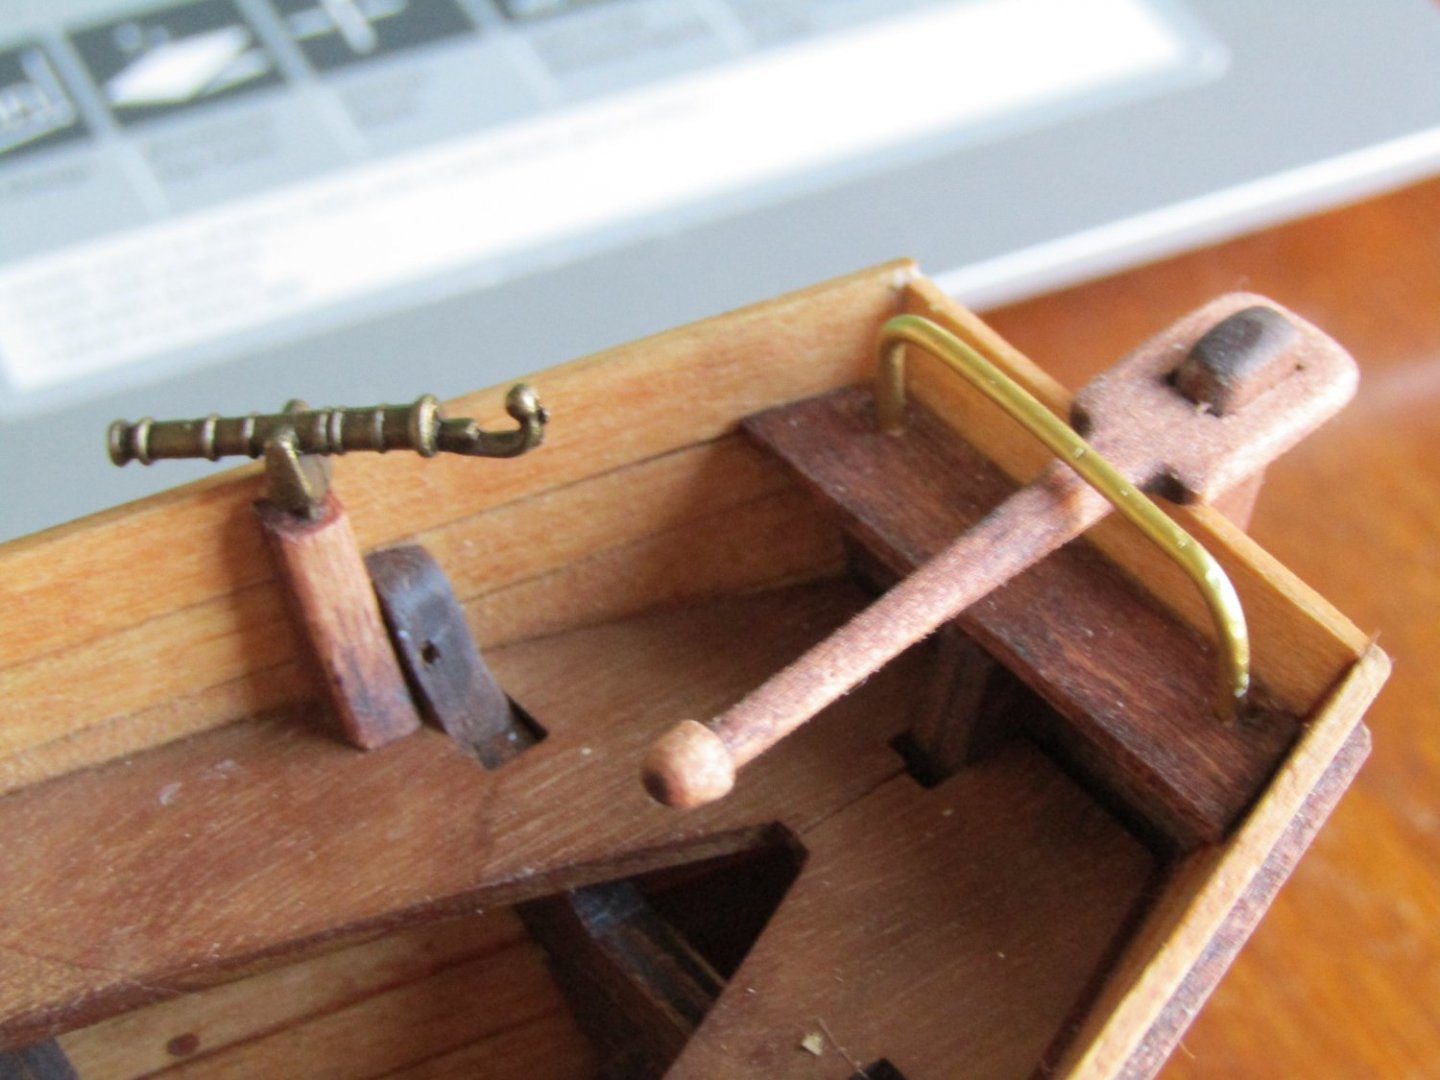
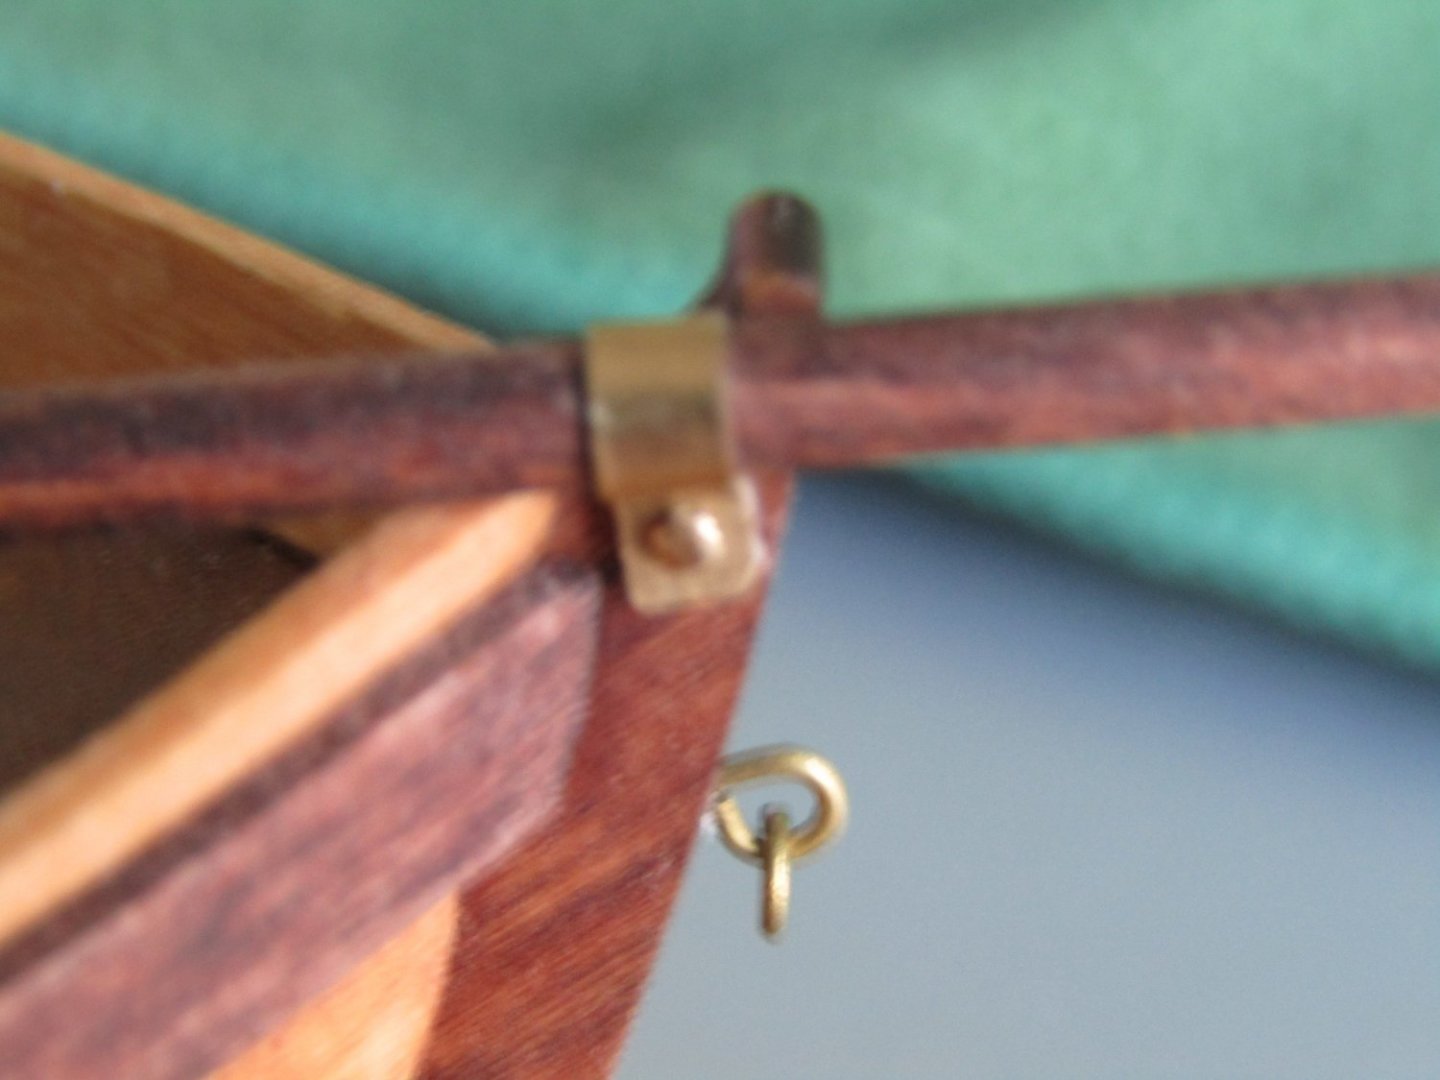
Once again I apologize about the quality of the pictures. This is my youngest daughters camera and I showed her the inconsistency of the photos I was getting and asked her why. It was at that point I learned why she was so readily offering its use. She told me she had the exact same problems and that is why she replaced it, “it’s just to flakey” she said. We now have a horse, a light swivel gun, a mast and a bowsprit in place. The horse is just dry fit for now as I still need to do the boom rigging. I was able to get the holes plugged and touched up from my first horse installation attempt. Bent the horse and transferred the leg locations with no problems. I’m a bit disturbed with the look of the horse. I got a couple dips/doodles in the rod when I “straightened” out one of the initial bends and then rebent it. Realized that I was making the situation worse by trying to make it look better and just stopped. I’ve decided that during the course of the boats life it took a knock or three along the way (that’s my story and I’m sticking to it). Next up is the bowsprit support. I was able to rework what I started. I straightened everything except the tab. I clamped it down on my 6” straight edge such that I could bend it over and round the bowsprit. Then it was just a bit tweeking to get right. Still just a little bit of spring to it but much better than before. Applied some CA to the flats to close the loop. I held my breath when I unclamped it, it was holding. Another deep breath as I inserted the bowsprit to the correct location, fully expecting it to pop open. Still holding. Spent the next forever finger drilling the hole thru the tabs. The way my luck has run with this build I fully expected to CA to give way just I finally got the hole finished. Nope, held tough. Could it possibly be that I’ve got all the “bad luck oopses” out of this build? Got the hole location transferred, drilled and bowsprit support nailed into place (reinforced with CA) complete with the bowsprit located as it should be. And lastly I just had to lash the bowsprit end to the mast. The photo in the instructions of this step really looked messy and slipshod at best. I wanted to create something much neater. IMHO, I believe I accomplished this, at least to my liking. I wound up doing a figure “8” around the mast/bowsprit junction. I suppose I was basically seizing the two together. The starting end got covered with each lap around. I prethreaded a sewing needle prior to starting figuring it would be the best way not to waste any line. When I completed the last lap I was able to slide the needle down the bowsprit, under the lashing pulling back unnecessary line back thru the needle eye to minimize wasted line when I cut it free. l Pulled things tight as I snugged things up. Trimmed the loose ends and added a tough of CA to hold things together. On to the standing rigging. Think I have a plan on getting the chainplate deadeyes at the correct angle and shroud deadeye locations even. I had asked about the shroud twist at the cheeks of the mast as shown in the instructions but didn’t get a response/reply so I’ve decided to seize a loop up top which I’m thinking might complicate things a bit. As usual, I'll overthink this to death until I build up enough courage to just go for it.


- 129 replies
-
- 3
-
-
- Bounty Jolly Boat
- Artesania Latina
- (and 1 more)
-
Welcome aboard. I strongly suggest a build log, even it's a "well this is where I'm at now". No better way to share your work and it does make it easier for those to help you, if you do ever need help. Your hiatus was a little bit longer than mine. But I'm back it and I believe I see the end coming on this build. I was lucky and still had all the dialog and photos that were lost during "The Great Crash" so I was able to recreate my build log.
-
Gary, what you've created is crazy cool. If one didn't know better they would think you could just climb in and row to where the fish are, just perfect all the way around. Regarding the seats: I would bet they are/were surprisingly comfortable. If you think about it, a hunting/fishing guide wants their clients to be as comfortable as possible during the outing. If the boat designers added a lip to the thwarts so greenhorns don't drop/loose their tackle, you can bet the seating would be as sturdy/practicle and comfortable as possible. You can bet a guide doesn't want to lose repeat clients because they suffered a two day case of TB from sitting on an uncomfortable seat all day.
-
Welcome aboard. You've found a very supportive community of modelers who enjoy sharing their work and helping others to learn the art of wooden model ship building. From the look of your work, I believe you'll be the one giving advice. Look forward to seeing a build log of the ship in progress.
-
Gregory I agree with you, all costs of doing business must be factured into the end item delivery total. And sole source providers hold the key to the city. My issue comes with the practice of shipping and handling fees based upon item price and how that can be applied to a multiple item purchase. Maybe this example might clarify my point. Let's say you want to purchase 2 items from Company "X". Company "X" charges a $10 shipping and handling for items up to $30. The total purchase price of the 2 items you want is $25. You would think, and common sense would dictate, that your total price would be $10 (shipping and handling fee) + $25 (total cost of items) = $35. But no, the total price is $45, because Company "X" wants every penny they can squeeze out of you, $10 (shipping and handling fee for item 1) + $10 (shipping and handling fee for item 2) + $25 (total cost of items) = $45. Now comes the funny part, when the items are delivered what do you get? Two separate packages or both items in a single package. Our household has experienced both endings and we no longer do business with those companies.
-
I've experienced this also. I've come to believe that this a way for them to make up for "such a great deal" they are offering their customers. And remember, the vendor is still making money on every item no matter what the price is.
-
I can attest that isopropyl alcohol is better than water on water soluble PVA. Water causes the wood to swell and can raise the grain (which can cause additional work to get the wood right again) where isopropyl alcohol does not. I was halfway thru planking my Jolly Boat and was dissatisified with the result. I used isopropyl alcohol and removed all the planking so I could start over and it didn't affect my frames in the slightest. I would follow Craigie65's input closely since he has built this kit. Looks like everything is salvageable, so I would have to agree with the others and suggest you remove what you have and start again. I believe it will cure a couple of issues. You can do some additional fairing to take care of the high spots you noticed, be sure to use a long plank over many hulkheads from stem to the appropriate point stern and the full length of the bulkheads. You will be able to properly position the bulwarks, trying to fix what you have by trimming probably will cause more problems elsewhere. The gaps between planks can be addressed with tapering and edge bending, as mentioned earlier, and don't forget the bevel. There are many tutorials on these subjects in the planking section. They take a few tries to get the results you're after but the time and effort spent on the first planking more than pays for itself on the second planking. Don't dispair, we've all been there and sympathize with what you're feeling. Take your time and enjoy the voyage.
-
Very nice bench and paint booth, both look quite sturdy and serviceable. I'm glad my build log is of help to you and hopefully to others. That was the primary goal and just sharing my experience. I try to go back and add warnings/cautions/suggestions/be-carefulls/etc. at the appropriate place(s) when I discover an error I've made after the fact. I haven't used any paint on my Jolly Boat. Everything is stained or just the natural wood. If you do decide to use stain, please please please use a water based stain. Not knowing any better at the time, I used an oil based stain and it posed big problems for me later in my builld. The oil based stain creates a barrier so the PVA cannot reach into the wood thus the bond is not nearly as strong (my keel pieces and transom post kept falling off). I would also suggest using isopropyl alcohol instead of water to debond PVA. Water will cause the wood to swell and raise the grain which may create extra work for you, where isopropyl alcohol does not. I found a sanding block work well on installing the bow rail as I was able to create a single plane across the multiple surfaces. Take your time, have fun and most importantly don't hesitate to ask any questions you may have.
- 62 replies
-
- 1
-
-
- Bounty Jolly Boat
- Artesania Latina
- (and 1 more)