HOLIDAY DONATION DRIVE - SUPPORT MSW - DO YOUR PART TO KEEP THIS GREAT FORUM GOING! (89 donations so far out of 49,000 members - C'mon guys!)
×


GDM67
-
Posts
103 -
Joined
-
Last visited
Content Type
Profiles
Forums
Gallery
Events
Everything posted by GDM67
-
Hi Greg, This is good advice. Although, I am in Southern California where the humidity is relatively low and constant. Now that I said that, look out! On another note, I was rereading and reviewing your work on Pegasus in TFFM Vol III last night. Beautifully done. G
-
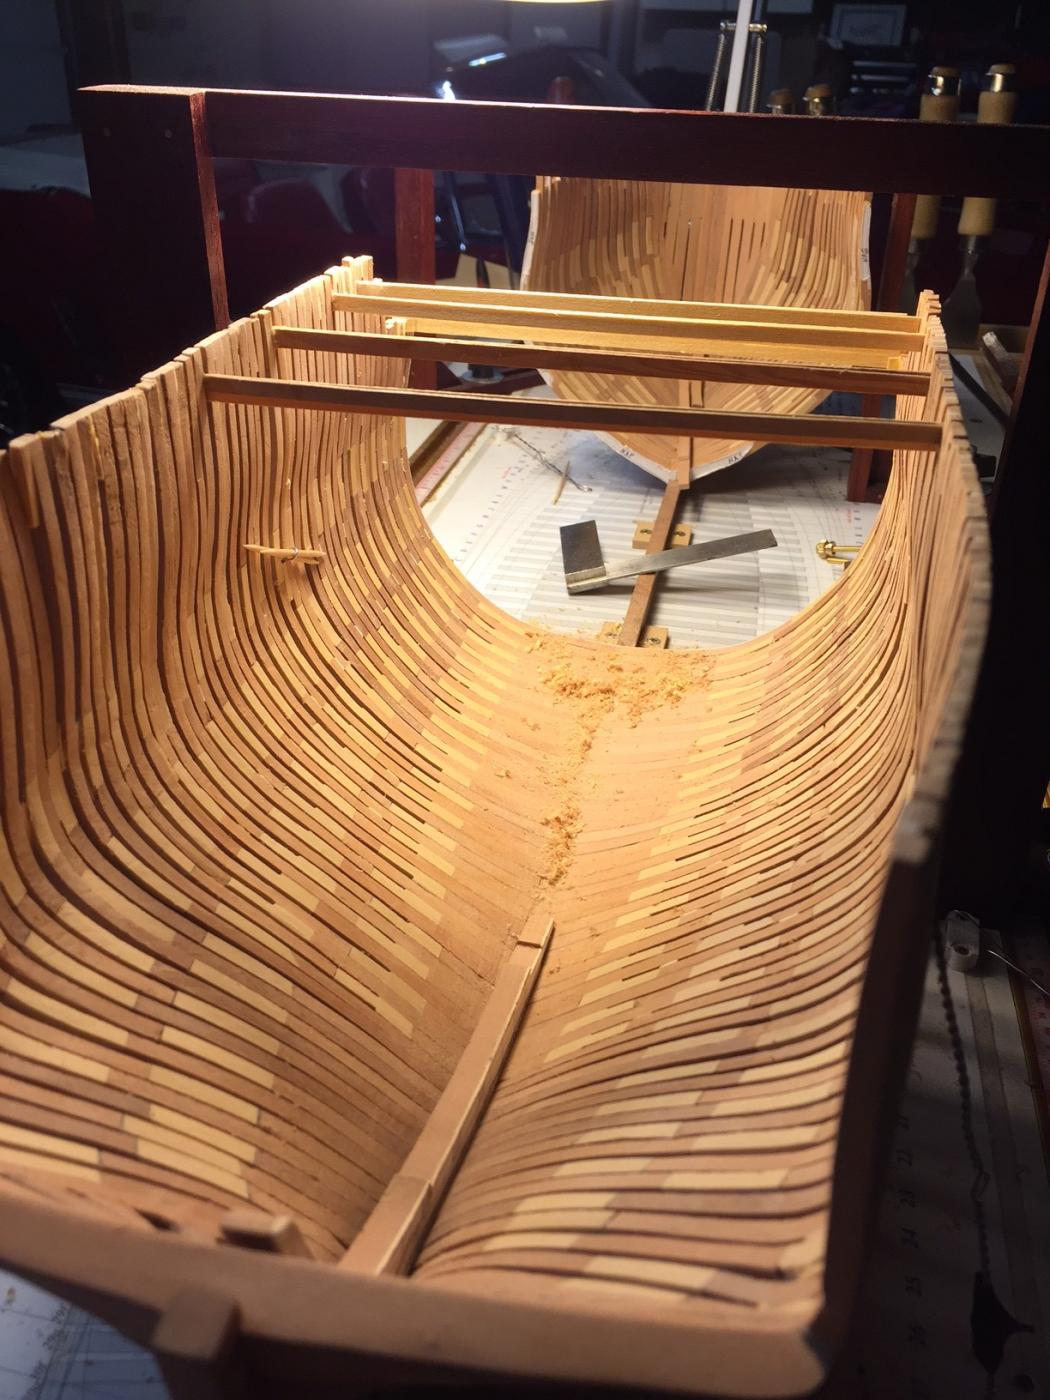
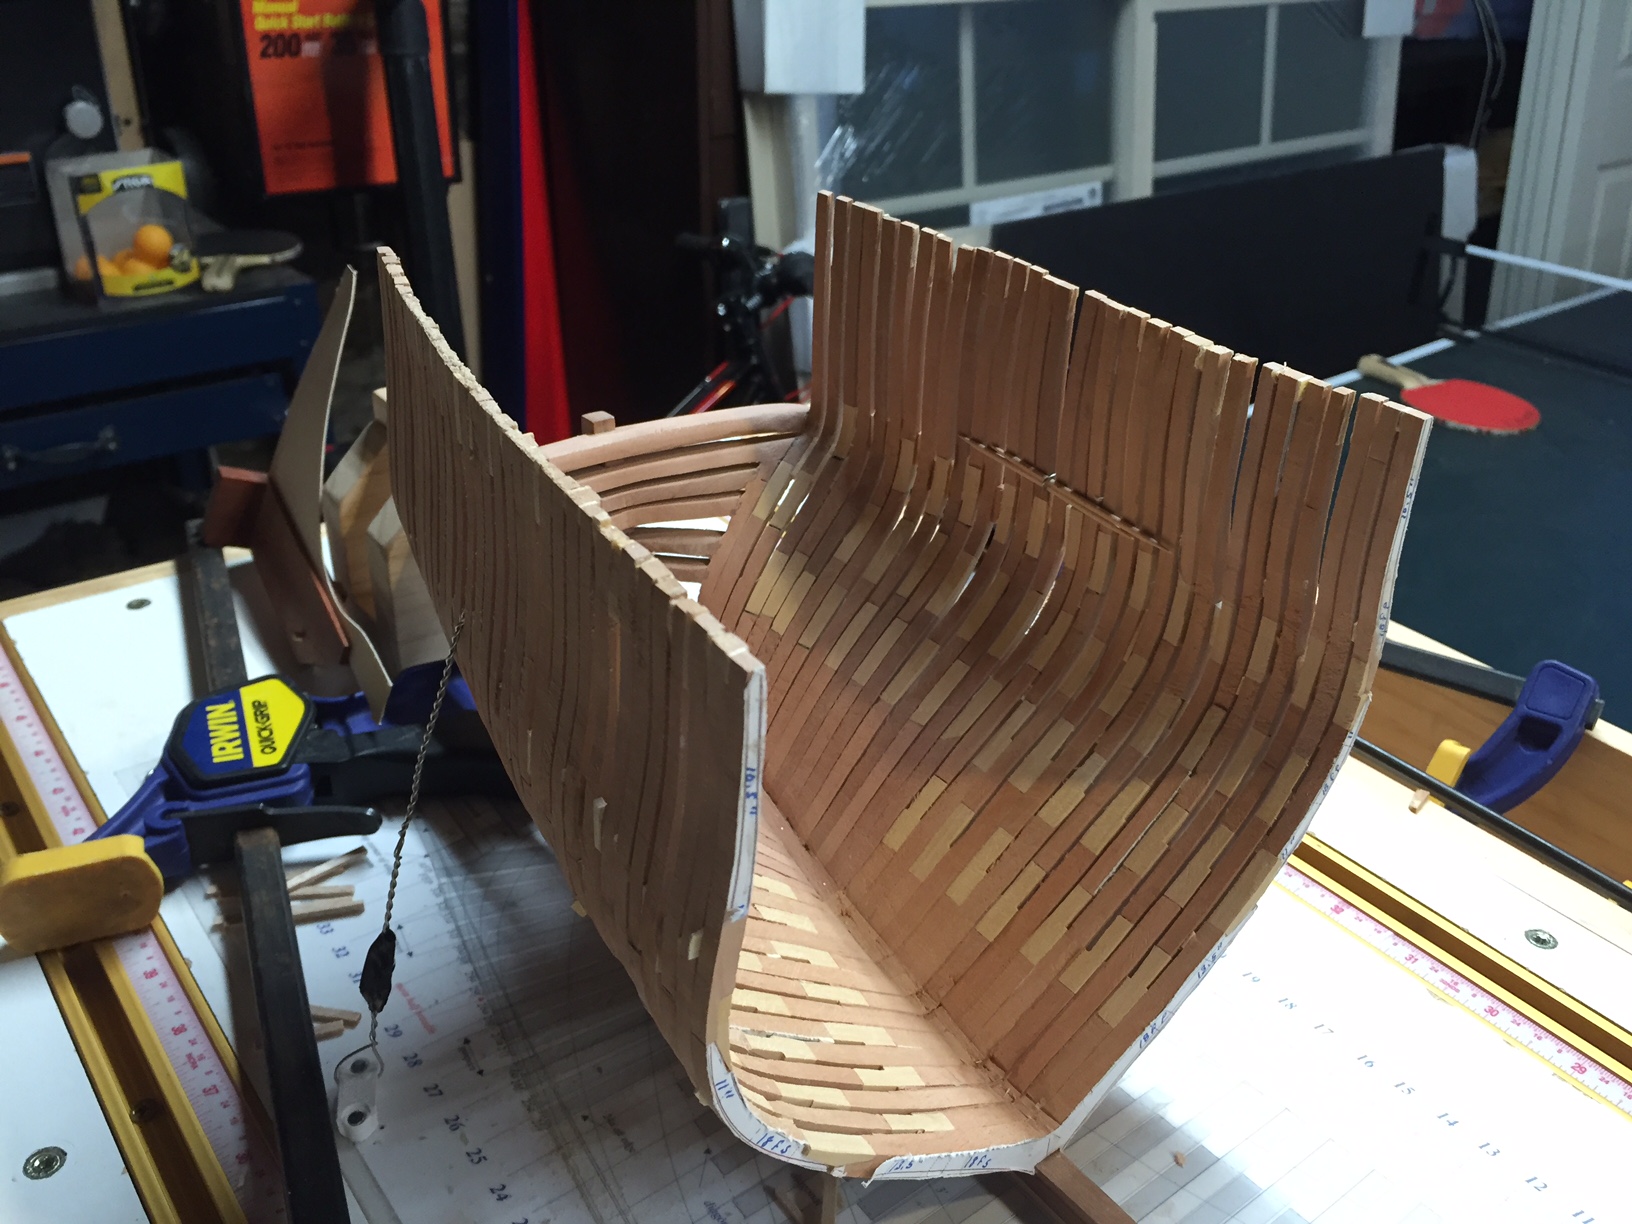
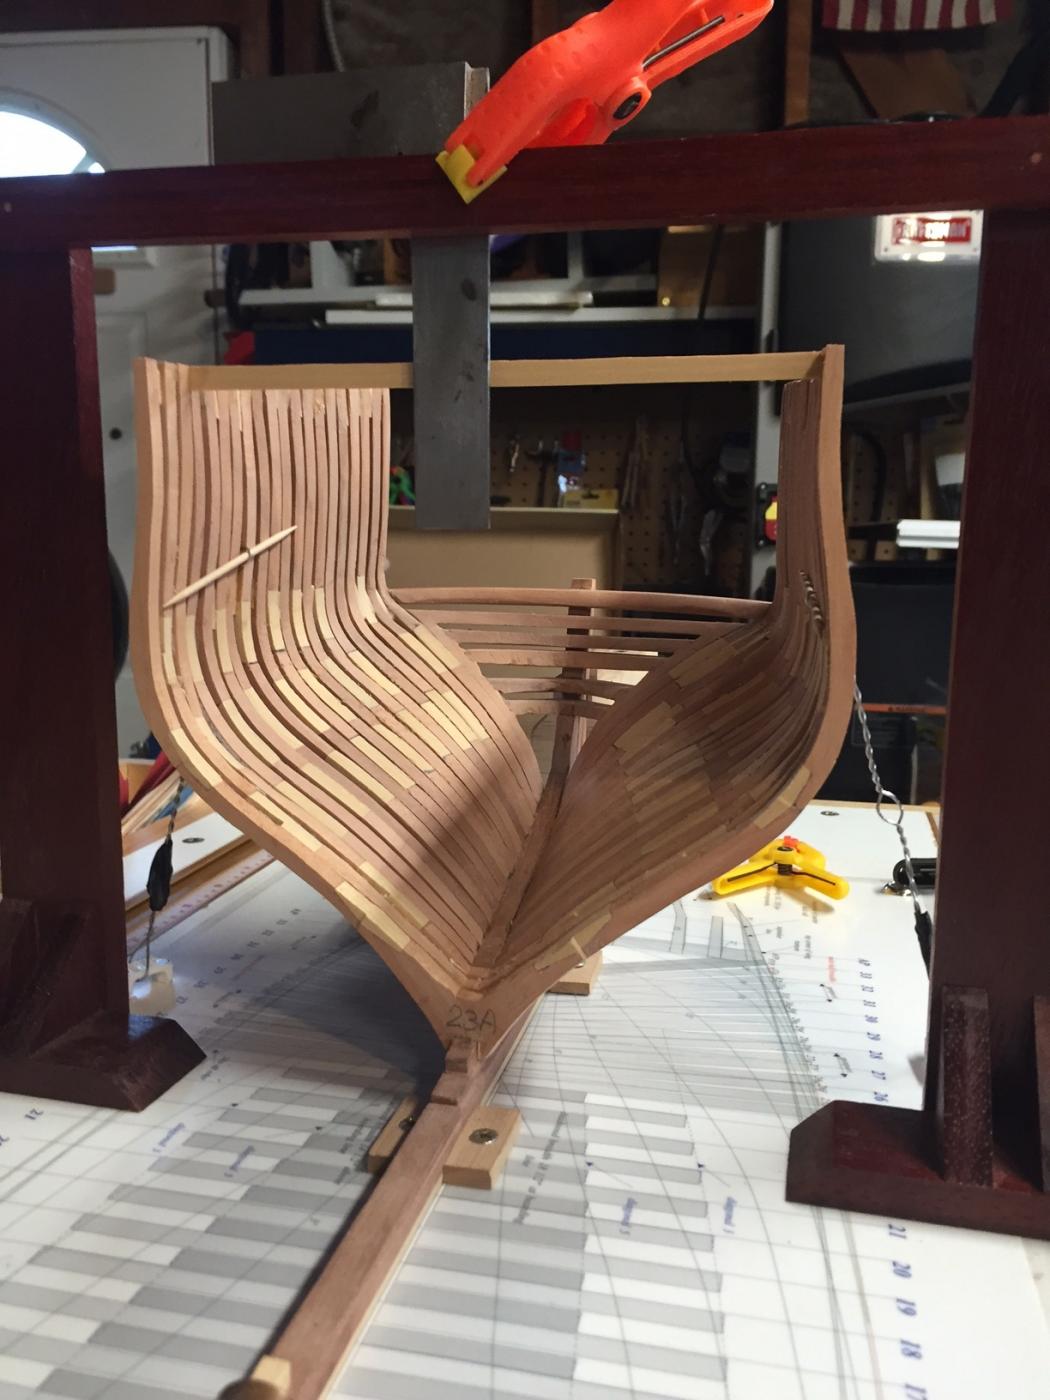
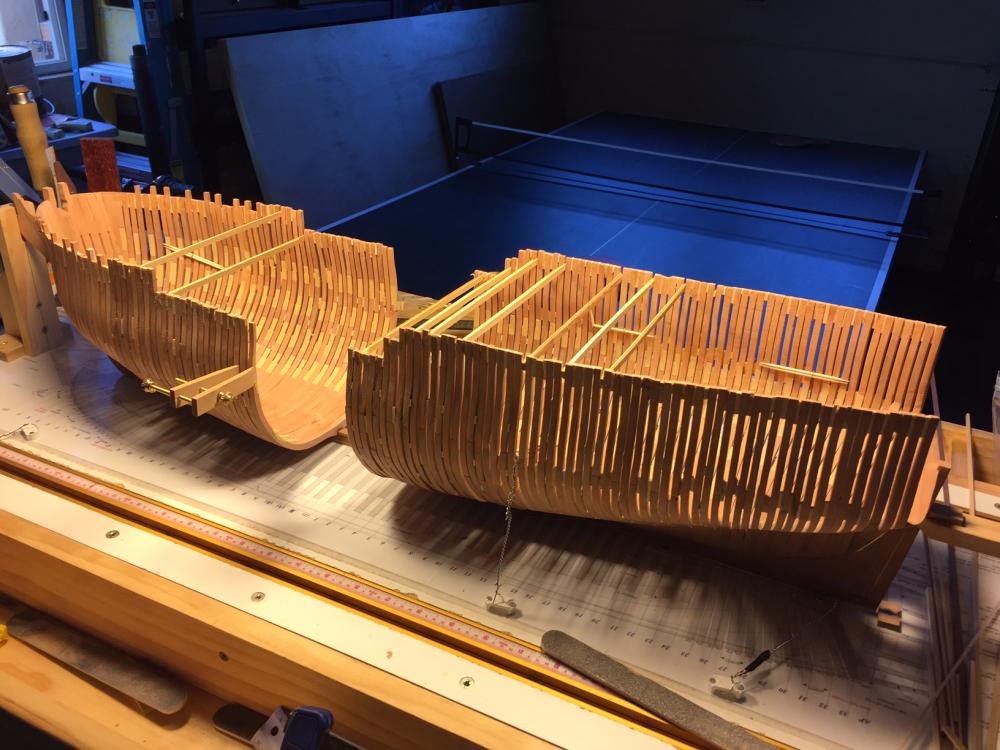
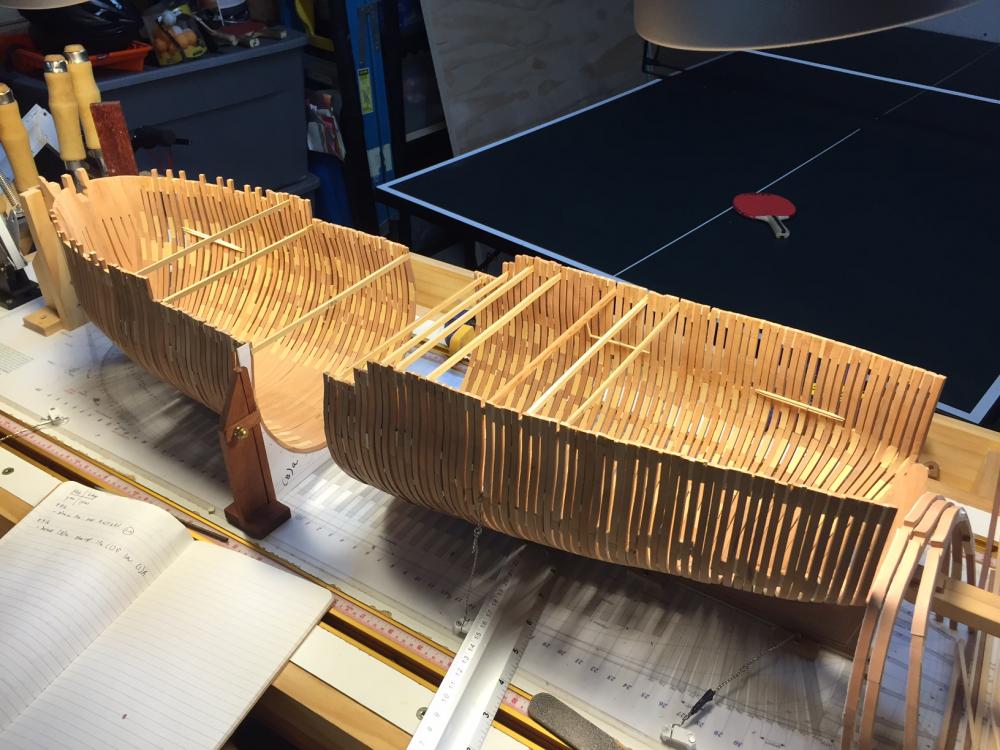
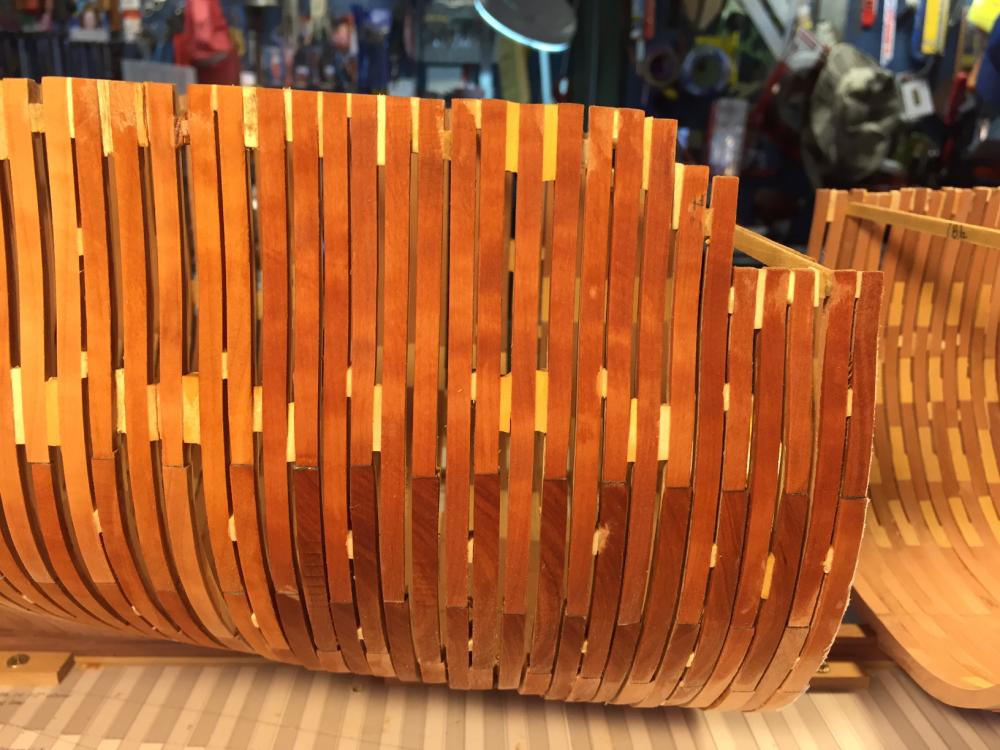
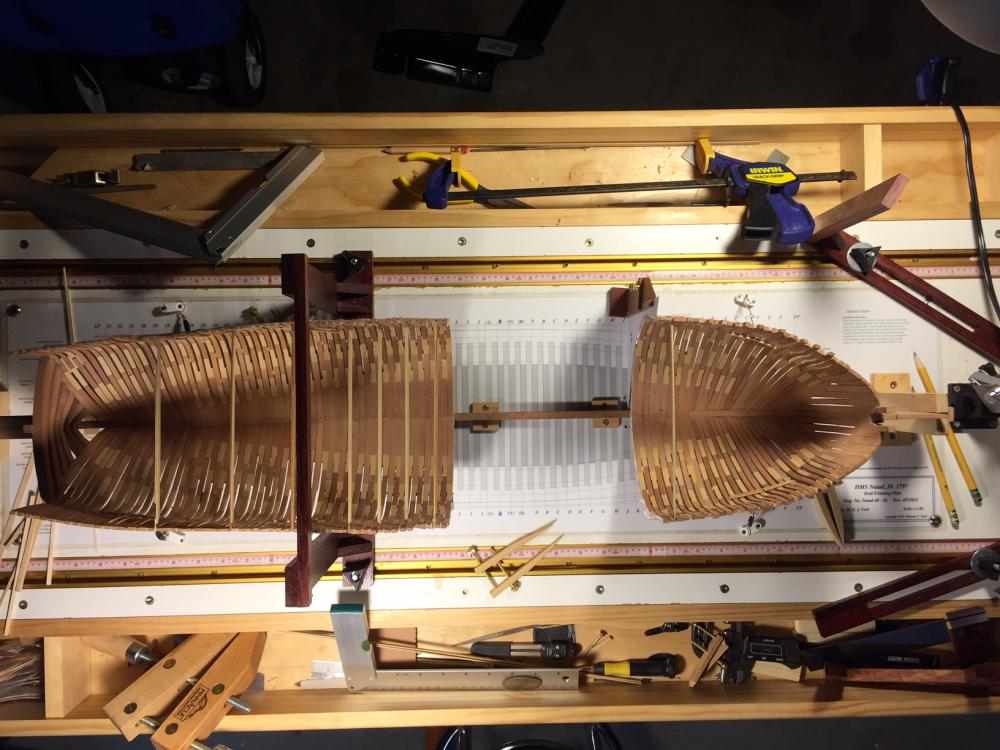
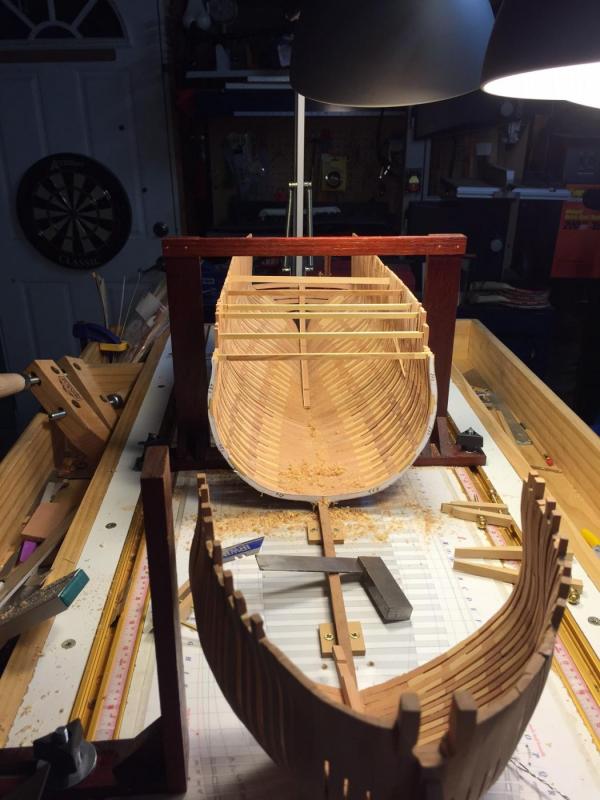
367 Hours into the voyage... I am so close to nearing the completion of the framing, that I found myself rushing! I really had to step back and pace myself. I had hoped to finish the framing last night, but decided to just take it easy, fine tune and be patient. Patience has never been a strong point for me. I have just four frames to go. They are built, all I need to do is fine tune them and install. You will note the use of wood blocks and window/door shims. These are used to tightly fay the floors together. I should have employed their use sooner, as outlined in Ed's book. Overall, I am still exceedingly happy with the results. Its interesting to look at the my earlier framing and observe how heavy handed I was with a file. Building 161 frames over seven months gives you the opportunity to refine your touch. The first photo shows the rough framing wetted. I am looking forward to what it will look like finished (years from now...). I estimate that this build will take anywhere from 1500-2000 hours to complete. Since my primary interest in ship building is structural, I will do very minimal planking. Please excuse the out of order photos. In addition, I am no longer able to add narratives below each photo. I think it has something to do with my computer.


-
Thank you, All. Its really neat to be communicating with people from all over the globe in just seconds! Hi Ed, I recall from your book that you prefer the one frame at a time method to ensure quality. For me, I found that the assembly line process is faster and produces better results. That being said, it does get monotonous . I started building 4-6 frames at a time. That seems to be my threshold for the assembly line. Although, I did stand at the jig saw for many an hour cutting all those futtocks. Best, G
-
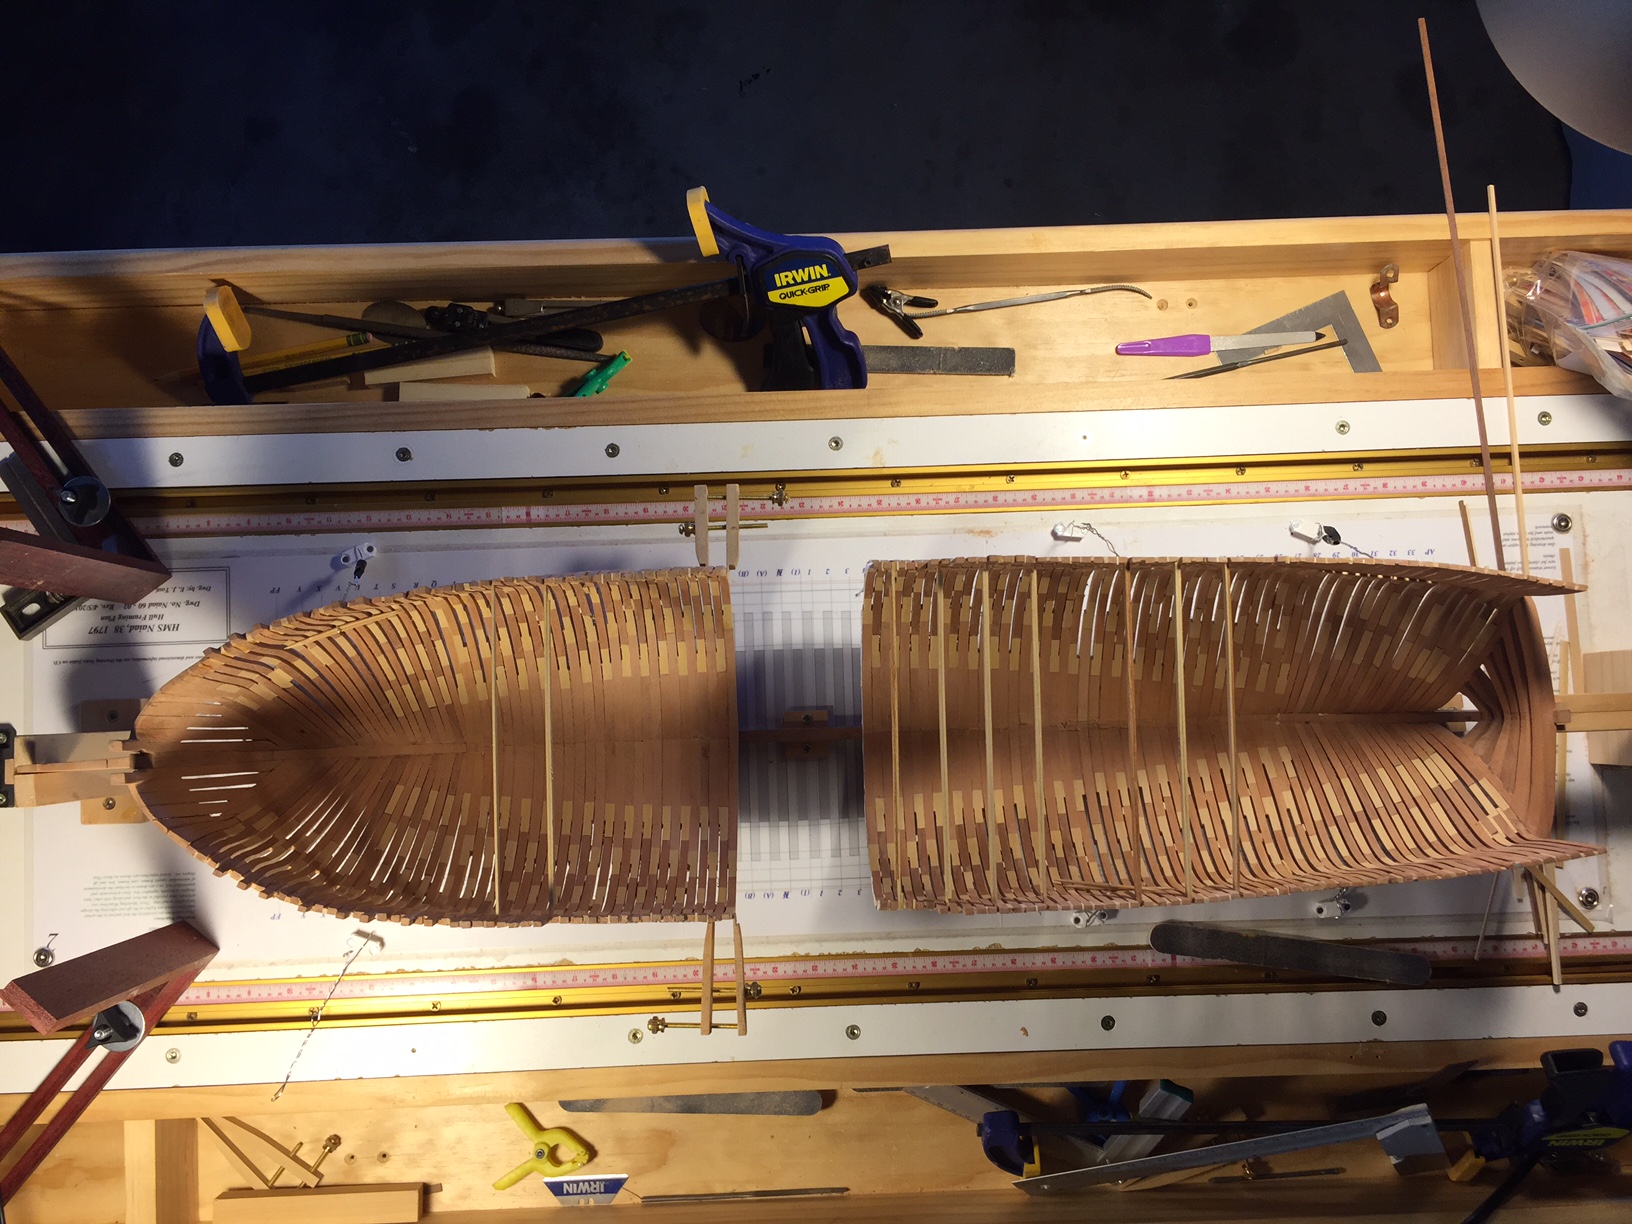
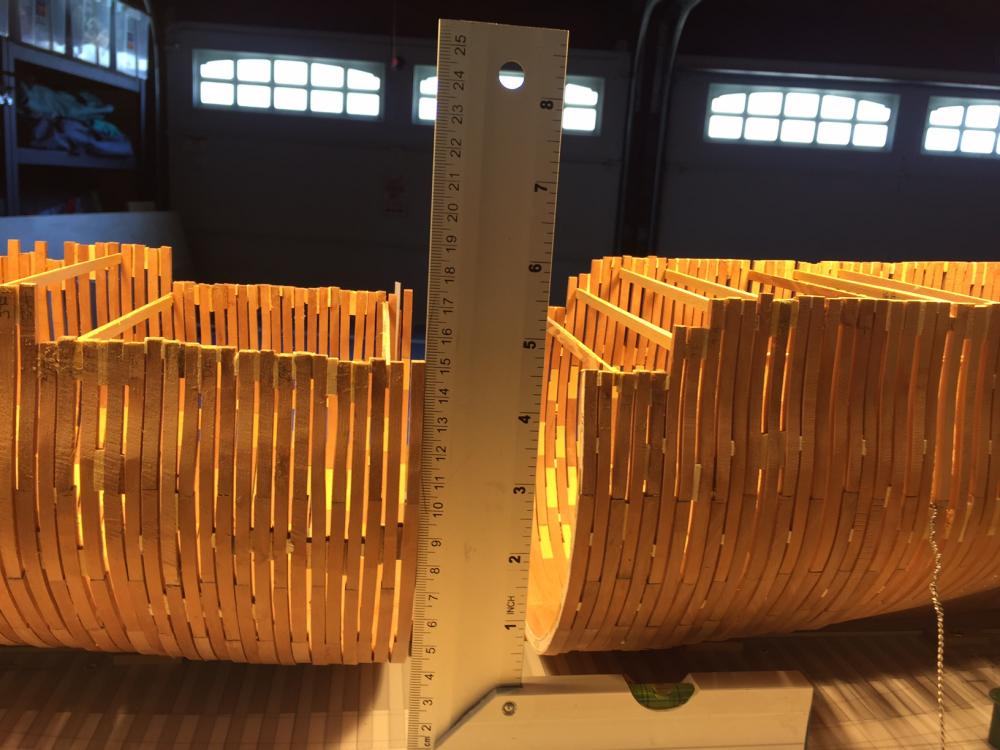
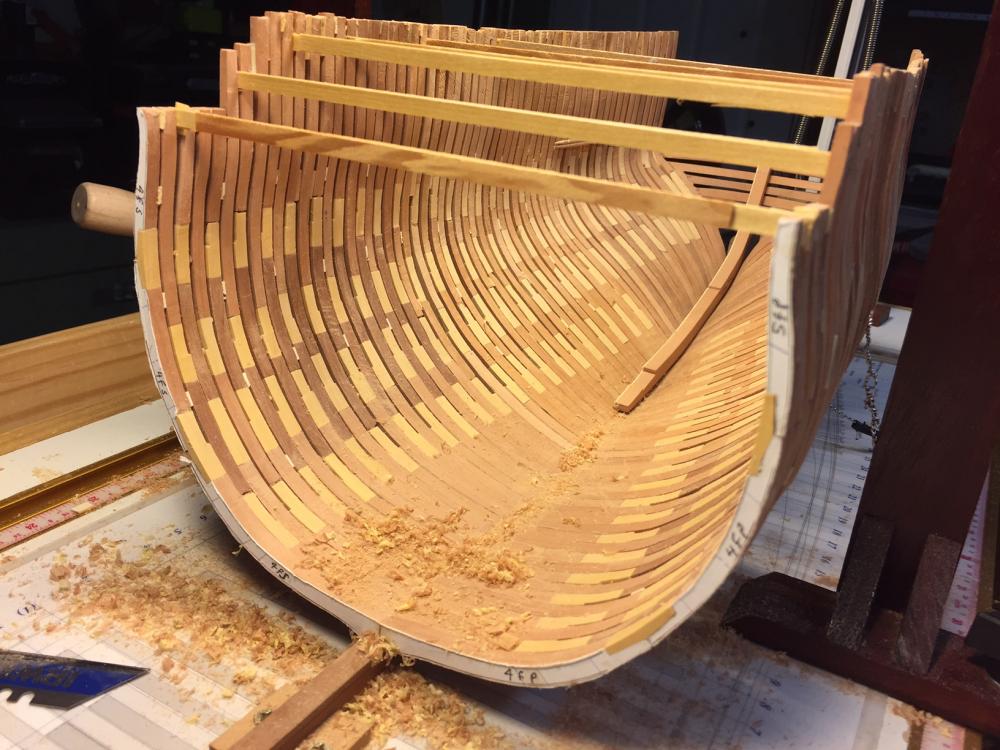
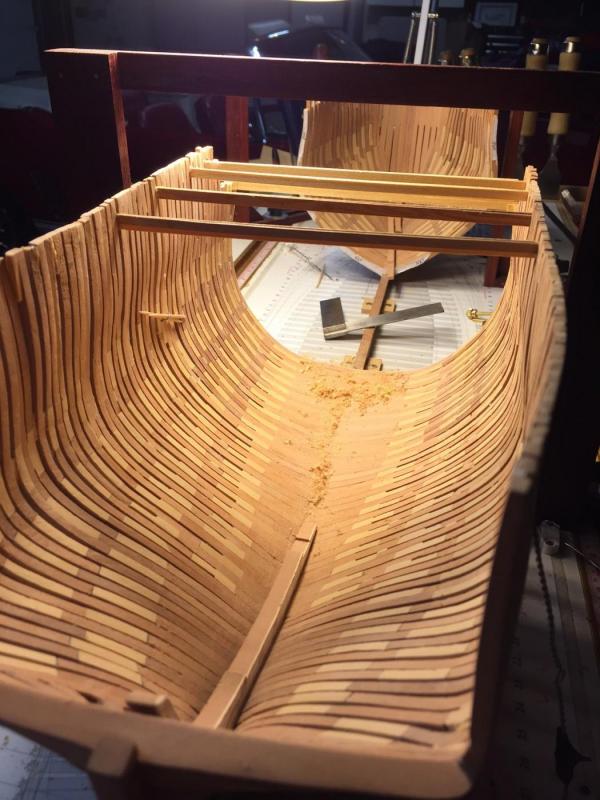
347 hours into the journey with just 13 frames to go. While I have enjoyed the framing portion of this build, I am looking forward to a change of pace. Shown here are how things look to this point. Note the template continues to be on target. One challenge that I have continuously had with this build is the sided dimensions of the frames. The glue joints over time have added to this overall dimension. While only a few hundredths per frame, that can really add up when you do 90 of them. On my final 9 frames, I need to claim back 1/8th of an inch. This may not sound like much, but its critical to keep everything within spec. Otherwise, the gun ports and other openings will be off. After the final timbers are placed, I will be adding a few more cross spallings before removing the ship from the board. I will then spend considerable time fairing the overall hull. I will then sit on the front porch where it is shaded, but bright and go over each frame - futtock by futtock, chock by chock to get them smooth and well aligned. After that, I will place the chock bolts, etc. Best, G


-
Druxey, I'm thinking the next ship will be a Swan Class. You might be familiar... Thanks, G
-
Hi All, 327 hours into the Naiad build. I averaged 1.9 hours per day at 22 days in July, slightly lower than previous months, but I had a list of chores from the Admiral that had to get done first. Although, I did put a large window in my garage for the natural light when building. Things are sailing along smoothly as I approach the last twenty or so frames. All at a time when I am just getting the hang of making these things... The templates are matching up well. Best, G


-
I am having trouble uploading today, so this weeks work will come in several installments... I am also having difficulty doing a narrative under each photo, I am now all the way thru frame 4 as shown in the first photo. The Keelson Knee is just shown fitted in place for now. The third photo highlights frames 4 and 5. Note the notching of the chock on frame 4 that still needs to take place. I forgot to do this at the bench... The top timber of frame 5 has a significant slant. While this may look like an error, its actually to spec. The slant allows room for a sweep port to be inserted. There are many intentional irregularities with this ship that are historically accurate. This is significant departure for me since I have built stylized models in the past that appeal to symmetry. I now prefer the historically accurate models. Interesting how our tastes and opinions on things evolve over time... The last photo should actually be the first photo. the forward frames are just sitting in place, awaiting spacers, final fitting and glue up. The assembly line style of building the frames is certainly not for everyone, but it has greatly improved my efficiency and quality. You will also note the cross spauls that have been reinstalled. This is a must in order to keep the shape. As mentioned, I am bringing this ship to NRG in October (As well as my USB Eagle, also a scratch build in progress). My goal with Naiad is to have the framing completed and faired, along with ribands, keelson, and chock bolts inserted. I estimate that will take me about 110 hours. Best, G


-
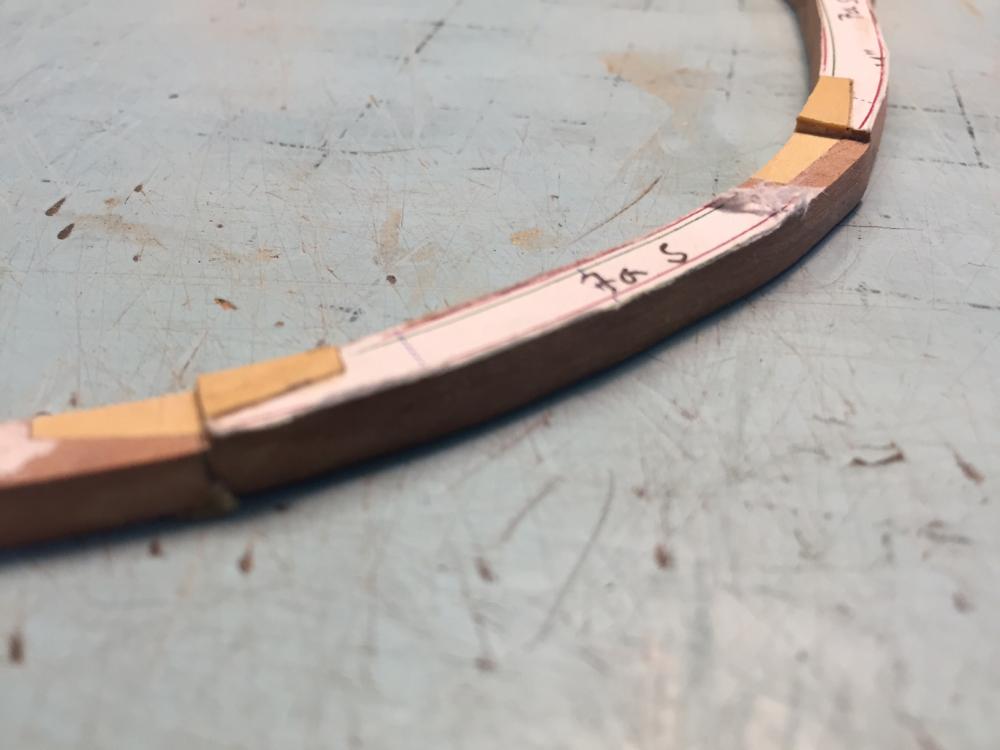
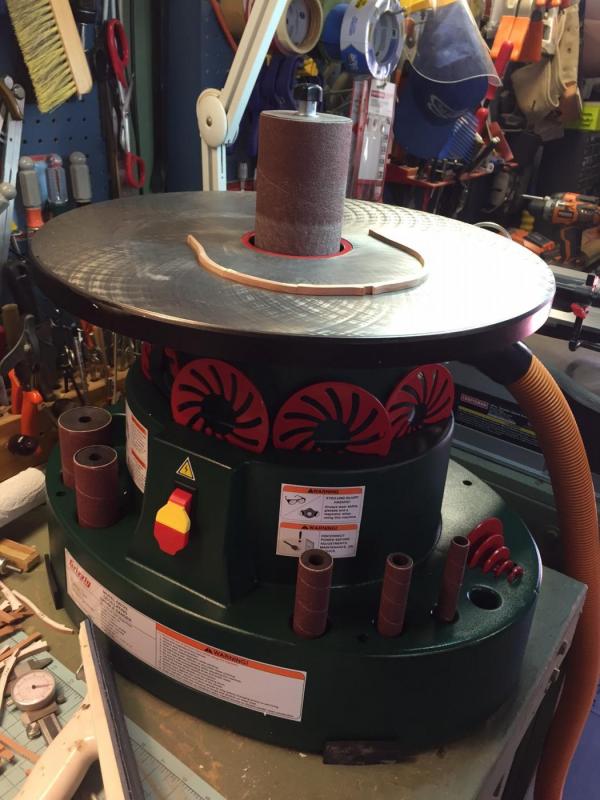
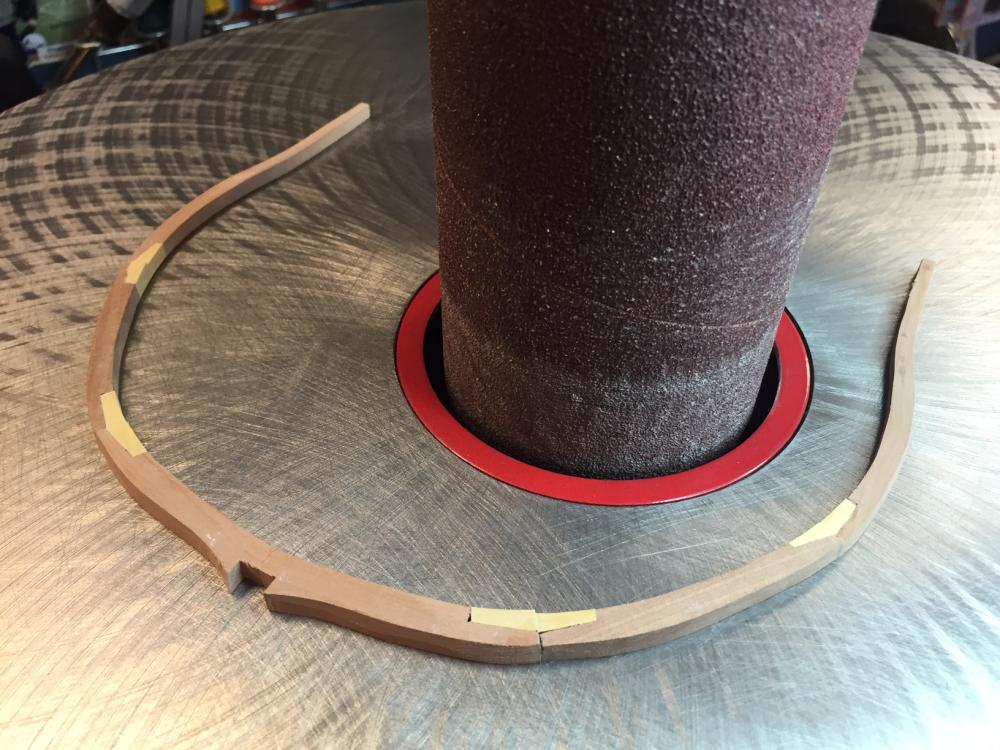
316 Hours into the voyage. Smooth sailing with the purchase of my new Grizzly Spindle Sander. Its simply wonderful. The more fairing done at the bench, the less that needs to be done in the shipyard. Of course, you had better be on track with the patterns or undersizing timbers is a real reality. Laid out on the Mustang are the remaining frames. These have all been accounted for and tucked away until needed. The last photo shows the sizing of each frame. You will note the different sided thickness of each frame as shown by the notching.

-
Wow, thank you for such great replies! This is so very rewarding to me personally. More to come next week! Tom- I see you are from North Reading, MA - I used to windsurf on Lake Quannapowitt back in the mid 80's while at college in Boston. Its a beautiful town and I have wonderful memories of my time there. G
-
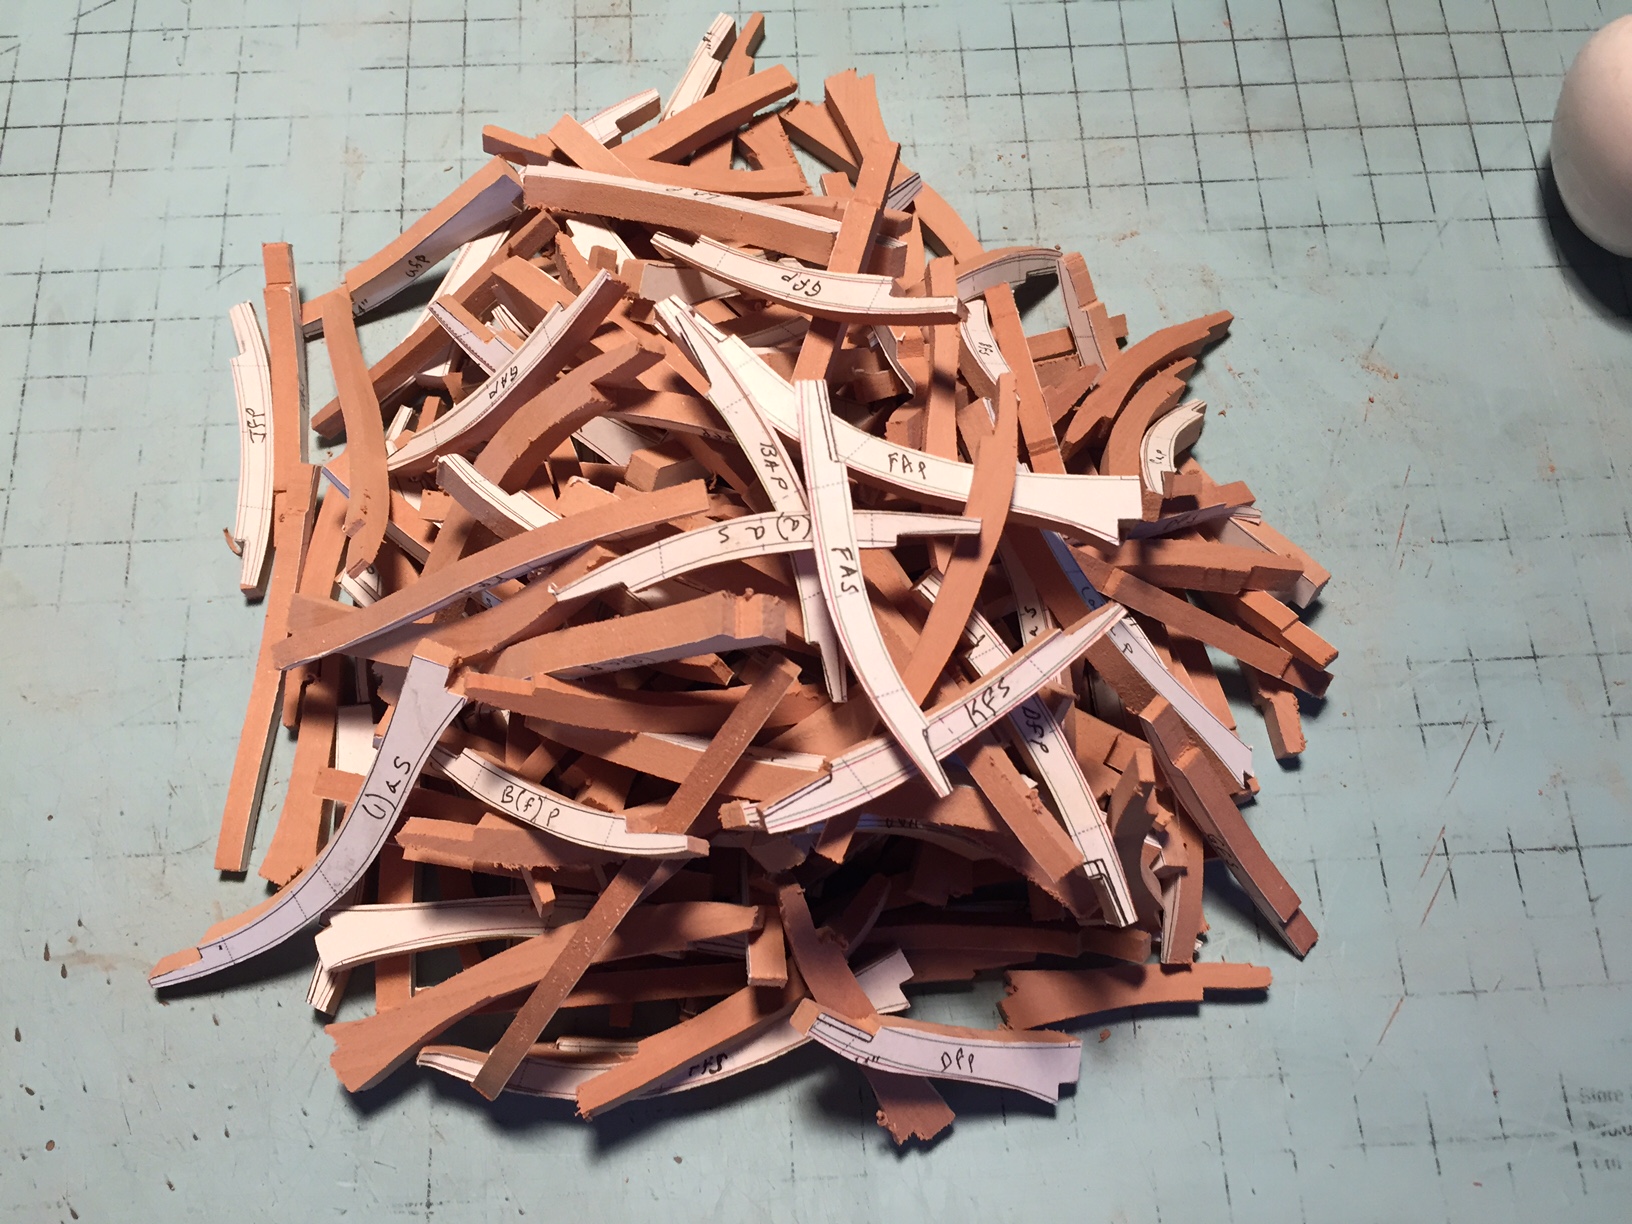
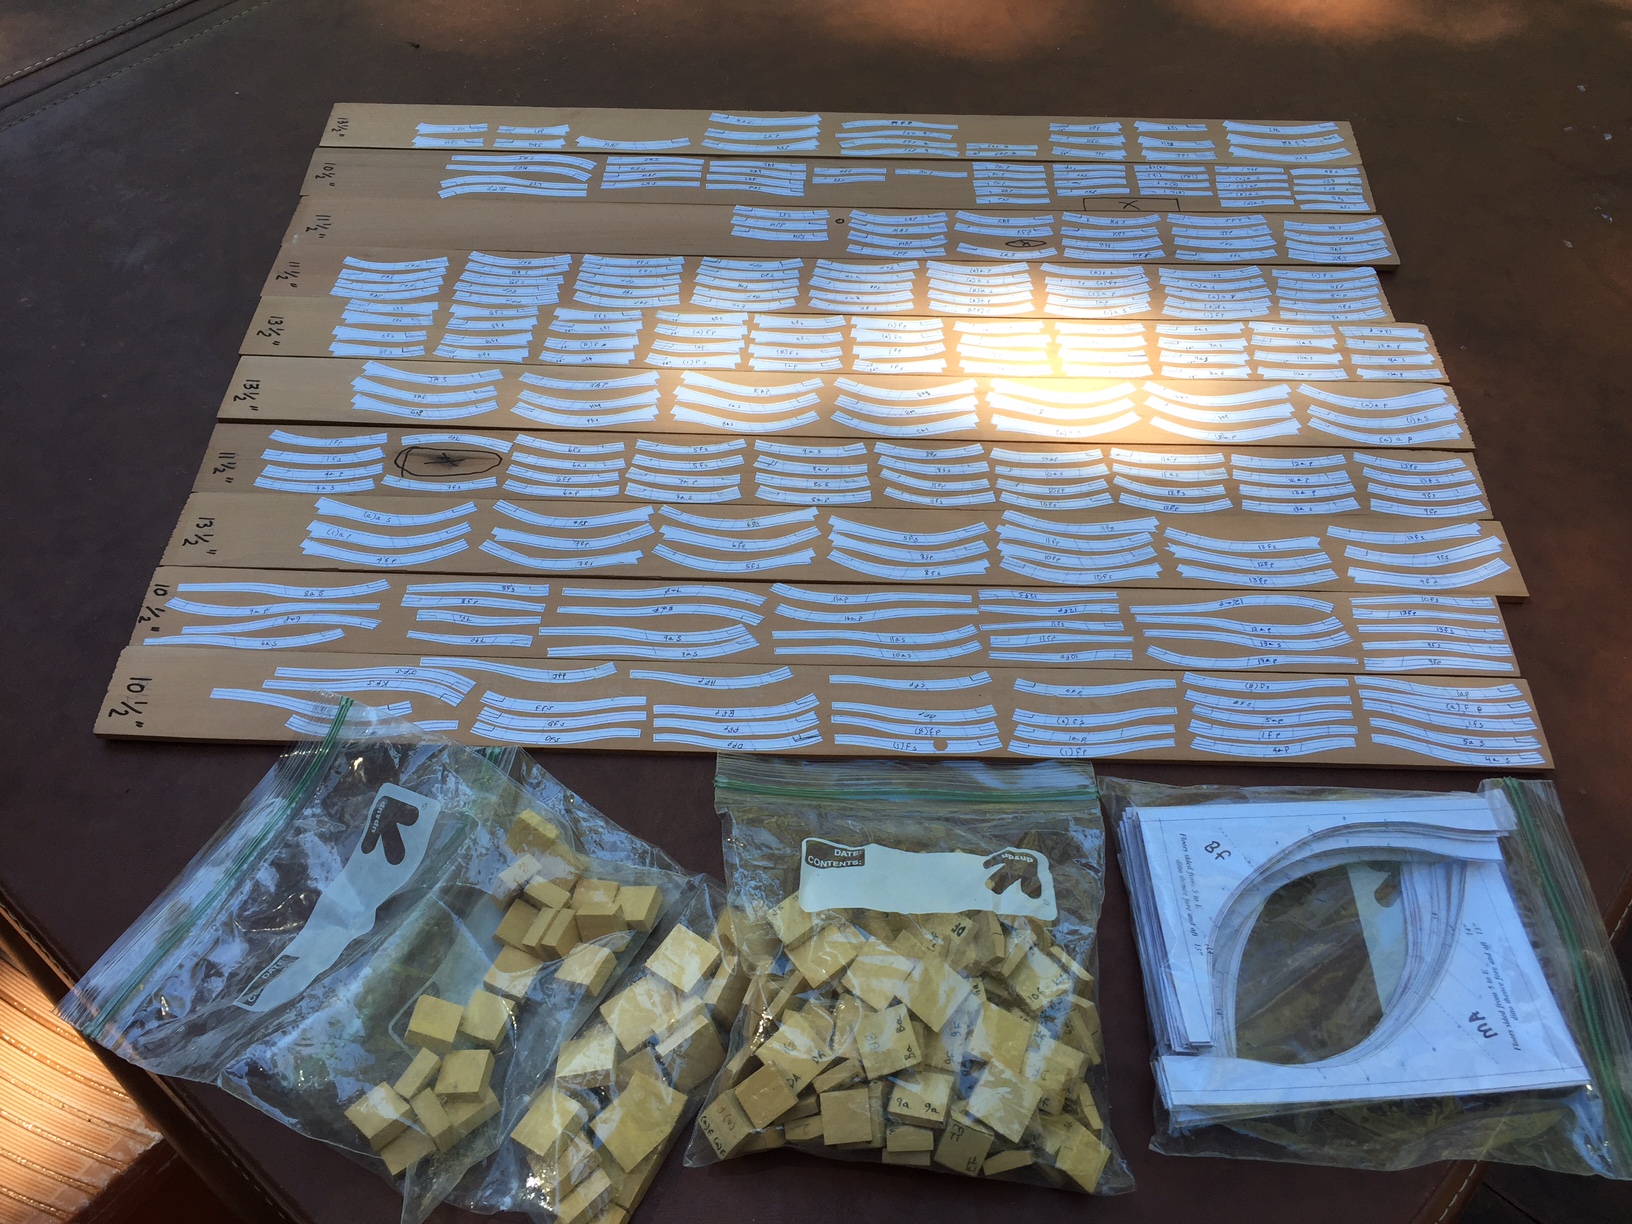
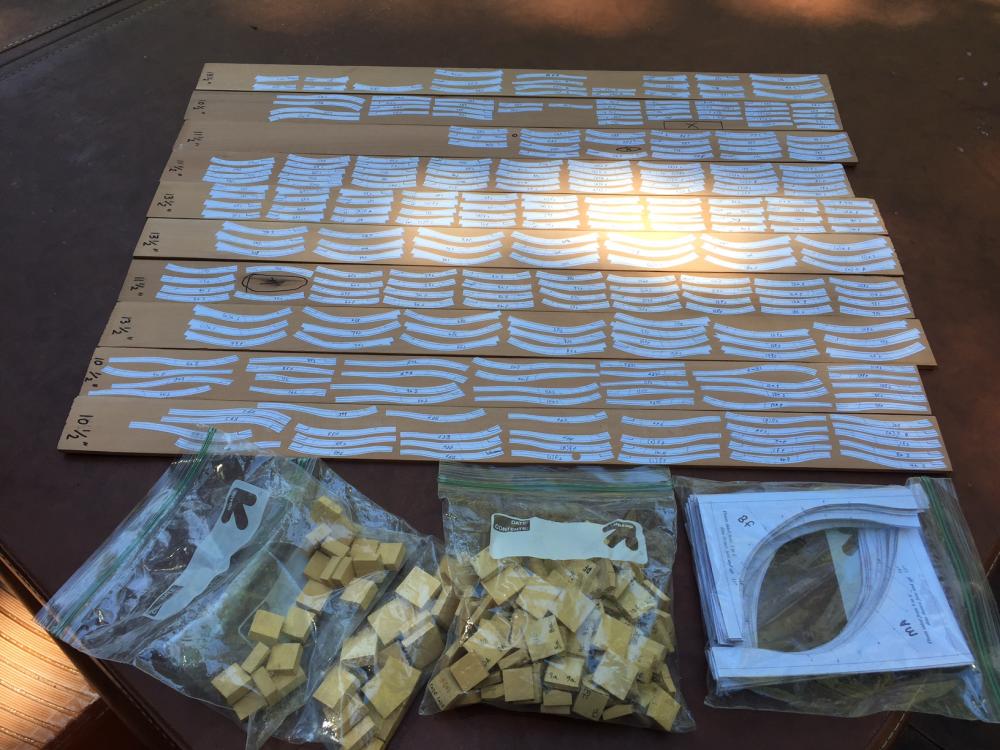
Hi All! 304 hours into the journey and feeling good! The photo below is not a pile of sticks to be played with like one of my powder monkey's thought. They are the remaining 256 framing pieces awaiting shipment to the shipyard. Prior to yard assembly, they will go through a quality check, drum sanding (my grizzly spindle sander arrives tomorrow), filing of the chock joints, and squaring of the ends. I will remake any framing piece that does not pass muster. I will then organize them in zip lock backs and place them in a plastic file bin, along with thier template, pattern, and chocks while they wait for assembly. There will be another quality check after assembly, prior to installation. My back of the envelope calculation is that there are about 1000 frame pieces, 550 chocks, and 50 keel/stem/stern assembly pieces at this point in the build. I estimate that I will have a roughed in hull at 400 hours. Not a bad way to spend 400 hours, if you ask me. I hope to see another build of this ship on the forum in the near future. It has been an amazing journey thus far. I have seen my knowledge of ship design expand exponentially, my scroll saw skills are now dialed in and my enthusiasm is as strong as ever. While personal results may varry, if you are looking to up your game, this is a ship to consider! Best, G

-
Thanks, Alan. I have to agree with you on the light colored chocks, they do grow on you. That being said, I dont recommend them since there is always the chance that they will show through the finished hull, as they do in a few spots after fairing. This was during my first few frames where the bevel is significant. I will need to strategically place some planking over them when the time comes. I do like painting with wood... Best, G
-
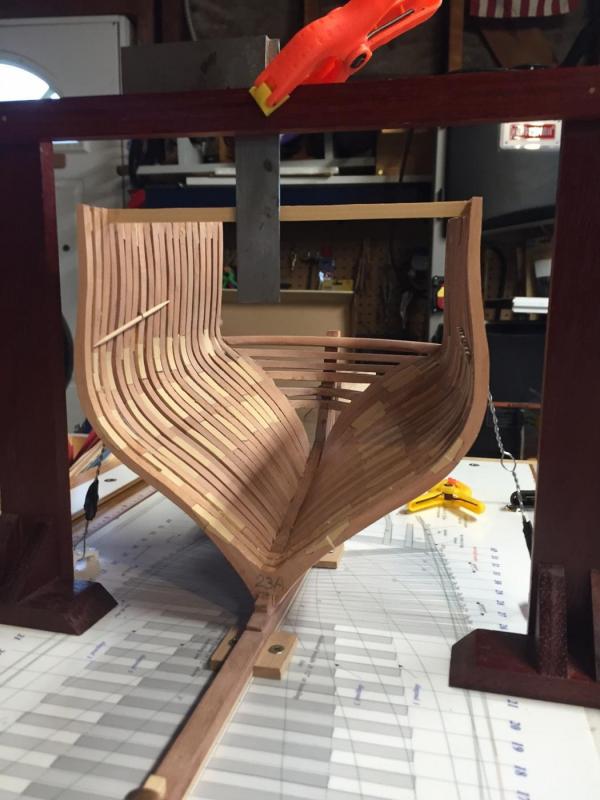
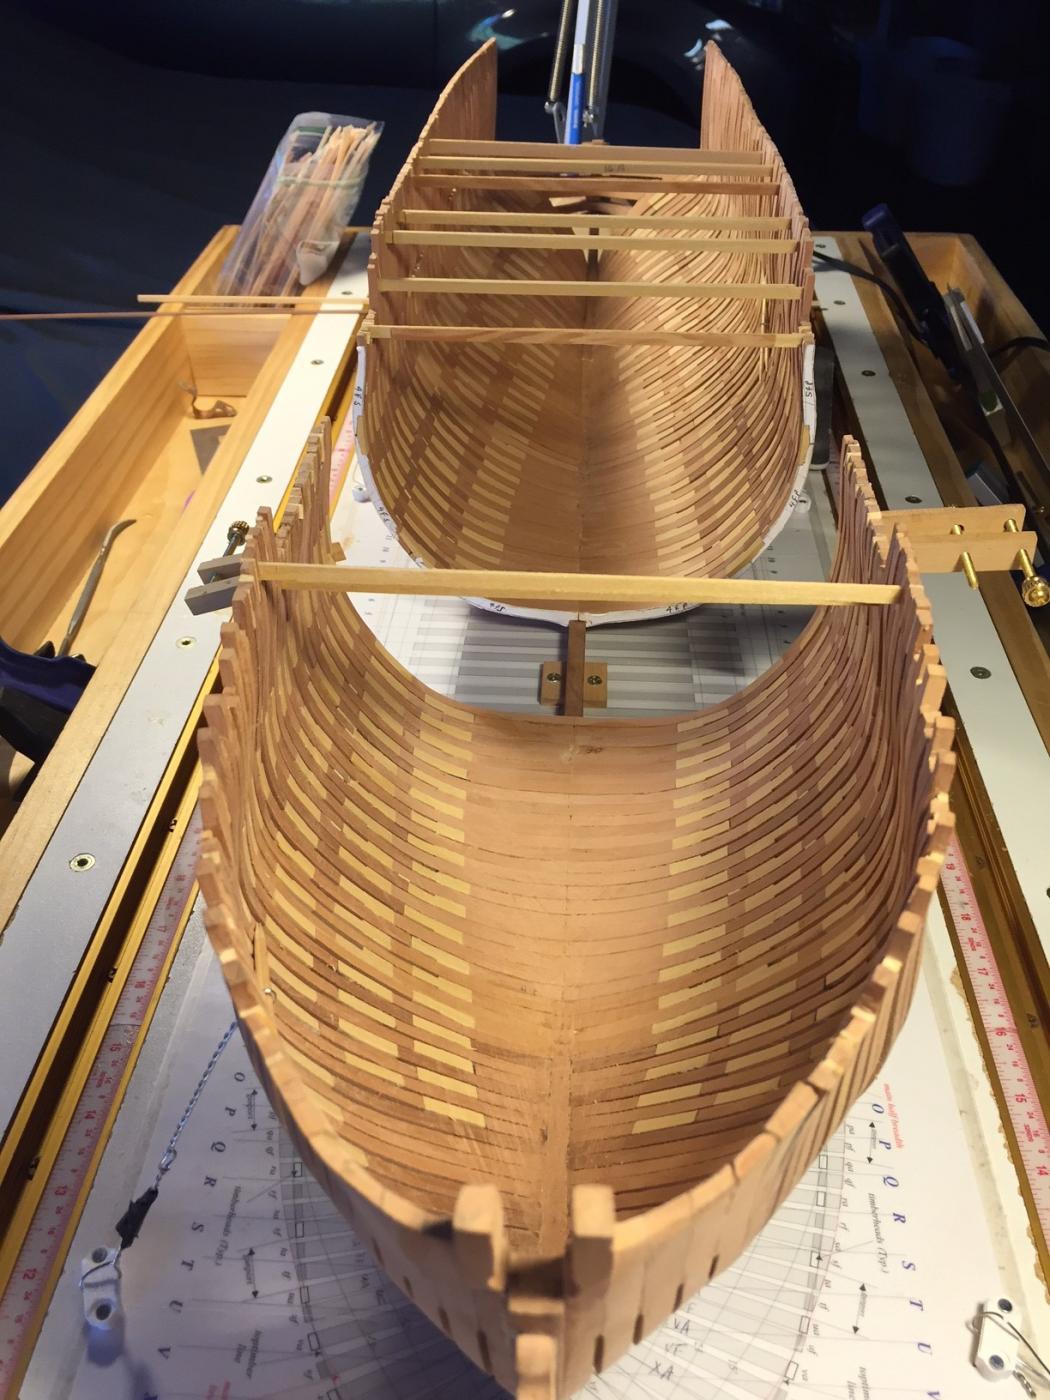
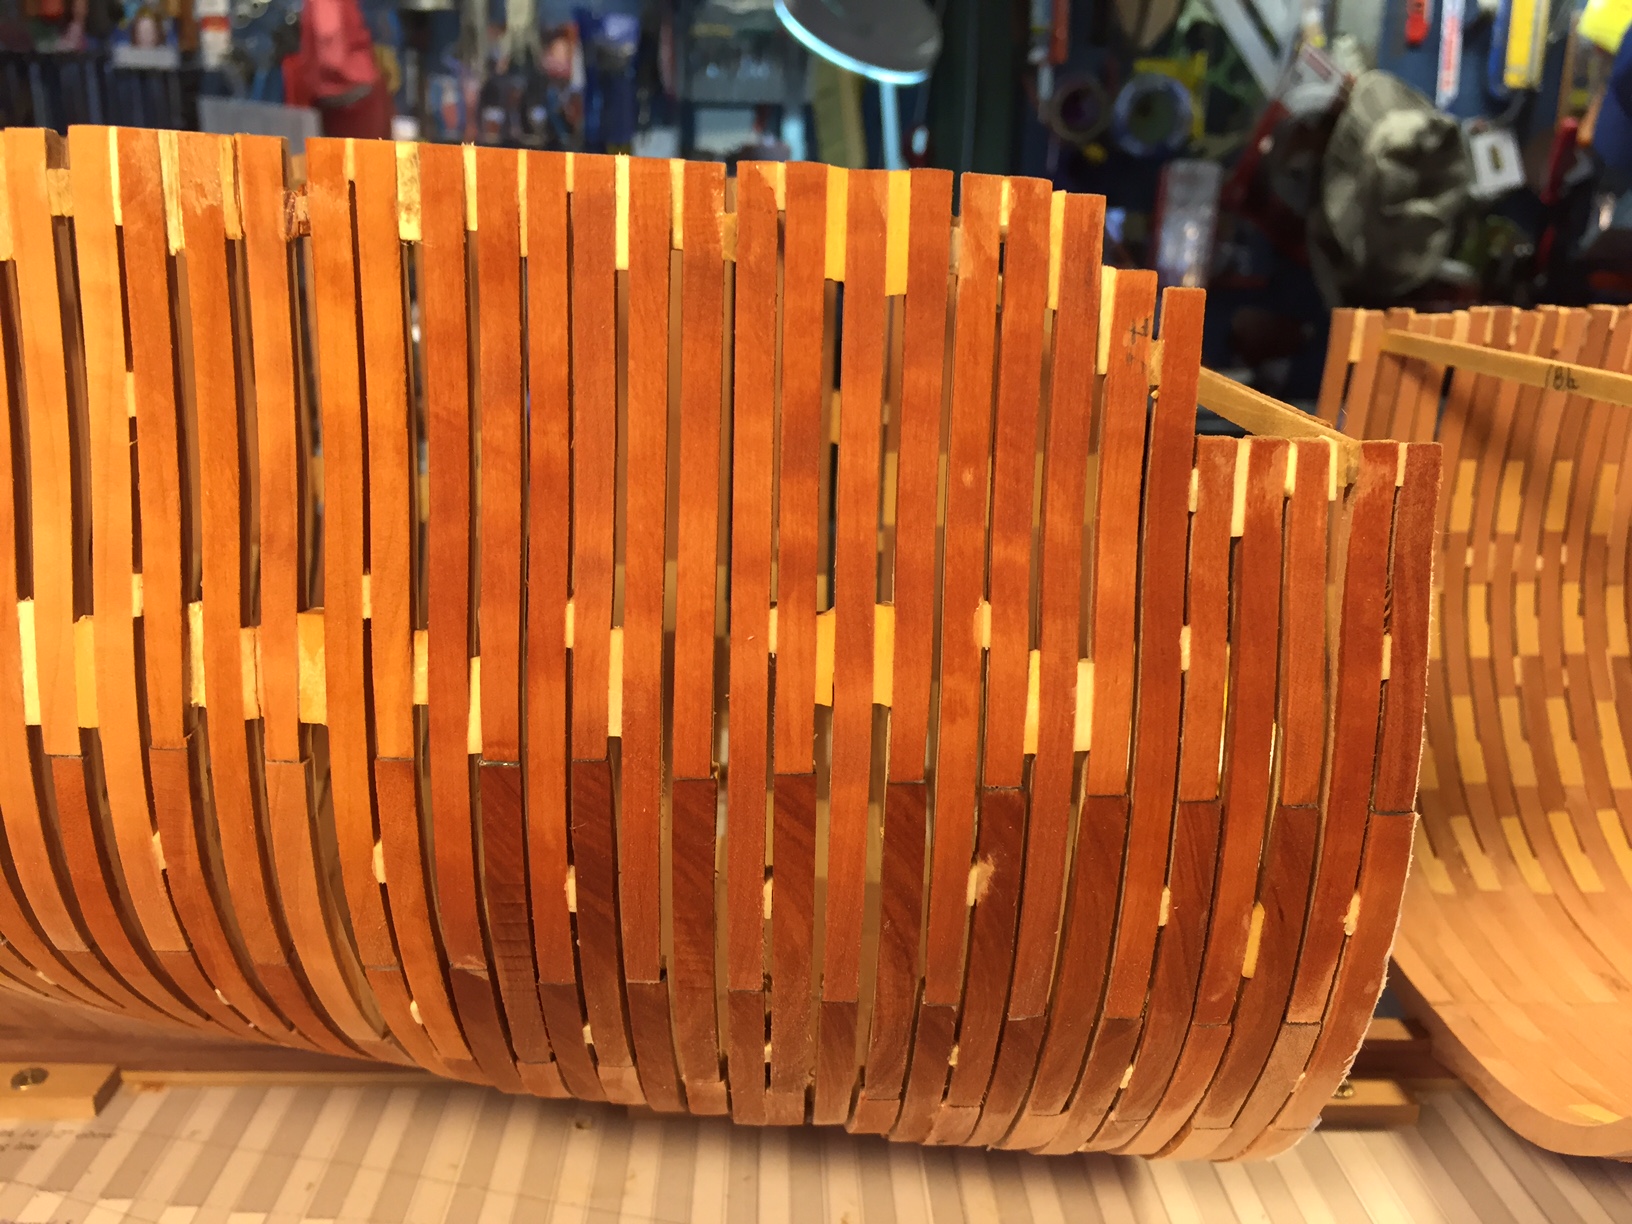
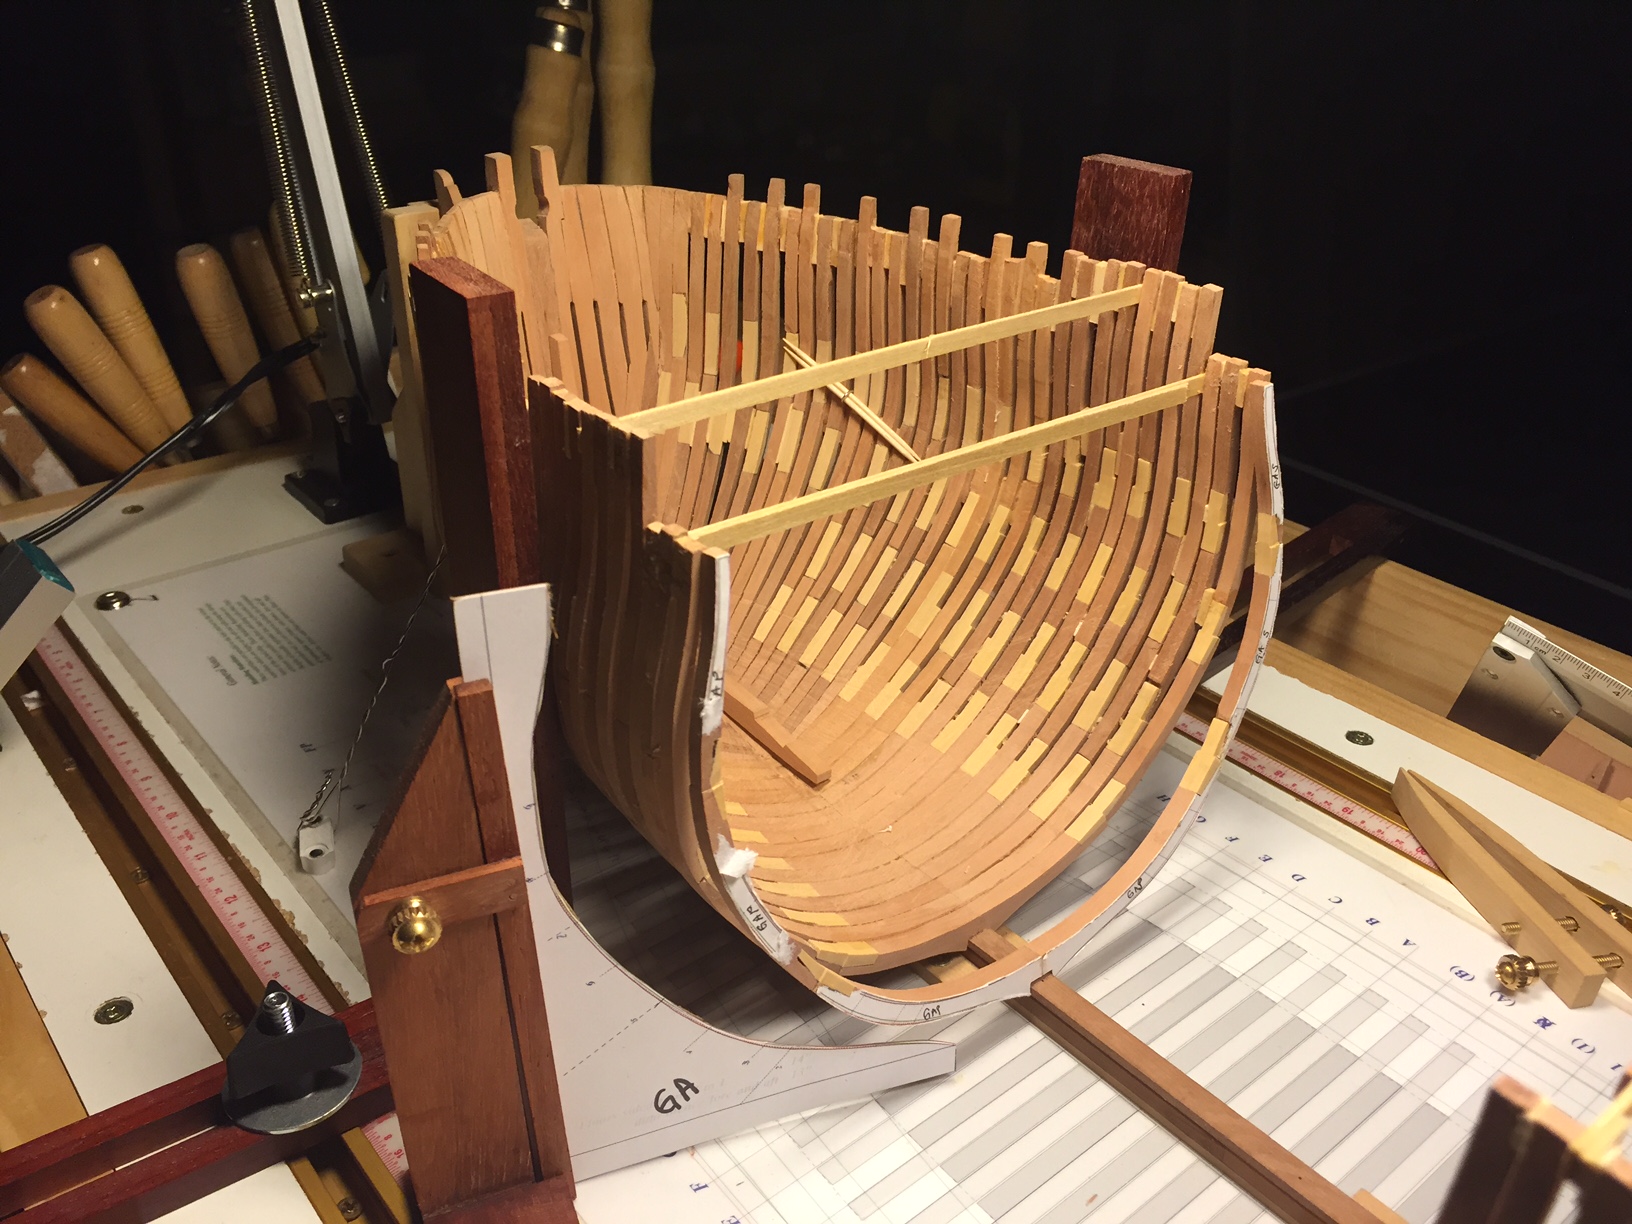
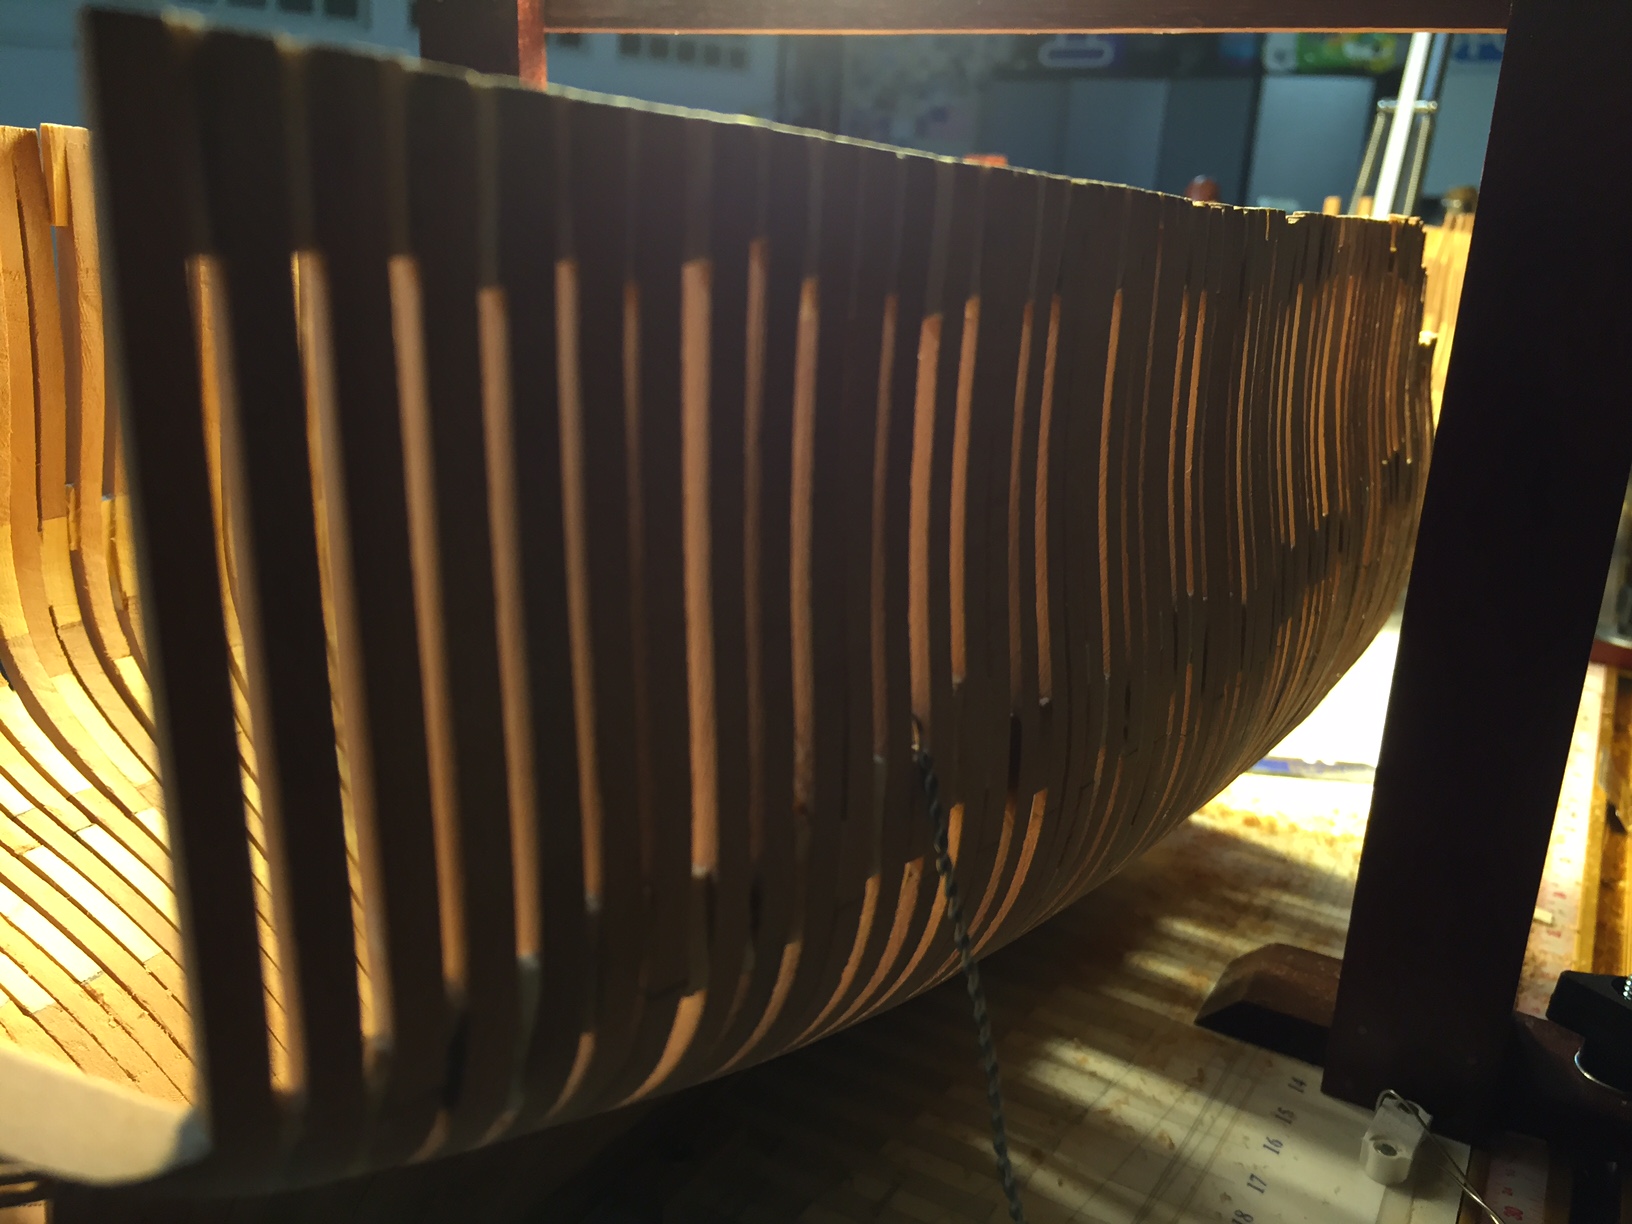
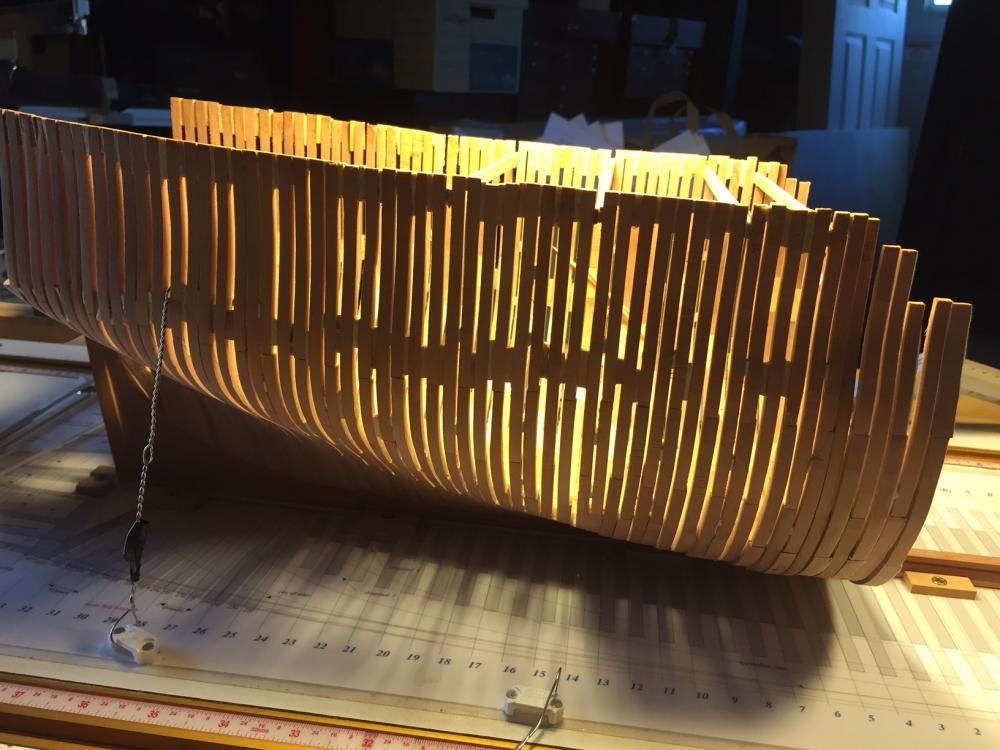
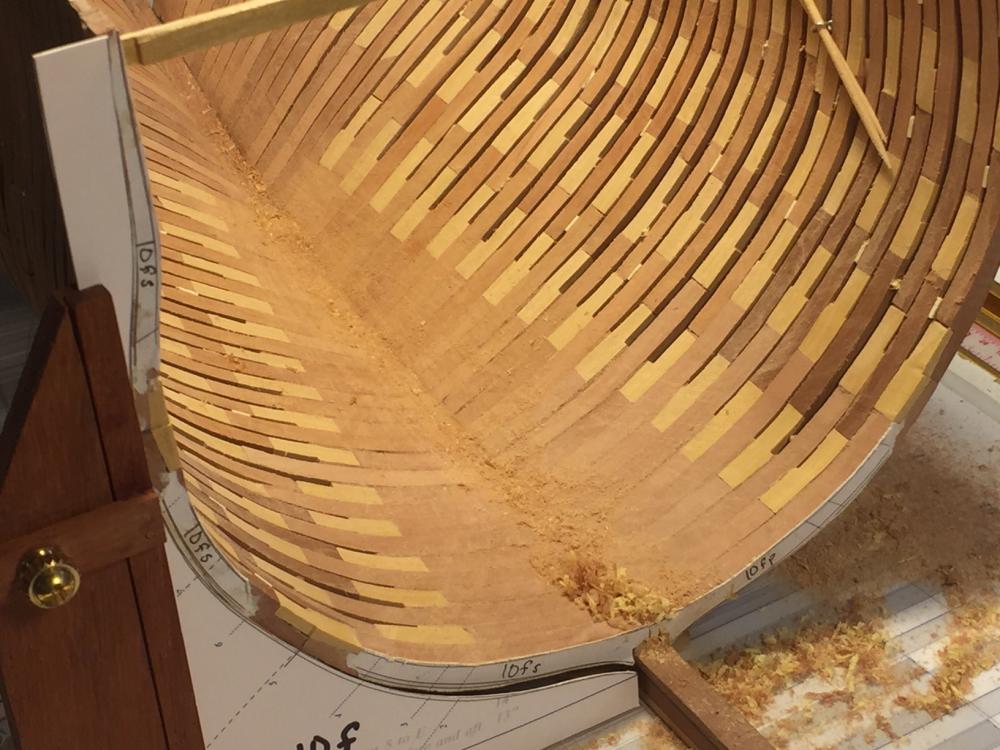
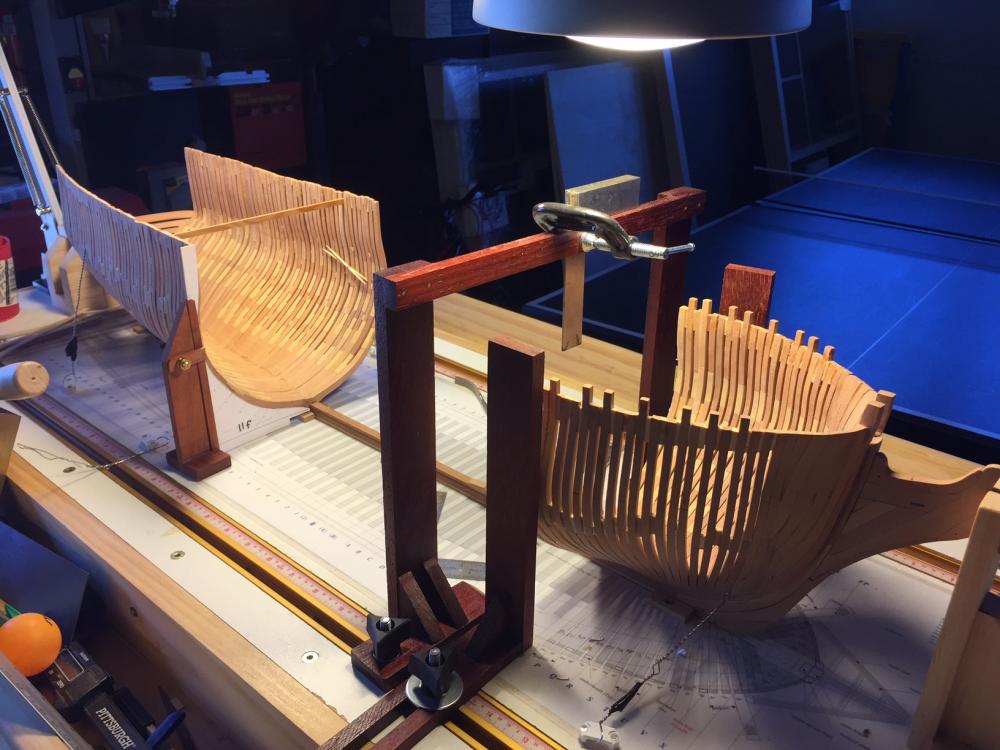
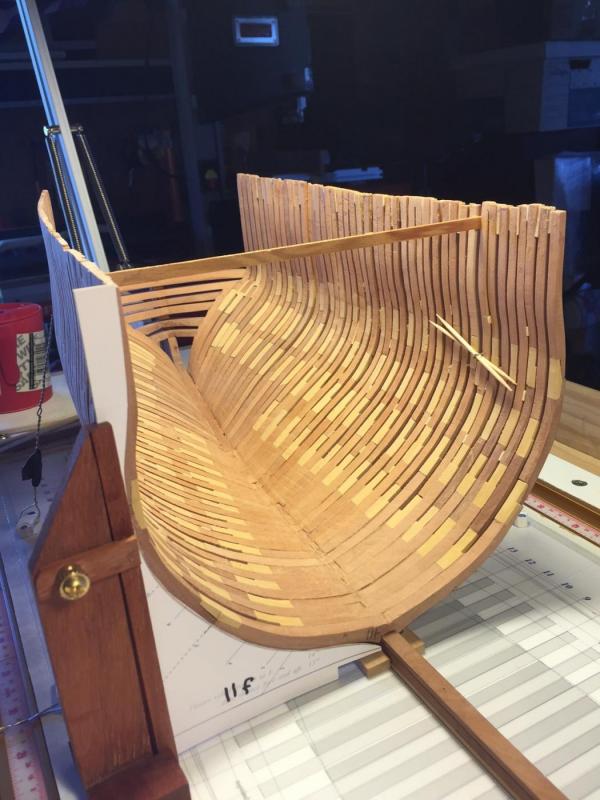
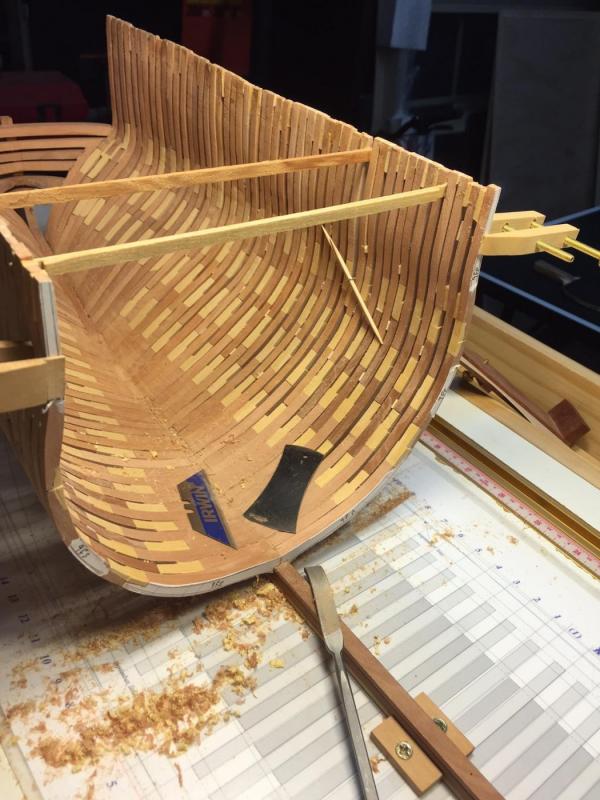
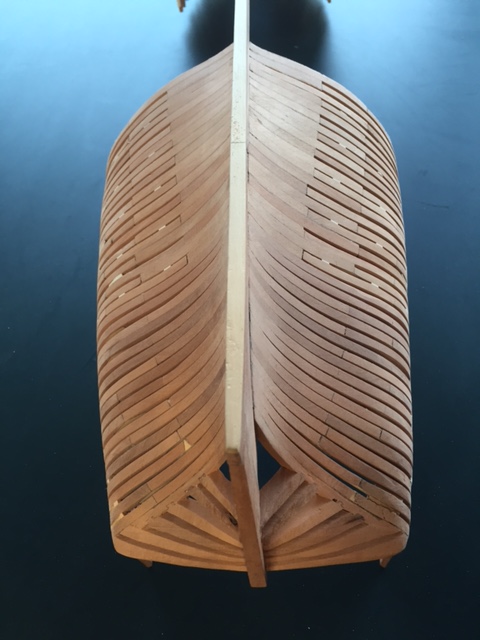
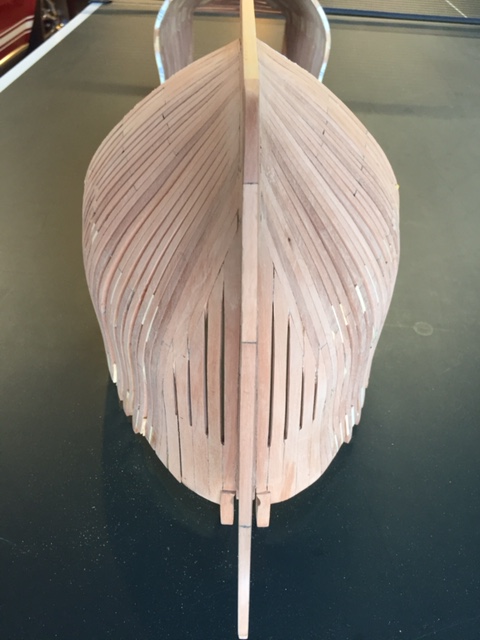
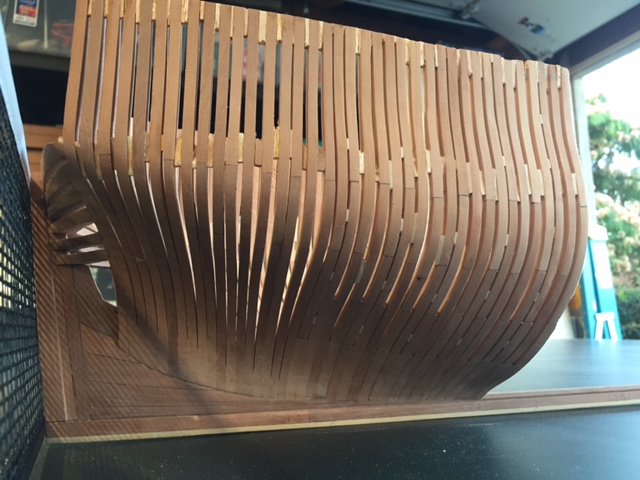
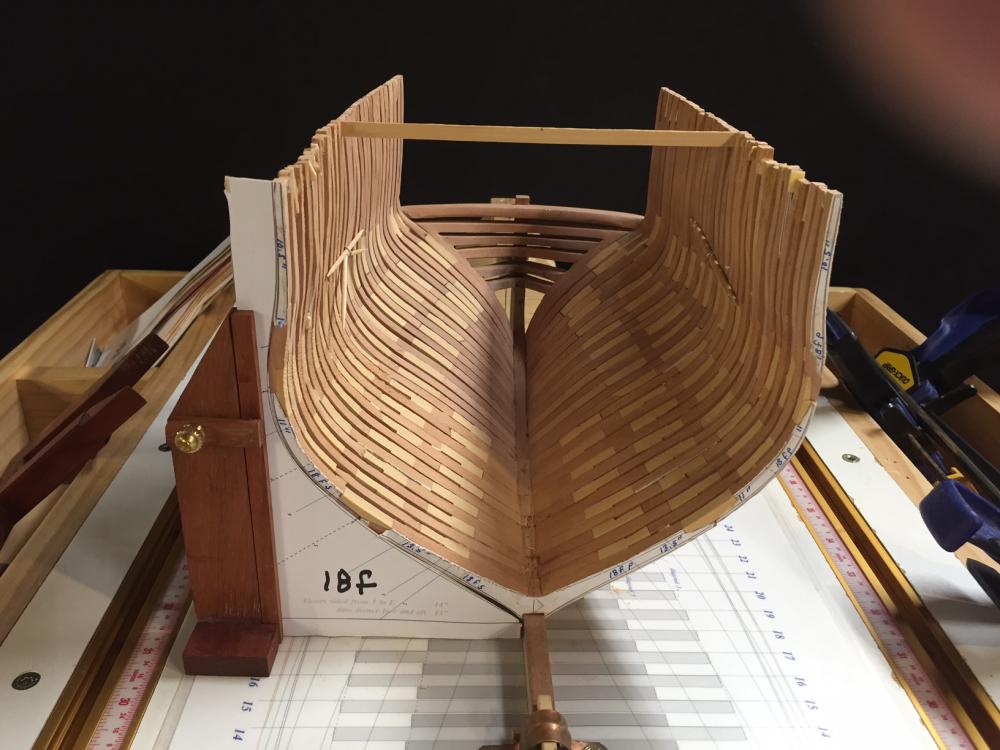
295 Hours into the Voyage... As I approach the dead flat (midship frame) of the ship, beveling the frames has become less of an issue. Each frame is just a fraction of the previous frame. Below are a few s/b shots of the ship with the new installment of frame 11F. Below is frame 10f (forward) each frame section is composed of a fore and aft. The main frame bends are the even number / lettered frames. It is these frames that have the stretchers across the top. I will be going back to reinstall some of the aft stretchers in my ongoing attempts to fair the top timbers. The stretchers help keep the top timbers in alignment. Without them, the ship wants to cave in on itself. This will be easily rectified. For those considering this build, keep the stretchers in as long as possible. I removed a few to many, a little to early... Here is where I have ended up as of last night. Frame 9f. All my little friends are shown. Clamps, single cut curved file, a razor blade, and miniature cabinet scraper. I have stayed far away from sandpaper up to this point and plan to do so until I go into final finishing. Even then, sandpaper will be a secondary tool to the finished product. This is a major departure from how I used to build ships. A few more thoughts: Consider building this ship in 1:48 scale to take full advantage of all the scale drawings - they are truly impressive works in their own right. Obvioulsy, space will be an issue. Consider building a few sample frames, such as the mid-ship frames, prior to embarking on the beveled frames like 24a/f. Even with previous experience in POF and lofting, this is a new challenge. Its a totally different kind of build that a sistered piece POF or Hahn style build. I am planning to submit this ship to the NRG to share at the conference this fall. I think more poeple should consider this style build. Its what I call Extreme Plank on Frame Building "EPOF". As an EPOF, I plan to fully detail the interior. It would be ashame to cut corners now... More next week. Gary
-
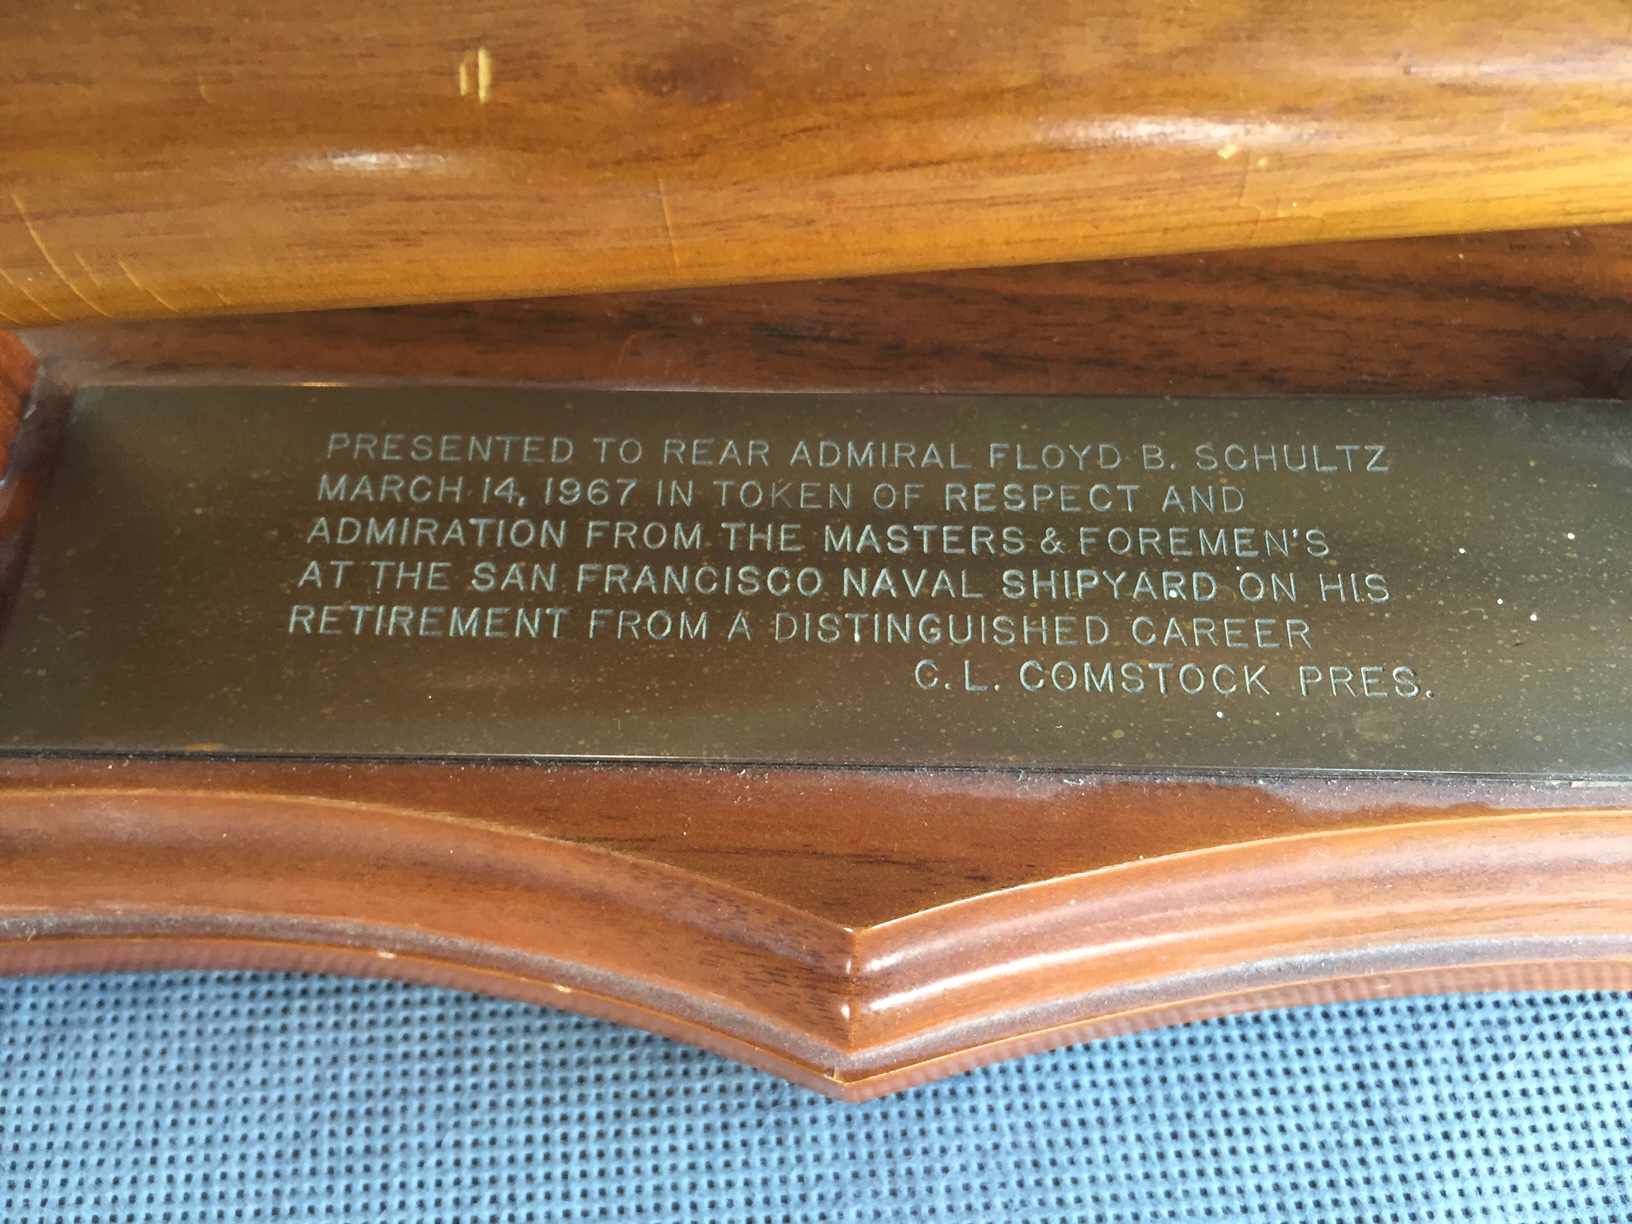
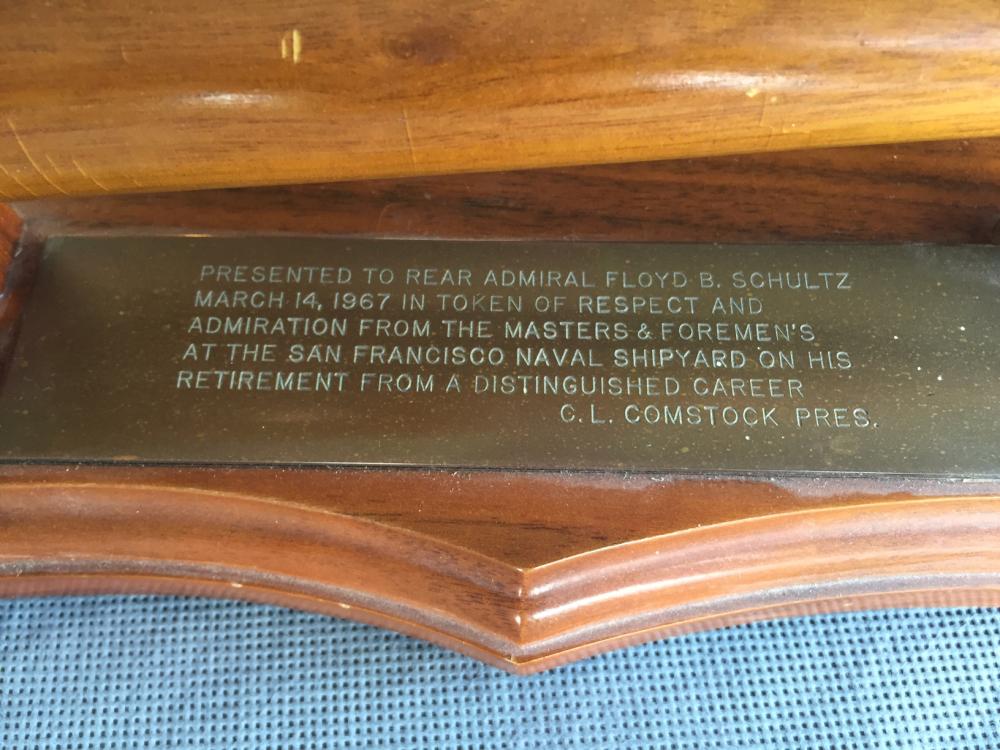
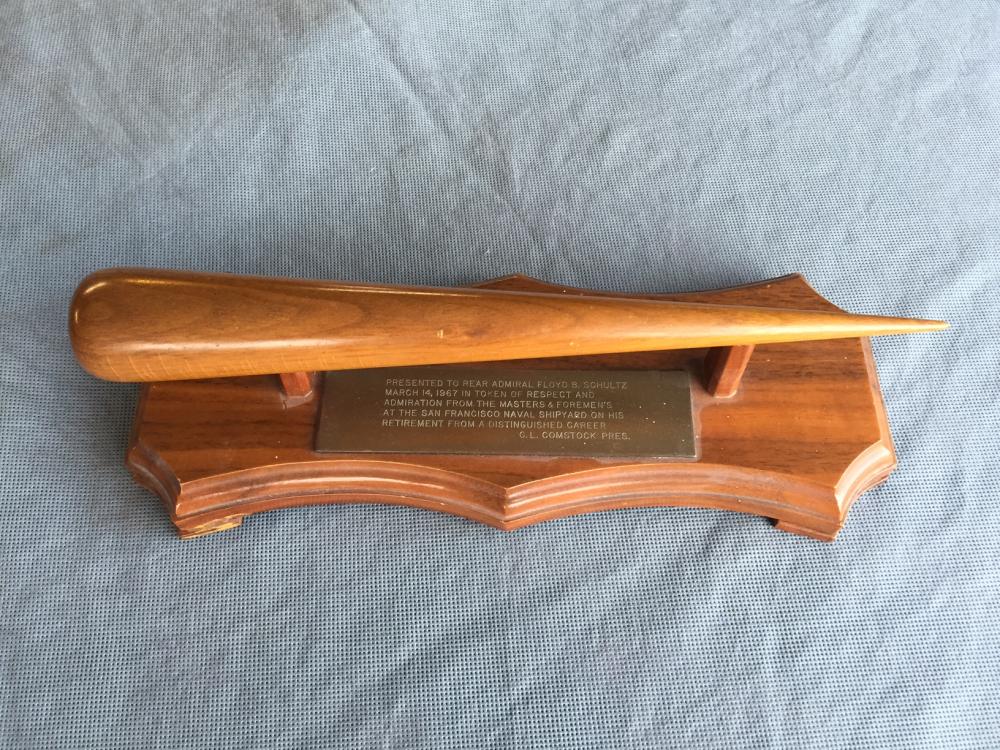
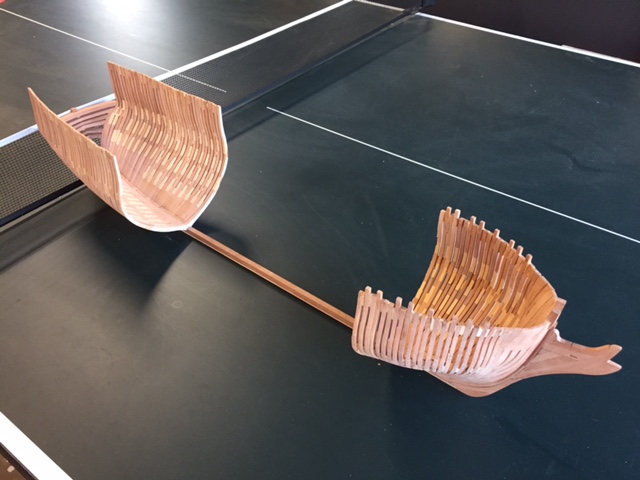
Just a quick update to share. I have begun the tedious, yet rewarding and fun task of cutting the futtocks and floors out using my scroll saw. The ping pong table is full of these pieces. Typically, there are 6 pieces per half frame with 4 chocks. Thats 20 peices per frame. All need to be precision cut, glued and fine tuned. Now for the fun stuff! To my delight, last night my neighbor came over and gave me this presentation fid that was given to her father over 49 years ago (six weeks before I was born...). He was an Admiral and ran naval shipyards across the US and also was at Pearl Harbor as was his daughter (my friend). She has always remarked that her father would have loved to see my shipbuilding, especially the gantry system. I am honored to have such a family heirloom and will cherish it. Both she and her husband are my families closest friends.

-
I too, look fowrad to the books and will order them! Your last series was highly inspirational to say the least! Gary
- 641 replies
-
- 3
-

-
- greenwich hospital
- barge
- (and 1 more)
-
Thanks. Guys. I have never been one to sit down and watch TV, instread, I head to the garage. Not to mention that I have a very understanding Admiral. And, my OCD... Greg, regarding organization of the templates, I like to put like frame pieces next to each other in the same orientation, resisting the temptation to use every square cm of wood. In laying out the frames in this way, I allow plenty of room between frames and rows as well. When I go to cut the frames with the scroll saw, I am then able to make repetative cuts without funky twists and turns.. Best, Gary
-
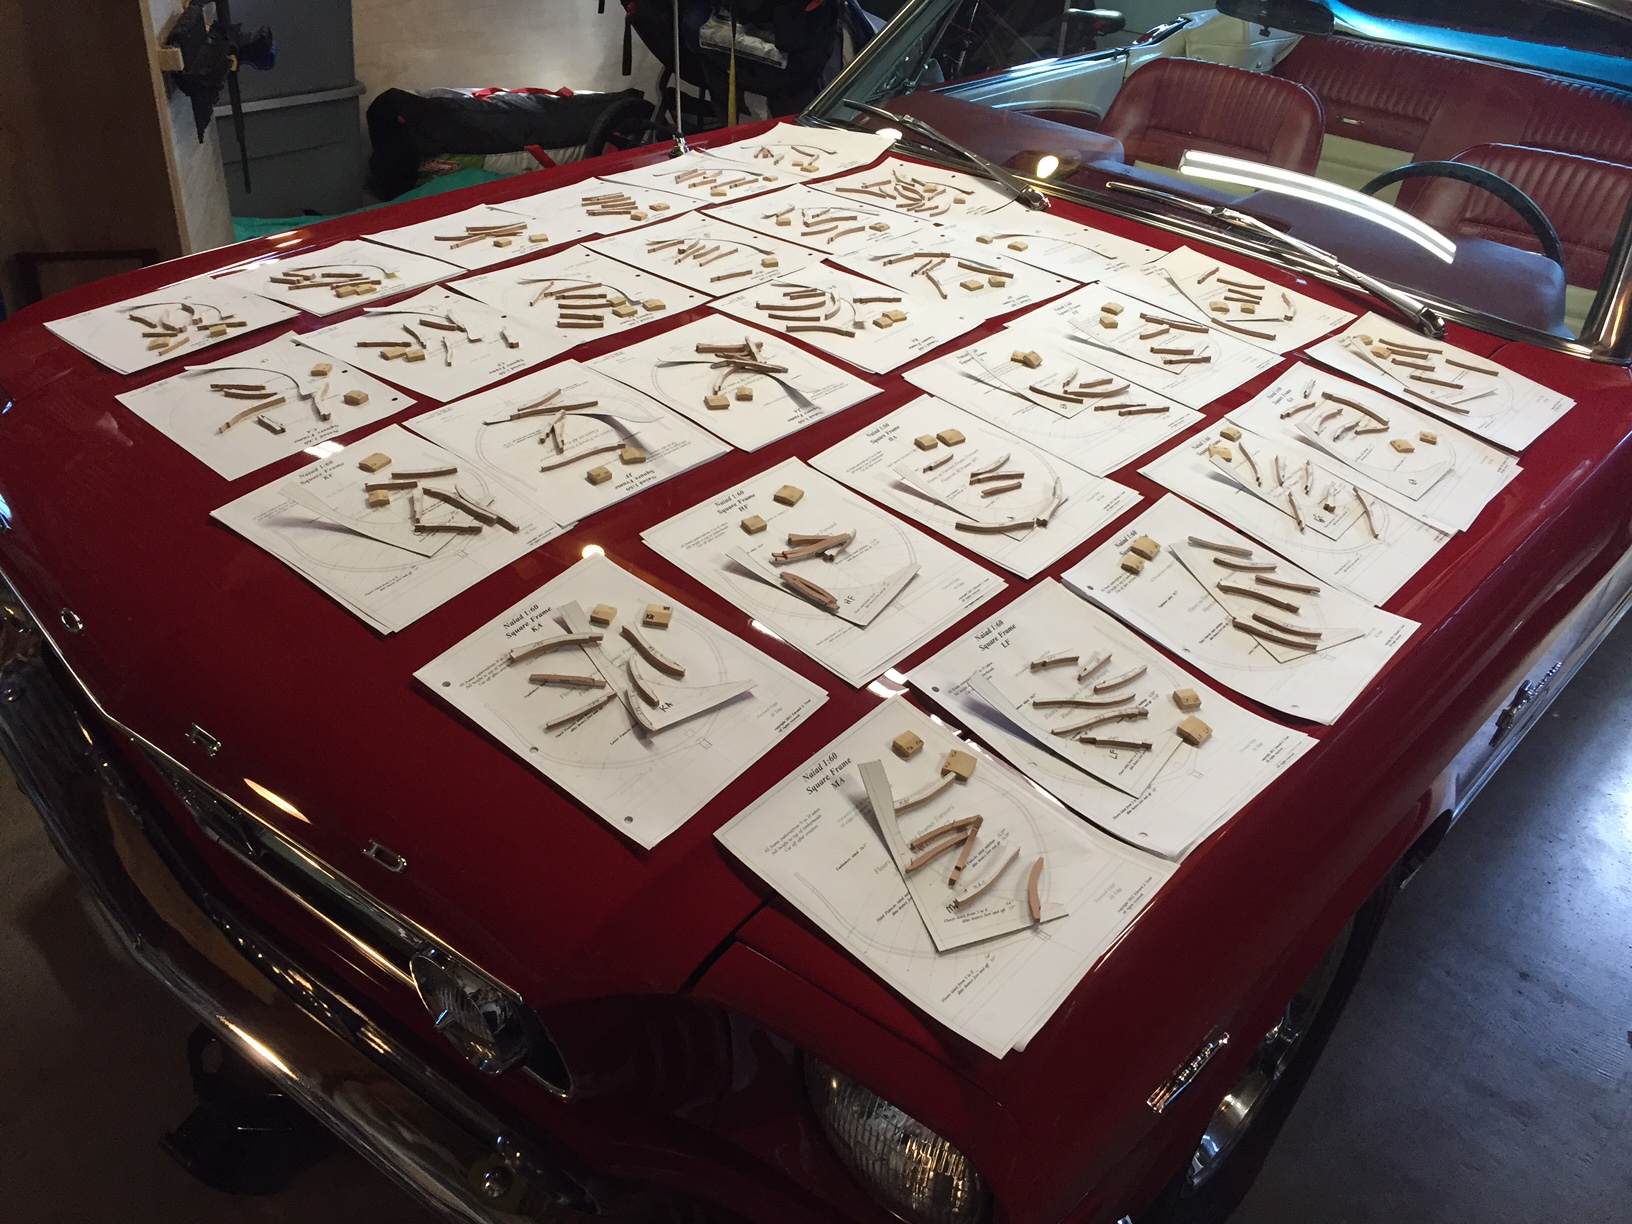
Look what I did on my summer vacation... 278 hours into the build of Naiad, with 51 hours in June. Since the start of Naiad 5 months ago, I have averaged 23 days a month of building at about 53 hours each month. You may have noticed that I like to keep stats. As mentioned before, I had never done that with my previous builds, but now I find it a great motivator. Not to work faster, but to work more. I try to get in the shop for a few minutes each day, which usually turns into much longer... Most of my work is after 8pm when the kids go to bed. While on vacation in the Sierra's of California, I took advantage of the downtime and made up all the framing templates as well as the patterns and chocks for the remaining frames. There are over 400 pieces here. They took a total of 24 hours to layout, cut, and paste. I have found that assembly line fashion work increases my productivity as well as the quality of the work that I do. I like the repetitive tasks and break each one down into its individual sub-assembly. My goal is to cut about 10 frame pieces a day at the jig saw while accomplishing other Naiad work. I estimate that this will take me through the first part of August. After cutting each piece, I smooth them out at the drum sander before glue up. The more fine-tuned the piece is before glue-in/up, the better the overall quality of the work. Best, Gary
-
Thanks, Ed. That explains everything so perfectly. Best, G
-
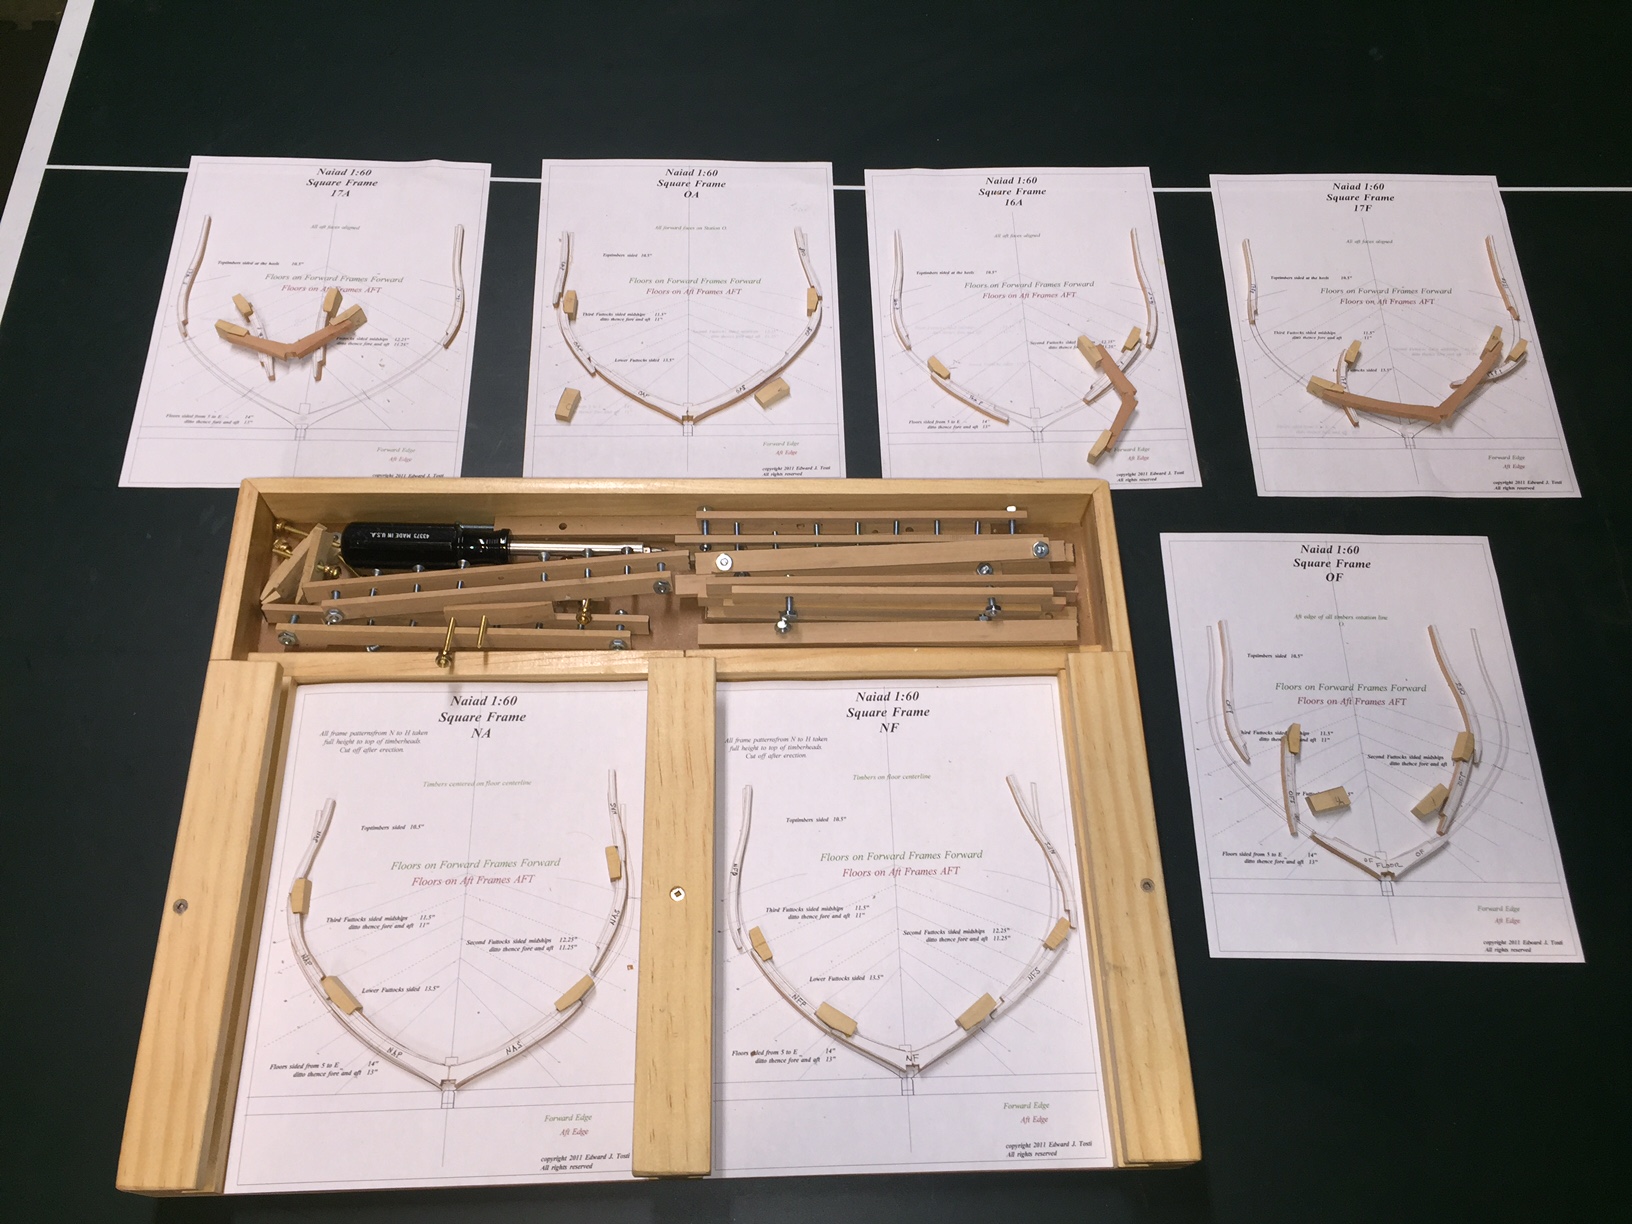
Ed - Question: I am unable to locate a mid-ship framing pattern on the CD. Also, with regard to patterns DF A, and DF F - Are these duplicates of DA and DF? There is not a location for them on the shipway plan. Thanks, Gary
-
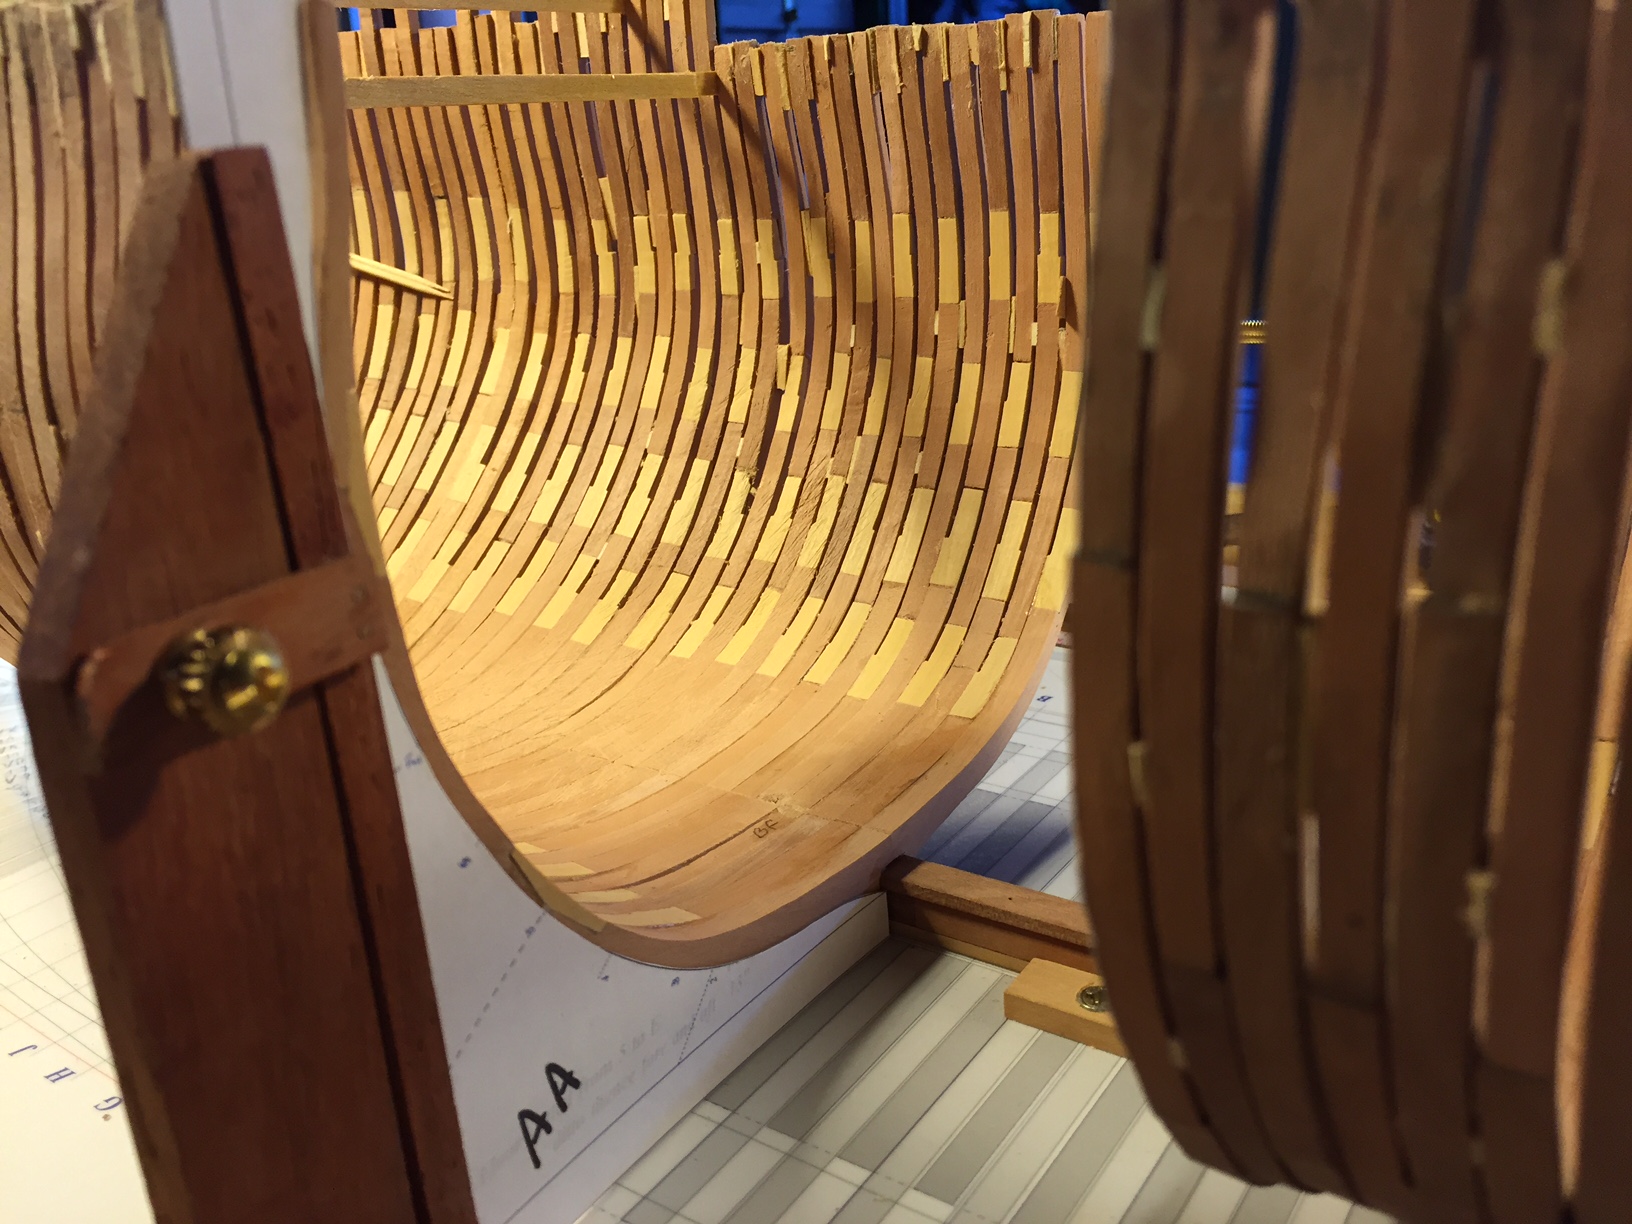
Hi All, thanks for the likes and comments. Ed - I tried to change the title at one point, but couldnt figure it out. I will send an email to Admin. I appreciate the history narrative. It really adds to the overall build. One thing that I wish I could do over are the bottoms of the frame footings. These need to be snug and well set at the start. While they may look good from the outside, its the fit that really counts. Otherwise, when you fair them, any discrepancies show up rather quickly. Best, G
-
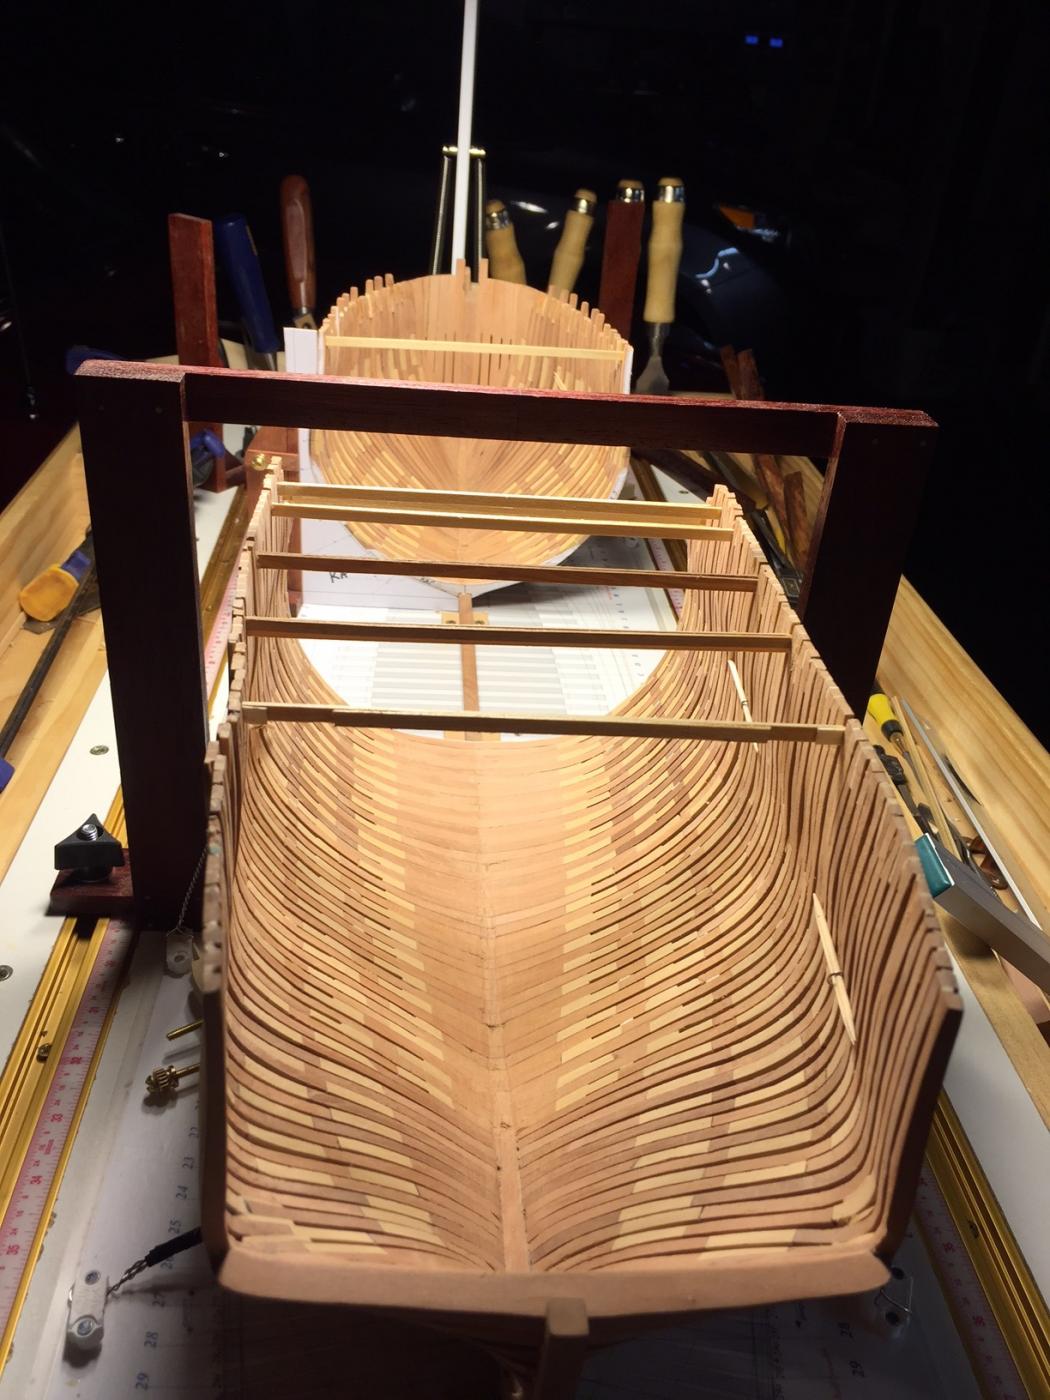
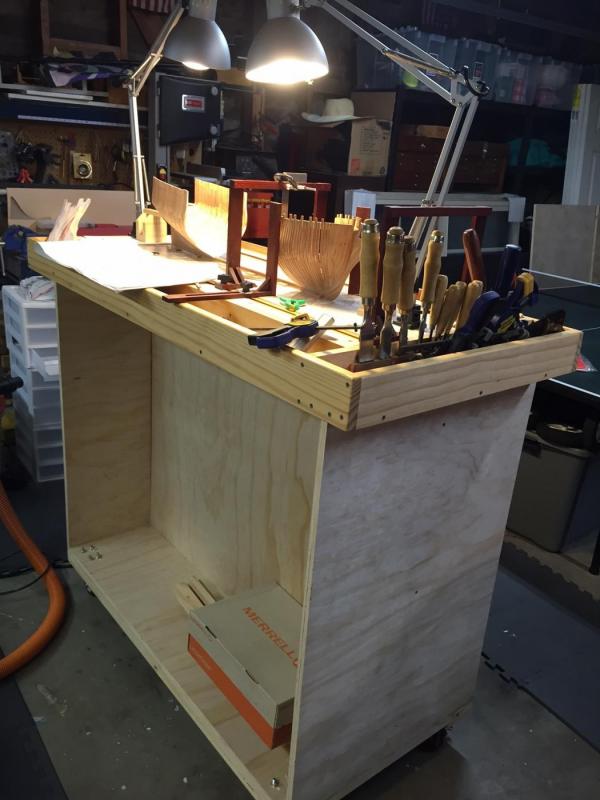
236 hours into the journey... Things continue to go well for the Naiad build. I have developed a good rythm in making frames and have instituted a few additional quality checks before installation. Namely, spending extra time to better square the frame ends and chocks. There were a few that appeared sloppy that got by me... I took the ship off the shipway over the weekend and spent a solid 5-hours on the front porch yesterday for Father's Day, just filing away. My goal was to reach the near finished dimensions and to reflect on how I can improve upon my work. Here is a shot of my new build table. Since I do all of my work while standing, the table is tall. Still to come are shelves and drawers. It meastures 48"L x 24" W x 44" H. The ends are rabbited and the middle panel is dadoed. I used 3/4" cabinet grade plywood. It sits on poly swivel/locking wheels attached to an underneath stretcher assembly. Yes, its probably a little over built. I als added an electrical outet. On the sides, I will add custom fittings to hold gantrys, clamps, squares, etc. Finally, I addeed two lamps. I cant believe how long I went without really good lighting! There will be a book shelf at the bottom of each side as well as several long wood drawers and then multiple smaller shallow drawers for tools, etc. Its a fun project that I will share more on as I go. The photo is a bit skewed, everything is ship shape. Still needs final sanding, polish and stain. Another 60+ frames to go...

-
Greg, How is it that I am just seeing this log for the first time...?! There are so many good logs, its hard to focus at times. That being said, marvelous work. I love the toptimber details and the challenges they create. My next ship was going to be Pegasus, but now it might be Speedwell... That being said, I have a few years left on Naiad. Again, I love the workmanship, not to mention the illustrations, overal presentation, subject matter and scale. Best, Gary
-
HI Greg, I appreciate your keen eye sight! There are some pattern reminants here and there that will be sanded off later. And then there are some other patterns that I forgot to take off... My plan is to use the pattern of the previous frame to help position the newest frame. Once I fine tune the new frame, I then take the pattern off the frame already glued in. Once I take the ship off the build board, I plan to spend a lot of time out in the sun with files, sandpaper, and steel wool to tweak the ship - frame by frame. Like many of you out there, I find the thought of that to be purly relaxing. My wife and friends just think I'm crazy. Thanks for the kudos everyone. I really enjoy this log and the comments and questions. G
-
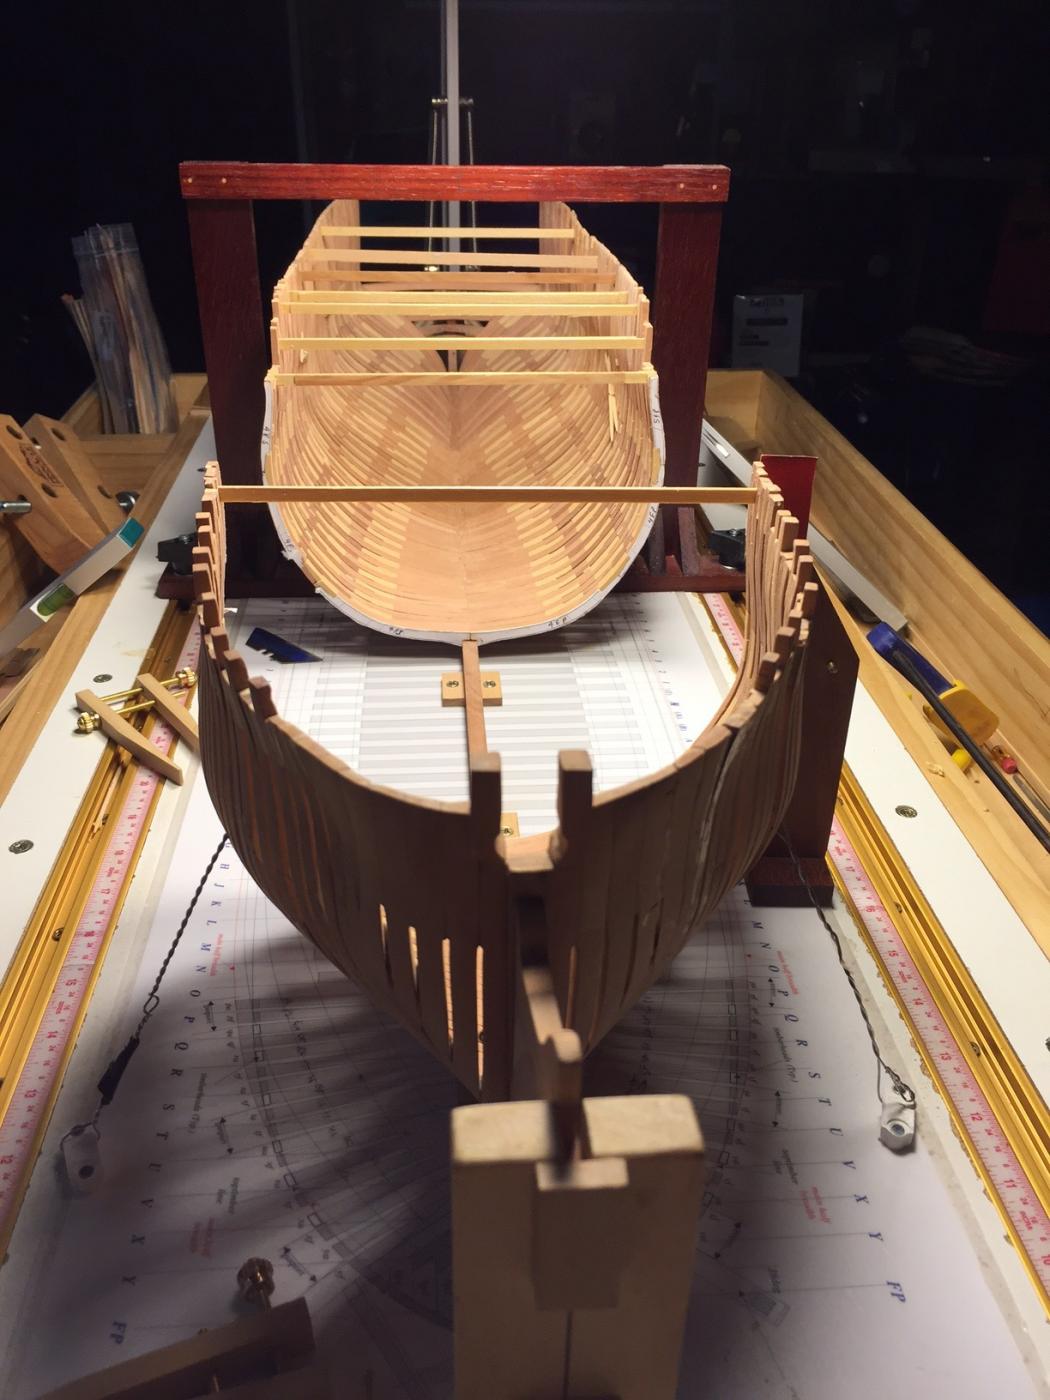
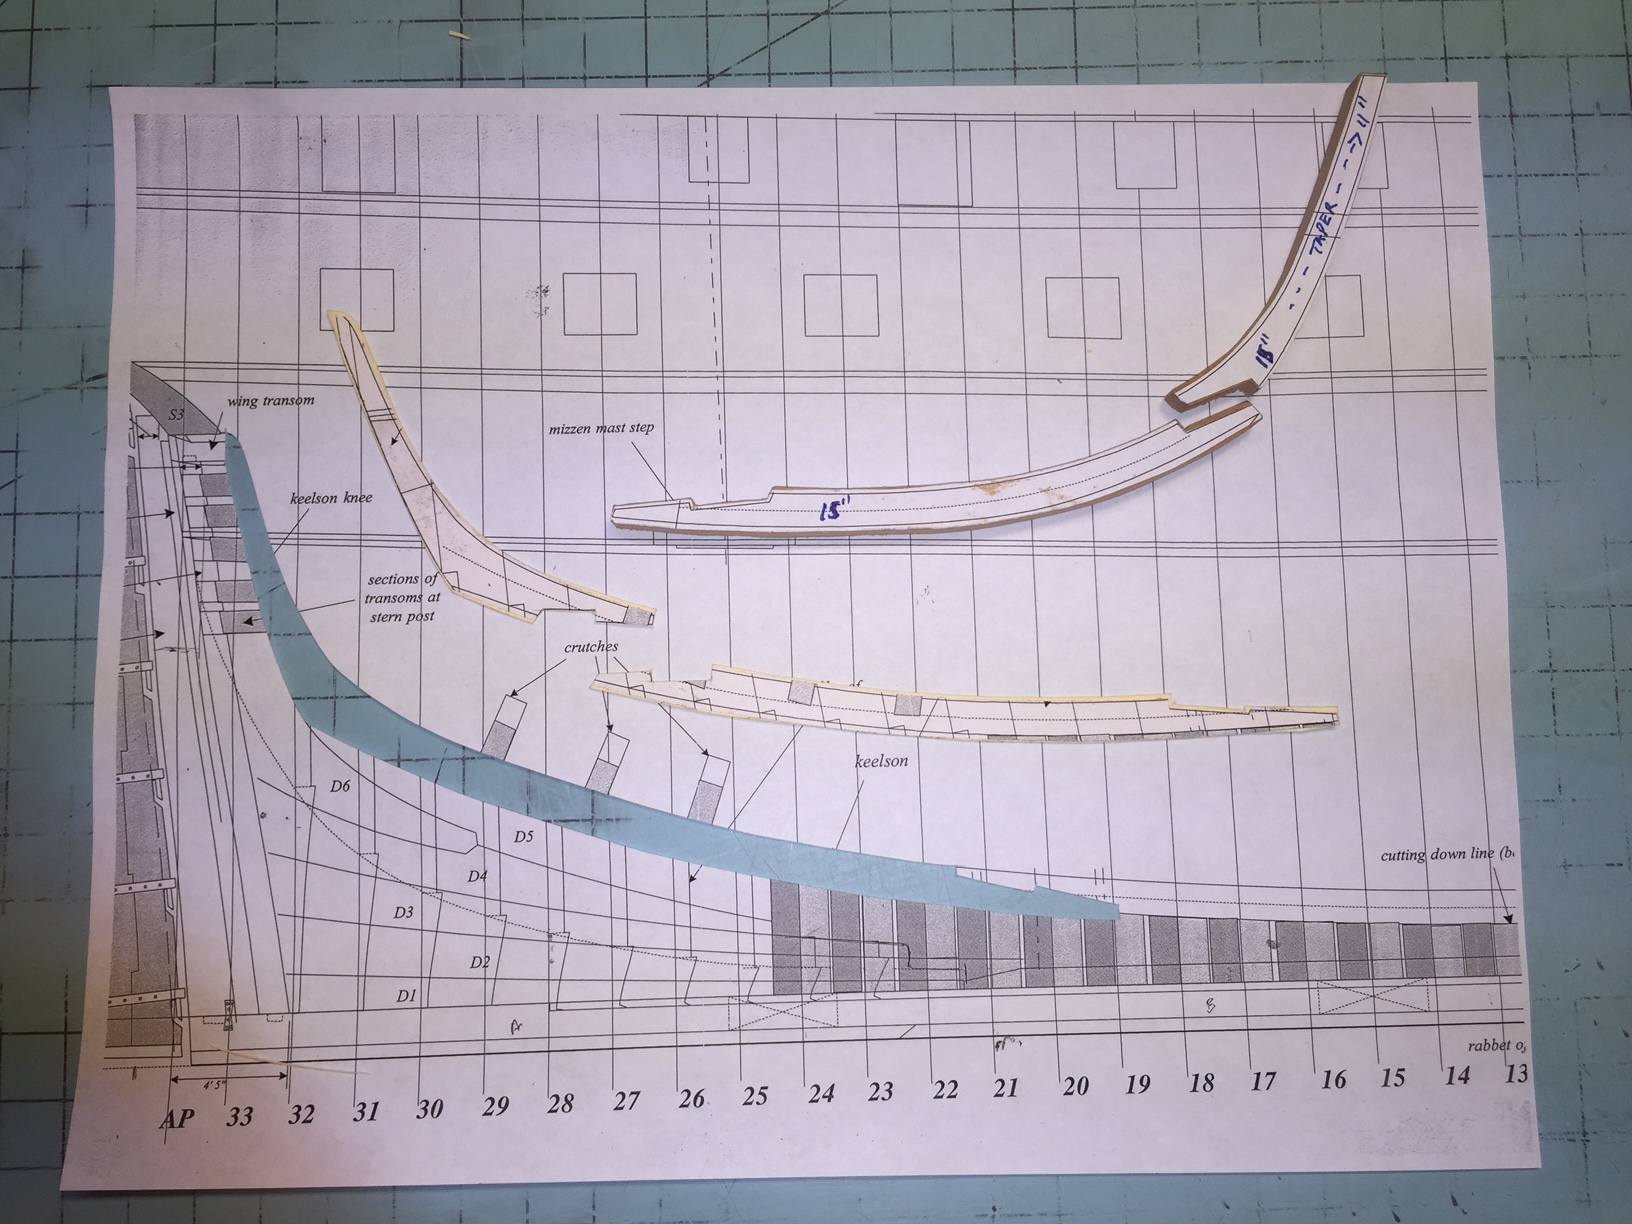
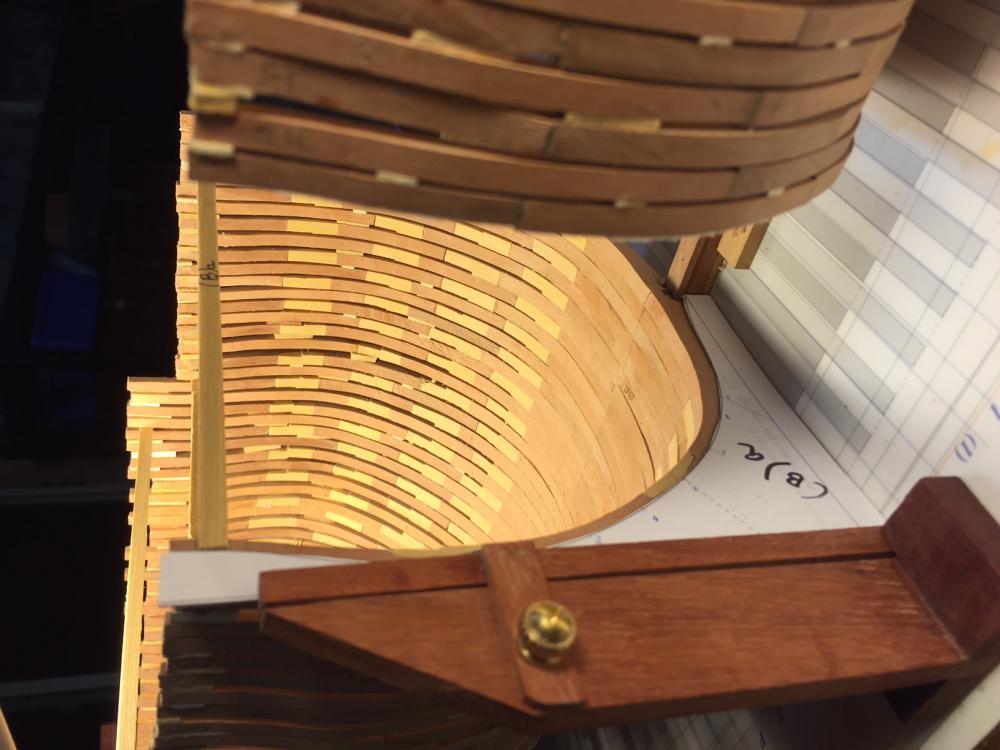
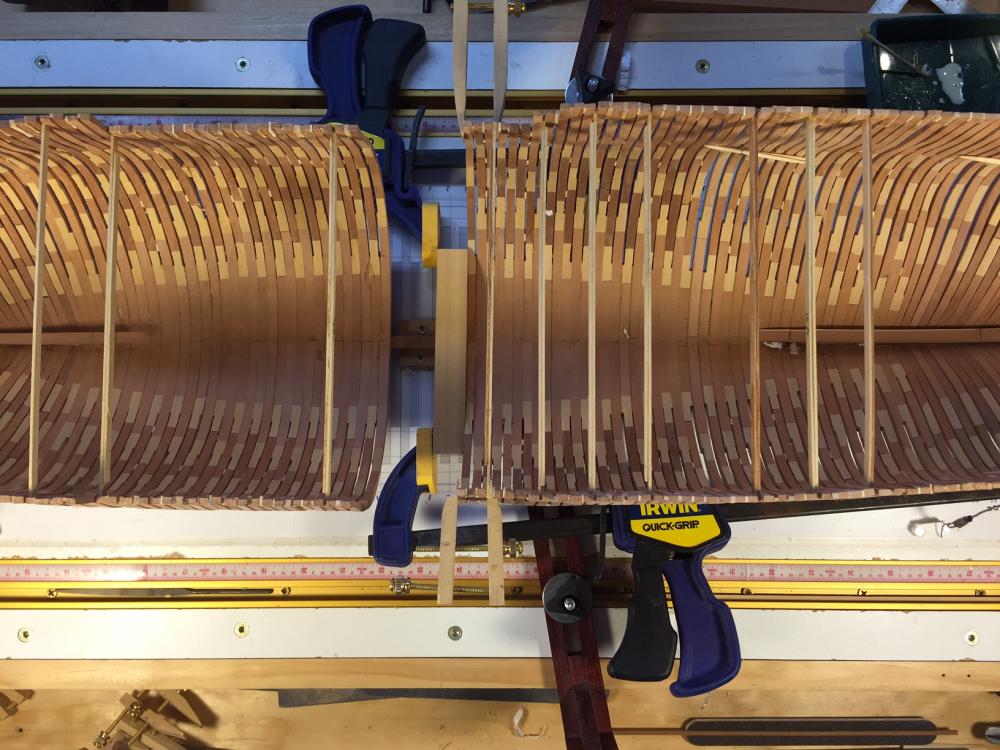
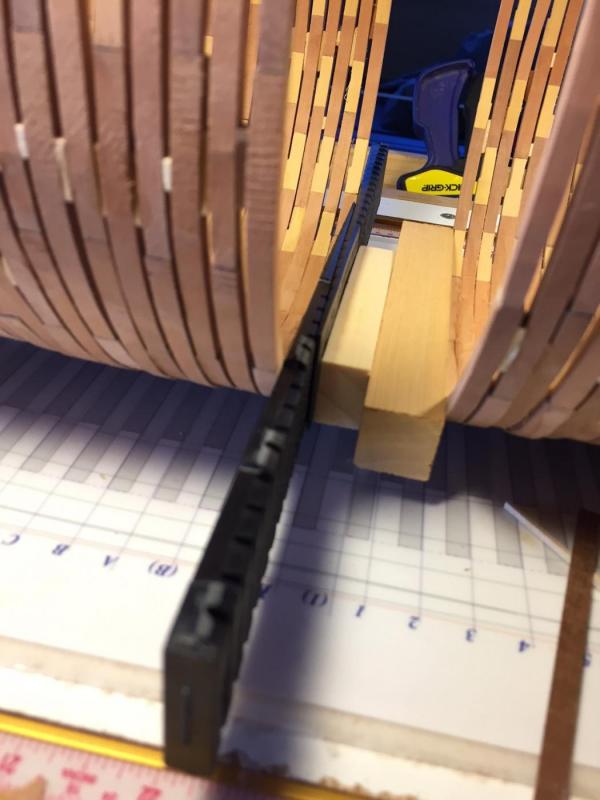
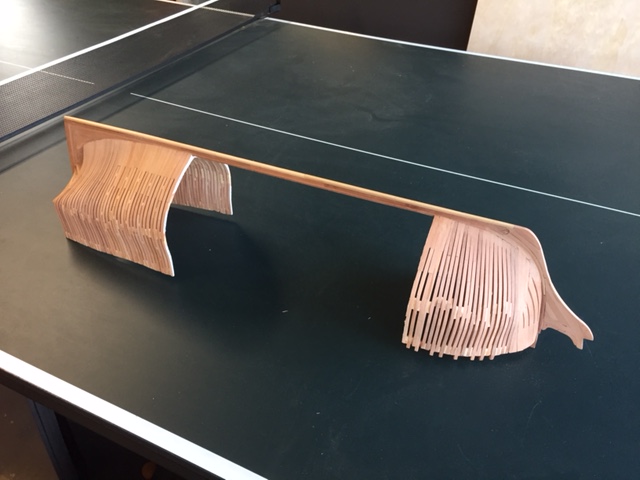
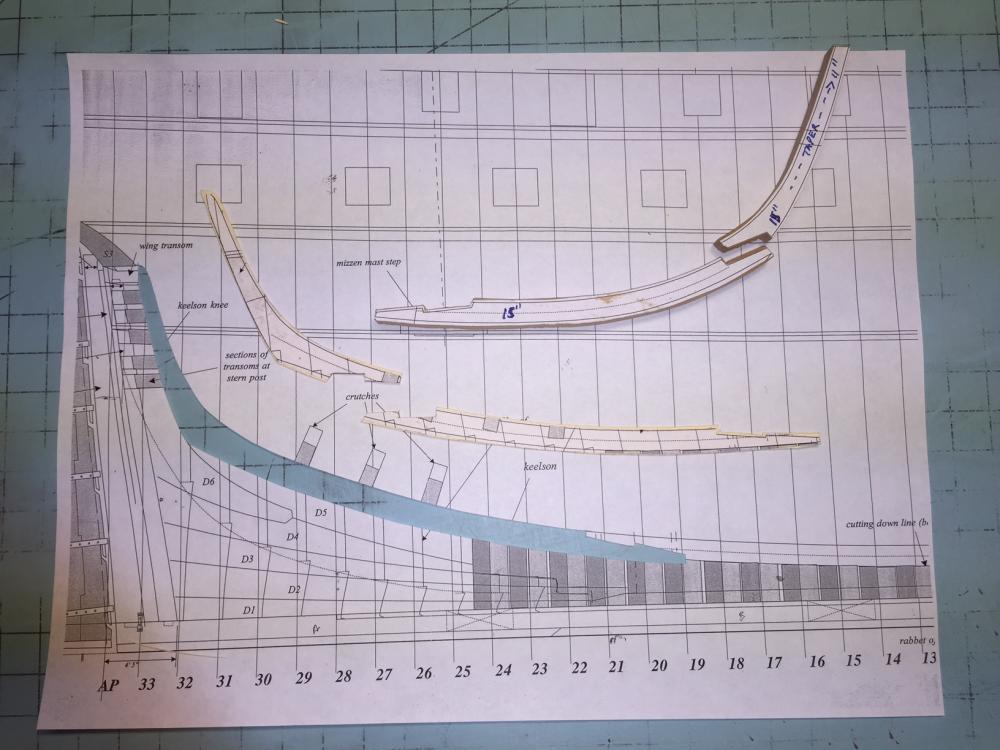
211 hours into the journey... I have been doing some fine tuning this week and realigned the top timbers. I was originally going to glue a strake across the outside top timber to fair the frames, but thought against it since it would lead to access issues at a later date. Instead, I clamped a strake across the upper works and then reglued all the spacers for better alignment. I am pleased with the results and obviously have a little more work to do. There are 81 square frames on this build, thats a lot of repetition and hundreds of hours work. I decided to batch make my frames in sets of 4 or 5. As you can see from the photo, the ping pong table is doing double duty (at least until tomorrow). You will note frames in various stages of completion. I prefer to have as few wet glue joints as possible when gluing up the frames. While it may take longer to assemble each individual frame, it has improved the overall results. Looking for a slight change of pace and a little deviation for the frames, I have begun to layout the keelson. Here you can see various pieces for the stem and stern. They are oversized slightly for fine tuning. I used thick cardboard to make the patterns for the stern knee keelson and aft section. While the scarph joints will not show, I am going to do them anyways since it will be good practice and will also help to reinforce the keel structure as they did on the real ship.


-
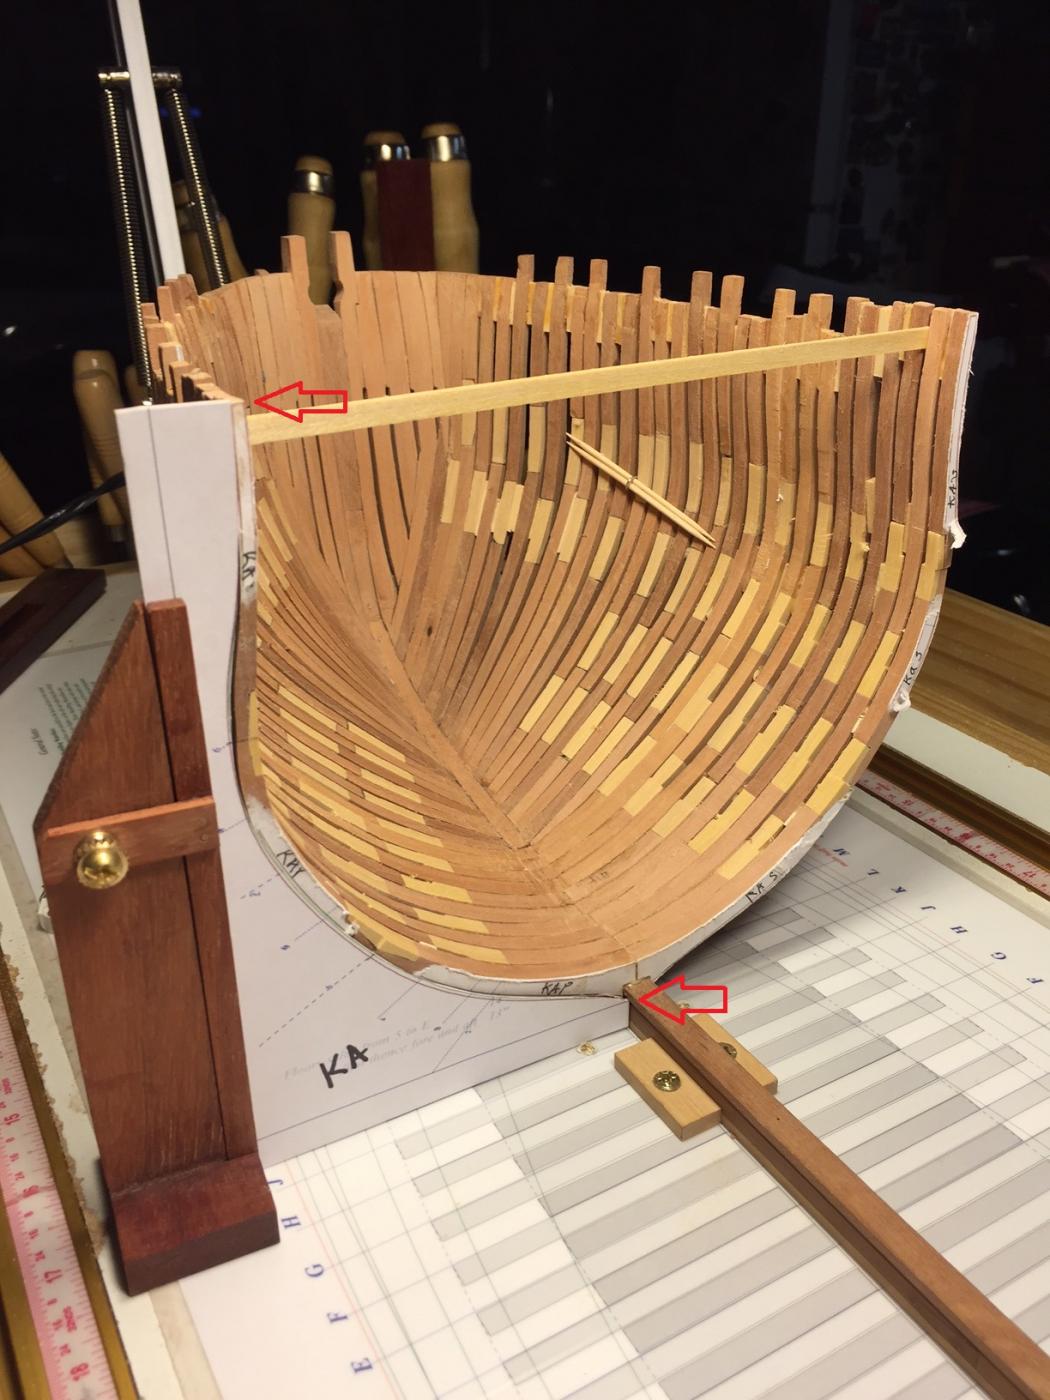
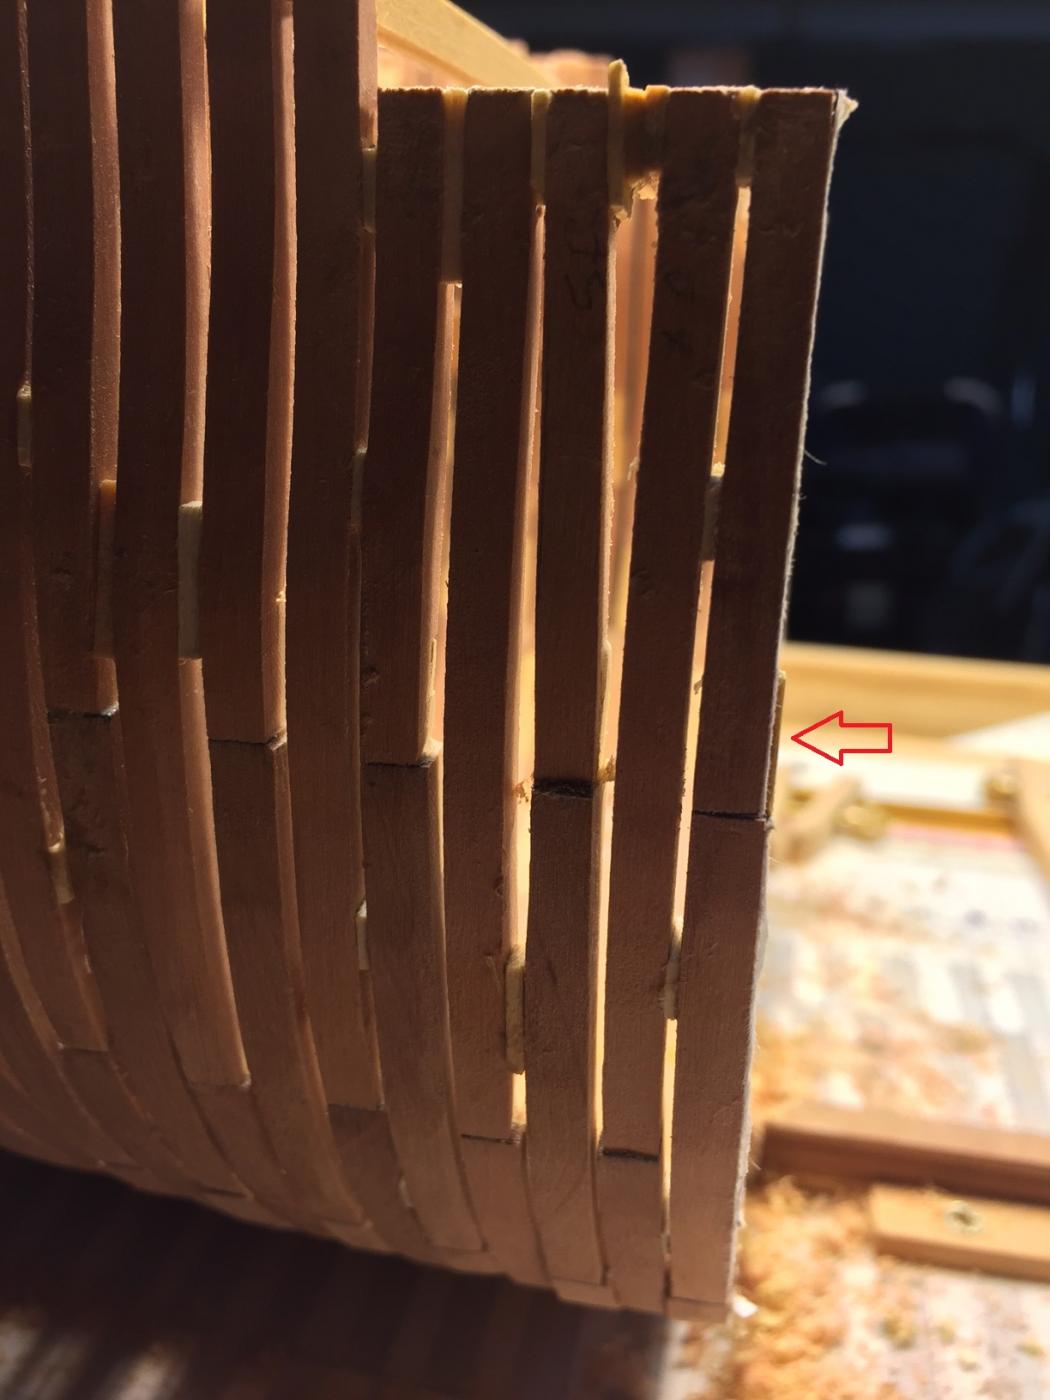
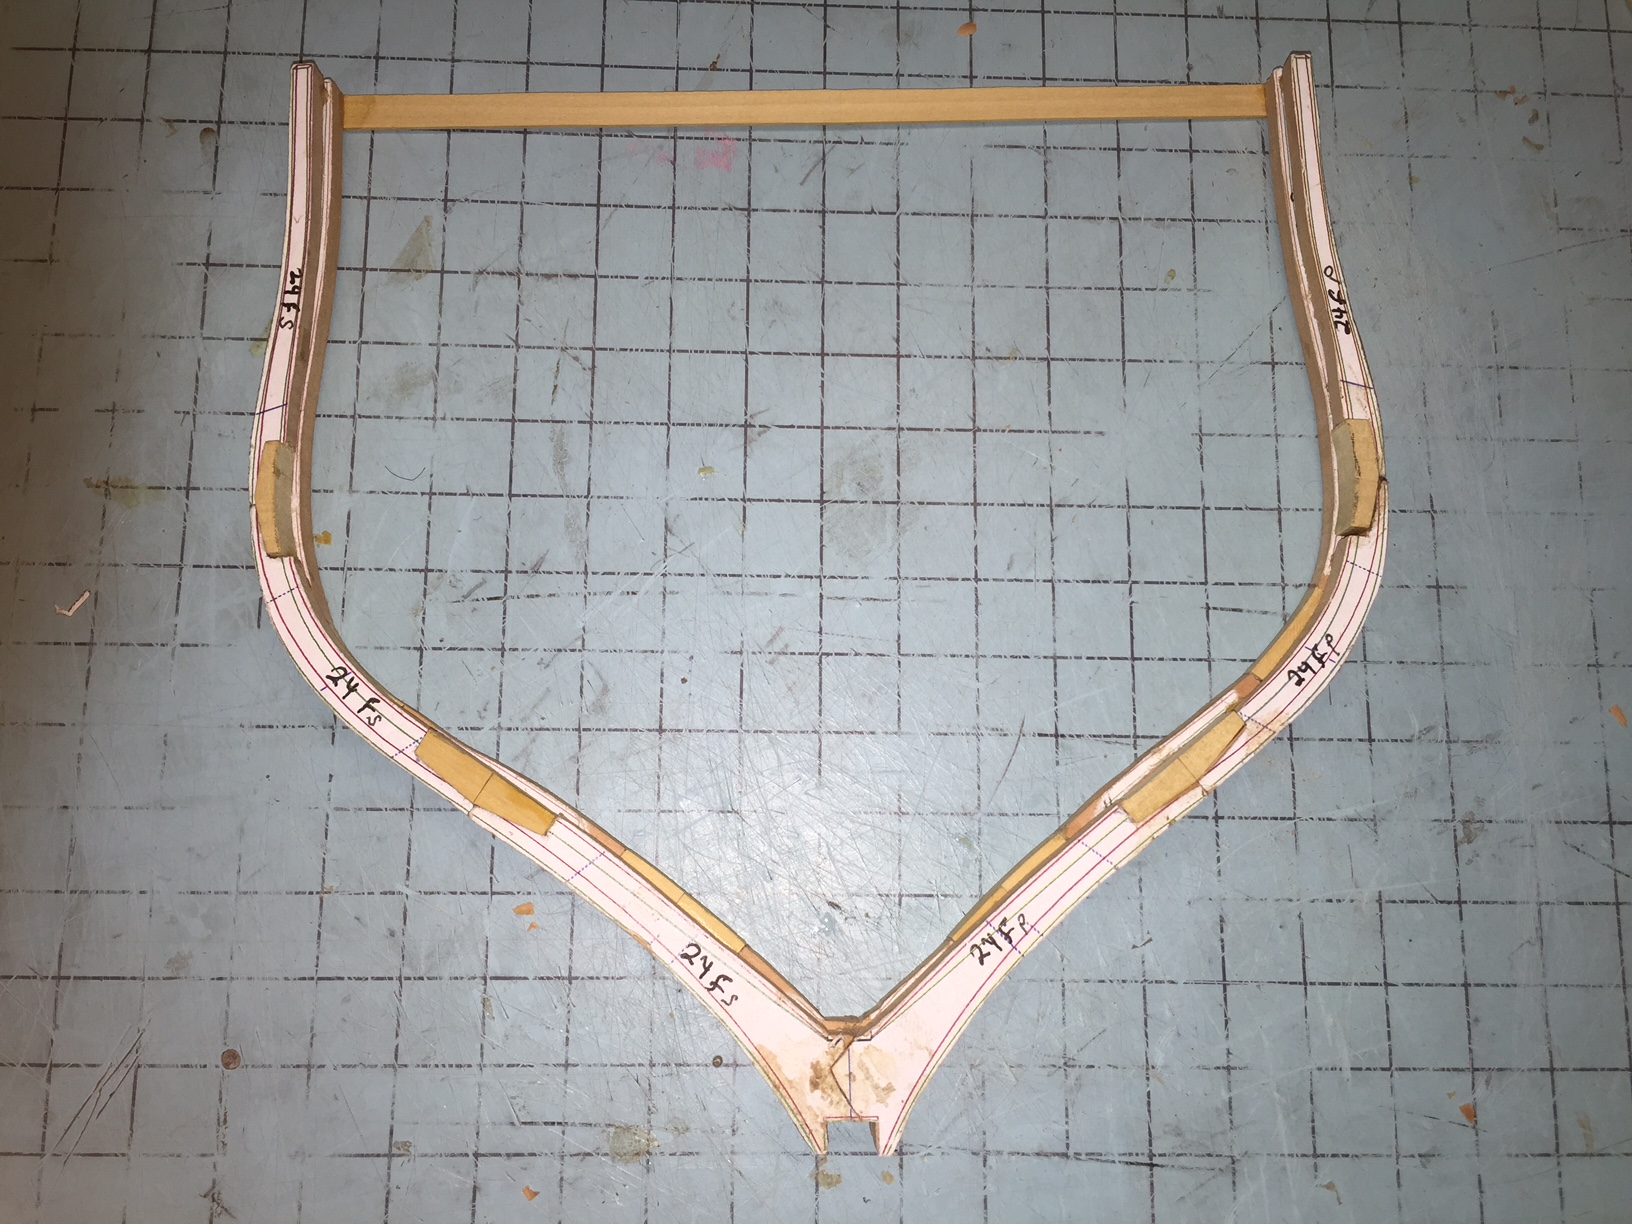
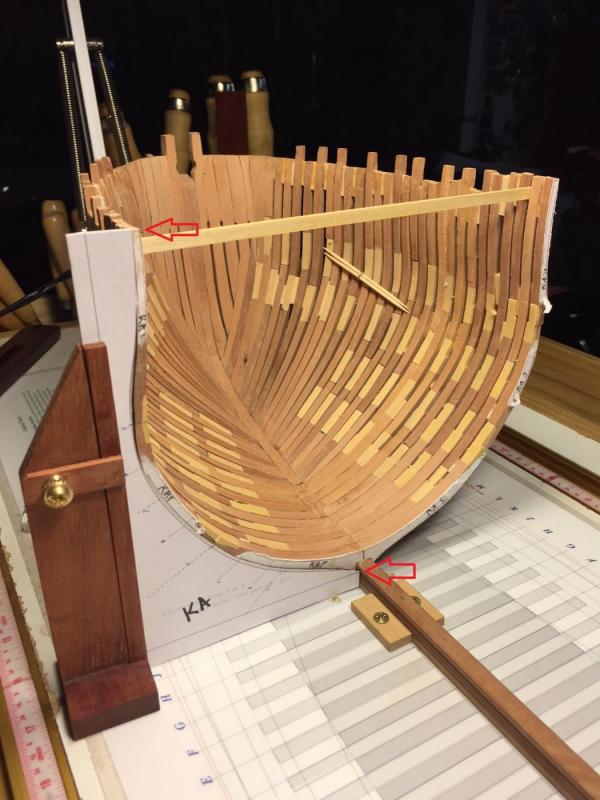
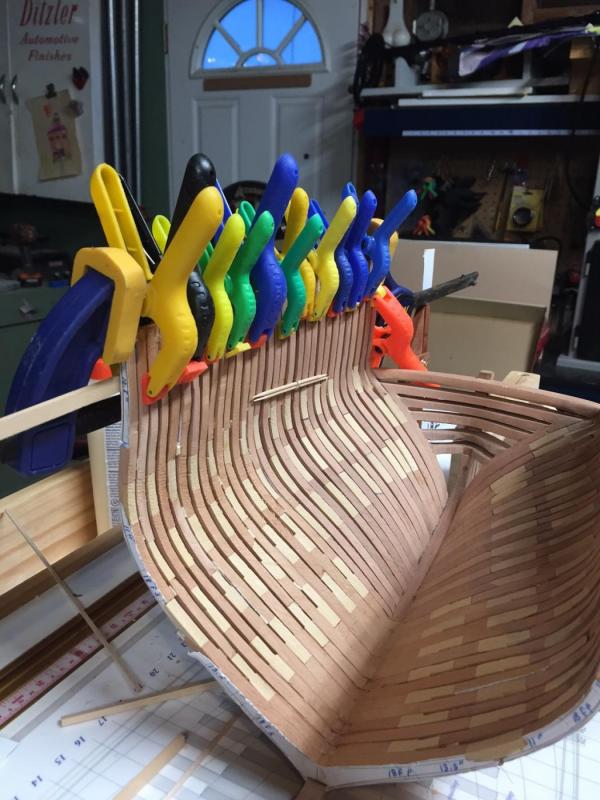
205 hours into the voyage. I am now at frame 18f. This is one of the main bends where 18a and 18f (Aft and Fore) are bonded together with 2.5" spacers along the frame, starting above the floor. I am very pleased with how things are turning out and as you can see from the template, the frames are at their correct shape. I have decided to deviate from the practicum briefly and will fair the top timbers completed to this point before moving forward with additional frames. I feel this is necessary since there are a few out of place and this will affect the fairing of the hull further down the road. I will pin a batten along the sheer line using bamboo dowels to pull the timbers in line. I am choosing bamboo as opposed to brass pins so that I can fair the inside of the top timbers. My longer-term plan is to place the ceiling timbers before full fairing of the outside. This will offer the hull structure the best support possible. Note the patterns are still attached. While a bit tattered, they are a valuable road map. I can't emphasize enough how iimportant it is to leave these patterns in place until the last possible moment. Thanks, Gary

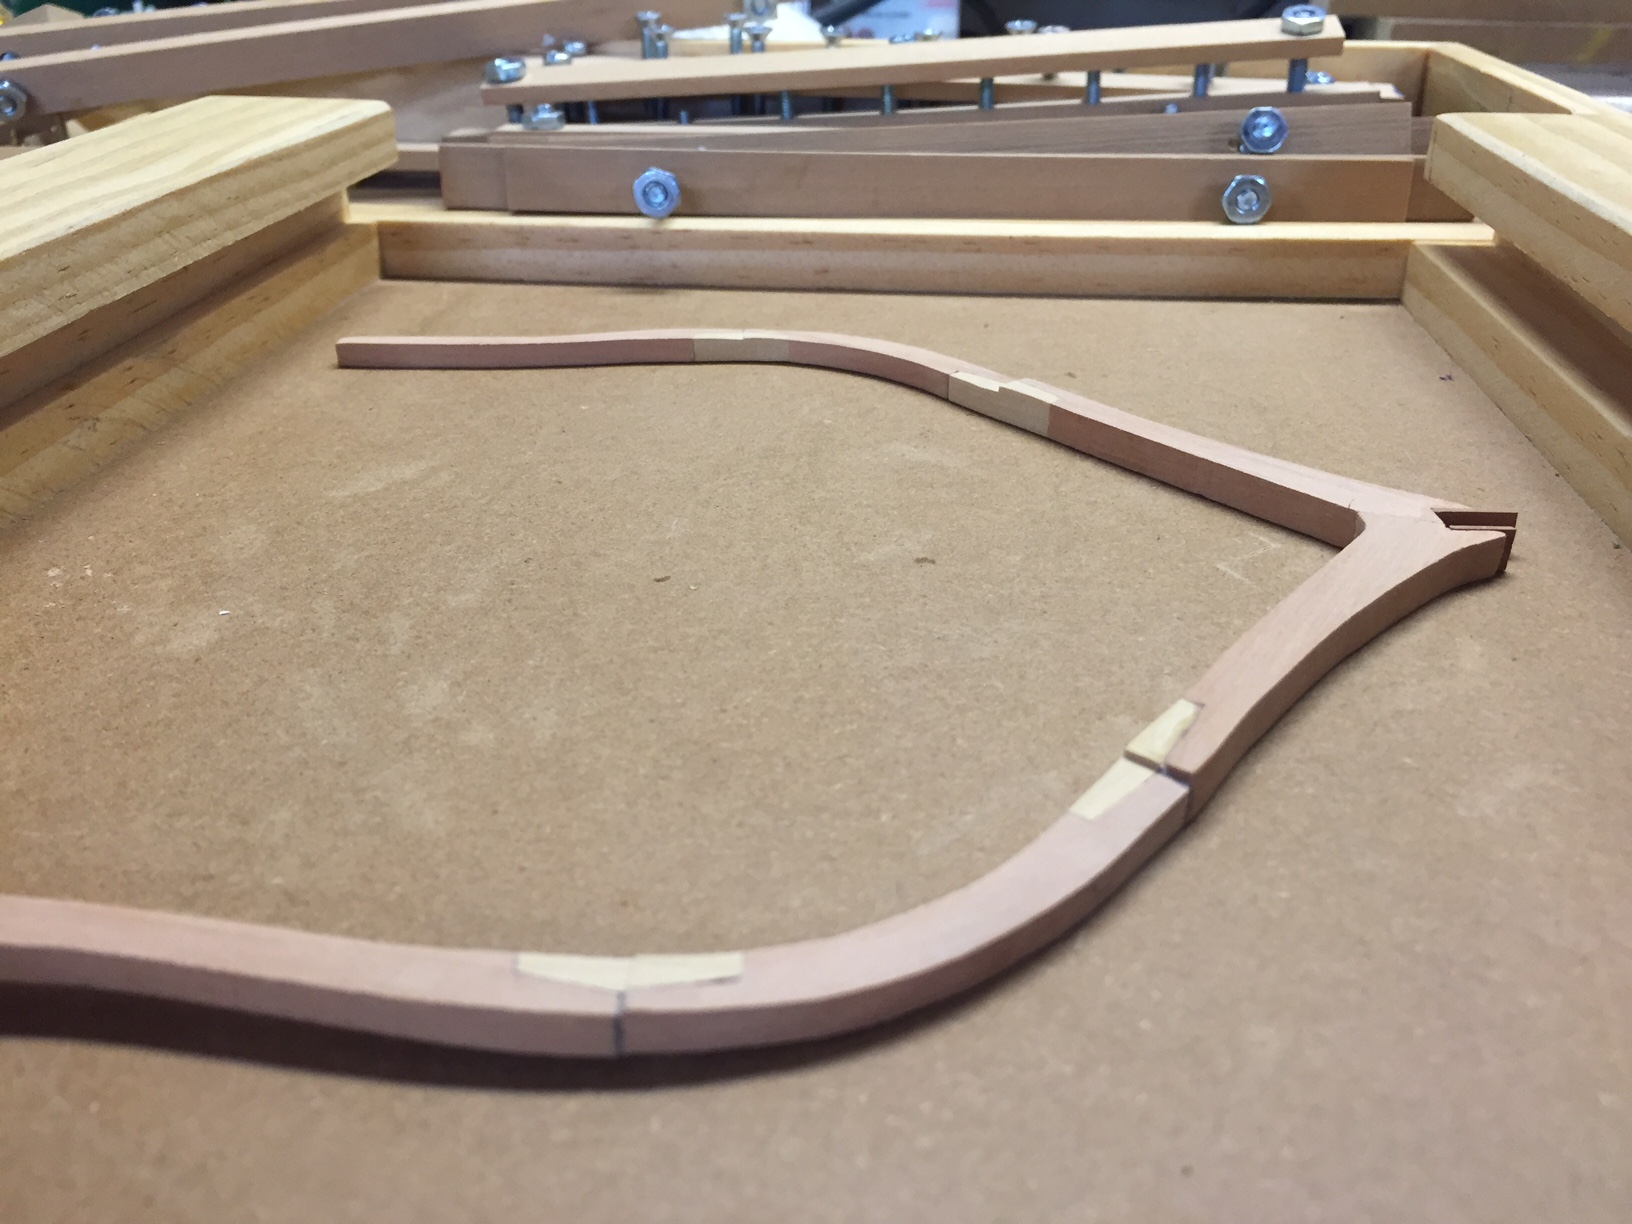
-
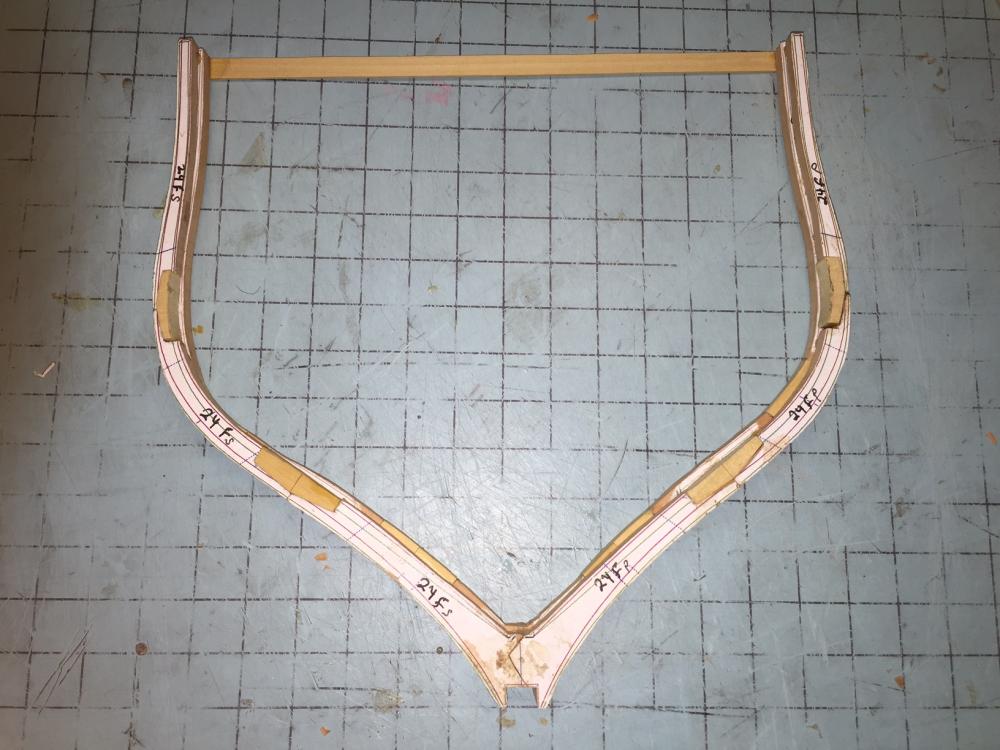
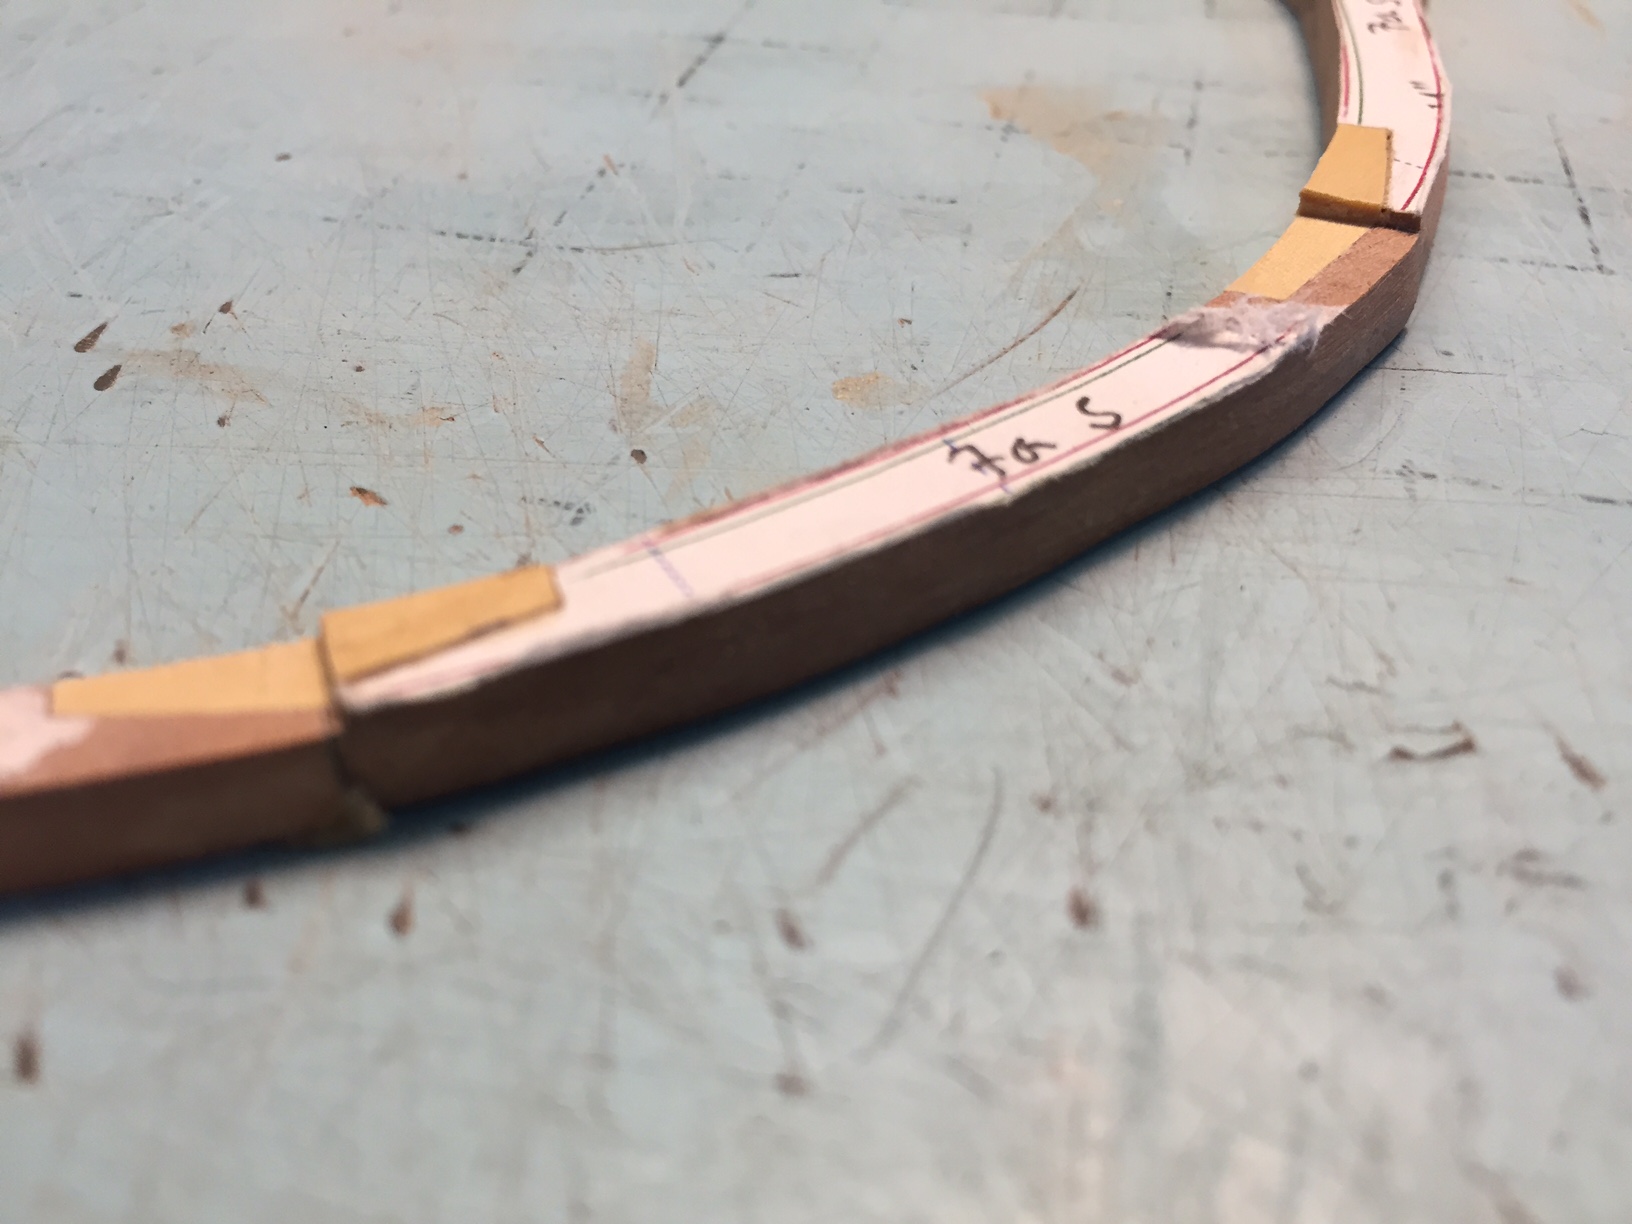
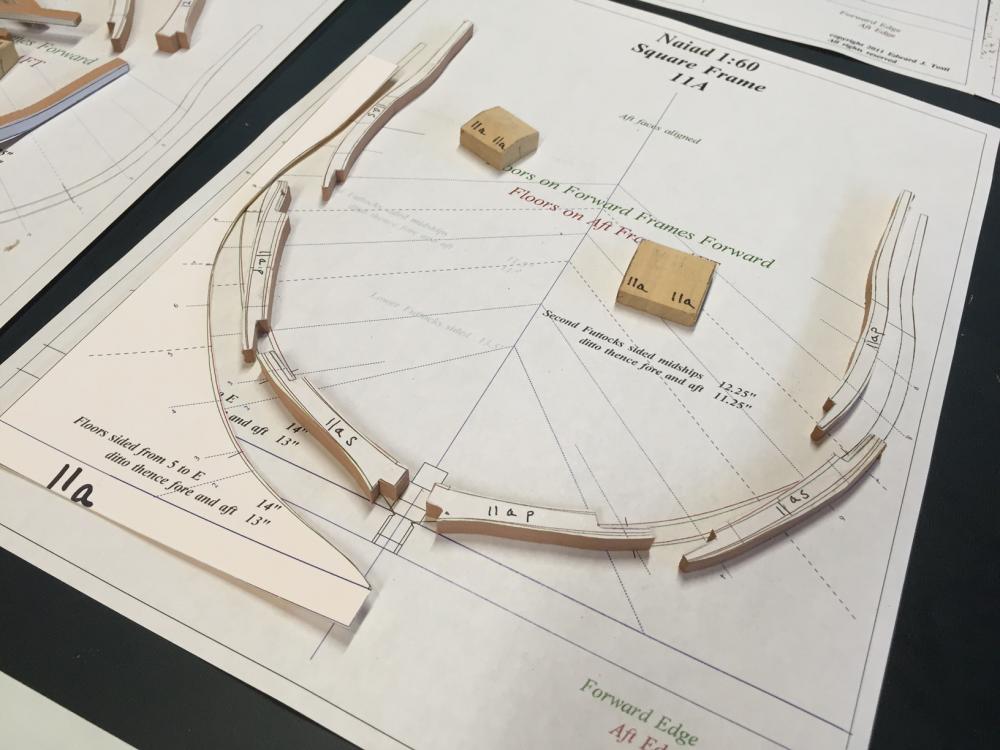
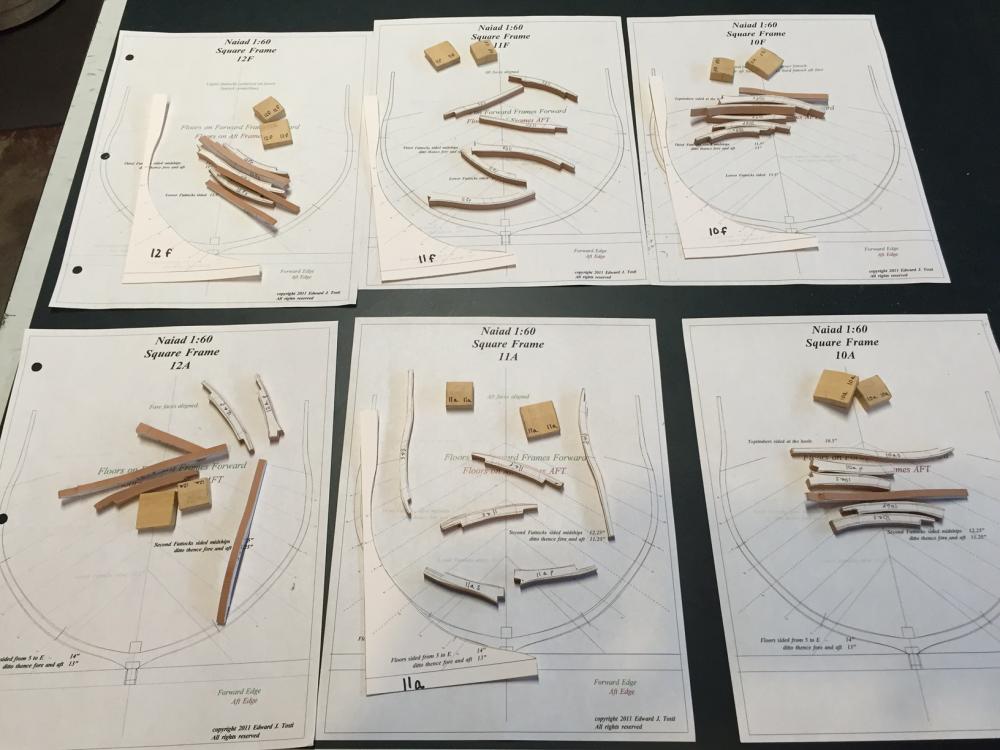
179 hours into the build - I have now begun work on the next phase - Square Frames - these are very complicated and a wonderful challenge. The difference in sided thichkness from one futtock to the next is anywhere from 1 3/4" to 2 1/2". At scale, thats in thousands! At first, I was just going to blend the sided thicknesses to one size, but in my humble opinion, that gets away from the whole point of building a ship in this style. So out came the calipers in thousands! I had to glue in some wood spacers in the keel slot since it was too wide. I will file these down so there is a snug fit. This will not be seen in the final model. In subsequent frames, I will not cut this slot so wide on the first go around. Note the subtle changes in frame thickness and how the chocks are cut. I love this kind of detail. Here is Main Frame 24. The main frames are bolted together with spacers for breathing. You really get a strong appreciation for how the shipbuilders mittigated wood rot through creative spacing techniques. This build is the best ship construnction education I have gotten as compared to just reading about it in books. Note the amount of fairing to be done - later... yes, the S/B side first futtock looks thin... It actually just on the margins... I will need to be careful here when fairing and gain some thickness back in the next frames. The gantry helps to align the frames center line.