GDM67
-
Posts
103 -
Joined
-
Last visited
Content Type
Profiles
Forums
Gallery
Events
Everything posted by GDM67
-
Hi Tiz, Thanks for the explanation. I look forward to your next post! Gary
-
Tiz, I echo everyones comments to the max. What is your process for obtaining such a high-quality finish on each individual piece? Sandpaper, scrapper, both? I welcome your elaborating on how you attack each piece and then your assembly process. Your wood is of such high quality, do you pre-select and mill it yourself? Looks like Swiss Pear, but better. What type of finish are you using? Thanks, Gary
-
Generic Sharpie by DocBlake
GDM67 replied to DocBlake's topic in - Build logs for subjects built 1851 - 1900
Hi Dave, Great start. I have been eyeing this one for something different. I will follow along with interest. On a separate note, I see that you have the Rattler planned for a future build. I did this one several years ago using the Lauck Street Kit Bash. If you are interested, I have many insights on that one. Overall, it was an excellent practicum, but there are some things I would do differently a second time around. Looking forward to future posts. Gary -
Hi Tiz, I am late to the show on this one! Simply spectacular work. I find that detailing the inside of the hull to be difficult at best. You have accomplished it without flaw. I love the detailed photos of your journey and will continue to follow along. All the best, Gary
-
HMS Naiad 1797 by albert - FINISHED - 1/48
GDM67 replied to albert's topic in - Build logs for subjects built 1751 - 1800
Albert, your work is simply stunning. Its an inspiration for my own Naiad build. I really like the uprights you use at mid-ships to stabilize the structure. I will build a set as well. Best, Gary -
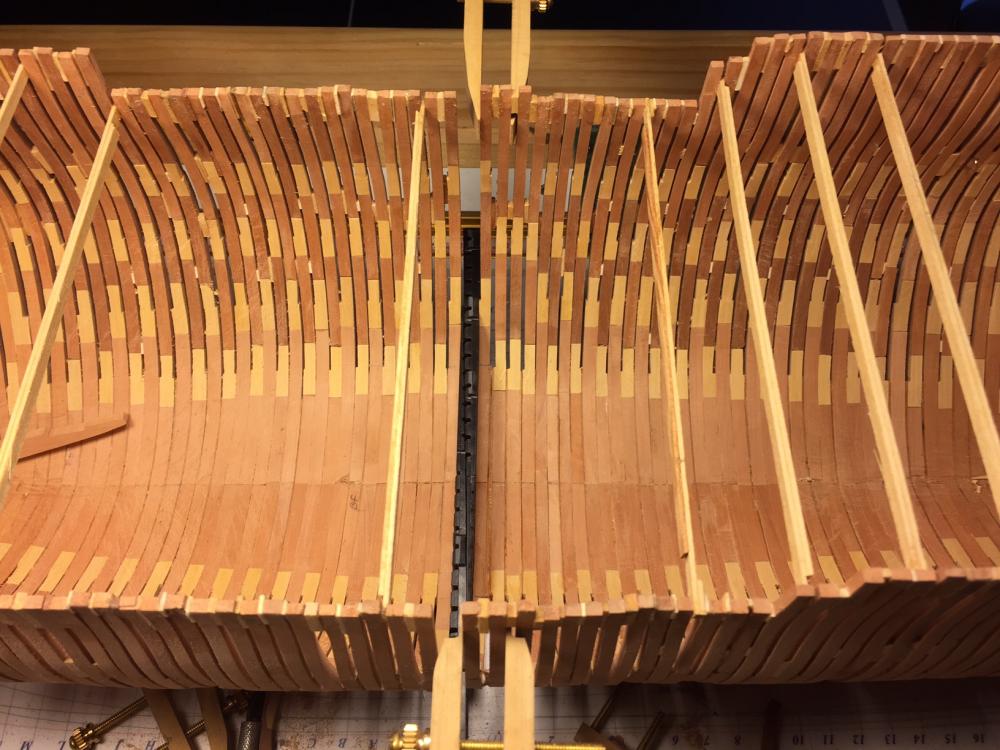
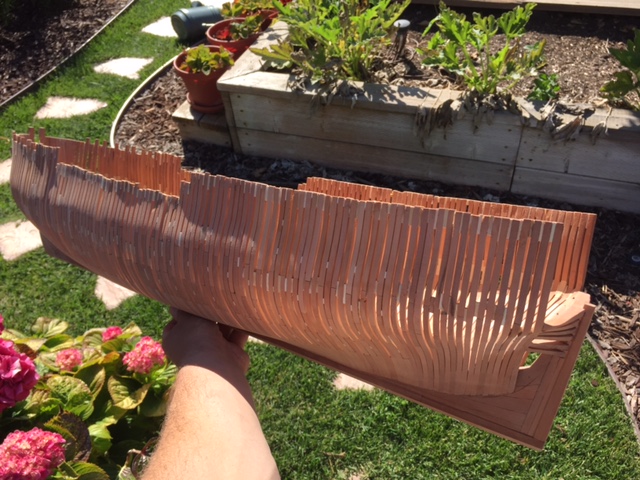
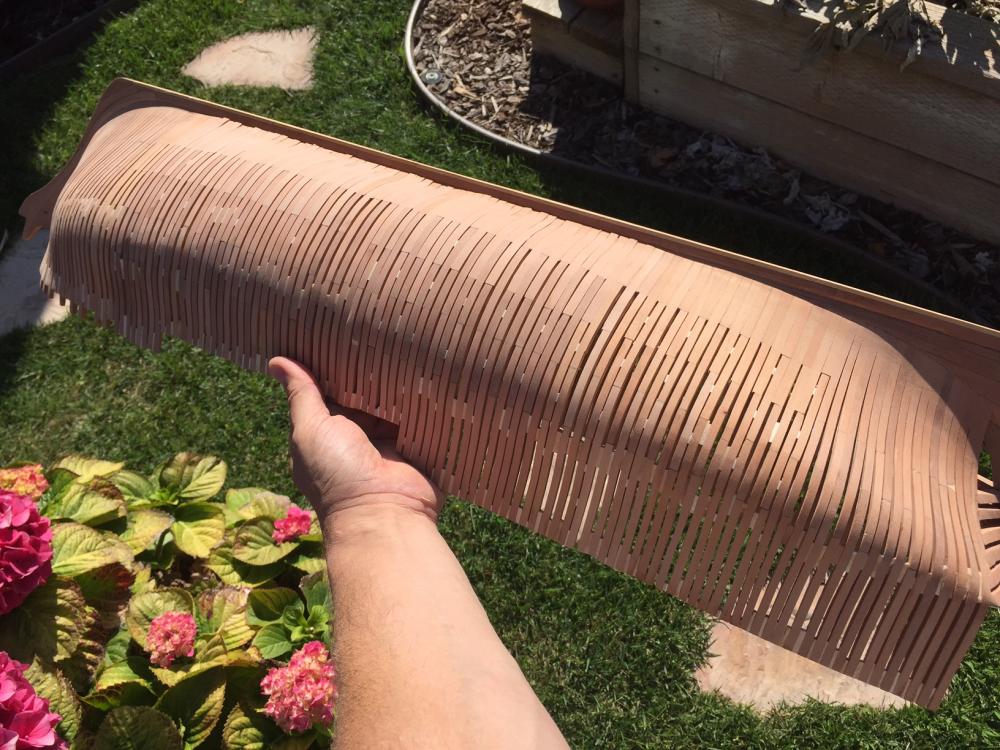
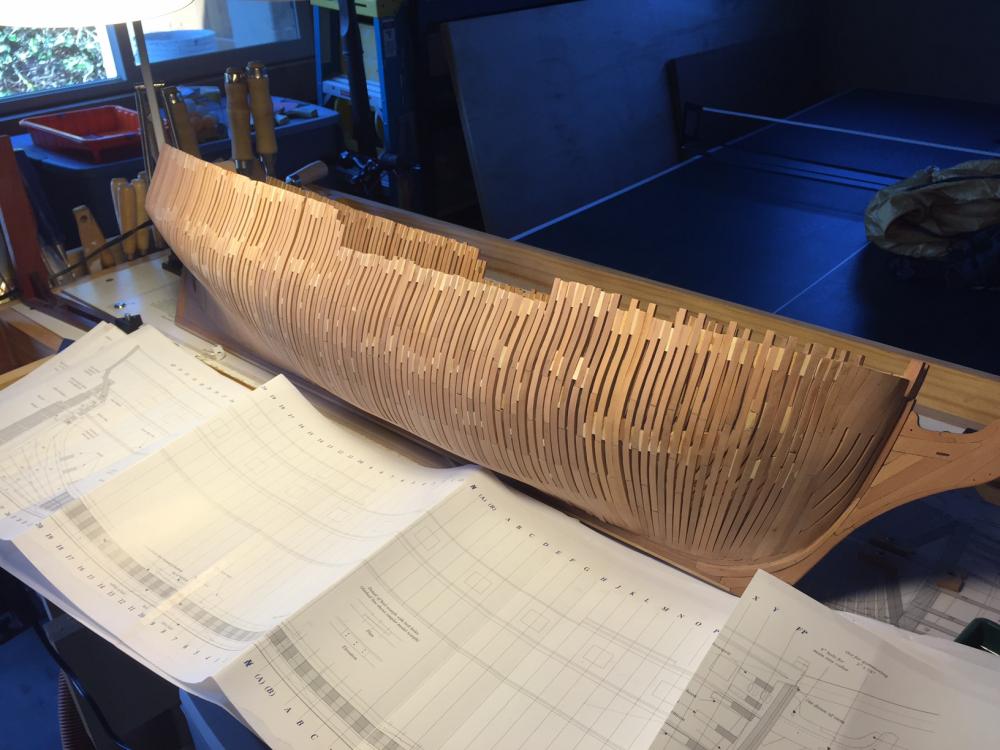
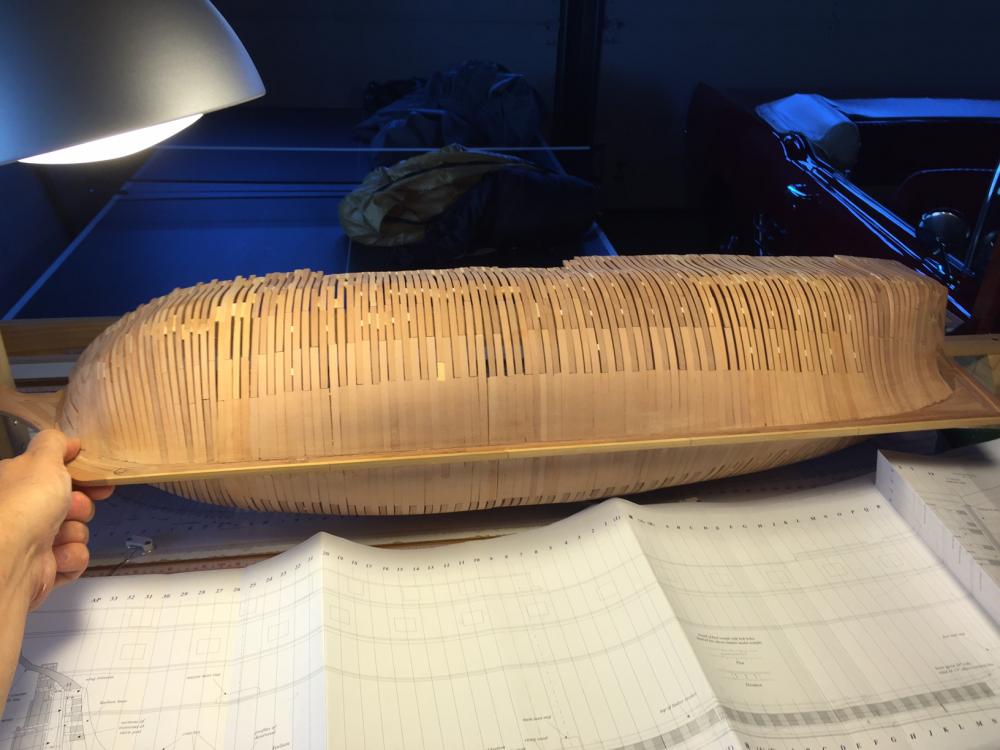
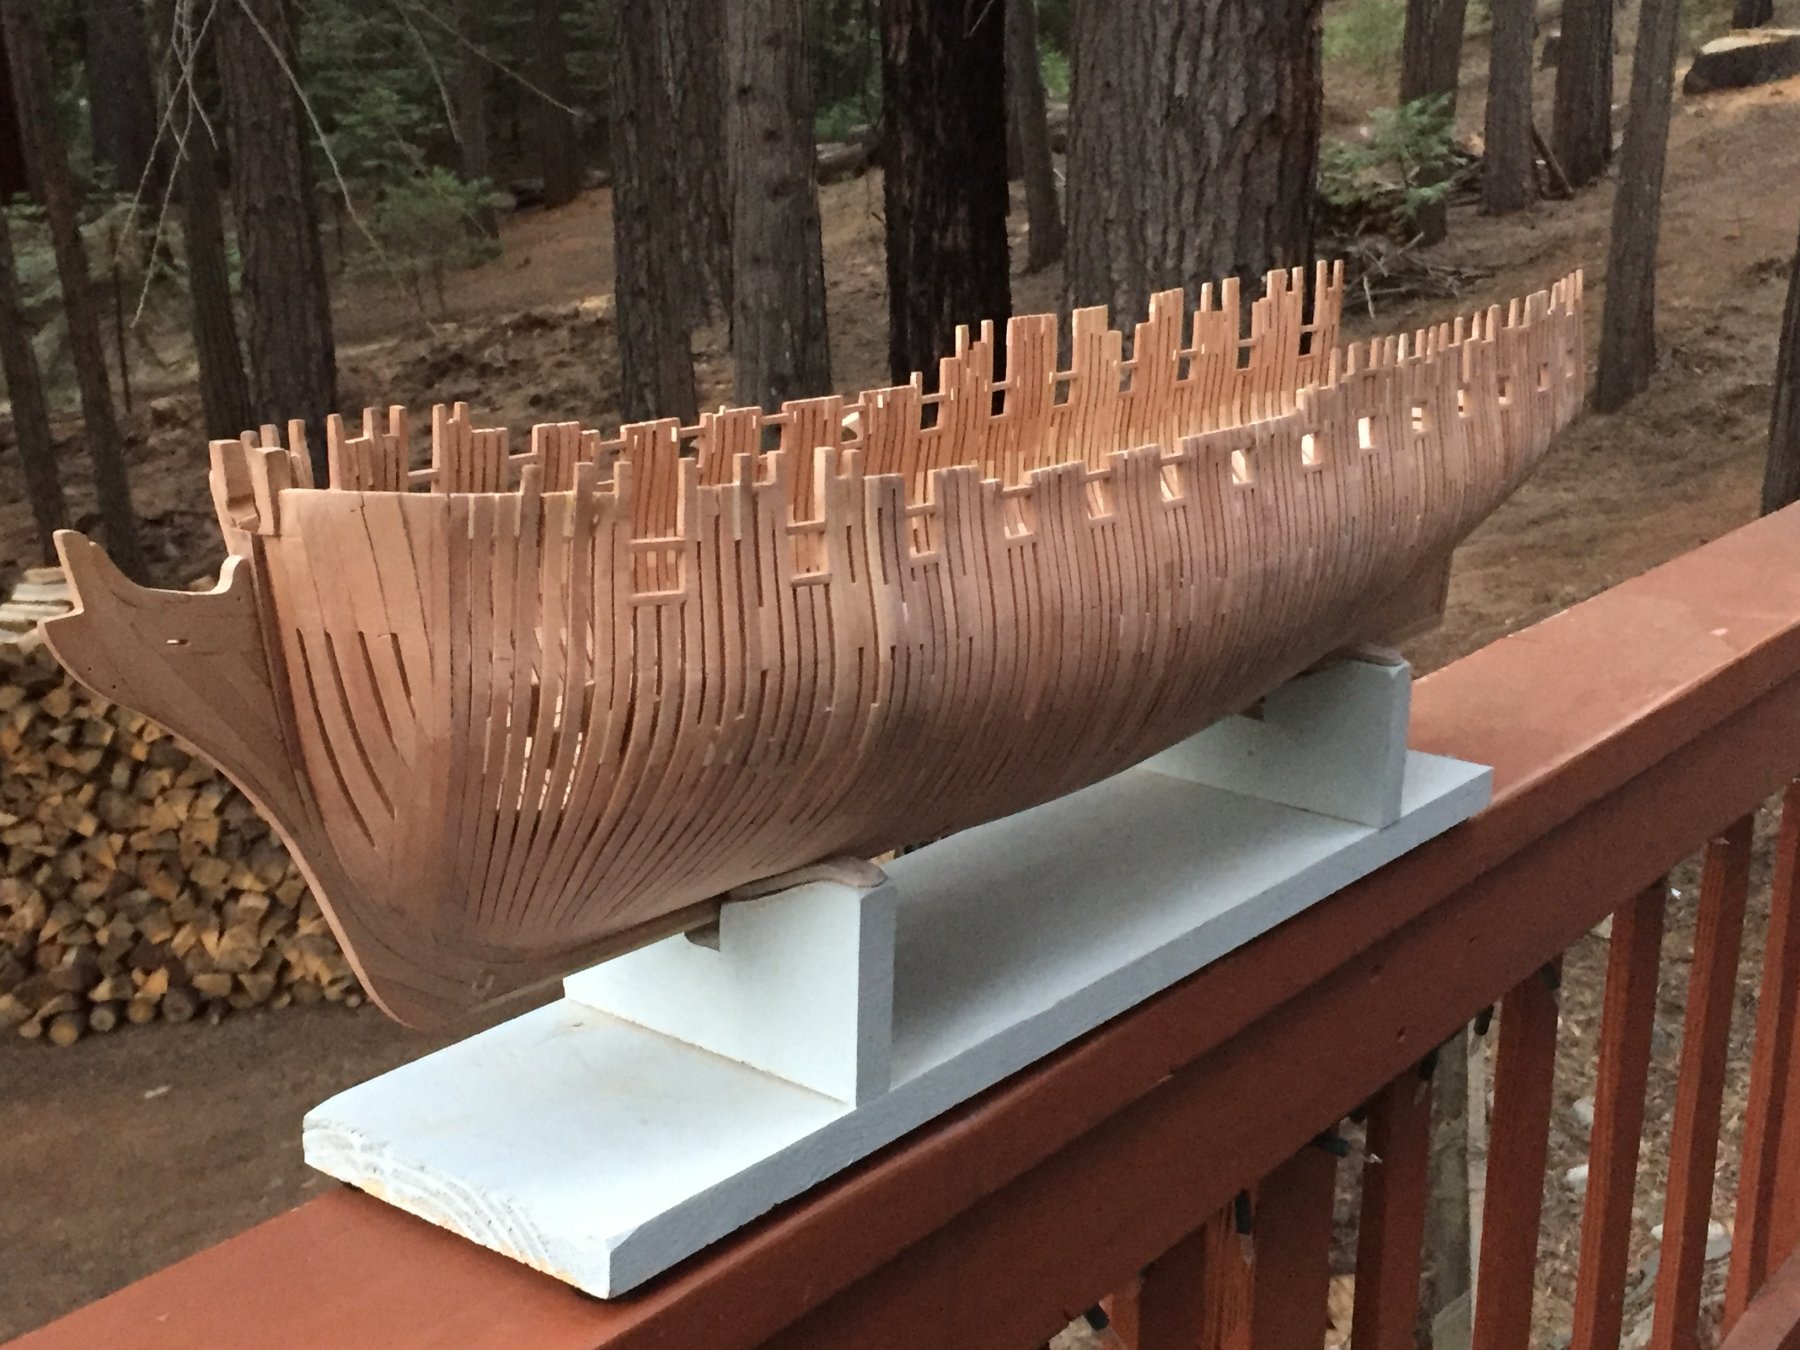
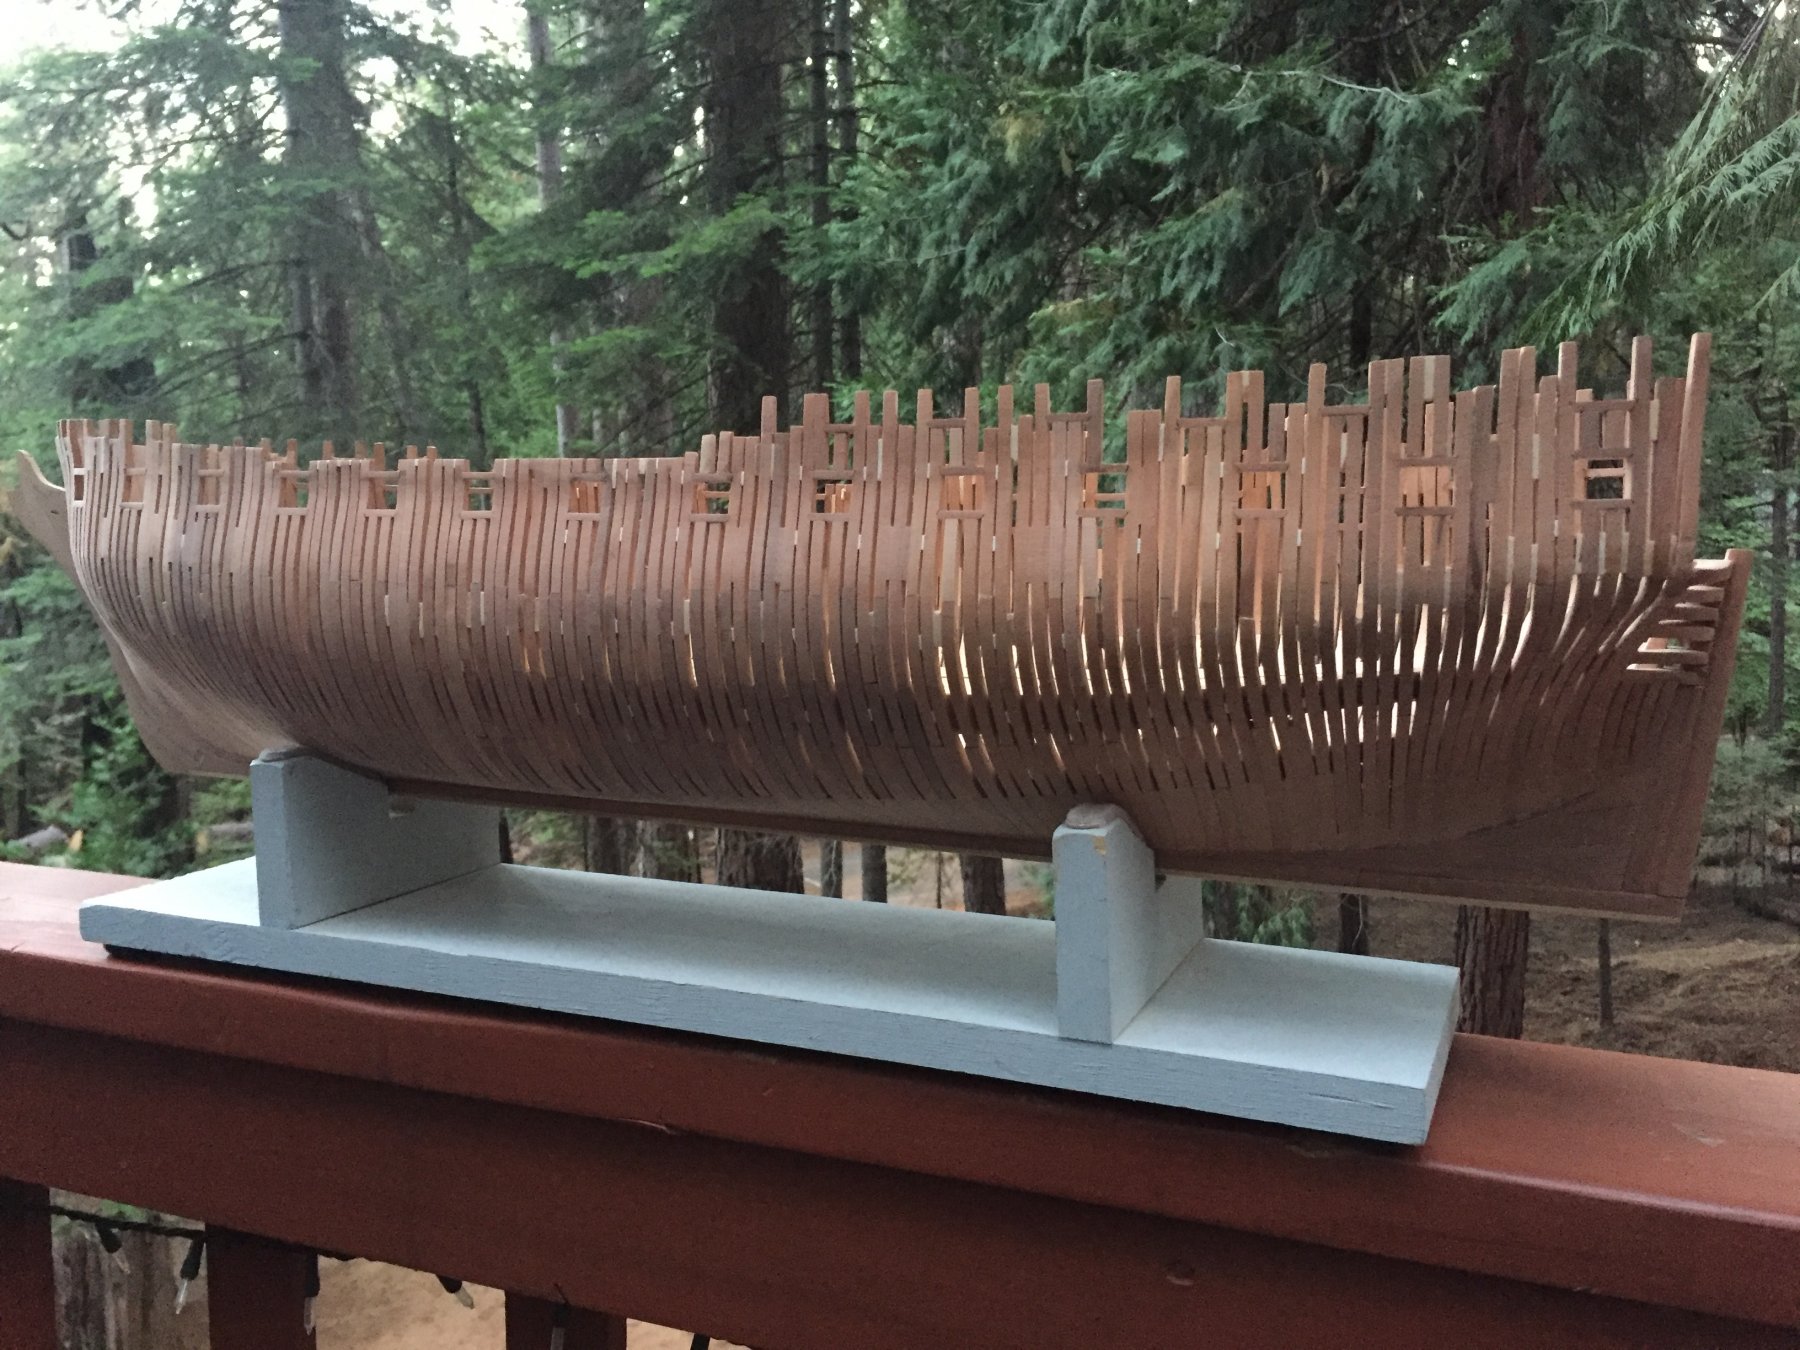
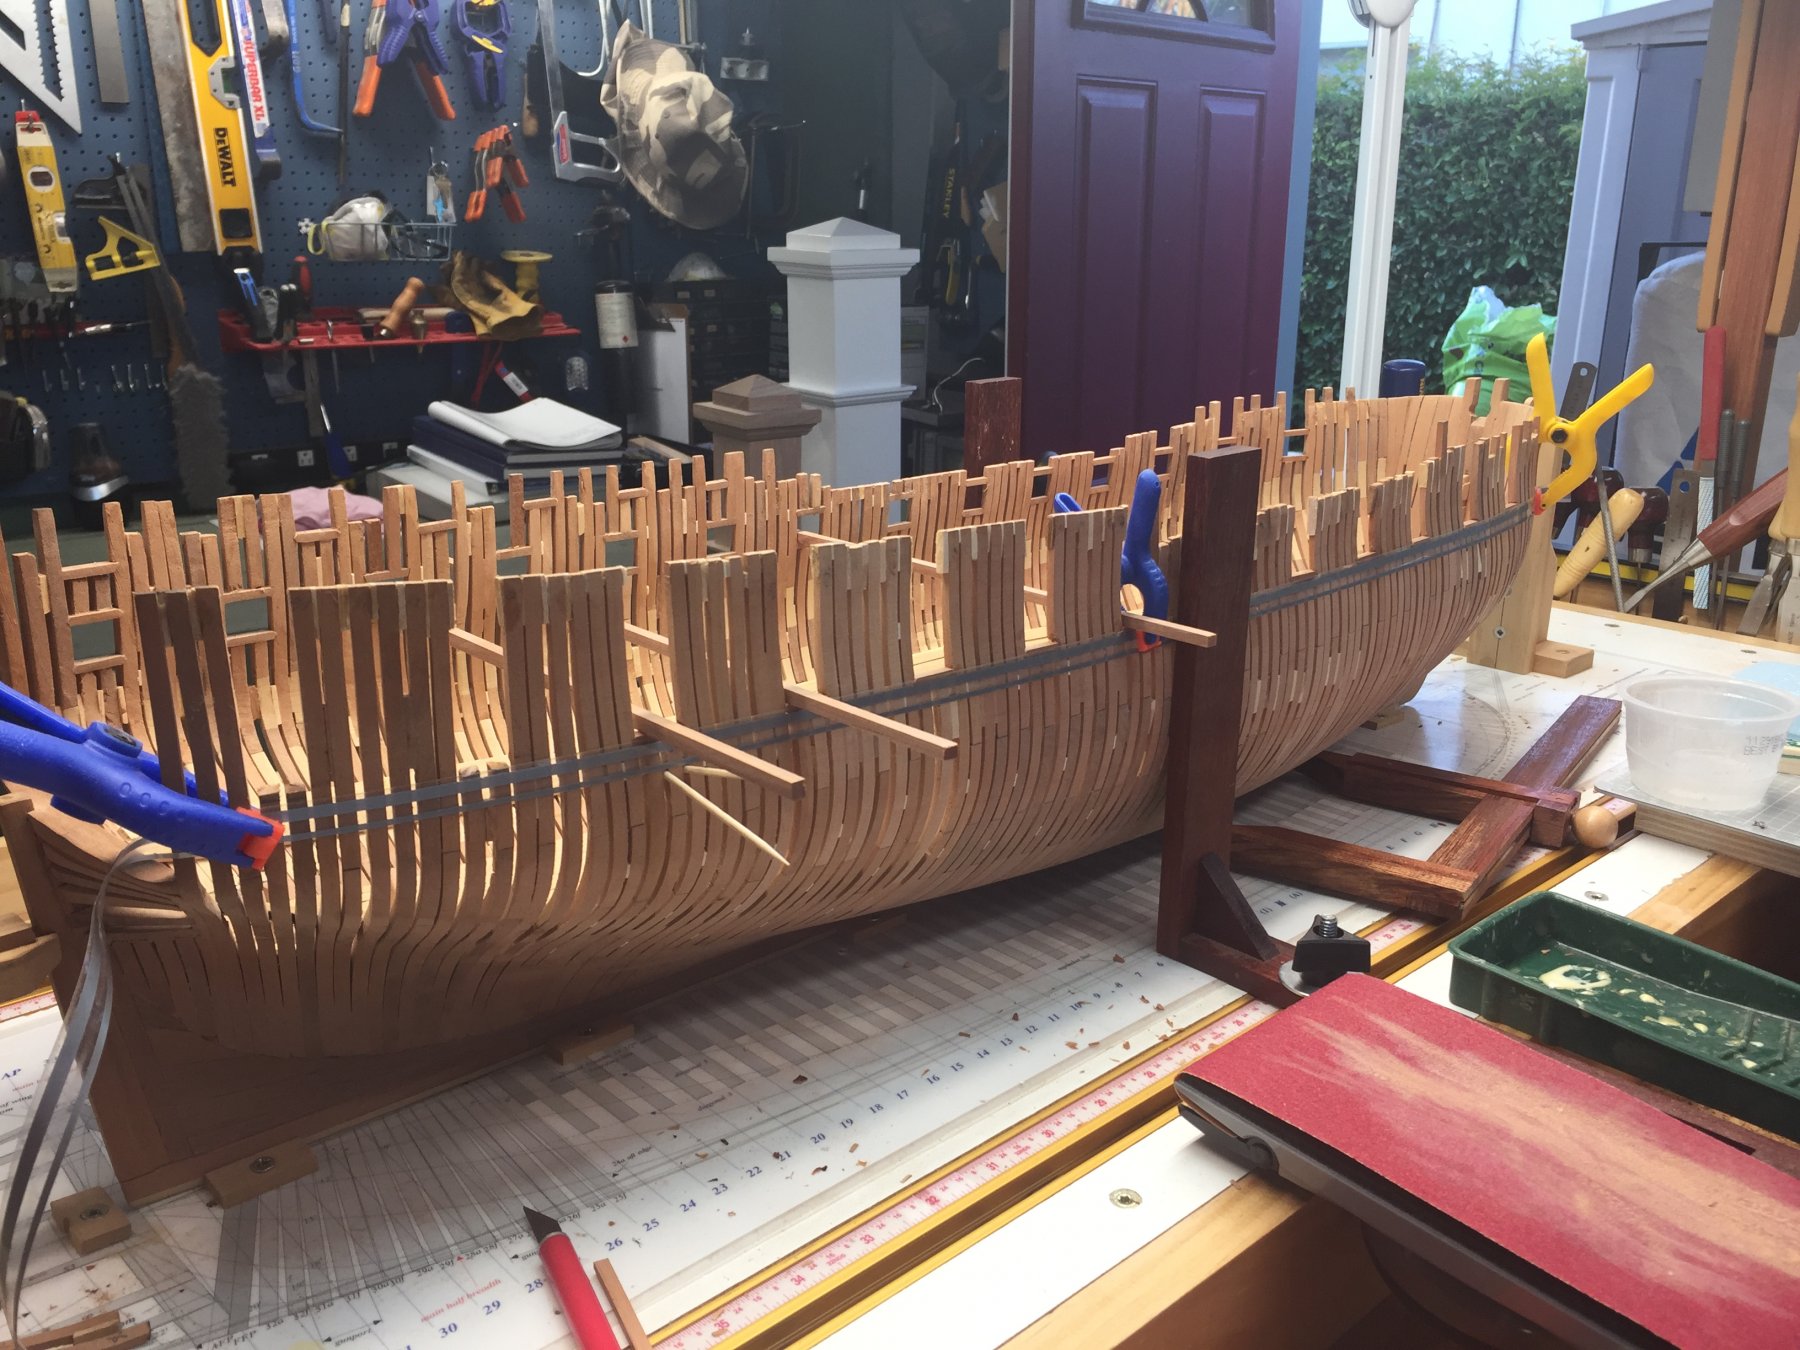
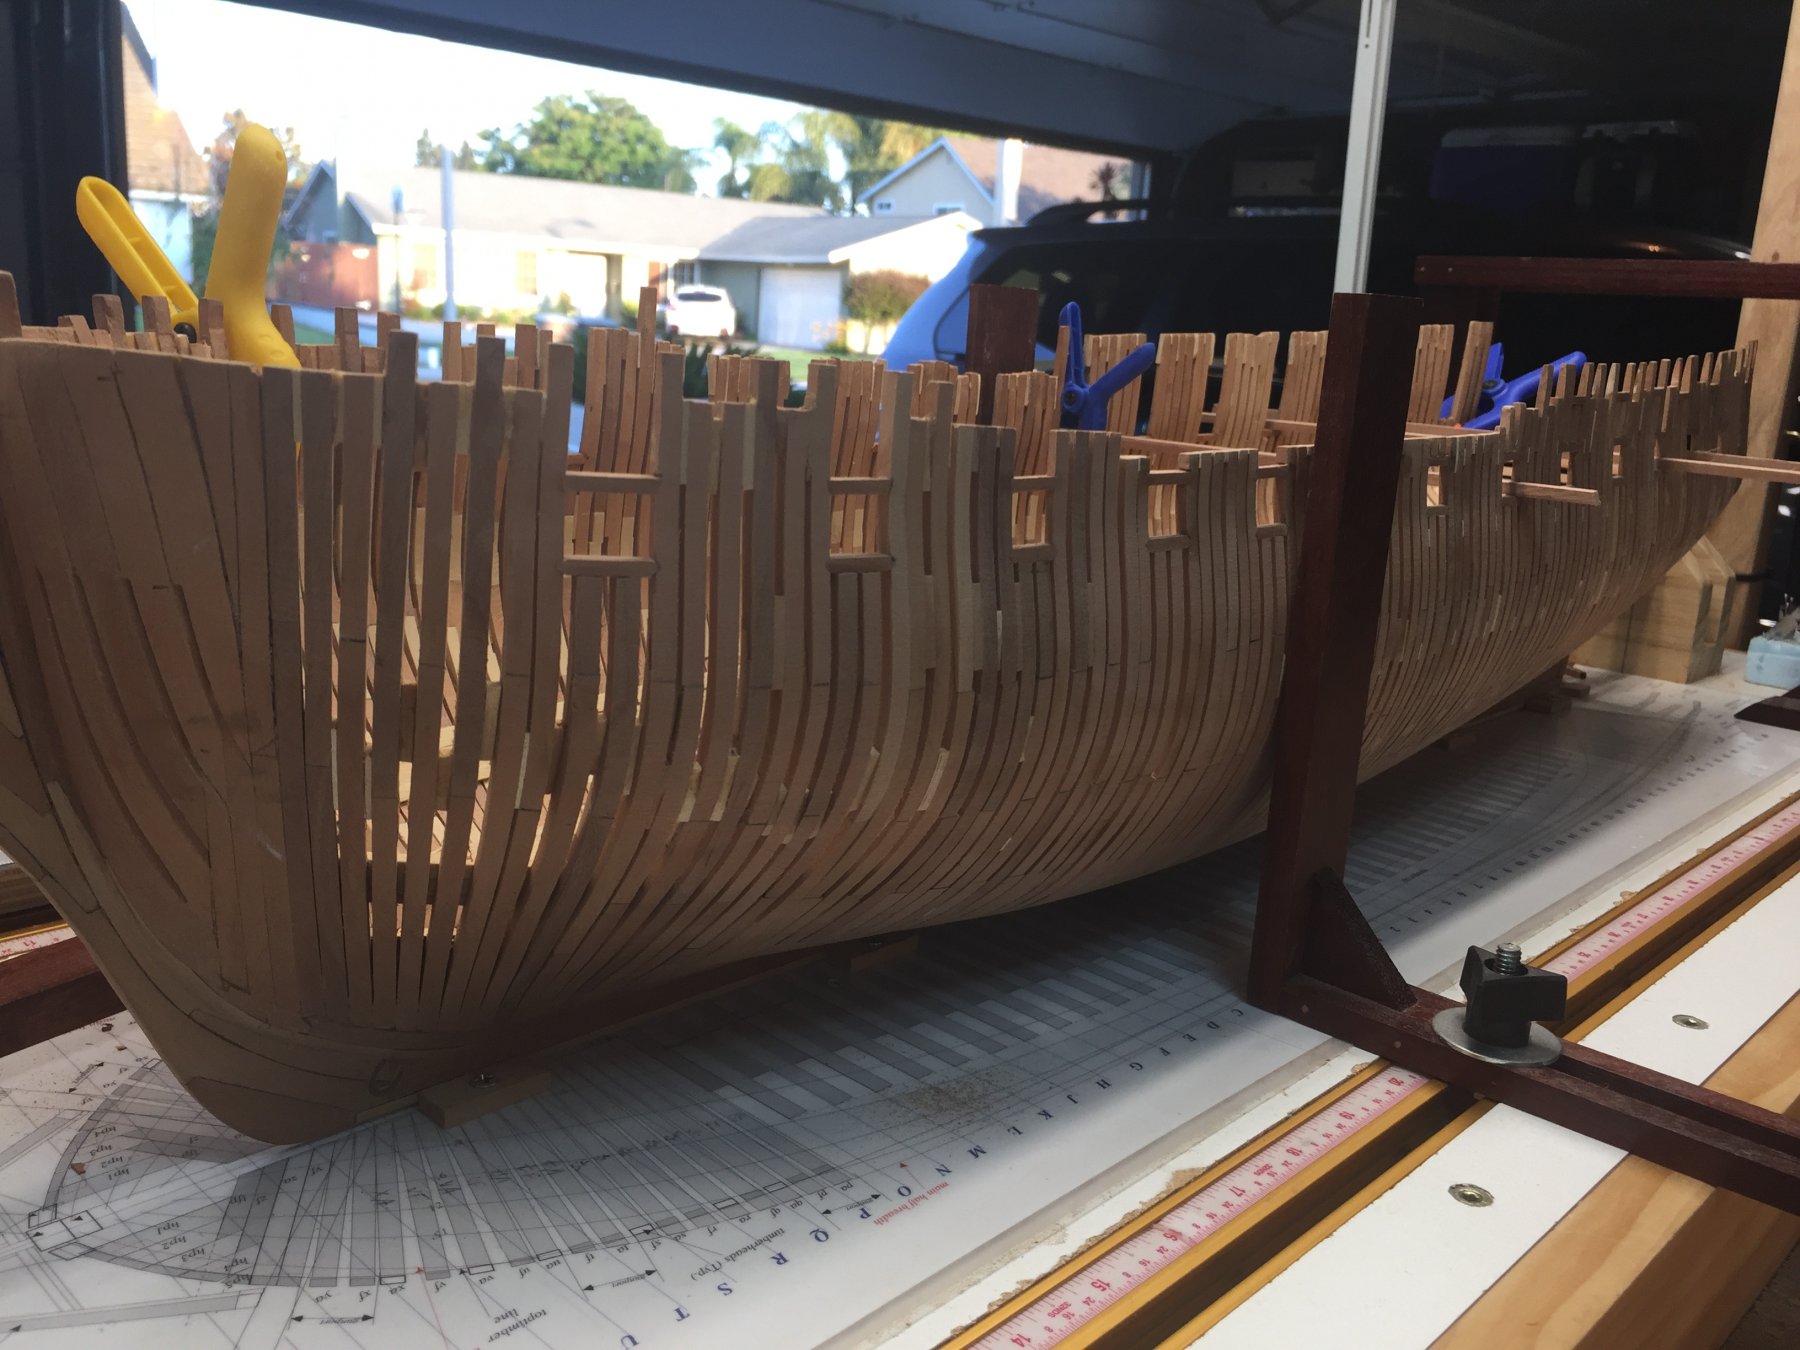
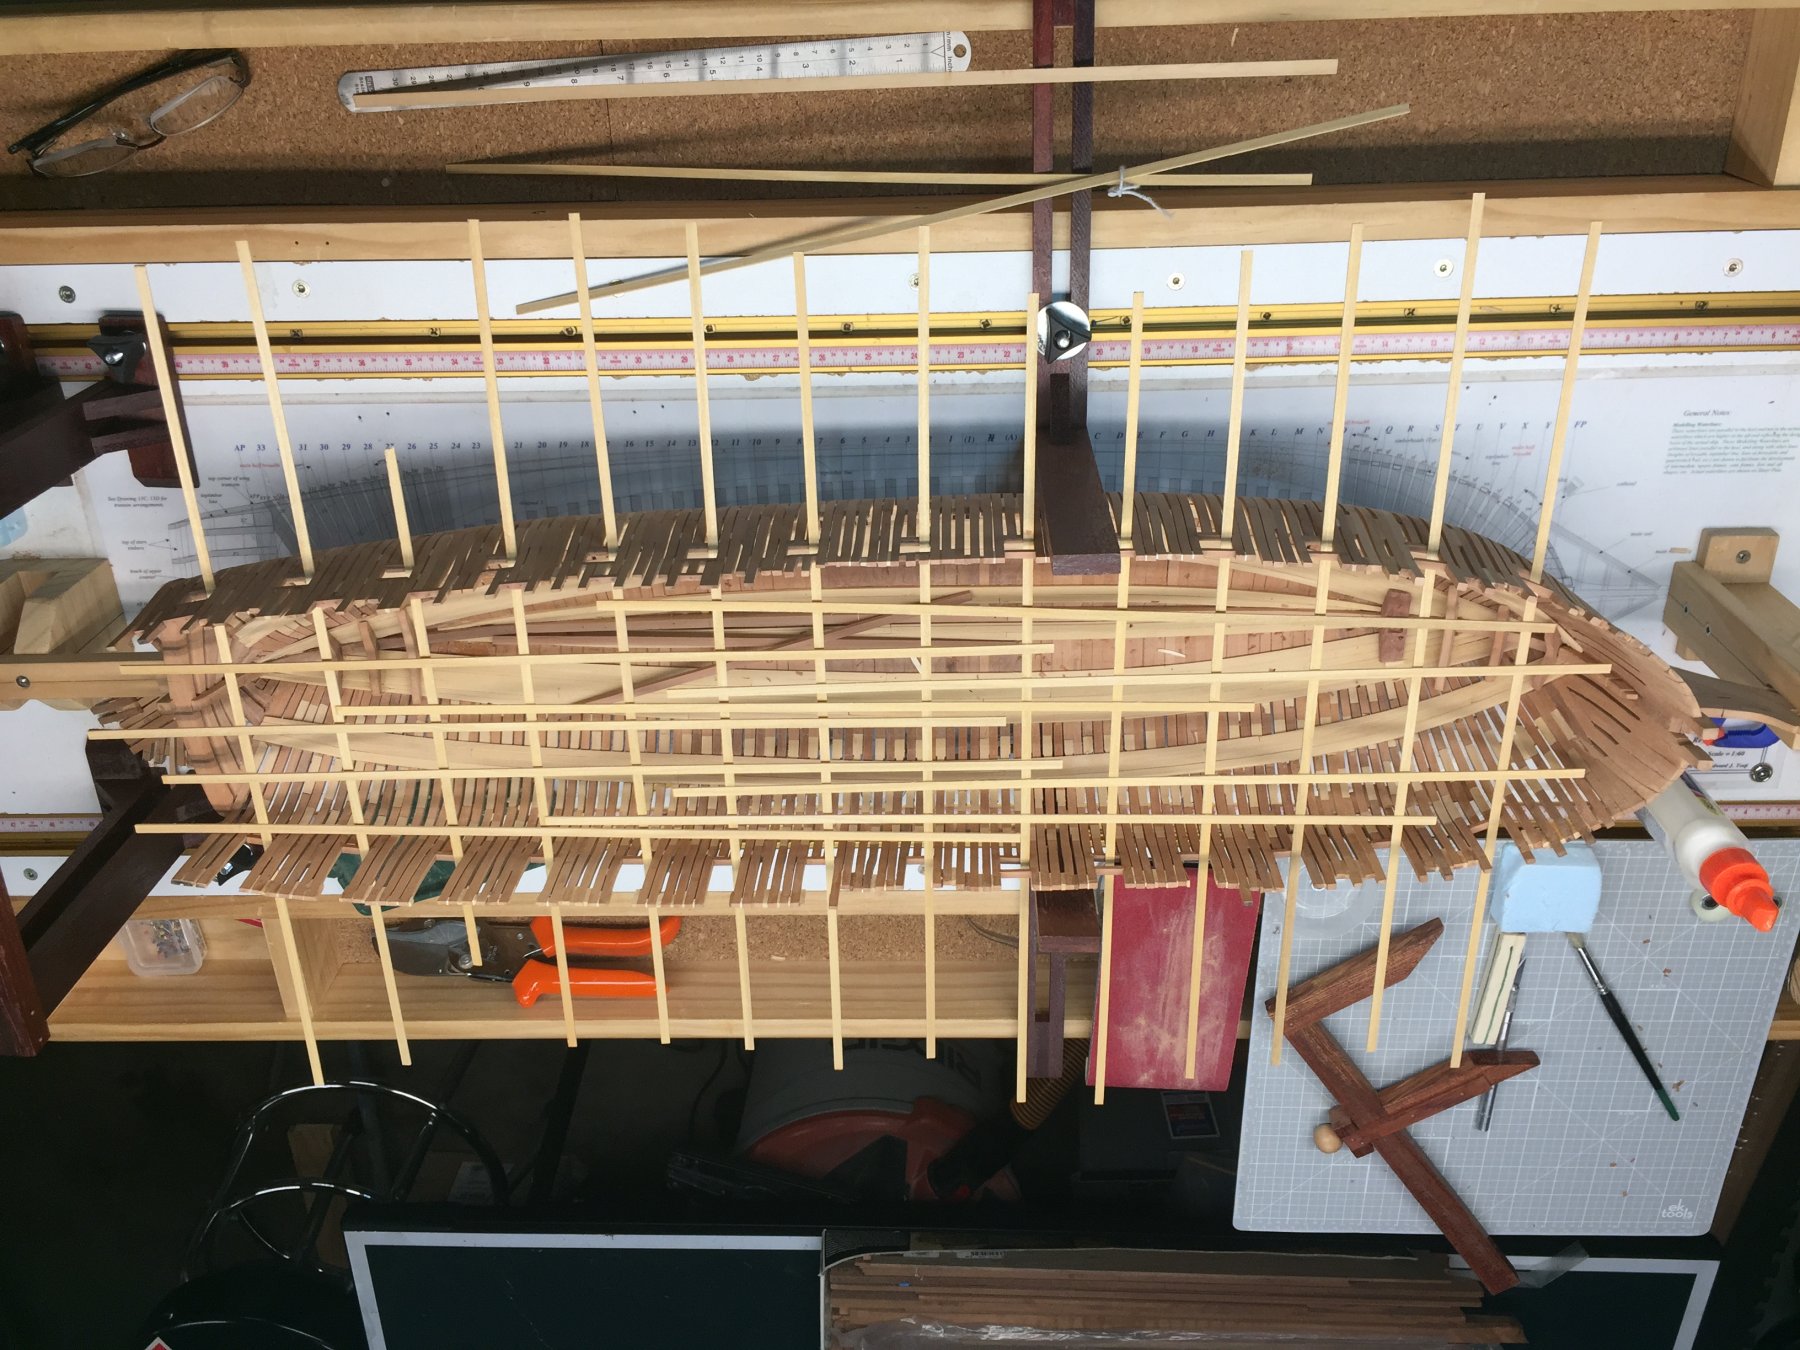
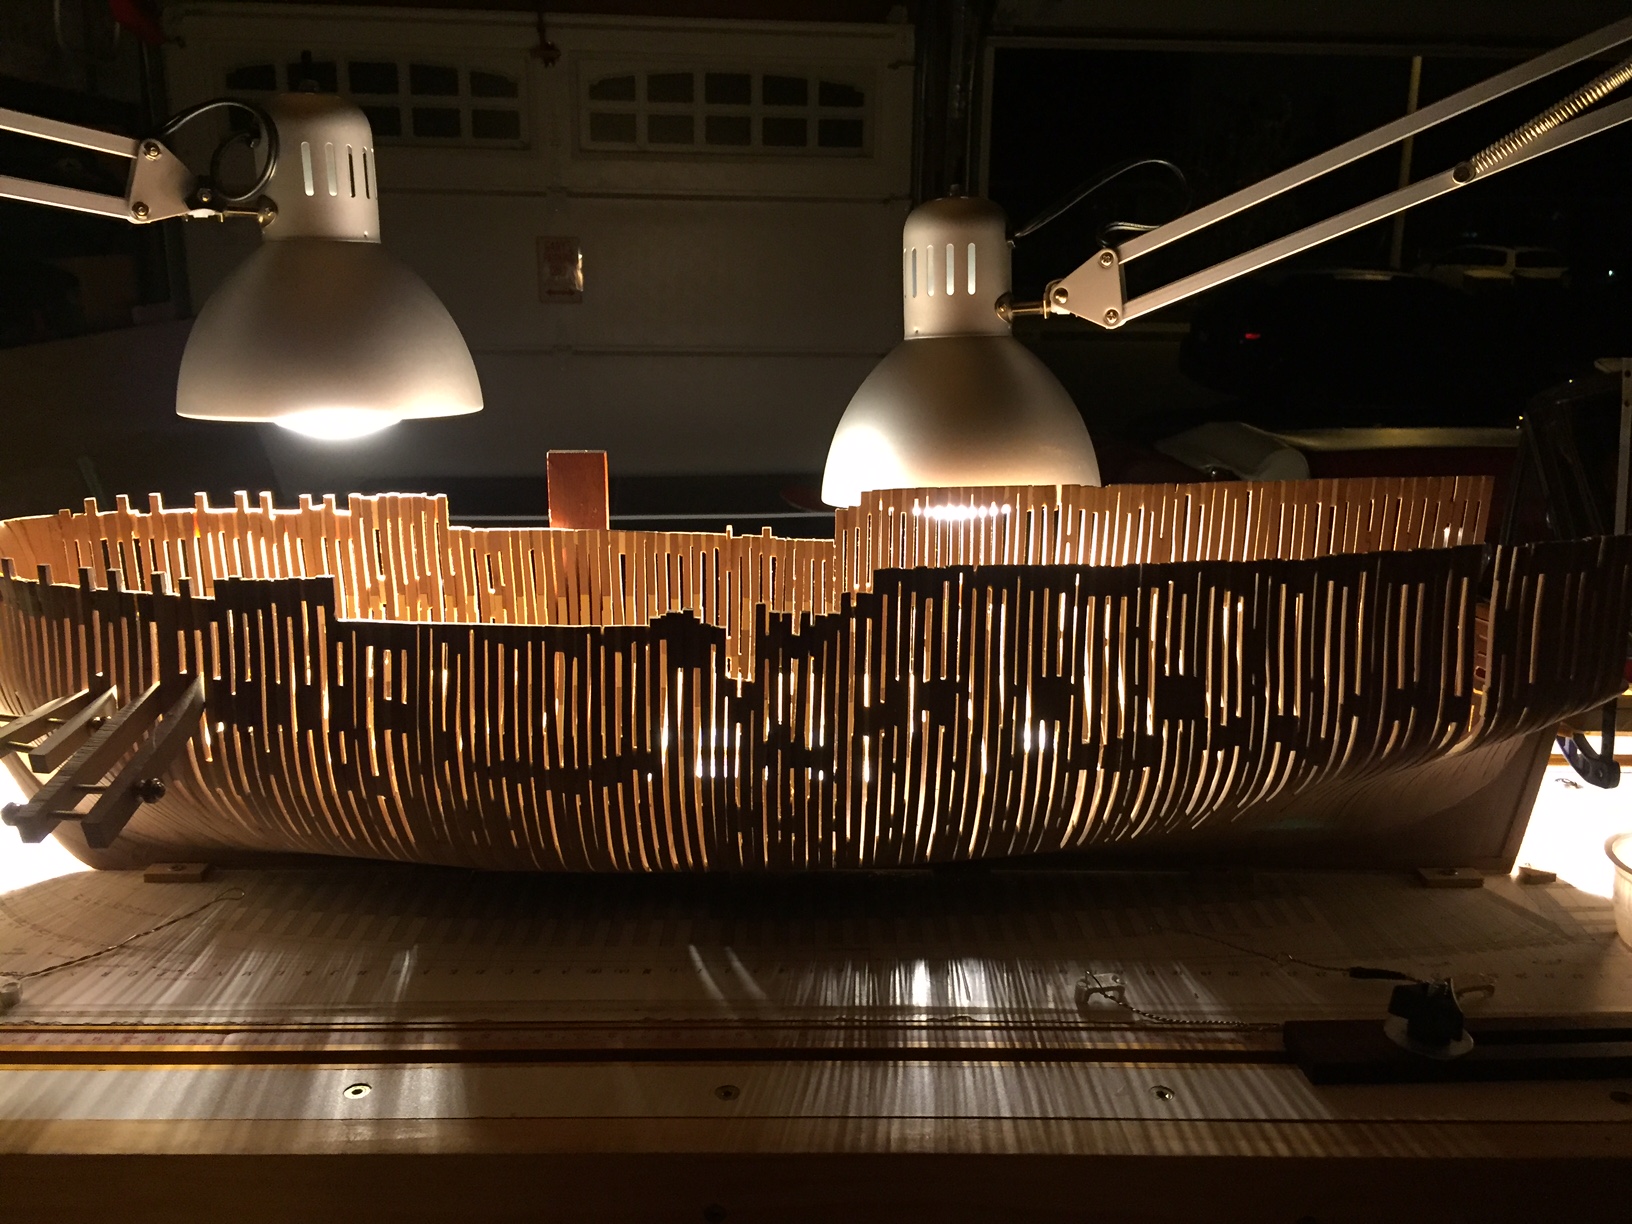
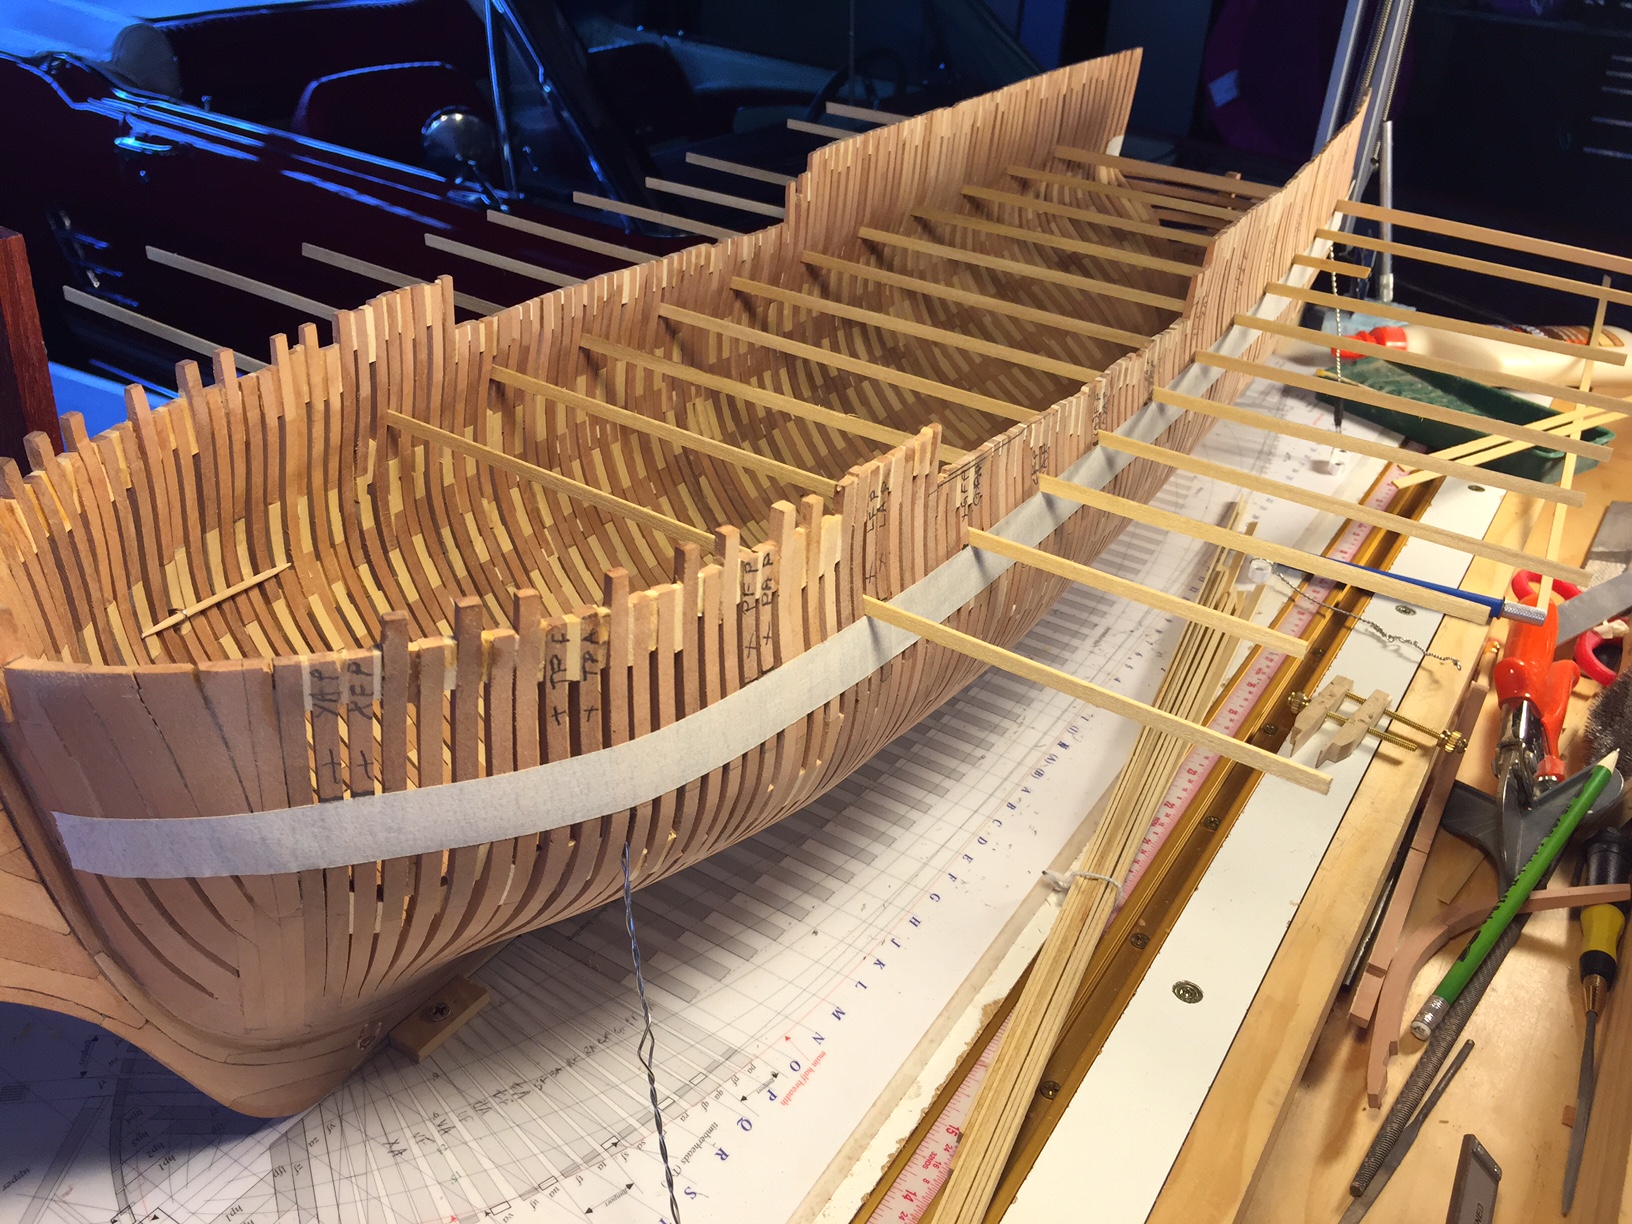
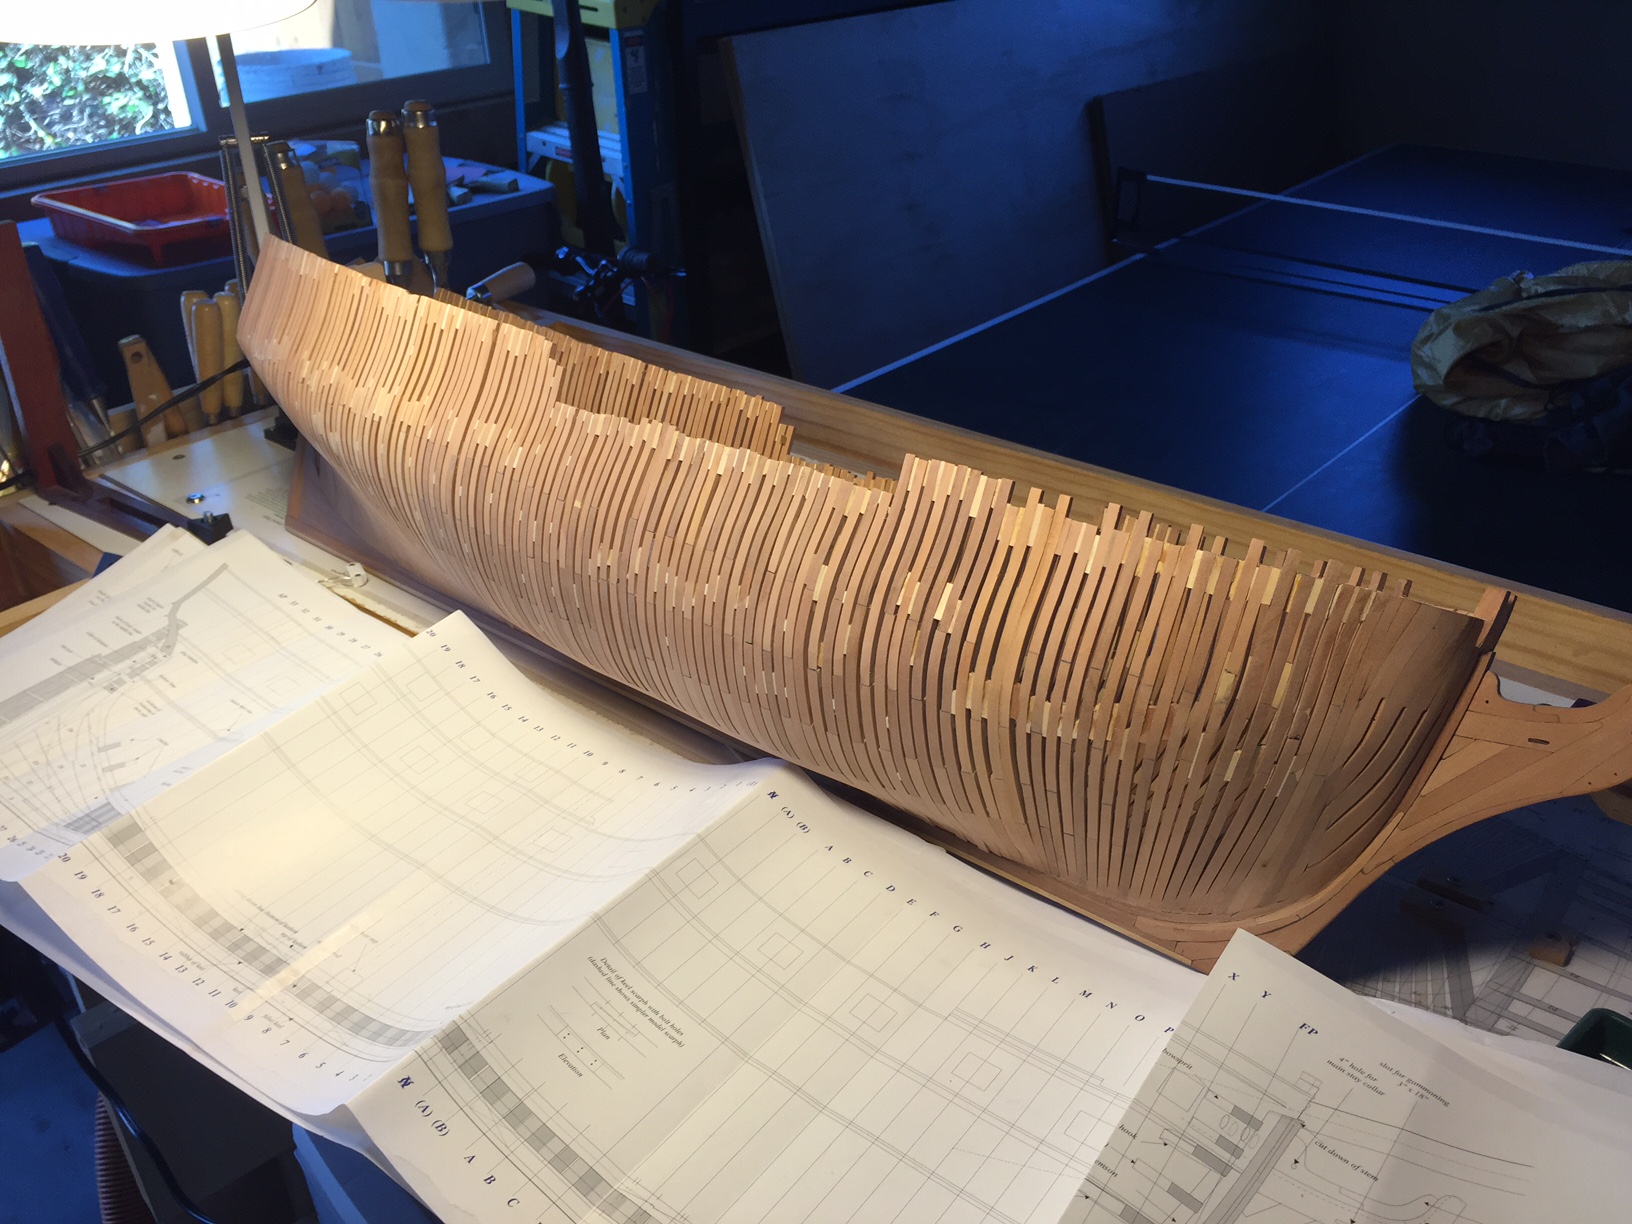
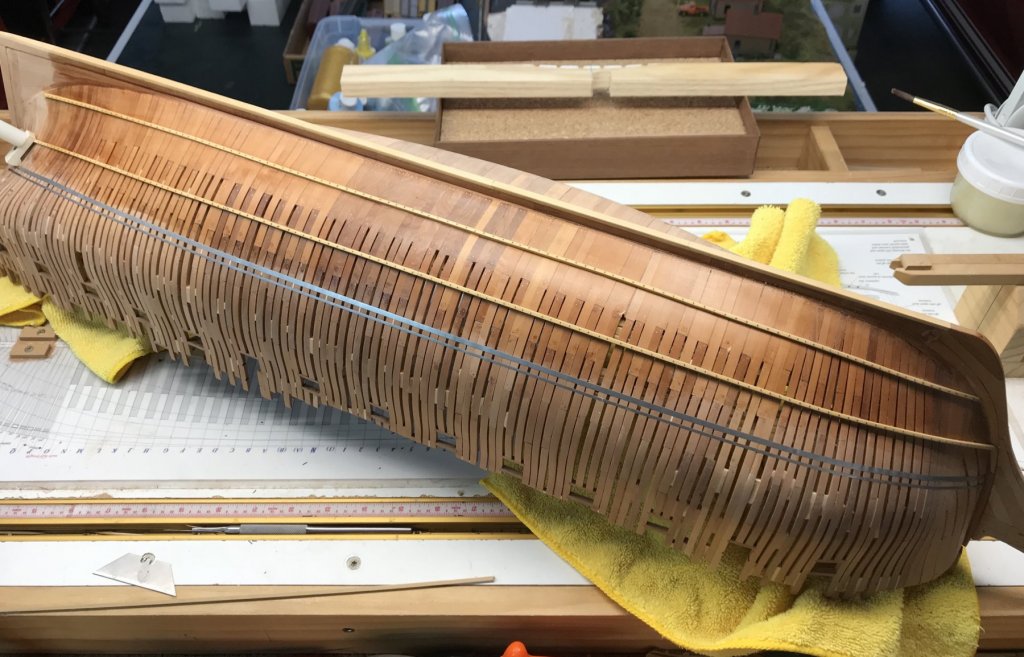
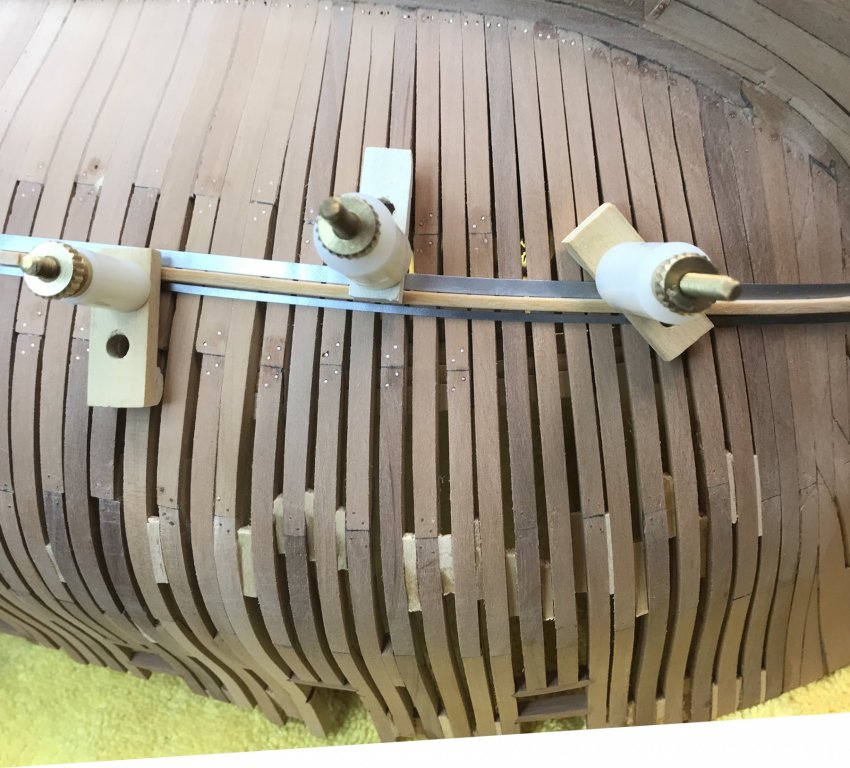
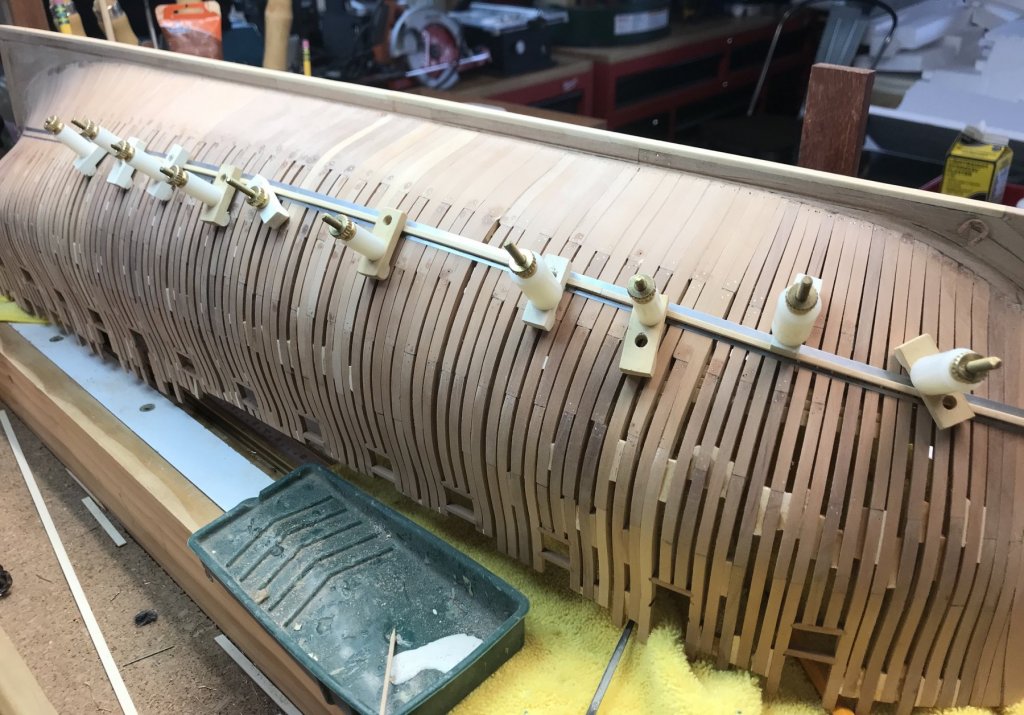
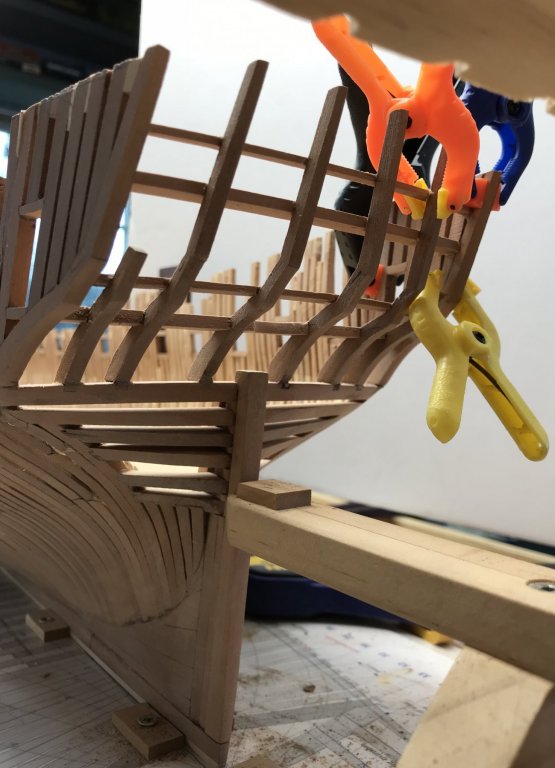
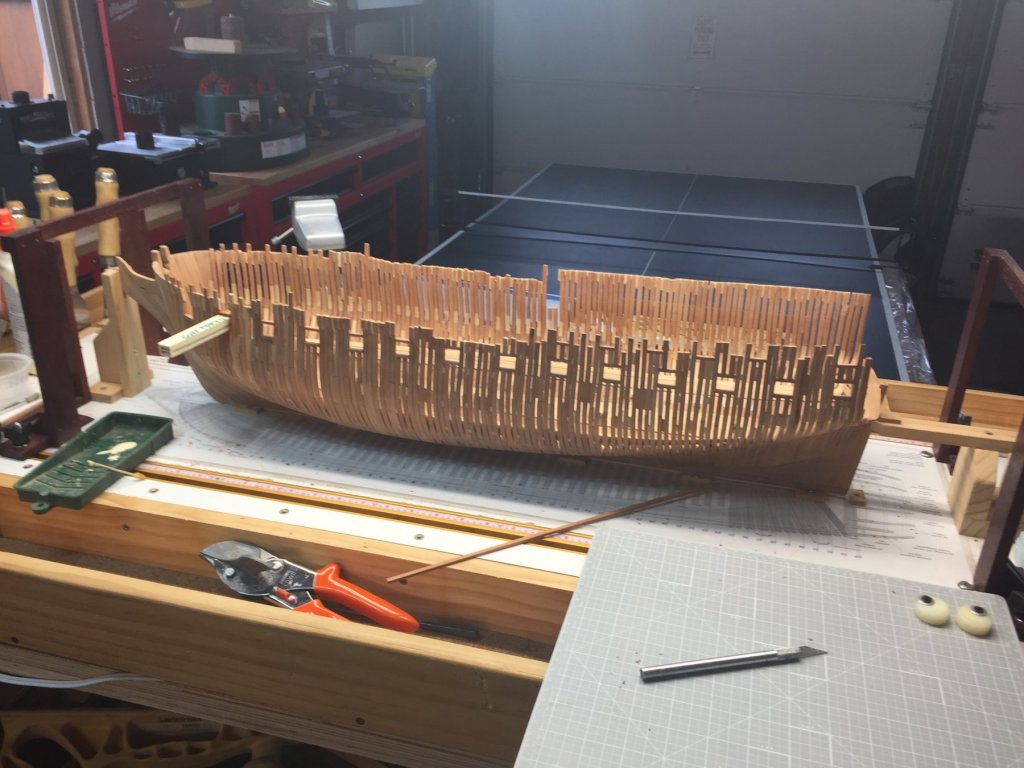
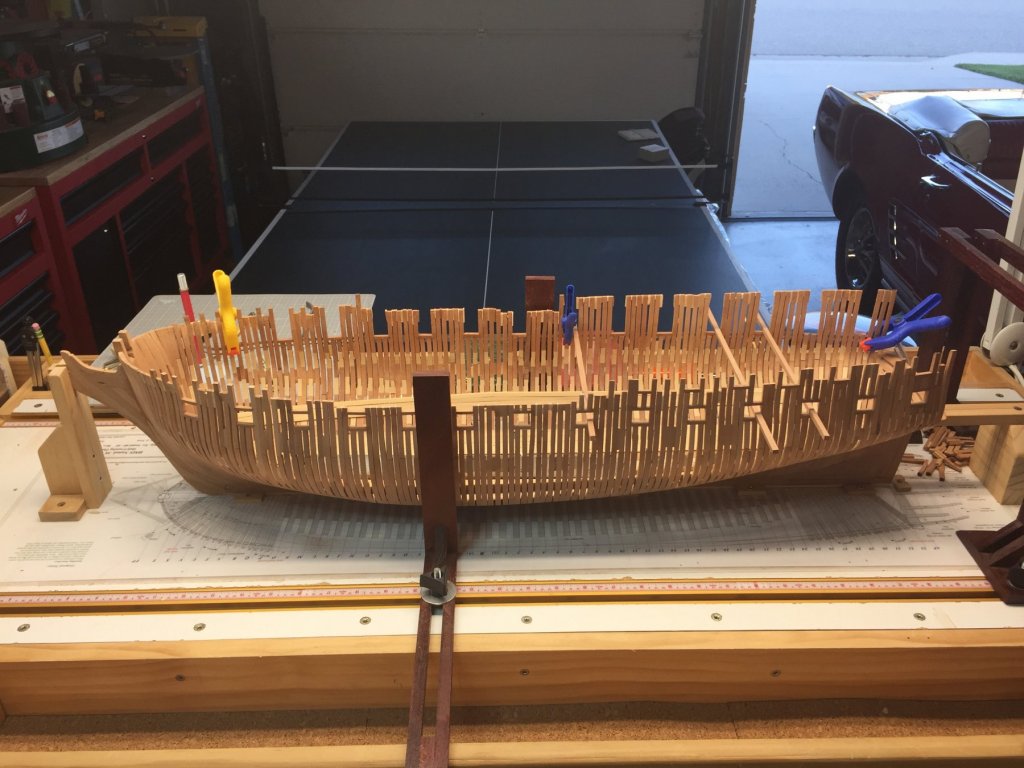
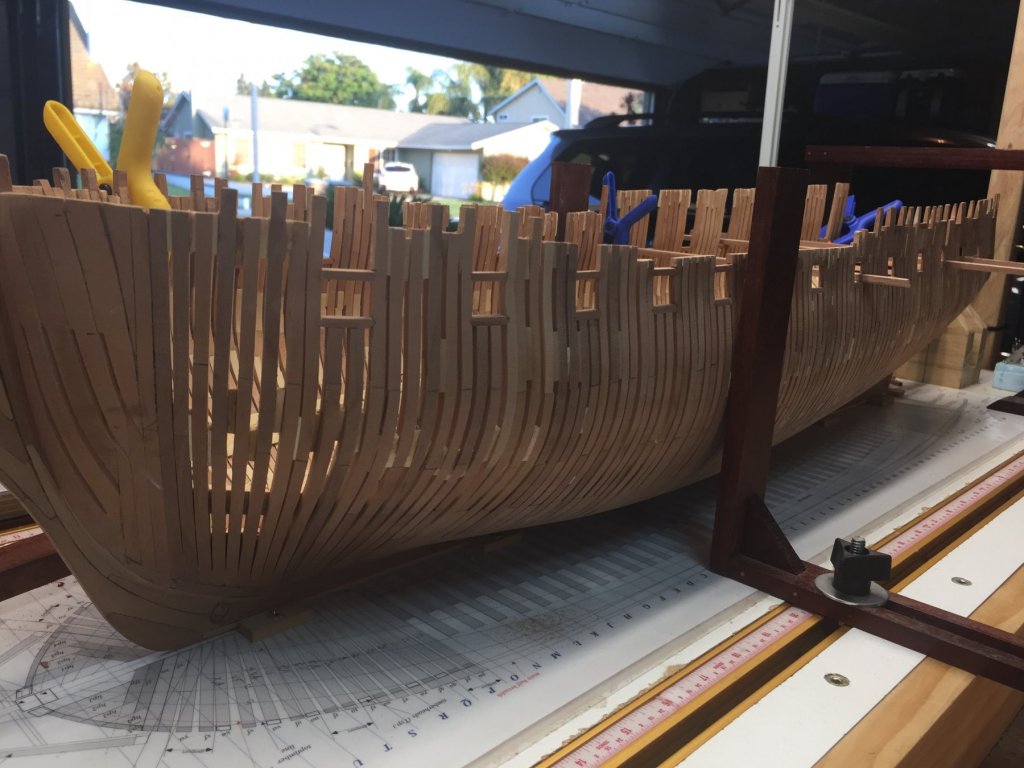
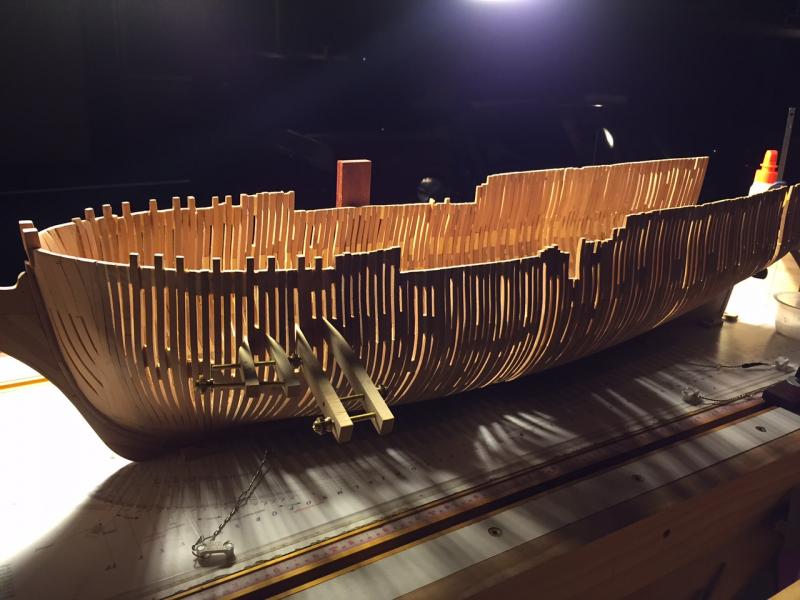
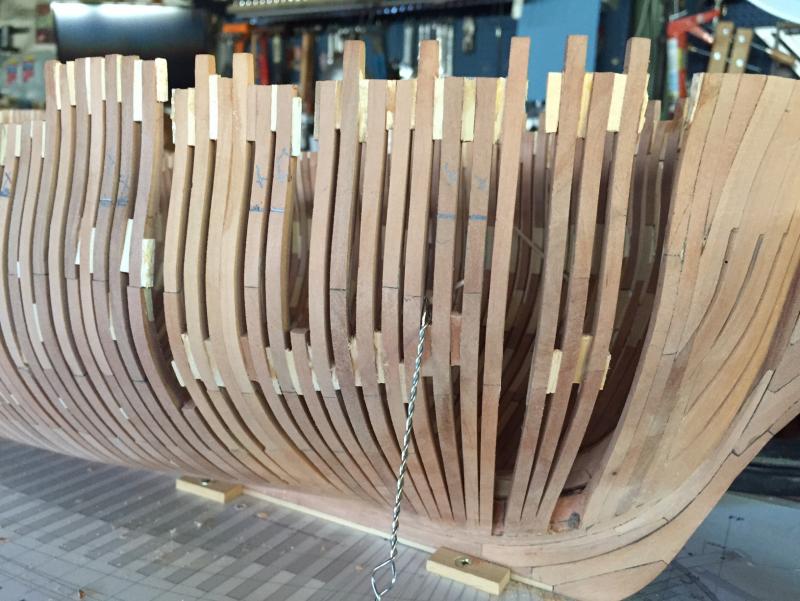
Again, thank you for all the kind words and likes to my post about my Mom. Today would have been her Birthday. 610 Hours into the journey. I think I am at the most fun part of the build yet! The installation of the ribbands has proved to be very therapeutic and enjoyable. After the ribbands are installed, I can now beginning to apply finish to those sections that are complete. I am using turpentine and wax as Ed recommends in his book. You have to be incredibly diligent and disciplined on what you finish because it will literally be finished after that - no glue will stick... That being said, after applying the wax and turpentine, I sand the spots over the brass bolts to remove the residual CA that I spoke of in my last post. I am very happy with the results. The ribband installation is a slow process. Each piece has to be test fit and many have to be steam bent before applying. More next week. Gary
-
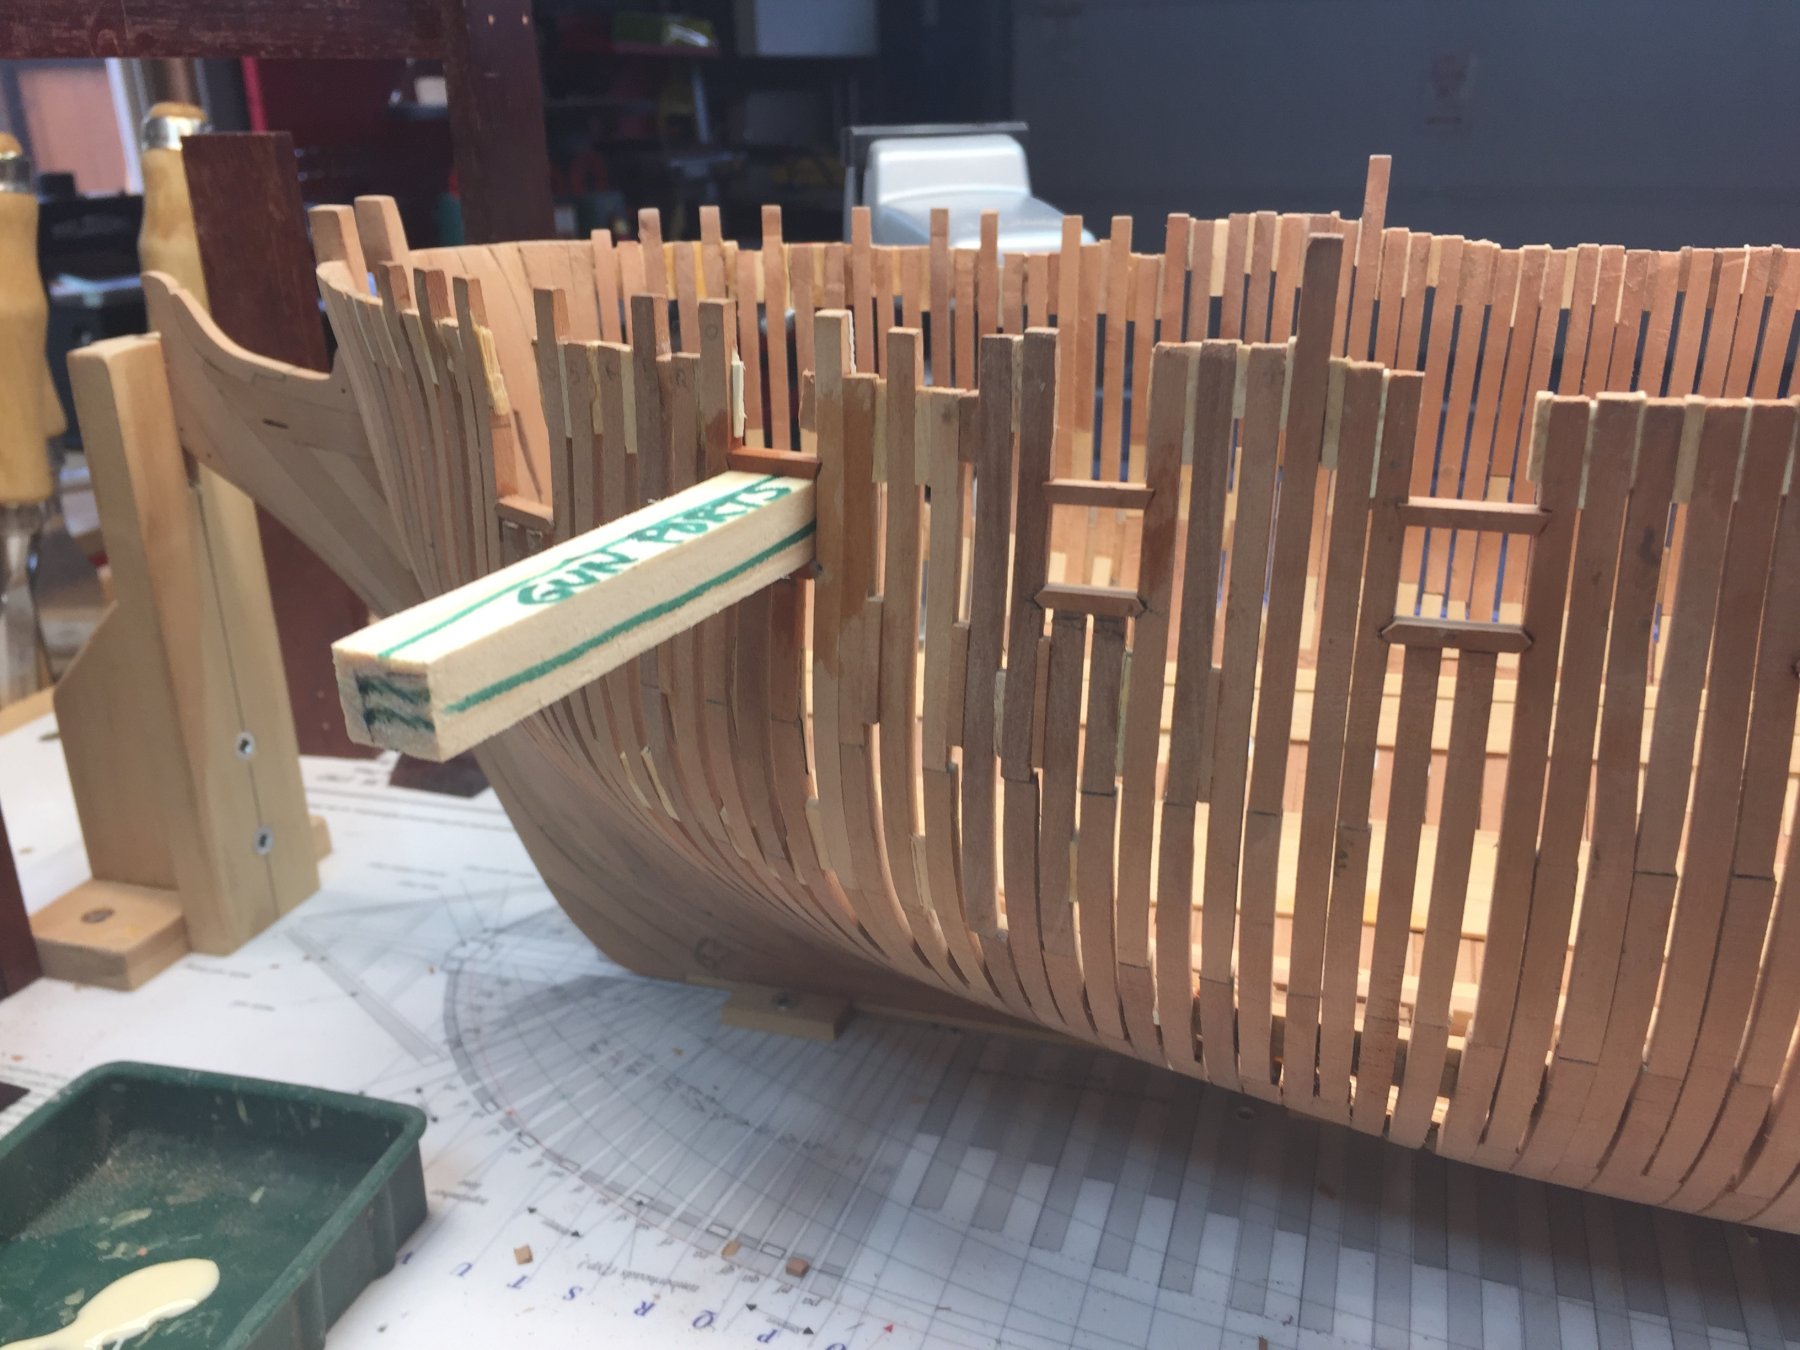
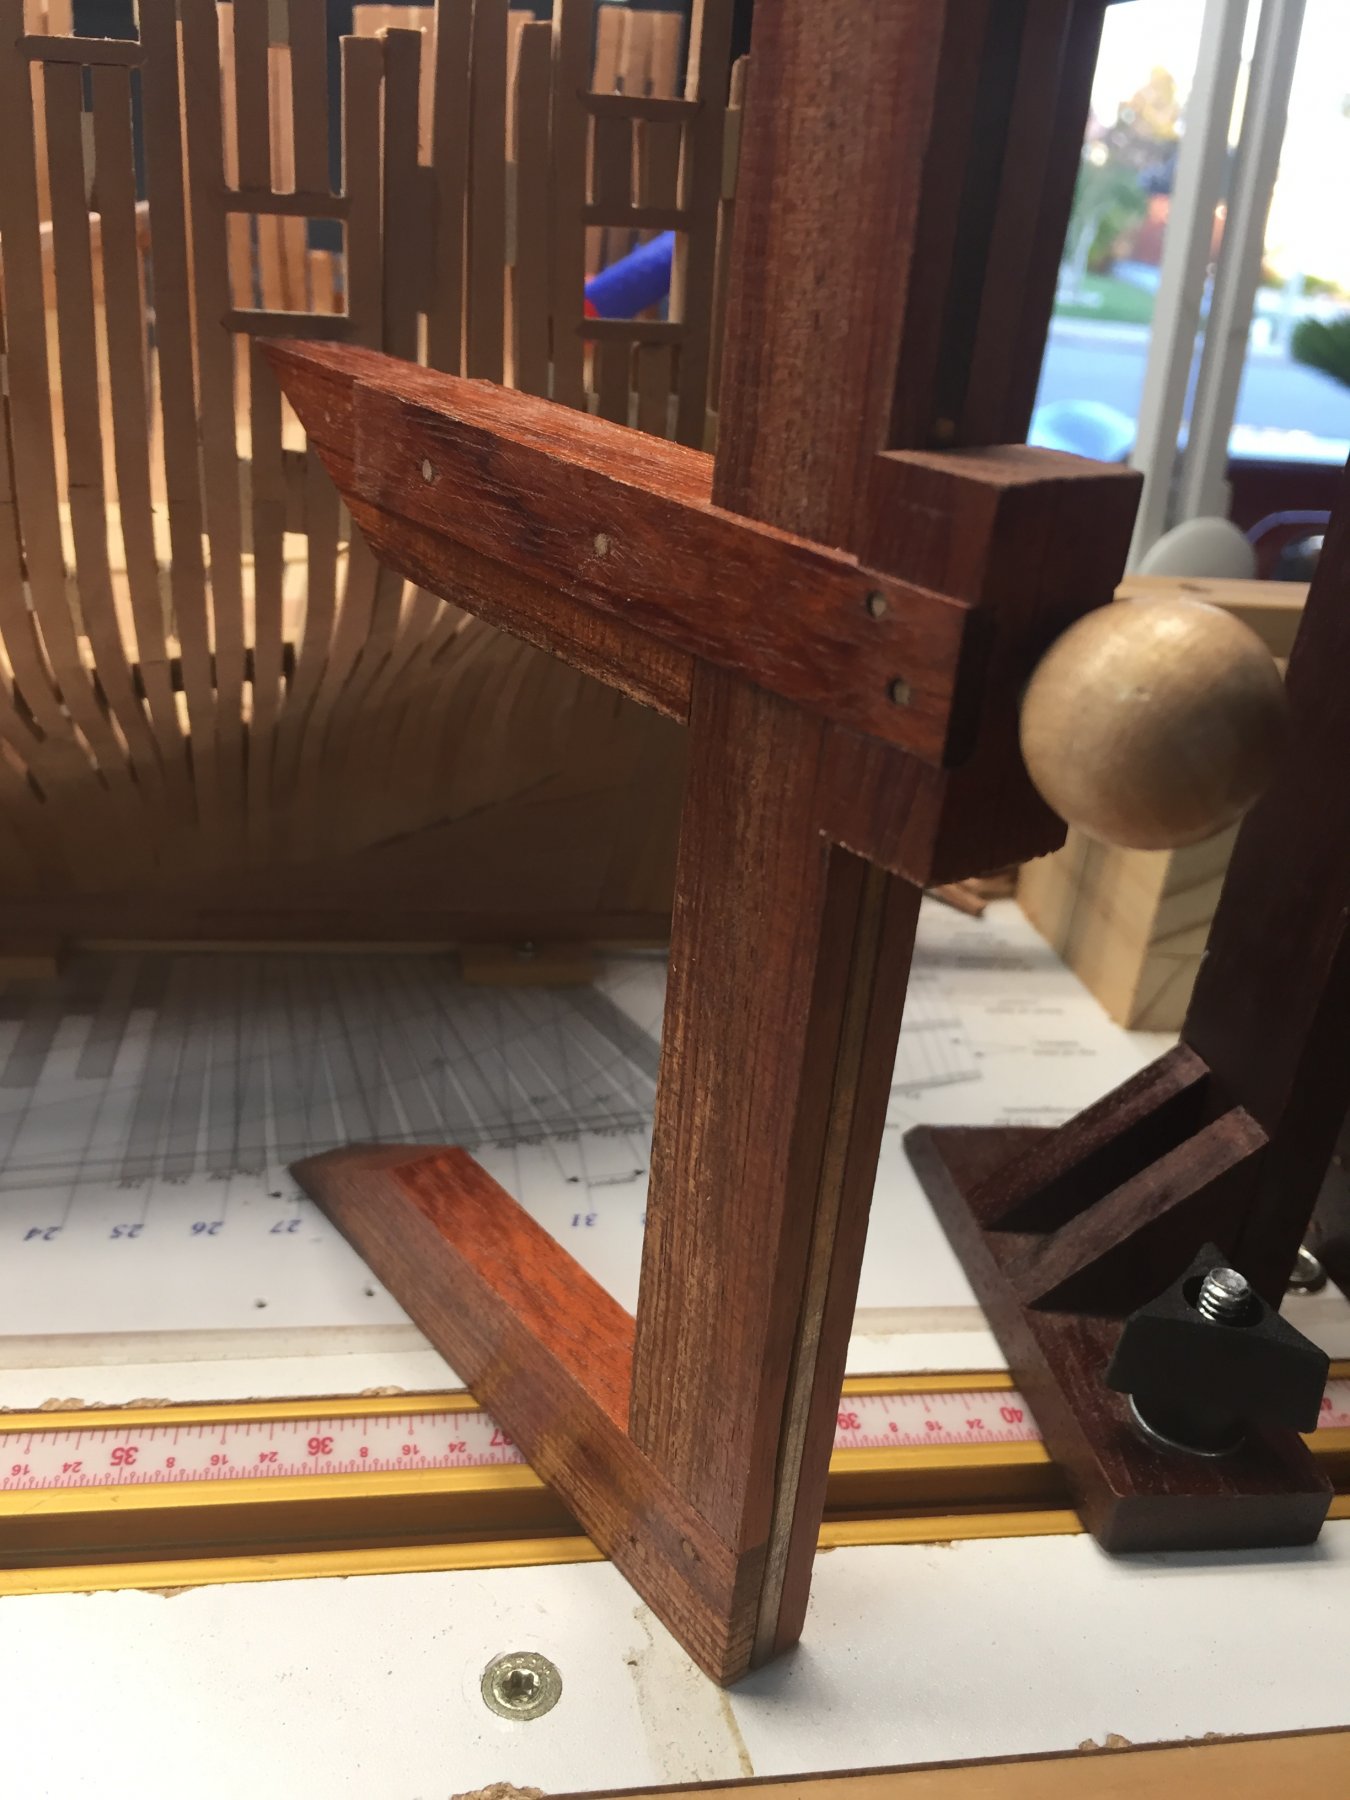
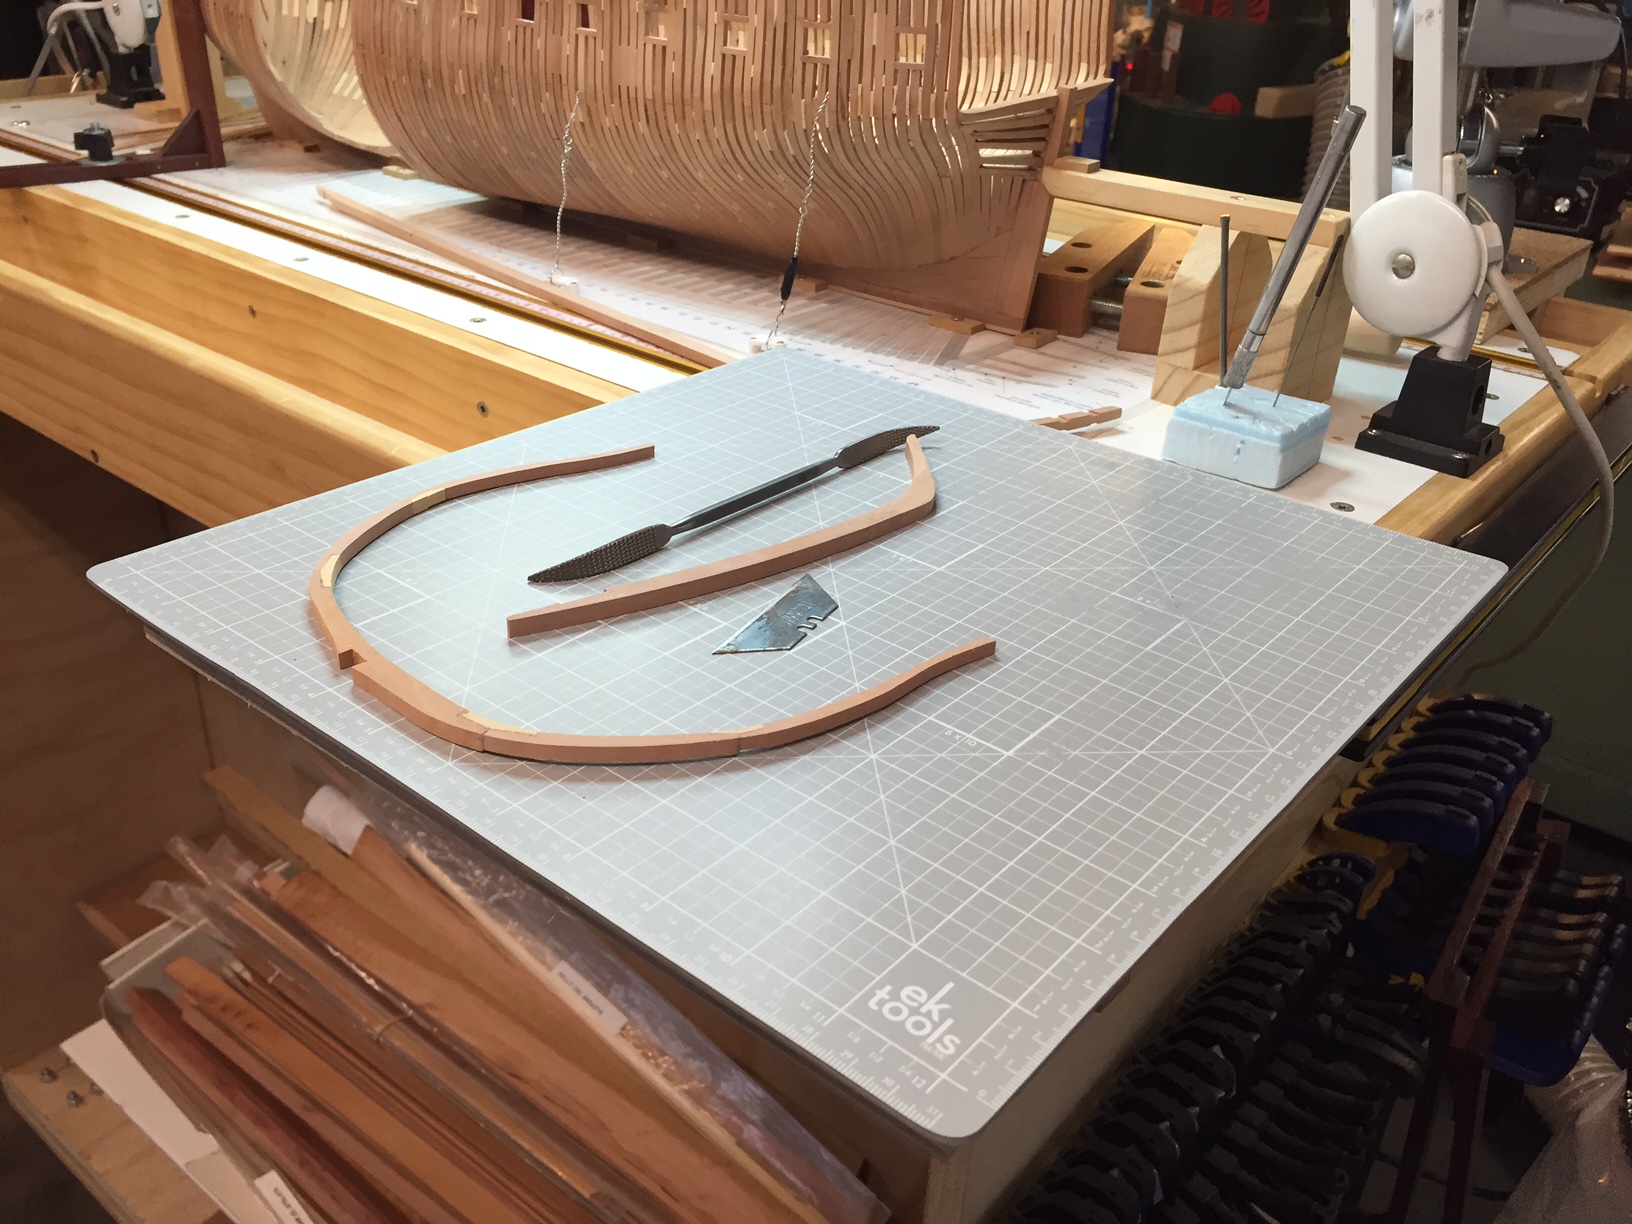
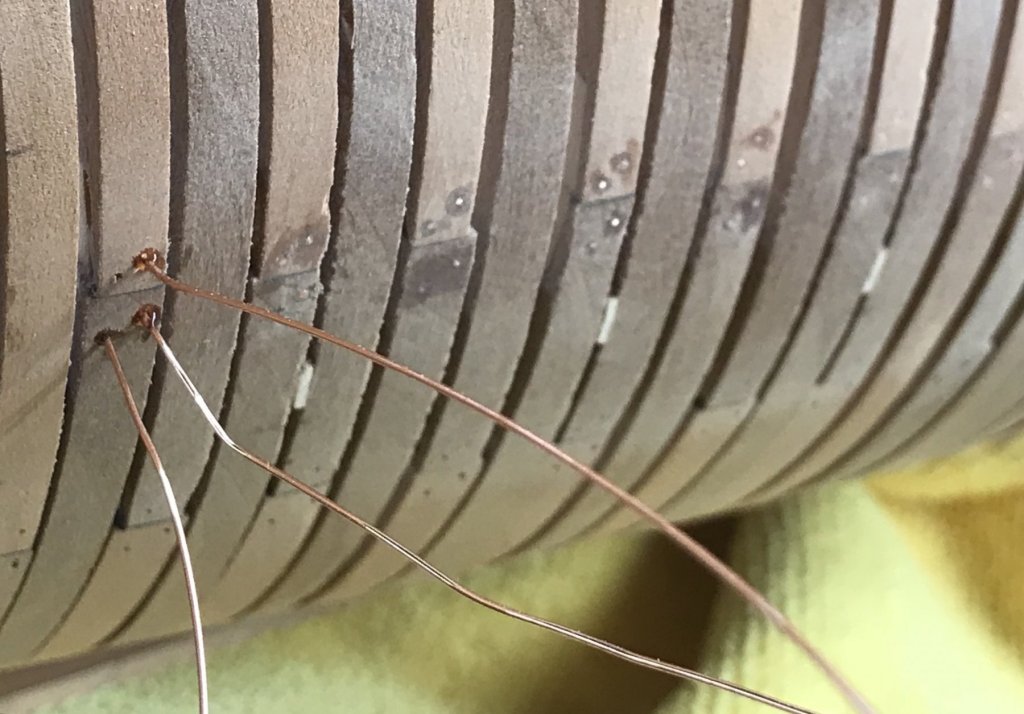
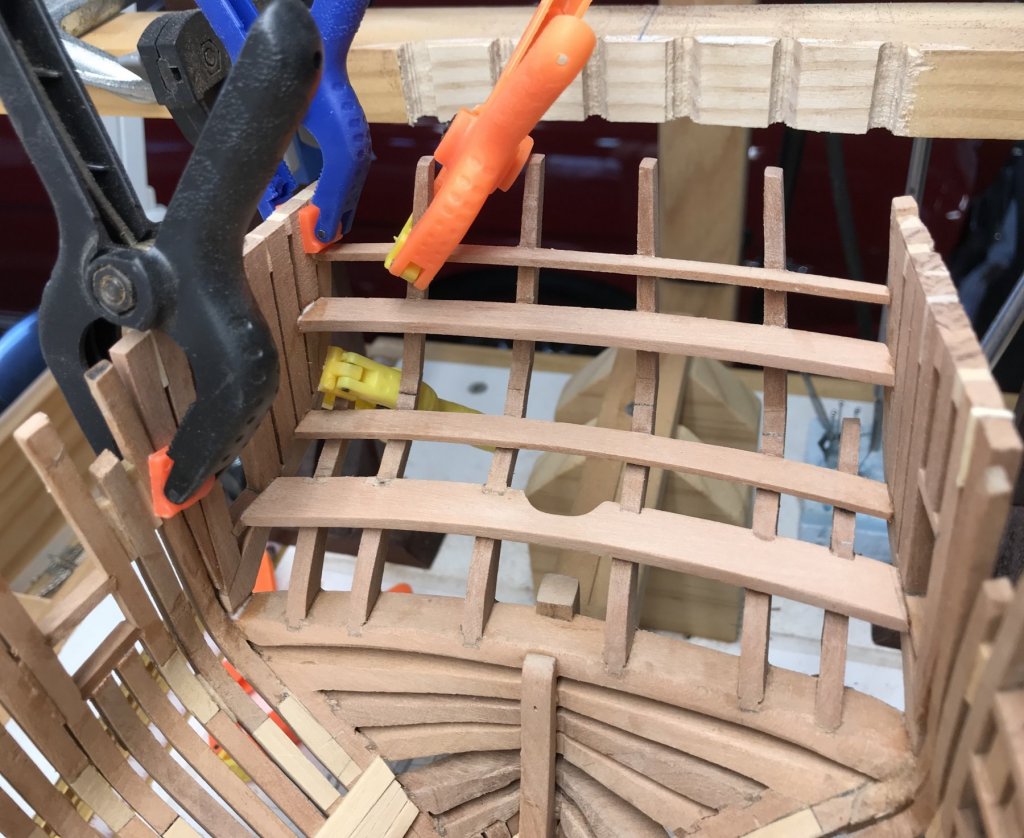
Thank you for the likes and nice comments. 606 Hours into the build and I have completed the brass bolt installation on the hull. I wish I did not use CA glue when installing the bolts. The CA glue stains show through the wax and turpentine finish. I should have tested this off the model! This was not a problem when using oil based finishes on past ships. Perhaps I need to add a little more turpentine to the mix? Any ideas on how to solve this? After the bolts were installed, I sanded the entire hull with 150 - 220 - 400 grit and then steel wool. I focused on one frame at a time. I then turned my attention to the ribbands. TIP: I used car pinstripping tape to layout the ribband sweep. It worked out great! I just ran the ribband in between the two stripes. It even helped with glue drips. These pieces are about 30 scale feet long at six inches square. I rounded them off slightly as Ed describes in his book. They are boxwood and are hook scarfed for added detail. An iron bolt will run through the ribband at the location of each frame. I absolutely love the clamps that Ed recommended be made for this model. They are simple to make and very effective. Prior to putting any glue on the ribband I test fit the clamps and had them ready to go. I plan to do four ribbands on each side of the ship. I don't intend on doing much planking. I really want the structure to show. There are a few trouble spots that will receive planking, just to hide the errors. All has worked out well to this point. My plan is to finish the lower hull, just below the gun ports, before turning my attention back to the interior of the ship. Thanks as always for following along. Gary
-
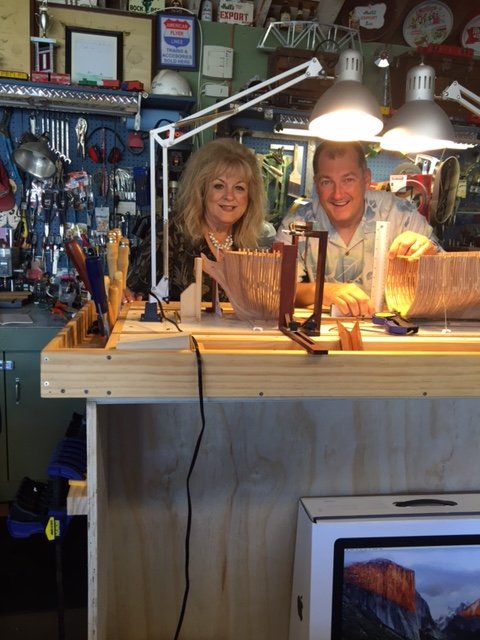
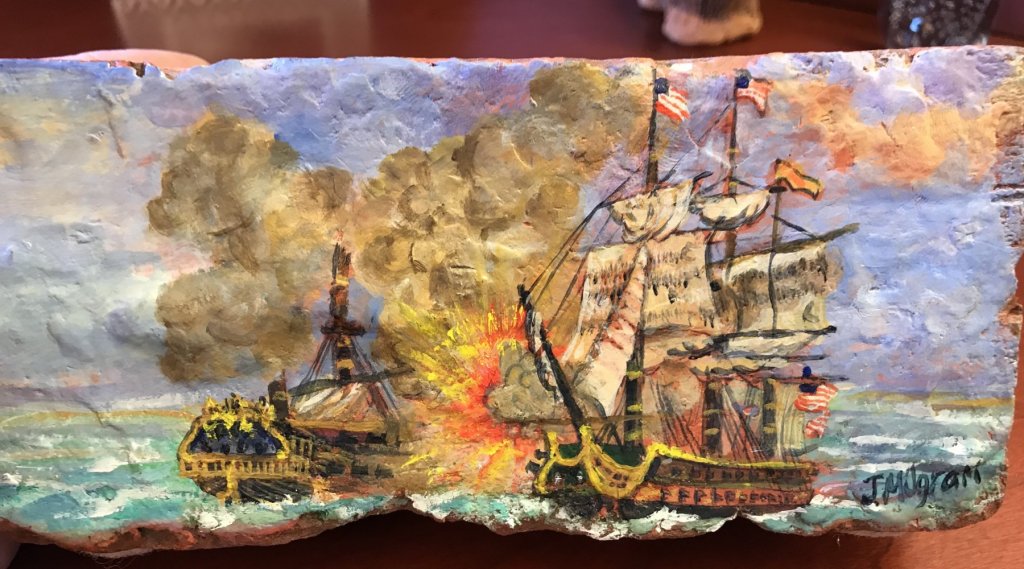
Below is a picture of my mom and me in front of my Naiad taken several years ago. Sadly, my mom, Judith Milgram passed away several months ago. She was a great lady and a great mother! My mother was a professional artist and an inspiration for my modeling habits. I owe her a great thanks for instilling in me a love of crafts and modeling (although, I never got her painting gene... that went to my sister…). I will frame this photo and place it on my workbench. Here are a few bricks she painted for me upon my request many years ago. They sit on my desk at work. When I was a child, we lived on the coast of Connecticut in a small beach house where my mother had painted the fireplace bricks with miniature sailing themes. Those were special times and a special place. She is now buried in that town. I wonder if those scenes are still there in that house. I also have dozens of her paintings hanging in my home and office, many of them with ocean or sailing themes. I am very lucky to have them in my possession as well as to have had her as my mother. Thank you for allowing me to share this. Gary


-
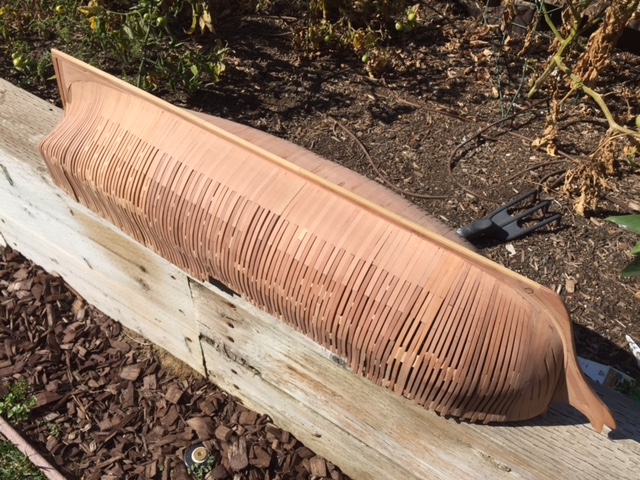
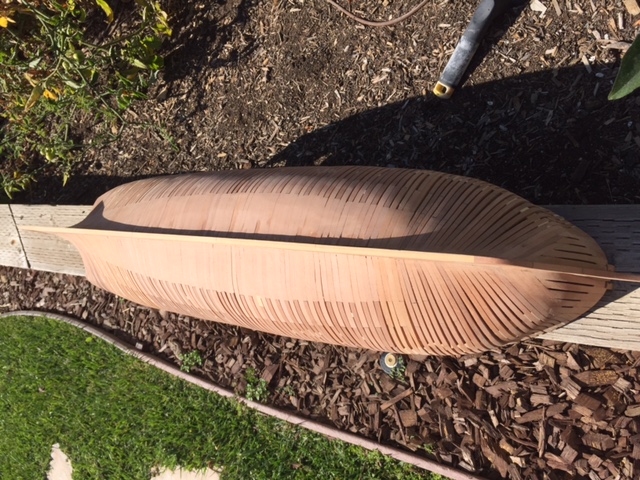
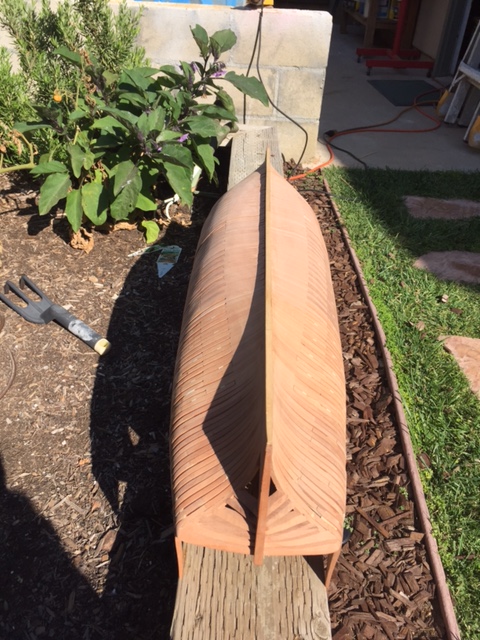
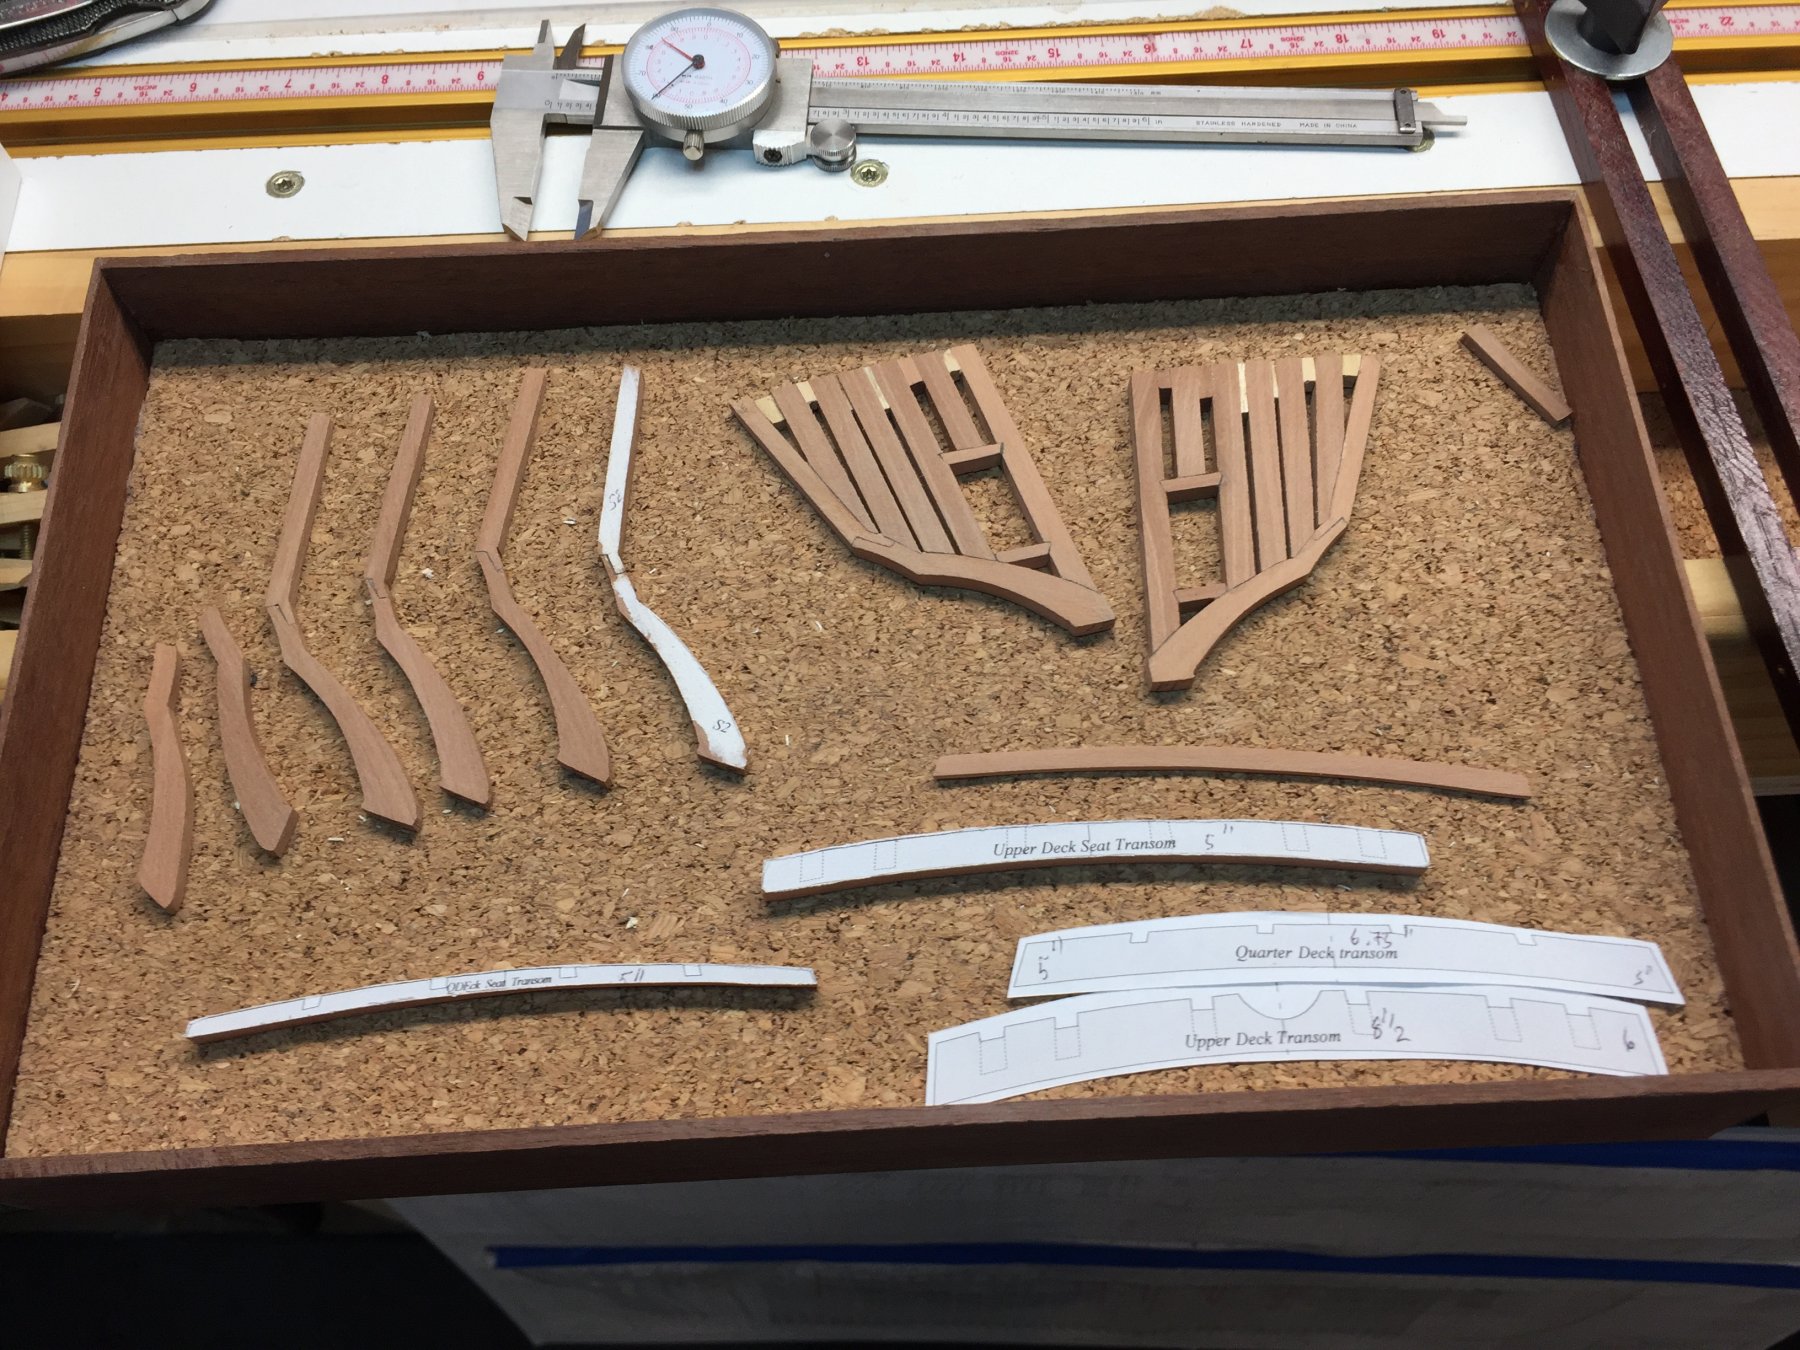
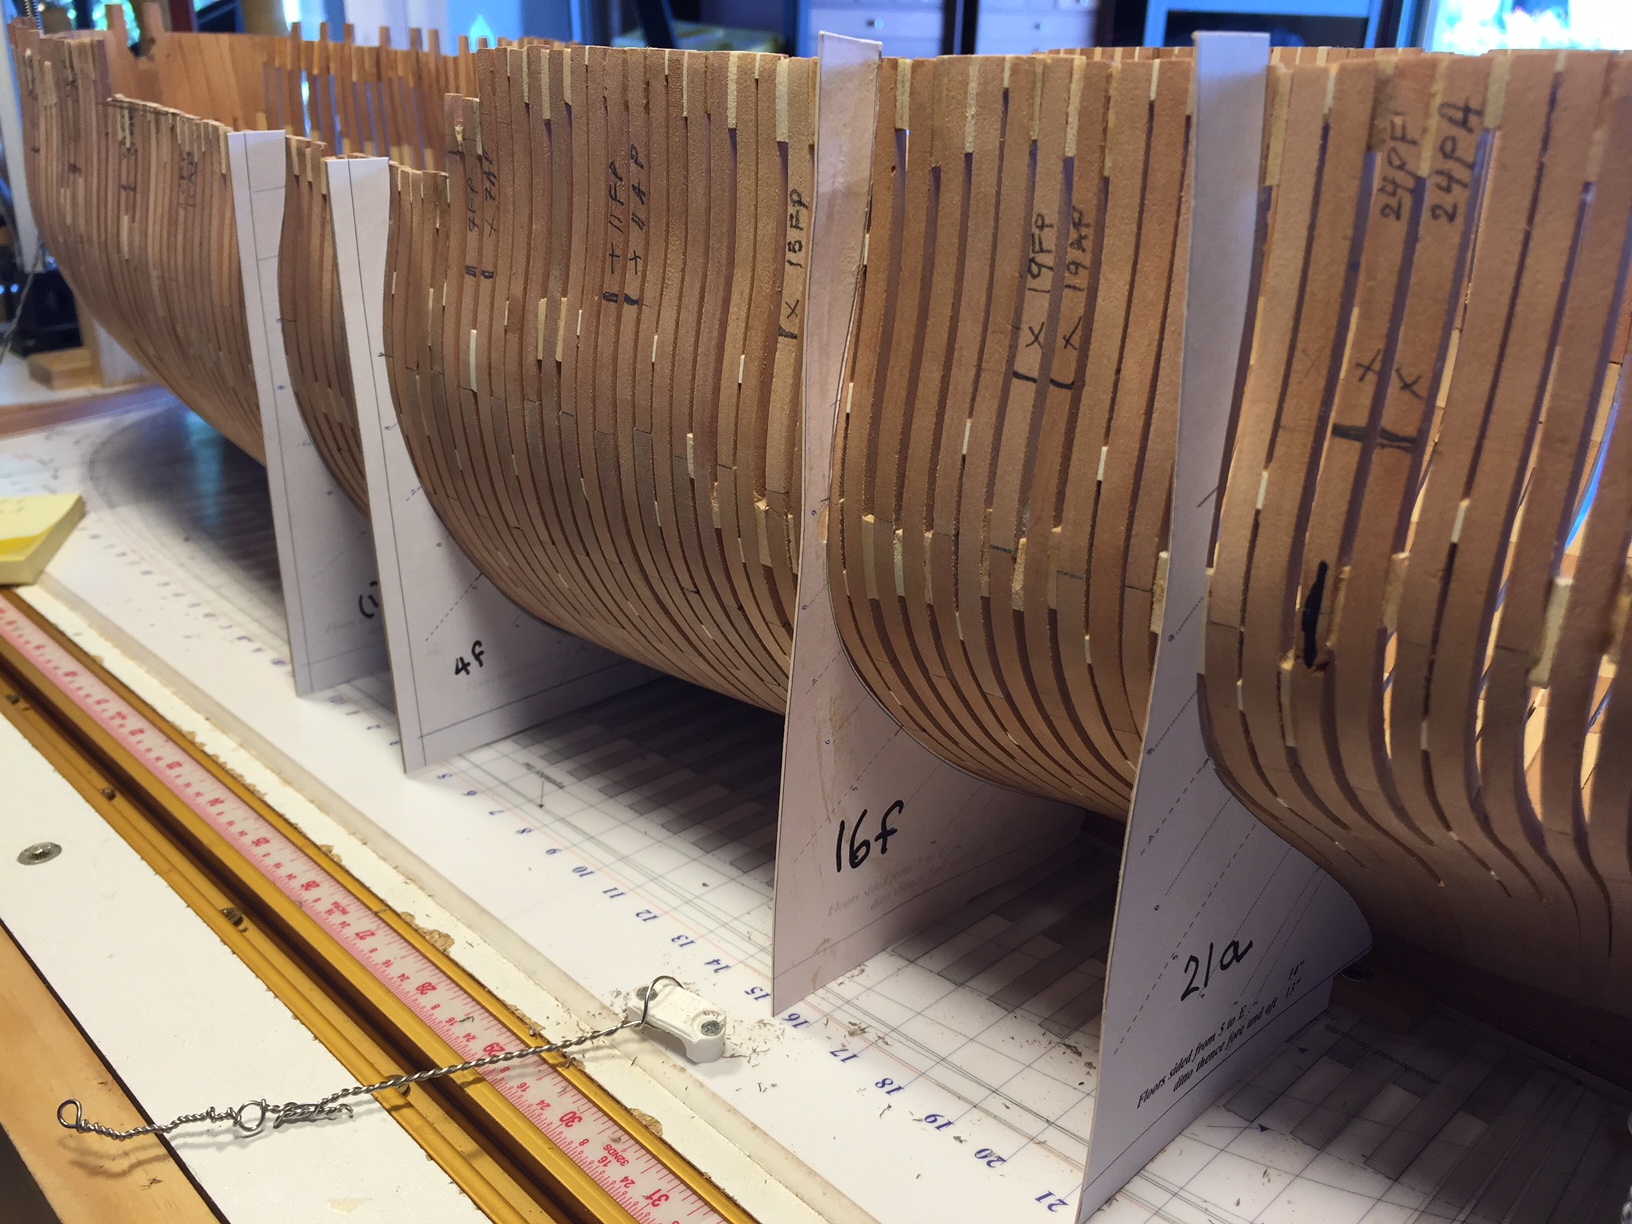
Hi All, Its been a solid 7-8 months since I have posted and almost a year and a half since I worked on Naiad. Funny how these things go. 590 hours into the voyage and I have successfully tackled the Stern Transom. This was an extremely challenging area of the ship to model. One of my greatest takeaways was that no matter how precise you are, you should always leave a little meat on the bone when it comes to making parts from patterns. For some reason I cant help myself, I tend to cut the parts too close to the pattern lines. I have learned to love the scroll saw on a build like this and am amazed at how quickly my skills have developed with it. That being said, leave atleast a 32nd of an inch or so of extra room on the parts. Doing so will allow you some margin of error when fitting the puzzle together. In addition to the Transom, I am doing a final detail of the lower hull. This includes inserting copper and iron bolts. I will also add the ribbands and other copper features. One other lesson that I am trying to learn is - know when to stop sanding! I have been sanding this hull off and on for two years. There is only so much material to work with, so resist the temptation to make it to perfect to early. I'm going to finish it and walk away. Thanks for following along! Gary
-
HMS Naiad 1797 by albert - FINISHED - 1/48
GDM67 replied to albert's topic in - Build logs for subjects built 1751 - 1800
Hi Albert, I have been away from my shipyard for a while, but am slowly returning to m own Naiad. Its really neat to see the progress on your Naiad. The carvings are exceptional as is the fit of each piece. I true pleasure to see. Gary -
I am late to the show on this one. I really enjoyed reading your log and seeing all the neat tips. Especially like those aluminum clamps. Outstanding work. Gary
- 503 replies
-
- 3
-

-
- washington
- galley
- (and 1 more)
-
Hi Joe, if you have the space for 1:48, I say go for it. The plans have so much detail in them that you should be able to capture it nicely at that scale. Looking forward to your build. Reach out if you have questions. Ed - as for perching the ship on the railing of that deck... I got distracted and actually left it there for over an hour! Wont do that one again! It would have been a 20 foot drop to the woodpile below... Thanks for all the kind words and follows! G
-
Hi All, Thanks all for the kind words and encouragement. Ed - I have to say, the times I didn't follow your advice are the times I sorely regretted it... Mike Y, you would be interested in the section of Ed's book around quality and setting a standard for your work. He gives some great thoughts on the subject that I am trying to live by. For instance - I will never drill a hole that I didn't first mark and pick. I think its human nature to cut corners at some points. I certainly have done that at times on this build and regret it. I am striving to make each piece as perfect as possible. But even then, there are challenges. To make one's sword so sharp is to make it dull. Here are a few photos of the nearly completed hull. I took these from the deck while on vacation in Northern California. Yes, I took my ship on vacation and yes, the Admiral did tease me about it. Another tid bit - Don't be too anxious to remove the frame spacers or cross-spauls. I spent more time repairing frames and adding new spacers. I should have just left well enough alone. Thanks for following along. G


-
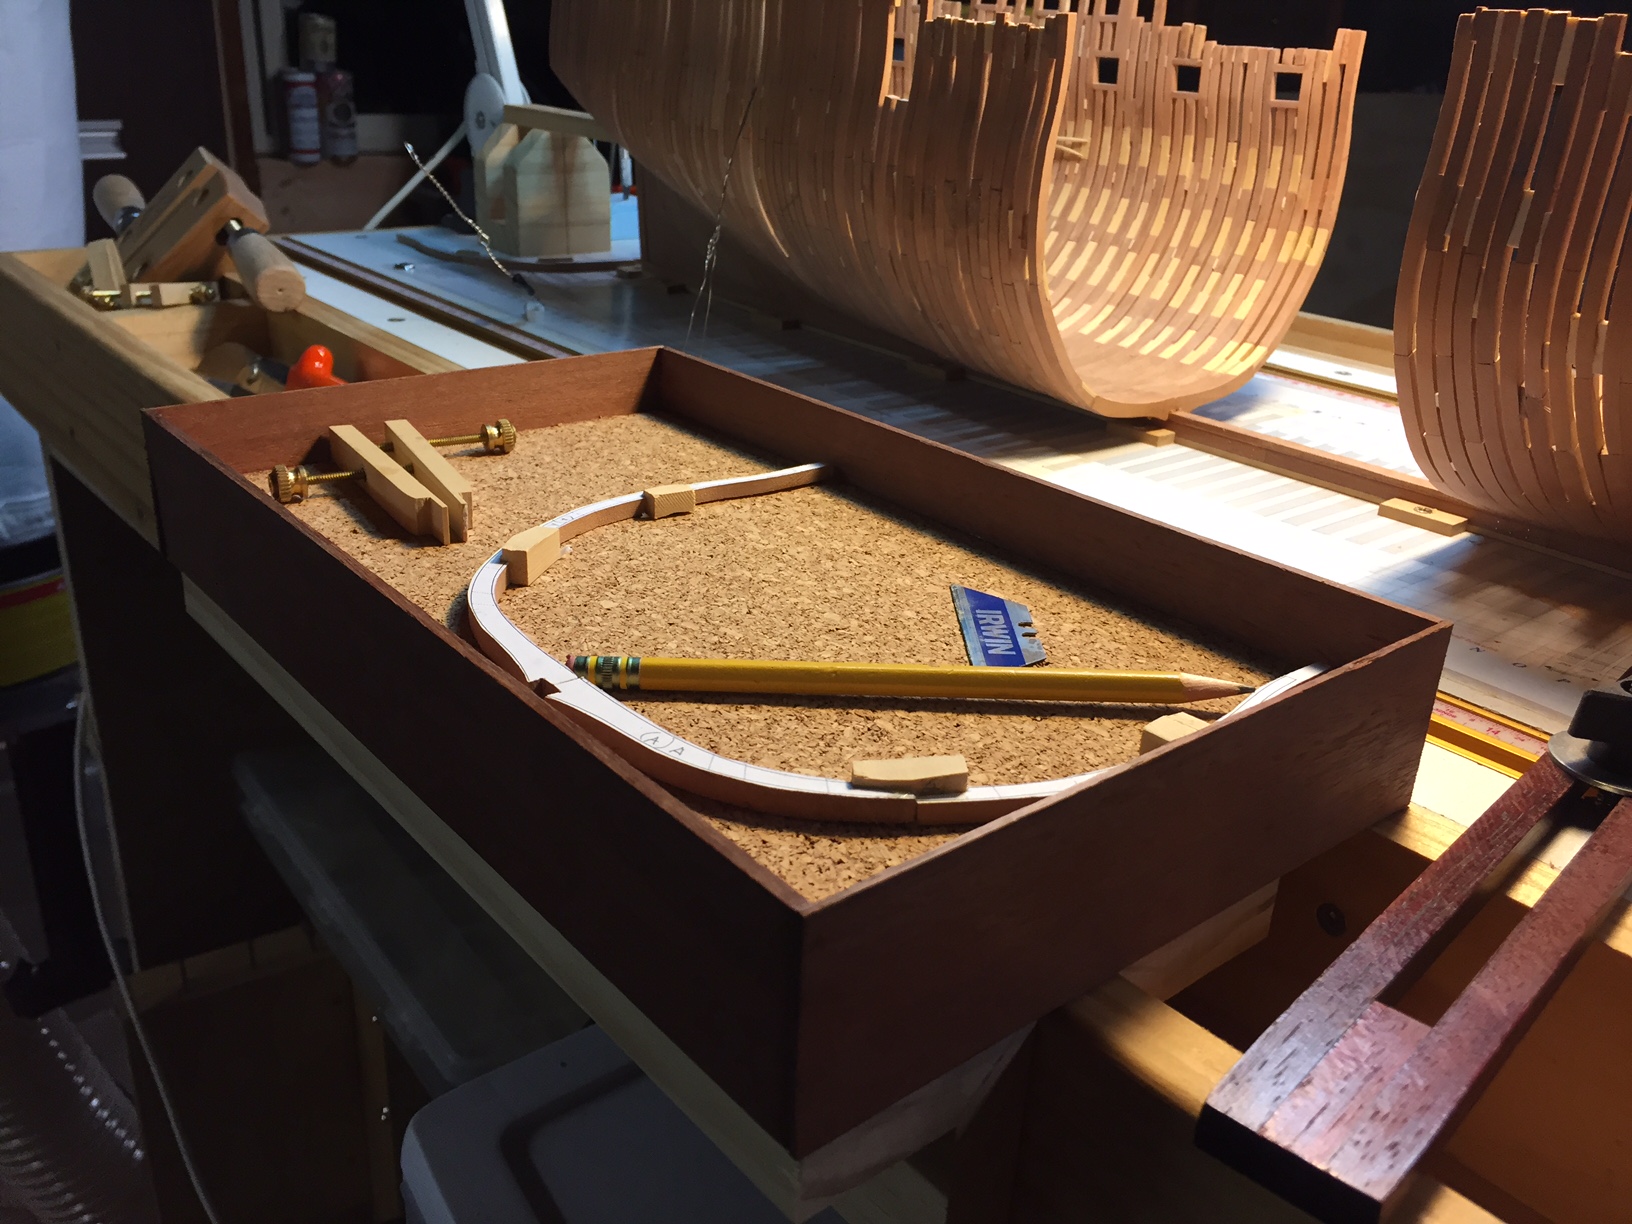
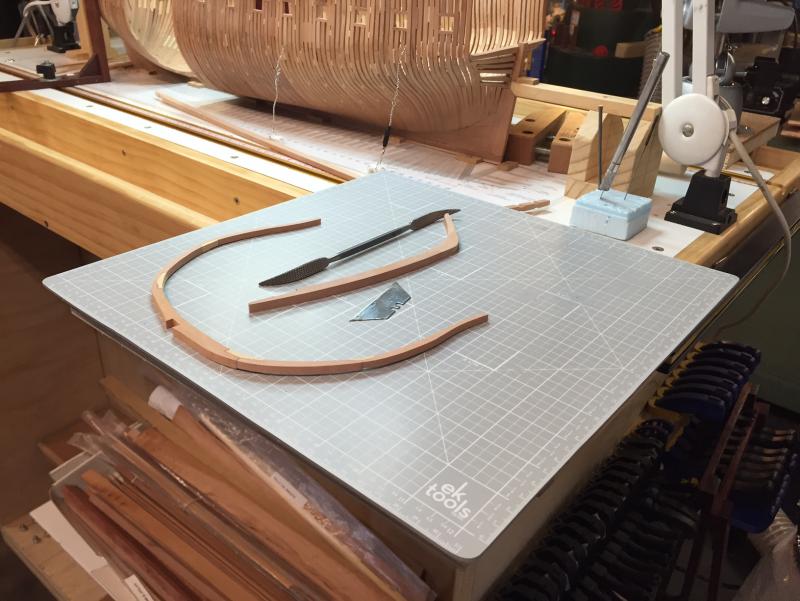
Hi All, About 575 hours into the voyage of Naiad. I took this photo a while back, but never posted it. Thought I would do so today so as to keep the thread alive. These are the counter timbers and and various stern transoms. One of the things I learned is that for temporary spacers, use pine or other soft wood as Ed recommends. At various times, I used harder woods simply because of sizing. This proved to be difficult when removing. Just another of the many lessons learned. Now I just have to try and not repeat my mistakes... As discussed last week, I am at the point of final sanding of the hull. Prior to that, I will plan on building up the stern so as to attain a nice fair sweep. I am looking forward to this part since it is very detailed and somewhat complex. All parts are book matched for uniformity. These pieces are sitting on a cork lined tray that I made that clamps to the side of my build table with a thumb screw. Thanks for following along. G

-
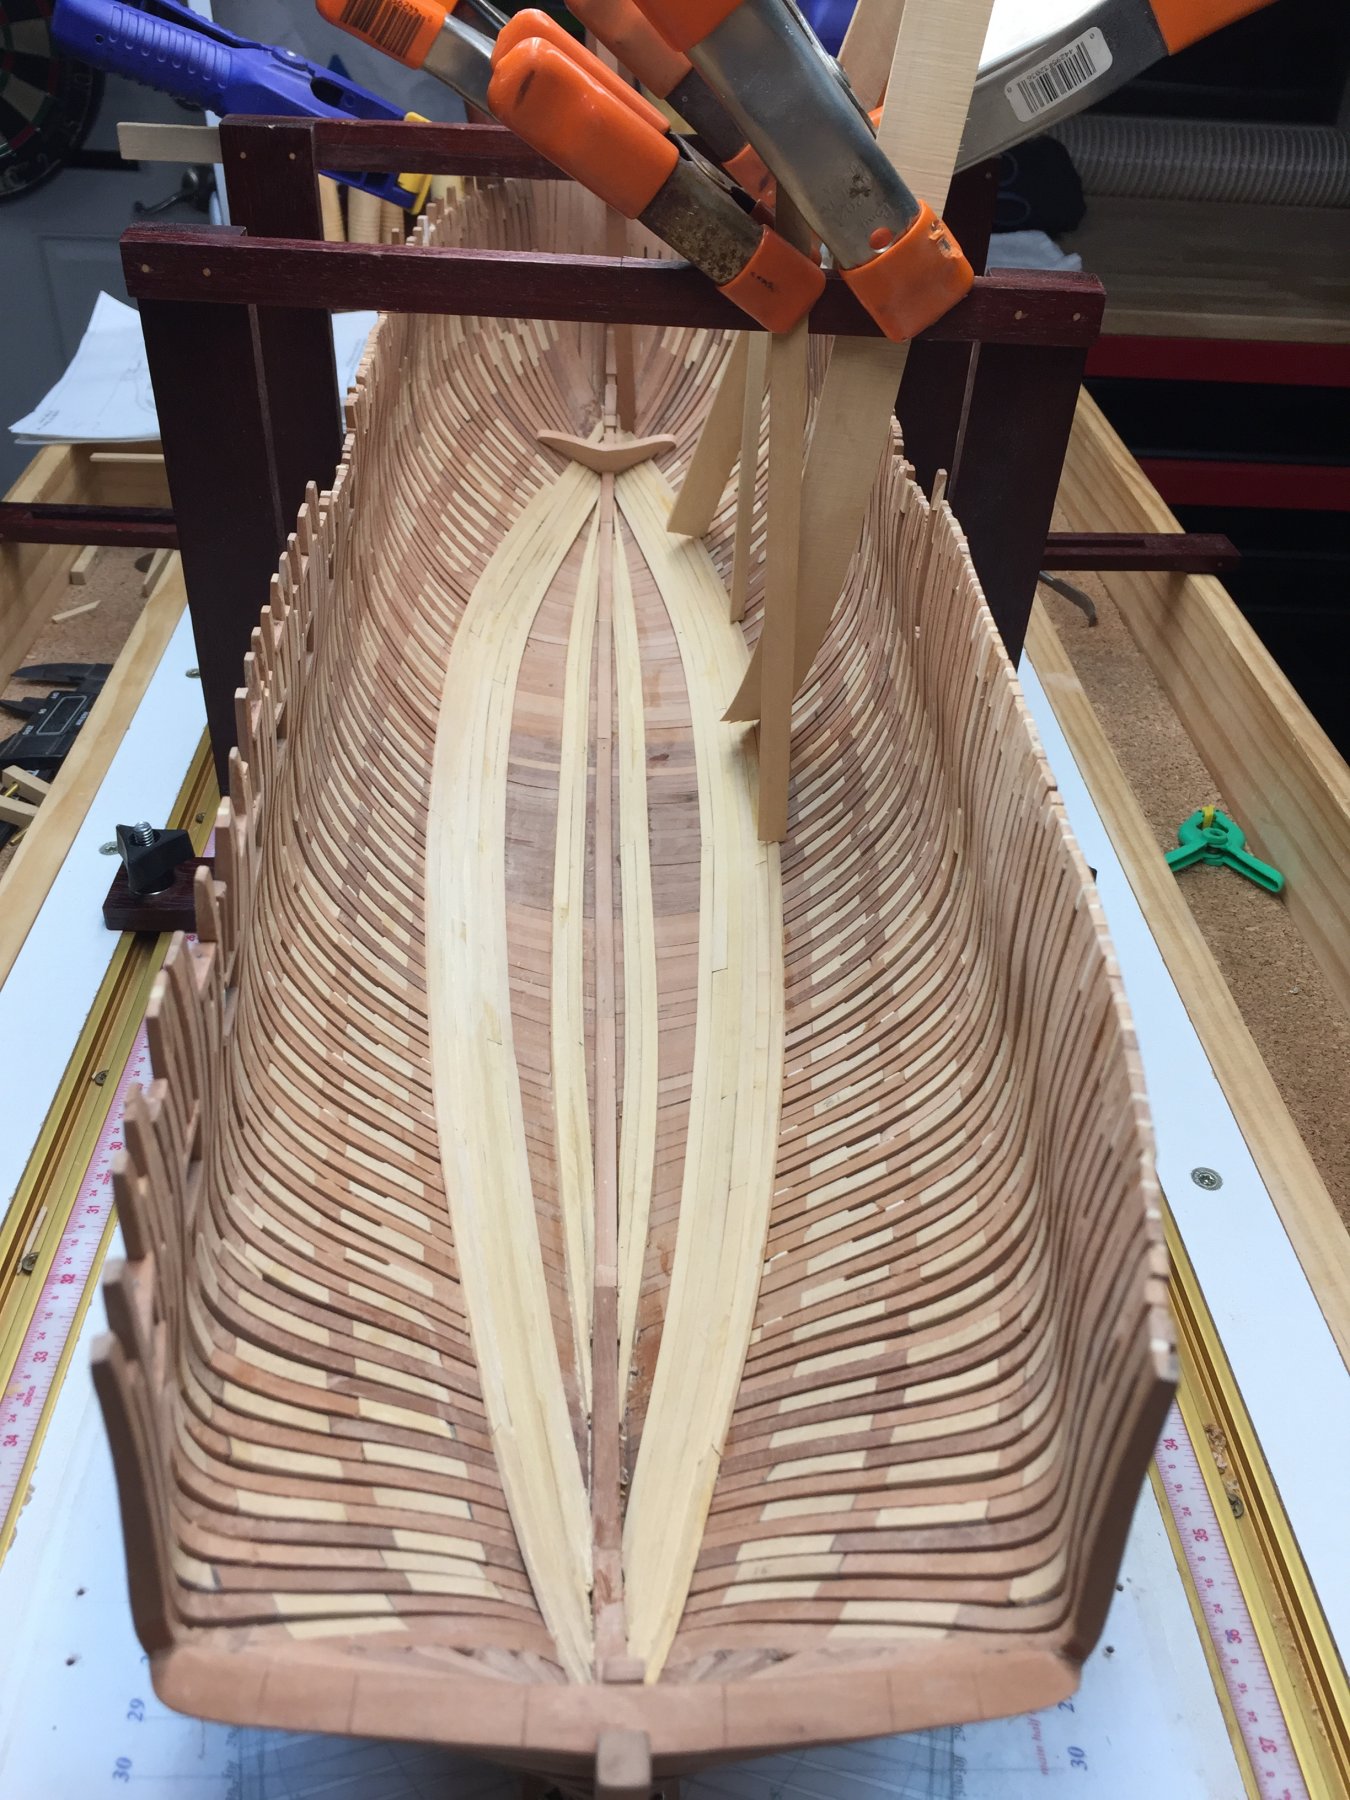
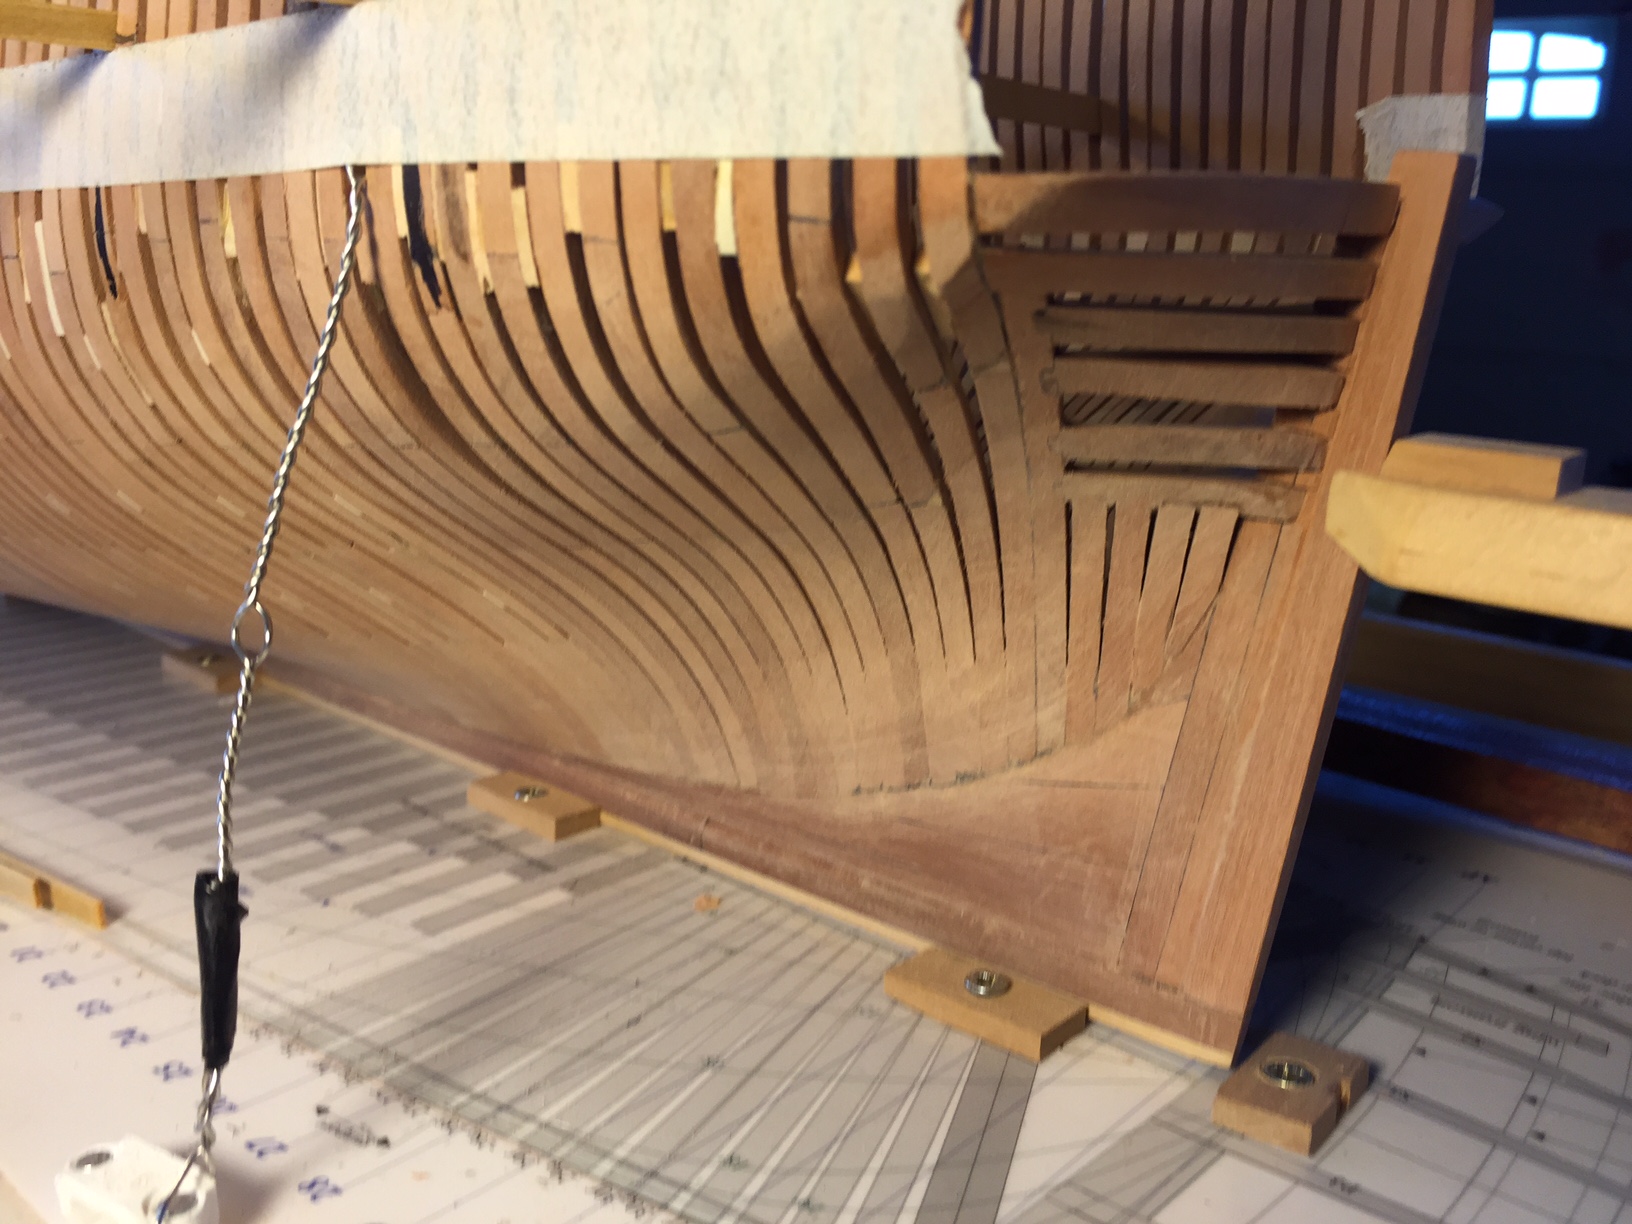
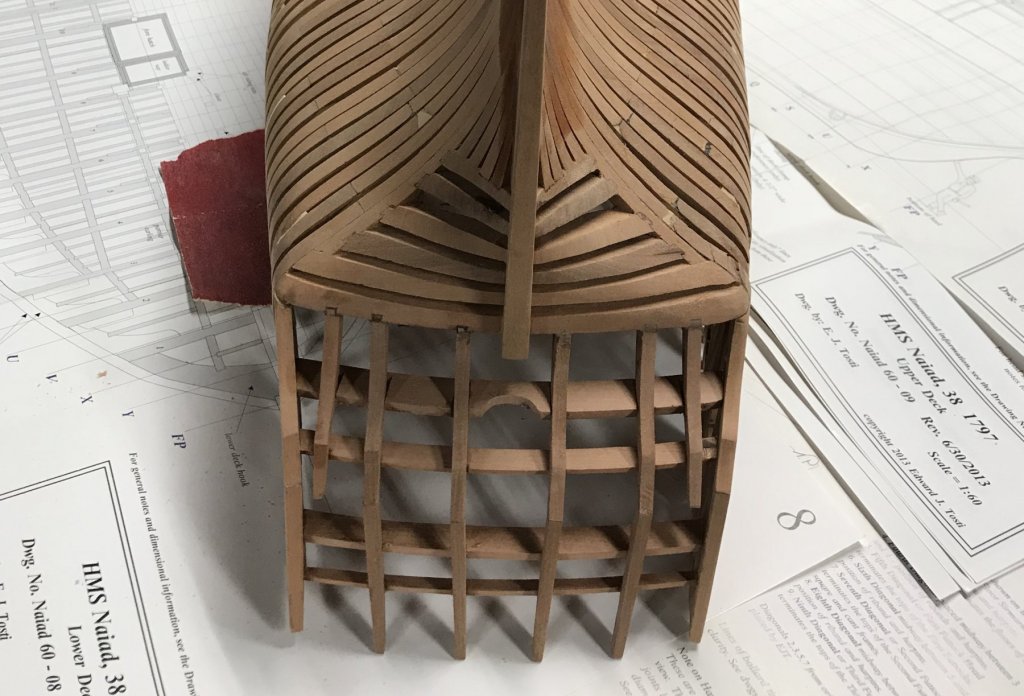
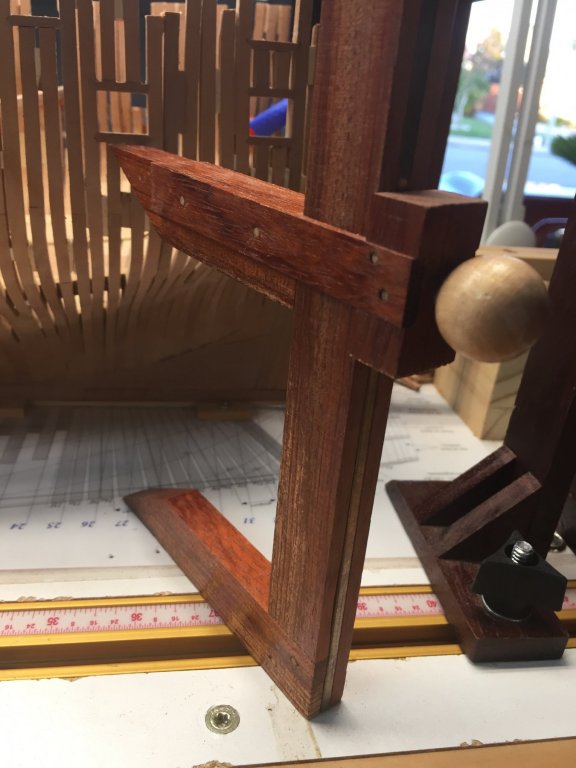
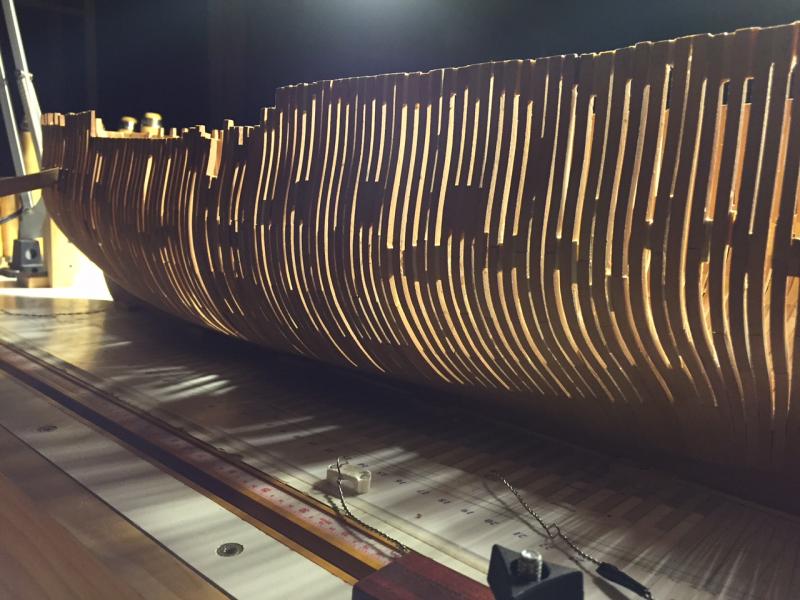
Hi All, I am now 565 hours into the journey of Naiad over the last 16-months. Feeling good about where I am thus far. Since my last post, I have completed the gun ports on the p/s and have completed the sills on the s/b side. In this first photo, is my small cutting board clamped to the build board. Note the half cup in the far corner. This is screwed to the board and I insert the larger cup of water in it. I use the water to wash off excess glue. I was tired of spilling it all the time. Also, I mounted a pencil holder and caliper holder to each side of the build board. I am trying to train myself to put these items back after each use. I figure this will save me thousands of hours of having to looking for pencils and calipers. (I don't know why this text got underlined, oh well...) I built these measuring calipers at the start of the build as recommended by Ed. They are lap jointed and pinned and have proved to be invaluable. I used scrap babinga wood. Recently, I added a brass strip for the screw to clamp down on. This has limited the movement of the caliper once tightened. As I placed each sill, I would use strips of bass wood as a "winding stick" to check for level from sill to sill. I am very happy with the results and have recreated the slope of the sills as outlined in the plans. There is a gentle rise at the ends of the ship with a low-level valley at midship. There is probably a nautical term for this sweep. I still need to fair the inside of the top timbers. While this picture is upside down, it shows the squareness of the gun ports. I cannot emphasize enough that each piece you place is of great importance to the overall symmetry in a build like this. Mistakes, no matter how random or remote will likely be magnified somewhere else in the build. This is just an exterior portside view of the gun ports and illustrates the gentle sweep of the ports. Yes, that's a dead rat hanging from the light... fake of course... I used pinstripe tape to establish the fair sweep of the sills. The sills remain horizontal throughout the ship, the sweep is very subtle. You will note the use of a spacer block for the ports. I found this essential I getting the correct length and height of each port. I colored the block so I could easily find it among all my scraps. Yes, I uploaded these photos backwards... Next on the to do list is to finish the upper sills on the s/b side, rework all the spacers within the hull so they have a uniform sweep, cut the top timbers on the s/b to length. I then plan to sit down with the hull during our family vacation this summer in the mountains and go over it frame by frame. I will spend my early mornings for those 10 days with scrapers, files, and steel wool. I am looking forward to those quiet moments on the deck, sipping coffee and filing away - long before the kids get up! Thanks for following along. Gary


-
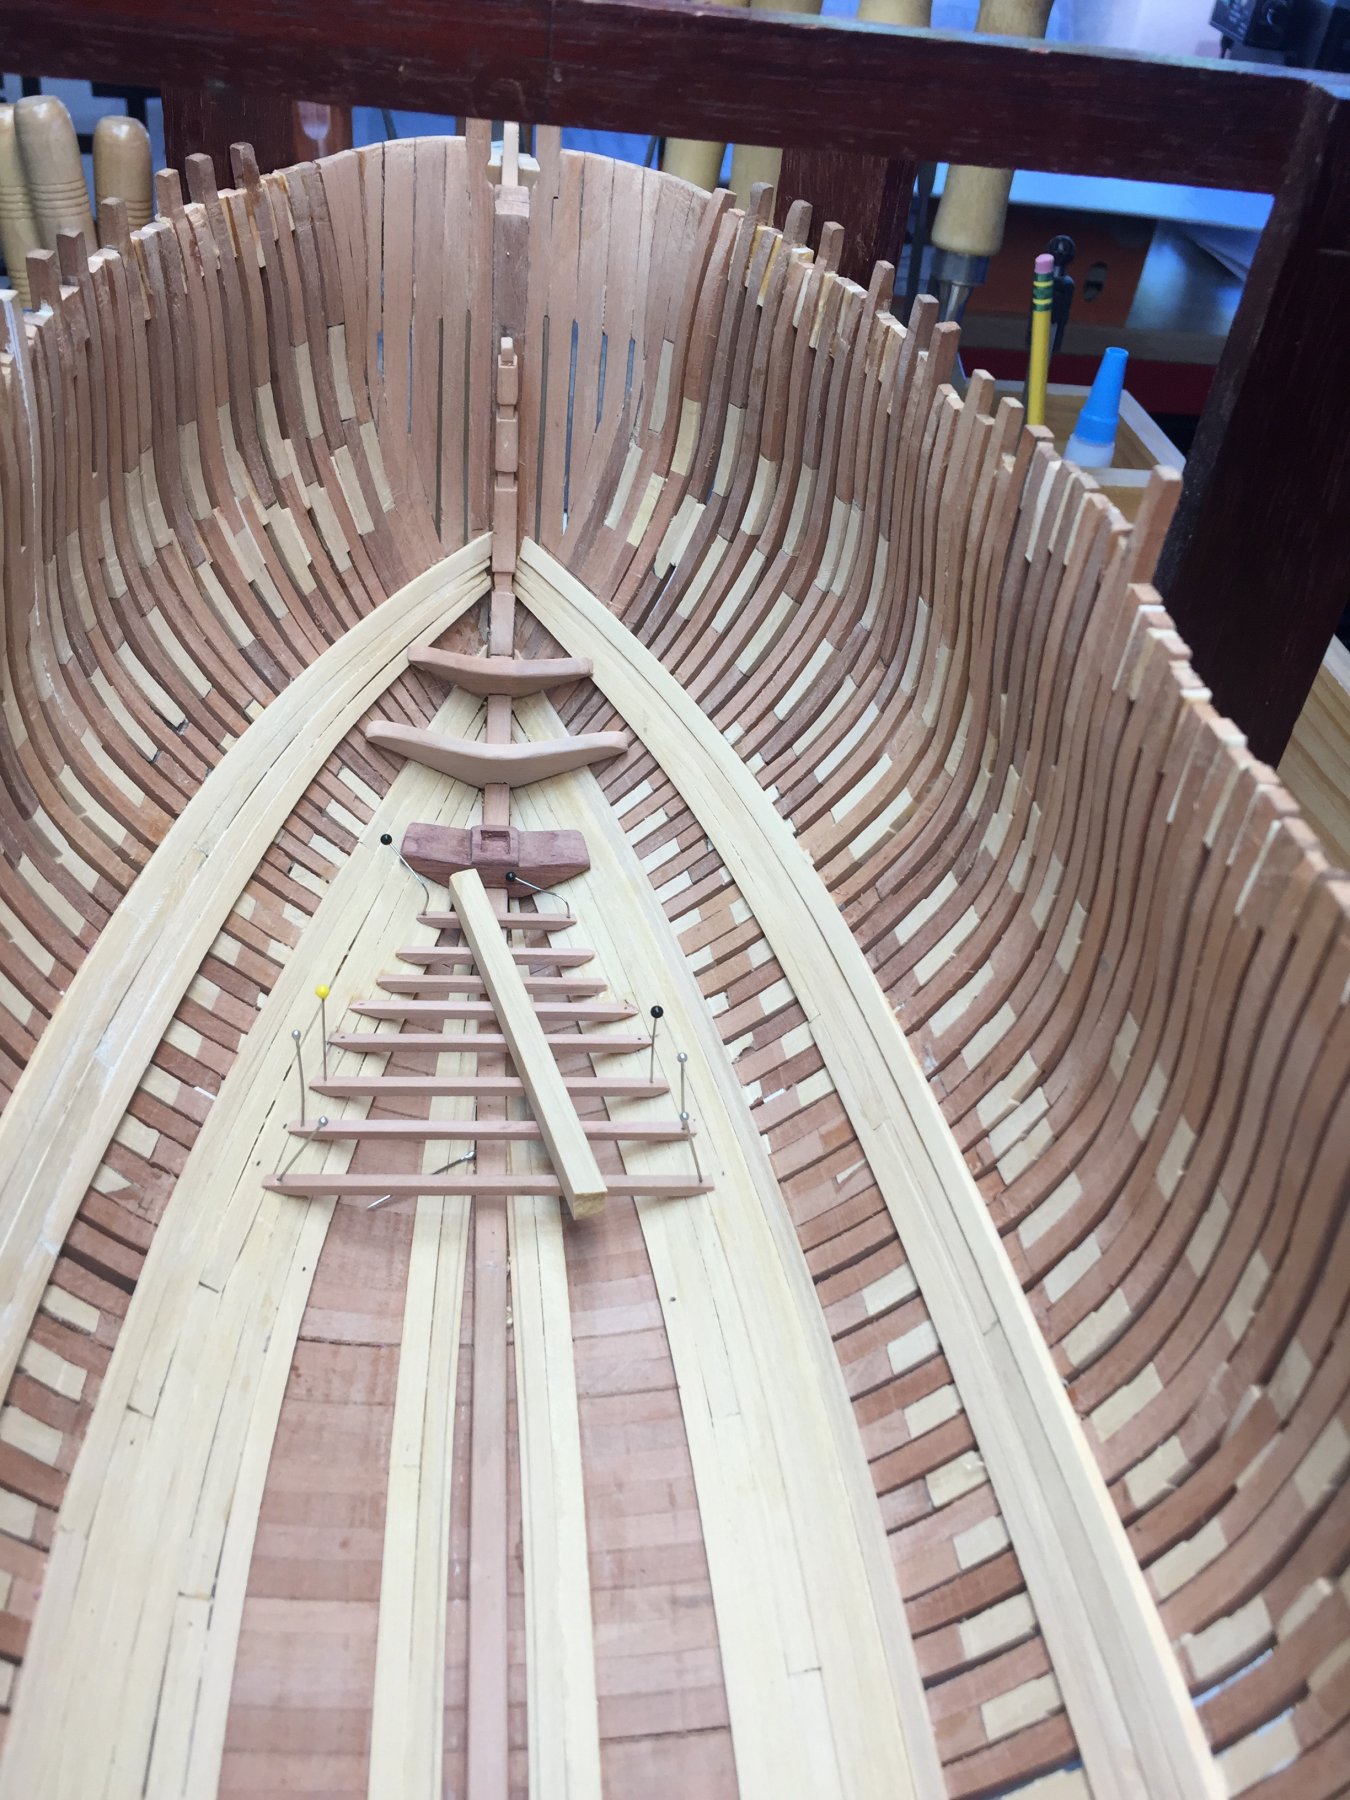
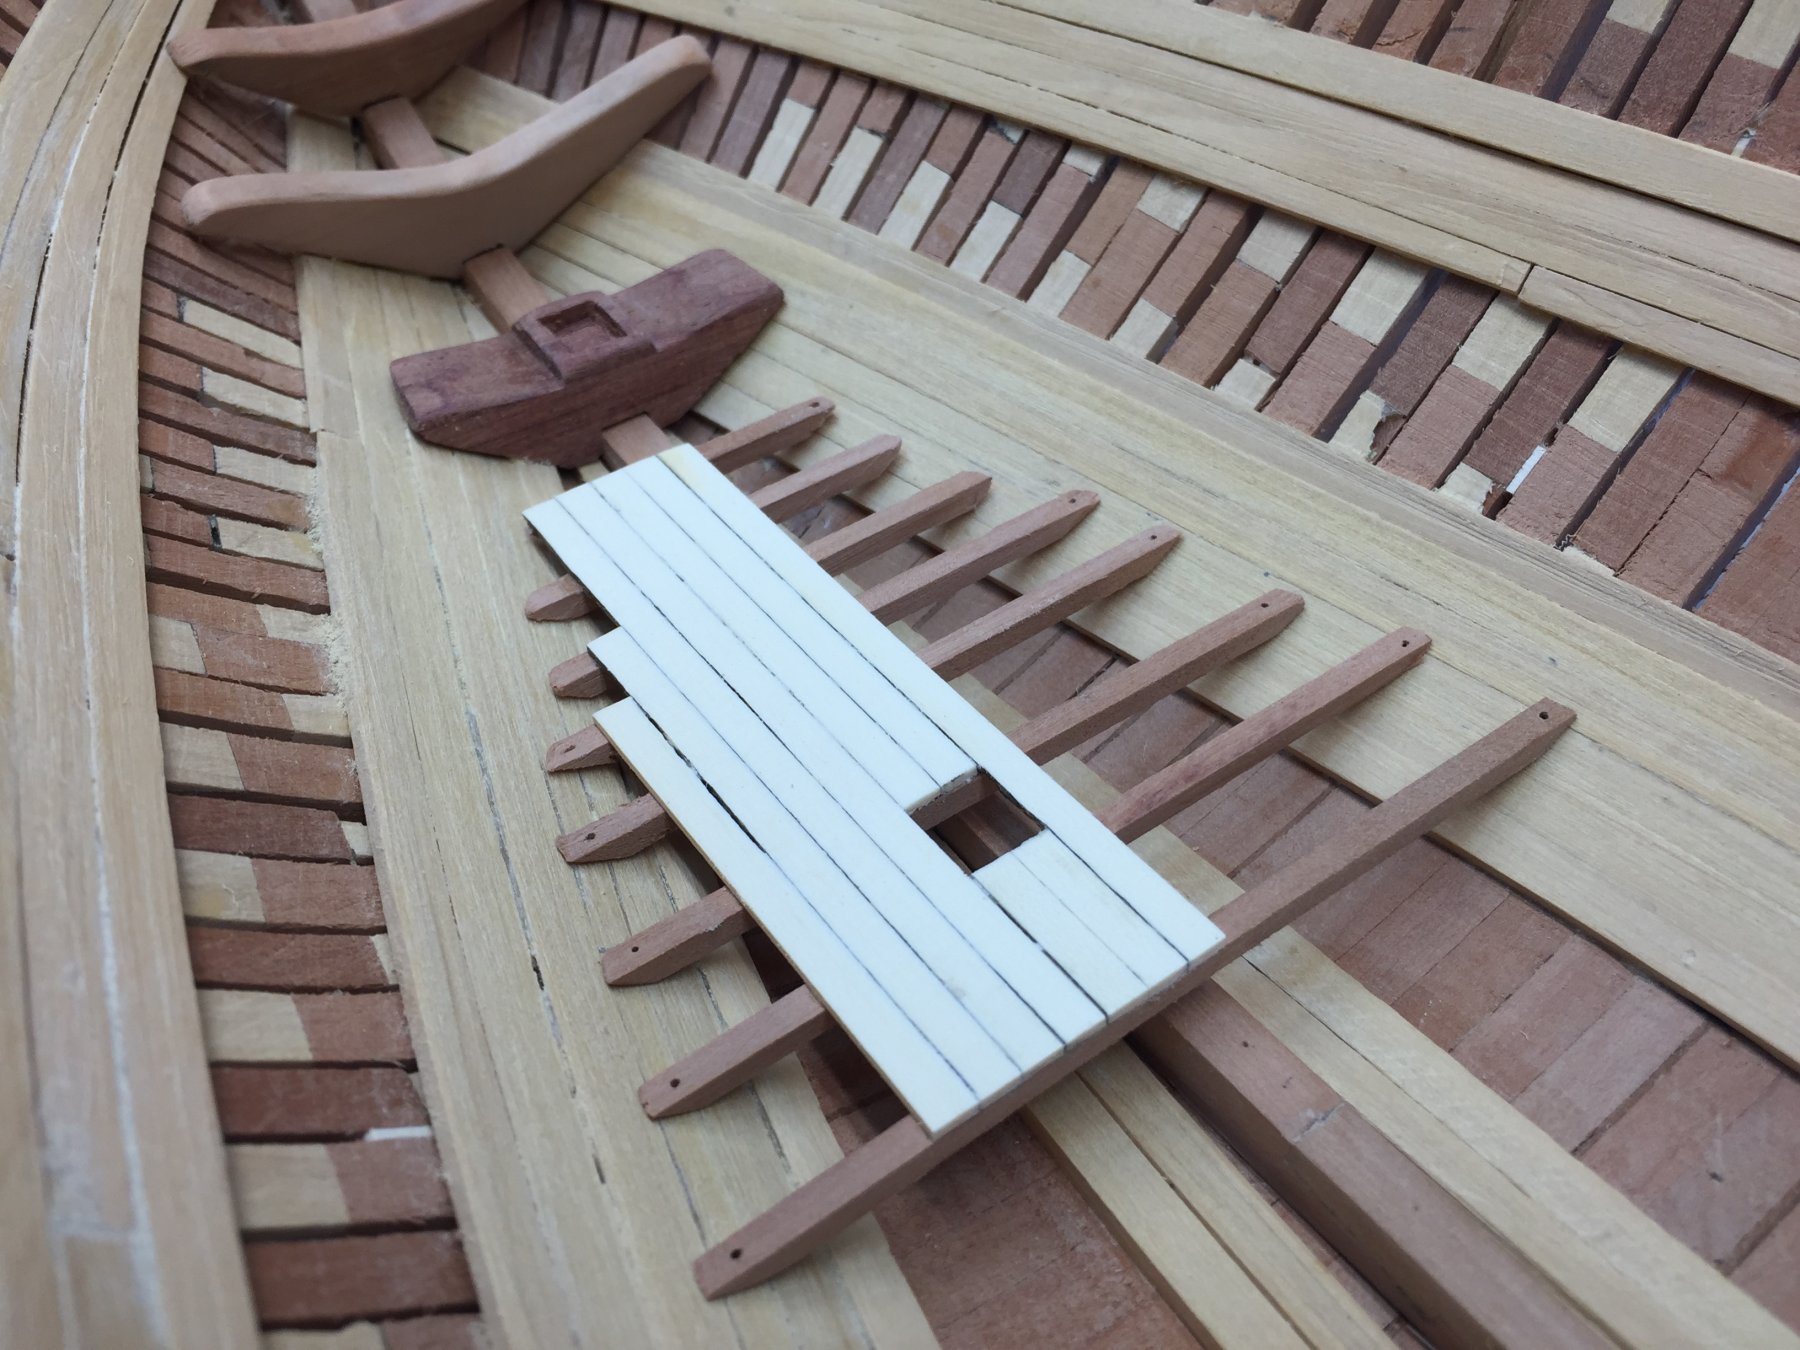
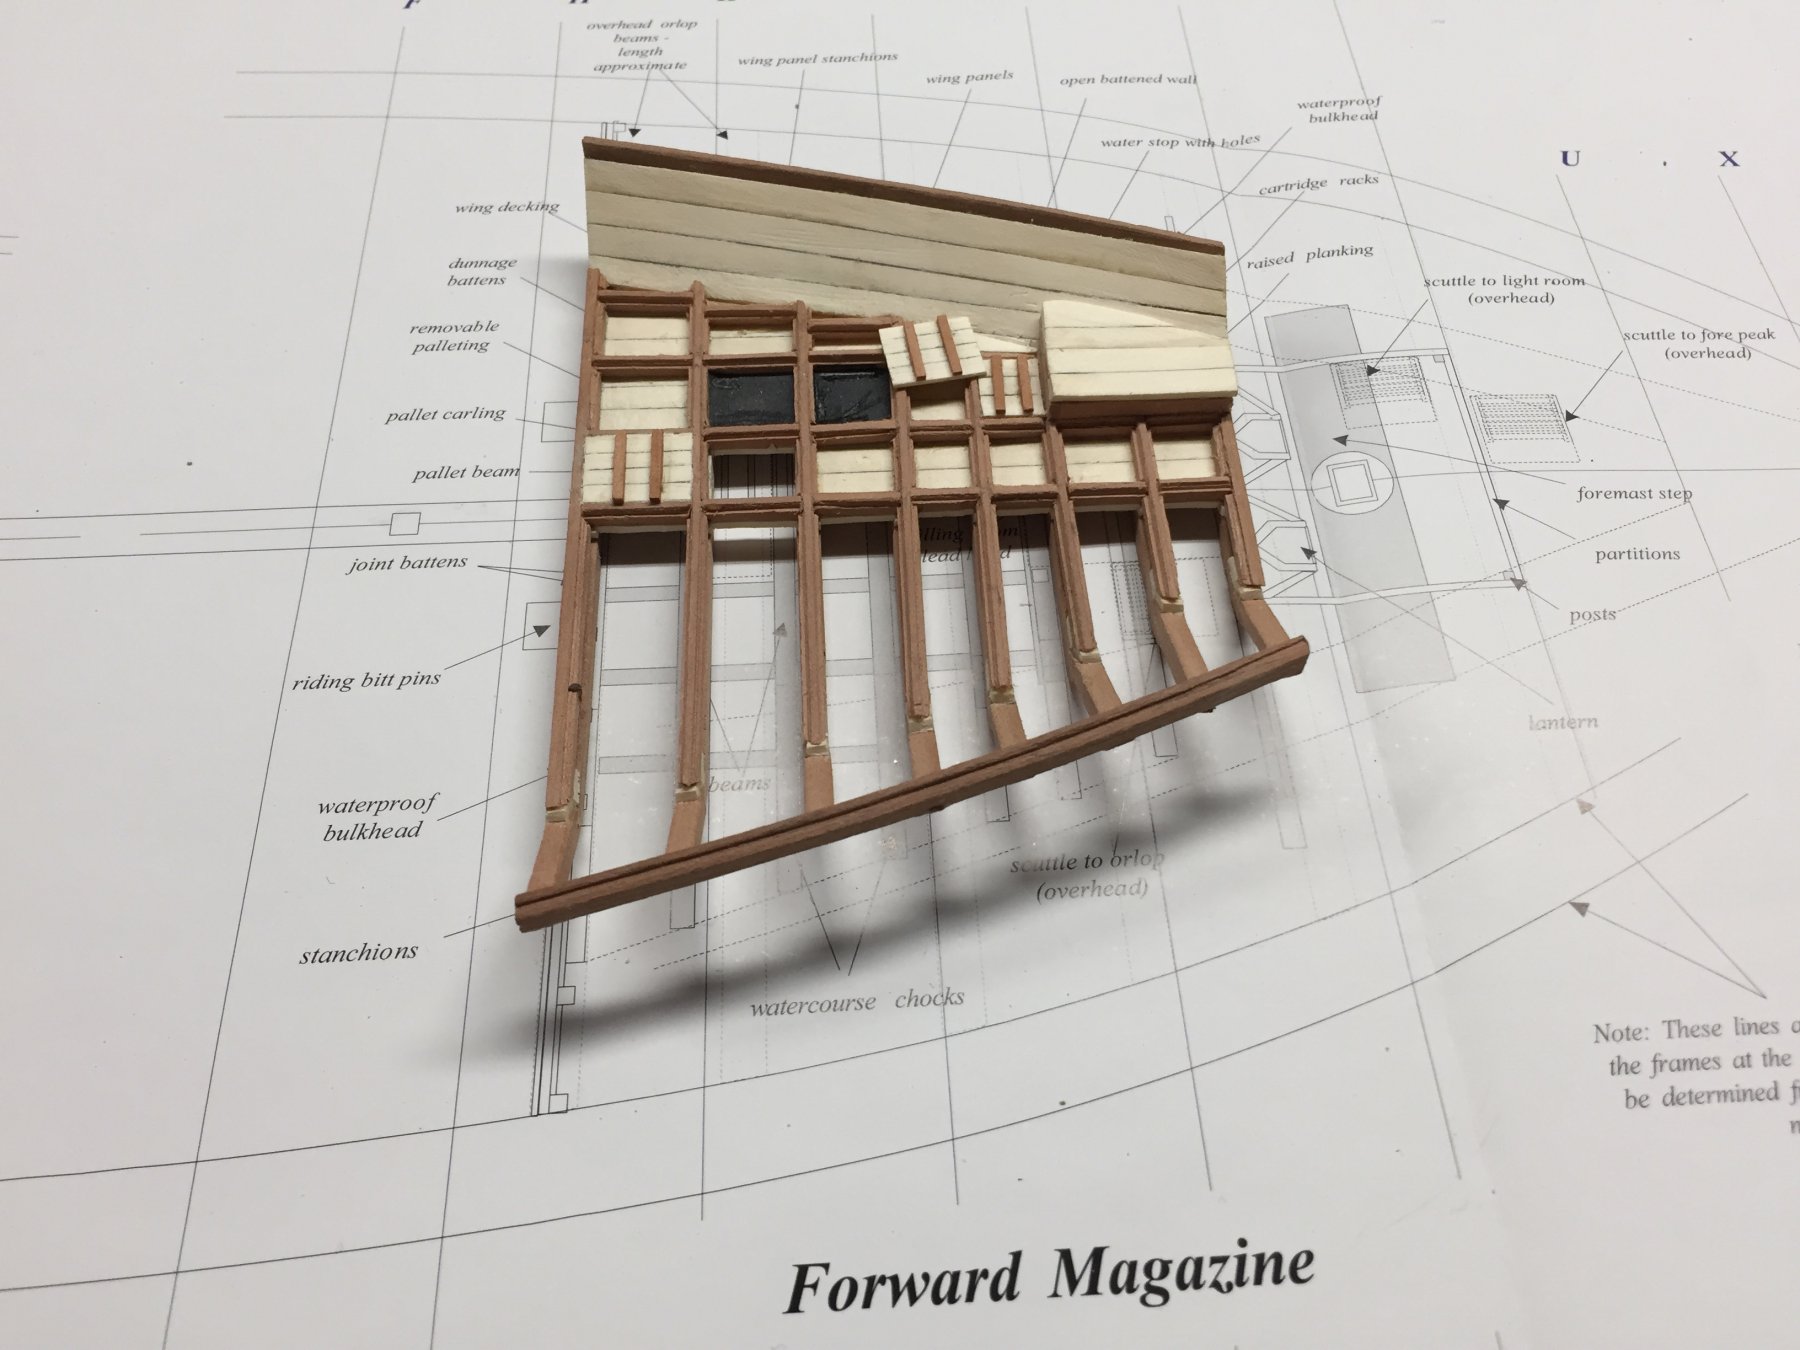
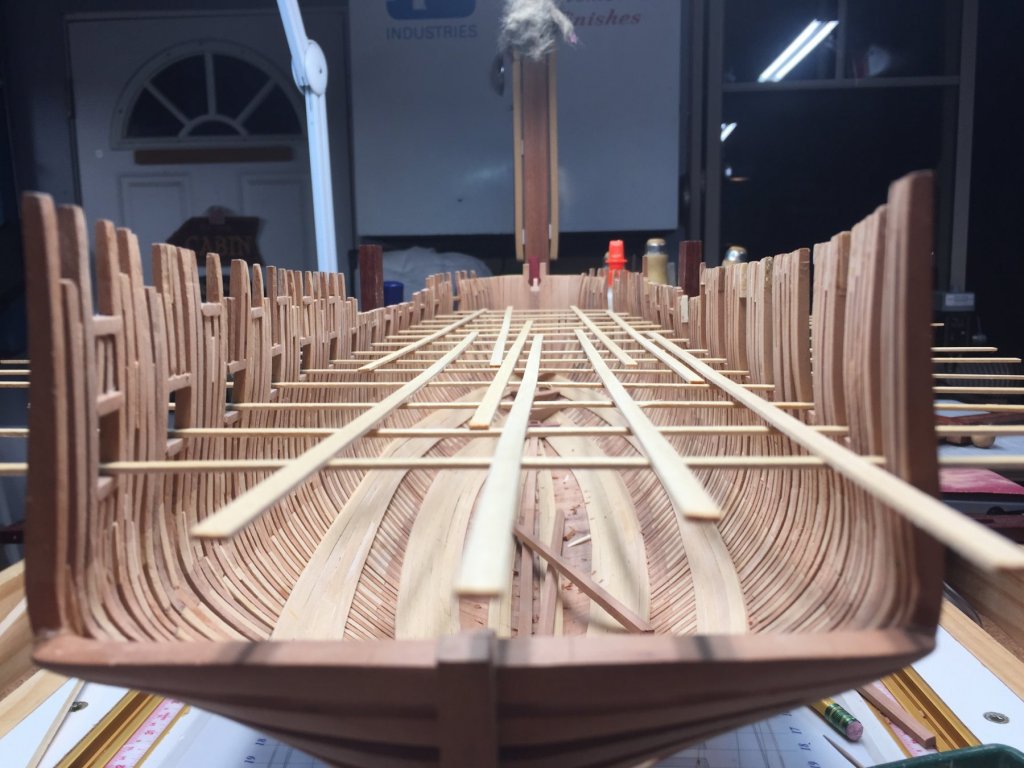
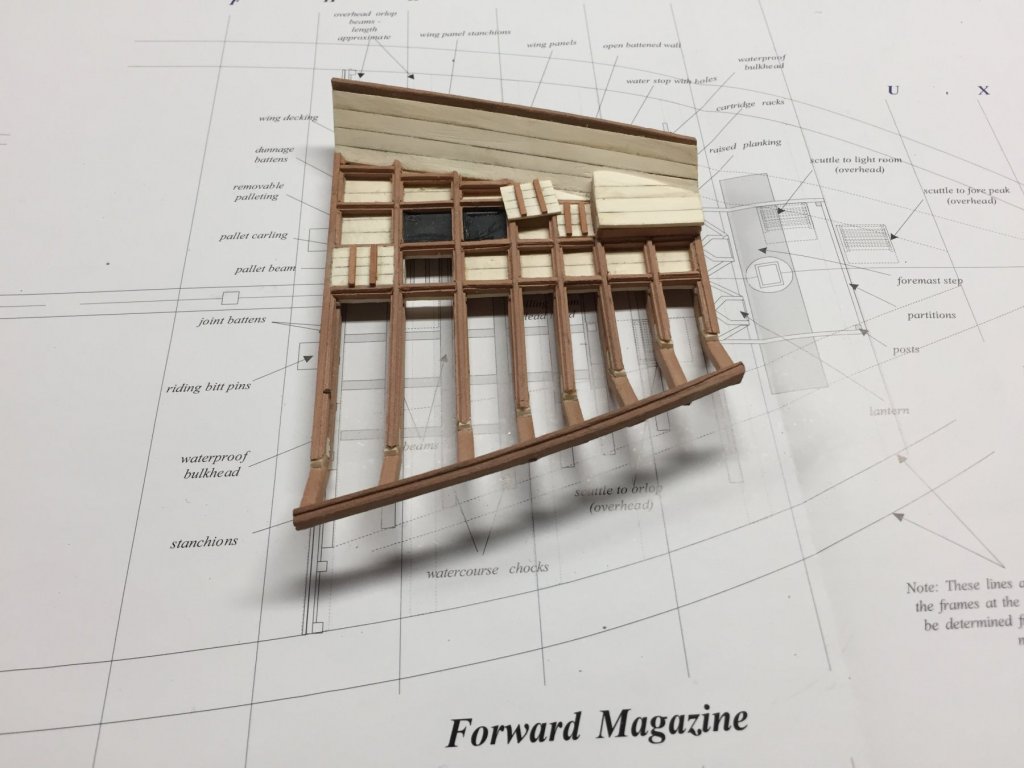
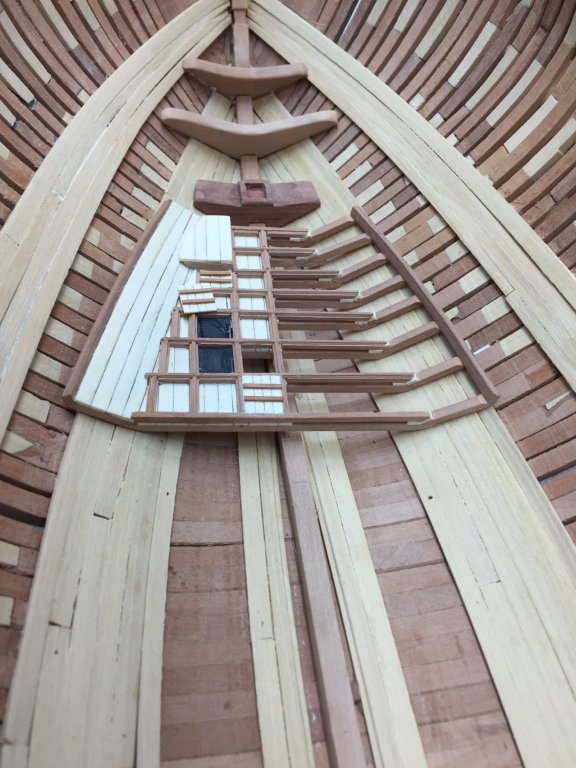
Hi All, I'm back! I took a little break but am now back in the shop and going strong. 530 hours into the journey. I decided to shift away from the hull work and tackle a little of the inside. I had several reasons, the real one being that I needed a change of scenery. That being said, I wanted to stiffen the hull before doing final sanding. To do that, I laid the keelson, ceiling planks, crutches and breast hooks. I then built up part of the magazine while I was on a roll. Ed suggests building the forward magazine while off the model. I think this was a great idea and it allowed me to work freely at the bench. At some point, the magazine will be installed, but first I need to lay the orlop deck beams. There is a critical relationship here that you need to get right. My version of the magazine has simple detail elements. I decided not to treenail at the lower depths and decided to simplify the number of beams on the sb side. This being said, I will increase the detail as I climb. I enjoyed making the magazine substructure. It was a unique challenge. And, looks much better to the naked eye - these photos are unforgiving. I wanted clean detail, but I am not obsessing on my work here. The black area is simulated charcoal. I simply took 500 grit wet sandpaper and applied it here. I doubt you will be able to see it on the finished model, but thought it would be a nice detail to discuss. The ceiling planks were a special challenge when it came to clamping. I made great use of the gantry system when securing these planks. Its amazing how stiff the hull is with these structures in place. While I would not want to step on the model, it does give you appreciable insight into the durability of the actual ship. As I reflect further on building an extreme POF ship, one of the many things I like about it is that you don't simply glue pieces together, but rather think about how they would have worked together on the real ship. My skills have improved since I have been forced to think differently about the ship. Hope to have more soon! All the best, Gary


-
Hi Kees, Sorry not to reply sooner. That family stuff has really got me becalmed. Yes, I stand over my model. At some point, I imagine I will sit down, but have done all my modeling while standing to this point. I guess it has a lot to do with the fact that I sit at my computer for 8-10 hours each day at work. I have made little progress on Naiad since November, but am still an avid builder. Photos when there is something worth sharing. Thanks for commenting! G
-
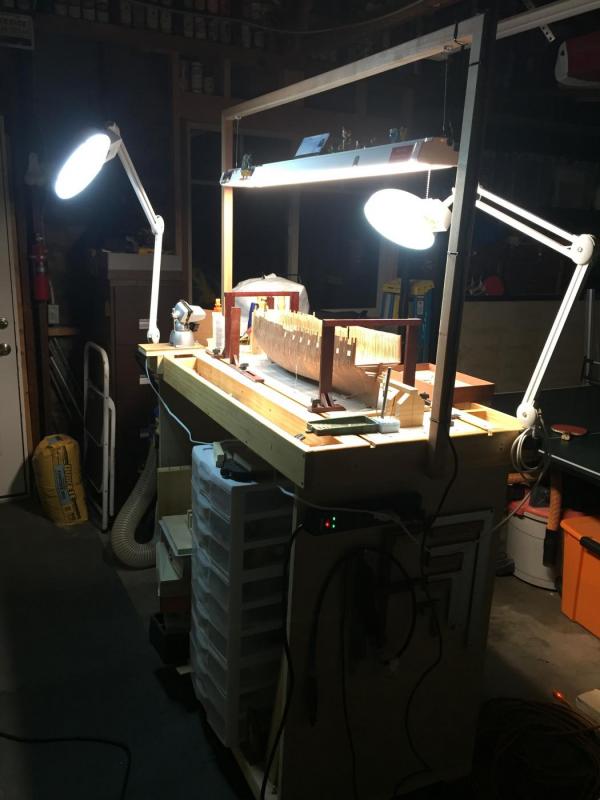
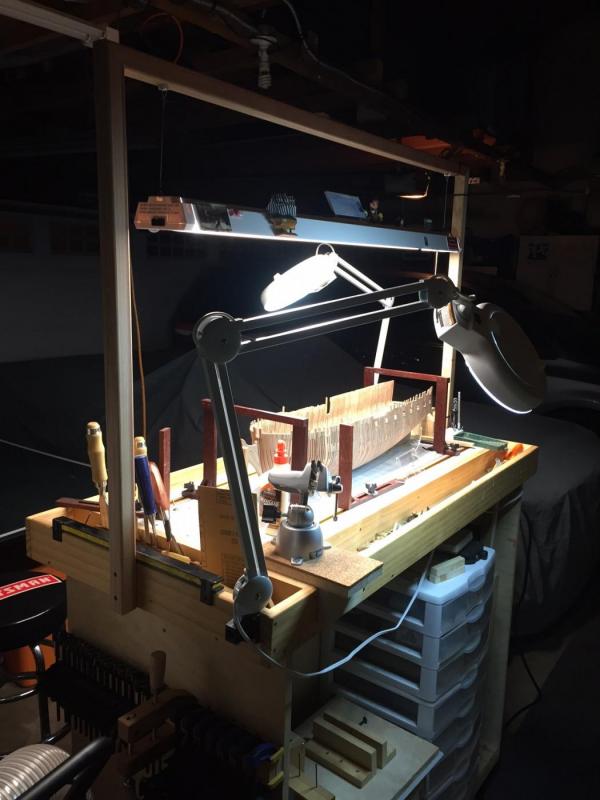
Hi All, Its been a crazy month with lots of honey do's... But I thought I would send a few pictures so as to keep the thread alive. That being said, I am 490 hours into the journey. I have continued work on my build board/workbench by adding 4' LED lighting above the build board. I am very happy with the results and cannot believe I went this long without good light. You will also note to fluorescent task lights with magnifiers. In addition, I hang my Dremel from the uprights that support the lamp. I will get working on the shelving over the weekend, provided the Admiral doesn't have me finish grouting the side patio... Best, G
-
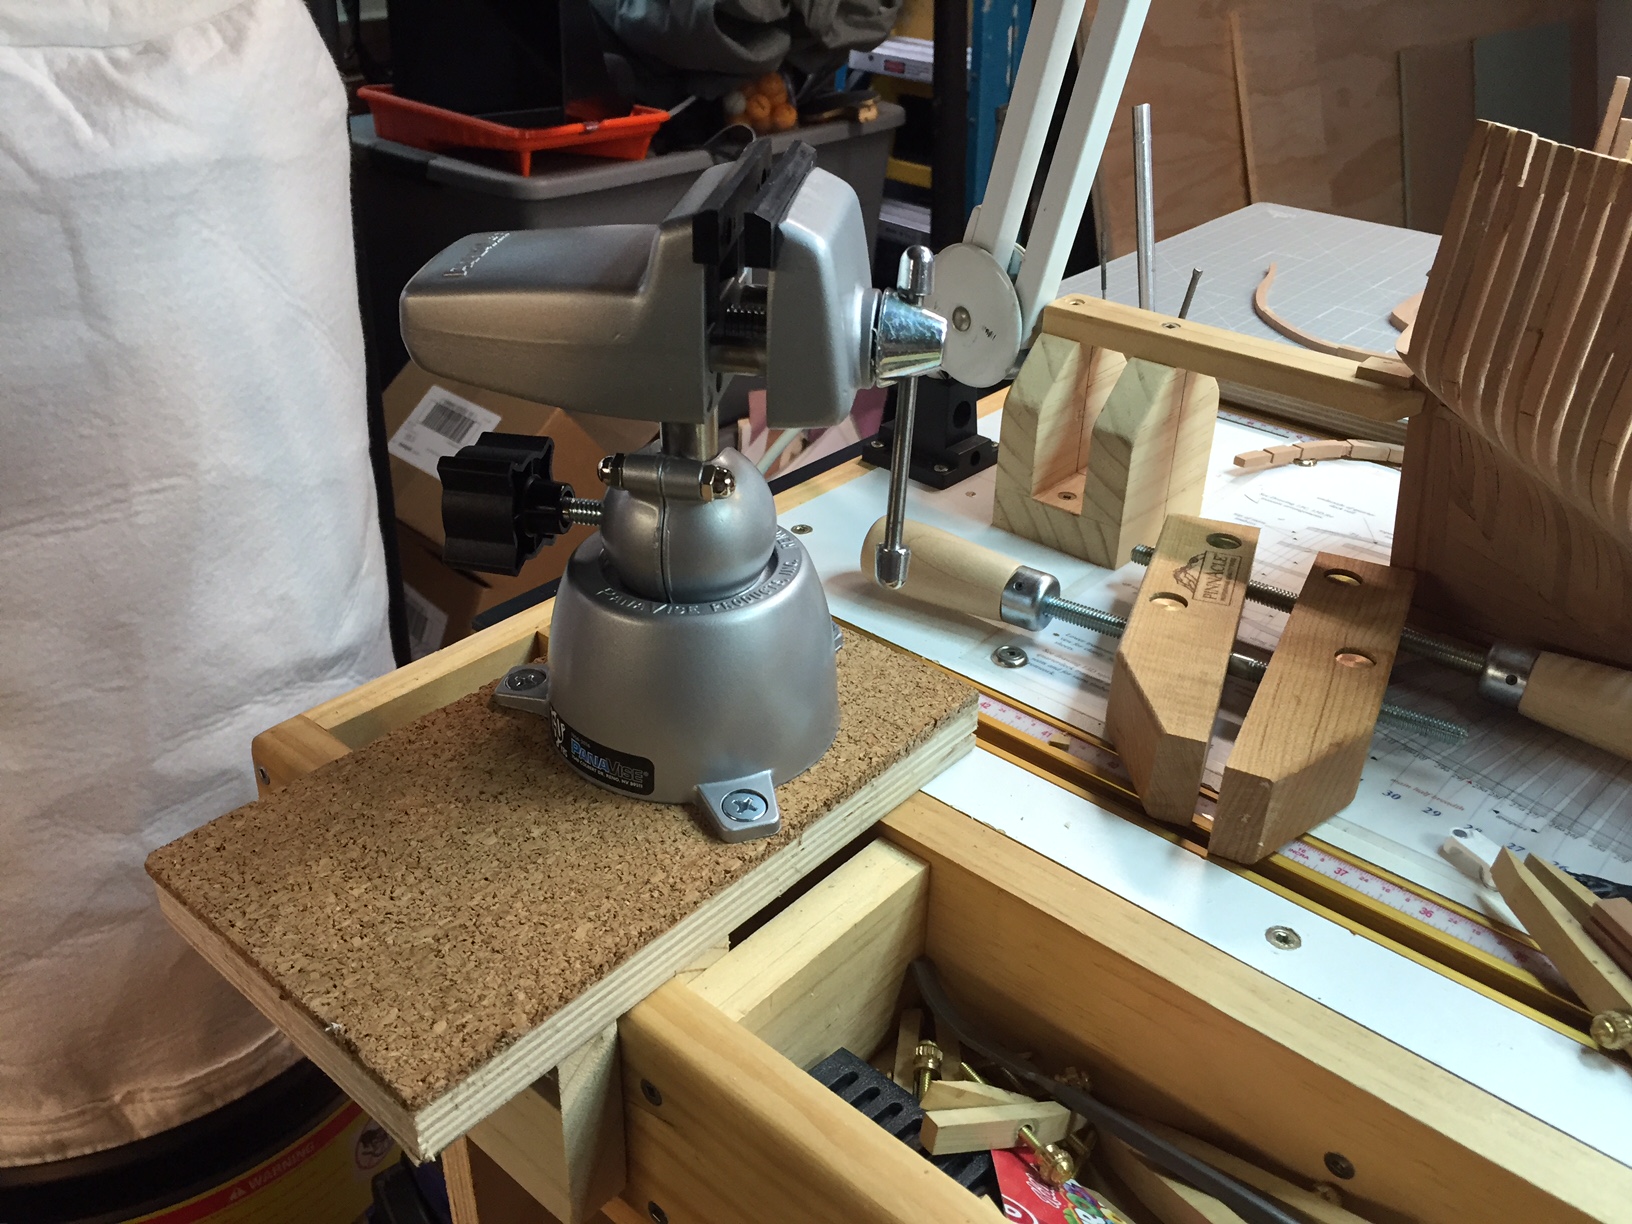
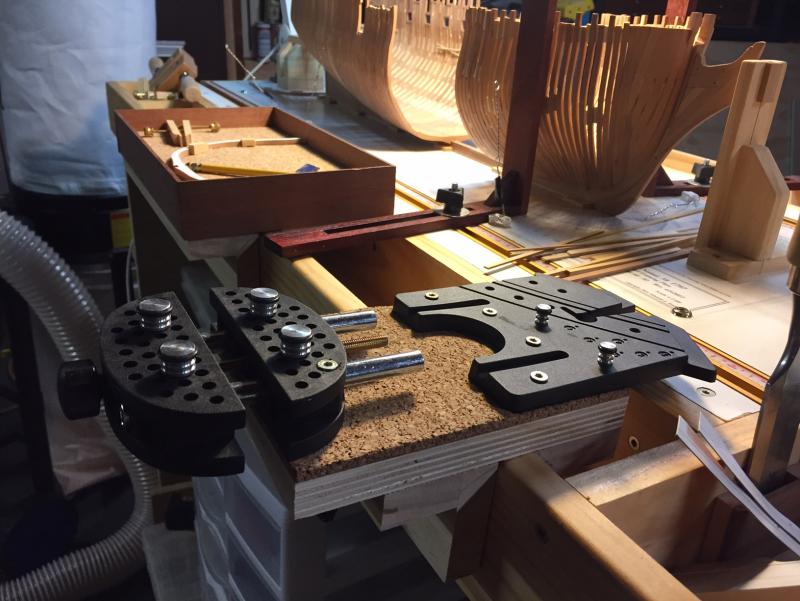
Hi All, Well, its been a little while since I posted, but that doesn't mean I haven't been busy. I had a great time at the NRG conference in San Diego last weekend and met so many wonderful people there. I was very pleased with the amount of interest fellow modelers showed in the Naiad. There were so many impressive builds! Here are a few shots of some attachments that I made for my build board, which sits atop a custom rolling cabinet (I still need to make drawers for the cabinet). As mentioned previously, I do all my modeling while standing. I like a high platform so I don't hunch over when doing detail work. The attachments rest on cleats that fit over the edge of the build board and have thumb screws to tighten them. I am able to move them around where I need them. There is a tray with a cork lining and mahogany sides (hey, it was scrap), I have a pana-vise mounted on a cork top, as well as several Amanti jigs for cutting and carving. I will make a few more as time goes by. I plan to store some inside the cabinet when not in use. My goal is to keep most of my small hand tools and other accessories easily accessible in the cabinet. I am 446 hours into the build. I did a little rework on the frames. I didn't like how some of them faired, so I ripped them out. I am not taking pictures of the rework, too painful. I am still loving the build, but need to remember to move slow for maximum speed. Best, Gary


-
Hi All, No photo updates this week. I will be heading to San Diego on Thursday with my Naiad and Eagle. Hope to see some of you there. All the best, Gary
-
Hi Toni, your work is highly inspirational. I love the small treenail and bolt details as well as the subtle notching of the horseshoe and countersinking of the stern plates. Gary
-
Hi All, 400 hours into the journey. I have spent the past two-weeks doing rework on the top timbers as well as addressing some other quality issues. Overall, I am happy with the progress, but am frustrated by the little mistakes that caused the rework. Somewhere along the way, the scale of my drawings was converted to "fit page" as opposed to "100%". This caused the top timbers on frames 1-6 to be too short. Ugh. Its only off by 3/8th of an inch, but that matters to me. I want to reinforce some of the ideas on what I would do better on next time. I have posted most of these already, and, they are worth remembering: 1. Make your top timbers at least a 1/4 taller than required. This allows you the wiggle room, as well as a place to put your spacers and not have to worry about messing up the actual frame. 2. Make the chocks from the same wood as the frames. I replaced five frames that had the chocks sanded through. 3. Leave plenty of meat on the frame when installing chocks - this will come back to haunt you. 4. Consider building this ship in 1:48 scale to take advantage of all the small details. 5. Install the chain plate filler pieces as you go. They are a permanent part of the ship and can aid in stabilization of the frames. You also will need fewer spacers. I plan to replace the top timbers on the s/b side 1-6 and then add treenail and bolt details this week. I will then do a final sanding of the outside hull and then install the ribbands. I really wanted to get her cleaned up before I show her at NRG next month, but will not rush to do that. More next Monday. Best, G

-
Hi All, Thank you for the kind comments and likes. Its all very motivating. Gary
-
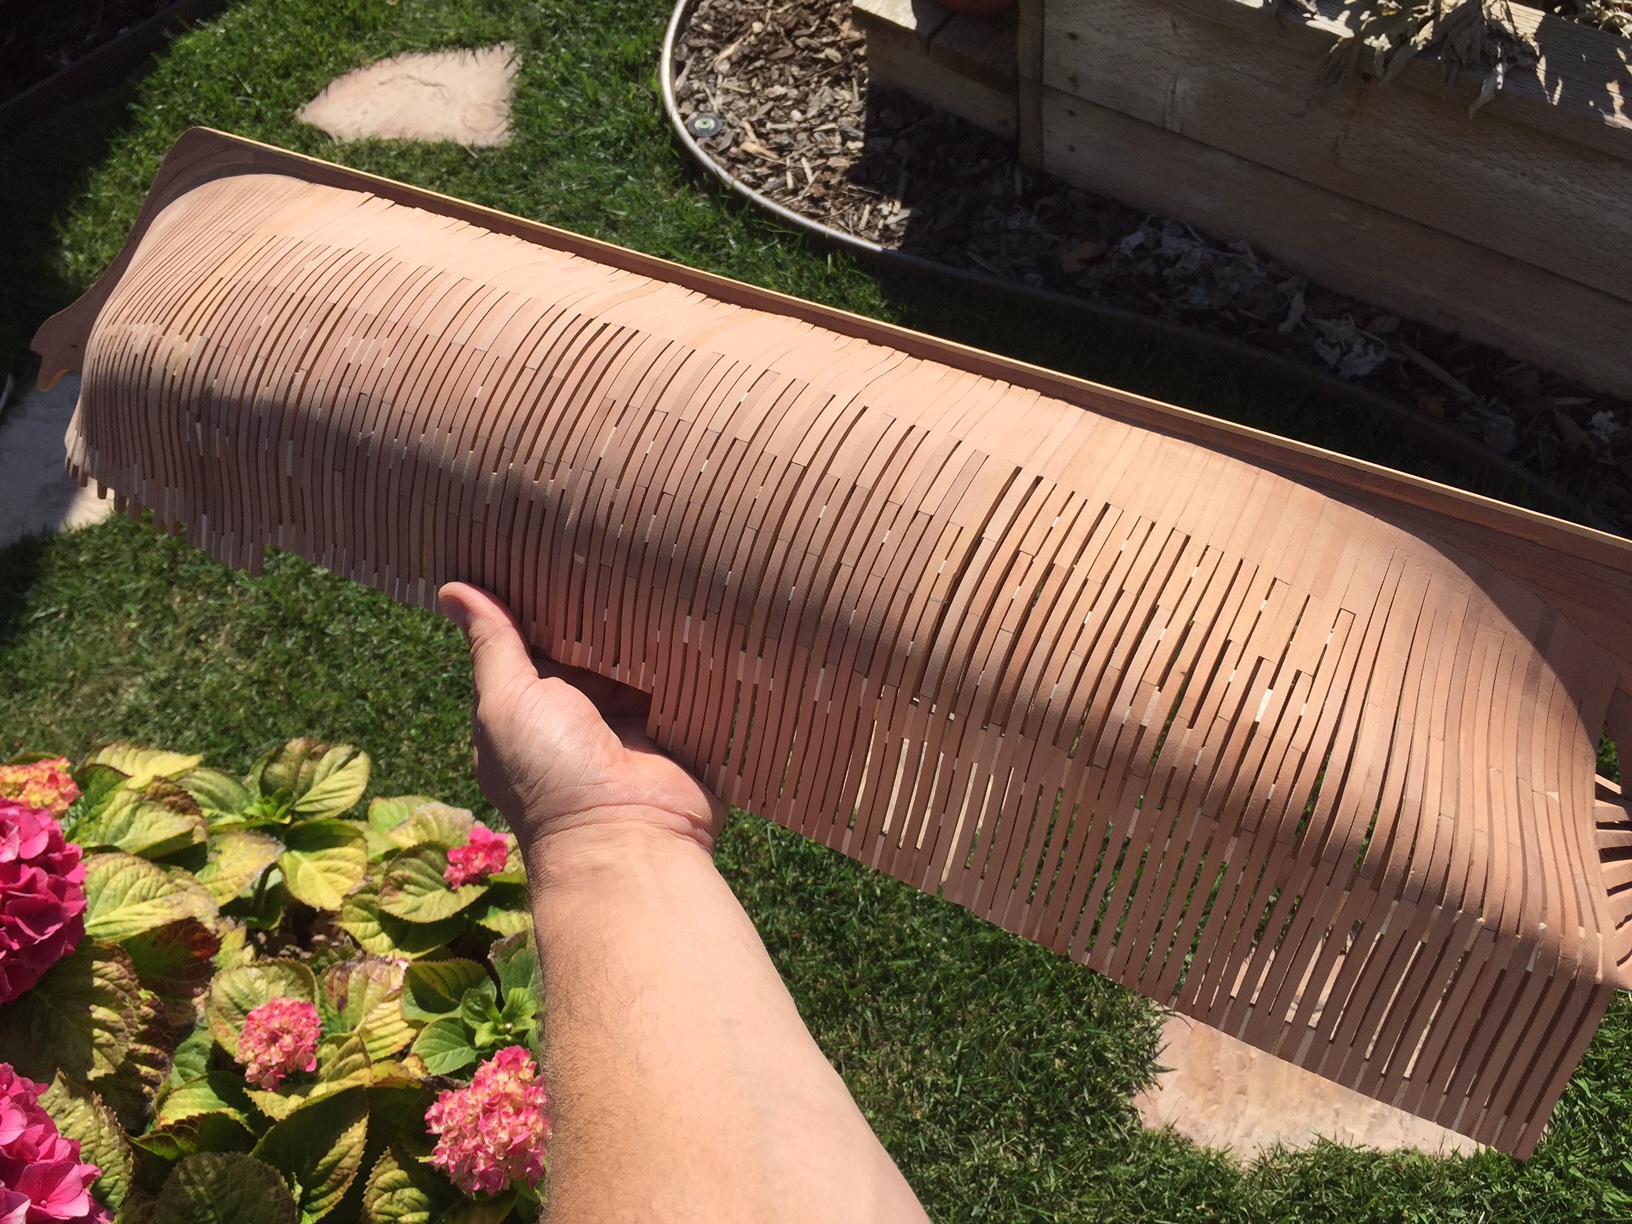
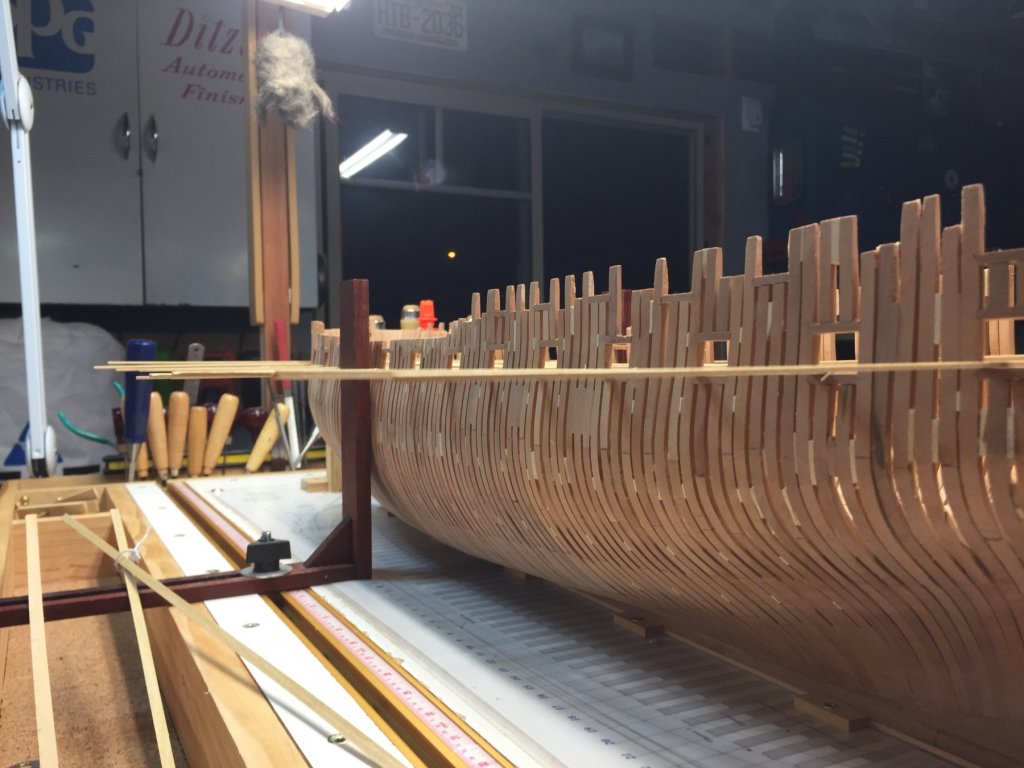
380 hours in and feeling really good! As you will see in the photos below, I have completed the fairing of the hull in 80grit paper and an orbital sander. I then used a box knife blade to scrape the surface clean. You will note the use of the templates to ensure that I was on target. I decided to replace a few of the frames that were not up to my liking. This was very risky and actually caused me a bit of angst as I was tearing them out... Since last week, I also completed the stern filler pieces, these are dadoed into the stern transom. I am happy with the results. I marked the bottom of the lower sills and then ran masking tape to ensure they were in a nice sweep along the sides. I then placed temporary cross spauls where the ports were to see that everything lined up on the ship. I was pleased with the results. One thing that I missed was the top timbers. I should have made them long and then cut them down. As it is, there area a group of 6 frames along the dead flat that are too short! I will likely pull those frames out and redo them. The time to have made some of the rework was at the time I initially installed the pieces. Now it will take longer and I run the risk of damaging things. This being said, I feel confident that I can make these repairs and have them look good.


-
370 Hour Mark! I have reached a milestone - the hull is now fully framed, ok, I still need to do the four filler frames along the stern deadwood on each side, but hey, I'm almost there... I have faired the hull using a combination of curved rasps to know down the high spots and smooth rasps for the detail. I then resorted to an oscillating palm sander with 80 grit paper to take out the heavy scratches. I have a few frames that I sanded through to the chock... I am debating about replacing these frames, but think the repair might be worse than what is there now. I think a few of these chocks can be hidden with planking, etc. There are some small seem gaps here and there that I will fill with glue and sawdust. Otherwise, things are exceeding my expectations. Overall, I am exceedingly happy with how things turned out. Next to do in this order are: Filler frames Refinement of the hull along the rabbet Treenail the chocks Copper bolt the frame feet Add the keelson Finish sand the hull 120, 340, 600 #0000 Steel Wool "point" each of the frames. Making each frame butt sharp and even. Install a temporary sheer strake Finish the top timbers (remove spacers) Install the ribbands Apply finish to the lower hull The above list will easily take me right up to the conference in October. I estimate about 75 hours work. Things I would do differently next time is to be more careful with my spacers. While temporary, I think they should be installed very neatly and relatively in the same location on each frame. You will live with these for a long time and they distract from the model when sloppy. Also, I would wait to install the main frame spacers, which are permanent. I made mine from Holly. While the drawings give a great reference point for these spacers, the subtle change in angle or position of the frame can change the location on the completed model. I will redo some of these so that they run in a fair line when looking down the hull. Thanks for reading! Gary