


ted99
-
Posts
235 -
Joined
-
Last visited
Content Type
Profiles
Forums
Gallery
Events
Posts posted by ted99
-
-
Thanks, Rod--means a lot coming from you.
Continuing with fiddly bits. The superstructure is close to complete--just lacking the details that cross over from one module to another. Next steps are to drill the stanchion holes at the edge of the deck. I was fortunate to outline the wooden deck edges while still at the hull construction phase and was able to sand the hull edges to a uniform 1 mm gap, except at the stern, where it became 2mm. I will use the .7mm drill size that the instructions call for. Then I'll do as much of the deck furniture as possible before actually gluing on the superstructure pieces. After the drilling, I'm going to build the boats and try to attach them to the hangers/superstructure before I assemble to the hull deck. Looks like I will have better access as separate pieces to rig the holding lines.
The superstructure pieces have had their spray of Rustoleum matte clear and it did a great job of evening out the sheen of the different pieces. Particularly where my earlier attempts with CA resulted in smearing around the different pieces. After the matte spray it all disappears. The clear does a good job of revealing all the PE brass detail, which would have been covered if I had used a colored spray can. It's hard to control the thickness with a big spray can, compared to an airbrush. The smaller Tamiya cans are a lot easier to meter out, but very limited in their color choice. It's amazing to me how much easier assembly of the tiny bits are having grasped the use of thin CA and a loop applicator. The tiny pieces grab immediately with a thin application of thin CA, unlike the medium CA applied from it's tip I started with to get the increased working time I thought I needed.
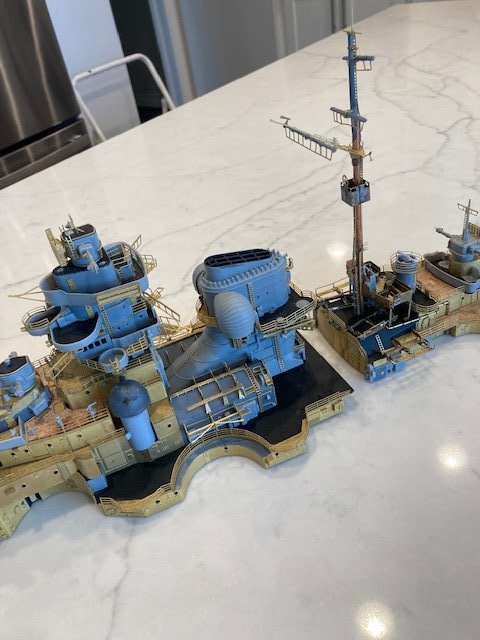
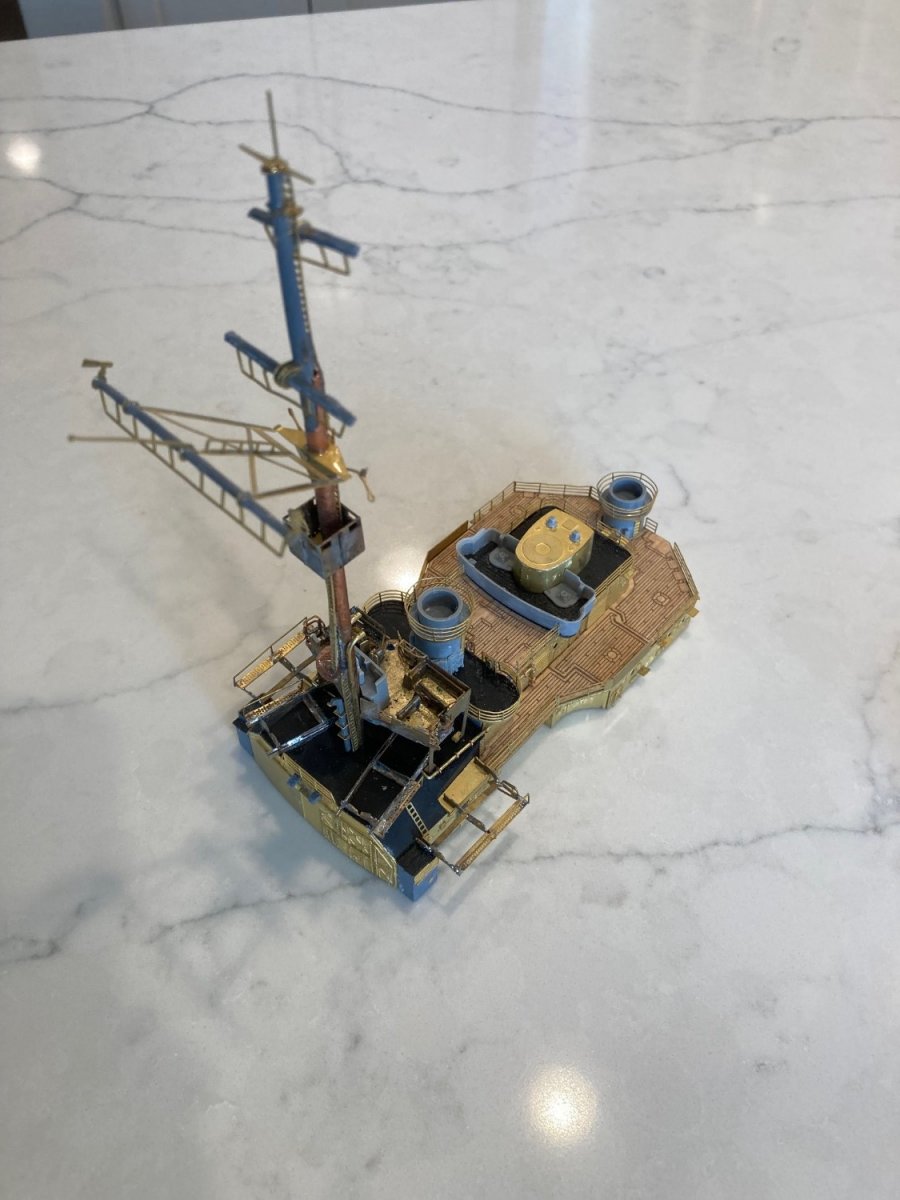
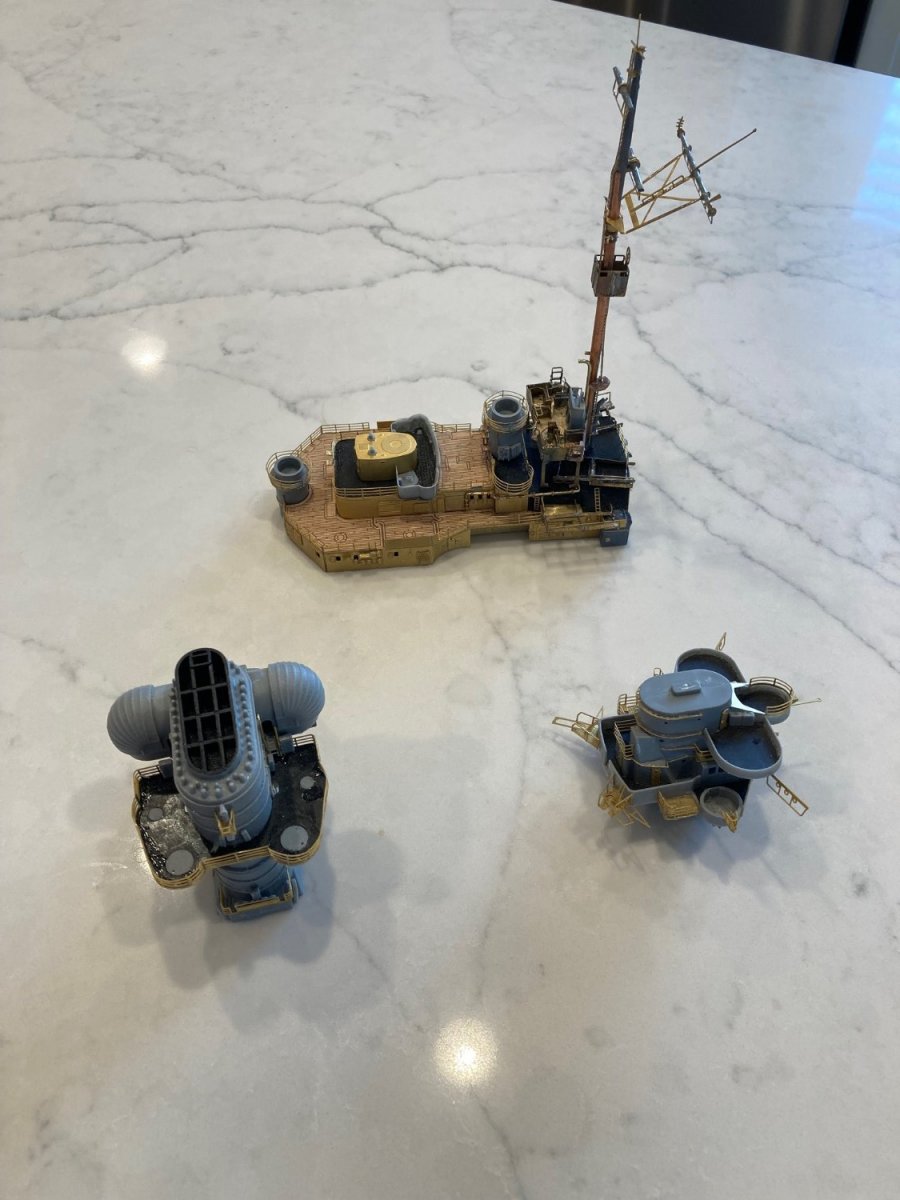
Beginning to get a feel for what the completed model with unpainted brass will look like. Interesting how the i-phone camera shows the plastic as "blue", while my eye says "grey".


-
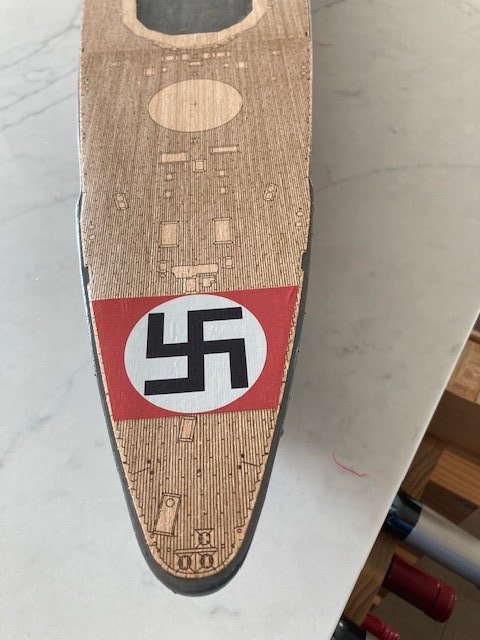
Continuing on the fiddly bits. I'm just skipping around in the manual working on parts that go together and parts that need something done before I go on to another stage. The swastika photos show after I used the Micro sol for final adhesion. I used the micro set on the deck before sliding the decals on, and then sprayed a coat over the decal, but that didn't get a tight-enough adhesion, so I sprayed Micro Sol over the decal and that achieved what Micro Mark describes as a "painted on" look. I was nervous about using a brush for this stage, so I repurposed a small eyeglass cleaner bottle and just over sprayed the decal for a touchless approach. Worked fine.
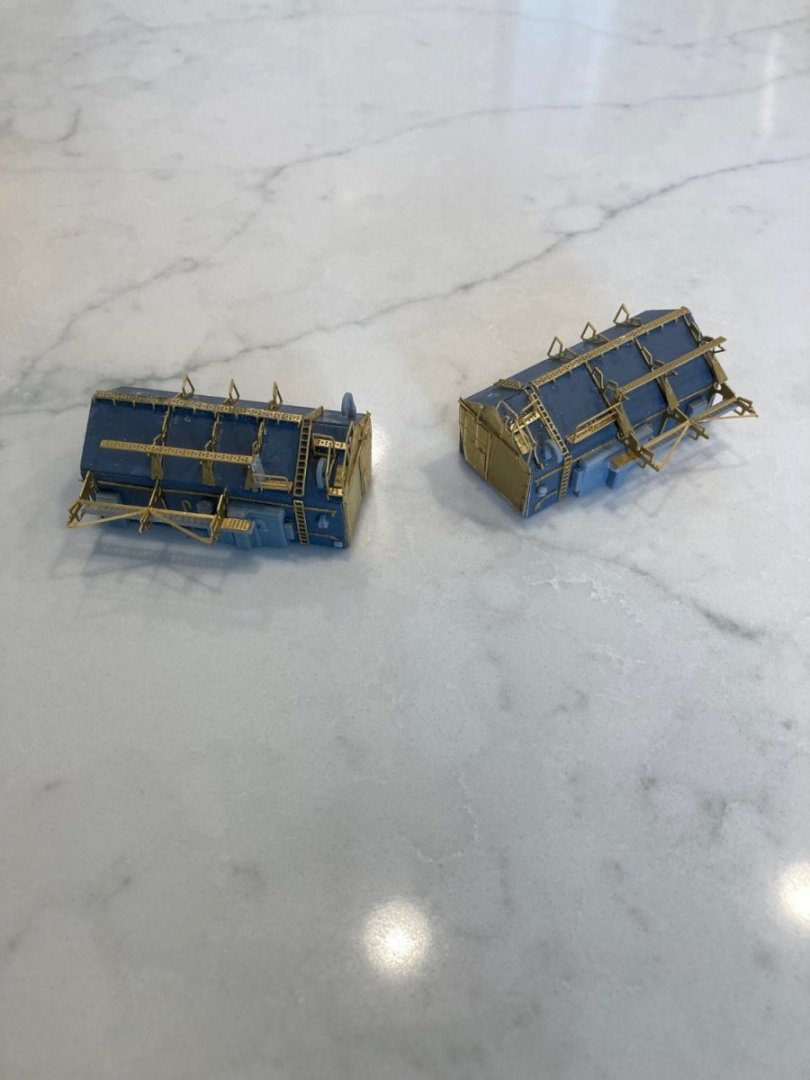
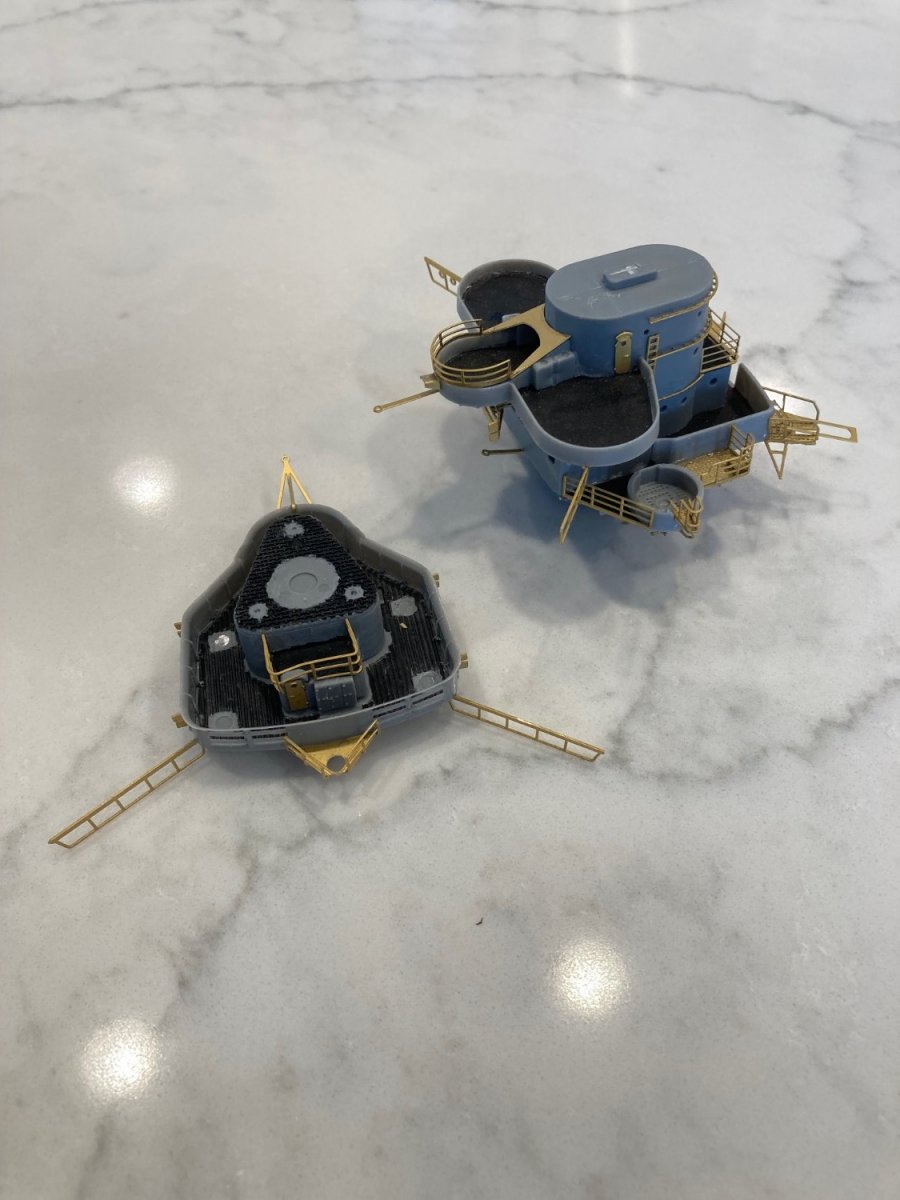
The next two pictures are of the two superstructures
.jpg.f37378f75660c01ea73c0bcecdd3b5a3.jpg)
-
Continuing on the fiddly bits. I'm just skipping around in the manual working on parts that go together and parts that need something done before I go on to another stage. The swastika decal photo shows after I used the Micro sol for final adhesion. I used the micro set on the deck before sliding the decals on, and then sprayed a coat over the decal, but that didn't get a tight-enough adhesion, so I sprayed Micro Sol over the decal and that achieved what Micro Mark describes as a "painted on" look. I was nervous about using a brush for this stage, so I repurposed a small eyeglass cleaner bottle and just over sprayed the decal for a touchless approach. Worked fine.
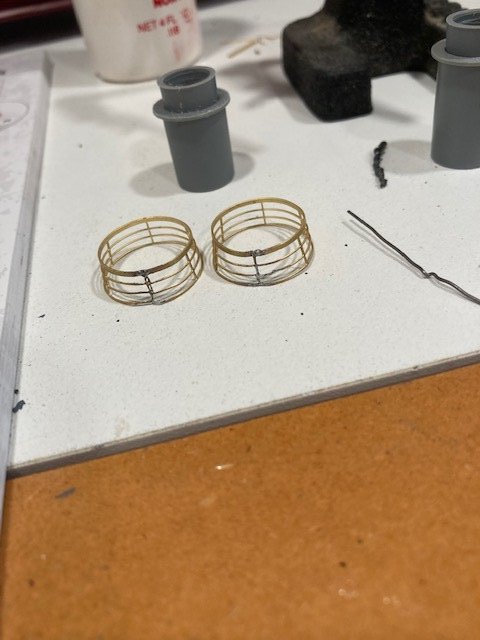
The next two pictures are of the two superstructures sitting in place on the hull showing a tight fit. A slight push in the middle of each gets each down tight to the neck and I'll do that as the glue sets when I put them on for good. I used my "sheet of sandpaper on the deck and moving the structure back and forth" until I got a good fit. The next pictures show the fiddly bits I've completed, ready for a spray of Rustoleum clear matte. That's next up. Then I can start gluing subassemblies together and the bits that connect between them. The last picture is of the two hangers. They were a lot of fun to build. I did the one after the other and you can clearly see which one had the benefit of the learning curve. Really great how much better "thin" CA applied with a looper works to minimize excess CA. Rod--I got a Bic grill lighter and it works perfectly to burn off the clogged looper. What a time saver!
About the time I completed the hull and started on applying the brass cladding, I decided that I'd like to do the MIssouri and in 1:200, the only choice seems to be the Trumpeter plastic kit. I've decided that is OK, as having done the Bismarck hull in wood, I don't need to do that again and the plastic superstructure isn't much different from putting PE brass pieces on brass cladding. So, I purchased the Trumpeter kit and the Pontos super detail kit to go with it. That'll be my next project. Did that before the move. But, I began to think that it would be neat to do a "set" of the major battleships of the two sides in WW II in 1:200. The obvious candidate is Yamato. I'll display them stacked one above the other on supports screwed to the wall. The French Navy was never in the War and the Brits seemed to top out with the Hood and that was a Cruiser. I rule out their left-over Battleships, so at the moment, it's just the three. Looks like the only choice for Yamato is the 1980's Nichimo plastic kit, so I just bought one off eBay. So far as I can tell, Pontos didn't do Yamato but there are some PE detail sheets for Yamato advertised on eBay and I'll have a look at those after my Yamato kit gets here and I see what's in the box (supposedly next Monday).


-
12 hours ago, hof00 said:
Hi Chap,
Looking really good!!
Decals look great. I am currently in communication with the company as I want to get some 0.5mm Pinstriping decal for the Arado Canopy Frames.
Cheers....HOF.
Harry--That's a great idea. Let us know how that works out. I would never have a steady-enough hand to paint them.
- mtaylor, Canute and Old Collingwood
-
 3
3
-
Thanks, Rod. I had read about the flame method of cleaning, but didn't have a torch, anymore. Never thought of the Bic lighter--will get one. At present, it's a #10 knife blade and a small drill for the hole--tedious. The Bic lighter is an elegant solution for a condo that doesn't want any "gas" appliances. Yes, I stumbled onto the bag trick. It's a great medium for a small drop of CA to dip the looper in to.
- mtaylor, Old Collingwood and Canute
-
3
-
Harry, rather than cluttering Rod's build, I'm responding to your question about the decals here. I don't have the applicable sheet, anymore, but it was the set for the Bismarck 1:200. There are a few other decals on the sheet for flags and the aircraft, as well. I needed both kinds of decal setting solutions that Micro Mark provides: the "micro set" for preapplication to the deck. When that wasn't enough, I used their stronger "micro sol" for application to the decal itself to get halfway decent adhesion over the decking on the bow.
-
Beautiful build, Rod. I can only aspire to something approaching this.
- Canute, mtaylor and Old Collingwood
-
3
-
On 5/21/2022 at 10:21 PM, hof00 said:
Hi All,
No update today but rather an issue that I discovered yesterday....
The problem is that I have a "Gap" between the Main Hanger and Deck, Port side. (Starboard is fine unless I place finger pressure on top of the Hanger, the whole thig rocks slightly and I get a real bad gap all around. ()Except for the Hager....)
I have been giving this allot of thought.....
I initially thought that this was a "Fit" issue ,When I initially constructed this, it was super tight.... But no, I paired down the mounting lugs, so, not that....
Inspected the Underside of this, but nothing looks out of place, so, My conclusion is that the Hanger wall is not quite square but square with the rest of the Superstructure.
I thought about removing the Hanger but this would be an absolute "Nightmare" with all the PE, Decking, Etc. attached.
My only other thought was to carefully fill the gap once it is comes time to fix it down.
The Gap is only about 1.0mm and not noticeable just viewing but it really annoys and it would be good to fix as best I can.
I don't want to "Rush" the fix either and thought that I'd put my issue to the Forum to see if anyone has some "Sage" advice.... 🙂
(I took some photos to show the problem.)
Cheers....HOF.
Photos:

My approach for this (which I recognize is too late for you) was to glue all the brass cladding on the wood superstructure. I did the little brass and plastic detail pieces last). After a little time for curing, I put a sheet of #80 grit sandpaper over the hull deck in the area where the superstructure was to fit and moved the superstructure back and forth over the sandpaper until it conformed to the deck at all sides. The brass cladding got sanded down just like the ply. Lot of time for this. When all was done, I had a gapless fit of the superstructure to the deck. Will this still be OK? Don't know as I haven't been looking at this. Gluing all the little brass and plastic details may have caused some warping and I'll find out about this later. Obviously too late for you, but some other builder may like to know about a potential problem here.
-
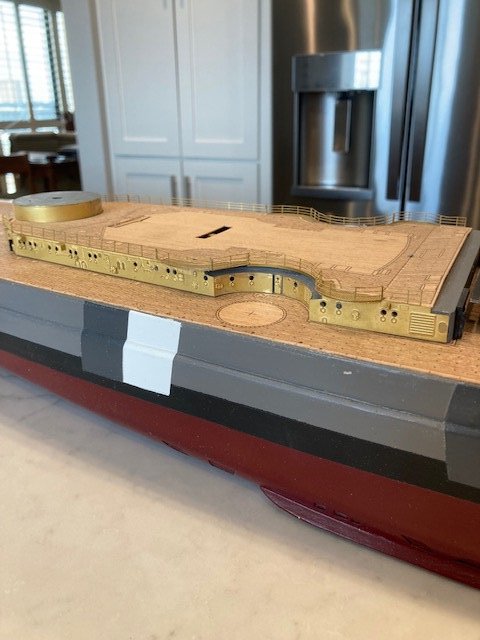
Move completed and all the pictures hung (wife would never have let me work on hobby until pictures were done--ugh). Did the decals on the deck, prior to a spray of matte clear protection before I glue on all the deck parts. Decals were 1:200 from Custom Hobby Decals in Australia. website: www.customhobbydecals.com. Took about 2 weeks to arrive. These are a very heavy gauge decal--probably because of the size--and very much needs a decal setting solution. Tough to get the fore decal squeezed over the chain reinforcement deck pieces. I think paint is a better solution, but I'm not set up for that so decals it was.
Rod mentioned soldering some parts and I am set up for that, so I thought I'd give it a try. Depending on the piece, soldering was a better choice than CA, but after trying it out, there were not so many places where it was better. For example, connecting the round railings at their ends turned out to be a great place for solder. Also, any place where there is some stress. But overall, I think CA is better for most places. It's taken me a while to develop a technique that looks good. At first, I was using medium CA because of the longer set time and gap filling (of which I had more than I would have liked). Now, though, having found the "looper" CA applicator, I've been able to clean up the look of my joints using thin CA. By the way, anyone using the "fork" applicator from MicroMark? Cleaning out the loop of the applicator filled with set up CA is a pain and it looks like the "fork" might be a little easier to clean. Wish I had a lot of the brass PE to do over, now that I'm better at it.
Been doing the "fiddley bits" skipping around the manual as pieces appeal to me. I'll spray all of these subassemblies with matte clear before assembling them on the hull--remember I've decided to leave all my brass natural, painting any wood grey and leaving the plastic it's natural grey color. Never intended to be a museum scale model--I just want to show off the minute PE brass detail. I figure the matte clear will be needed to retard tarnishing.


- rvchima, Old Collingwood, yvesvidal and 4 others
-
7
-
On 5/31/2022 at 3:42 PM, hof00 said:
Hi Rod,
Your "To Do" list looks a little busy, good to see you will not be idle!! 🙂
Looking forward to your upcoming builds.
By Deck Transfers, I am alluding to the Swasticker markings, or, more correctly, Air Recognition" markings.
Were these supplied or did you paint these? (I guess I'm looking for a source to order from.)
Cheers and Regards,
Harry.
Harry--In case you decide against painting, I got decals from an Australian company. Custom Hobby Decals. website www.customhobbydecals.com. They are a very heavy gauge--probably because of the size--and a decal setting solution is absolutely necessary. The bow one is particularly difficult to get adhesion because of the anchor chain wear decking. I have completed my move and restarted my build. I'll post a picture of the deck with decals tomorrow. I think that paint is the better solution, but that needed tools I don't have.
- Old Collingwood, mtaylor and Canute
-
3
-
-
Harry--
Found your build log about a week ago, and now with my "downtime", I've had a chance to go thru it. I'm looking at your PE lattice work with great interest, as I'm nowhere near to doing that, yet. Like you, I'm learning about PE on this job.
Regarding attachment of the decks: I dry laid mine to get the alignment right pretty much one piece at a time, starting from the bow, because of the fit to the plastic anchor block. Once I was satisfied that the alignment was correct, I outlined each section by pencil to assist in final gluing. I used Elmers non-waterproof PVA. For each section, I put down lines of the PVA and then used a pocket comb to scrape the PVA out until it was an even coat over the surface. At this stage, it looked like one does with tile mastic. The tines of the comb were like a notched trowel and I was able to get complete coverage at a more or less uniform thickness. I laid each piece of decking using the pencil lines as guide. I did not let the glue go all the way to the edges and I didn't have any squeeze out. I didn't need to make any adjustments after each piece was laid down and It would have been difficult to do this as the large surface area being glued made "adjustment" near to impossible because of the tenacity of the glue. As the decks dried, bubbles formed due to the moisture from the glue percolating thru the thin deck sheets. I left them alone and as the glue cured, they all settled down flat to the hull. Your deck printing ink may be different from that of Amati, but I gave the wooded decks two brush coats of Minwax polyurethane satin clear with no distress. Once I've done the swastika deck decals, I'll use a satin spray to do a final fixing, before I attach the superstructure.
I've had success removing excess CA glue with mechanical scraping using dental picks and a #11 knife. This stuff is TOUGH. I don't think this will work with the delicate brass on brass structures, though. That's why, when I get there in my build, I'm going to try soldering.
The Antipodes have a lot of VERY interesting wood species. My final five years of working were at the US Embassy in Canberra and I stayed on afterwards for five years. I did a lot of racks/shelving/picture frames with WA Jarrah. The DIY stores all had lots of Radiata Pine as the basic construction timber and it was superior to #2 grade Pine in the USA. I have a number of pieces of furniture made of Jarrah (a Mahogany-like wood) and Tasmanian Oak ( light colored hardwood) In fact, the background of one of my hull pictures shows the top of a barstool carved from Tassie oak.
Ted
-
Thanks, Rod. After my move (end of Feb) and after I get the "workshop" (a 5' bench) reset, I'll start on the fine detail. Based on your report, I will give the small brass to brass details a try with soldering. I'm pretty well facilitized for that. Still stuck with my balcony railing for a paint booth, though. I've run out of larger structures to build, so could be mid-March before I start again. Time to pack everything up.
In an earlier post, I offered the opinion that for me, the ideal kit would have a plastic hull and wood/brass superstructure. I enjoy POF hulls but after several of them, they just seem like rote work, now. Particularly after having done the Bismarck hull--my first modern ship. A wooden sailing ship hull has a more interesting fabrication, but from experience I don't enjoy rigging. Bismarck with it's plethora of PE brass detail has been very interesting and more fun than another sailing ship. So, I'm going to test my premise by doing the 1/200 Trumpter Missouri next. The two together at the same scale will be a very interesting comparison. Bismarck is the ultimate pre-WW II battleship and Missouri the ultimate battleship of all time (save perhaps Yamato--wish Trumpeter would do this one in 1/200). Hood is a perfect example of the backward-looking British Admiralty's armoring the ship for alongside broadsides rather than plunging fire and air attacks. I've just ordered the Trumpter kit and the Pontos up-detail kit. Who knows what the price may be at the time I complete Bismarck with current inflation. Thankfully, there are several build logs of this kit on MSW.
-
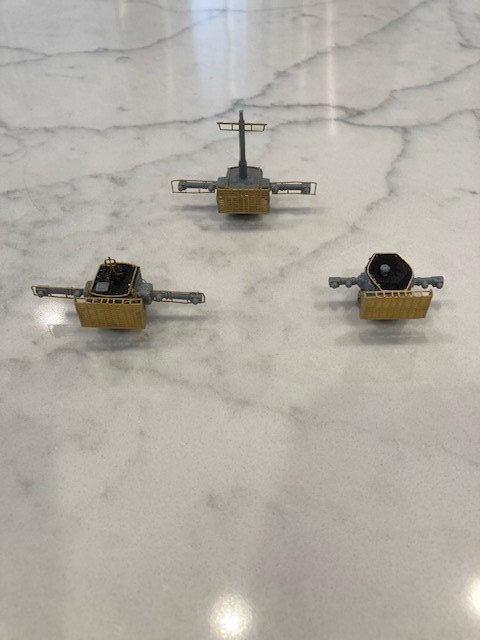
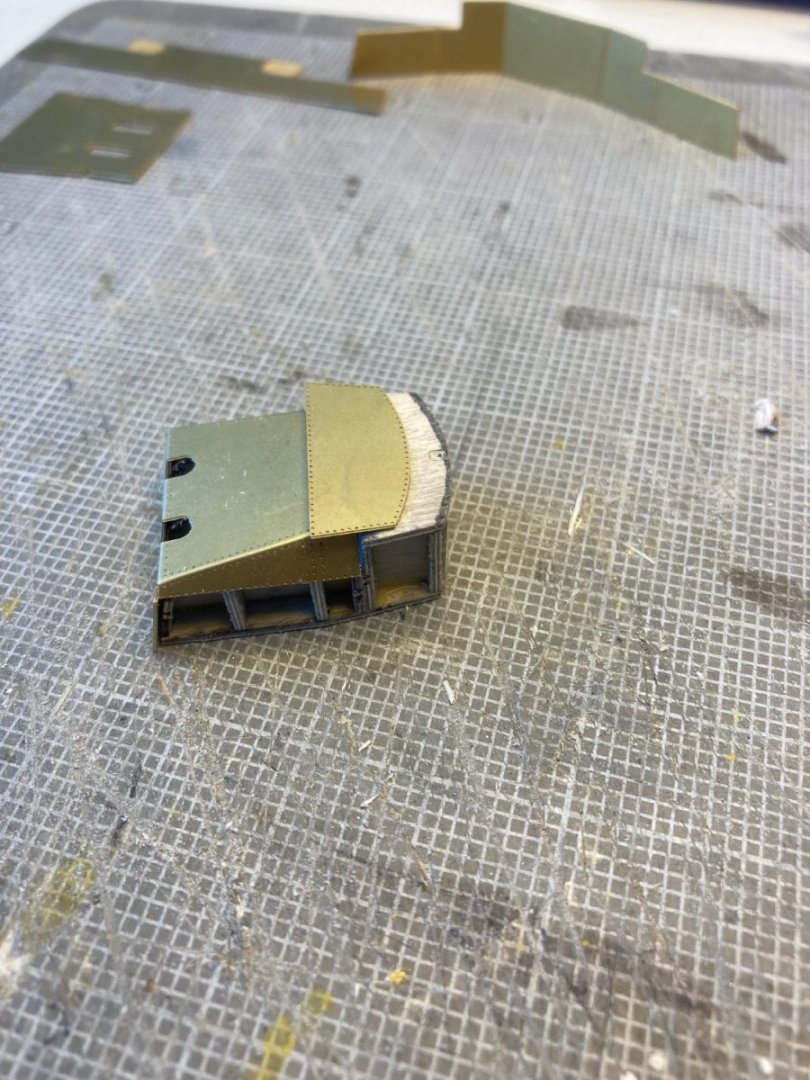
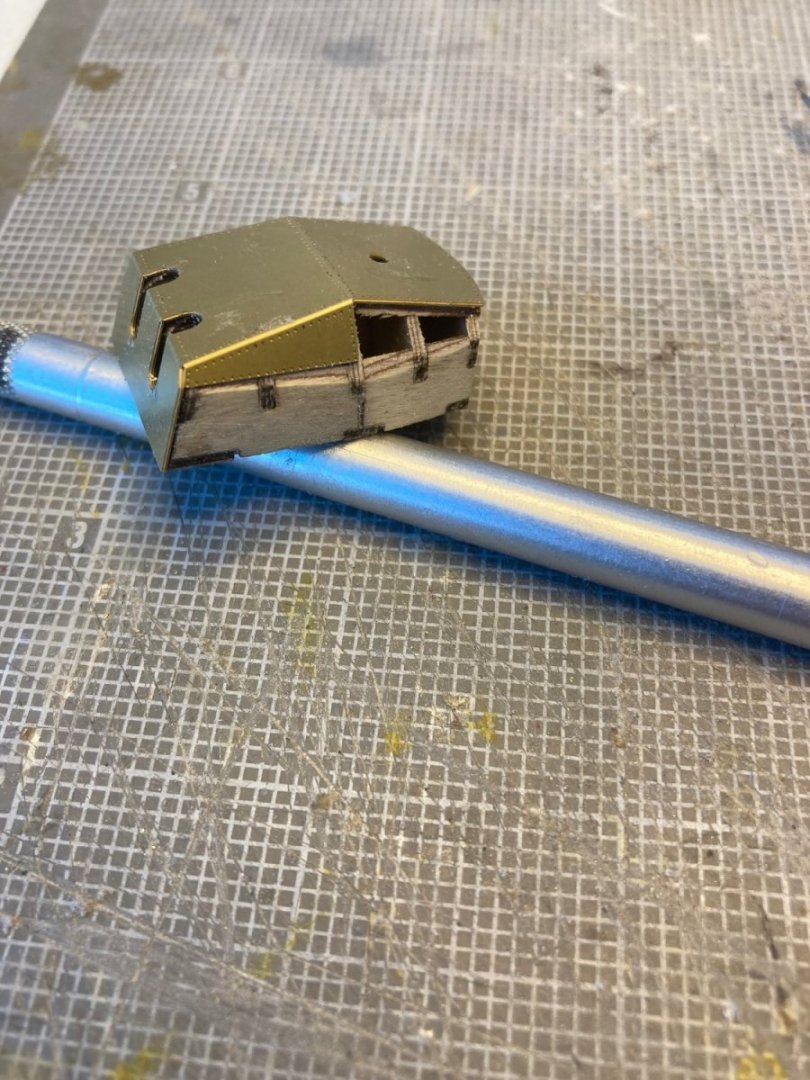
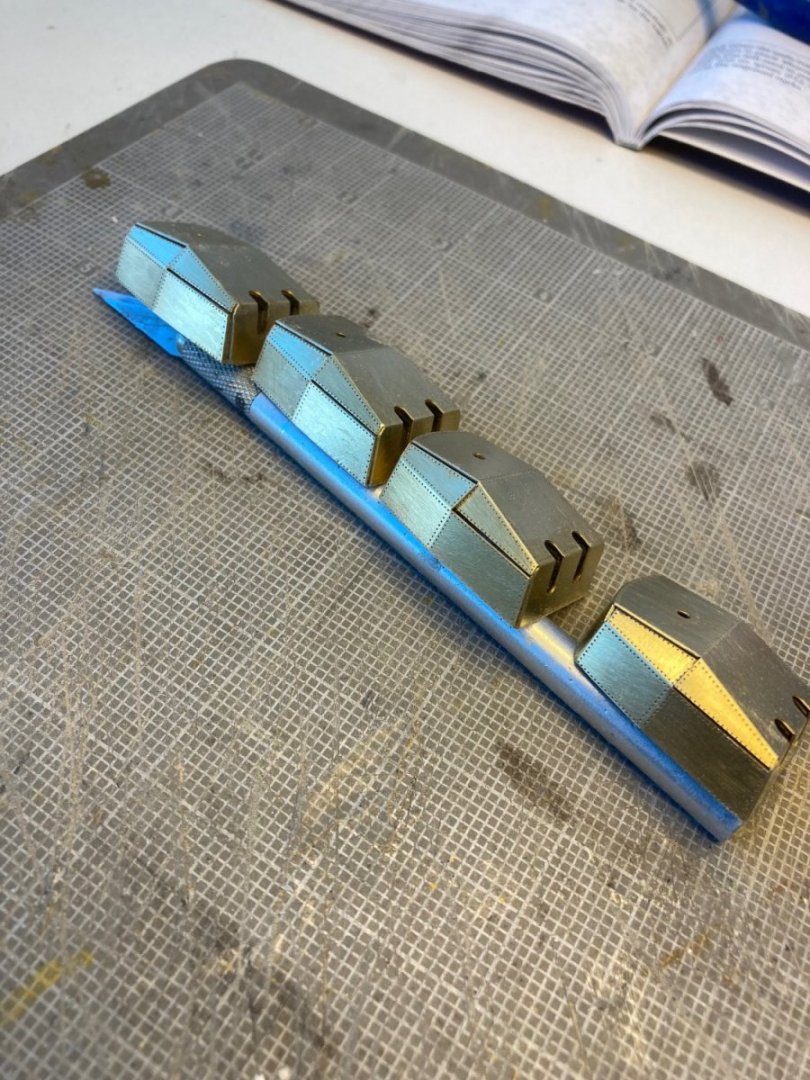
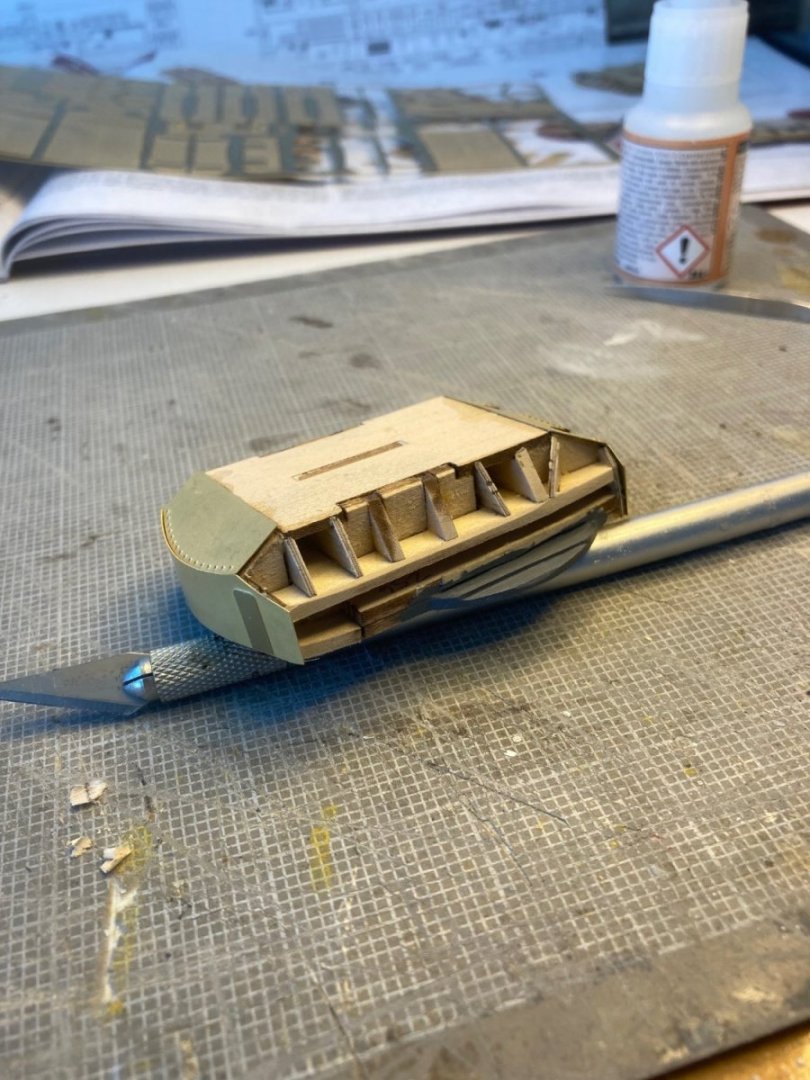
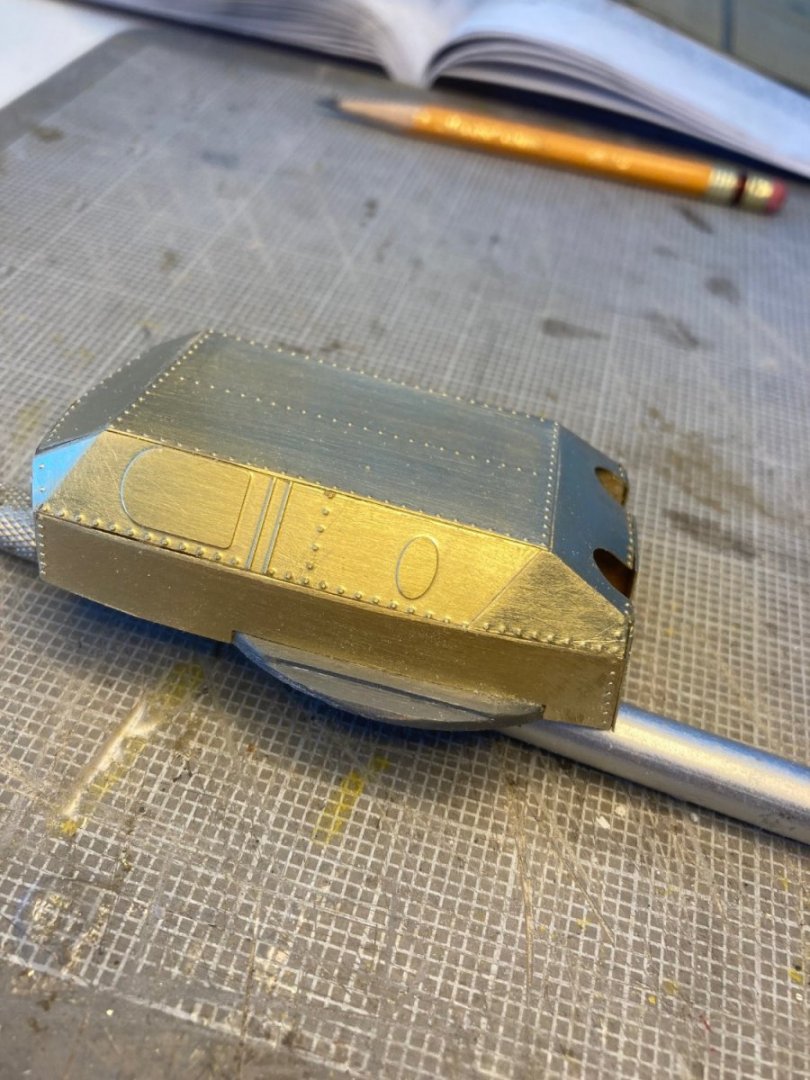
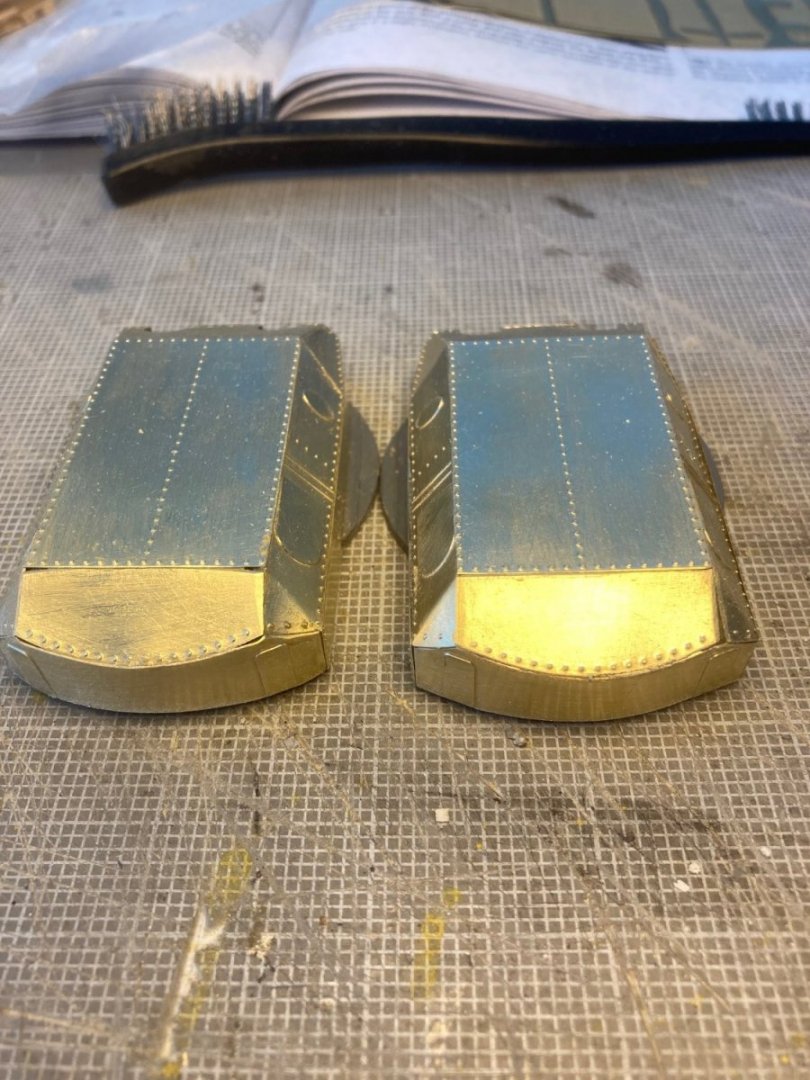
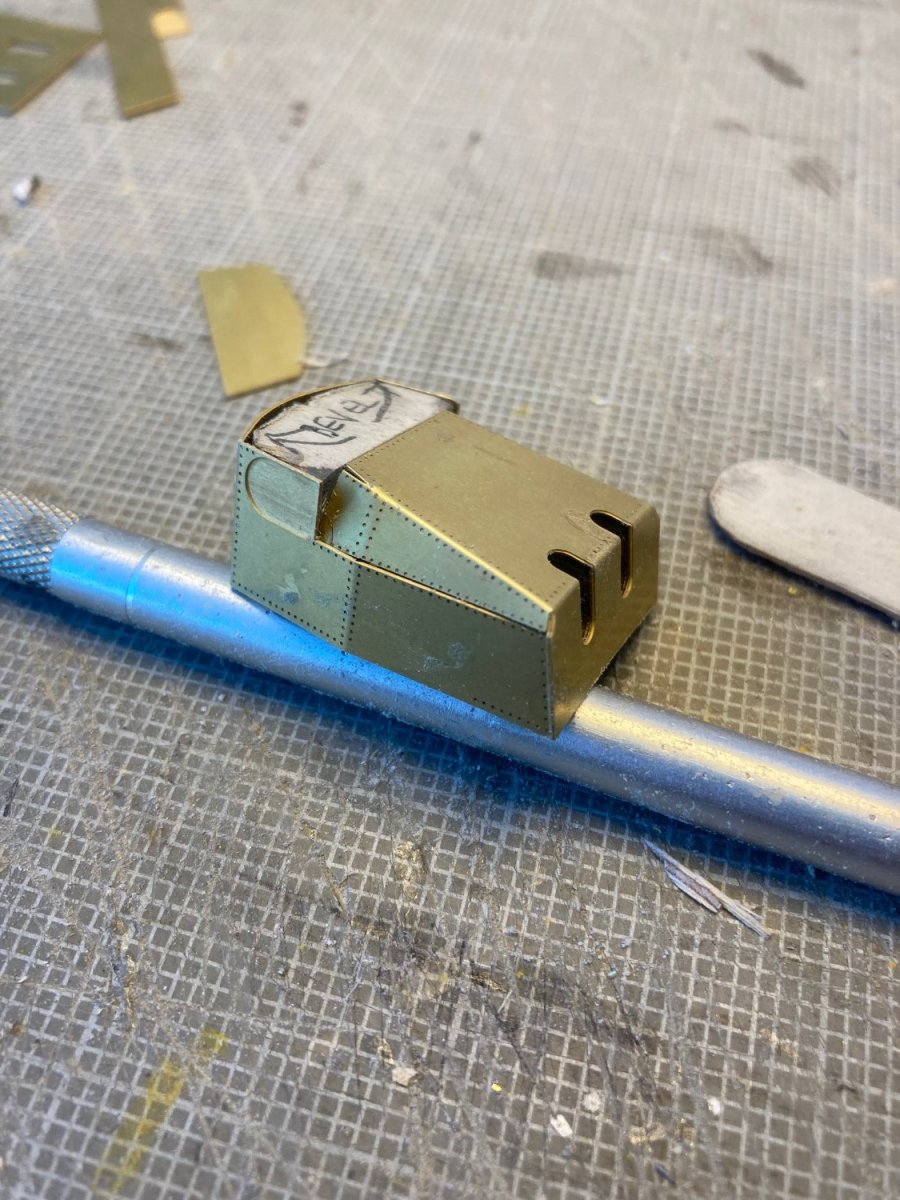
Finished the last two small turrets. First picture shows completed. Next set shows assembly sequence, based on my experience with the first four. The first four are done with two pieces of PE brass and the last two with three pieces. I would have loved for the turrets to have been done with four pieces of brass. Getting the angles just right for gapless joins proved impossible for my skill level--which is NO prior PE brass ever done before Bismarck. If those angled side pieces had been separate, I think I could have filed them into place and not lost any rivet detail. The brass is relieved on the back side to make bending easier and if I had it to do over, I'd try cutting the angled pieces away from the top/sides and try fitting them that way. Might, or might not work, but I'd give it a try.
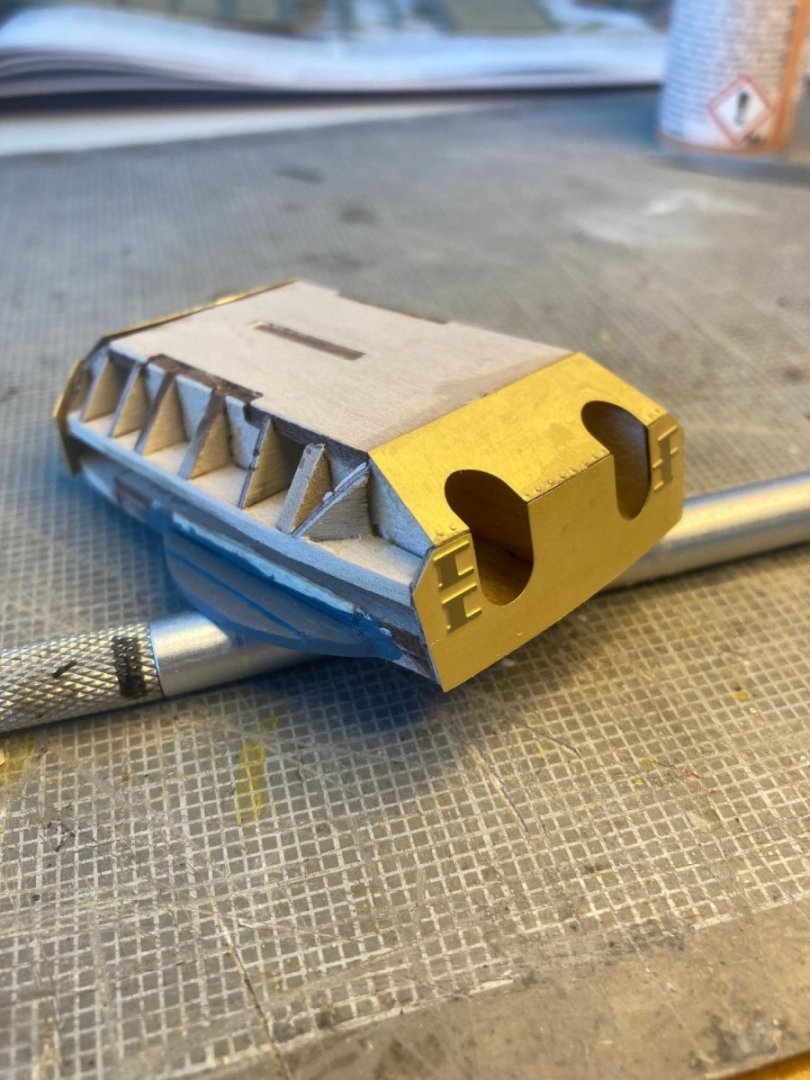
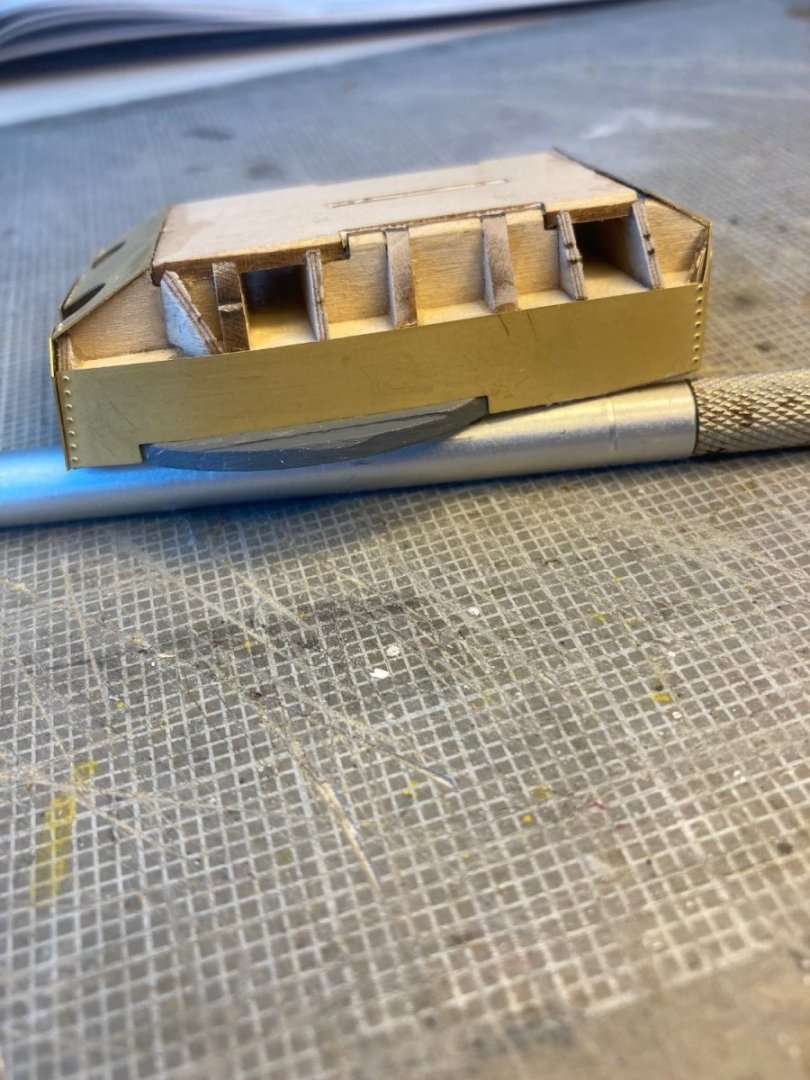
Next three pictures show the assembly sequence I used, based on my experience with the first four. First step was to sand in relief at any wood edge that had a brass bend. The relatively heavy gauge brass bends with a very sharp join, so rounding these wood edges just frees up the area from binding the brass as it bends to conform with the wood. I bent the brass wingwalls a little at a time so as to get the edge protruding beyond the side wood just enough to meet the top edge of the side piece. I did not mash the brass all the way down to the wood substructure because that would have put the edge inside the side brass and left a smile. After CA'ing the top/front brass, I dry fit the top piece to determine the proper profile for the rear. As in all the other turrets (large and small), the wood is a little longer than the brass. You can see a black pencil line at the rear of the wood showing how much of the wood had to be sanded off to get a lip of the brass top to extend enough to cover the curved rear brass piece. I also checked the extention of the sides to be sure that they matched up with the overlap on the front of the turret. Turns out that shortening the rear brought the side exactly flush with rear of the front brass piece (which extended out the sides leaving material to file down for a perfect match). After the sides were in place, there was a small amount of the brass that stood proud of the wooden top, which I filed down and the top almost exactly covered all of the vertical edges of the side/rear brass. A little filing at the edges to clean everything up. No rivet detail was lost.
As always, if I had all 6 to redo, I'd have much better results. Building these things was fun, so it would be a pleasure to do them again (unlike that ammo hoist).


-
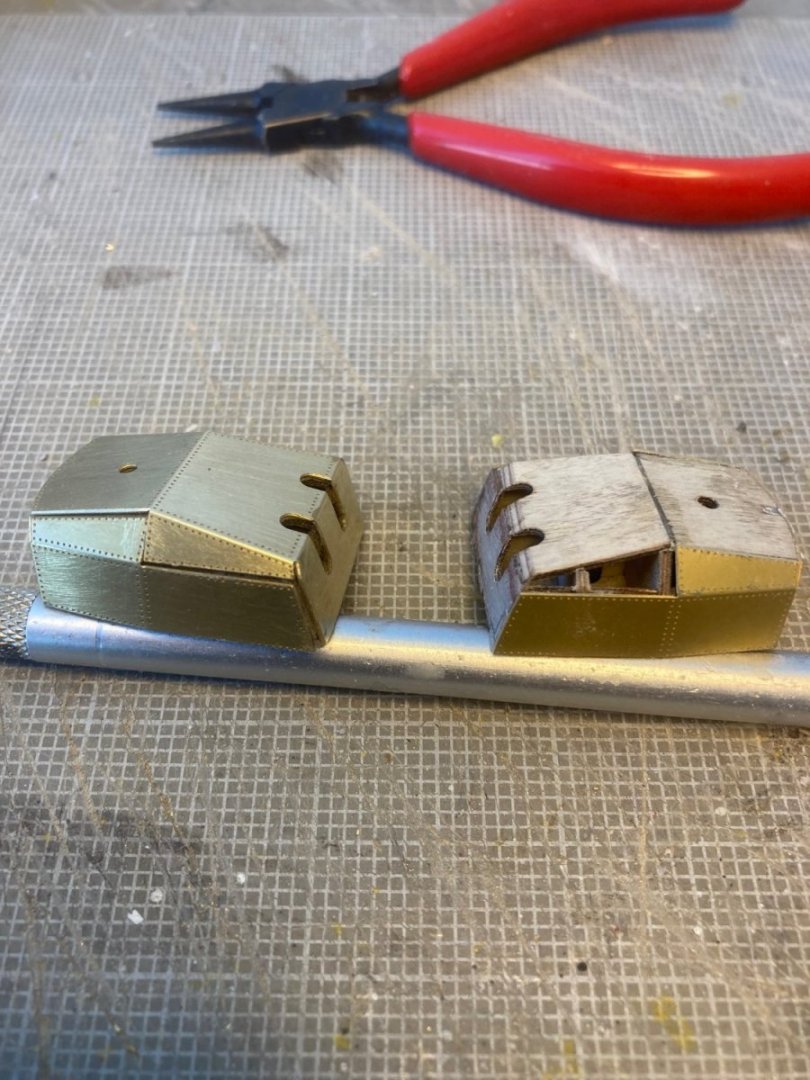
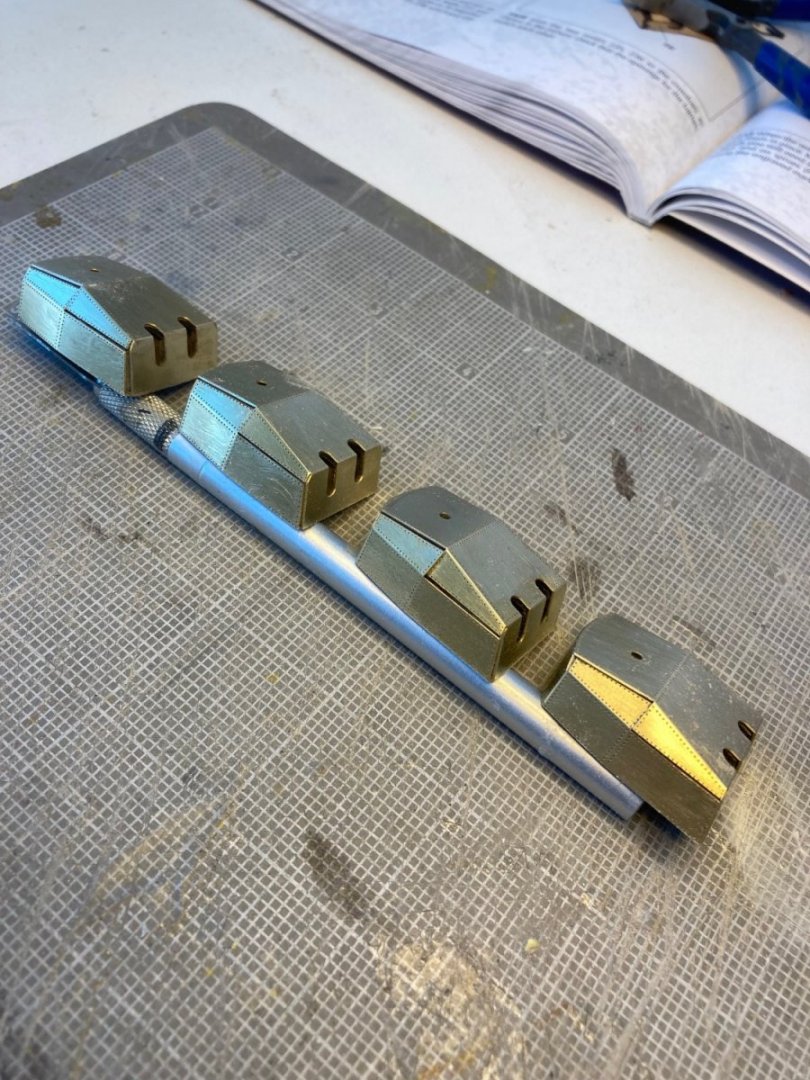
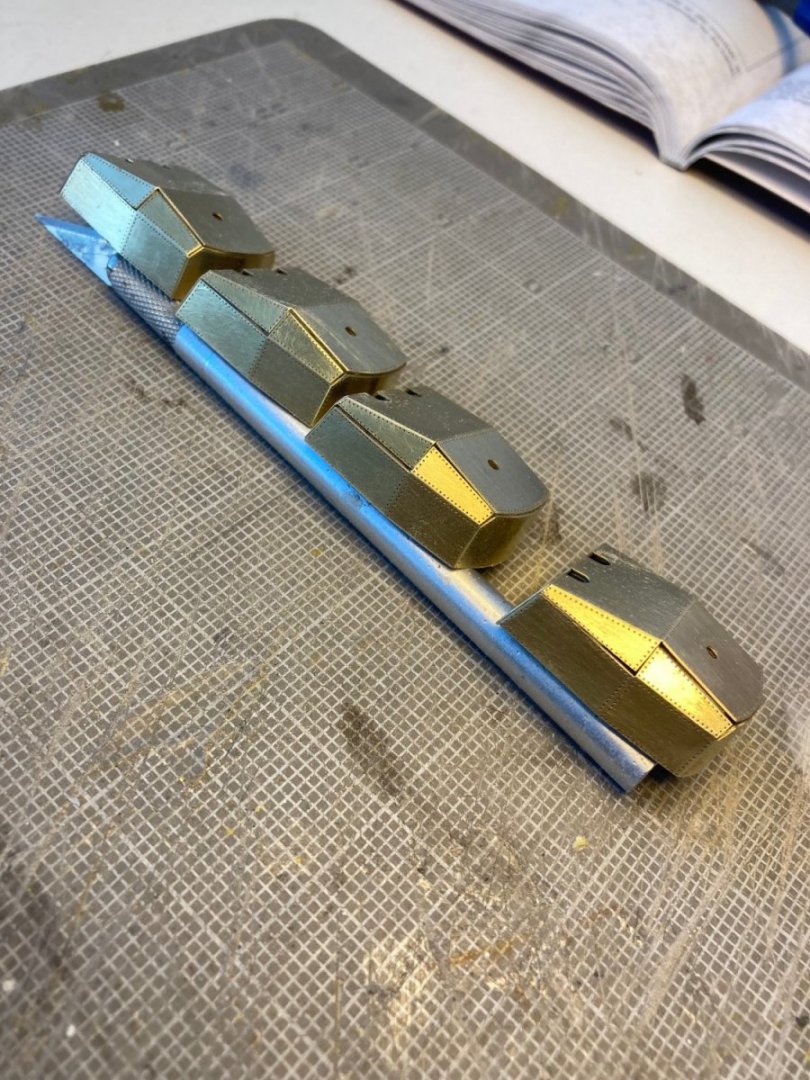
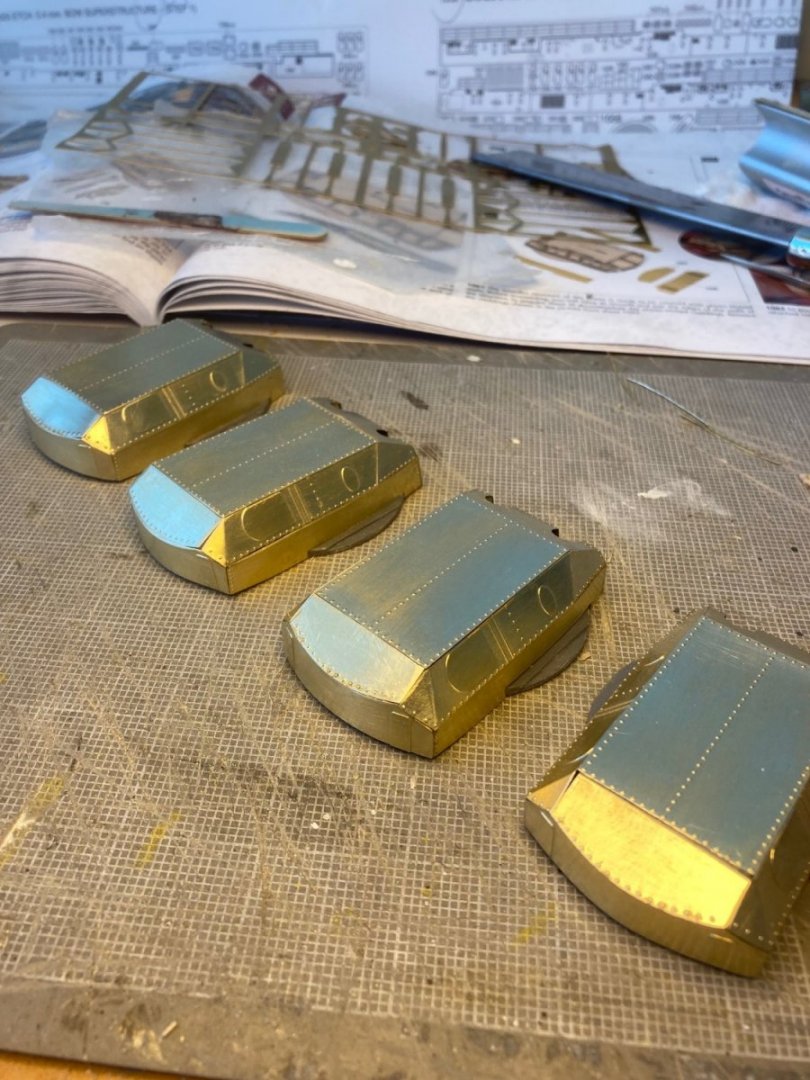
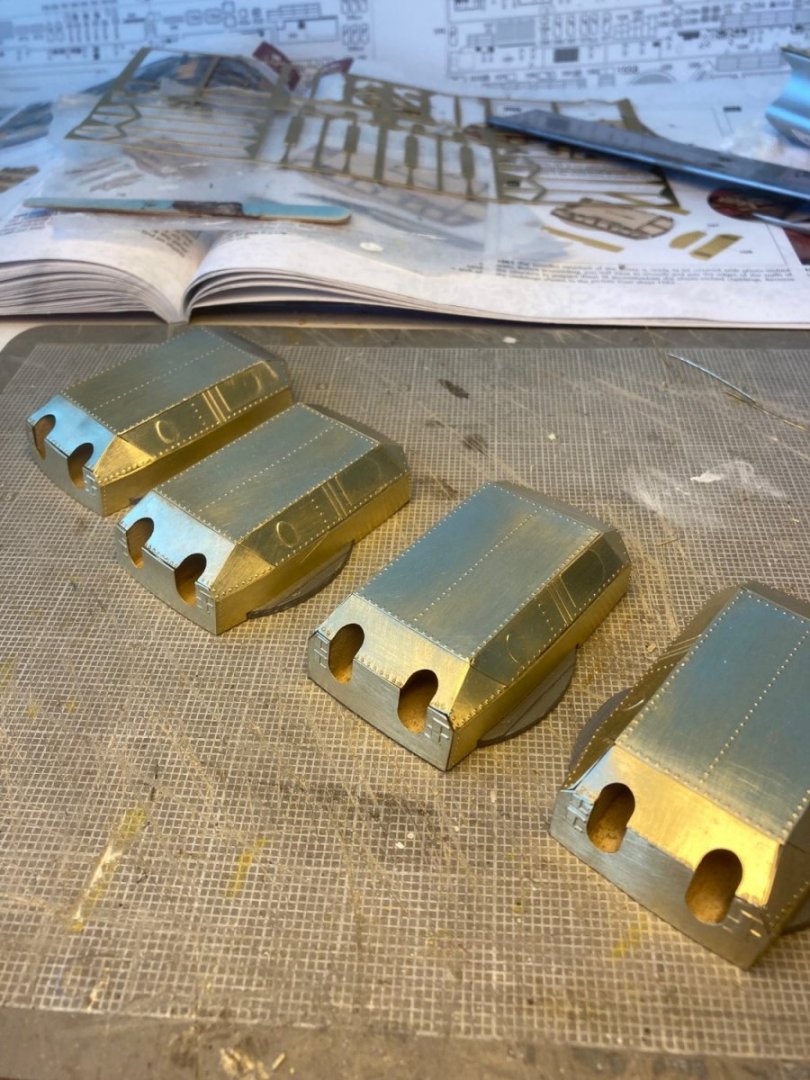
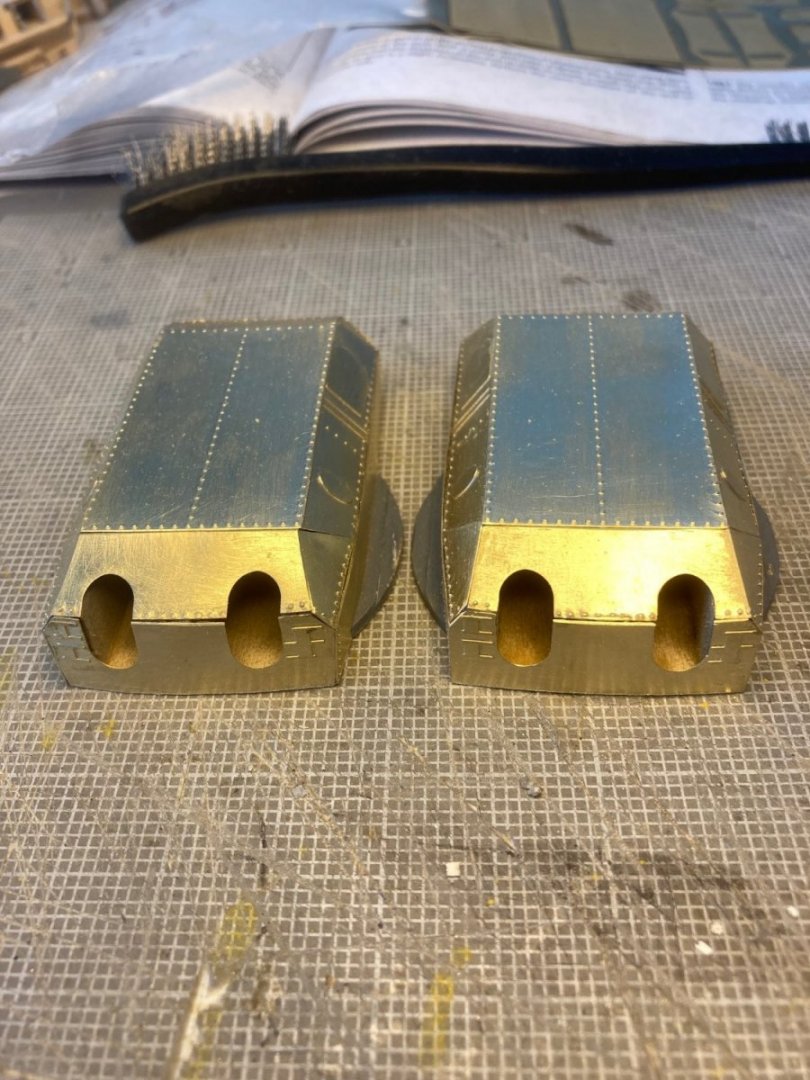
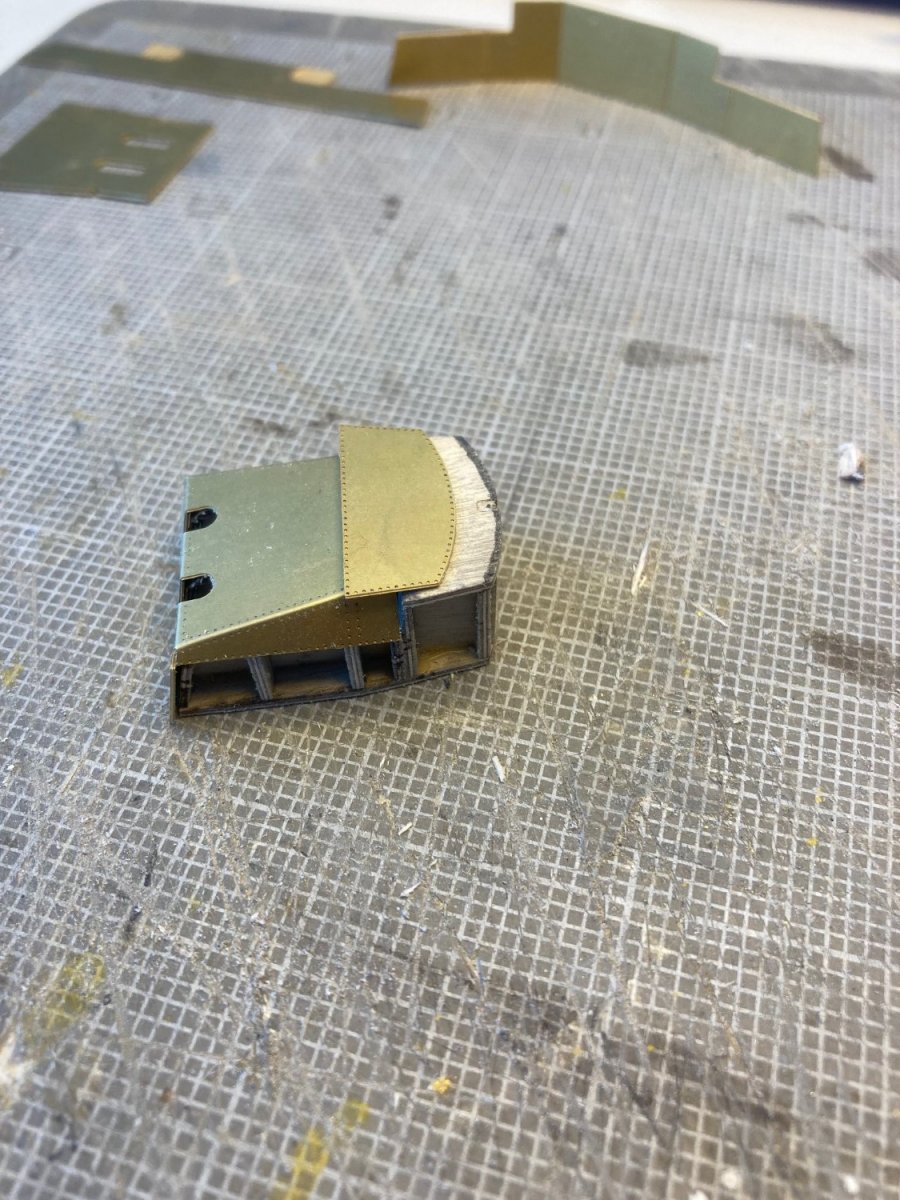
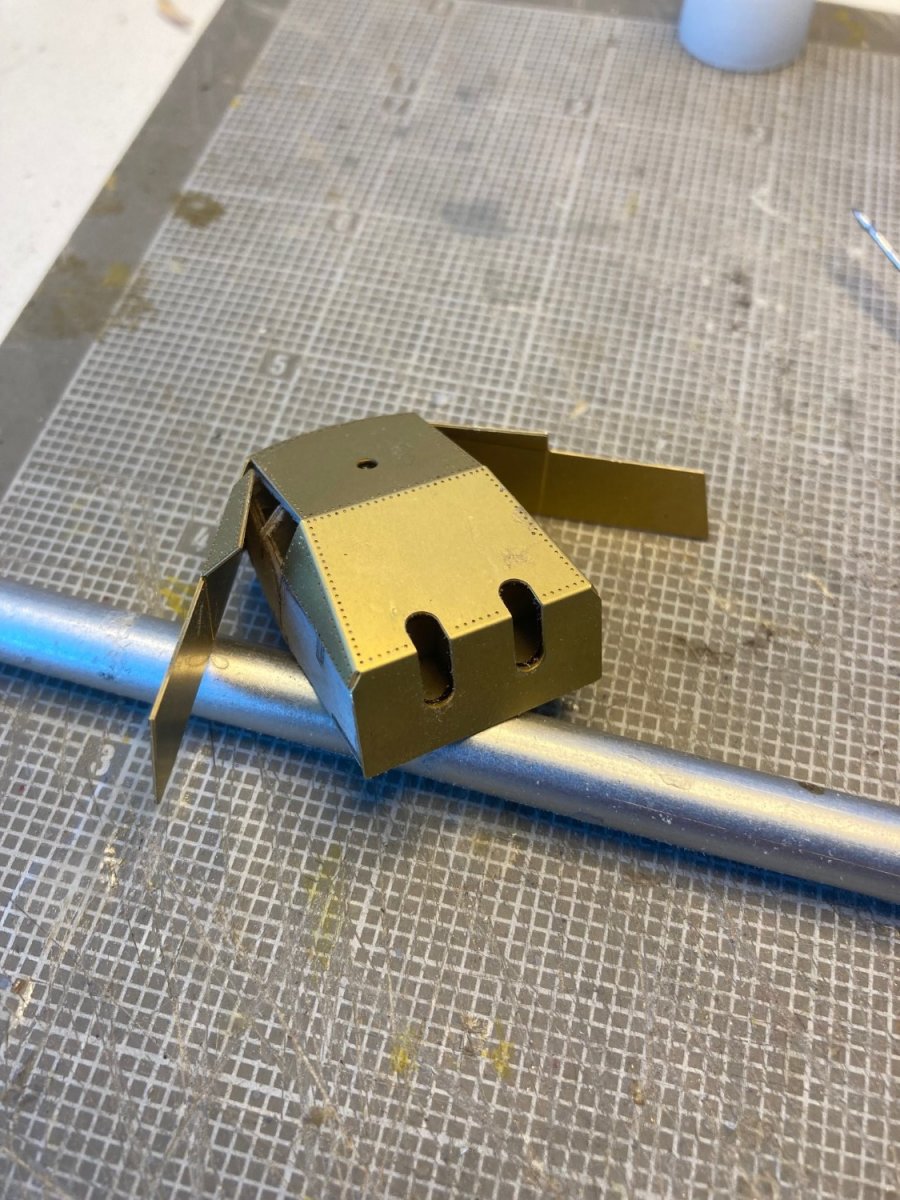
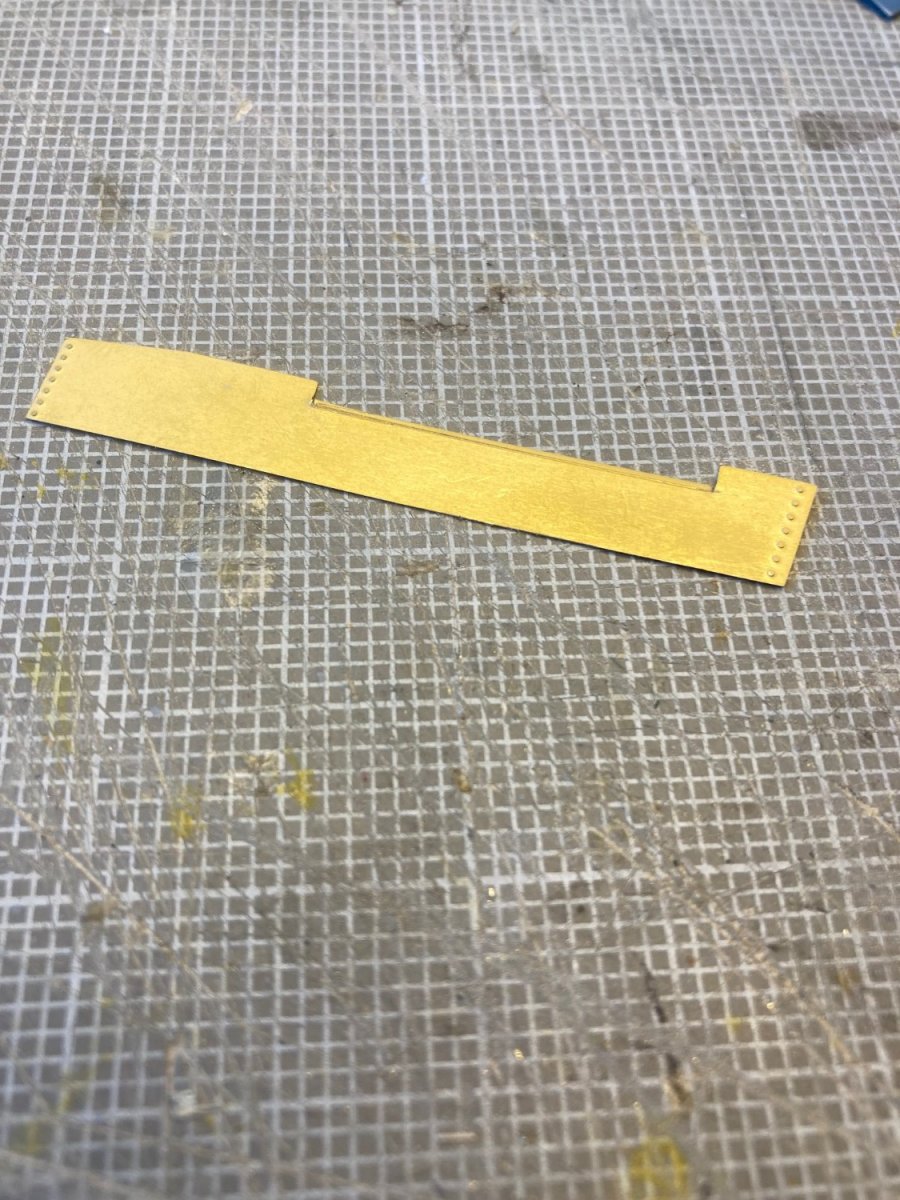
I've finished the 4 minor caliber turrets. These are different in fabricating, compared to the main turrets because the brass is heavy gauge compared to the size of the turret and there are only 2 pieces per turret, both with 45 deg wingwalls. VERY difficult for me to get alignment on all of the edges. It was a lot easier on the main turrets because of all the separate pieces. The hobby knife gives a good comparison for size.
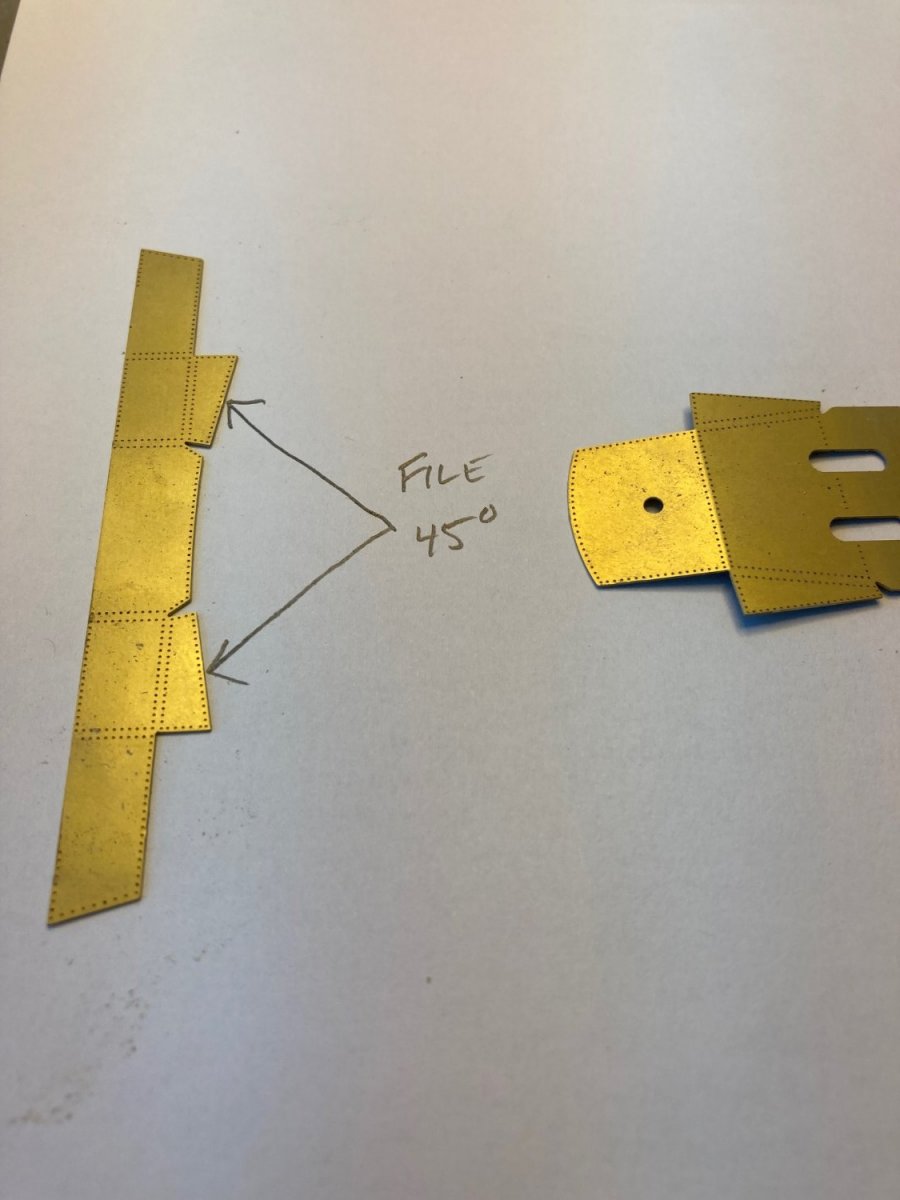
The first picture shows the first one done on the left and the second one started. On the first one, bending down the front of the turret did not go well. I decided that I needed to sand a bevel relief at the bend joint of the wood substructure and this bevel is shown on the turret to the right. The angled flaps did not align well, so I decided to try a different sequence of assembly and to pre-file bevels on the "flaps". The second picture shows what I beveled and the third picture shows doing the top piece first, as contrasted to the side piece shown in the first picture. The fourth picture shows the front of the turret bent into position and the beveled relief in the wood substructure allowed this to go very well. Later pictures of the third turret shows that doing the top first gave even larger misalignments, so I went back to the original assembly order for the fourth. The later pictures show all 4 with the order of assembly from left to right. Gaps at the angled sides never came out perfect, but each one got a little better. The etched rivet detail would never survive using filler, so it's au naturelle brass and gaps be damned. Same issue with these as the main turrets--wood substructure too long for the brass, so I sanded down the rear of the turrets wood.


-
-
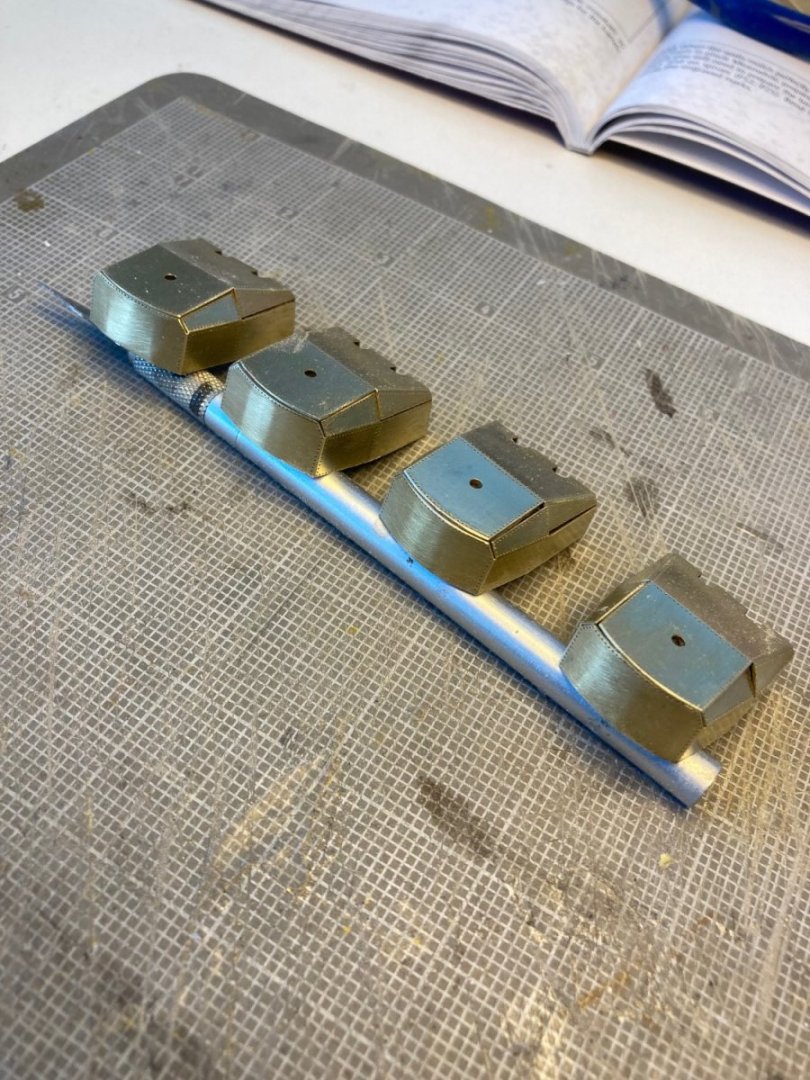
Finished the other two turrets and learned another lesson. You'll notice a "smile" between the lower vertical side panel and the angled panel above on the earlier pieces. This is because the lower panel extends too far up on the wood substructure and overlaps the angled panel after it is fitted. If you file it down, you will file off the rivet detail. The brass should be exactly even with the 45 deg break in the wood substructure. For the last turret, I learned to trim away the top of the recess in the side PE piece, that clears the round platform, so that it would sit lower. I did not change the order of assembly from my earlier post. It still gave the best results with easy trimming of the brass and preservation of the rivet detail. The 4 photos are of the four turrets from different angles.
Sorry about the timing, Rod. I got the idea to do the turrets during pre-move after seeing your photos. I think I ended up spending close to 5 hours on the last one. Process of trimming the wood to fit the brass and trimming the brass to fit each other. Since I'm not painting the brass or plastic (except for the turret and director tops) I obsessed about gaps. If Amati gave me another set, I'd do them over again--they were fun.
Now for the minor caliber turrets.


-
Been a while since I last posted because I'm moving to a different apt at the end of this month and I've avoided working on anything so delicate that I'd worry about it in moving. Been "decorating" the superstructure sections already built with all the little do dads on the bulkhead sides. I'm also doing substructures like the gun turrets as they are plenty robust for moving.
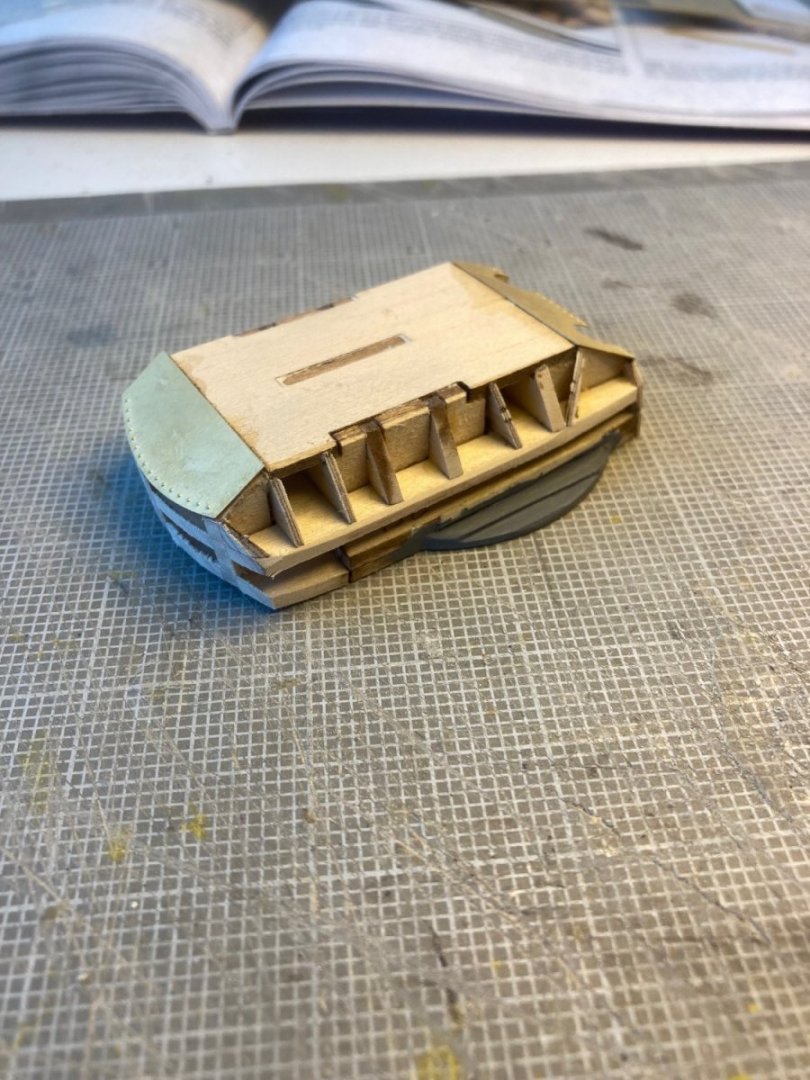
These turrets are a lot of fun to build with all the interlocking parts. All of those bulkheads serve to act as structural support for the PE brass pieces. It's like a jigsaw puzzle on which you can use a knife or file to make the pieces fit. To that end, I have some advice for future builders on the main battery turrets. I put the PE brass on the first one by working around the turret at the lowest level, and then proceeding up the sides and finally the top piece. WRONG! It turns out the wooden base is a little longer than the brass, when fully assembled, and the top comes up short when you get to it. I've attached pictures of the step-by-step process I used for the second one to correct for this problem. The last 2 pictures show the first and second turrets side by side (obviously bad one on the left). As you can see, the top piece of PE doesn't cover the whole top and the front of the turret is a little too far in front for a good join to the angled piece. Painting the tops black will allow for a little filler to cover up these gaps, but it's still undesirable.
1. The first picture shows the angled pieces of brass as the first pieces to be attached to the front and rear of the turret. Align these pieces to the top flat edge of the turret. You will then have a little excess wood structure on the front and rear vertical parts of the turret, which can be sanded down flush with the brass pieces.
2. The second picture shows the vertical fore and aft pieces of brass being attached. Note that I aligned the aft piece of brass flush with the bottom of the turret and this is wrong. It necessitated a LOT of filing at the end. It is better to align it flush with the angled piece of brass because it's a lot easier to file off the excess at the bottom, than up by all the rivet detail.
3. The third picture shows that the fore piece of vertical brass aligned well with the angled piece the way I should have done for the aft piece.
4. The side vertical pieces go on now. Note that the fore end of the side piece has the rivet detail close to the edge and this end should be butted to the protruding edge of the forward vertical piece. The aft end of the side piece has excess brass after the rivet detail and the rear vertical piece of brass should be filed flush with the wood structure so that the aft end of the side piece can overlap the rear brass piece. File the excess brass of the aft end of the side piece flush with the rear vertical brass piece. The rivet detail is now very close to the edge of the side piece, as it should be. It's not clear in the photos, but I needed to do slight shimming of the lower wooden edge supporting the bottom of the side piece to have it be vertical.
5. A lot of trimming with a file on the fore and aft ends is needed to get the piece ready for the angled pieces of brass. My top on this second turret fit perfectly in the resulting area
6. The last two pictures show the finished major construction, with the first and incorrect method on the left, and the second better method on the right. Both turrets have been burnished with a SS wire brush to remove excess CA glue and fingerprints. It'll tarnish out shortly. I pre-painted the exposed wooden platform grey, in keeping with my intent to leave the brass mainly "au naturelle" to show off the construction and only painting exposed wood. I'm not building a museum-scale model. I'm building a visible testament to the intricacies of this model and the difficulty in building it. And also demonstrating that it's not a lot of PLASTIC!
My experience here, which I'm sure is familiar to any experienced builder, is that a lot of working with PE brass cladding is the need to do a lot of pre-planning of the assembly sequence. When there are multiple pieces to be done, the subsequent pieces will always benefit from the earlier pieces and it is not a good idea to assemble all the pieces at the same time. Dry-fitting the brass pieces of the turrets would not have revealed that the wood sub-structure needs to be trimmed a small amount down to the size of the brass pieces. But, the dry-fitting did work out for determining the better sequence for assembly of the major bulkhead sides.
-
-
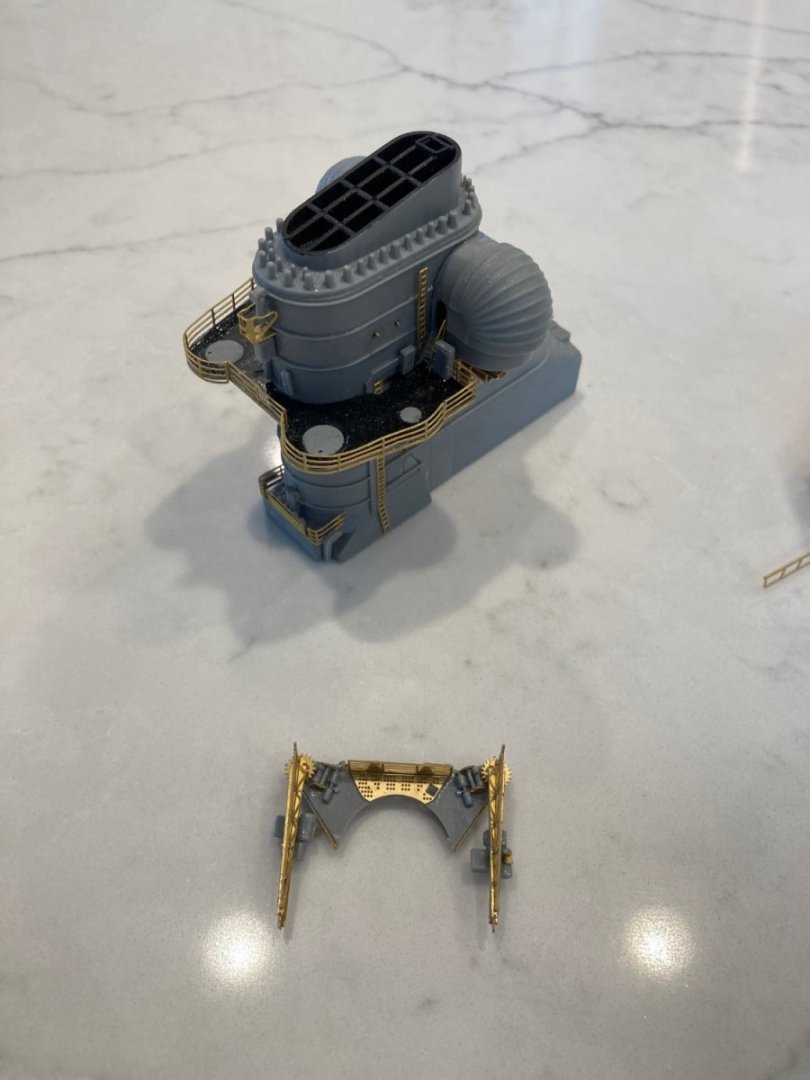
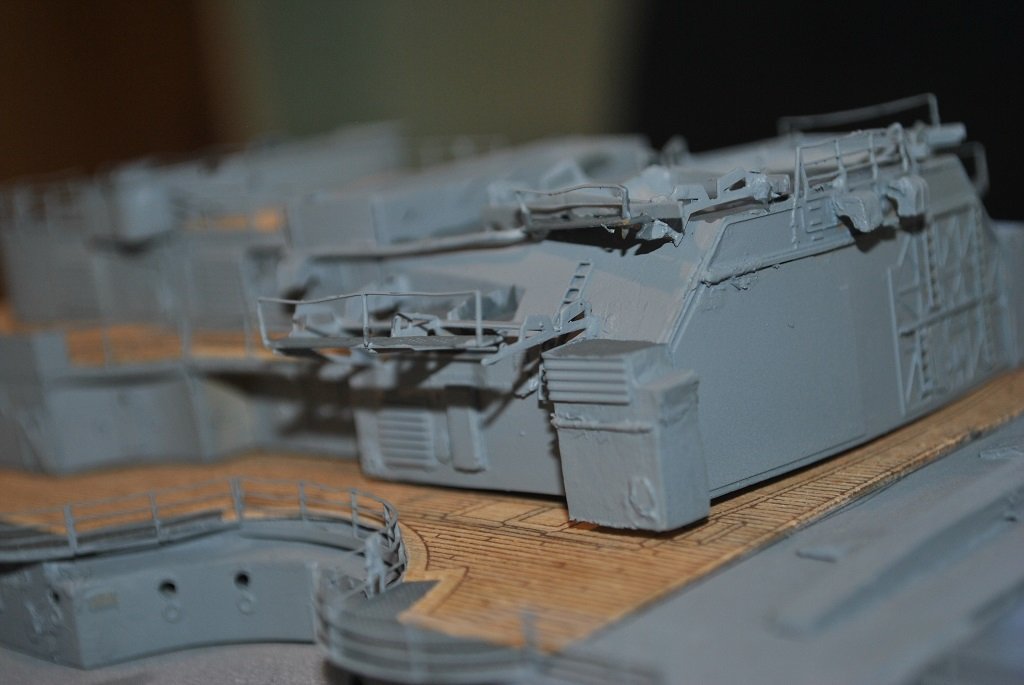
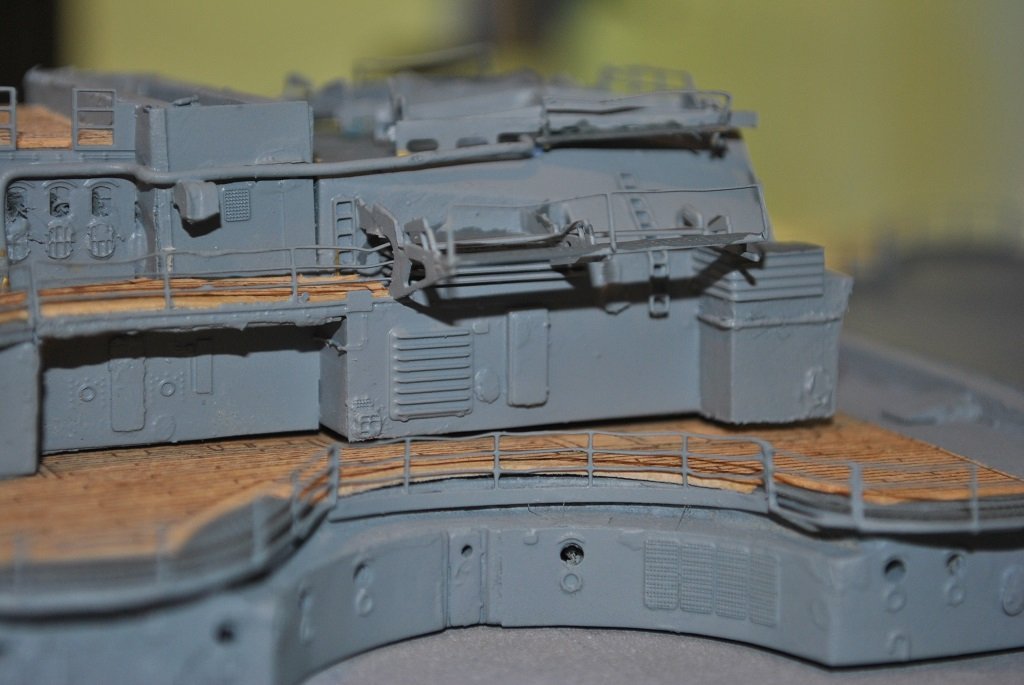
Beautiful construction. A lot of hours, there. Looking at your work, it's clear that the funnel and hangers need to be painted when separate, then glued together on the deck. I agree with your assessment of the "quality" of the plastic parts. It's clear that the stack will need to be filled, and then painted before I decorate it with the PE details--remember, I'm clear-coating after all the PE is attached. I'm using Tamiya "putty", which is a plastic/solvent mixture that hardens very quickly and can be sanded. Agree with your judgement on that silly "gap" on the conning tower. I suggested in my build log that the gap be filled before putting on the wrap-around brass piece, rather than the order described in the instructions. Very messy, otherwise. Your comment on the wicking of the CA glue on the hangers noted. I've pre-painted mine with grey 2X primer (after gesso wood filler) in anticipation of doing the PE brass detail, so I'm not expecting a wicking problem. I'm painting all exposed wood black or grey, prior to decoration with PE brass, but planning to just clear coat all the brass and plastic detail pieces. From your pictures, it looks like there will be a fair amount of filling on the plastic towers, et al, necessitating a grey paint spray before PE brass application.
-
20 hours ago, rvchima said:
One of those foam sanding pads around 220 grit will remove the razor blade scratches and leave the brass nice and shiny.
Another thought: A top view of the Bismarck shows that the tops of many components were painted dark gray -- turrets, range finders, gun barrels, etc. You might consider painting just those things for some contrast.
Good idea. I'll try this. A cotton Q-tip dipped in Acetone has been effective in removing fingerprints. Yes, I agree with you on painting the "tops". I've already done this with some of the wooden tops of the superstructures that appears to be black. The Rust-oleum 2X black primer has just the right sheen. Same very dark grey color as the Automotive Rust-Oleum black primer, but the automotive primer is thicker than the 2X--I'm sure this better serves final sanding before top-coat. The 2X primer seems like it doesn't harden off right away but if left alone for a few days, it firms up. I guess the 2X primer is designed to stay softer for a little while to improve adhesion with a 2X top-coat, but I definitely like that it doesn't hide details as much as the automotive. It DOESN'T like to be sanded, so the substrate better be just the way you want it before application. Makes it good for plastic and brass, but not so much for wood.
- Canute, Old Collingwood and mtaylor
-
3
-
14 hours ago, rvchima said:
I was looking at your model and wondering "How is he going to paint that?" Then I remembered your earlier post.
I can see why you'd want to leave the model au naturale. The raw brass is attractive, and the contrast with the gray plastic and the wood really shows how much work you've done. My brass is already heavily tarnished, so you might want to get that matte coat on it soon. My brass also has a "few" spots of CA on it, that I hope I can hide with paint.
I have fingerprints, too, from CA residue on my fingers and I've scraped some of the CA residue (before I discovered the blotter technique) off with a #11 blade--which then leaves shinny scratches which I'd like to tarnish back. Yes, I'm thinking that everything will get a coat of clear flat after as much cleanup as possible with Alcohol. I'm thinking that it should be done as soon as a major subassembly is completed--but that is really tough to decide "when". Everything is attached to everything. For instance, the stack you are working on now. Should I wait to attach the finished aircraft hangers to the stack before clear-coating? I think so, but where to stop and clear coat?
- Old Collingwood, hof00, Canute and 1 other
-
4
-
1 hour ago, rvchima said:
Plastic Glue Questions
I am currently building the funnel, which is all plastic with PE details. I don't have much experience with plastic modeling and could use some advice from Old Collingwood or another plastic modeling expert.
I am finding that my usual CA glue doesn't work very well with the plastic supplied with this kit. On the plastic the CA takes much longer to harden than it does for brass or wood. Plastic-to-brass is very slow - 20 seconds after application the parts are still sliding around, although they do set up eventually. I hate to spritz these tiny parts with a big blast of CA accelerator.
Should I be using a different kind of glue for PE on plastic? What about large plastic-to-plastic joints like the sides of the funnel?
I agree with yvesvidal on the plastic cement for plastic-to-plastic joins. I've been having VERY good results with the "Flexy 5K" CA. The "for PE" bottle does a very good job for attaching the brass to plastic, plastic to wood, and plastic to brass. I've been using the "slow" for attaching the brass sides to the wood superstructure. The Flexy did not work well for the ladder rungs because I needed a harder set, where regular "medium" CA did well. The flexy 5K comes from a guy in Poland. One technique I use is when the droplet is a little too large and some excess squeezes out, I blot the piece with a paper towel. The brass has already bonded to the substrate, but the excess is still liquid and completely blots up in the paper towel. Learned this after some messy joins.
- mtaylor, Old Collingwood and Canute
-
3
-
10 hours ago, mikegr said:
i guess a coat of primer would have helped a lot on this.
Thanks--I did use a primer before the Tamiya flat white, but I had bleed thru from grey's at the edges after stripping the masking tape (before I used the technique of sealing the tape edges with clear acrylic), so I used a brush with Tamiya flat white from the bottle to touch up. I discovered that the Tamiya paint would only allow ONE stoke of the brush before looking like crap. I'll remask the hull at some point and use Rust-Oleum flat white over all the Tamiya white before I seal the hull with a flat clear spray and start on "decorating" the deck. Tamiya paint and I are quits!
- mikegr, mtaylor, Old Collingwood and 1 other
-
4


Bismarck by ted99 - FINISHED - Amati - 1:200
in - Kit build logs for subjects built from 1901 - Present Day
Posted
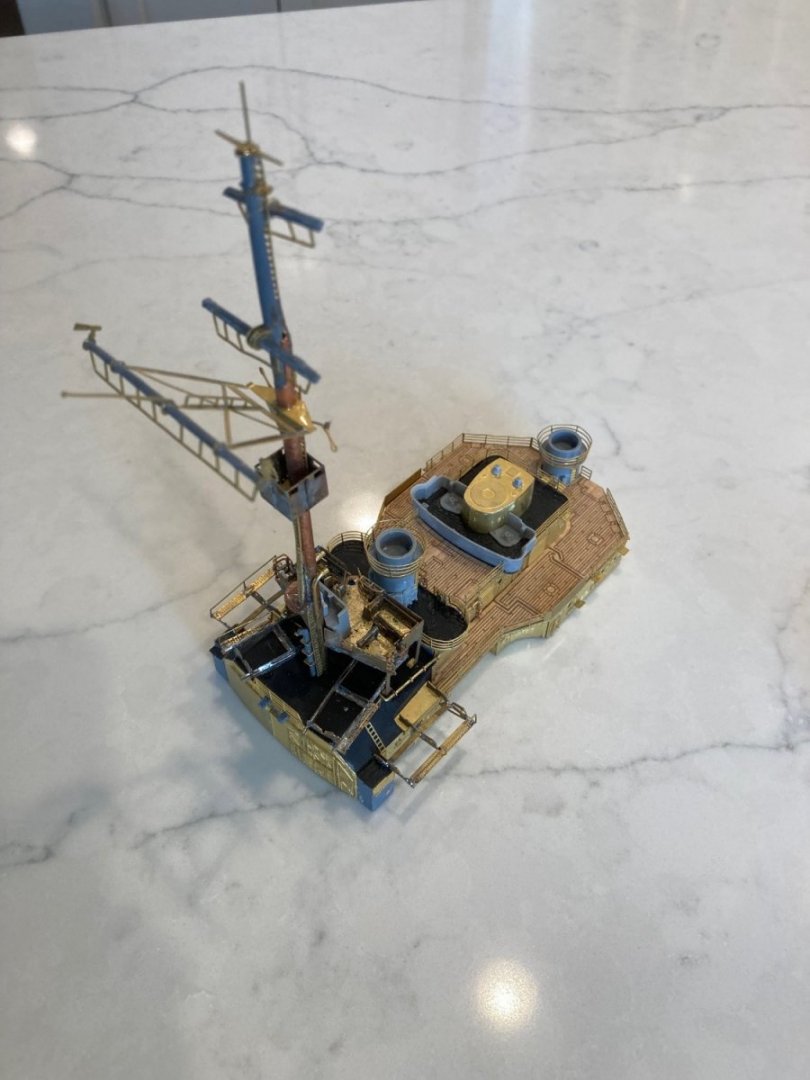
Boy, are there a LOT of fiddly bits. But, that's why I bought the kit--lots of detail. I reached the stage where I've added as much detail to the superstructure as is reasonable, without being attached to the hull; so I've attached the two pieces of superstructure to the hull with PVA glue. The pre-sanding of the bottoms of the superstructure using the hull deck as the mandrel has worked out with good gaps at the deck join.
I was forewarned by Rod about the interference between the rear of the #2 turret (Bruno?) and the ammo hoist, so I found that I could increase the "inset" at the bottom of the two plastic pieces glued to the rear of the turret to give enough clearance that allows the full range of motion. Picture shows the extra material removed from the plastic, compared to one of the other turrets. Could be this is what the prototype had, since it looks right.
I'm now seeing the overall effect of leaving off painting the brass and the plastic parts (except for where they had black highlights) and I'm happy with it. Really shows off the amount of PE detail this kit has. When I do Yamato I think I'll paint all of it, compare the two, and then decide what I'll do with Missouri. I have the Pontos detail set for the Trumpeter Missouri, so it may have close to as many detail parts as Bismarck (lacking only the brass cladding of the superstructure). But, not nearly so much available for Yamato. Plus, from my research, Yamato had very abbreviated deck furniture because of the backblast from the 18" guns. Everything was enclosed as much as possible and any exposed manned guns had to be abandoned if the main battery was in use.
Next is to work on the remainder of details that could only be done after the superstructure is mounted, and then the deck details. After that, the overhead wires, the hull side gear, and finally, the handrails as the last items to be done. I'm modeling Bismarck as she appeared just before leaving Bergen for her first (and last) deployment. The superstructure dazzle camo had been painted over, but the air recognition swastikas would not be painted over until she was underway and had left the range of Nazi air cover. I'm timing it to be just before all of the gangway and boat boom gear was stowed, but after all of the boats had been stowed and the aircraft were about to be put into their hangers.