


JimmyK
-
Posts
25 -
Joined
-
Last visited
Content Type
Profiles
Forums
Gallery
Events
Posts posted by JimmyK
-
-
4 hours ago, ccoyle said:
Congratulations, Jimmy! I built this kit myself, but bashed it into a West Coast lumber schooner, so I'm well acquainted with all of its many shortcomings. Finishing this as a first kit is definitely a noteworthy accomplishment! You will find the newer, better-designed kits coming out these days to be a breeze in comparison, should you choose to go that route.
Cheers!
Thanks ccoyle
Yes I saw your build earlier, it looked nice, when seing yours I knew that my chocie of the dark brown color maybe was not the right one.
I have a few more kits waiting as I inspite of all had a good time building this kit and that made me look for more and of course is waiting
for less problems as this kit has given me.
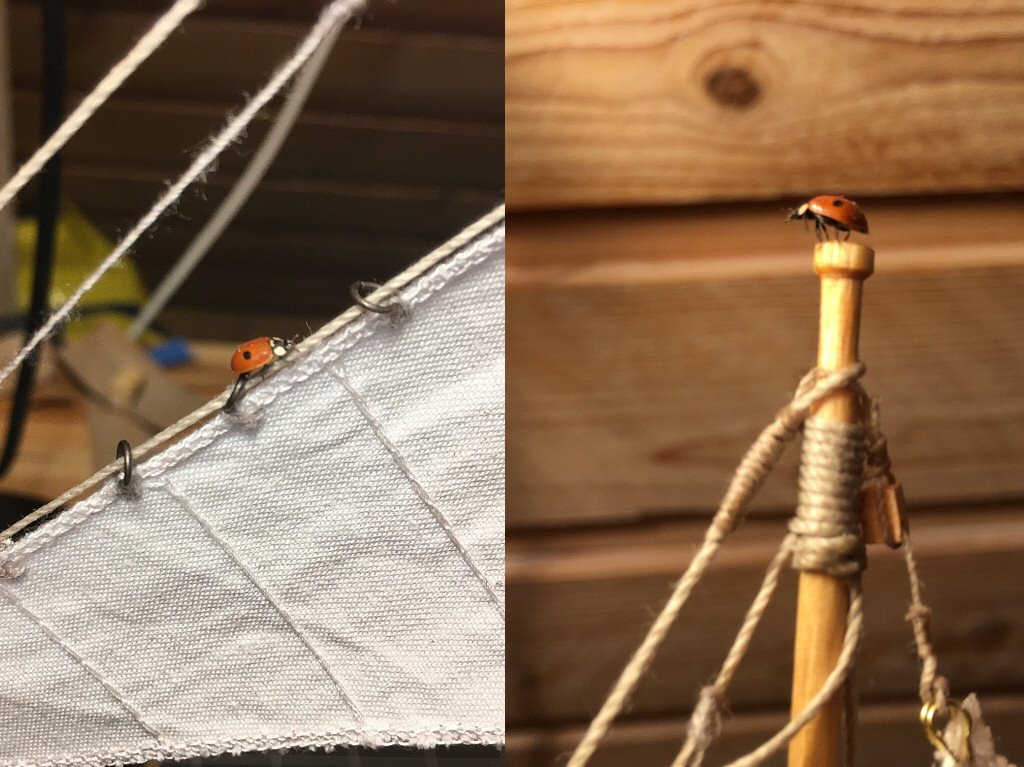
I am my way to build a display box to protect the Flying Fish from dust and flies or whatever to complete the build, which reminds me that there was a crewmember under cover a week ago already doing an inspection round on the entire ship, this guy was not shy, turned up a few cm from my nose") .
.
The Lady Bug did wake a couple of months to early for its own best, but if you are a born sailor...
/Jimmy
-
12 hours ago, Dr PR said:
This was a good first wooden ship model. First builds are never perfect. It looks like you learned a lot from it and that is what first builds are for.
What's next?
Thank you.
Yes I have learned a lot with this kit and not only with the building itself.
First time I saw the word "Dead eye" I wondered what it was as, never heard of it, well English is not my native language and after a short while I understood what it was when watching a video clip, but I never looked it up in a dictionary. 14 days ago I saw that 8 pcs of the 5mm Dead eyes in this kit was also missing, not surpirised by now. Went online and found a model shop 60 km from me, where I could buy this Dead eyes, only now I also learned the Swedish name for them that made me smile, Actually I have never heard this either. In Swedish they are named "Jungfru" directly translated it means "Virgin/Maiden". Wonder which brainac invented that name, but it is not hard to see how it got its Swedish name. So there are lot of terms as well to learn.
I have purchased a couple of kits to improve myself (I hope) maybe one day I will do my own build, time will tell. My next project is "San Fransisco II" from Artesania.
/Jimmy
-
Thanks Keith. It turned out better then I hoped for, but then there are things that I could have done in a different way, well still learning so I am happy with the outcome as my first model. However after missing cruicial parts, parts out of scale, not enough materials like missing rope, round wood 5mm some planking and more, errors in drawings and no instructions, self made solutions that should not be on the Flying Fish 1860. All this forced me to buy and buy to be able to complete the kit. Of course as it was my first kit I still had to get a lot of things to build the kit, but all this extra was not what I expected when started a "complete kit". For me it was my first and last kit from Corel.
What I did like was building deckhouses and items from scratch from planks and wood, learning about rigging (still much to learn), so the kit had a lot of hands on which I enjoyed. I have seen that this kit is still on the market from Corel but as mine was bought 13 years ago I have no idea on how the box looks inside today.
/Jimmy -
-
I ordered my sample of Vasa now (the name is changed to Vasa) from Artesania today, this ship has been a life long desire to build. Jan you are doing a very nice job
on one of Swedens biggest failures that changed into a very big success, only it took 300 years.
The Swedish king meant this ship to be the most frightening vessel on the sea that is why all this figures exist just to scare the enemies. Though he was a little too keen on seing it to set sail. This ship did not even pass the "Rocking test" when it was set at sea in the harbour, the test was aborted as the ship was on its way to turn upside down. The ship was not correctly constructed from the very start, when it sunk there was a trial, whom ended up in no one was to blame. That depended on the King himself had approved all the drawings. Incompetent King <> Incompetent shipbuilder whos to blame?
There are many stories, but I know for sure that it must have been very hard to convince a war mongering king about reality for any shipbuilder.
I will follow your build Jan with interest keep up the good work.
-
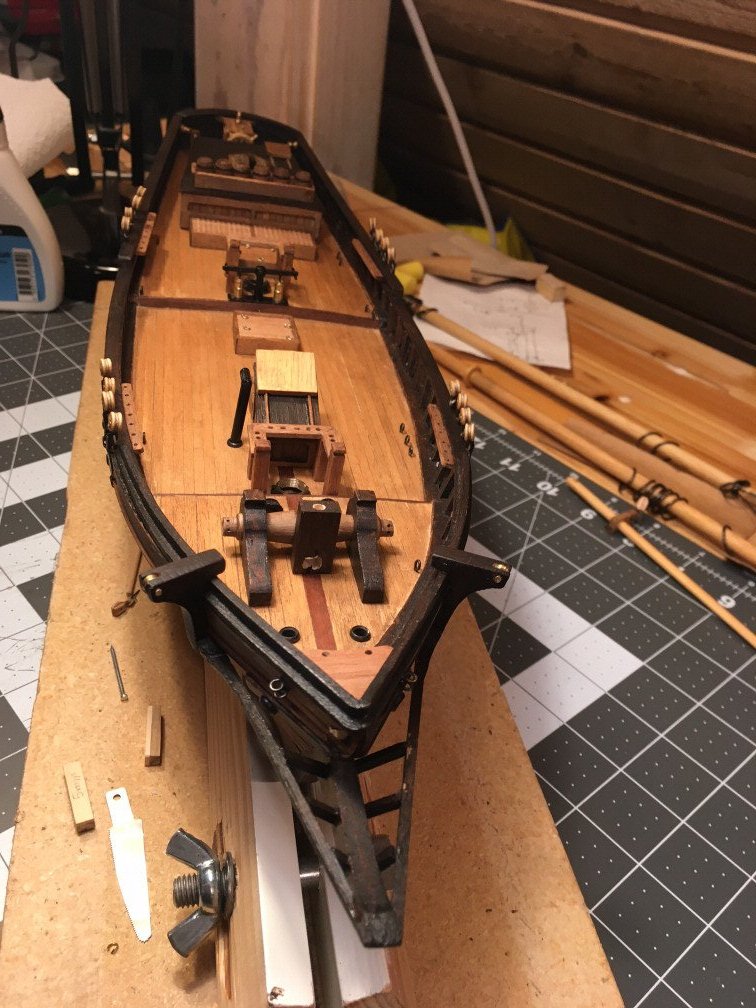
Painting the name is done, used acrylic colour.
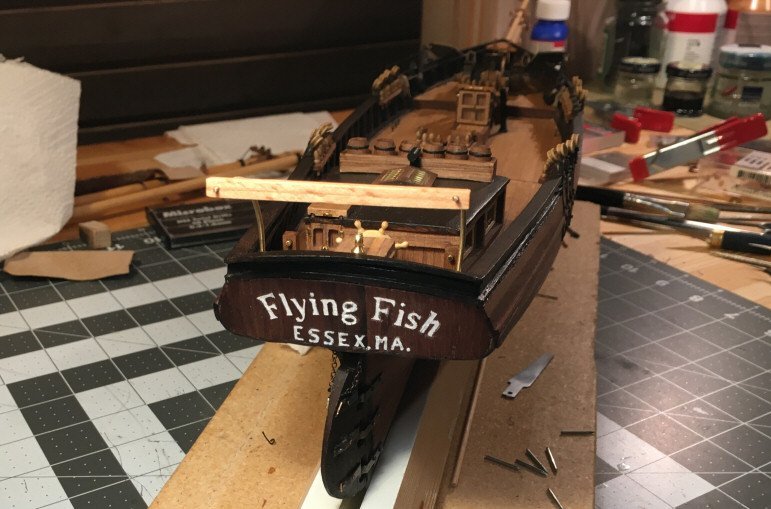
Finishing up the last items attached to the deck
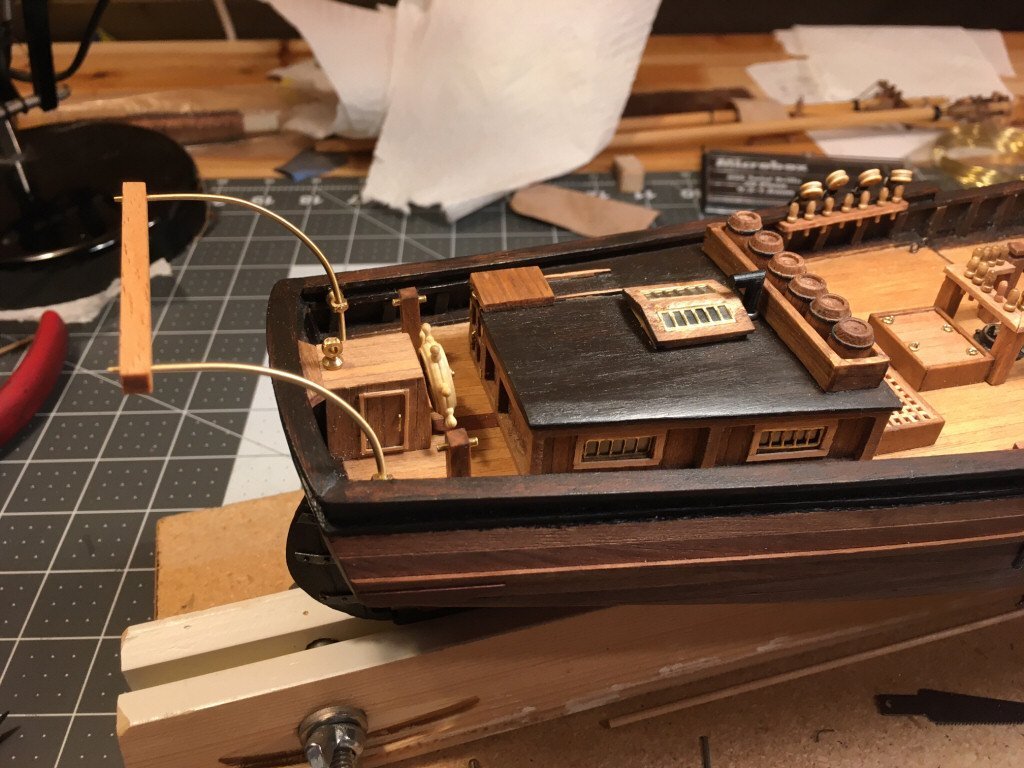
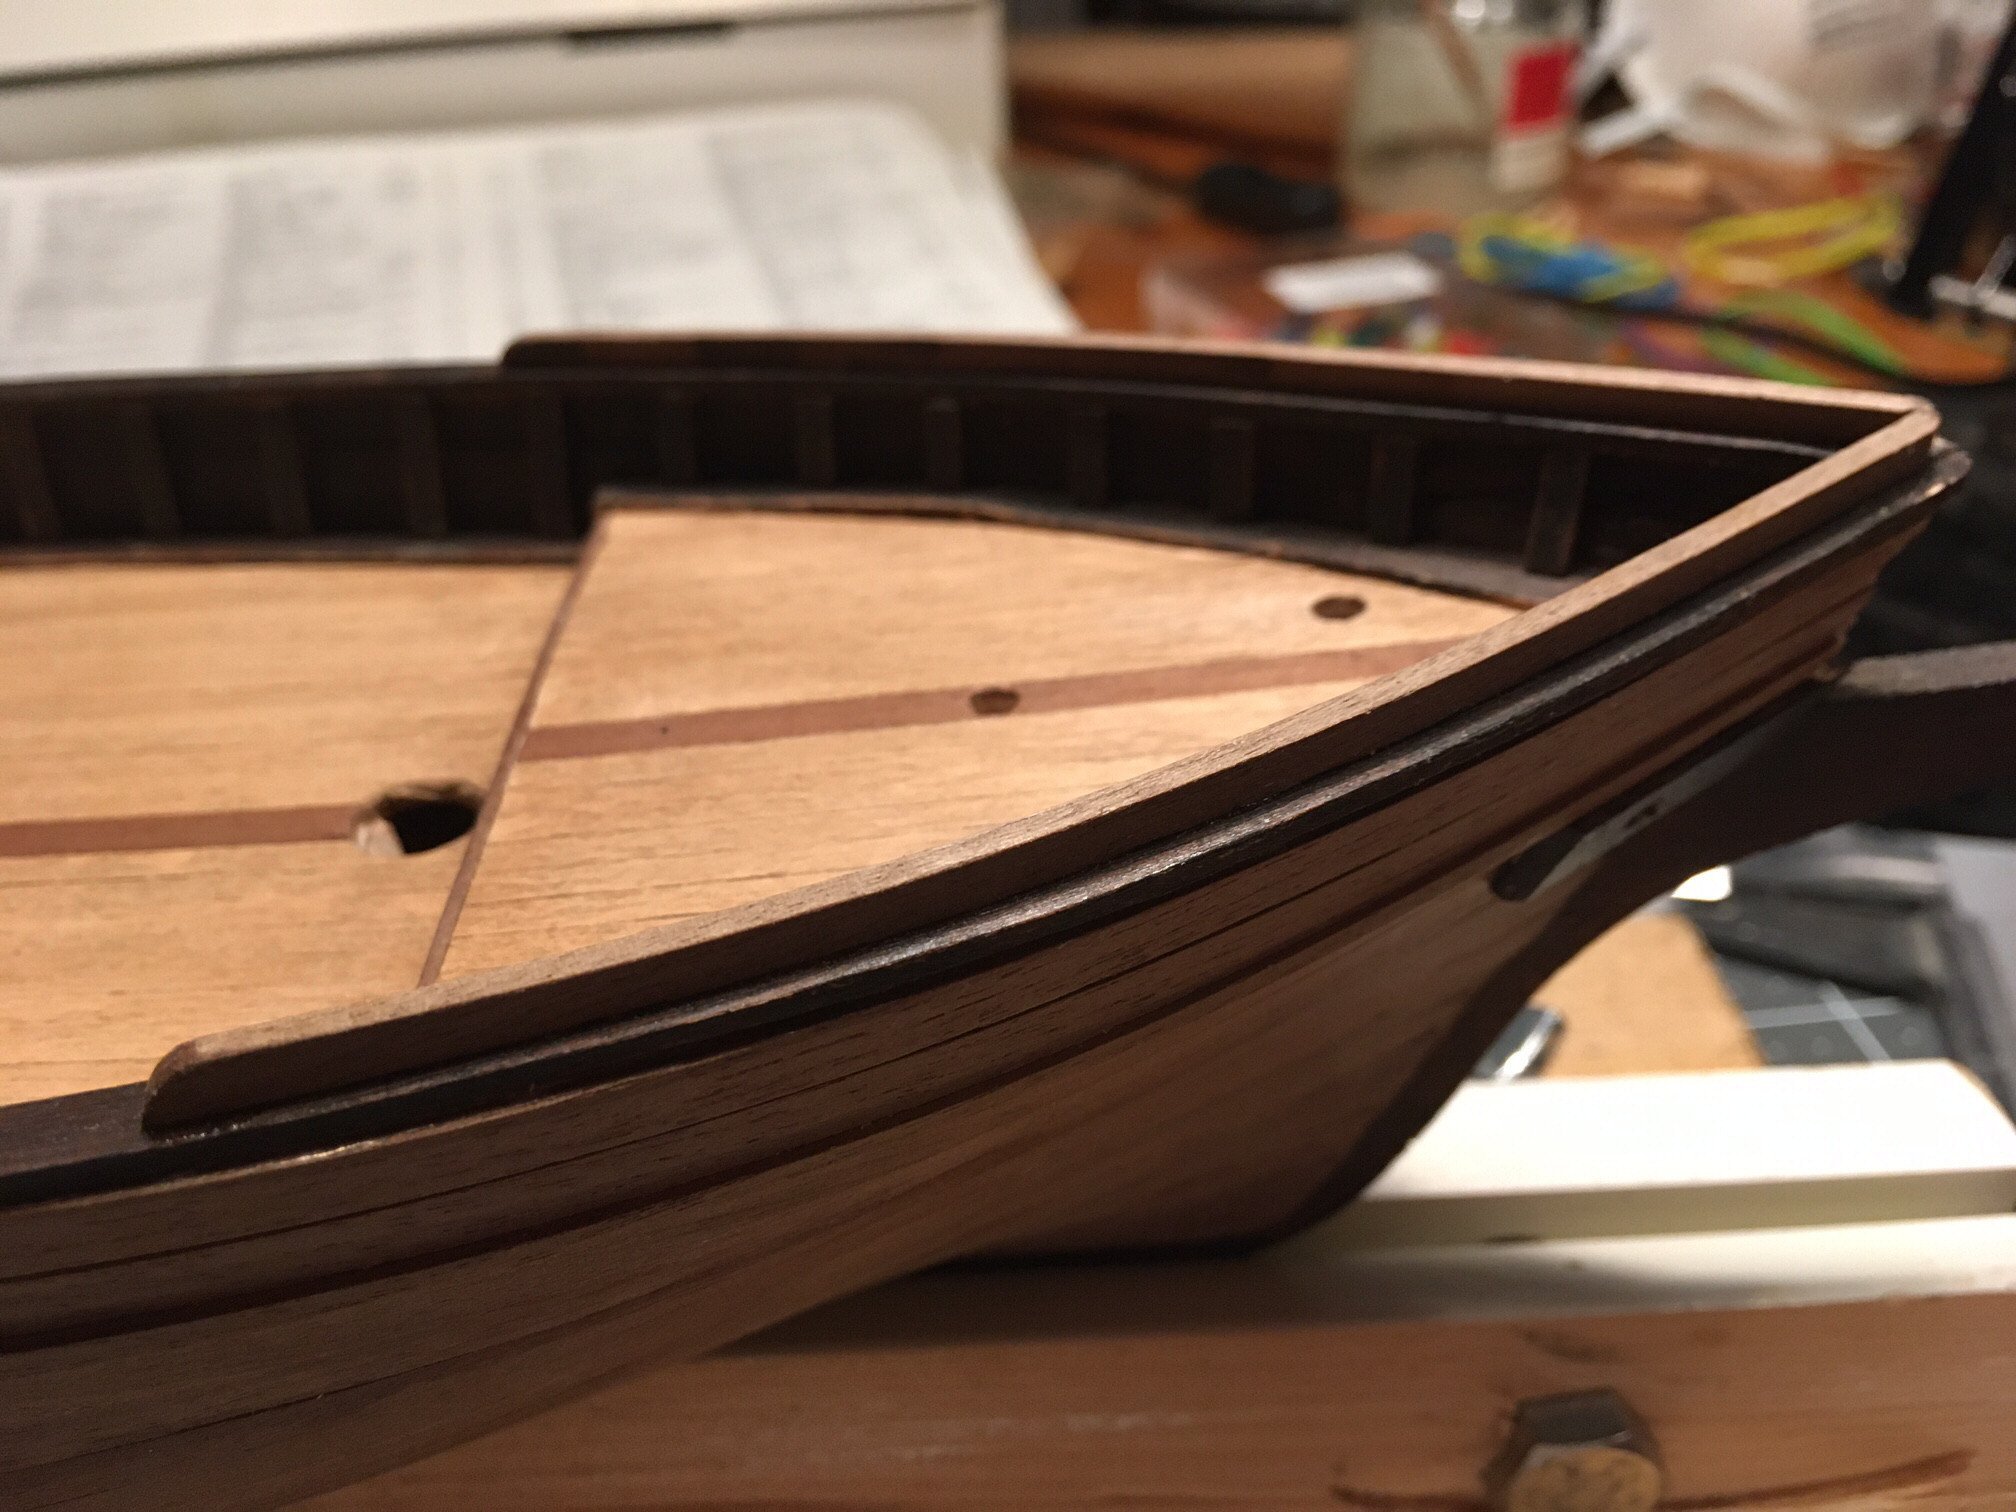
I have just now realized that here is another part that you should not follow Corels drawing, the fore deckhouse is too close to the mast.
I think I will get problems when attaching the ropes. 10 mm backwards on the deckhouse would not harm.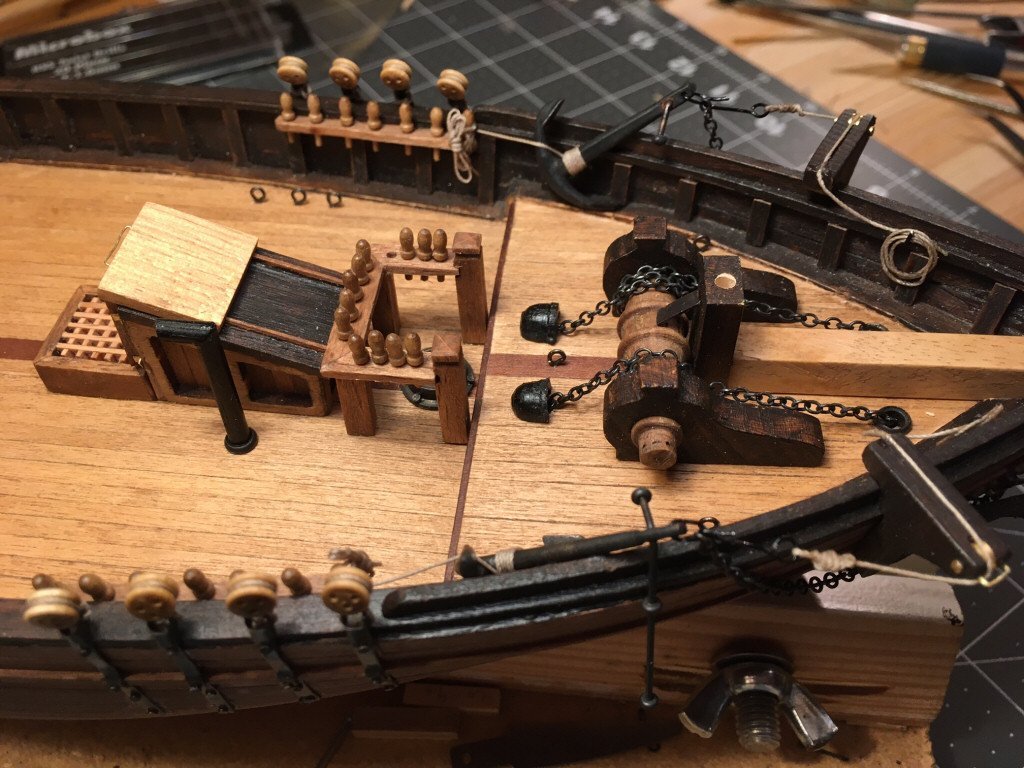
As I saw on the picture from catopower the anchor is placed something like this, but the anchors themself do not seem to be correct
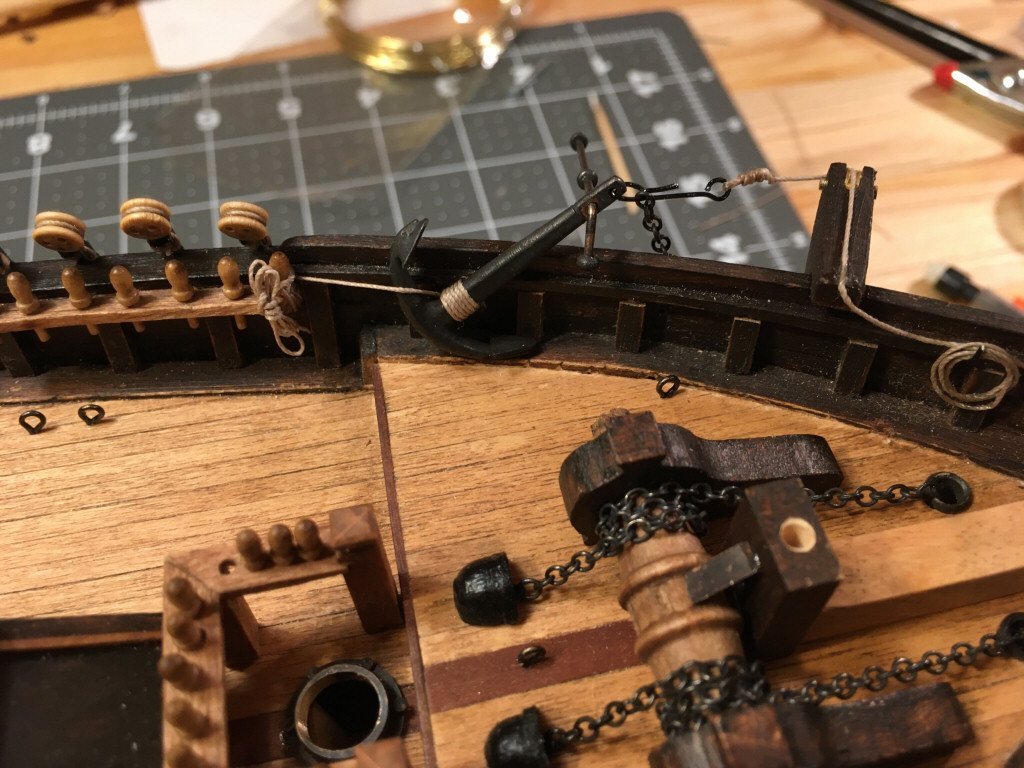
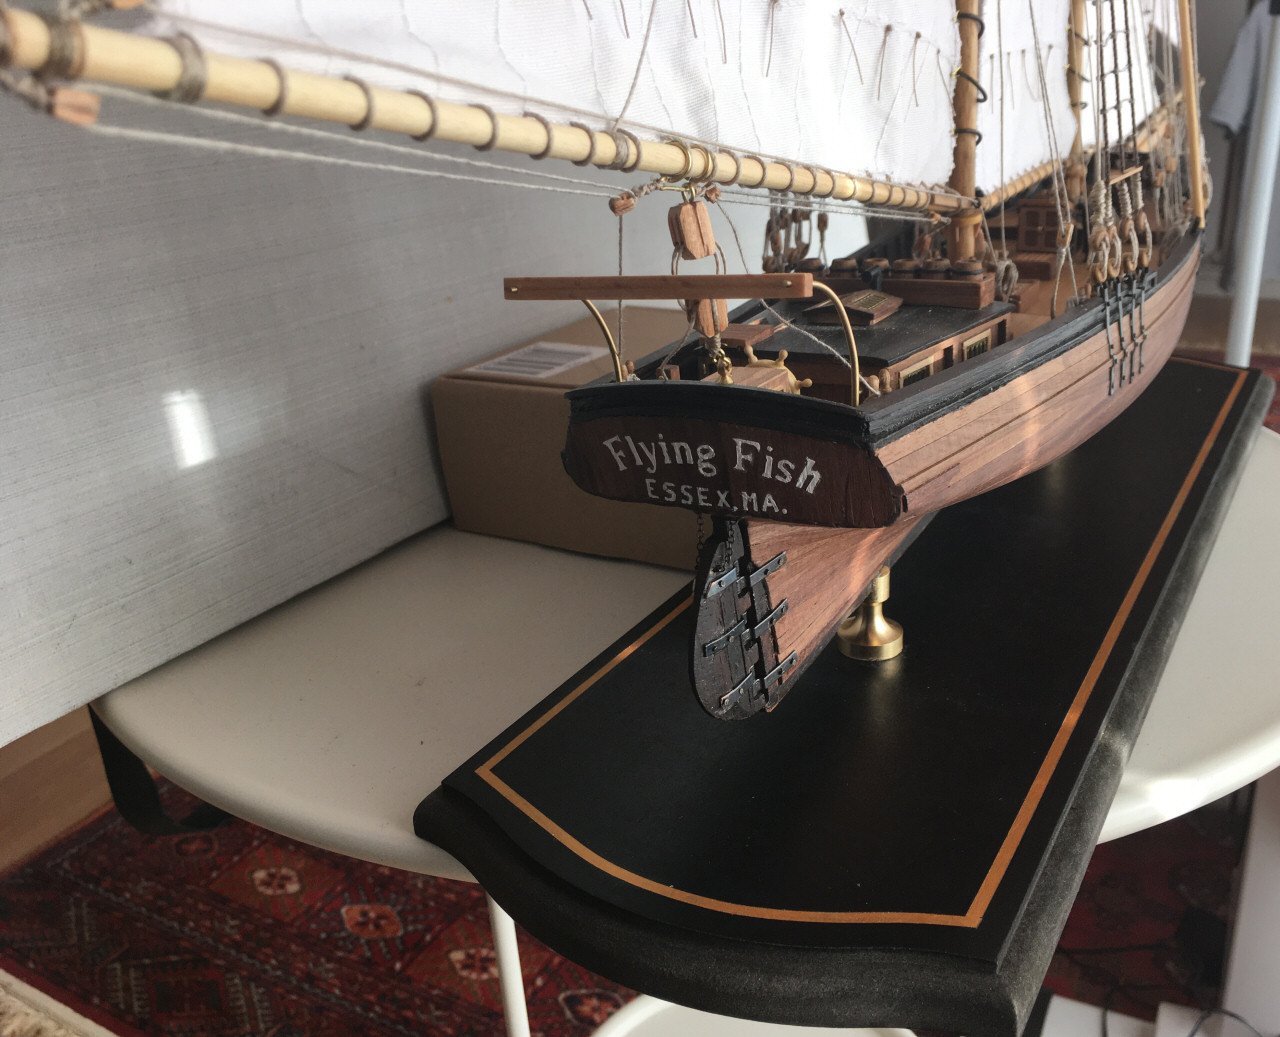
Placed the rudder, Today I saw from another build that the rudder chains should go through a brass ring in the hull, as they are not present I just glued
the chains onto the hull. Not good but it will hardly be noticed.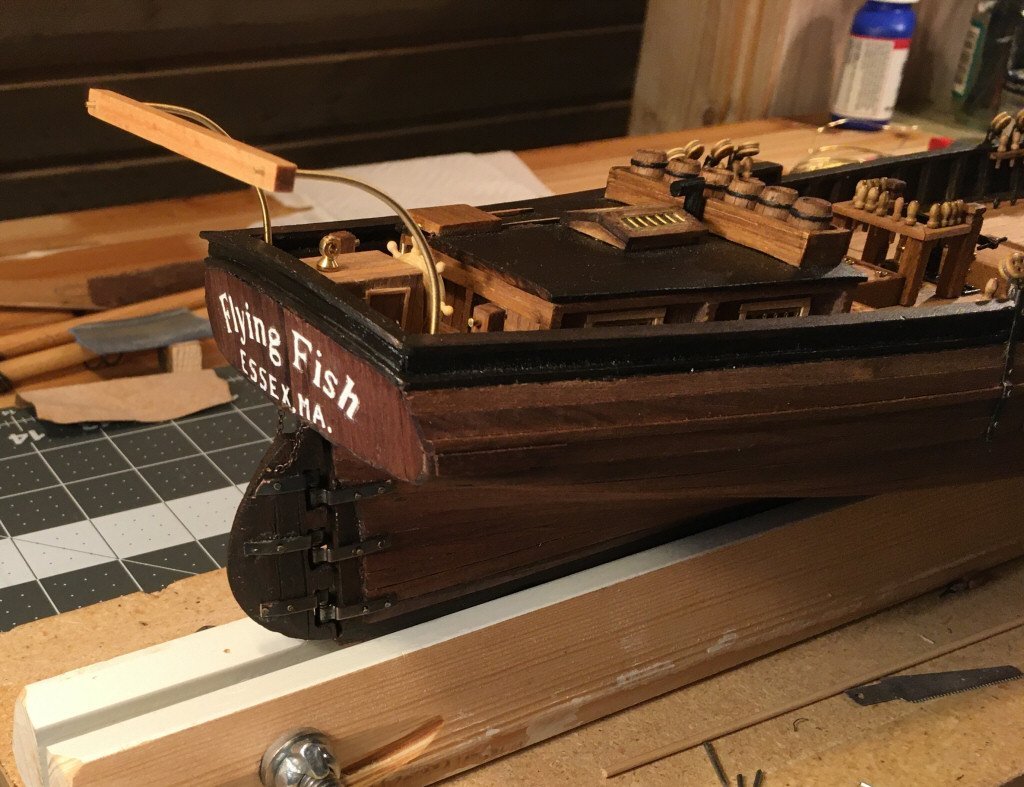
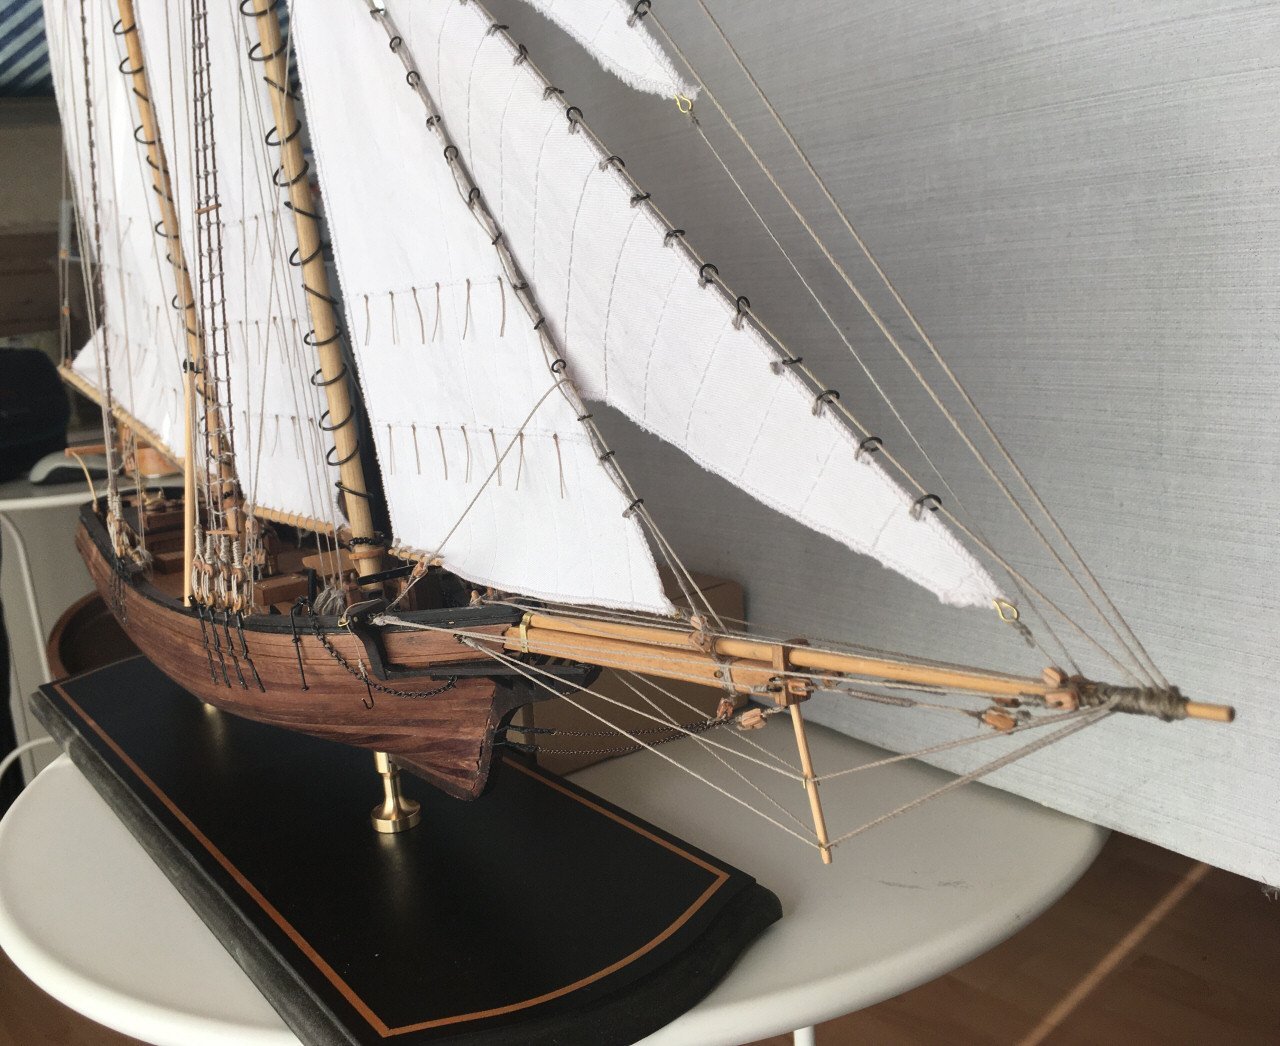
I purchased Lennarth Peterssons book Rigging fore and aft craft as advised. Found that the Bowsprit/Bobstay should probably look very different then
the Corel drawings. Corel had 2 blackened brass pieces on the fore for attaching the chains. According Lennarth there should be 2 drilled holes, I did a middle path. Drilled two holes and made 2 rope pieces for attaching Corels chains. This ropes should probably go all the way and be attached to dead eyes, no chains at all and no blocks.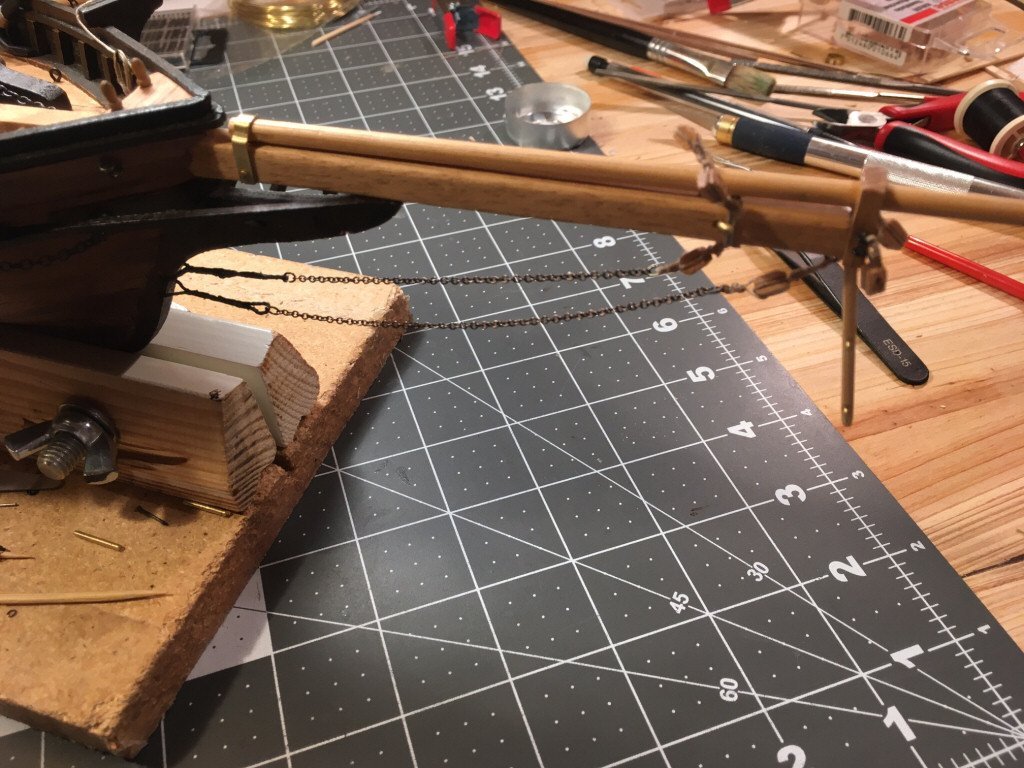
Started to work with the sails this weekend.

-
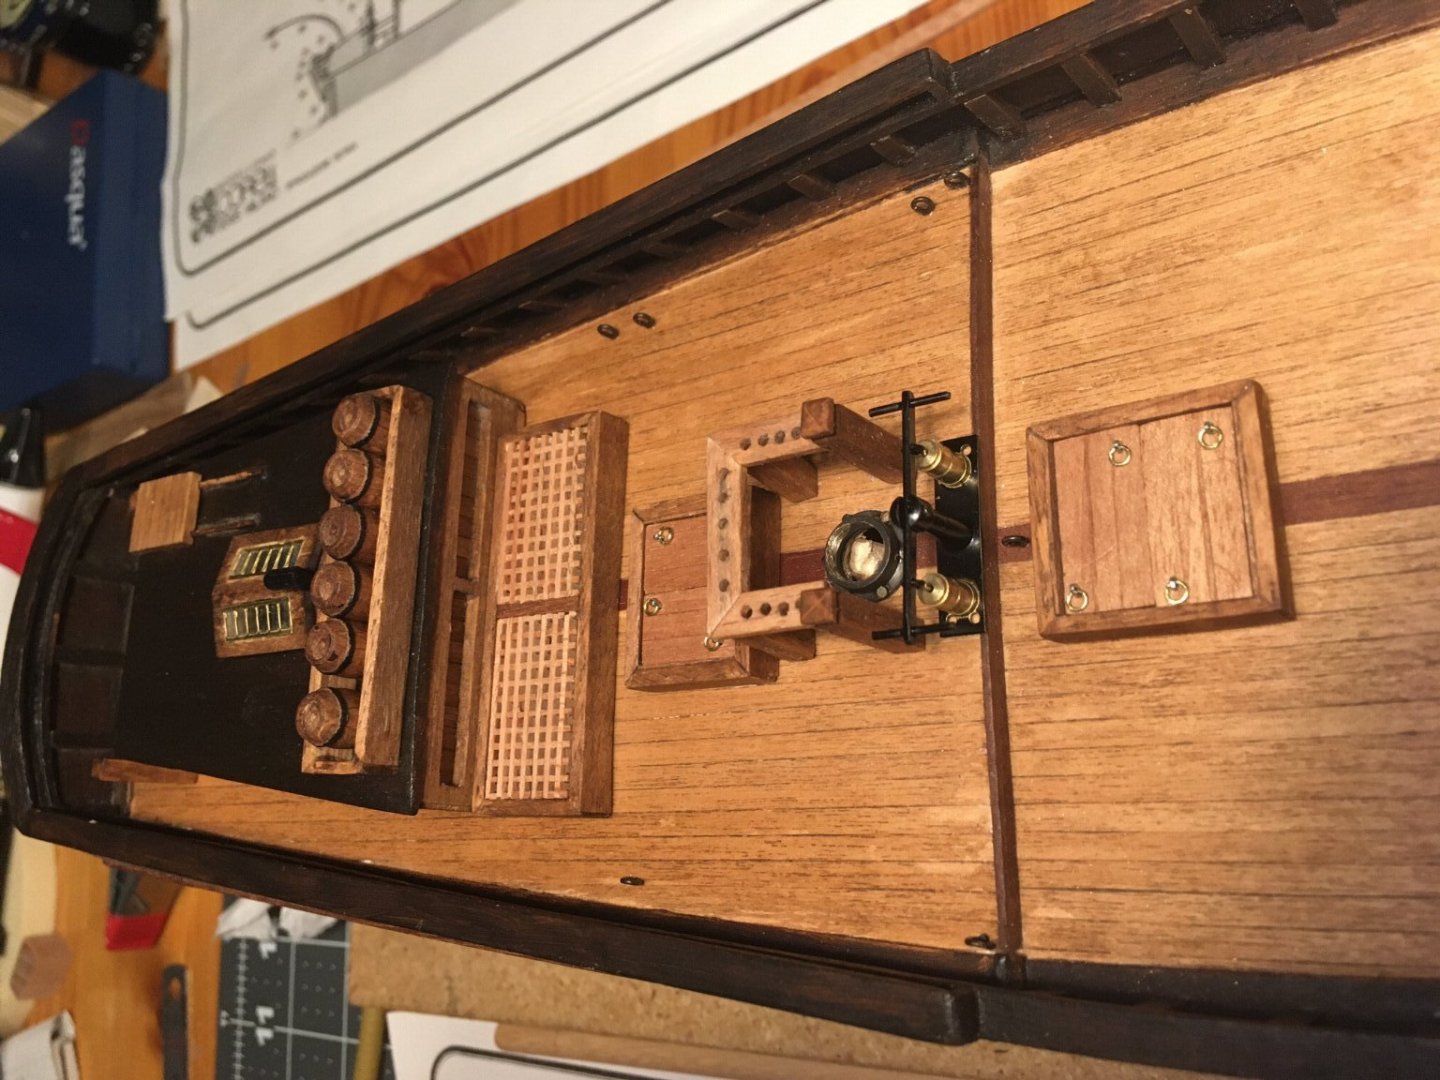
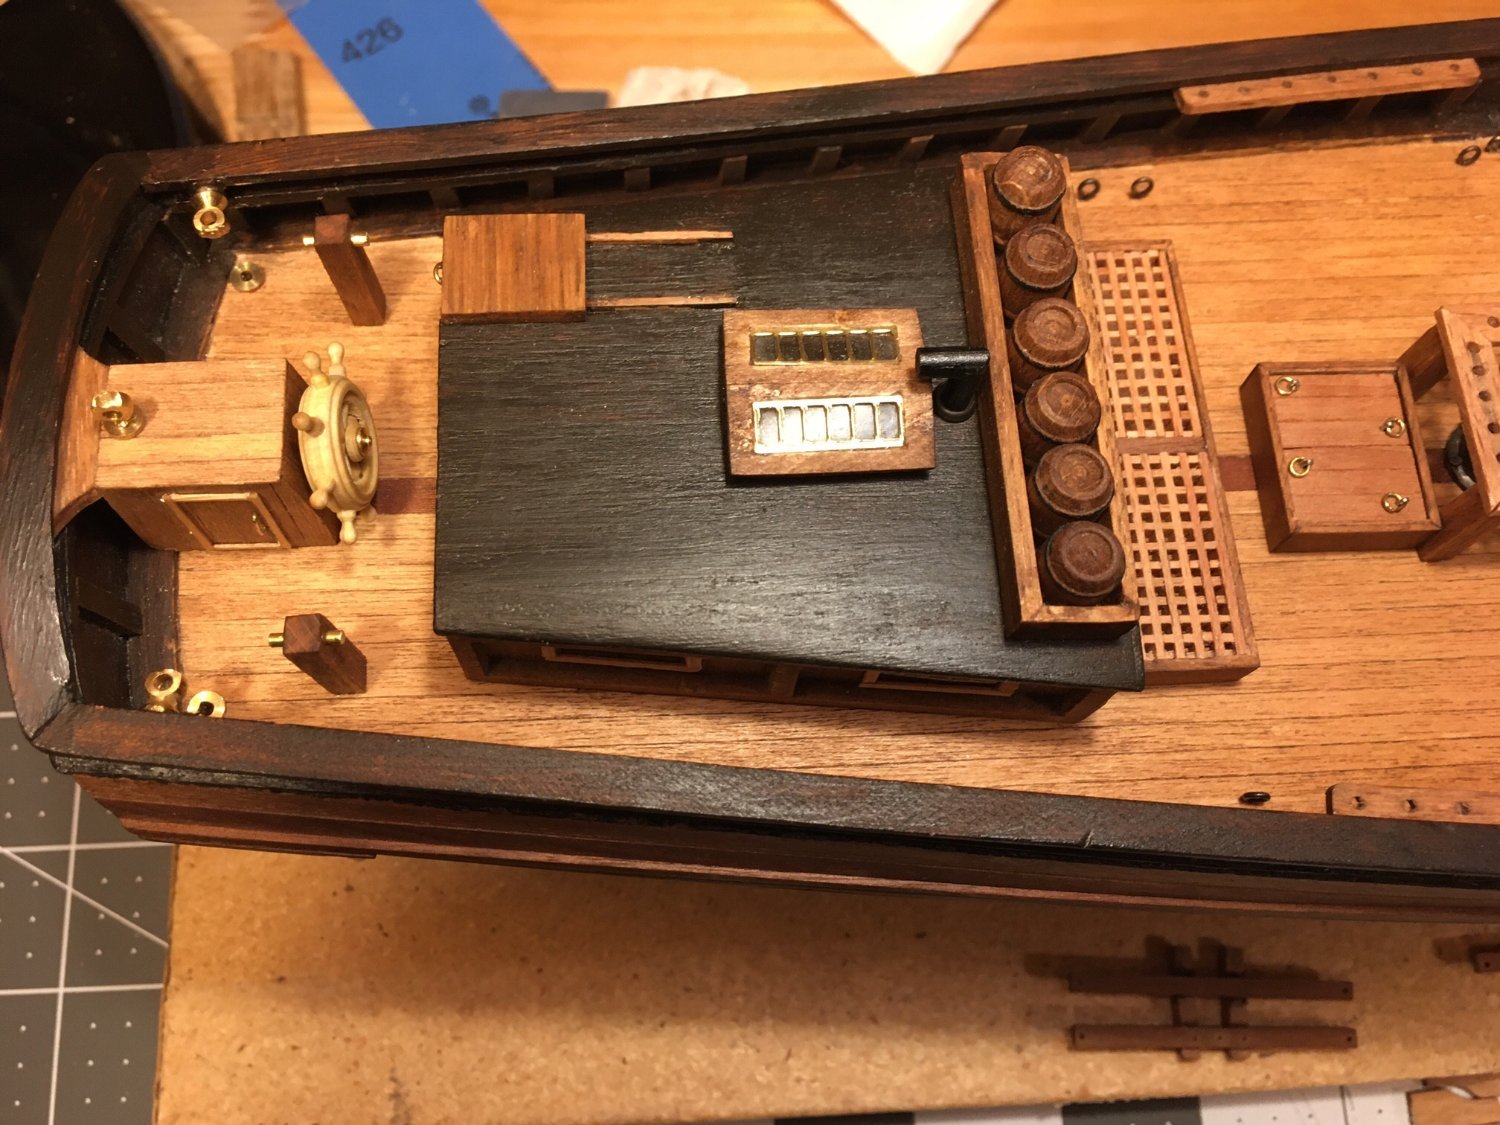
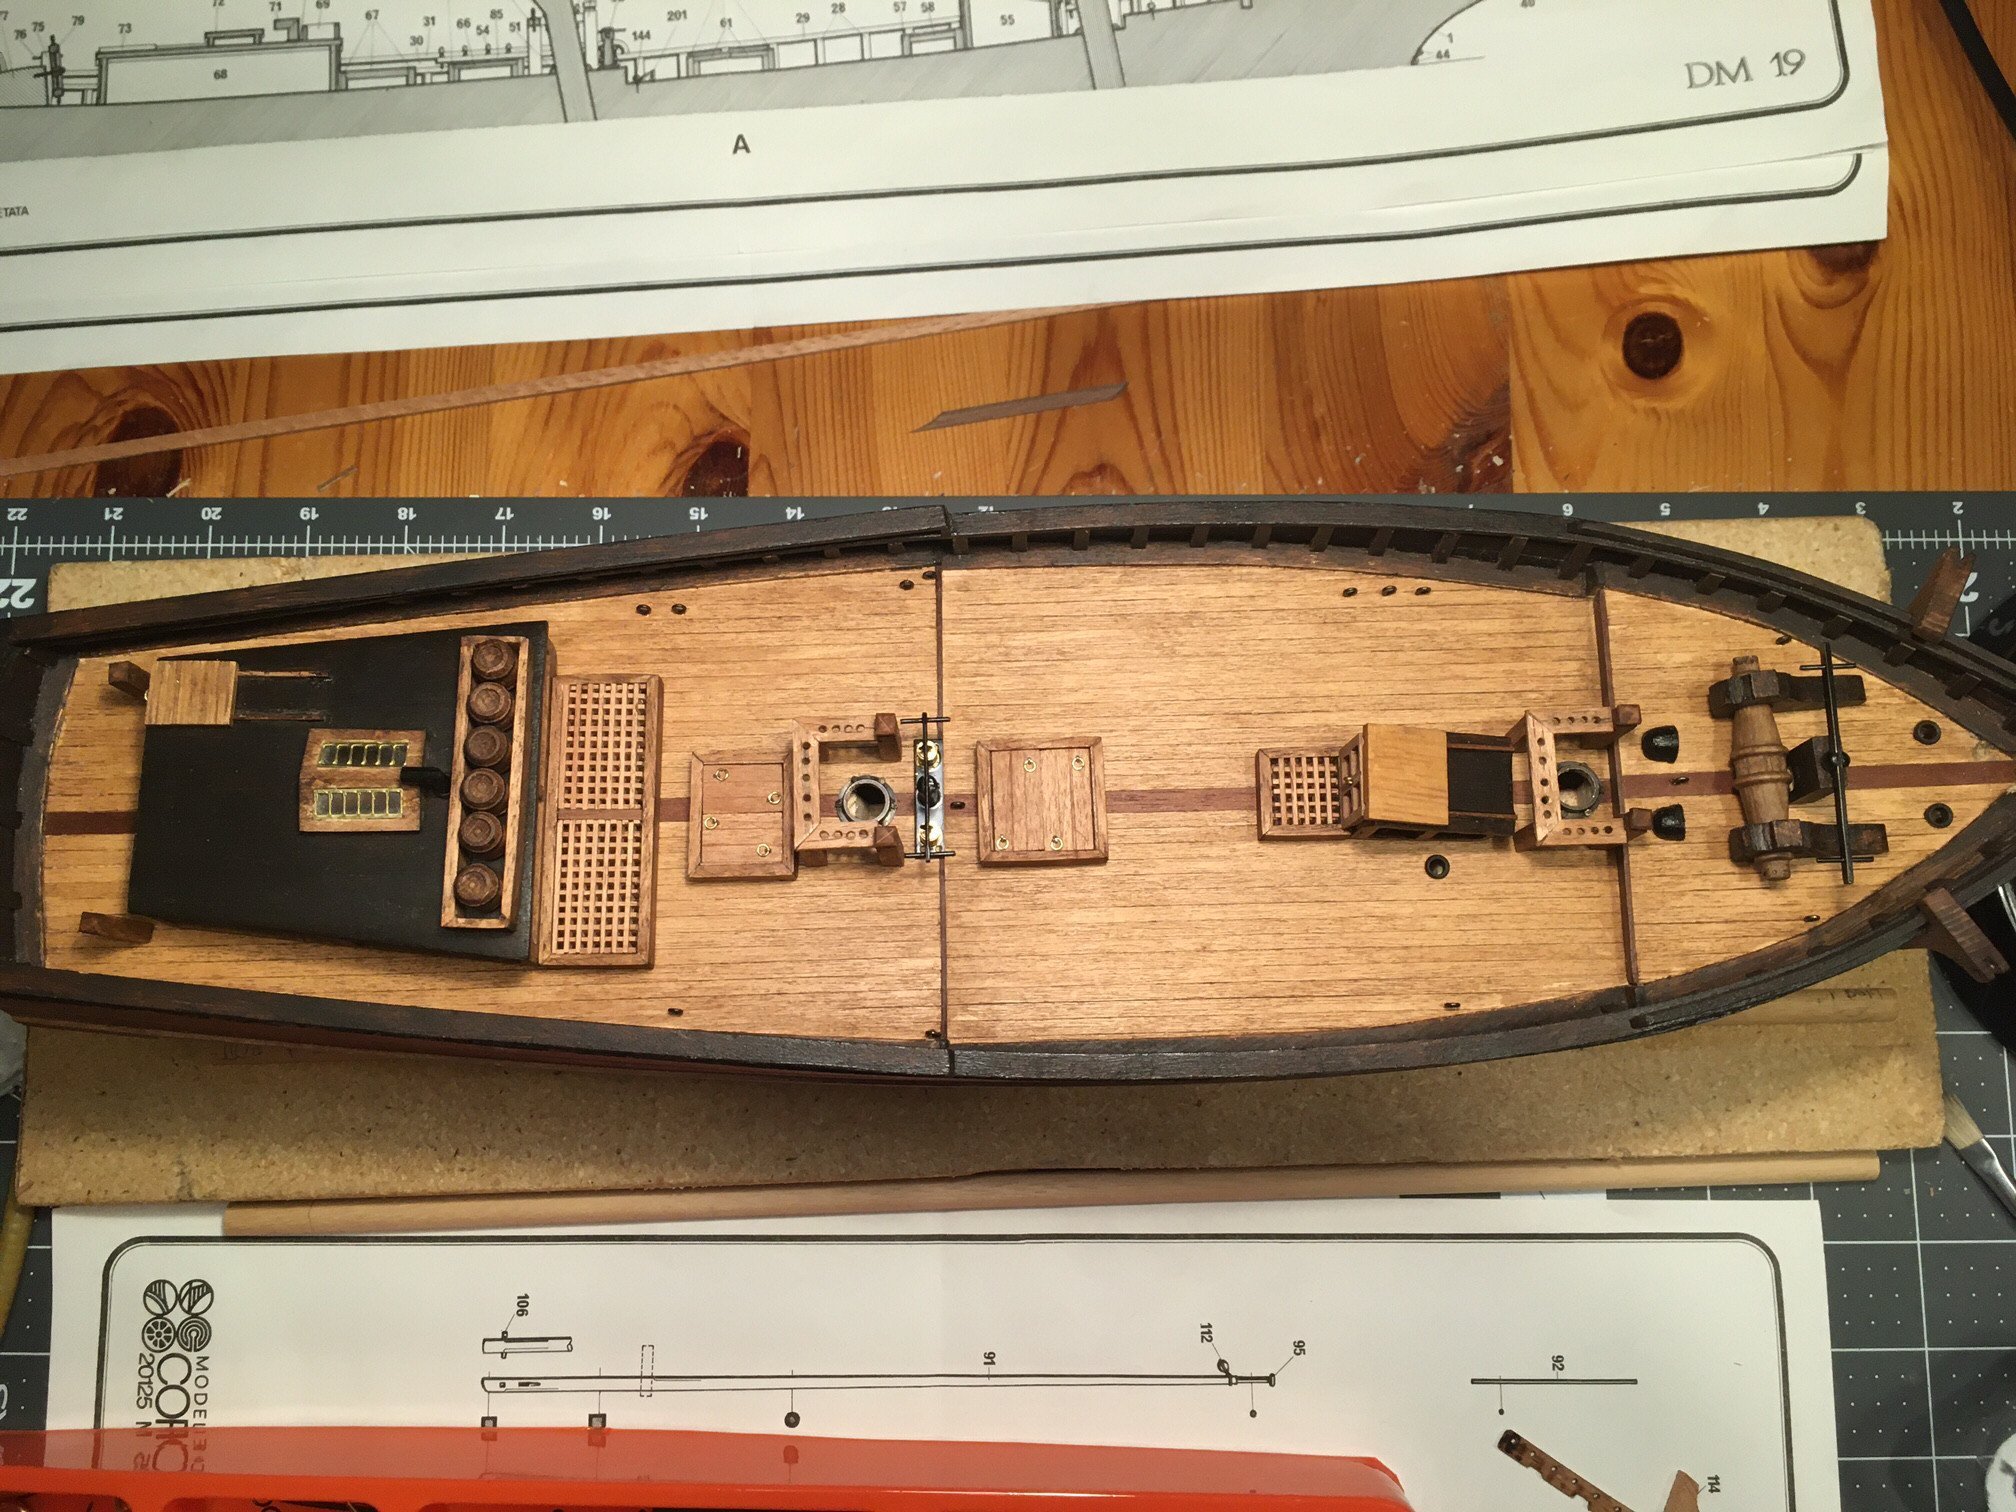
Deck houses and most items on deck are now in place.

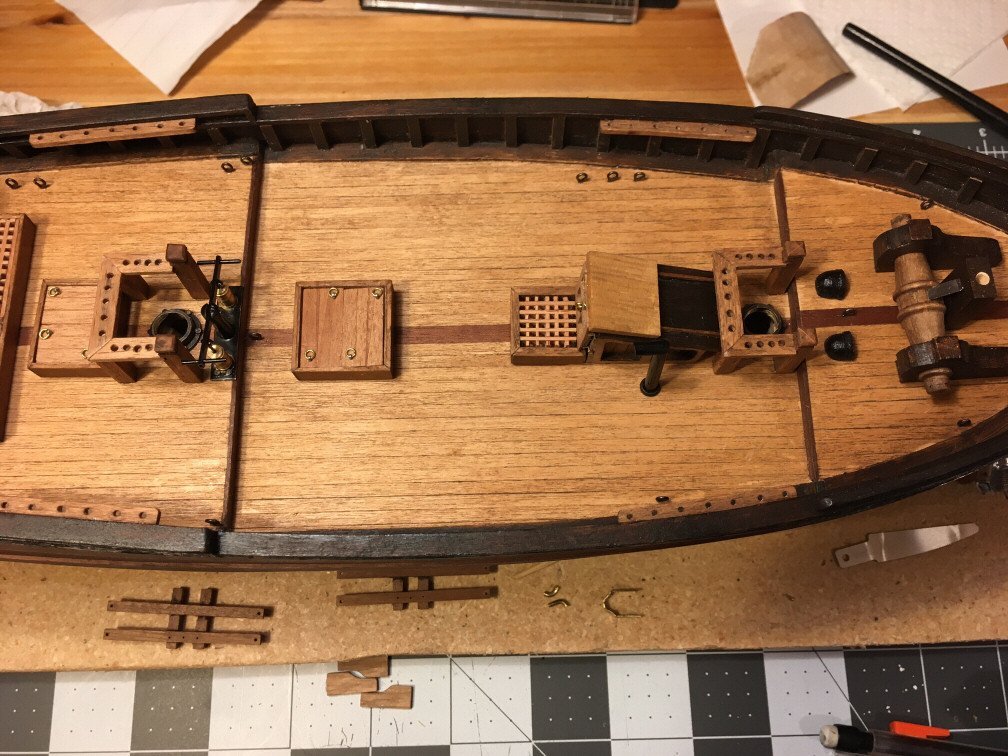
I increased the height of the galley stack/pipe thanks to catopowers picture
The masts are now in their right shape ( I hope )
Also thanks to catopower the ring at the bottom of the masts are added, though it should have holes for the "Pirate clubs" according to the picture but as they already are present I had to compromise by just adding the complete ring, in the Corel drawing it was more like 1/3 of a ring
- ccoyle, Keith Black and GrandpaPhil
-
 3
3
-
On 12/23/2021 at 3:35 PM, ahb26 said:
Welcome Jimmy. I found your build log yesterday and was amazed at the progress you have made in spite of difficulties. She looks great. I seem to favor small New England-built ships and Flying Fish is a beauty. I will follow your build with interest.
Thanks Andrew.
I looked into your build log on Emma C. Berry, very nice. Hopefully I can create something worth a place on the shelf
- Keith Black and mtaylor
-
2
-
Have been building on this for a couple of months now, this is my very first wooden model kit I am building and there are a lot of things to learn here and there.
Thankfully youtube exist where lots of tips and tricks can be found. However as this kit do not provide any building instructions at all, only a parts list which
does not describe all numbers, items can be out of scale, missing parts, items in the package is not for this model, lacking some wood and the drawings are not the best to follow and as it turns out in some cases should not be followed.
All this gave me more problems then I needed and I proceeded as best as I could. I have in mind to finish it, hopefully it will be a nice looking ship after all.
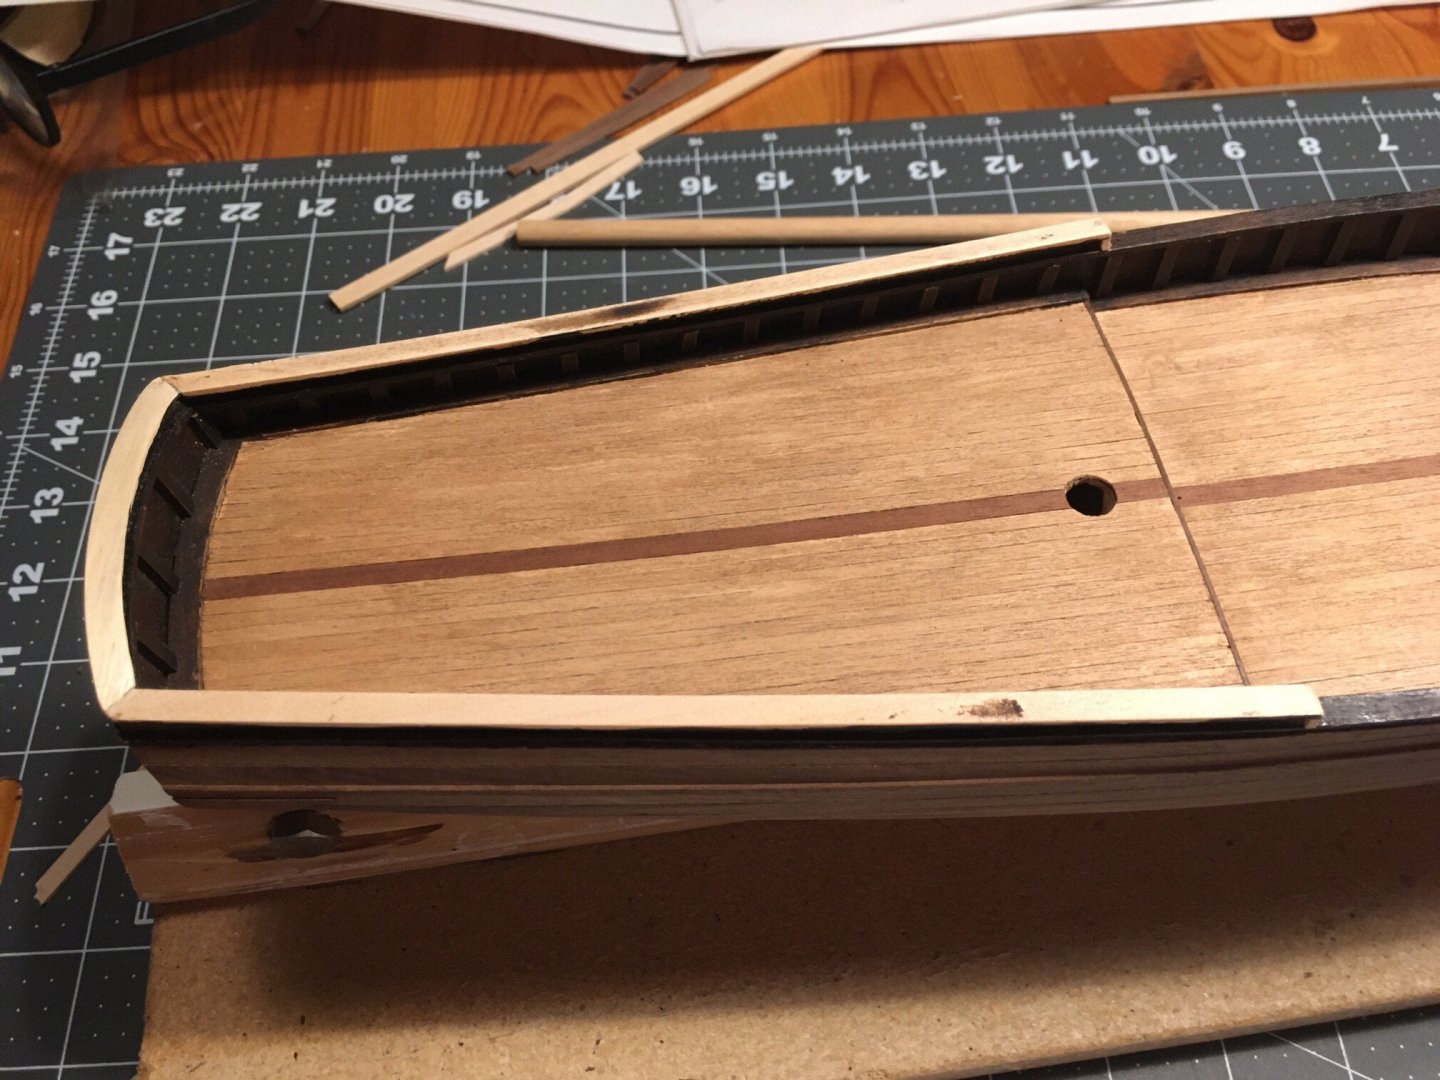
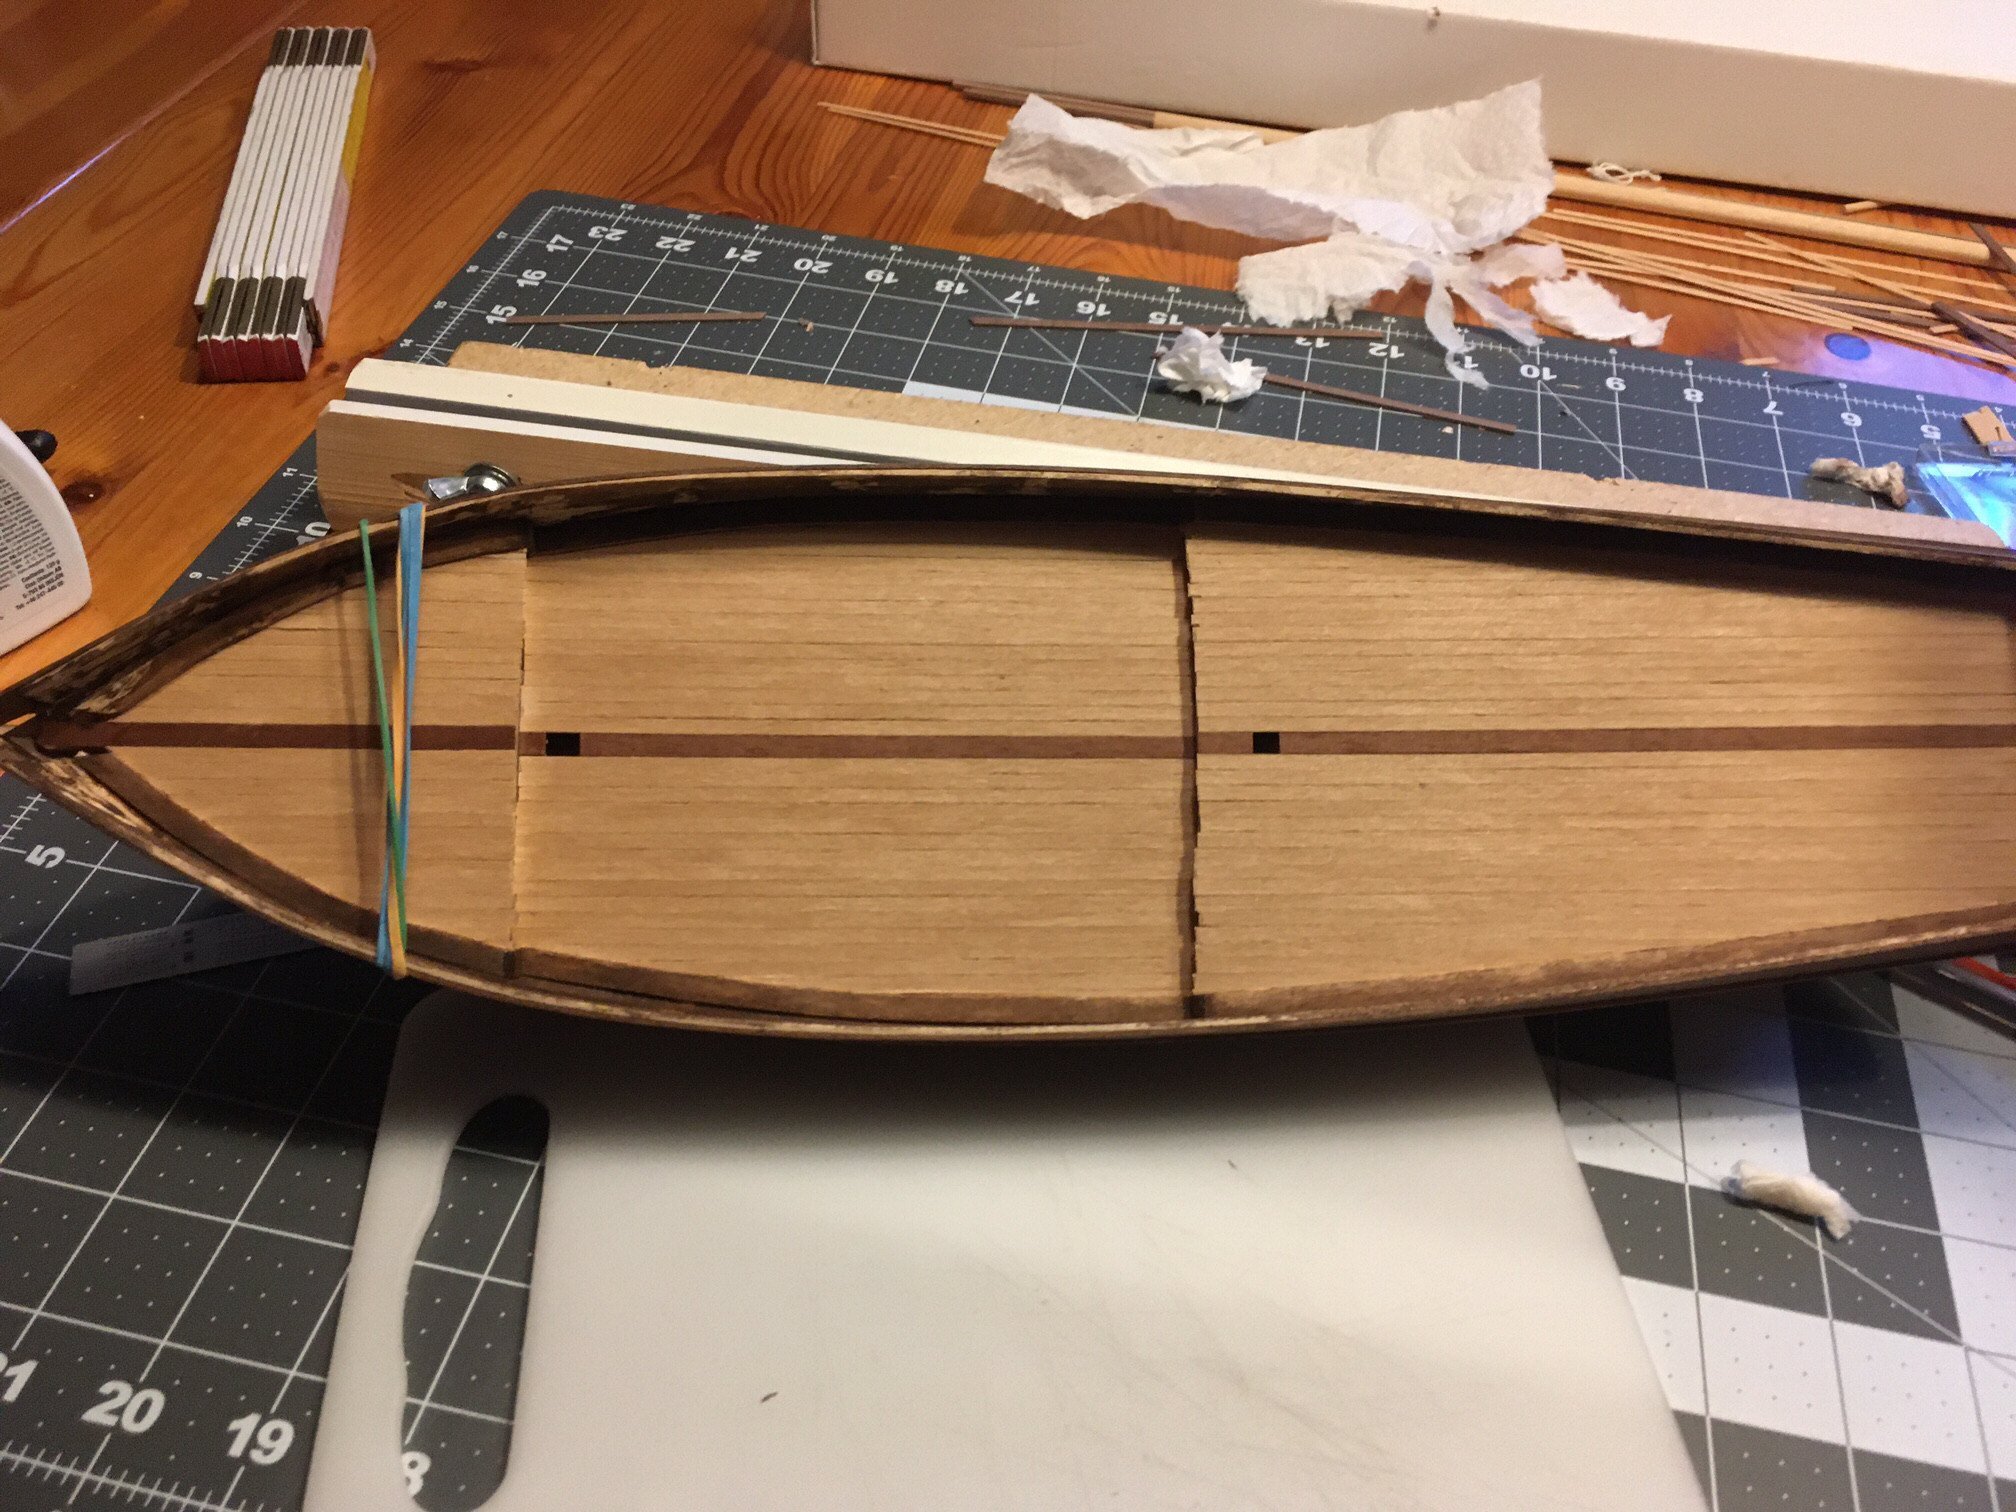
Second planking and deck planking on the way, a hole emerged in the hull but it could be fixed nicely with the second layer.
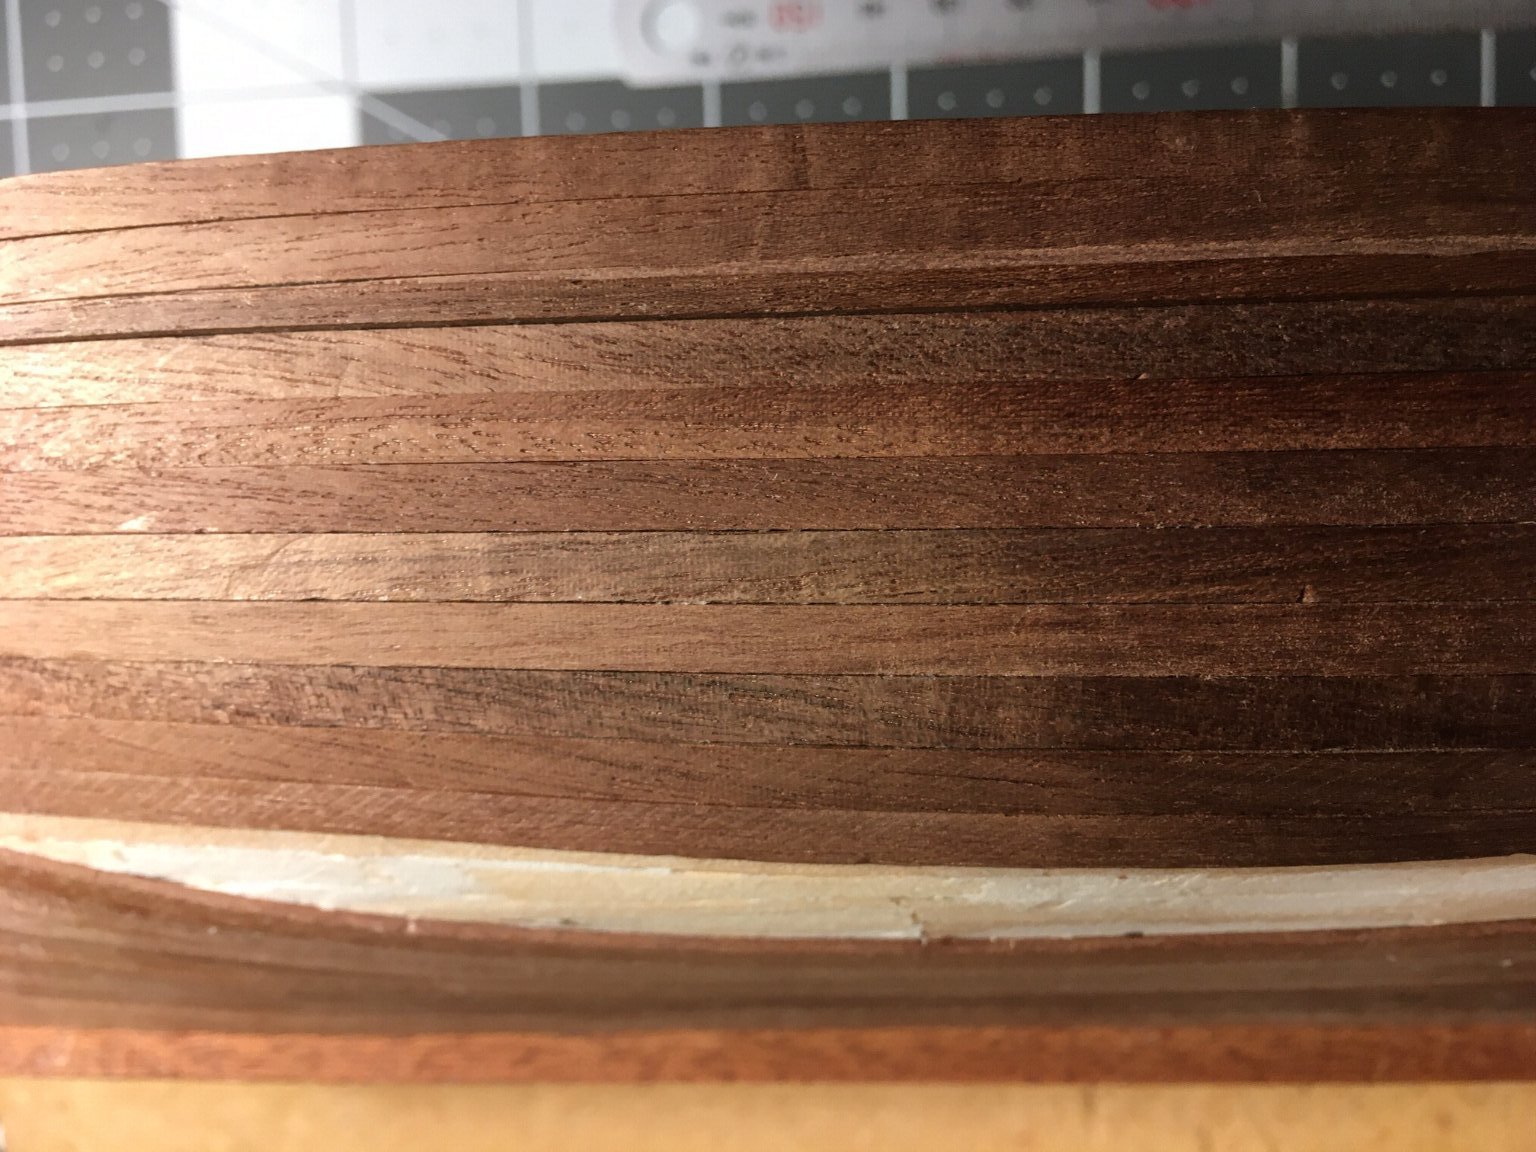
Second planking was done with 1x4mm Walnut

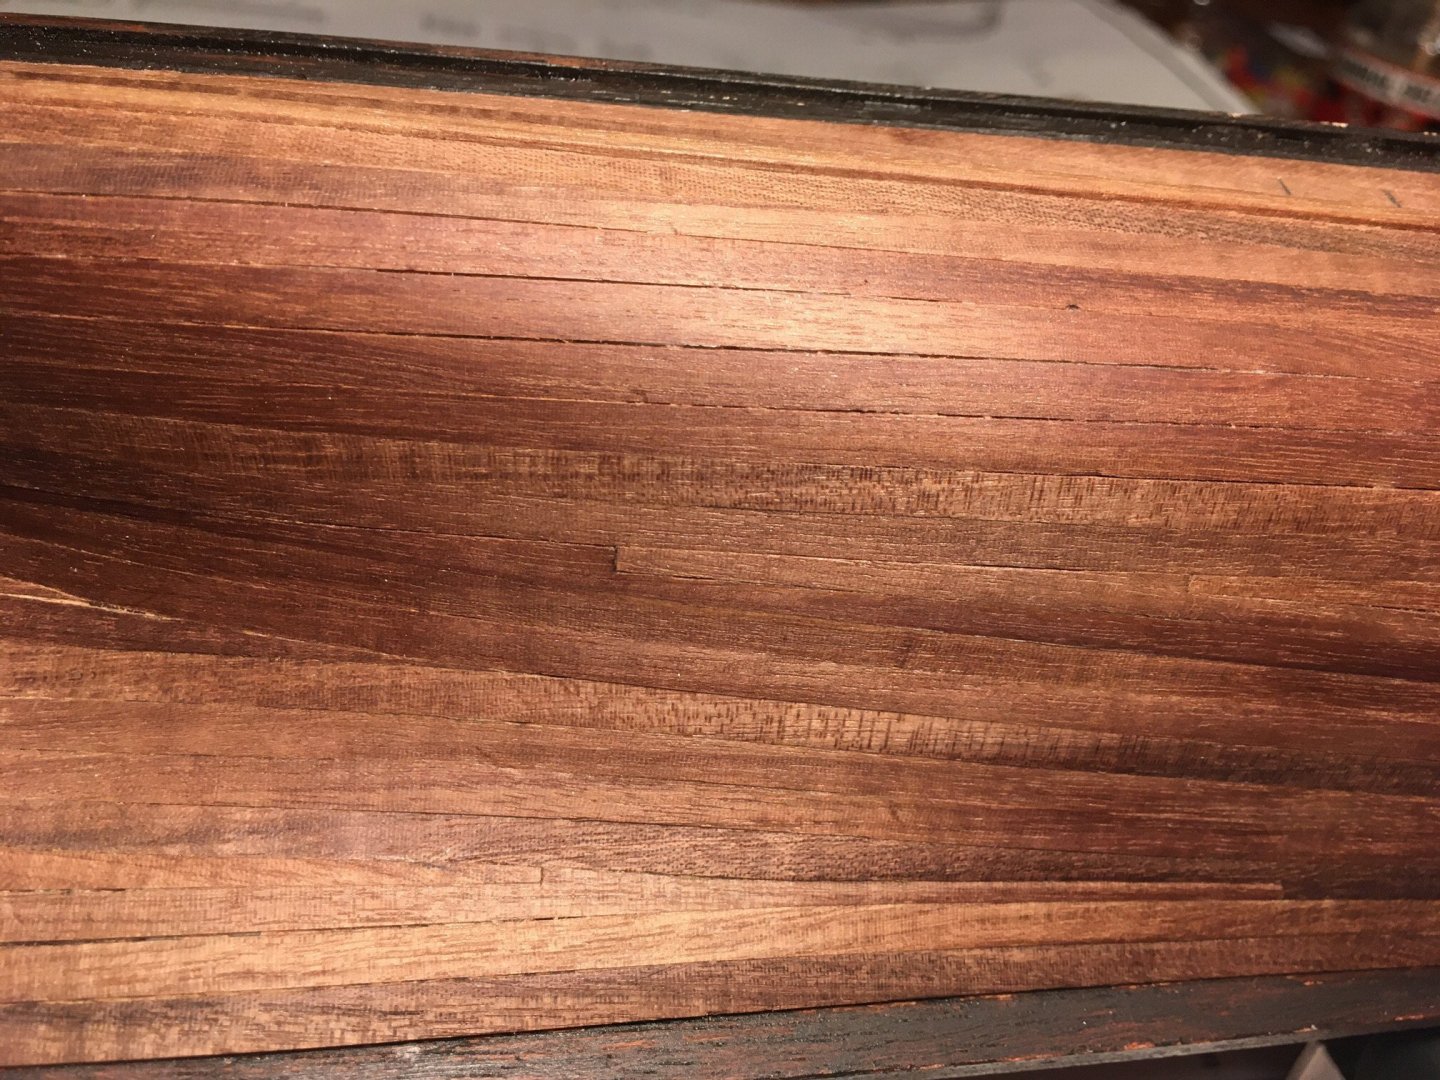
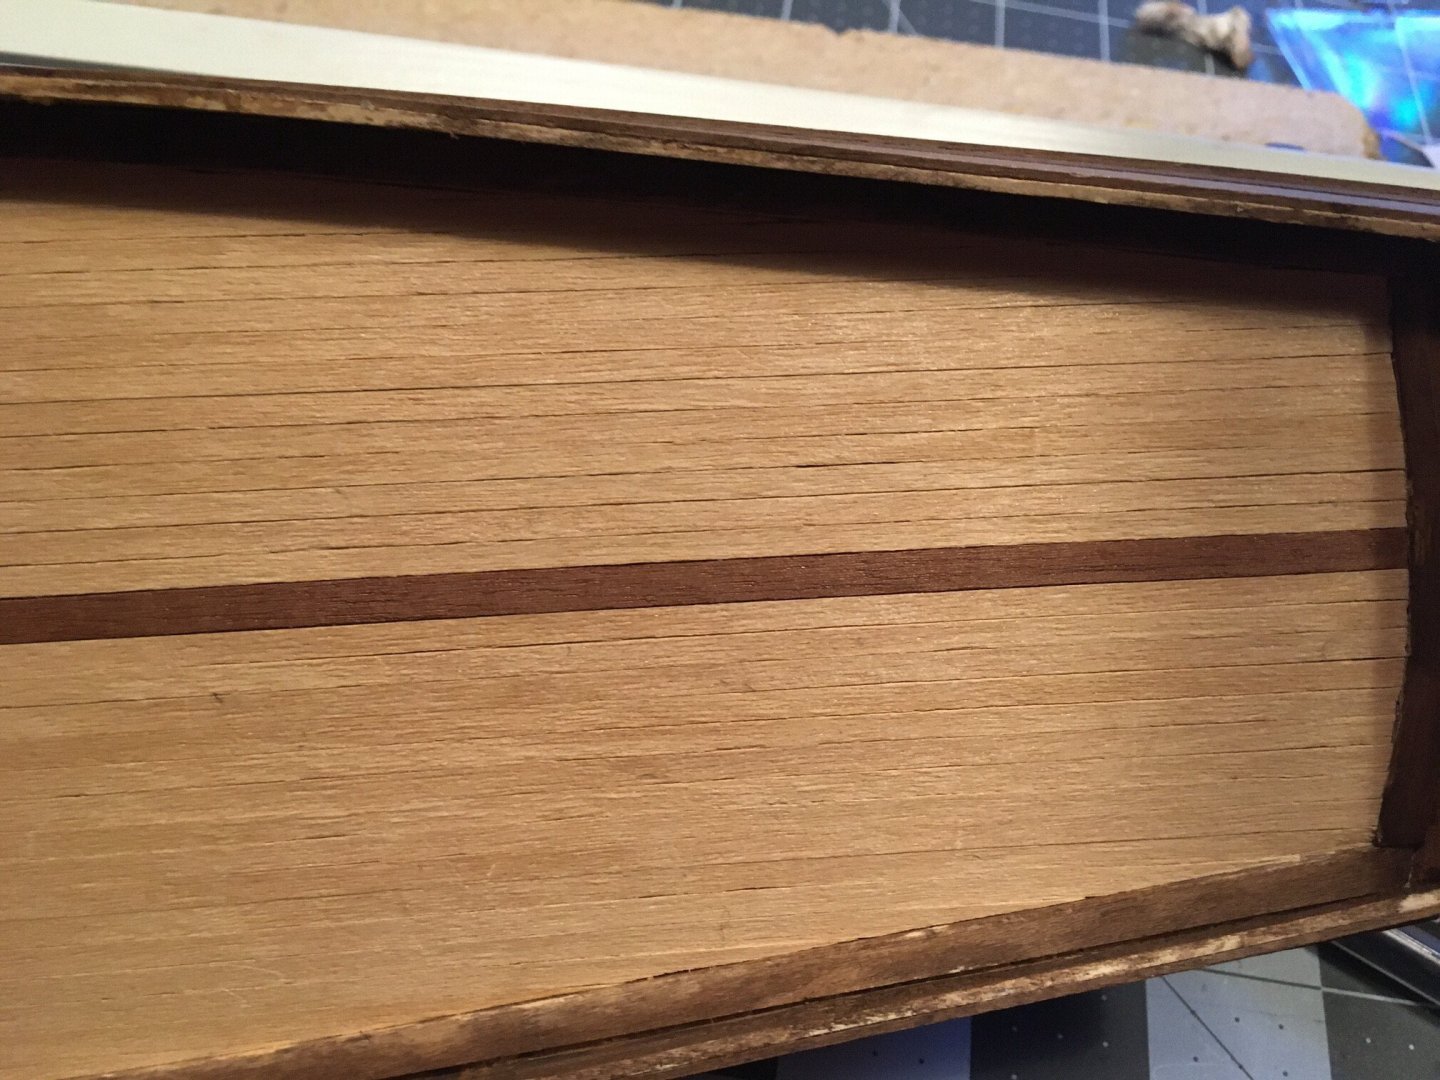
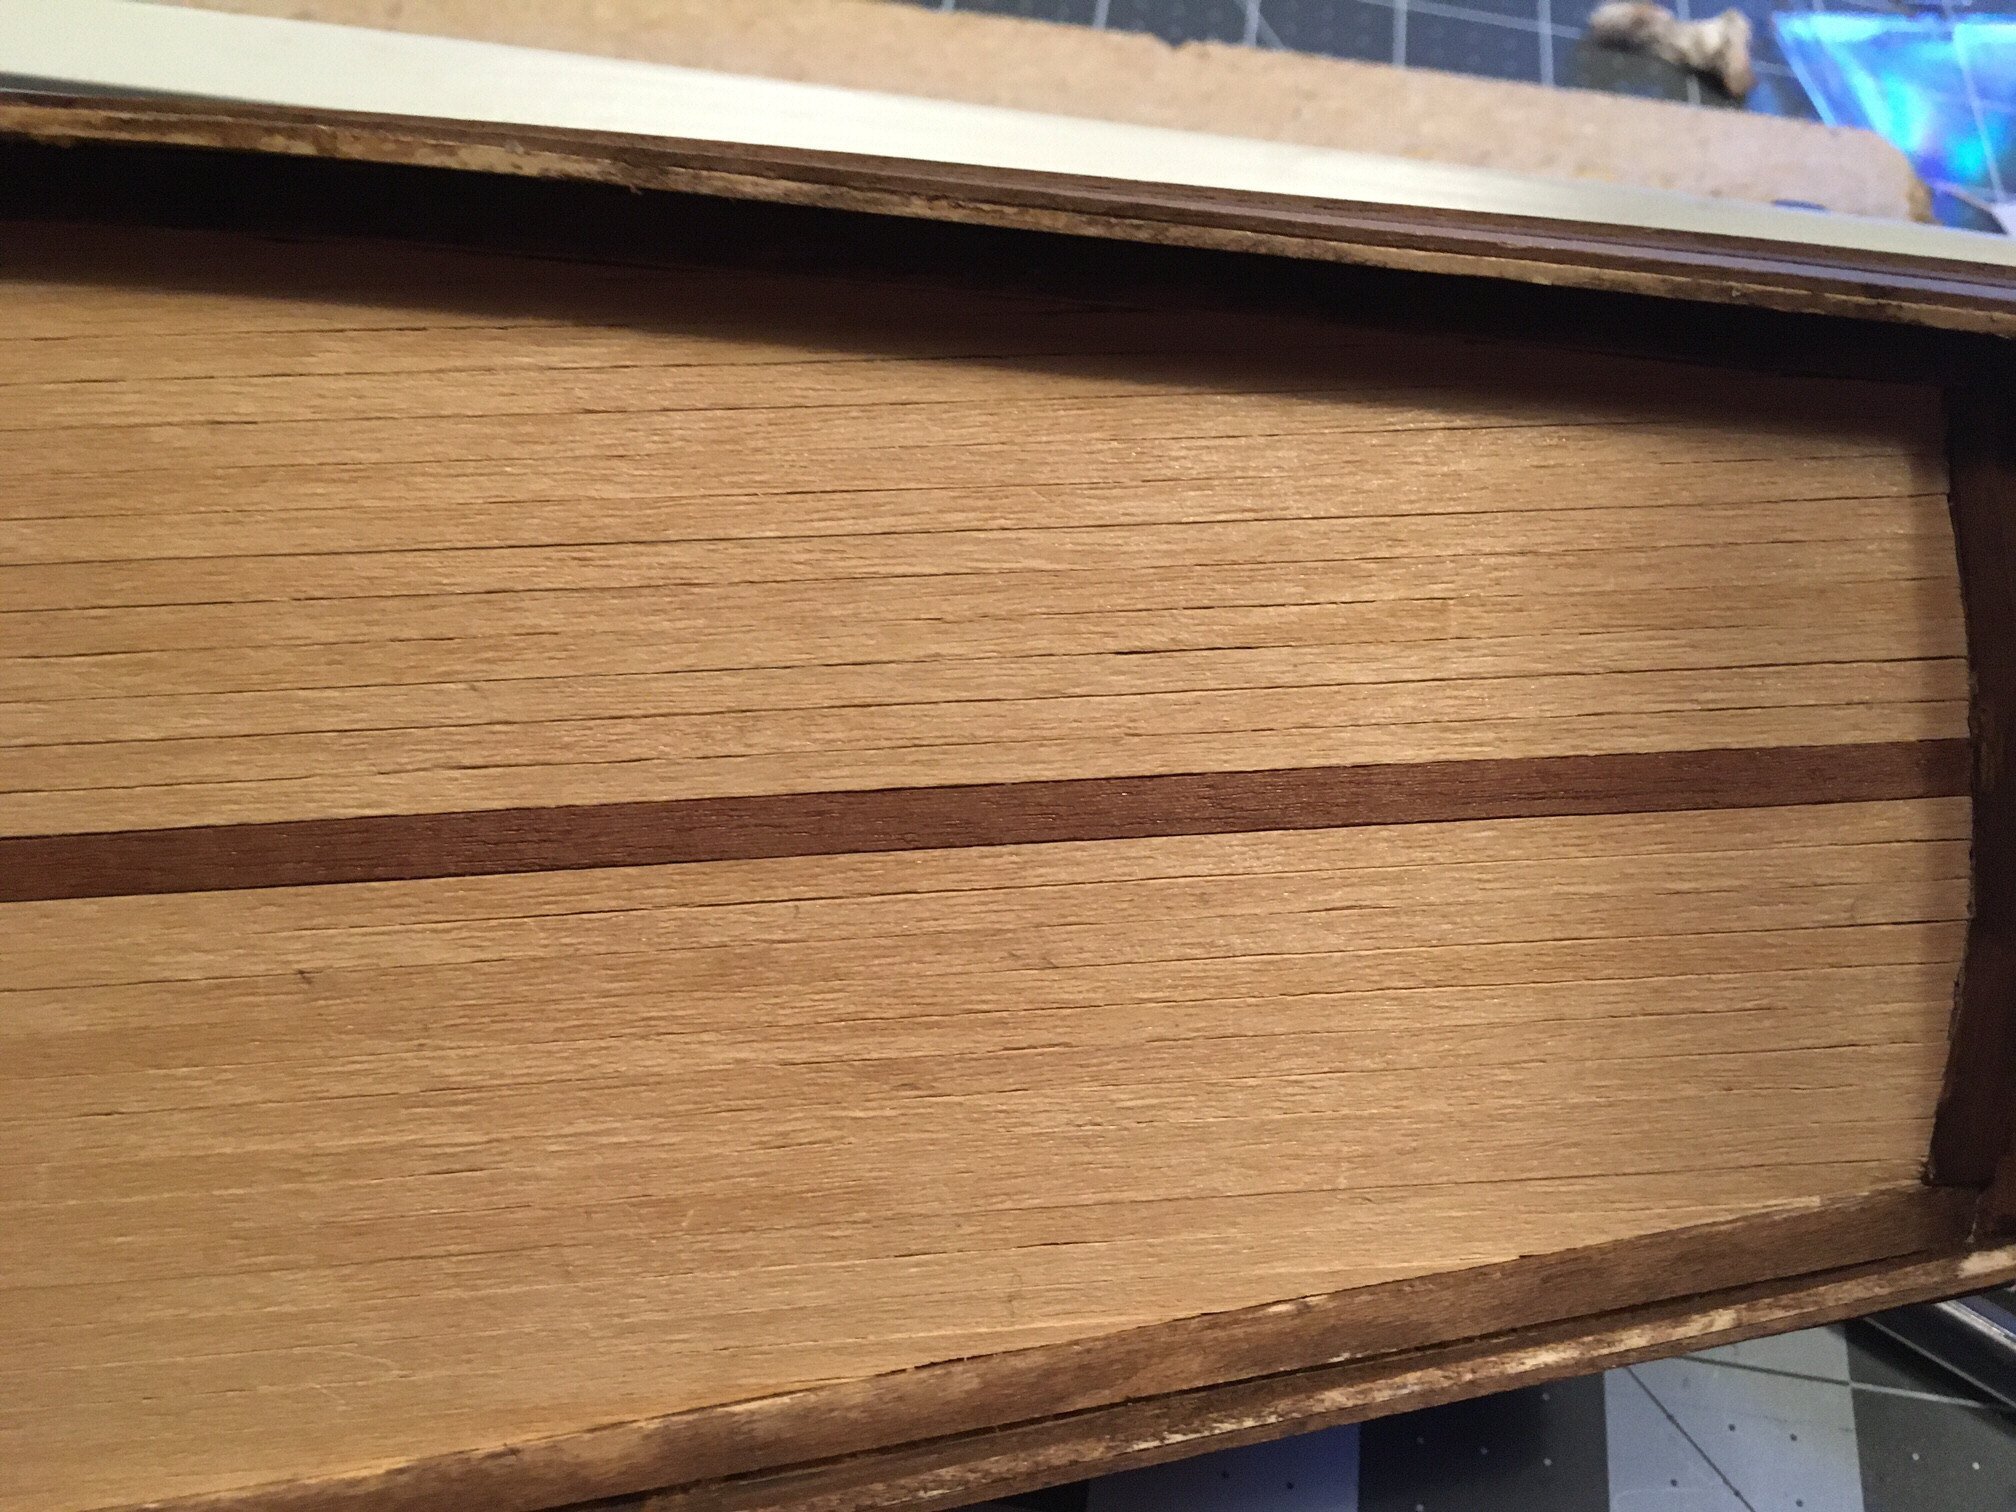
Deck planking Tanganika 0.6x3mm

In center there are a Mahogany board 0,6x5mm
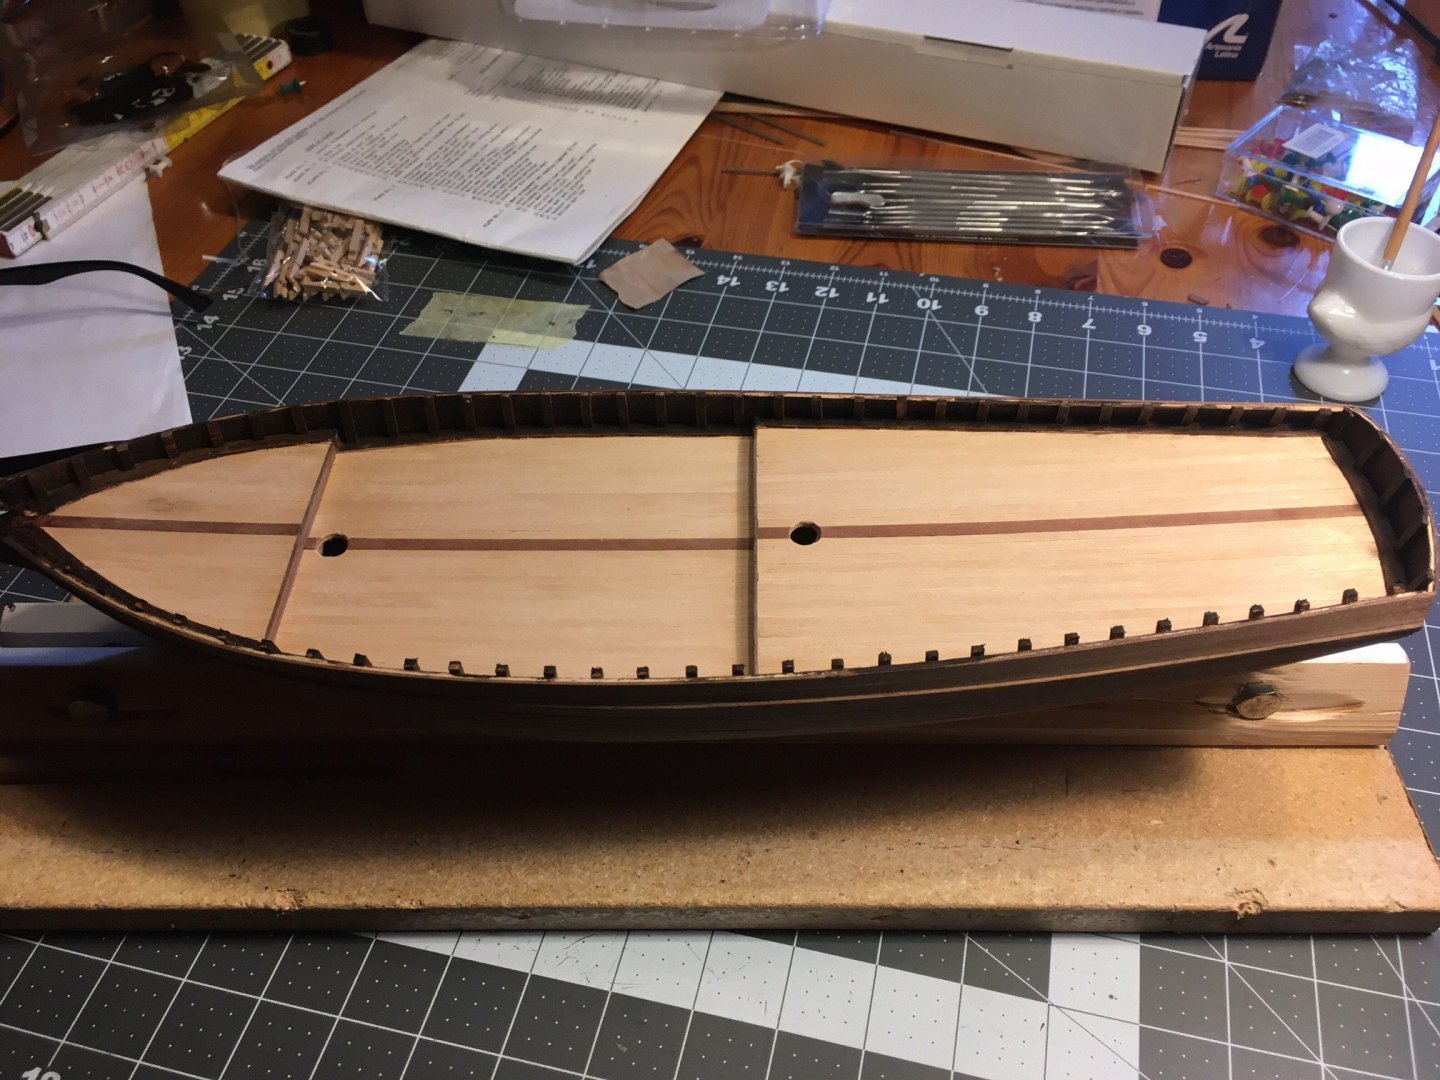

Starting to place the Capstan and Jibbom

This part was missing, I started making a new, found a brass screw and I thought "This will do just fine" after a while the grinding revealed that it was a fake brass screw, steel under the yellow skin.
It was Ok as I was going to paint it anyway, just a little tougher to work with 😊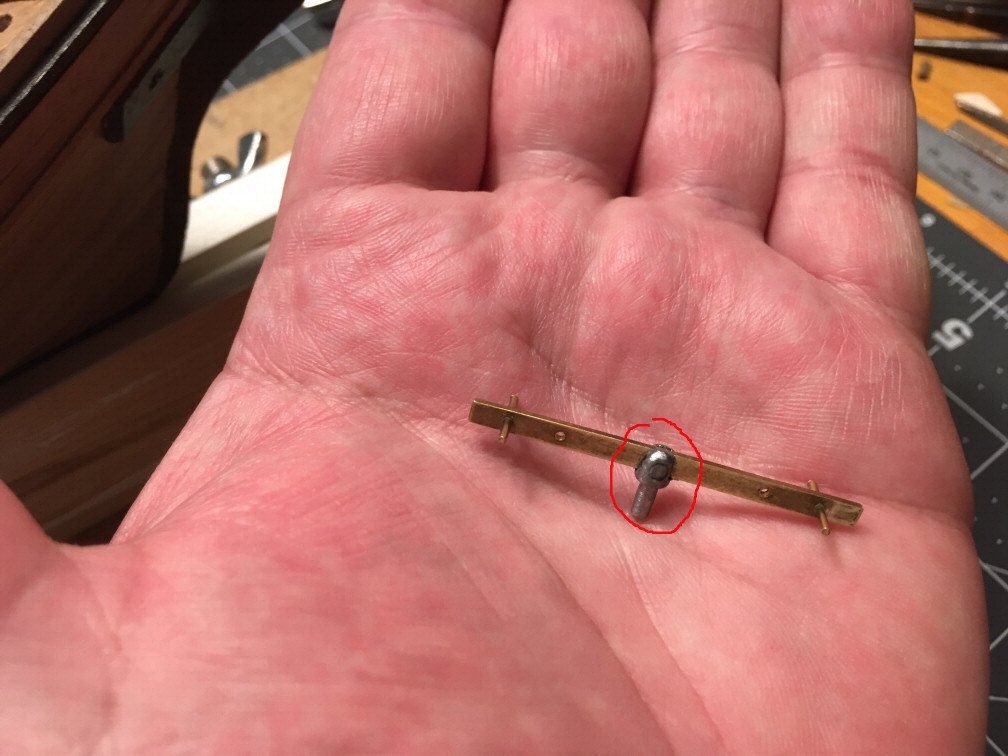
This part was also missing, made a new one from what I could find at home, oak.
Placed the railing in the fore

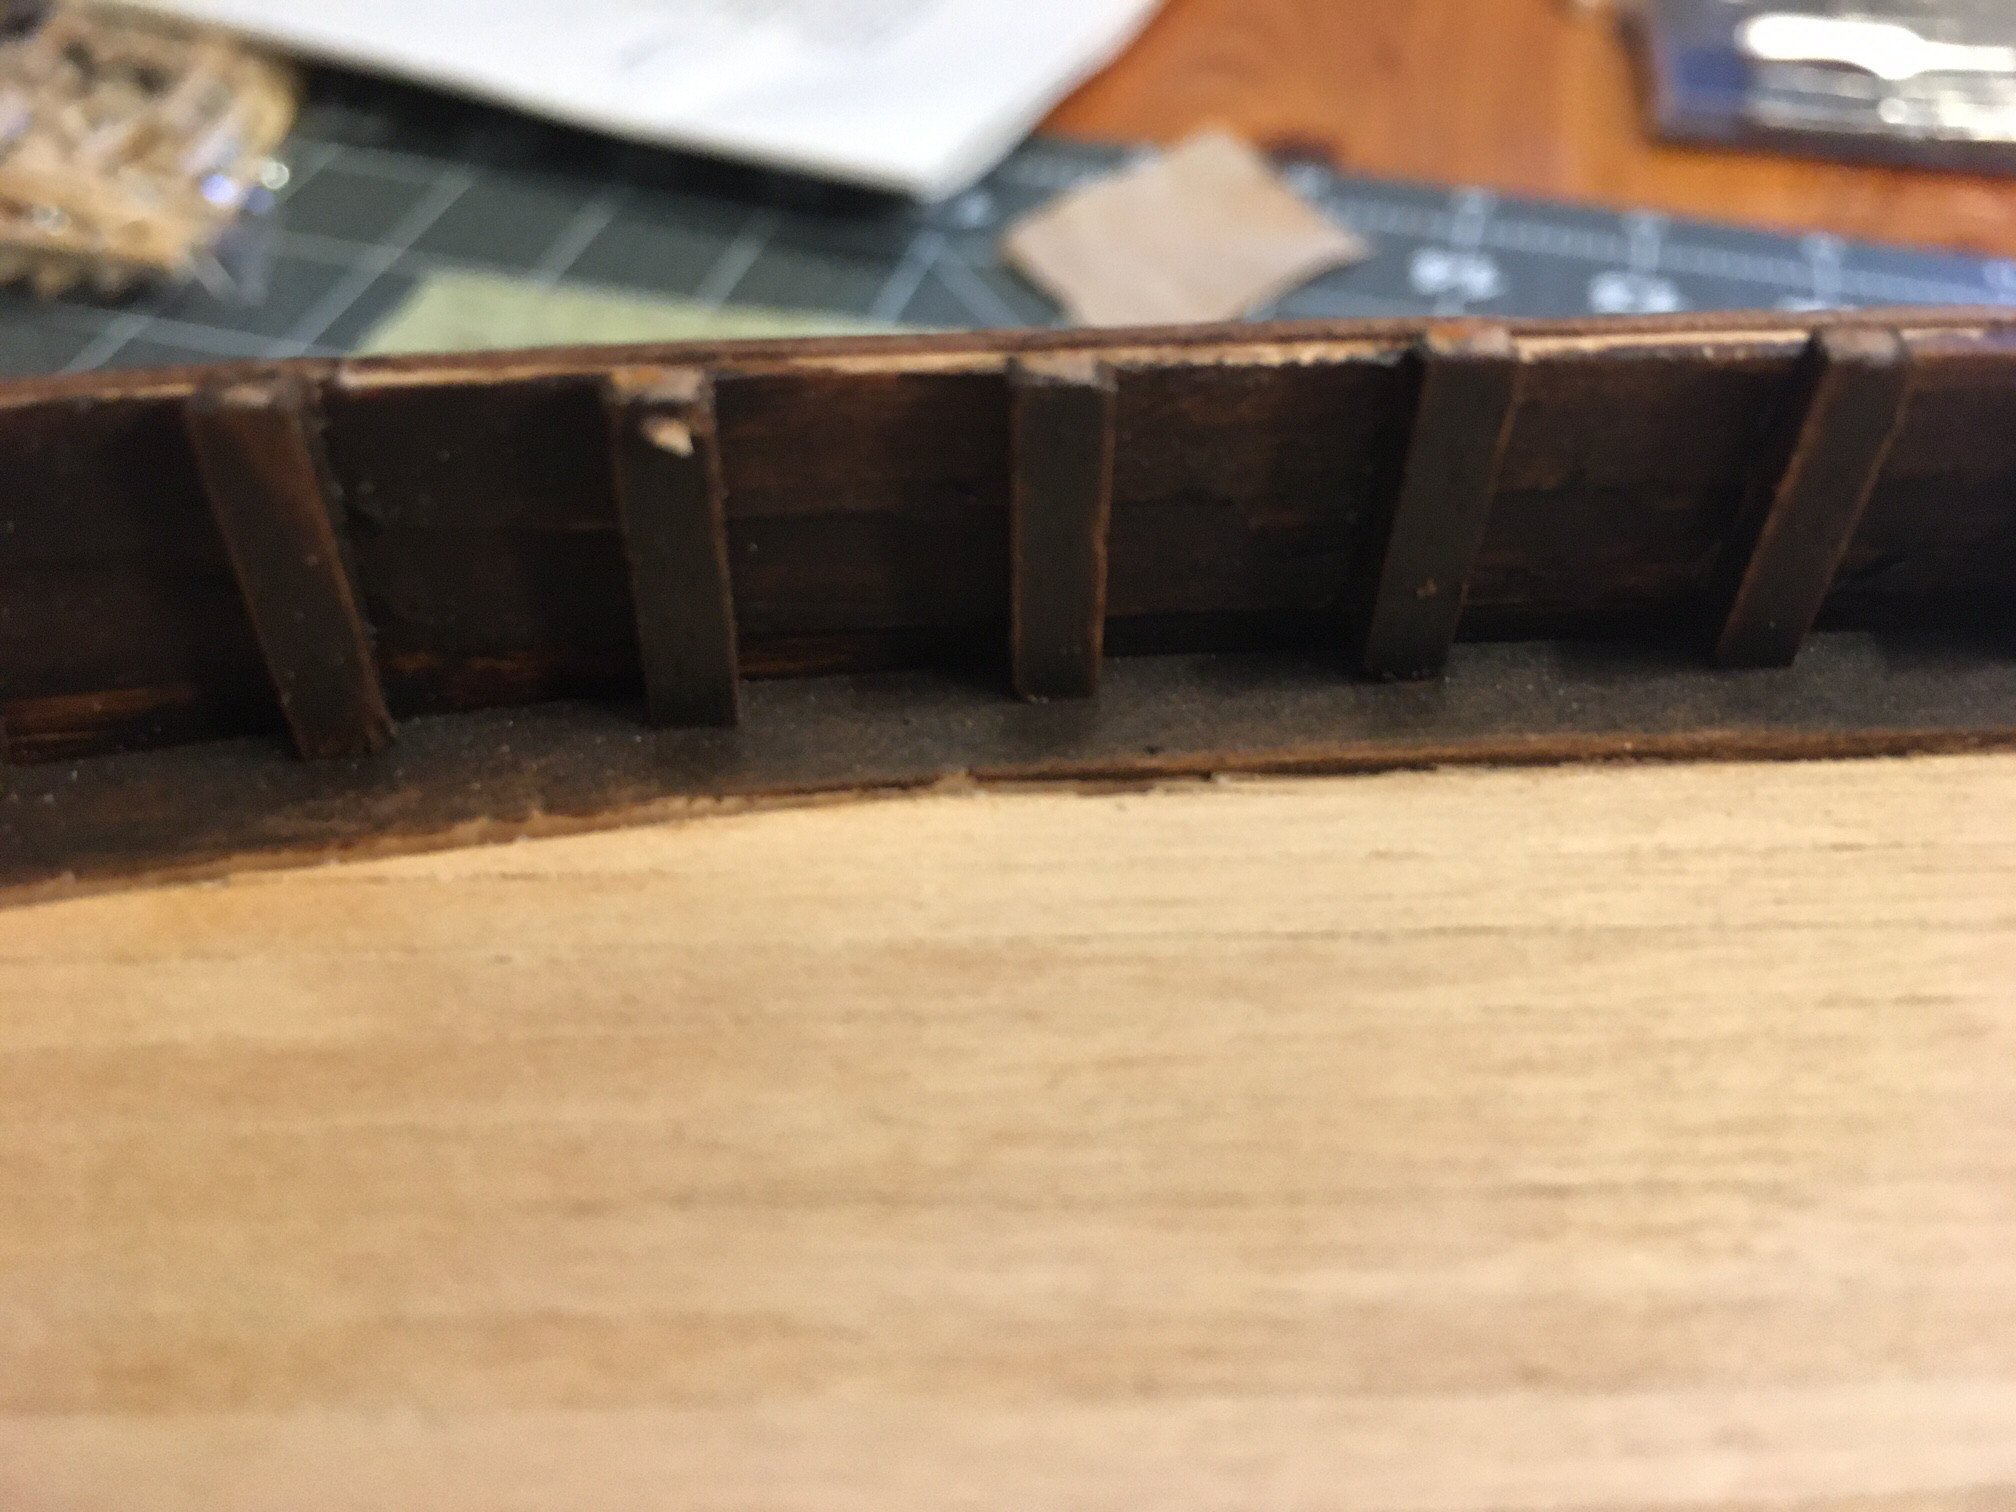
Placing the railing in the stern, yet another setback, according the part list and number on the drawing it was supposed to be made from flexible birch, I was missing around 4-500mm of that so I had to use hull planks from layer 1. Also this flexible birch was not wide enough 5mm. It should have been 6mm to ensure that it was a little bit wider then the hull, now it is just as wide.
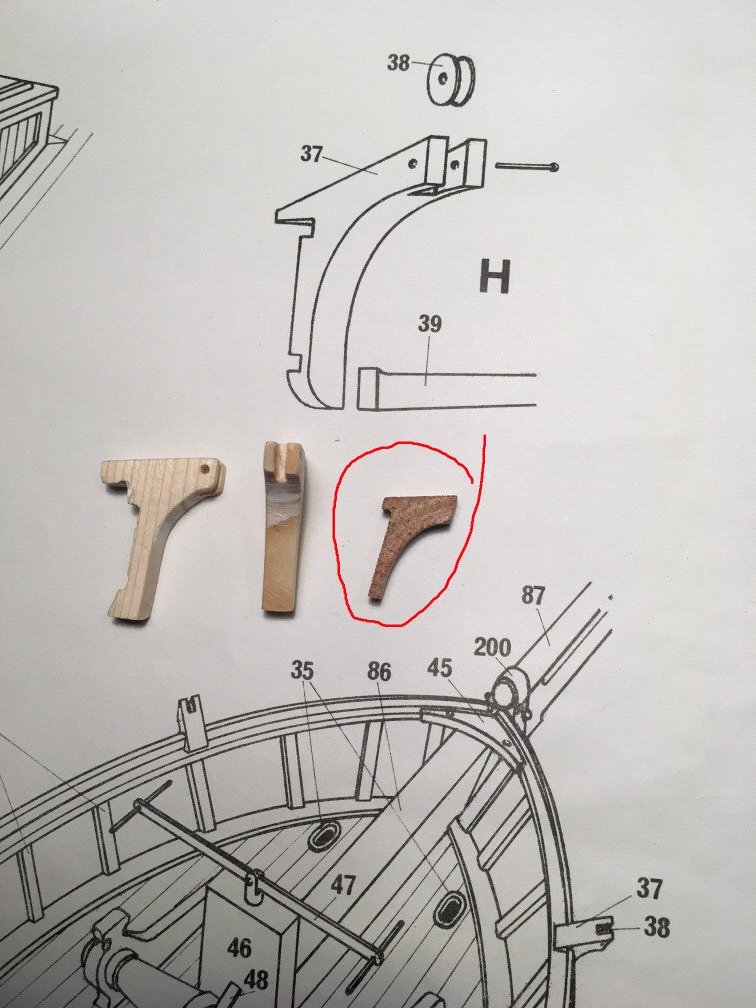
Here is another piece that was impossible to use, out of scale, made new ones.
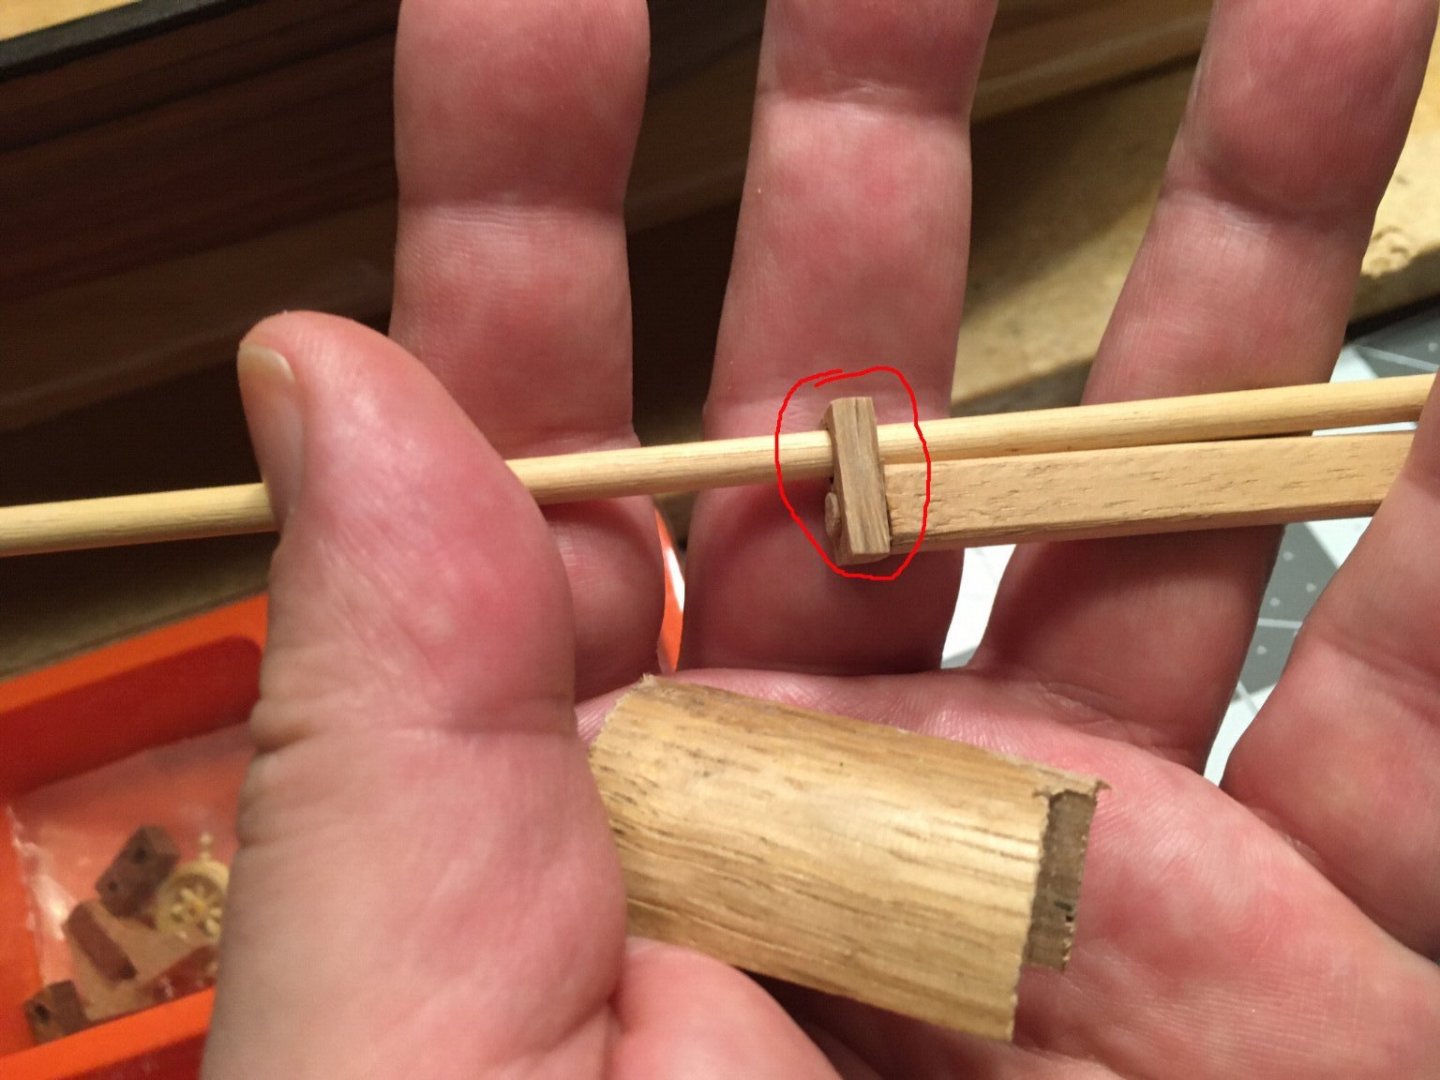
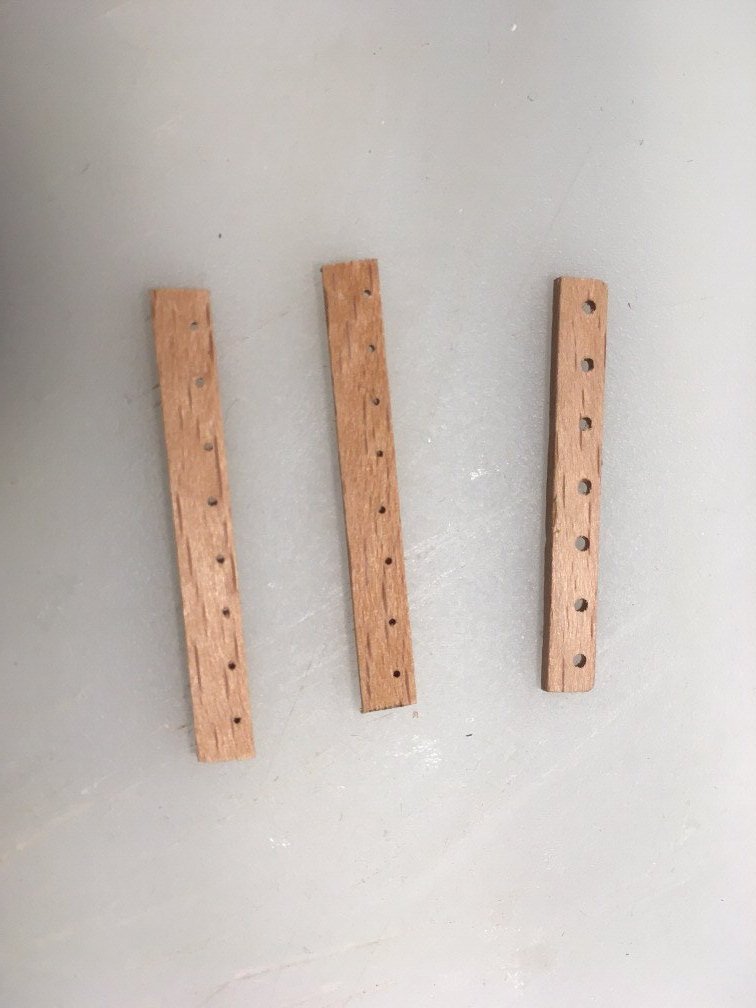
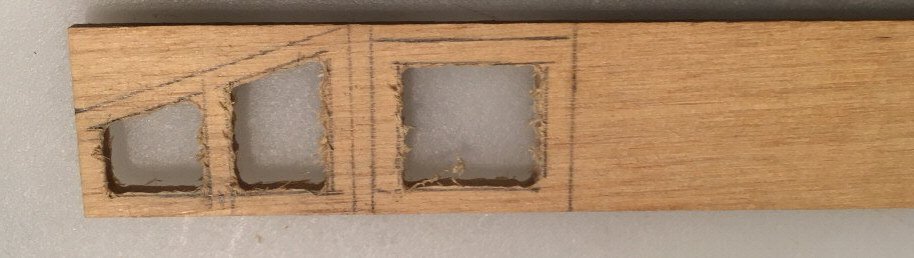
This pin rack should have seven drilled holes, did my math and started drilling, I really must have enjoyed the drilling itself as when I was finished I had eight holes.
Did the math once more and now I got seven holes
Building the fore deckhouse
More deck items

Note: The Items are not fixed yet

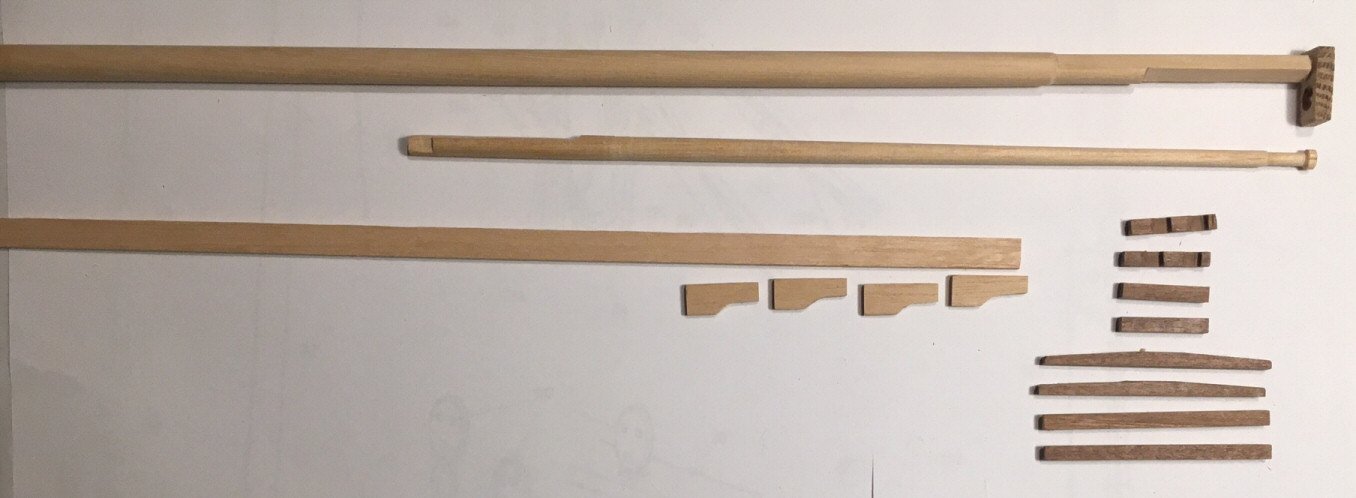
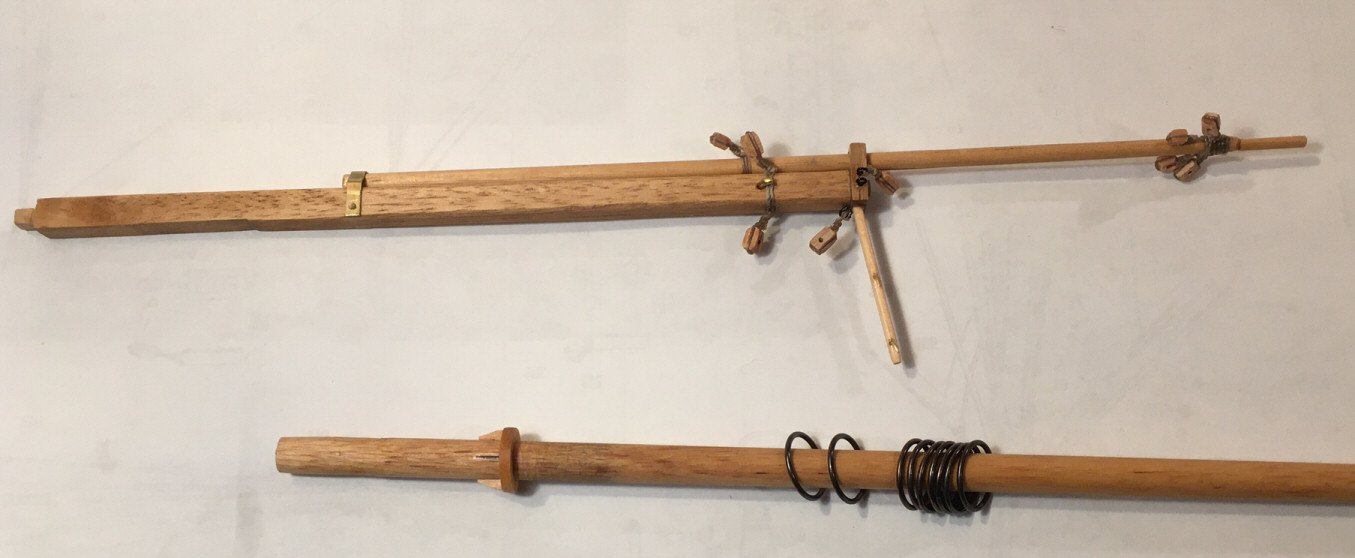
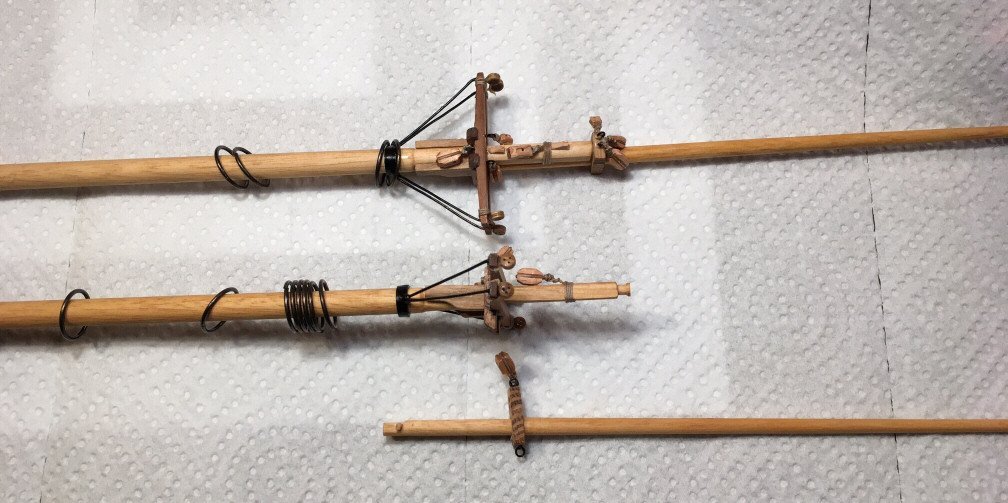
Then I started to look closer on the two masts, I needed to have some kind of grinding station so I can make them conical.
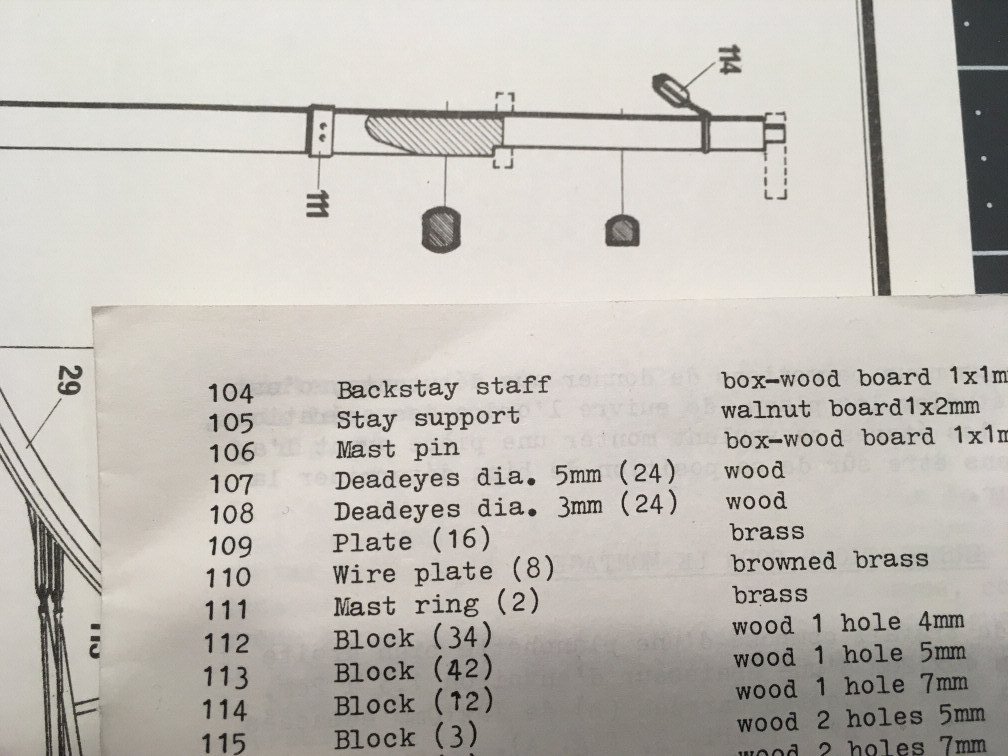
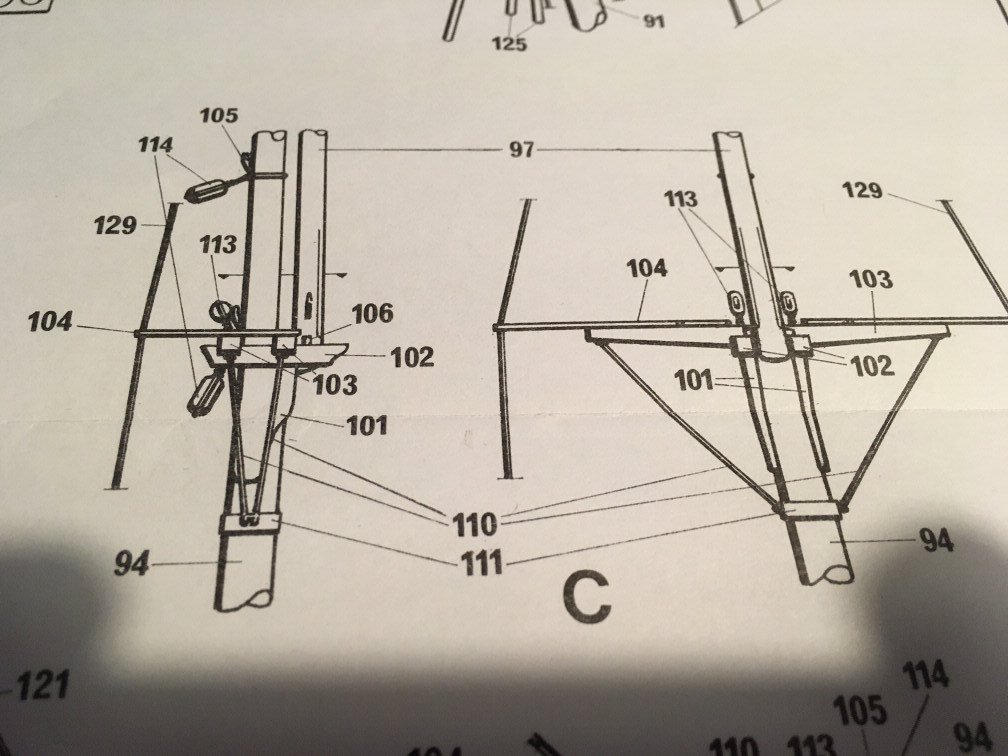
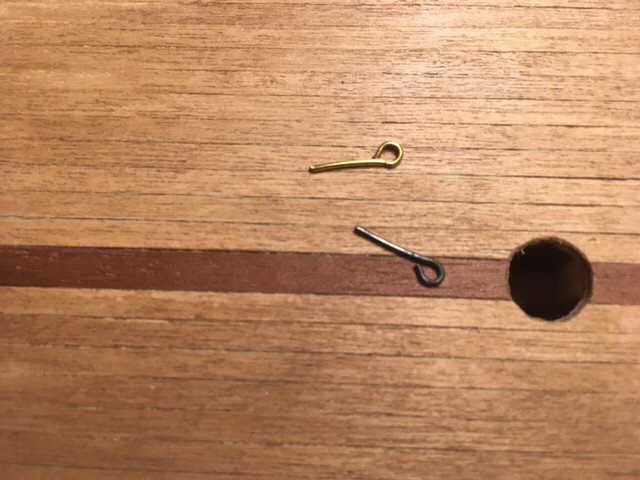
This is build now and soon I will start with this job, but when I was looking at one drawings I found that 2 brass ring to be placed on both the mast also in the part list (pos 111), they are both missing. I have ordered two brass pipes 9 and 10 mm so I can make both this rings.
Then there is something attached on the mast-rings, (pos 110 Wire plate, browned brass), also is missing.
I cant make out what they are, could a round brass piece work? If so, which diameter should it have approx. or how should it look?
- GrandpaPhil, ahb26 and Keith Black
-
3
-
4 hours ago, Dave_E said:
Welcome Jimmy! 🙂
Glad to be here Dave. Thanks
- mtaylor and Keith Black
-
2
-
6 hours ago, allanyed said:
Super warm welcome to MSW. The diversity in home locations of our members never ceases to amaze!
Allan
Thanks Allan. The digital world really shrinks the earth, so far away but so close
- mtaylor and Keith Black
-
2
-
7 hours ago, Backer said:

Thank you Patrick, made a quick visit on at your Wasa build, looks nice. One day maybe
- Baker, Keith Black and mtaylor
-
3
-
20 hours ago, thibaultron said:
Welcome!
Thank you Ron
- Keith Black and mtaylor
-
2
-
4 hours ago, mtaylor said:
Welcome to MSW and a great hobby, Jimmy. Good on doing a build log as it's the best way to get help and advice and meet others.
Thanks Mark
- Keith Black, mtaylor and thibaultron
-
3
-
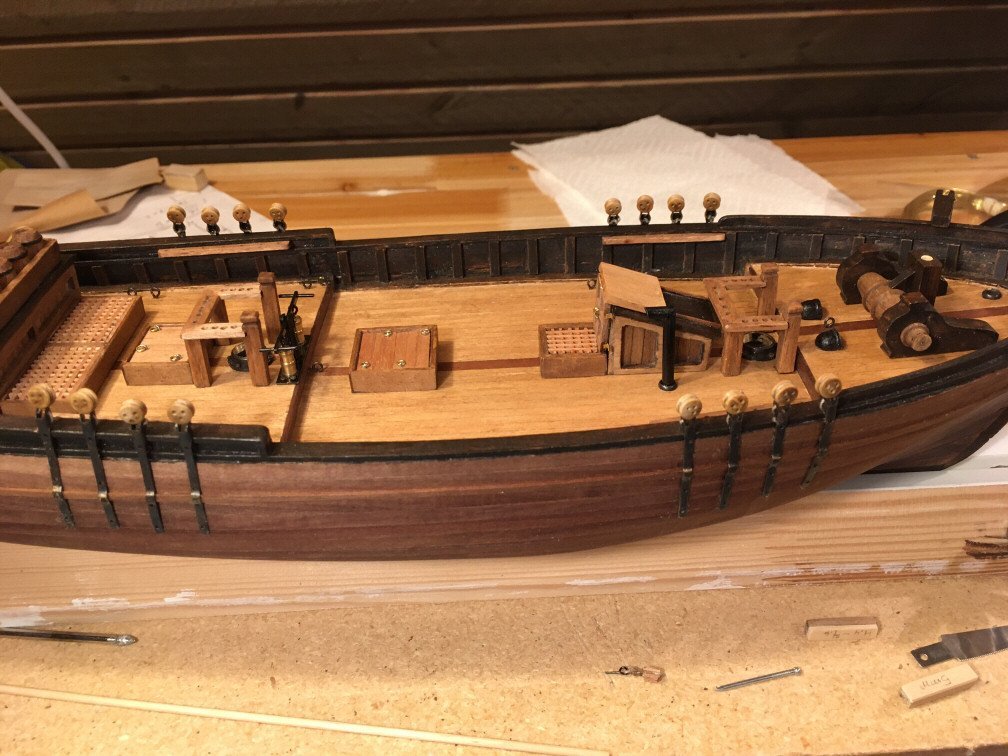
That was really a big difference with the anchor details and all around it actually, thank you very much. Unfortunately I glued the small black anchor chain covers on the deck earlier today and I also made a hole in the deck where they are placed. Maybe I can still improve some of the details there
This is how it looks today, none of the deck furniture is glued on place yet. And yes it seems like it really is the Flying fish

- ccoyle, catopower, Keith Black and 2 others
-
5
-
Hi All
And thank you very much for the welcoming and advises.
I will soon try to create a build log here for my model as I already have another question and guess more will come
BRJimmy
- thibaultron and Keith Black
-
2
-
15 minutes ago, catopower said:
Hi Jimmy, All, l
Let me add that Ronnberg shows that the anchor chain is not run belowdecks at all. Rather, there is a chain box on deck next to the forward companionway hatch, on the opposite side of the galley stack.
I was going to send a photo from the book, but I have to run out to a work appointment right now. I'll do so when I get back.
Hi.
I saw on another ship that Keith posted here, there the Anchor chain was not running over more then half of the ship as you speak also of, I have already changed that as I belive that makes sense instead of having a chain all over the ship smashing things to pieces- catopower, Keith Black and mtaylor
-
3
-
2 hours ago, ccoyle said:
Jimmy, you are experiencing the joy of discovery -- the joy of discovering all the niggling little foibles in this particular kit. Corel have a good reputation as a kit manufacturer, but it is my sincere belief that when it comes to their products, you get what you pay for. Their expensive kits get rave reviews, and their less expensive kits, like FF, often appear to be crappola grande. In the case of FF, they tossed in a lot of off-the-shelf fittings that are either period-inappropriate, out of scale, or both. You can see my version here. I took many liberties with the kit in order to make it somewhat representative of a West Coast bald-headed schooner. BTW, I ran into some of the same difficulties you have described, e.g. the round stern, which the kit instructions do not describe at all. I actually wrote a rather unflattering review of this kit on another now-defunct forum.
It really is not much fun to work on a kit that frustrates rather than rewards, and I would hate to see your enthusiasm for the hobby wane simply because your kit is a bad design. As I said in your other thread, don't hesitate to set this one aside if it gets too maddening. Kit design and manufacture has come a long, long way since FF was produced, and there are many excellent kits out today that are designed specifically for beginning modelers -- and they can actually be built.
Cheers!
I see what you mean ccoyle, it is just my normal bad luck as got this model, but as I said earlier I think it will be a nice looking schooner done by a novice when it is finished. I have no intention of giving up on this build even as set backs comes here and there, the latest today when I found our that there are missing 2 brass rings to the mast. My major problem with this kit is actually what am I building. Is it really the Flying Fish? I should have had the manual that catopower told about earlier in this project
In a way it will be a good learning object for me even if not the easiest one, learning many things envolved in this hobby this is how I treats this kit now.
Thanks
Your FF version is very nice looking.
- Keith Black, mtaylor and ccoyle
-
3
-
12 hours ago, catopower said:
Jimmy,
I have to say, I'm really impressed with what you've done so far. When I read that this was your first wooden ship model kit, I did not expect to see such a nice job with the woodwork.
I worked on this same kit a LONG time ago. Unfortunately, I don't have any photos of the model.
What I do remember is that in appearance and deck arrangement, the kit follows very closely to the drawing of the ship in book The American Fishing Schooner, 1825-1935, by Howard I Chapelle (pg 95). Now, some people say Chapelle's deck arrangements can't be trusted. But, lacking other information, I see no problem basing the construction on it. And, it seems pretty much what Corel based their kit on.
The only flaw that I see, is that I believe that Corel mis-interpreted the plan and put in a raised forecastle.
Anyway, if you can get access to a copy of this book, there's a large amount of detail information – pretty much the entire second half of the book.
Also, I strongly recommend the instruction book put out by BlueJacket, Inc, for their book Gloucester Clipper Fishing Schooners, which is used for their model kit "Smuggler". It should be available separately from the kit and is an excellent source for model details on this ship type, though it's for a ship from 20 years later. Still, it was by Erik A. R. Ronnberg, Jr., who has a lot of background connection on the subject.
Edit: I just found it on Amazon.com for $15 here.
By the way, both Chapelle's drawing and Ronnberg's drawing show the charlie noble or galley stack similar to what you have now on your model. So, unless you have actual information that's better than these sources, I wouldn't change it.
Good luck and keep up the nice work!
Thanks catopower
That seems to be an excellent advise with the Gloucester CFS. However I am afraid that maybe I have come to far with the build now as basically all deck items is done (not nailed in position yet), shipwheel in the stern is left and the holder to the wheel (whatever name it has, shipwheel holder maybe ) is out of scale so I must make a new one else it is done. I have some building left in the fore on the outside else it it is more or less time to place the masts that I will turn/grind down to somewhat correct measures. I am about to create a build log for my model and have questions to ask about the masts happy to receive good advise when the build log is done and you will see how far (or not) I have come.
- Keith Black, mtaylor and catopower
-
3
-
Last weekend I joined MSW and would like to tell a little about myself.
My name is Jimmy and I was born and in Southern Sweden for 62 years ago where me and my wife still lives.
Model building I guess is probably like the most of you here, an interest that started when I was a boy, though back then
it was the cheap plastic models that I did and as I came from a not wealthy family there was only a few of them.Over time the interest faded but it never vanished completely and 12 years ago it woke for a short while when my wife bought
me my first wooden model "Flying Fish 1860", I was not well equiped then so I just did a little on the ship then it was hidden away
somewhere as I was not really ready for it.Around 7 seven years ago another of my childhood interest really came to live, Universe and astrophotography.
I bought some equipment and started and loved it. Though during summer I can't do anything with this hobby if you don't like to engage yourself in the sun.
So 2 years ago I expanded the photography to animals and nature so I can keep myself busy with that as well, I am at amateur level and will keep it like
that. The hobbies are excellent during Corona escpecially for me. Normally I would be rather occupied with astrophotography now but the weather is certainly not
getting any better here. I started a counter last autumn on my website and that counted 92 days without a whole clear night. The counter has been active this season as well and today I have reached 97 days without one chance to carry my equipment outside, so this hobby is very tough right now for me and I feels the interest is slowly fading.As tha AP hobby is not giving me anyting atm a couple of months ago I remembered the "Flying fish" model and the interest woke again. I have now got myself tools and what I needs to complete the ship. I guess I will ask questions now and then as I am totally new with this kind of modelbuilding. And this ship is maybe not the easiest as a starter.
A little fun info is that my working life started at Oersundsvarvet as a trainee/apprentice ( don't know correct term ) on a 3 year school education to be a shipbuilder Oersundsvarvet is/was a shipyard located in Landskrona that build rather big ships, 123000DW, my education was actually sheet metal worker (thick plates
) and welder. My 2 older brothers also was on that school but another direction, one of the became a mechanic and the other a plumber. Oersundsvarvet large ship building time ended 1982. Actually yesterday I found a website about the ships build on the shipyard, it was odd to find that those large ships build when I was working there 1975-1980 is in use no more and has been cut down into pieces, some of them sunk, 25-30 years lifetime on a 123000DW ship.
I still work 40 hours week but are not sure for how much longer, as my work today is in an office and Corona hit us all, I have been working from my home since soon 2 years now. For me personally it is just fine as I am that kind of person that really do not need so much social contact.
So there you have it a little bit of my and my life.
- druxey, ccoyle, thibaultron and 8 others
-
11
-
17 hours ago, mtaylor said:
I was thinking what Keith thought about the stack. Some did swivel but you'd never, ever want one set up for the wind to blow into it.
Kit technology and research have improved very much. The older kits, particularly cerain manufacturers, never bothered to put much time into research for a kit. Just follow the advice of the build log and give it your best shot.
Mark, I will try to do this hoping for the best
- Keith Black and mtaylor
-
2
-
23 hours ago, Keith Black said:
Jim, I like seeing you're going to push through regardless.
Please take a moment to introduce and tell us a bit about yourself in the New Member Introductions section (see link) and then start a build log for the Flying Fish. In your build log you'll be able to ask questions, address build issues, and post photos. A build log is one of the best ways of getting help.
https://modelshipworld.com/forum/3-new-member-introductions/
Ok, I will do this thanks
-
Keith and Gregory, thank you.
Looking at JEBs work made me even more confused as I now see another ship but it should be the same, as Gregory pointed out it seems like Corel picks up some info and adds what is fun when releasing this models. I will look into the links you both gave me and use that instead as it seems the best way is to ignore Corels drawings as much as possible.
Let me show what really made me wonder.
Look at the capstan and compare it with JEBs, two different things. When I first saw the anchor chain on the drawings I wondered why an anchor chain would lie open over more then half of the deck, and when it is in use it will probably rip edges, poles and a pipe to pieces, but I must follow the drawing.
Looking at JEBs build makes the path of the chain sensible, I will place it like that instead .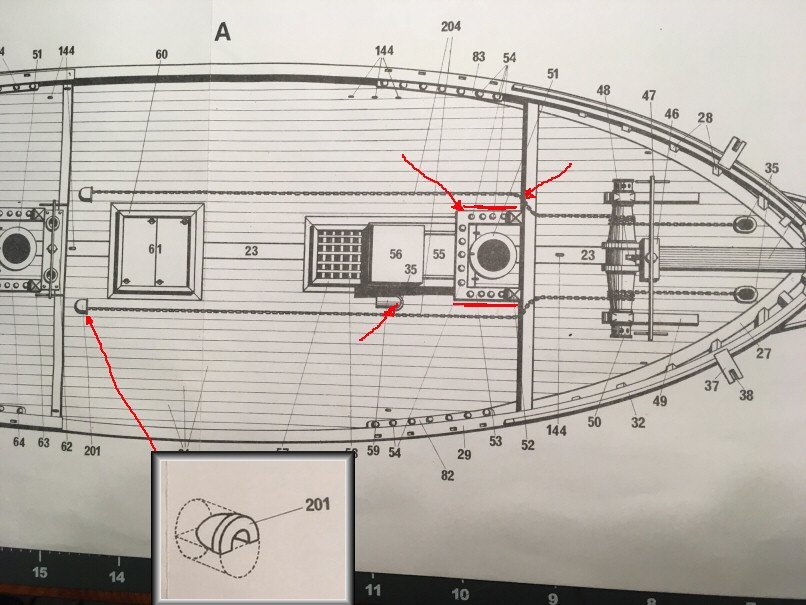
JEBs stern also don't look like my drawings and my guess is that mine is wrong, also look at what I think is a chimney pipe on the deckhouse, who would place that directly in front of a roof window, unfortunately I have already completed that structure following the drawing so I will leave it as is.
The rounded stern I was not able to make, maybe my fault or it was not possible due the hull itself.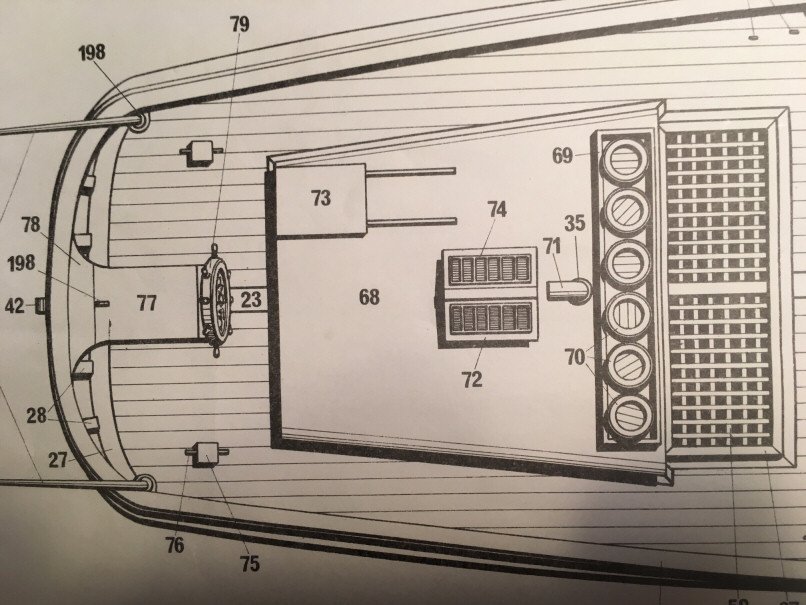
I also saw that JEBs have a different solution for holders to some rigg components, actually what I got in the box, looks like them on the drawing, but they not the same as the in the drawing and they are impossible to apply as they are shown here due pos 31 is not wide enough.
The material is also changed on my kit as you can see below on the hull planking and more details that differ, so this is another ship kit.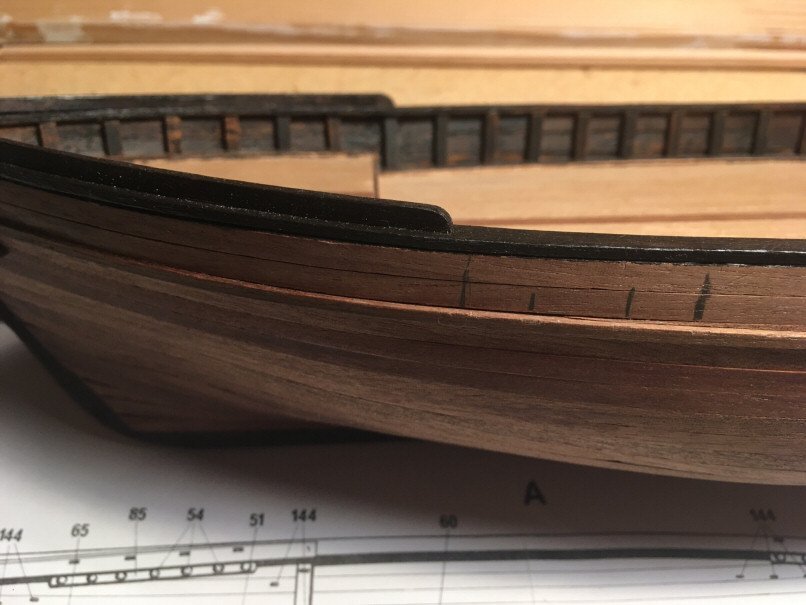
At least I know now that I don't need to worry so much over the drawings and will try to finish this vessel as I can by looking on others and learn about rigging
- Keith Black, Gregory and mtaylor
-
3
-
My wife bought me this model 12 years ago and I started building a while but I lacked many tools and there are no instructions so for a beginner like me it was frustrating and the interest droped after finishing the first planking. A couple of months ago the interest started again and my first issue was to get some of the required tools which I have done and I was on my way.
I have seen on other forums that this kit is not the best and I can confirm this as well but I have nothing to compare with as this is my very first model, but I would not recommend it for a beginner like myself. Just the lack of instructions is hard and when you expect them, and following the drawings by drawing number has given me surprises from later drawings that shows some details as should have been done in a earlier stage. Maybe this depends on my own lack of experience, but as there are no instructions...
It does not get any easier when parts included do not apply to the drawings, so far two of them was so wrong that I must build new ones to fit as they should be, on other places I will have to accept the fact that some parts are not like the drawings, this maybe this is something that you must accept?
I fumble in the darkness with some things and think that "I will do it like this", not knowing if that is correct or not.
The worse thing with this kit is the fact that some parts are actually missing, so far: around 100mm anchor chain, missing some wood, missing one metal part to the capstanAll of this have made me do mistakes, not crucial (yet, guess it depends on whom is looking) so I came to the point where I decided to complete the ships as good as I can and accept the fact that there are mistakes and to do it as well as I can. I guess/hopes it will be a nice looking ship in the end after all.
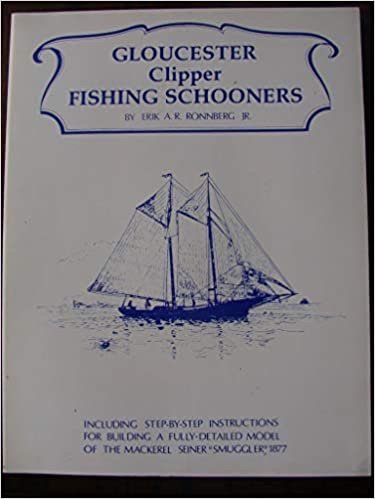
Now I needs help with some lines that I noticed today on one drawing.
As I am working on completing the deck furniture and items I saw on the deck where both the masts are that there are three markings
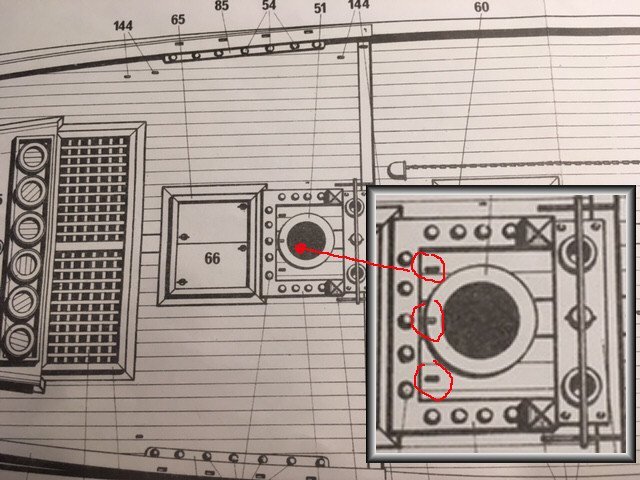
On another drawing they are marked as 158,159,171 and 173.174.182.
Looking on the part list, as is all I have to follow, shows this for the no 158,159,171 and 173,174,182 = Nothing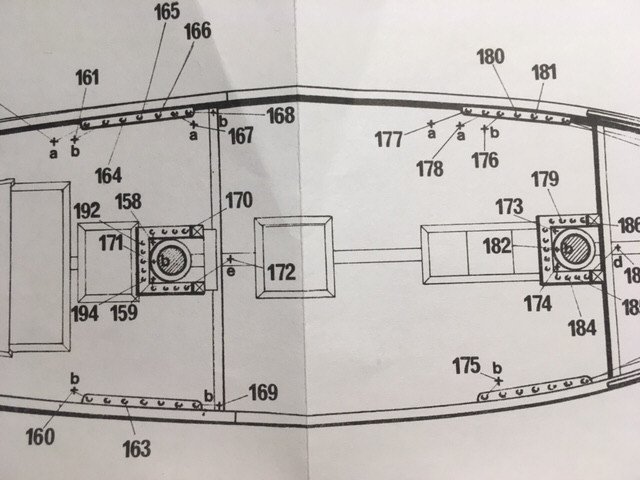
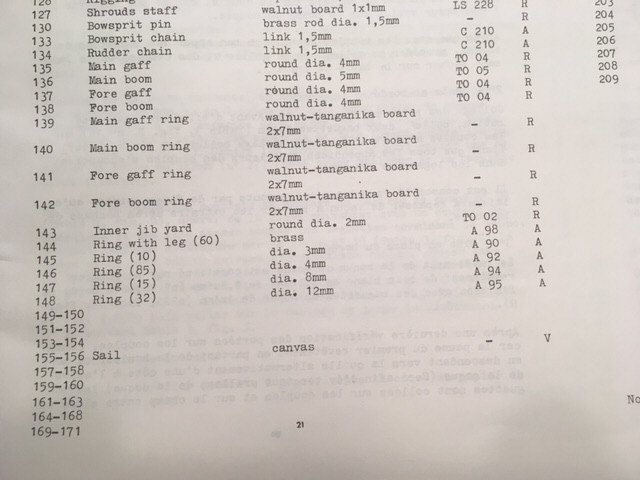
Could this also be part 144 – Ring with leg, 144 can be seen on pic1, I suspect it is as it looks like this but I don't know.
As I have not yet placed the deck furniture it would be best to know this before I continue. I can't make out on the rigging drawings either what it is.
- Keith Black and mtaylor
-
2


Flying Fish 1860 by JimmyK – FINISHED - Corel - 1:50 - Market Schooner from Essex, Massachusetts 1860
in - Kit build logs for subjects built from 1851 - 1900
Posted
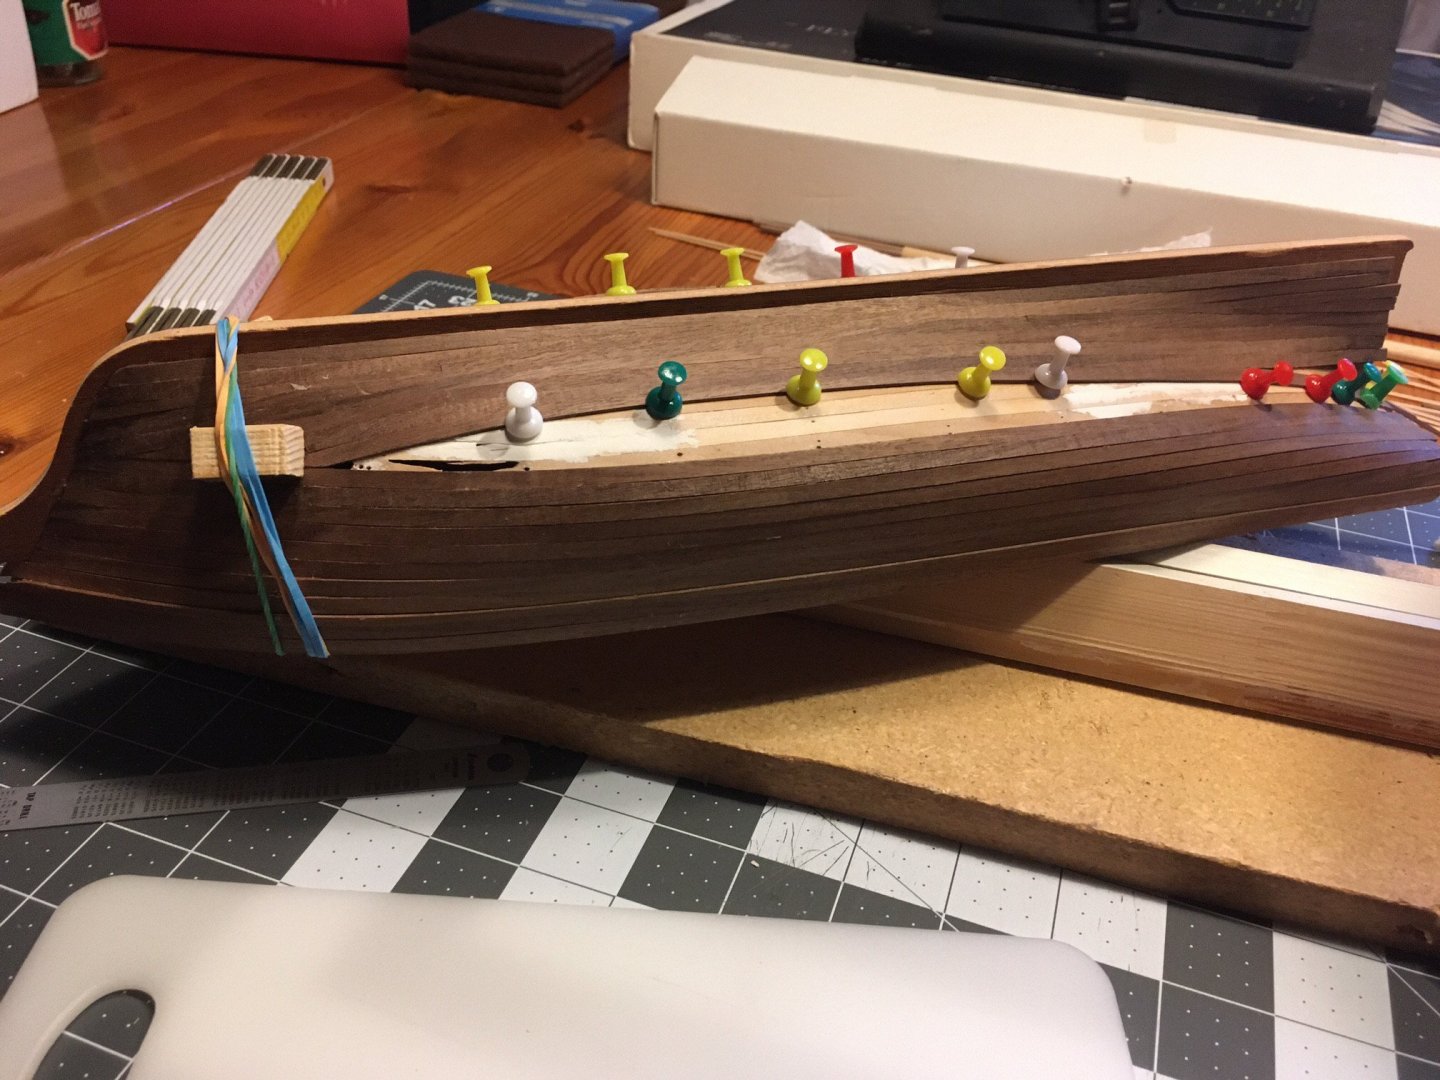
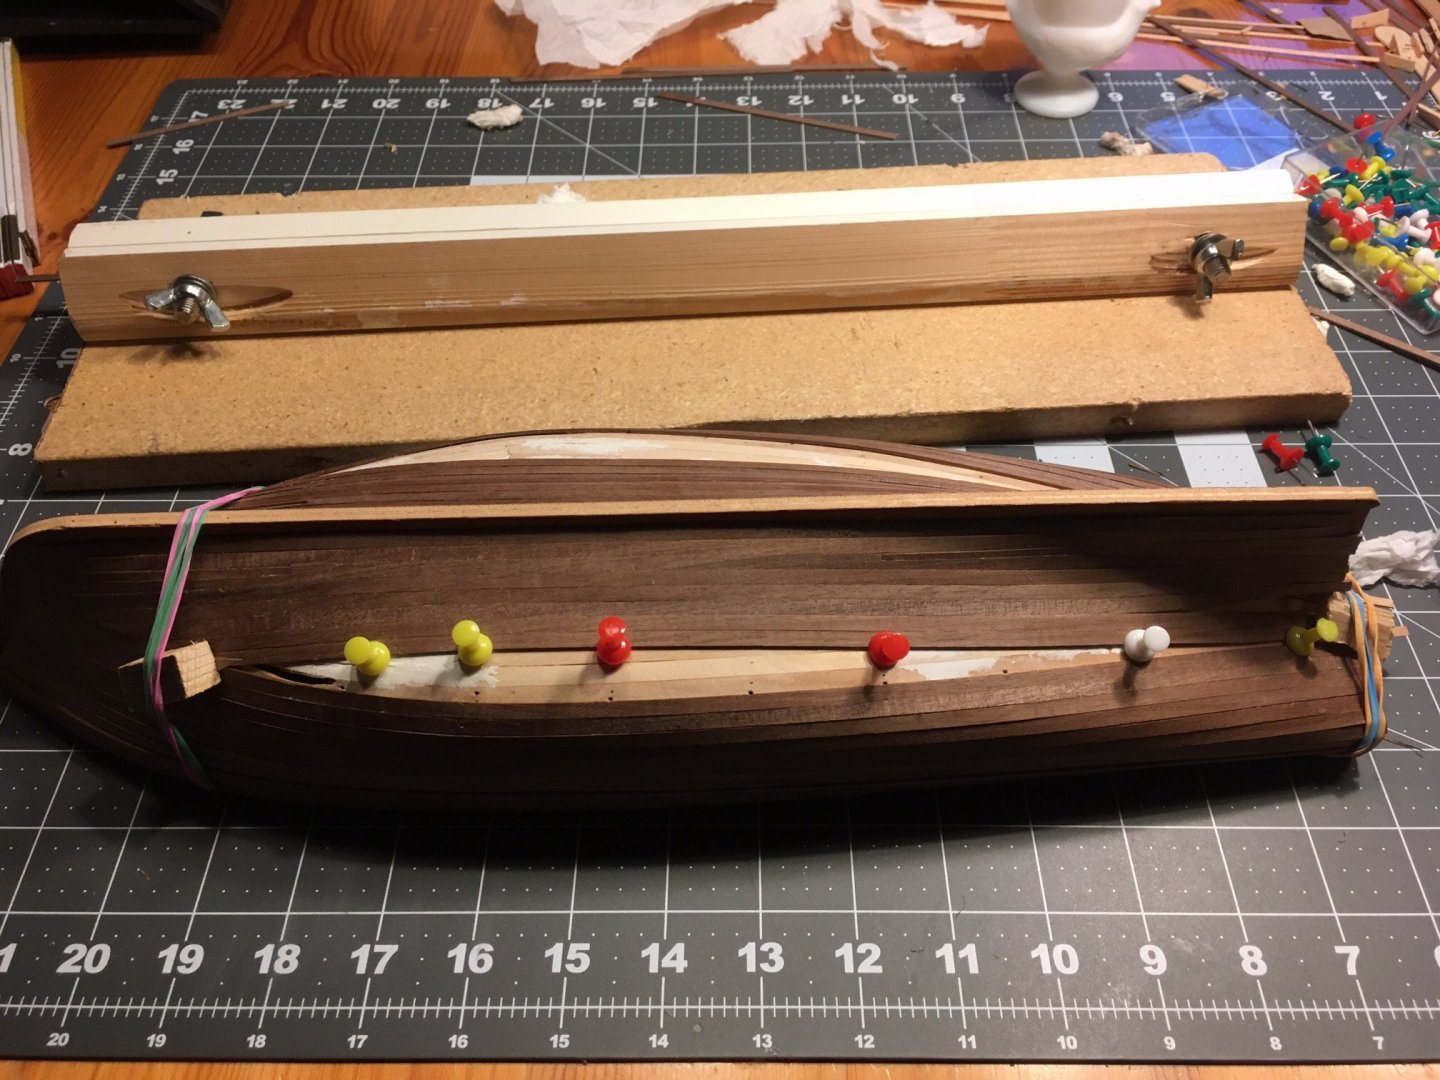
So the protection box is done, maybe I will add some wood in the corners later, but will leave it as is for now.
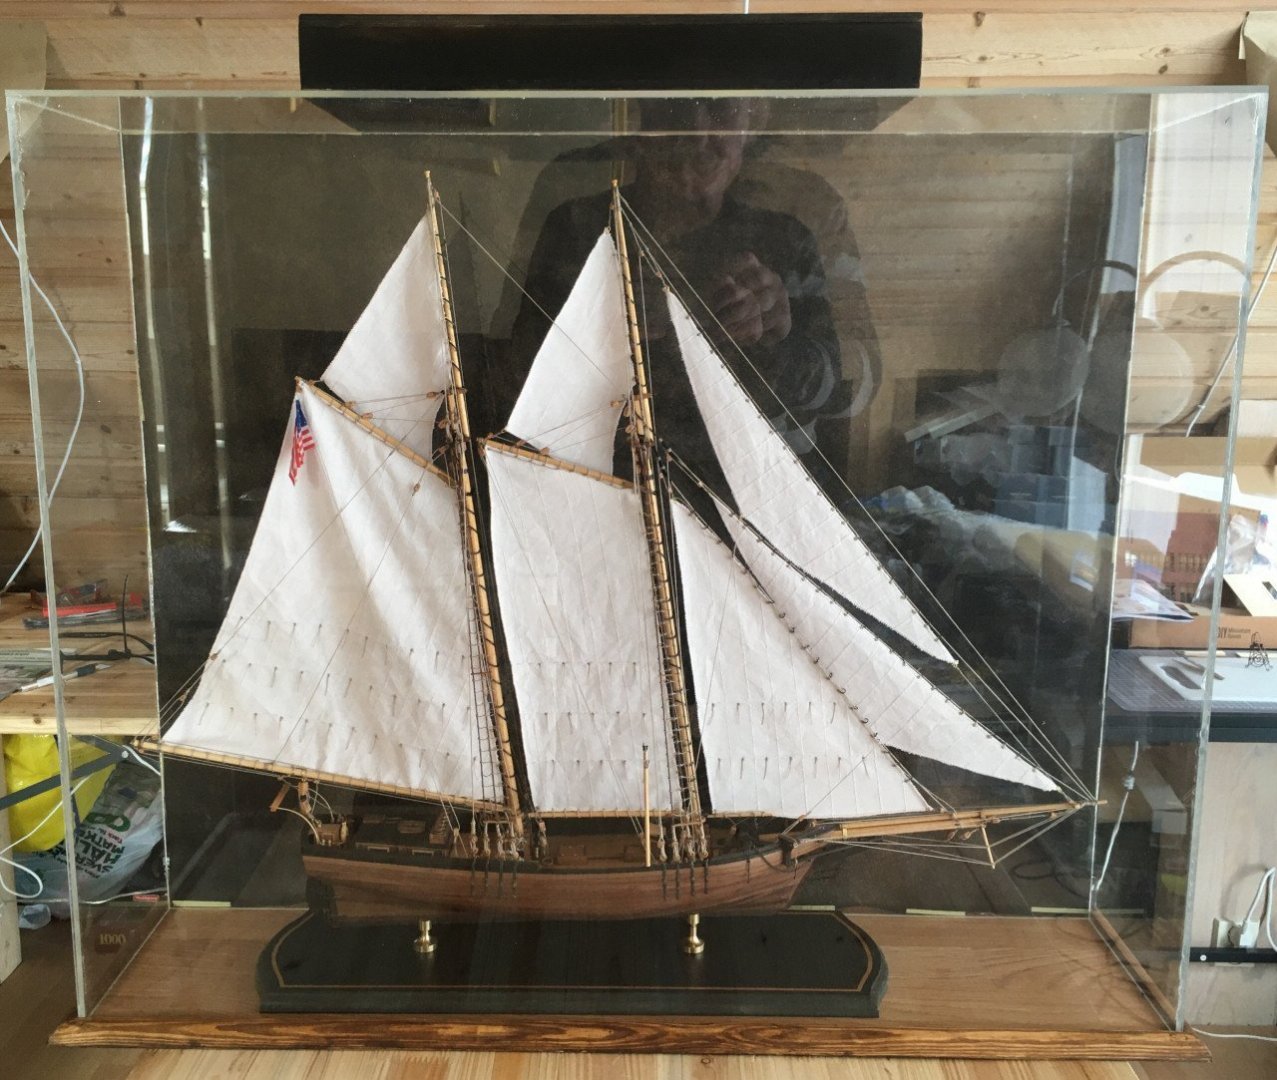
Added 3 LED lights 12V to it.
Job done. Thanks for watching.
/ Jimmy