
DB789
-
Posts
429 -
Joined
-
Last visited
2 Followers


Recent Profile Visitors
5,295 profile views


-
 DB789 reacted to a post in a topic:
HMS Harpy 1796 by dunnock - Vanguard Models - 1:64
DB789 reacted to a post in a topic:
HMS Harpy 1796 by dunnock - Vanguard Models - 1:64
-
DB789 reacted to a post in a topic:
HM Armed Cutter Sherbourne by Zvr - FINISHED - Vanguard Models - 1:64
-
DB789 reacted to a post in a topic:
Chris Watton and Vanguard Models news and updates Volume 2
-
DB789 reacted to a post in a topic:
HM Armed Cutter Sherbourne by Zvr - FINISHED - Vanguard Models - 1:64
-
DB789 reacted to a post in a topic:
HMS Harpy 1796 by dunnock - Vanguard Models - 1:64
-
DB789 reacted to a post in a topic:
HMS Harpy 1796 by dunnock - Vanguard Models - 1:64
-
DB789 reacted to a post in a topic:
HMS Harpy 1796 by dunnock - Vanguard Models - 1:64
-
DB789 reacted to a post in a topic:
Chris Watton and Vanguard Models news and updates Volume 2
-
Cathead reacted to a post in a topic:
Grecian by DB789 - FINISHED - Vanguard Models - 1:64 - American Privateer Schooner
-
Zvr reacted to a post in a topic:
Grecian by DB789 - FINISHED - Vanguard Models - 1:64 - American Privateer Schooner
-
AJohnson reacted to a post in a topic:
Grecian by DB789 - FINISHED - Vanguard Models - 1:64 - American Privateer Schooner
-
 chris watton reacted to a post in a topic:
Grecian by DB789 - FINISHED - Vanguard Models - 1:64 - American Privateer Schooner
chris watton reacted to a post in a topic:
Grecian by DB789 - FINISHED - Vanguard Models - 1:64 - American Privateer Schooner
-
palmerit reacted to a post in a topic:
Grecian by DB789 - FINISHED - Vanguard Models - 1:64 - American Privateer Schooner
-
JacquesCousteau reacted to a post in a topic:
Grecian by DB789 - FINISHED - Vanguard Models - 1:64 - American Privateer Schooner
-
Glenn-UK reacted to a post in a topic:
Grecian by DB789 - FINISHED - Vanguard Models - 1:64 - American Privateer Schooner
-
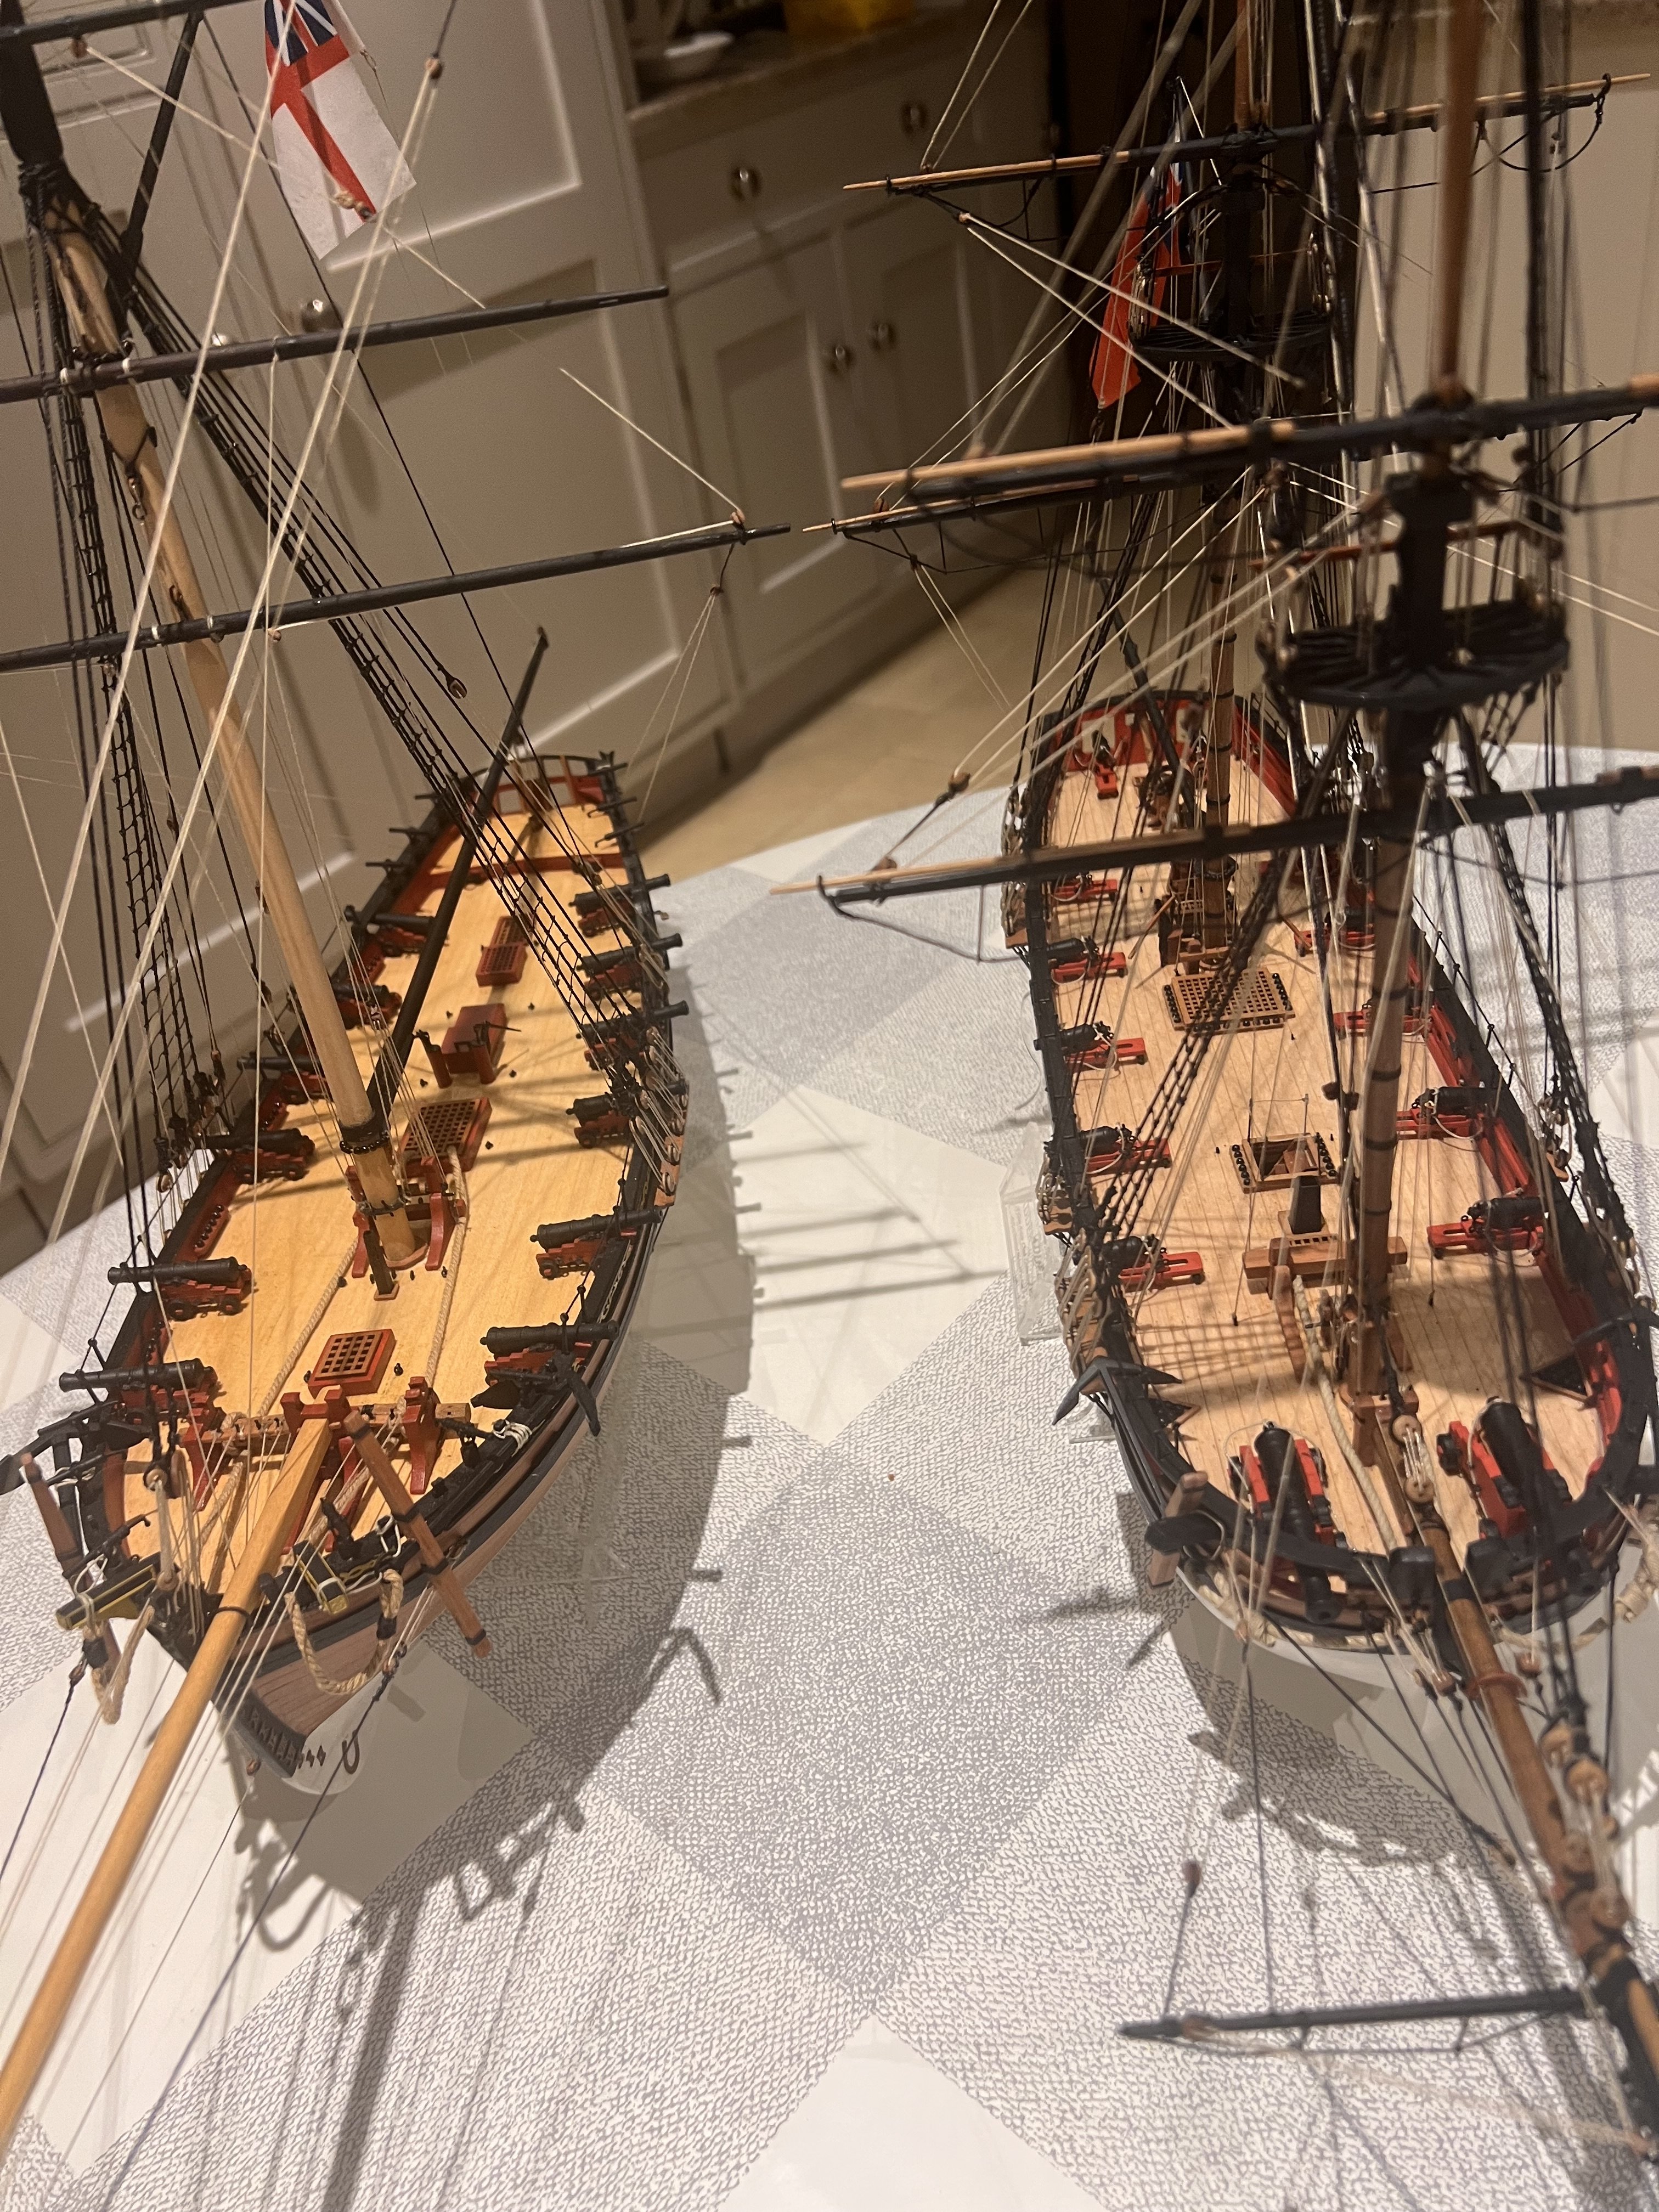
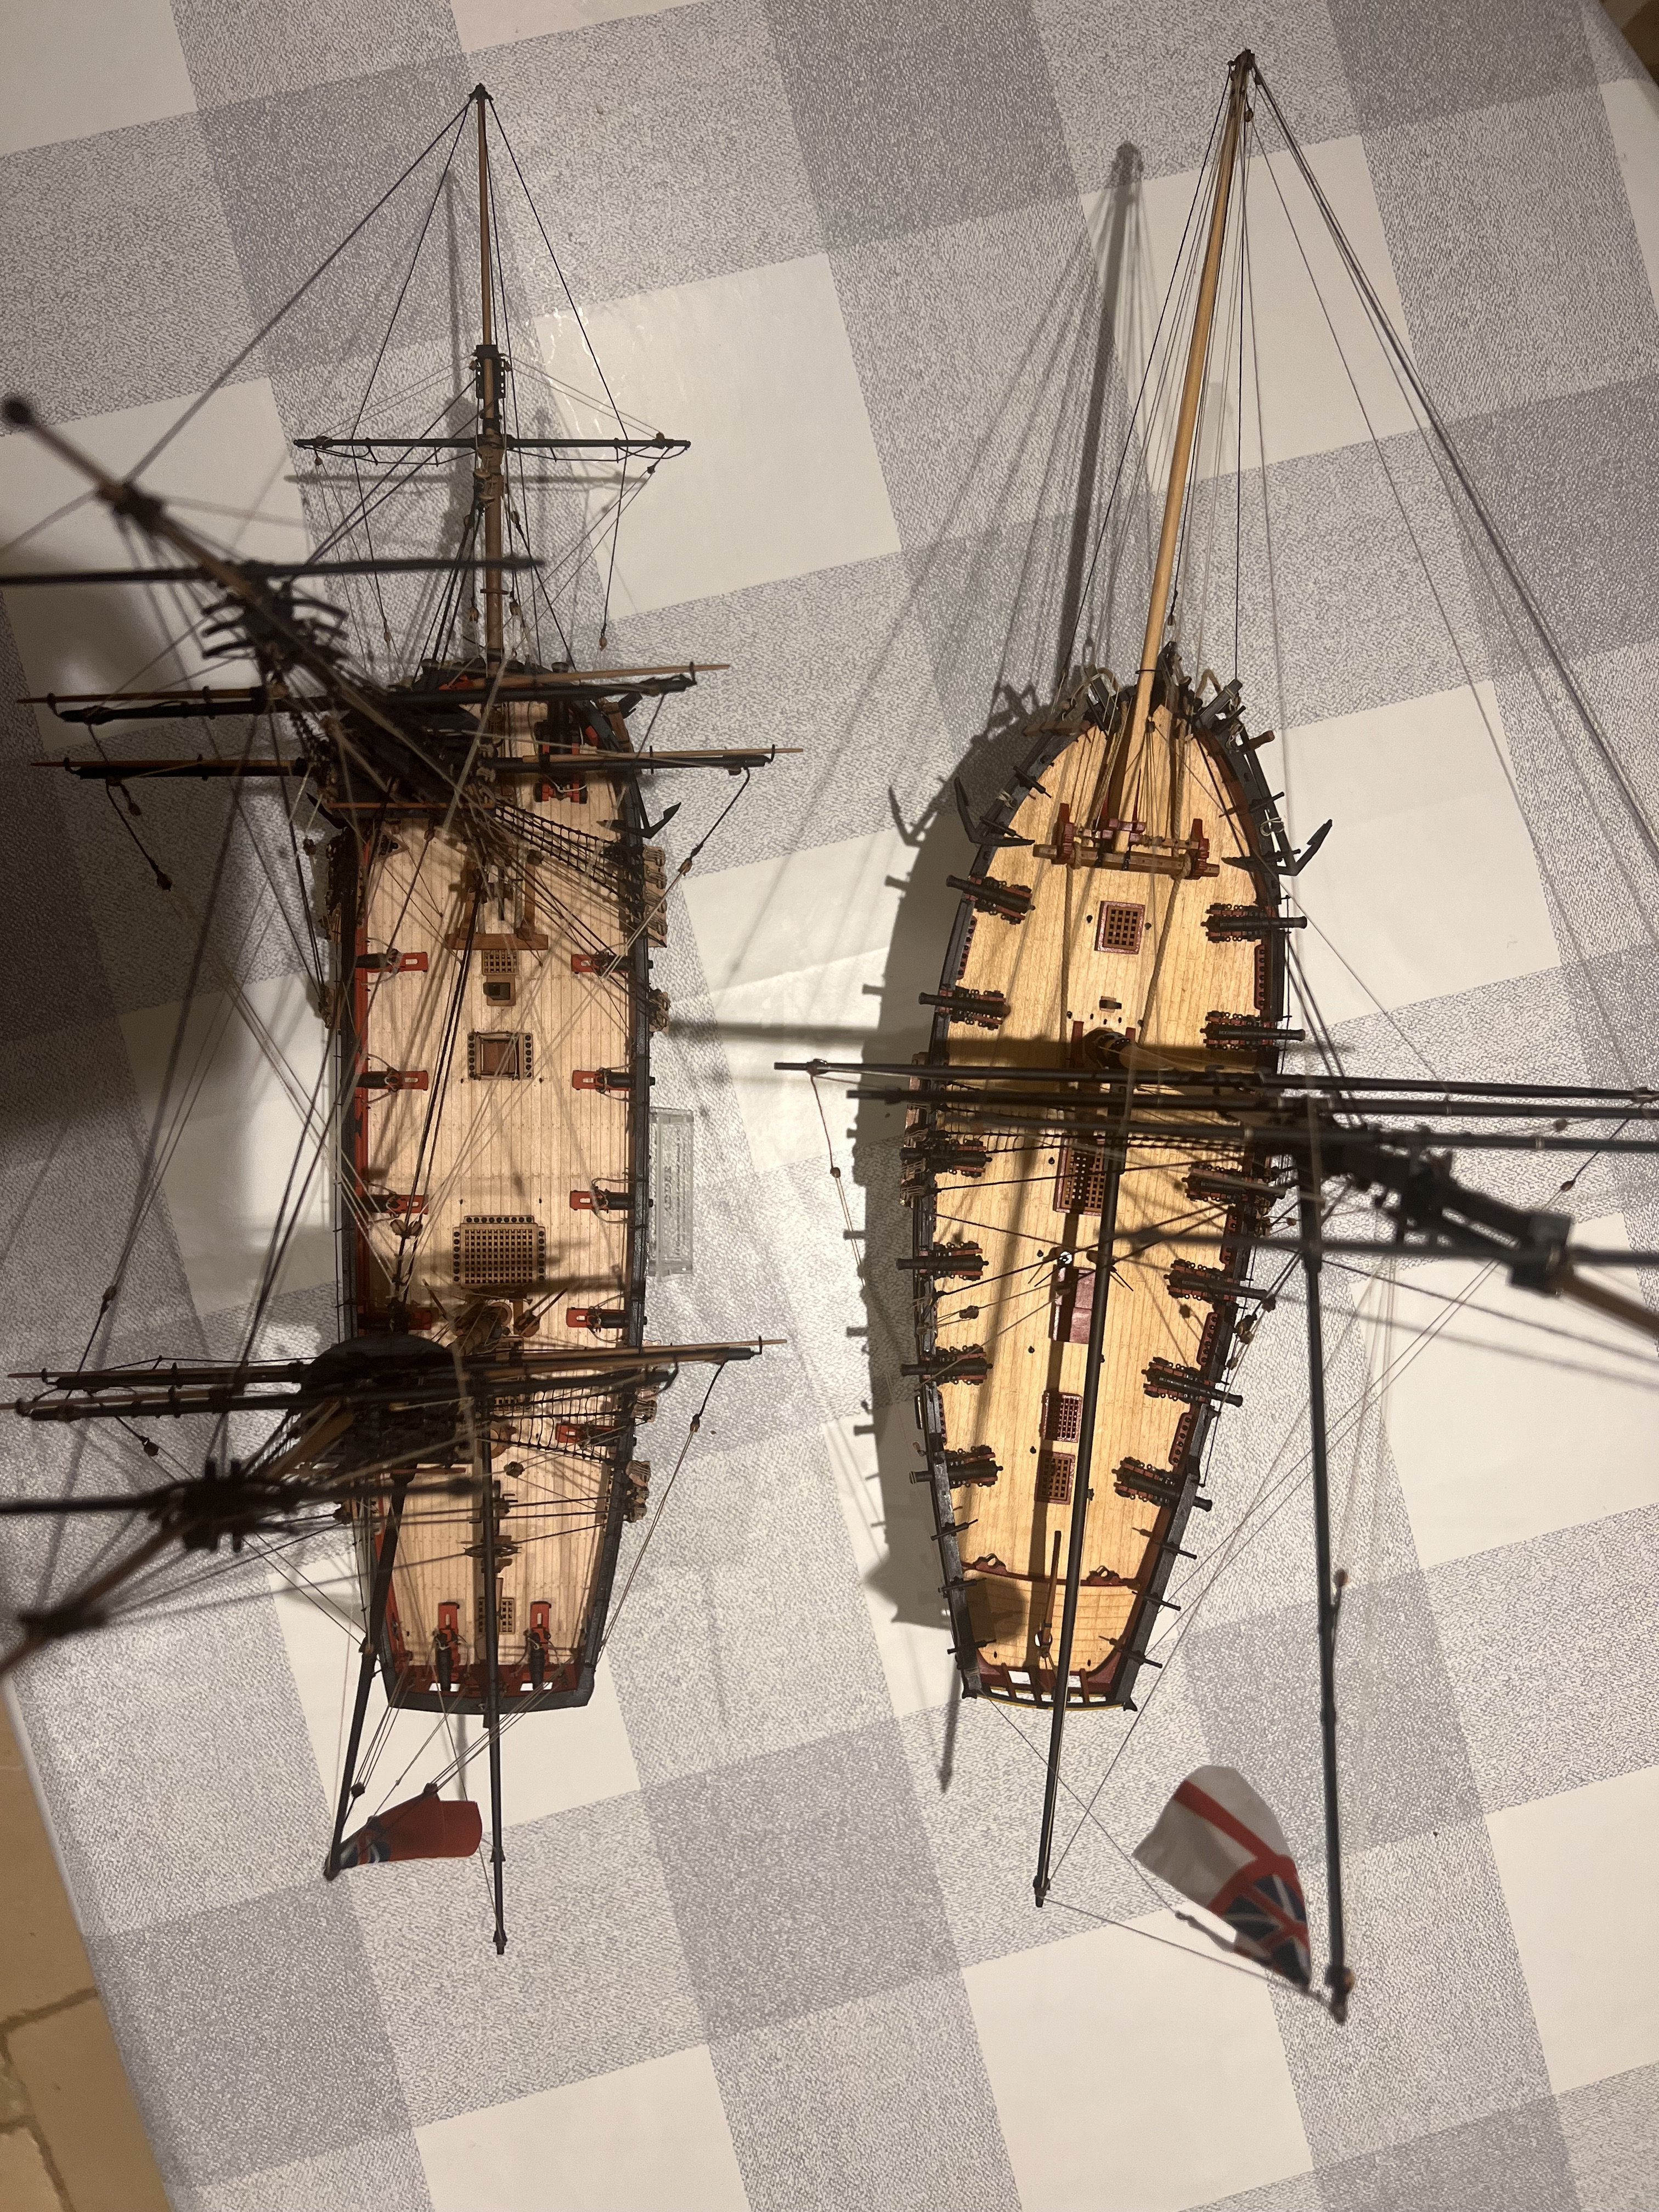
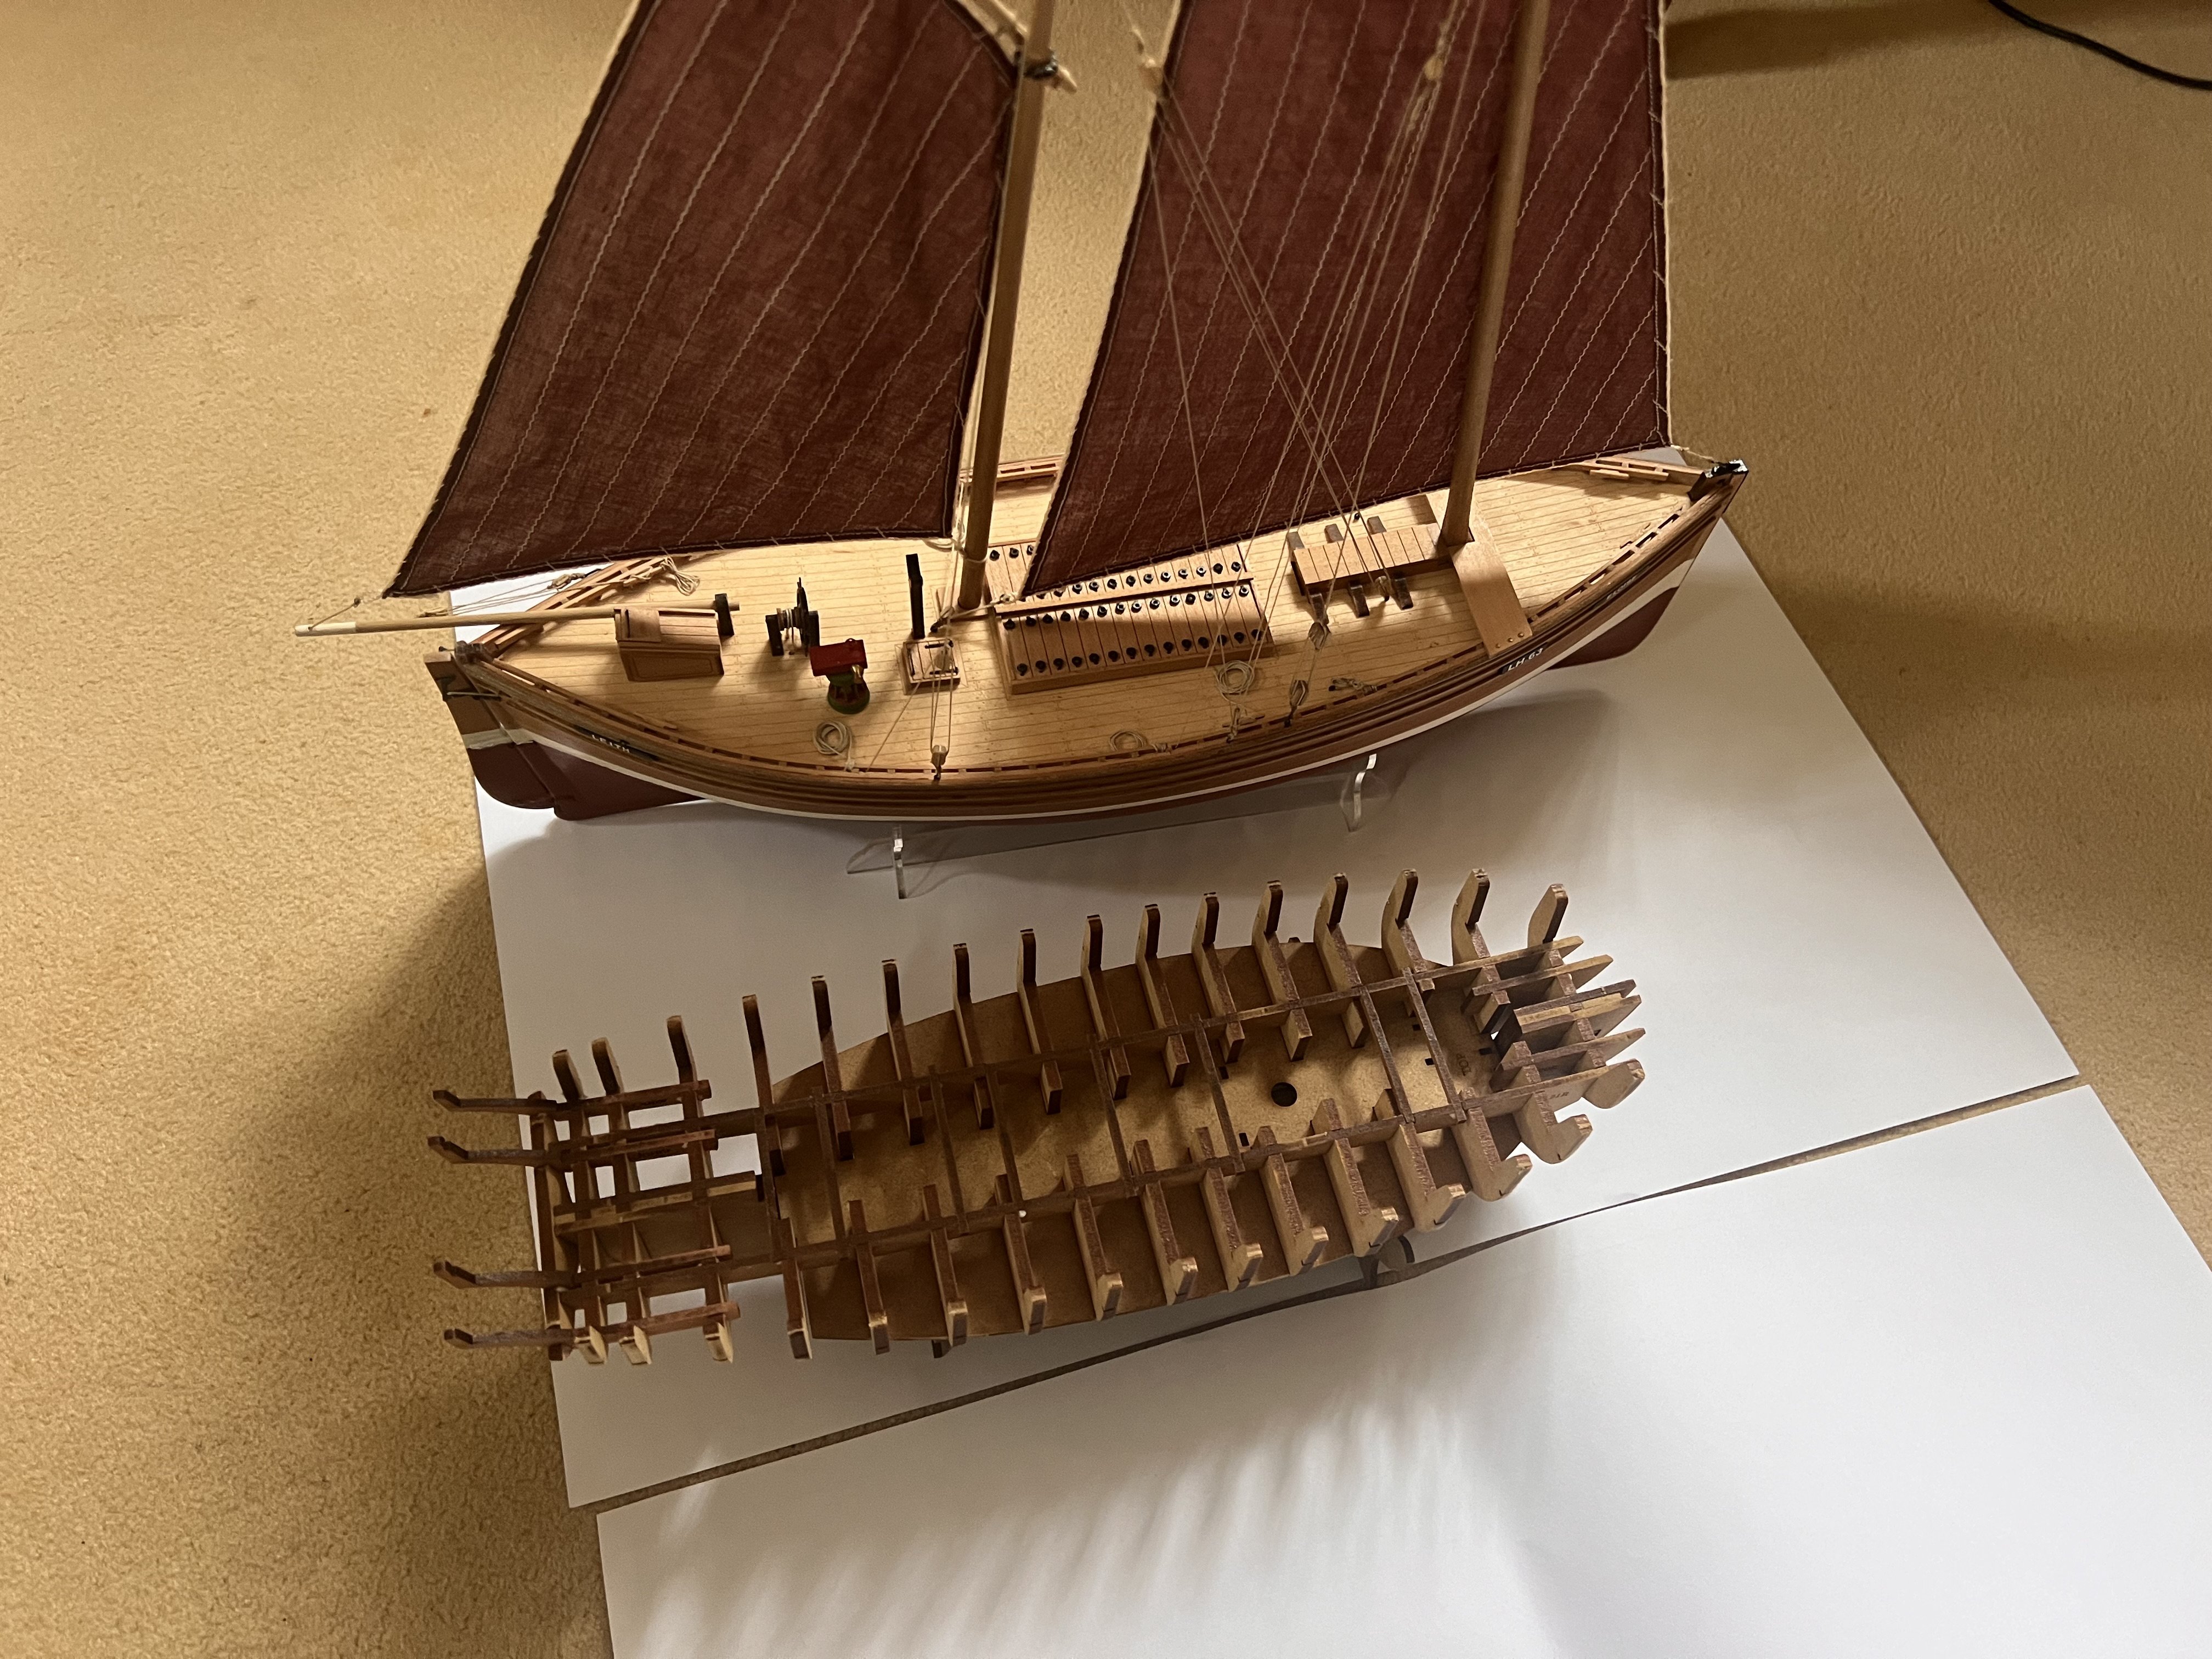
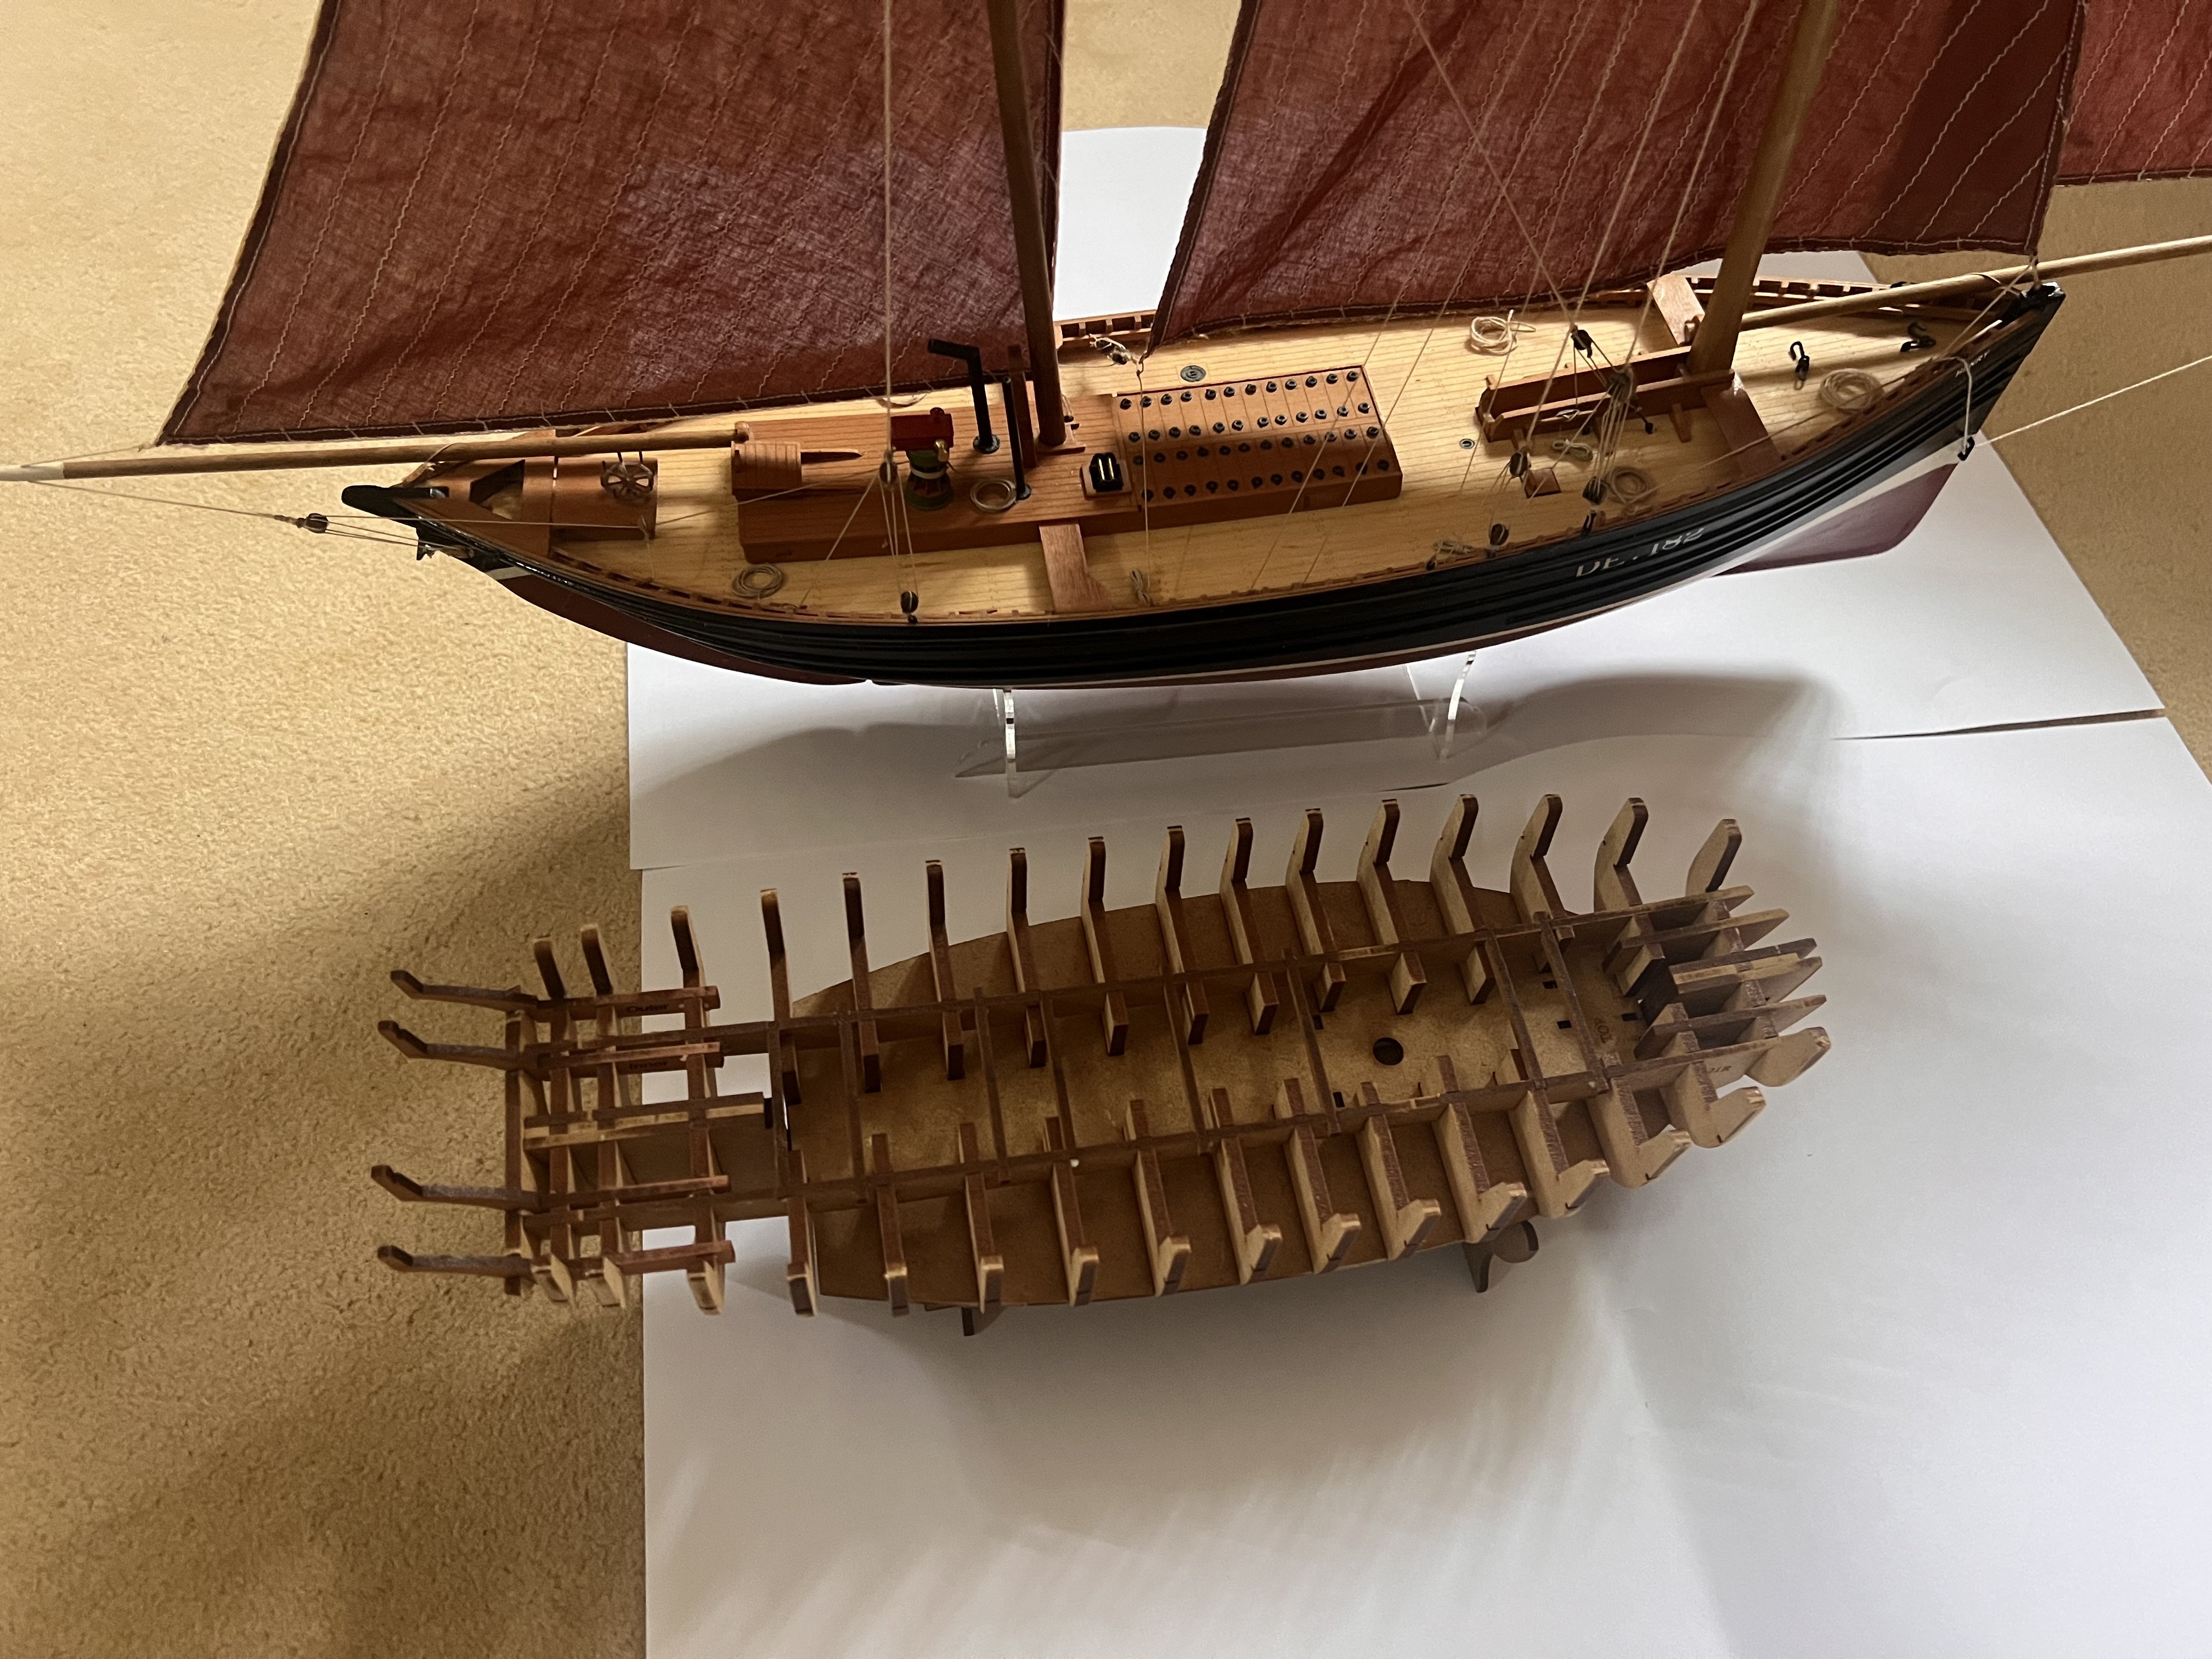
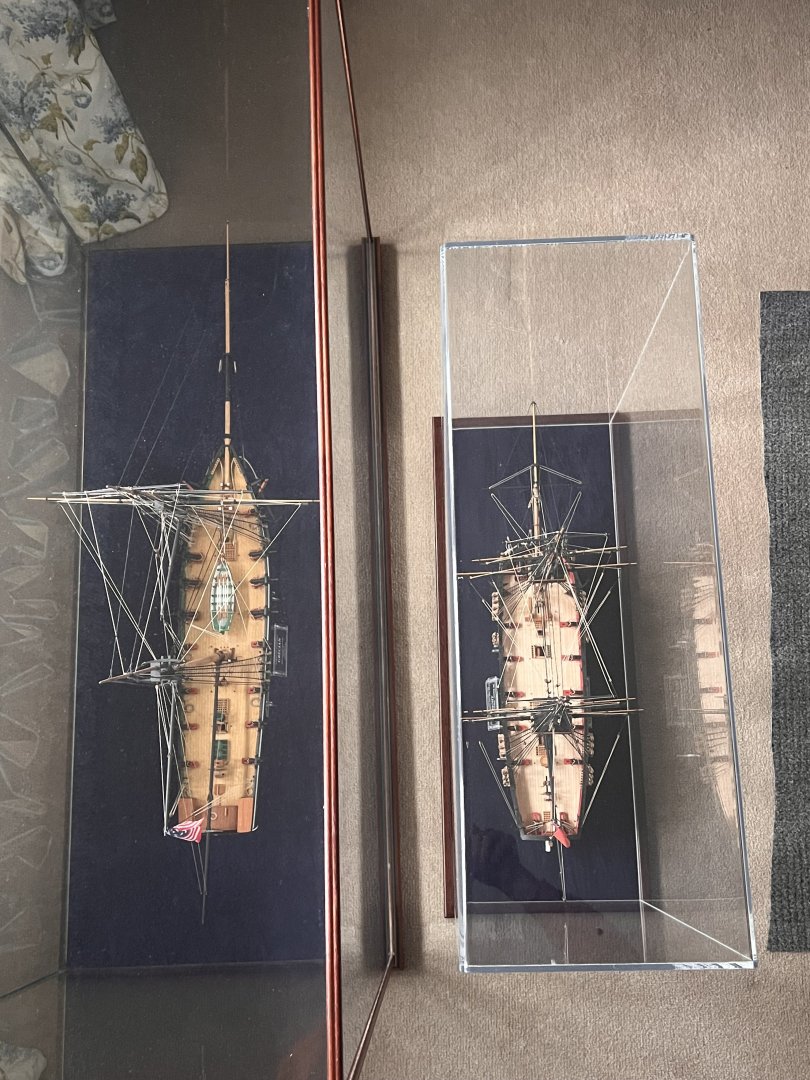
 Apologies for terrible quality photos below as they’re both in cases, but they show how different Grecian and Adder are. Adder is much smaller and beamier.
- 106 replies
-
- 6
-
-
-
- Grecian
- baltimore clipper
- (and 4 more)
-
Zvr reacted to a post in a topic:
Vanguard afficianadios...... Cutter Alert vs Brig Adder
-
DB789 reacted to a post in a topic:
HM Gun Brig Adder 1797 by Geordie Tyne - Vanguard Models - 1:64
-
Thukydides reacted to a post in a topic:
Sherbourne by DB789 - Vanguard Models - 1:64
-
Paul White reacted to a post in a topic:
Sherbourne by DB789 - Vanguard Models - 1:64
-
DB789 reacted to a post in a topic:
HMS Sphinx 1775 by Ronald-V - Vanguard Models - 1:64
-
Hi Palmerit, I think they’re both brilliant kits and two of my favourite boats. They’re very different boats in shape and rig but overall there’s not a great deal of difference in terms of complexity. Hull / planking: Grecian’s hull shape is very easy to plank and forgiving. The only caveat being that the arched tops of the gun ports are fragile and easy to break. Adder’s hull shape is much more bluff at the bow and trickier to plank neatly if you’re leaving it bare wood, but with Chris’s clever design all the planking is below the wales so if painted white and not visible it’s not a problem with filler and sanding. Rigging: Adder’s rigging being fully square rigged is a little bit more complex than Grecian and on a smaller boat. Adder’s rigging is the standing rigging not the full running rigging that the Speedy kit has. Grecian’s rigging will be more familiar to you as its fore and aft and more similar to Ranger and Sherbourne with just square rigged sails on the foremast. Size: Grecian is much larger which is easier to rig and work on than Adder (that’ll be part of the cost difference too). But worth noting quite how large Grecian is when fully rigged as her masts and bowsprit are exceptionally long. Coppering: I found the copper tape (not engraved copper plates) pretty easy to apply on Grecian and I think looks good, the key is buying the cutting device that James shows in his build log that enables you to cut copper plates the same length. I am probably in a minority of one on MSW, but I prefer the look of the copper tape over engraved copper plates as it’s thinner so the edges are less visible and they mould to the underlying hull shape better. Of the four non-fishing boats I have completed (the other two being Alert and Duchess of Kingston) Adder and Grecian are both considerably easier to build. My view is that Grecian is slightly easier but there’s not a lot in it. Hope that helps!
- 106 replies
-
- 5
-
-

-
- Grecian
- baltimore clipper
- (and 4 more)
-
Thanks Geordie. I’m really enjoying following your build of Adder too. She’s looking super.
- 21 replies
-
- 2
-
-
- Vanguard
- Sherbourne;
- (and 1 more)
-
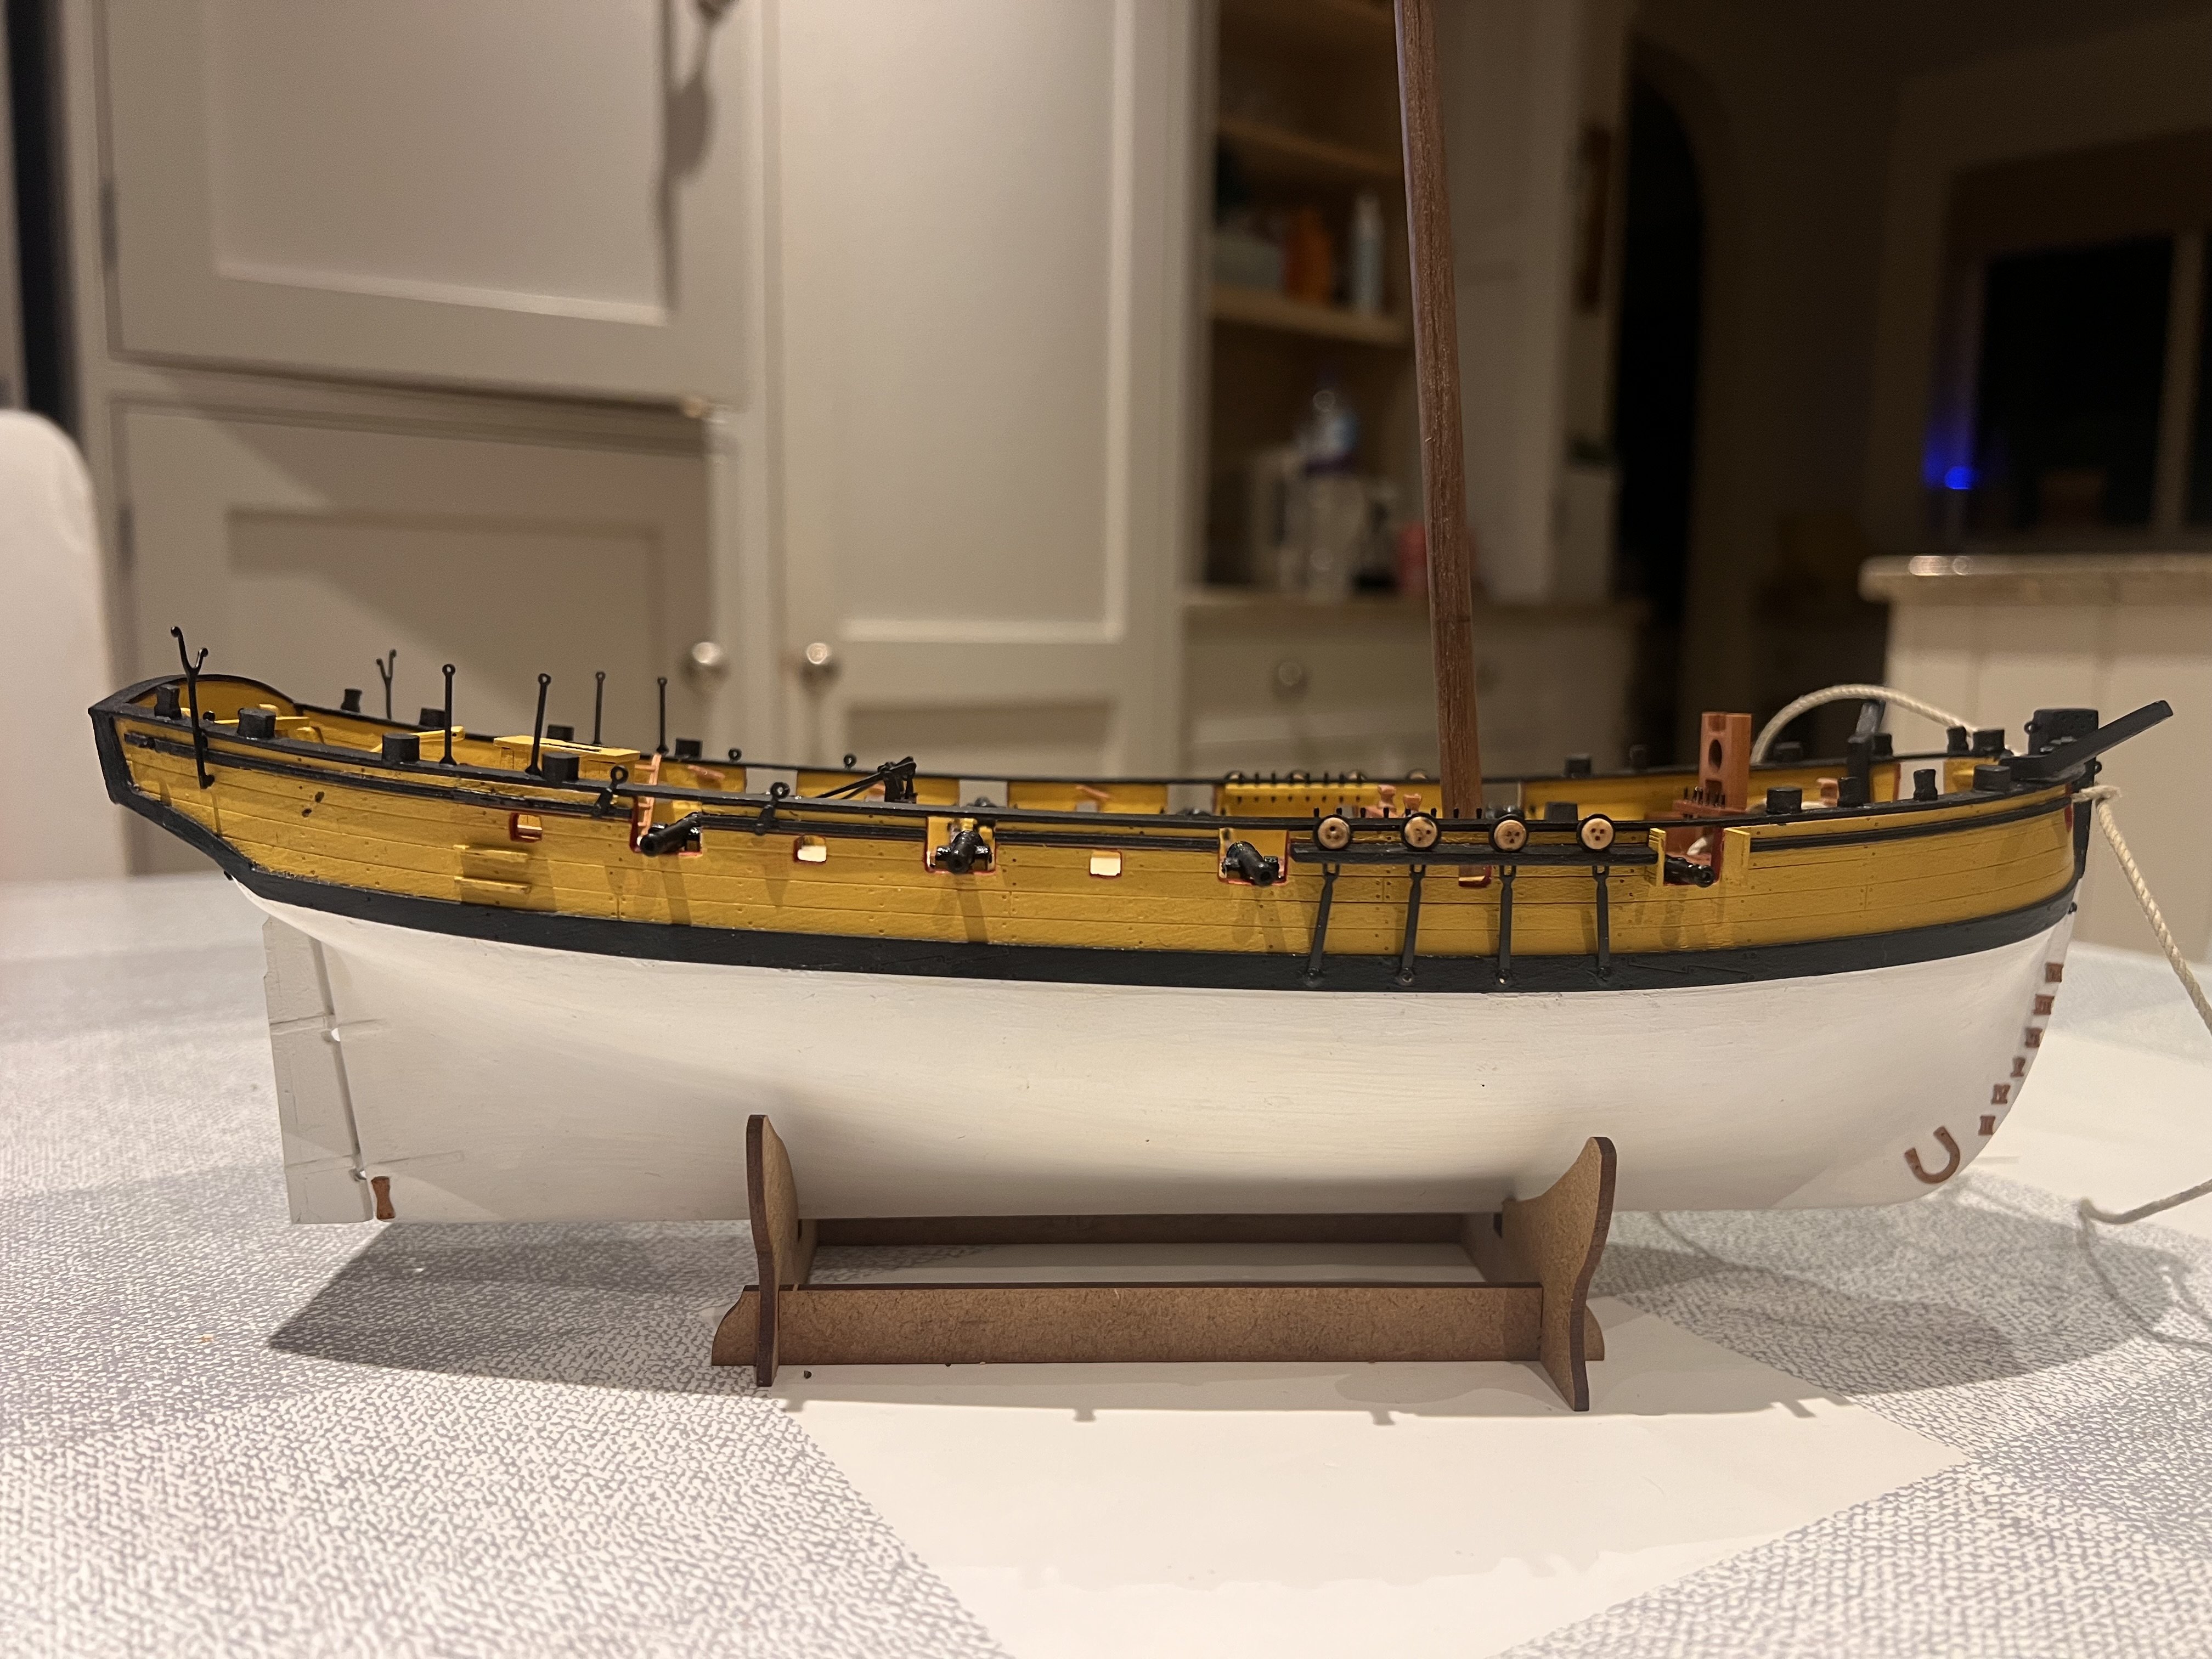
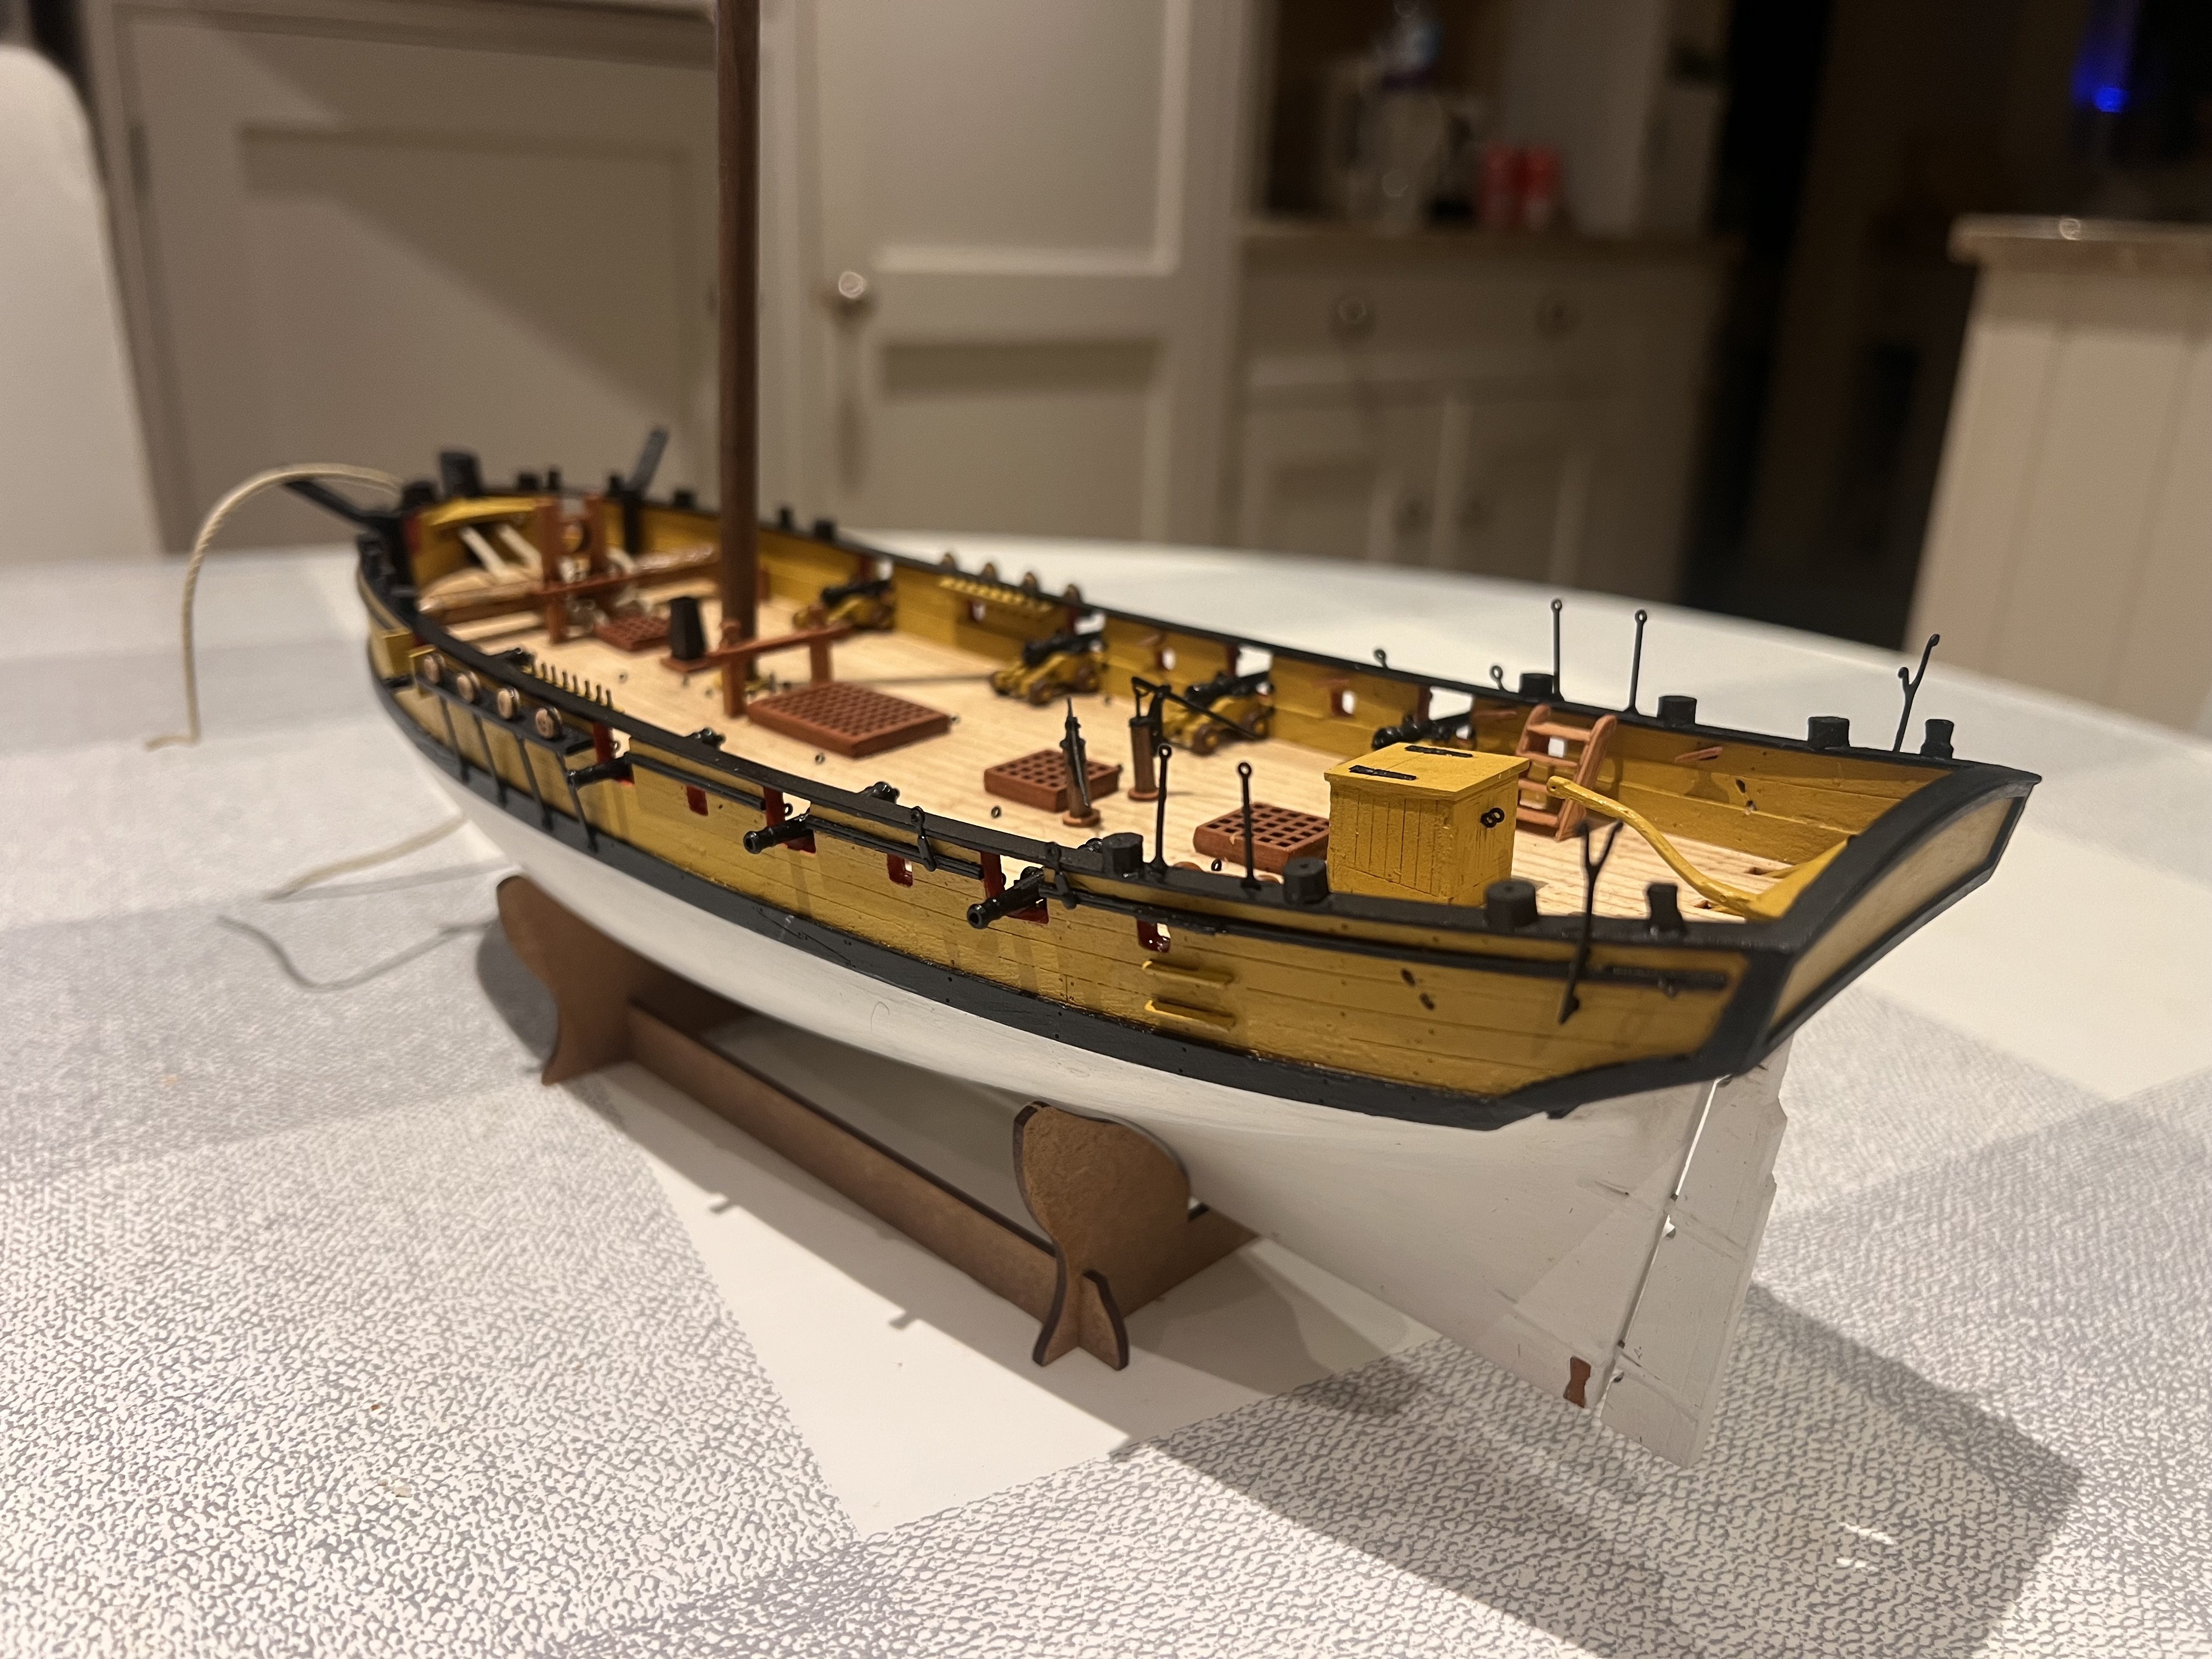
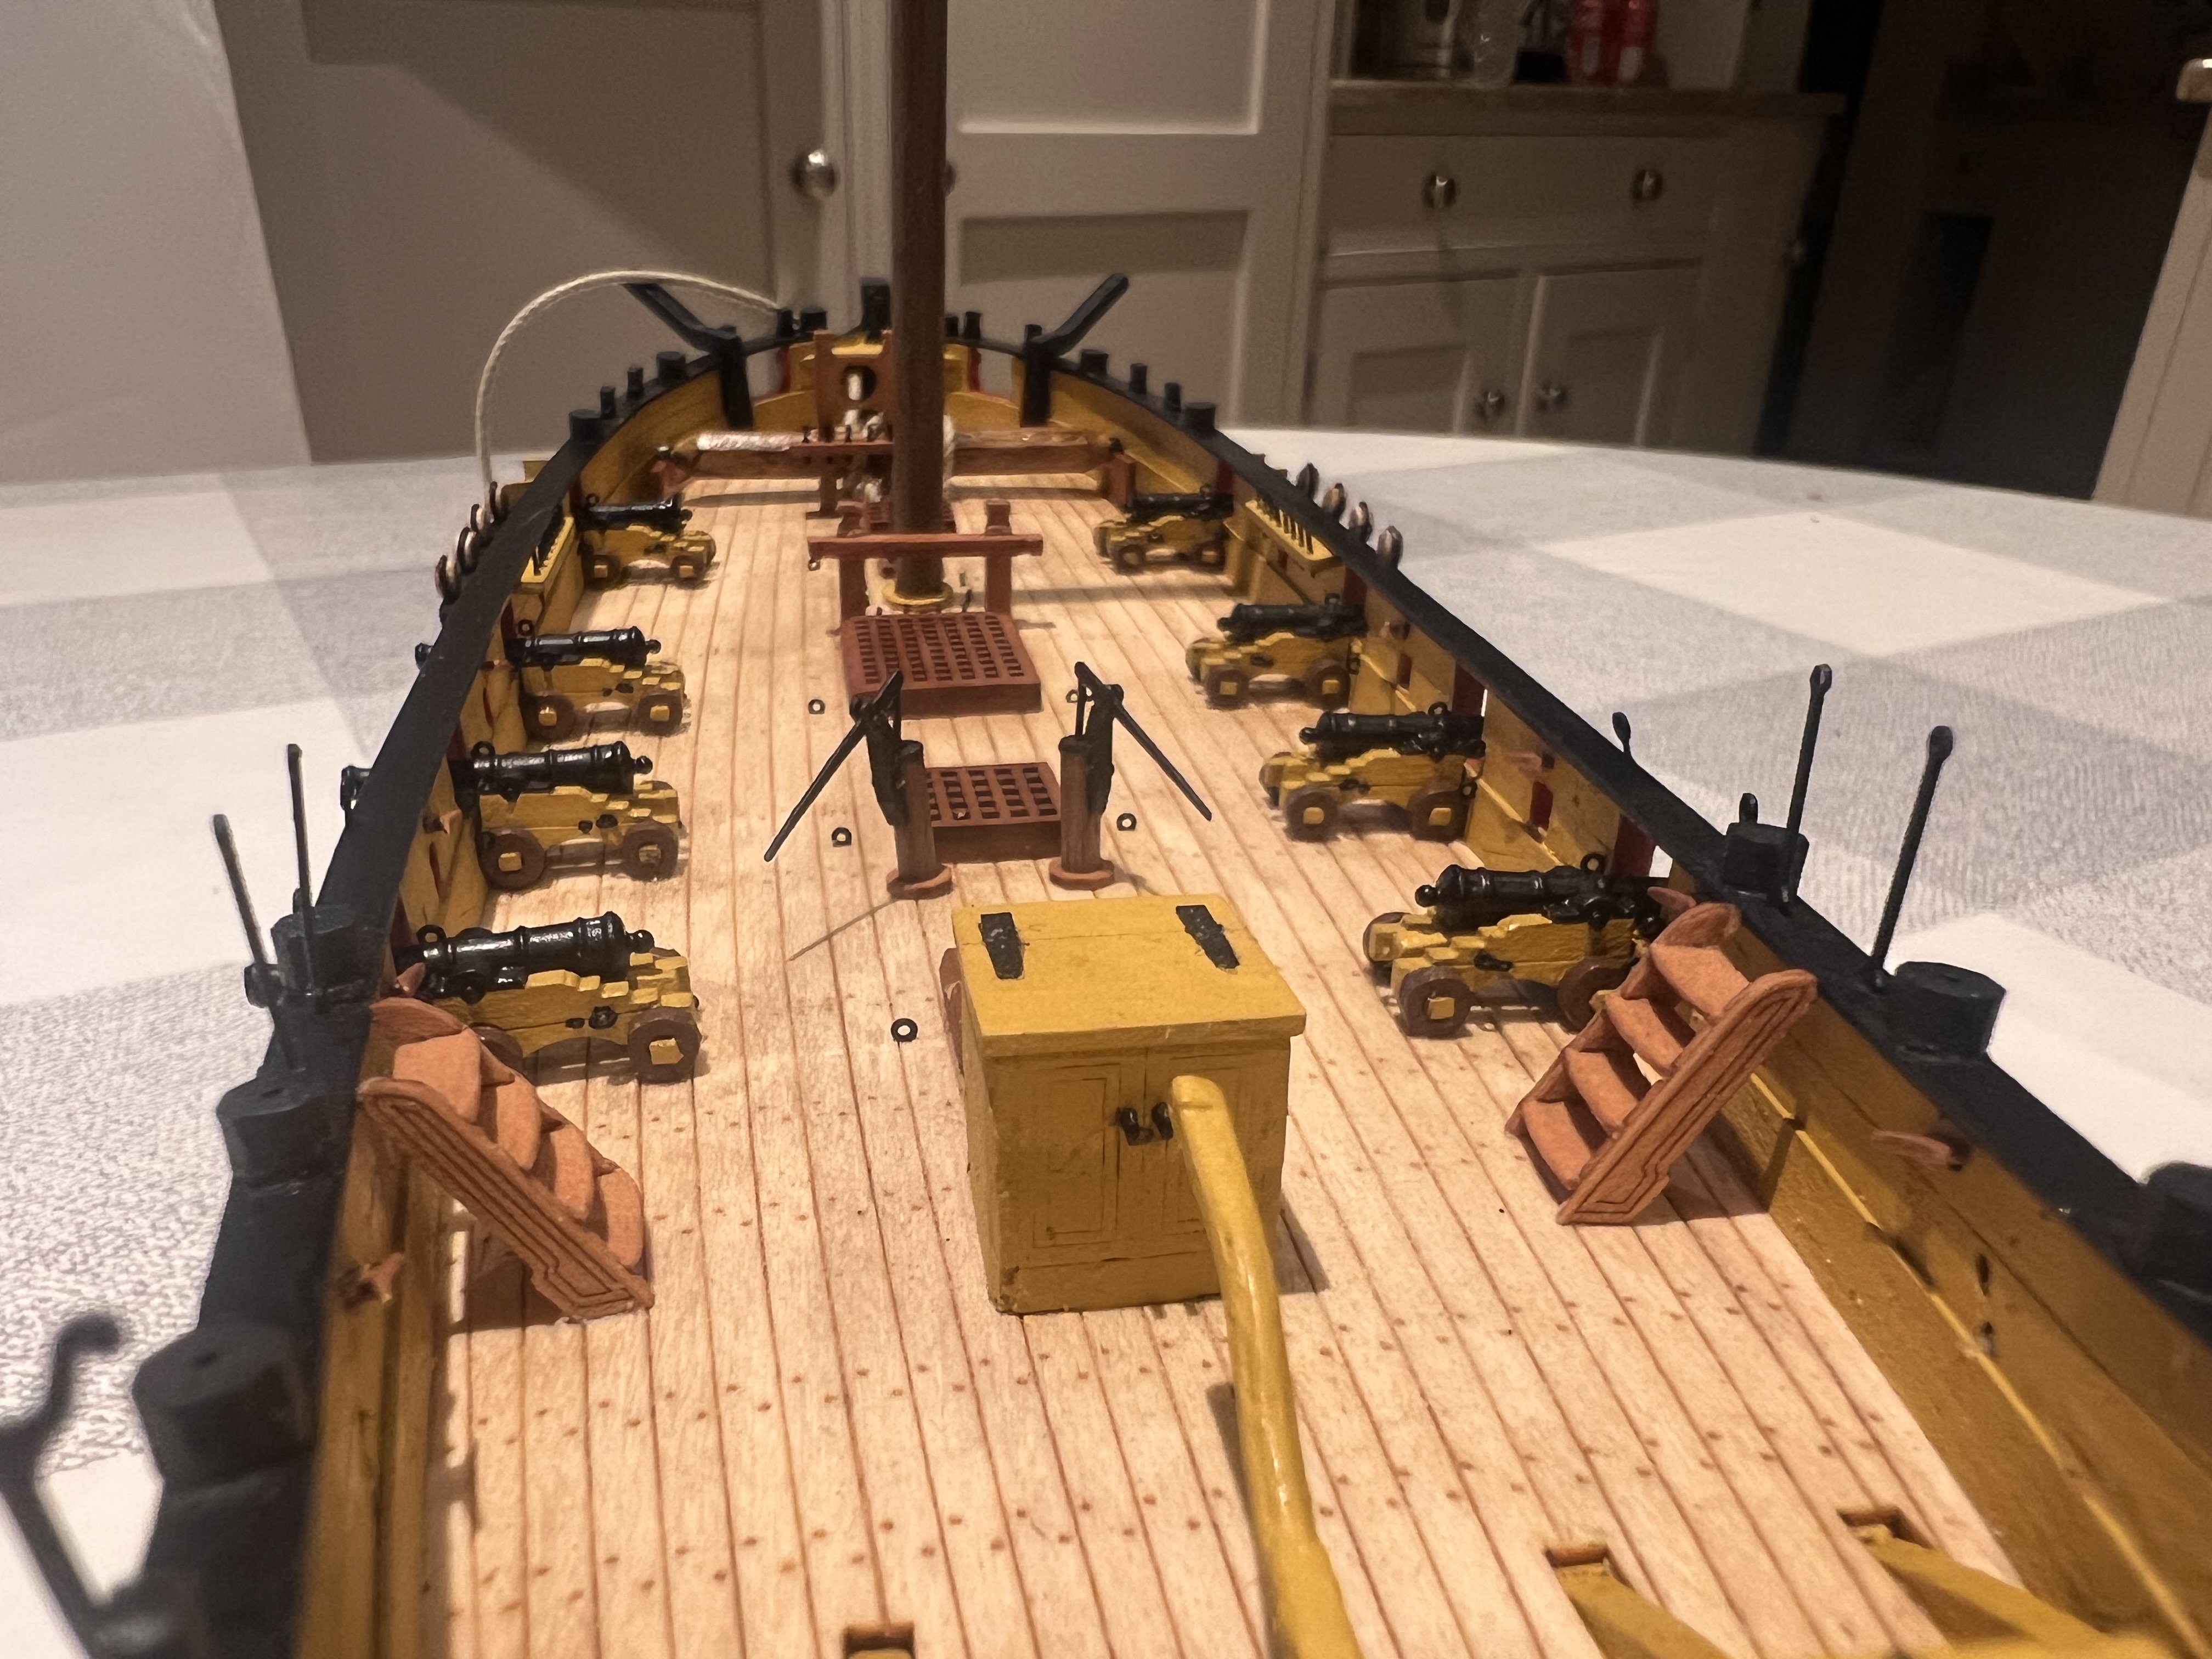
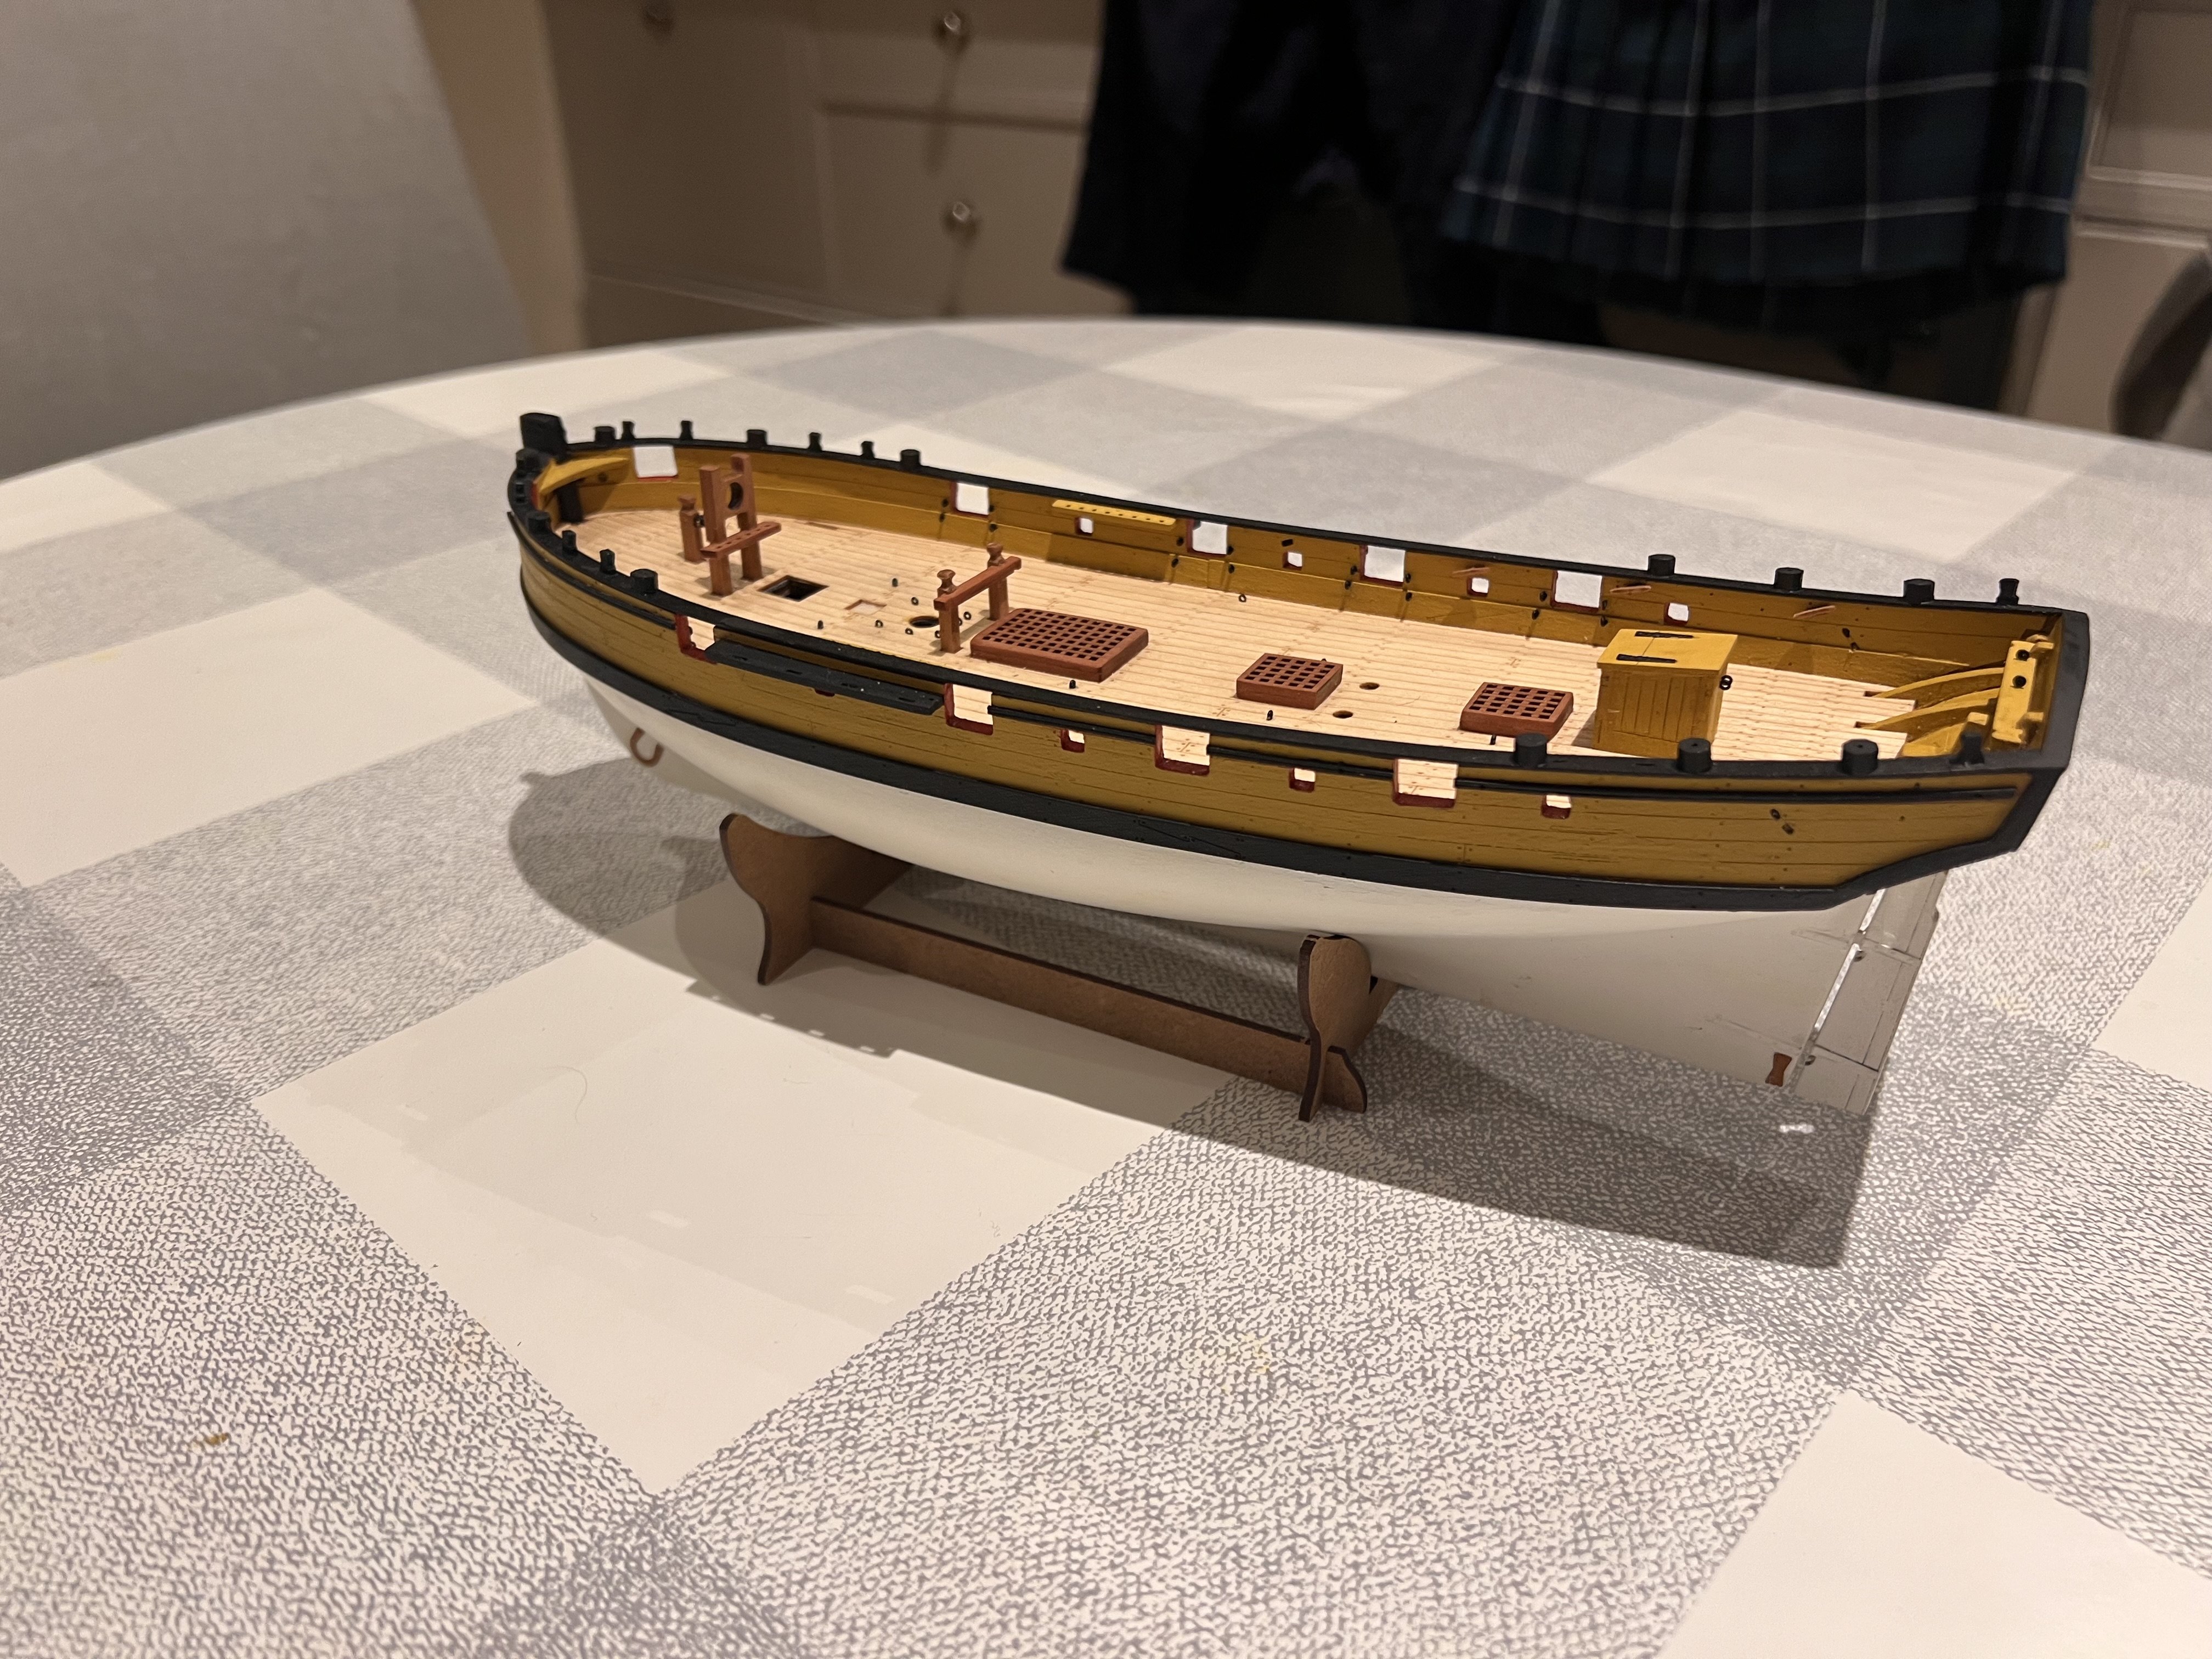
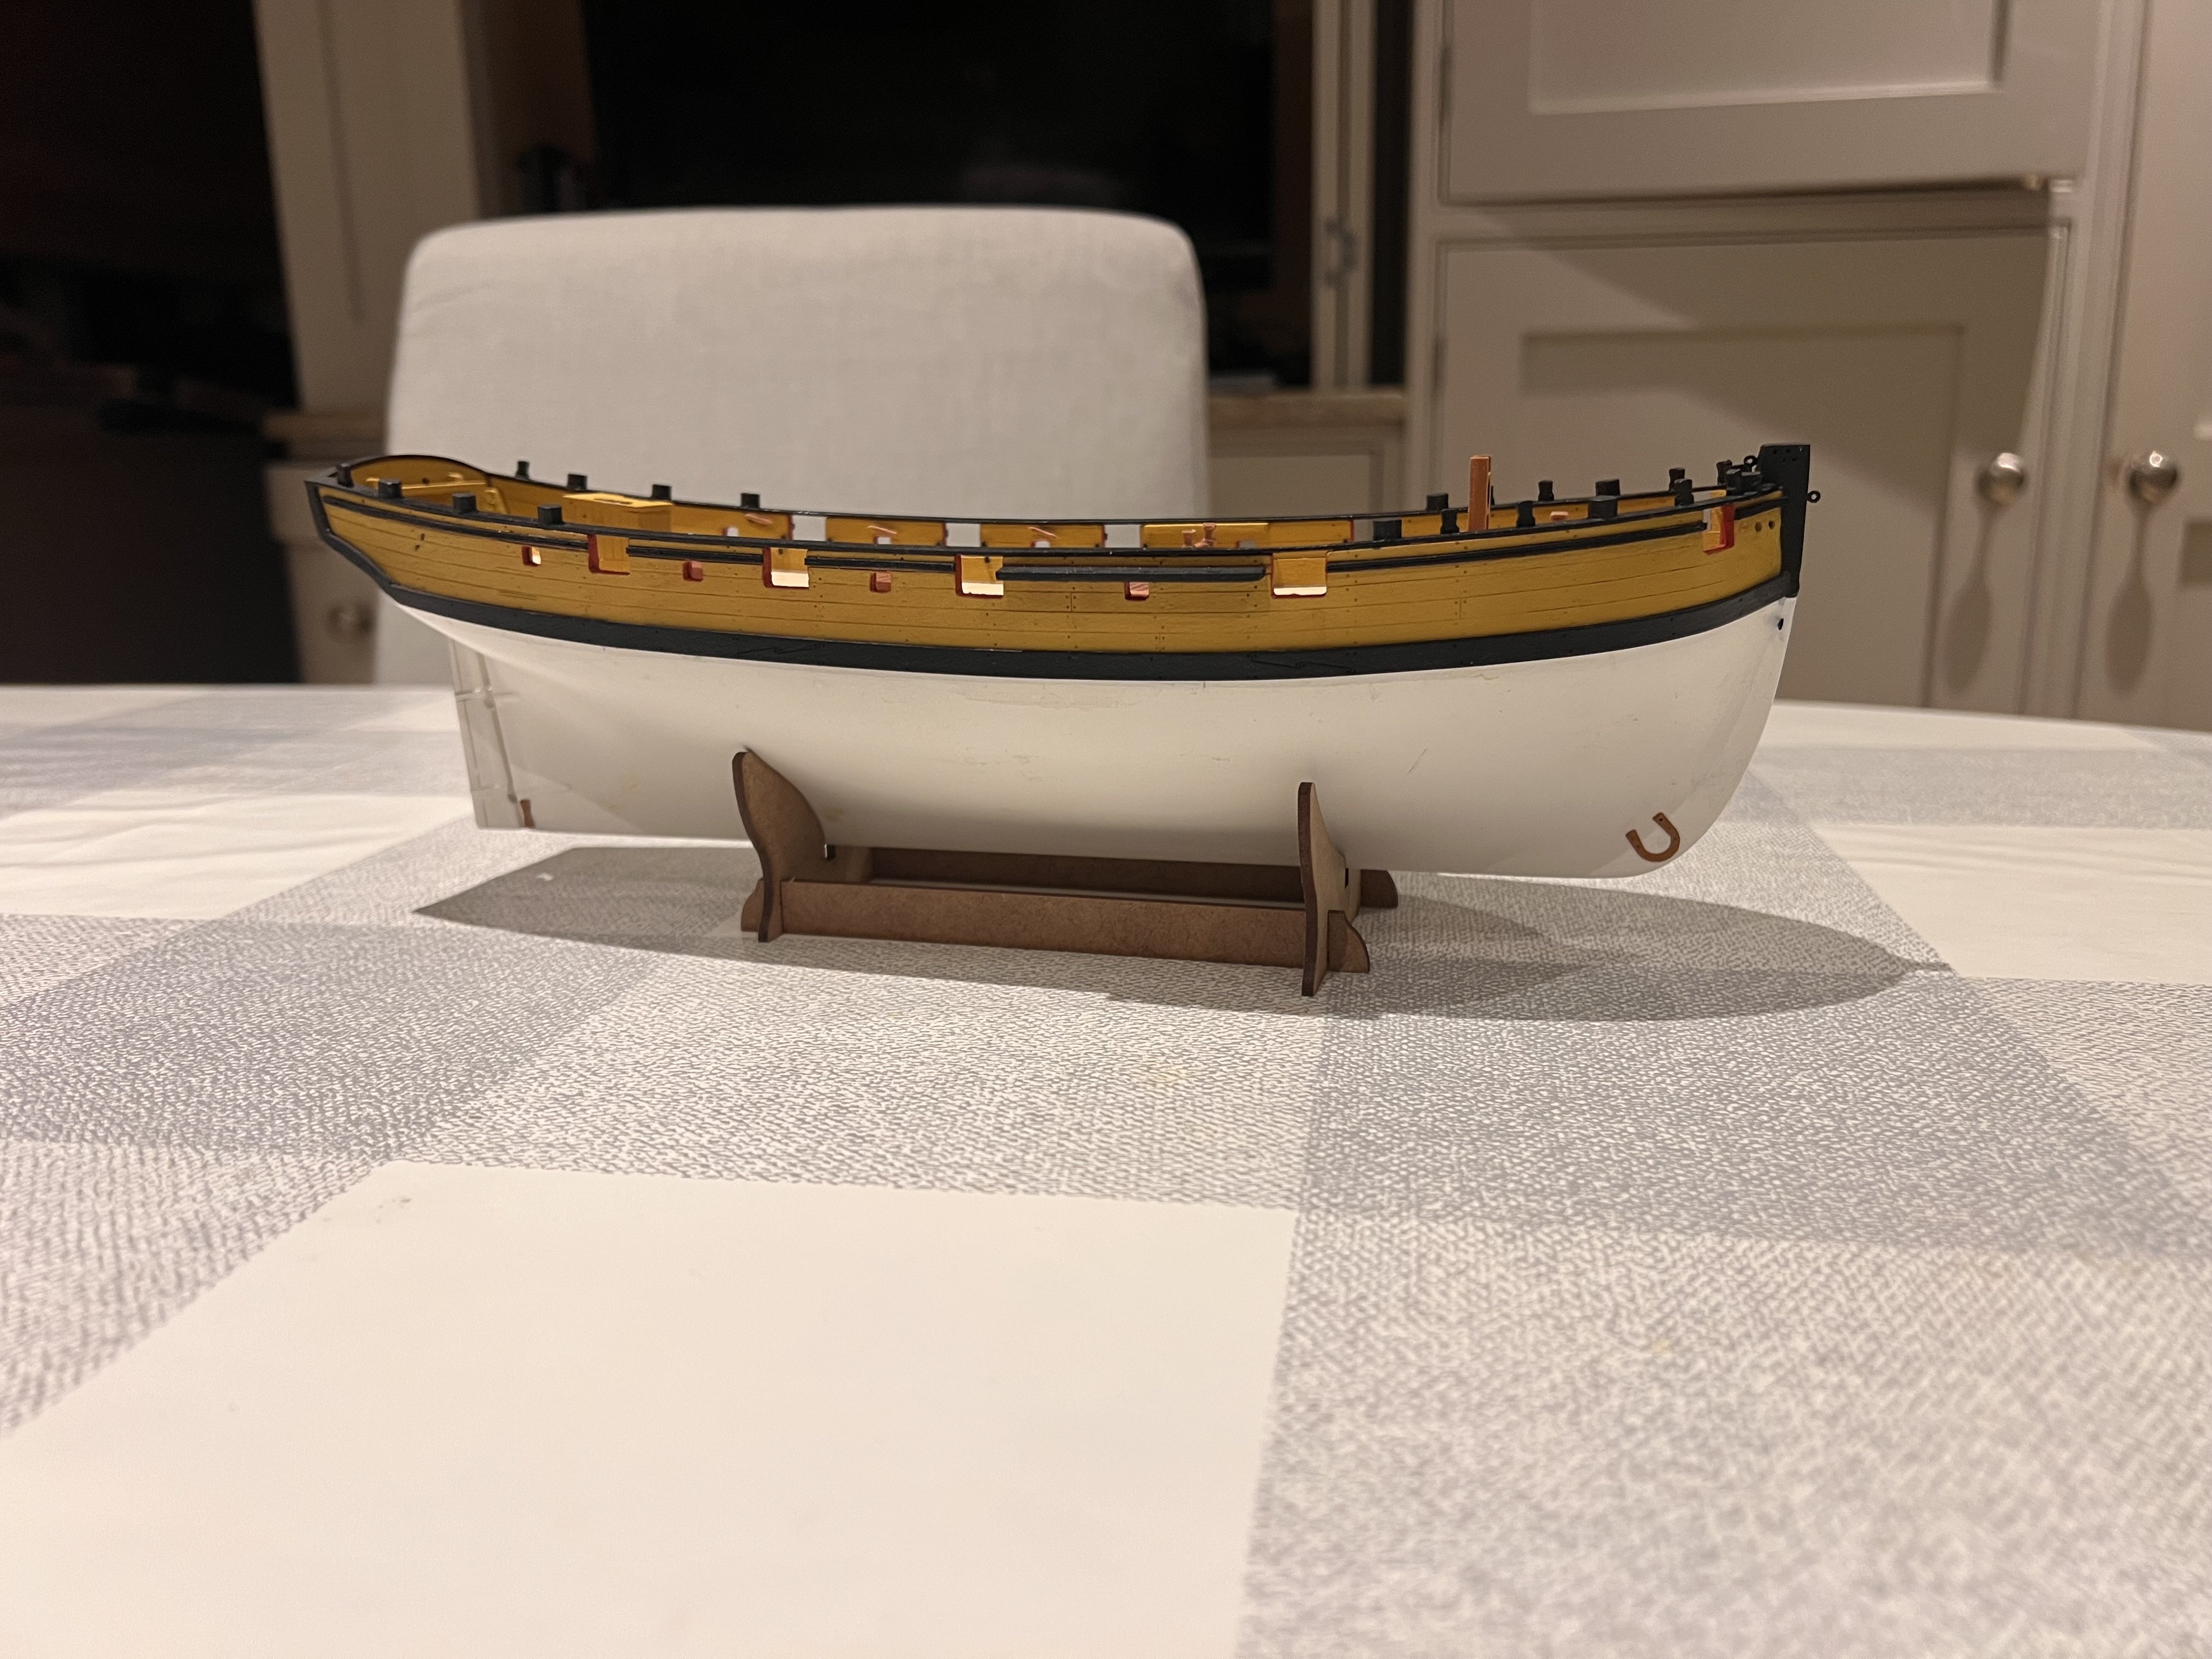
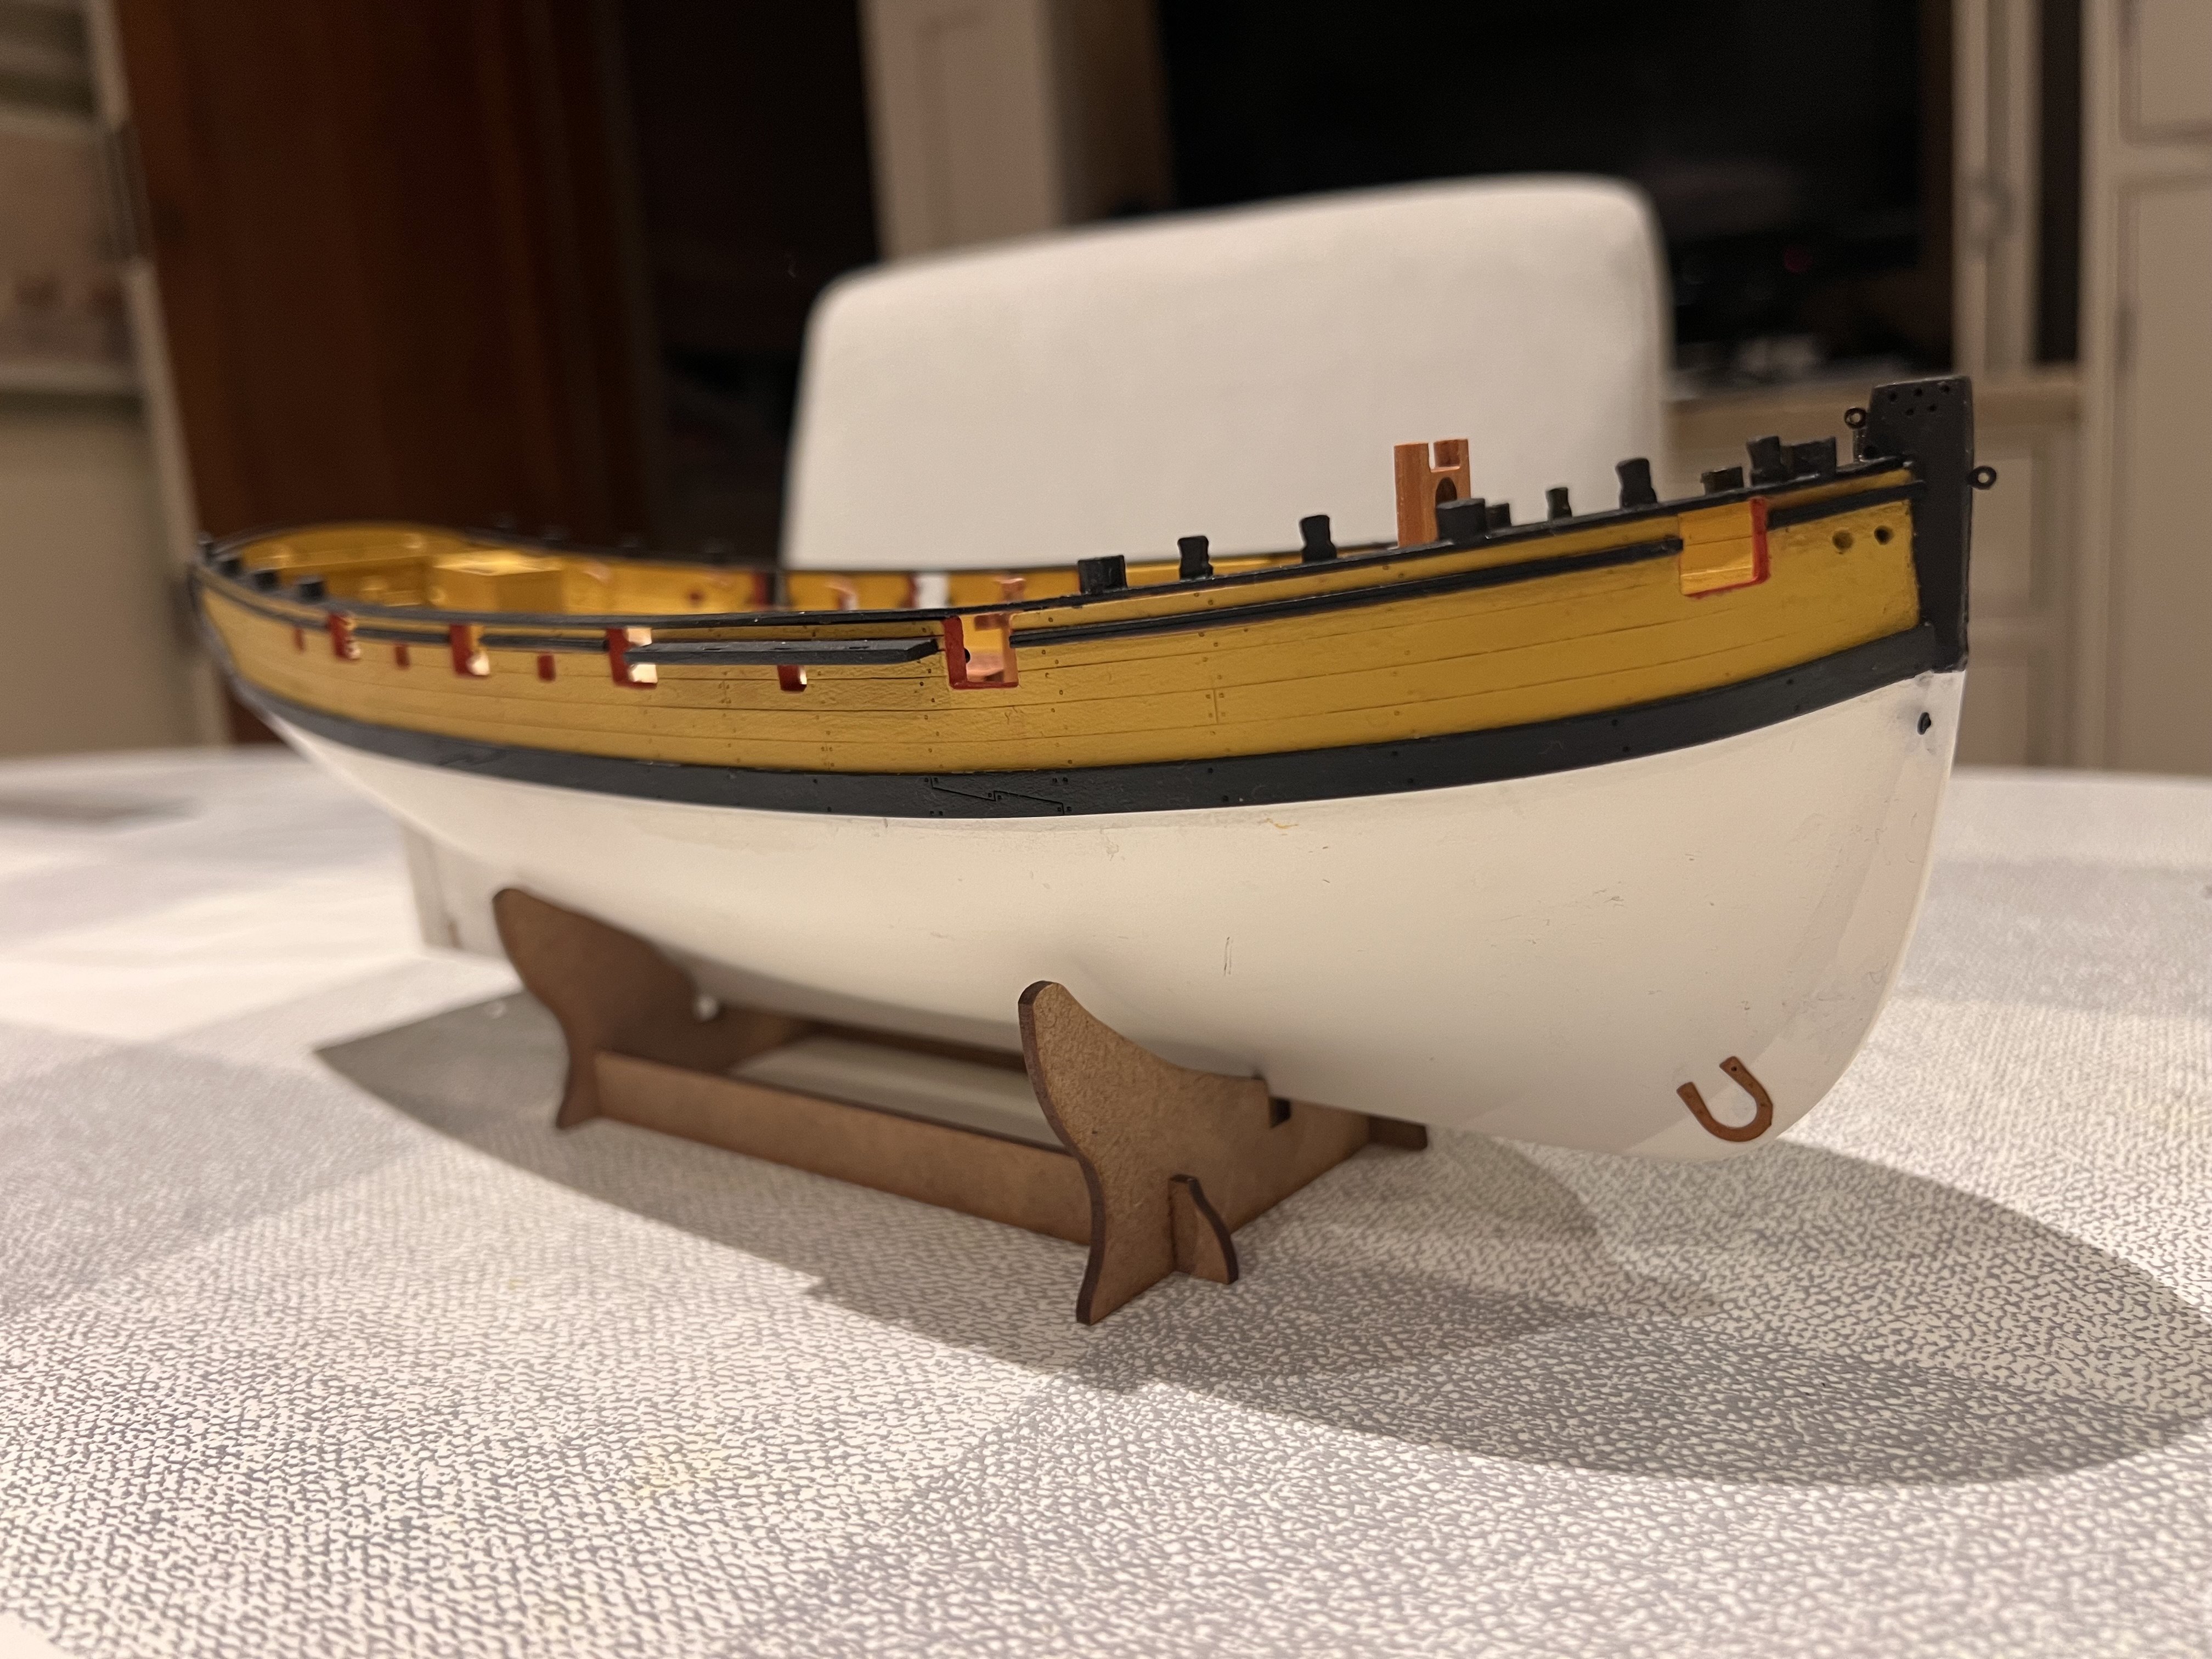
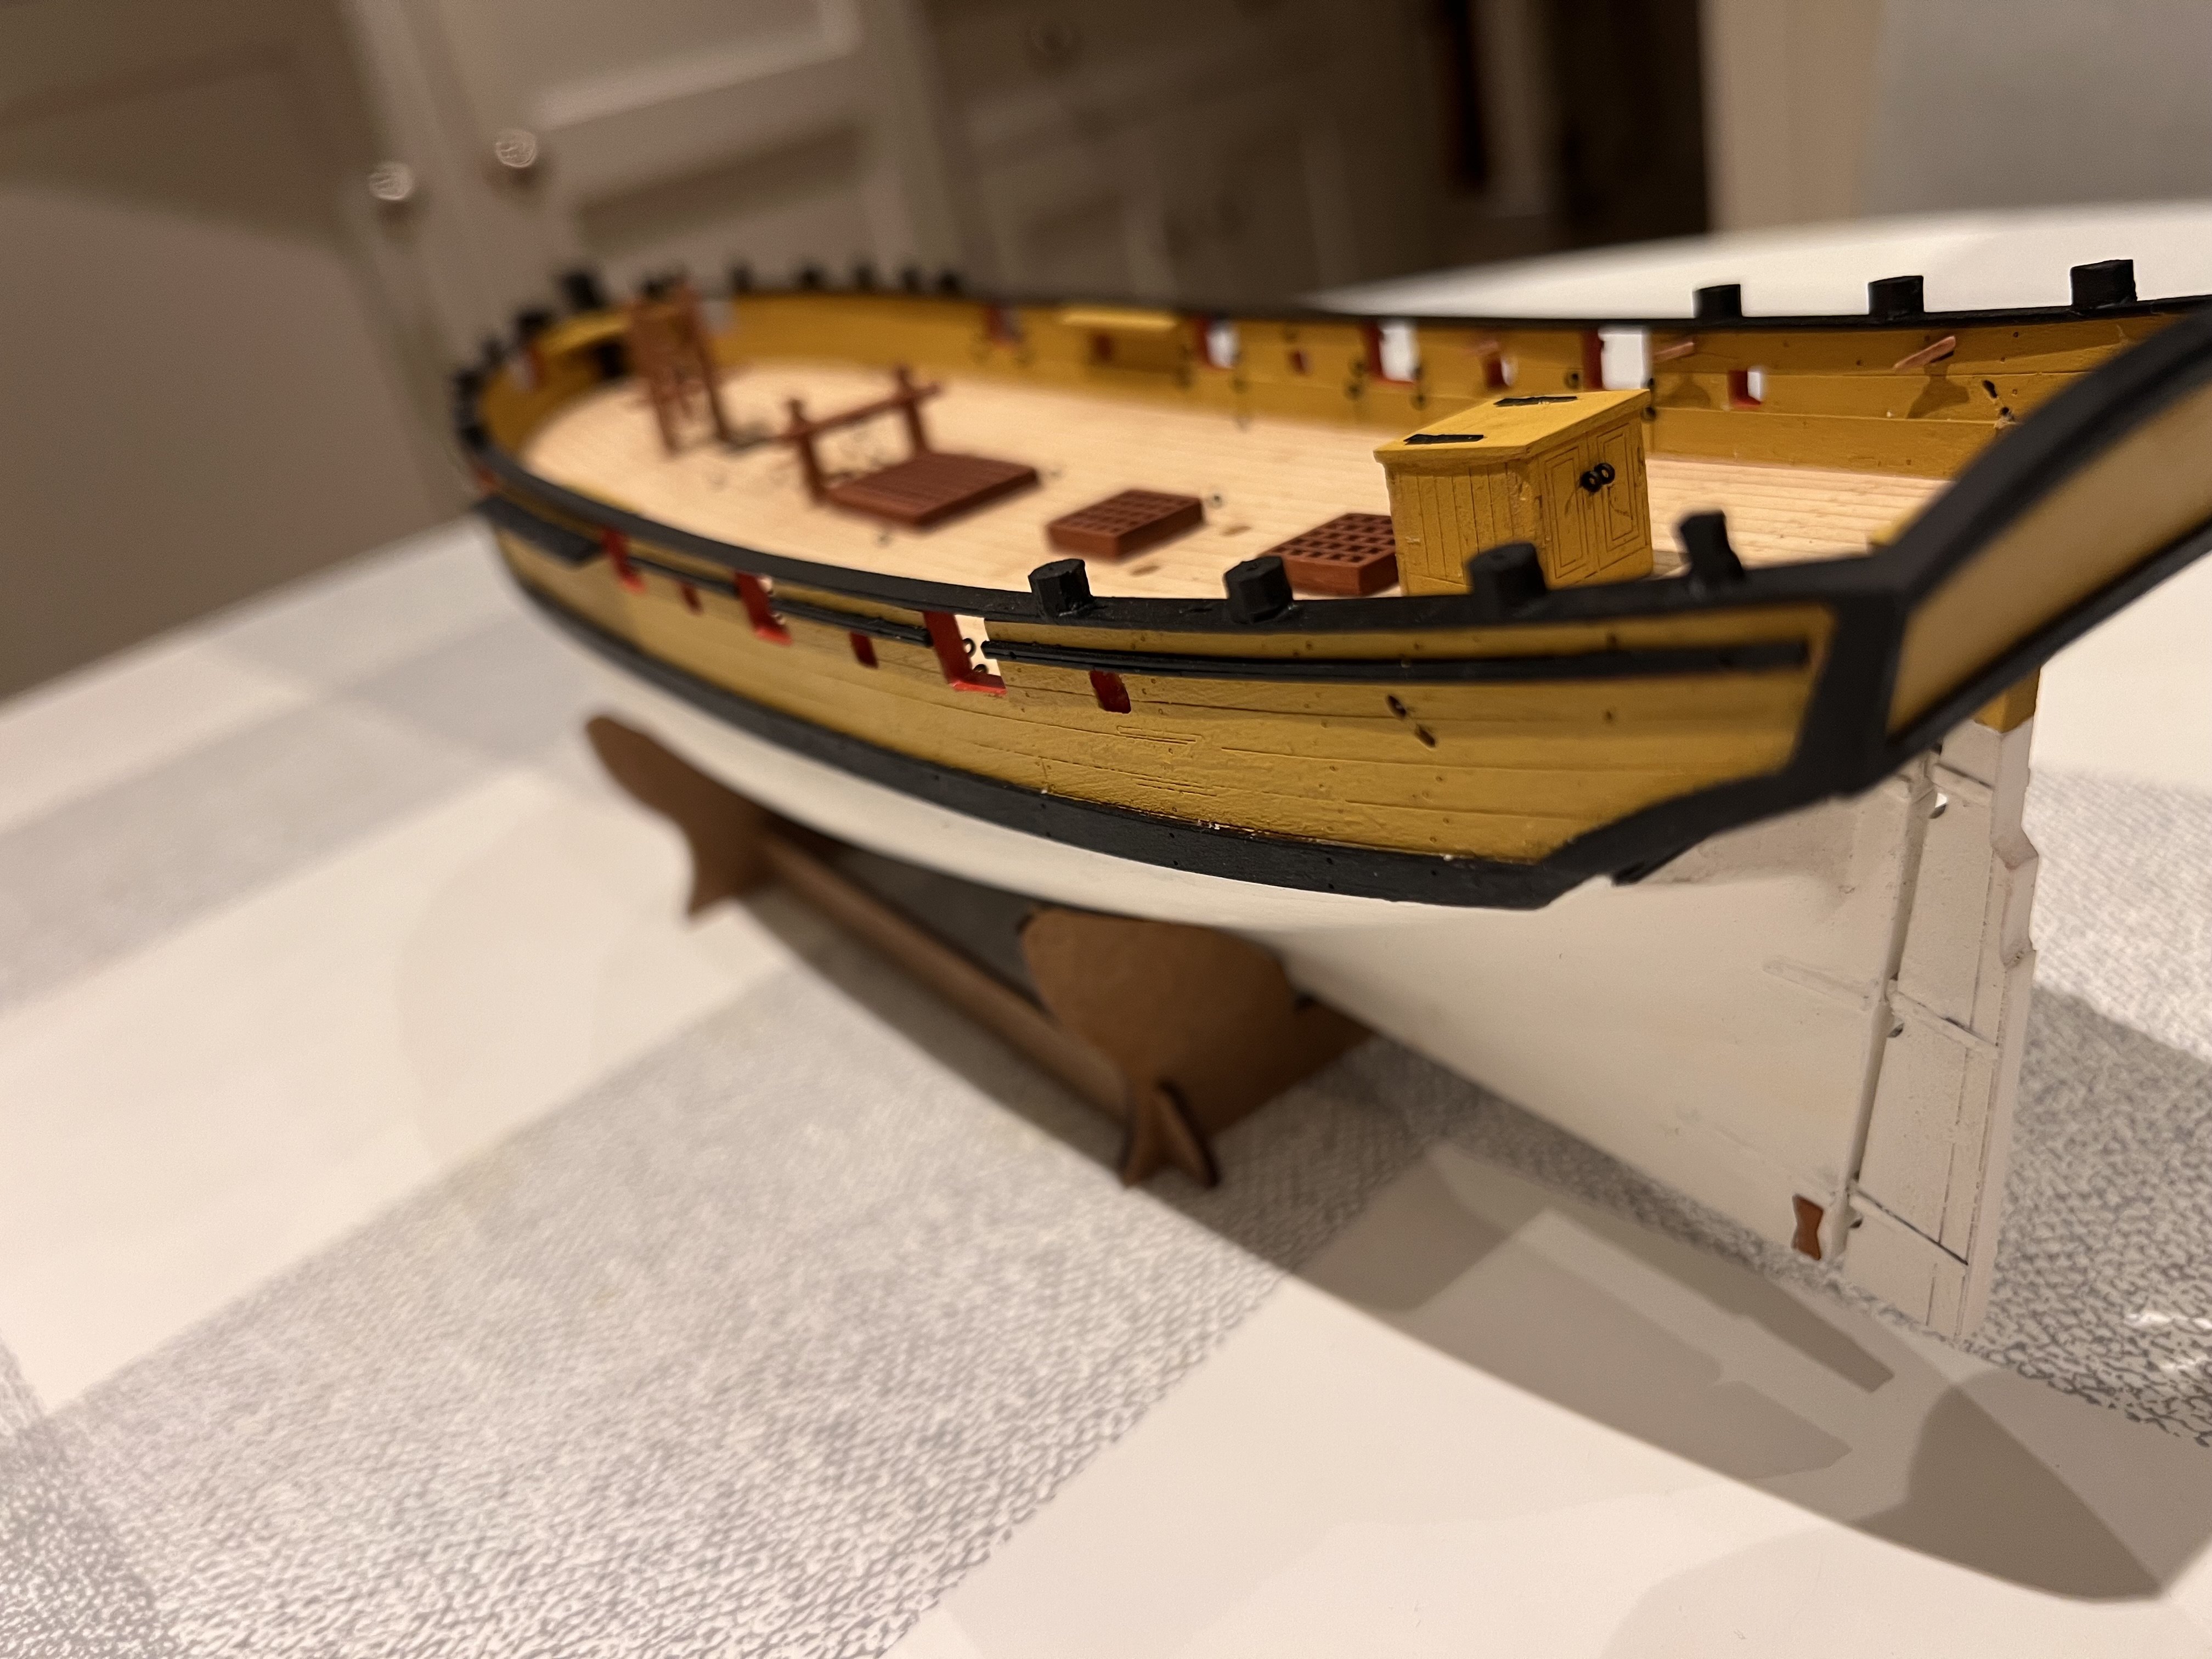
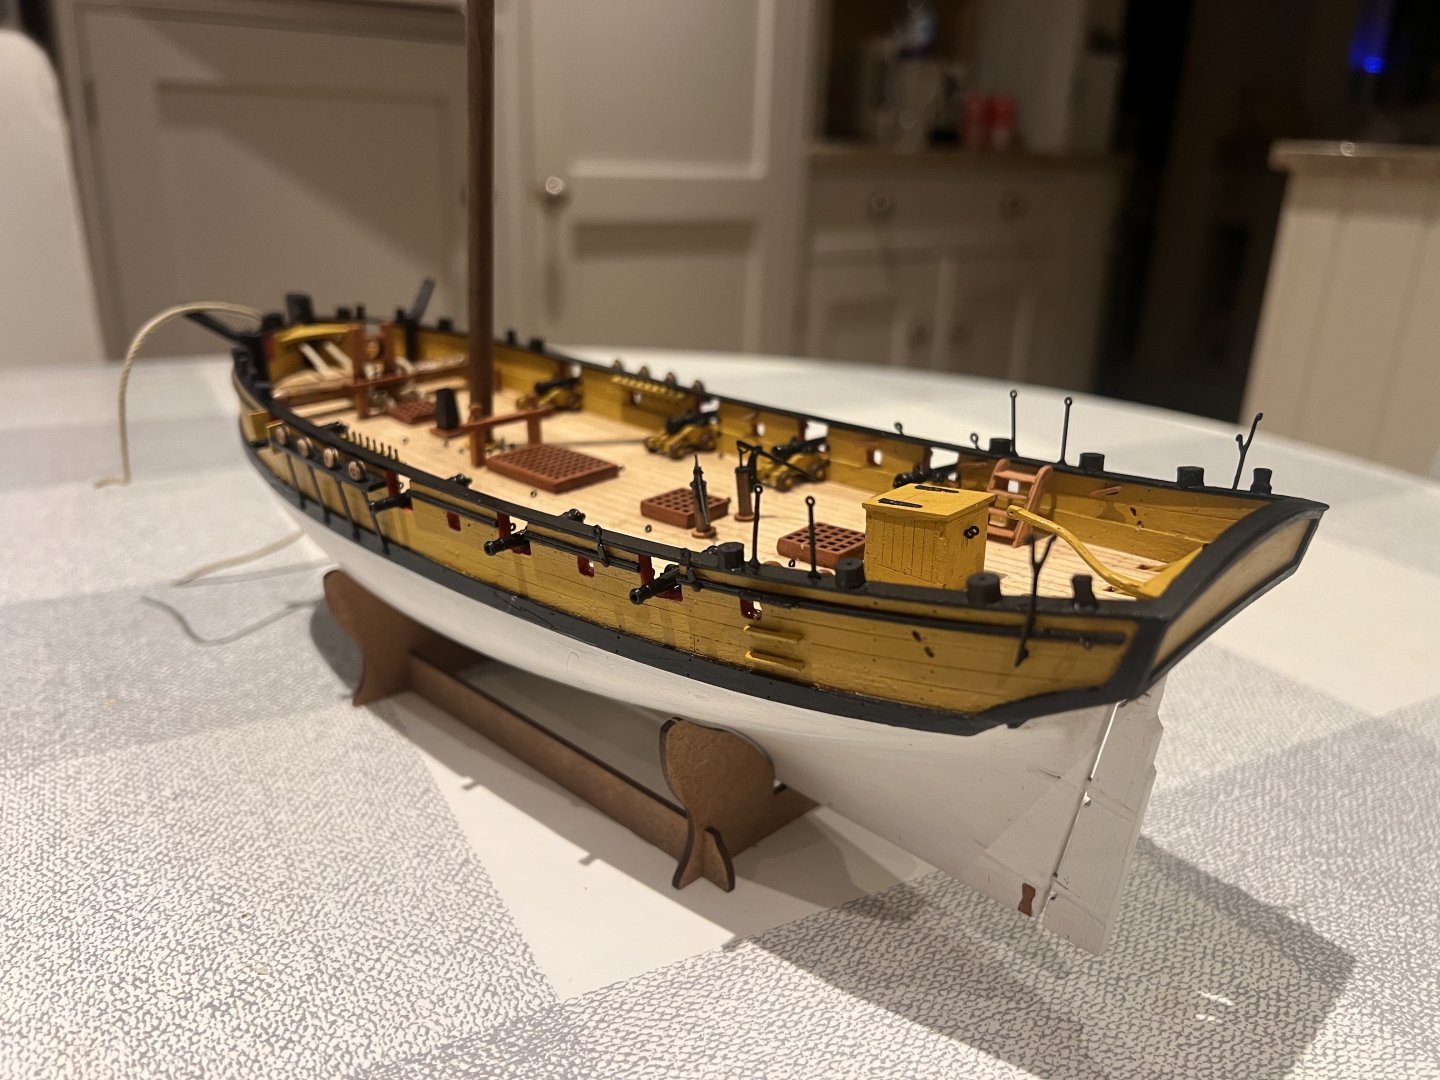
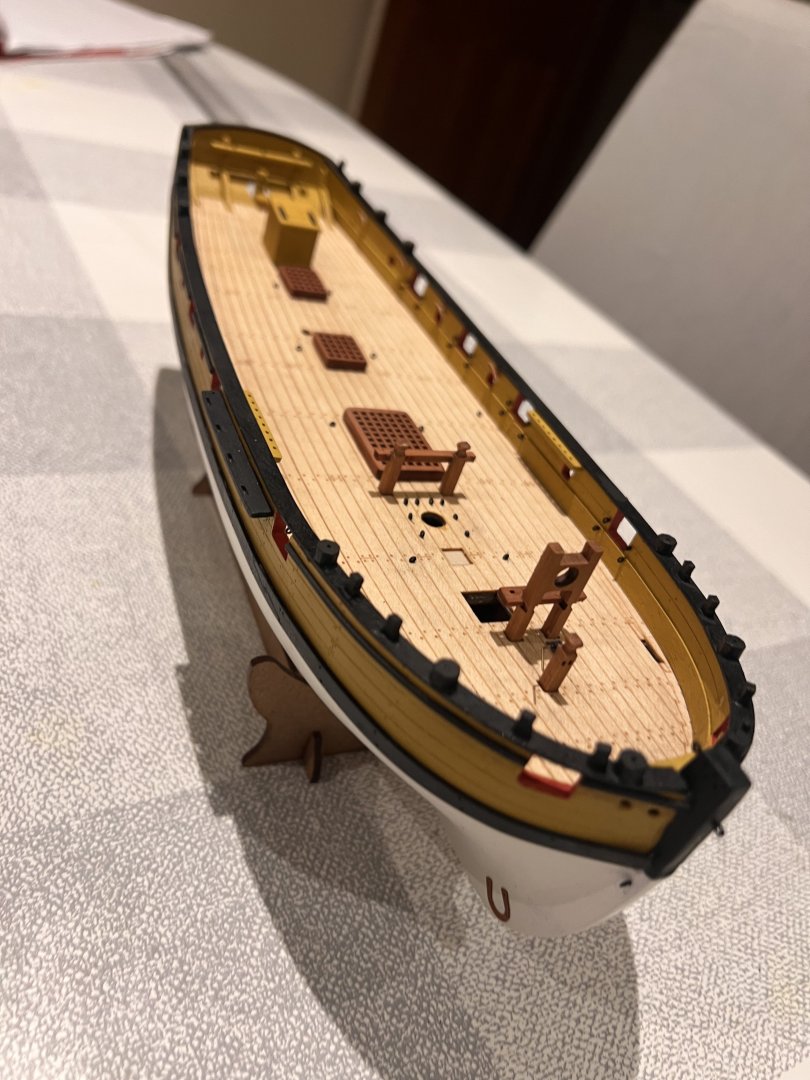
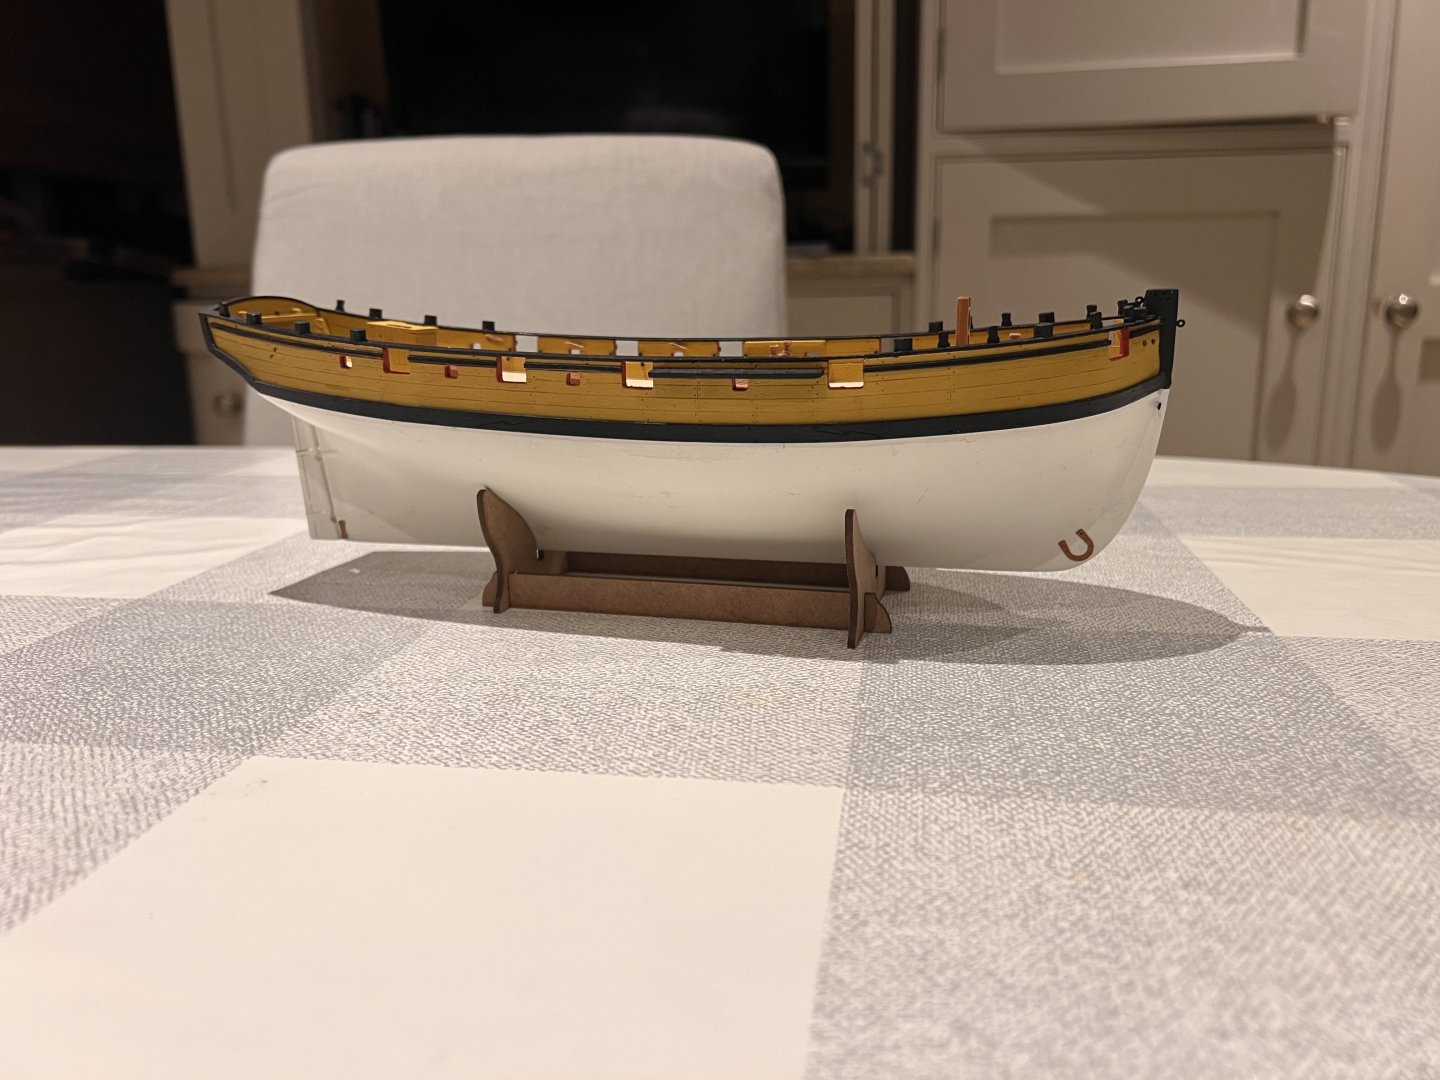
Hull now fitted out except for anchors and swivel guns that will be in the way of rigging. Pretty little boat. I like the yellow ochre, makes a nice change.


- 21 replies
-
- 14
-
-
- Vanguard
- Sherbourne;
- (and 1 more)
-
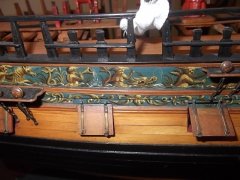
Thanks Chris, that’s amazing and very kind of you. It’s entirely my personal preference not in any way a criticism. Your kits are fantastic and I’d build them with or without cutaway decks! Thukydides you are absolutely right, I could do my own deck planking which was my goal on Sherbourne. My intent had been to learn to deck plank on this kit so I could do the deck planking on a much bigger Surprise later. It didn’t go to plan on Sherbourne as shown above and unfortunately life is particularly busy right now so I decided not to persevere. Nick and Andrew - thank you for your kind words. Peter - thanks but the photos flatter my painting skills. I don’t use an airbrush, I know it gives a better finish, but I’m getting decent results just brush painting. The main reason for this is that I enjoy brush painting the kits! It’s part of the fun for me. I do use rattlecan sprays for the white lower hull and also a black can to provide an initial coat of paint to the PE and some other larger black parts. The brushed colours are black and yellow ochre from the Vanguard paints set. The black spray is Citadel Chaos Black and the white spray PlastiKote Matt white (both recommendations from other build logs on MSW). if you do need to mix wipe-on poly the key I missed the first couple of times is ensuring that the polyeurethane varnish used is oil-based. 50:50 mix seems good to me. Good luck with Sherbourne, she’s a lovely little kit. Once you’ve built a Vanguard kit I doubt you’ll want to go back to other manufacturers.
- 21 replies
-
- 4
-
-
- Vanguard
- Sherbourne;
- (and 1 more)
-
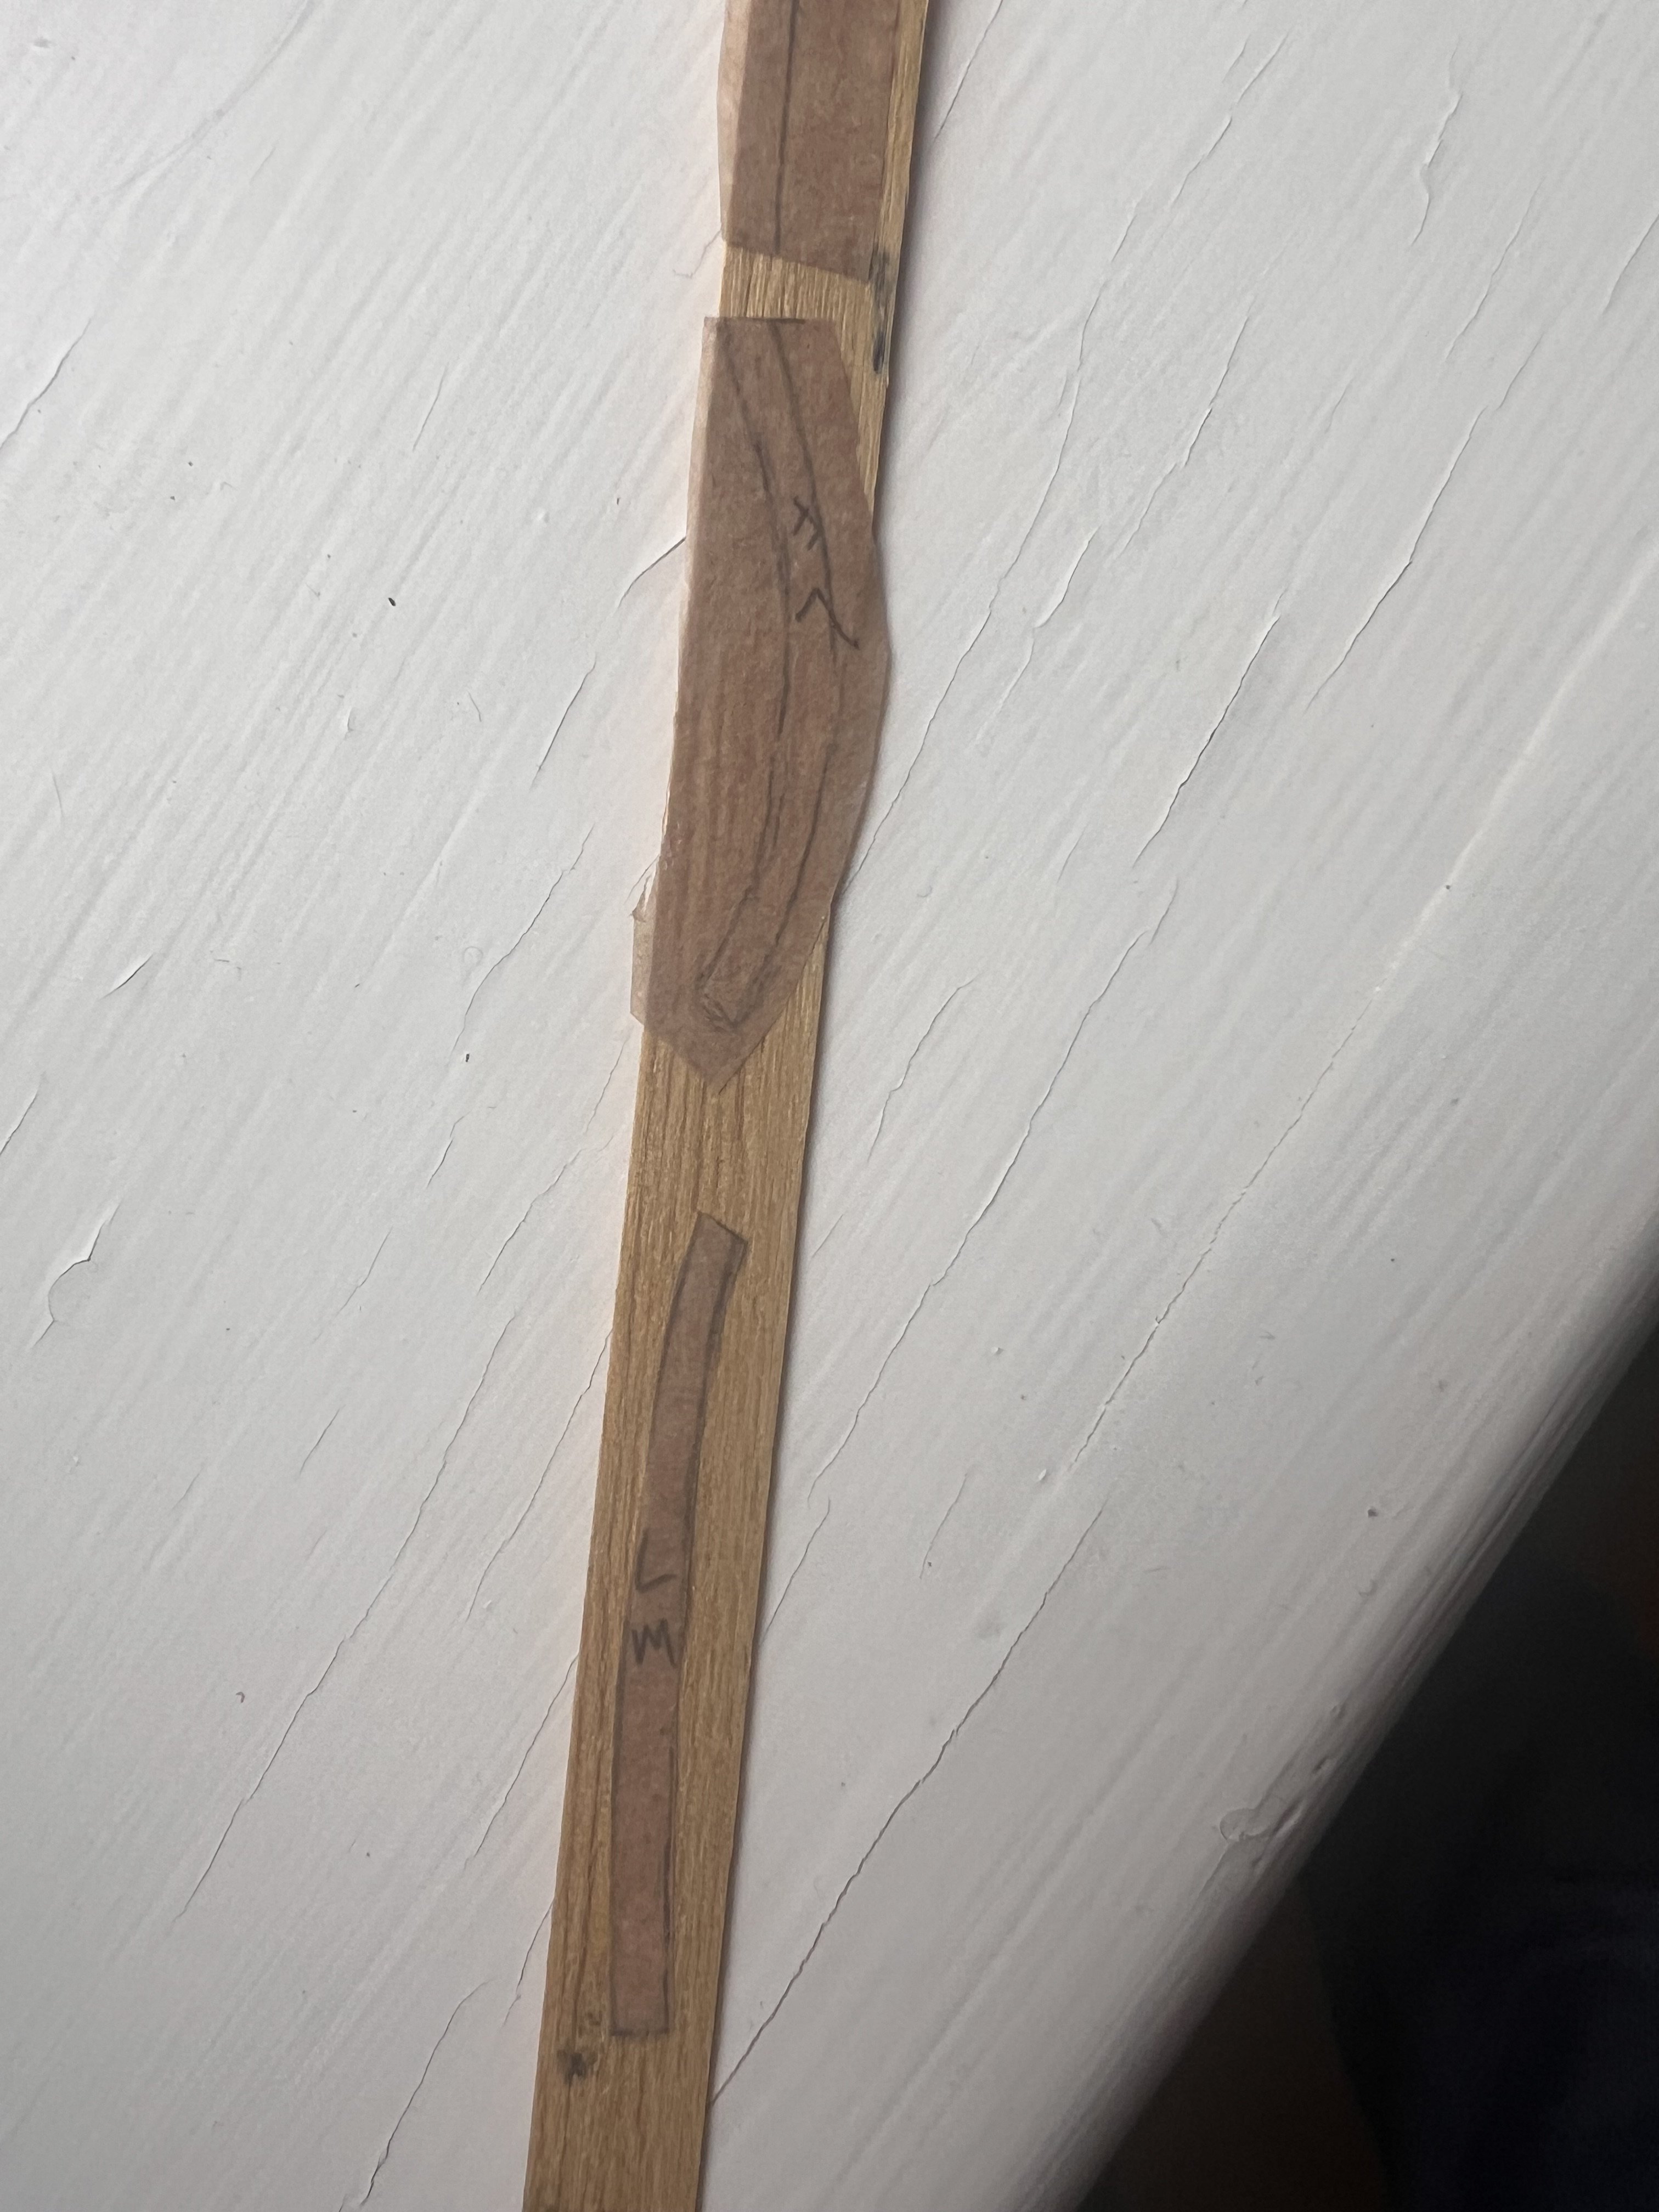
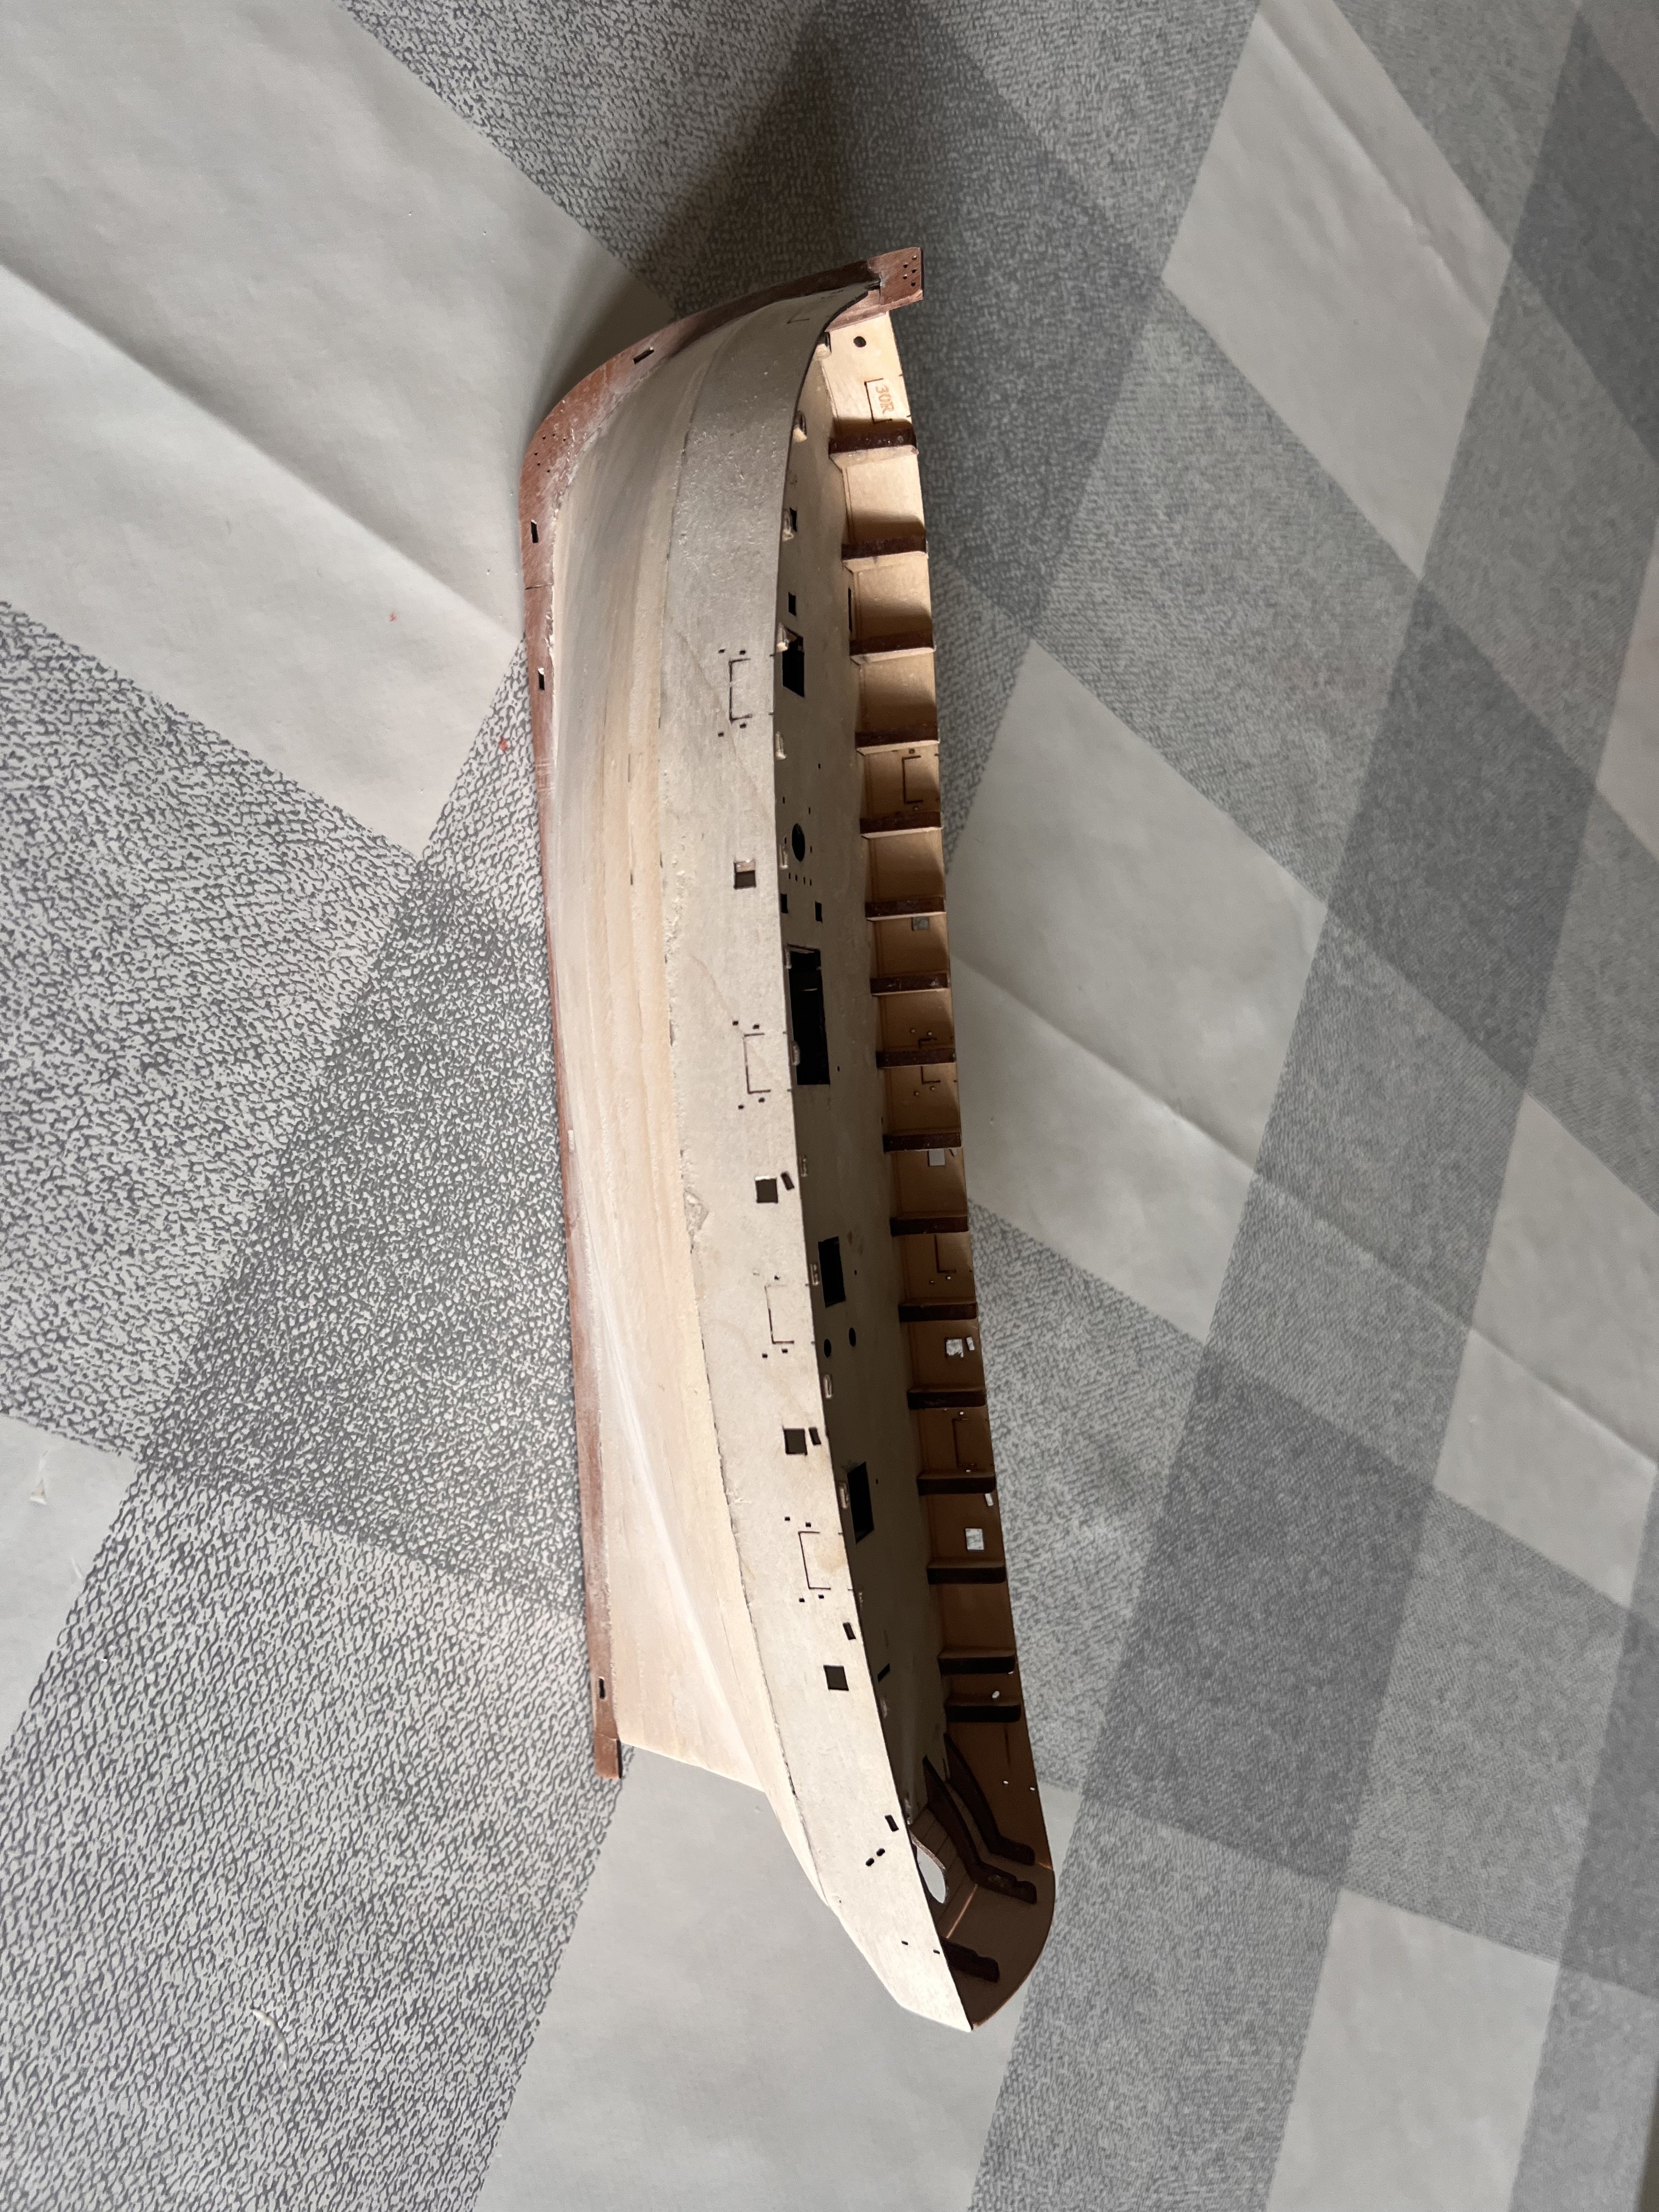
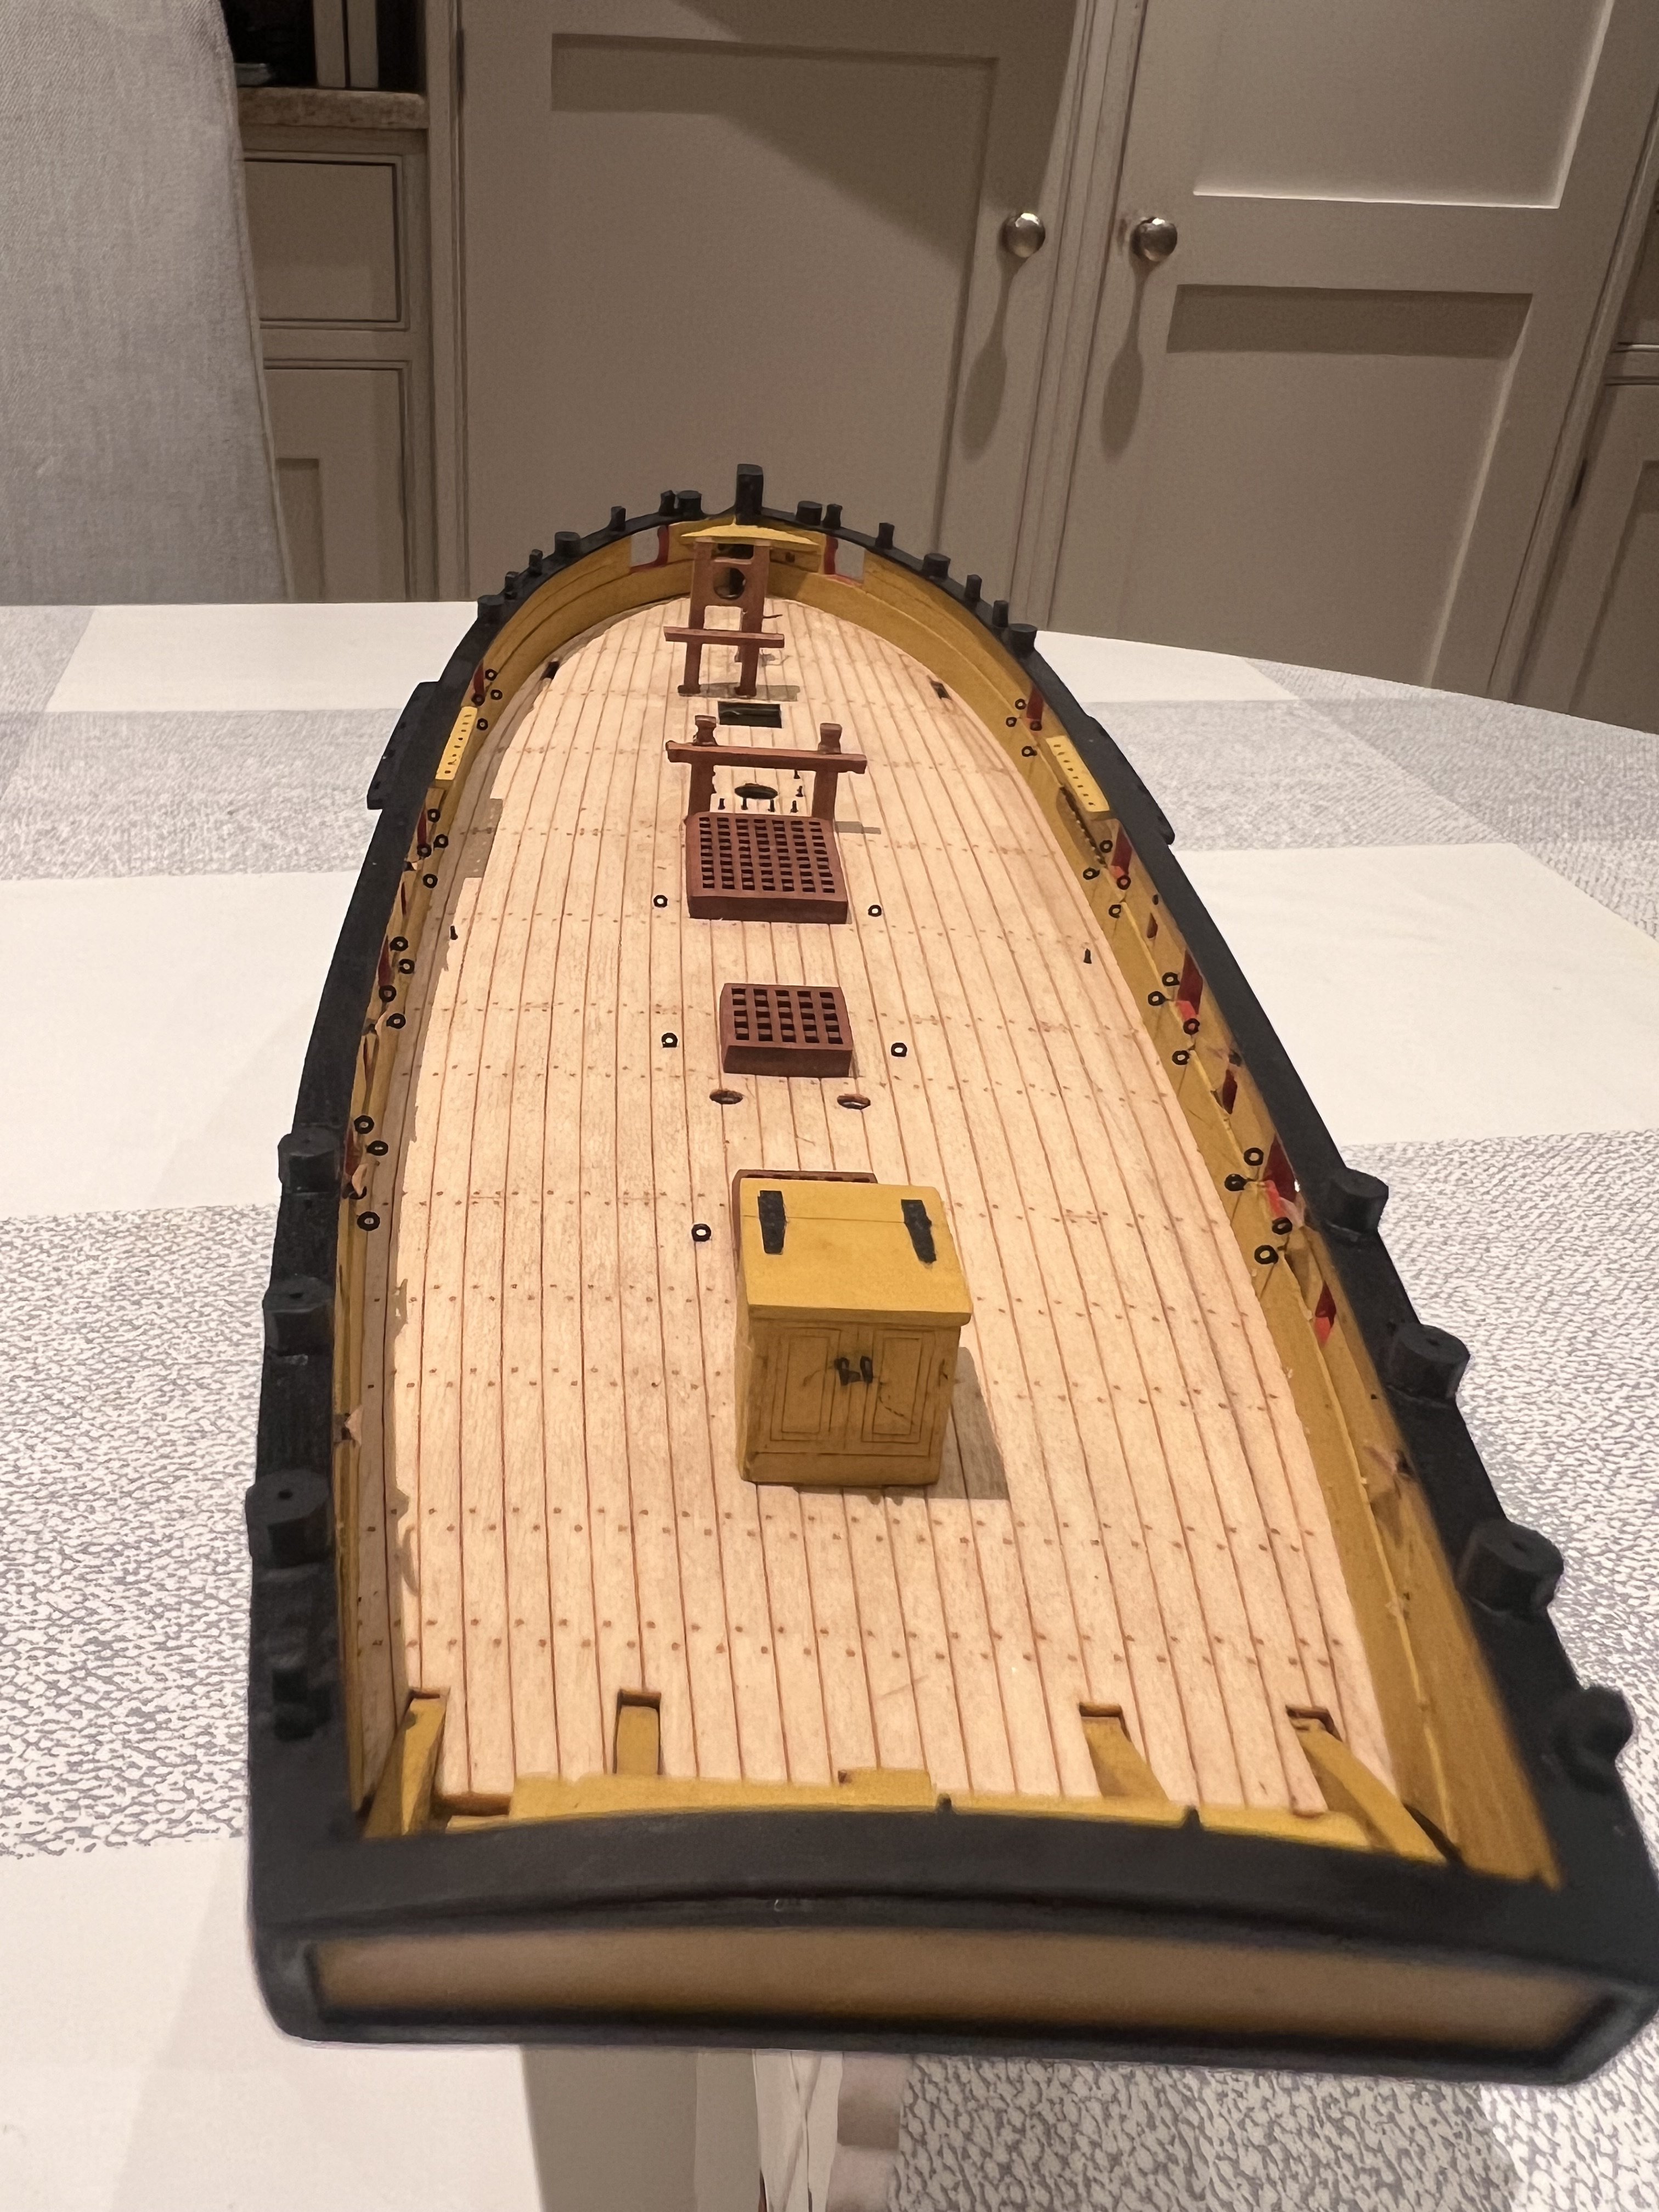
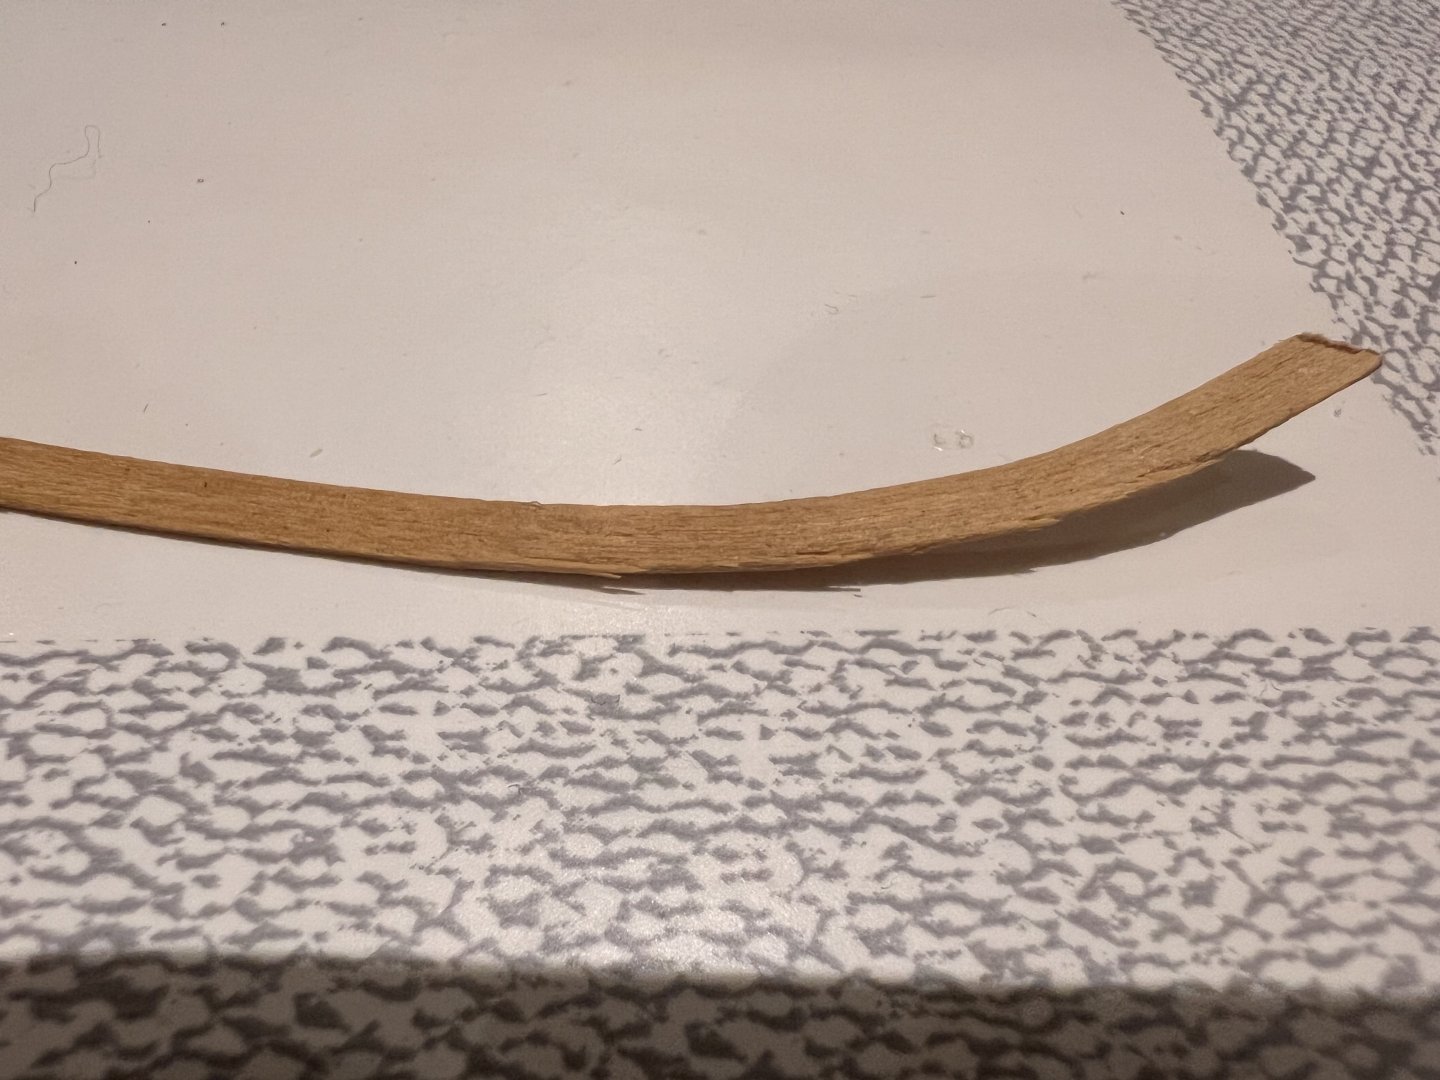
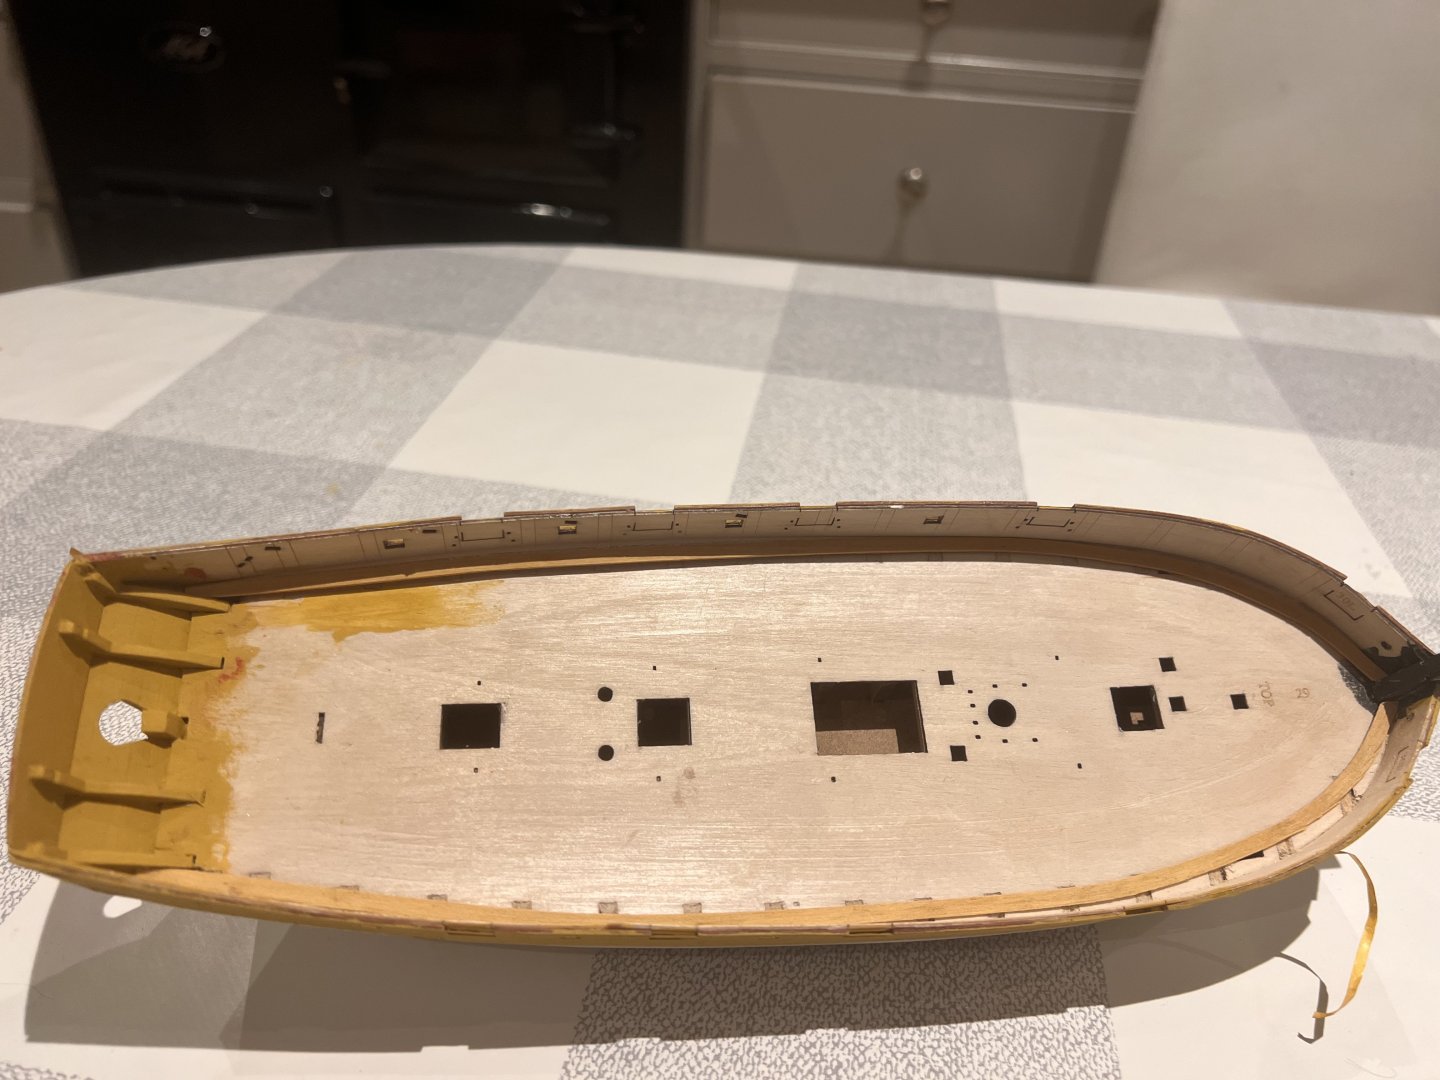
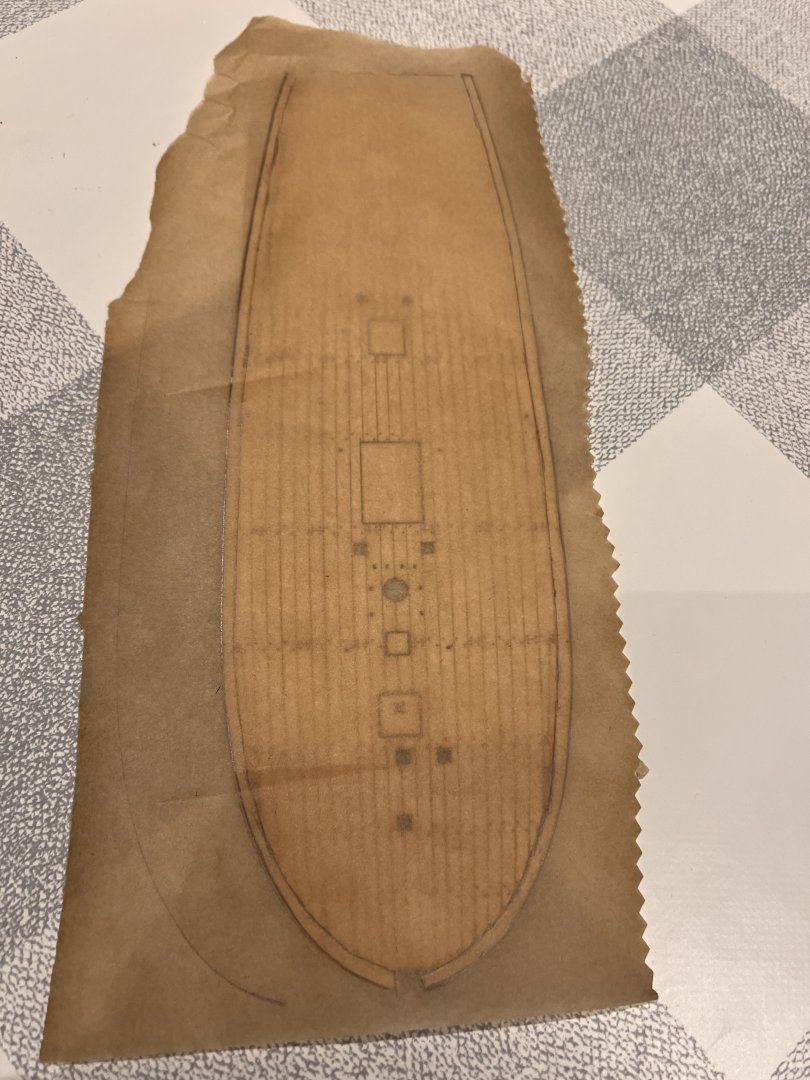
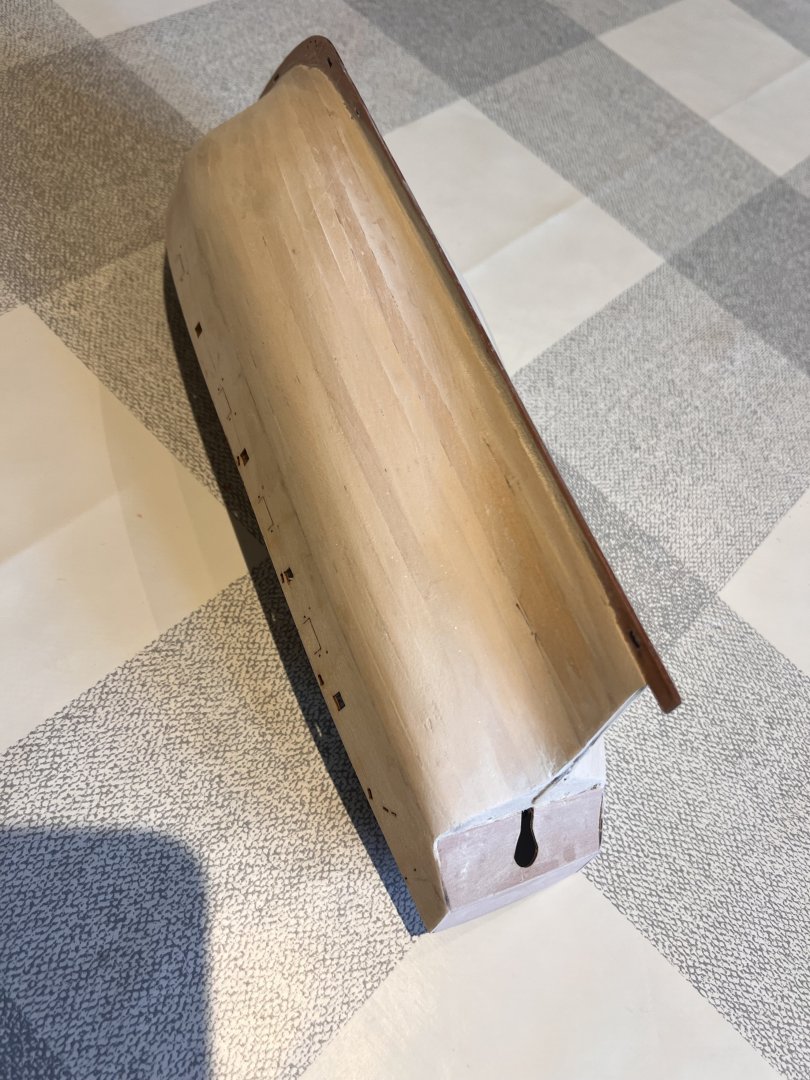
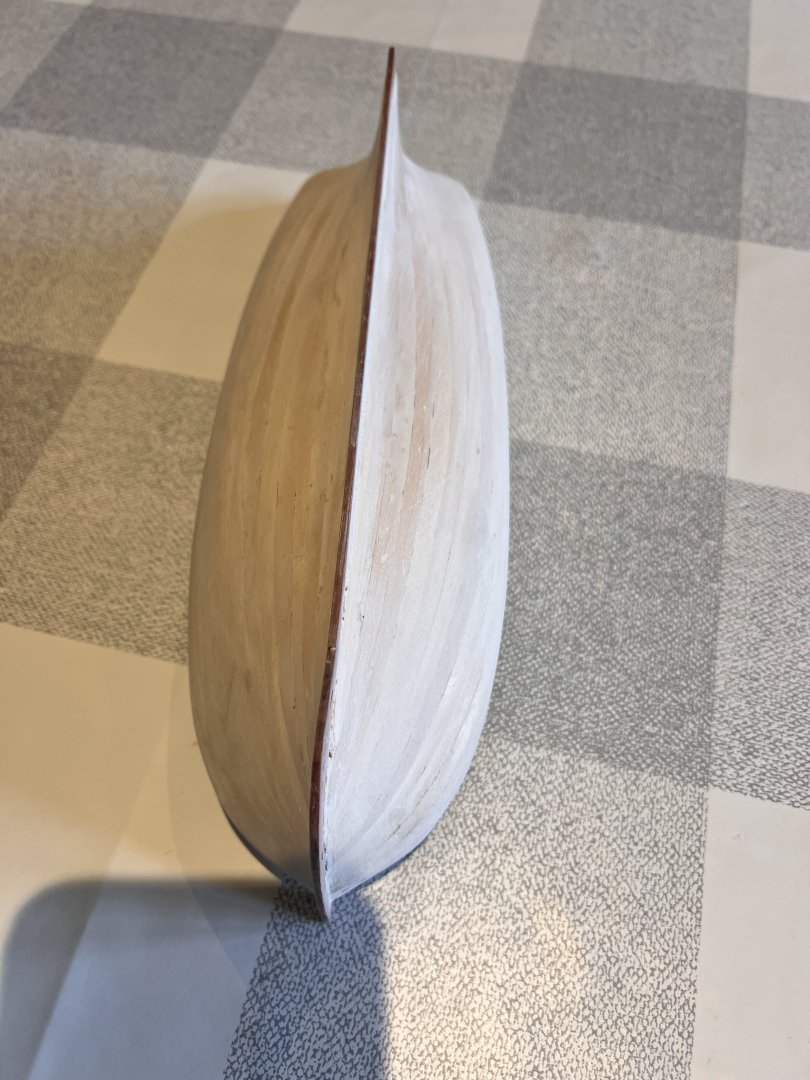
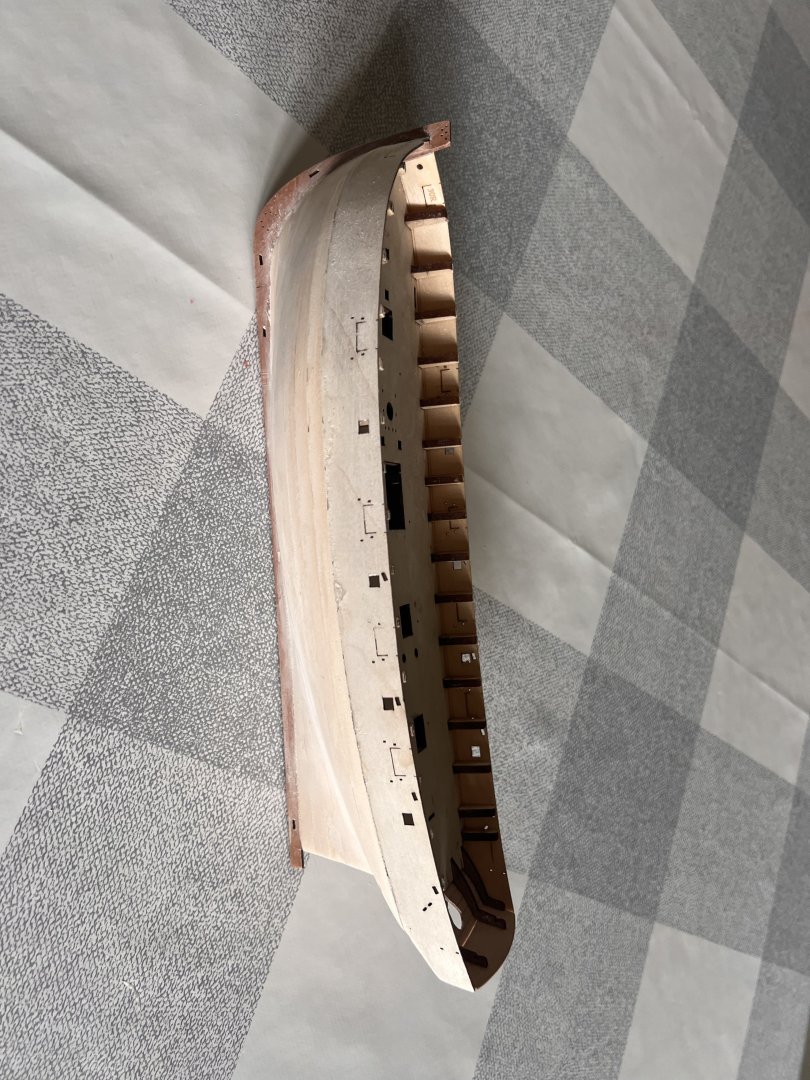
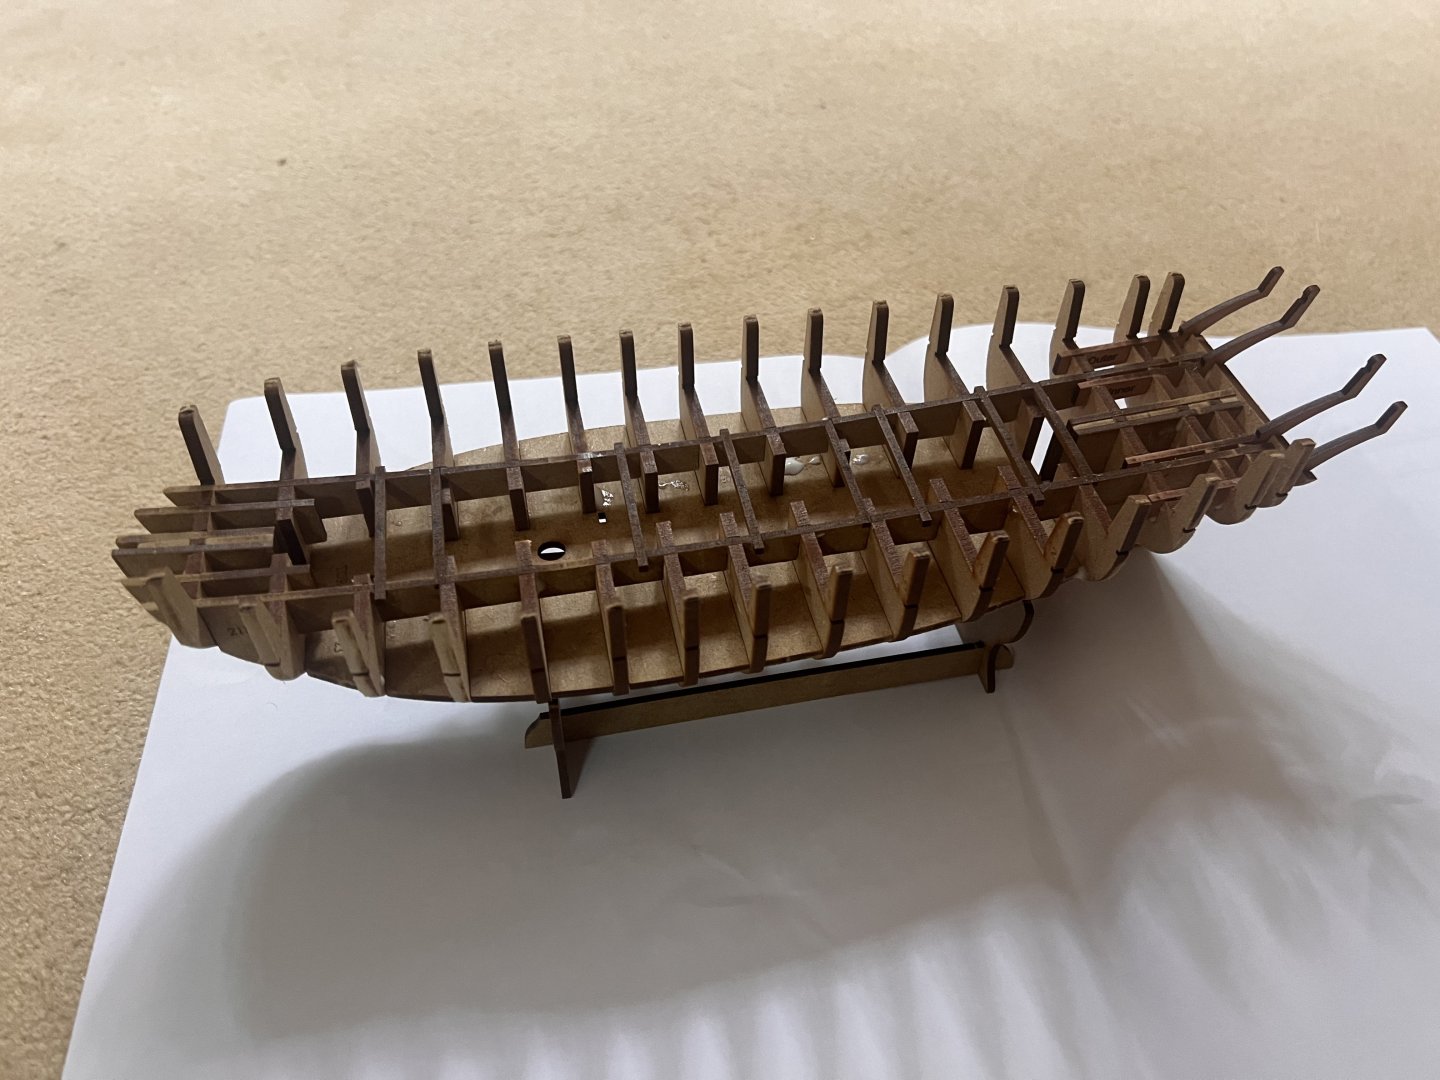
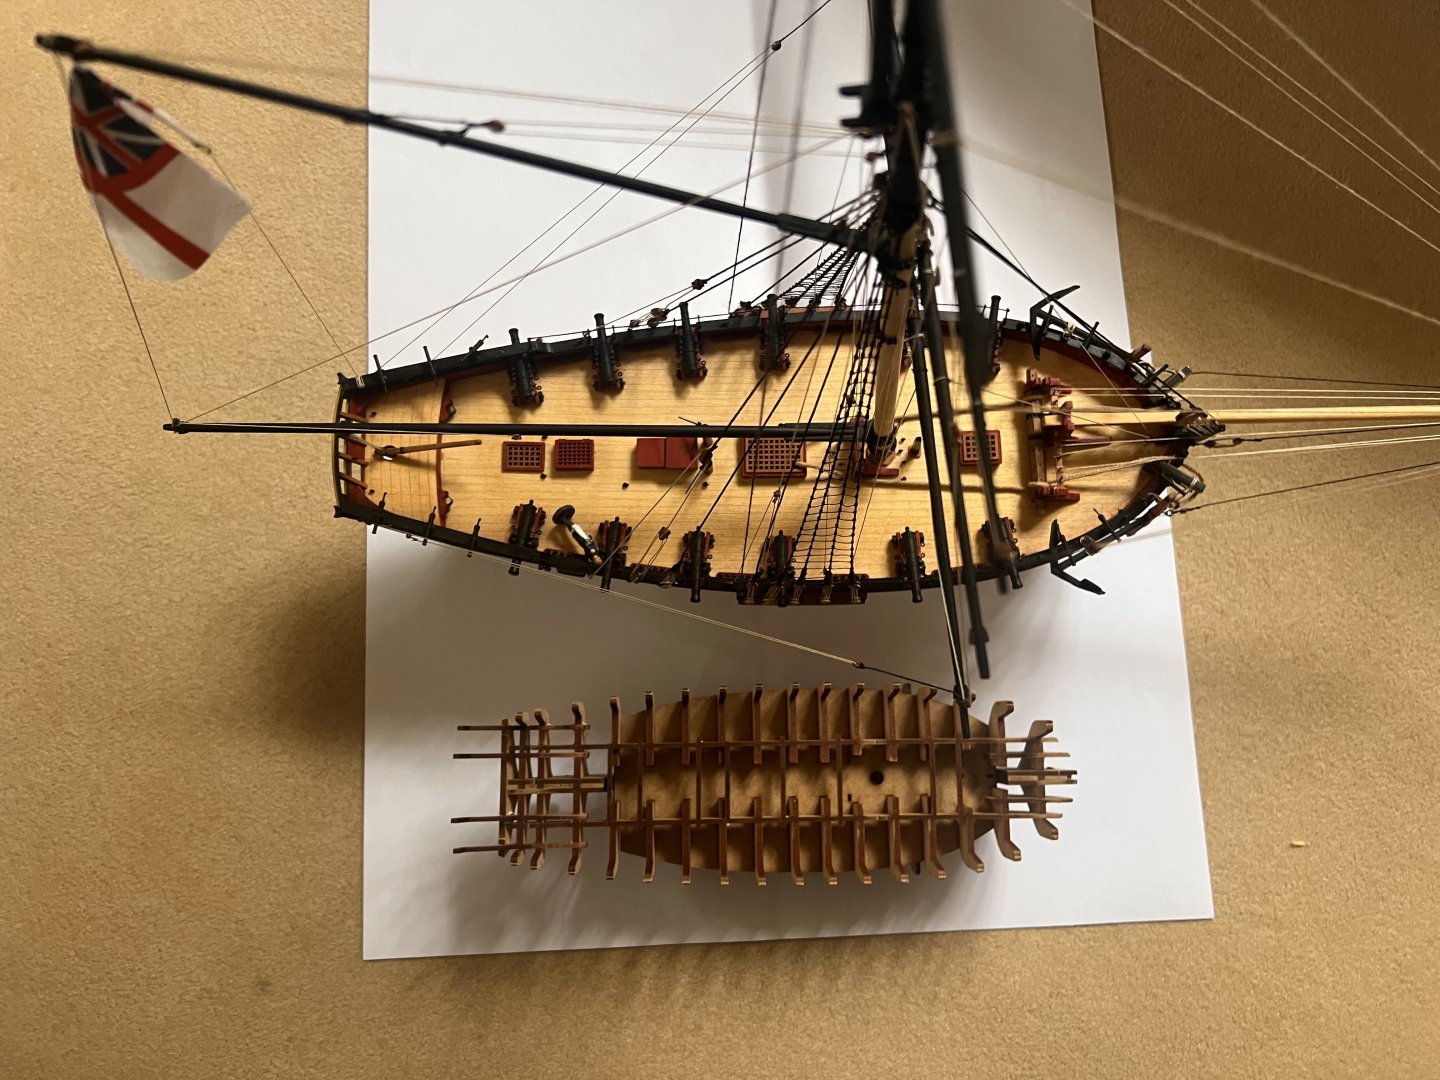
I’ve not had much time for shipbuilding recently, but I’ve managed to progress on Sherbourne slowly but not keep a full build log. My intent with this build was to work on three areas: 1. Learn to plank the deck. This goal failed. I ordered some expensive boxwood from a cabinet maker online. The strips that came were a deep yellow colour (apparently Boxwood can be). The real problem was that they splintered when I tried to soak them, bend them, cut them, etc. I started out using tracing / baking paper to trace the outlines of the margin plank from Chris’s engraved deck then glued this to a 1cm wide boxwood strip. Then tried to cut the shapes out but they splintered into pieces. I then tried soaking a strip and bending it to shape. I could just about get the shape, but the wood splintered in doing so. Clearly the wrong wood for the job. I got fed up so I reverted to the engraved deck rather than order a different wood to try. I really like the Vanguard engraved decks. I’m less keen when they’re cut away to show the interior as they are on Sphinx and Surprise. The cutaway deck works really well on Harpy as it makes the model much more interesting, but in my opinion detracts from the small frigates. It’s entirely a personal preference but I’d prefer they weren’t cut away as standard. I’d like to have had the option to fully deck Surprise myself so I can choose whether to have the cutaway engraved deck or not. I may have another go with deck planking on my next build (Speedy). 2. Paint the hull yellow ochre and see how it turns out. My planking can be messy so it’s nice to have the option of a fully painted hull. Sherbourne was one of my worst yet planking jobs, not that it mattered as everything that is planked is below the wales and painted white. I’ve been short of time and may have rushed the fairing so the planks didn’t lie as well as they should. Entirely my mistake. Some photos of the first planking below. It was worse than it looks here! I also snapped the inner plywood bulwark and am eternally grateful for Chris’s superb customer service at Vanguard. He very kindly sent me a replacement. 3. Mix and use wipe-on poly. You can’t easily buy wipe-on poly in the UK. I used the Blackfriars oil based polyeurethane varnish clear satin that BE recommended and mixed it with white spirit 50:50. Seems to work well. The effect on bare pear wood is almost identical to the finish I’ve achieved on other boats with Danish oil. Being a varnish I guess it seals and protects the wood better. The latter two have been a success - some progress photos below: There’s still work to be done to the hull before starting the rigging. I’m not going to put any ropes on the cannons on this build. I forgot to do so before fitting the ring bolts to the bulwarks and they’re so small on this build that I’m not going to try and add them later.


- 21 replies
-
- 14
-
-
- Vanguard
- Sherbourne;
- (and 1 more)
-
Thanks Chris. I’ve built Duchess and currently on Sherbourne. Will be building Speedy next. Hopefully Surprise or Harpy after that. Your kits are superb and I really enjoy building them.
- 146 replies
-
- 3
-
-
- Adder
- Vanguard Models
- (and 1 more)
-
Vanguard afficianadios...... Cutter Alert vs Brig Adder
DB789 replied to bigcreekdad's topic in Wood ship model kits
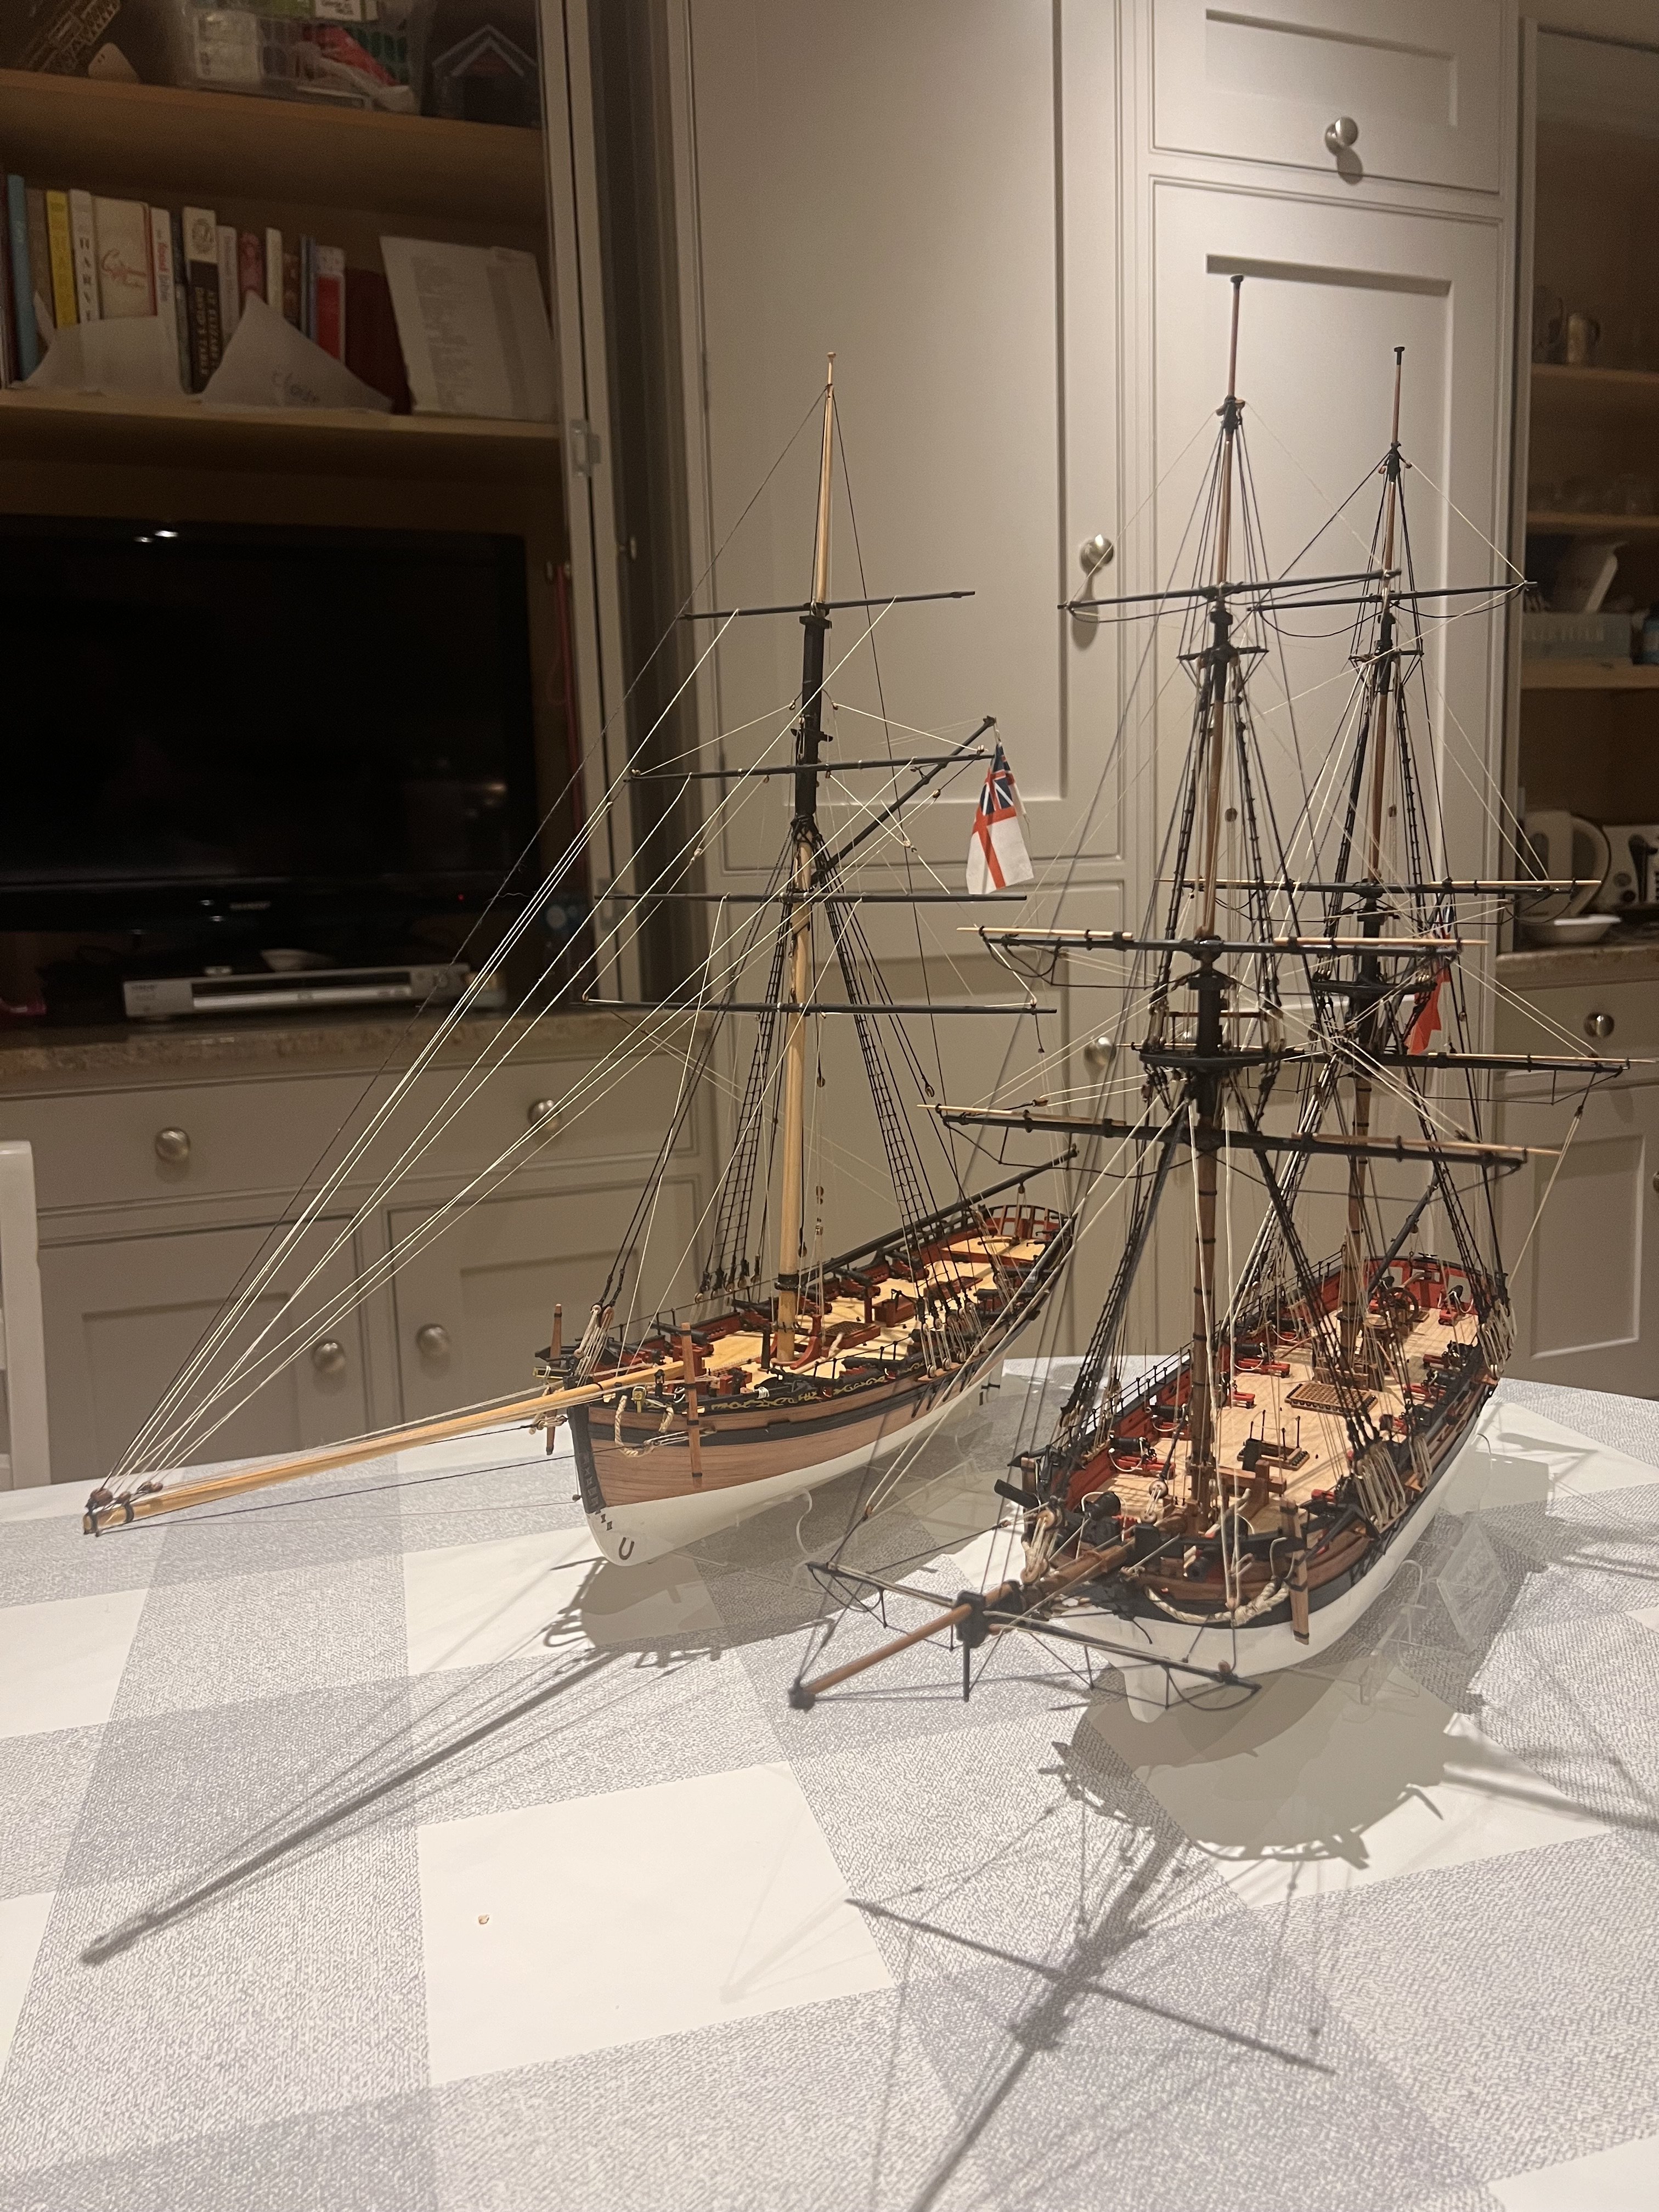
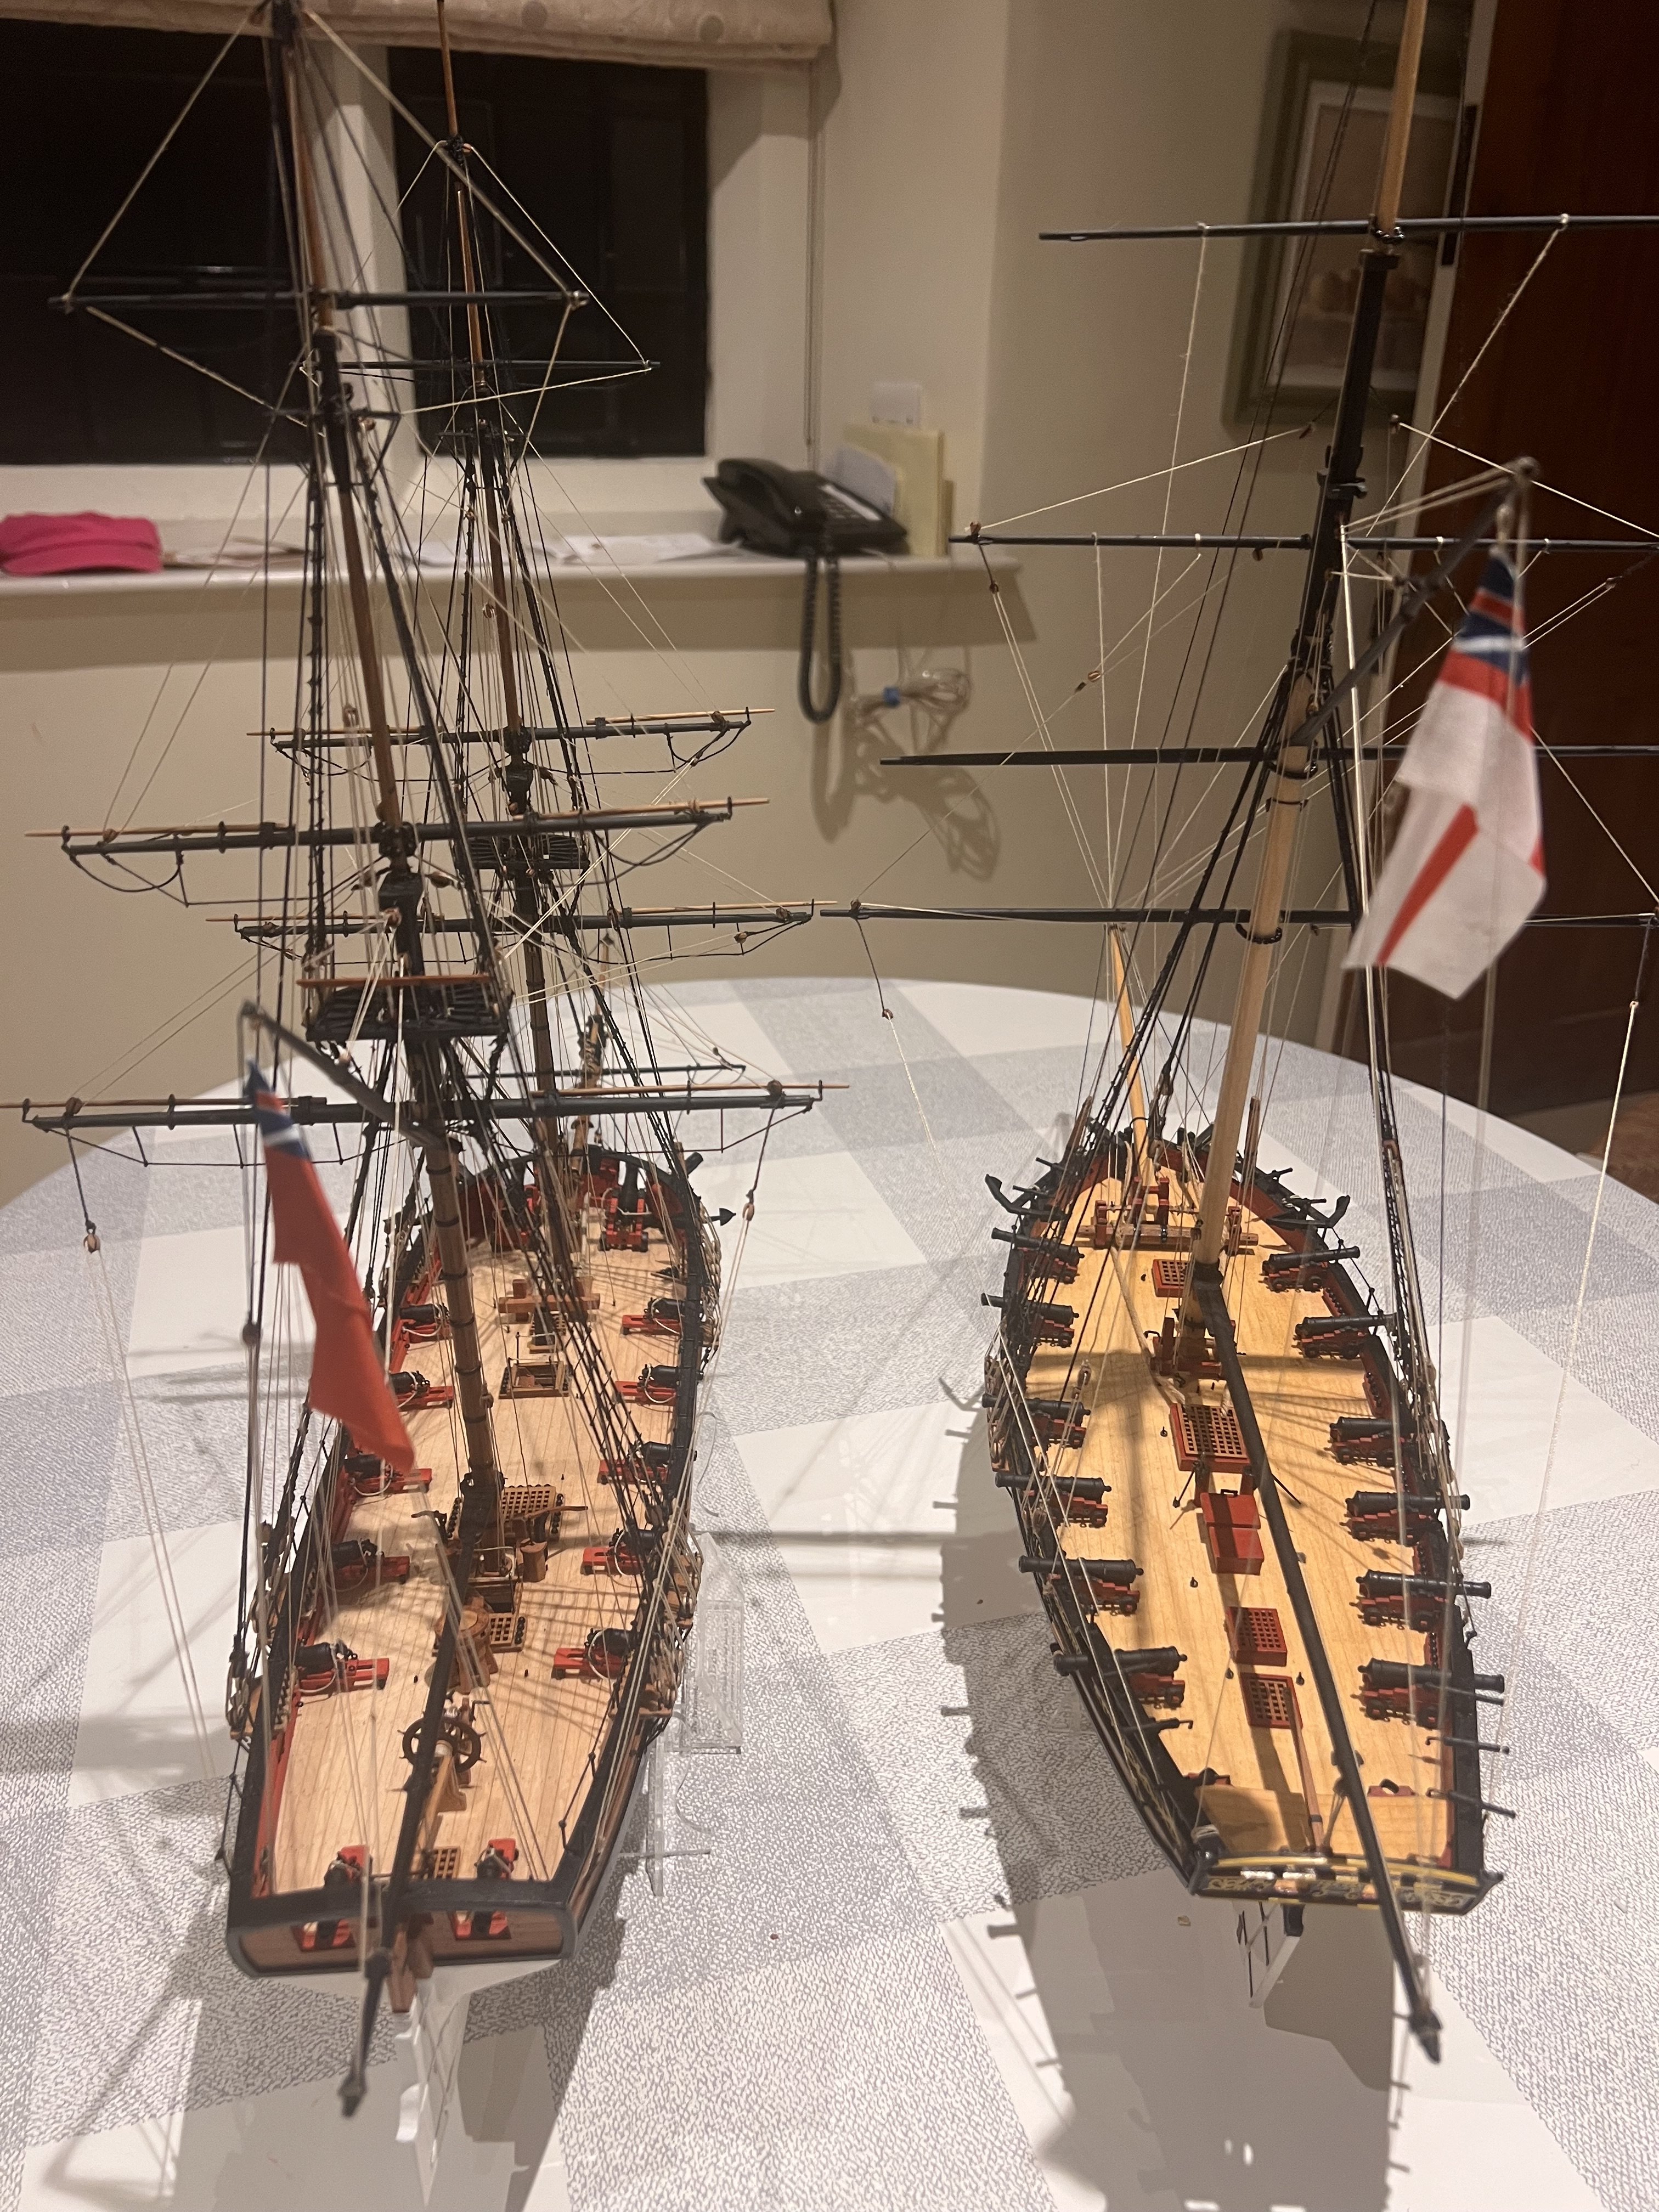
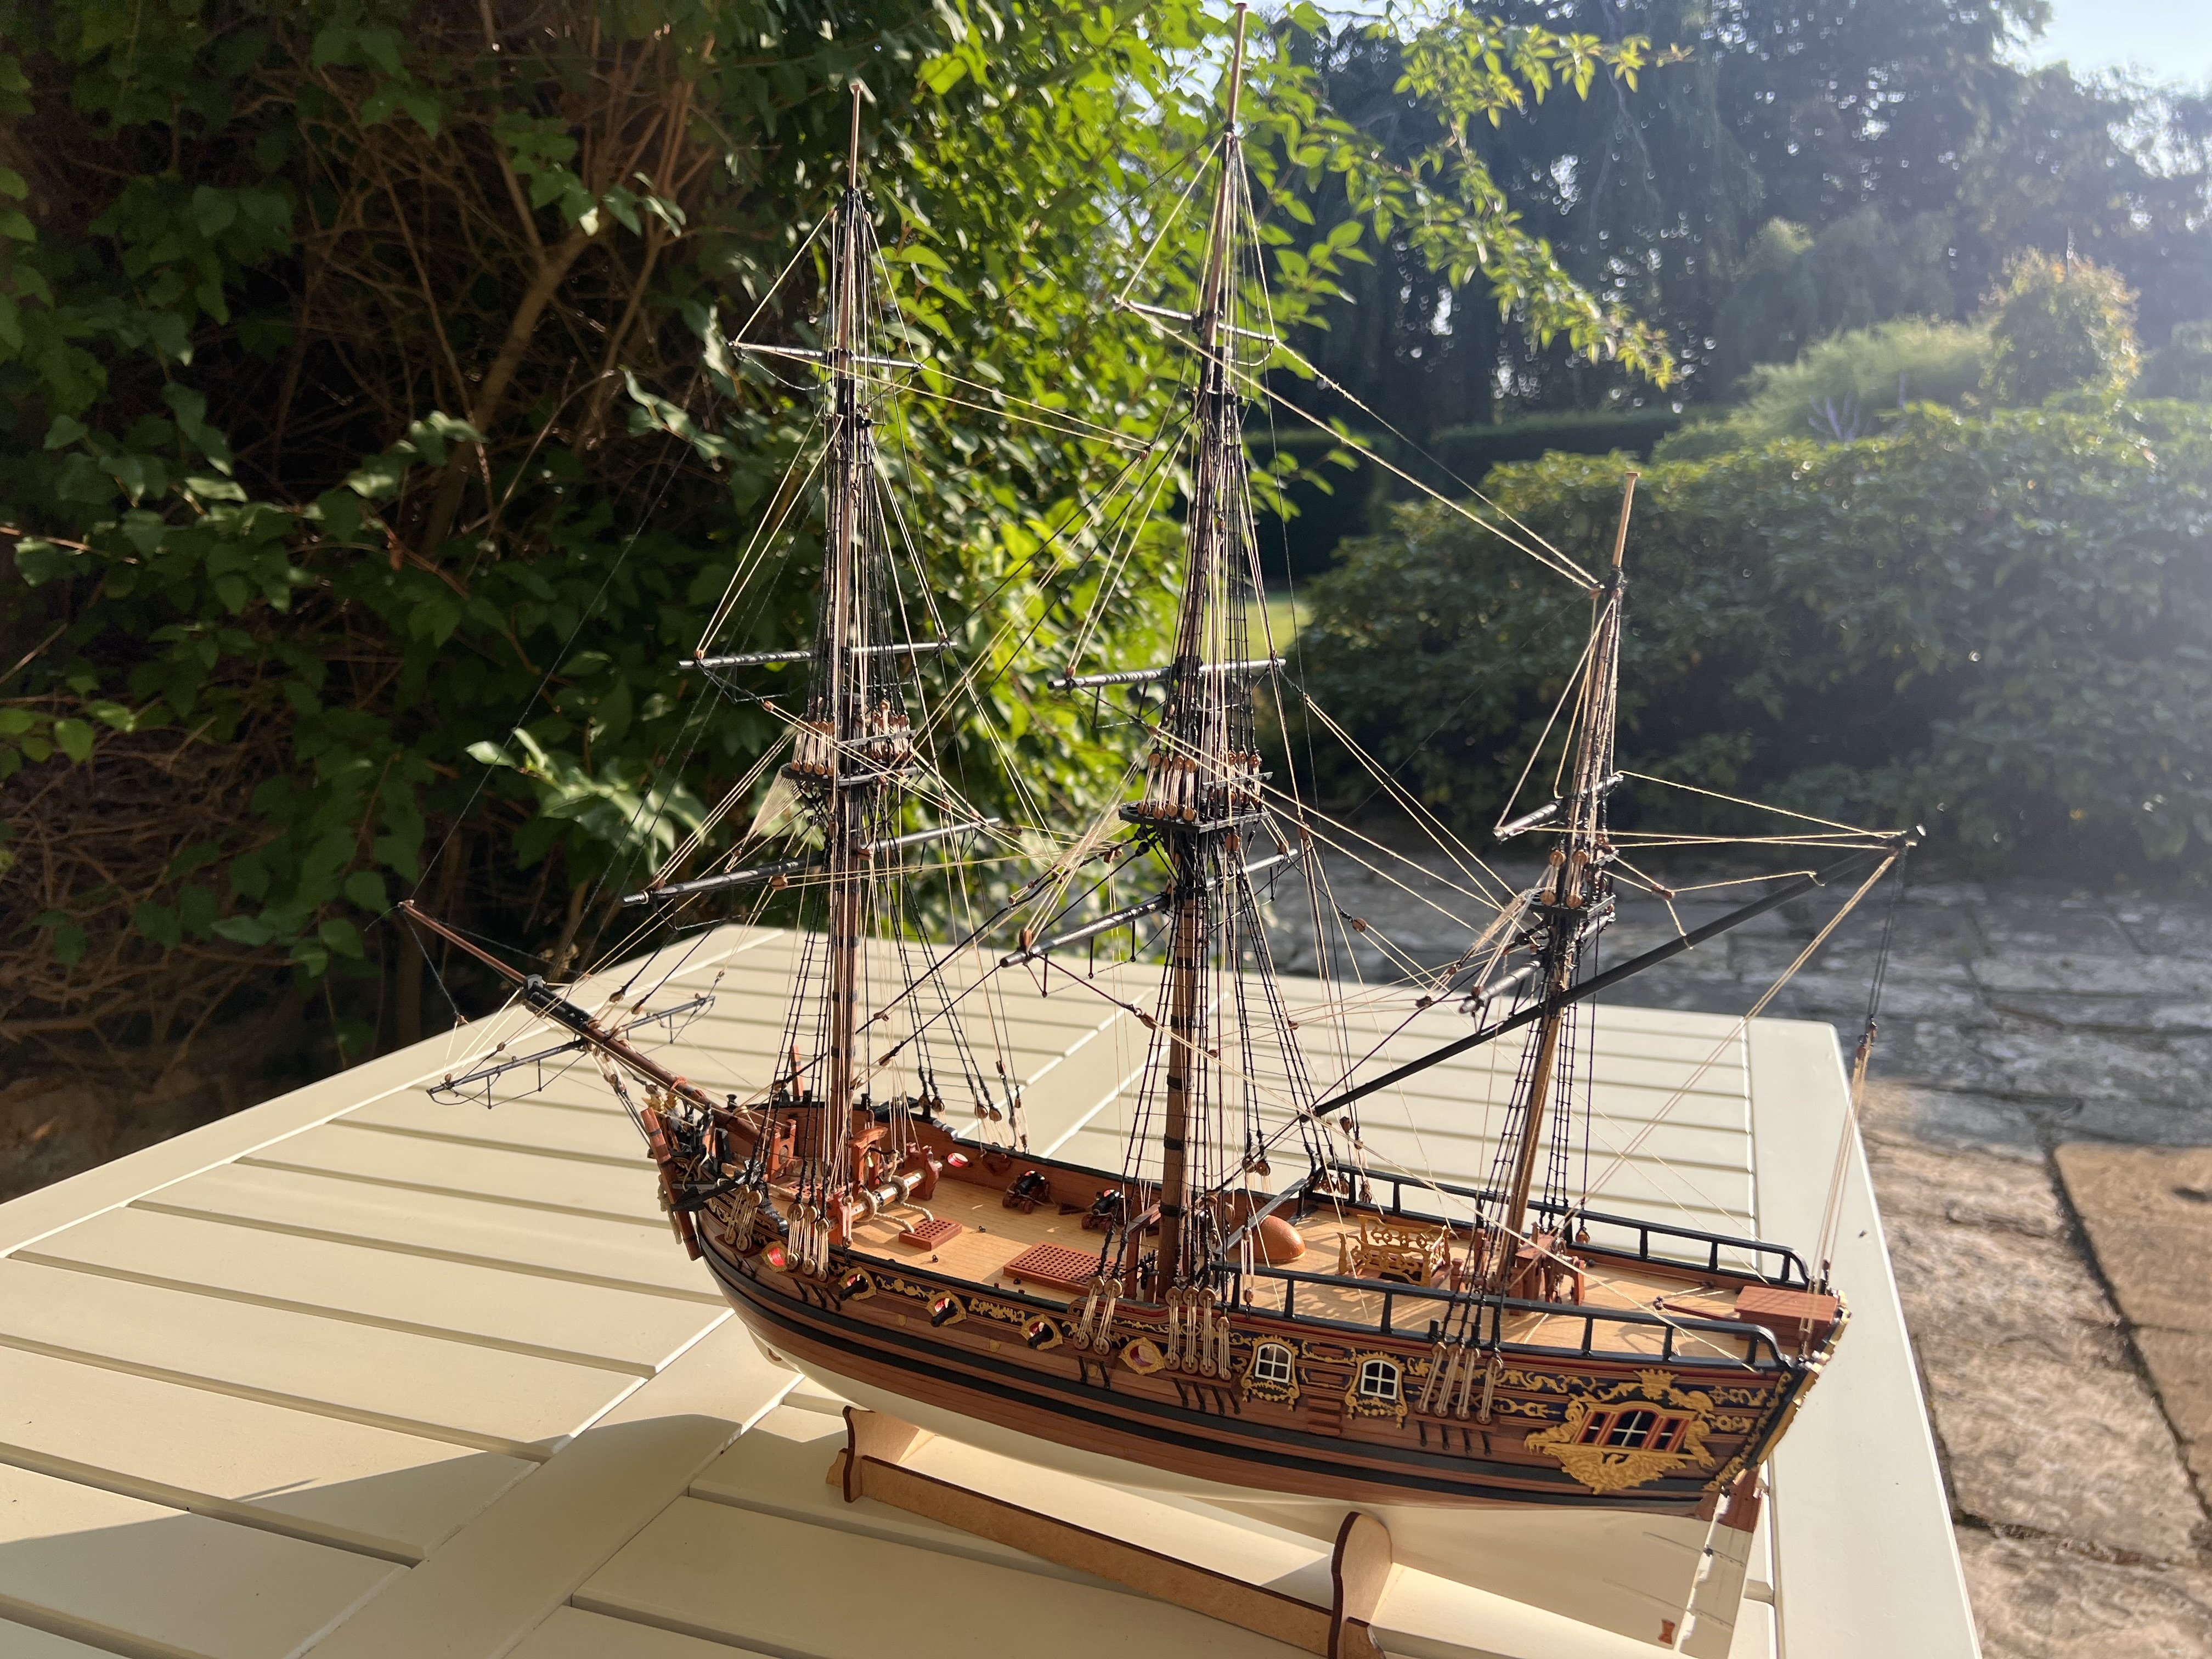
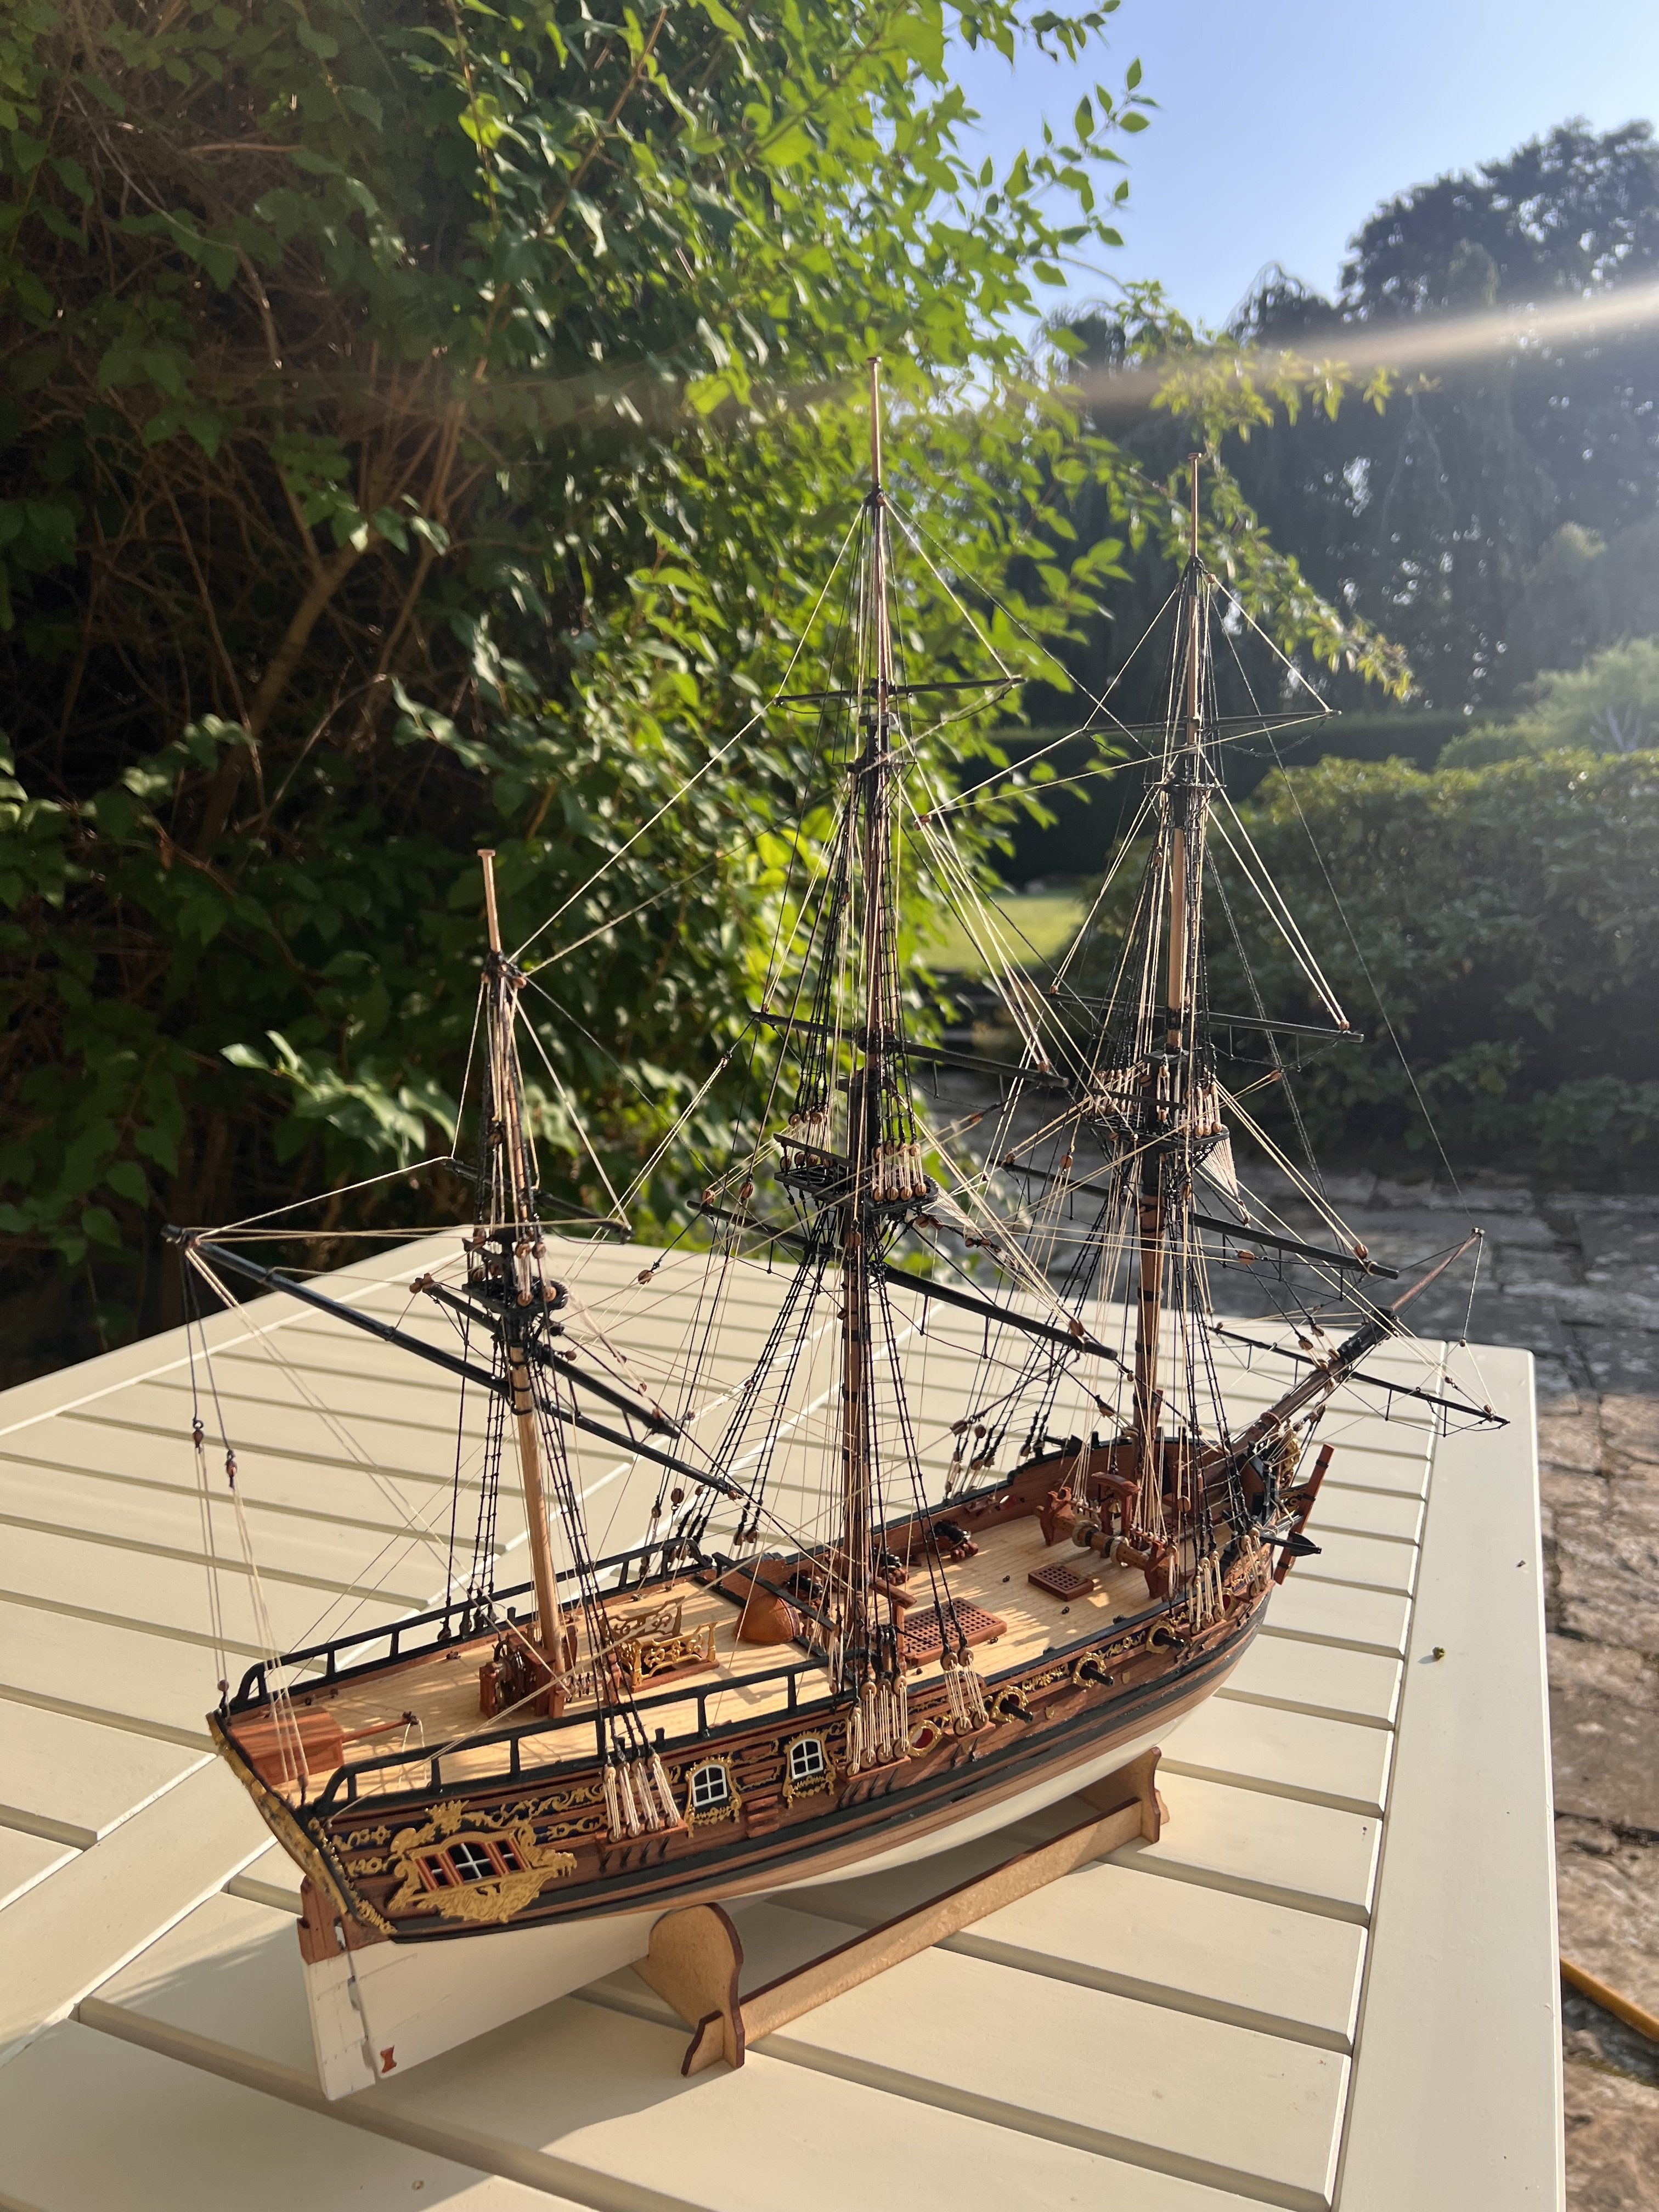
Long overdue… but here are side by side photos of completed Adder and Alert. Both are excellent kits and build into lovely models.


-
Congratulations, another fantastic build Glenn. Very impressive! Like you, I wasn’t so exited about Grecian from a subject matter perspective, but she has still probably been both my favourite model to build and also as a completed kit. I look forward to seeing what you do with her.
- 241 replies
-
- 1
-
-
- Vanguarrd Models
- Harpy
- (and 1 more)
-
Vanguard afficianadios...... Cutter Alert vs Brig Adder
DB789 replied to bigcreekdad's topic in Wood ship model kits
Sorry, I’ve only just seen this. I have built both Adder and Alert. They’re both really great kits. As mentioned in the posts above they are a similar size and Adder has more rigging. The biggest difference in my opinion is that Adder is a much newer design by Chris at Vanguard and incorporates all of his latest innovations which greatly simplify the build - even with a very bluff blow to plank. In particular, there is no planking above the wales just engraved wood with lots of detail. Alert on the other hand was Chris’s first kit at Vanguard and the construction is more traditional. It’s still a superb kit and easy to build - but the hull is a little harder, there is more visible planking up to the top of the bulwarks and you have to cut the gunports yourself. There is also a lot of PE decorative detail that Adder does not have. The rigging I found a little easier as there is less of it. I really enjoyed building both of them. I’m away at the moment, but when I’m home I’ll take a picture of the two completed kits together and post it. -
Chris - I can’t believe you get those emails - given their high quality, your kits are underpriced as it is! Nonetheless it is really hard to see the relative sizes of different boat kits from standalone photos, even when you provide full dimensions. Do you have finished versions of both Sherbourne and Alert? If not, would it help if I sent you side by side photos of Sherbourne and Alert once completed that you can send in reply to those emails? I haven’t a Trial yet to include. Mark & Hook - thanks so much for the advice on planks. I’ll likely try the tang from Cornwall Model Boats have. I may get 0.5 and 1mm to try both and see what looks best. The planks on the Vanguard engraved deck are ~3.5mm width. I think I’ll go with 3mm width planks, but could do 4mm. I have found a boxwood option. I might try that too. It’s only £12 for ten strips of 0.7x3.4x1000 mm which doesn’t sound too expensive but the company is on holiday until 8 Sept. BigCreek - thanks but I don’t have the equipment (or skill) to cut my own planks! Ronald - thank you. Loving your Sphinx build. Hugely impressive. Andrew - thank you, great to hear you’re back on the case with Bounty and Sparkler.
- 21 replies
-
- 5
-
-
- Vanguard
- Sherbourne;
- (and 1 more)
-
Please could anyone point me towards some materials that advise how best to do deck planking. I have never done this before. I can’t find information on MSW but I’m sure it’s there somewhere?! Thank you. Any advice on what wood to use (bass seems popular for decks?) and width (3mm?) and thickness (1mm?). I’ll likely use a pencil to simulate the caulking. Even better where to get the wood from in the UK, doesn’t look like Cornwall Model Boats where I usually buy model supplies has anything suitable. I’d like to get the materials Thanks so much. Dan
- 21 replies
-
- 1
-
-
- Vanguard
- Sherbourne;
- (and 1 more)
-
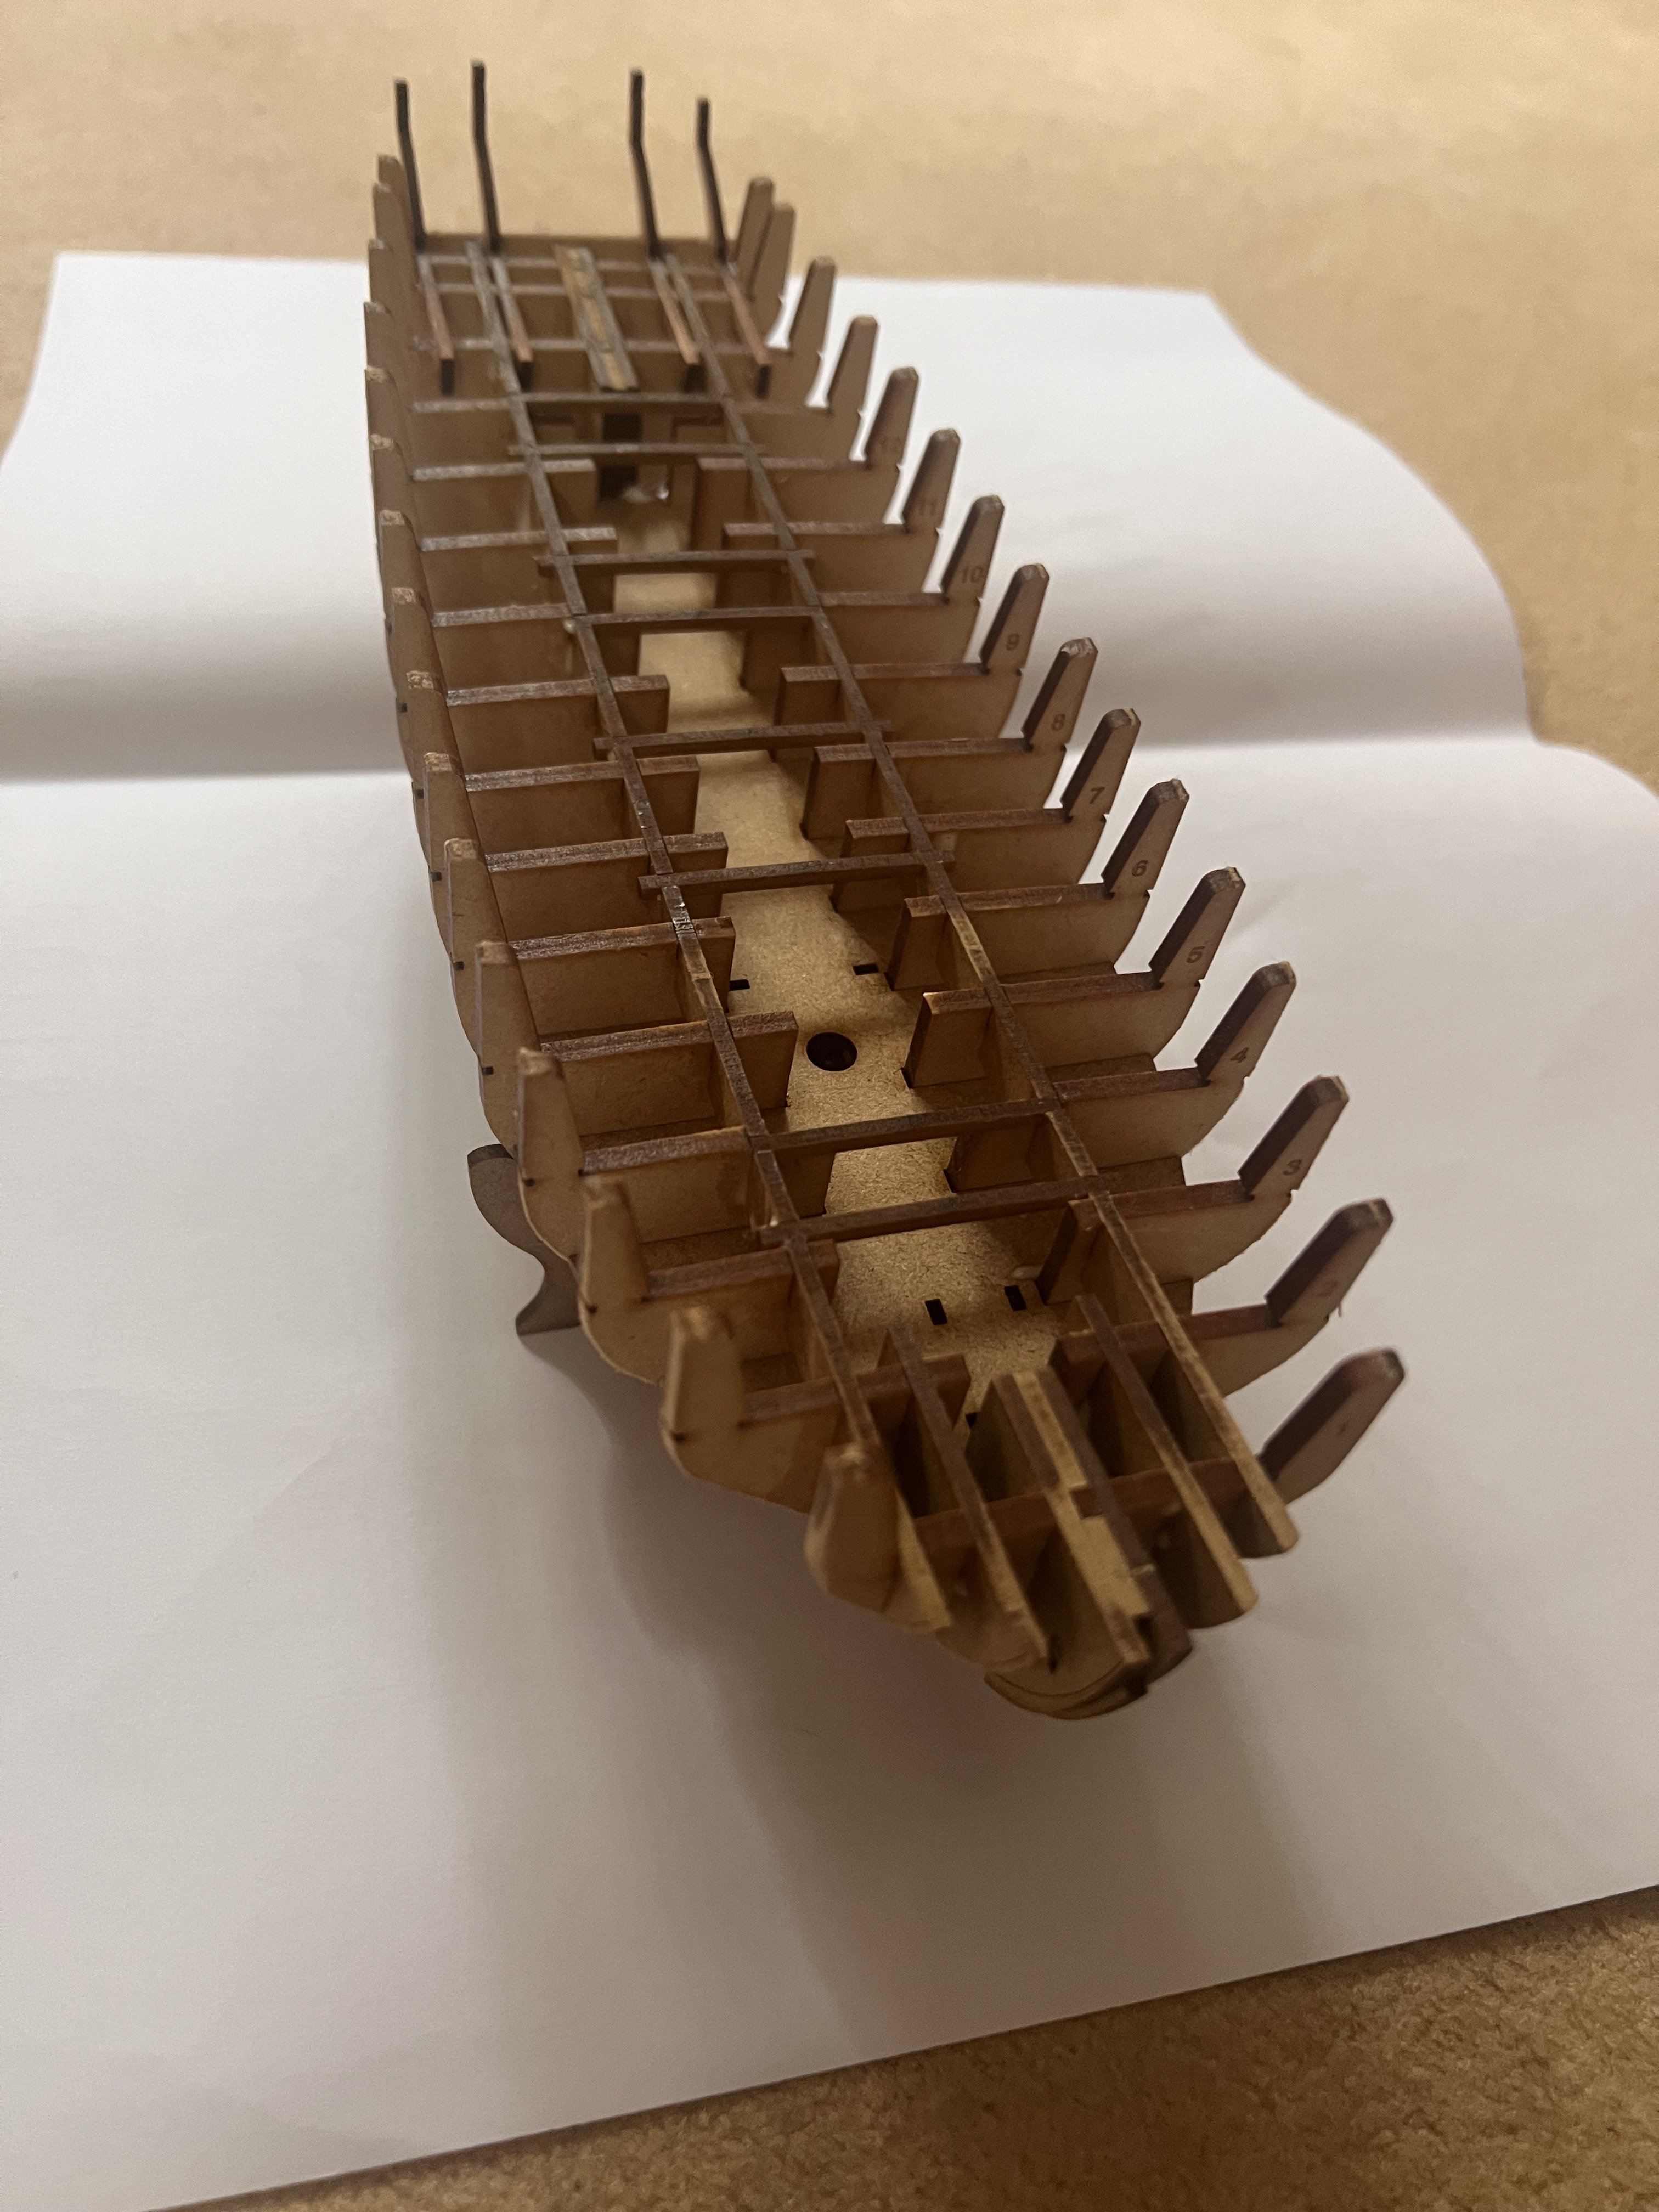
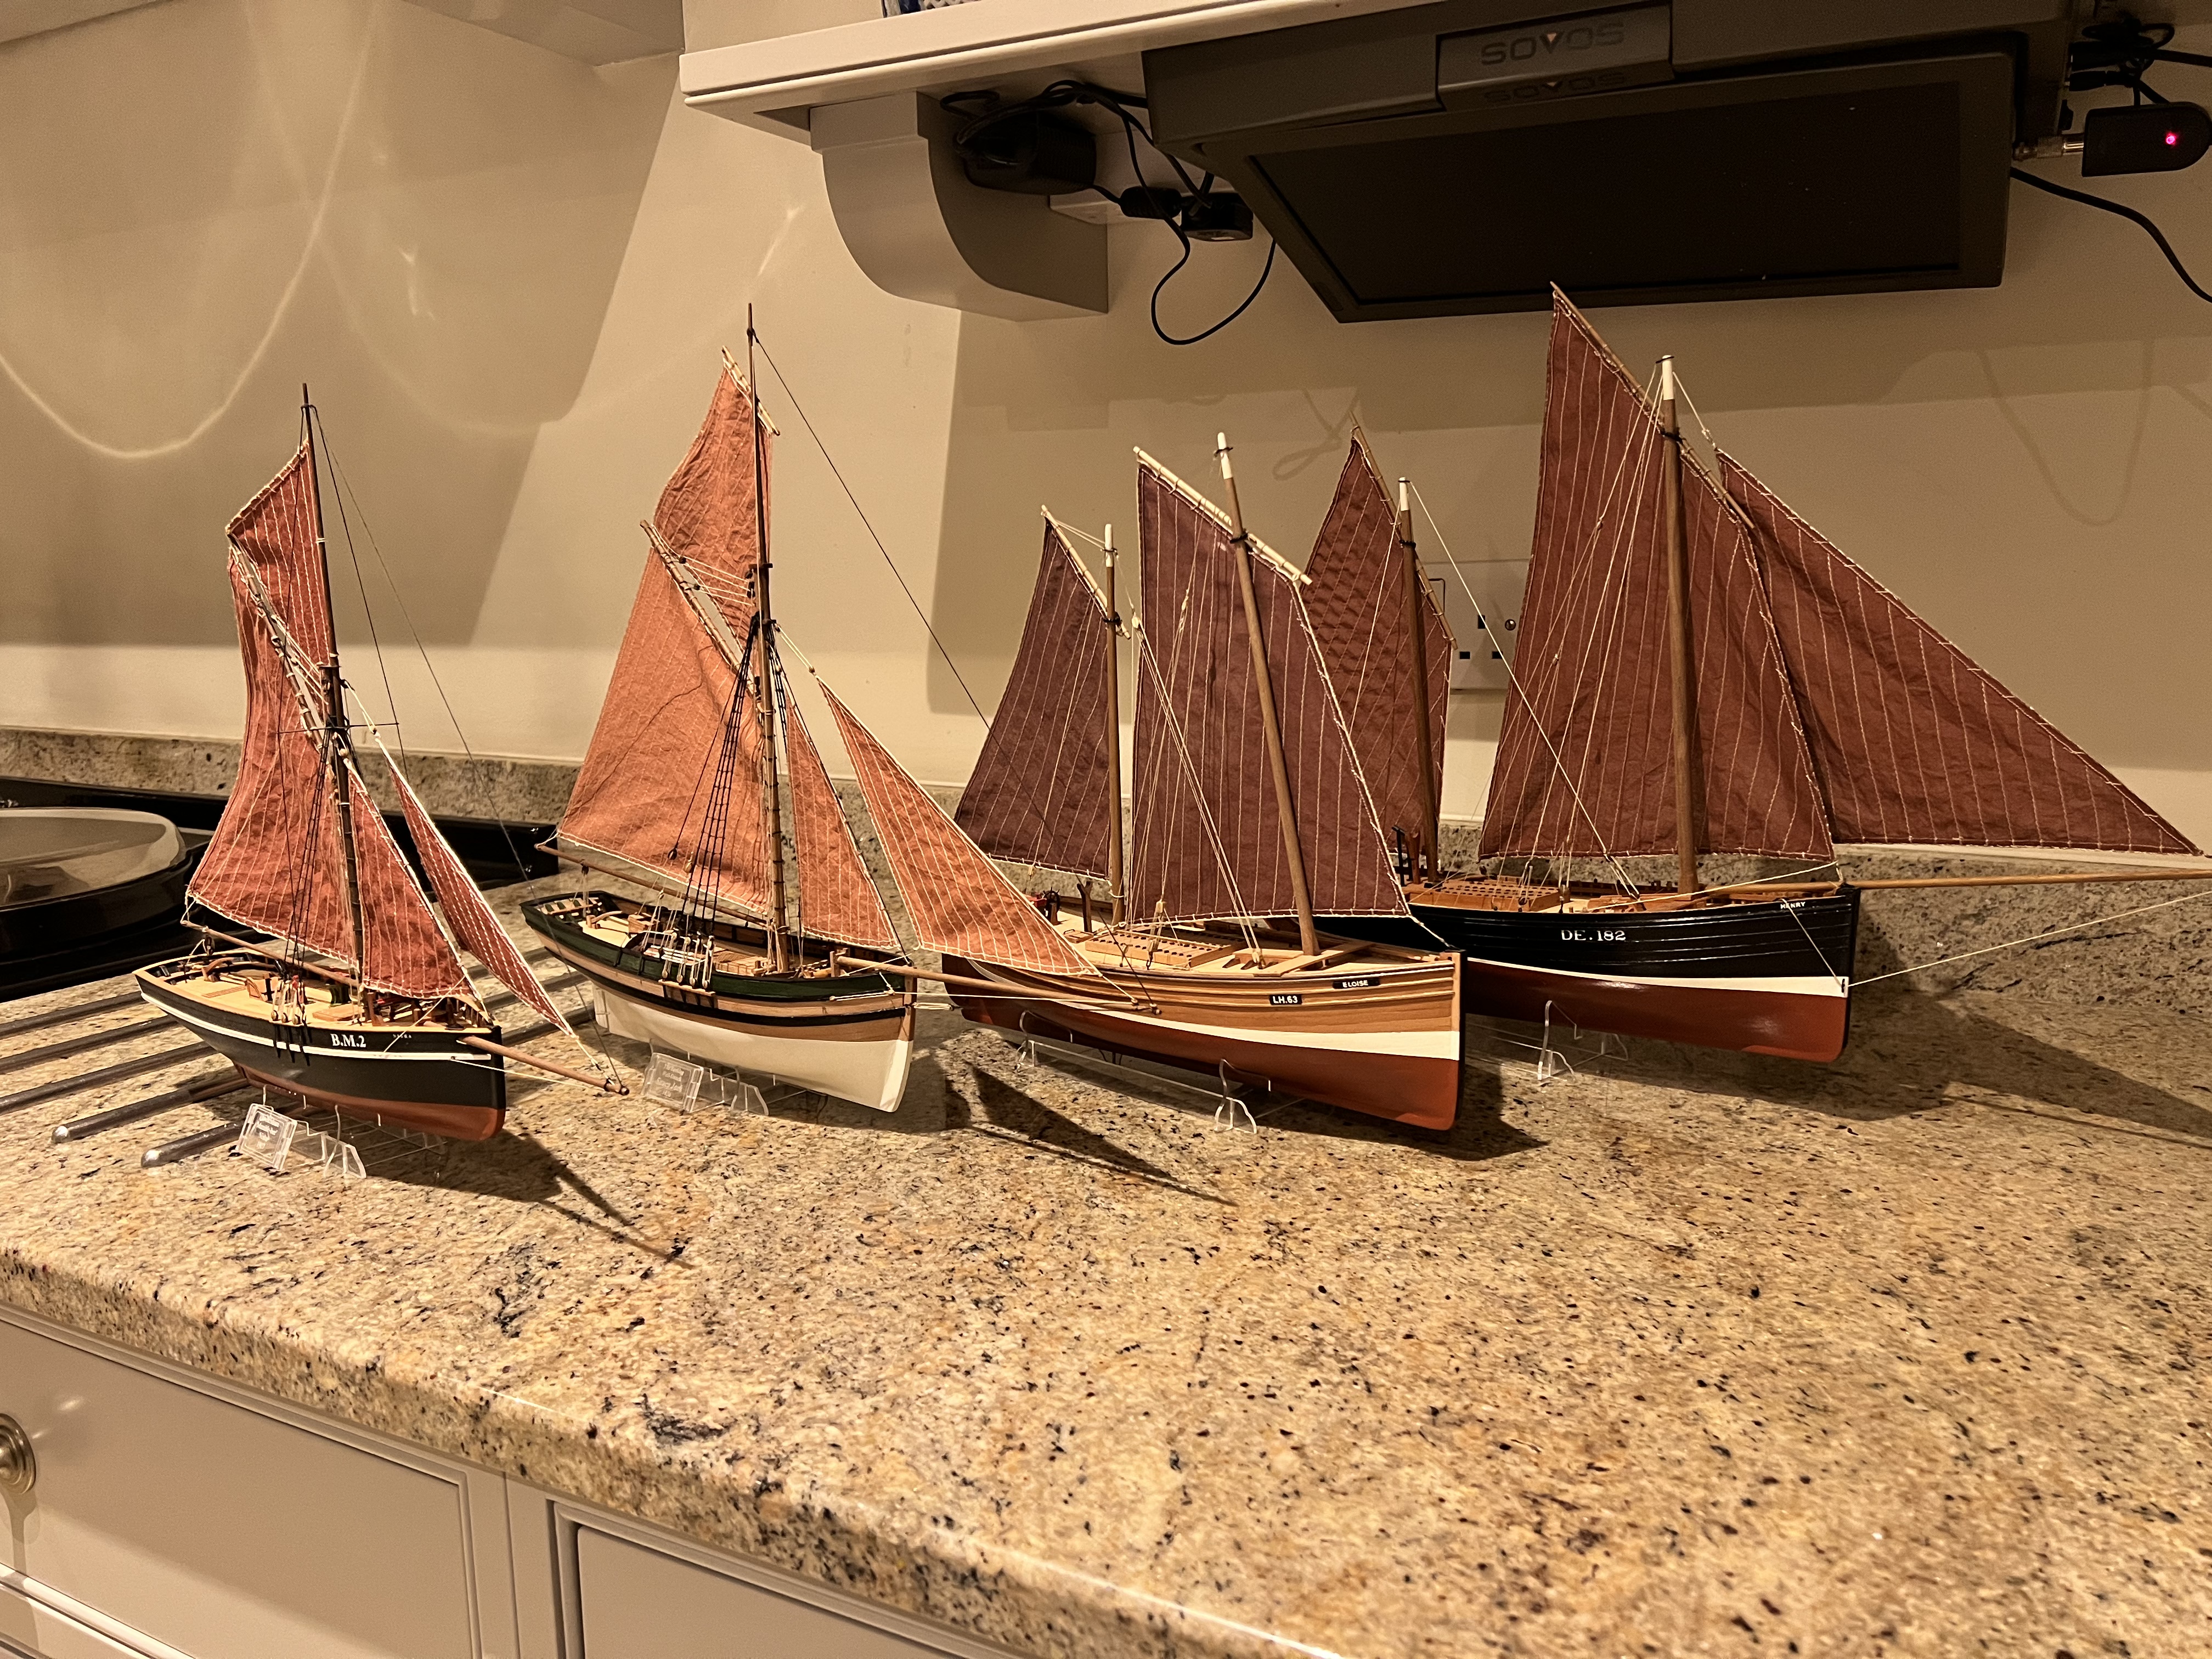
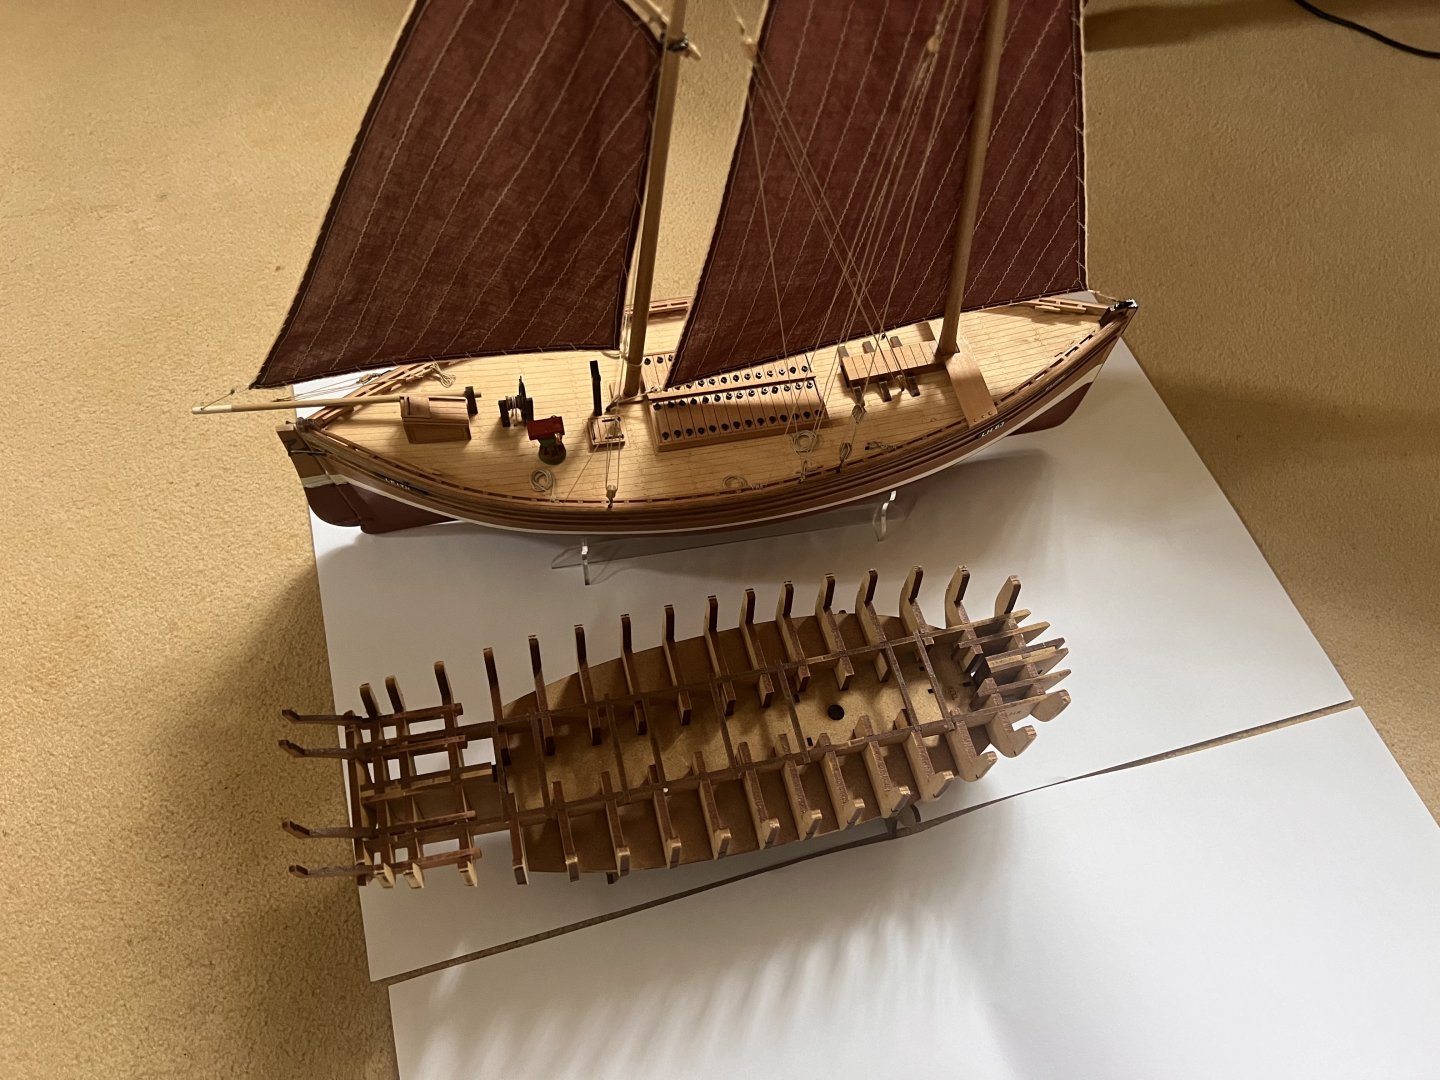
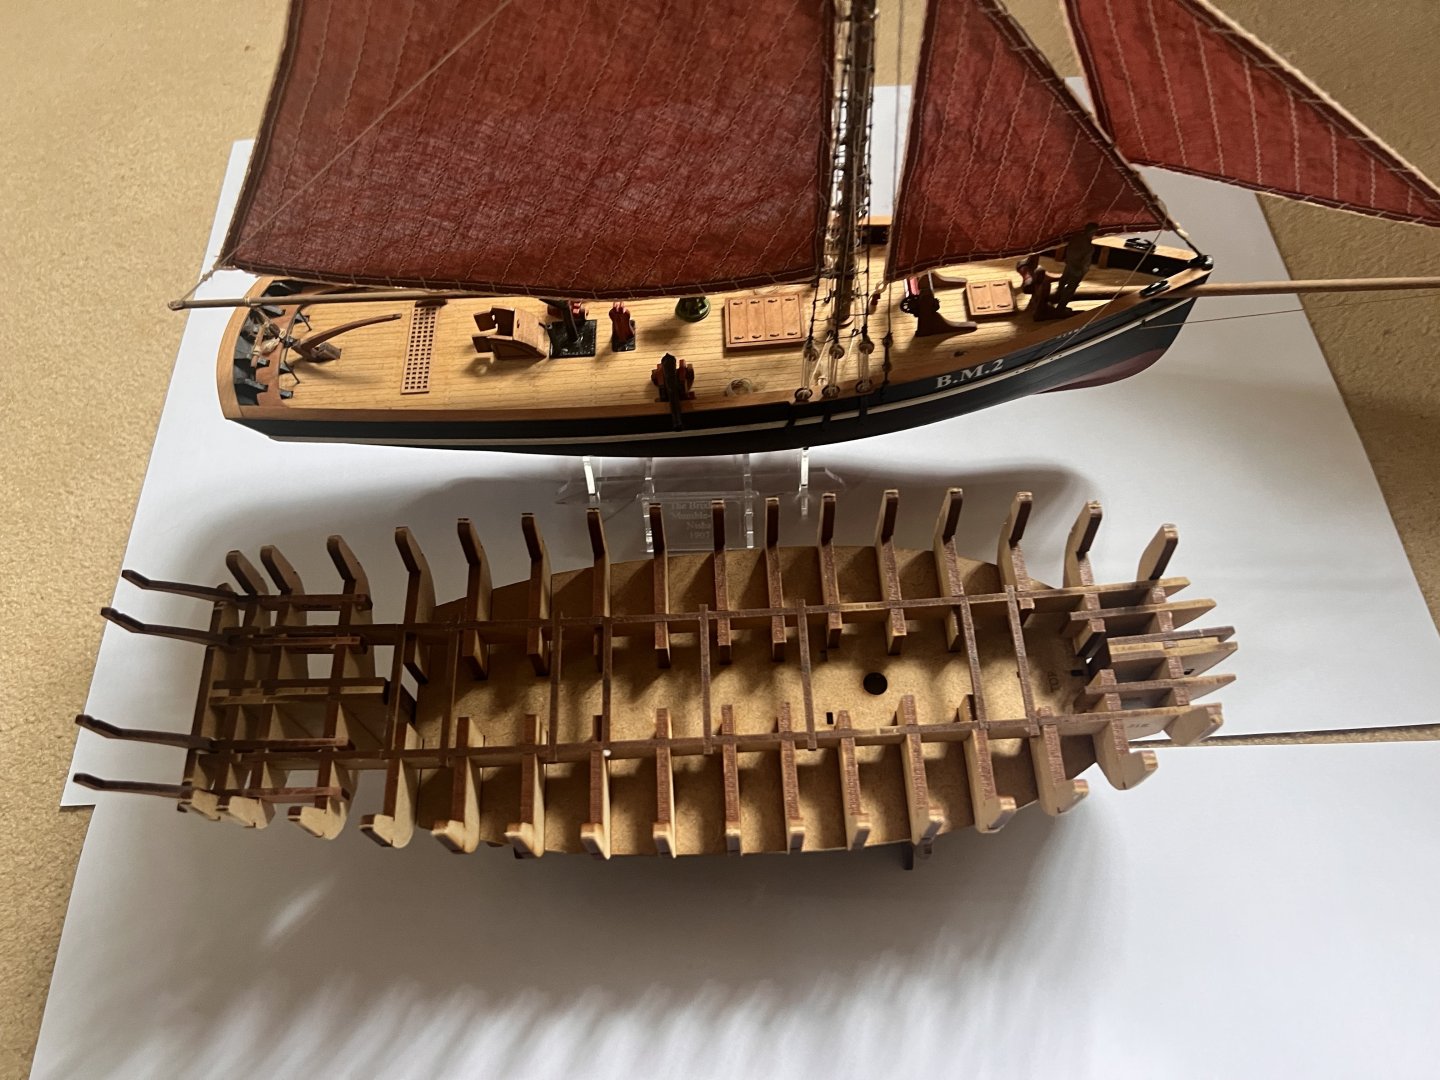
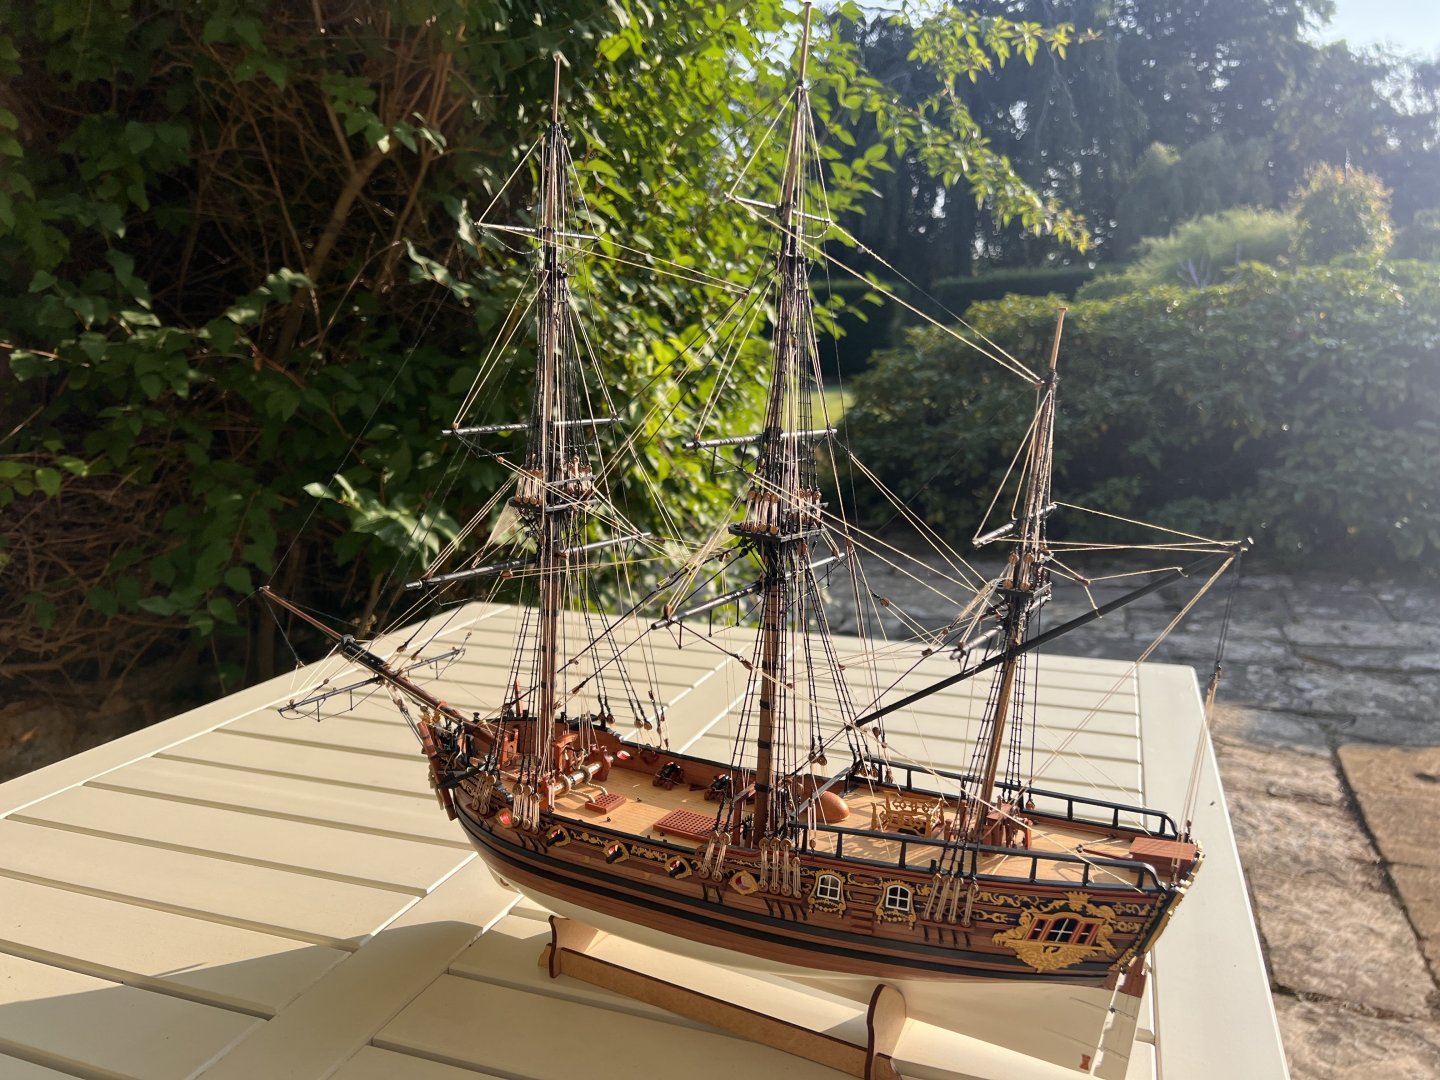
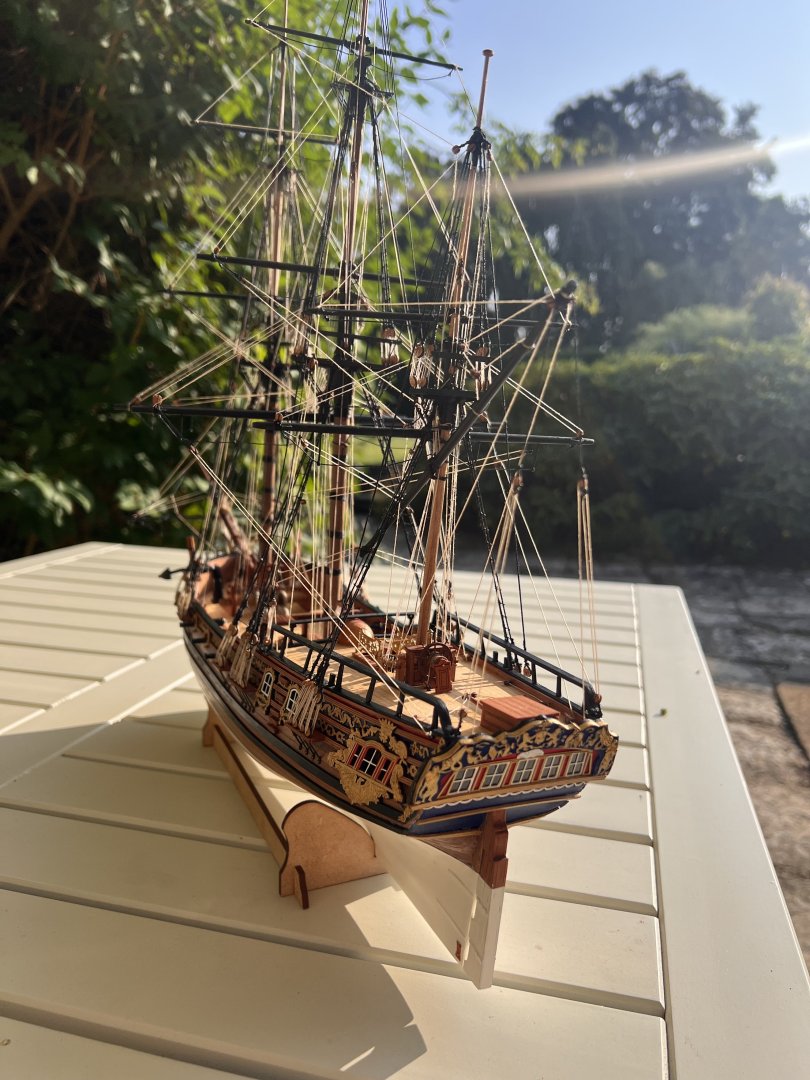
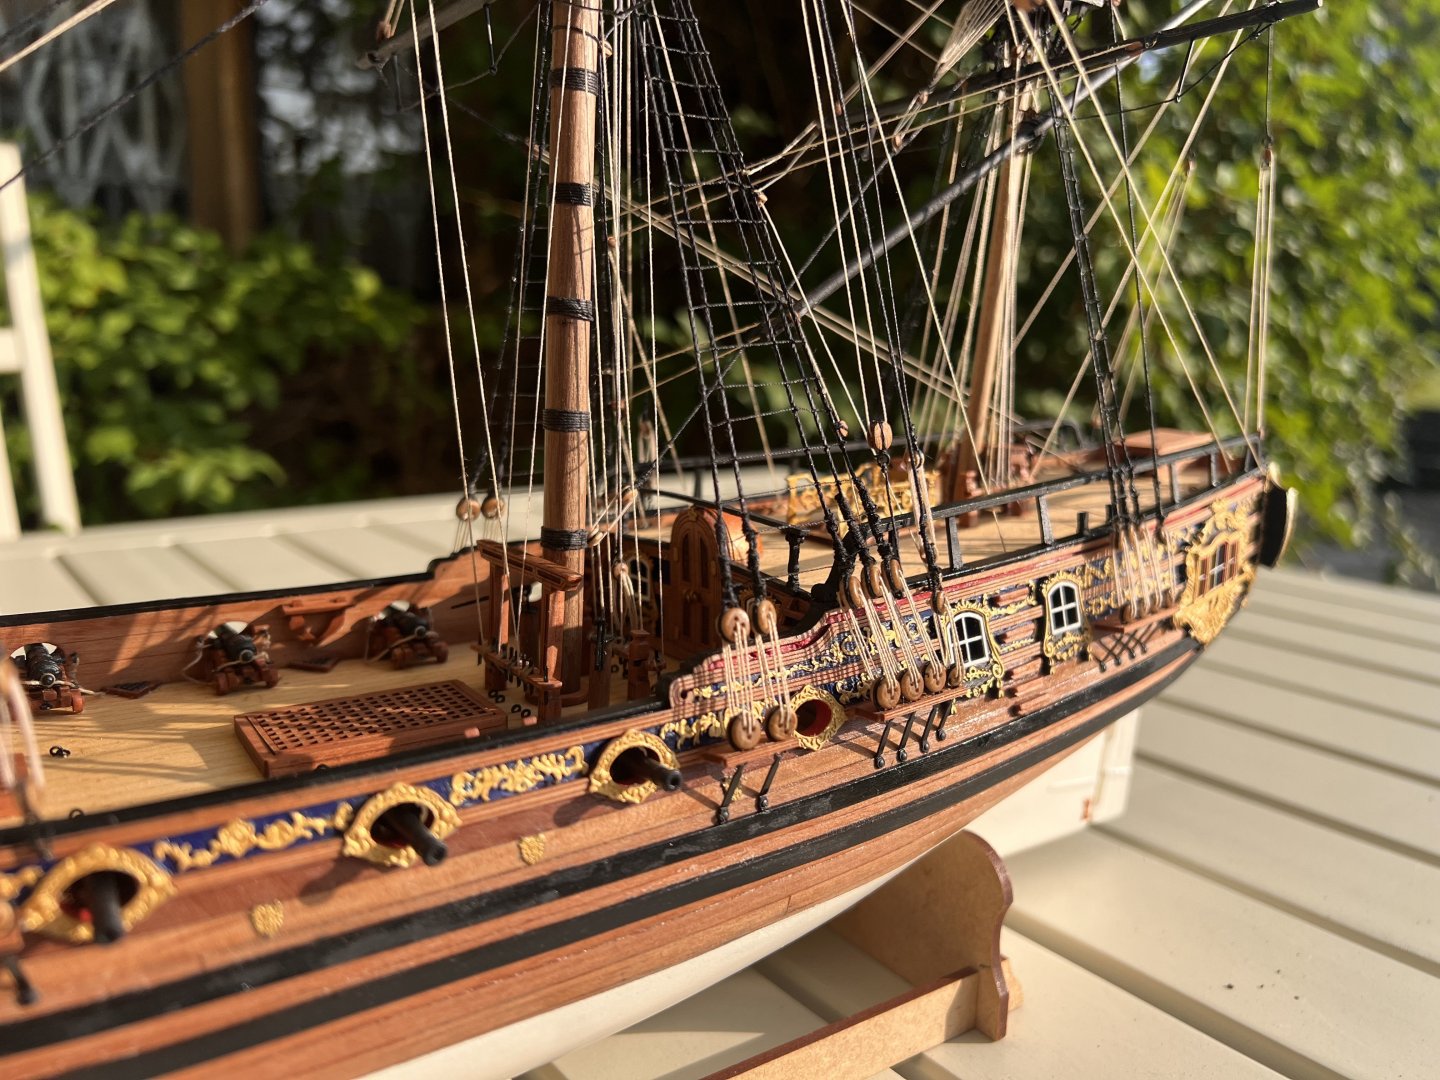
Sherbourne is my 11th model boat build and all of them kits from Vanguard due to their excellent quality in terms or design, quality of materials and instructions. Having just completed Duchess of Kingston I had intended to continue to increase the complexity of my builds with Speedy next, followed by Sphinx and maybe ultimately Surprise. But I was given Sherbourne last year and she’s a very cute little cutter so I’m building her with the plan of developing my skills a little further. My three key objectives are: 1) attempt to plank her deck rather than use the engraved deck from Vanguard; 2) try yellow ochre paint on the sides of the hull rather than varnished wood; 3 get to grips with wipe-on poly which isn’t readily available made up in the UK and my previous efforts, I think using the wrong thinner, have failed. I loved building the Vanguard fishing boats and this little boat has a similar feel. This kit is clearly meant for and ideal for beginners, but is still an exceptionally high quality kit given all the same Vanguard treatment as other kits in the range for a price that is simply far too low for what you get. 19 sheets of plans! Full colour detailed instructions with photos, high quality pear wood and brass PE. This will build into a wonderful little boat. The first stages are assembling the frames which fit together precisely and create a rock solid core for planking later. These are made of MDF and easily slot together with no breakages. The four timbers at the stern are wood which is nice as they will be the only parts of this structure visible in the finished kit. I have been describing Sherbourne as small, but I hadn’t quite realised how small she is. The behemoth next door to her is no ship of the line but merely another cutter Alert (albeit a large one). She is even dwarfed by some of the fishers: Zulu Fifie Even the tiny Nisha appears to have a marginally longer, albeit less voluminous hull. Size isn’t everything, she’ll be great fun to build.


- 21 replies
-
- 10
-
-
- Vanguard
- Sherbourne;
- (and 1 more)
-
Thank you very much for the comments and likes! Really appreciated. I have been trying to research how best to do the deck planking for a kit on MSW, particularly the margin planks. I can’t find anything as it gets caught up in the search with hull planking. Does anyone have any resources on this that they can recommend? Thanks.
- 36 replies
-
- 1
-
-
- Duchess of Kingston
- Vanguard Models
- (and 1 more)
-
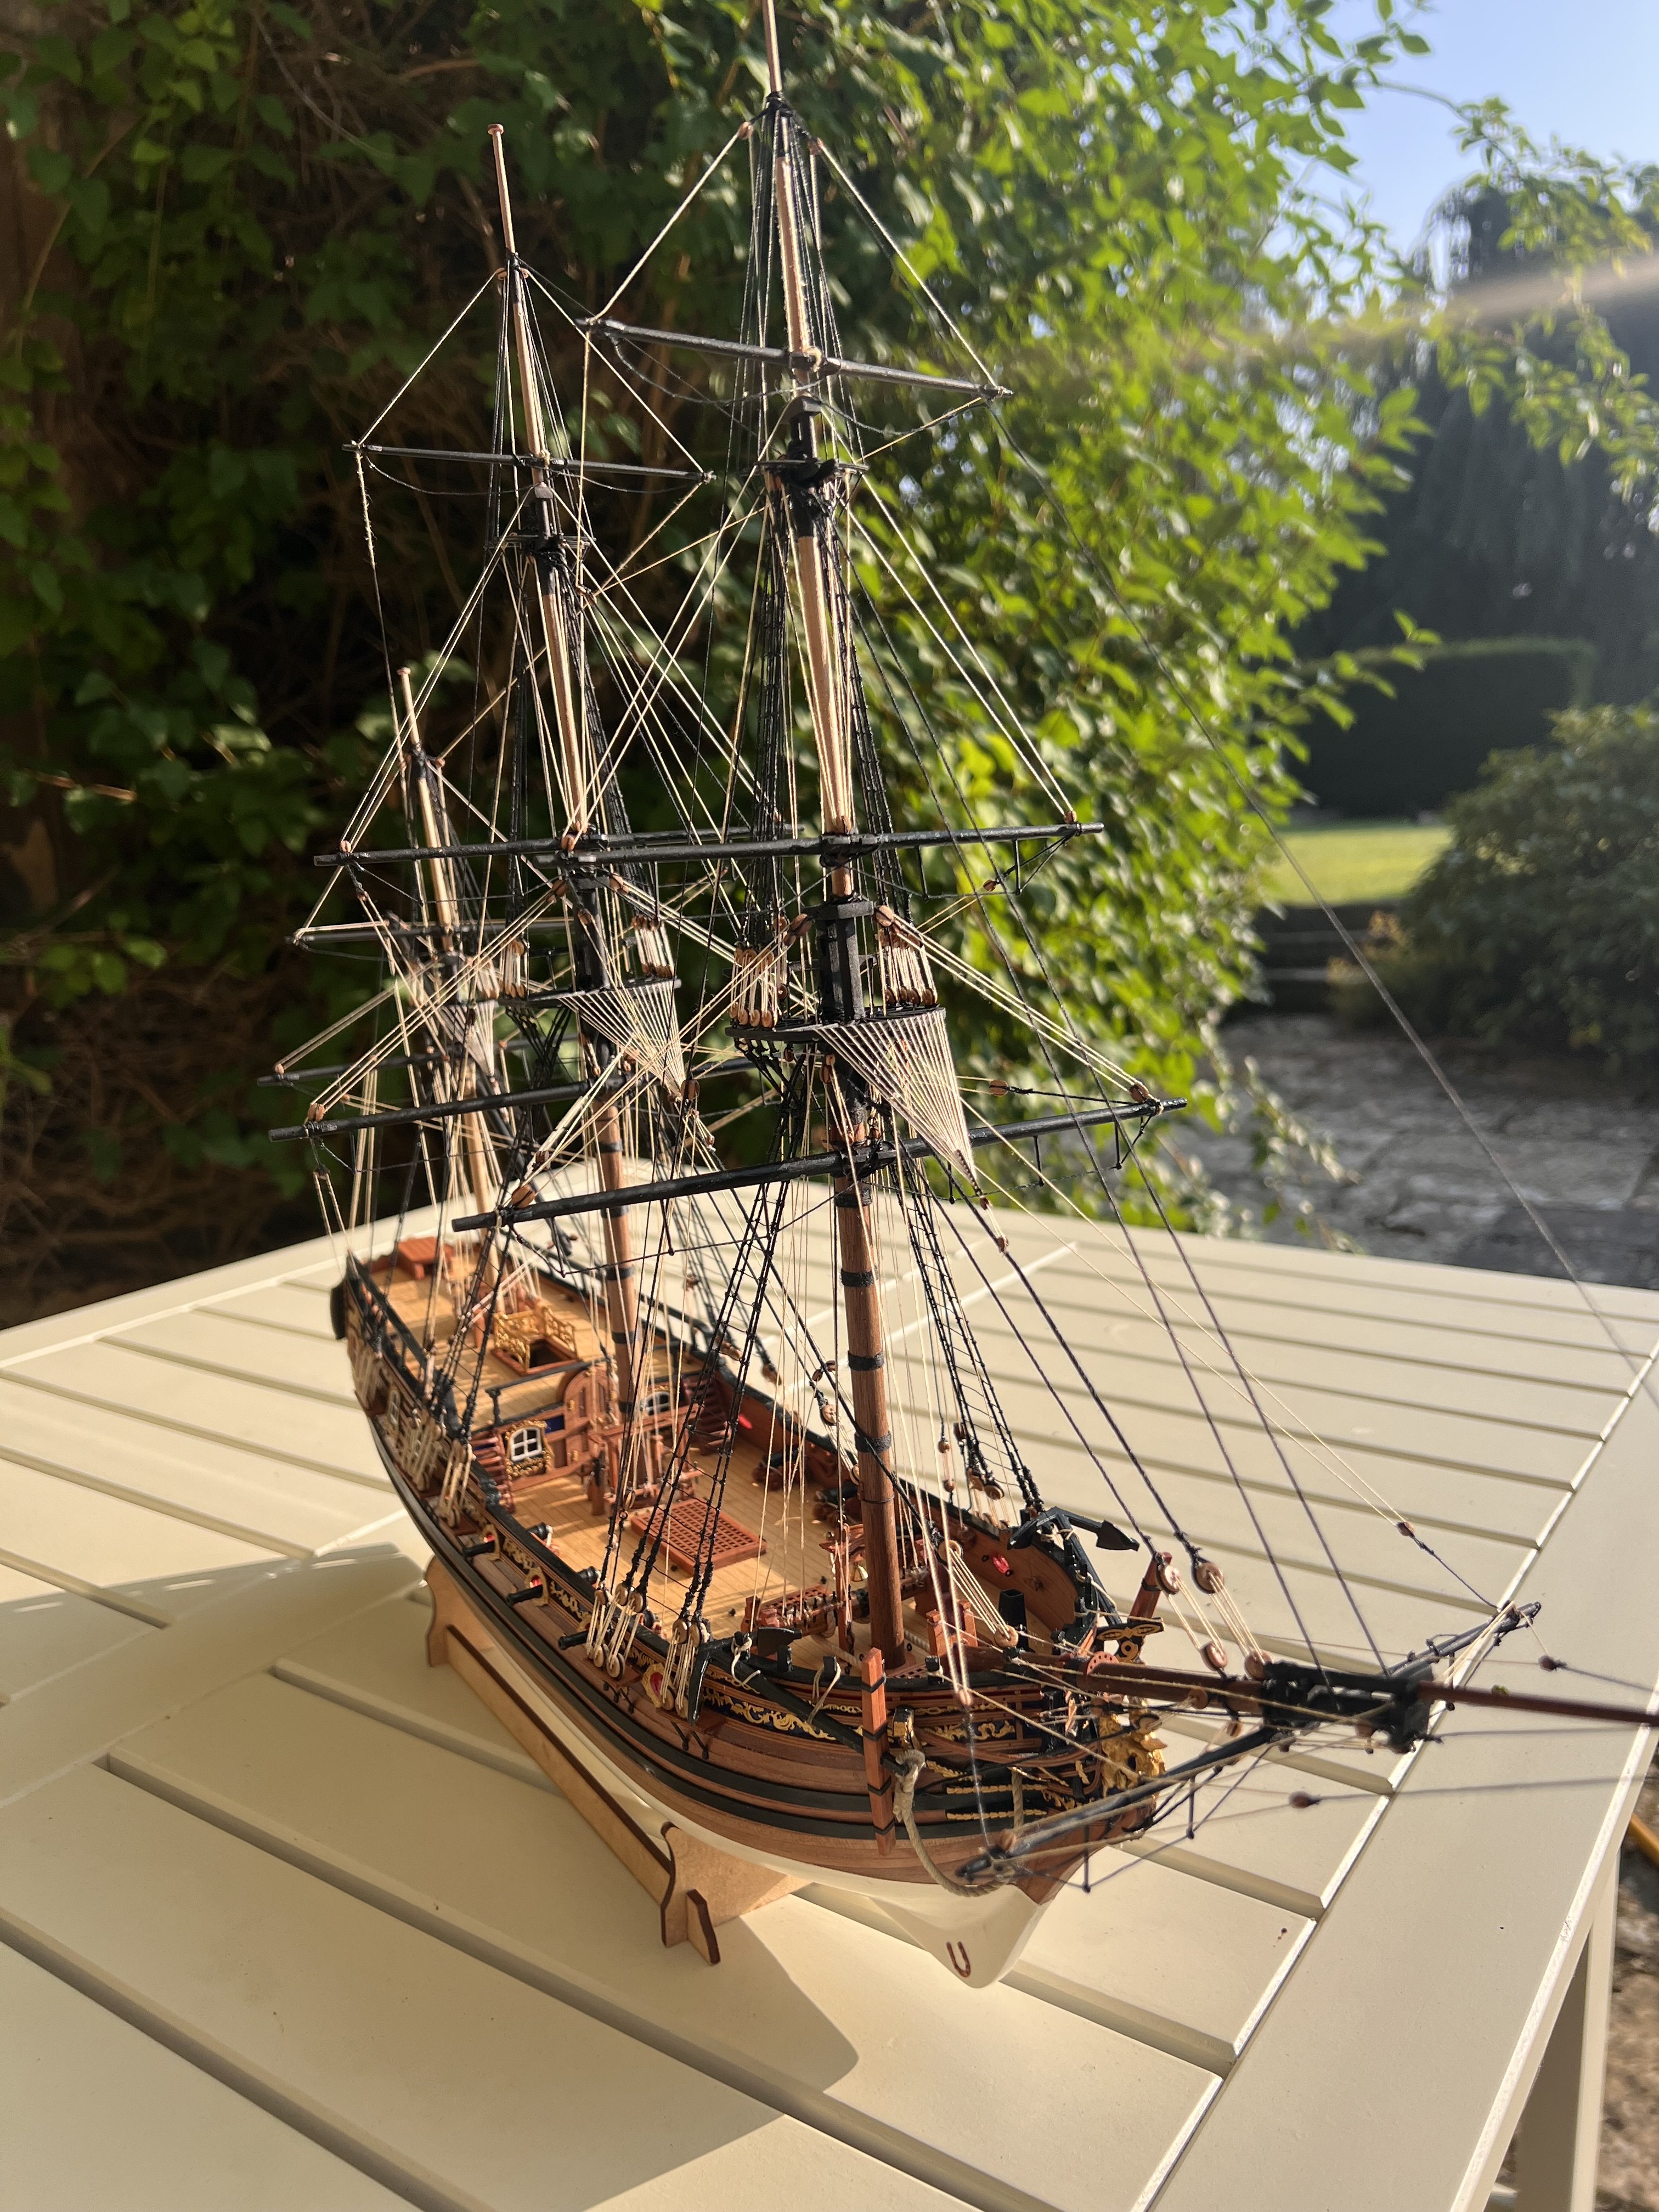
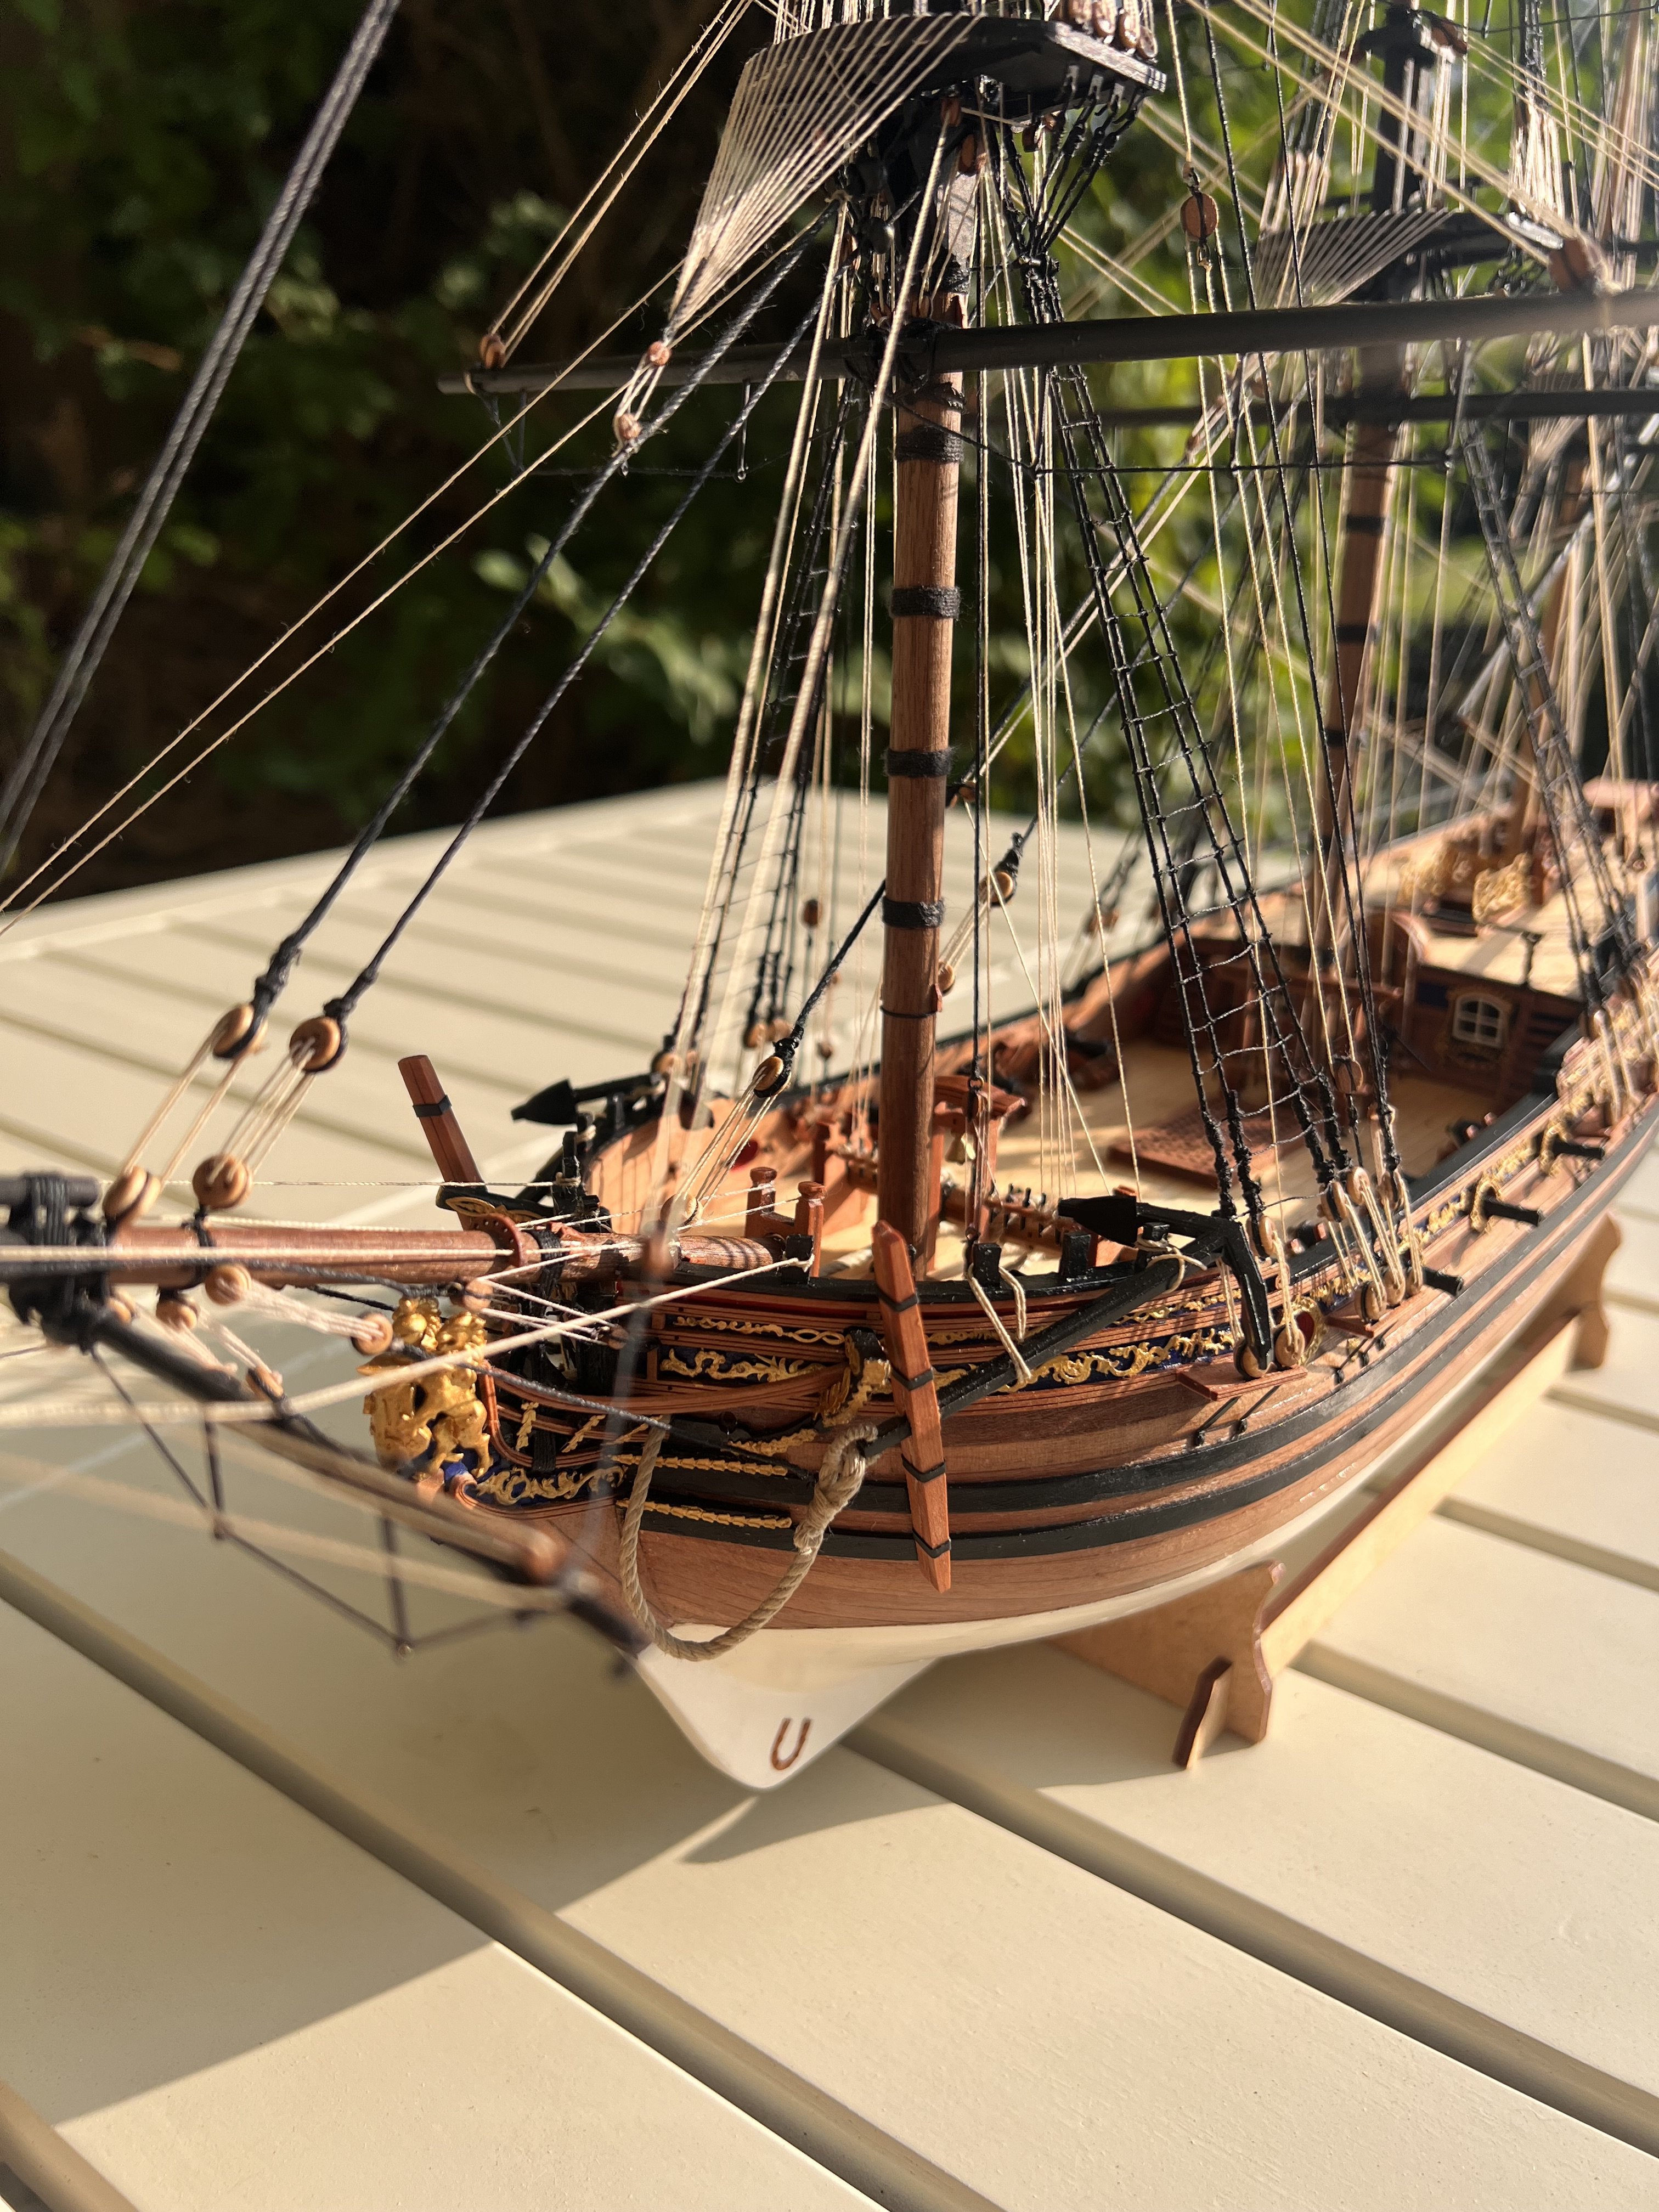
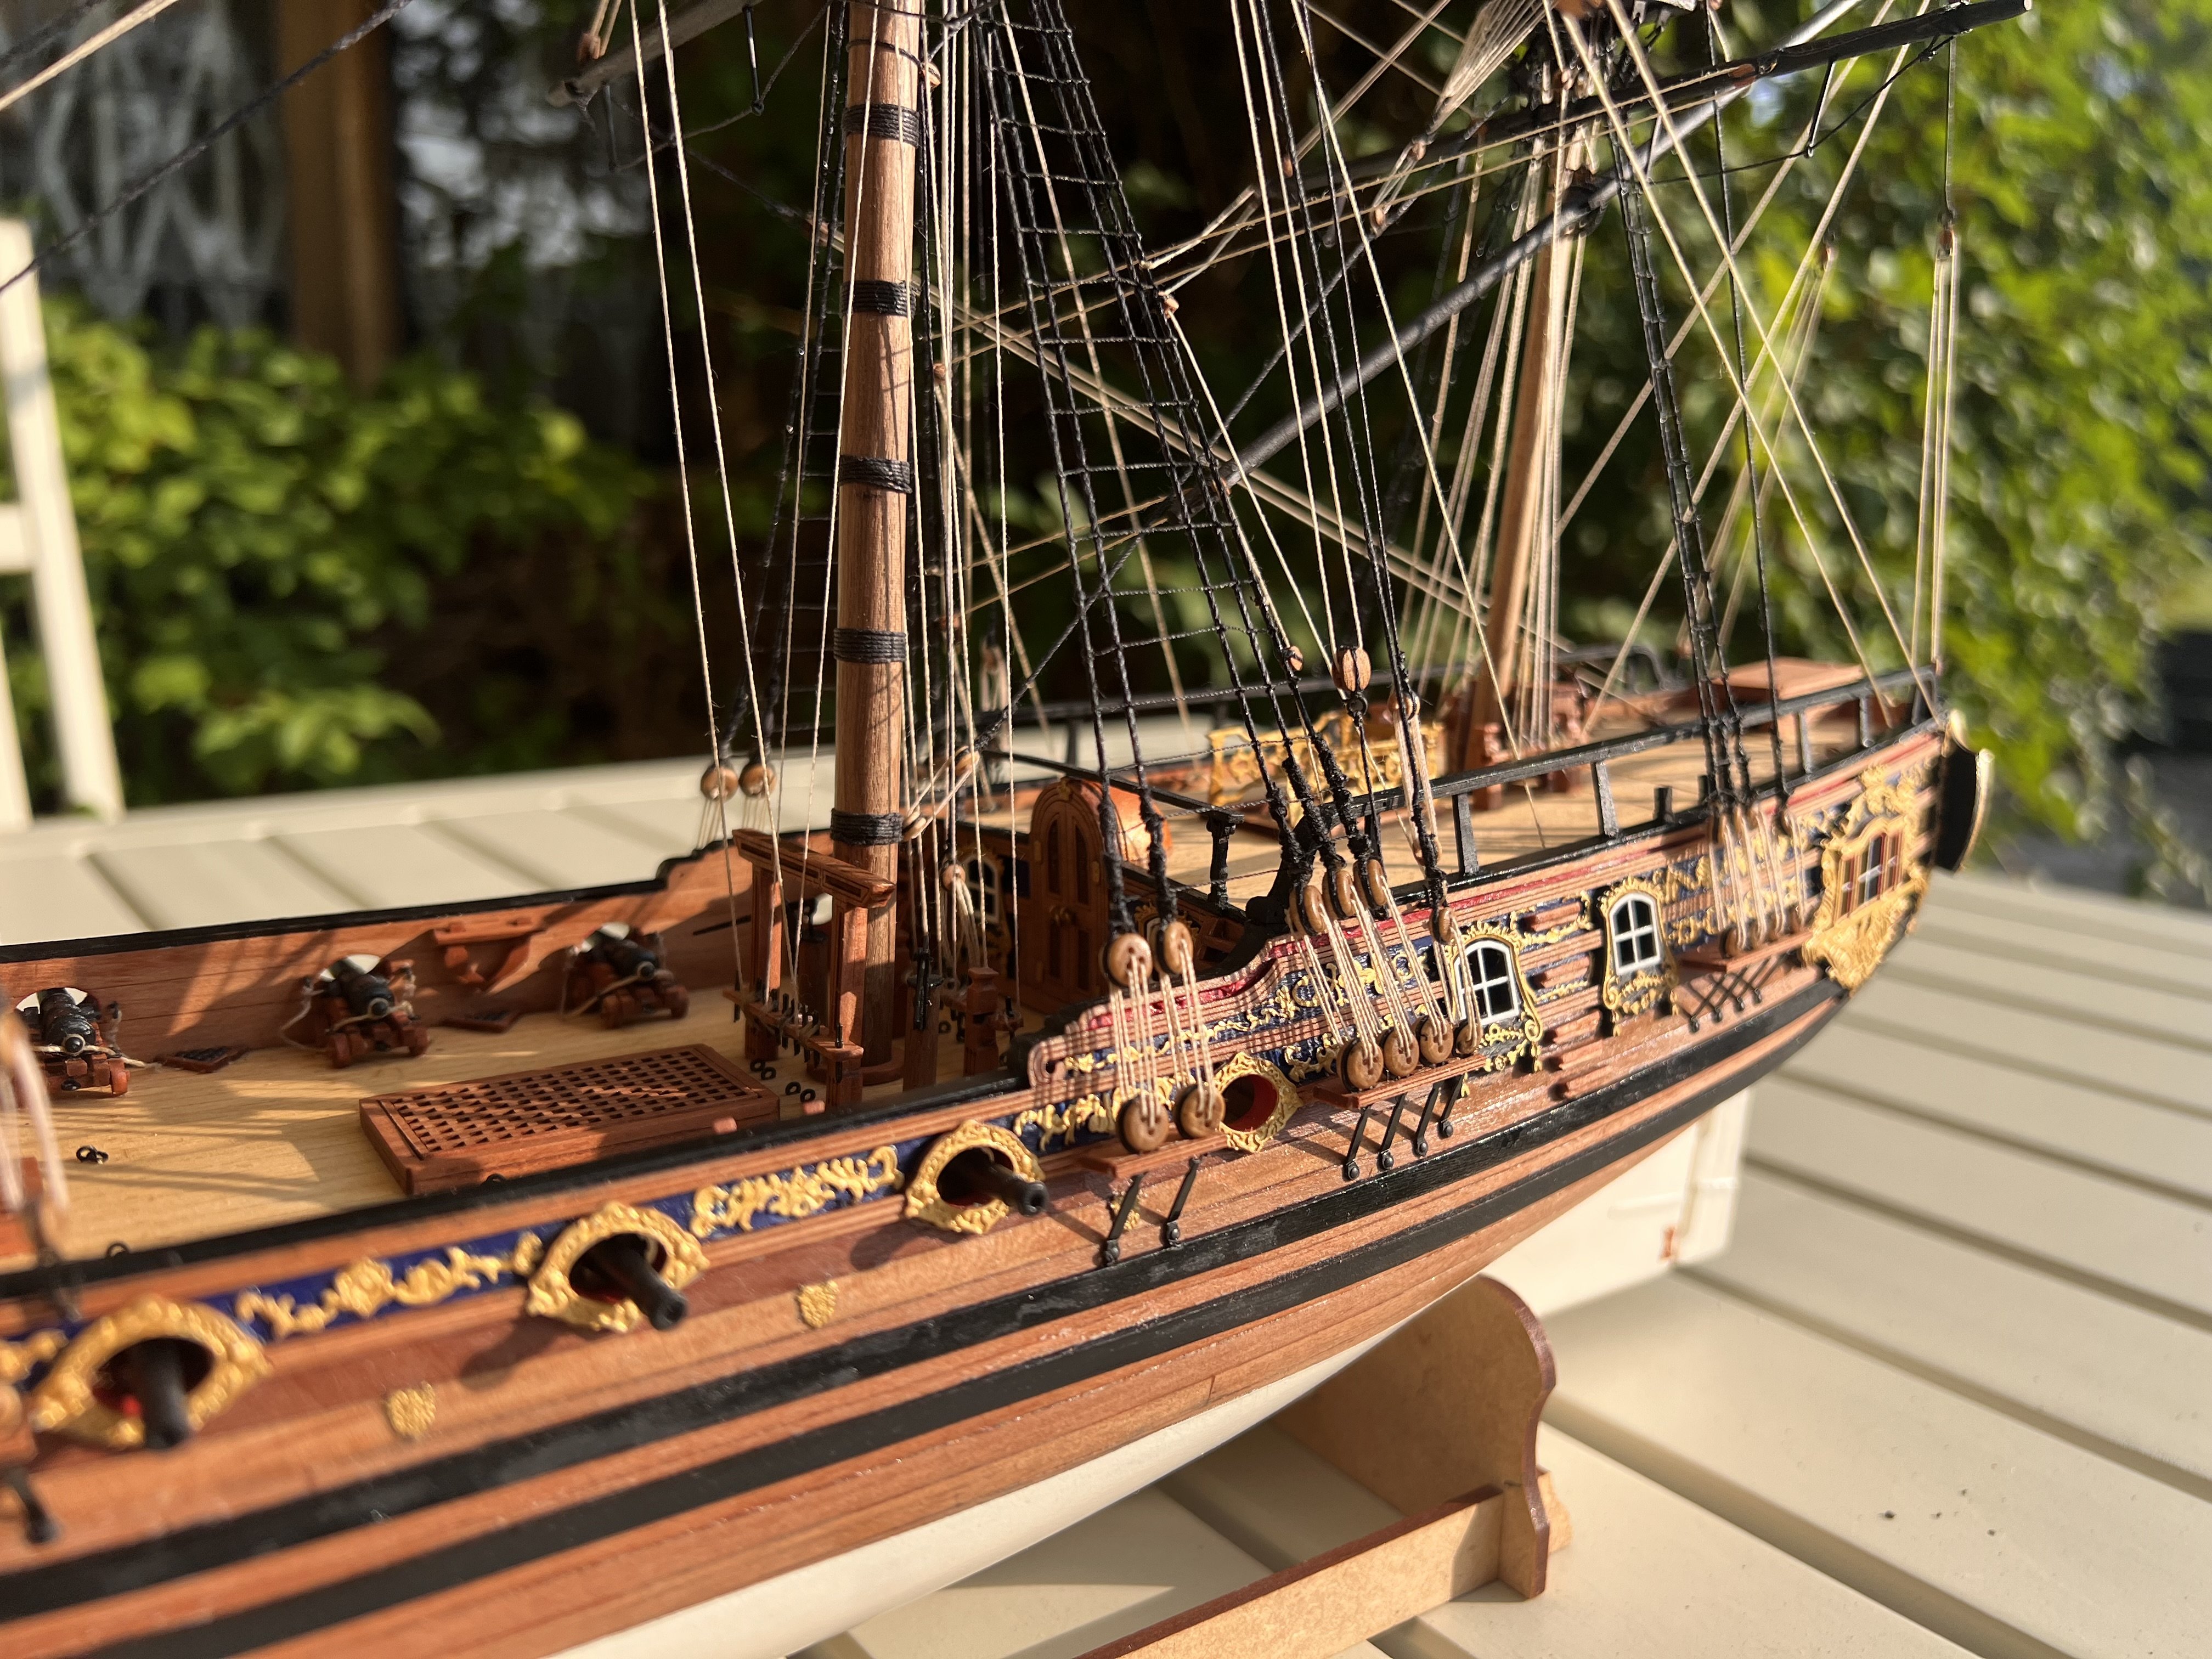
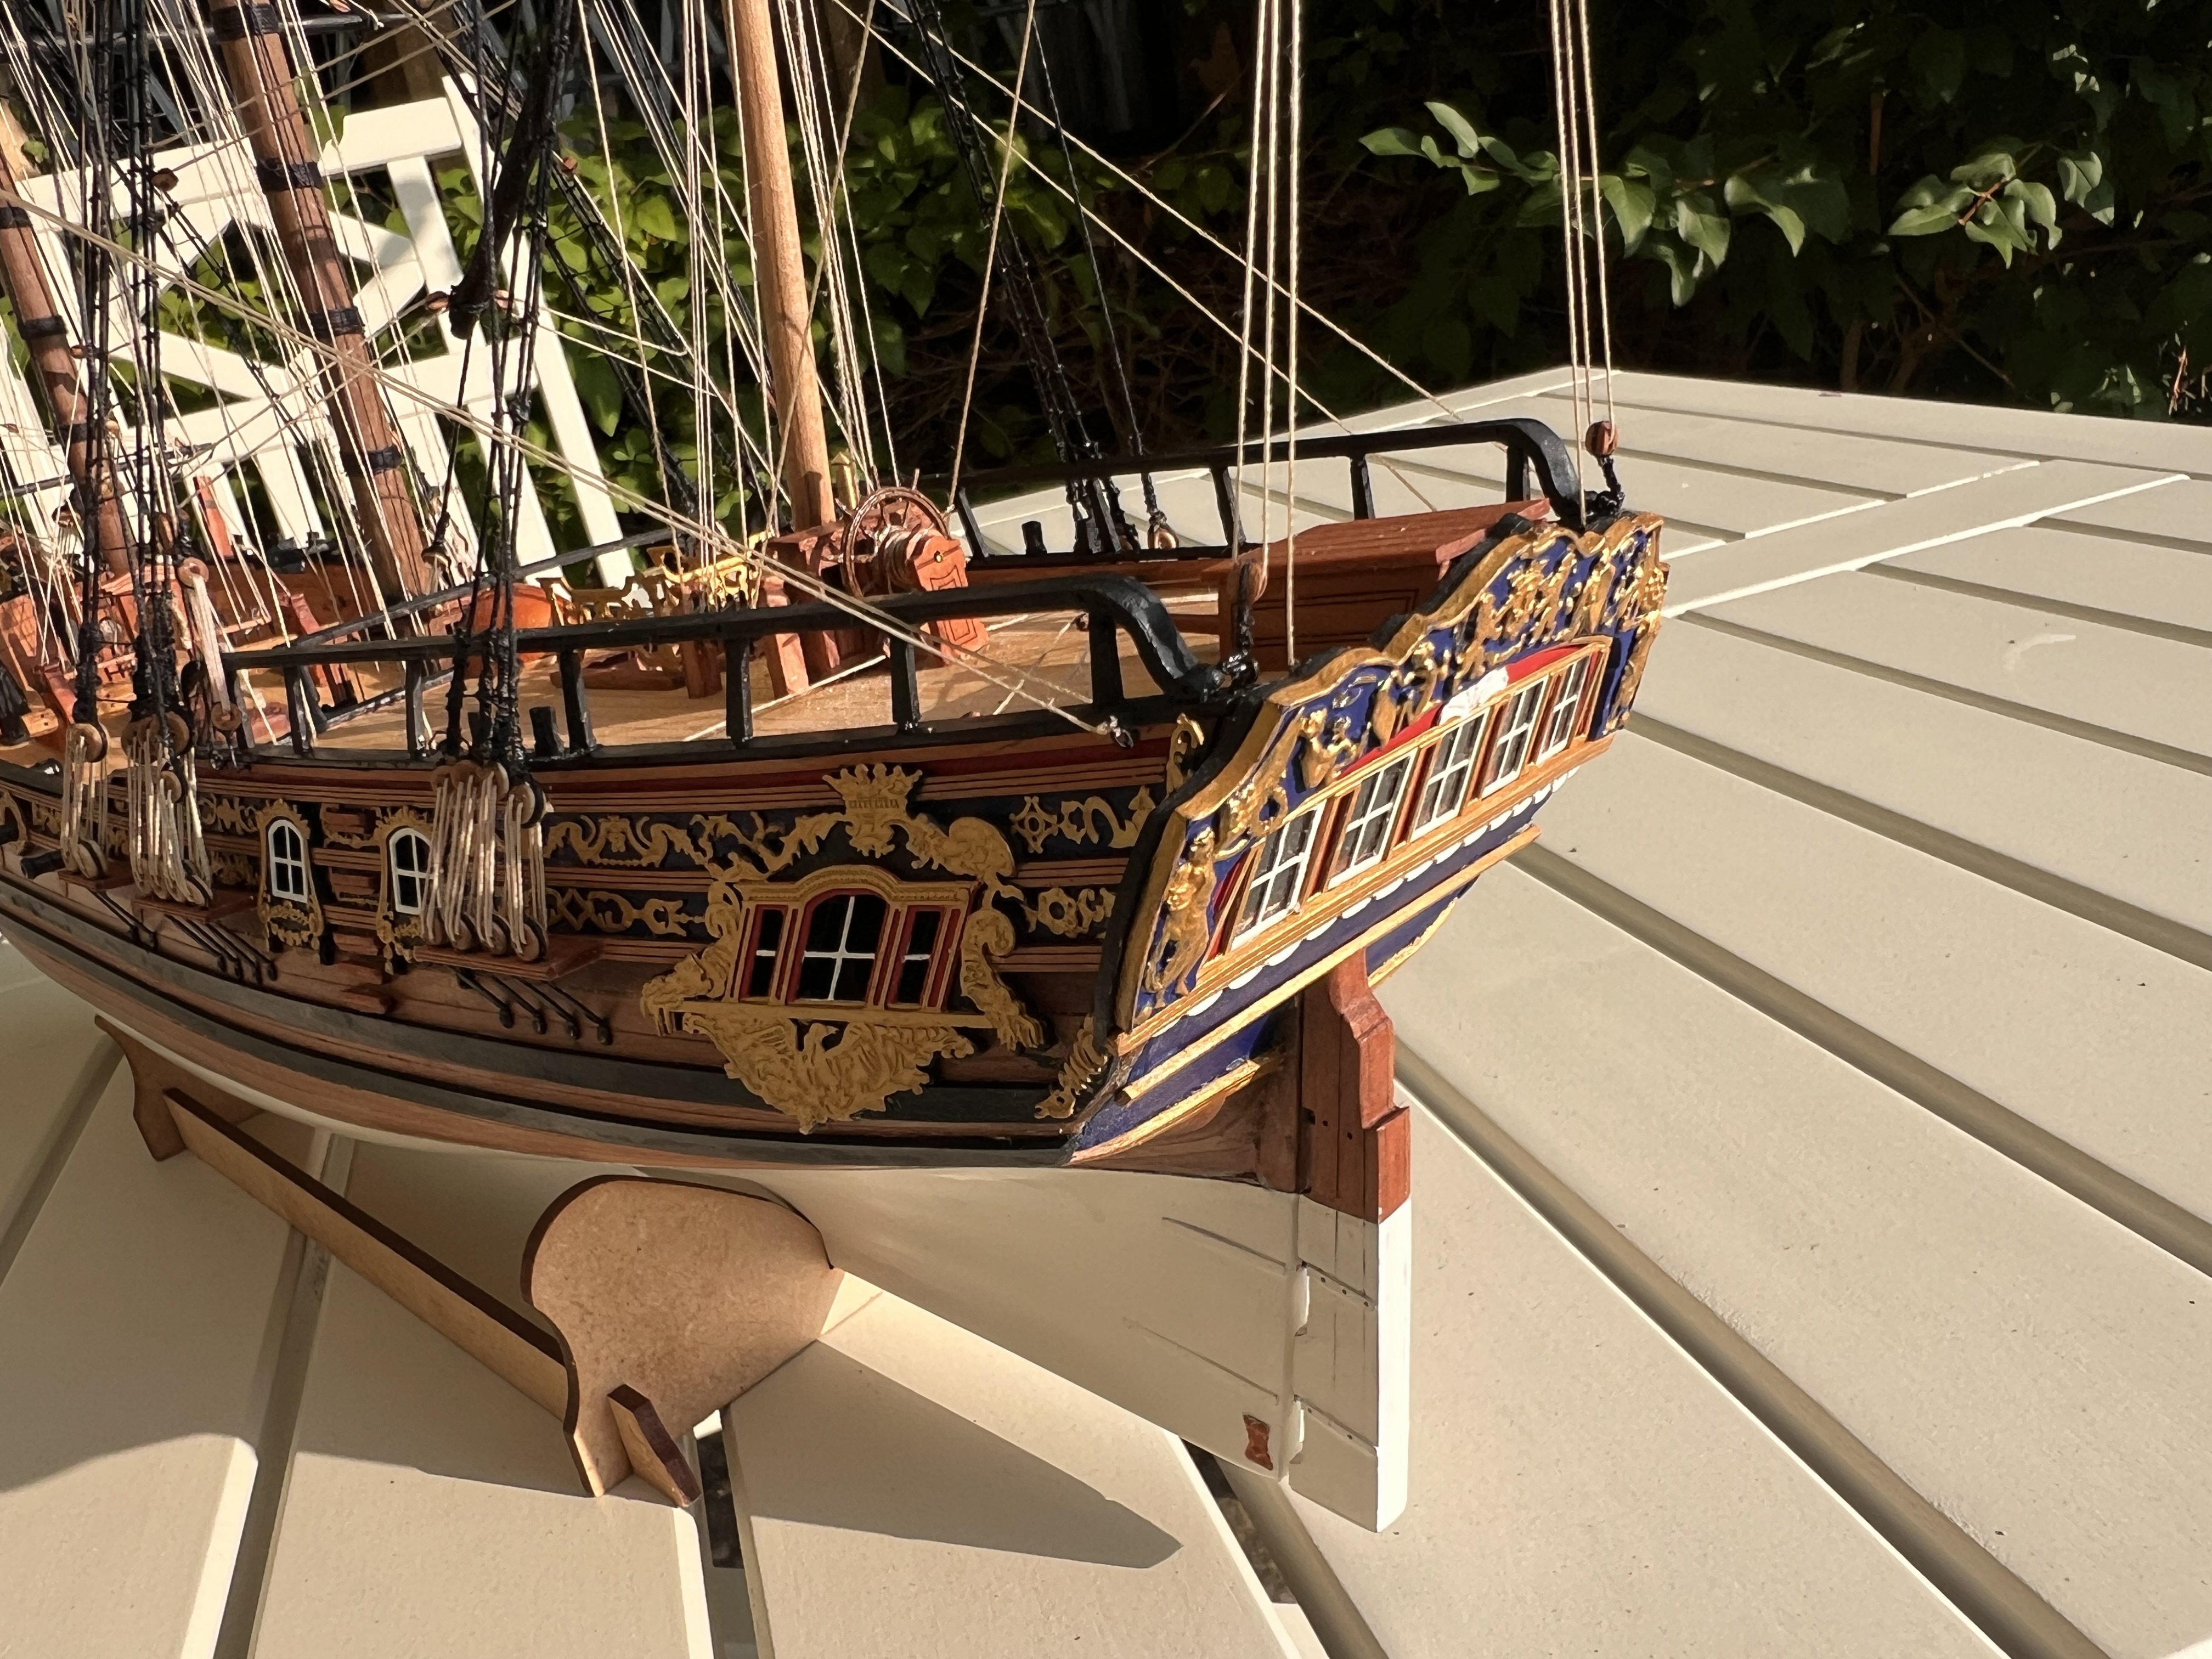
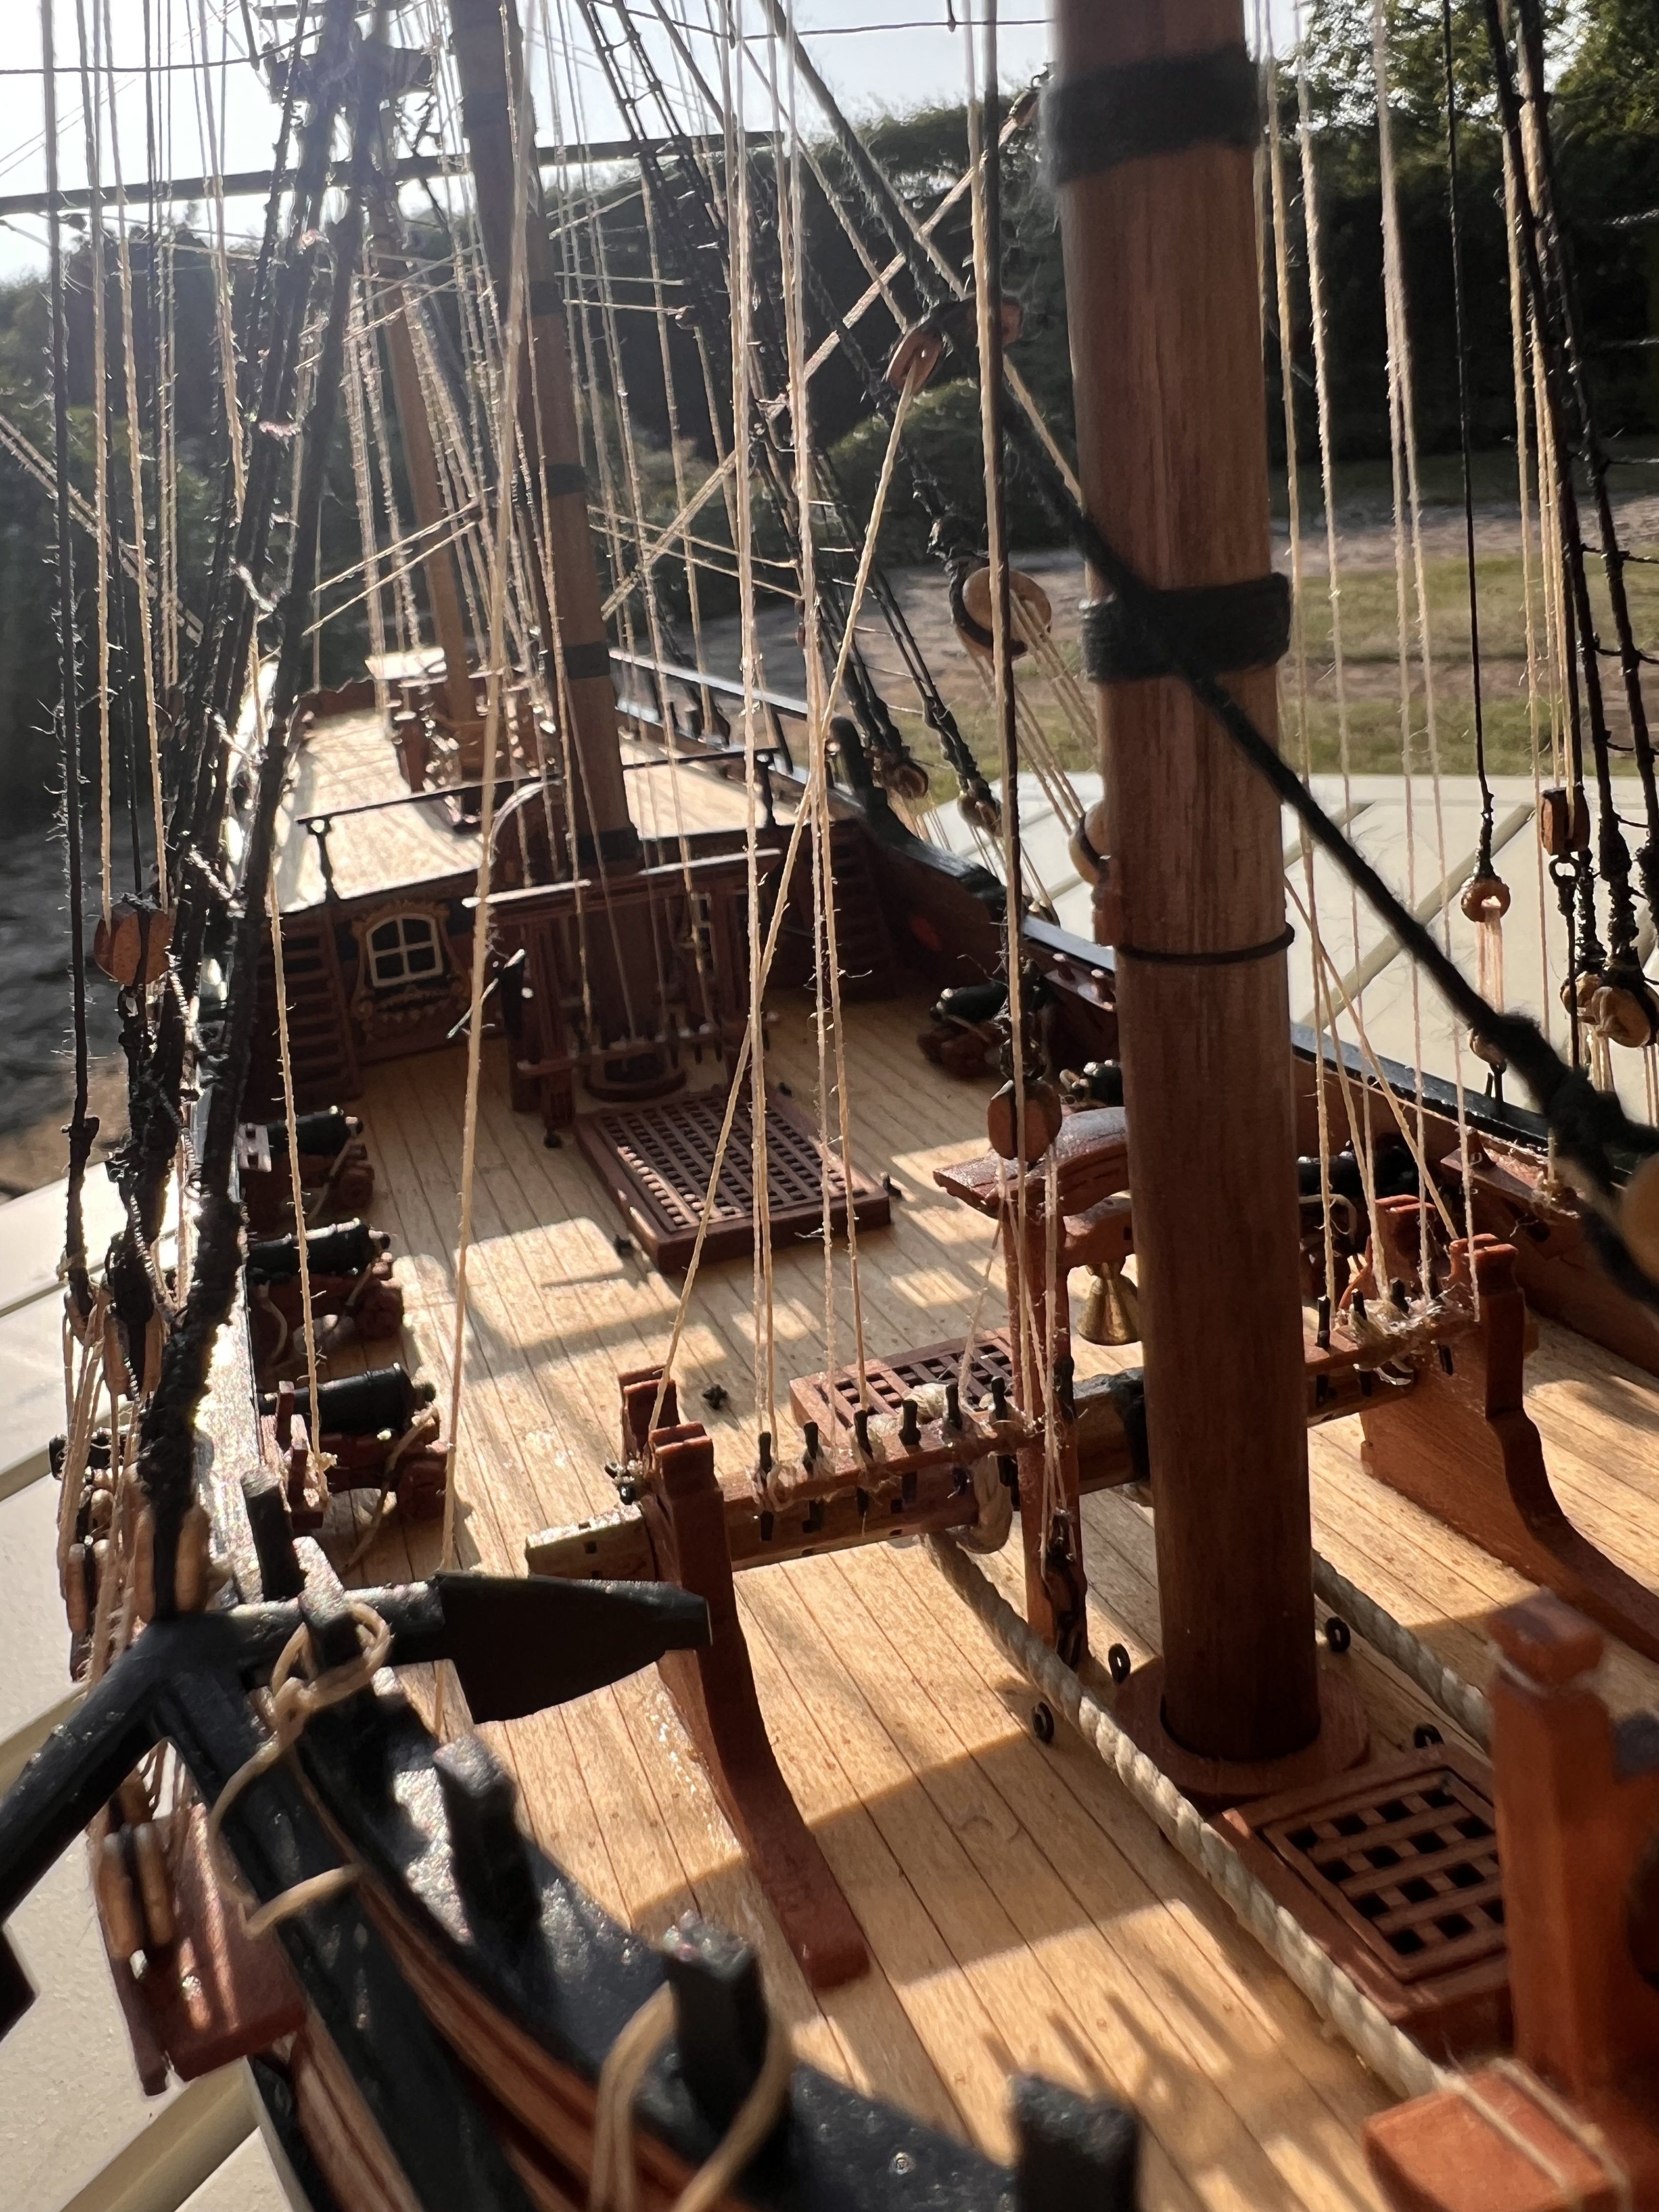
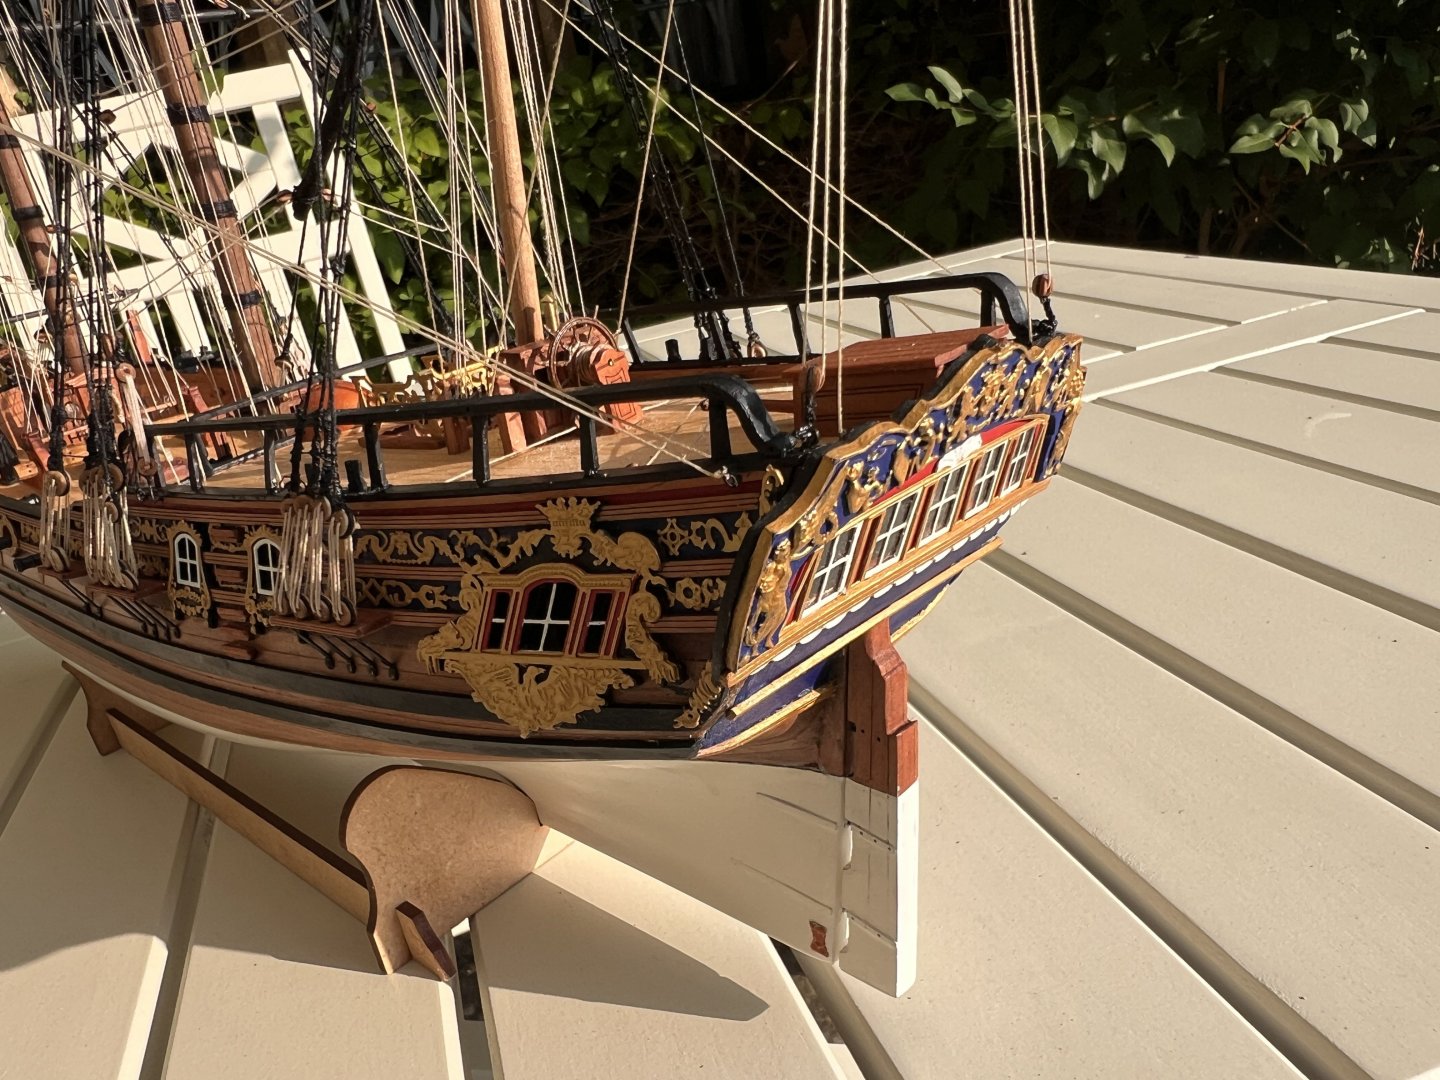
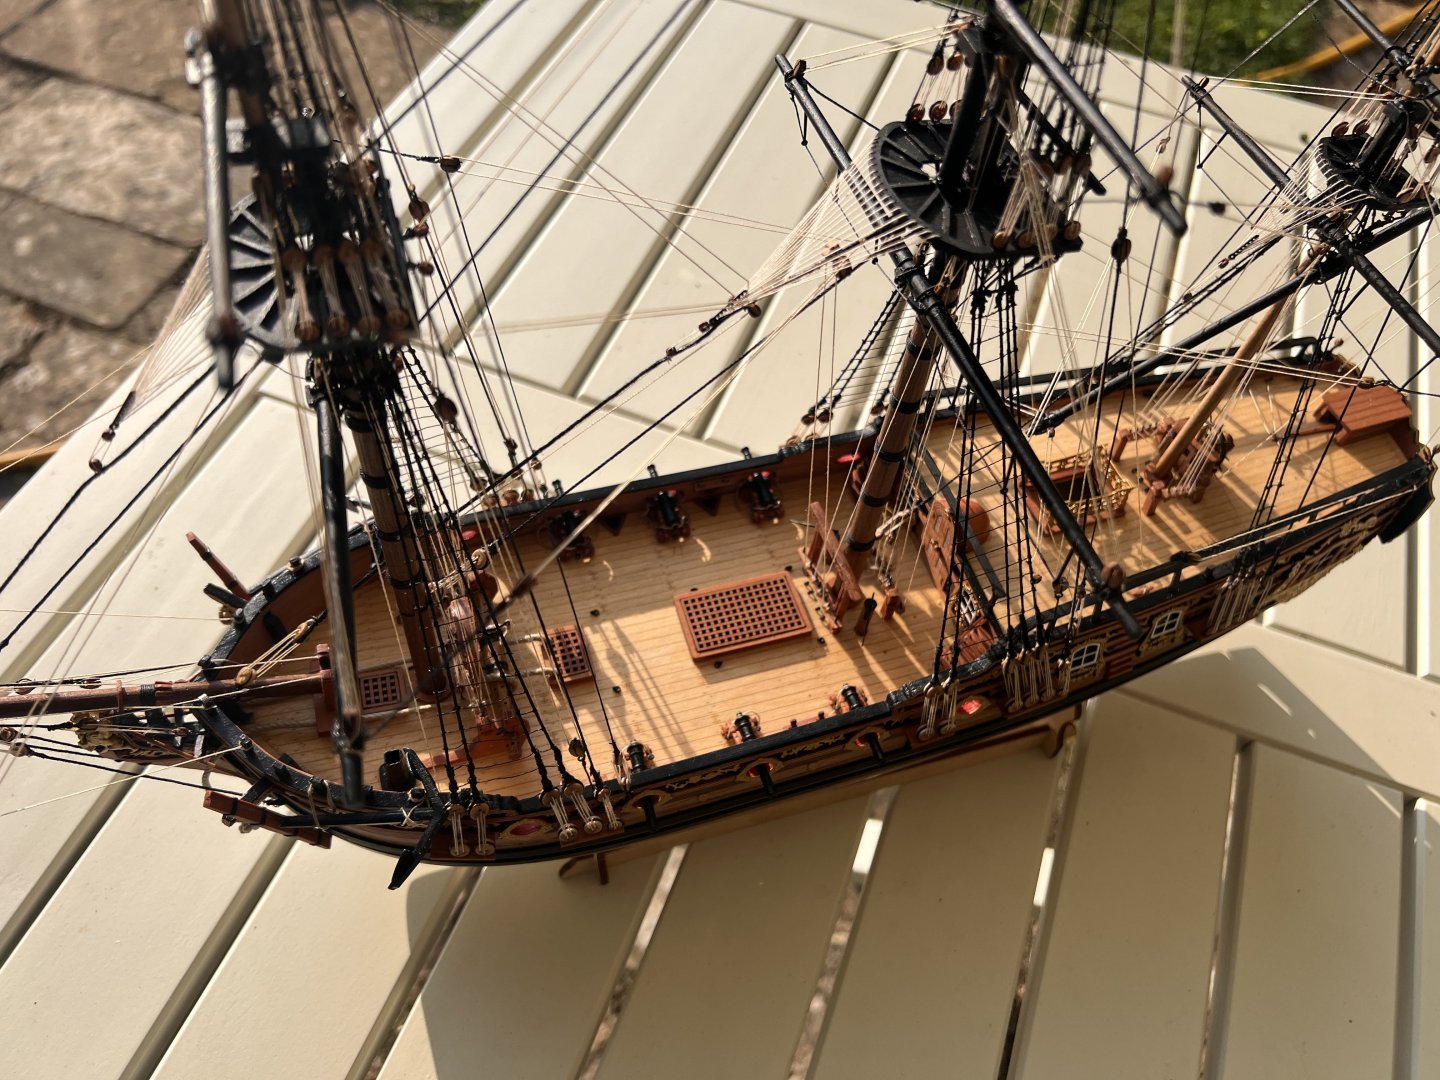
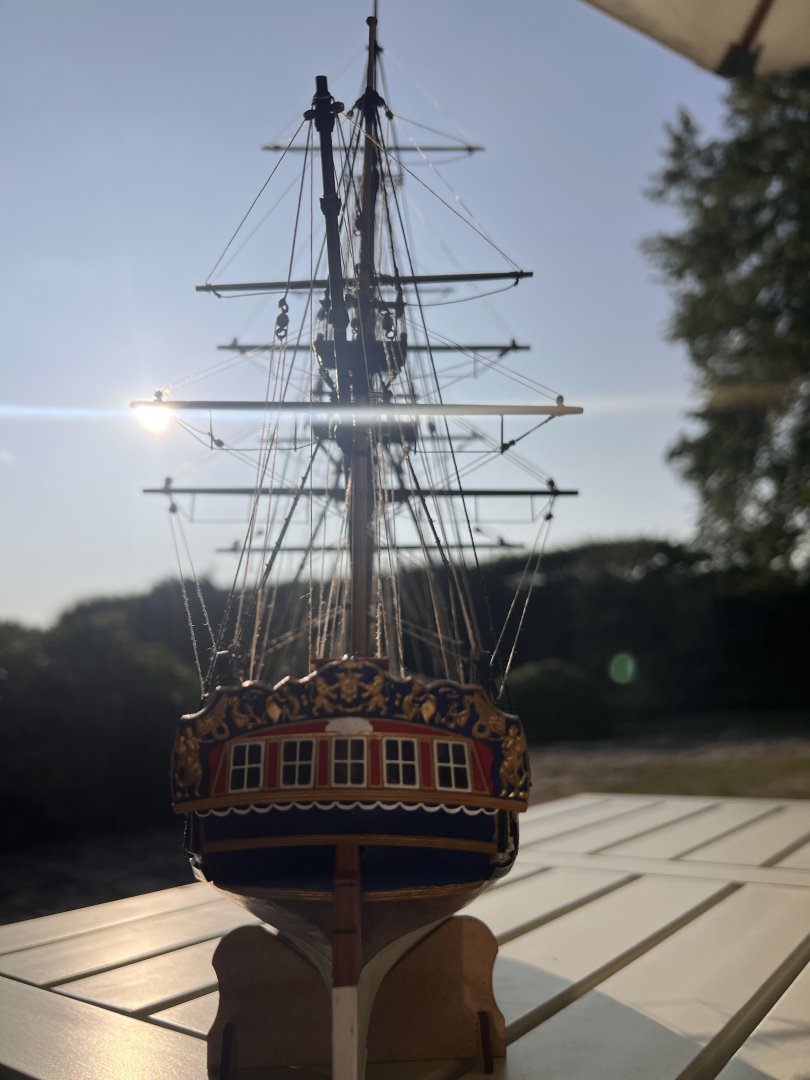
11 months after starting, DoK is finished. I’m very pleased with the end result, although she’s not quite as tidy as Adder or Grecian, but that’s more a measure of how easy Chris has made the latter two kits with his most recent innovations. Dok is rightly classed by Vanguard as “experienced” whereas the other two are “amateur”, she has certainly been more of a challenge and taken considerably longer to build. Learnt lots as usual and my first ship-rigged model. Overall, yet another outstanding kit of an interesting ship from Vanguard, thanks again Chris. It’s a lovely sunny day in the UK so photos outside for a change. A bit of a break from building now, after that I have Sherboune and Speedy waiting to be built. I think Sherbourne first as she’ll be nice and quick, rather than getting stuck into another year long build such as this one. I hadn’t planned to build Sherbourne, but was given her as a present. I’m glad I was as I’d like to try a few things and develop some new skills on a small build. On Sherbourne in particular I’d like to try to plank the deck myself, try ochre painted sides (whilst I love the look of the bare wood sides in many of these kits, especially in the nice pearwood Vanguard uses, I can’t imagine in real life that many ships weren’t painted to protect the wood, maybe I’m wrong?), and finally try and achieve a usable wipe-on poly which isn’t readily available in the UK.


- 36 replies
-
- 14
-
-
-
- Duchess of Kingston
- Vanguard Models
- (and 1 more)