Ferrus Manus
-
Posts
1,407 -
Joined
-
Last visited
Content Type
Profiles
Forums
Gallery
Events
Everything posted by Ferrus Manus
-
 I have a counter-point regarding your assessment about the planks. The entire Northern Tradition is descended directly from viking vessels, and furthermore, without much evidence from the Bremen Cog, I also think the planking question remains unsolved. Bjorn Landstrom seems to argue throughout the cog section of "The Ship" for the traditionally-laid parallel plank approach. His book, however, was written a year prior to the discovery of the Bremen Cog. Another point is that the Stralsund Cog is closer in time period to the Nef than it is the Bremen Cog. You could expect a few things like planking and rigging to be more similar to nefs than they would be to later cogs. That's almost like using the Bremen Cog as an authoritative source for a model of a ship from 1480, which you can't really do. I might go the heart route when it comes to the shrouds and stay. I'm already going to be doing a bunch of scratchbuilding for this project; I'm not building an entirely new deck. You should definitely follow this, as your input will be more than helpful as it usually is.
 -
While I think Robert solved the question with his government article, your post also brings up some good points. It is more than likely that the images in a book don't actually belong to the book's author or publisher. Chris pointed out that sharing an image or image fragment from a book to MSW is very unlikely to actually be an IP/copyright infringement, especially if the image in question is of a primary source created hundreds of years ago. This is still factoring in the fact that the images likely belong to a museum or other conservation organization. It seems as though this would still fall into Fair Use, especially considering the context in which the image/images were posted. Chris also pointed out that it doesn't really come down to stringent legalism as far as MSW modstaff are concerned, but rather users simply being careful with what they post.
-
@Louie da fly That was going to be one of my other questions, hearts or deadeyes for the shrouds. While the Bremen Cog is over a hundred years younger than the Stralsund Cog, it should be expected that both should share similar rigging patterns. However, the shapes of the upper works of the two ships are completely different. Another thing is that the deck planks on my cog are laid parallel to the keel, rather than the Viking-style "removable planks" design. Is there any real evidence either way? To my sensibilities, it seems as though the through-beams present on many examples of cog iconography are indicative of traditionally laid parallel planks (see the Mataro Nao as an example).
-
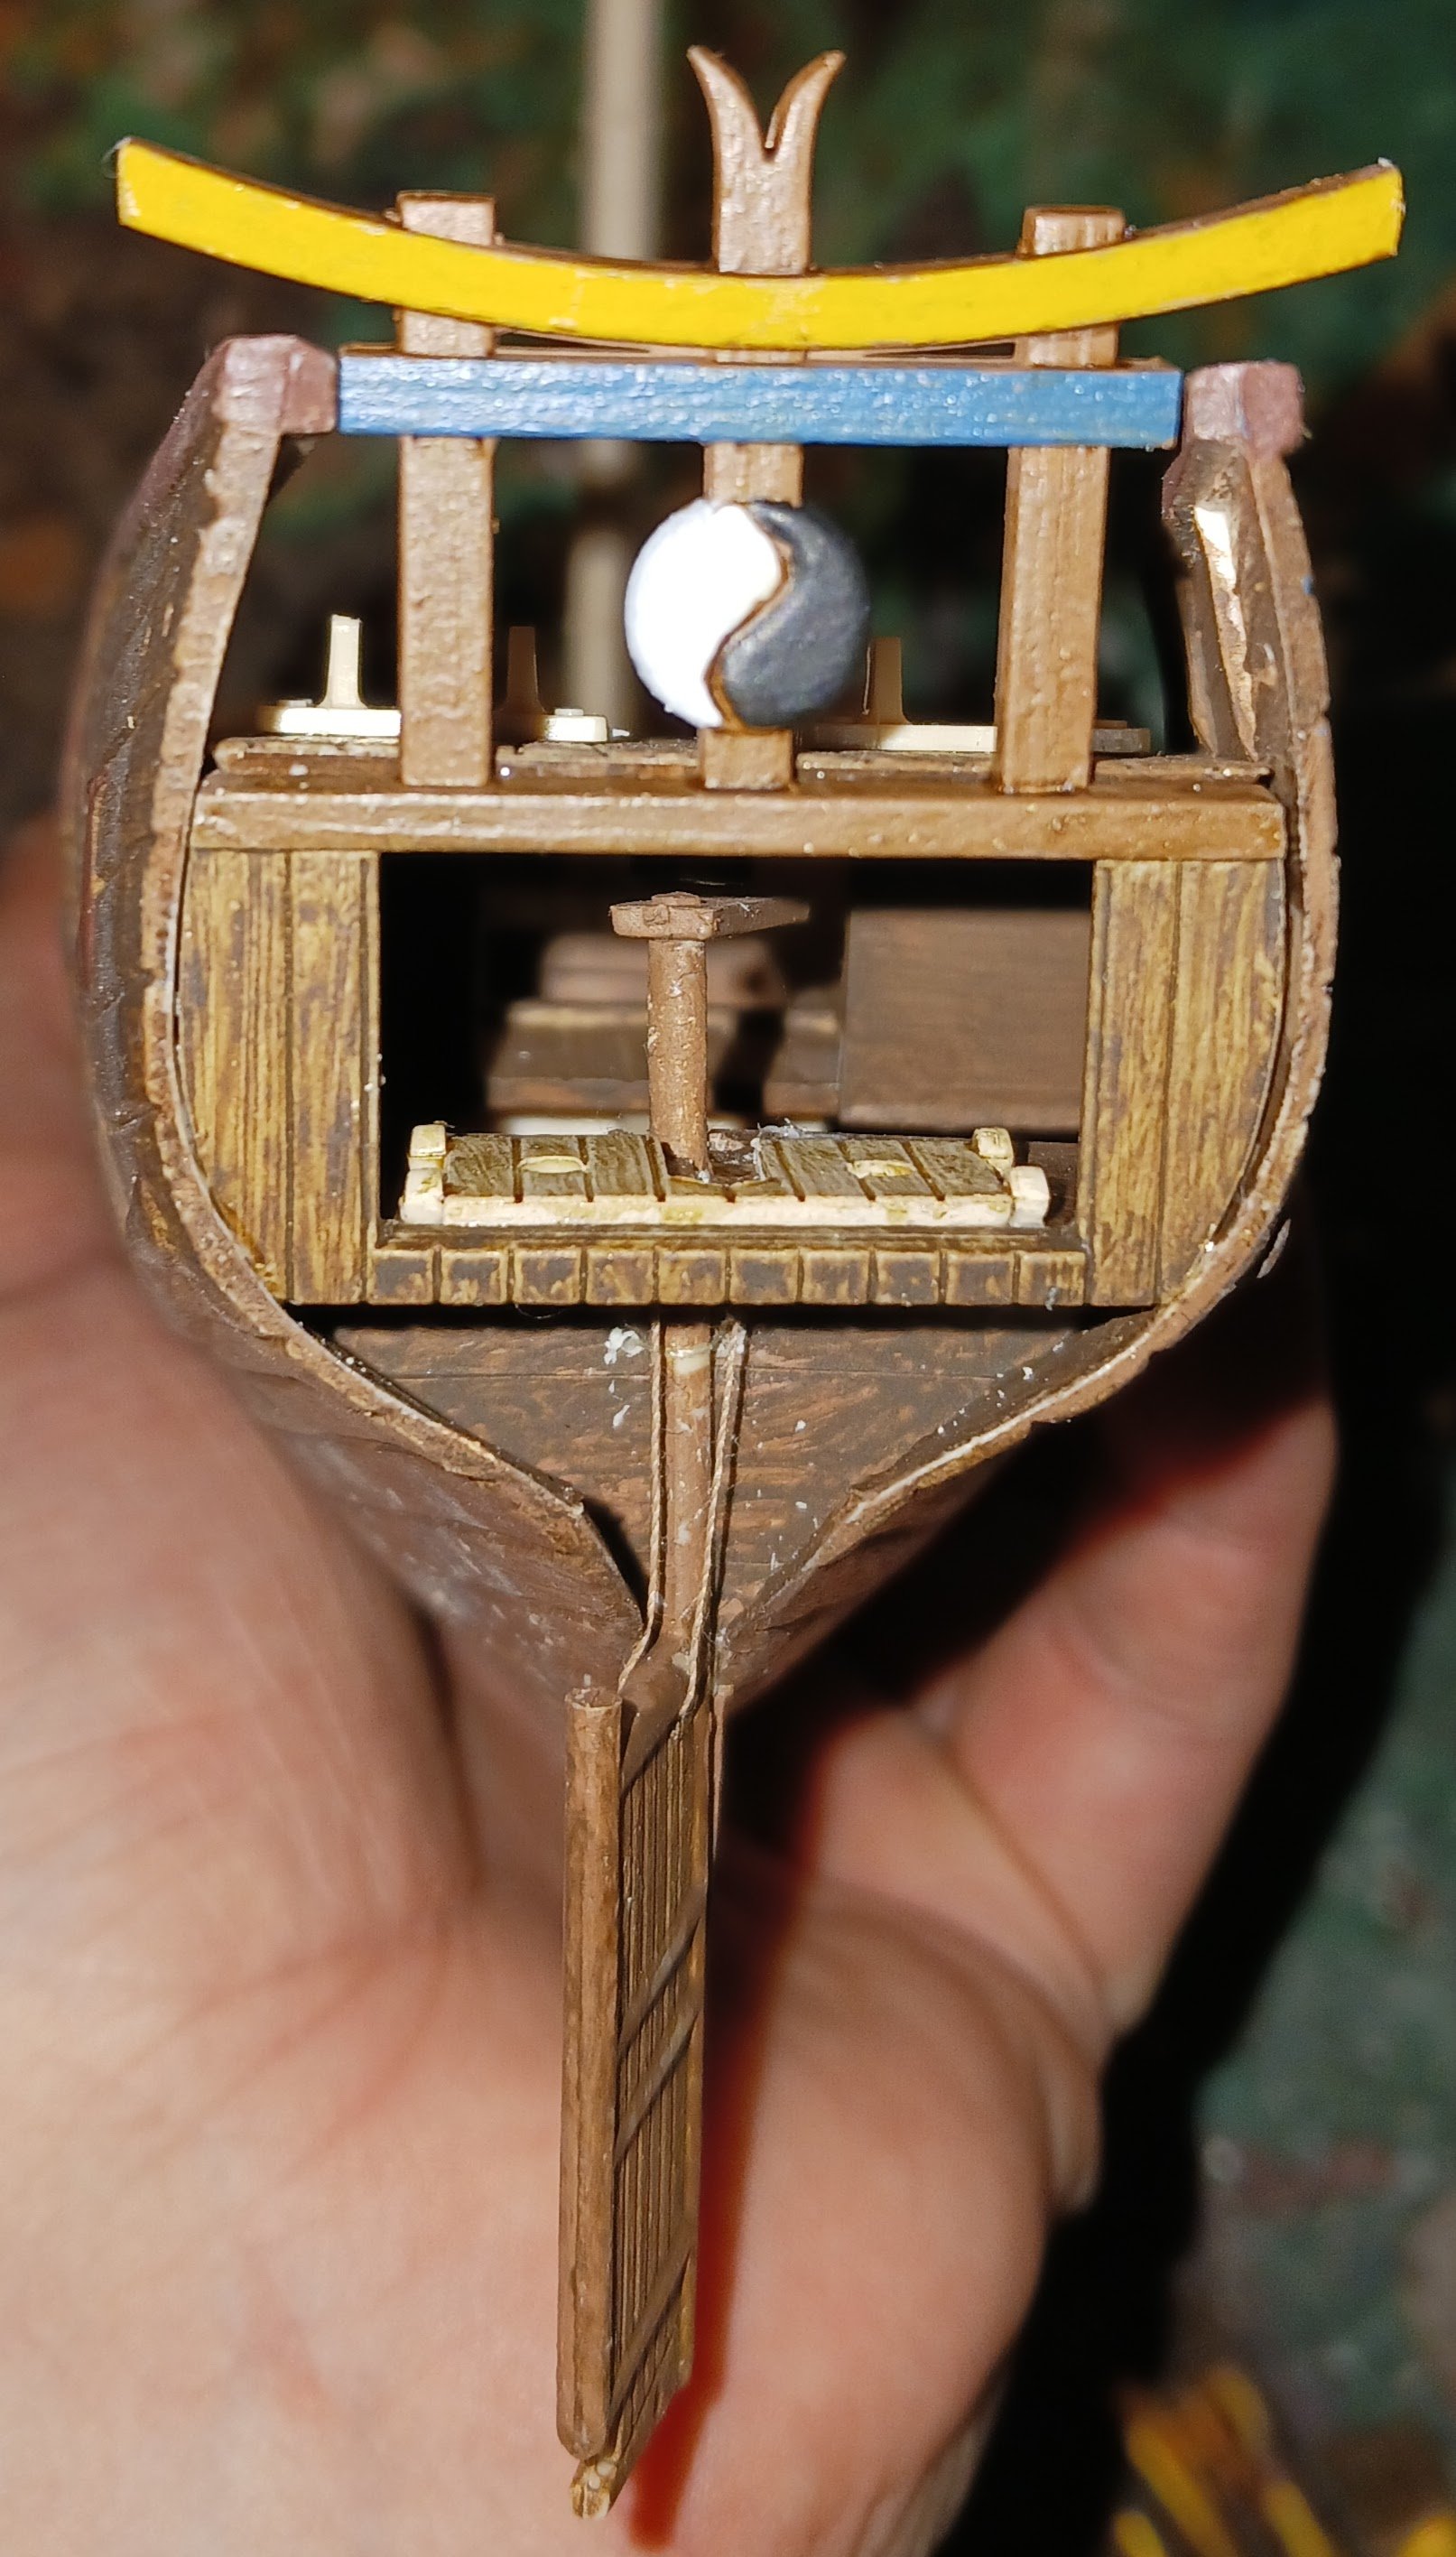
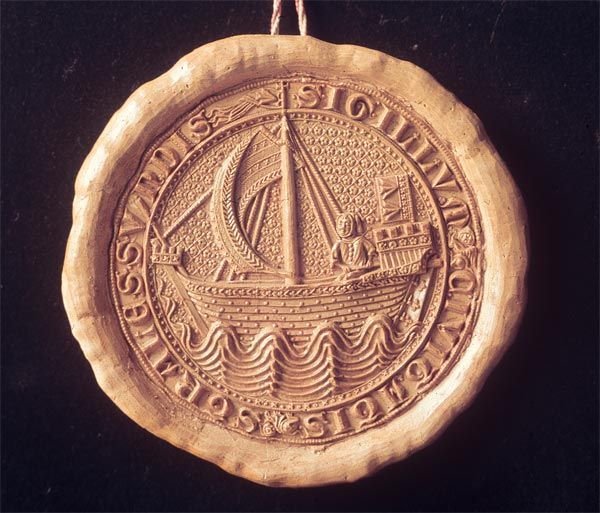
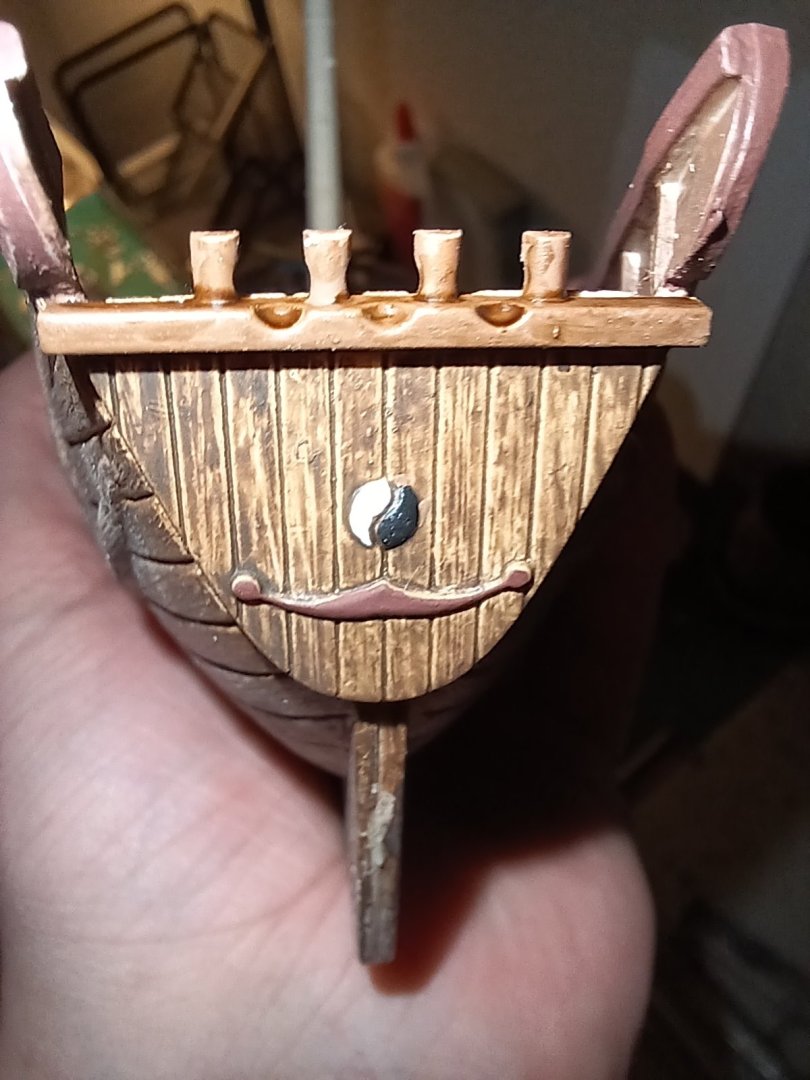
This image comes from @Louie da fly's Pinterest page, where he compiles primary sources regarding ships from the Middle Ages. I have repeatedly stated how helpful he and his primary sources are, so I don't see any more need to go on further. This sigil depicts a cog of the Hanseatic Leage, from the German city of Stralsund, circa 1278. We will be basing our ship primarily on this source, and multiple modifications will be made. The kit I have purchased is technically the "Crusader Cog" version of the original Revell kit from 2008, re-released by Zvezda. Either way, all of the parts for the original Hanse Kogge came in the box. While this won't be a perfect reconstruction of the ship, I want to check all the major boxes. We will also be using the book "Cogs, Caravels and Galleons" by Richard Unger as a source.
-
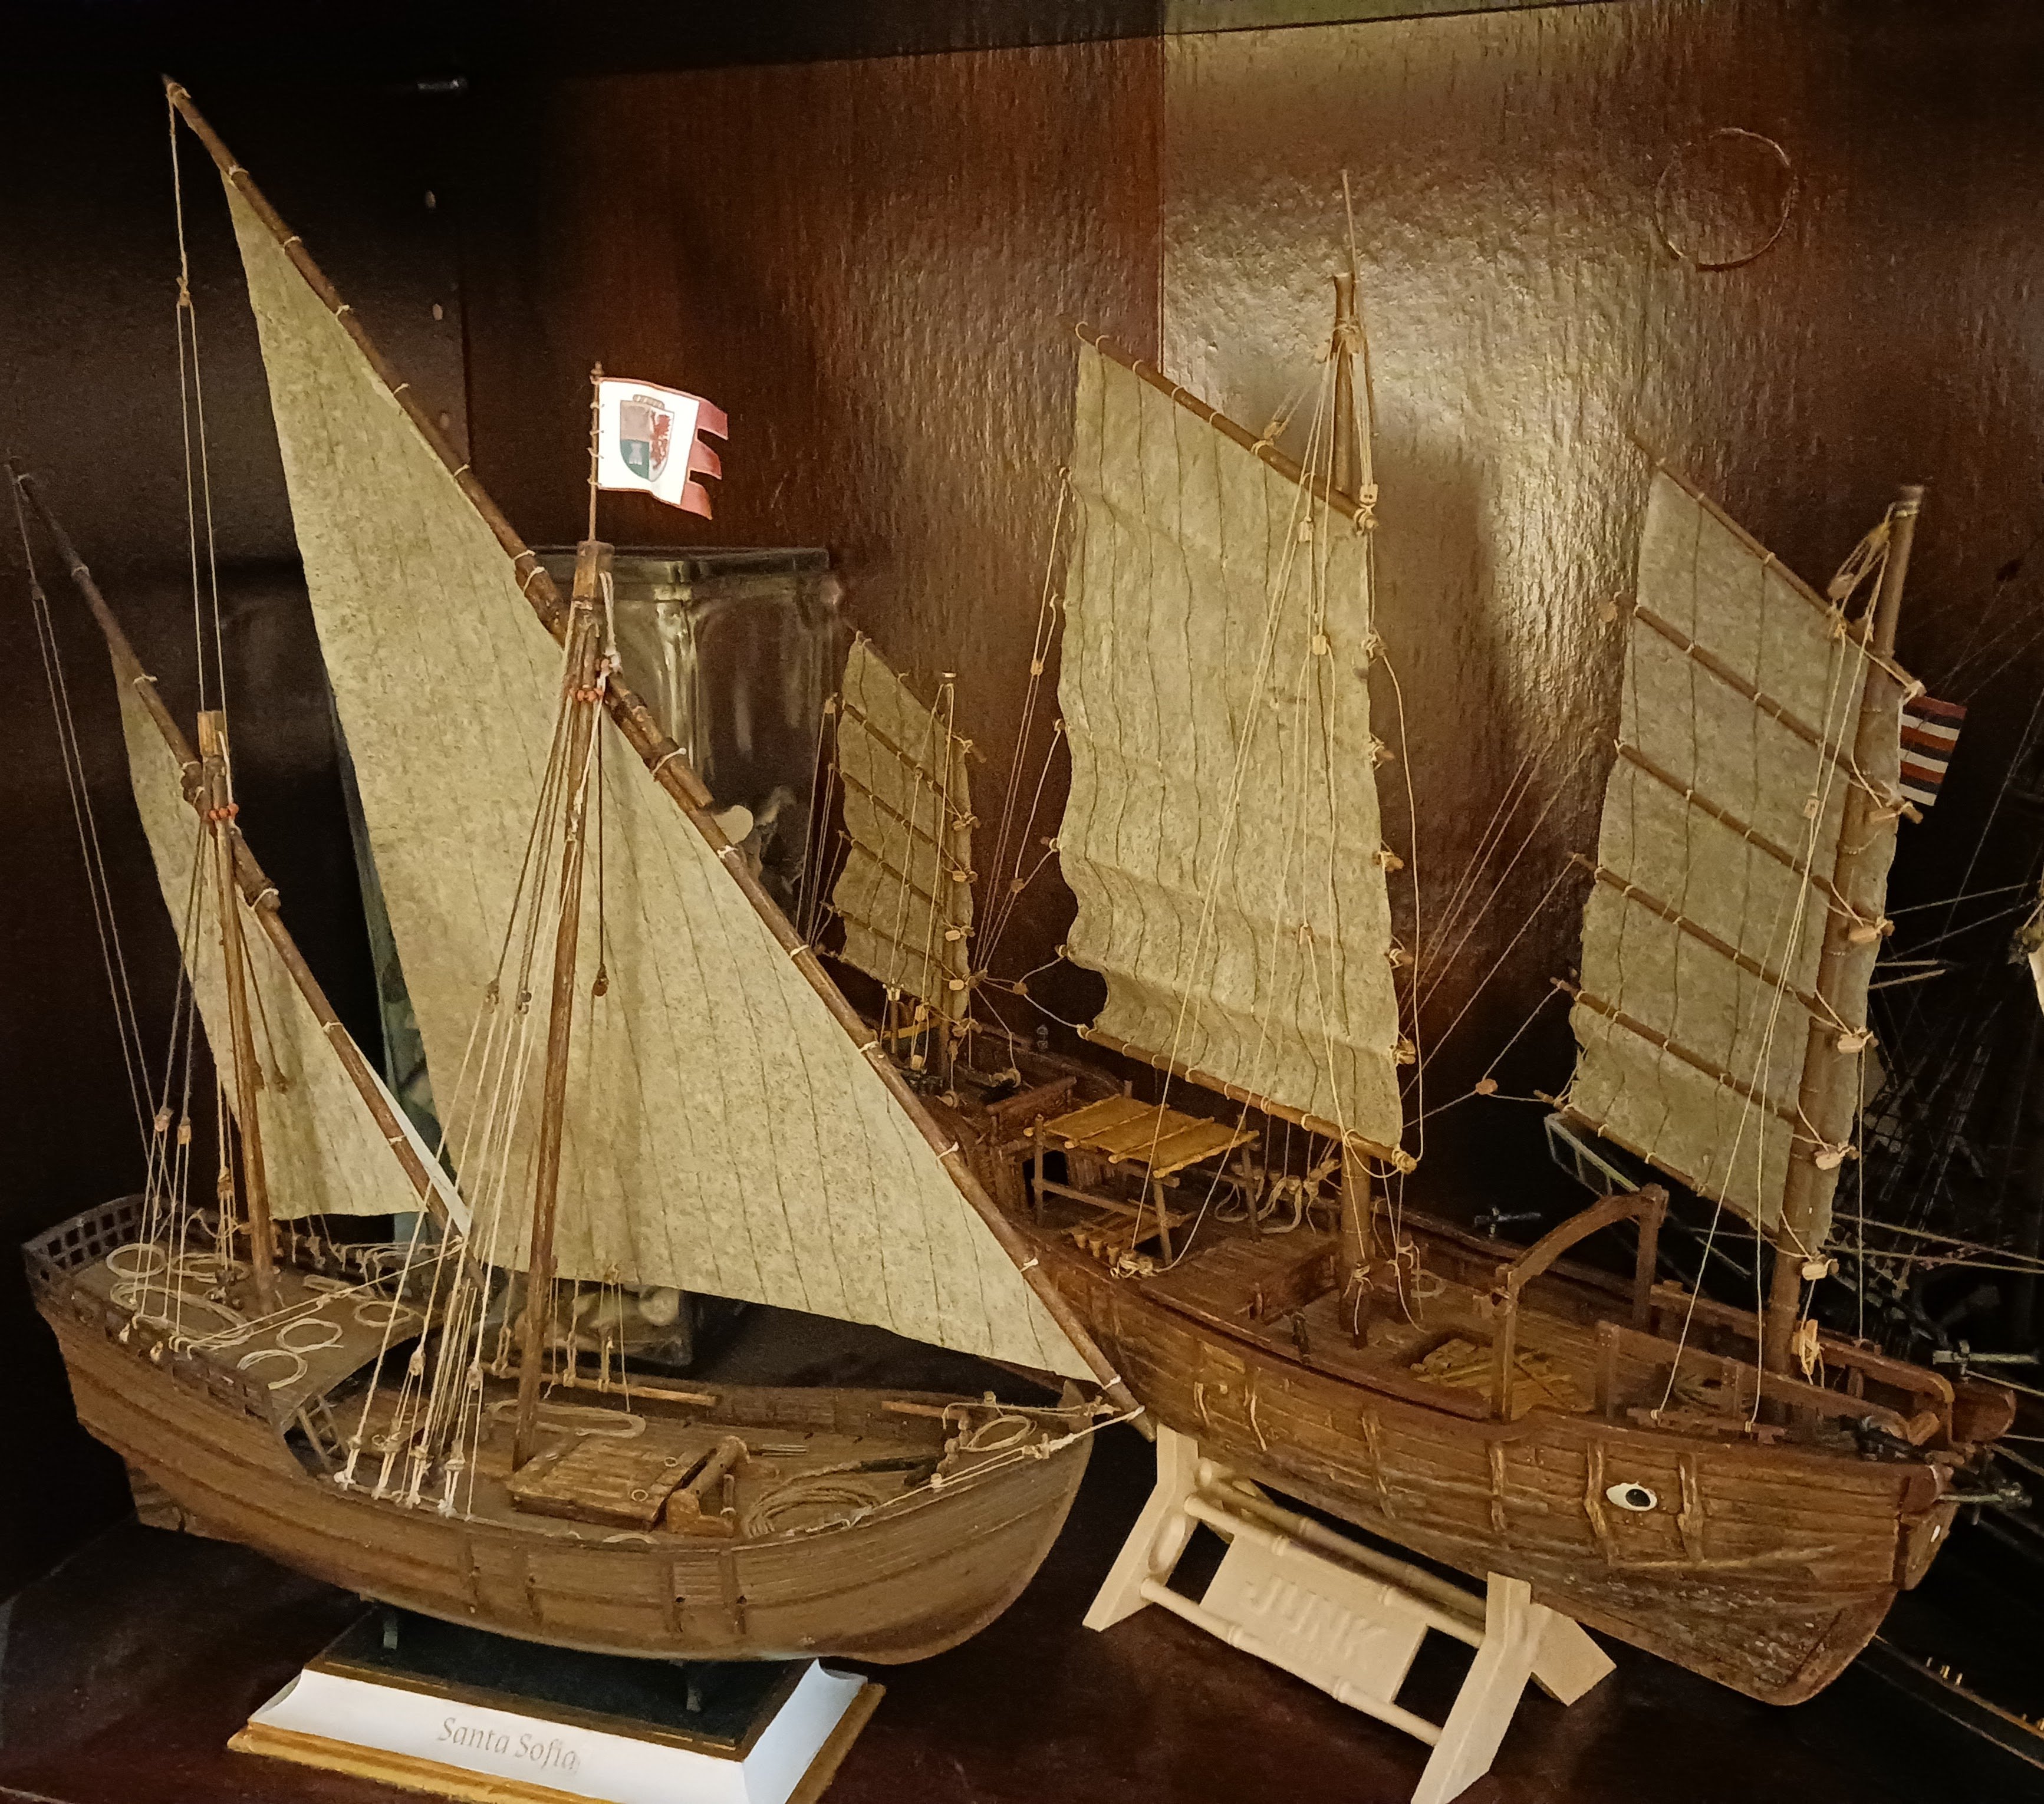
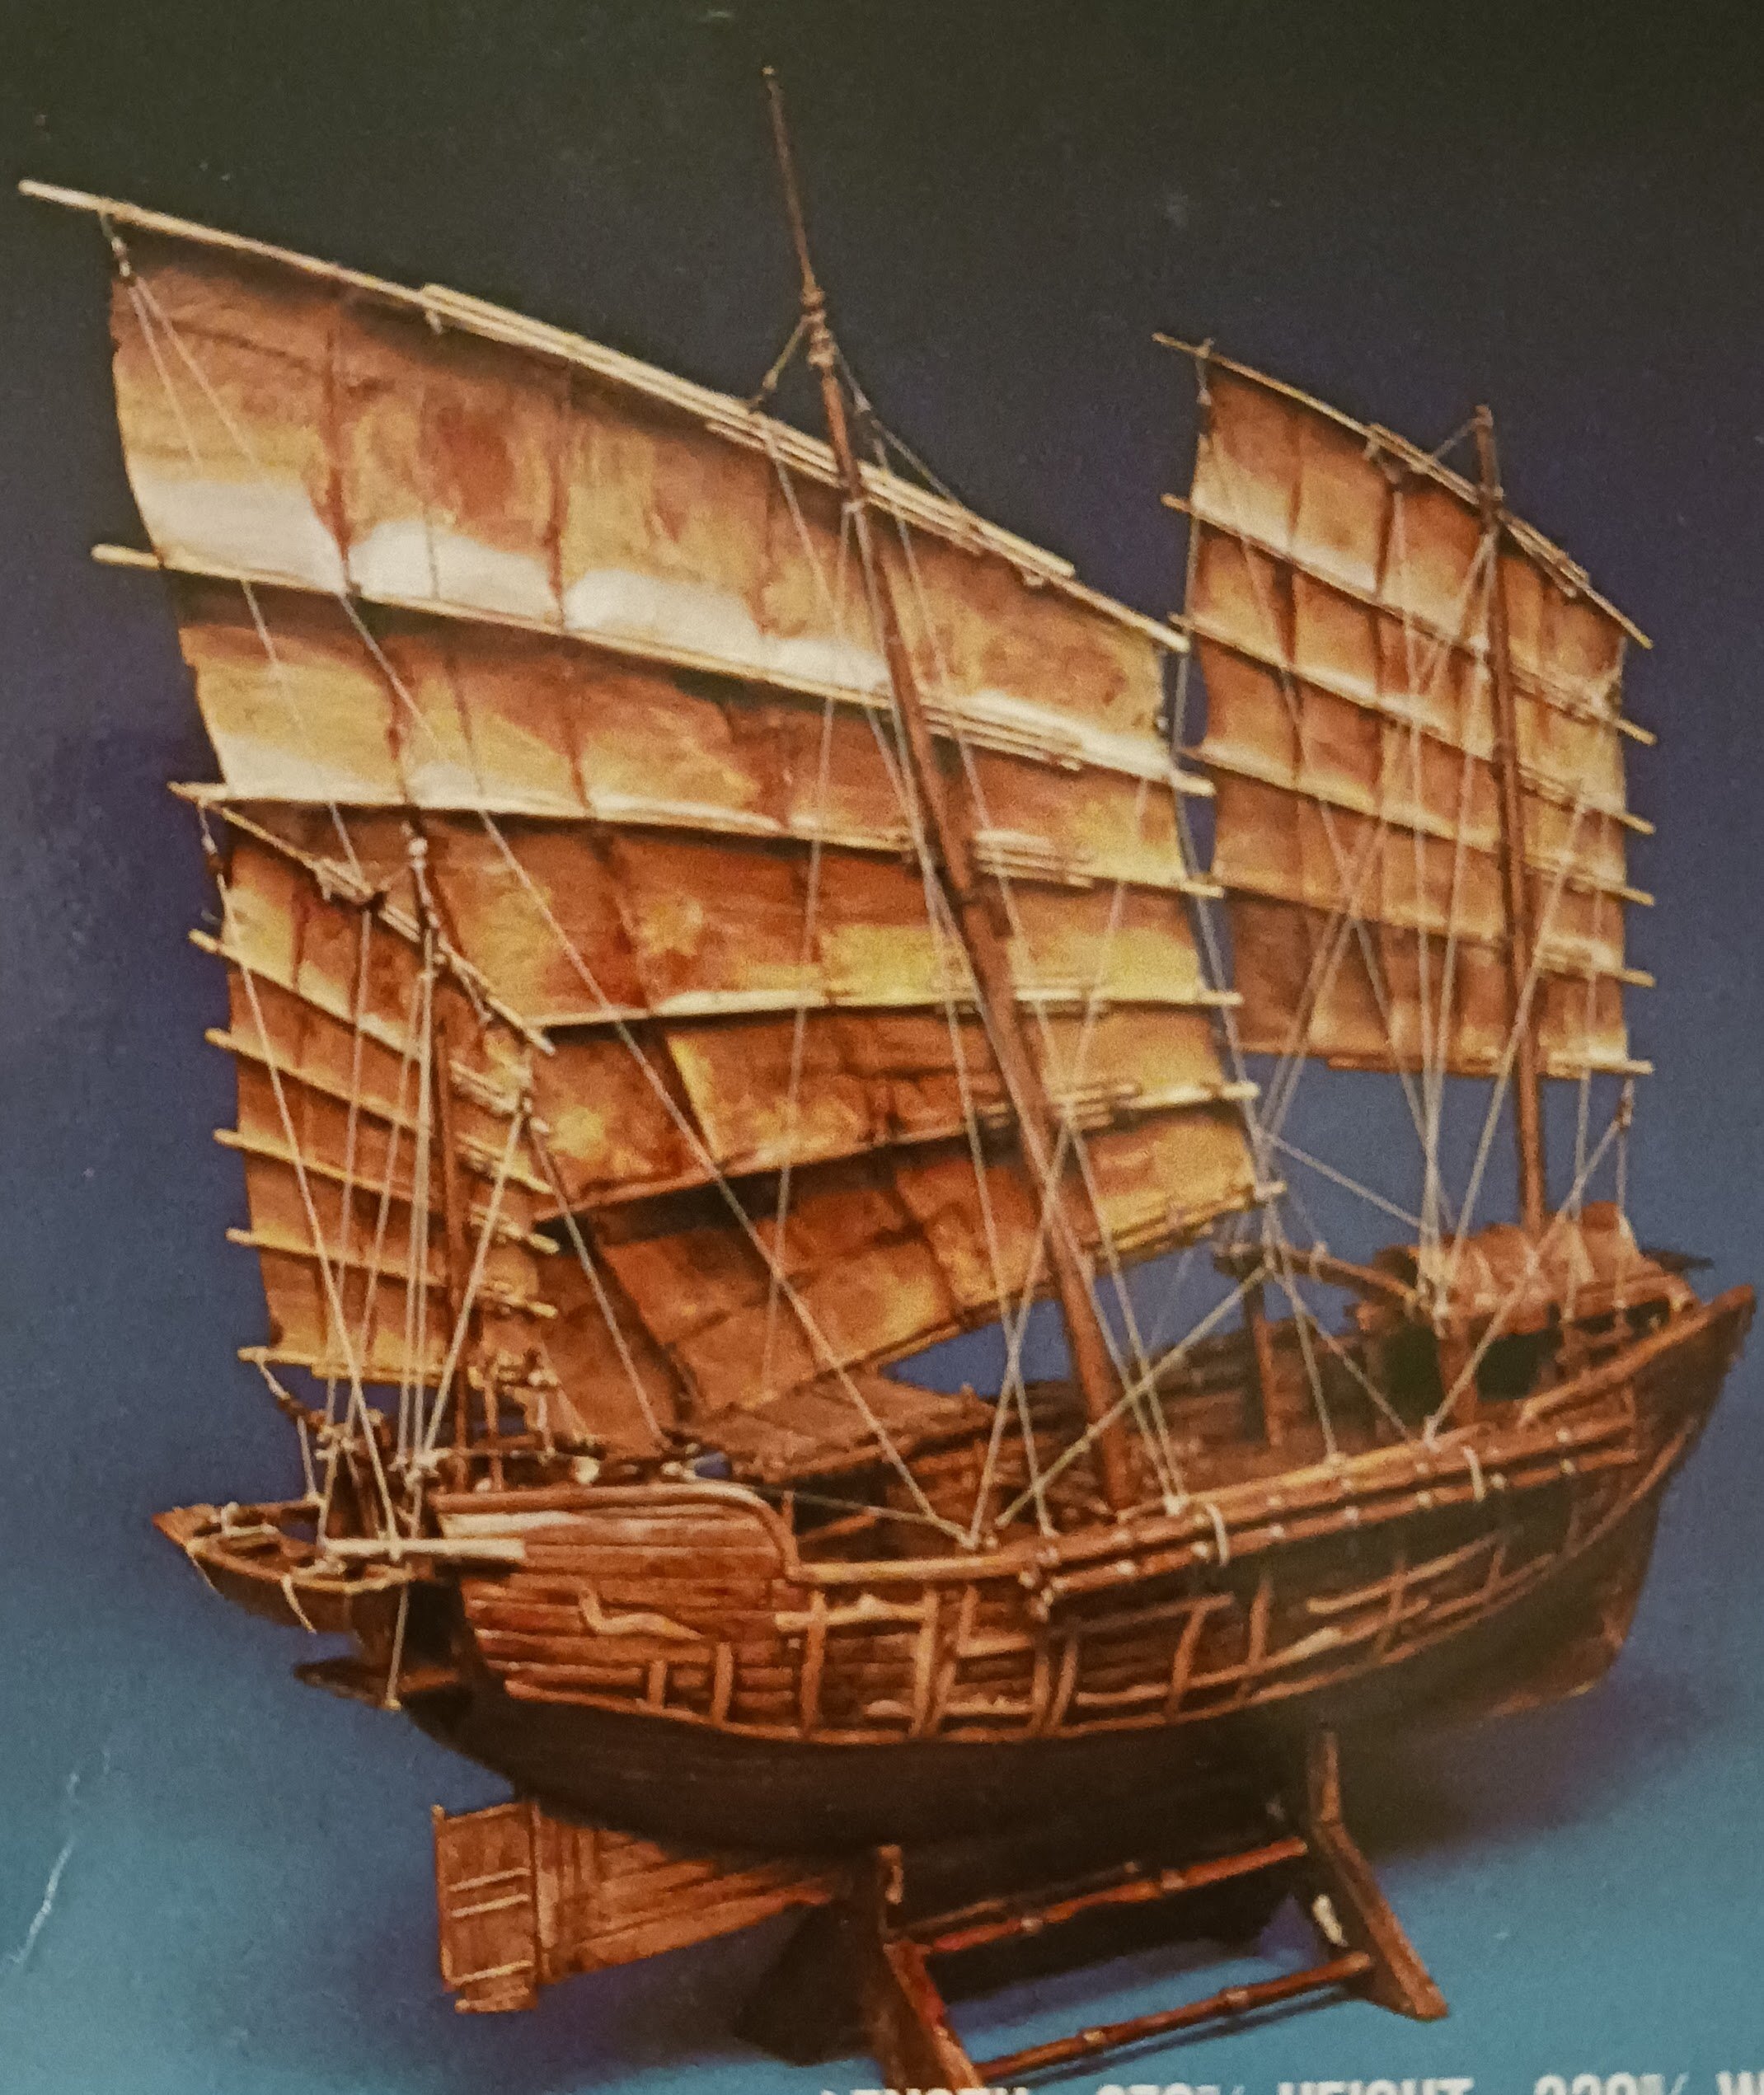
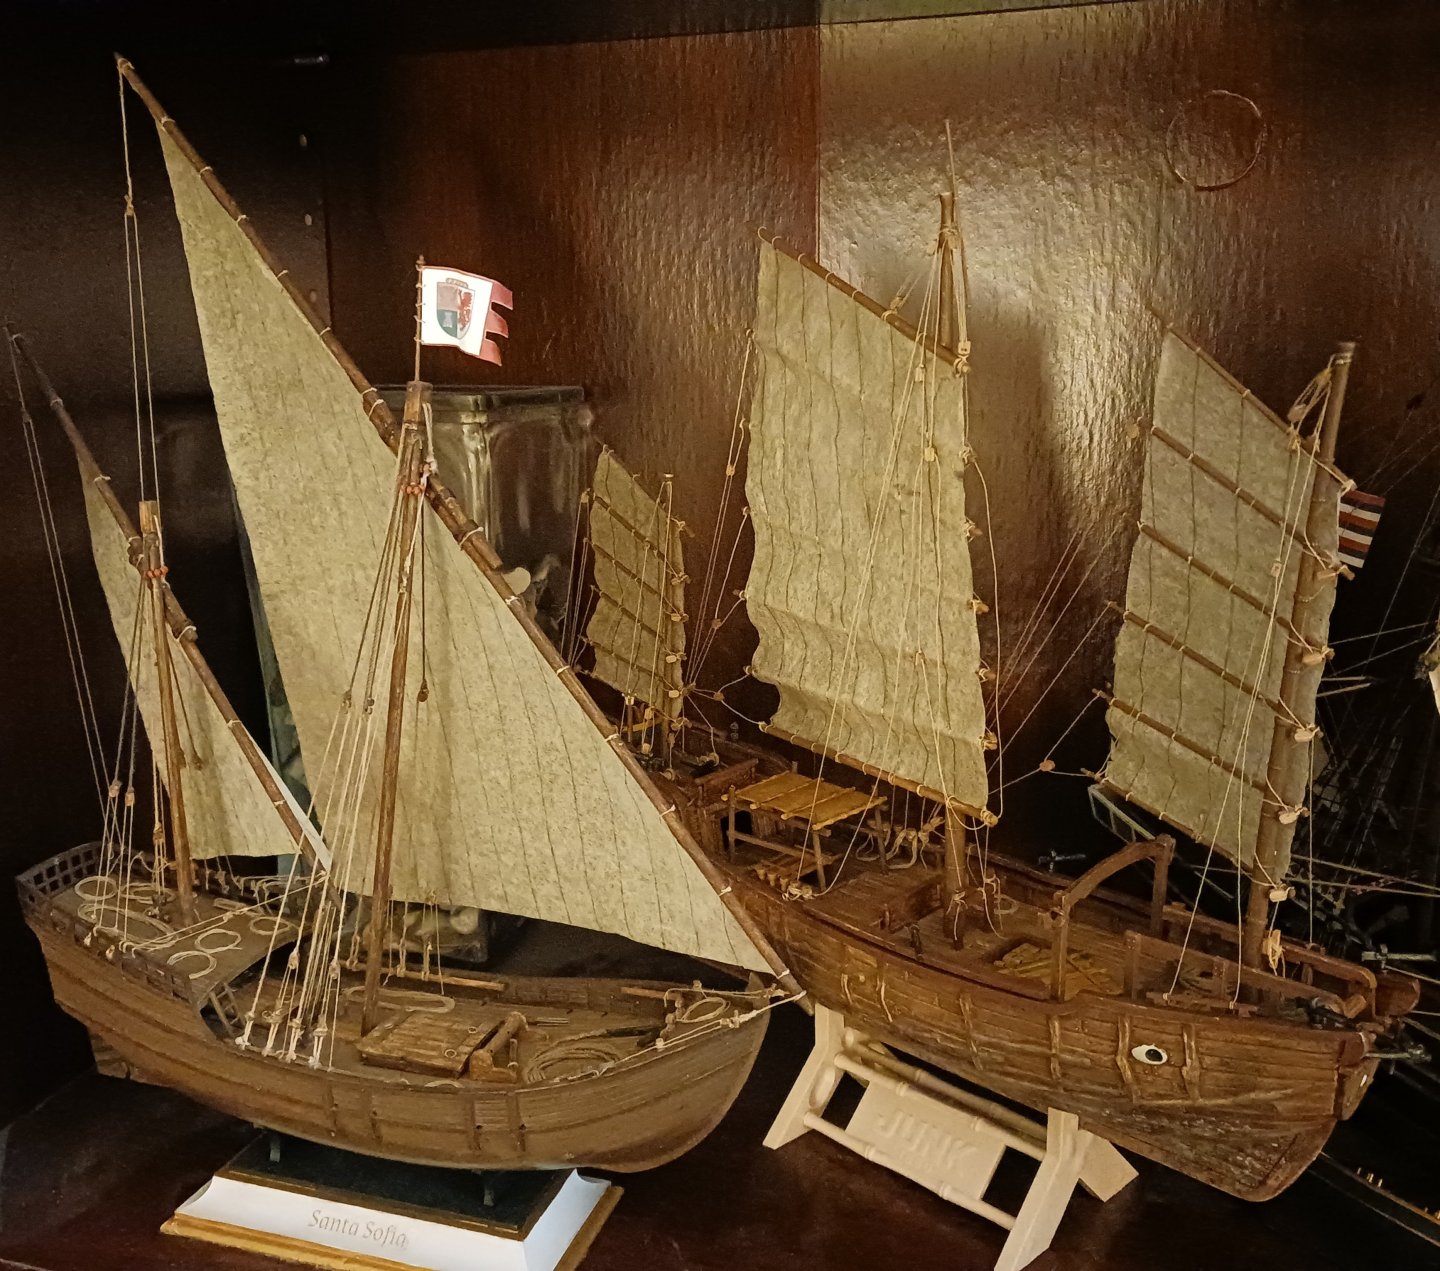
Quite a few things have happened with the Junk since the last post. Since then, I have fully armed the ship, finished the rigging, made the anchor, and made the stand. The rest of the rigging was pretty simple. I simply copied what I did on the mizzen mast, with small changes made to the main. Every line was stained with a brown shade. Three thicknesses of line were used in total for the entirety of the rigging. Rope coils are placed where necessary, and I tried to make them look realistic. I slightly modified the anchor with a scratch-built "stock" which likely would have been part of the anchor itself. I chose this anchor setup based on photographs of junks from around this time period. The ship also has a pig stick for the nonexistent flag: The ship's stand: And finally, the Junk on display with the Santa Sofia:


-
Robert, the government article you posted was very helpful. It seems as though use of copyrighted images for the purposes of scale modeling research, on a forum that doesn't really have an effect on the market for those photos, falls pretty cleanly under the definition of Fair Use. I'm assuming this is with the exception of images whose use is directly monetized.
-
@ccoyle All of the images I share/intend to share to the forum are primary-source images (I.e. from more than 50 years ago) that have been re-uploaded to MSW. Let's assume, for example, I share a download of a Pinterest post that's a picture of a cog on a coin. This would have been created centuries ago by an unknown artist. Does Pinterest itself have the rights to that image? Is it in creative commons? what about the poster of the image? If an image is not a creative work but rather a historical source, does copyright/fair use still apply?
-
It has recently come to my attention as a relatively new MSW user (2022-present) that MSW makes very serious efforts to enforce copyright laws regarding materials, both written and visual, that are used on the site. This is a good thing, and I agree with such measures. With that said, I would obviously like to stay on the right side of both the law and MSW policy, and so I have a few questions. 1. I have found Pinterest to be of great value as a way to find primary-source images regarding different types of ships. I have, on many occasions, seen Pinterest images used as research aids and posted on the forum, including by myself. Is that okay, or permitted under Fair Use laws? Who, if anyone, needs to be asked permission or compensated? Are there any citation rules? 2. If I purchase a copy of a book, am I free to post self-taken images of a picture in my copy of the book on the forum, provided I already compensated the creator of the book and am using the materials for non-monetary purposes? P.S. It seems to me, under a very rudimentary understanding of the concept of Fair Use, that most of the copyrighted materials that would be posted to MSW fall under Fair Use laws, because they are used for research and scholarly purposes, and are not used for any kind of financial gain. Am I correct in this assumption? Or is there something I'm missing?
-
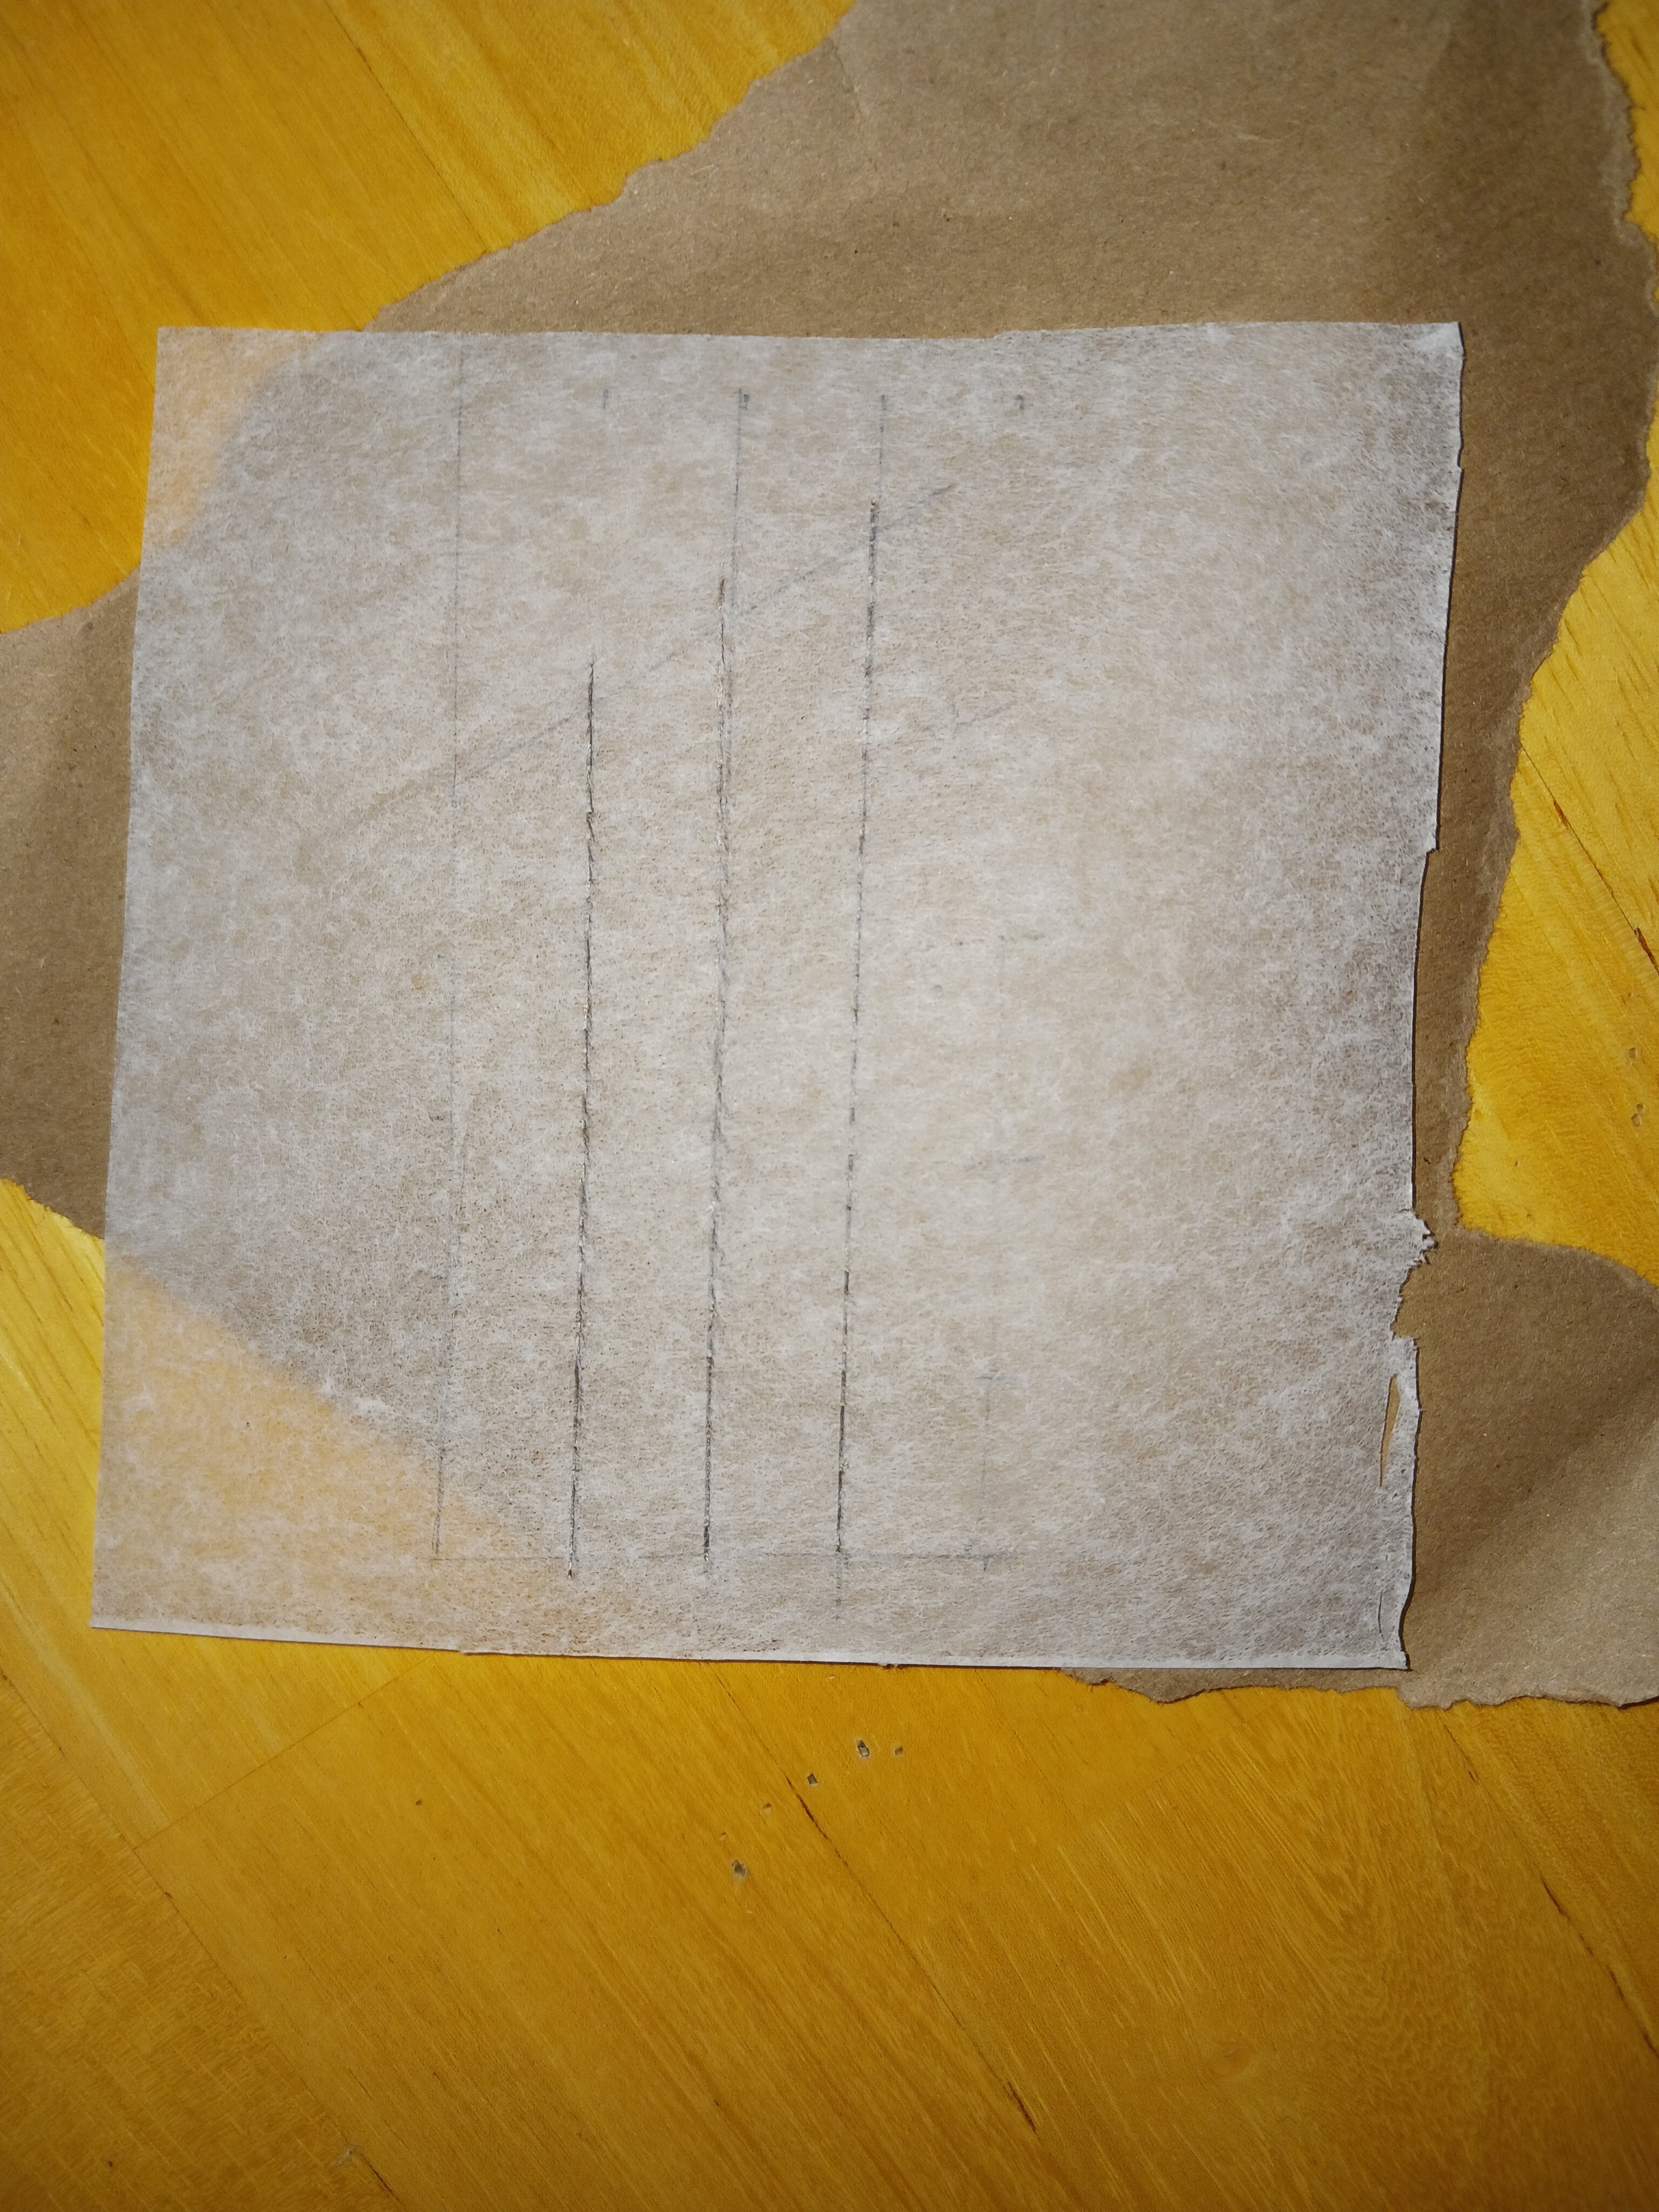
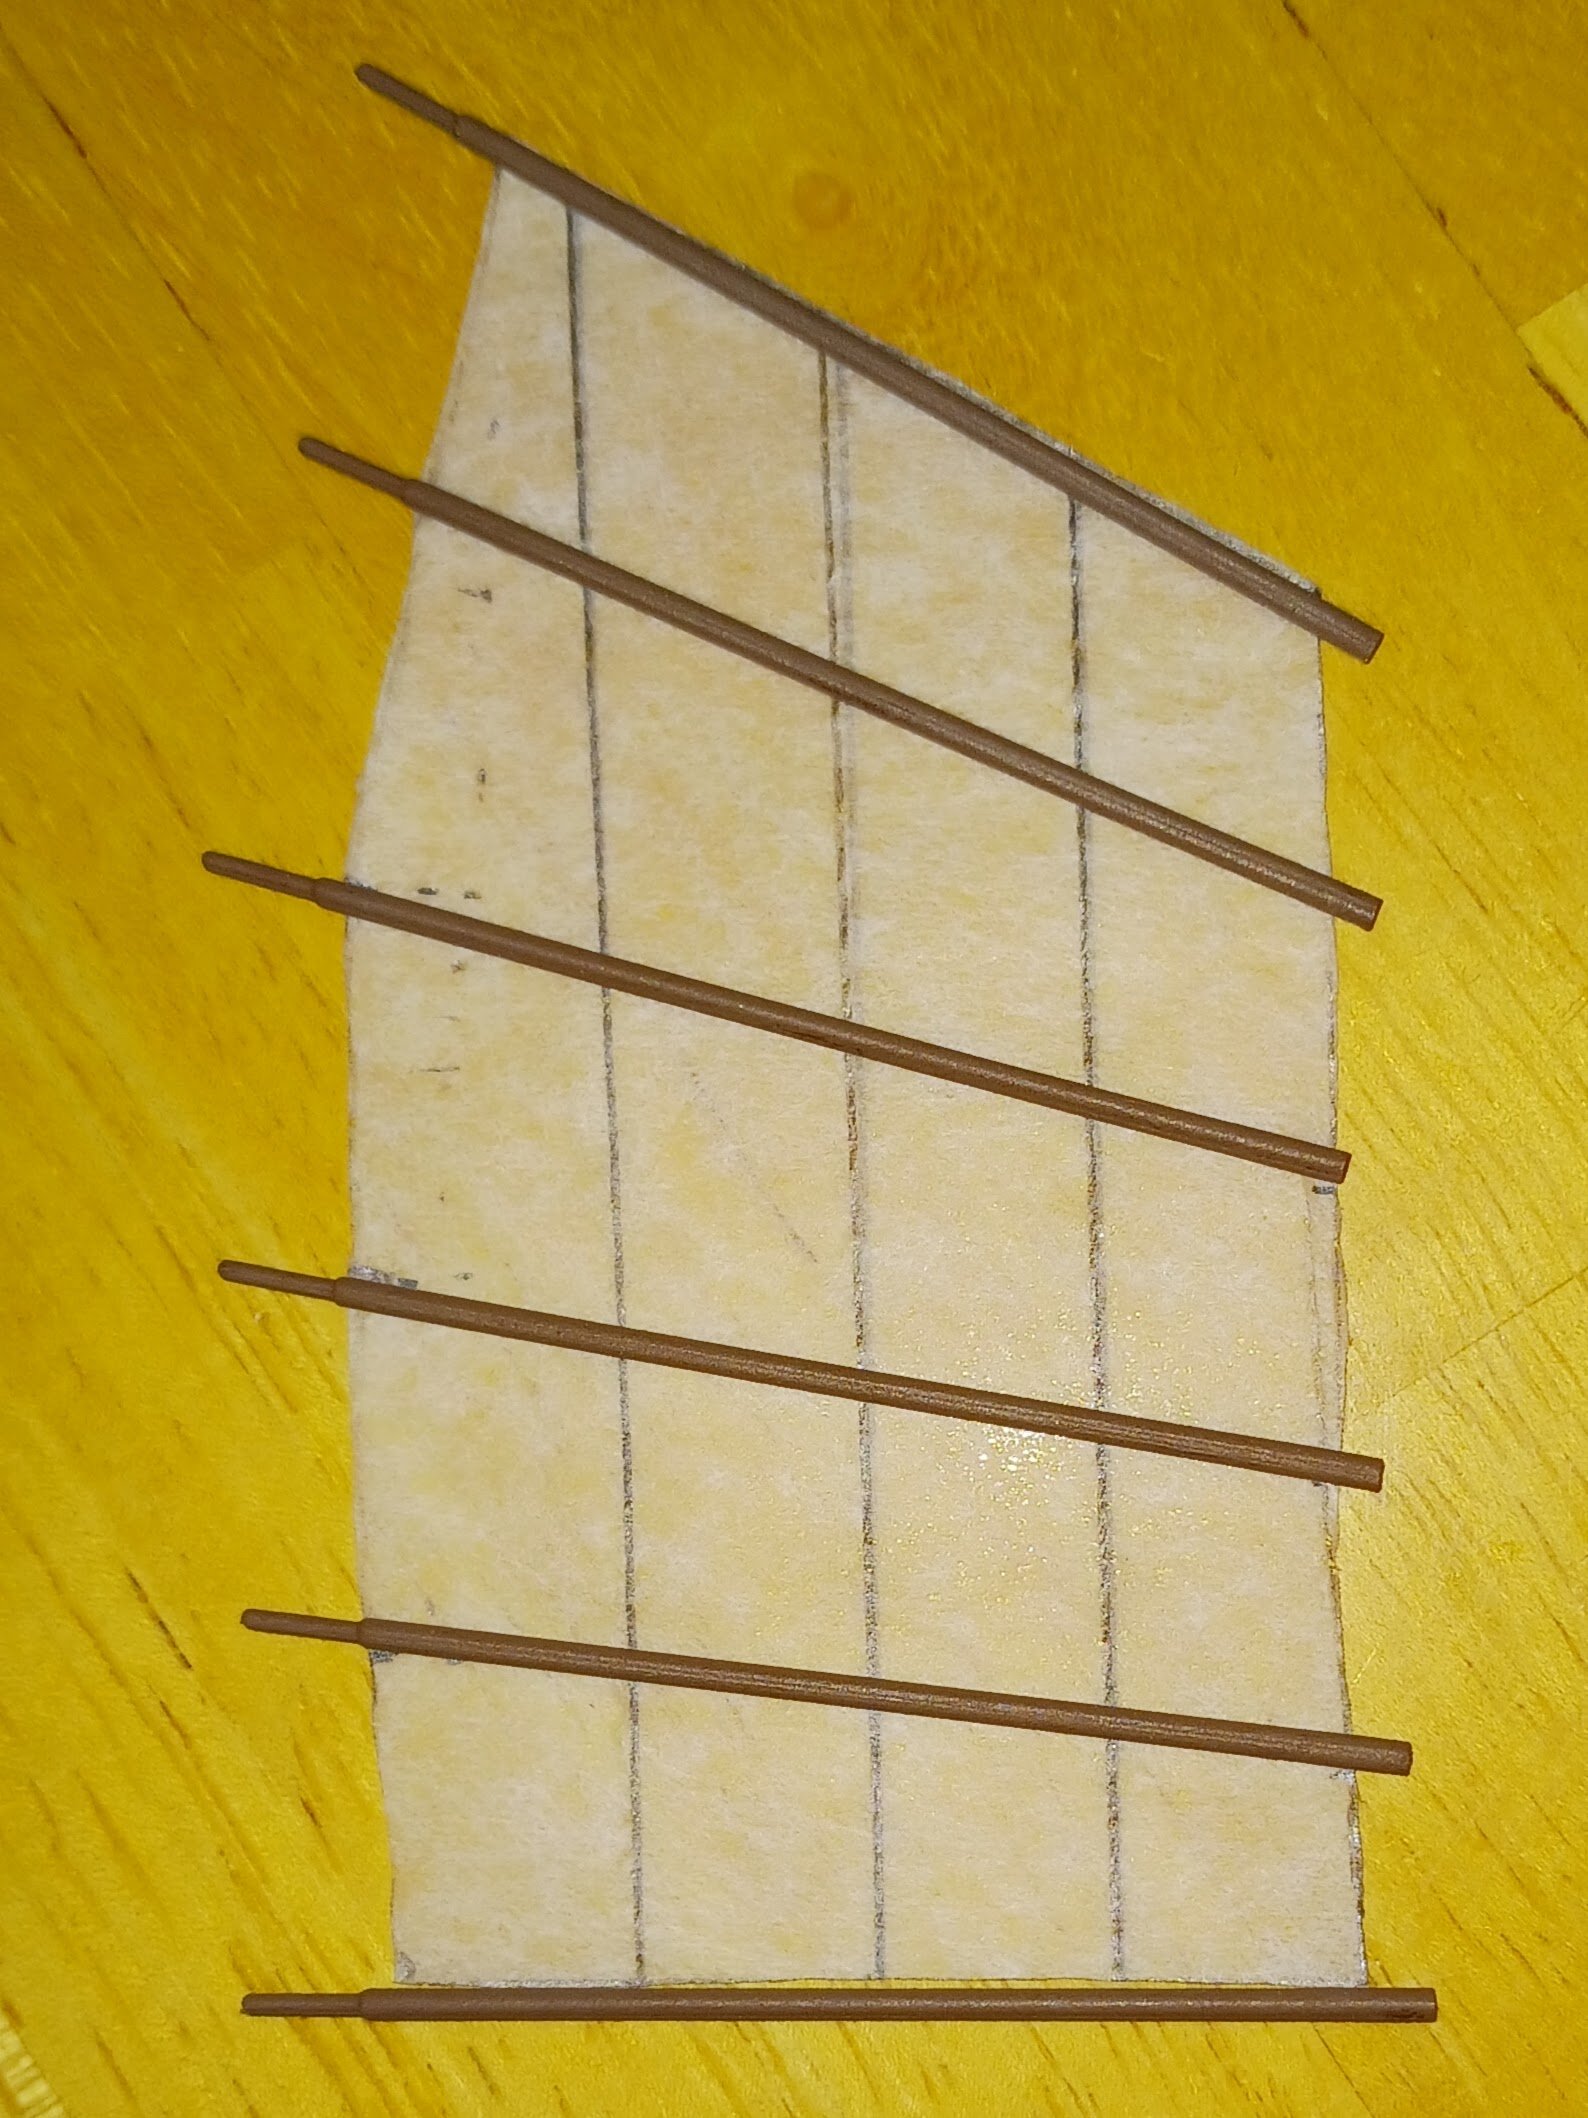
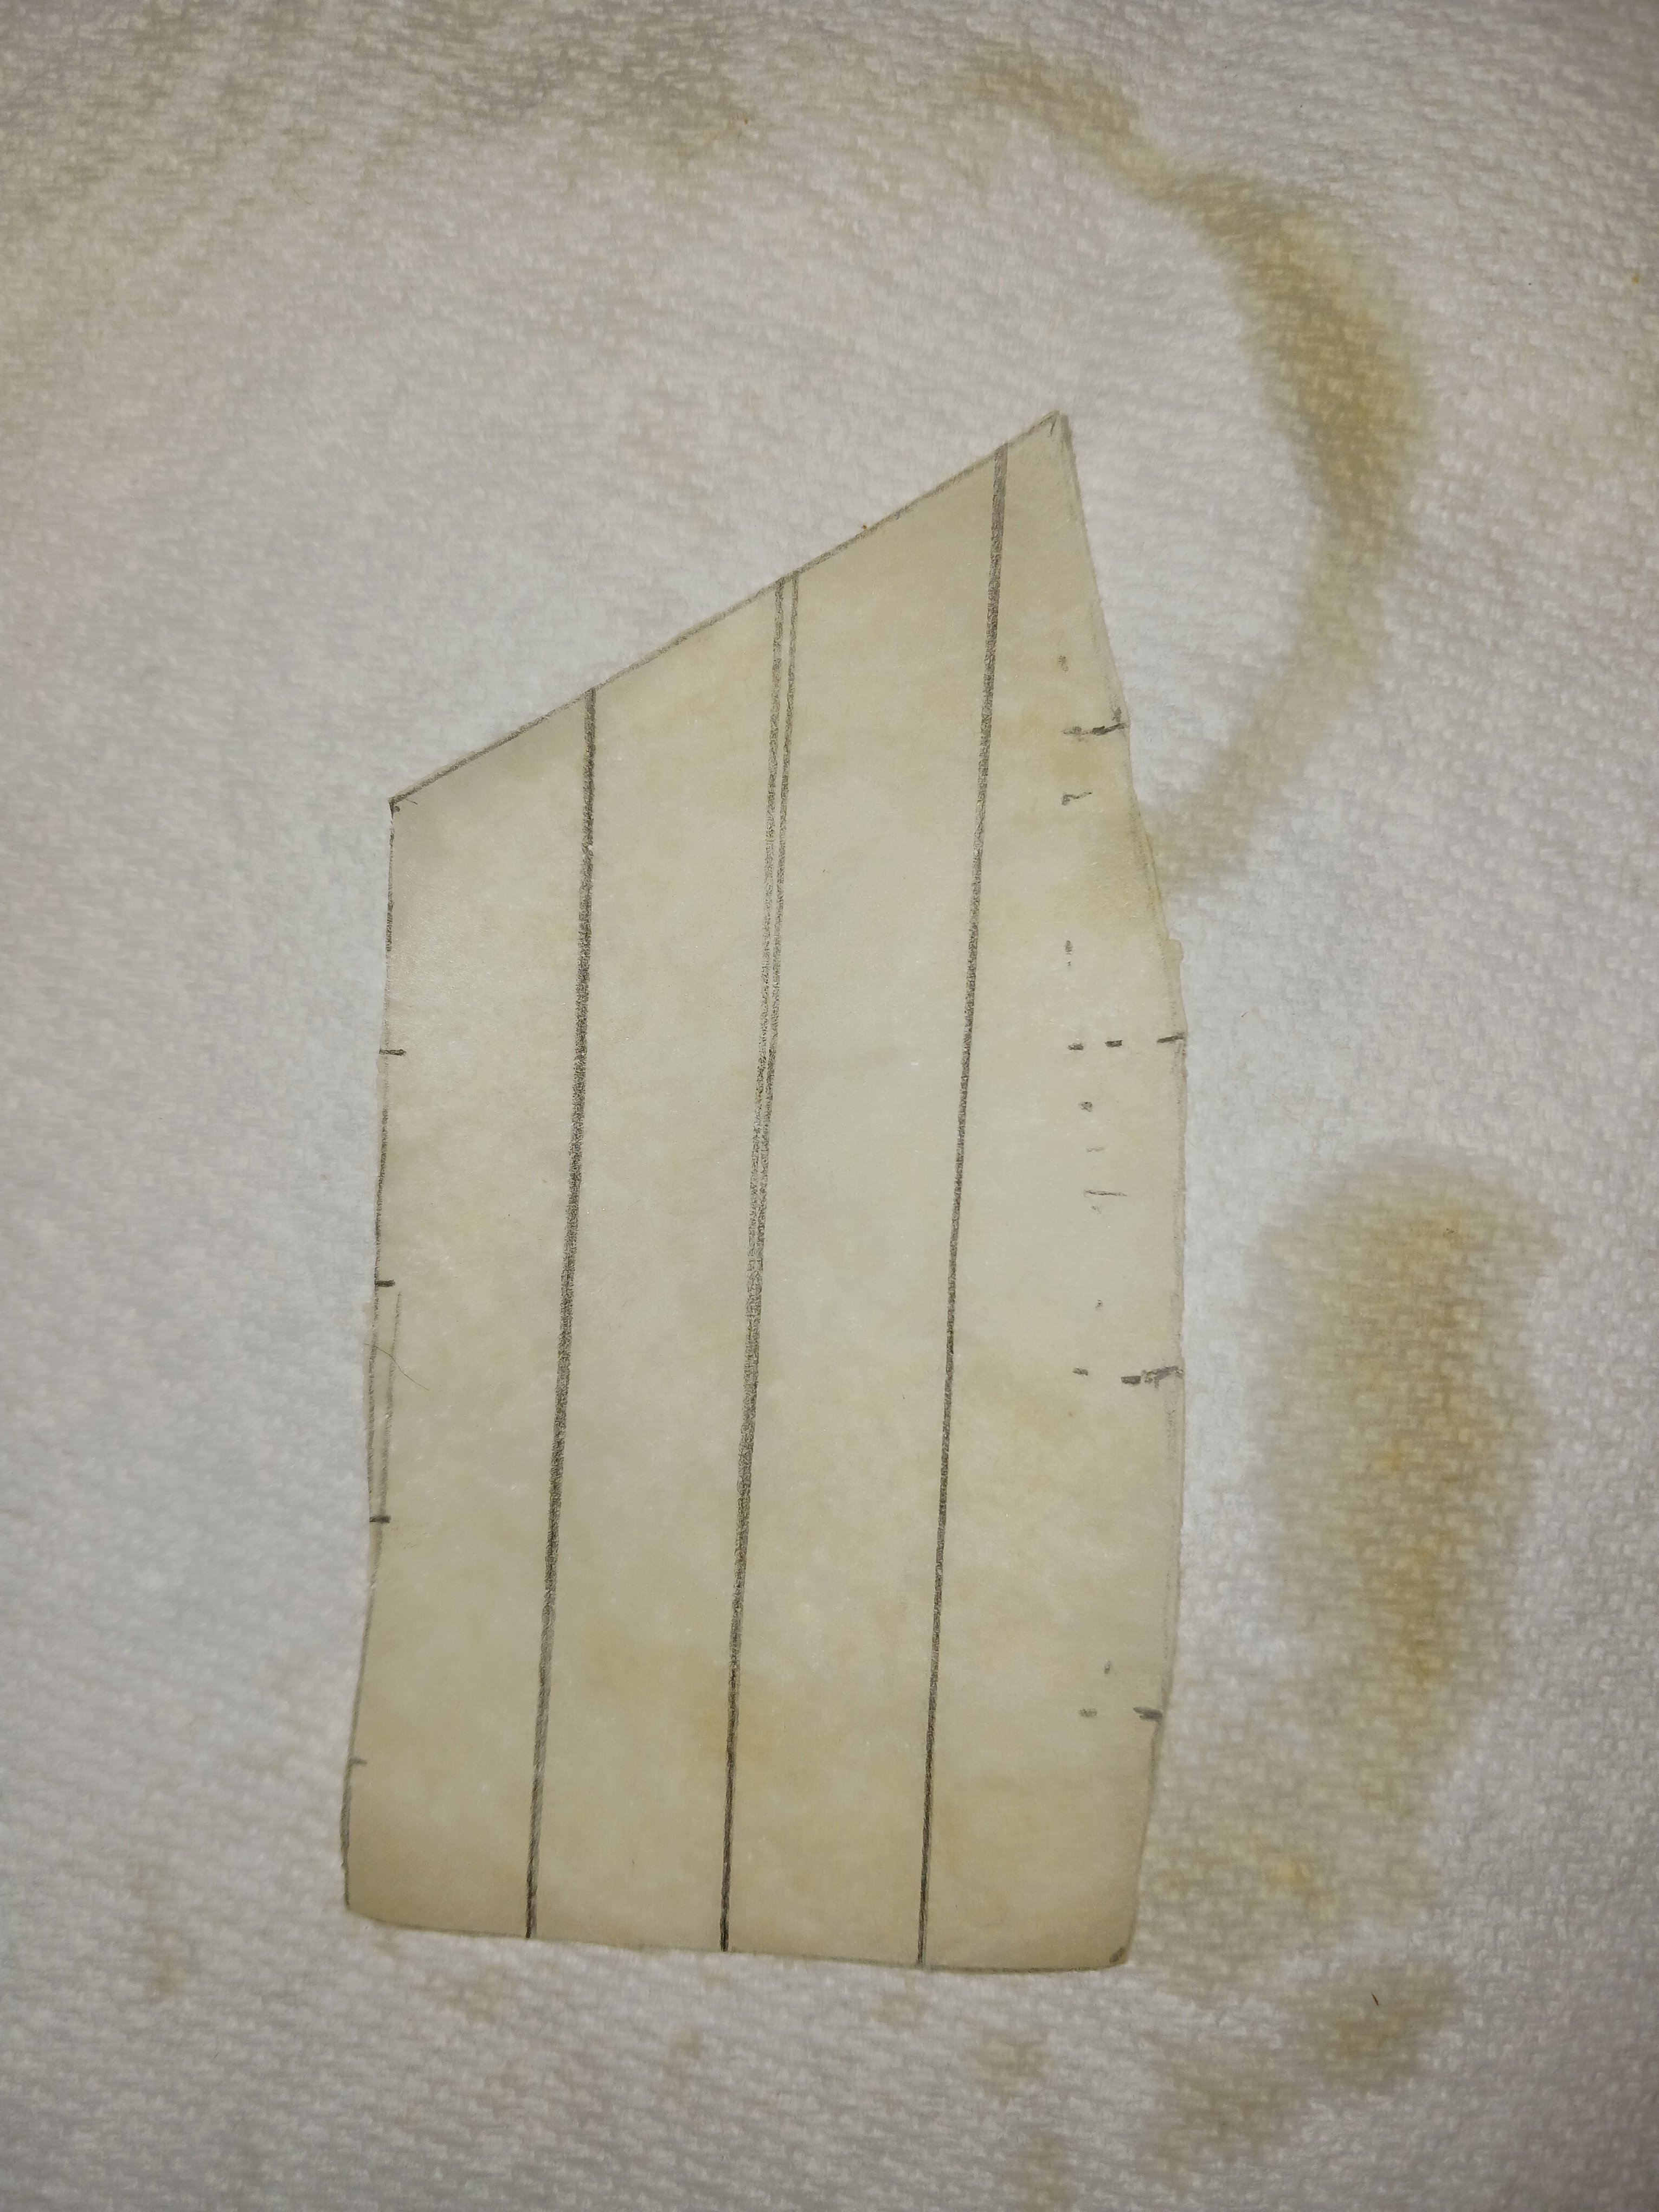
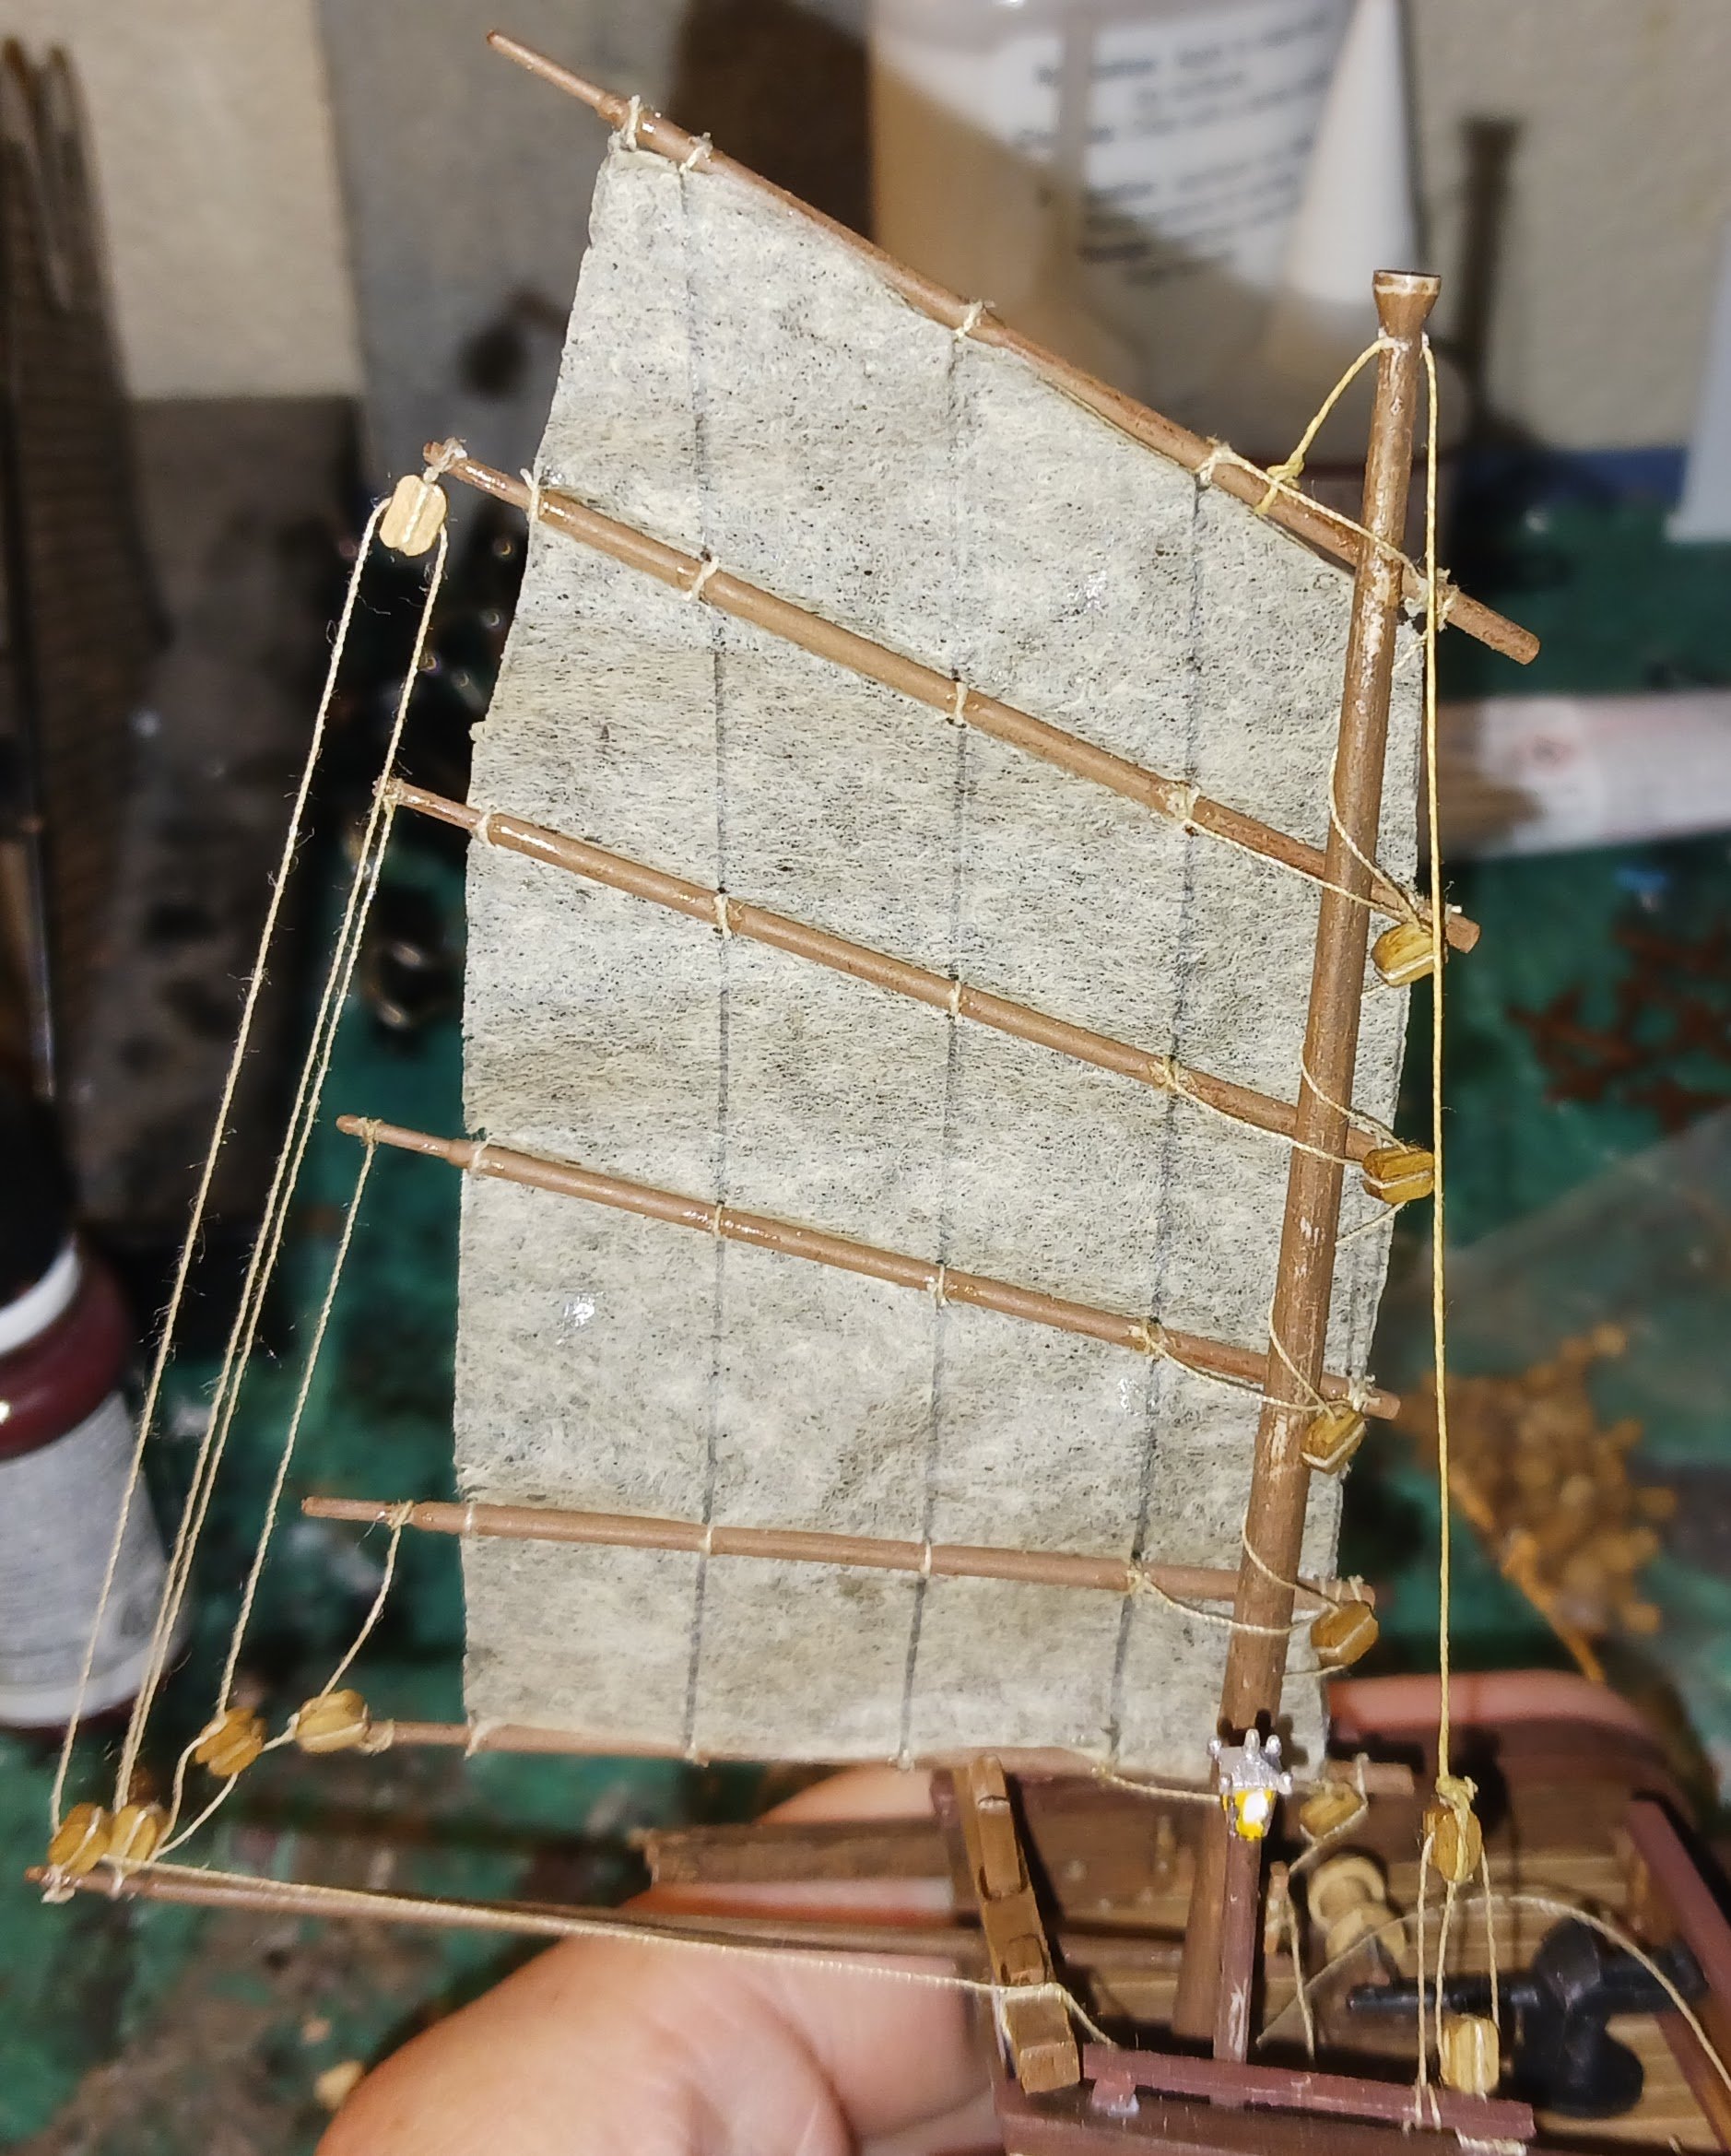
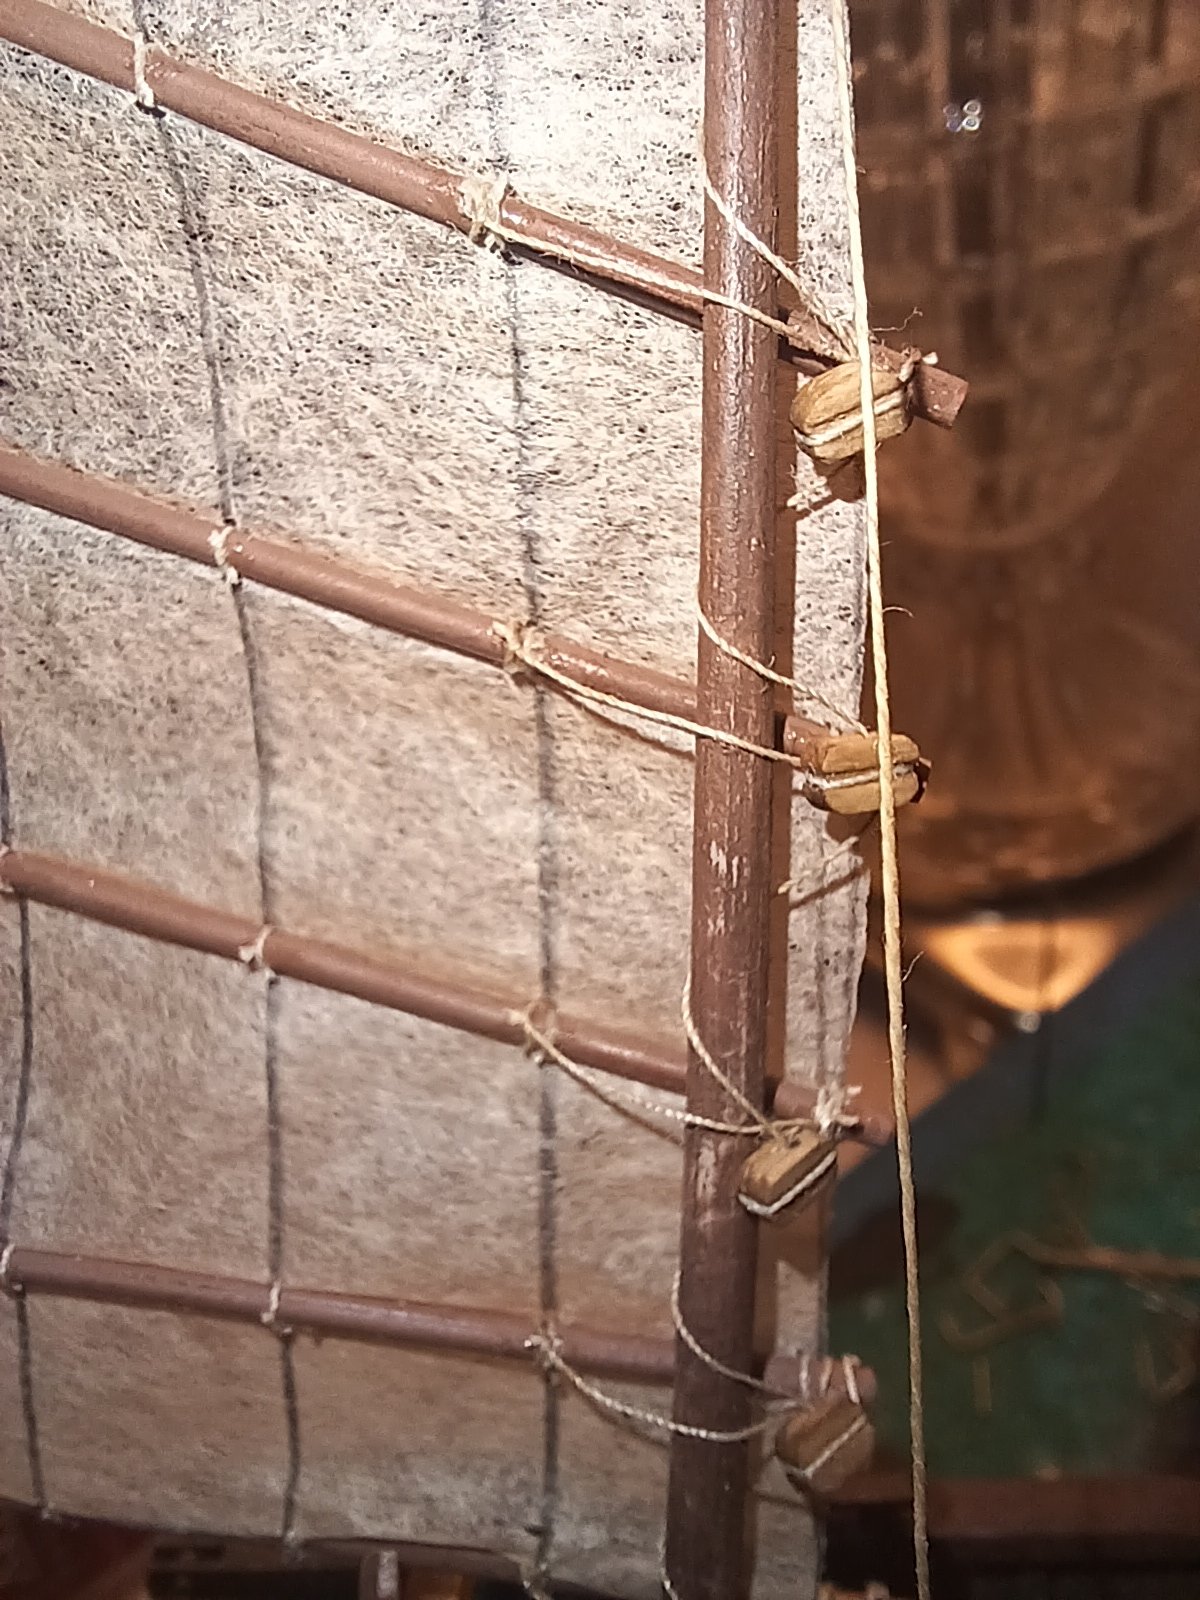
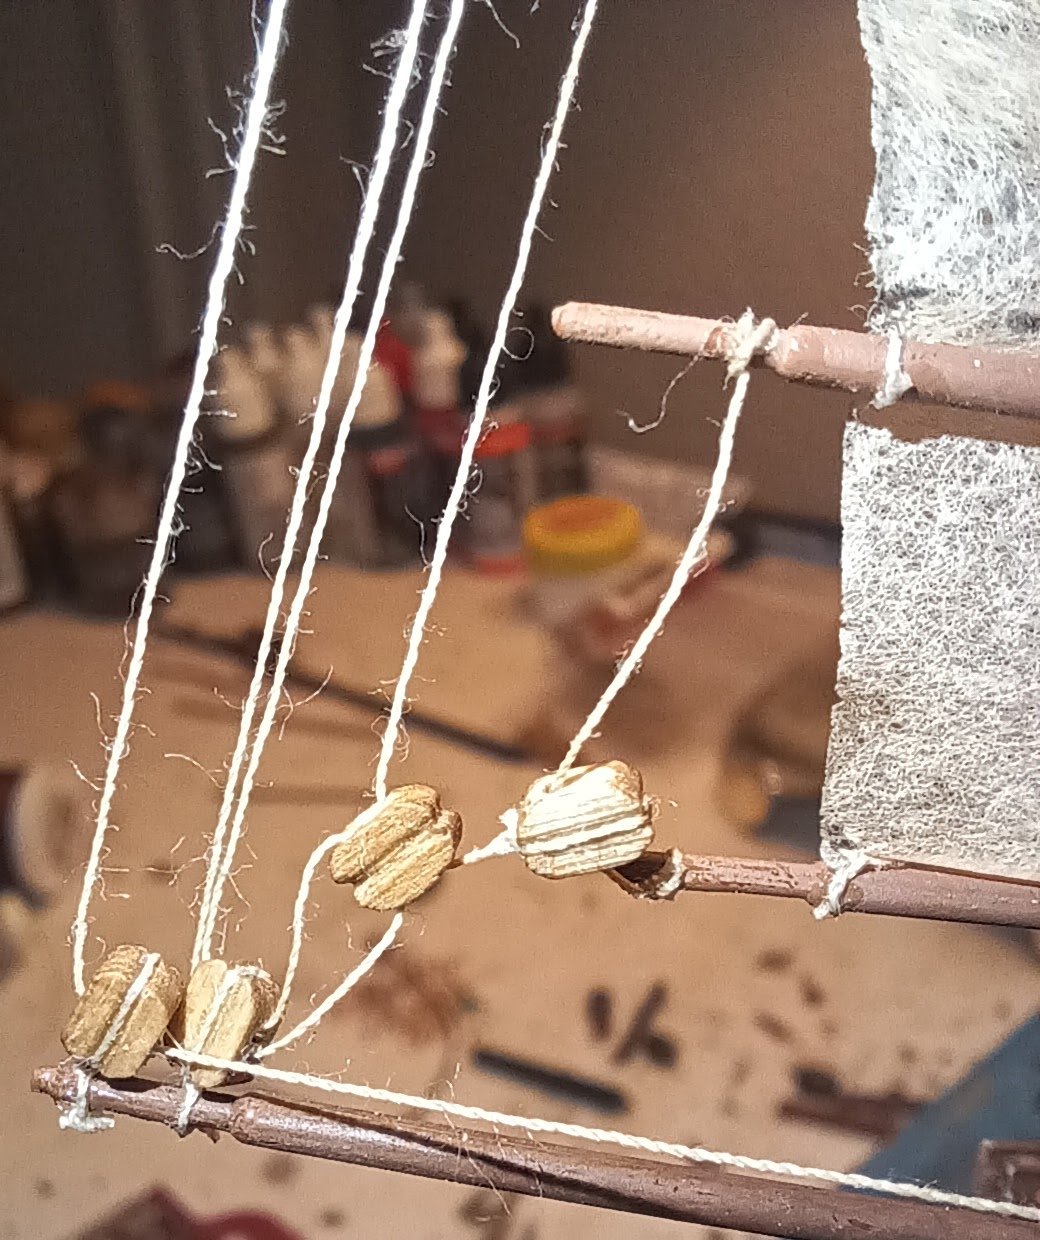
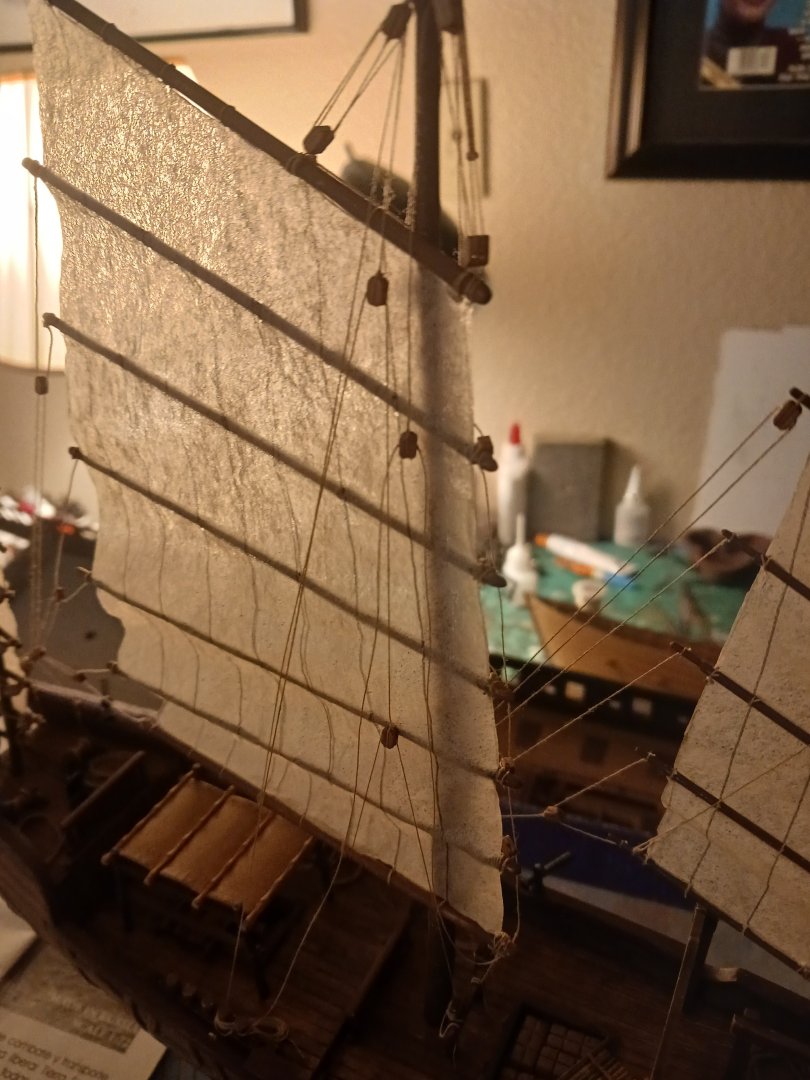
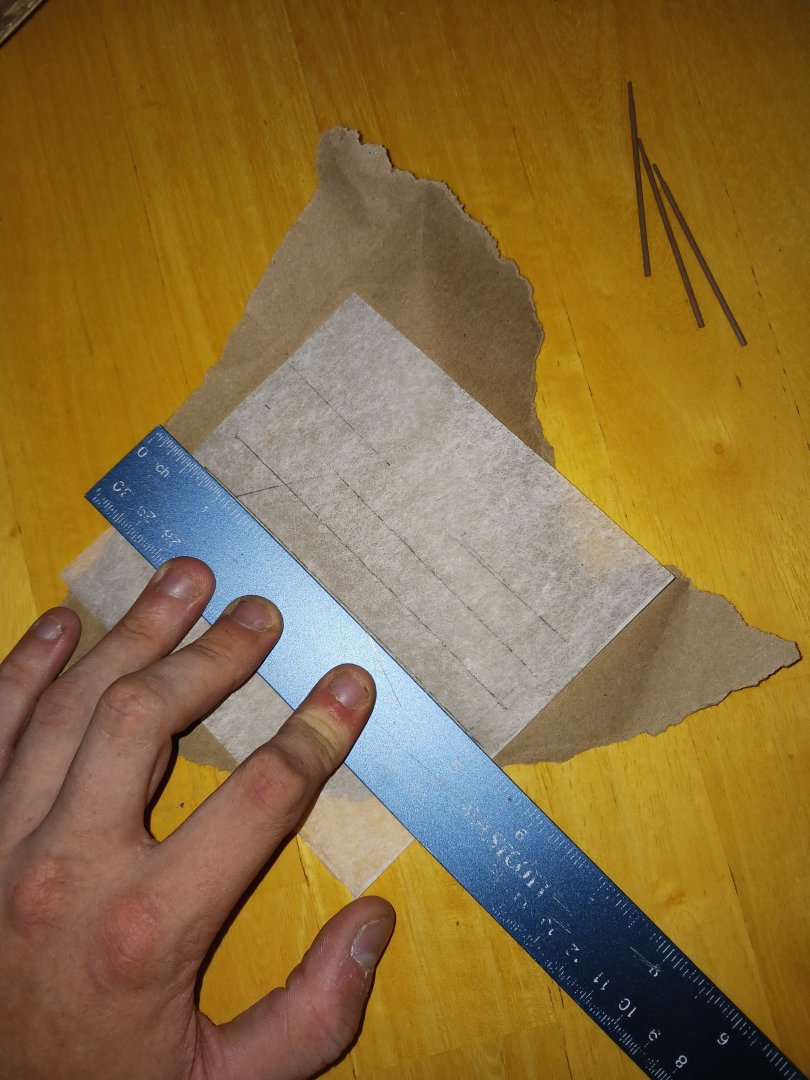
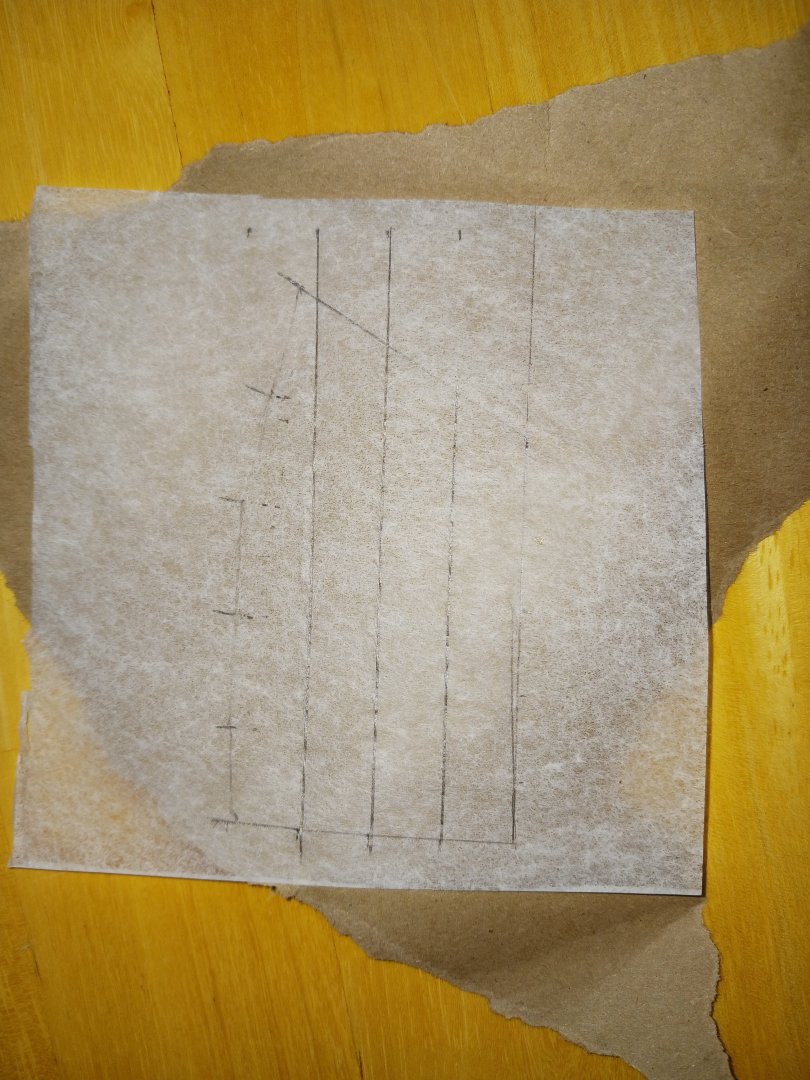
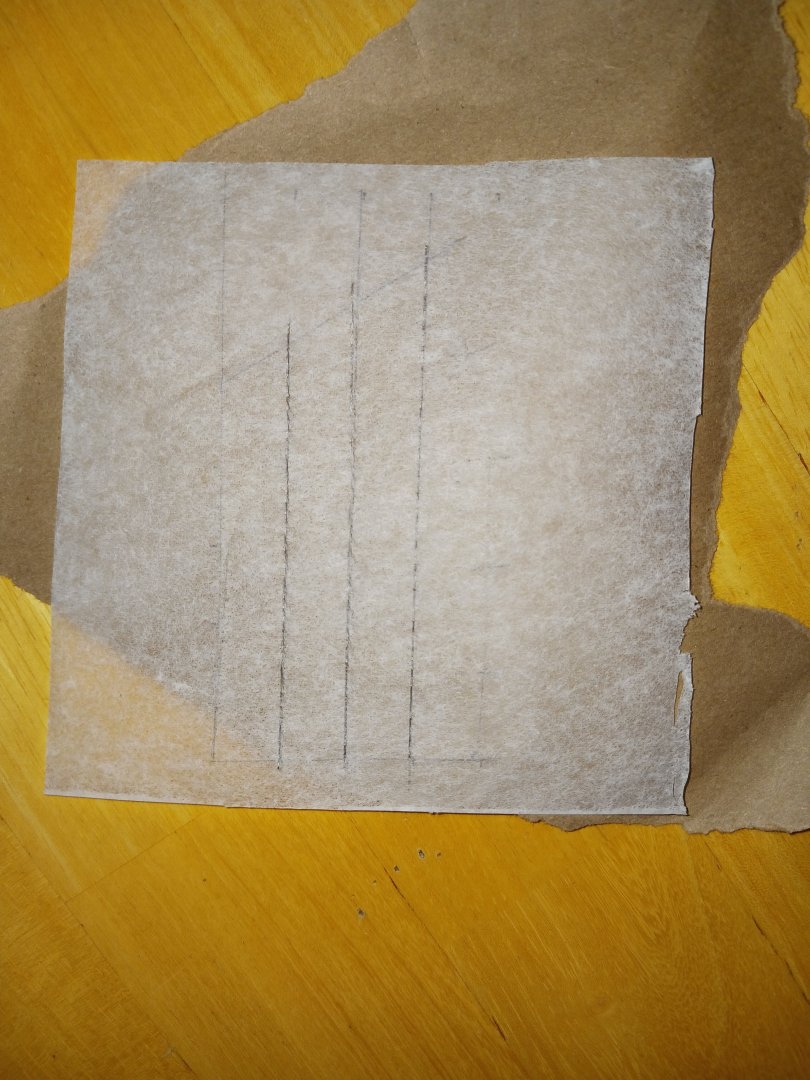
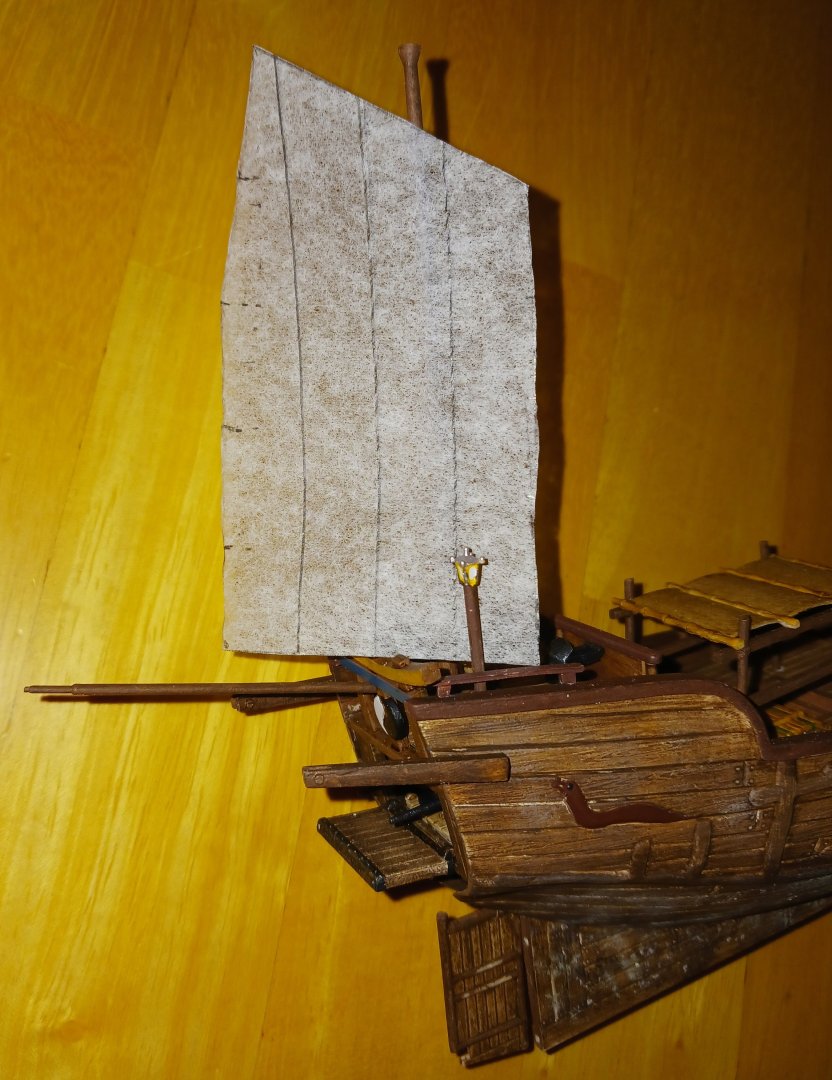
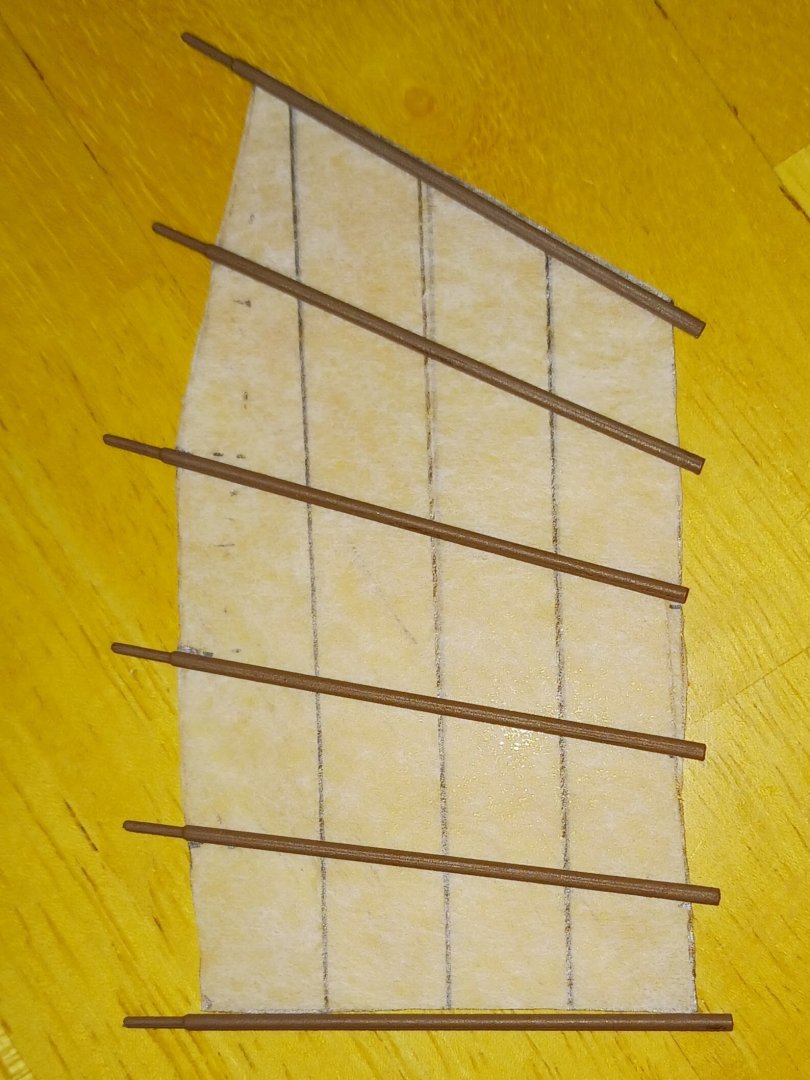
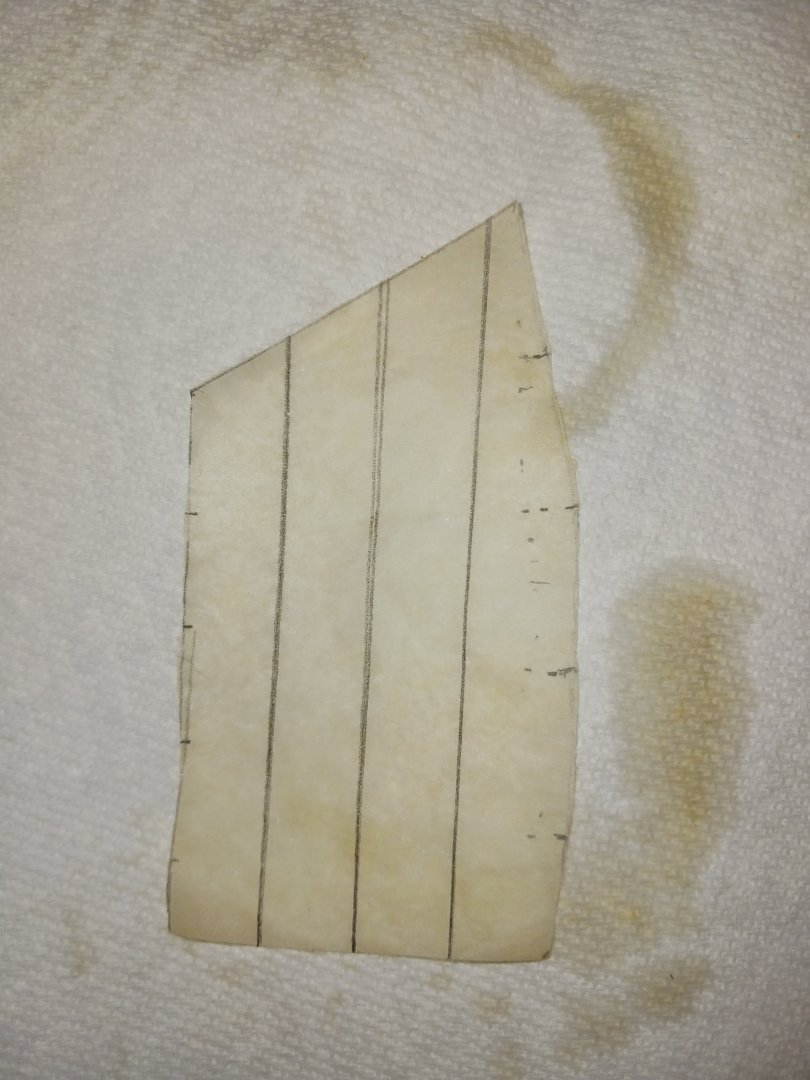
Let's go through the entire process of making and rigging a sail from scratch. If you're someone who wants to use the kit sails (and they are remarkably well-made for kit sails) then this post won't apply to you. Before you make any sail of any type, you must first familiarize yourself completely with the type of sail in question and how it is used. You should know every line, block, and other structure on the sail, and what it does. Failure to learn everything about the sail you are about to make could cause you to have to remake the sail in the future, which is a huge waste of time. Ideally, you should analyze both modern diagrams and pictures/paintings from the time in which the sail was used. You could even check out videos of people actively sailing the modern replicas that use the sail. The Chinese junk sail (also known as the balance lug) is very unique in that it is an extremely complex sail for its size and use. The material I use for sails is silkspan, which is basically a stronger form of tissue paper. I used some modified parts from a different kit as the battens and yards/booms, so that is also a non-issue. The line I used for this sail was tan sewing thread, as it was a good diameter for realistic rigging on this sail. First, I measured and drew an outline of what the sail's size and general shape would be. Then, I drew in the panel lines on both sides of the sail with a mechanical pencil. After cutting out the sail, I did a test fit to see how it would look on the mast and assess whether or not it needed adjustments. Before I could commence with the rigging, I had to do a few more things to get the sail ready. The first was to test-fit the battens to the sail to see if any of them needed to be trimmed, which none did. Afterwards, I soaked the sail in black coffee to give it a realistic stain. I dried the sail on a paper towel. These are the materials and procedures I use with nearly every sail I make, and I have made dozens. Many modelers choose to do it differently, many with better results. Now, on to the rigging. For the rigging of the sail, I followed the diagrams as closely as possible using the aforementioned sewing thread, which I stained a darker shade of tan using a wood tone paint. I had to modify some of the blocks to fit the design of the rig, but none of that was a big deal. The rigging was very simple, here is the finished sail: While the hairy thread isn't that apparent in real life, if you want to remove it, just run the thread through beeswax a few times. This should at least help.


-
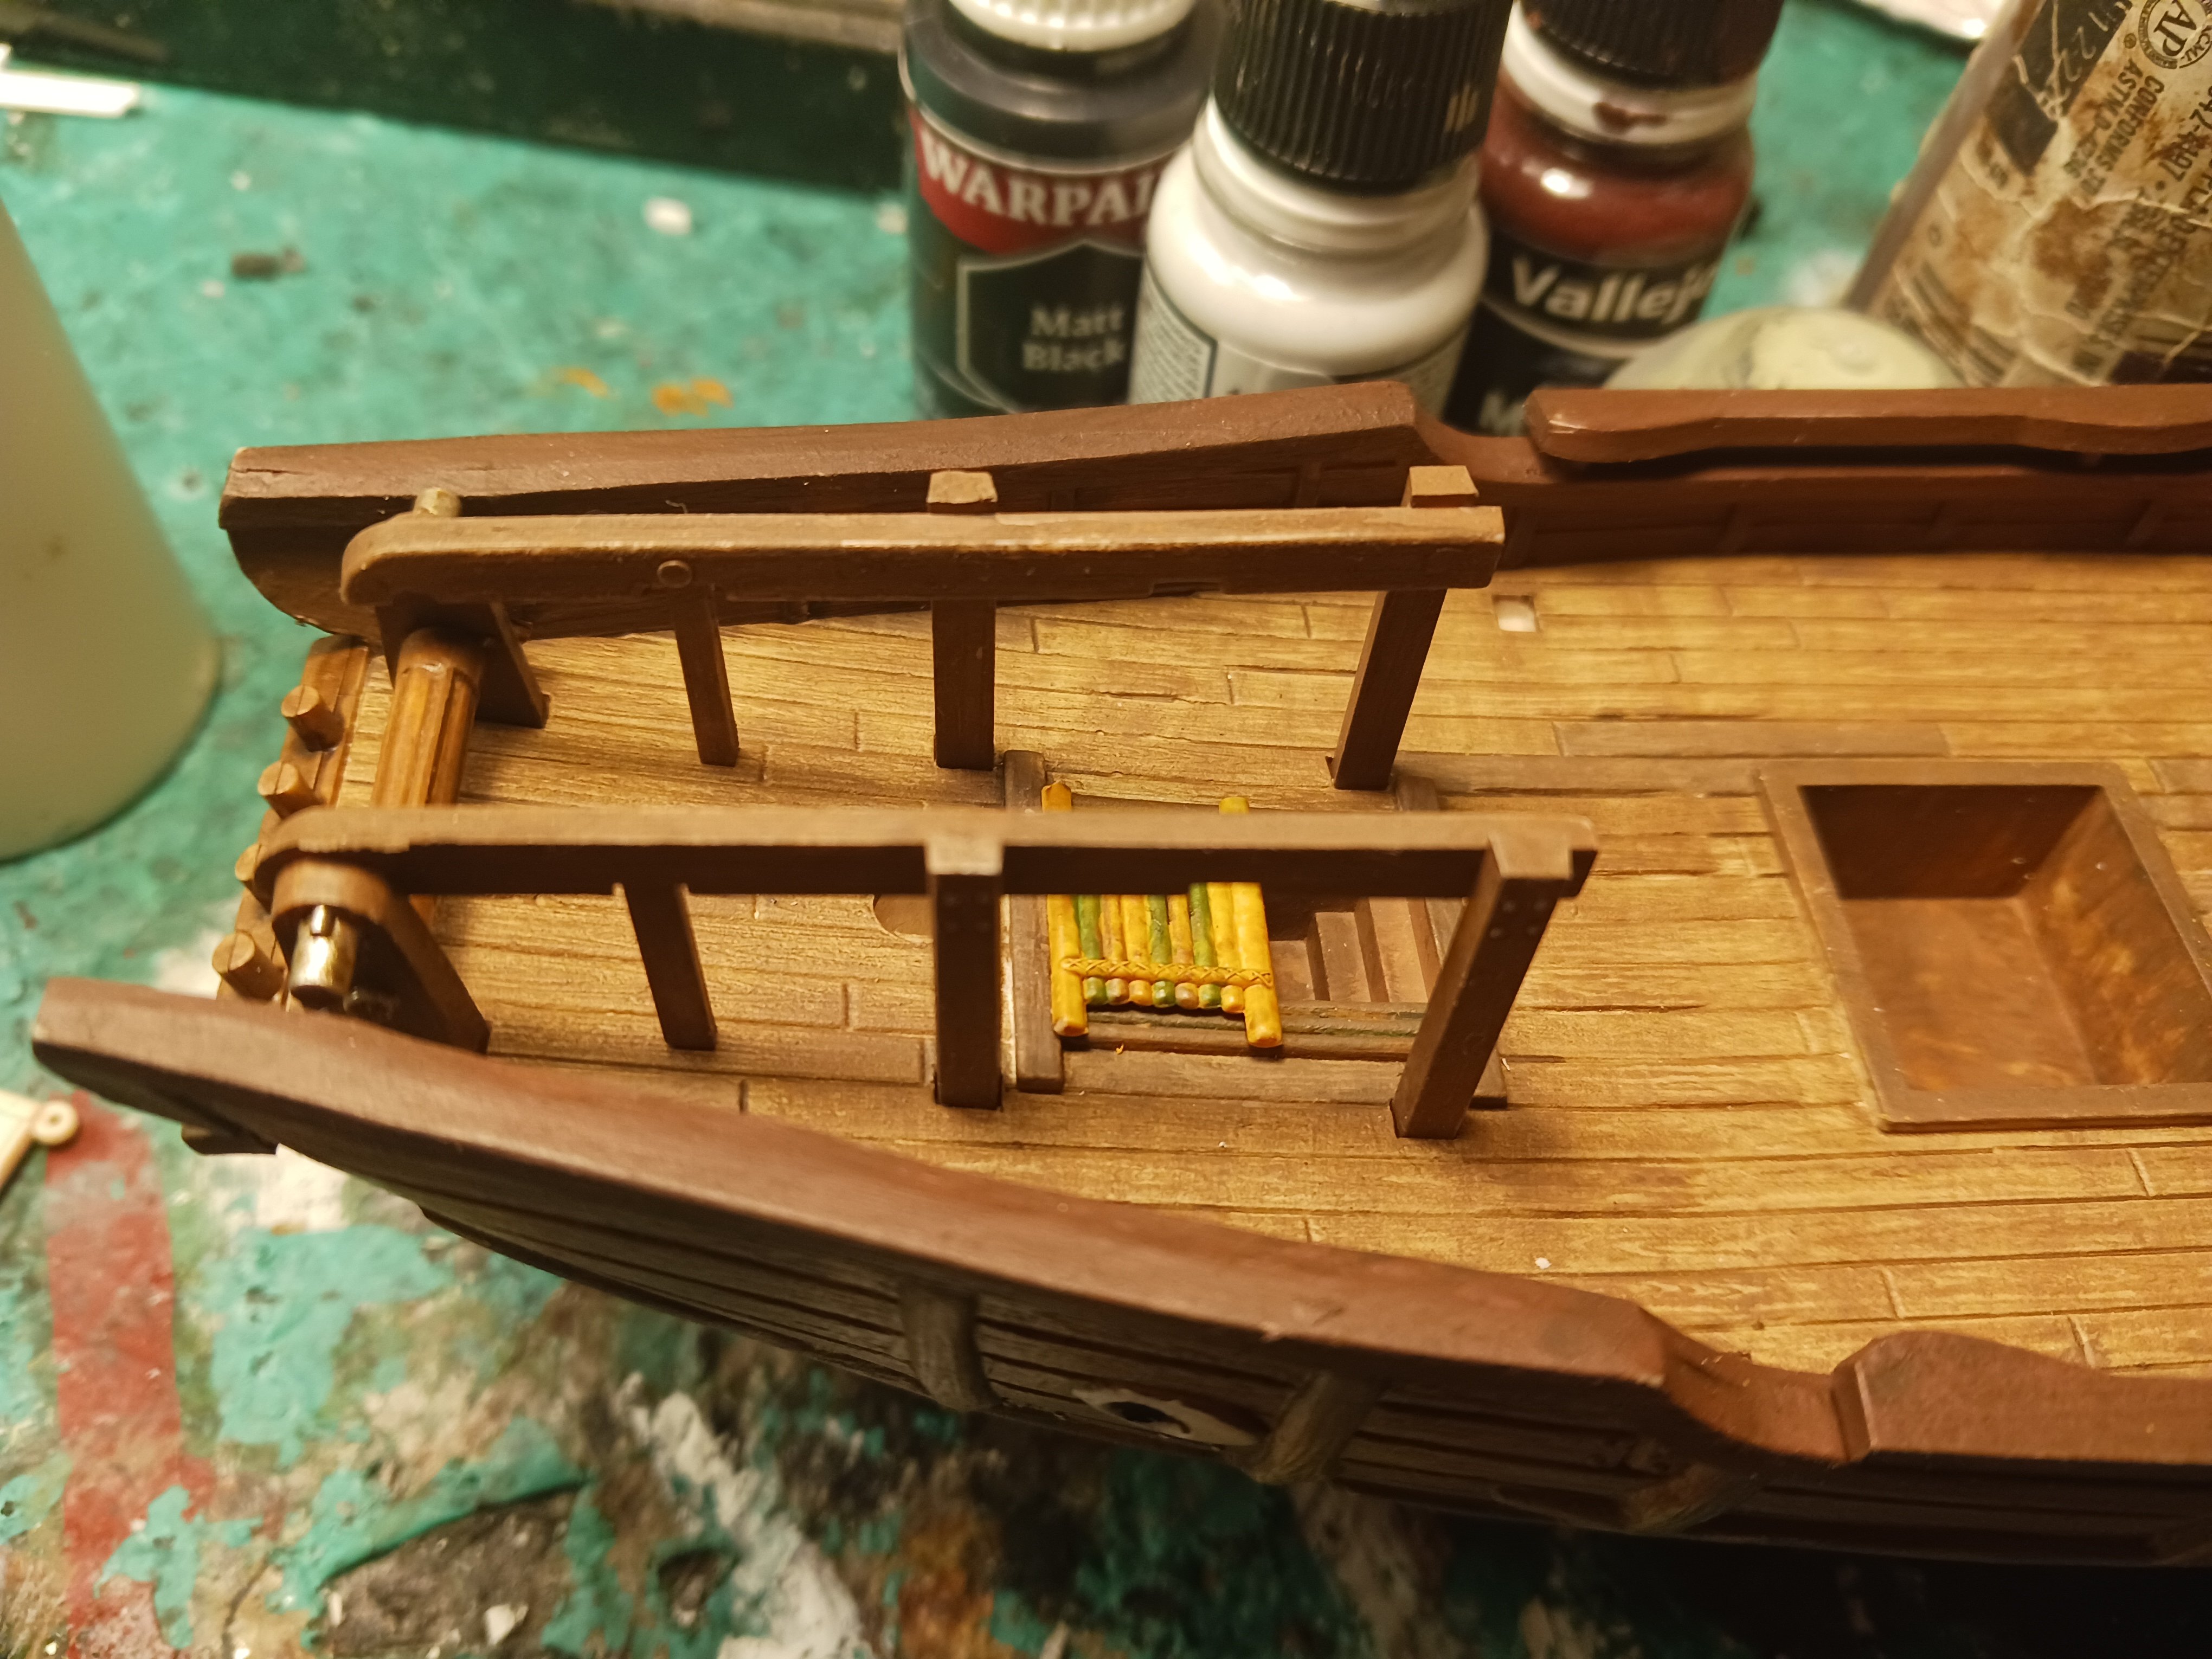
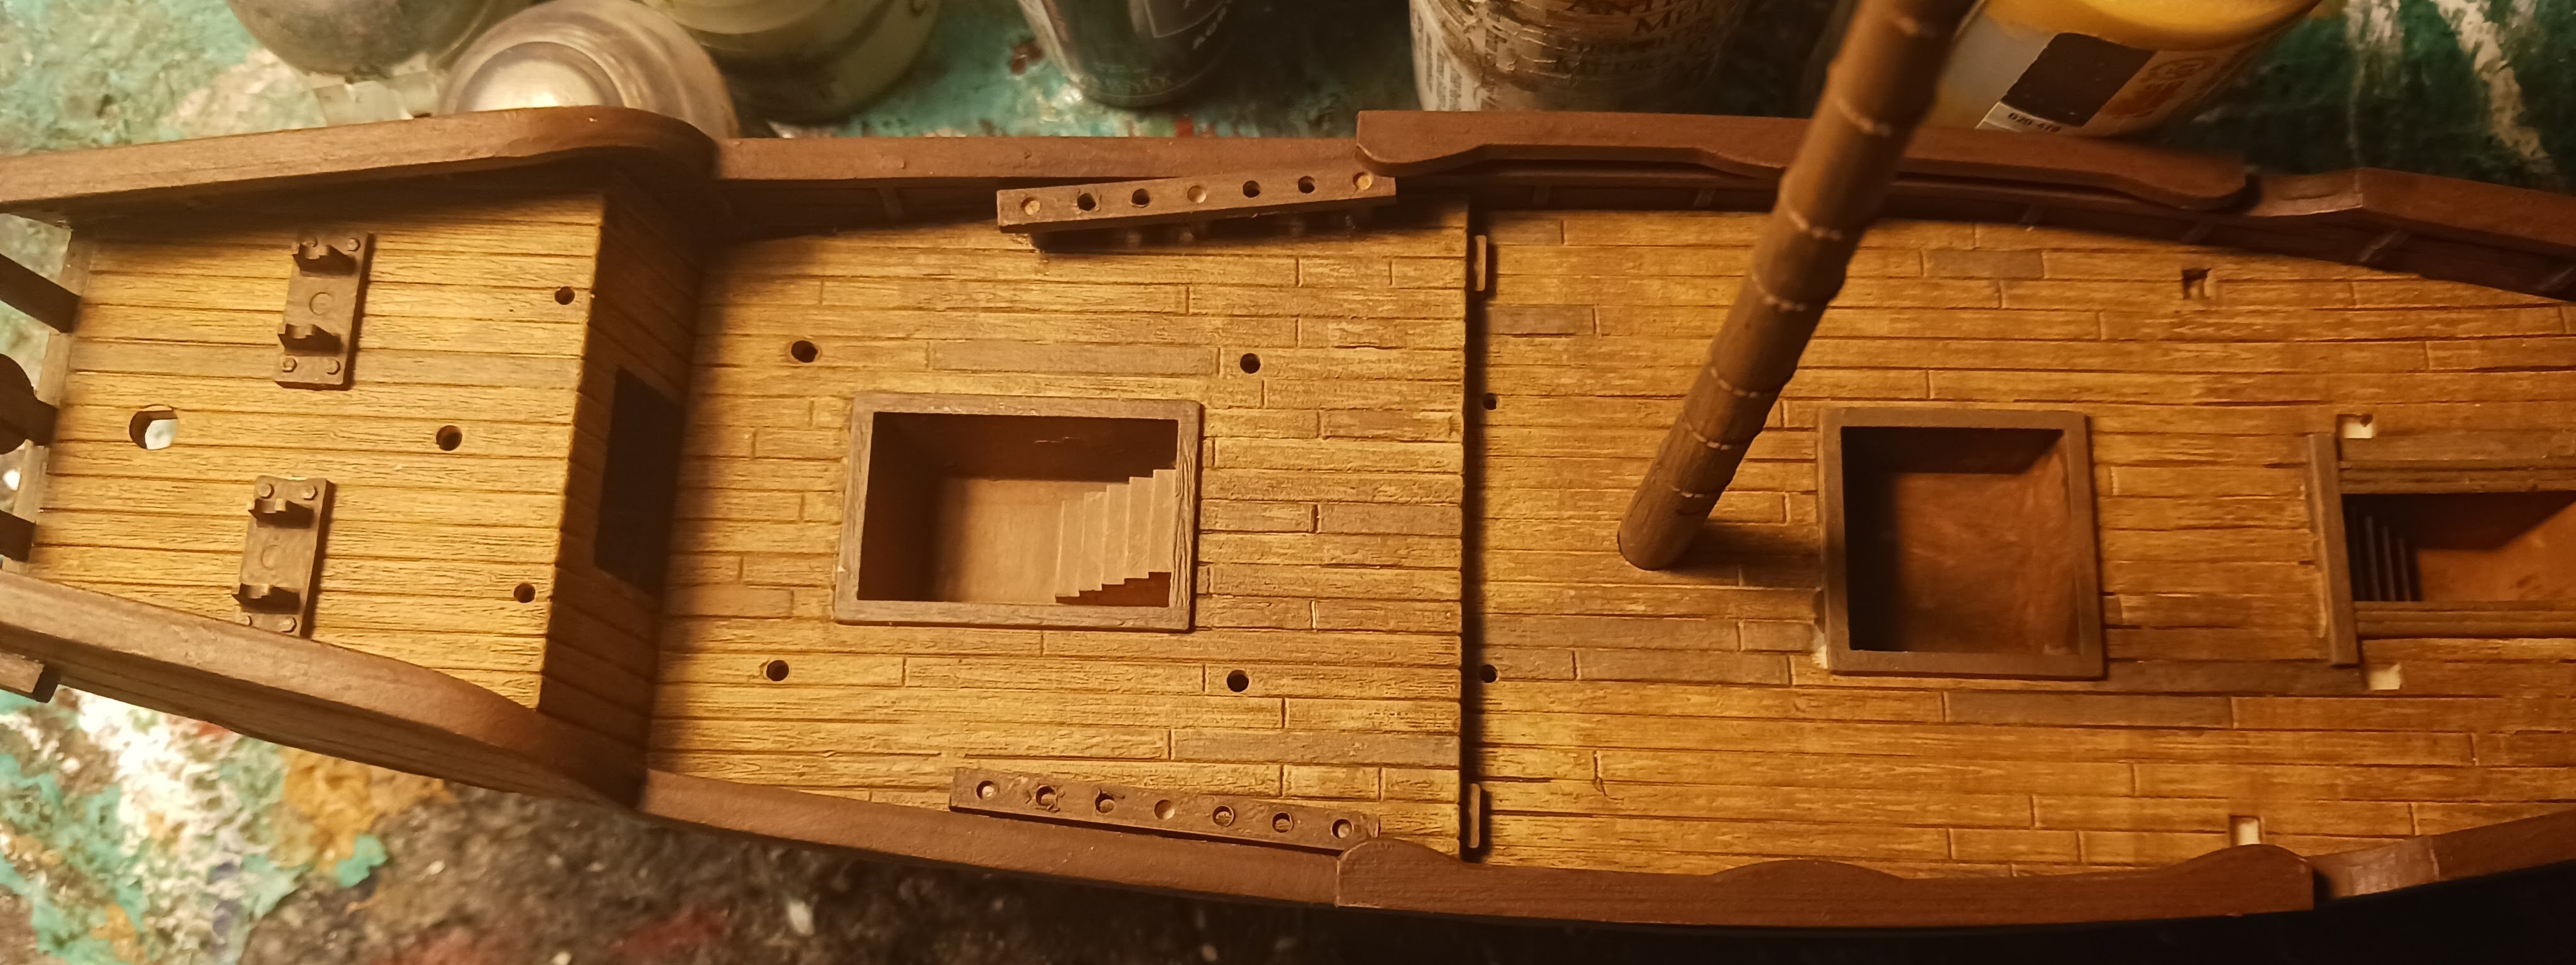
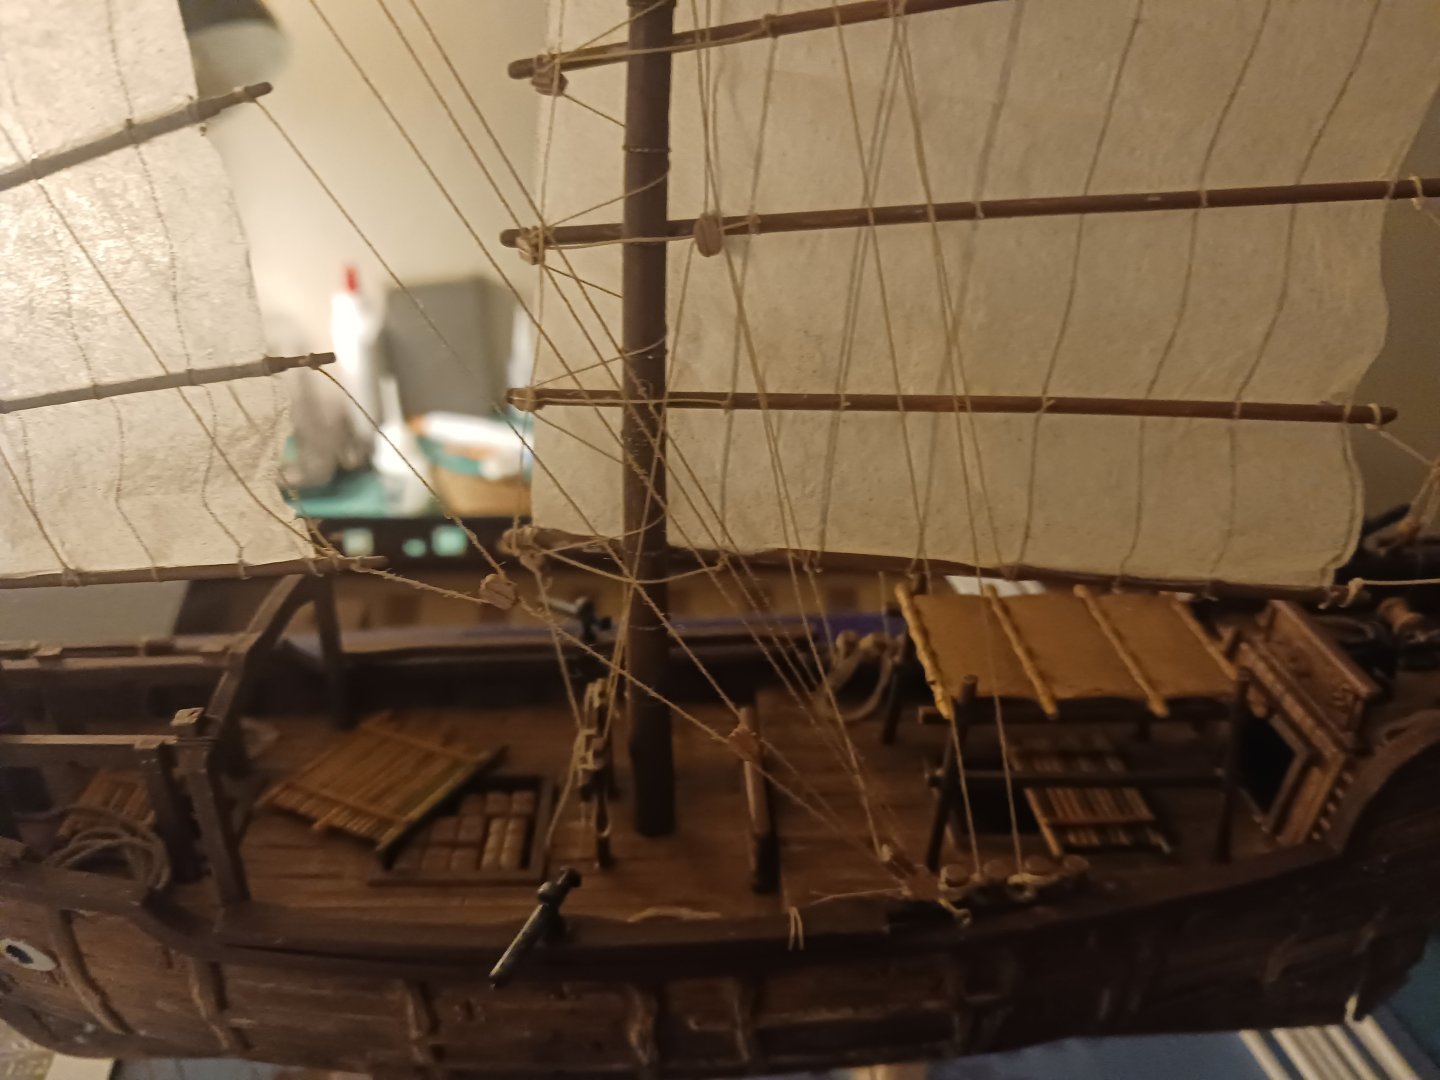
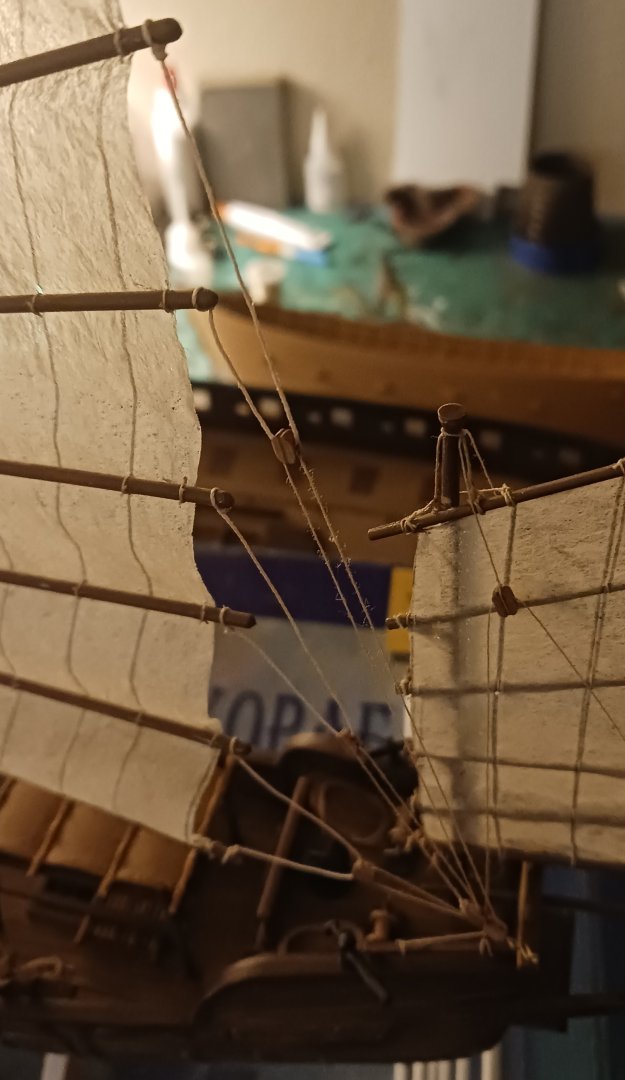
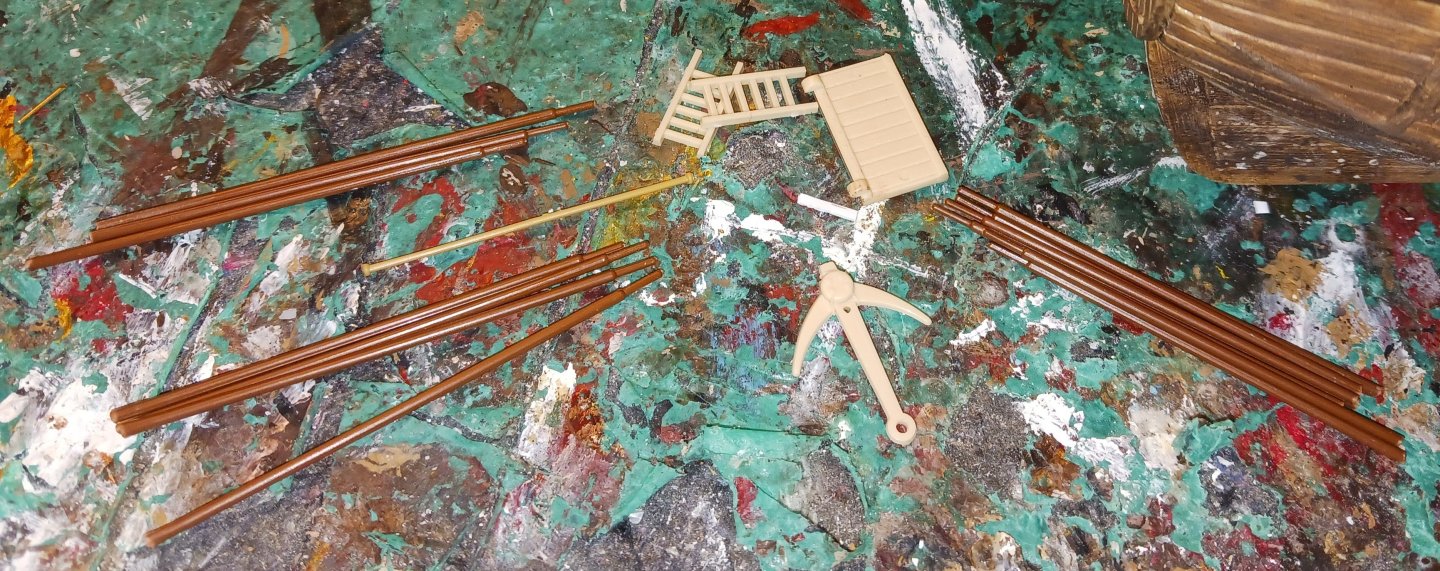
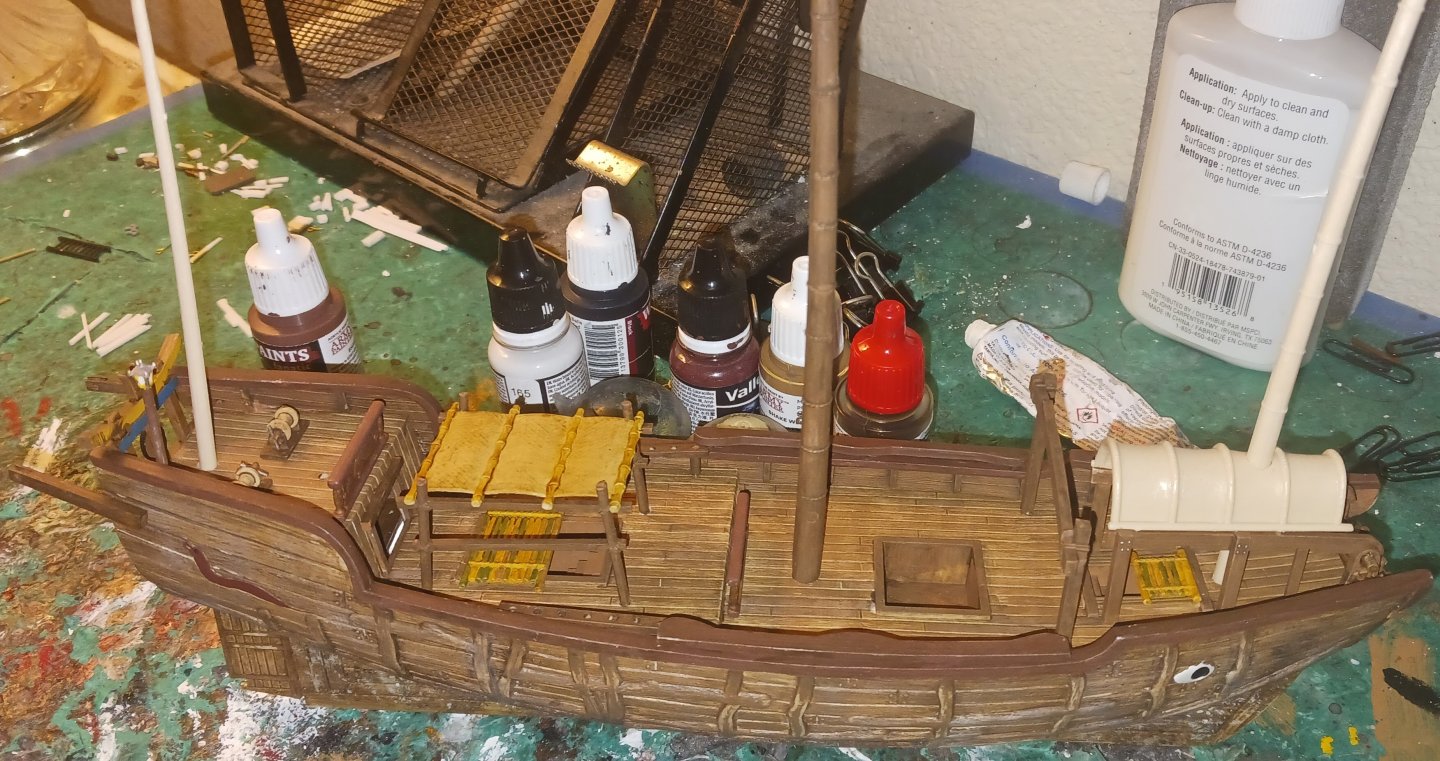
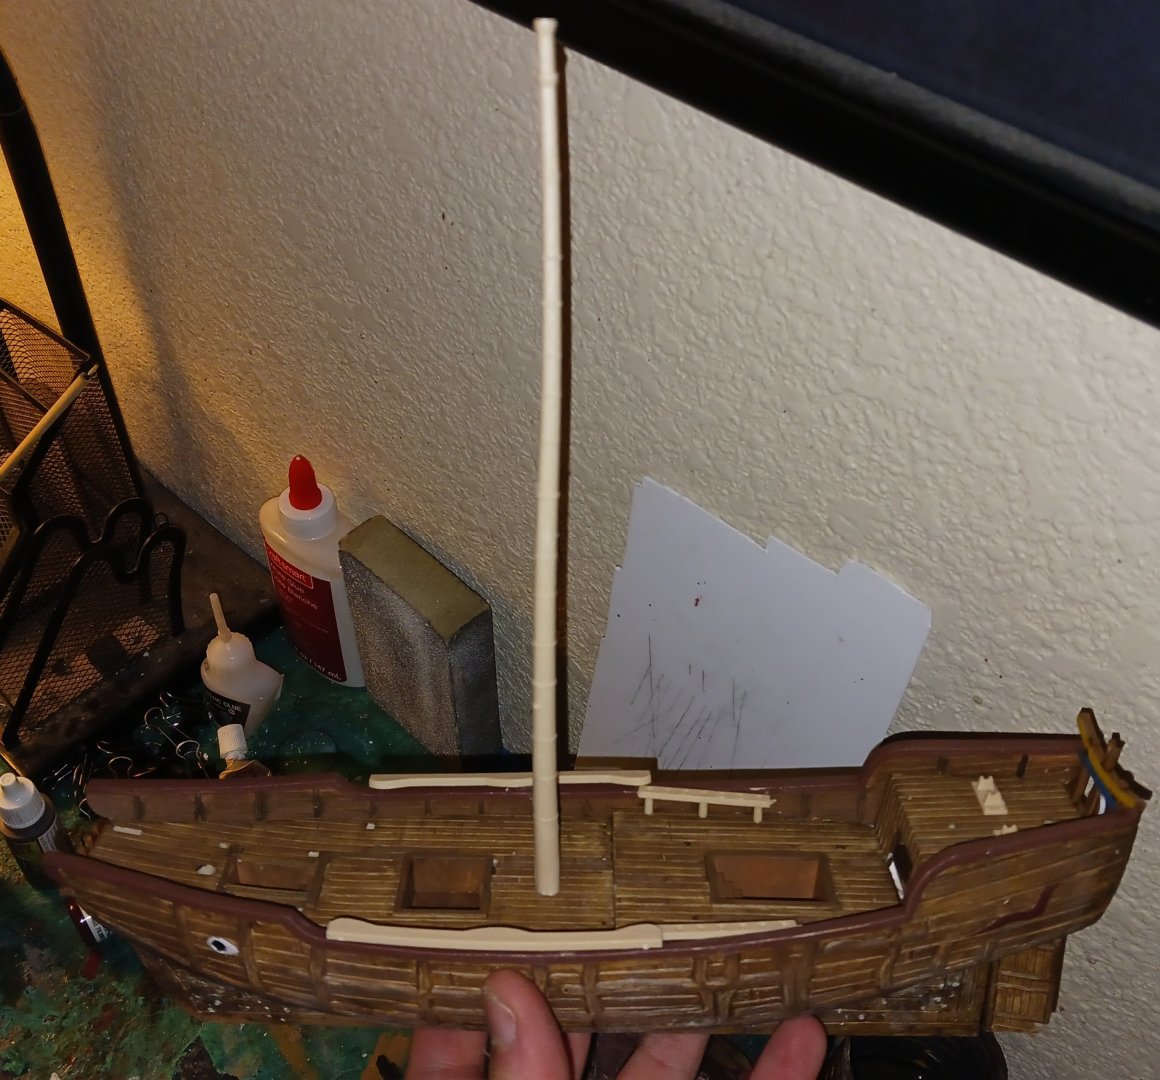
Since the hatches were made and painted, I have done the rest of the work for the ship's hull. I also did some scratchbuilding to facilitate easier rigging. In addition, I painted and installed all of the masts. The stern outrigger is a scratch-built addition, as a means to accept the mizzen sheet. These are some of the elements so far for the sails and rigging. The gunport lid and ladders have since been painted and installed as of the creation of this post.


-
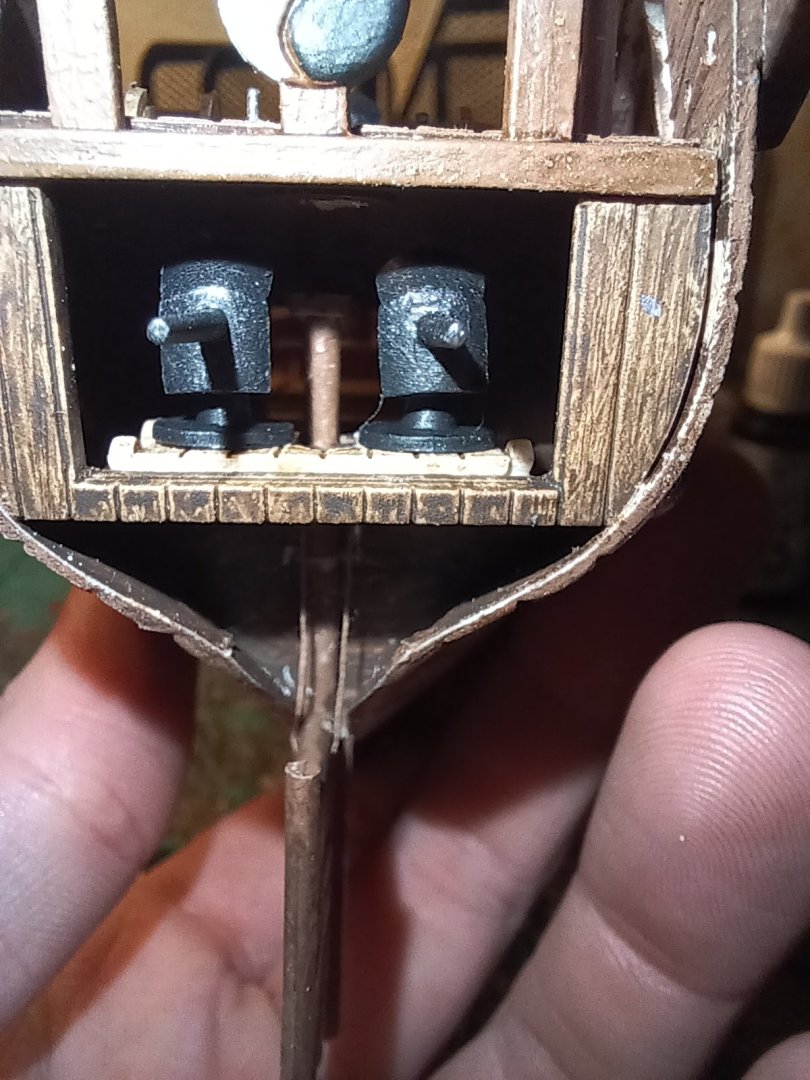
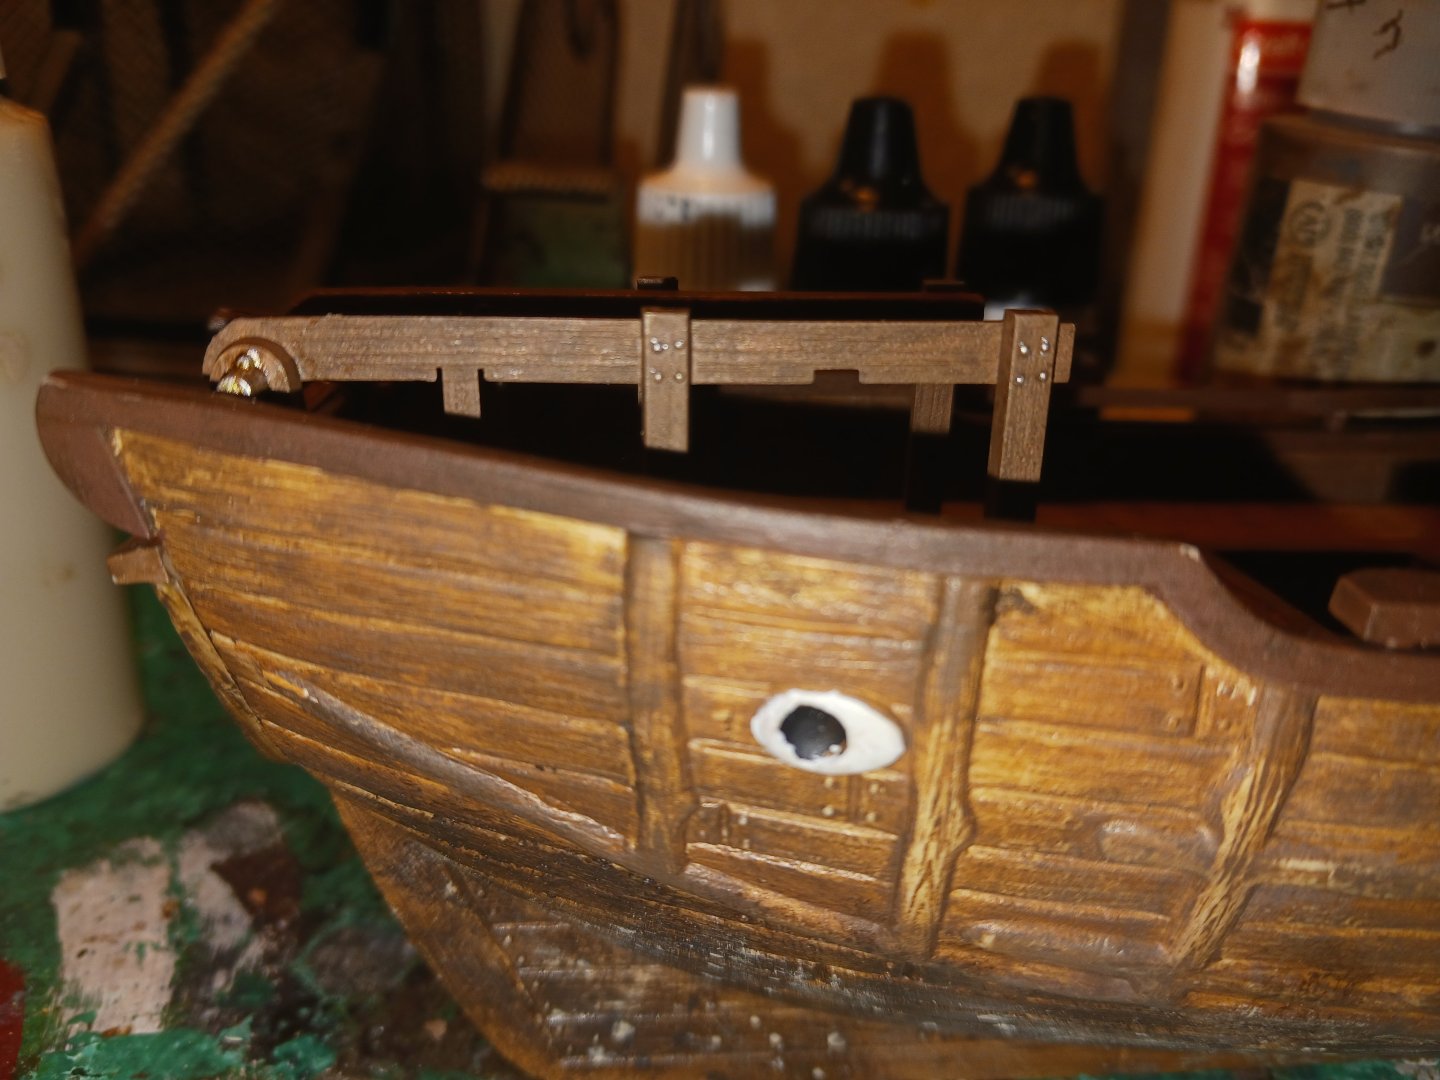
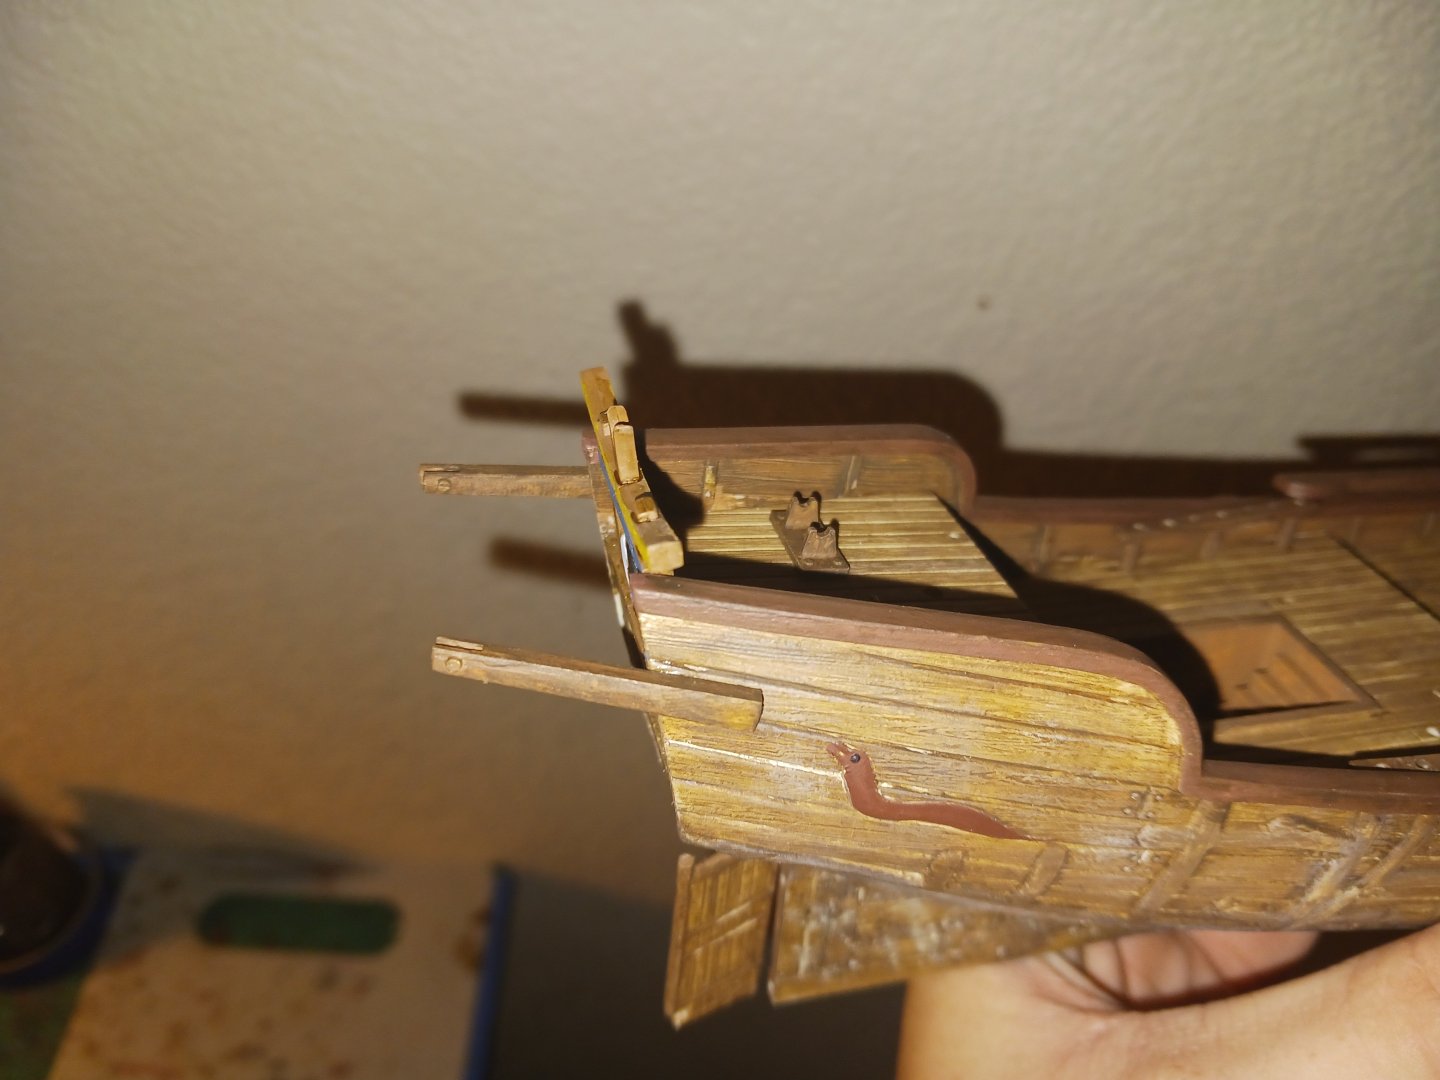
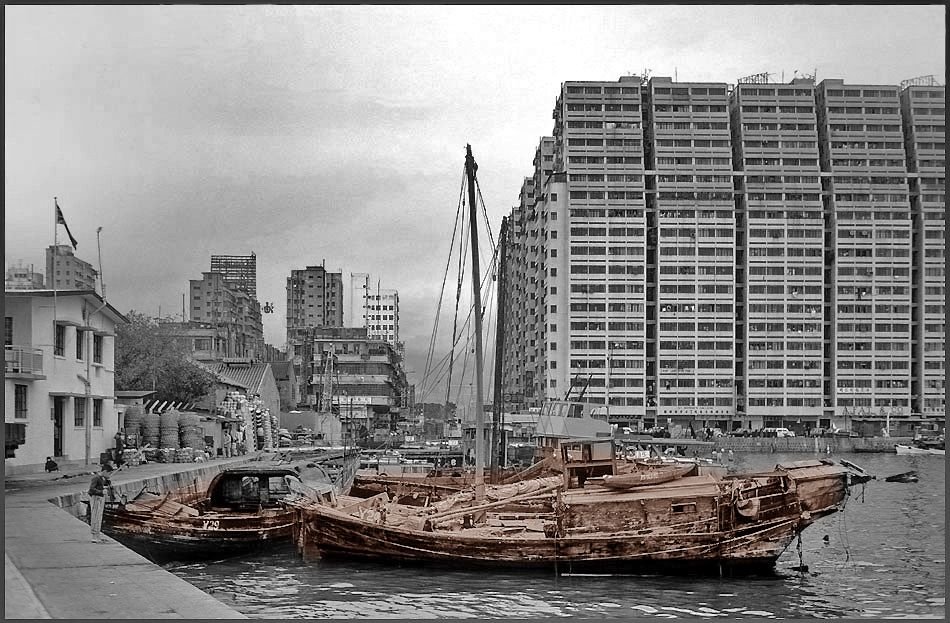
An interesting thing I found about this ship is that not only is it armed, but all three of its anti-ship guns point directly aft. Unfortunately, these guns had barrels so tiny they wouldn't have been able to accept a pin vise bit. The anti-personnel pieces that will be added after the completion of the rigging are the same way. Either way, the crew of this ship is probably well familiar with the practice of running away from something while shooting at it. Perhaps something this ship is carrying puts it on the wrong side of the law. Found it! In an attempt to conceal their criminal intent, a few members of the crew have partially covered their stash of highly illegal opium to sell on the black market in southern China. The sale and use of this addictive substance fueled two wars between Qing dynasty China and Britain in the mid-1800's, with the end result being a Chinese crackdown on the sale of the drug within their borders, citing social decay and the immorality of drug abuse. This was the original War on Drugs, and the crew of this smuggling ship is looking at a long prison stay if they're caught.


-
Since we have now been over the basics of model painting, I find it redundant to continue with the painting tutorials. The next in-depth subject will be the rigging concepts, but we aren't there yet. The ship's stern lantern, sterncastle hatch mouldings, stern shade structure and fore boom crutch have been painted and put onto the ship. The fore shade structure and the fore and mizzen masts are currently dry-fitted in place. After we are finished with the masts, we will do some scratch-building to facilitate easier rigging. The paintwork looks much more flat in flash photos than it does in real life.
-
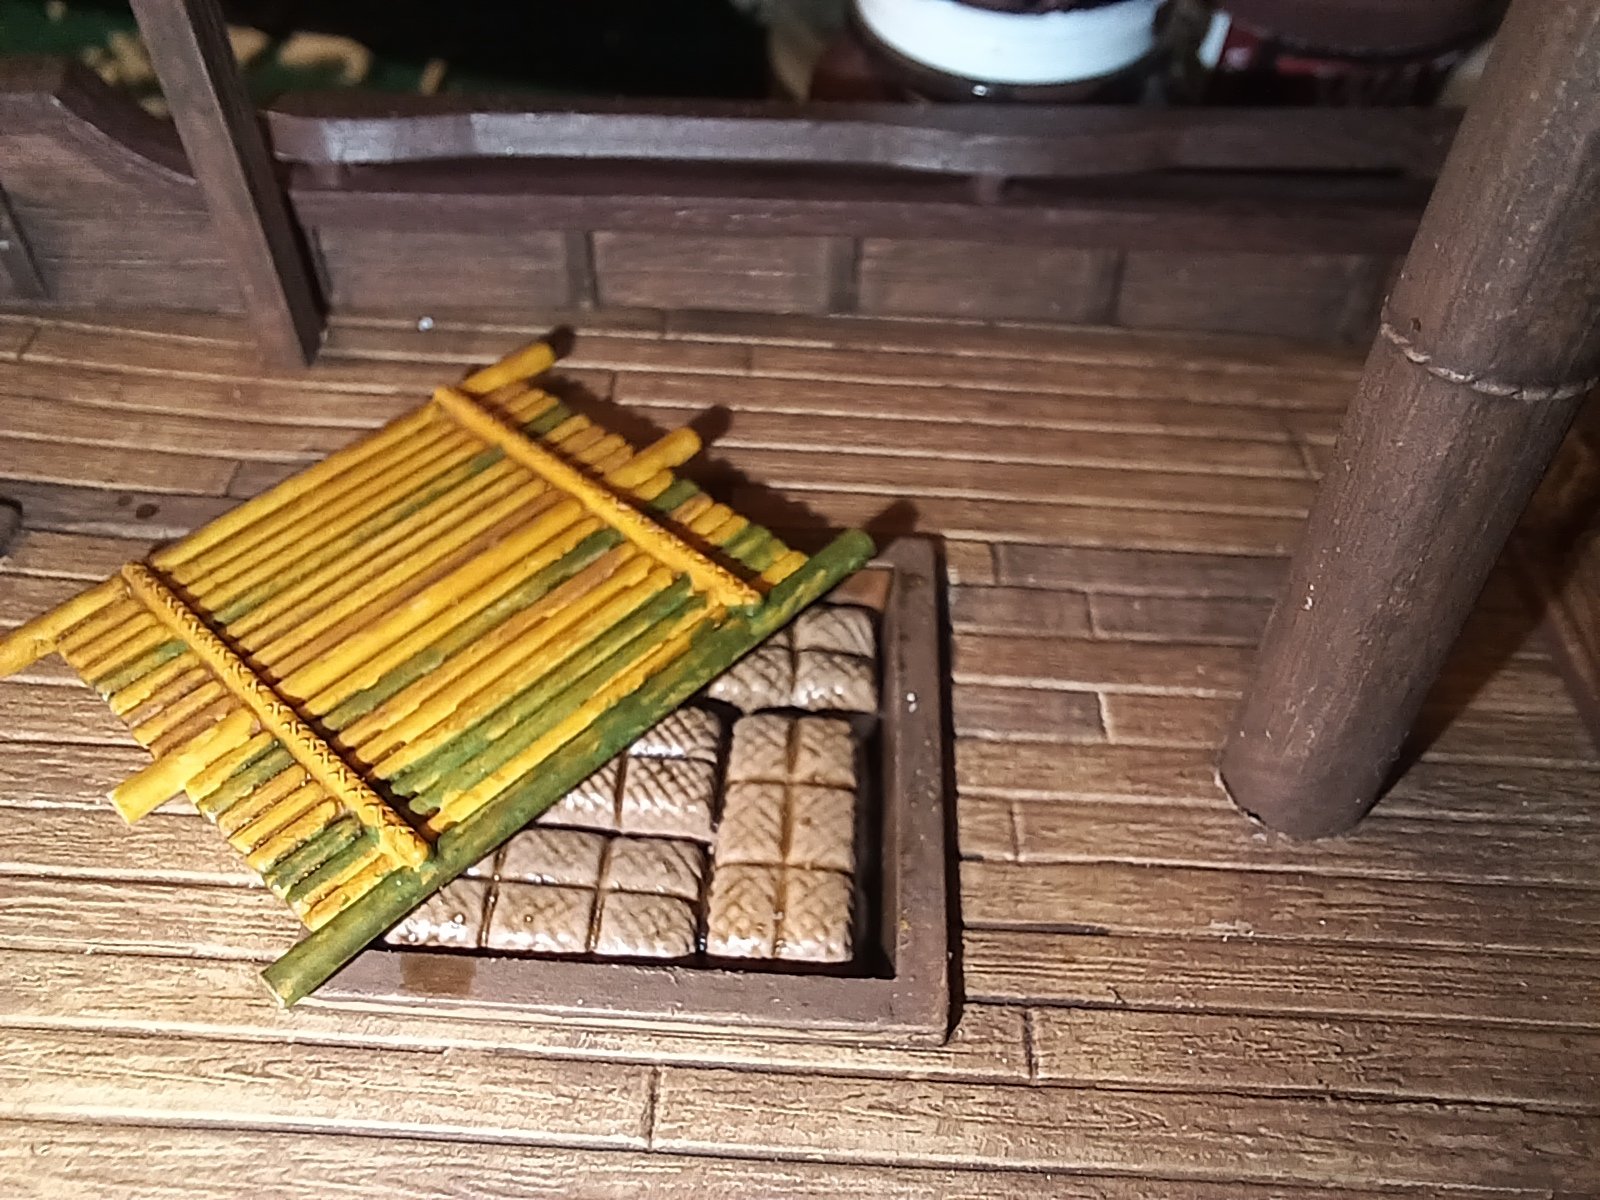
The railings were painted to look like unpainted wood, which is an effect that isn't easy to achieve with a plastic model. What I did was paint each railing with two coats of thinned brown paint, which was applied unevenly, and put a brown shade coat on top of that. I proceeded to paint the top and bottom a different color of brown. The bamboo hatch covers were painted using a brown-yellow paint as a base. After that, a mixture of yellow and green went over select bamboo poles to indicate newer bamboo. Older bamboo in need of replacement was painted yellow-brown. The fore upper works were painted relatively normally, using a brown paint with shade on top. Metal elements were painted silver and shaded.


-
The parts that we dry-fitted on the deck have all been painted according to previously laid-out principles, and installed. It is wise to dry-fit every part prior to painting and installation. What I like to do is grab and prepare a few different parts in the order I want to install them, and proceed from there. The next assembly will probably be some of the interior railings, hatch covers, and some other miscellaneous pieces.

-
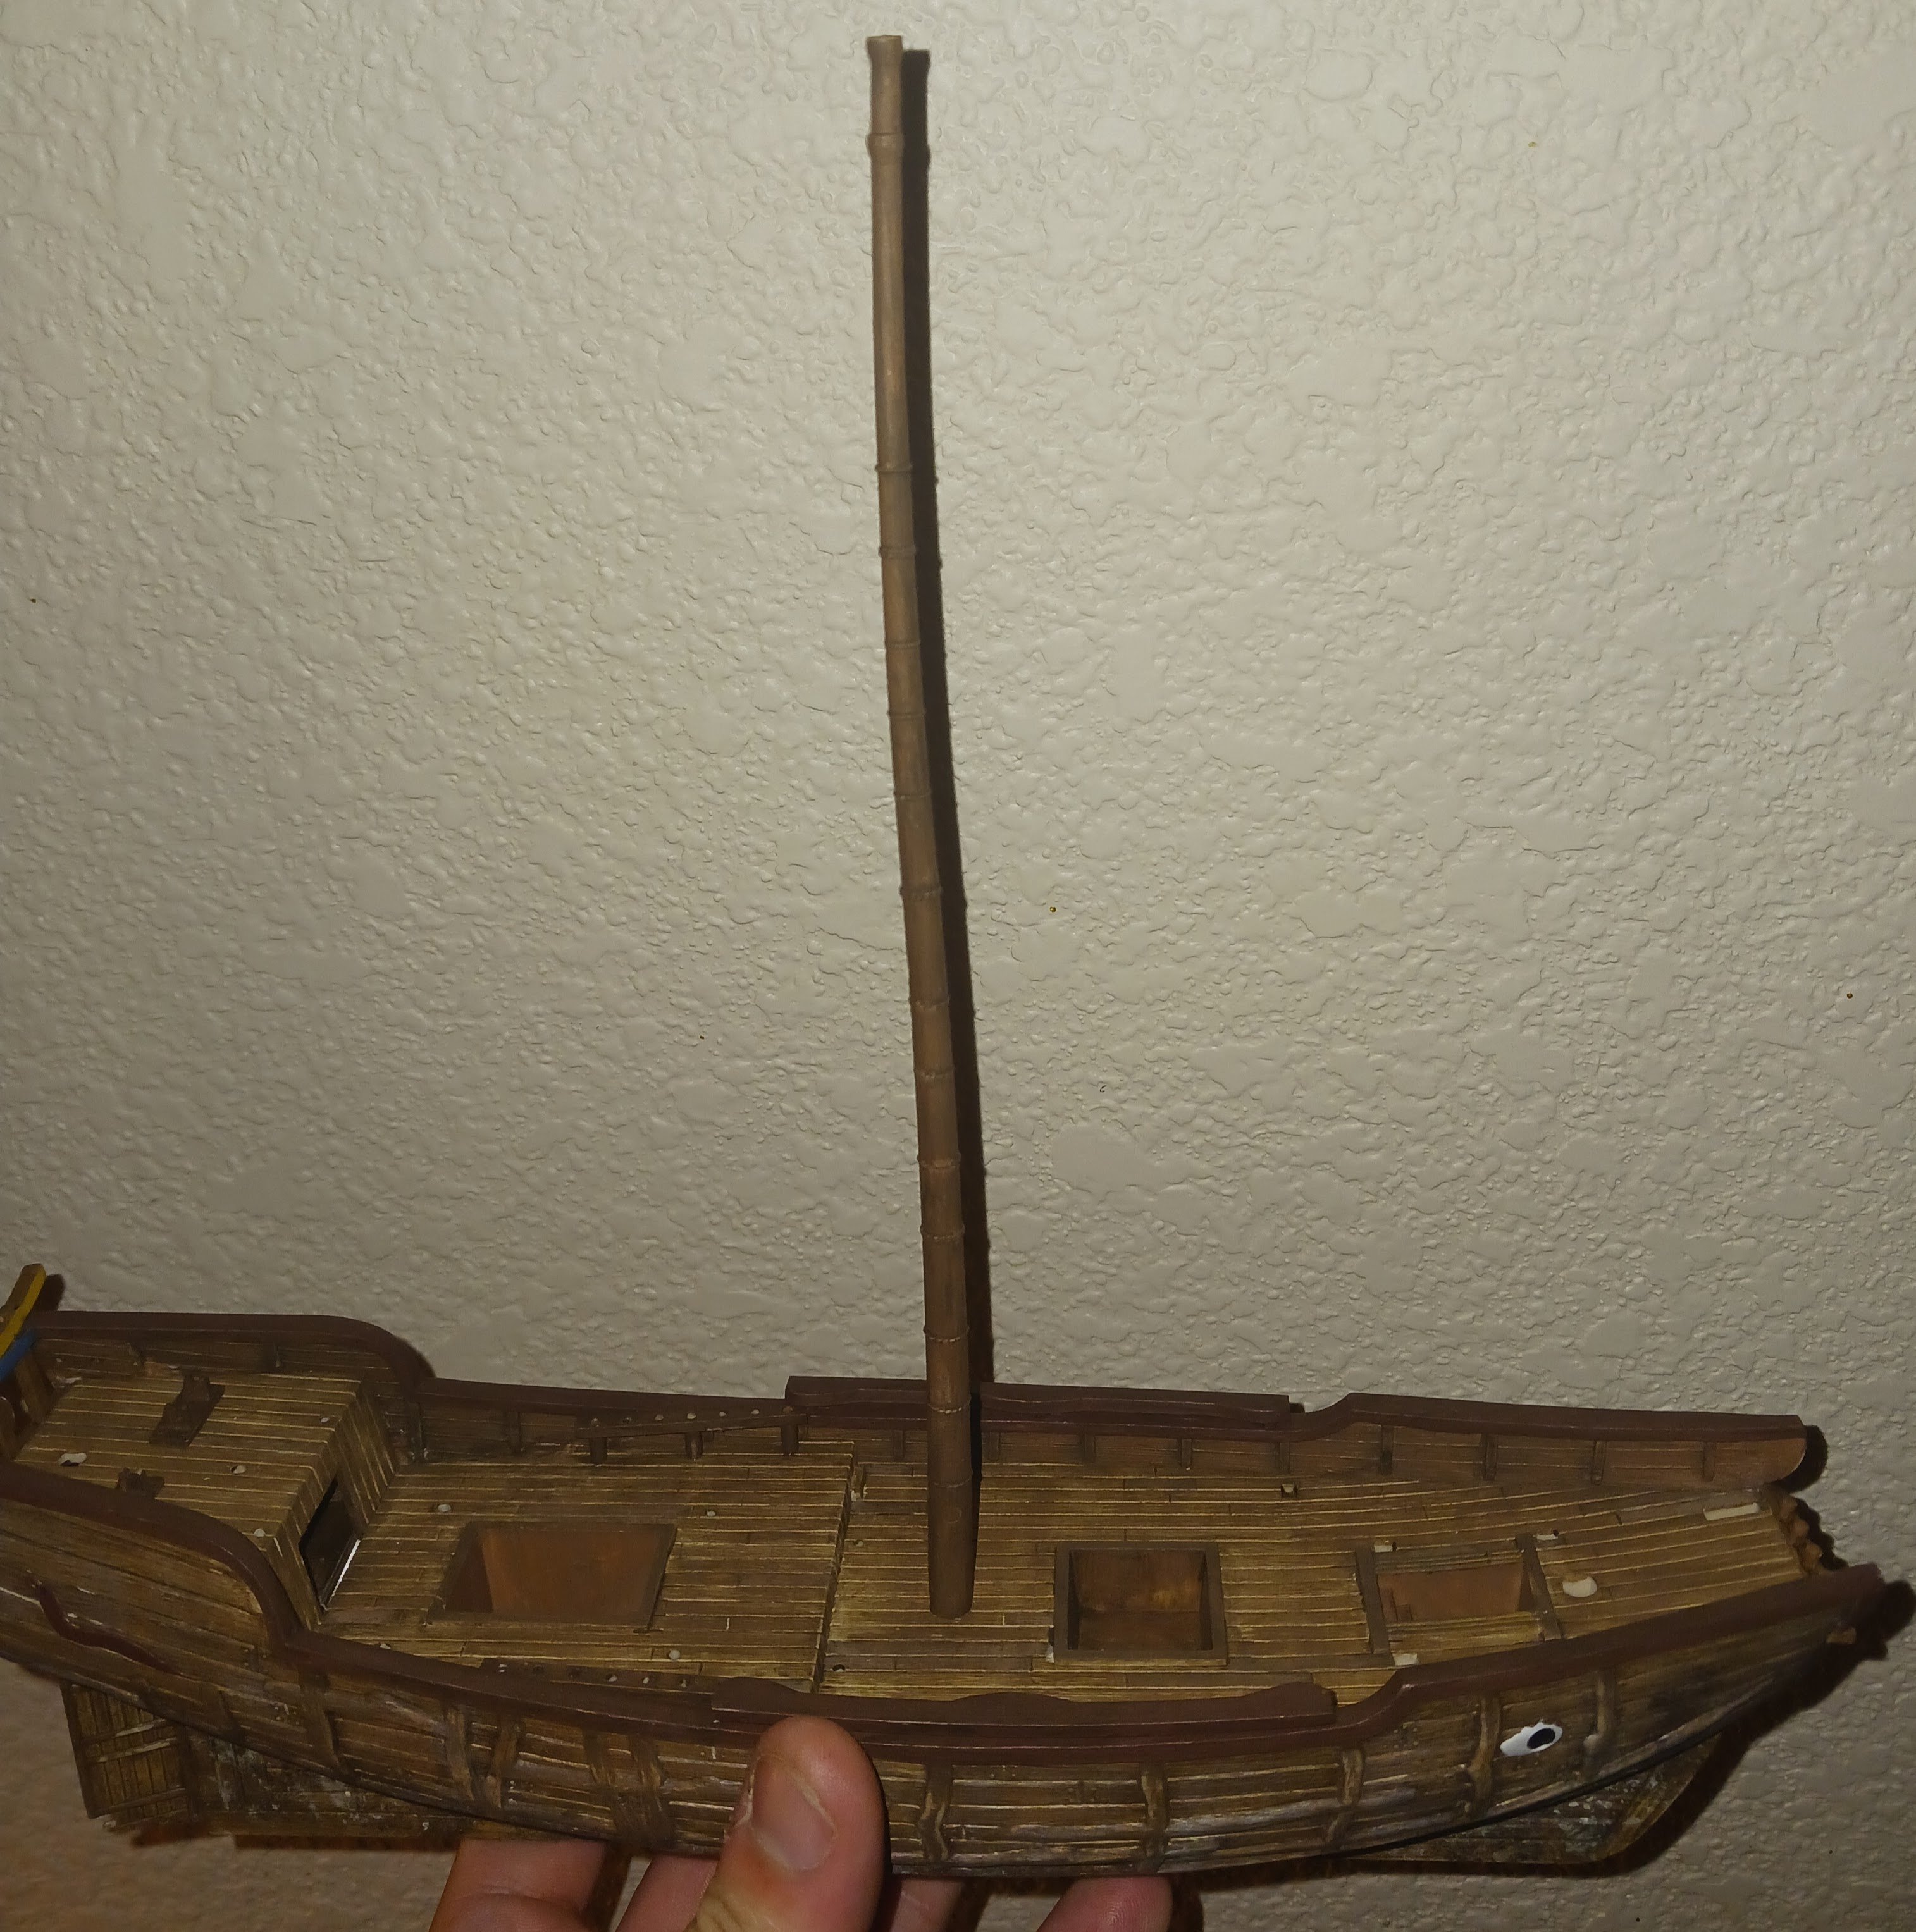
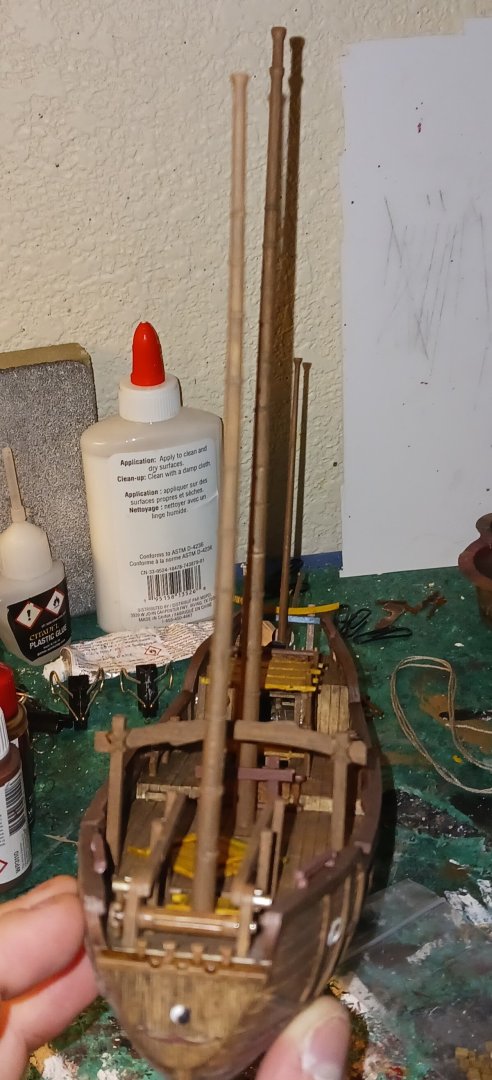
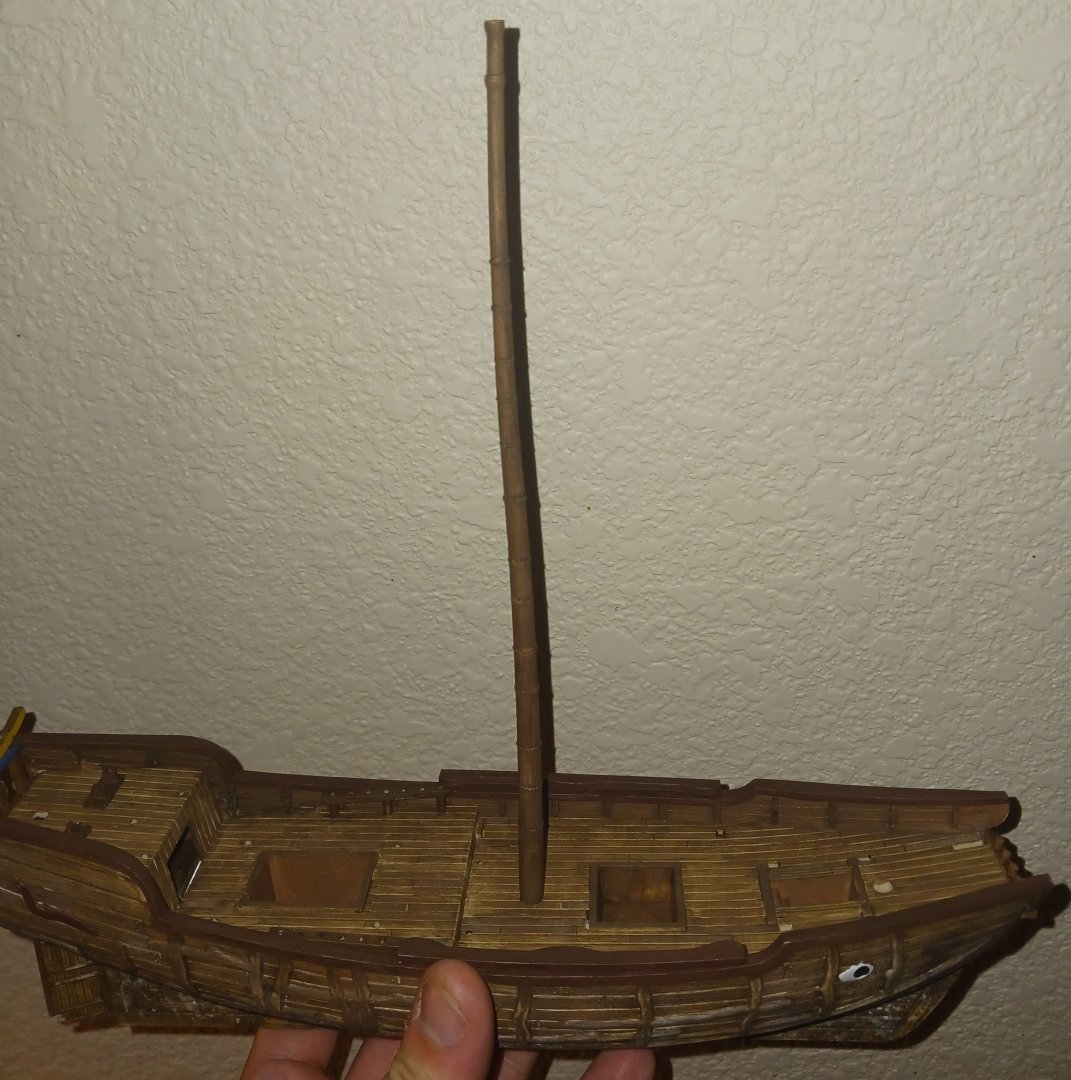
The fore, aft, and deck of the ship were all painted similarly to how I painted the hull. The deck is slightly lighter as I went easier on the weathering, but the technique is functionally the same. The boat winch housings, pinrails, main rails, and mast are currently dry-fitted into the hull. I rectified the aforementioned issue with the mast rake by doing some strategic sanding of the base of the mast. These will probably all be painted some shade of brown.

-
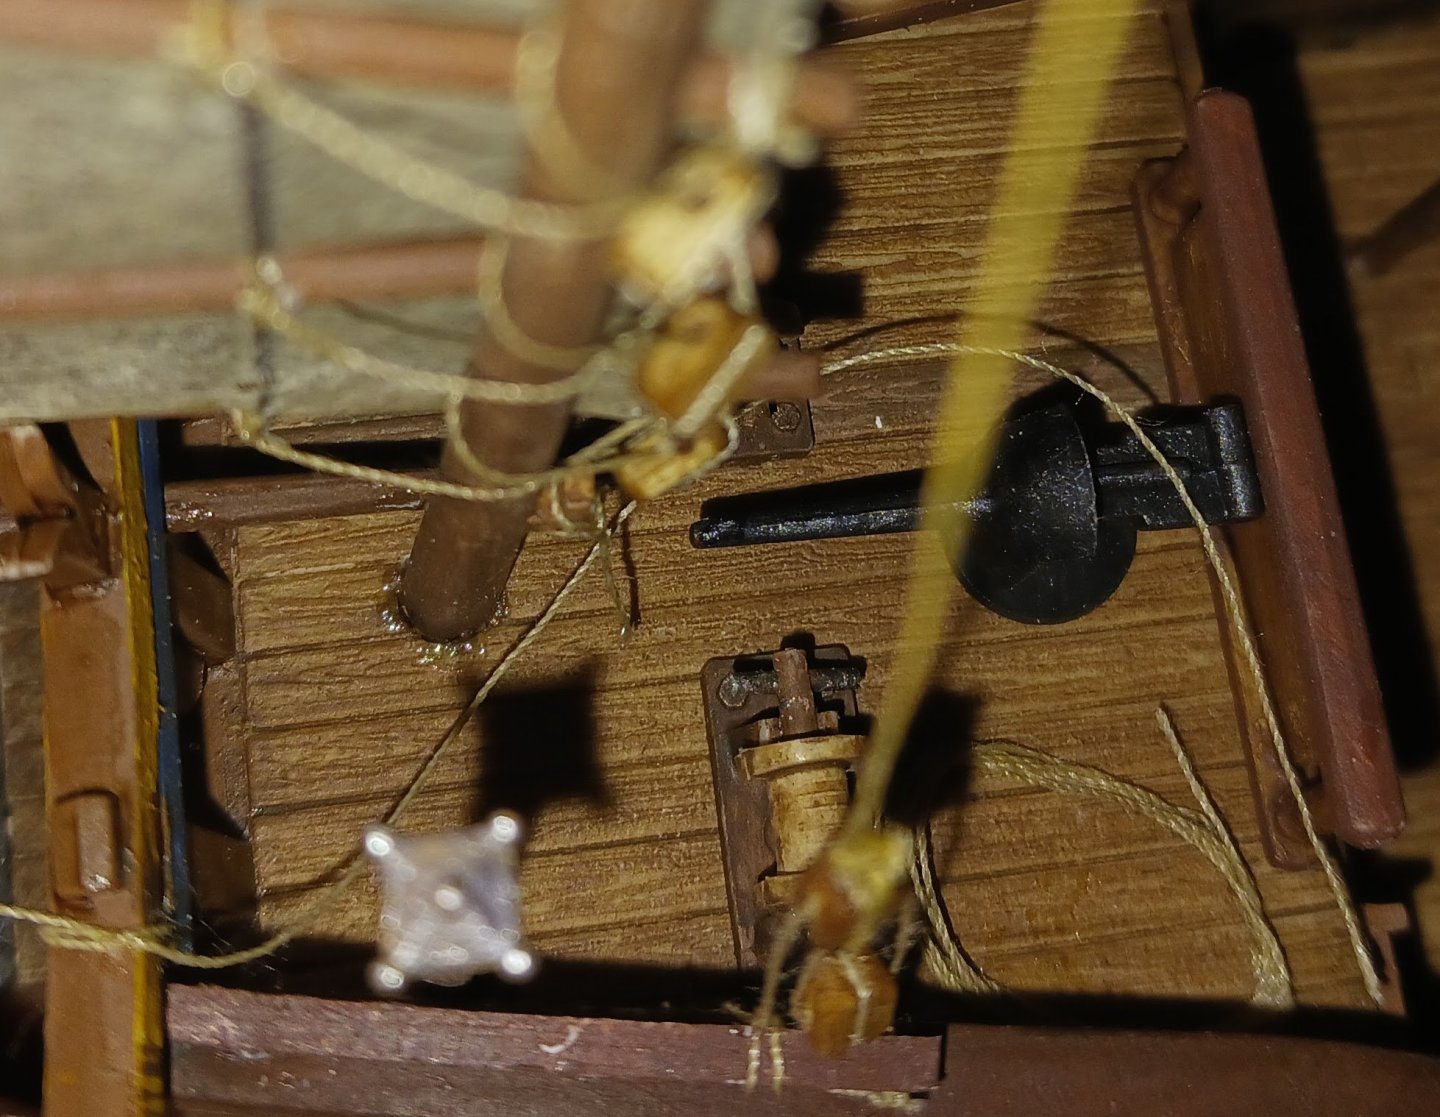
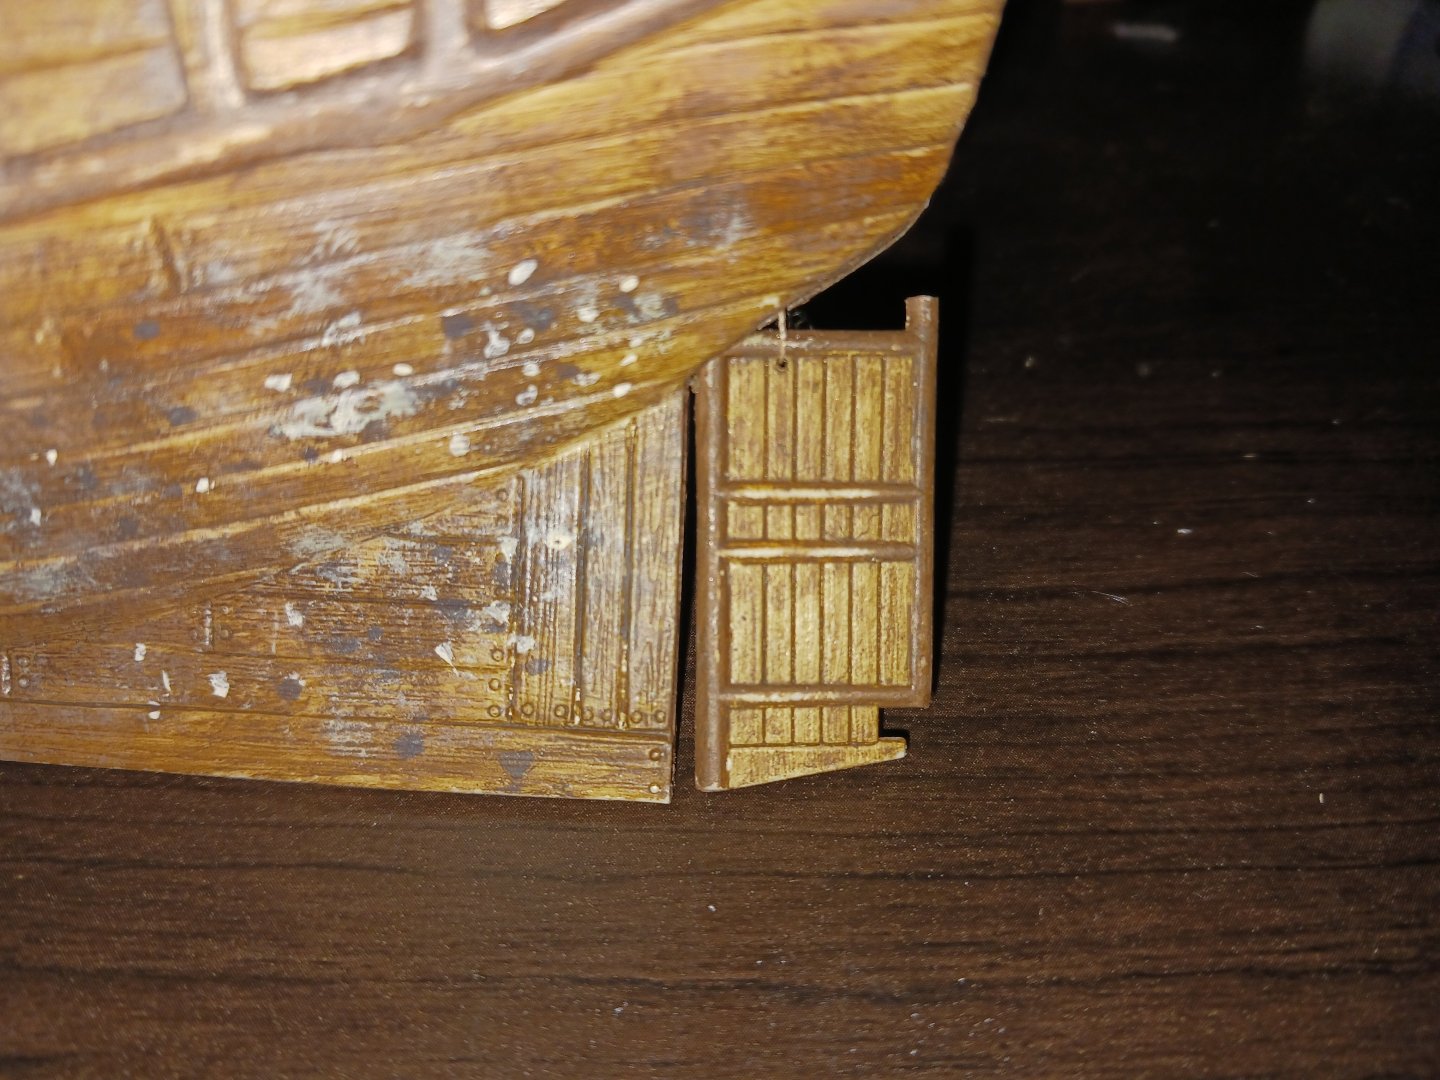
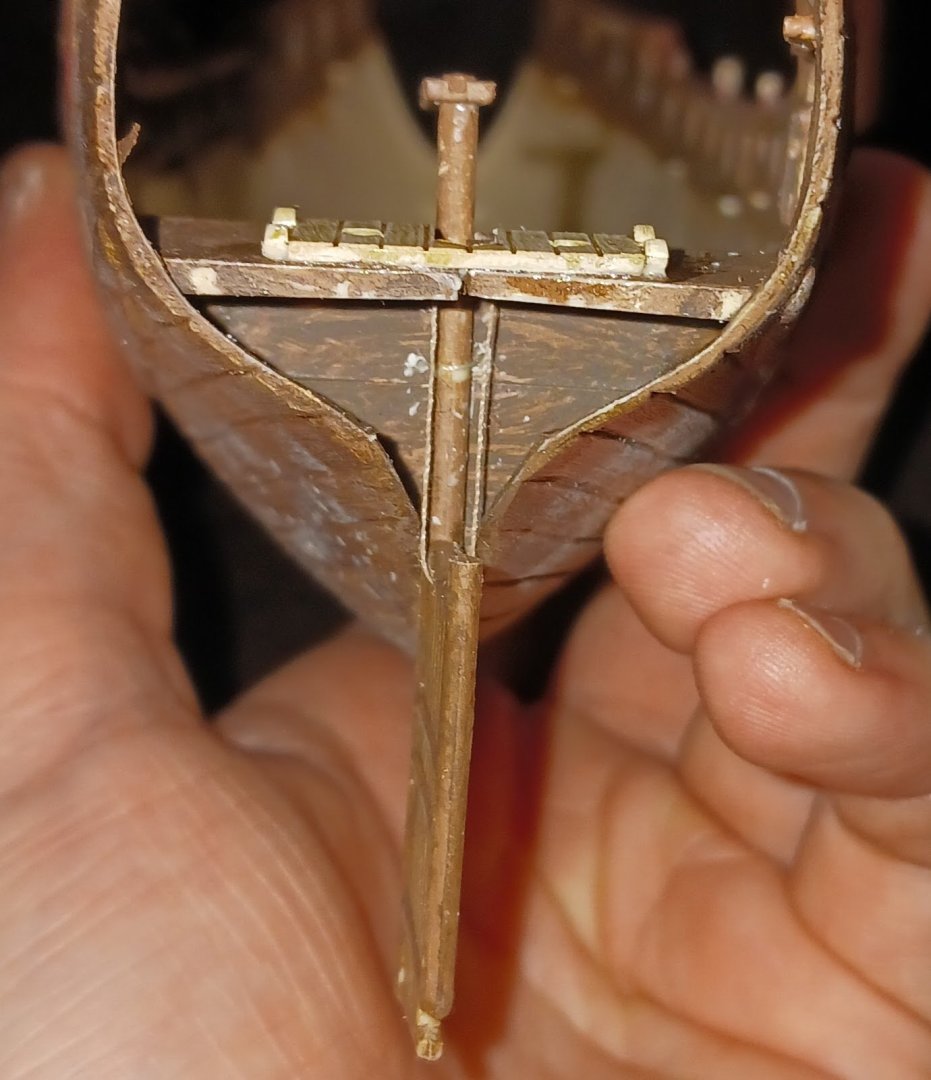
I've now completed the rudder assembly. There is a rope that wraps around the rudder post to prevent it from tilting aft, as well as the rudder lift. Here's what they look like from outside: And the rat's nest inside the ship, which will not be seen once the deck goes onto the ship: Two of the ship's guns will go into the interior section at the aft, which will further obscure this mess.

-
That is one of the Imai kits I would love to build someday, I've just never seen it being sold. I doubt a single copy with ever show up online again!
-
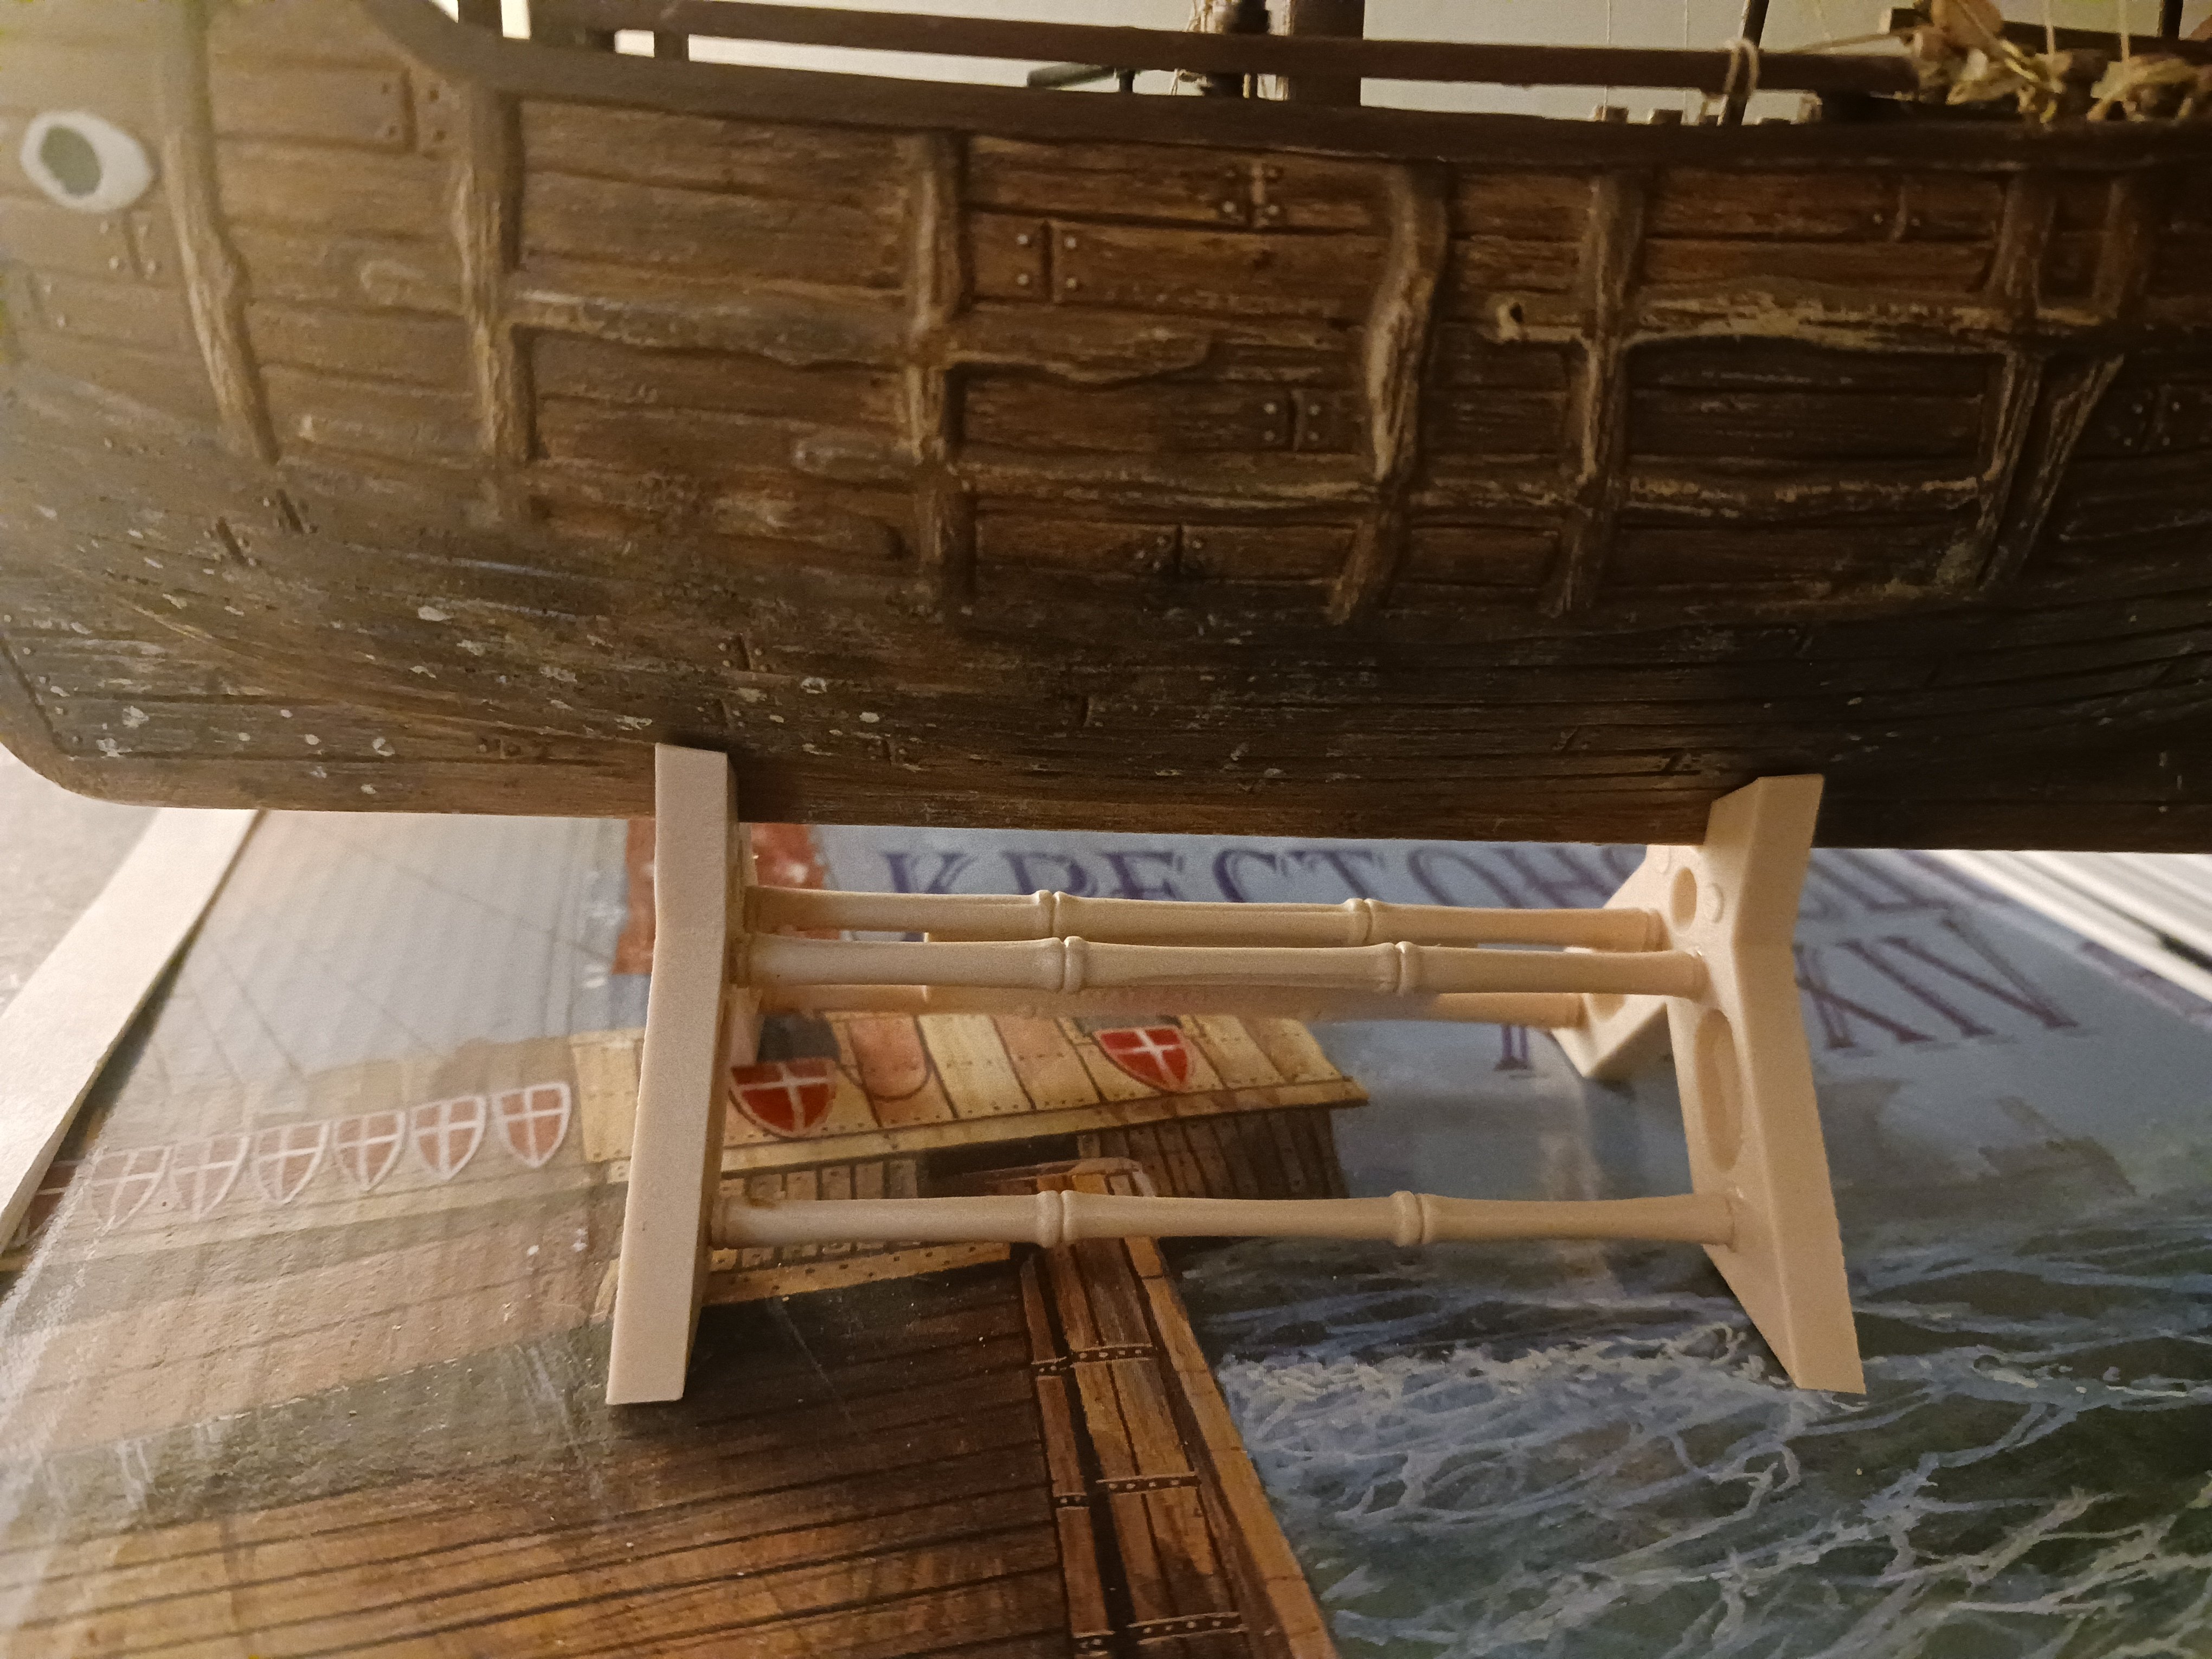
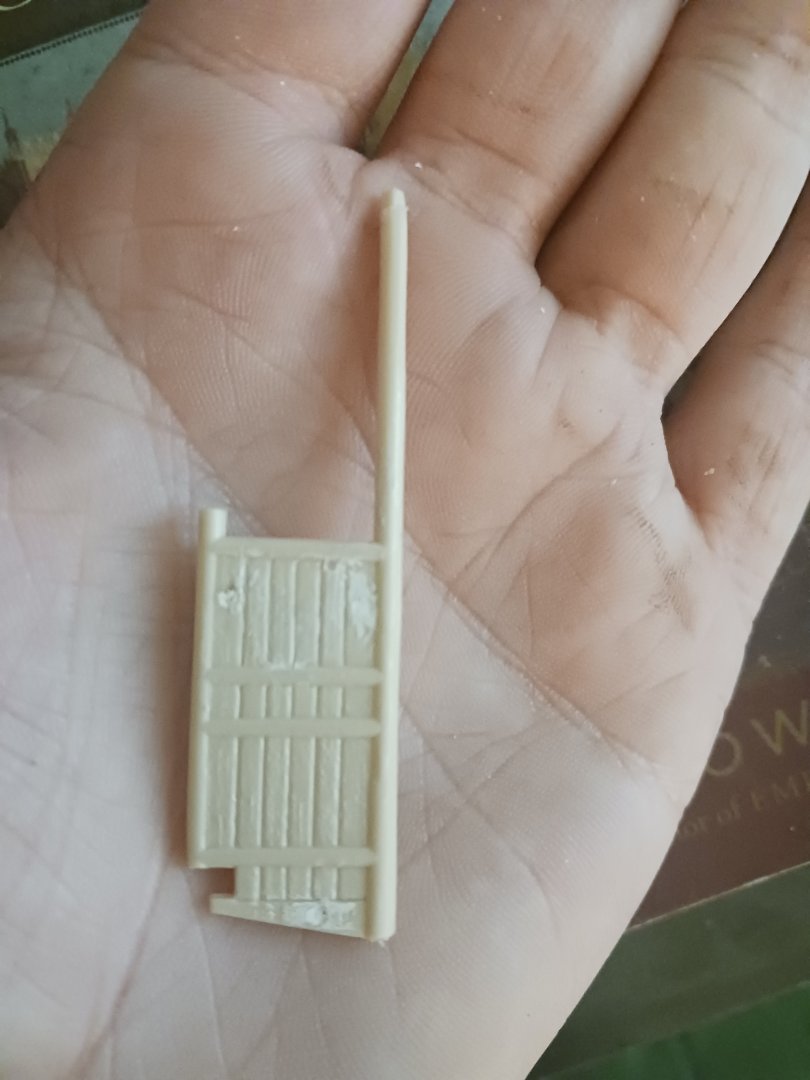
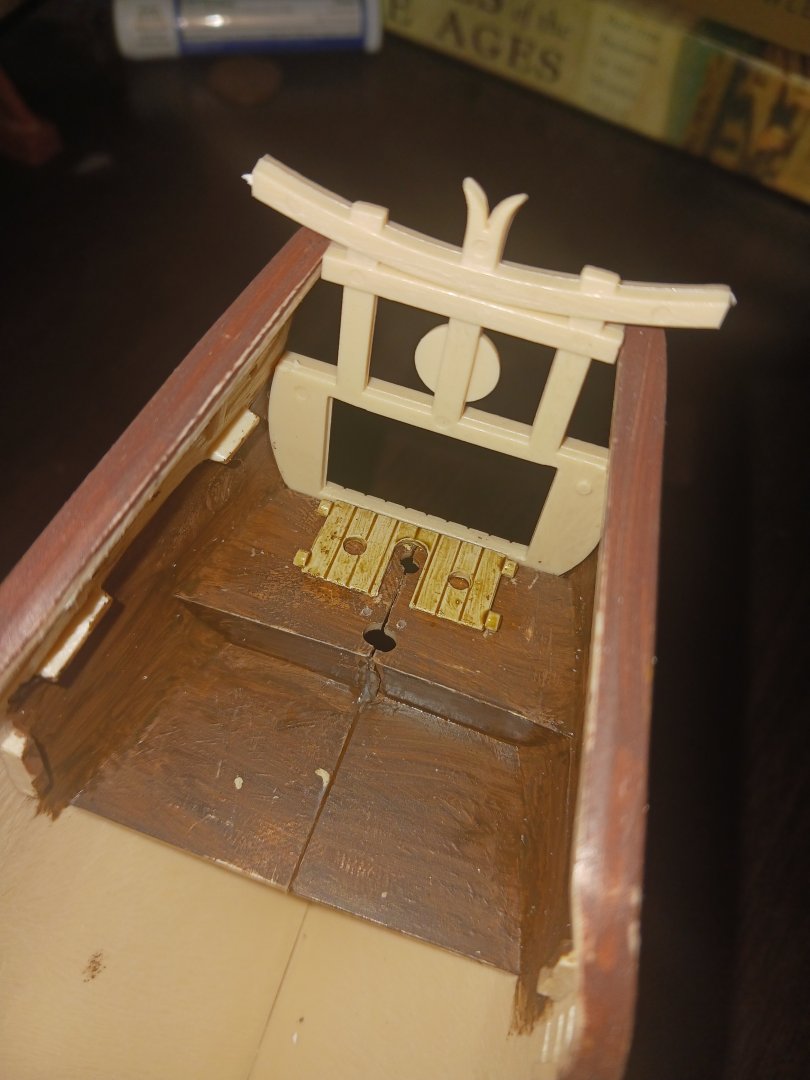
The next thing I'd like to get out of the way before we do the deck is the rudder. Here is the ship's rudder and tiller: I have already done some modification to the rudder in preparation for mounting. The kit instructions say that you are to trap the rudder between the hull halves when you glue the hull together. I did not want to do that. I wanted to retain the rudder's freedom of rotation and, more practically, delay the installation of the rudder until after the hull halves were glued. Originally, there was a ring that went around the top of the rudder's main post, and two pegs that joined into the sternpost at the aft of the ship. I have sanded both of those down. Rather unusually for Imai kits, there are three injector pin marks to fill with putty. This is the rudder after I filled the injector pin marks. I have also drilled a hole with a pin vise near the top of the rudder fin. This will accept the rudder lift, which was an important feature on Chinese junks: The stern of the ship. I have the unpainted transom resting on the back of the hull. The planked gun platform is glued in place and painted. There are two holes on the center-line of the stern. The forward hole is for the rudder, and the aft is the step for the mizzen mast. I have drilled two holes immediately aft of the rudder hole for the lift. Some actual rudder designs:


-
Thank you, Glen. I could never do the kind of work you have done with your Japanese SIB.
-
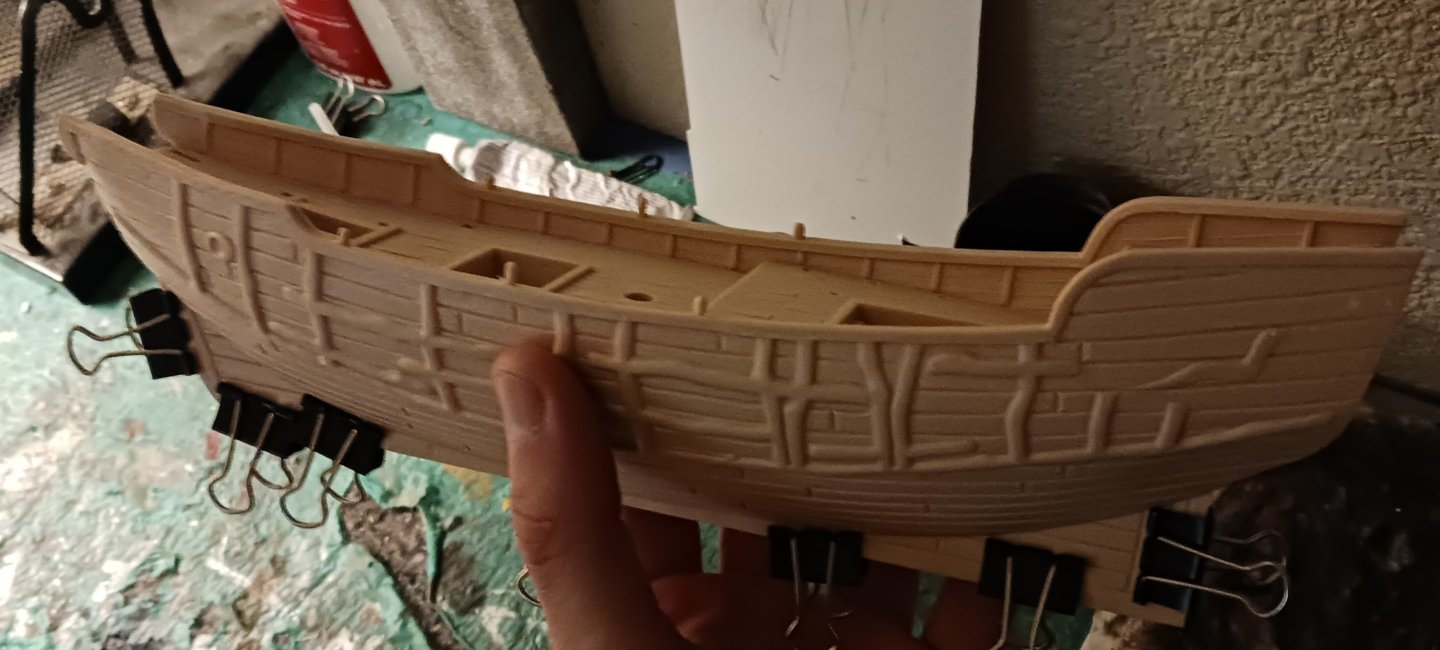
Gluing the hull halves is very easy given that this is an Imai kit. The keel will require some sanding and the aft interior will receive some more painting detail.

-
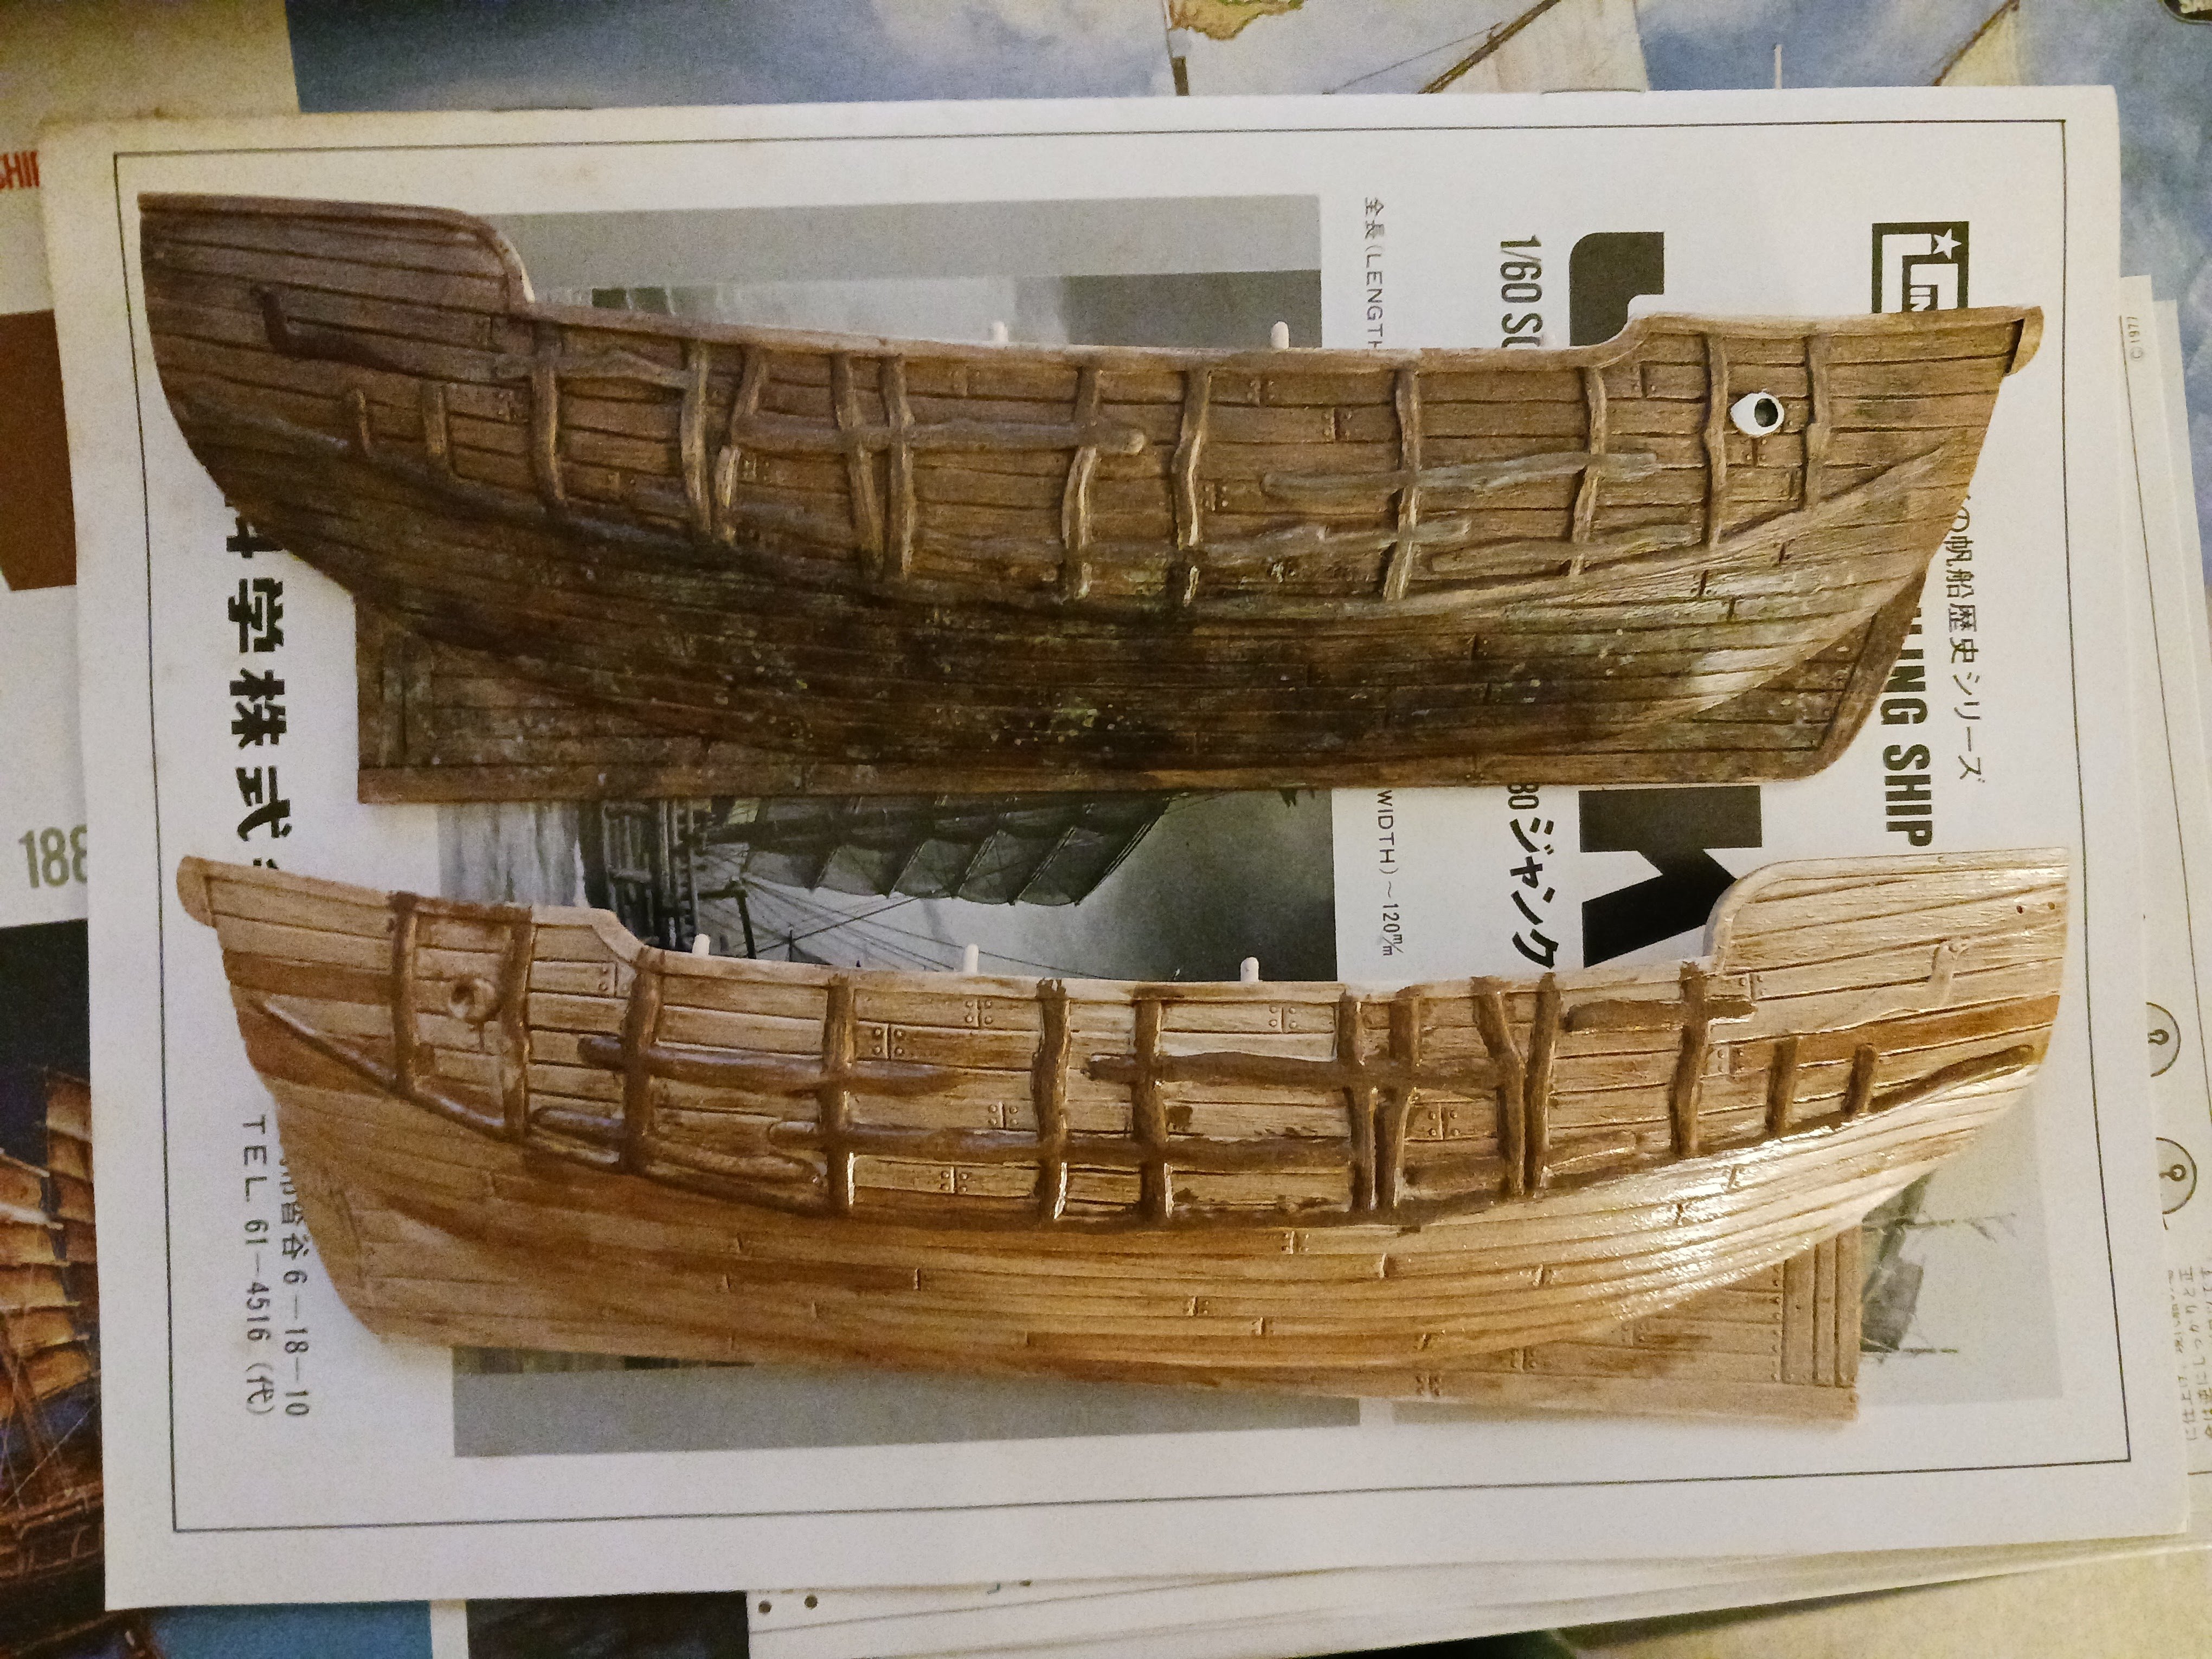
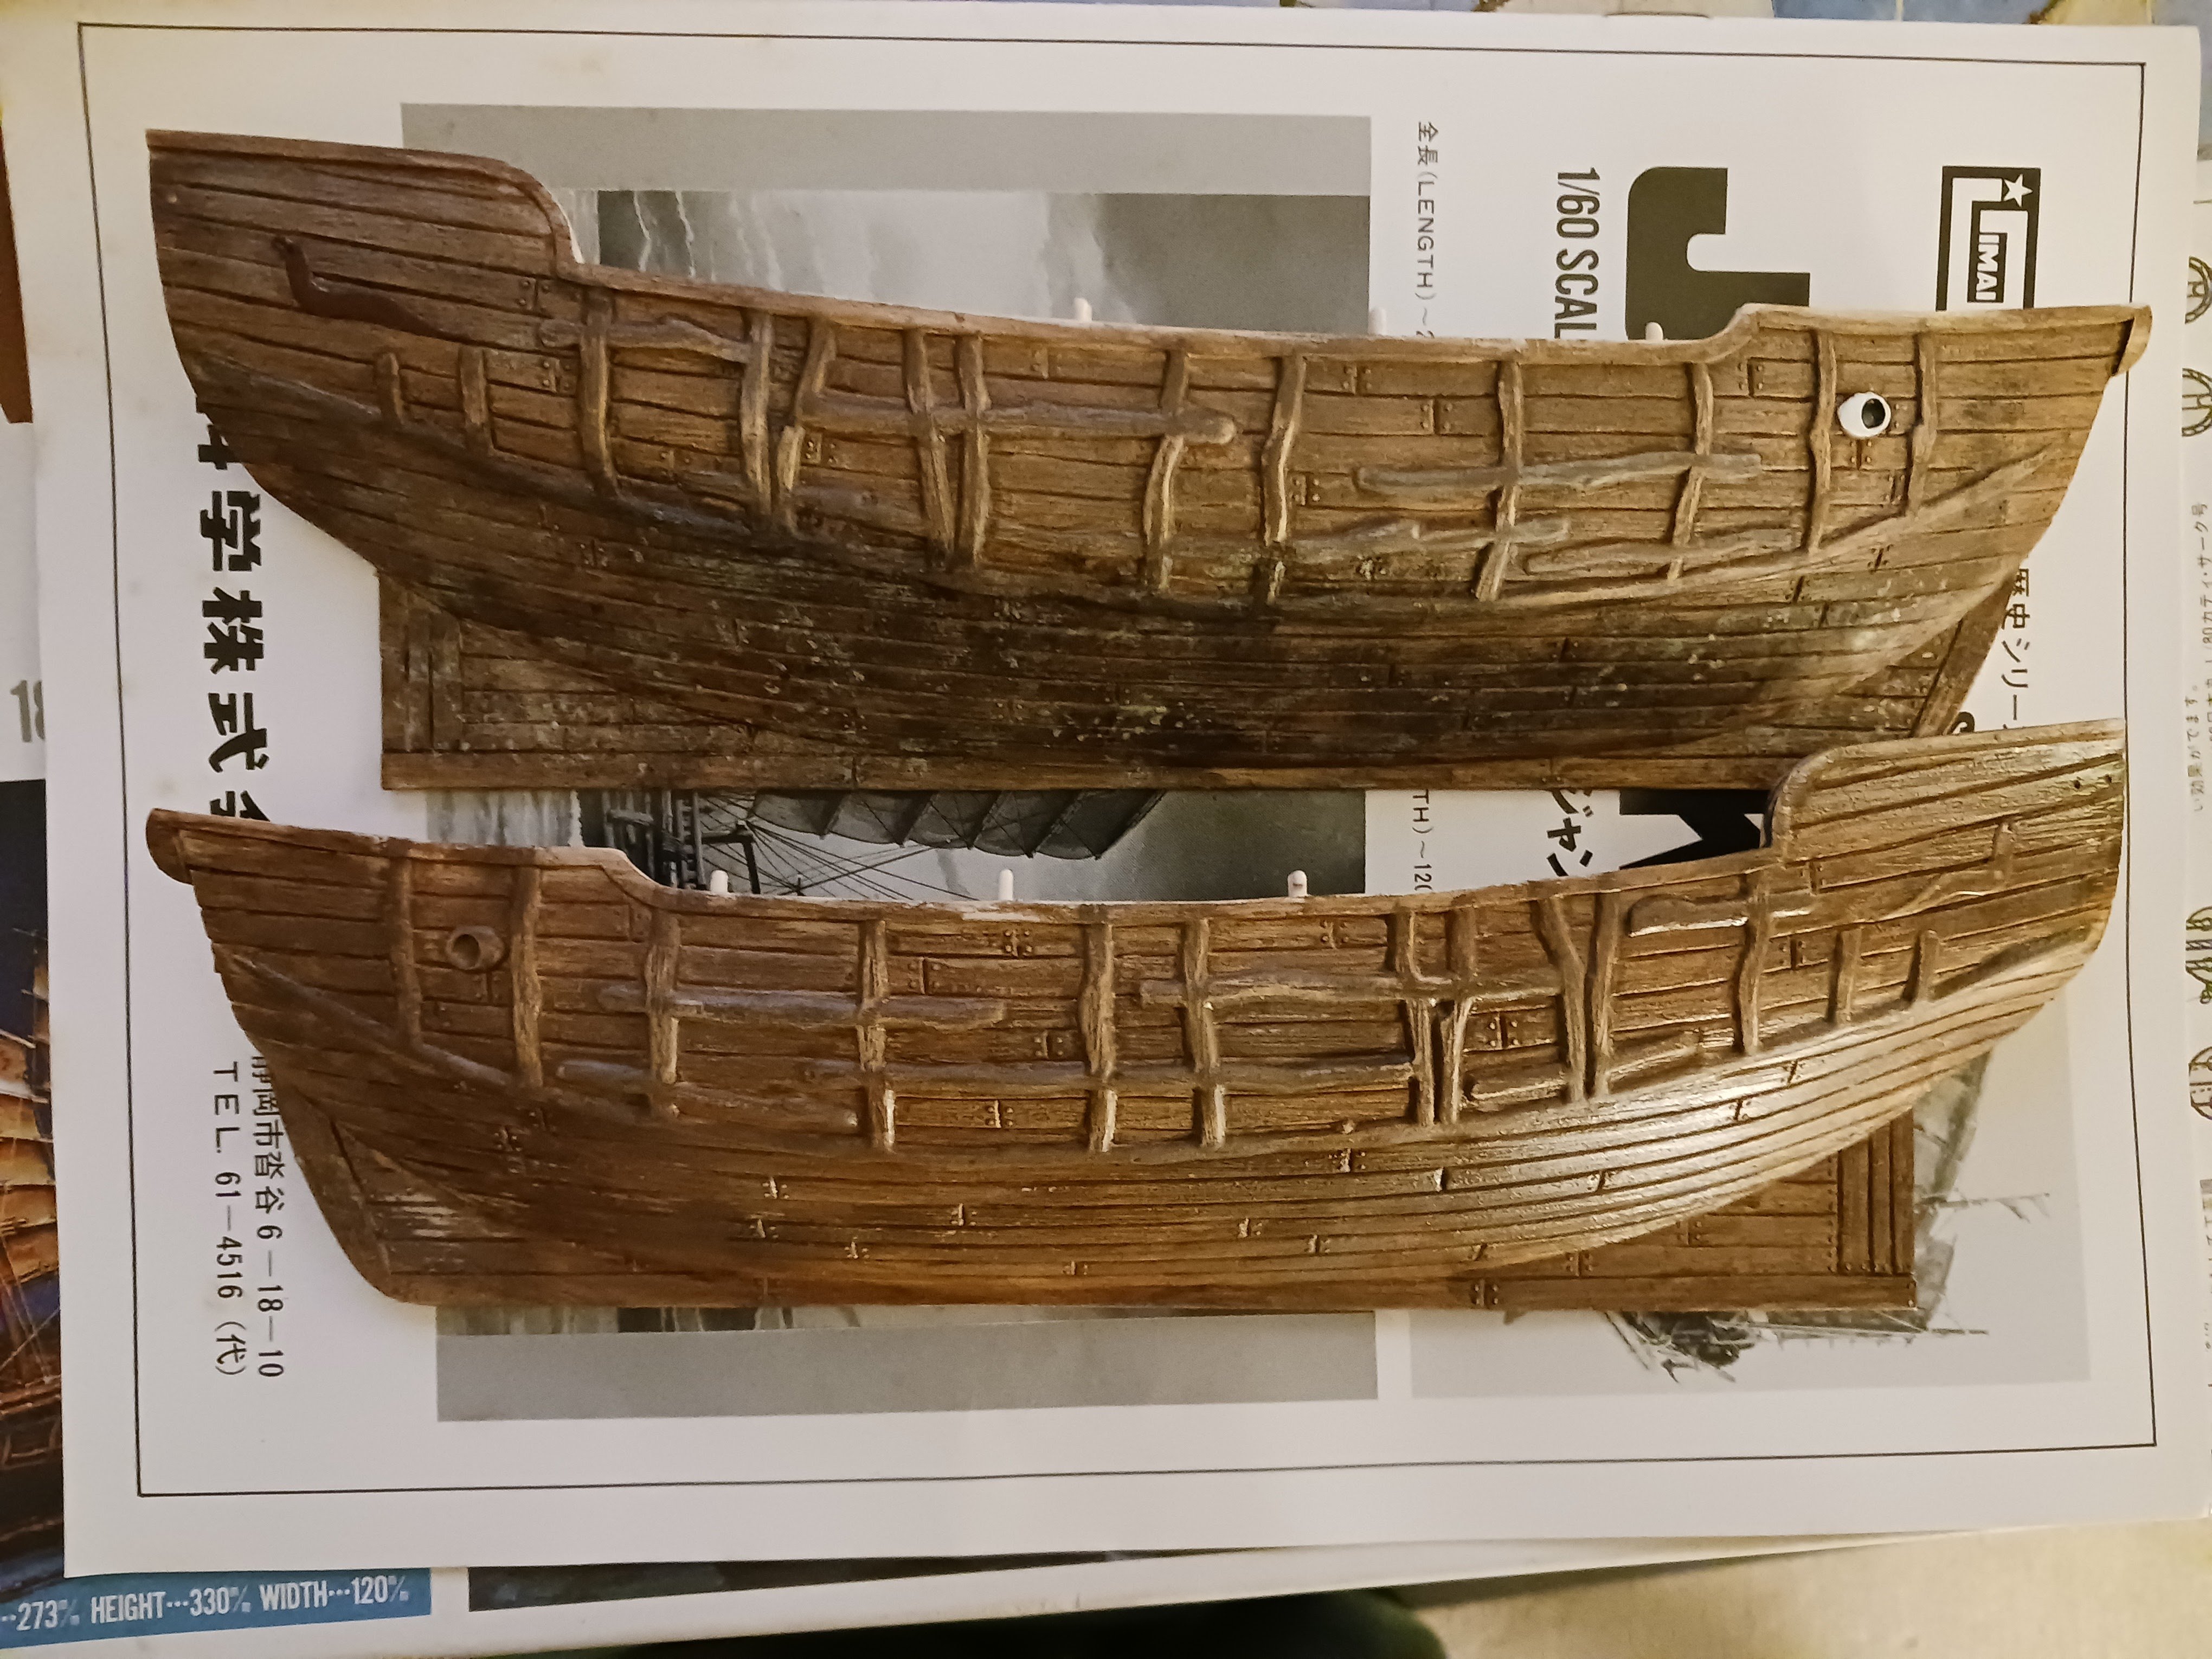
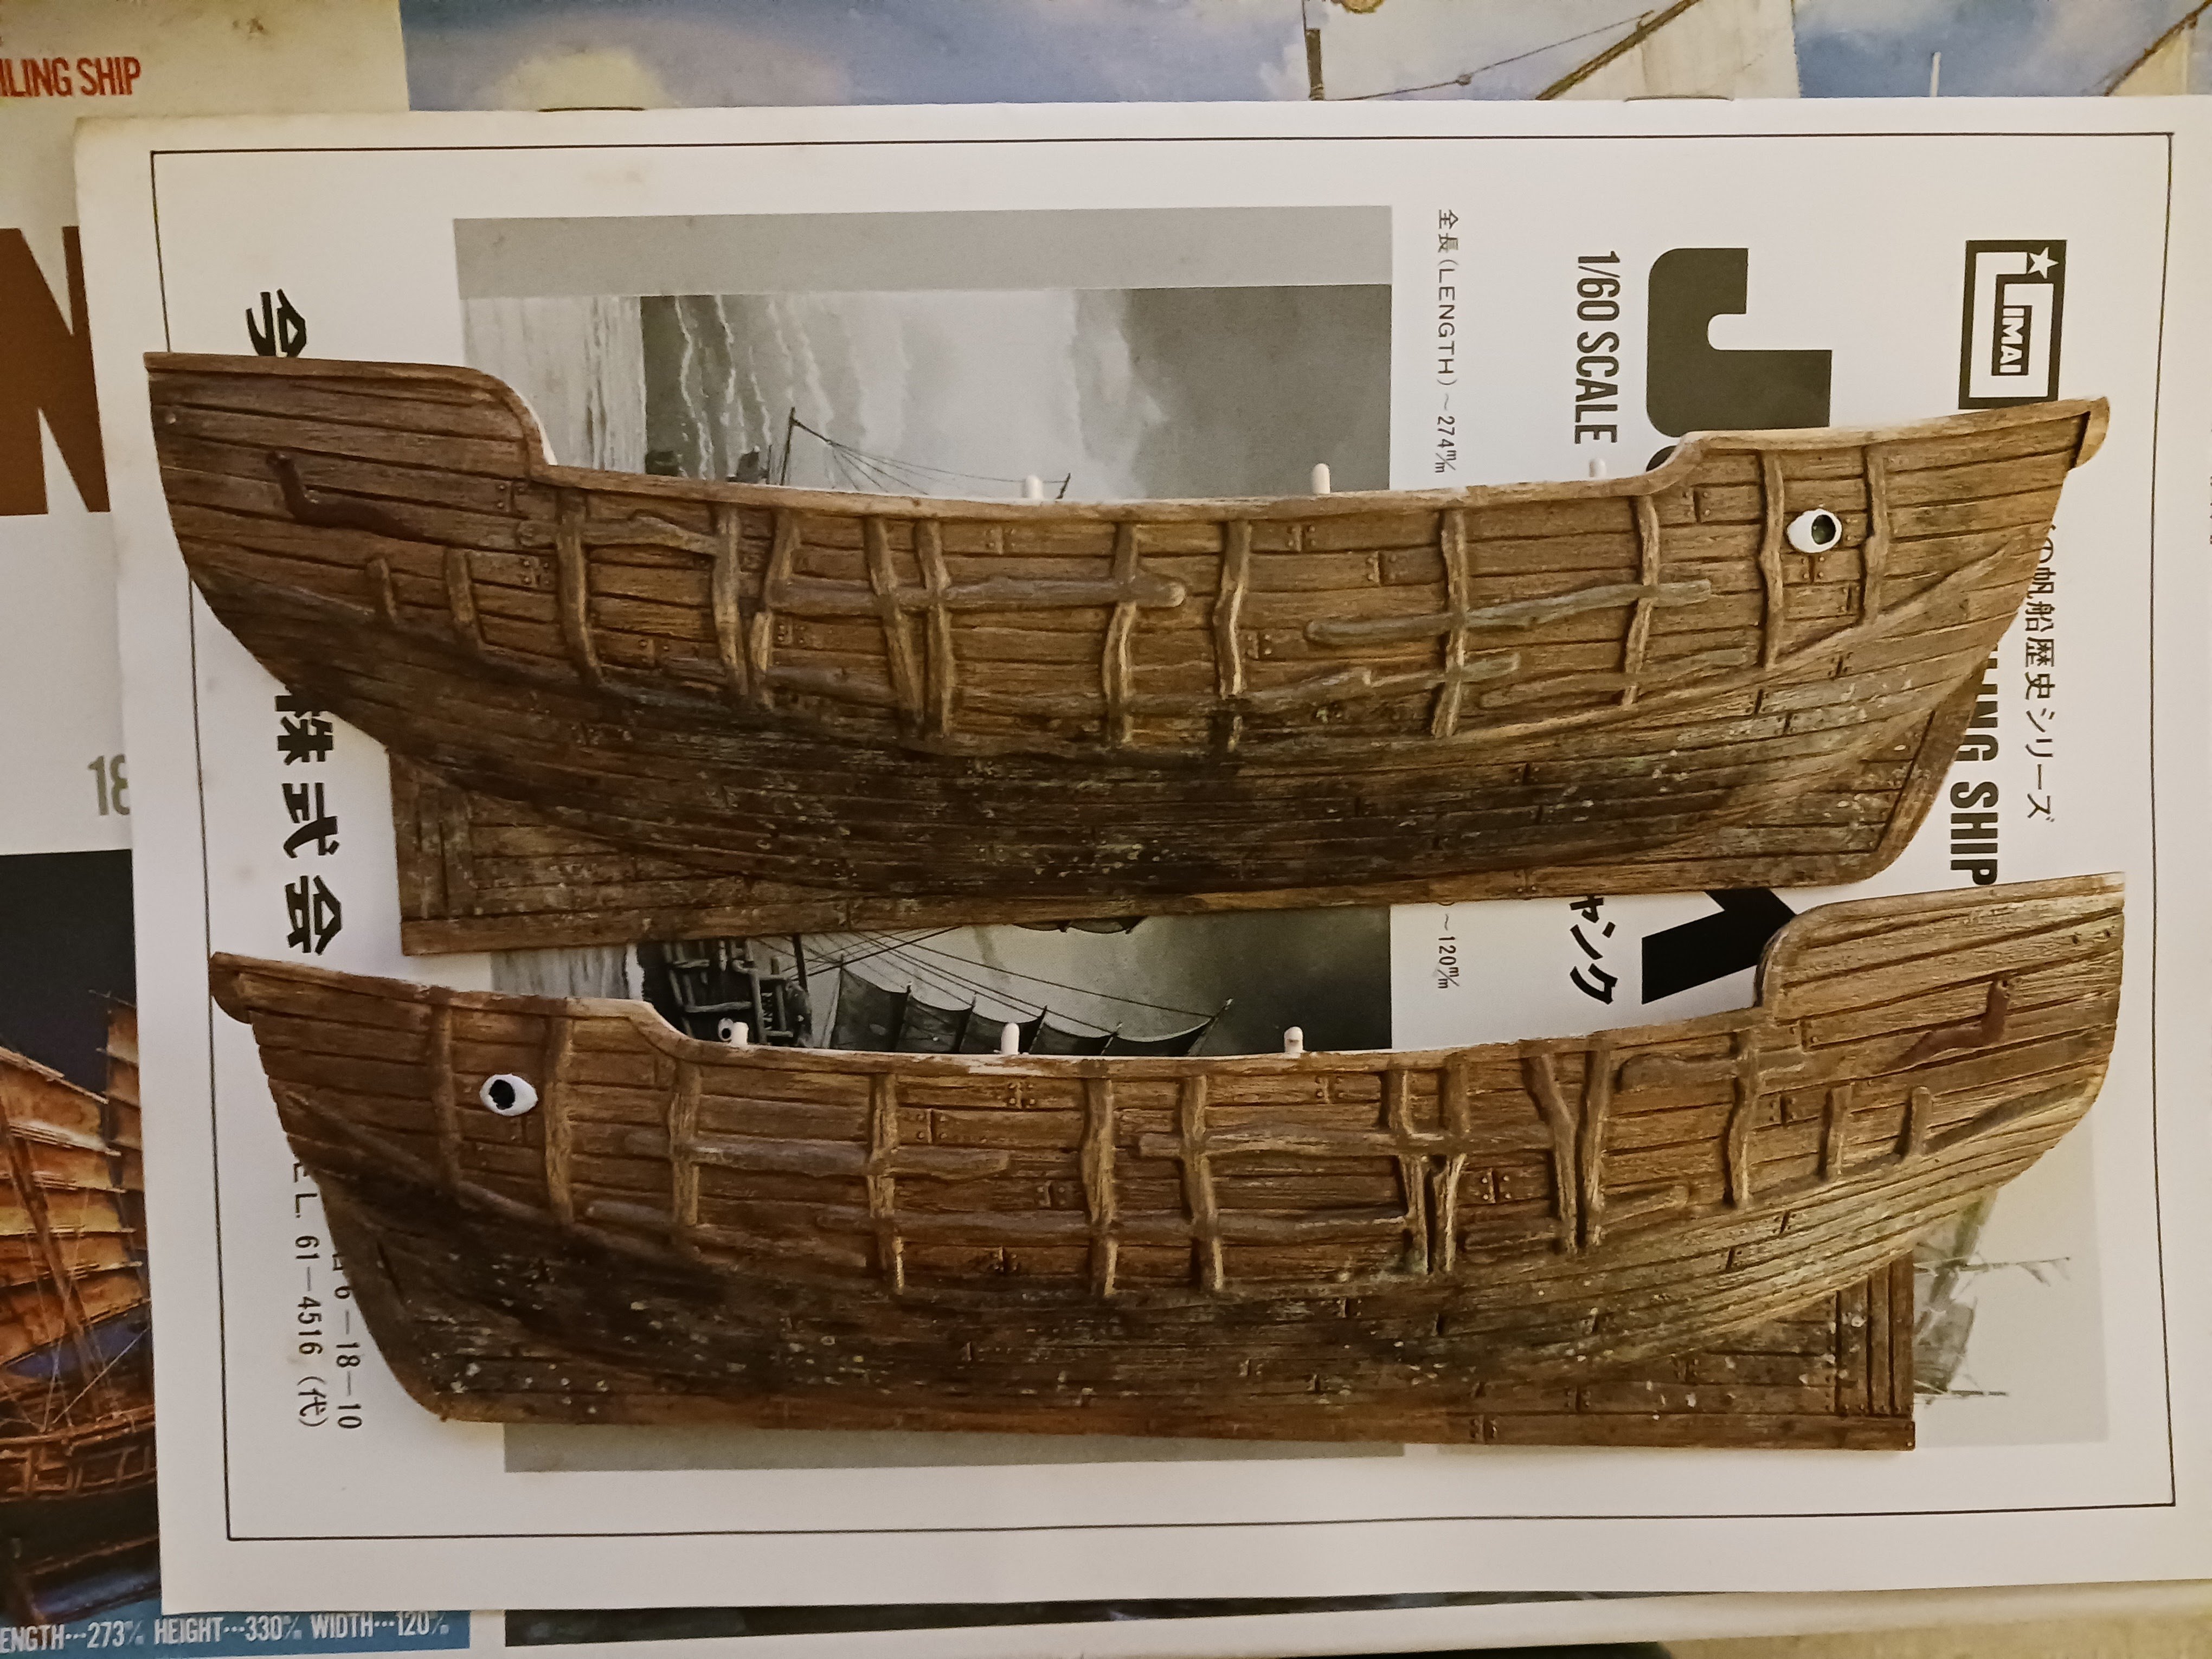
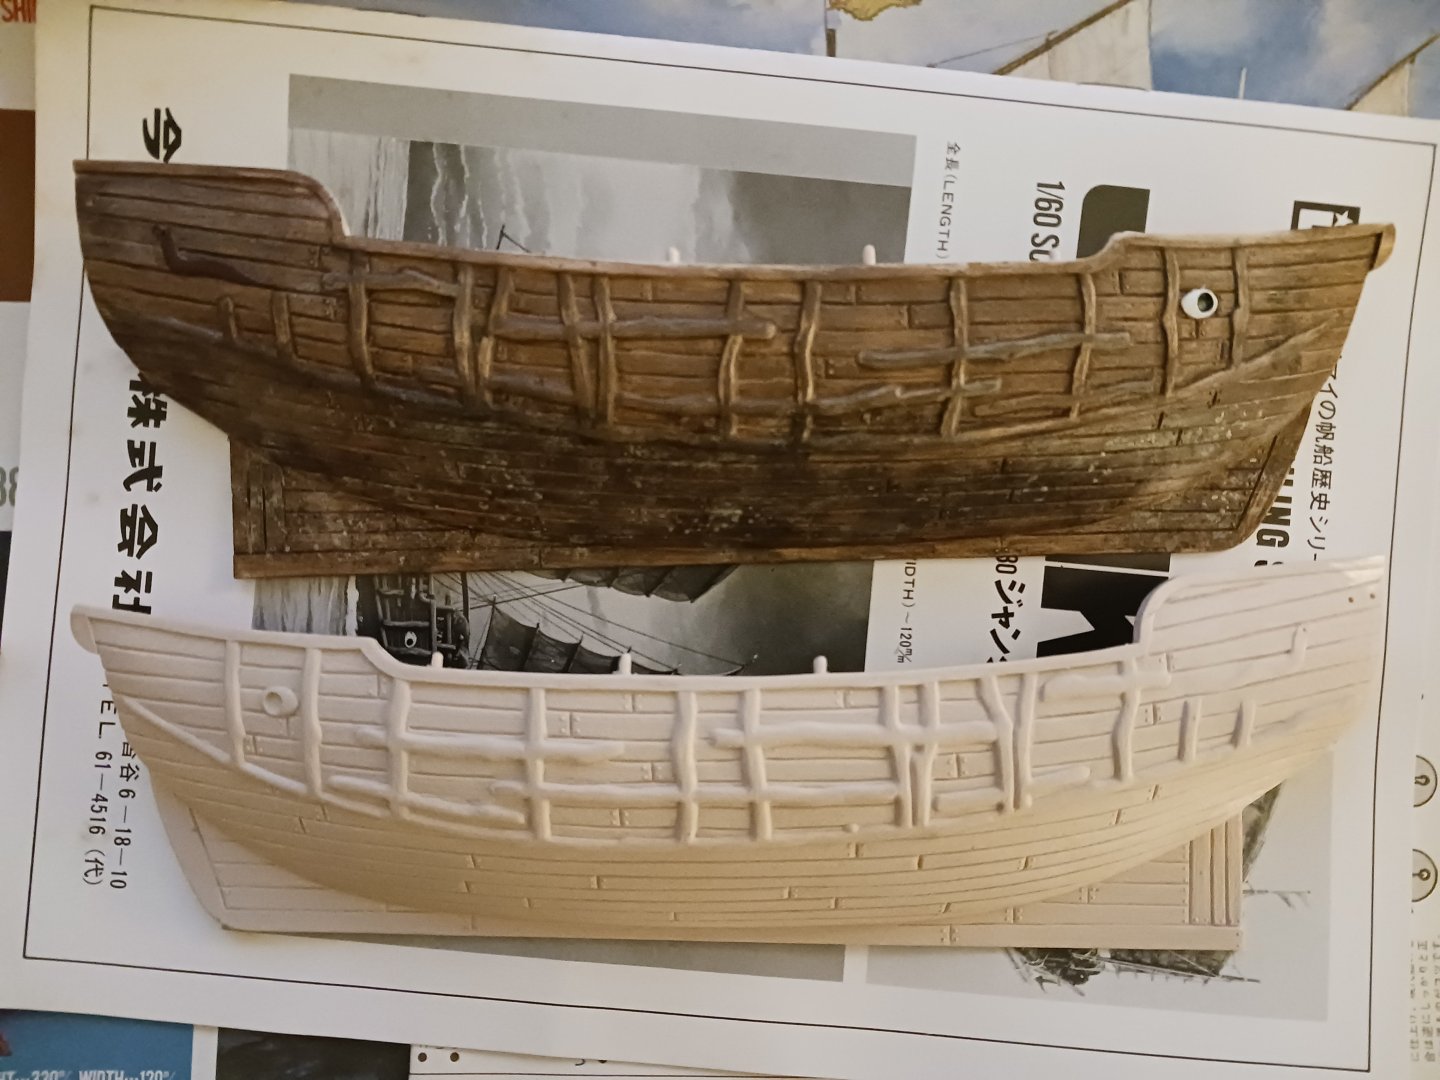
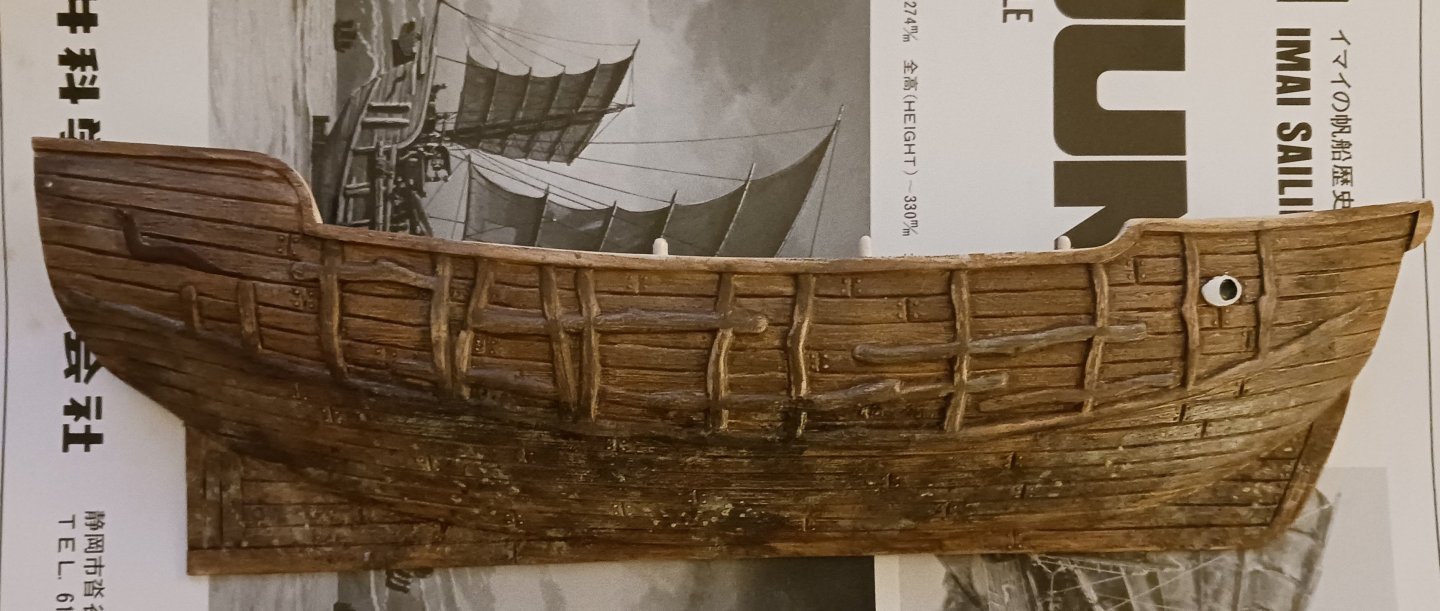
This is the paint job for one of the hull halves. I made sure to attempt to accurately portray the way hot, wet climates beat up and destroy wood. Clearly, this junk has not been well taken care of. My decisions for this model's paint job were based primarily on this black-and-white photograph, which I have interpreted in color: Let's see how we got there. First, I applied a coat of cream colored paint, which was almost the same color as the plastic: Then brown on the very organic-looking wales, and a creamy tan on some of the planks, which may have been replaced recently. I made sure to make it as messy and sloppy as possible, which will come in handy when weathering. A healthy coat of a light brown shade: A very heavy coat of antiquing medium, my favorite paint for the last two years: I made sure to rub some of the paint off to add to the weathering effect. I also dry-brushed on a mixture of brown, white and grey, which you can barely see in photos: I then added muck on the bottom, as well as barnacles and algae: Finally, the eye and serpent carvings were painted: This is approximately how we will continue the paintwork throughout the construction of this model. We will pay special attention to weathering and shading, and spend as much effort as possible making this ship look like something that would have really existed in the South China Sea. You should be able to see a clear distinction between this and Aoshima's paint job, which looks toylike in comparison. We will paint the gunwale in a bit.


-
If I ever have the time, money, or display space, I would like to build Imai's Kaiwo Maru in 1/100 scale, a four-masted sail training bark:

-
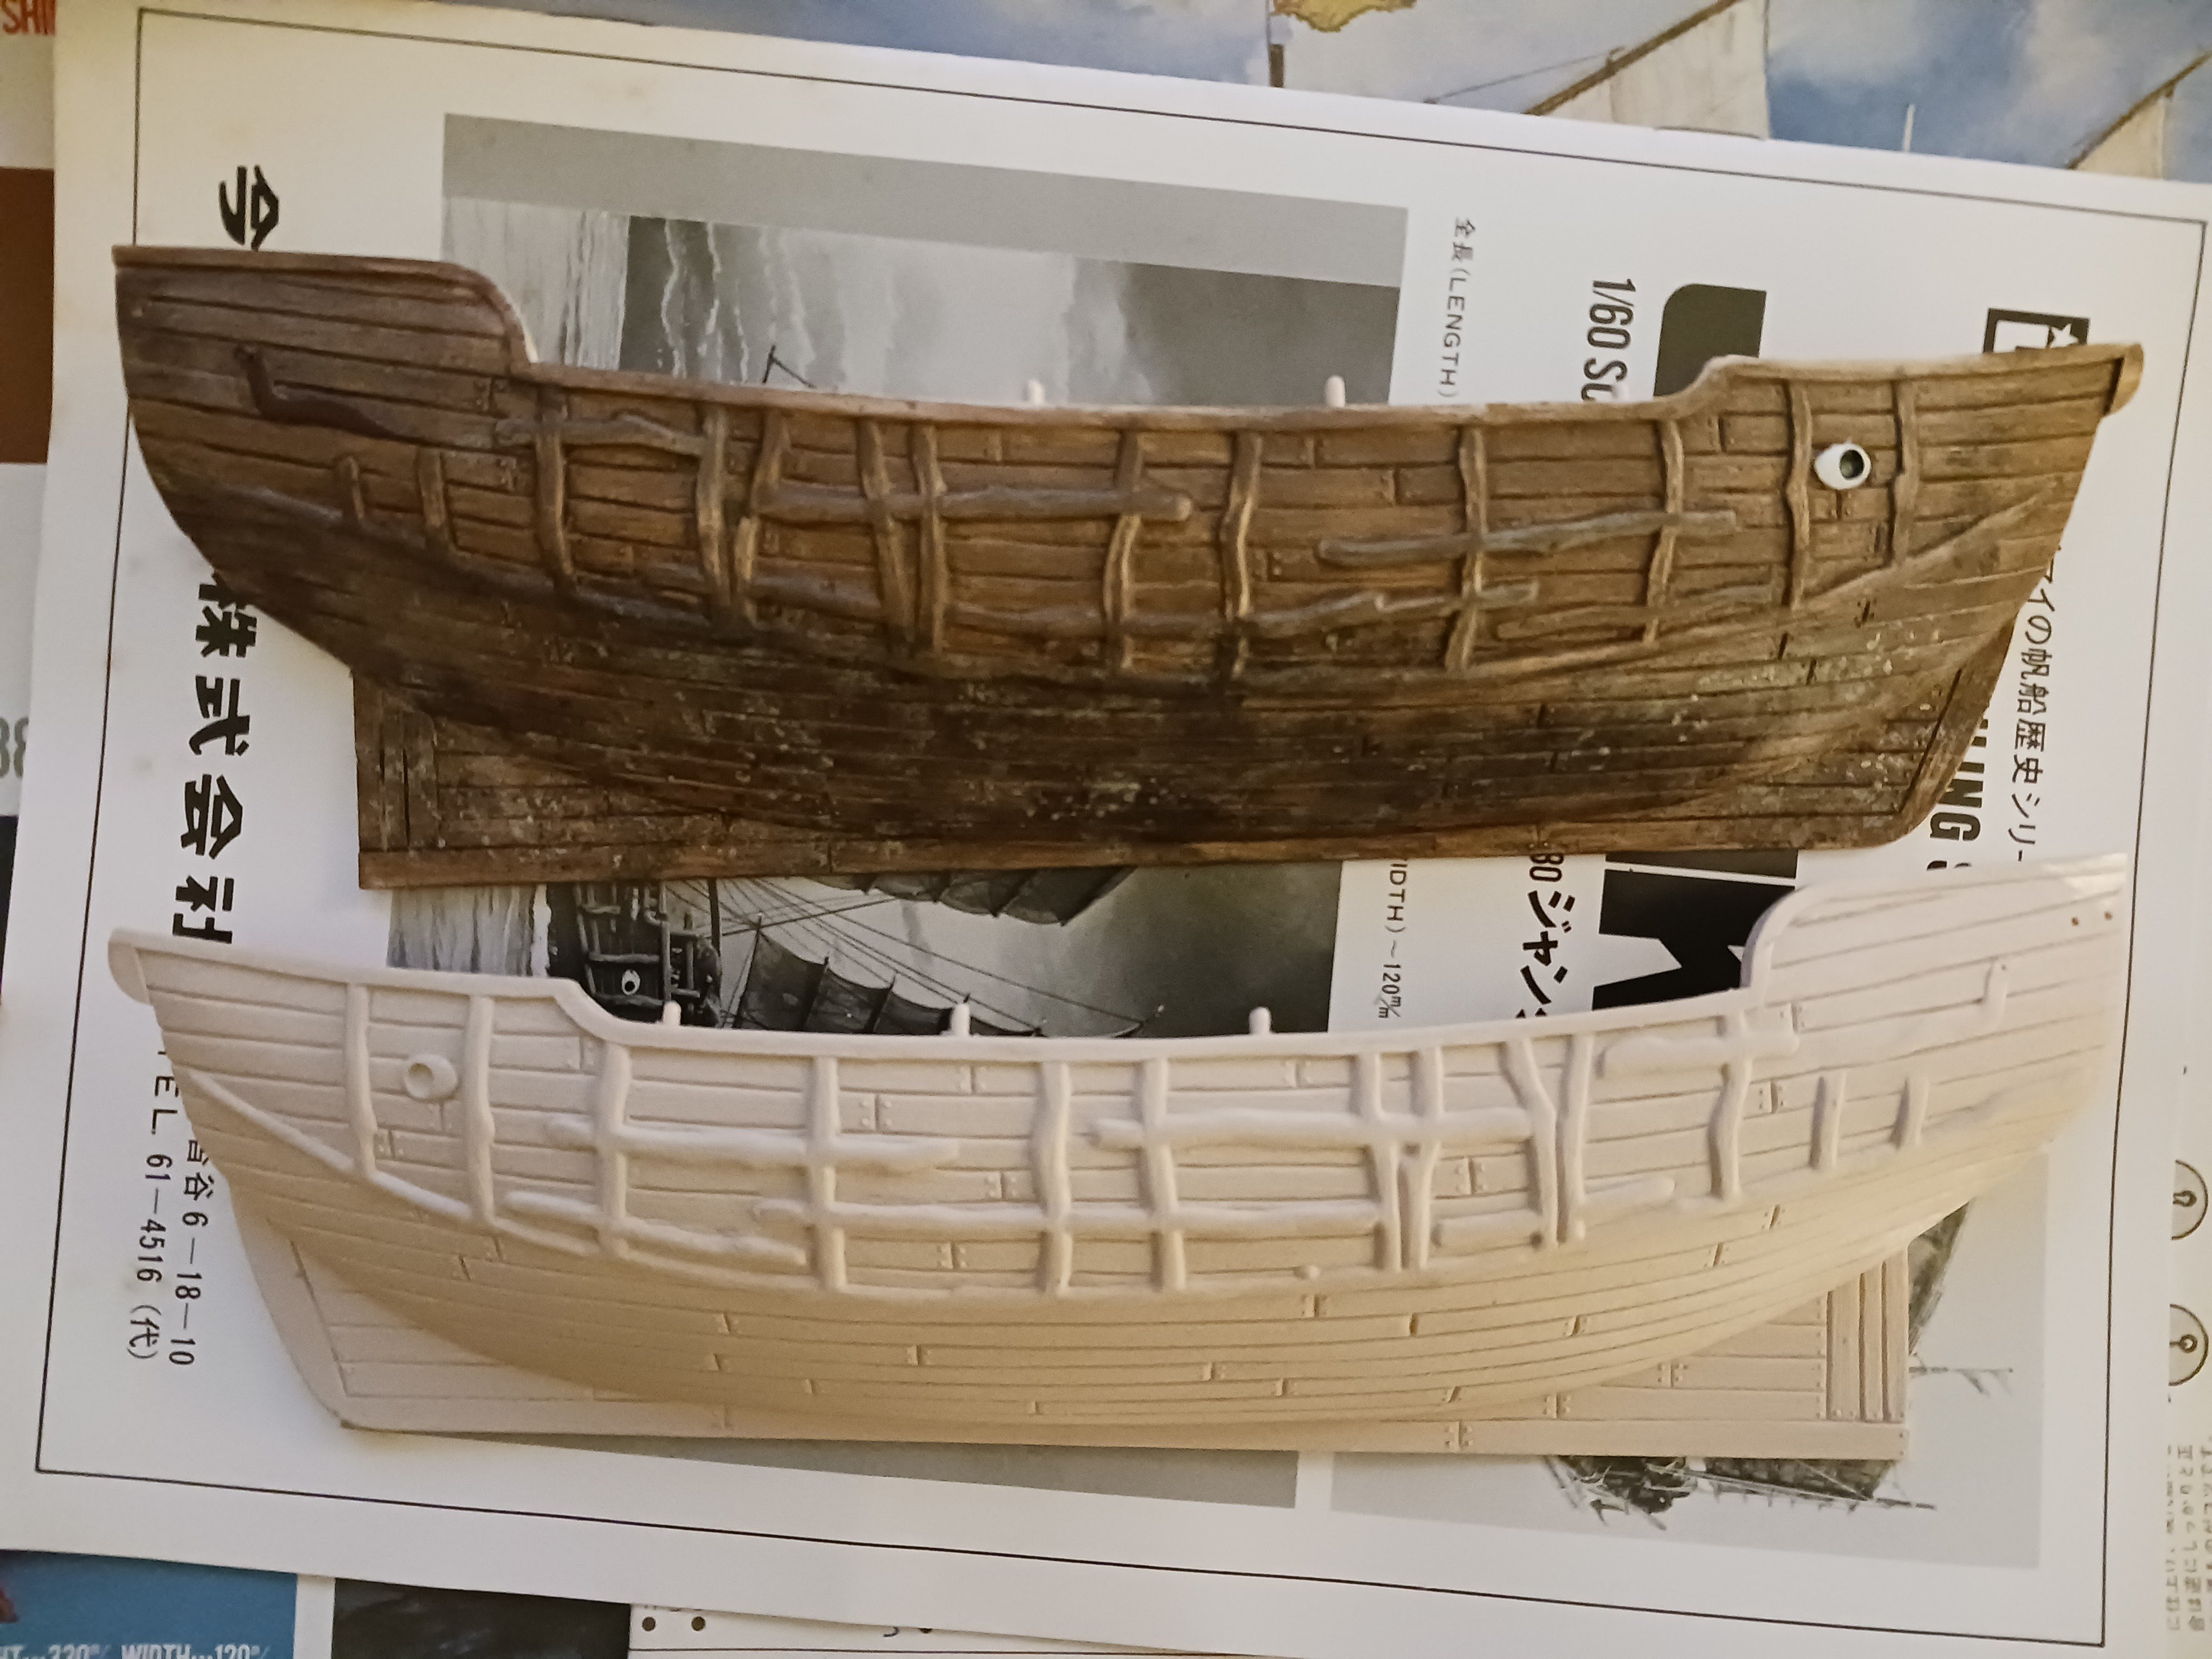
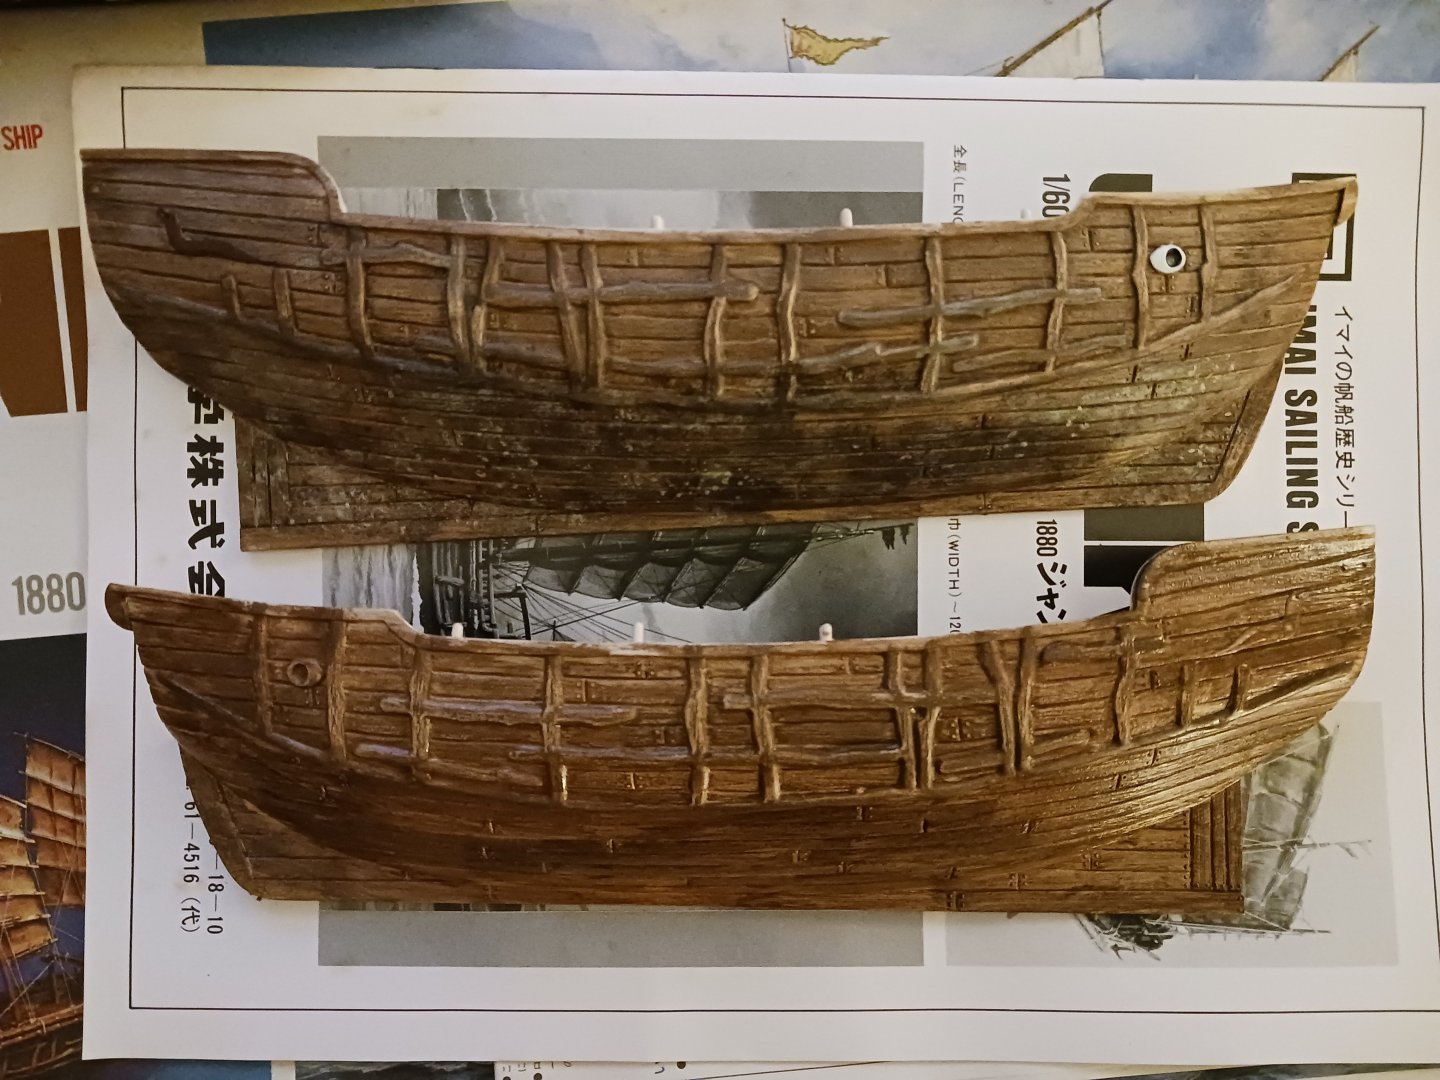
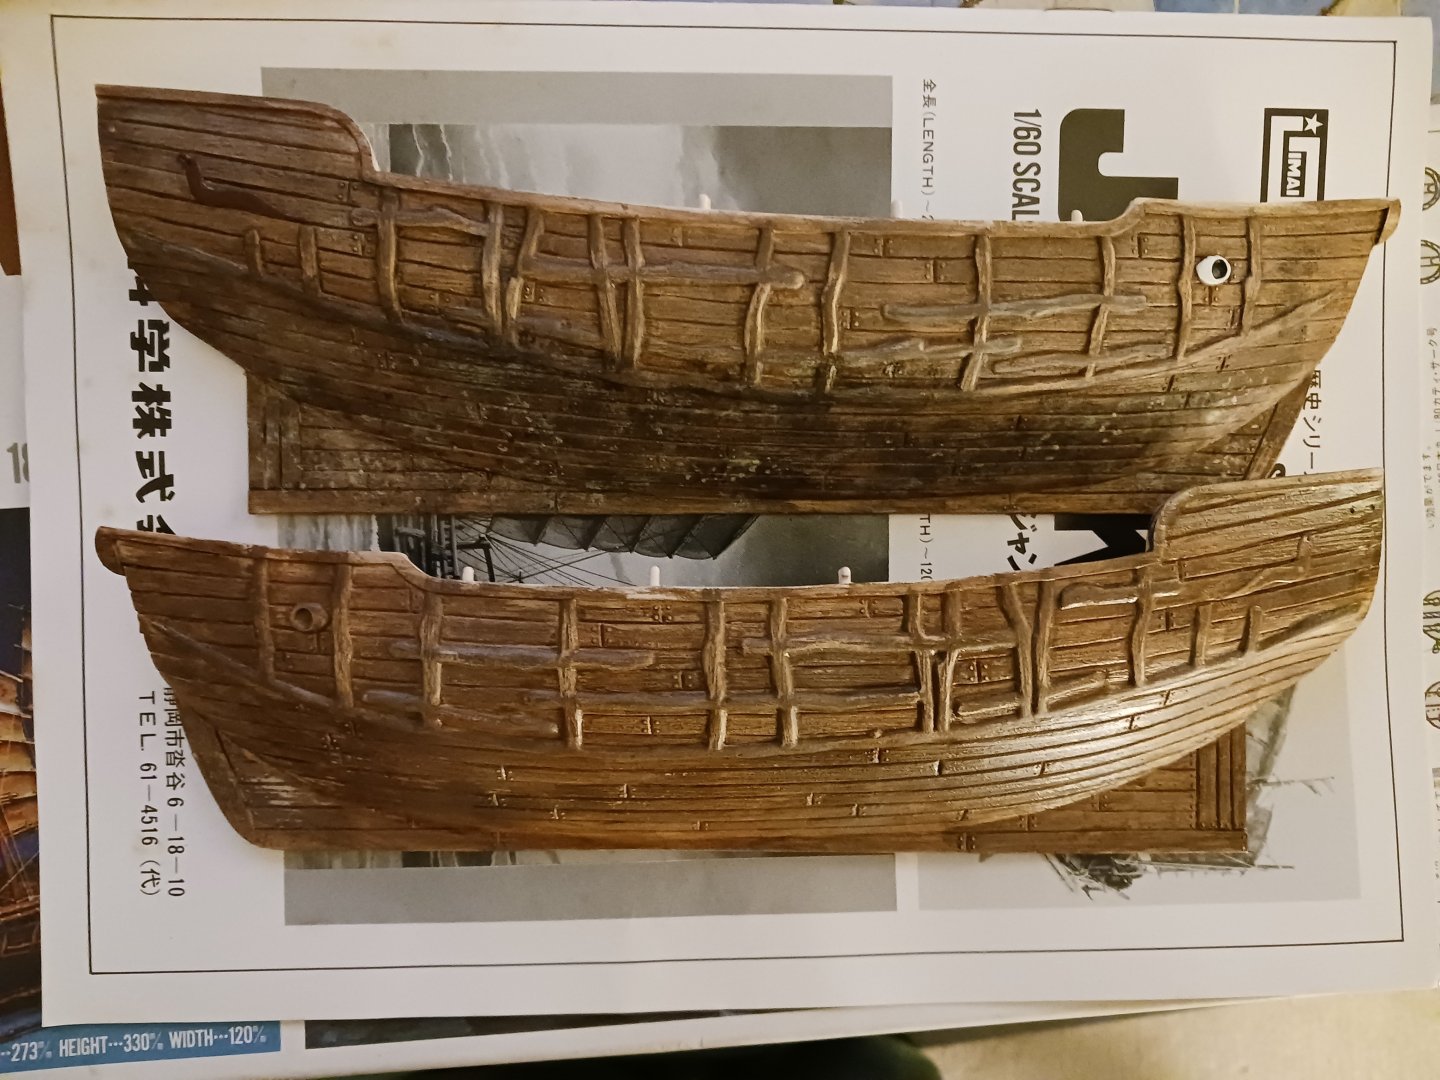
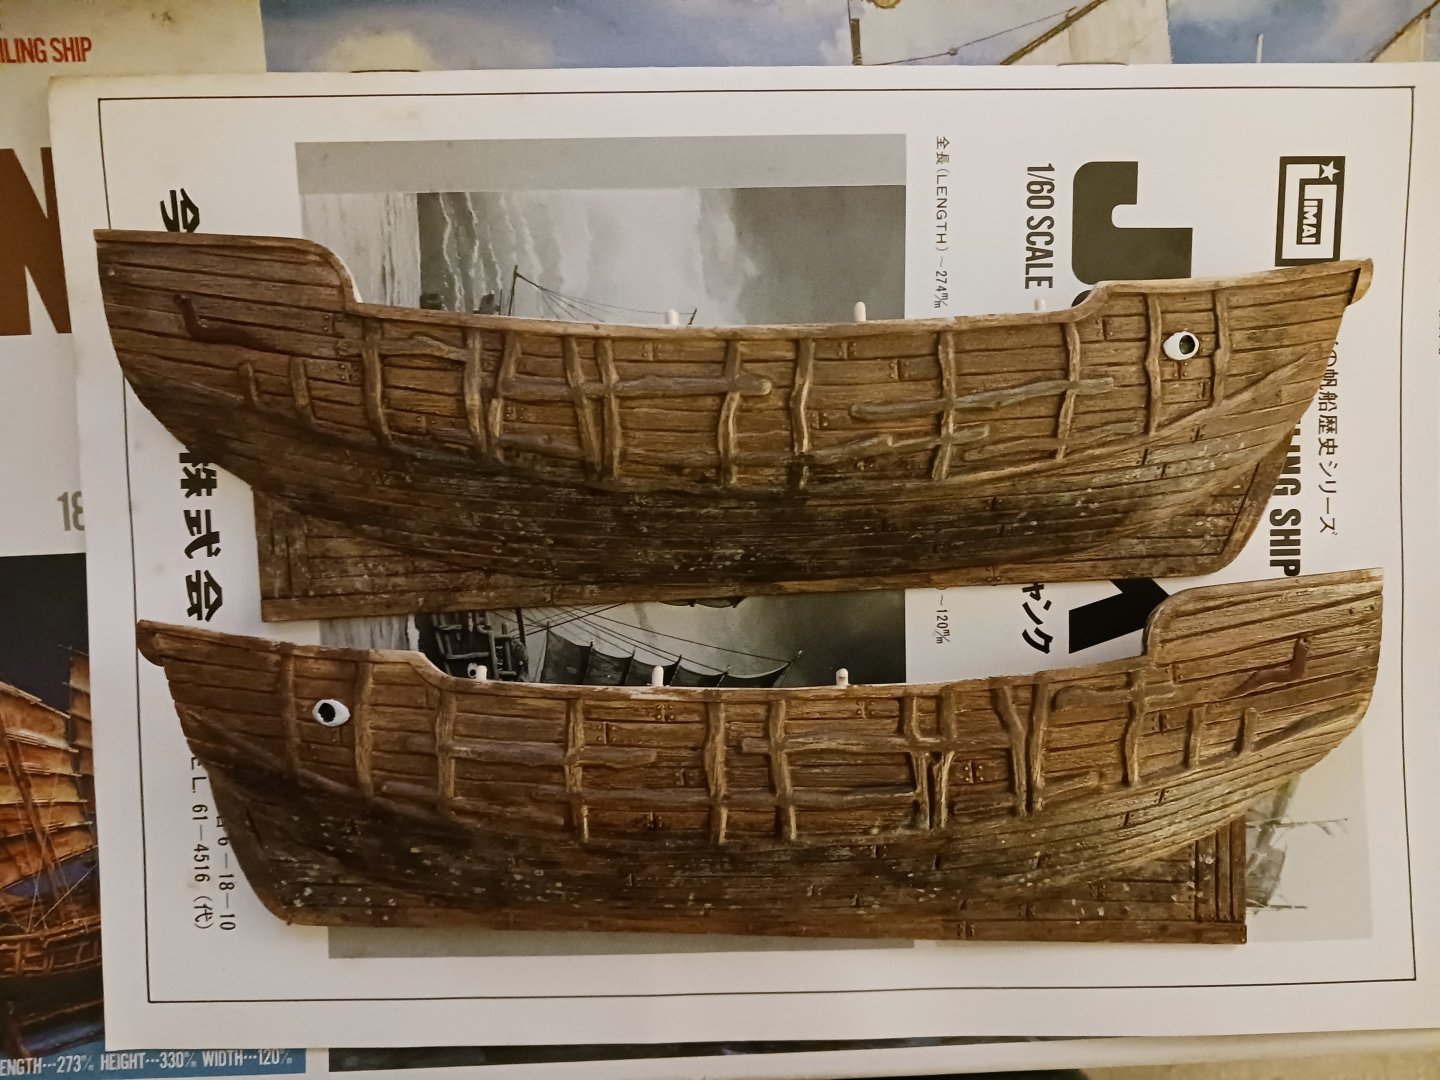
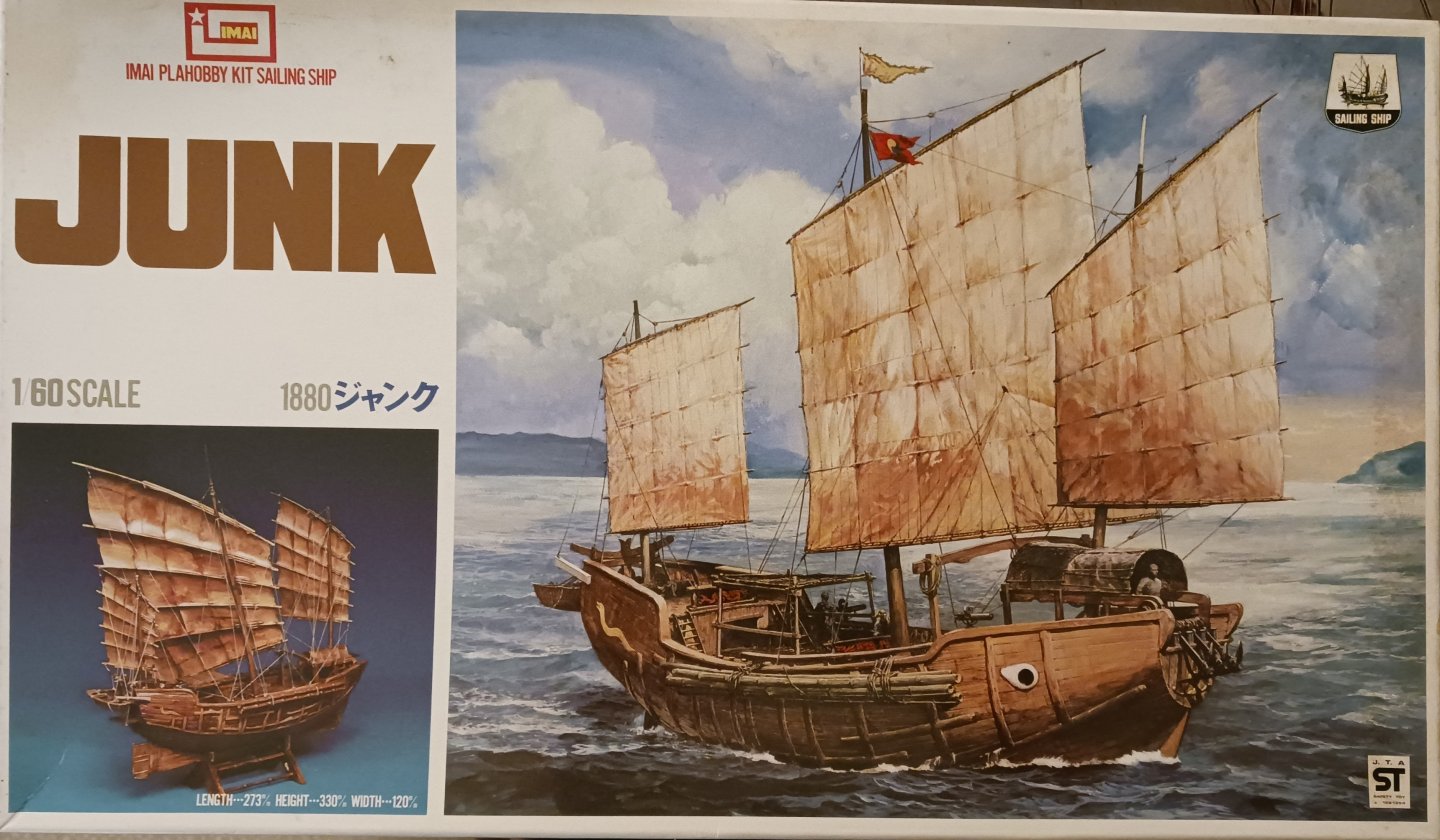
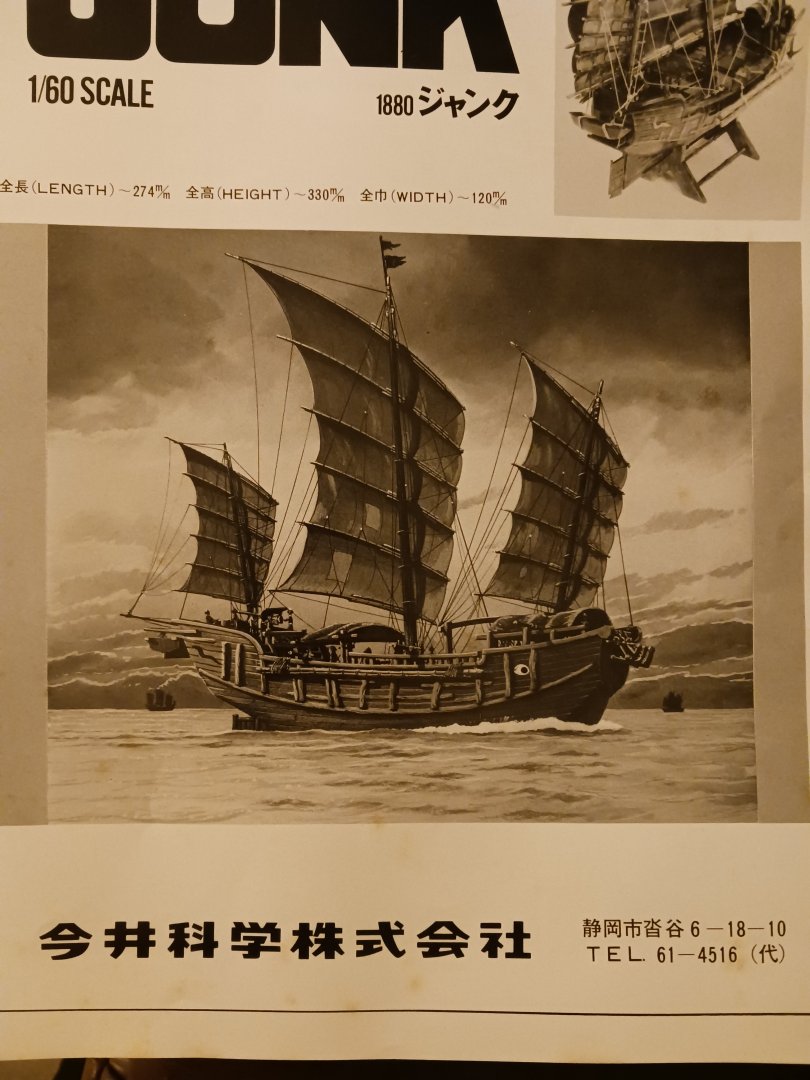
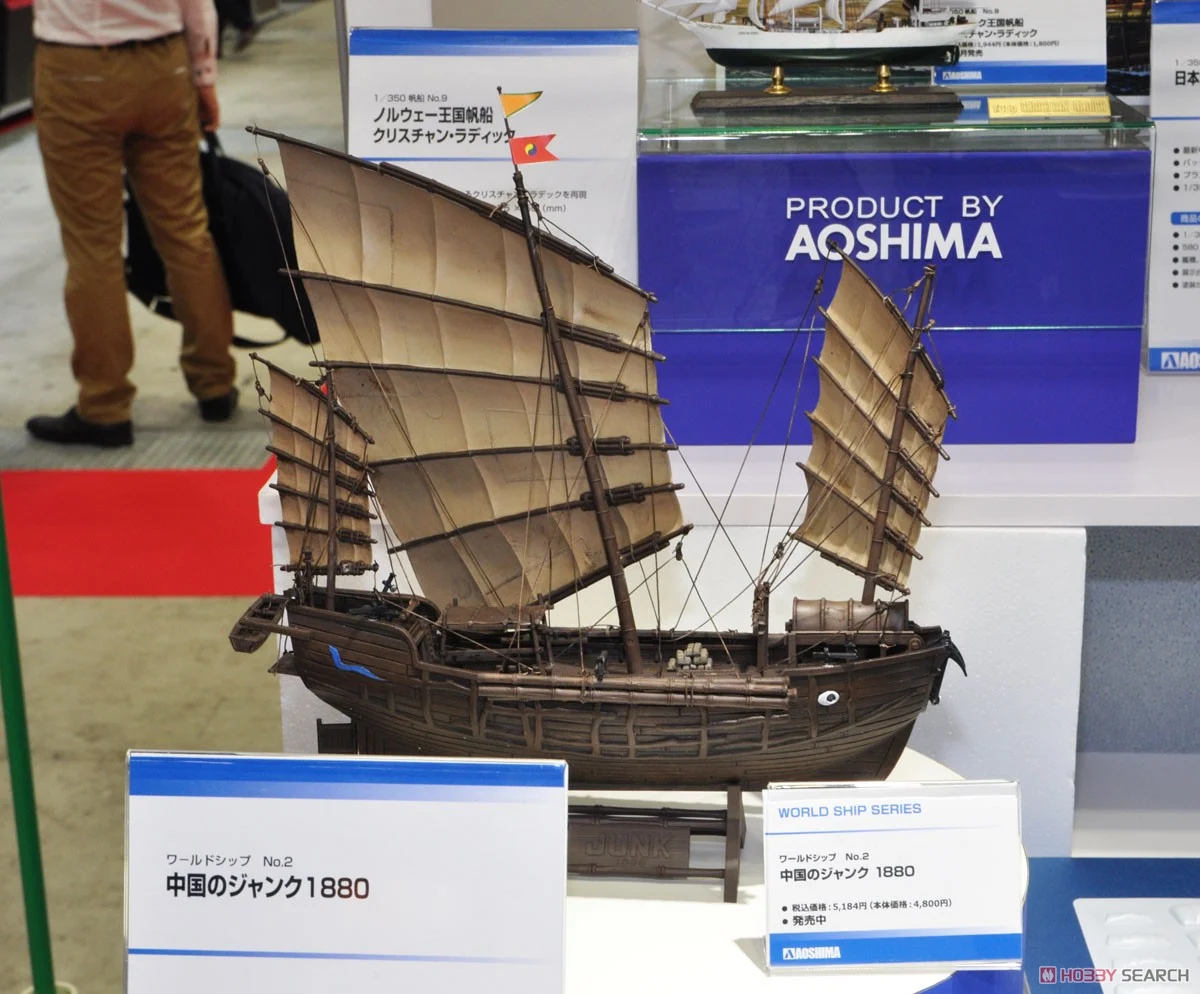
I've been eyeing this kit for a while, as I would like to build another Imai ship model. I also used to have a fascination with Chinese and other non-Western ship types, which I feel are woefully lacking on MSW. I'm also pretty sure my build of this model is going to be the first on the forum. My build logs usually entail me posting progress photos and maybe a few explanatory sentences, but this one will be a severe departure from that norm. The reason why is that this log is intended to serve as instructional material for a coworker of mine who is just starting out with scale model shipbuilding. Thus, extreme care must be taken to ensure my information is accurate and well-explained. I somehow managed to get my hands on a first-edition copy of this kit, and if you know Imai kits, you'd know how rare they are. Please, if you see one of these for sale online or anywhere else, snatch it up right away- you may never see one again. There are Imai kits I have been searching for for years, and I've never found even one place where they were sold. Here are some introductory photos: The first two pictures are of the box, and the third one is of the instructions, which are all in Japanese (Imai is a Japanese manufacturer that is long-defunct). You might see an issue when comparing the three. The two illustrations of the ship have significant differences between the two, which in turn have differences between them and the model itself. For those reasons, and reasons of historical accuracy, I am going to rig my model based on historical photos and diagrams. The hull will be constructed according to the instructions. This is Aoshima's version of the model. The model has a lot to be desired in the paint department, and while the plastic sails provided in the kit are some of the best I have ever seen, they are still plastic sails- woefully out of scale, inorganic, and unsuitable for use. I will be replacing them with sails made from silkspan and wooden dowels. There is one more striking issue with the kit that is obvious in this photo, which is the extreme aft rake of the mast. I have already begun working on a solution for this as far as my model is concerned. I will also be using the ship's hull as a canvas for some pretty intricate paint-work, in order to make the ship look filthy and worn-out. Here's the dry-fitted hull and deck: Wish me luck!

-
Next will be Imai's Chinese Junk, which is currently sitting atop my stack of boxes. I have not started yet. Currently doing some research.
- 56 replies
-
- 2
-

-
- Lindberg
- sternwheeler
- (and 1 more)
-
It doesn't look like anything amongst the rest of my navy, because it doesn't sit amongst my navy. I built it for an elderly friend from church who I have become good friends with. Her name is Carol, after whom the ship was named.
- 56 replies
-
- 3
-
-
- Lindberg
- sternwheeler
- (and 1 more)