

sirdrake
-
Posts
25 -
Joined
-
Last visited
Content Type
Profiles
Forums
Gallery
Events
Everything posted by sirdrake
-
 Hi Jeff, congratulations! You've built a really beautiful model. I very much like the color scheme, and the overall appearance of your boat. Looking at your model and mine side by side, I think it is fascinating to see how different the outcome of the same kit can be. Yours looks lively, colorful, like ready to sail out to the shores of Northumbria. Your rigging turned out very nice, no doubt about it. I'm so with you drilling the holes into these needle-shaped "shroud-tension-things". I damaged two or three during the process and was glad there were a few spares in the kit... Thanks for that wonderful build log. A pleasure to read. Frank
 -
Jeff, she really is a beauty already. Very well done. Did I understand you correctly that your sale came without bolt rope sewed in? That would be a surprise, because the sail included in my kit was already "complete"... Frank
-
Just found this log after having been absent from the forum for a while, and will gladly follow along. 🙂 So far you're doing a great job, congrats!. As you know I have built the same one a few months ago, and all the problems you've described so far seem utterly familiar to me. Broken bulkheads, the infamous laser-cut line on the plank ends, ... And your build is a very clean one! If you allow for one hint, something I completely overlooked at this stage and was unable to fix later on: The equivalent of lanyards that attach the shrouds to the ship's hull are placed between the bulkheads and the outer planks. If one looks very closely (I didn't), you will see that the two bulkheads on each side to which these "lanyards" will be connected are cut a bit differently and leave a little opening between plank and bulkhead. That little gap is easily filled up with glue. Should that have happened to you, now you could still easily fix it while the mast and other stuff is not yet in place. Keep on with that great build log. It's a pleasure to read. Cheers, Frank
- 23 replies
-
- 2
-

-
- Slavic Longship
- Falkonet
- (and 2 more)
-
Chuck, yes, only the cant frames are the problematic ones. The others fit in very nicely. Frank
-
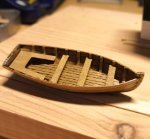
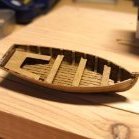
Although I was lucky with frame 22, that was not the case with the remaining ones. After using the individual frames for glueing them together, they wouldn't really fit into the bow or stern. I ended up disassembling all of them, and then inserting only the small connecting piece into its corresponding slot of the keel frame, but only after sanding them down into the right shape to make sure the bow and stern pieces of the upper half fit nicely on top. Then, after the parts of the upper half of the keel where fixed in place, I added the rest of the frames right onto the completed keel assembly. This still needed a lot of correcting and sanding of these nasty frame parts, but it made sure that everything is aligned correctly. Me too, I used thick gap filling super glue for the final steps. Frank
-
I'm with you here, Jerry. Just assembled no. 22 and feel lucky that it fits into the frame... What are your problems with the frame? They don't fit after glueing? Frank
-
Dutch Whaler by aliluke - Sergal
sirdrake replied to aliluke's topic in - Kit build logs for subjects built from 1501 - 1750
I'd be very proud if my first wooden ship would have looked like this...! -
Yes, I only just finished the first few frames but the fit is tight. I guess it's a good idea to widen the clearances so that the frames can slide in and out easily. Otherwise removing the completed skeleton without breaking something might become a real challenge.
-
Chuck, I can confirm this. I started with frame 21, and 21L goes into the right side of the jig, and 21R into the left side, with the floor futtock on top. So I first thought, R and L refer to starboard and port side of the ship, not the left or right side of the jig's slot. But now as I read your post I checked and can clearly see that part 19 breaks this rule, as L and R are switched compared to 20 and 21. The drawings in the instructions clearly don't help much either... Obviously the pieces are marked inconsistently. Confusing. I guess the only way to deal with this is to always keep in mind how the frame parts are to be oriented towards the stern or the bow in the boat, which decides the direction of the fairing, and then place the L and R frames into the jig accordingly. Frank
-
Glad the prince finally came along to deliver this much needed kiss...😘 I have a similar kit lying on my desk as part of the "St. Gabriel" from the same manufacturer. Luckily there's your build log along with a few others here and there, because I certainly would have used glue in many very wrong places...
- 6 replies
-
- 1
-
-
- ships boat
- Falkonet
- (and 1 more)
-
Found this thread and will be happily following along. The Revell Golden Hind was a kit that I first tried to build as a kid, but utterly failed... When I got back into the hobby many years later, that was one of the first models to build in order to compensate for my childhood trauma. It worked better this time, at least I got the thing done. Build straight out of the box: no attempt on fancy wood-like painting, using the plastic shrouds and ratlines and those "things" that are supposed to be blocks for the rigging. I didn't know better those days... 😇 The model didn't survive a move across the pond, but a few pictures of it actually still live in the depths of the internet: Golden Hind. Good luck with your build! It'll be a beautiful ship. Cheers, Frank
- 137 replies
-
- 2
-
-
- Golden Hinde
- Revell
- (and 2 more)
-
I just ordered the kit, and am looking forward to following along here.
-
Great build, congratulations! I have the "St. Gabriel" from the same manufacturer on my shelf, can't wait to start... Frank
- 275 replies
-
- 1
-
-
- phoenix
- master korabel
- (and 1 more)


