Prairie Sailor
-
Posts
15 -
Joined
-
Last visited
-
 druxey reacted to a post in a topic:
Lowell Grand Banks Dory by Prairie Sailor - FINISHED - Model Shipways Shipwrights' Series - 1:24
druxey reacted to a post in a topic:
Lowell Grand Banks Dory by Prairie Sailor - FINISHED - Model Shipways Shipwrights' Series - 1:24
-
druxey reacted to a post in a topic:
Lowell Grand Banks Dory by Prairie Sailor - FINISHED - Model Shipways Shipwrights' Series - 1:24
-
druxey reacted to a post in a topic:
Lowell Grand Banks Dory by Prairie Sailor - FINISHED - Model Shipways Shipwrights' Series - 1:24
-
bobandlucy reacted to a post in a topic:
Lowell Grand Banks Dory by Prairie Sailor - FINISHED - Model Shipways Shipwrights' Series - 1:24
-
AlexMN reacted to a post in a topic:
Lowell Grand Banks Dory by Prairie Sailor - FINISHED - Model Shipways Shipwrights' Series - 1:24
-
GrandpaPhil reacted to a post in a topic:
Lowell Grand Banks Dory by Prairie Sailor - FINISHED - Model Shipways Shipwrights' Series - 1:24
-
JpR62 reacted to a post in a topic:
Lowell Grand Banks Dory by Prairie Sailor - FINISHED - Model Shipways Shipwrights' Series - 1:24
-
dvm27 reacted to a post in a topic:
Lowell Grand Banks Dory by Prairie Sailor - FINISHED - Model Shipways Shipwrights' Series - 1:24
-
druxey reacted to a post in a topic:
Lowell Grand Banks Dory by Prairie Sailor - FINISHED - Model Shipways Shipwrights' Series - 1:24
-
wool132 reacted to a post in a topic:
Lowell Grand Banks Dory by Prairie Sailor - FINISHED - Model Shipways Shipwrights' Series - 1:24
-
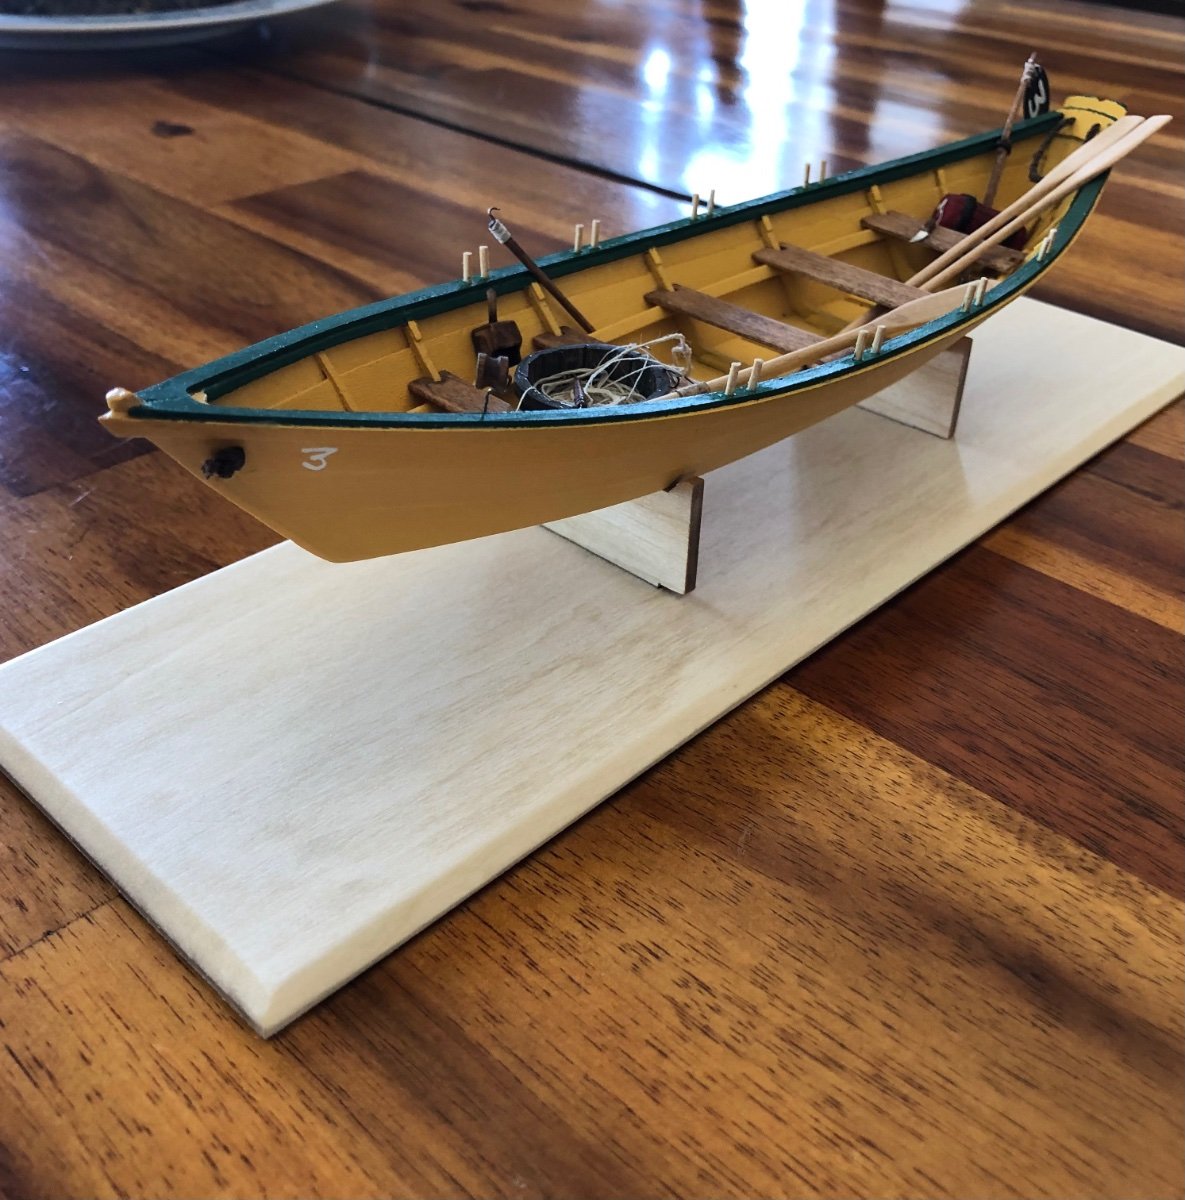
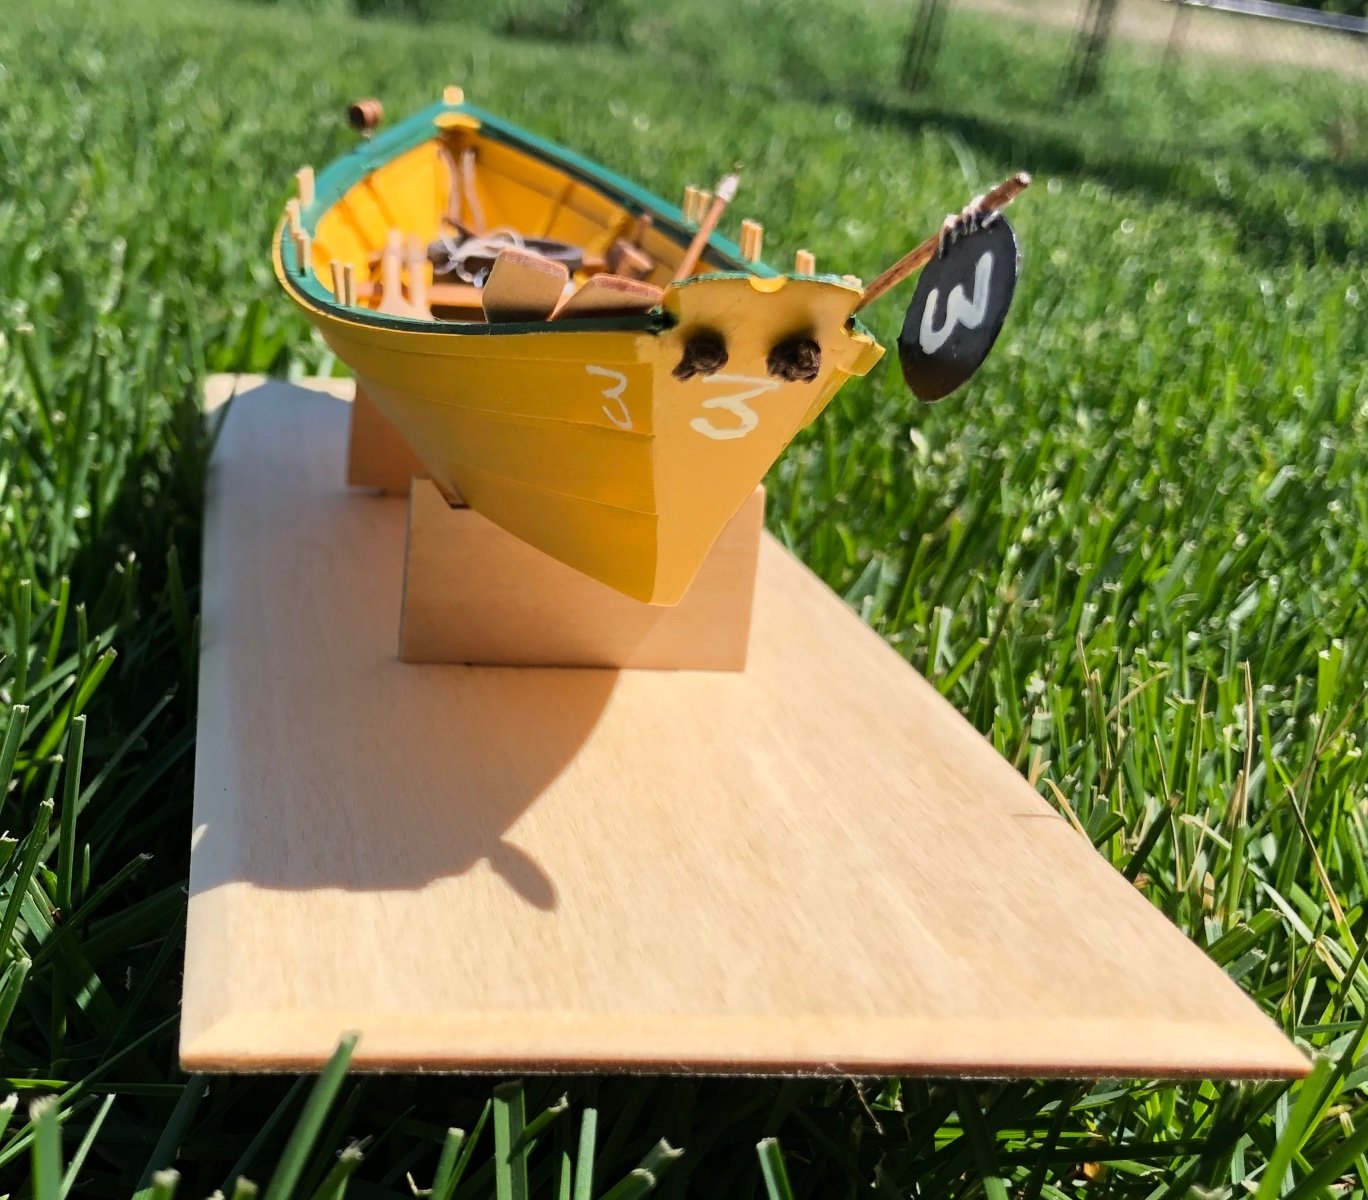
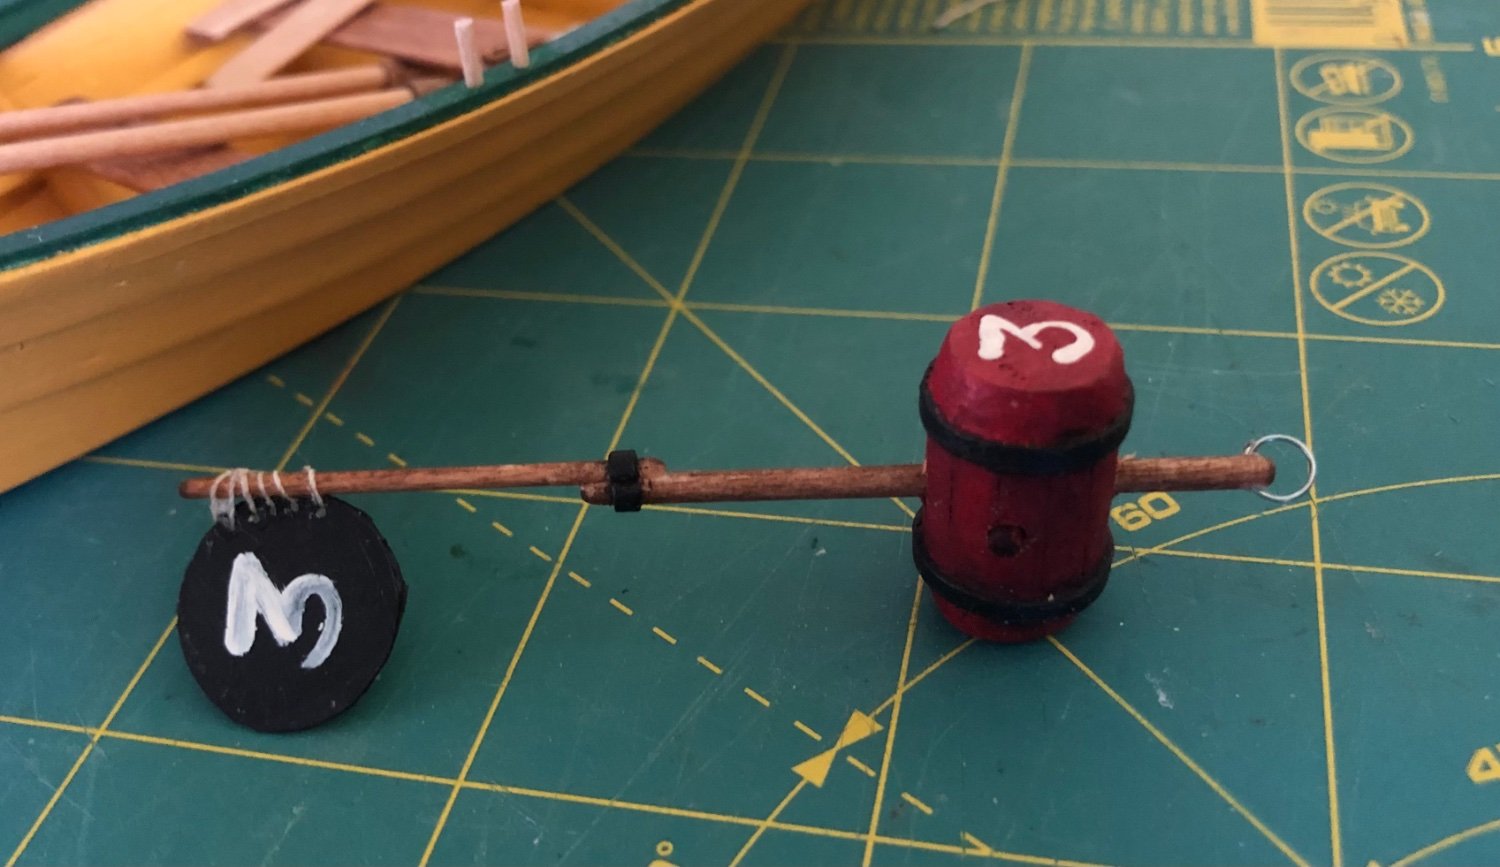
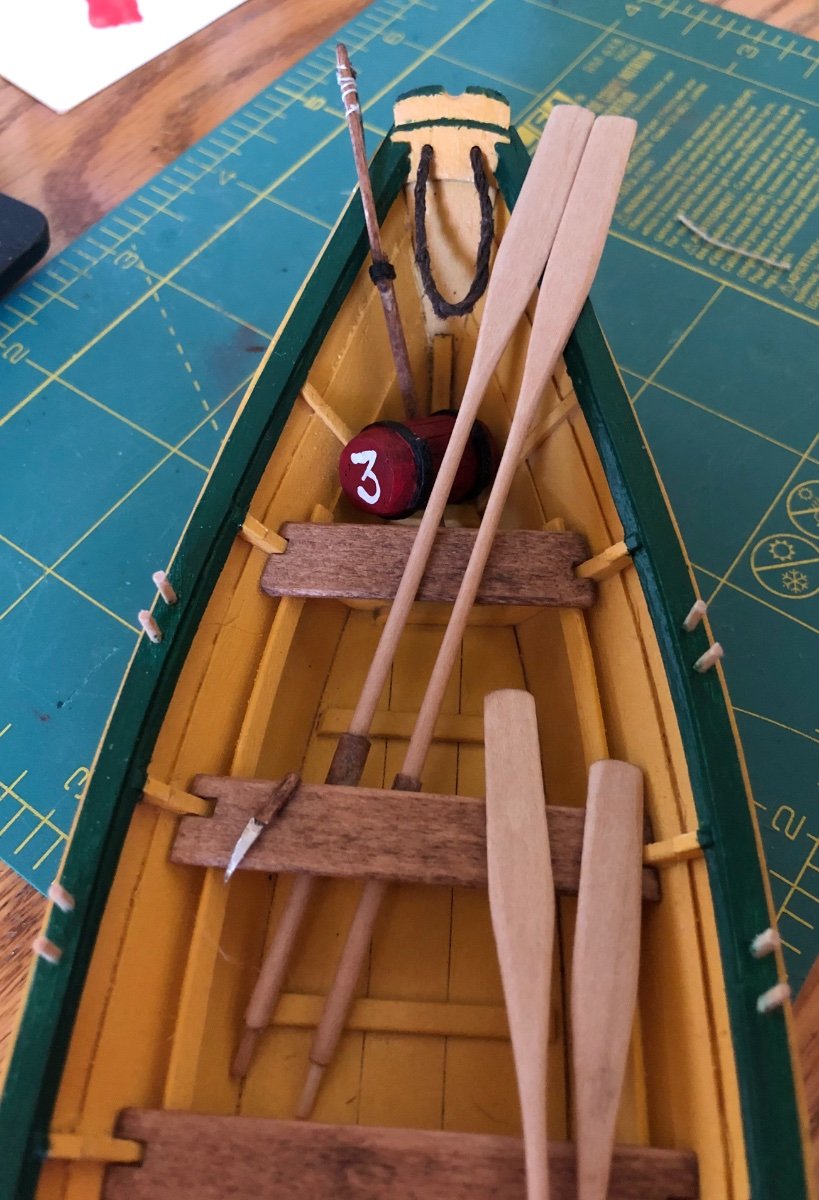
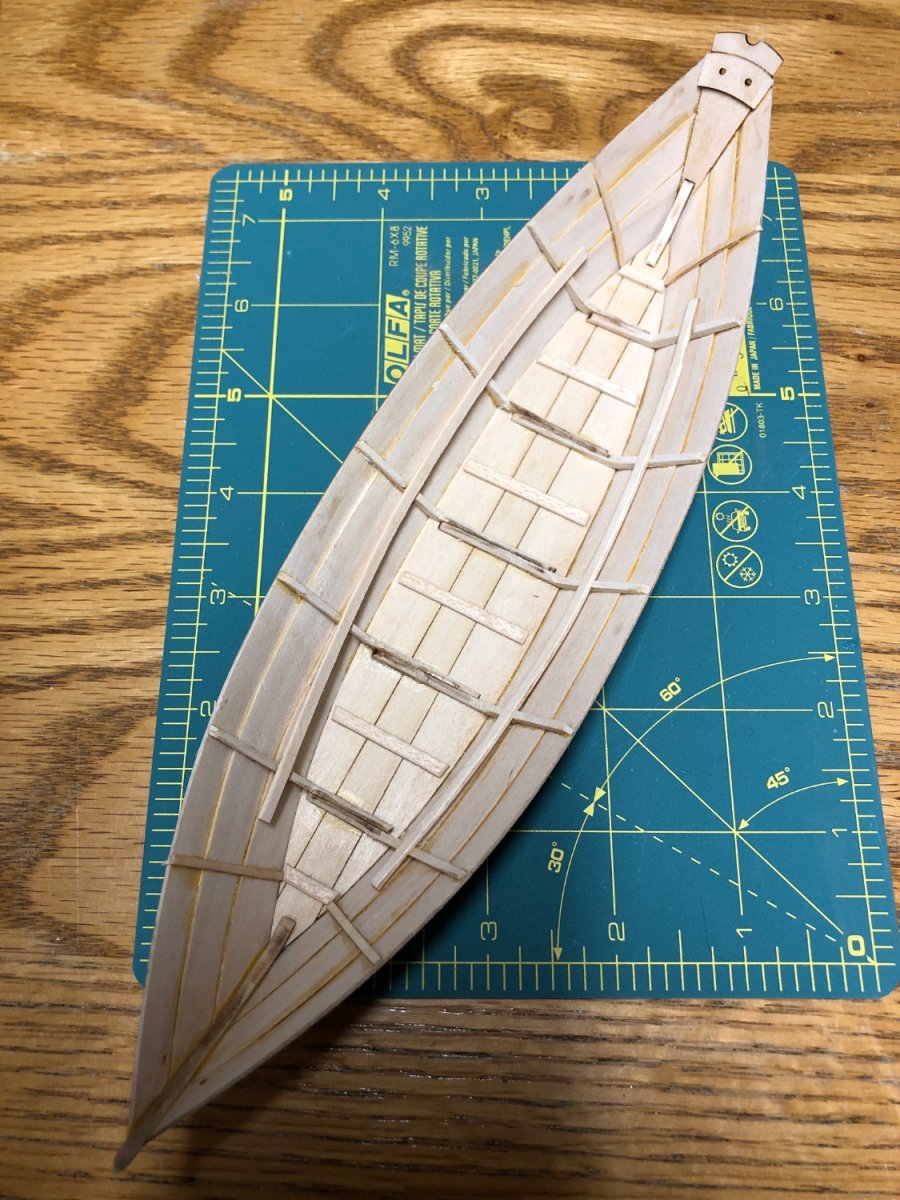
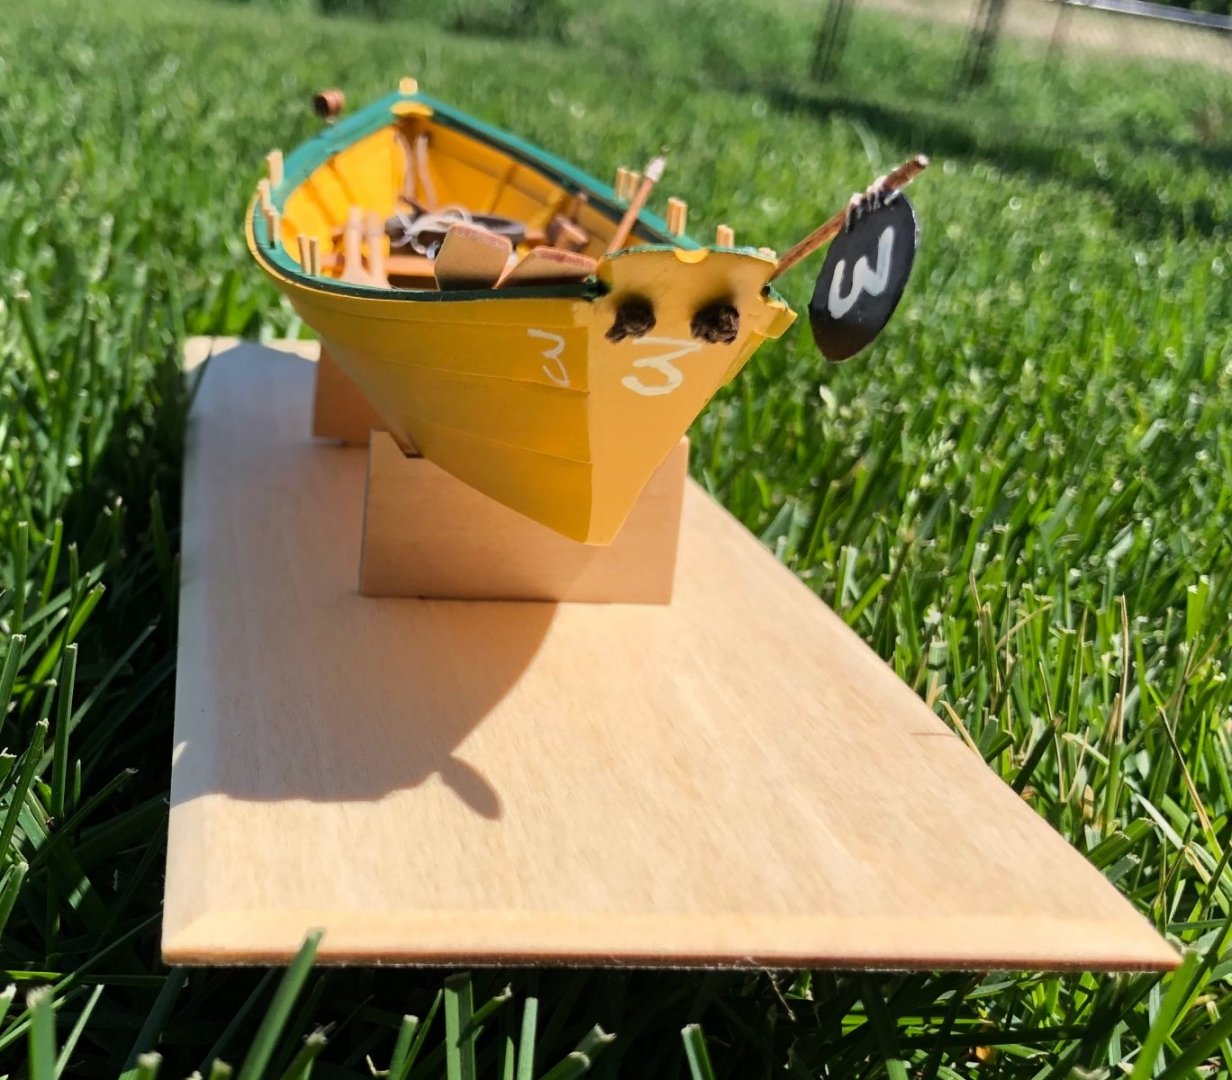
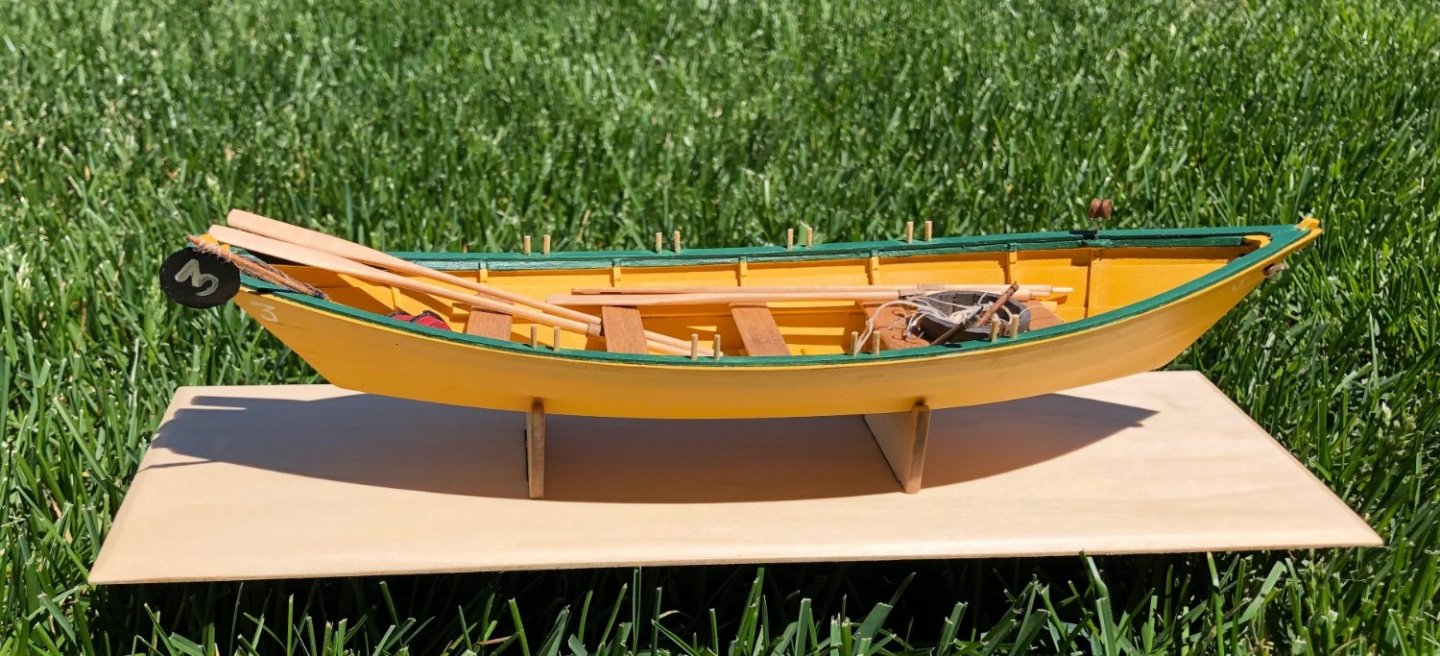
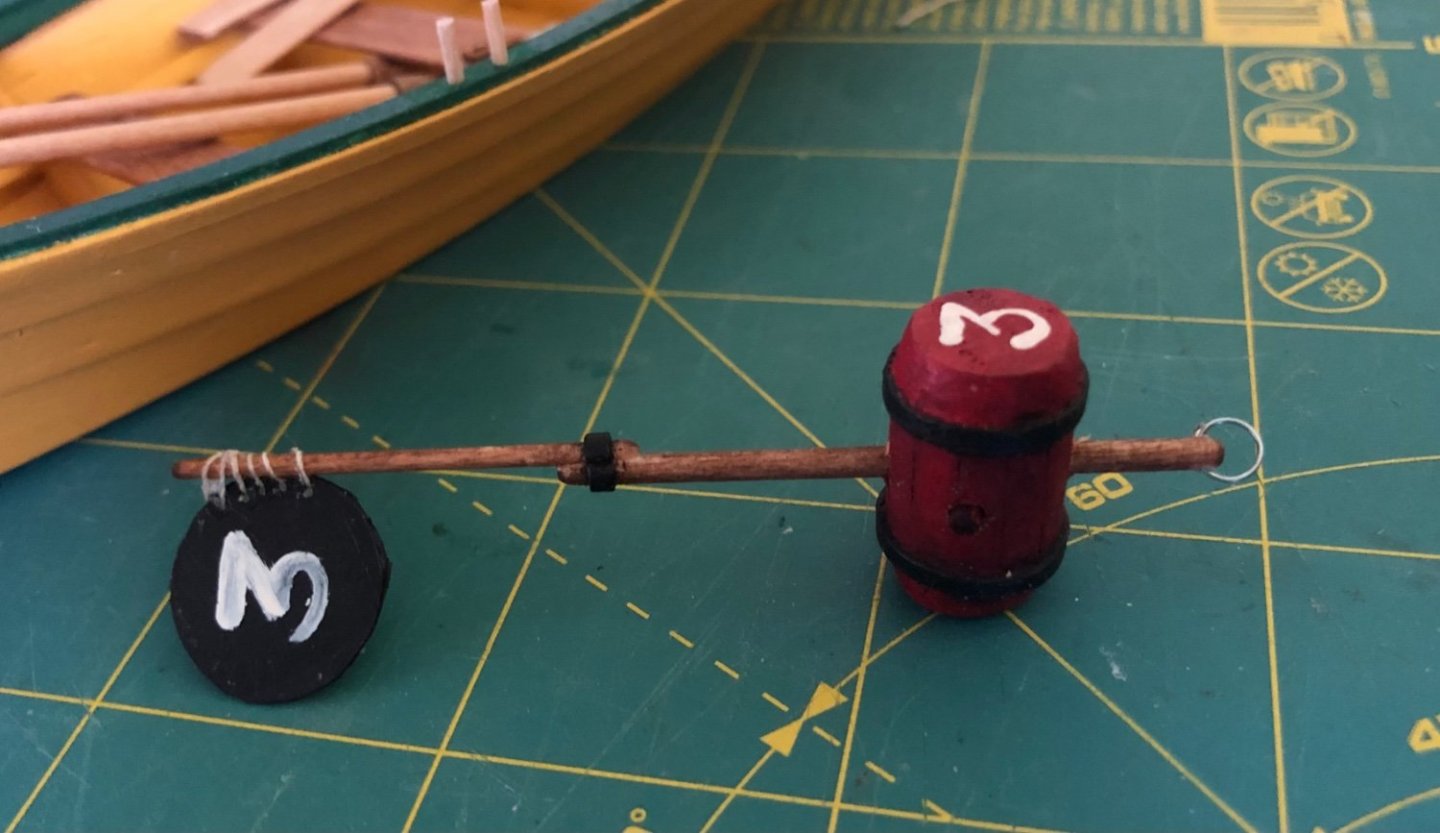
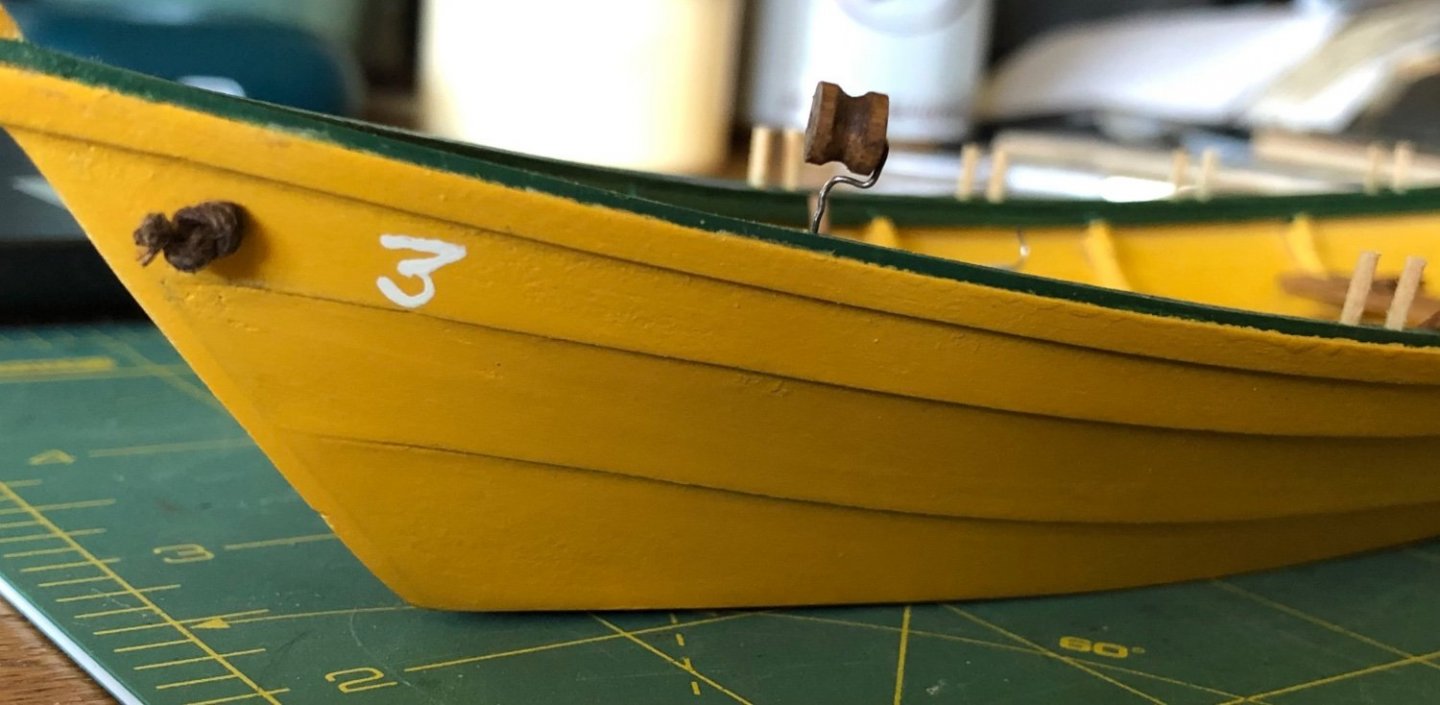
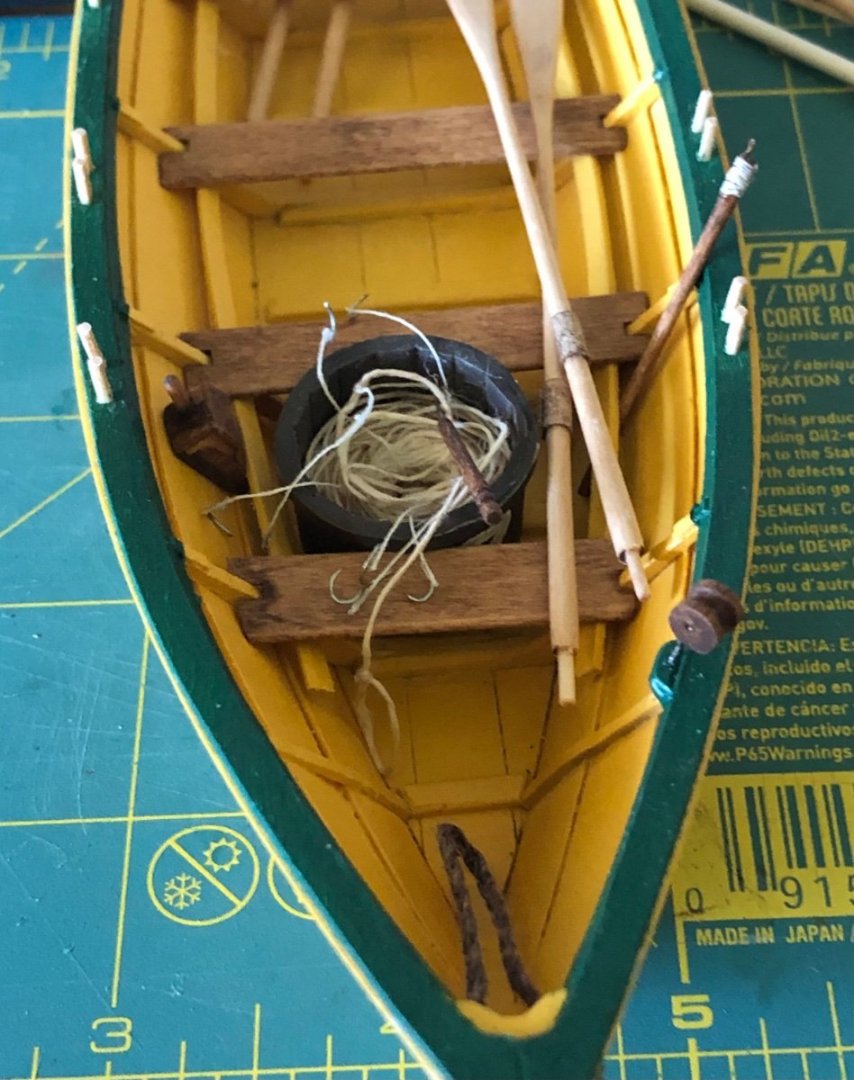
Finished a buoy and a tub of trawl with 2 foot leaders and hooks spaced every 6 feet as well as some other minor gear. I’ll tweak the lines to lay better - but putting this on the shelf as finished for now. I choose to number the dory. Based on a number of paintings a bow number or stern number was often visible. I am realizing now that I didn’t see any with both, but mine has both bow and stern numbered… Next up is the Pram.


- 23 replies
-
- 9
-
-
- Model Shipways
- Shipwright Series
- (and 2 more)
-
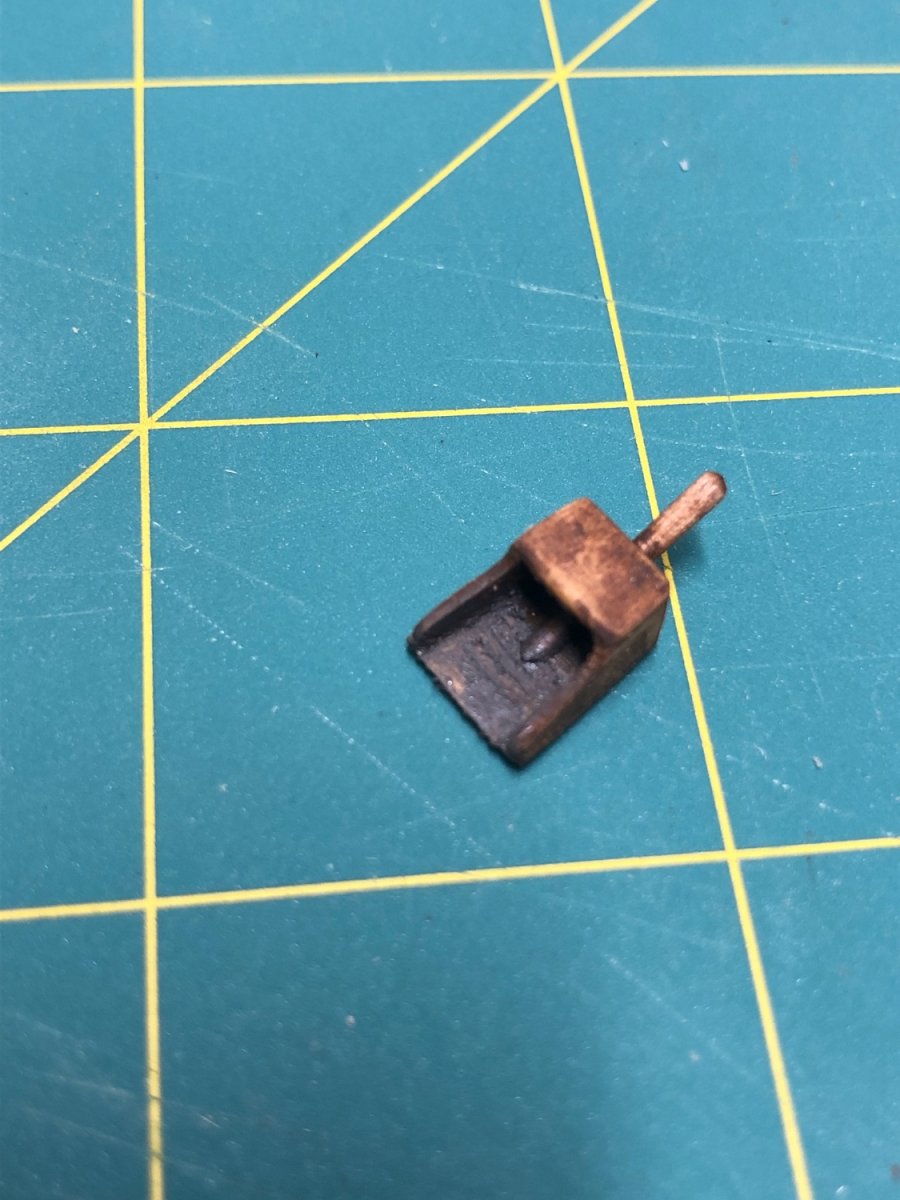
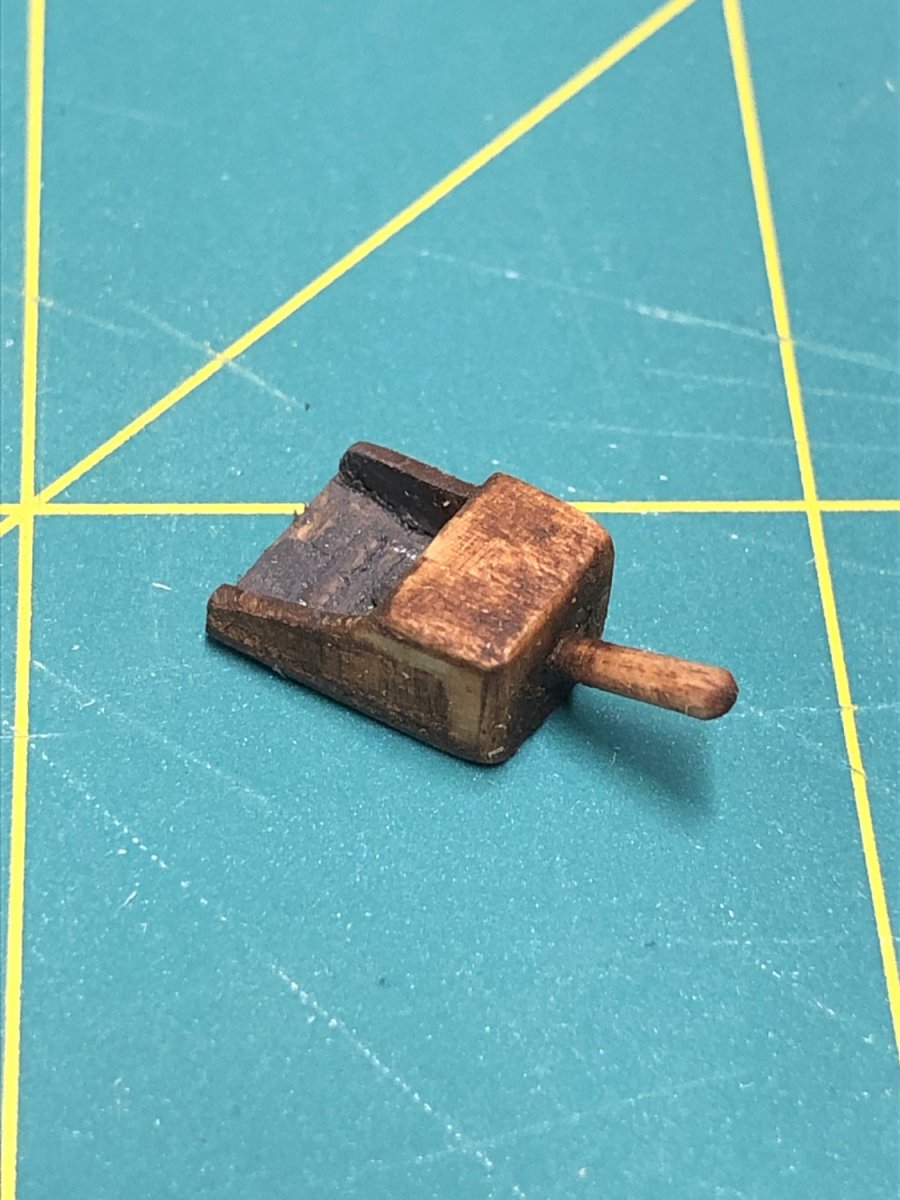
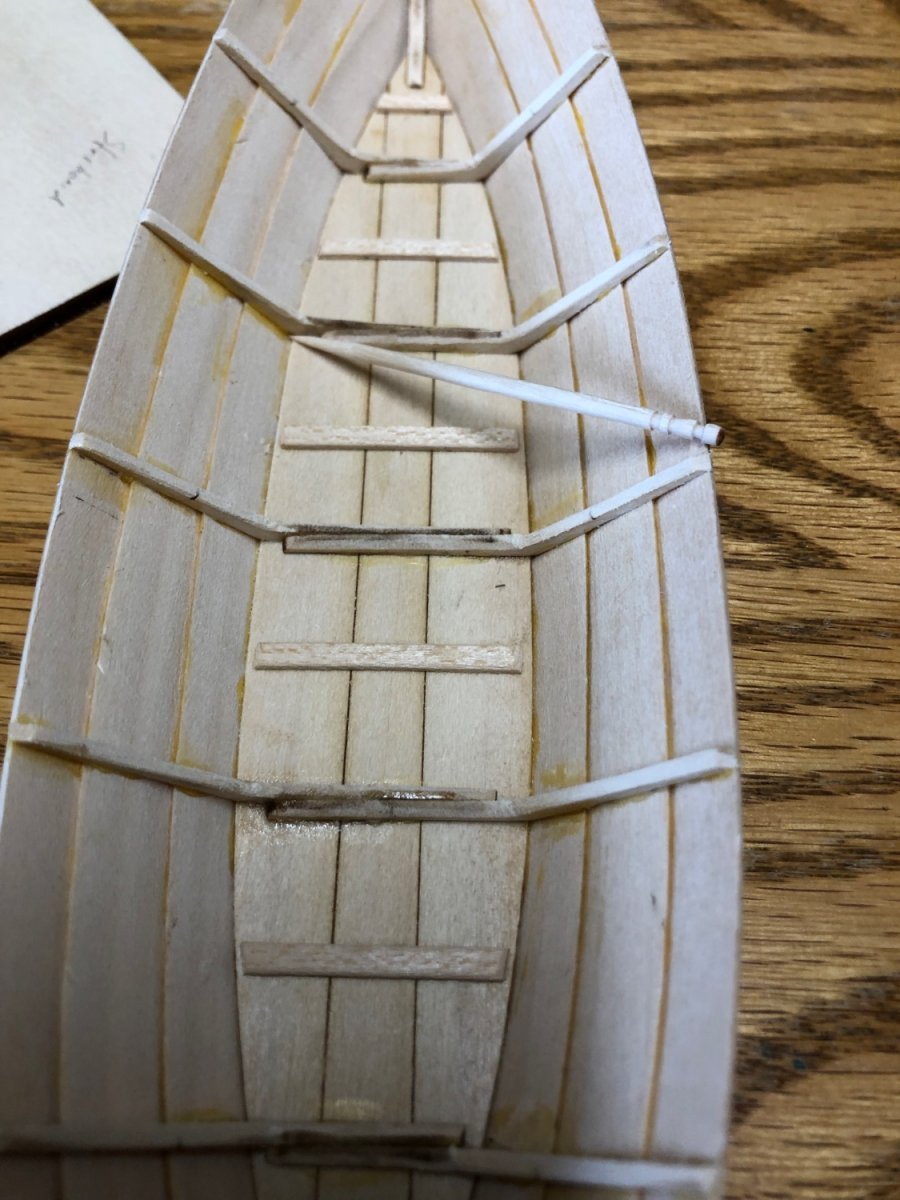
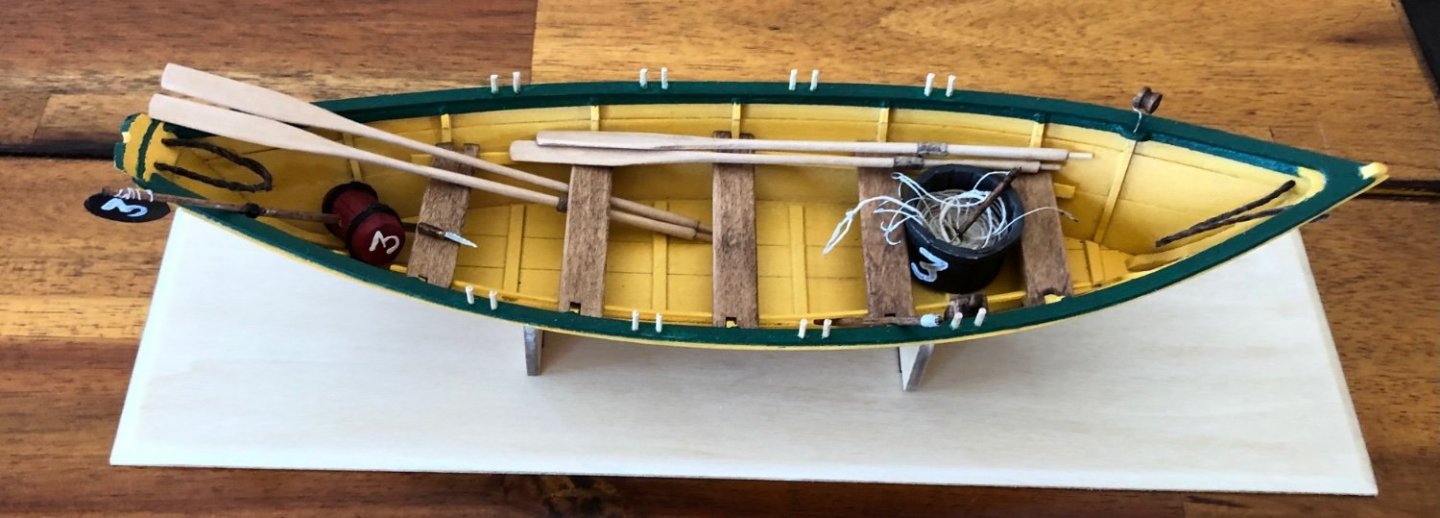
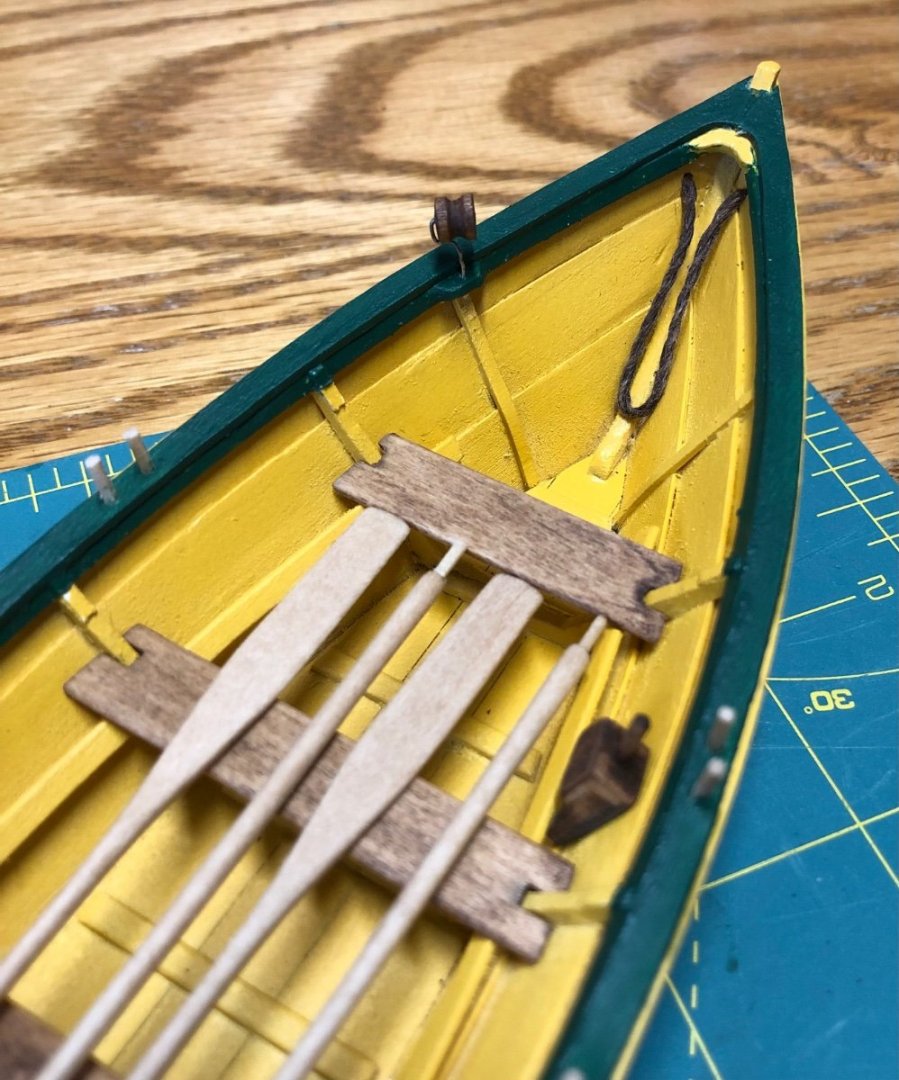
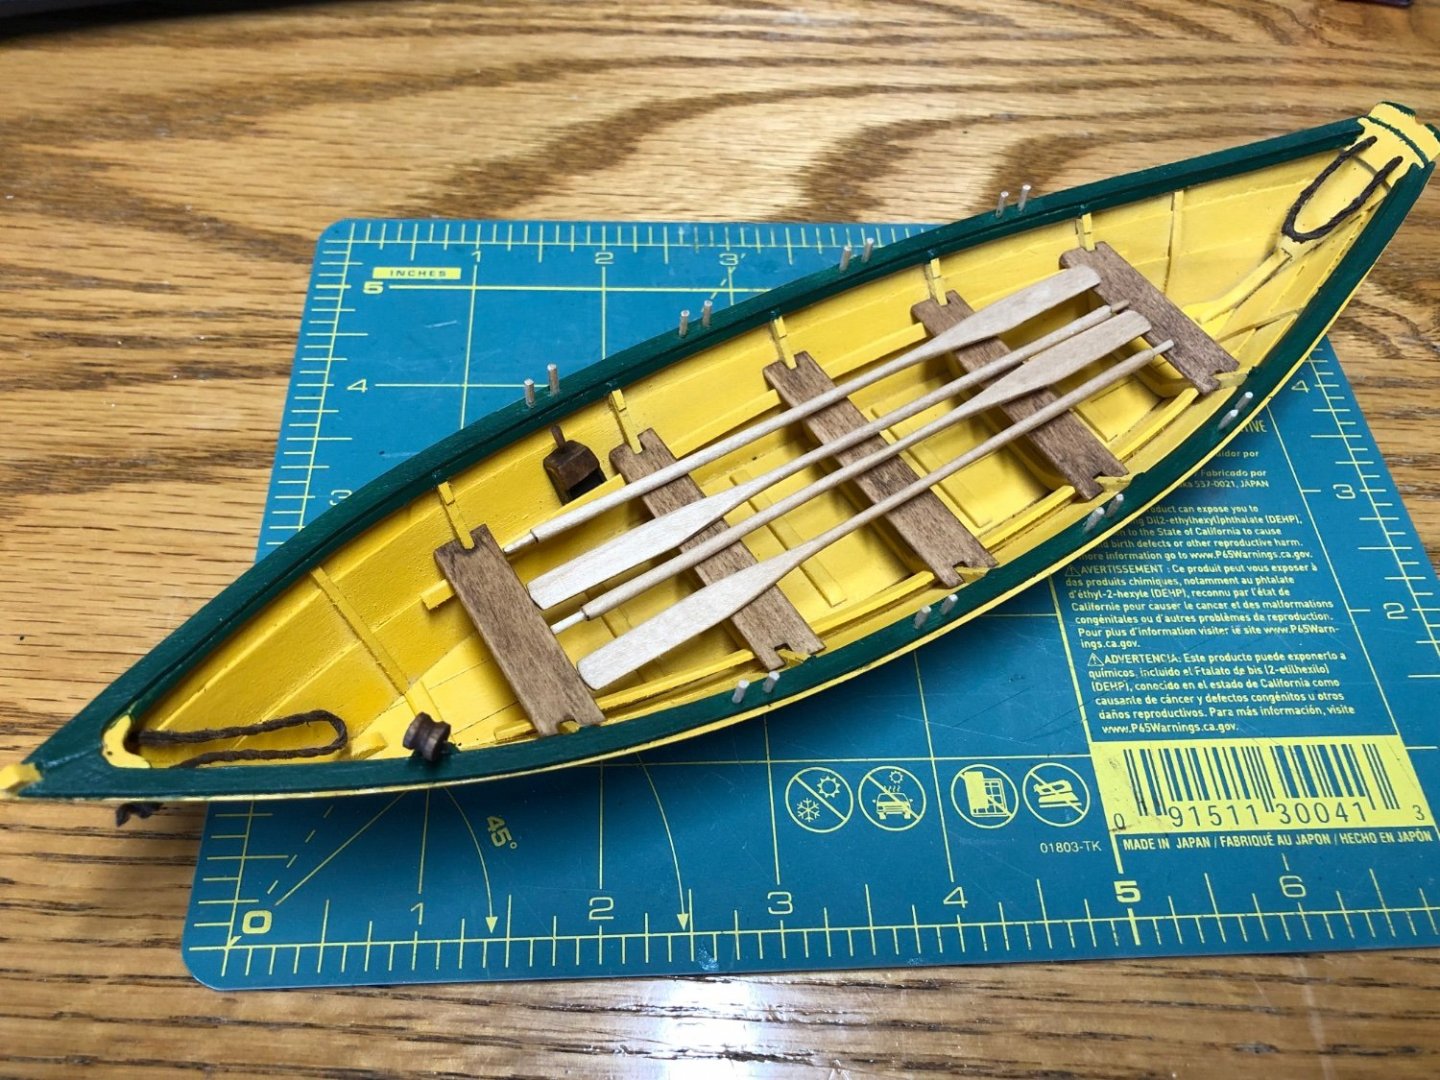
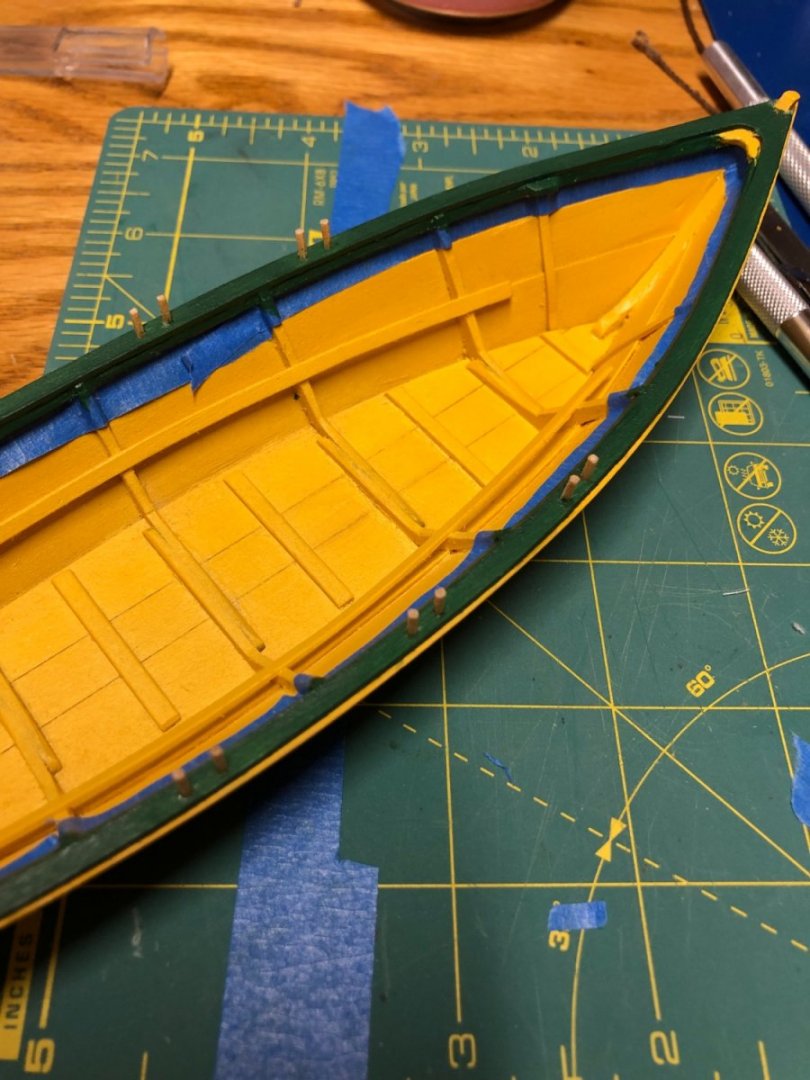
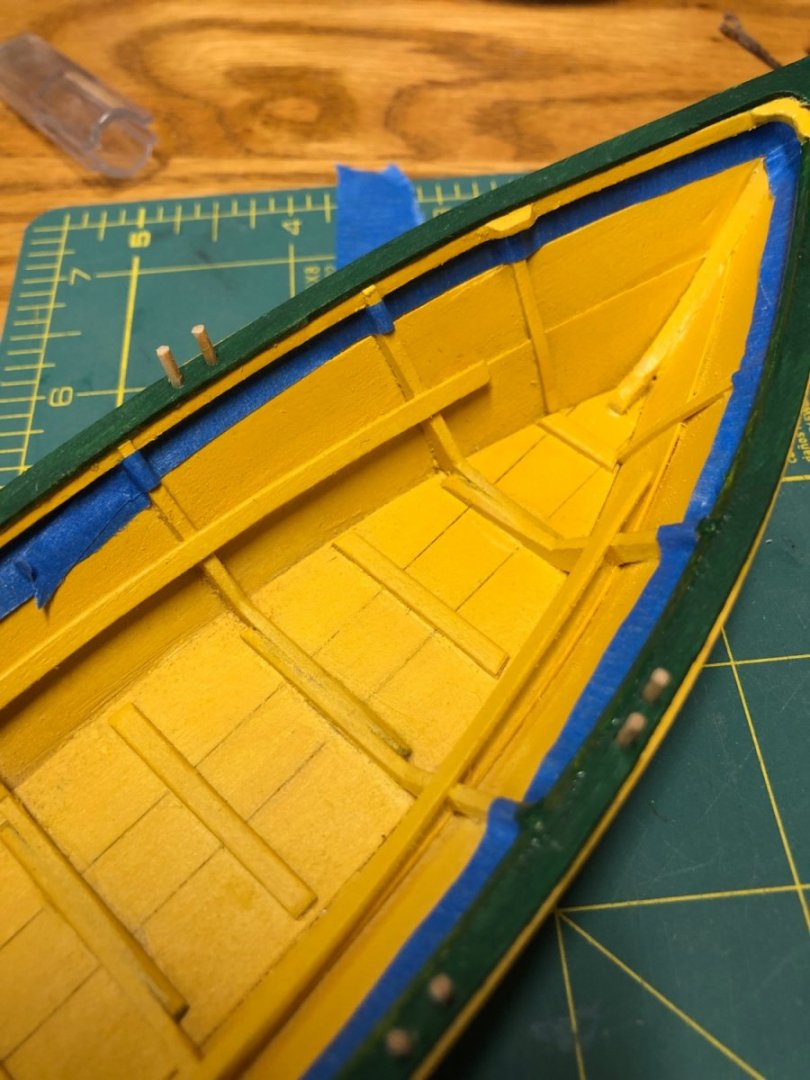
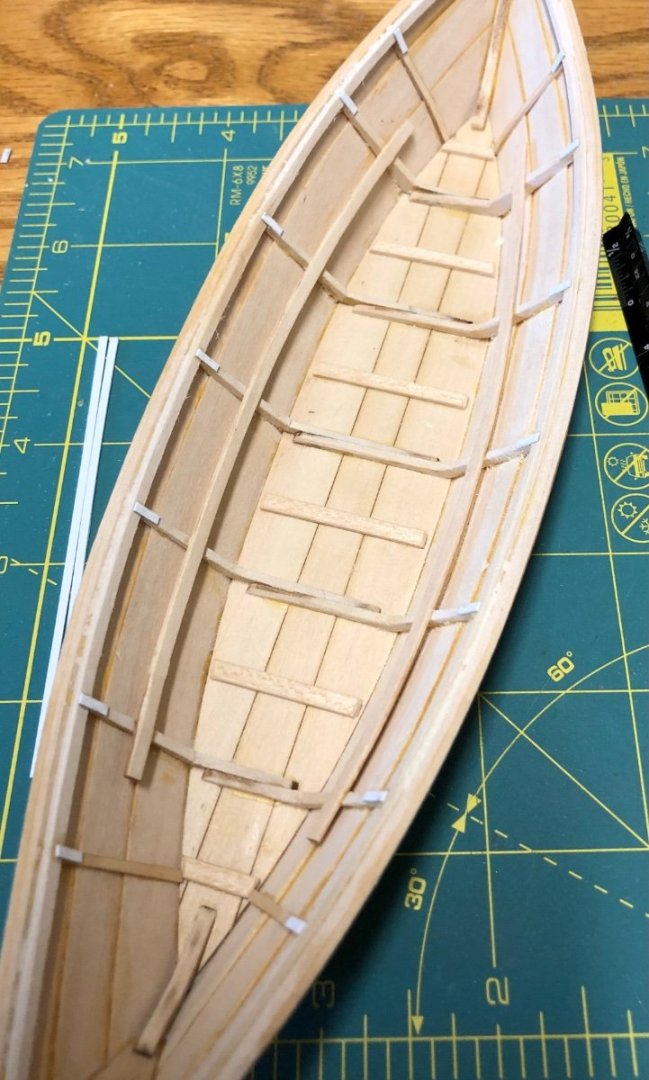
Having a grand time. I couldn’t help myself and got the tape off today too. My biggest complaint is that this boat is Packer colors and while that may not be an issue for many nor the original fishermen, it will create unwanted conversation and misdirected attention in my house. I could have done a red and green scheme but the Packers aside I do like the colors. I had very minor bleed through on a couple of frame heads. I used my knife to shave away the green and cleaned up the few frame head plates easily. I added a roller/pulley to the port bow that would be used to help pull up the trawl line. I also added my beckets (temporarily). The instructions call for the stern becket to run outboard but I have seen some period images with it inboard so I tried that. Seeing it now, I think that when I replace the lines I will run it outboard for more visual interest. I could put it on the cradle now and call it complete but I want to finish the leather wraps.

- 23 replies
-
- 5
-
-
- Model Shipways
- Shipwright Series
- (and 2 more)
-
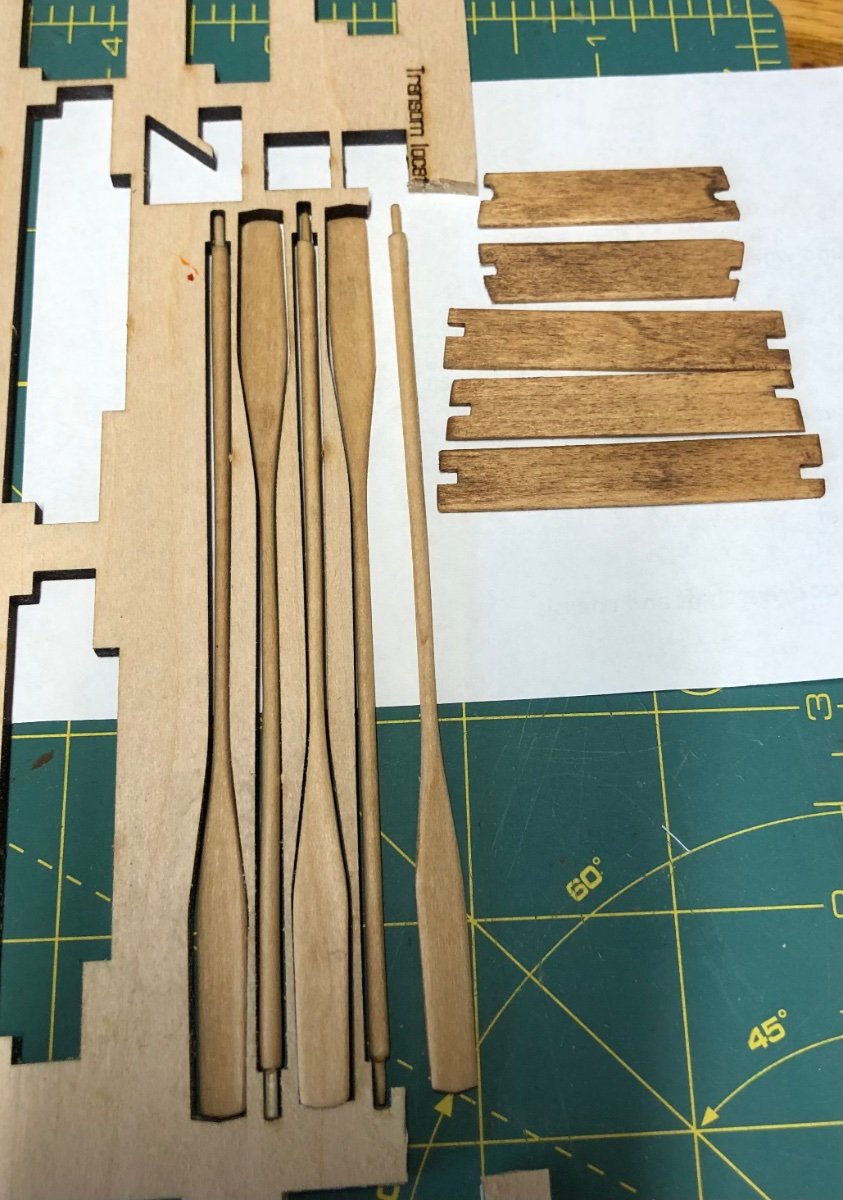
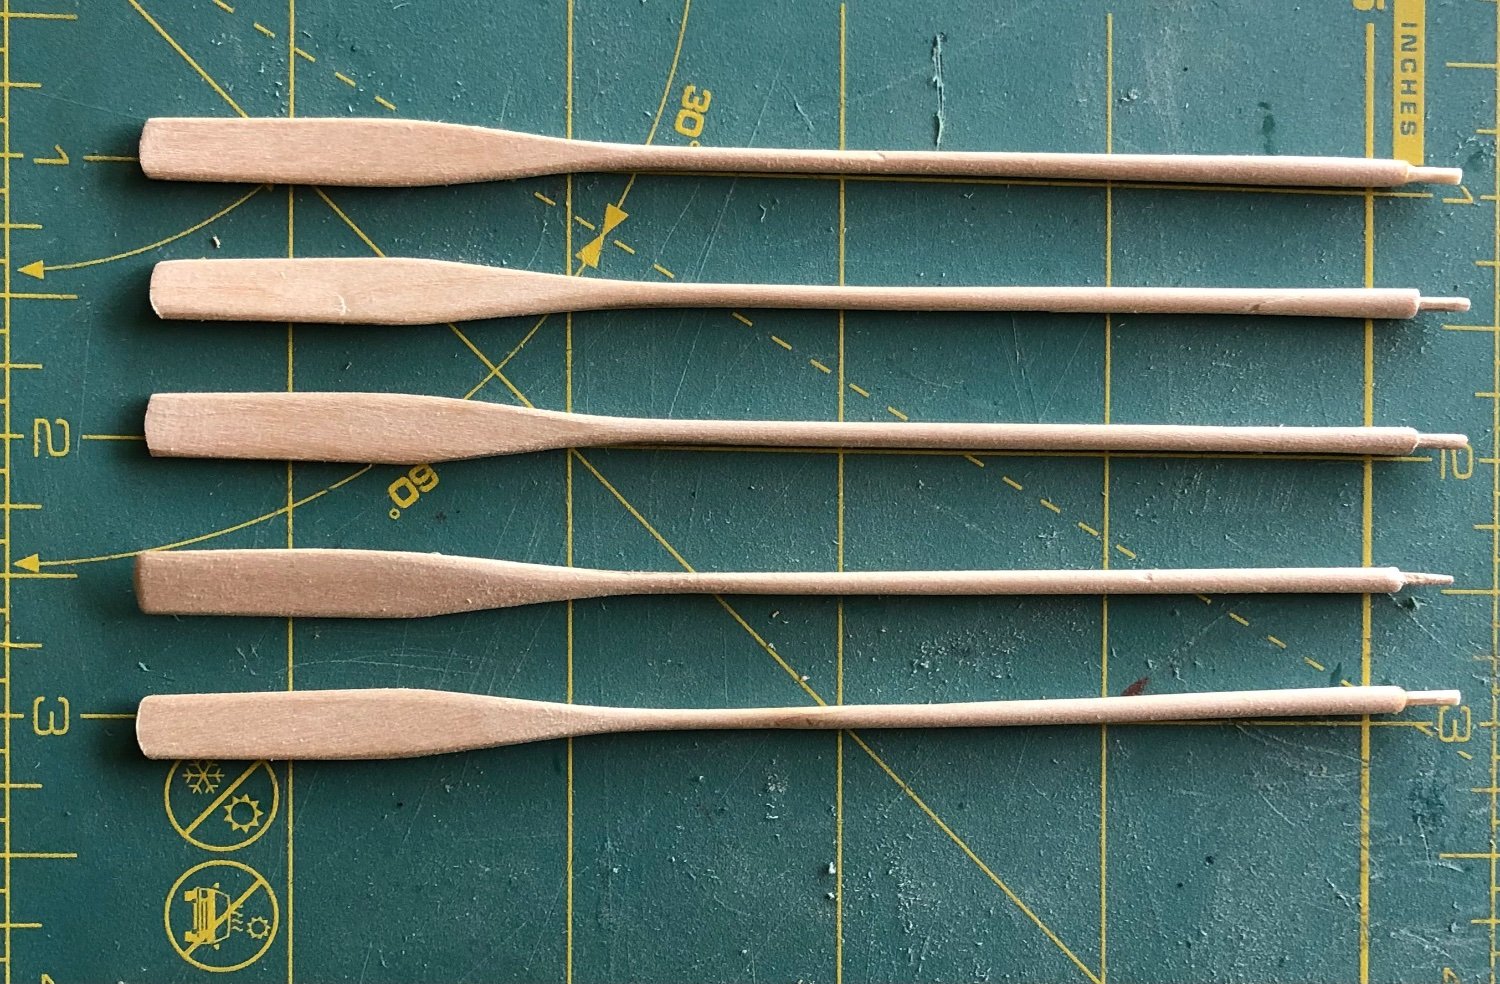
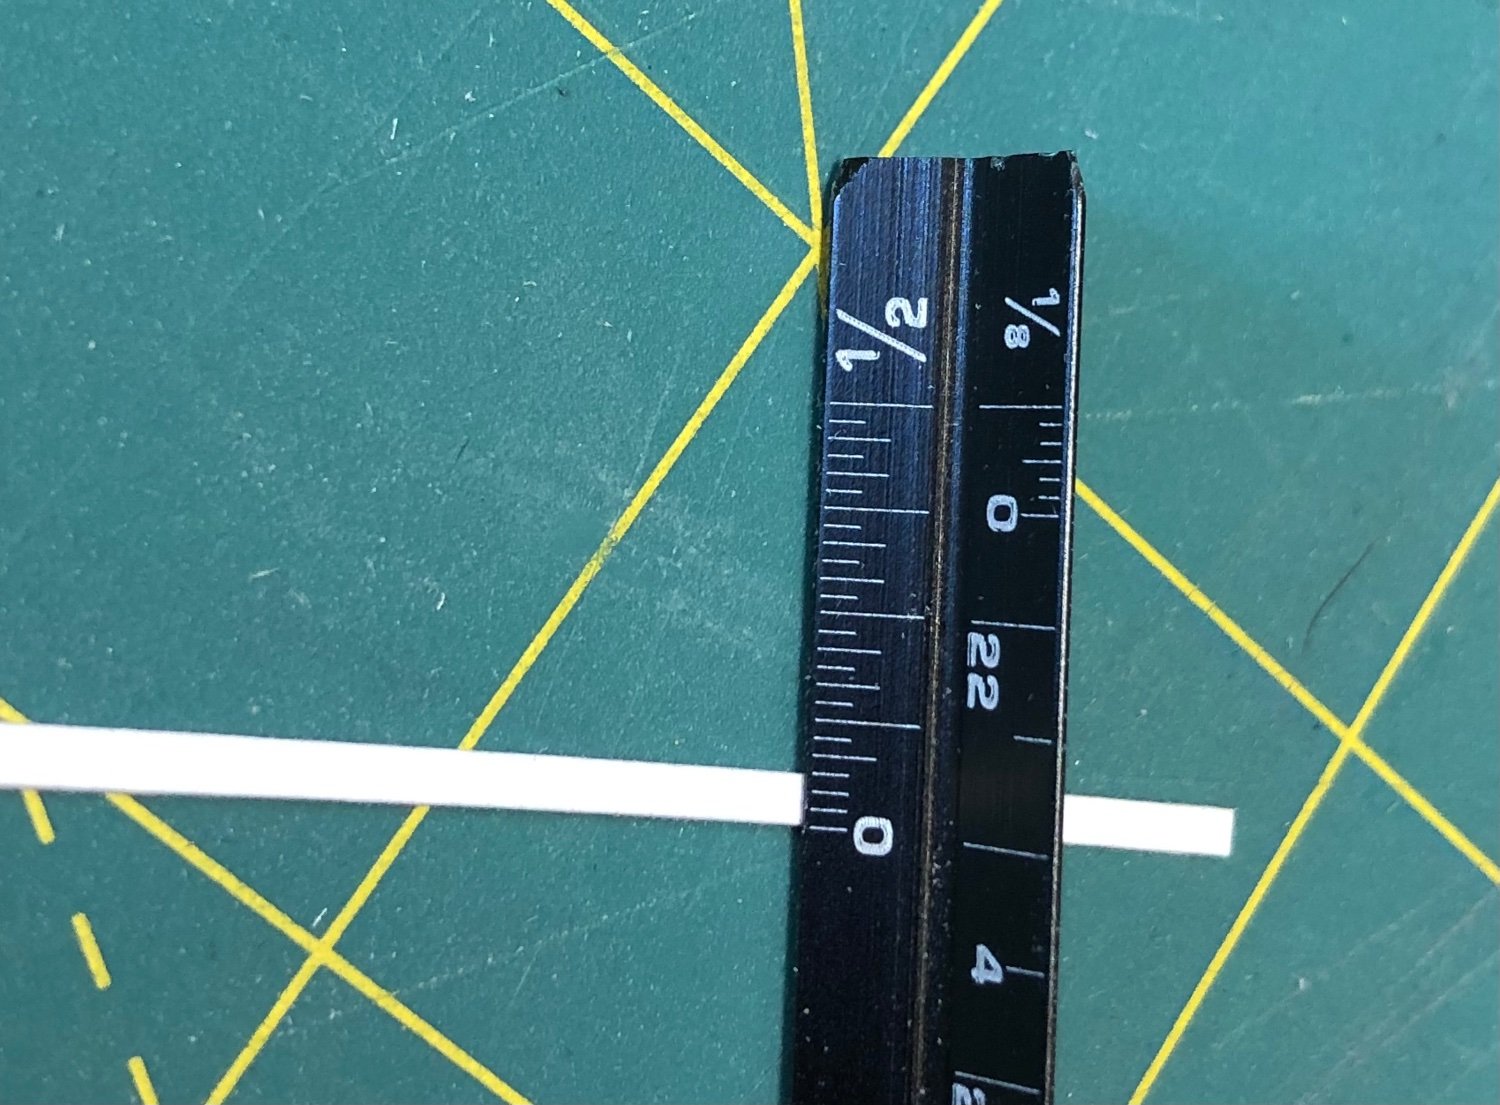
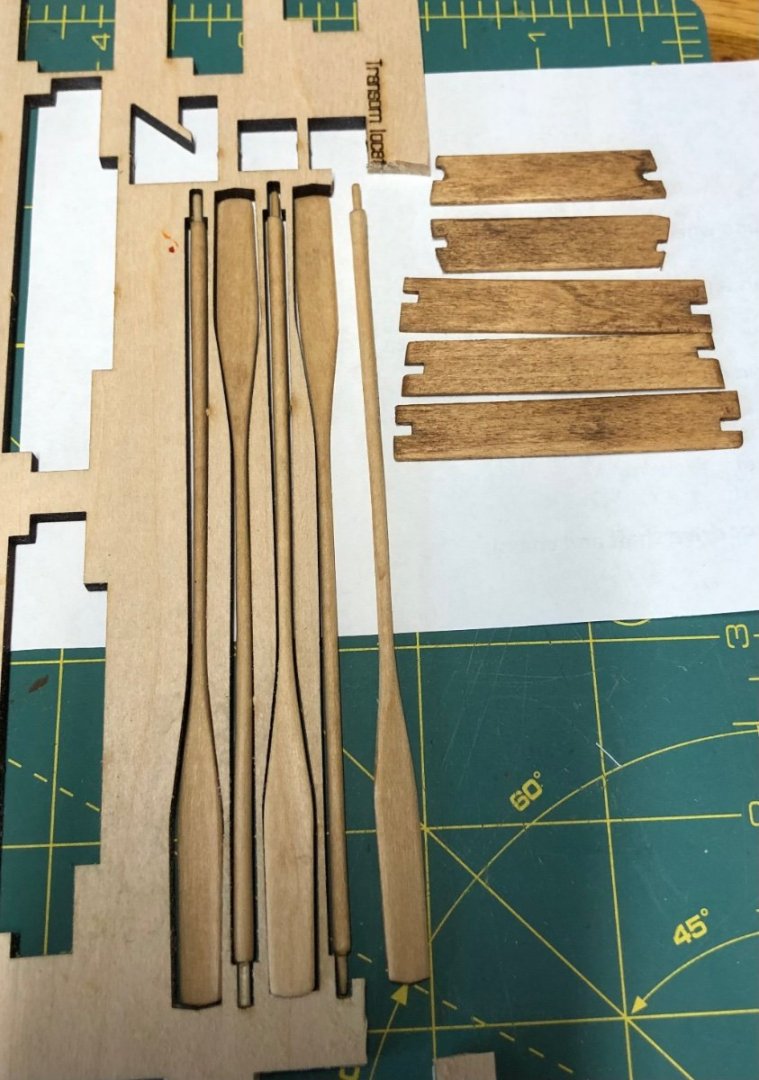
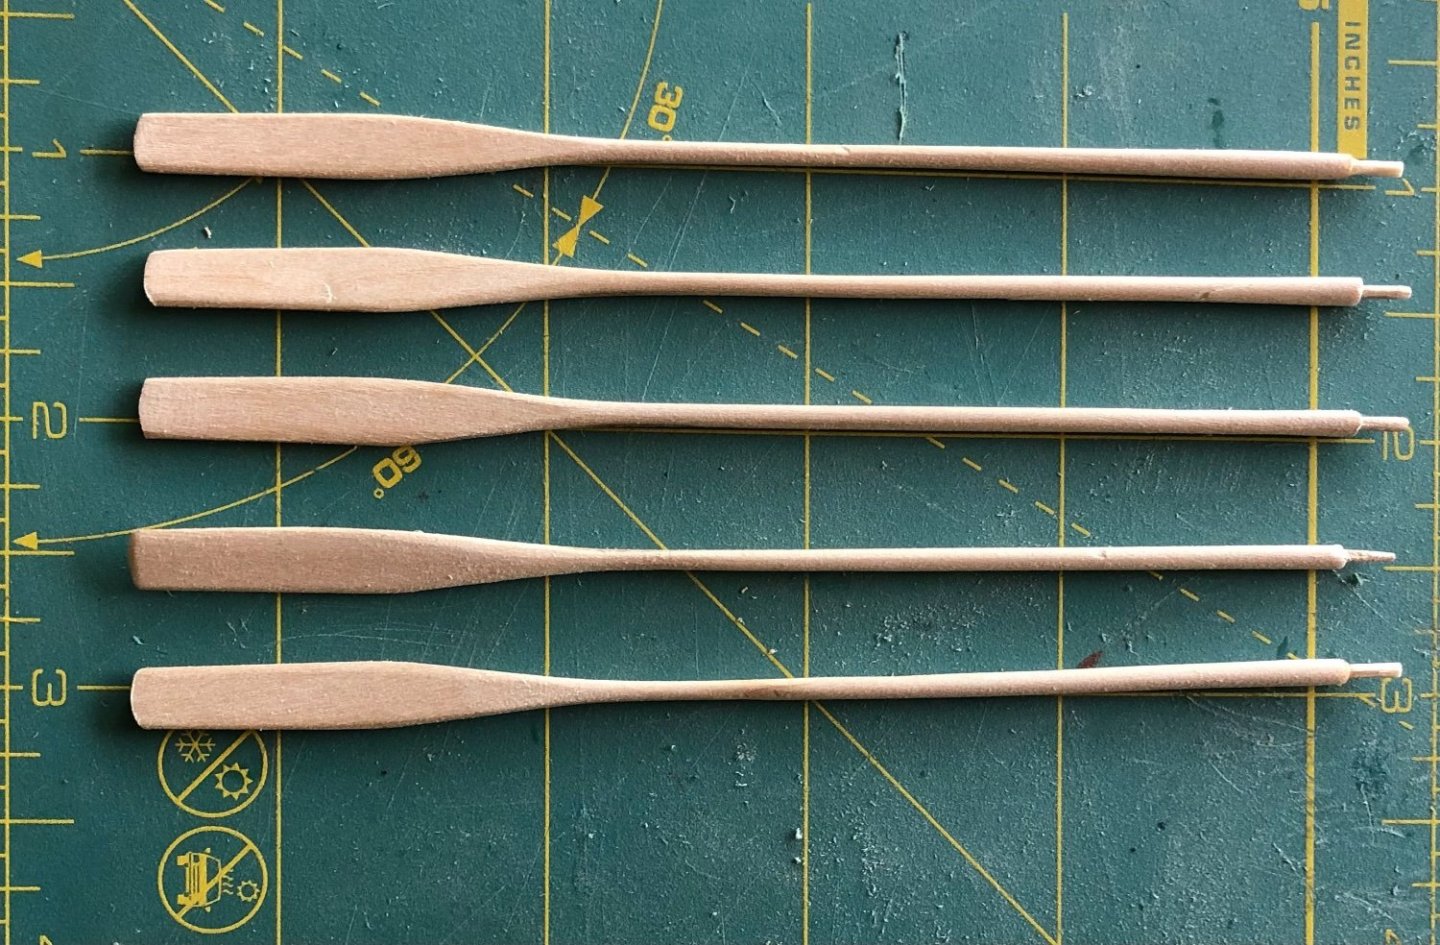
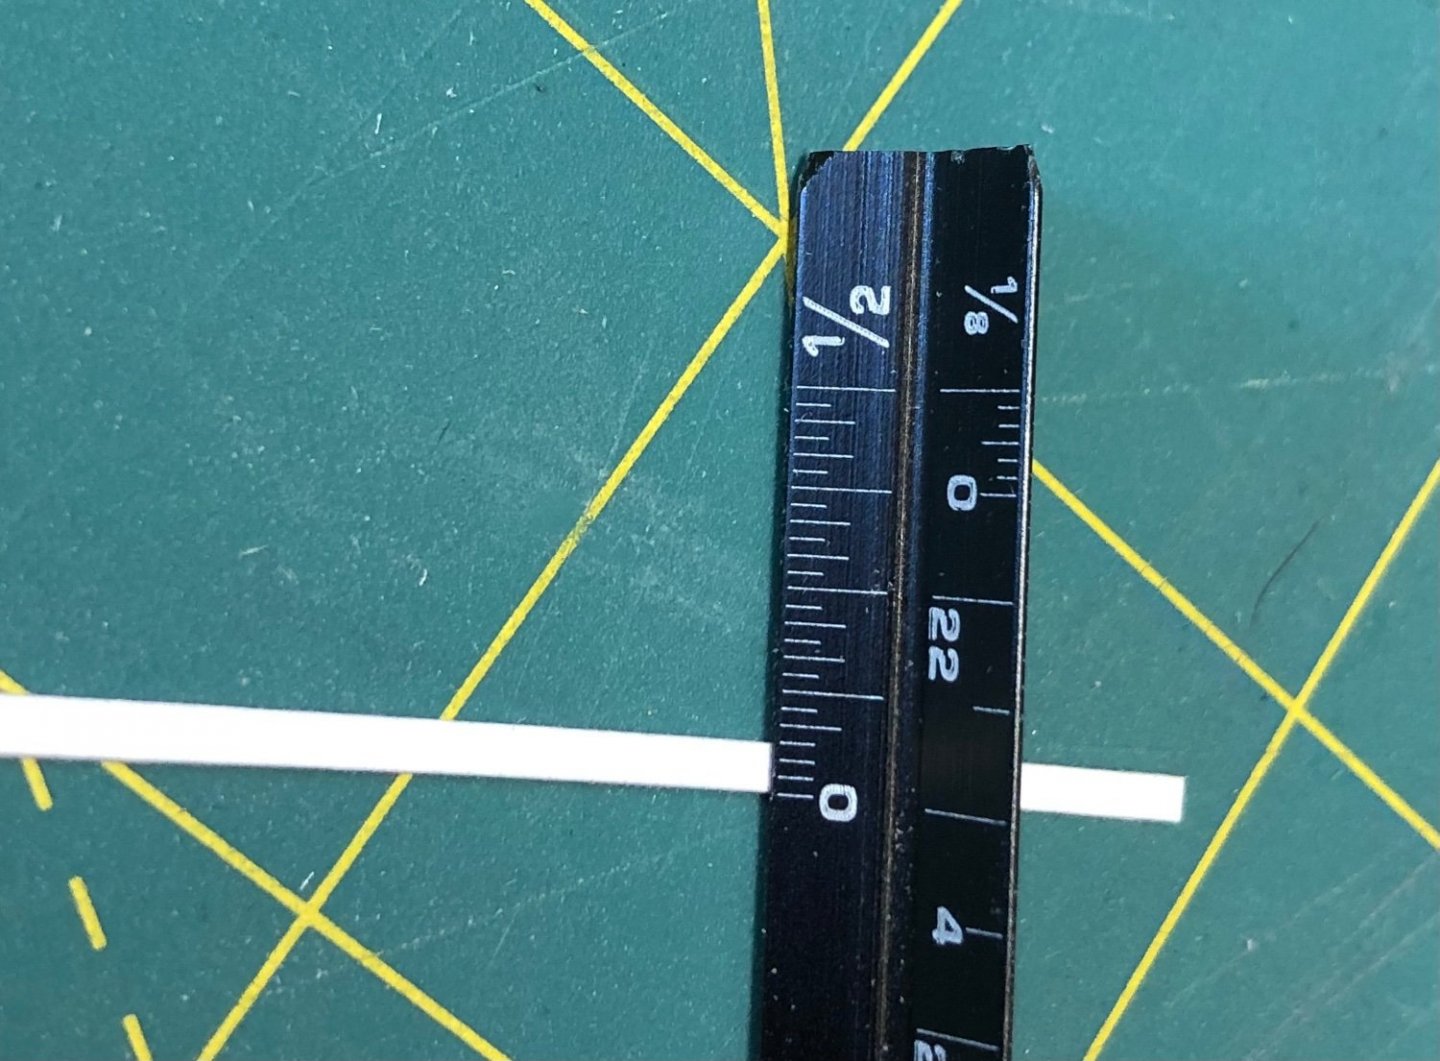
I finished the oars in tung oil, lightly sanding with 400 grit when they were still wet from the oil. I am happy with the very light finish and it is lower luster than I expected (in a good way). Next I will add the leather wraps. While using the tung oil, I also dipped the thole pin stock. Prior to dipping them, I had shaped the thole pins by sanding round the square stock - ever so carefully. After dipping in the oil and letting it dry, I cut the stock to size (1/4” per pin). I stained the thwarts using about a 1:1 ratio of Minwax Natural 209 and Golden Oak. I had tested it previously without a pre-stain and got good results. I wanted the thwarts and oars to have some variation and didn’t want the wood to be too yellow and lack contrast with the dory. I tested a lot of paint and primer and combinations and didn’t find anything I really liked. Finally I decided to just spray on a yellow and be done. I am glad it did. I am happy with it. It could have been a little more muted but I wasn’t finding the hue I had in my mind and just putting paint on it allowed me to get past my mental block. In the end, I used Krylon Fusion All in One - Matte Wild Honey for the hull (probably 6-8 light coats) and Model Expo Bulwarks Dark Green (without primer) for the cap rail. Once painted, I installed the cap rail as described in the instructions but installed the thole pins while the cap rail glue was still wet. This was good in that they glued into the space between the gunwale and the cap rail but It made my touch up painting harder. I wanted to paint the gunwale green to match the cap rail so a bit of tape and a tweezer to help seat it well into all the nooks. Once I get the paint off I may decide to paint the breast hook I prepped the presentation board, using my sanding jig to sand the edges with a 45 degree angle. The kit price is right but the presentation board would be the second thing I might upgrade in the future. I finished the board in tung oil as well. Photos to come. The first thing I would upgrade or change is the string. If anyone has recommendations for what kind and size to get from Siren or others please advise. In fact, I’d likely order sting upgrades for the Shipwright Series pram and smack at the same time. DM me or let me know below as I know a number of you have swapped out your rigging materials in the past. Here is the kit string for beckets which is too big for the holes in the boat (but that is easily fixed) and too shiny (that I think it looks out of scale and unnatural). Below it is #20 natural hemp which I think is too light. I tried dying it in some wood stain and it got really dark (too dark I think). I’ll likely use the dark hemp until I get replacement rigging line for the pram and smack.

- 23 replies
-
- 3
-
-
- Model Shipways
- Shipwright Series
- (and 2 more)
-
Prairie Sailor reacted to a post in a topic:
Hannah by gjdale (Grant) - FINISHED - Amati - 1:300 - BOTTLE
-
Prairie Sailor reacted to a post in a topic:
Hannah by gjdale (Grant) - FINISHED - Amati - 1:300 - BOTTLE
-
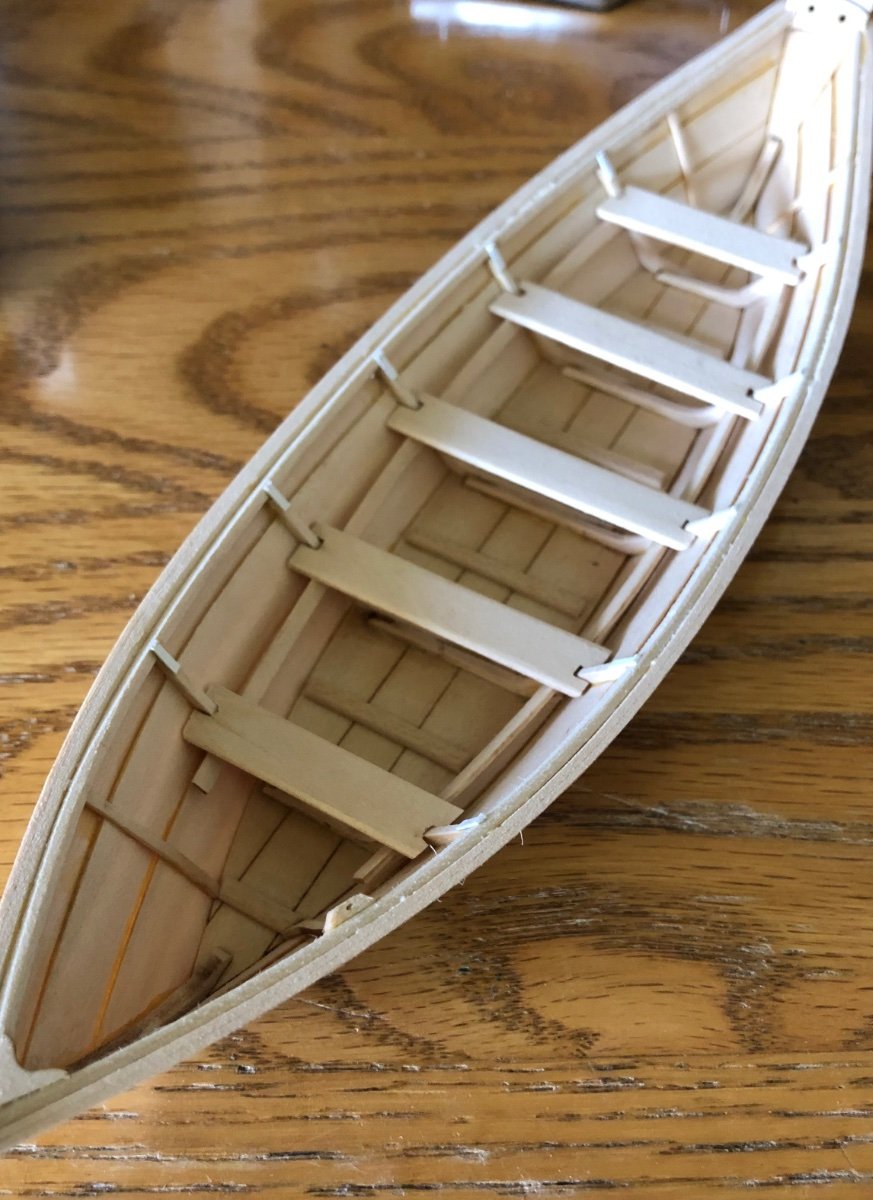
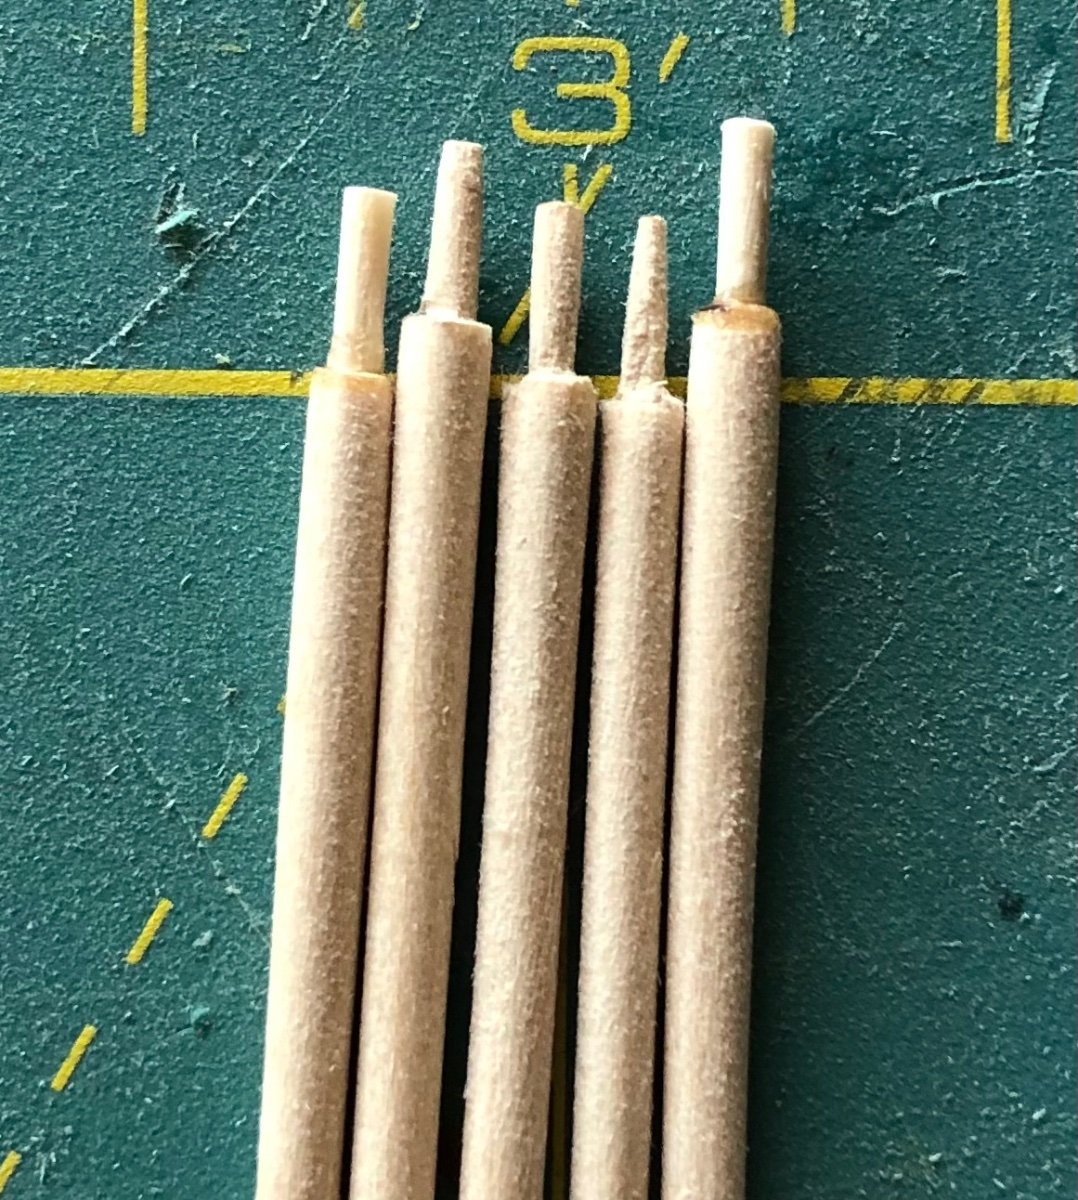
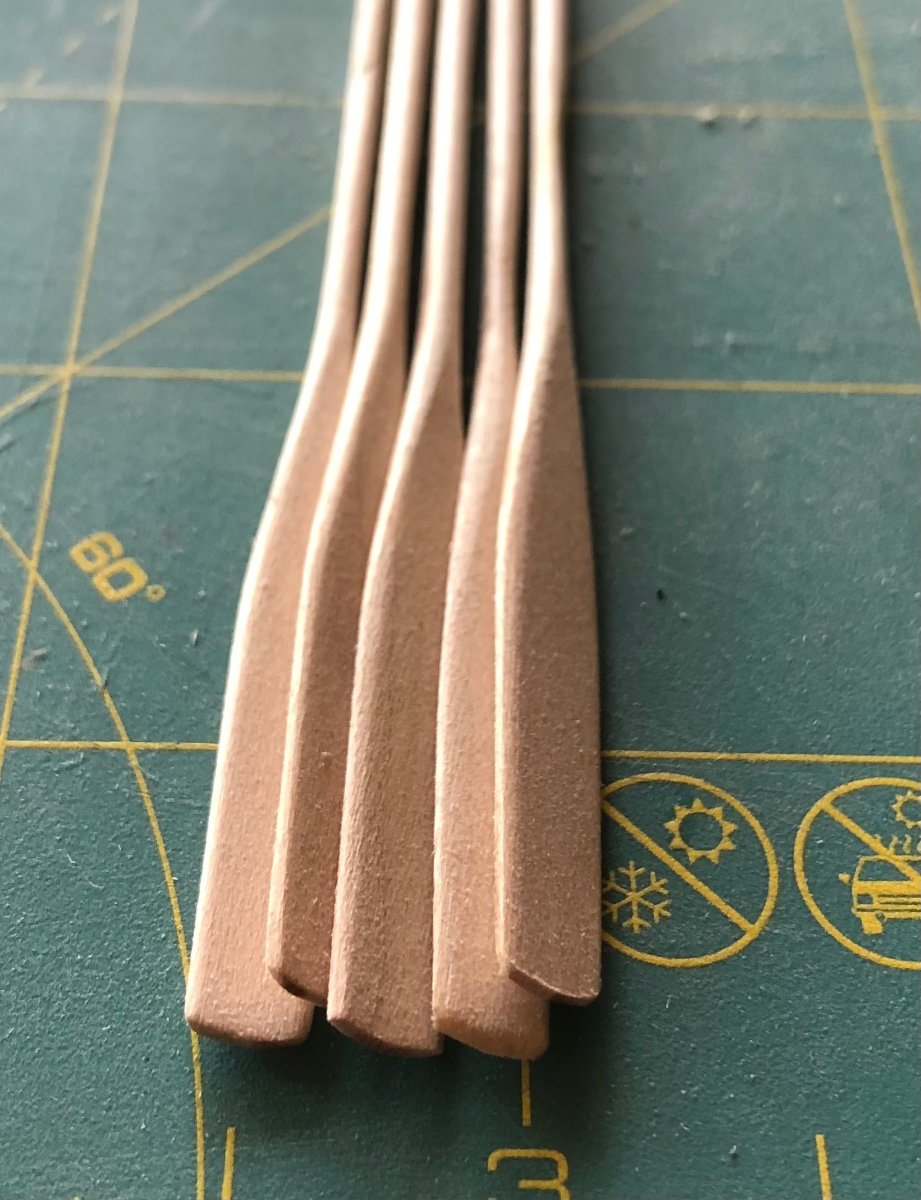
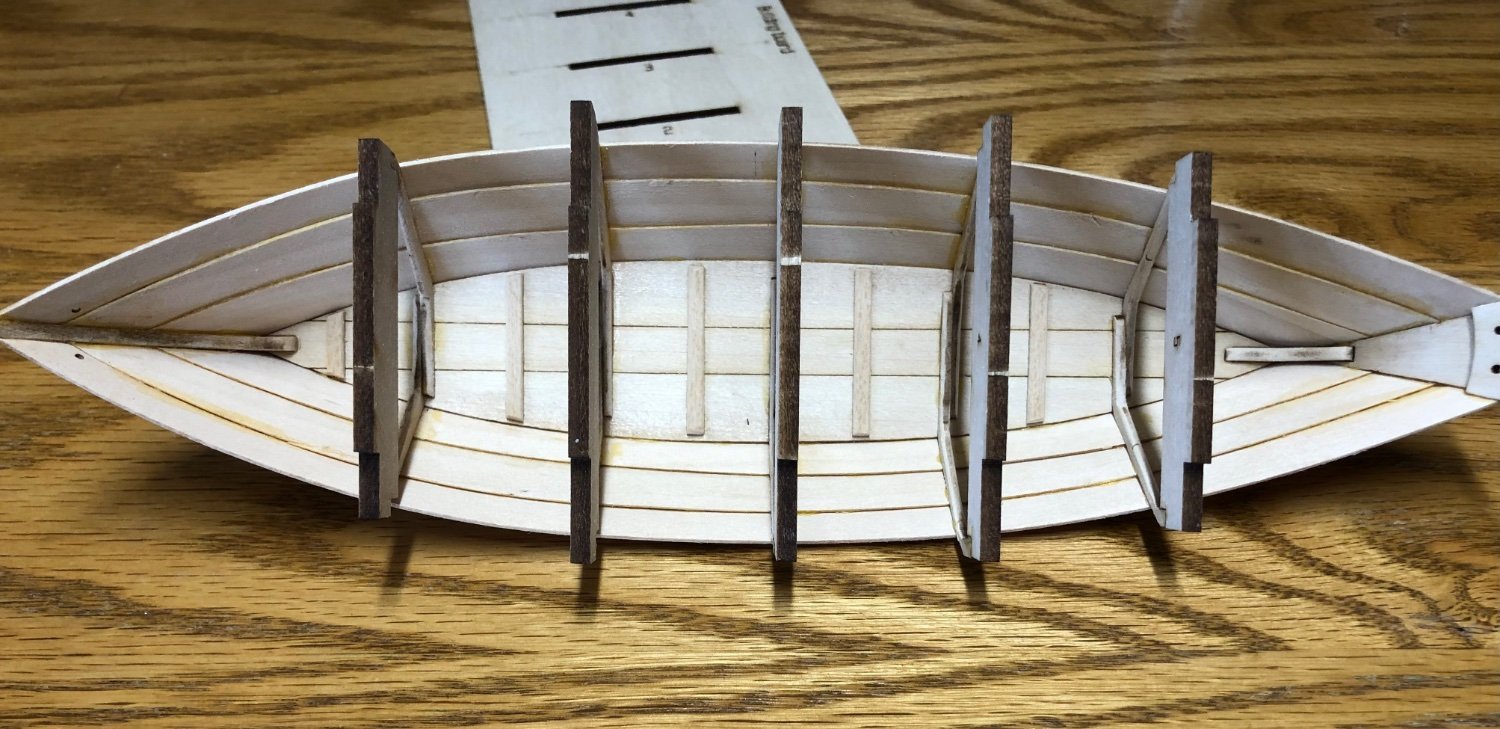
Still playing with paint. Finishes are my least favorite part of a build because they do so much to convey the final impression and I feel that I am never able to find the right hue I am looking for or I get it too thin or too thick etc. Suffice to say, I am still learning A LOT in this area. In the meantime, I fitted the thwarts. Number 3 fit about perfect but 1 and 5 needed a lot of fitting and only minor fitting for 2 and 4. A discerning eye may notice the small split in the first thwart where my carving of the notch got away from me. I glued it together and since the photo was taken have sanded it and it is now unnoticeable. I also added a small scratch built piece to the gunwale at the fore side cleat - more to come on what that will be once the cap rails are installed. I then turned my attention to the oars. I carved and sanded the blades and was really pleased with the result. Then, over confidently I carved and sanded the loom and body. I struggled with consistency when saving the corners of the oars. In some places I slipped and went too deep and other times my angle wasn’t right or I was varying the thickness of the shaving across the length of the loom and body. Sanding helped and in the end they look WAY more consistent than I expected but not as uniform I would desire. I need more practice and next time I make oars especially in a different scale, I will practice before jumping in. Finally, I must admit another fault or mistake - not UNDERSTANDING the directions before proceeding. I knew I needed too and I thought I knew what I was doing but alas, when carving the handles, I approached them like the loom and body. I shaved the corners to make them octagonal and then proceeded to sand them. This is fine for rounding square stock but they were too small and too thin. I ended up with a tapered handle on one and I broke two handles from the loom before figured out my error finally in time for the fifth oar. So, to anyone reading this who will build the dory, remember to simply cut the rectangular handle to be square (as written and photographed in the instructions) and then sand the corners to be round. Couldn’t be easier and my fifth turned out great and it was easy! I rebuilt the two broken handles using a whittled and sanded toothpick and some superglue.


- 23 replies
-
- 5
-
-
- Model Shipways
- Shipwright Series
- (and 2 more)
-
Prairie Sailor reacted to a post in a topic:
Ranger by James H - FINISHED - Vanguard Models - 1:64 - A Barking Fish Carrier - prototype build
-
James, I'd love to see a photo of the full fleet of fishers!
- 16 replies
-
- 1
-
-
- Ranger
- Vanguard Models
- (and 2 more)
-
He included it in the finished build gallery - https://modelshipworld.com/gallery/image/26593-ranger9jpeg/
- 16 replies
-
- 2
-

-
-
- Ranger
- Vanguard Models
- (and 2 more)
-
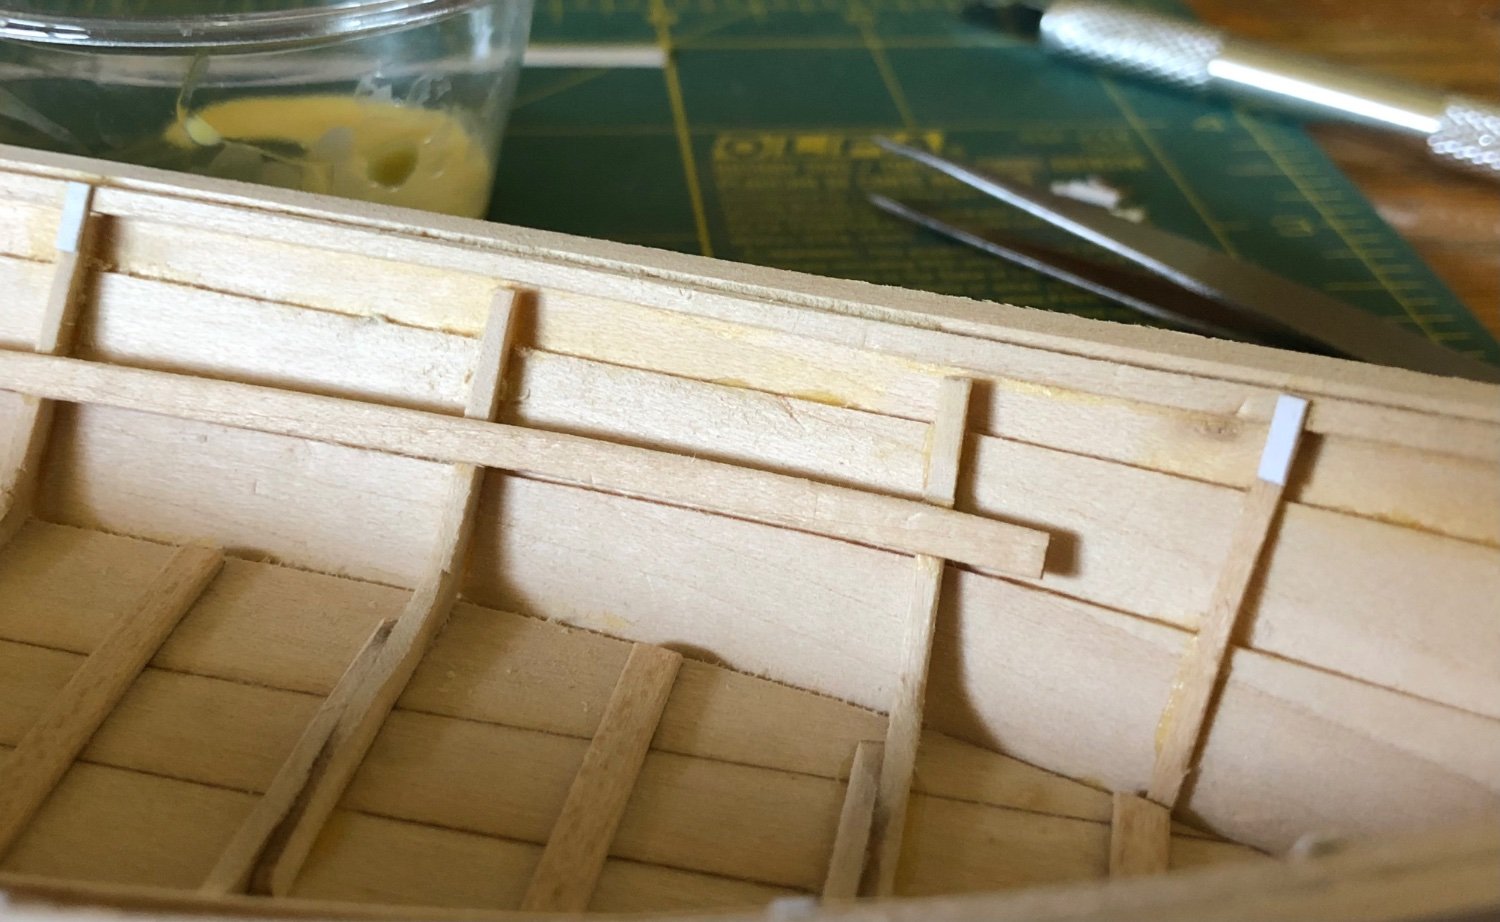
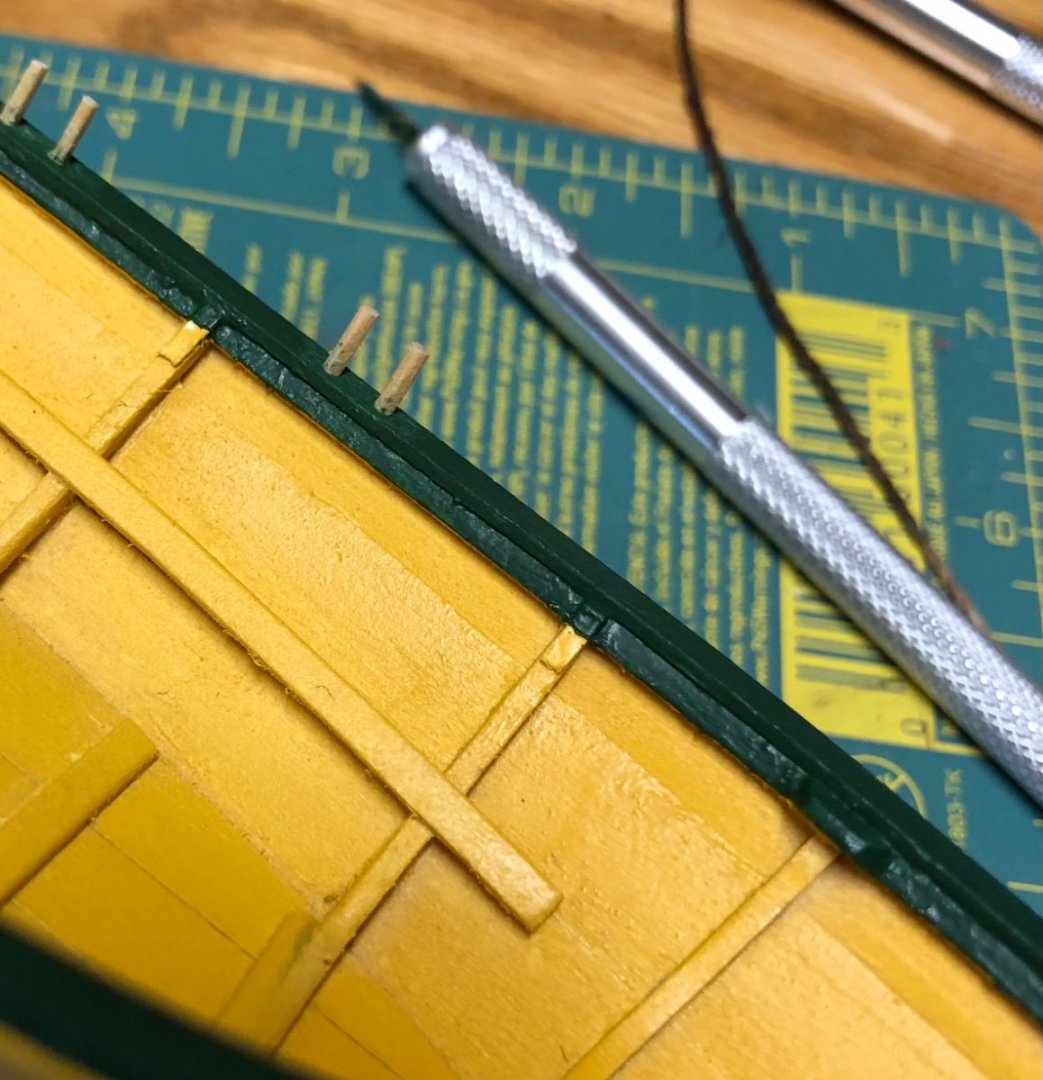
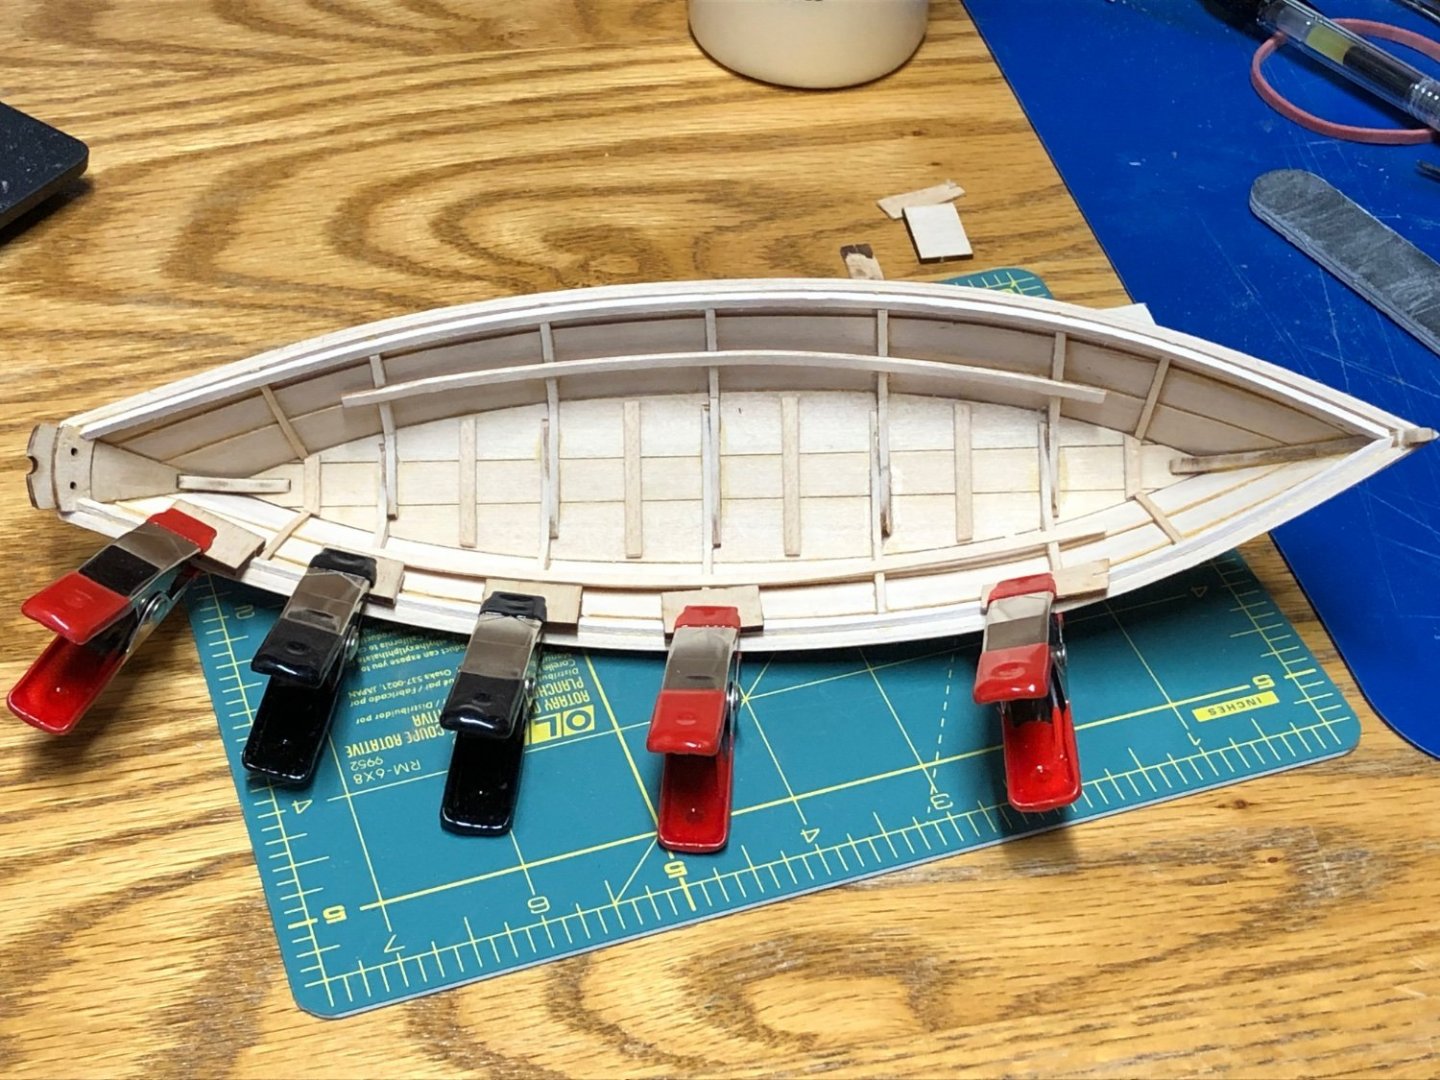
Thanks Druxey et al. for the likes and comments. It is encouraging me onward! Gunwales are glued and sanded. When glueing them into place I tried to ensure that they the inward corner was aligned to the height of the sheer and bands. This meant I had a slight gap (.5 to 1mm) over a couple of frames but I was comfortable with that since I planned to add the optional frame head irons. I reasoned that the gap would be covered and better than sanding down the sheer and band to match or having an uneven or gap under the cap rail. The directions called for the iron frame heads to be 3” wide (by 4” long) but my frames seemed closer to 2” wide. I cut a business card to 2” at scale and followed the directions for 4” length. This ratio seemed to turn out well. You may notice one error (repeated four times) in the two photos above. I made an assumption that the FRAME head irons attached all frame-esque pieces to the gunwale and this put them on the side cleats too. I had looked in the directions for comments on this but didn’t see anything that they are only for the frames and to include or exclude the side cleats. (In my excitement I had also temporarily forgotten that they were called cleats and just counted how many irons I needed to cut.) But after glueing, I knew something wasn’t right and I sought to do more due diligence (even if it was after the fact). Then I found it, photos in the painting section that clearly show the side cleats, fire and aft, without the FRAME head irons. Better late than never, I corrected my error and removed the irons from the side cleats. I installed the breast hook. Let me know your thoughts- I think it is sufficient for this build with the coming cap rail and as a learning experience - but in the macro lens I am seeing that I need better fit and finish attention. Next will be painting. I have a few test pieces on which I am experimenting with primer and paint. There will like we a few days delay in the progress as I finalize my plans for paint and finish. Side note: I had a lot of minor dents in the bands from clamping the gunwales. I should have used a scrap or other padding on the outboard sides as I did on the inboard. I ran a bead of water along the bands and the dents sprung back.

- 23 replies
-
- 4
-
-
- Model Shipways
- Shipwright Series
- (and 2 more)
-
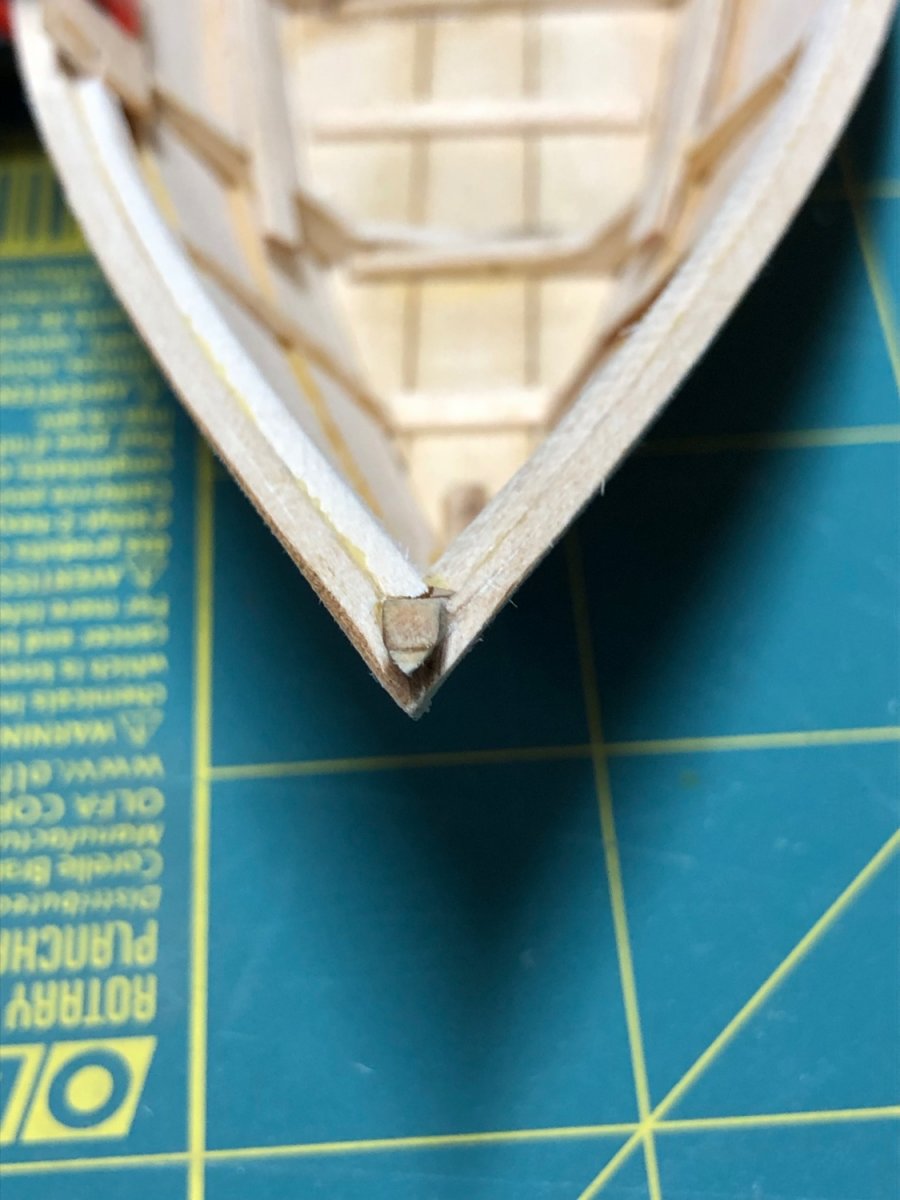
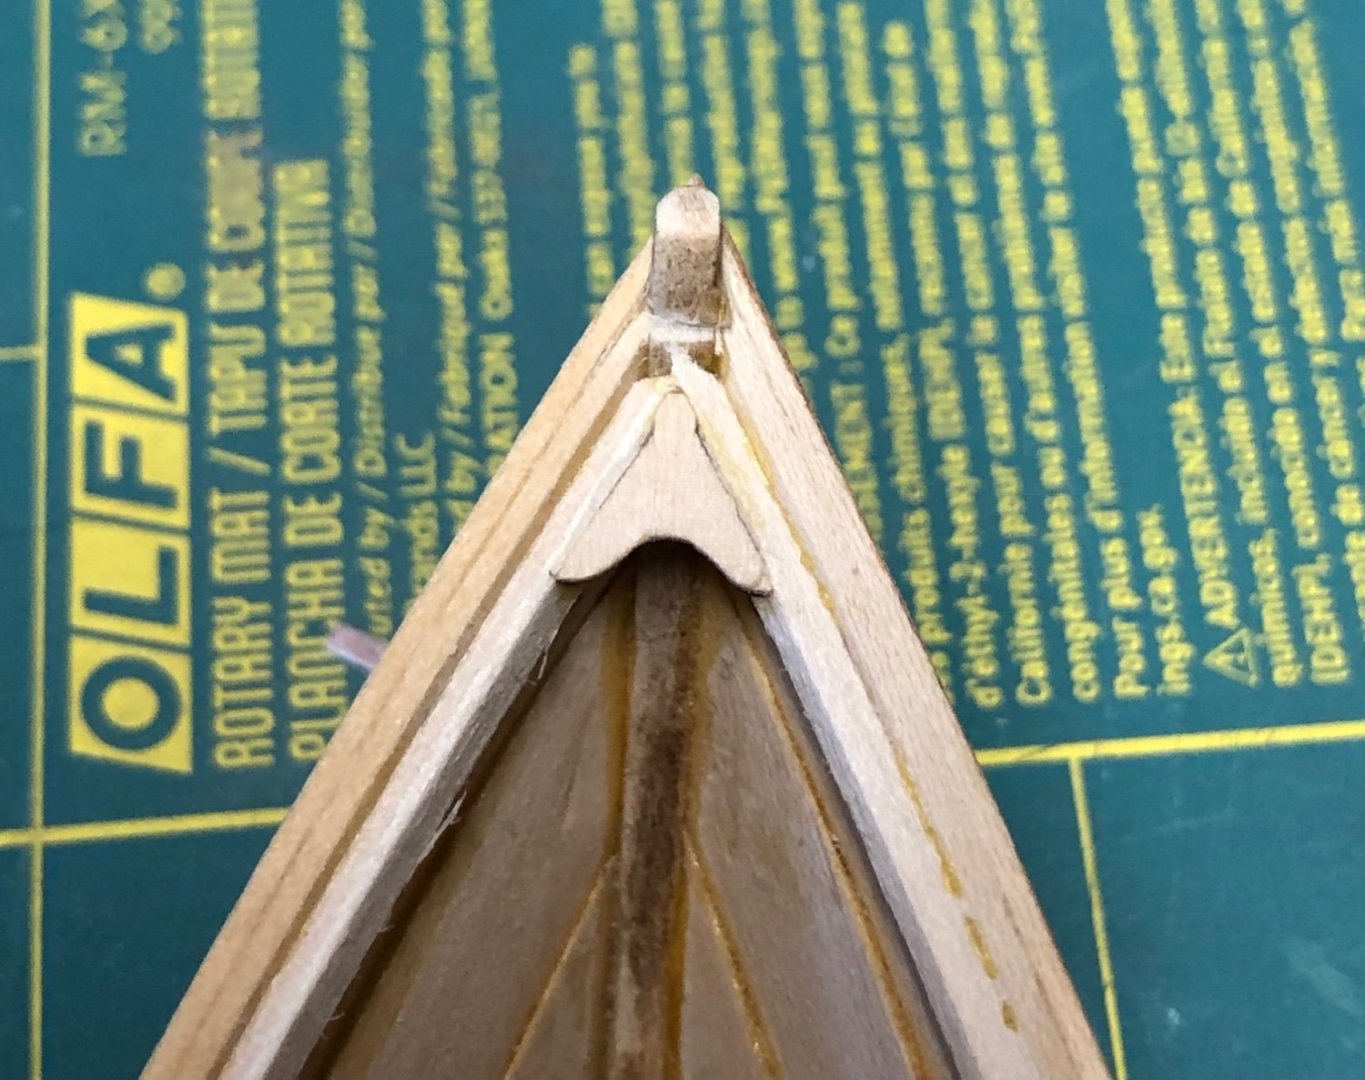
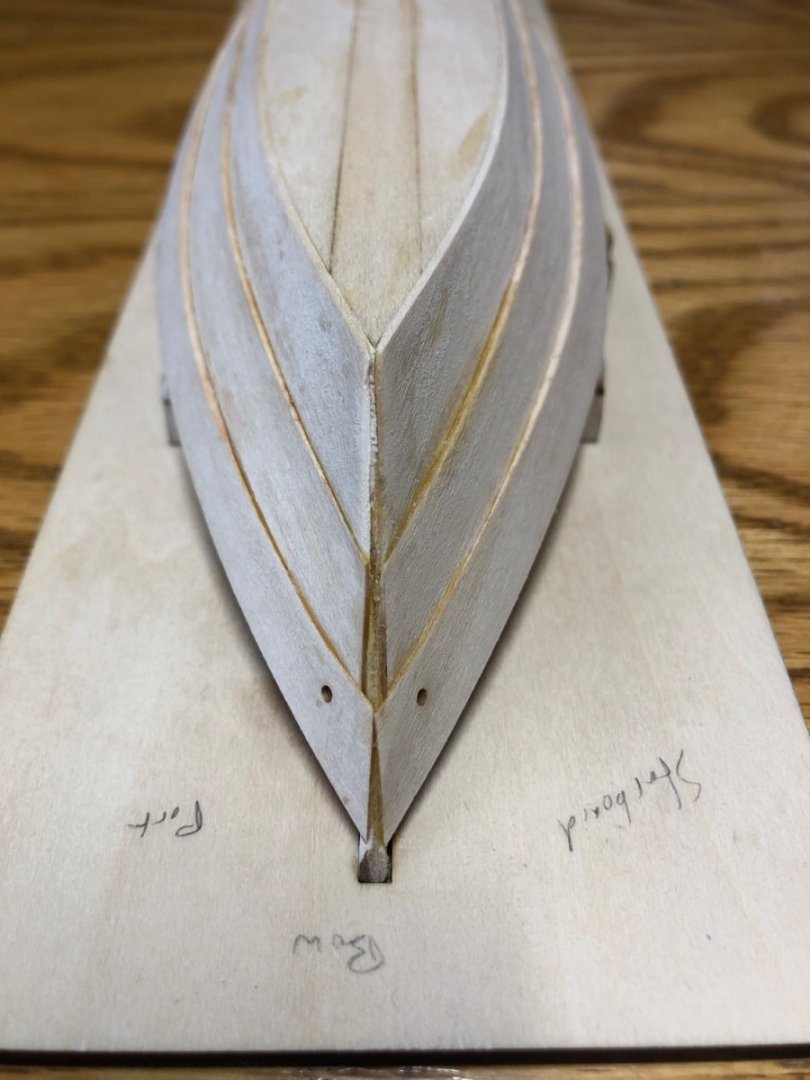
I decided to miter the bands in front of the false stem. Having sanded the bands and chiseled the frame tops, I installed the gunwales next.

- 23 replies
-
- 8
-
-
- Model Shipways
- Shipwright Series
- (and 2 more)
-
Prairie Sailor reacted to a post in a topic:
Lowell Grand Banks Dory by RMillet - FINISHED - Model Shipways - 1:24
-
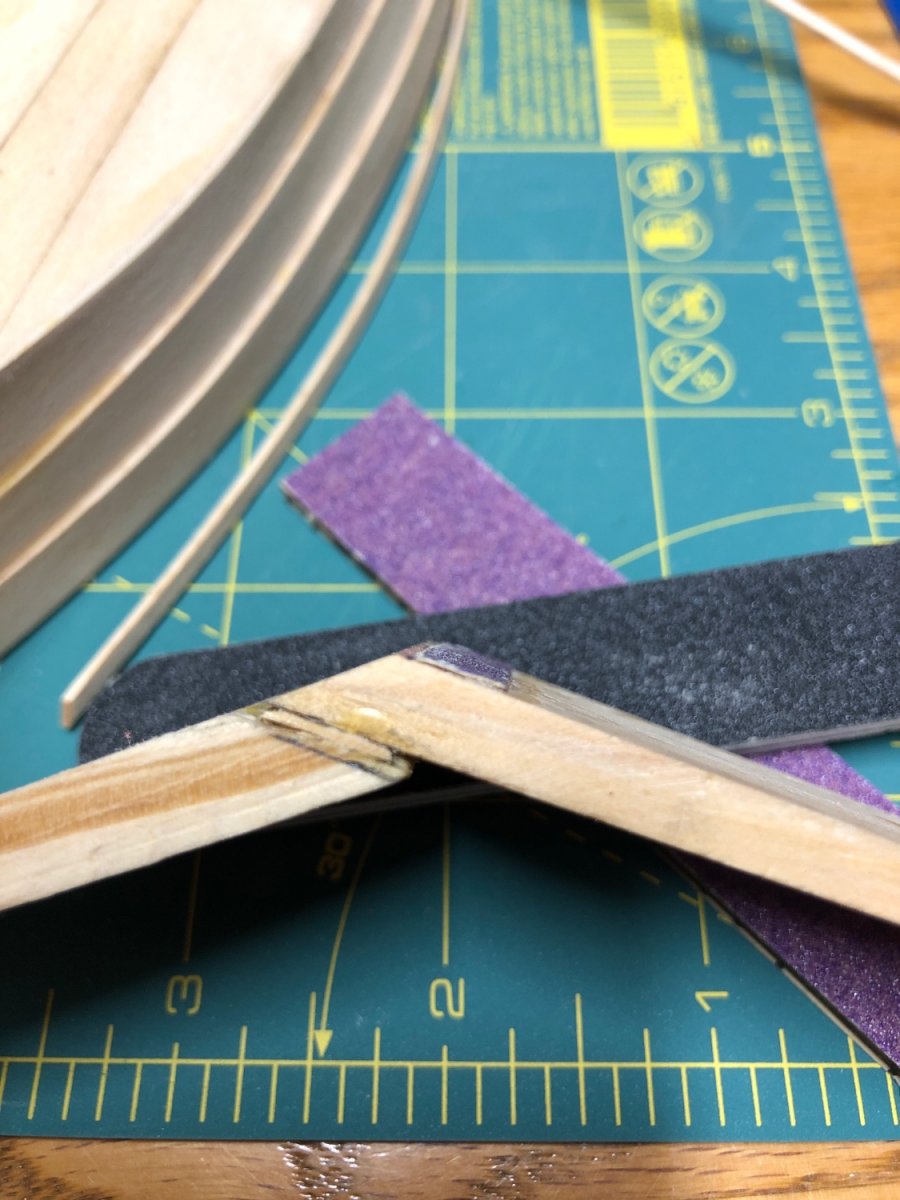
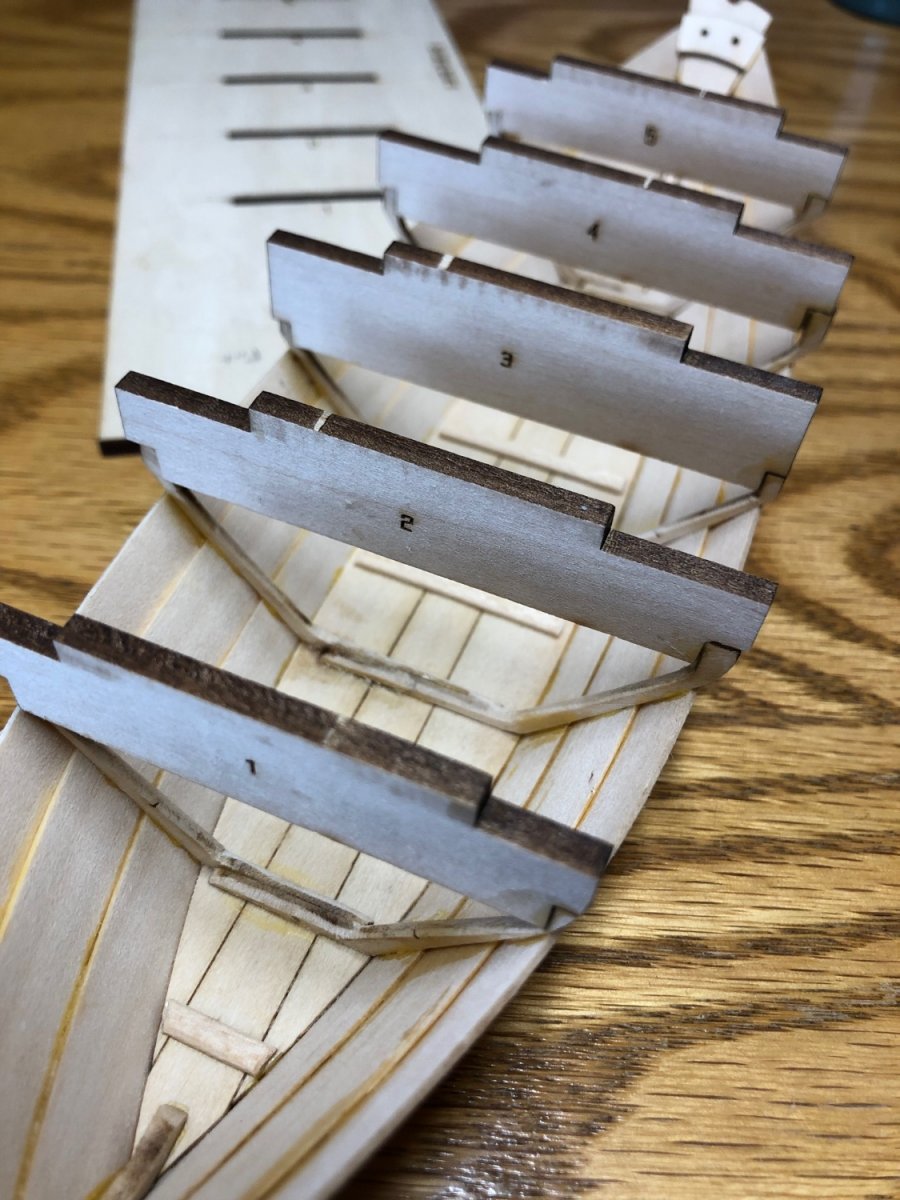
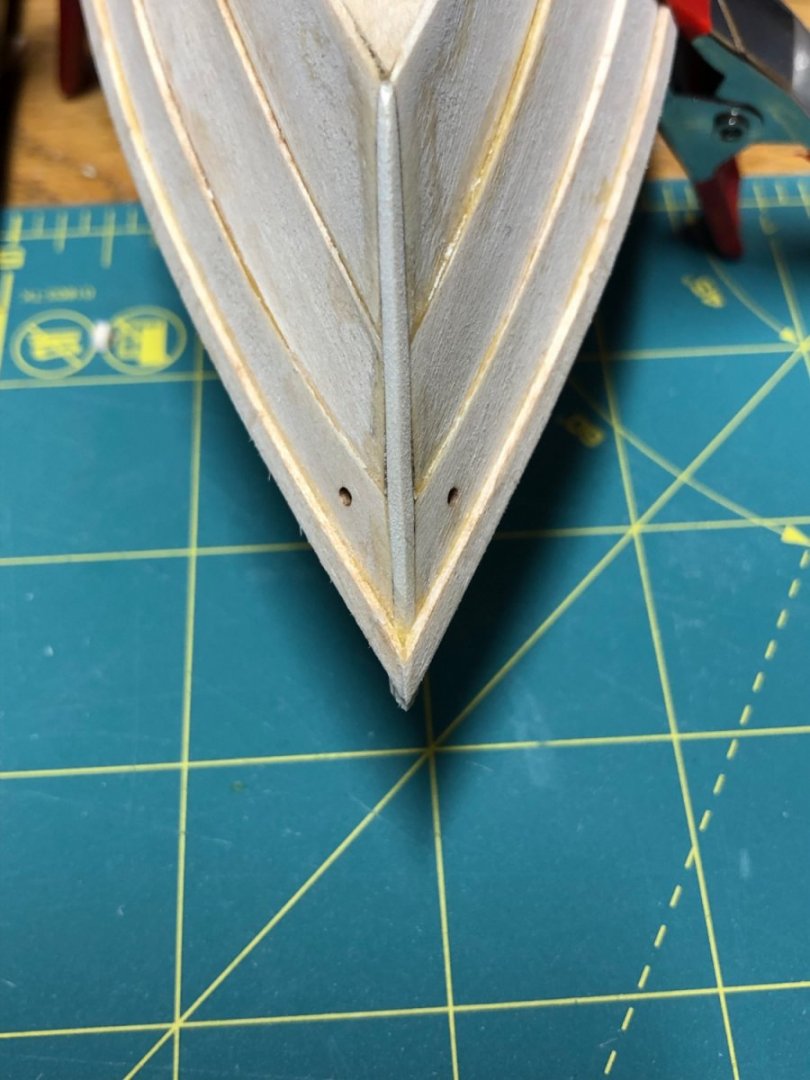
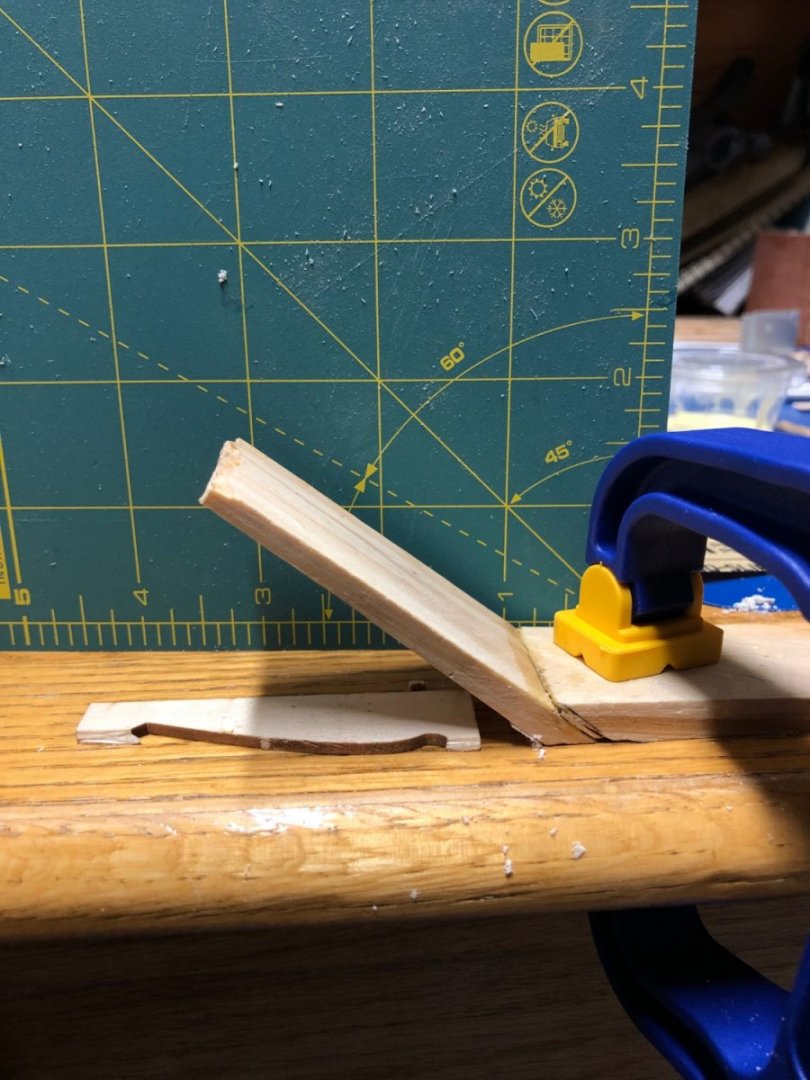
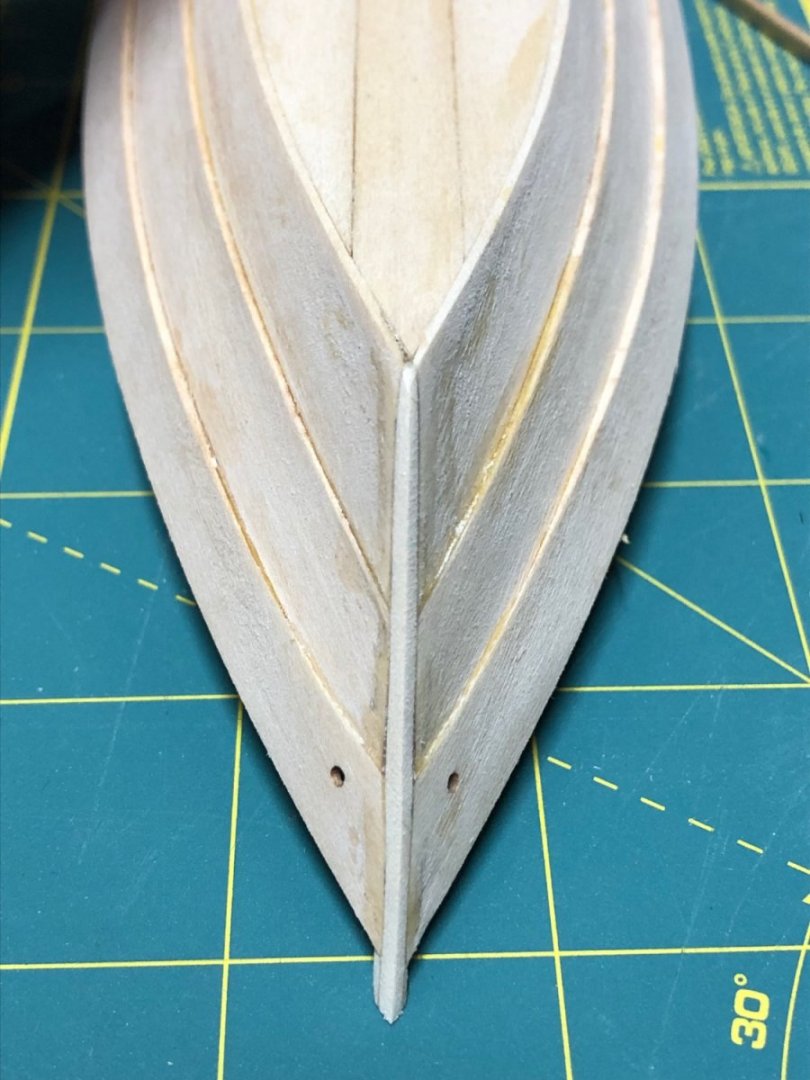
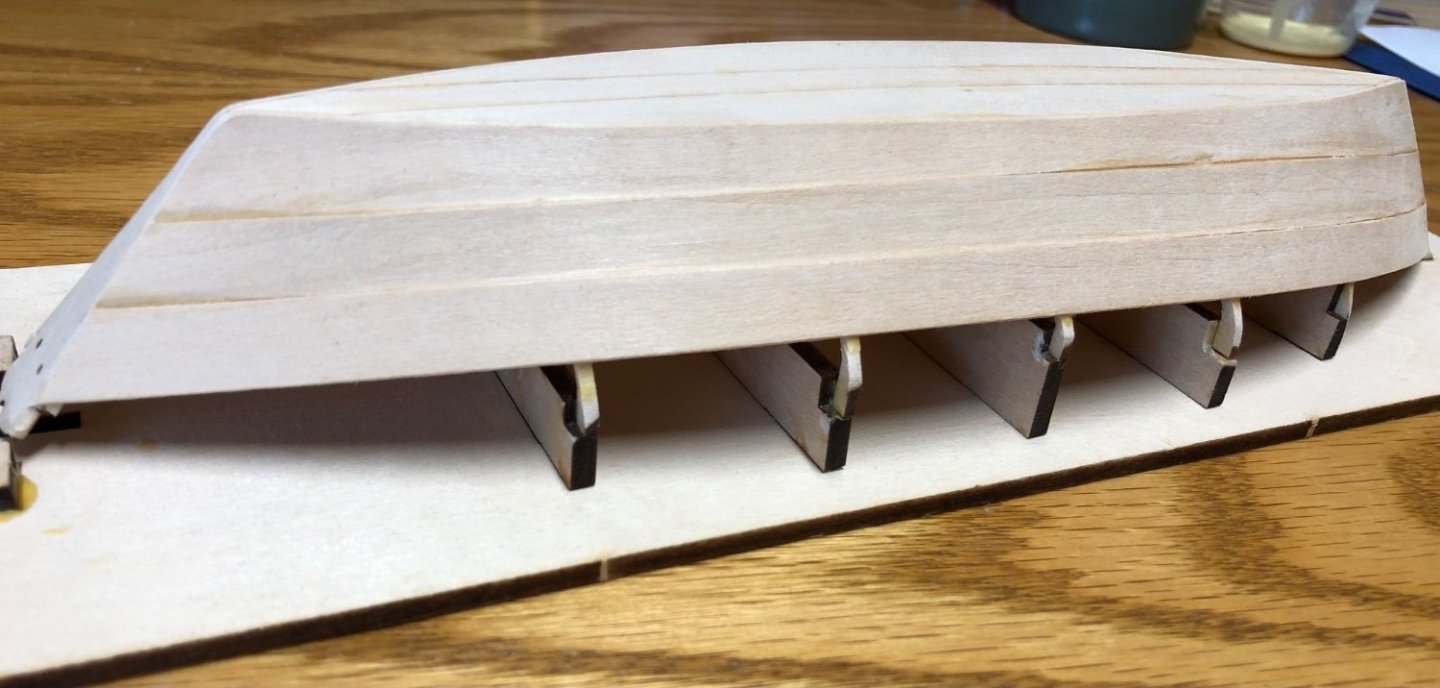
For beveling the planks, I assembled a jig with sand paper on the slopped piece. The slope was supposed to be 45 degrees but is a closer to 40. The sand paper stopped about 2 mm from the deck so that I didn’t sand the entire side with a bevel. Clamped to my desk, I would then use the desk as a flat surface to sand the planks. I cut a piece for my false stem from the original sheet that held the stem. I then used my jig to sand a bevel on both sides making it close to triangular and then glued it to the bow. Then I sanded the it until it was flushed with the planks. Side cleats are on and seat risers are installed. After installing them, I had the thought that I may have wanted to leave them off for painting. It was a light glue job so I could remove them but then I would risk losing the score marks that help with alignment so I will leave them at least until I apply spray primer. My bands are bent but I am pausing before attaching to figure out how they should meet at the bow/stem. A basic butt would be the easiest but a mitered butt would look better; however I am not sure it is will be noticeable one painted. Although not stated in the instructions, the photos don’t show if the bands warp around in front of the false stem or if they terminate abeam the stem.

- 23 replies
-
- 5
-
-
- Model Shipways
- Shipwright Series
- (and 2 more)
-
Does anyone know where the false stem comes from? I don't see it within the laser cut sheets or listed on the parts sheet and the instructions just state - "Wet the outer surface and glues this extra piece on." It seems like I must be missing something obvious but I can't seem to solve for it. I am contemplating fabricating the false stem from scrap of the sheet that the stem came on. Thanks!
- 23 replies
-
- 1
-
-
- Model Shipways
- Shipwright Series
- (and 2 more)
-
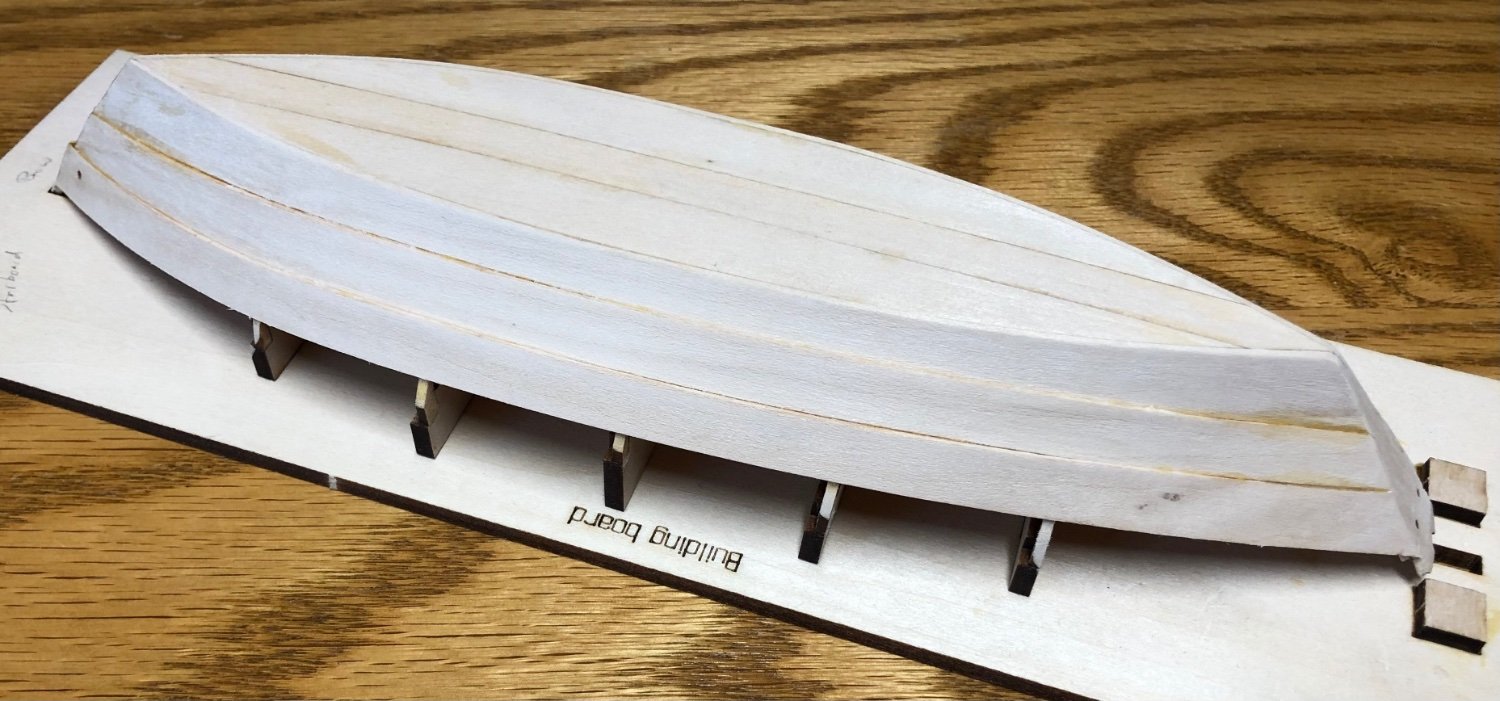
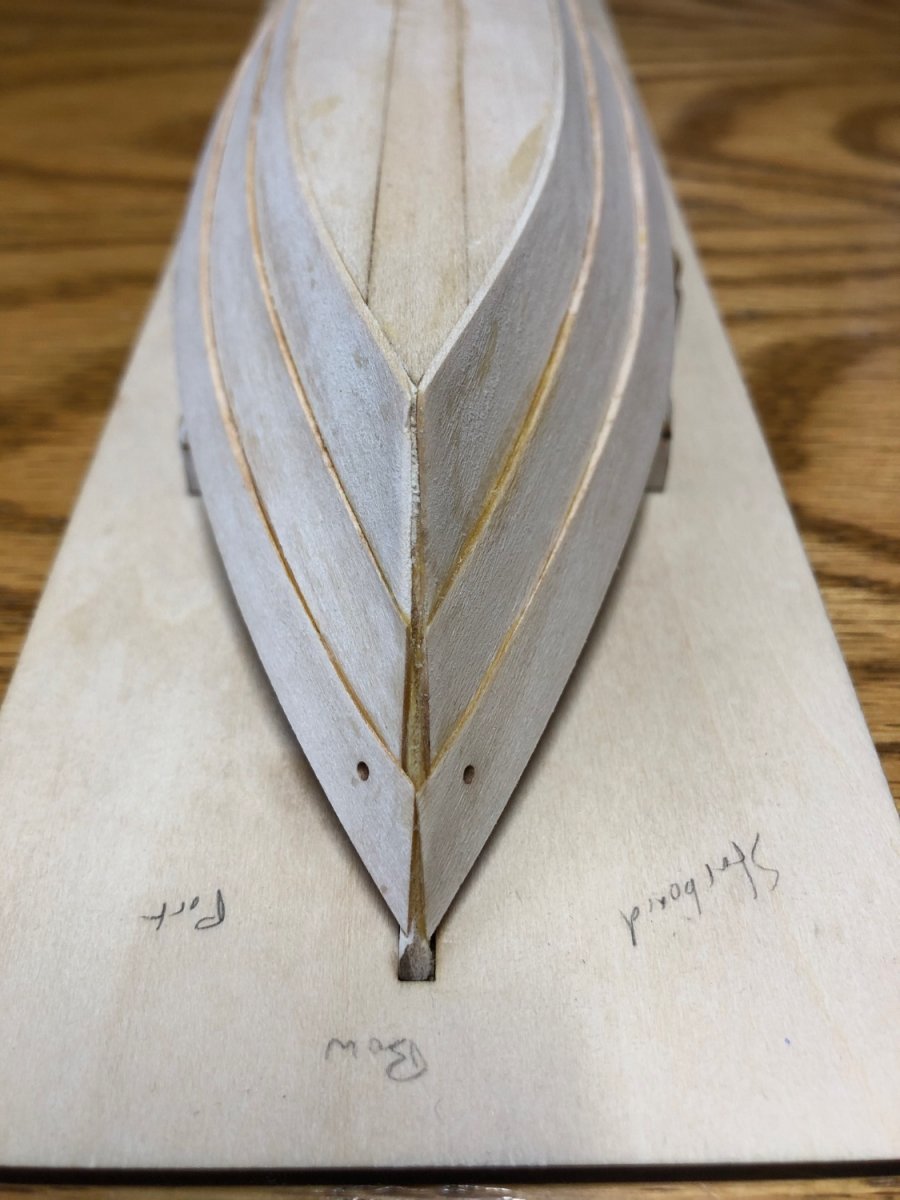
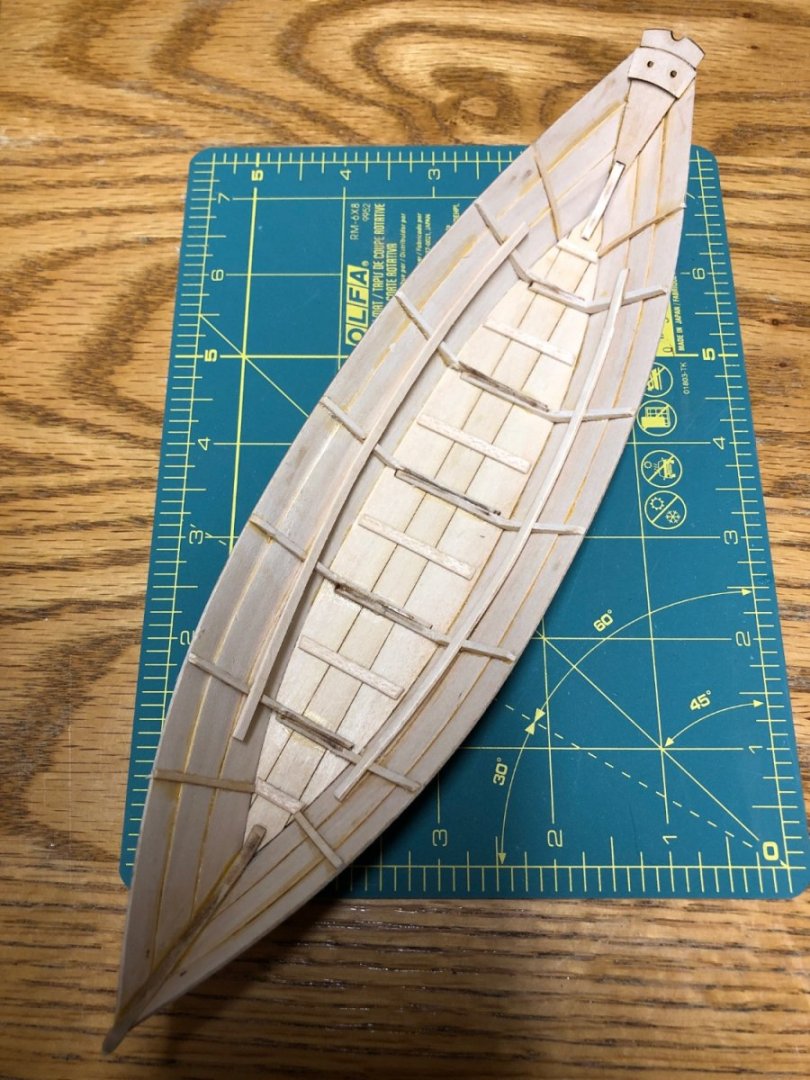
Finished the planking! I have limited squeeze out from the glue but there seem to be many spots where the diluted glue has soaked the wood and is pretty flush but stained the wood. I’ll work on clean-up in a few spots. I am not 100% confident/happy of how the planks came together at the bow. Especially the broad strake may be too far back- I’ll see soon when attaching the false stem whether or not this will be noticeable. In reading other logs I learned to watch for consistent plank height and think I did okay with that but definitely made adjustments when gluing. Now to patiently clean up glue spots (like by frame 4) and sand the inner frames. I think that this optional step of sanding the inner frames is essentially faring the hull, just on the inboard side.


- 23 replies
-
- 5
-
-
- Model Shipways
- Shipwright Series
- (and 2 more)
-
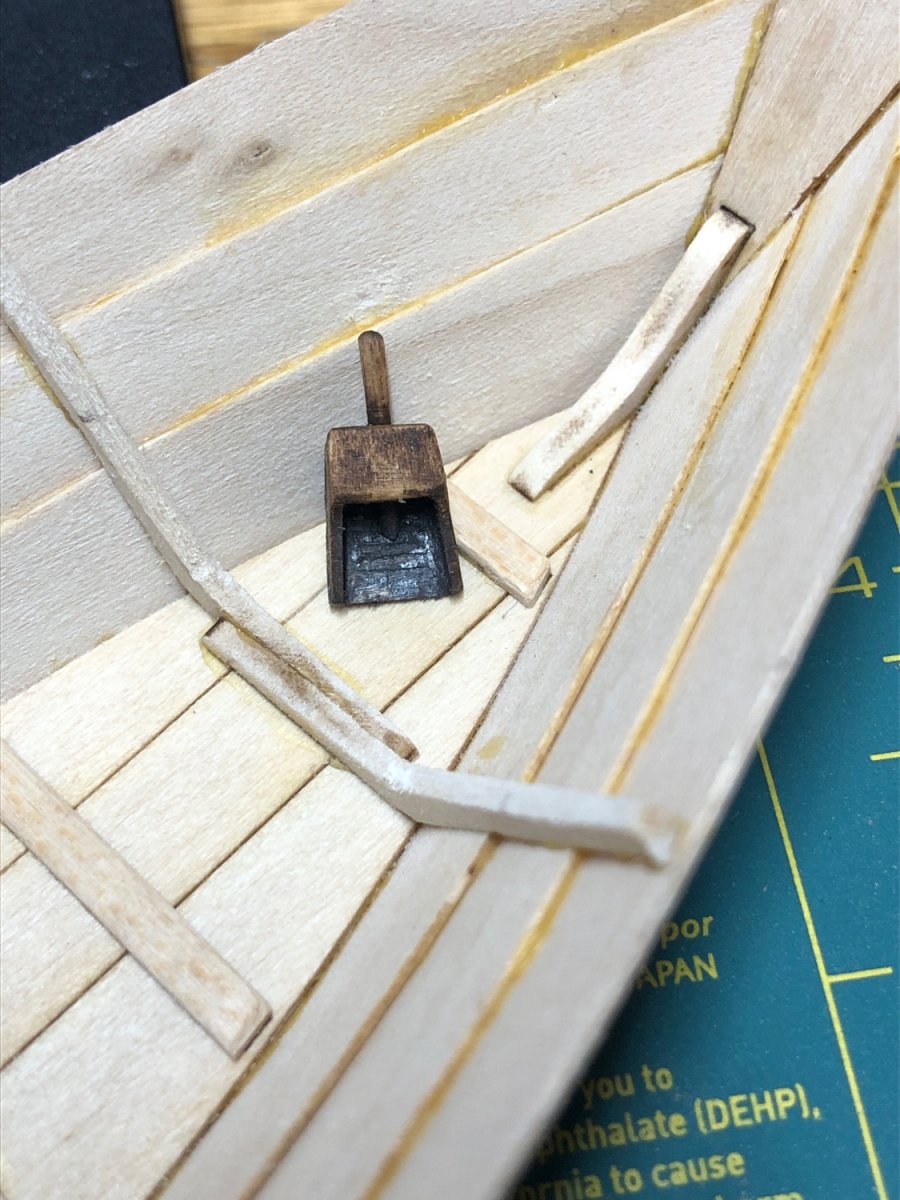
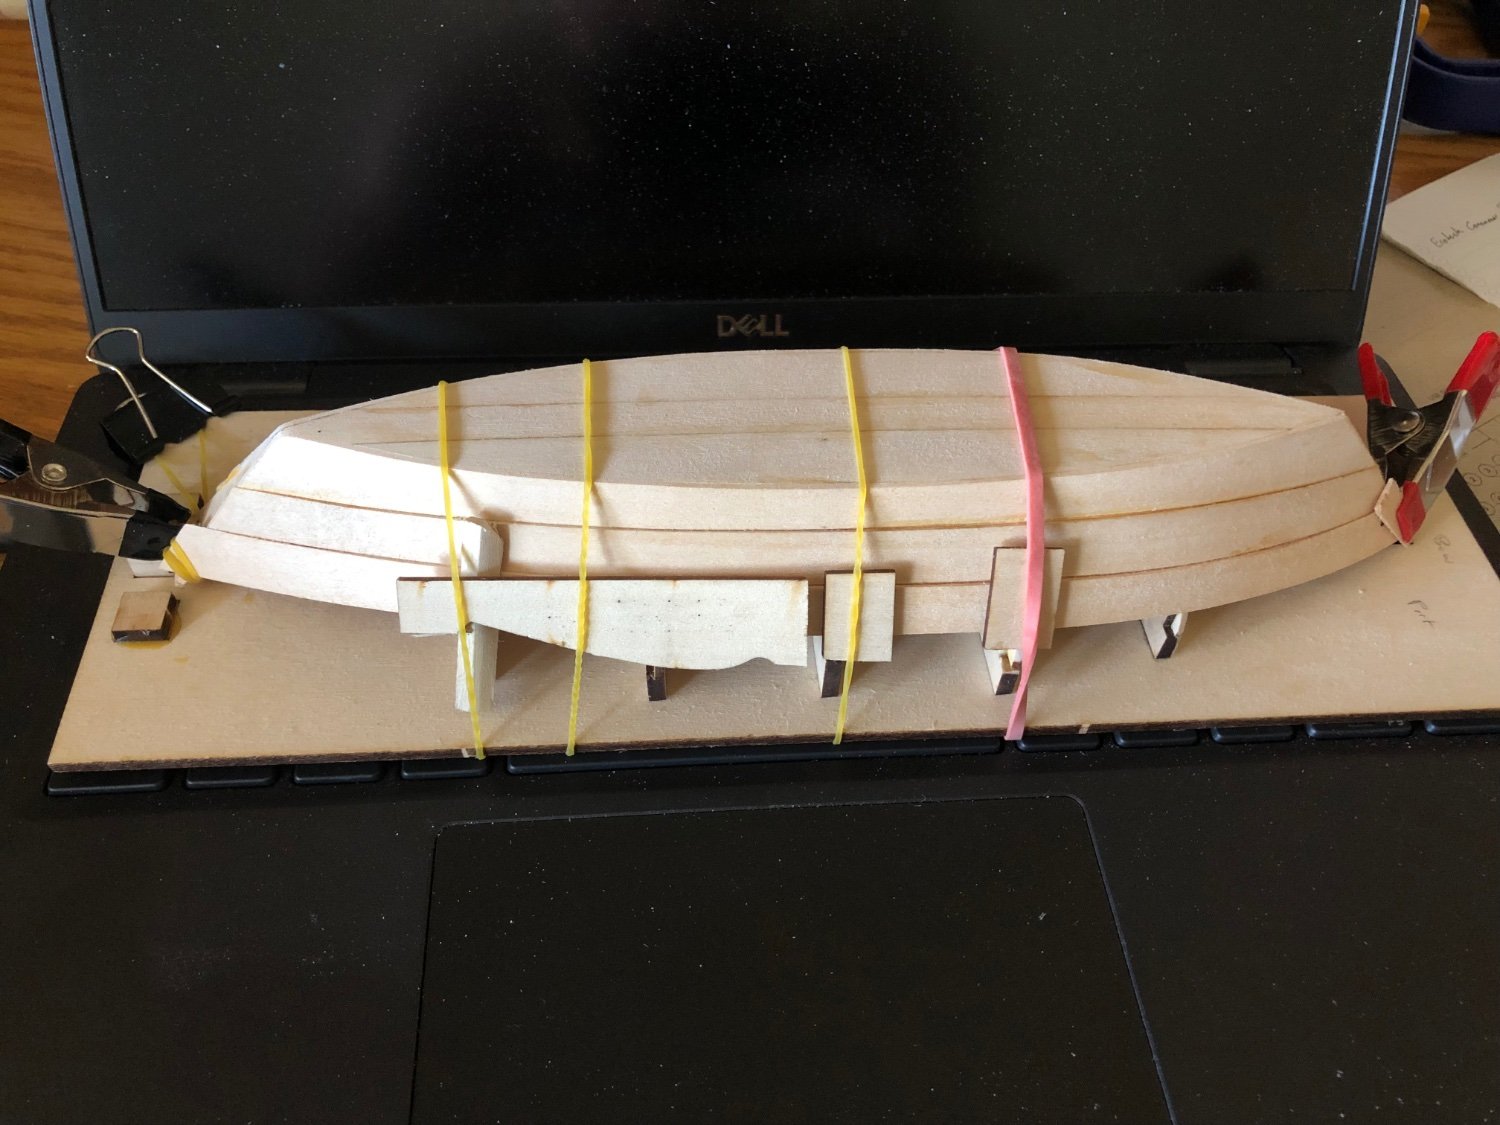
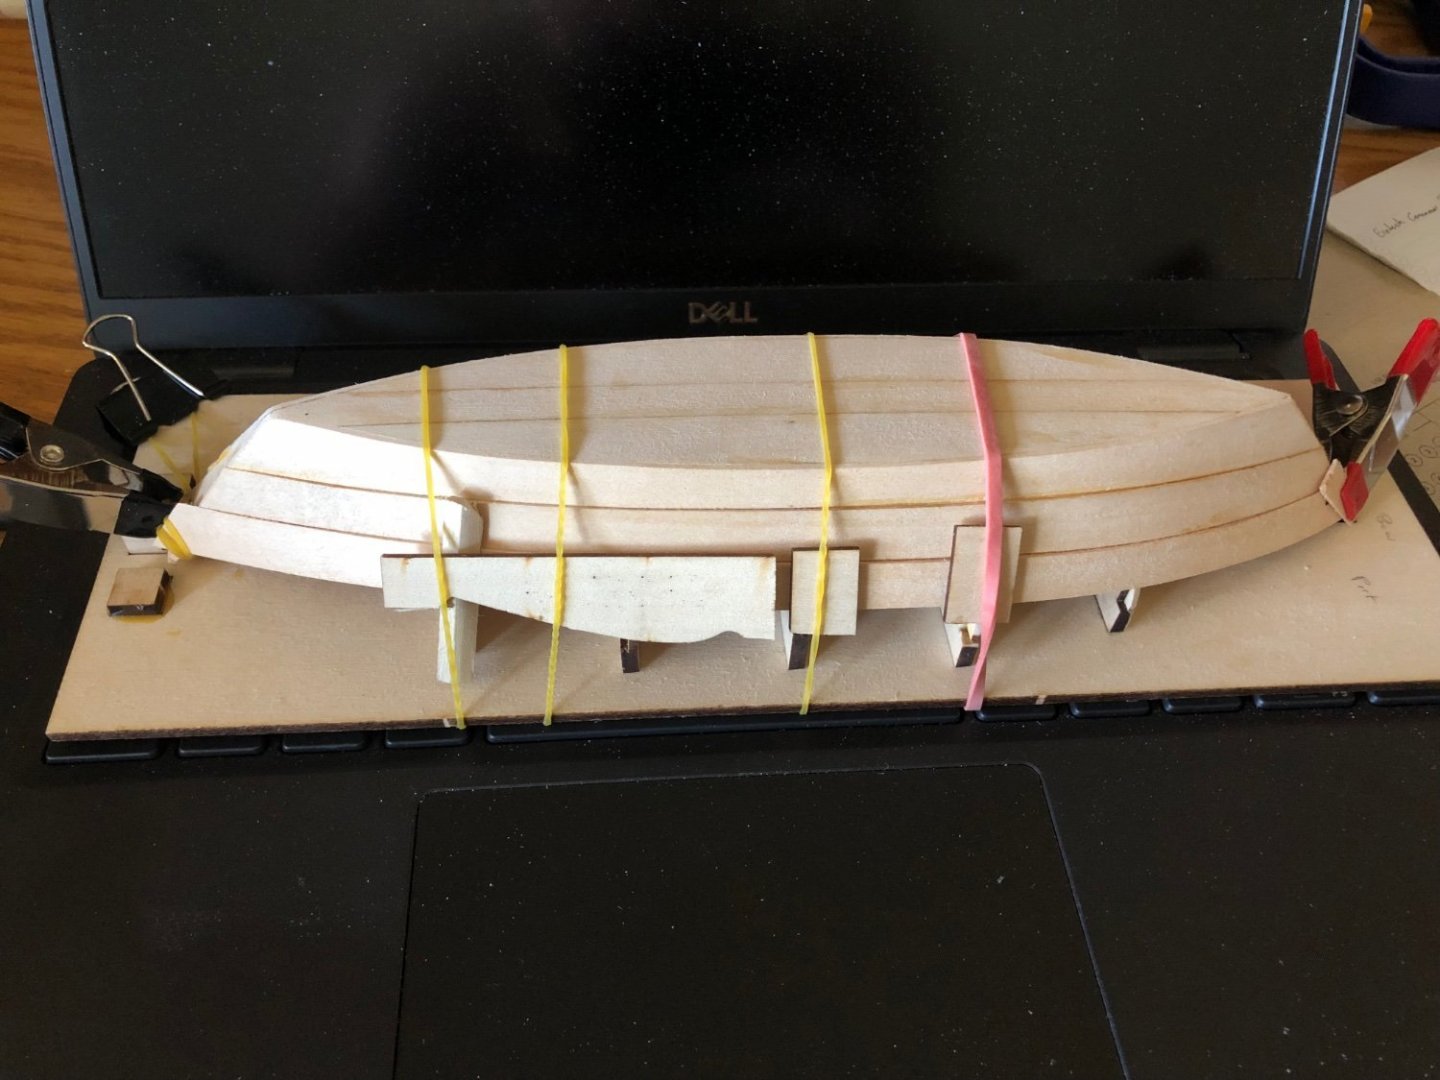
Once the glue is dry I will trim the bailer and take more photos. Here on the build board the starboard sheer strake is clamped for bending.
- 23 replies
-
- 5
-
-
- Model Shipways
- Shipwright Series
- (and 2 more)
-
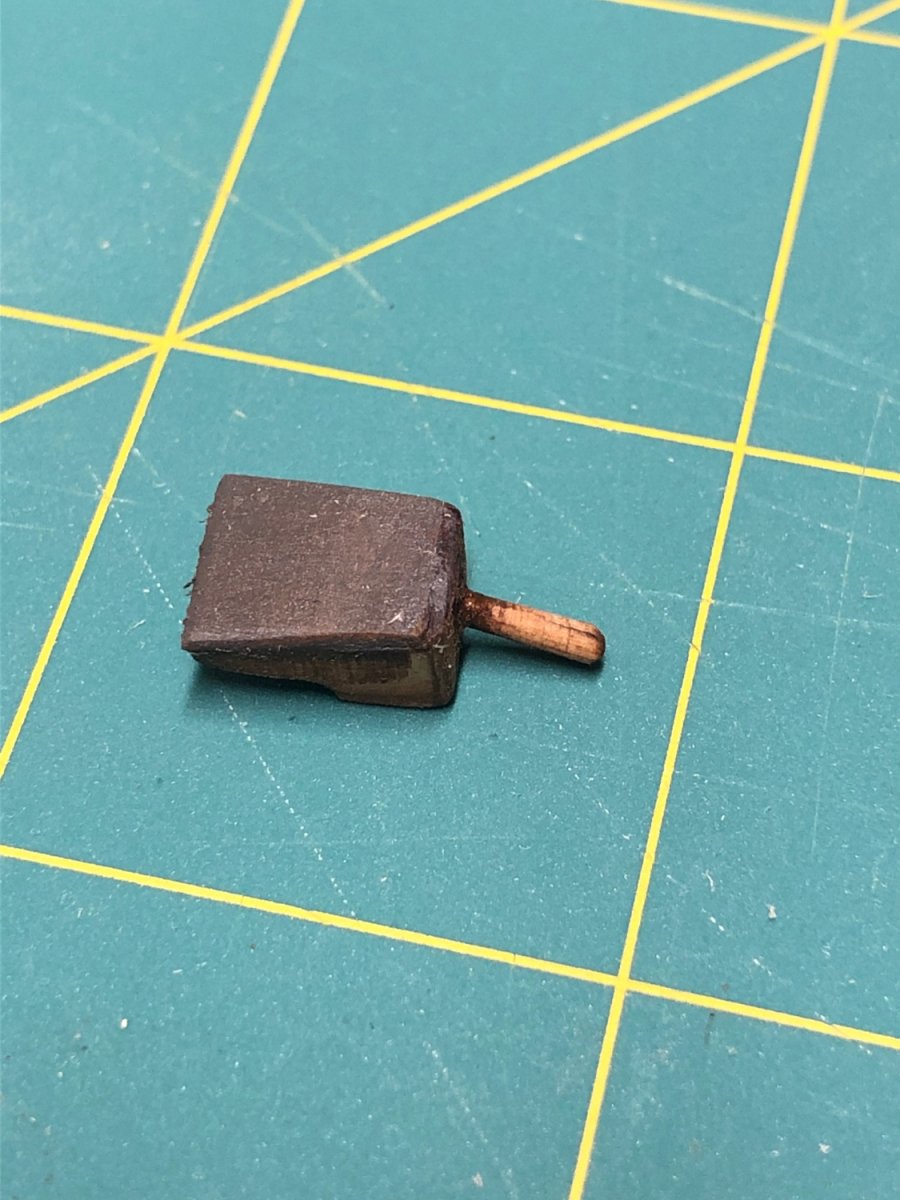
Well, I have put off starting a build log for long enough. Part of my reluctance is due to my slow build speed and the limited time I have towards modeling I want to spend on the model vs. typing up notes and photos. The other is that most of my internet access is through a mobile phone which isn't the most fun to write a build log from. But now with the preamble out of the way... into the build. I have dabbled in modeling for awhile off and on. I have build a few plastic models, a few ships in a bottle and have been working on a couple of larger models from Model Shipways and Billings. I recently got back to the modeling table and seeing the great reviews that that Shipwright Series was getting I figured I should build my way through the Dory, Pram and Smack to gain a firmer foundation of skills before continuing on my other builds. I ordered Model Shipways kit no MS1474 which has all three Shipwright Series kits and tools but does not include the paint. Upon arrival, I found the inventory to be complete and started by reading the directions cover to cover twice. I forced myself to slow down and read them rather than just skimming the photos and diving in. This was a big help. I also read many of the existing build logs to see where people had challenges etc. Then I started punching out the pieces for step one. At this point I am wrapping up the planking so here are a few notes from my build so far: 1) Cutting out the pieces from the back of the laser sheets was a new tip I picked-up. 2) The kit includes a back-up bottom piece. I was having a little trouble with lining up the planks and was tempted to just grab the back-up and start with that. That would have been a grave mistake. The bottom plank assembly was one of the easier steps encountered so far and learning to joint and glue the bottom planks was not only a good skill learned but gave me a sense of accomplishment and confidence going into the planking. It gave me peace of mind that if if did mess it up beyond repair I did have a back-up. Don't rely on your safety-net, but move forward confidently knowing it is there if you slip-up. 3) When placing the stern knee and transom I could not find how far back they should be set on the bottom. I checked many build logs but didn't find conclusive answer so I tried to place them far enough off of the bottom to just barely need sanding and that seemed to work out well when it came time for faring. 4) When assembling the frames, I found that the cross pieces were all longer than the pattern on page 5. Some build logs have shown builders modifying the cross piece but I opted not to. I don't know if that was correct, but I figured that it would be easier to deal with the wider width of the overall frame than trying to modify the cross piece and ensure that the rib's notch was square. 5) It wasn't clear in the instructions or in build logs if the the ribs should be flus across the entire bottom or if they started to rise at 45 degrees before the edge of the bottom. I assumed flush across the whole bottom, but my frames were mostly all too narrow. When gluing the frame pieces, I had them square in the notch of the cross piece and the two overlapping pieces of the bottom flush/square so it seemed correctly glued. After faring and placing the garboard, I think that they should have been wider, but the error (if it is) isn't noticeable to the casual observer. 6) In the planking process, patience is definitely key. Letting the soaked and bent board dry fully seems to take forever but is worth the ease when gluing the plank. There is likely a more expeditious manner but right now, I am bending a plank in the morning and evening and then gluing the next day such that in 2 days, I can complete one row of planks. 7) Clamping the ends is difficult. The first plank in the row is easier but its opposite requires some creative techniques. So far, I haven't found one that I love but I have found different ways to be successful. While waiting for planks to dry etc. ,I have considered moving ahead to the the oars, but those seem daunting... so I tried my hand at scrap building a bailer. I used margin material from the plank and rail sheets (WP1470). I based the dimension on a few photos of antique bailers for sale and ended with 9" by 7" with a 6" handle. The volume of the enclosed portion is 40oz. which seems a little small to me. I stained the bottom grey as some of the bailers appeared to have a metal bottom but it didn't show up with as much contrast as I expected. I used pre-stain, but still had some splotches from glue staining. Photos to follow.
- 23 replies
-
- 3
-
-
- Model Shipways
- Shipwright Series
- (and 2 more)
-
When I first started wooden ship models, my father-in-law got excited to show me his collection. They were a variety of ships purchased on vacations and travels from various gift shops. Most probably were had for about $20 and despite the brass name plate affixed to the bases, they all seemed to be basically the same thing. Below are a few links to similar models but I don't have the photo rights so I am hesitant to post photos: Pirate Ship Confection Discovery Bounty Now, I am pondering, how can I create a model that is most representative of my talents and closer to the generally high quality seen here rather than the those found at the corner drug store. In studying the models from my FIL and the photos linked above, I have identified a few core themes. But PLEASE add on from your experience. Also, correct me if I am misstating something here. Fit and Finish - ensuring that all joints are touching, angles correct, lines straight etc, all edges sanded smooth etc. Scale wood - use the correct (or as close as possible) thickness and width of planking for decking, deck houses, hatches etc. Scale rigging - especially blocks and a variety of diameters for running and standing rigging even if precise scale can't be achieved, using more than just the same black thread for all. Scale and tapering masts and spars rather than all just the same diameter dowel Paint - clean edges, thin coats, matte finish rather than high gloss Metal work - don't leave fittings and metal in the kit finish (unless accurate). Most need to be blackened, especially brass pieces which are not representing brass in the actual world What did I miss? What do you pay attention to that helps ensure a good outcome rather than something that looks like a toy or a child's craft project. Nate