
HOLIDAY DONATION DRIVE - SUPPORT MSW - DO YOUR PART TO KEEP THIS GREAT FORUM GOING! (Only 13 donations so far - C'mon guys!)
×


DocRob
-
Posts
1,257 -
Joined
-
Last visited
Content Type
Profiles
Forums
Gallery
Events
Everything posted by DocRob
-
 Thank you for the suggestion, I heard about Solvaset, but don't have any, but other possibly stronger setting agents than Micro Sol. I think the Micro Sol will be sufficient and I will apply several coats first, before switching to hotter agents. I really don't want to damage the clear canopy, there is no respraying, if something goes wrong . Cheers Rob
 -
Thank you Mark, until now everything turned out ok. My major concern in the moment is the front wheel strut. I hope it holds the hefty weight of the Arado. Cheers Rob
-
Progress is slowly, as there is not much bench time and I started another in between project, but I finished the underside of the Arado, adding pitot tub, antenna, the parachute release ropes for the starting rockets, steering horns, ... I also touched up the underside color, where necessary. Flipped to the other side, I started decaling the canopy framing with the supplied rivet decal strips, a task, I wasn't looking forward to. I don't like to work on canopies, but the Arado needed it all, sawing, sanding, painting, masking, gluing, drilling, in other words, many ways to potentially damage the canopy. Luckily this was not the case and the decals behaved mostly well, some, I hope to lay down better with following coats of Micro Sol, fingers crossed. The framing isn't finalized, which will be done, after the decals have thoroughly dried. Cheers Rob
- 79 replies
-
- 13
-

-
What a tragic story, Roger. If you refer to the parachute on the two Rato starting rockets (Walter HWK 109-500), these will be dropped shortly after the start and the parachutes will be released through a thin rope, which is connected with the wing and opens the parachute when the Rato rockets falls down. They burn only for a short period of ca. 30s, helping the heavy plane to accelerate faster for take off. The Rato's are reusable and drop near the airfield. The ropes for this mechanism will be added later to my build. The Arado 234 also has a braking parachute in the aft fuselage, which to my knowledge is released with an explosive charge, pulling out the parachute. This is the strange loop, you can see on my belly pic of the Arado. Cheers Rob
-
What an interesting encounter. I hope you can repeat the meeting and maybe prepare yourself beforehand. When I get the chance, I will visit the museum to see the real thing. Like I said before, the Arado 234 is one of my favorite planes in many different aspects. I'm also eager to see, you doing your magic wit the Hasegawa kit. I thought about buying one as well, but when I decide to build a second 234, it will be another Fly 1/32 kit, possibly the reconnaissance version. Cheers Rob
-
I can't tell you how happy I am, to have reached this point. The Nachtigall is not done, there is a lot do do until she is finished, but adding the subassemblies to the underside and remove the masks from the canopy was a major step. The canopy had some staining on the glass, where I'm not sure, where they came from. Luckily, could rub them carefully away with a cut toothpick. The framing needs to be decaled with rivets, the black color is only the base level. I hope the landing gear holds up, as the Arado is a really heavy bird with all the heavy resin bits inside and the heavy nose weight as well. Cheers Rob
- 79 replies
-
- 13
-
-

-
Thank you Popeye, the painted variant looked good until I tried to remove the residues of the masks glue . I can live with the decals, silvering on 'silver' is not so much of an issue. Cheers Rob
-
To subdue the camo contrasts a bit and to enhance the visibility of the panel lines, I applied Flory clay wash dirt type onto the whole airplane and wiped the excess away with damp paper towel and cotton buds. It's more visible on the underside naturally, but it ties the paintjob together. I will not apply more weathering, as I think, the service time of these night fighters was brief. I resprayed and decaled the external tanks along the Rato rocket packs (not shown). There are no masks for the Ratos stencils provided by 1ManArmy. The gun pod was treated with clay wash as well and got it's resin barrels inserted. Now there are only some small works to do until final assembly, which I will start from the underside up, beginning with the wheel struts. Cheers Rob
-
Thank you, normally, I have no problems, masking over Extreme Metals. They are more durable than Alclads and very robust and I painted the tanks some weeks ago. I was so astonished, because the 1ManArmy masks behave like normal Kabuki masks in all other cases. On the tank I used two different types of Kabuki tape for the rest of the masking, without issues. Learn something new, every day . Better there, than on the airframe. I would have blindly used the 1ManArmy masks with Extreme Metals as a base, given my experiences with both, color and masks. Now I'm forewarned. Cheers Rob
-
Stripping off the masks revealed, that there are some touch ups needed here and there but nothing mayor, like paint running under masks or other gruesome incidents. The de-masking took about four hours in a sleepless night. The masks behaved perfect, adhered well and were removable residue free, at least here... For black markings and crosses, I used a mix of two thirds flat black and one third Nato black, the white got a tiny drop of sand added and was only sprayed 90% opaque. Super fine markings, heavily macroed: With the last step of de-masking, I experienced something unexpected. While removing the masks of the external tanks, I found, that the 1ManArmy stencil masks were nearly impossible to remove, completely contrary than on the airframe and left they sticky residues onto the surface. First I suspected the red color to be the culprit, but it was the same Tamiya XF flat red, I used onto the plane, thinned with Mr. Levelling Thinner, where it worked flawless. When I removed more masks made from my stock Kabuki tape without issues, it became clear, that somehow the adhesive from the 1ManArmy masks must have been reacted with the base layer of Matte Aluminum from AK's Extreme Metal range. Normally these behave absolutely perfect and it was not the aluminum color which was affected. The masks were only for some hours on the tanks. Warning be careful, if you plan to use 1ManArmy masks over AK's Extreme metals for a NMF paintjob possibly. I would recommend some testing on a dummy. This is how the tanks looked after nearly half an hour of peeling. I couldn't remove the residues any further manually. I tried an alcohol/aqua dest mix, which was not hot enough and a rub with IPA removed the red color completely. Now it's deep cleaning, respraying and decals . Cheers Rob
- 79 replies
-
- 12
-
-
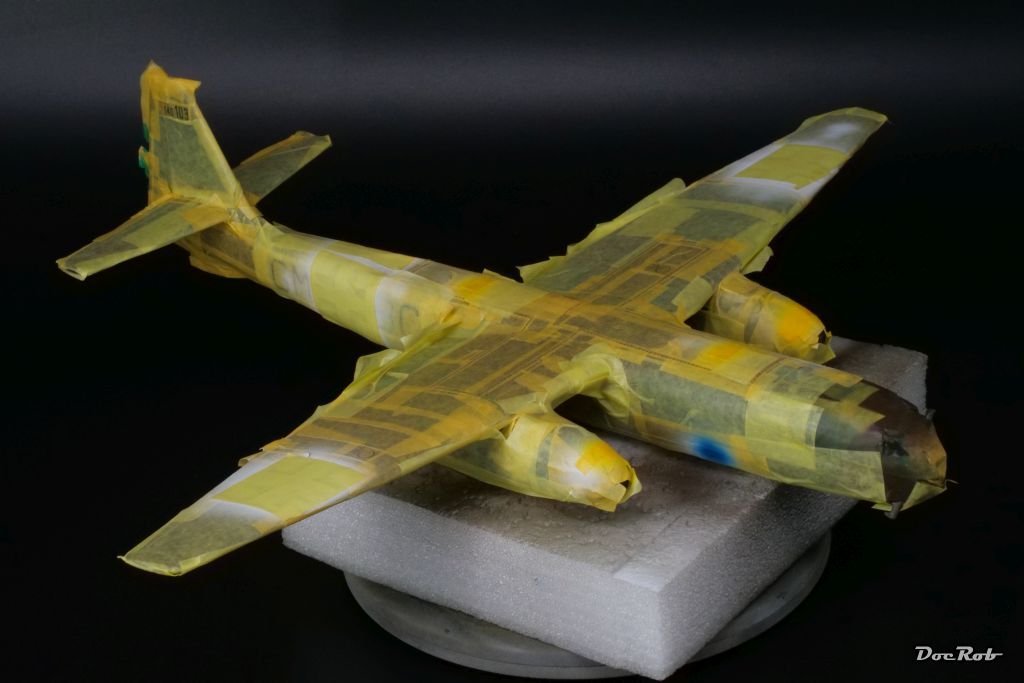
More plane bondage. It doesn't look like much, but I finished the basic masking all over, including the external tanks and sprayed the crosses and white markings first, then the yellow triangles on top and finally a dot of blue for the oxygen inlet stencil. All these steps include permanent over- and remasking . My next build will be Kabuki free. Cheers Rob
-
Thank you Popeye for providing all that insight and the planes codes. The V-designation means 'Versuch' and indicates the prototypes and test planes in order of the numbers. Up to V8 the Arado's were A-models with a starting trolley, from V9 on B-models with retractable landing gear. The development of the 234 was constantly going on, for the airframe itself and for it's assignments in a reconnaissance role first, then the bomber variant and last the night fighter with the added rear operator place and radar equipment and finally the four engine -C variant, where only two prototypes flew in the last days of the war. My code letterings are not on your list. Mine should have worn the SM FE code, but I opted for GM BC, as I have no masks for the correct one. I'm not so much of a rivet counter, but I want to know, what is wrong with my builds and here it is deliberately. I also own Zoukei Mouras He-219 along a lot of add-ons, including a dreaded 1ManArmy mask set, because the decal sheet doesn't look too promising. It will take a while until I start this one after the Arado, but the Uhu always attracted me in a similar way like the Arado and some other weird and technological advanced planes. It appeals the engineer in me for some reason. Short run kits, well, this is one, definitely. My evaluation of kits has changed. I do like to build some shake and bake Tamiya kits once in a while. You can fully concentrate on painting, weathering and learning new techniques on them with a relatively narrow time frame of building time. The not so easy to build kits, I have in two categories, good and bad, as simple as that. Good means, I absolutely want to build it, no matter what, like the Arado or my MikroMir Fokker D.VIII. With these, I open the box and feel the urge to build them and try to find solutions for their shortcomings. The Arado had so many super detailed resin parts for the cockpits an other details, which besides the technical attraction made me want to build it. She sat on the shelf for some time, but I was sure, I will finish the build. The bad ones, I try to omit. I don't buy Italeri kits for example, I don't like the idea of a mayor company issuing so many mediocre or bad kits. They are buildable, but that is not satisfying to me. I have several Special Hobby kits in my stash, but have to admit, I never built one until now, but there is no other reason, than my building schedule. I like their kits, which surely need some extra attention during the build, but what is modelling without a challenge . Cheers Rob
-
Thank you Egilman, sometime it's about “A man's got to do what a man's got to do.” . Where would be the fun in modelling, a completely time and effort wasting hobby, when the spent effort wouldn't be maximized with unnecessary tasks. There is no way to explain what we do to an outsider, it's only us nerds, modelling is important to, so let's keep this little island afloat with some self flagellation. Cheers Rob
-
It depends on the stencil layout Craig. With the Corsair it was easier to mask around the stencils and for many, I used reusable Kabuki templates with a rectangular hole in it to mask around the stencil. With the Arado and multi colored stencils, the walkways with surrounding stencils and the overall stencil distribution, the masking has to be done a bit more thorough. Masking has to be done relatively precise, as there is not much room around the cut stencils. Cheers Rob
-
This is getting out of hand. I'm running out of masking tape and patience. Because there are stencils everywhere, you have to mask around them, which actually means, covering the whole plane in Kabuki. And that's not all, after finishing masking around the stencils, some of them need to be covered, because different colors will be sprayed . It's really hard to make no mistakes and leave a spot uncovered for example the tiny number of each stencil. I needed two exhausting bench days to get to this point and I'm not ready yet. By this time I cut a zillion patches of Kabuki tape and my eyes are hurting from placement work. Are these masks great, yes they are definitely, would I use them on a bird like the Arado again, NOOOO. I used 1ManArmy masks for my Corsair build and this was way easier done due to the placement of the stencils and the used colors. Cheers Rob
-
The Arado 234 was a fascinating airframe in many aspects ahead of it's time, but obviously flawed in some aspects, as the development was rushed, material and fuel was sparse. It was an extraordinary reconnaissance platform, but I think, it's value was a bit overrated in the video. One of it's advantages was, it could fly higher and faster than the Allied fighters and could therefore act in a theater of enemy air superiority. Cheers Rob
-
What an interesting little beauty, Greg and the kit looks decent. I would try to do a complete rigging job but would simplify the turnbuckles, using mainly flexible rigging thread, maybe Ca-ed in pre drilled holes and a drop of CA or white glue to simulate turnbuckles. The outmost wing rigging looks like flat material, where I may would use etched wiring, which would it make easier to have the right angled arrangement, without sag. Cheers Rob
-
Thank you Craig, it's tedious, but it pays, as you don't have to deal with the usual decal problems. The kit decals behaved well, except for silvering, therefore, I opted for the masks, with a heavy heart. Cheers Rob
-
Thank you Ken, I have some books about the Arado as well and there are enough side views provided with the codes on. The material about the Nachtigall (nightingale night fighter version) is a bit sparse though. I have only the kit decals for the correct fuselage code and they do silver, so I need another solution. I may use a false code for my plane, which is supplied with the 1ManArmy masks, but you haven't heard that from me . The Arados flew different types of combat missions, as reconnaissance plane, as a bomber and some attempts with the night fighter as a Mosquito hunter, but without success. The plane proved not to be practical for the role due to lot's of reflections inside the glass house canopy and absolutely no protection for the pilot. It may have been one of the best reconnaissance plane of it's time though, with a high altitude and speed and an unmatched stable base for the cameras due to the non-prop engines. These duties started in June 1944. More than 200 were built, but not all of them saw action. Cheers Rob
-
My test decal on the tail silvered and that meant masking time, hooray . The OneManArmy masks are cut absolutely precise, but it's a lot of tedious work. With the Arad, some masks require three layers of masking and color, phew. Masking the walkways on top of the fuselage and wings was not so easy, with trimming the strips to size and align them with a ruler and good eyesight. The larger markings like the crosses were applied with frisket film on top, which makes alignment and placement easier, a lesson learned with my Corsair build. Now I have to think about the airplane codes on the side of the plane, where I don't have the proper masks for. Silvering decals? A false code and hoping nobody recognizes it? Browsing through my masks and try to find something appropriate? Decisions, decisions... Next will be masking the masks , which will be an equally annoying job, before it's spraying time. I hope my new airbrush will arrive soon, which will be helpful with the fine markings and other filigrane airbrush work, but more about that later. Cheers Rob
- 79 replies
-
- 10
-
-
-
Congratulations Mark, what a beauty. I like the decision, to omit the masts and rigging. I'm exactly at this point with my Duchess of Kingston and can't find the courage for the rigging. With your great build, I realized for the first time, that not all of the gunports have lids and I own this kit as well. Cheers Rob
- 505 replies
-
- 7
-
-

-
- vanguard models
- Sphinx
- (and 1 more)
-
After a proper drying time, I inspected the paintjob and found only some minor flaws, which will be corrected by brush. The constantly pressing on of the vinyl masks payed in the end. To unify the camouflage a bit better, I used a 6000 grit sanding sponge and wet sanded the whole model. It's interesting, how this seemingly unnoticeable effect integrates the different hard edged colors better. I now have a very smooth base and have to decide, if I go the painful route with the 1ManArmy masks or if I use the kit decals. Some markings for my plane are not included in the mask set, so I decaled the Arado's serial number and the kit decals behave exceptionable well. Thin but robust and easy to slide and position. I will evaluate after drying, which way I choose with the markings and stencils. Cheers Rob
- 79 replies
-
- 12
-
-
Thank you Ken, let's hope it stays this way . Cheers Rob
-
That was an interesting detour into the world of super sport cars, Yves. Your restoration work let the old gem shine again and make it a standout in the display shelf, congratulations. Cheers Rob
-
The hard edge camo is done. I sprayed the brown violet over the masked dark green areas and got a sharp result. I used a dedicated masking set, made by LF Models. The masks are made from vinyl and It took some effort to lay them down perfectly, to have no color running under it. The manual is a bit vague in places, relatively small and some codes were printed blue on green, hard to read. Definitely an area for improvement. I always remove my masks rapidly after application, before the color is properly hardened through. Luckily on first inspection, I couldn't make out severe mistakes. After proper drying, I will have a closer look. Cheers Rob
- 79 replies
-
- 11
-