


DocRob
-
Posts
1,257 -
Joined
-
Last visited
Content Type
Profiles
Forums
Gallery
Events
Everything posted by DocRob
-

Renault RE20 Turbo by DocRob - FINISHED - Tamiya - 1/12
DocRob replied to DocRob's topic in Non-ship/categorised builds
You may think, I was lazy, as I've posted no updates, but no. The nature of the build dictate, that there is a lot of painting and planning ahead involved with this build along with time consuming cleanup. The kit shows it's age, but all is manageable. I sprayed different metal and black shades to the monocoque and front suspension but nothing is assembled now, the pictures are only a mock up. I decided to use Polished Aluminum from the Extreme Metal range, but it permanently clogged my airbrush, even after in thorough between cleaning. Strange, last week, it sprayed without problems. I opted for Chrome then, which looks bright and shiny and enough like polished aluminum. As a primer, I used Tamiya's gloss black LP color, which is fantastic for the purpose. The designated AK black primer proved horrible in earlier test and never thoroughly dried, with keeping it's tackiness, even after weeks. All other colors were from Tamiya's LP range, namely Sparkling Silver, Metallic Grey, Silver and Semi matte black. All these colors spray exceptionally well, thinned with Leveling Thinner and are very durable. Cheers Rob- 111 replies
-
- 11
-

-

-
Renault RE20 Turbo by DocRob - FINISHED - Tamiya - 1/12
DocRob replied to DocRob's topic in Non-ship/categorised builds
I'm looking forward to your GT 40 build, is it 1/12 as well? No matter which kit you own, I guess the supplied tubing is always lacking some detail and can be refined. Cheers Rob -
Renault RE20 Turbo by DocRob - FINISHED - Tamiya - 1/12
DocRob replied to DocRob's topic in Non-ship/categorised builds
Me too, I think, I will use them, which means to cut off all the plastic tube holder parts and drill some tiny holes and add short pieces of wire, to accept the tube. Cheers Rob -
Renault RE20 Turbo by DocRob - FINISHED - Tamiya - 1/12
DocRob replied to DocRob's topic in Non-ship/categorised builds
I took a photo for comparison and product numbers. These are the tubes I have. The unpacked one on the bottom is the Tamiya supplied one. It has an outer diameter of 1,2 mm. I think, I will exchange the tubes, but as I have to wait for the connectors, I leave the Tamiya tube on for the moment, until I know, which preparation is needed. Cheers Rob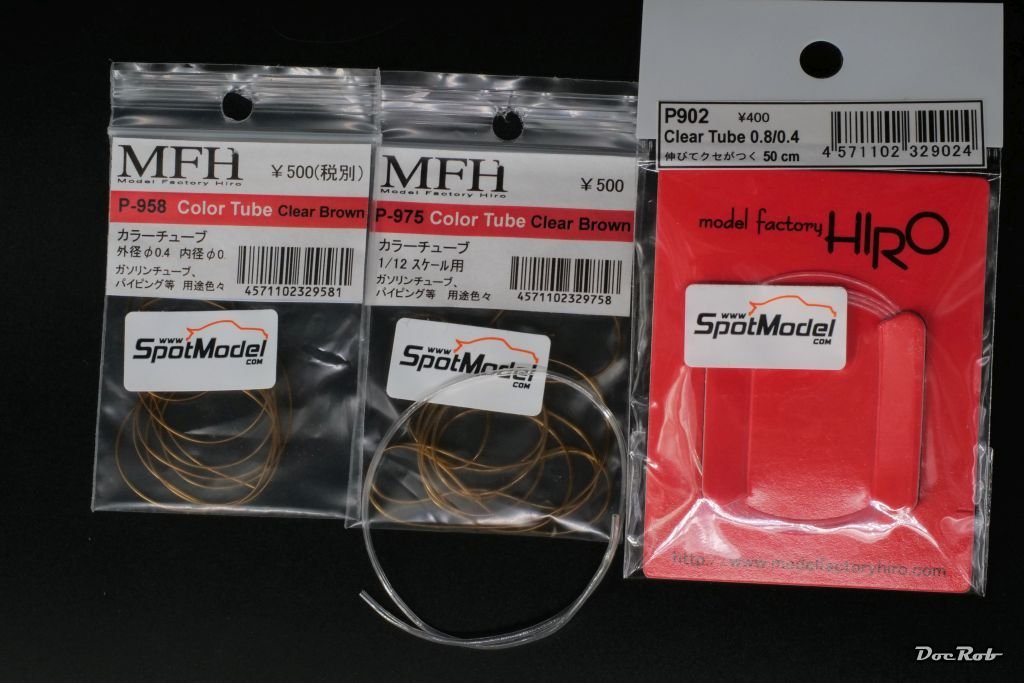
-
Renault RE20 Turbo by DocRob - FINISHED - Tamiya - 1/12
DocRob replied to DocRob's topic in Non-ship/categorised builds
I thought the same Craig, and I may substitute them with clear yellow tubing from Hiro. I will wait for my supplies of connectors to arrive, until I decide. The clear yellow tube has a outer diameter of 0,8 mm and should look better. Cheers Rob -
Renault RE20 Turbo by DocRob - FINISHED - Tamiya - 1/12
DocRob replied to DocRob's topic in Non-ship/categorised builds
There was a lot of work involved for it replicating only a 1,5 liter engine. The turbo chargers which will push the engine to about 500 PS are not even included. Cables and wires are not finally attached, as I may add some resin connectors later, if my parcel ever arrives. I added a thin black oil color/white spirit wash, to enhance the details a bit. Before, I tried Tamiya and AK panel liner, but didn't like, how difficult they were to remove and found the oil color mix much mor controllable and noted for the future, to mix my own washes preferably. Fit of the parts was not brilliant, but in most cases sufficient. I had to cut some connector lugs for the belts and few other smaller parts, but no major complaints. Cheers Rob- 111 replies
-
- 12
-
-
-
Renault RE20 Turbo by DocRob - FINISHED - Tamiya - 1/12
DocRob replied to DocRob's topic in Non-ship/categorised builds
Thank you Gary, the good thing with the RE 20 is, due to the reboxing, it's still widely available and has Cartograph decals along with a PE-fret, when you chose the new edition. The kits have aged relatively well, but quality wise, they are far away from Tamiya's todays standards. Lot's of cleanup is necessary, but I believe, you can build a very nice representation from the kits. I only have the Brabham BT44 in large scale in my stash, along the huge Martini Porsche 935. Kits of the same age more or less, but I look forward to build them someday. Cheers Rob -
Renault RE20 Turbo by DocRob - FINISHED - Tamiya - 1/12
DocRob replied to DocRob's topic in Non-ship/categorised builds
I have a wide array of interest modeling wise and a great interest to replicate the used materials correct. Therefore, I like to read in others build threads, how they achieved their great work and let me inspire by the materials they used. Knowledge of other users about colors and weathering products is very important to me and that's why I normally document what I use. The flat aluminum called for in the Renault's manual Tamiya LP-38 is dead flat and doesn't look right to me. I would have chosen another color, but found, with a bit of semi matte clear coating, everything came together. Cheers Rob -
Fantastic work Yves, I stumbled into your build log by accident and now I have to read 15 pages, thank you for that . Your work with the Bellona is absolutely perfect, one thing caught my eye immediately was the beautiful patinaed copper bottom. Cheers Rob
-
Renault RE20 Turbo by DocRob - FINISHED - Tamiya - 1/12
DocRob replied to DocRob's topic in Non-ship/categorised builds
Continuing with the engine, all parts were sprayed with Tamiya LP matte aluminum per manual. After masking, I applied Tamiya X-3 Royal blue, which I left a bit translucent, to have a nice anodized appearance. Next, I picked of the ribs and branding with a soft lead pencil. The AK weathering pencil silver was not found suitable after testing. After some detail painting, I assembled the engine so far and decided to give it a coat of Tamiya LP semi matte clear, as the matte aluminum was too matte for my liking. I plan to use a very thin oil wash next, where the clear coat will be a good base for. Another test of patience were the numerous belts, which were sprayed in matte aluminum entirely and then the belts were painted with Tamiya LP Nato black. Various parts, which will be added to the engine block soon, were painted with AK's Extreme Metals dark aluminum, polished aluminum and duraluminum. Cheers Rob- 111 replies
-
- 12
-
-
Renault RE20 Turbo by DocRob - FINISHED - Tamiya - 1/12
DocRob replied to DocRob's topic in Non-ship/categorised builds
We had a heat wave here, combined with a heavy storm and a humidity under 15%, definitely no weather for airbrushing, but as my cave is relatively cool, I managed to prepare a zillion parts for the engine and suspension, which is a really time consuming task with this dinosaur. Lots of flash and burr, every part had to be inspected closely. I filled all the gaps and ejection marks on the wing with Perfect Putty, as best as I could, which is hopefully sufficient. I really suck at filling. The engine parts, of which there are many, got a coat of Tamiya LP flat aluminum as a base color. The next step, I pondered in my small brain. The cylinder covers as well as some other parts of the engine block, where in a blue paint, originally. I tried to mask the demarcation line with tape, but was unable to get a perfect masking with the difficult shape of the part. Tamiya could have parted the cylinder covers for easier painting. During my siesta, I had an idea. I once bought a big bottle of semi viscous masking fluid from Moiotow for a special paintjob, which never worked out. Here it came to rescue. I spilled an amount of masking fluid onto some plastic and moved the part in the fluid, et voila, it worked. Siestas are no wasted time it seems. Cheers Rob- 111 replies
-
- 11
-
-
-
Hawker Typhoon 1b "Car Door" by AJohnson - Airfix - 1:24
DocRob replied to AJohnson's topic in Non-ship/categorised builds
Thank you Andrew, I'm blushing. I never built a British plane to my knowledge, so I'm hardly an expert, when it comes to painting. For the Tiffy and Mossie, I chose AK's Real colors, as they generally match well and spray superb, thinned with leveling thinner. They are also very durable and good to mask and weather on top. Cheers Rob -
Hawker Typhoon 1b "Car Door" by AJohnson - Airfix - 1:24
DocRob replied to AJohnson's topic in Non-ship/categorised builds
I misread something, sorry -
Hawker Typhoon 1b "Car Door" by AJohnson - Airfix - 1:24
DocRob replied to AJohnson's topic in Non-ship/categorised builds
Nice, can't wait to see some progress Andrew. I pulled my bubble canopy one out of the stash several times, but now I will follow your build first. Moons ago, I bought a loot of goodies for my build, among them the Brassin guns. Problem was, there were only three in the blister and I had to contact Eduard and they sent the missing one. It's not the firs time this happened to me with Eduard, but luckily they solve the problems relatively fast. At least, I learnt to check what's in the box with them. Cheers Rob -
Renault RE20 Turbo by DocRob - FINISHED - Tamiya - 1/12
DocRob replied to DocRob's topic in Non-ship/categorised builds
I already have an assortment of vinyl tubes of different diameter and color and I ordered some braided ones, connectors, hydraulic and electric, beside some metal rivets and clamps. Cheers Rob -
Airplanes and Tanks in plastic by Jörgen
DocRob replied to Jörgen's topic in Non-ship/categorised builds
Very nice painting and weathering. I especially like the very slight sheen in the camo and the tattooed in decals. Cheers Rob -
Renault RE20 Turbo by DocRob - FINISHED - Tamiya - 1/12
DocRob replied to DocRob's topic in Non-ship/categorised builds
Thank you Egilman, but I meant what I said. The word failure quite took a place in my brain with this one. I will continue, when I finished blushing . Cheers Rob -
Renault RE20 Turbo by DocRob - FINISHED - Tamiya - 1/12
DocRob replied to DocRob's topic in Non-ship/categorised builds
Thank you Mike, this kit definitely needs another approach than planes or armor. I built one 1/12 Ducati Panigale lately and I think the building and painting process is very close to this one. I guess, I have to learn a lot again with this build. Cheers Rob -
Renault RE20 Turbo by DocRob - FINISHED - Tamiya - 1/12
DocRob replied to DocRob's topic in Non-ship/categorised builds
Good to have you on board. It may not be the fastest build, due to summer related distractions, but I'm eager to make this experience. I only own two more Tamiya 1/12 kits, as my modeling interests are wide spread and I like to jump between subjects. The other F1 kit is the Brabham BT44, which I like a lot better, with it's aggressive styled body, it's 'honest' eight cylinder engine and the Martini looks. I have some 1/20 kits, which don't consider a bad alternative and finally there is the big Porsche 935, also in Martini livery. As I love preparing classic cocktails, another time consuming hobby, I have an affection for the Martini livery, although, I use different brands of vermouth and rarely Martini. The kit is the new edition one with PE-sheet and Cartograph decals, like I wrote above . Cheers Rob -
Renault RE20 Turbo by DocRob - FINISHED - Tamiya - 1/12
DocRob replied to DocRob's topic in Non-ship/categorised builds
For me it's a new venture in 1/12 land. I built a motorbike and a 1/24 car, but nothing this size. There are not so many dedicated extras out there for this kit, which surprised me a bit. I will add or change some hoses, maybe some rivets, will use Hiro seat belts but nothing mayor, only a bit refinement. I plan to use Tamiya Lacquer paints for the body colors. Their gloss yellow should fit and gloss white sprays like a charm. Metals will be AK Extreme metals and possibly some Tamiya lacquers as well. Cheers Rob -
...and now to something completely different. While choosing my actual summer build, I opened a lot of stashed boxes lately and got stuck with the large colorful ones. I have three of the old Tamiya 1/12 car kits and the Renault was picked over the Porsche 935 and the Brabham BT44, because I liked it less than the others. Large scale car modeling is new to me, so if I disappoint myself, the damage is easier to cope with. I wanted to have this kit, even if I disliked these turbo testosteroned mini engines, as the Renault looks like a gentle Frankenstein in formula one standards. The yellow and white paintjob does enough of a job, to conceal that a bit. The kit dates back to 1981 and this is clearly visible, while inspecting the parts. There is flash, parting lines, burr and crude looking parts. This kit for sure is not up to standards of modern Tamiya kits and needs some extra attention. Don't get me wrong, it doesn't look like a bad kit, but I guess, there will be some unwanted surprises hidden on the sprues. The ancient kit received PE for grills and brake disks and decals printed by Cartograph. First, I cleaned the main body parts and this was not done in a blast. It took some hours with the blade, chisel and sanding sticks to get rid off the multiple burrs all around. I want to paint the body parts early, that in case of failure, the expense in time and effort wouldn't be too great. The rear wing base construction is a four part U-shaped affair, which I guess should be flush all over. To reach that goal, there will be needed a lot of filler, as you can see on the picture. Another decision to make soon, is about the chromed parts for the wings and rims. The provided chrome doesn't look too bad, but I will compare it with photos of the real thing and decide then, if I strip and repaint these parts. Cheers Rob
- 111 replies
-
- 13
-
-

-
Thank you Jack, it took some time, but now I'm relieved, that the Arado is done. Thank you popeye, it is indeed a beautiful plane, even with all the clutter, like external tanks, Rato rockets, ..., which distract a bit from the slender shape of the Arado. You can't beat the results of these 1ManArmy masks, but they are a PITA to apply, especially with German planes, being multi colored and sporting extensive walkway markings. Cheers Rob
-
Phew, the Nachtigall is finished . It was a long journey, which started in 2019 and led to two long pauses in the SOD. Nevertheless, I never questioned my desire to finish this demanding build, because of the fascination of the Nachtigall. It is one of those kits, you simply cannot put aside permanently. There is so much detail provided, especially with the resin parts, which are simply stunning. Aftermarket bits where used, namely HGW seatbelts, Master brass antler antennas and Yahu instruments, camo masks from LF and marking and stencil masks from 1ManArmy. You have to be a bit masochistic for this build, mainly around the canopy glazing, which cost me tons of sweat with all that sawing, sanding, drilling, gluing, painting, decaling and these vulnerable pieces are the focal point of this build and there is no margin for errors. I expanded my self torture by wanting the canopy opened, which required more surgery. Speaking about errors, I made some, which I will not point out here. If you read through the build log it's all there. I'm happy with the result, which of course could have been better, but somewhere you have to draw the line. The kit needed modifications in several areas, mainly to reinforce the landing gear with brass rods for a bit more stability, because the Arado has a hefty weight. Cheers Rob
- 79 replies
-
- 11
-
-
-
Thank you, it's somehow strange, how a straightforward design, cross shaped no gimmicks plane got cluttered with tons of equipment. Cheers Rob
-
I finished decaling the canopy fastener strips, but still have to add more Micro Sol in some places. I used the sawed out clear hatch and decaled the fastener framing in and outside. Left of the canopy, you can see a hatch for the operators compartment, which was cut and bent from some clear food container. I will add an opening lever later. On the upper fuselage, I added the ring antenna and the Naxos radar with it's clear cupola. The antler radars got also glued together and are awaiting some color. Cheers Rob
- 79 replies
-
- 11
-
