


LED
-
Posts
81 -
Joined
-
Last visited
Content Type
Profiles
Forums
Gallery
Events
Posts posted by LED
-
-
Hey @bnw,
Good to see a real build log from you. You make me want to build this yacht. Man, those lines are sweet. Love it!!!
Anyway, in one of your earlier threads I mentioned a detailed video build of the HMS Sherbourne at the ModelKitStuff YouTube site. I can't look around in YouTube at work because it is blocked, but if you can find the ModelKitStuff site, the playlist for that build is in his Playlist page.
I don't think that chap is going to plank the deck, but his four videos on hull planking will definitely give you some pointers. One of the best things he is doing is forcing himself into a novice build and informing you of how to fix common problems we face as novices. Stuff that most of these members are well beyond - although I have read them offering such advice. For example, he goes through the process of steaming and bending hull planking using multiple methods. He also covers 1st planking and 2nd planking and how they differ. I think that playlist is well worth the time (and, my goodness, each one of the 40 is like 20 minutes long). He also seems to have other similar playlists available and for some reason the Bluenose is ringing a bell.
I hope to join the wooden ship fun soon. I will be completing my plastic DKM Admiral Graf Spee soon and I have my eye on the Sherbourne.
GLHF
and, Happy Hunting.
- TerryPat, bnw and king derelict
-
 3
3
-
Amazing base planking.
This is going to be a great build. And, what an absolutely beautiful subject. 🤗 -
I noticed that message about the new MSW sponsor Innocraftsman.
Wow, they got some nice stuff. Some of the stuff looks very useful for wooden ship models. It's mini-tools that high end modelers my find useful. I might kick down when I start the Sherbourne.
And, no, I'm not trying to pump the company. I just wanted to see what they did. Happiness ensued😃 -
Enclosed Bridge, Radar, Rear Superstructure and the Two Masts
I can see I still need a little sanding work, but things are coming along. This was my first real PE - that is, the radar that will go on top of the enclosed bridge and the platform with ladder on that bridge. Not exceptional, but not horrid for a first time. Both were difficult for me. It will be great when my thumbs stop getting glued to stuff and stop getting in the way, but it is what it is. Someday... Maybe 😁
Anyway, the last main structure is the funnel. I'm taking a break today and going after the USS Bridgeport in World of Warships. Kinda slacking on my game while spending lots of time on very little details of my kit.
I think I'm going to get the railings (pre-painted, but the paint seems sus) on the enclosed bridge and then paint again. There isn't anything on the bridge that I can't avoid when using a decent airbrush.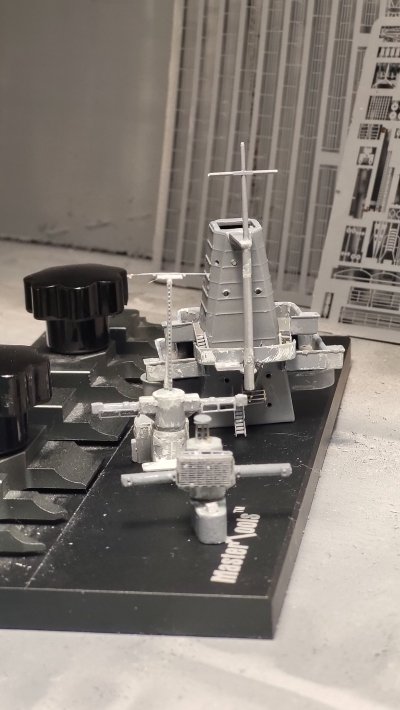
-
Flying Bridge Check, and Enclosed Bridge Structural Build.
Some of the instruments on the flying bridge went in soft. I was a dummy and wasn't careful enough when priming/painting on the sprue. Luckily, they still stuck and were only noticeable when I checked their condition. A little filing and re-gluing and I think all is good.
LOTS of filing, LOTS of test fits, and LOTS of putty later and the enclosed bridge is structurally done. Man, that was some poor fit for an otherwise great kit. Some of it was my fault, but I can't think of a way to late-paint that assembly. I would probably recommend something Revel Contactor Cement for the tower - then test fit the superstructure decks before things set. Those decks are tight. She is waiting a day before filing and sanding the putty, but she looks ok. I don't think I'll have too much problem with the airbrush coat to follow. I can just angle it such that it won't get paint on the tub decks.
I'm starting to play with the light to get better photos. She is starting to deserve that:
Tomorrow night is a sanding date-night. However, it will also be a radar bending night. It is another attempt to build a rectangle from a flat piece of PE. In this case, the PE looks extremely fragile. God help me. Any guide of YouTube pointers would be appreciated.
Soon, it will be funnel night!!! The PE on that looks doable. The funnel cap is a bit scary, but I won't reck the plastic till I verify the PE is good to go.
Happy Hunting -
-
@bnw
As @Ronald-V mentioned, the nail-pusher seems useful in the rough work portion of the build. Fastening the '1st Deck' to the bulkheads for shaping and for allowing the glue to dry. Likewise, for other things like that where you aren't worried about the finish. I had to get the synapse between my two glorious brain cells firing to think of why folks don't use nails for the finishing planking ('2nd Deck'). Uh, back then they used wood nails so maybe the metal ones won't look realistic.
Can I solidly recommend some peaceful viewing time on ModelKitStuff's 'HM Sherbourne, Wooden Modeling for Absolute Beginners'.
You will see the use and technique of using the nail-pusher. It is a bit weird to use, but I think it will be useful so I will get one. If you are impatient - I think this hobby will resolve that issue 🤣- the building of the structural planking are videos 5a and 5b (or, thereabouts).
You should also do what I did and click on the Ronald-V's 'Build log HMS Sphinx 1:64 Vanguard Models' in his signature. OMG 🫠. That is a 'sneaky' way of looking at the work of some good playa's in forums like these.
Happy Hunting -
I can't believe it hasn't been mentioned, but the build videos I have watched - and the basic tool videos out there - show heavy use of a 'nail punch'.
Yeah, you can grow a third arm and hand and tap, tap, tap your heart away, but that will likely become quite the slog when building the first planking.
My first wooden kit will be Vanguard Models 'HM Sherbourne'. It looks to be a great kit - and it has GUNS. I need guns. Guns are good😁. I was seriously looking at the Vanguard Models 'Grecian 1812' but folks around here kinda warned me off. She has great lines and she has guns. But, the rigging is complex and the hull has serious curves. Gonna wait on that one. BTW, ModelKitStuff created a great build playlist for the Sherbourne. He even dumbed it down for us Noob dummies since that was both what the kit is designed for and what he wanted to present.
If I didn't need cold hard steel that Bluenose II looks amazing. Man, those lines are sleek. -
It was a great plan...
Till, I started doing the work and realized only I only pre-painted only the front half of the sprue. Oh well...
Also, I have to note that I have no clue what my thought process was. It's been some time since I was working the plastic and PE. Lots of jumping around. Lots of half finished steps. Ugh.
But, finally drawing some 'X's through entire steps:
I was thinking of drilling out the hatches in the command superstructure, but they are square. I have PE for them, but my sanity is just too important for me. My wife would definitely send me to the rubber room. How do you guys drill out square windows???
And, yeah, not quite done. Gotta let things dry a bit then get to the putty, then paint again. Then dry again. Then pick out some of the details before they get covered - or I forget about them... -
You've probably already done what you are going to do, but...
- I would check online before trying to buy parts from the manufacturer. Are such purchases decently priced, what is the shipping cost, does the manufacture actually get the product to you in a decent amount of time.
- The 3D option sounds pricey and buggy. They would probably need the parts to duplicate anyway.
- The model is $60 if it is the one I Googled. Kinda bounce between this option and option 1. A quick Googly search kinda recommends this option unless you like calling Heller and dorking around with them on your free time.
-
Well, I've decided not to get too hot and bothered about my very weak PE skills. I'll use what comes out well from the bender. Likewise, I am not going to play around with brass masts for this kit - that has been the reason for my current delay. I can't be one of the Masters around here on my third build after a forty year hiatus.😆
One thing I learned by watching AlexModeling's recent 'Admiral Graf Spee' build is to NOT to not destroy the plastic parts till the PE looks good. That was great advice. The Edwards PE instructions had me cutting and grinding on the plastic catapult, then bending a long flat piece of PE into a long rectangle. I didn't do it right. Luckily, the kit is very well detailed. PE is great, the plastic will be very good.
I'm happy with the light weathering of the deck. I am modeling the Graf Spee as she left port in August 1939 - so, she will be two tone. She was the national flagship of Germany prior to the commissioning of the Scharnhorst early in 1939, so she would have been extremely well cared for. Heck, she was commissioned herself in January of 1936, so she was a young pup. Here she is with some of the superstructure dry fit:
Tomorrow, I will finish the main superstructure, the funnels, and hopefully paint those parts. Tuesday, hopefully, I'll start placing the little do-dads on the bridge platforms as well as installing the secondary armament and anti-aircraft guns. We shall see.
It is now that I really got to get the build moving. I don't want to lose or break parts. -
-
I'm watching some builds of various 'Vanguard Models' as I type. I see what you two are speaking about. I might go novice just to ensure success.
All in all, the kits seem really well built and the instructions seem first rate - but, flubbing things is an expensive lesson 😄
I think the Sherbourne might be a good fit for me. Got to get the tools, the skills, and I want a success.- barnacle Chris, Ronald-V, Kevin and 6 others
-
9
-
'Vanguard Models' has a very nice filter under it's 'Models' flyover menu option. They skill rate their kits to 'Novice', 'Amateur', 'Experienced', 'Advanced', and 'Master'.
I am thinking of trying out a wood kit. I found VM because of their skill rating and much appreciate it. I am looking at the 'Grecian 1812' - which is in the 'Amateur' level. BTW, I found this build log from ModelKits.com. He has a nice box opening review.
Where would this kit fall? I am guessing a bit higher than 'Amateur' - but, there is always hope🤪 -
9 hours ago, Winnie said:
I believe part of the problem is the paint you're using. I see Vallejo bottles, but no "model air". The Vallejo paint is formulated to brush painted and is quite thick. As for the model air by Vallejo, the thinning of the paint requires a bit of finesse to get it right, and you have to use their branded thinner AND flow improver! and the paint has to be very thin, and a reasonably low pressure (12-15 psi).
The Vallejo type paints also require a primer underneath, or it tends to bead up.
Hope that helps!
Harald
I'll try the Model Air on the next kit - which will likely be the 1:700 scale HMS Ajax. Keepin' with the theme 😄
The only issue is that I found a Model Color chart for naval ships in the various theaters of war:
https://app.box.com/s/2hz3x8hp57kqk8qqyu40y0lndkdnc696 (I actually use an older version of this map that doesn't have as much color mixing)I have yet to find a similar color map for Model Air. Plus, my hobby shop only recently has started stocking lots of Model Air.
I guess I'll have to use the Mark I Eyeball to do the color matching for me- Old Collingwood and Canute
-
2
-
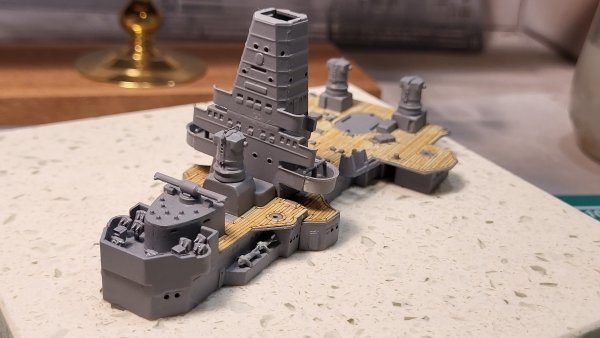
Well, got the superstructure wood down.
This weekend I'll be attaching the platforms. And, ugh... a bunch of PE. Pray for me. Building the catapults... I had a bit of repair on the bridge deck wood, it was a little too big and the center cross piece escaped me. The repair looks ok - I'm glad I saved the surrounding wood as I pulled the deck from the backing.

- madtatt, Canute, Old Collingwood and 1 other
-
4
-
I think that is a great level of weathering...
The ships would get beat up during WWII, but I don't think any captain would want an unreliable rust bucket to fight a war in.
I've been helping a World of Warships streamer with a stream topic: Play the most 'decorated' ships in the game for a stream. I don't think HMS Kelly (who I read about while doing the research) makes that list 😄. She never shirked her duty, but she is living proof that the only luck in war is bad luck. Yowser. -
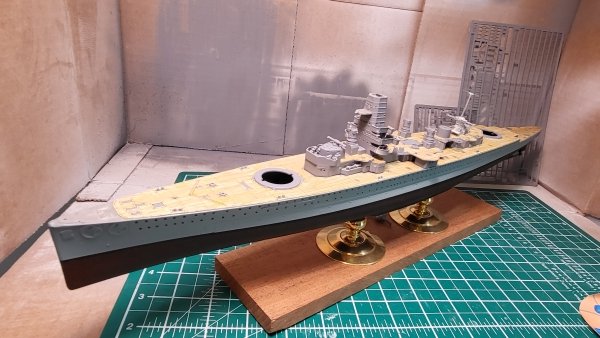
Ok, had to put a nice, even coat of paint on the major superstructure elements and the walkways I am going to place on them this weekend. The Eclipse is a very nice airbrush. It lays a very balanced paint pattern in light coats. I'm thinking of applying a clear coat to the superstructure prior to applying the wood deck - will that matter???
Anyway, at least she looks like a ship now:
- yvesvidal, Canute and Old Collingwood
-
3
-
Many thanks, Alan...
I couldn't figure out the rhyme or reason for the color coding - so, maybe it is what you say - "nothing". Too funny. Think long, think wrong 😄- Canute and Old Collingwood
-
2
-
Well, I thought I would have a nice entry with regards to placing the wood deck on the superstructure parts...
However, (comma - and, there always is a comma)- Those deck overlays are very complex with lots of very little pieces that have to be meticulously removed. Took lots of time for me...
- I noticed that the paint on those superstructure parts is less than ideal. I think my previous air-brush may have been abbey-normal, my current one seems to have a nice and even spray pattern. I hope this kit doesn't turn into a complete paint blob. We shall see.
- And, I like to work with natural light when painting and perhaps while placing the wood overlays.
Thus, tonight I will mask the superstructure parts in prep for painting, tomorrow I'll paint, and then I'll give it a day to two to dry before applying the wood deck. All in all, coming along pretty good. I just wish I hadn't been so bull headed about my former air-brush. It is known to be a good one, but mine rarely gave me a good finish. I switched to an Iwata Eclipse because my model shop has all the little parts and accessories for it. It is a very nice and substantial brush. Much to like...
-
Splendid work, Alan...
I picked up a Flyhawk Deluxe HMS Ajax that the model shop could not sell because it wasn't shrink wrapped. I got it for a song and a prayer - and, nobody appreciates my singing. It has everything!!! Including a bunch of PE 😐
Anyway, the instructions seem to be color coded - but, I cannot figure out what it is all about. I see they did the same with your kit. Some parts are in red, others green, and so forth. What did all that turn out to be?- AJohnson, Jack12477, Old Collingwood and 1 other
-
4
-
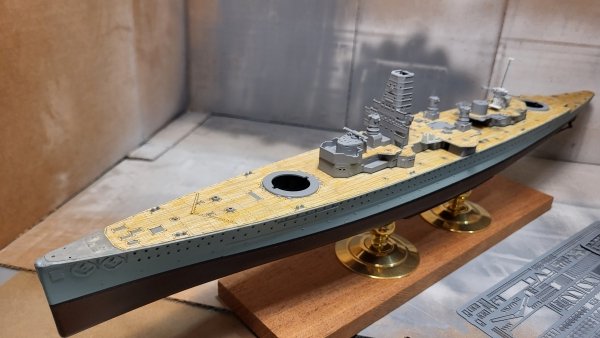
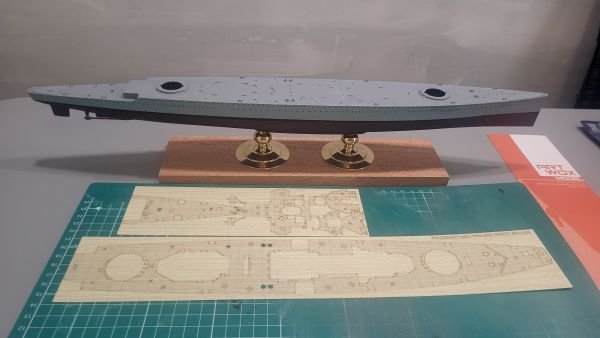
Honestly, I have been pretty terrified of doing this. I mean, it is a One-And-Done process to apply a wood deck to a ship model. In the end, the ArtWox deck is extremely well built. It is strong enough to be manageable, the laser cutting was precise and defined enough to be stable, and the fit was absolutely perfect. Finally, it is not completely a One-Shot deal. Because of the stability of the product you actually can adjust it on placement.
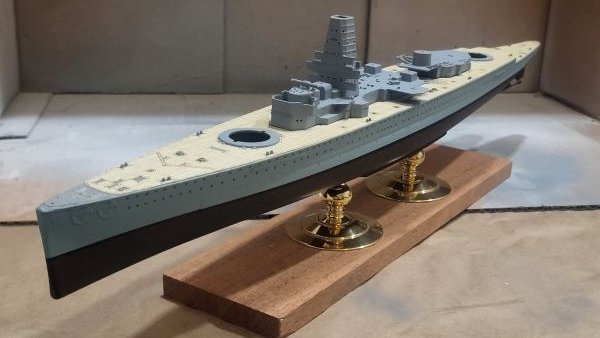
Just liked this photo better. Kinda looks like the start of a ship getting fitted out. Also, shows a bit of a problem. I was quite slick when I painted the hull. I lightened the color just a bit to present a bit of sun weathering. Now, I'm paying for that. I have to repaint a little of the hull and cannot get the color matched, so, I think I'll end up redoing the hull grey - hopefully, I'll get away with just doing that...- king derelict, yvesvidal, Canute and 2 others
-
5
-
I followed David's guidance to remove the unwanted wood and leave the actual overlay on the backing. He mentioned to save the remainder wood to the back of the overlay as potential repair material. The ArtWox deck was laser cut quite well - I had no problems with either the large pieces or the pieces I had to pick out:
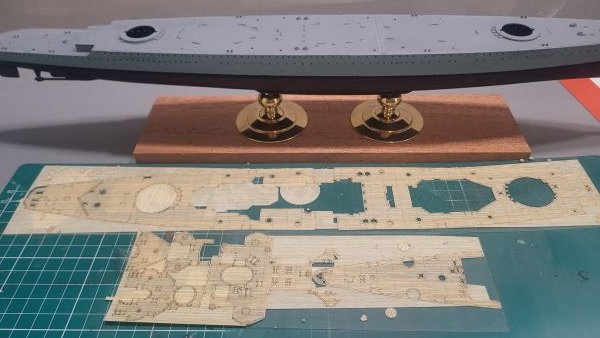
If there is a negative to this technique it is that it can become difficult to know if you have trimmed and picked what you needed. The wood you have placed on the back obviously blends into the wood you are working on. All in all, I think this will be a good idea.- GrandpaPhil, king derelict, Canute and 2 others
-
5
-
It's been a LONG time. Life happens. Not bad thangs, but...
And, sometimes - sometimes for very long times - you just ain't got the modelling bug...
And, then,It happens...
This will be my first wood deck. David, of 'David's Ships' YouTube site has a GREAT presentation regarding the application of a wood deck. He covers a lot of territory. He discusses potential mistakes with lessons learned. The following video covers the wood deck installation for his wonderful HMS Hood build playlist:
Wow, that's huge, whateva'
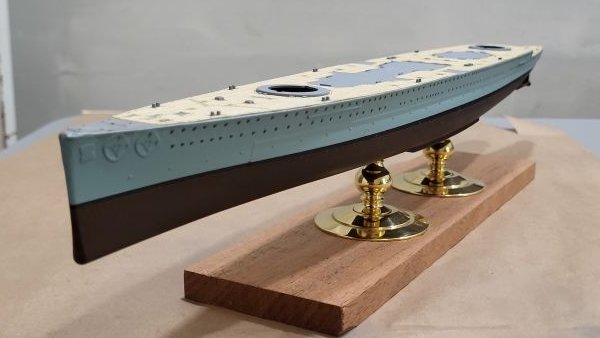
So, my first photo in forever. The 1/350 ArtWox deck and the hull of the 1/350 Academy Admiral Graf Spee:
I have to say that cutting the deck from the backing has been a breeze so far. ArtWox has done a great job to this point.
Pray for me, this is a one way, one shot deal😔


HMS Monmouth (F235) by king derelict - Trumpeter - 1/700 - PLASTIC
in - Kit build logs for subjects built from 1901 - Present Day
Posted
With all those itty bitty parts and all that PE and all that 1:700 stuff that could go wrong (and enhance the value of your rug!!!) I would probably keep this kit as a donor kit.
That way you can virtually guarantee a good and complete build with your replacement.
She is a beautiful ship. I have always liked the modern British ships. Then again, I have always liked the <=WWII ships as well. I guess I like British ships😀