


LED
-
Posts
56 -
Joined
-
Last visited
Content Type
Profiles
Forums
Gallery
Events
Posts posted by LED
-
-
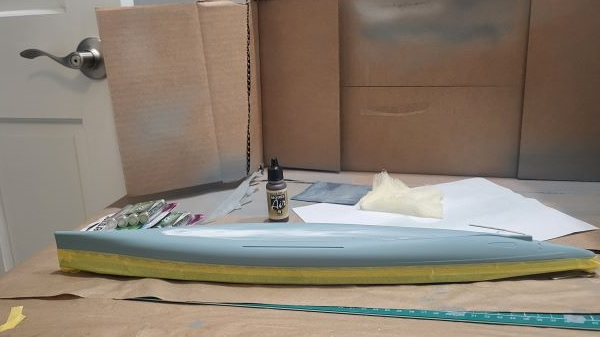
Yowser, after a lot of putty, much sanding, and a bit more primer than I like, I finally got the Hellgrau 51 on the hull.
And, still had a seem in the hull. I think it would have been noticeable by Muppet Children when displayed, so...
Since I am likely going to use a stand I decided to fill that seam with the ole' wet finger technique. So, the hull is masked for applying the anti-fouling red after the putty dries, gets sanded down, and a flat clearcoat cures. I'll get the clearcoat on tonight. This hull has been a nightmare, but she is coming along. I really don't like this kinda 'work' in modeling. I managed to avoid wiping out the detail on the hull since most of the kluge work has been on the seam - which in spots was more a gap, a hole, a canyon...
Next, a little more more masking for the boot line and a bit of flat black.
Then post some exciting photos. All heck, why not spread the pain around - I'm sure all of you have dealt with this:
The amount of work to get here has been stupid. It is a known issue with this kit, but I think mine was special. Anyway, looking at the sprues and the bits of superstructure I have been 'working' on it seems to indicate that the rest of the kit is pretty good. At least I don't think I'll be gluing open boxes together and hoping things square off...
Any ideas on improving the masts. RGL was right in that the Pontos aftermarket kit had masts, but it was more than a bit overwhelming for my current skillset. I would never finish the kit. But, I do like the subject, so perhaps in a future build. The masts are both fragile and a bit clunky. It would be nice to replace them with something a bit sturdier and elegant. -
-
Wow, that is impressive. I never saw it coming.
- Canute, Old Collingwood, AJohnson and 4 others
-
 7
7
-
It looks like the hull will come through. However, I think I am going to rattle can primer rather than messing with the airbrush. Man, that hull took a lot of putty. It was kinda warped in 3D 🫣. I hope it comes out. From the look I believe it will be fine...
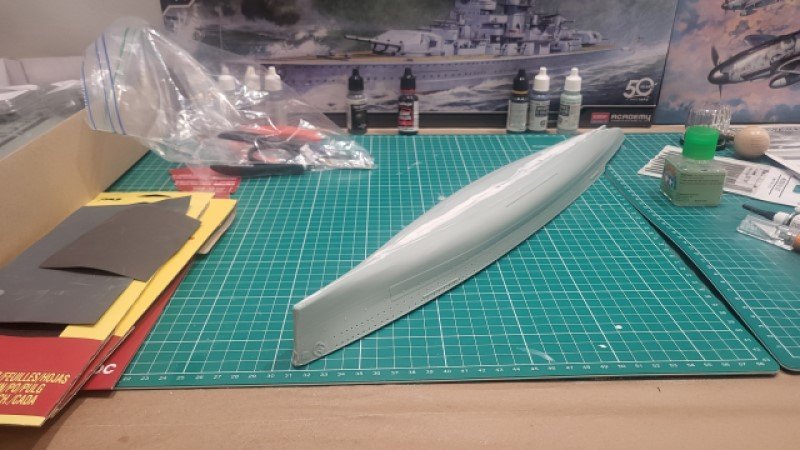
Then paint.
Then off to the superstructure. Actually, I think I will start the superstructure build soon. Maybe as I wait for the primer and the three hull colors to dry...- mtaylor, Canute, Old Collingwood and 1 other
-
4
-
All that repair work slowed things down. Finally got some putty on that mess. Waiting for it to dry.
It will come out alright. I was going to take a photo and post it, but...
Duke is playing UNC tonight. So...

- Canute, Old Collingwood and mtaylor
-
3
-
Hope the rest of the kit is engineered better than this:
This has been a PITA. I used medium gap filling super glue and a roll of tape. This is the first time I have ever used such glue. I may have lathered it on a bit too much. It is taking forever to dry...
- hof00, king derelict, Canute and 3 others
-
6
-
I'm not dead yet!!!
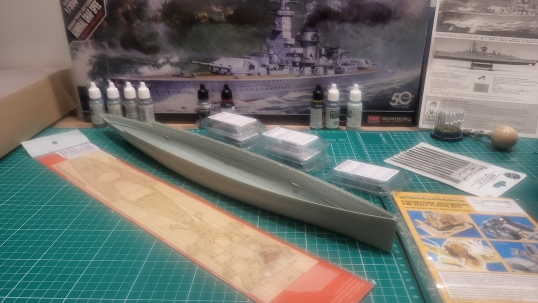
I was going to post a pre-paint, but finished and filled hull. Wow, the fit and finish of this is awful. I knew that was the case, but this is going to be a bit difficult. Not only does it want to split apart, but the fit at the bow and stern pins is god awful. My understanding is that the rest of the kit is a gem, so all will be forgiven. I will get the hull completed tomorrow under natural light. I can see better in natural light. Anyway, I have received all but the Micro Master turrets - and, I ordered those just recently. Here is the aggravating hull and the aftermarket items:
-
Many thanks, Greg. Nice tip for the inner porthole ring.
Anyway, if there are noobs out there (me!!!) who fear carving into a perfectly good plastic model ship then take a gander at this PlayList of an HMS Hood 1/350 Trumpeter kit. The site is David's Ships.I found his site quite a while ago when I first started getting reinterested in building model ships. Highly recommended.
- mtaylor, Canute and Old Collingwood
-
3
-
Wow, looks awesome...
I'm glad I spotted the mention of the MicroMaster guns in one of your early posts. They are amazing. Bought some for my build. Now, I see you painted them on their supports. Follow the leader...- Old Collingwood, mtaylor, Egilman and 1 other
-
4
-
Noob Question:
Do you leave the drilled out portholes:
- Open
- Put a dark backing behind them
- Build some kind of light blocking structure in the hull
A simple layer of hemorrhoid cream seems to have healed the pox 🤪
- mtaylor, Canute and Old Collingwood
-
3
-
Nine hundred and ninety nine portholes on the wall,
Take one down and drill it around.
998 portholes on the wall...
Not worth a photo.
And, if I decide to get the Pontos detail kit, then a pox on RGL and the rest of you. A pox, I say!!! 🫣
However, the Pontos kit is for the Trumpeter model, not the Academy model. I looked at the high end Academy Admiral Graf Spee and it did not include masts. It looks like I am just going to have to be extremely careful with the masts. I am 0 for 4 though. Ugh... -
-
Questions:
- I absolutely know I am going to wreck my masts. I also know that my cat likes to eat them - I actually completed the Tamiya HMS Rodney (1:700), was about to post my success story here, and ... my cat destroyed the superstructure and masts.🫣 I was recovering from a wonderful pair of rotator cuff strains, finally had a good sleep, and woke up to an odd crunching sound. He found the top half of the ship quite tasty. Who would have guessed. So, given all that, is there a good source for material for masts or maybe brass kits for them?
- I found most of this stuff on Squadron.com. Is there a source that has most of this that maybe sponsors this site or is otherwise a great experience? Is Squadron.com a good vendor that I can count on? BTW, that 'Model Ship World | Ship Kit Database' in the sponsor/advertiser section is really well done. I wish it had more plastic kits in it, I'm not skilled enough yet to tackle a wood kit.
- And, is it worth it to drill out the port holes if I don't model the ridge over them? I've never worked on a ship this size. I've never had to deal with that. Drilling them out doesn't seem to bad, but either fishing small wire cuttings or brutally small PE over the port holes seems horrific.
-
And, some GREAT footage of the Admiral Graf Spee in Montevideo (British Movietone):
- Old Collingwood, Canute and mtaylor
-
3
-
And, Skynea History is well worth one's time as well:
- Old Collingwood, mtaylor and Canute
-
3
-
Wrong about some of the history. Always take a peek at Drachinifel as a source. There are some AMAZING stills in this video that may prove useful for me and future Admiral Graf Spee builders.
- mtaylor, Old Collingwood, mikegr and 1 other
-
4
-
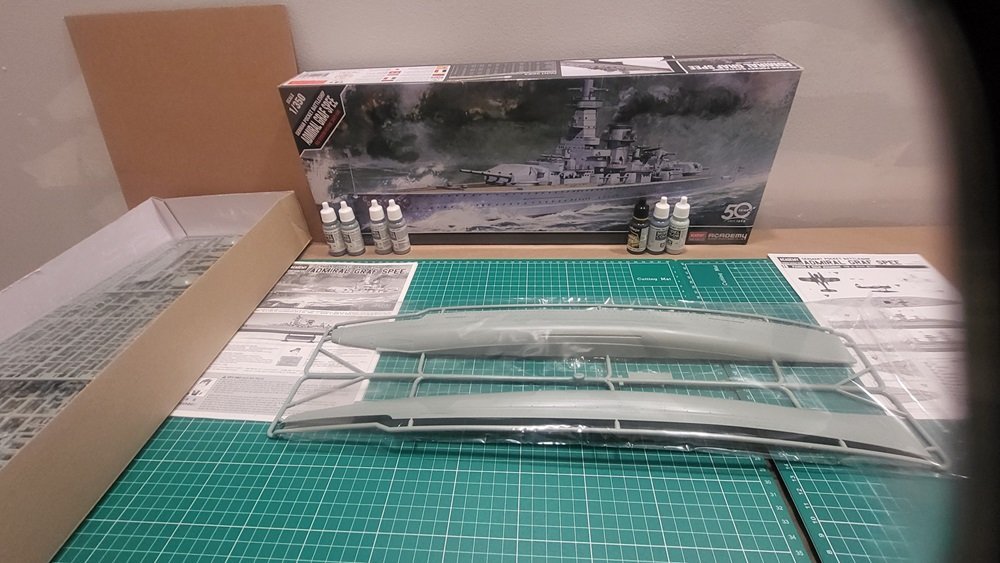
After my failed attempt at the 1:700 scale Dragon Z-39 I poked around the interwebs and found a site that presented skill levels in their reviews. ‘CyberModeler Online’ is a very nice review source. <sarcasm>Surprisingly</sarcasm>, the Dragon kits are ‘Expert’. But, the Academy Graf Spee kit I bought concurrently was a ‘Beginner’ kit. I've been lurking this site for about a year. It has kept my interest in the hobby going. So, here I go again!!!
I’m going to model her as she was while ‘showing the flag’ just before WWII. She, and her captain, were caught out by the start of WWII. It is not likely a good thing to be in the wrong hemispheres (both of them) as an unescorted cruiser against the world’s best and largest navy. Her crew applied many hasty, at sea, camouflages – some of which are cool. I really like the brush painted bow wave she sported on her final sorties, but I don’t know if she also sported the fake second funnel at the same time. Regardless, she did not take fire till the Exeter, Ajax, and Achilles plinked her at the Battle of River Plate. Thus, she probably should not be heavily weathered, and she had been well cared for. That means just two main paint colors and no camo pattern.I’m going to whale this one a little bit. I mean, I paid for her a year ago so any mullah spent now just seems like a justifiable new kit purchase. I’ve never used 3D printed parts but I think working those in will be easy and effective. I could not imagine bending PE for all those secondary guns. The Eduard PE will be used for railings and for some easy PE stuff – I did OK with the Z-39, but it was difficult. The plastic rails provided in the kit provide a nice and easy template for the PE. Regretfully, the Eduard PE doesn’t have the ‘CORONEL’ plaque that was placed on the superstructure while the WEM PE does – but the Eduard instructions are derived from the Academy kit instructions and I’m thinking that will make things much easier for a noob like me. I have never tried a wood deck, but there is no time like the present and the Artwox deck seems to fit no fuss, no muss based on build threads I have read. And, I’m going to ‘nope’ on porthole covers and whatever – I want to have a win here.
Another thought for the more skilled and ambitious. There is a really cool photo out there where the Graf Spee is anchored near the HMS Hood and Resolution for the coronation of King George VI in 1937. I think that will require back dating her secondaries since she was refit to include the below aftermarket secondaries in 1938. Look at this beautiful photo: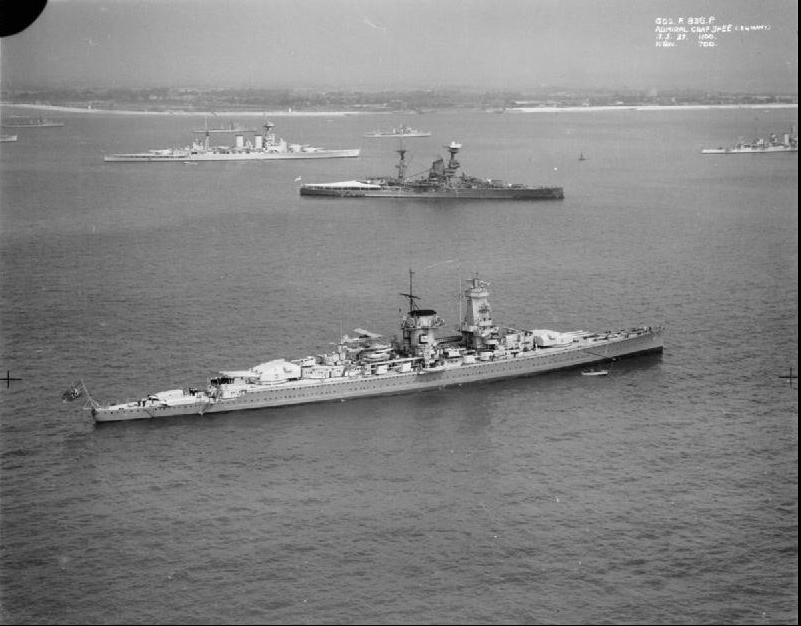
If any of you see anything amiss, please comment. I have yet to click the ‘Buy’ button and will probably not do so for a couple of days. I am planning on using Squadron.com for the purchases. If anyone has better sources please inform me. They seem ok though.
Aftermarket:
Item
Cnt
Manufacturer
Part No
Main Guns/Turrets
1
Micro Master
MM1743P
8x1, 150mm SK C/28
Kit Provided
3x2, SK C/33 Twin 105mm Dopp.LC/31
2
Black Cat Models
AC350071A
4x2, 37mm FLAK SK 30 Twin, Dopp Mount
1
Black Cat Models
AC350068A
10x1, 20mm FLAK C 30
2
Black Cat Models
AC350064A
Artwox Wood Deck
1
Artwox
AW10049
Eduard
1
Eduard
53050
Paint:
Color
Hellgrau 50 (light gray)
Vallejo Model Color 990 (light gray)
Hellgrau 51 (dark gray)
Vallejo Model Color 905 (blue gray pale)
Happy Hunting and Pray for Me...
-
@RGL,
For some reason YouTube put this in my picklist: The Stealth Ship So Powerful They Couldn't Build Any More
There is some nice footage of the Zumwalt in there. The photos you presented seem to have most of what you might want, but maybe take a peek- RGL, Old Collingwood, Canute and 1 other
-
4
-
And, tossed...
Two broken masts, one lost part, and the writing is on the wall.
The plastic is extremely brittle, the sprue attachments are huge in relation to the part, and the fit is weird. Additionally, it is odd what they think is a necessary additional part. A cross member of a tripod mast - but, only one of them. My guess is that they want to increase the part count to make the build more challenging. Anyway, weird.
Based on what I am finding during the build - the quality of the plastic results in the smaller parts being brittle - I don't think it would survive even if completed. I'm not into scratch building at this time and I don't want to buy a second kit to keep a build looking good. This thing will break if the sun shines on it.
So, writing Dragon off my kit manufacturer list. Not a good experience.
On the positive side, I handled my first PE ok. The included PE was really well done. It wasn't too fragile and allowed me to make mistakes and fix them with re-bends. The detail offered by the PE was amazing. The only issue is that I primed the PE on the fret. I think I will prime/paint after structural build next time. That's my fault.
Oh well, better luck next time. My next kit is going to be a Tamiya 1/700 Rodney. It won't break, the parts won't be useless, and it will go together smoothly.
- Canute, mtaylor, king derelict and 2 others
-
5
-

Thanks for the advice...
I have perused this site and others - and, ahem, actually read this kit's instructions - and came to the conclusion that I needed:
- A glue that worked well with PE - and would give me time to fiddle
- A decent magnifying headset with a light
- And, a pair of bending tweezers
Everything is coming at me in separate packages, with shipping times into the eons 😄. Turns out the photo-etch bending tweezers are kinda not needed - and those showed up almost immediately. Got my glue last night. My headset will show up Monday. And, now I have to break down my 'modeling bench' - really just an ironing board with some butcher paper over it - to deal with washing/ironing work clothes. Ugh.
I think I'll wait till I get that headset. It is kinda the most important of the purchases. Man ALL that photo etch is small and there are a LOT of fiddly plastic bits as well. Every single discrete construction step in this kit includes PE. I cannot get around it other than by not incorporating it.
Again, thanks for the painting and construction advice.
GLHF
-
4 minutes ago, king derelict said:
I never got on well with my Tamiya PE pliers. The jaws quickly went out of alignment. Possibly it was just a dud pair. The magnifiers with light are a big help to me.
I tend to stick the hull to something that I can hold to minimise handling of the model. I use a piece of plastic packing material liberated from work and double sided tape. Others use paint bottle tops and blu tack.
There is a big deep hole of tools that you can throw money into
Alan
I've been poking though your builds. You seem to glue the main deck to the hull early in the build. Is there a reason for that style?
I like to paint it separately, but I am open for suggestions... -
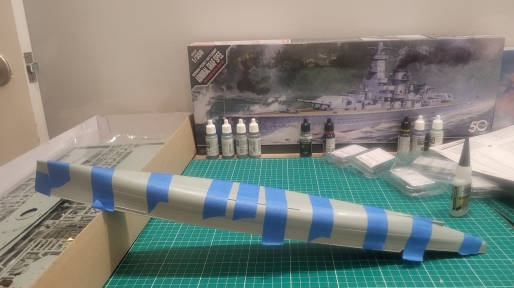
Anyone want a photo after the clear coat was applied??? 😝
I am thinking the hull red paint is relatively fragile. It kinda seems so, therefore the clear coat to protect my nice new 'waterline'. The next thing to do is to mask the red a little above the line - or if the black is wide enough then leave that as the waterline. Then try to pre-shade the mess I created. Finally, clear coat again and apply masking for the cool dazzle.
On perusing lots of your builds I notice that most (all???) of you glue the deck to the hull prior to painting. I have been painting it separately. Is there a reason for this or is it just personal preference?
Finally, I ordered Tamiya bending pliers. Yup, I got suckered, but I at least know they will be quality pliers. I should have paid more attention to what they actually were. I could have bought them at Home Depot... I also ordered a head mounted lamp with magnifying glasses. Finally, I'm getting new glasses tomorrow. When did this cheap hobby get so damn expensive🤑 -
Amazing...
And, to be honest, I would have never thought this topic would work - but it does. I kept skipping past it, but that was a mistake. Love the activity and the cargo. Plus, this gives a solid opportunity for weathering. Just wow...
I'm going to have to grind some of your other builds. Looking at the 'oil canning' shows me I didn't get the technique right. It looks downright 3D - like you are carving out part of the paint coats. Nicely done...
-
Well,
This thread will include the mistakes as well. The Vallejo Model Color Flat Black has a completely different viscosity (consistency???) than the other colors I have used. Between 'the runs' (it is a very 'slippery color') and my lousy skillset with the airbrush my pre-shading went to heck. I actually ended up kinda fixing the mess with a few of those Tamiya weathering q-tips. Oh, the humanity.
By the way, the Vallejo Hull Red is a bit difficult to work with as well - for the exact opposite reason as the flat black. I had a hard time finding the right mix to get it coming out of the airbrush. On the positive, once I got that set the hull red line was rock solid - there will be no need for touch up. The actual color is a touch redder than how it appears here.
I think the pre-shading will actually work. It will take more work than I expected with the hull grey, but I should be able to feather it in. I am also going to rattle can the bootstripe with my trusty old Tamiya Flat Black.
This is going to be a slow build. Now off to building the structures and masts. Pray for me😇
- mtaylor, Landlubber Mike, Canute and 3 others
-
6

DKM Admiral Graf Spee by LED – Academy – 1:350 - PLASTIC
in - Kit build logs for subjects built from 1901 - Present Day
Posted · Edited by LED
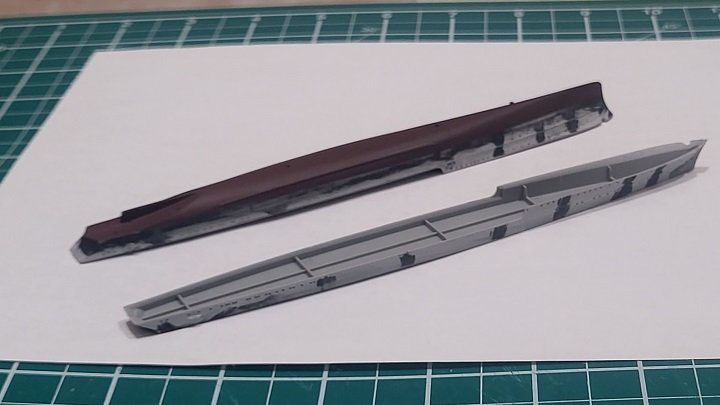
It's weird how the color doesn't really show in the photo. My mix for Hellgrau 51 has a blue tint to it. The photo looks like a matt finish on raw plastic.
Gotta get those photo skills improved, eh...