


East Ender
-
Posts
72 -
Joined
-
Last visited
Content Type
Profiles
Forums
Gallery
Events
Everything posted by East Ender
-
 Checking the waterline against the print all the way around with a surface gauge. (Top of tape is MLW)
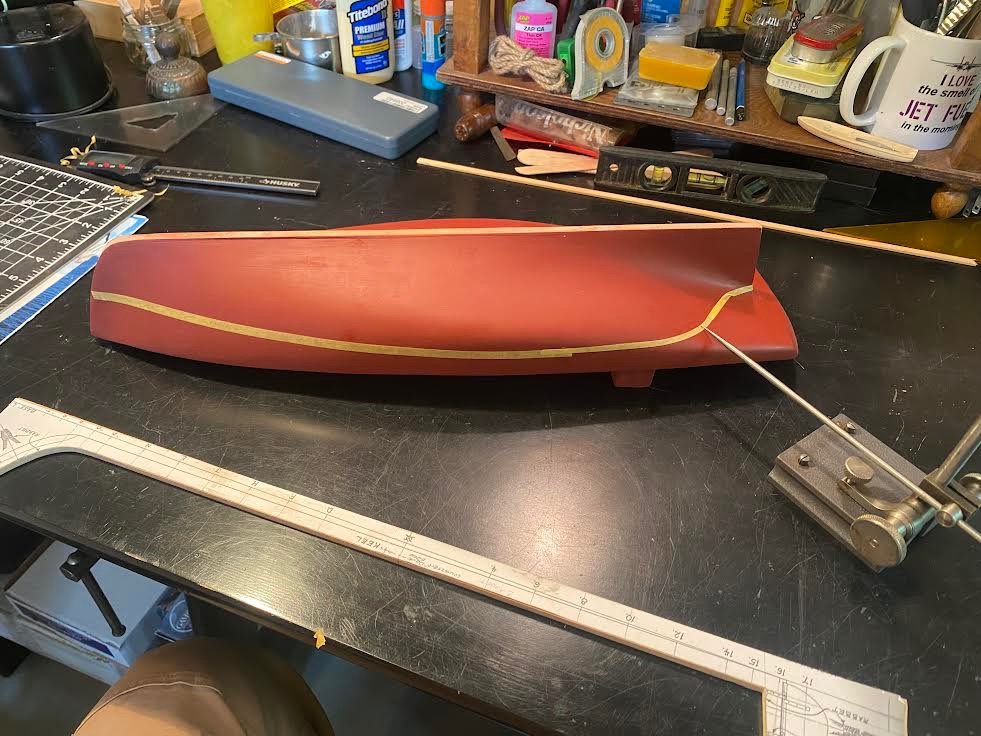
-
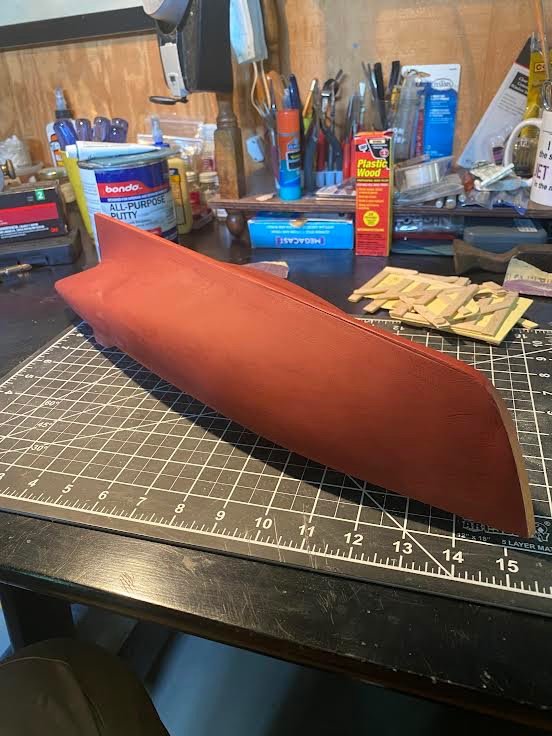
Sanded down the first few coasts of primer on the hull again, used a little red lead, made the repairs to the keel with Bondo where I accidentally overcut. Bondo is now my friend. I'll let the primer cure a day or so then I'll start on the bulwarks. I ordered a surface gauge to mark the waterline and and all of the other details on the side of the hull. I also located my old Grumman drill bushings which should help me be accurate with drilling holes for the masts, at least with the pilot holes. The rudder post/drilling looks like a critical set up.

-
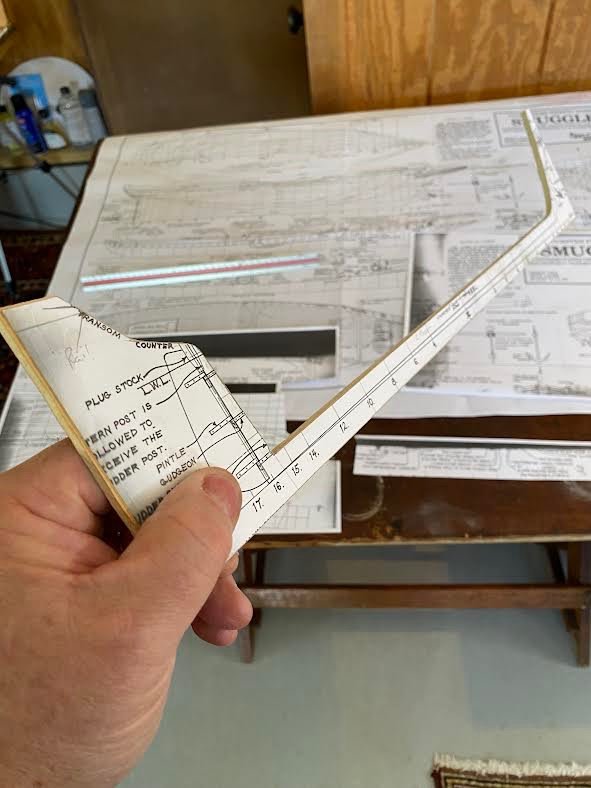
Roger, just watched a video on transom expansion. Now I get it. Skewed perspective and laying out a transom, inboard and outboard. Going out to the shop to study the print and give it a go. I doubt it but I'm wondering if Bluejacket has already accounted for this on Smuggler and the transom just needs cleaning up. Perhaps Mr.Bluejacket could weigh in? Thanks.
-
Thank your compliment and information Roger. I'm going to research Transom Expansion. I've looked into the miniature spoke shaves as well as the old Stanley 75 rabbet plane and the Stanley 100/1/2 model builders plane. Yes, I'm sure these spokeshaves would have made the job easier. They will help on my next solid hull, I will not start one until I have a set. This was my first solid hull. and I've learned a lot, especially of what not to do. I do need to improve on my layout skills.
-
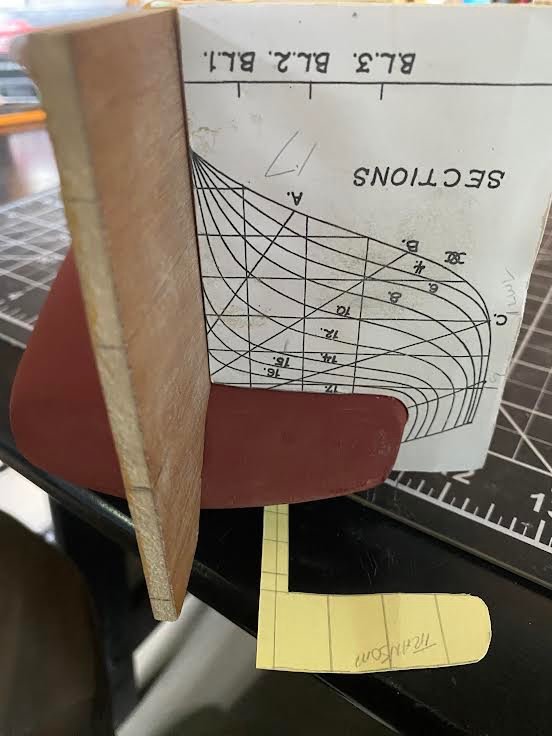
Not quite sure what to do here
-
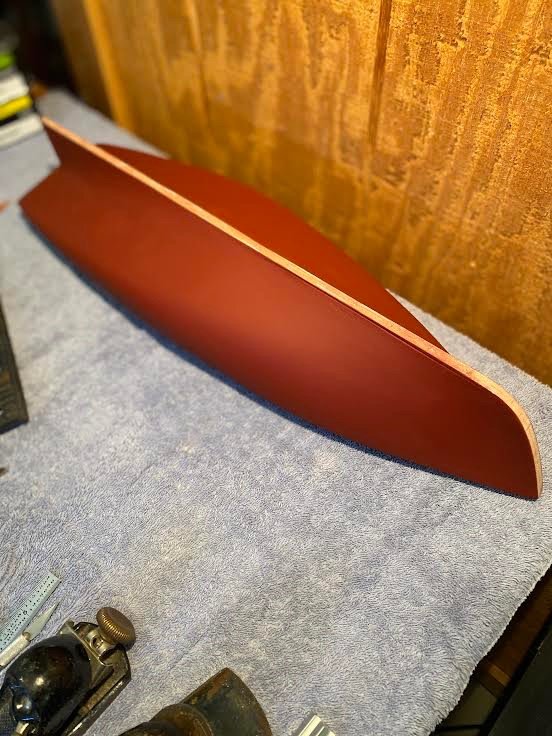
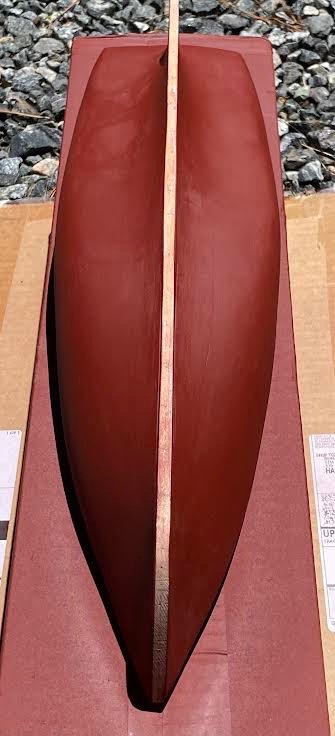
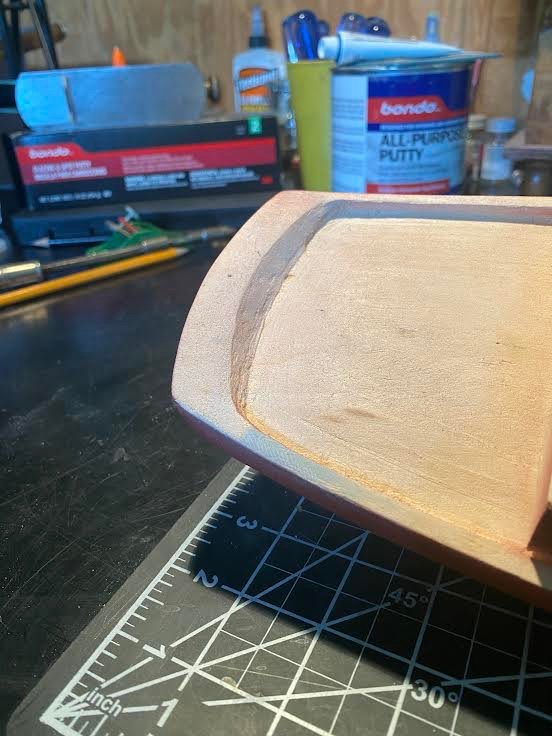
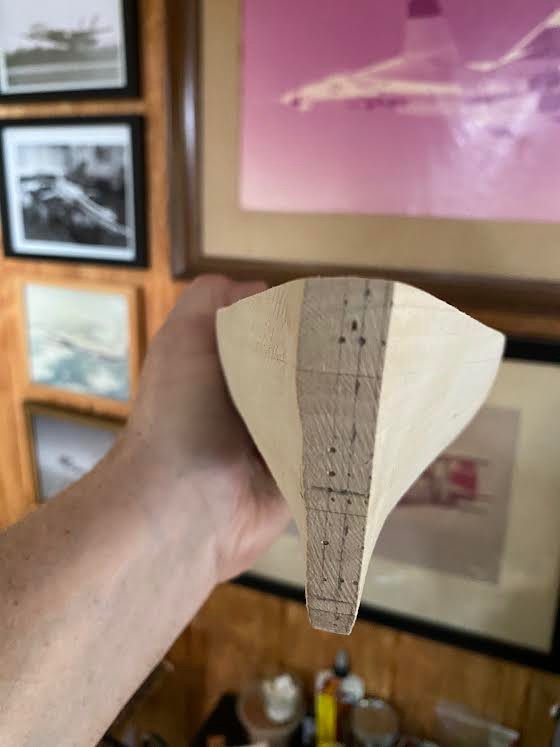
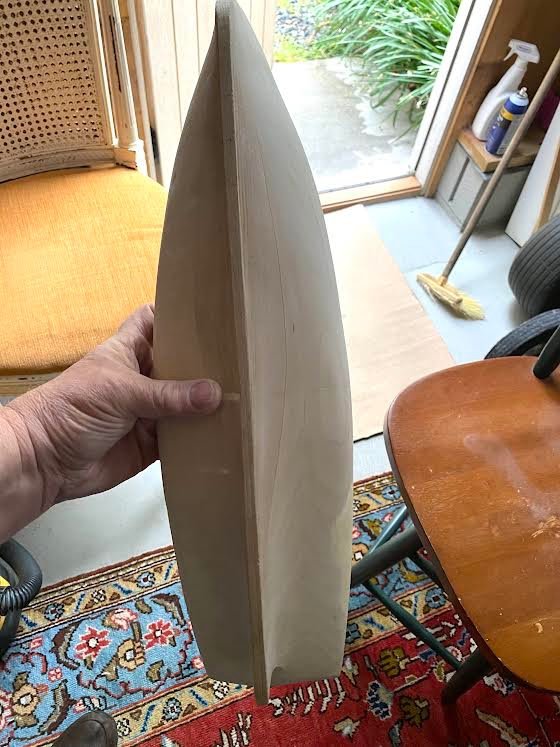
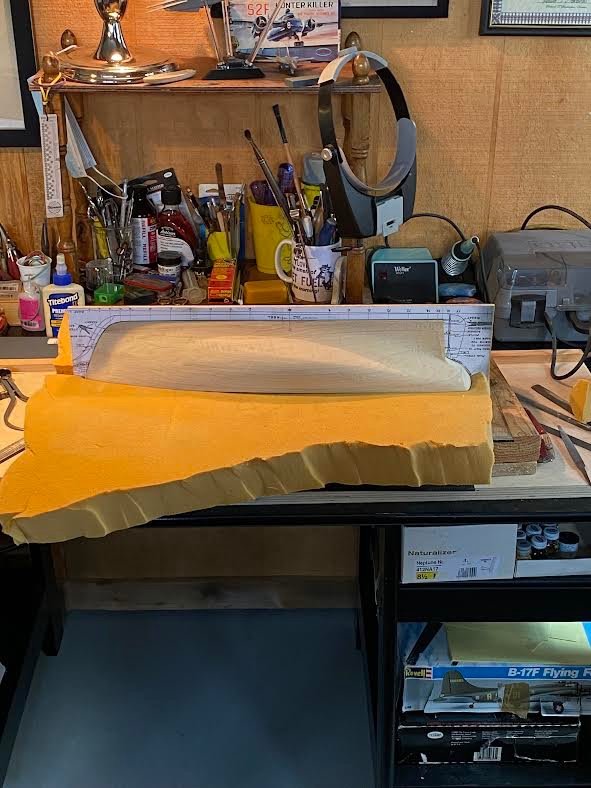
I suppose you could call this a major milestone, at least for me. With encouragement from Nic at Bluejacket about the use of Bondo, and epoxy /glue adherence to it. I triple checked the hull today to ensure all the templates which fit snuggly. My only dilemma is how to you position the very last template, the transom. The transom is on an angle and I do not want to overshave the area. Also not sure how much wood to remove on the top deck at the transom, see photo. I masked off the keel rabbet and primed the hull lightly with Dublicolor red oxide automotive primer and will lightly sand tomorrow and apply some with red lead where needed. Some of the grain was a bit narly in spots. I still need to repair some over cuts on the keel rabbit caused by my hamfisted use of the Dremel tool. I'll use a bit of bondo to reform that area. I've put the Dremel tool away for now as it cuts so fast and gets me in trouble. My second dilemma or perhaps this is normal for a solid hull model, and that is I need to shave the deck down as the bulwarks are not high enough when checked against the print. Why this is, I'm not sure. a I need to cut down at least .100. Here are a few photos of todays progress, and thanks again Nick for your support!
-
Following this build. Our entire family worked for Grumman on Long Island, my dads father on the F4F Wildcat, my moms dad on the F8F Bearcat through the A-6 Intruder, both my father and I on the F-14 Tomcat. Enjoy the build!
- 150 replies
-
- 12
-

-
I don't think any two wooden boats are the same anyway. Here along the Chesapeake Bay, Deadrises were commonly built by "Rack of Eye", no plans, just experience. If you have time, look up Billy Moore: Chesapeake Boat Builder 1981 on YouTube. He builds a Deadrise using only his years of skill and "eye" at the the Mariners Museum in Newport News,Va. I'm sure your model will be stunning when done, it's still a piece of art.
-
Thank you Jaager and Bob. I now want to run out to the shop and grab one of my planes and try my hand at this. All those wasted "curlies" over my life. This is a very interesting concept! I used to collect planes, and even have some of my Great Grandfathers tools as he was a Danish cabinet maker in Denmark and later in Quincey, Massachusetts. I have my grandfathers drawing tools as he was Art Director at Grumman Aerospace in Bethpage NY for years. I worked there for years myself in flight test and the prototype/production departments where prints were out on the bench every day. I'm struggling with them after two brain strokes and multiple myeloma cancer, which is in remission. Memory is a funny thing, all you need is a spark, and memory returns. So it is now working on Smuggler, It's a good exercise for the brain matter. My grandfather left me all of his drawing and drafting tools, lots of templates, french curves, triangles ect and I am presently using them on his drafting table along with mine he bought me back in 1970. I keep telling my grandson that he needs to learn a trade, something that will be useful for him, if not now but perhaps in the future as something to fall back on. If only he'd put down the X Box and learn one. We did send him to sailing school while he was visiting one summer and he did well. I will introduce him to my Bluejacket prints and explain to him some basics. I'm a tool junkie and will quiz him on certain tools and hopefully he'll remember. Back to the subject and sorry for the ramble on. I do have some cherry stock from our cabinet installation, along with lots of pine, 300 old re-claimed heart pine our floors are made of. Probably some oak and mahogany trim pieces out there in the garage as well. So I'm going to try the plane shaving method and practice on flat and curved surfaces and see how I do. I'll use PVA as they will be so thin, PVA will let me slide them around a bit if needed. The biggest challenge on this solid hull was finding a good centerline, both keel and deck. I measured and measured, used my dividers, calipers ect trying and get an average centerline on the deck then went around to the bottom stretching fishing 10 lb test monofiliment fishing line down and along the keel. I then centered the keel and went back and forth between the keel and deck until the met reasonably well .This took many attempts to get it as accurate as I could, but "I think" I got it right. My blank hull was thicker on one side than the other, the deck was off from side to side, the bulwarks were ..350 - 450 on the starboard side and .150-.200 on the port side. Cattiwampus? There's mention of cutting off the bulwarks and building them back up with wood strips. I'm going to try it the way the instructions say first,. Why? Because it's harder and a challenge. We shall see! Once I got the centerline, I worked the templates and have the bulwarks where they need to be. Before I did all this, I did ensure what I think was a squared and flat keel using the template. "Blueprints rule" so I made it work all around. I was concerned I was cutting too much. But, as mentioned, fixing a solid hull is easier than plank of frame. Solid hulls, I think I want to try another solid hull. Maybe 5 years from now.
-
Such an interesting topic on solid hull building. Bob Cleek hit the nail on the head with the lack of manual skills taught in todays schools. I asked my grandson about his courses in high school and asked him if he has ever had a shop class or mechanical drawing class and he said "what is that"? It's disturbing to me to hear that. As a new modeler, I chose my second build, Bluejackets Smuggler, which is a solid hull kit. Every step of the way has been a challenge, from becoming reacquainted with blueprints, to using old drafting skills with old tools learned 50 years ago in high school, to which tools work the best for shaping. Measuring and laying out stations, finding the centerline, becoming frustrated with mistakes but learning from those mistakes. Slowly figuring things out. This to me is the beauty of creating something. I may want to plank the deck on Smuggler, just to learn another skill. We'll see. I'm learning something new every day from everyone here. At my pace, I should be done with Smuggler in about 5 years...
-
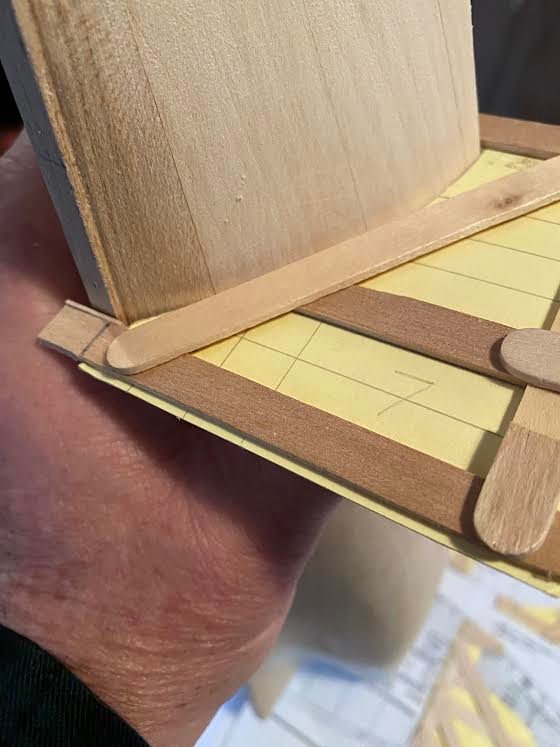
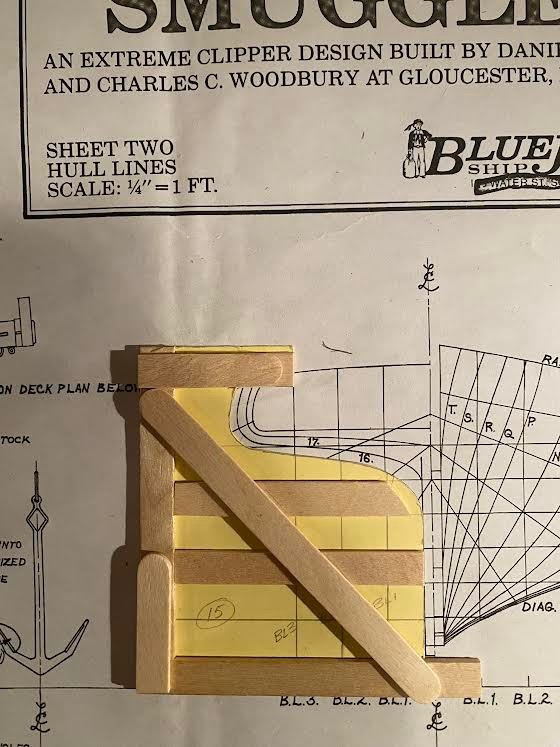
So after two months of searching, I found, by chance, my Dremel MM35 Mutli tool tucked away in that "safe" place that I had put it. In my opinion,this is the tool to have for solid hulls. Perfect weight and balance, at least for me, it can be held with two hands to be very precise. Shaping the hull is now a breeze compared to rasps, sandpaper and the old regular dremel with drum sander. Using 60 grit, it cuts aggressively, but you can control that with light pressure. I originally purchased it to cut the grout in our marble shower, and it performed flawlessly, and it also came with the sanding attachment and various pads. So any other newbies out there like me attempting a solid hull model should consider one. Almost completed the port side today on Smuggler. You can see the station 8- 10 repair with Durhams, where I found my template mistake, which in turn prompted me to stiffen the templates with craft sticks. This proved to work extremely well and accurate. Durhams is very strong and is extremely hard. Using Bondo if needed here on out with a glaze after priming on low spots.
-
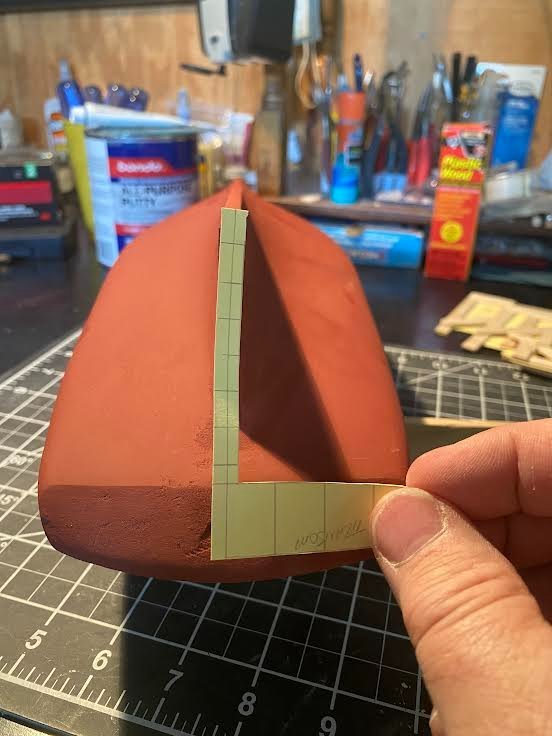
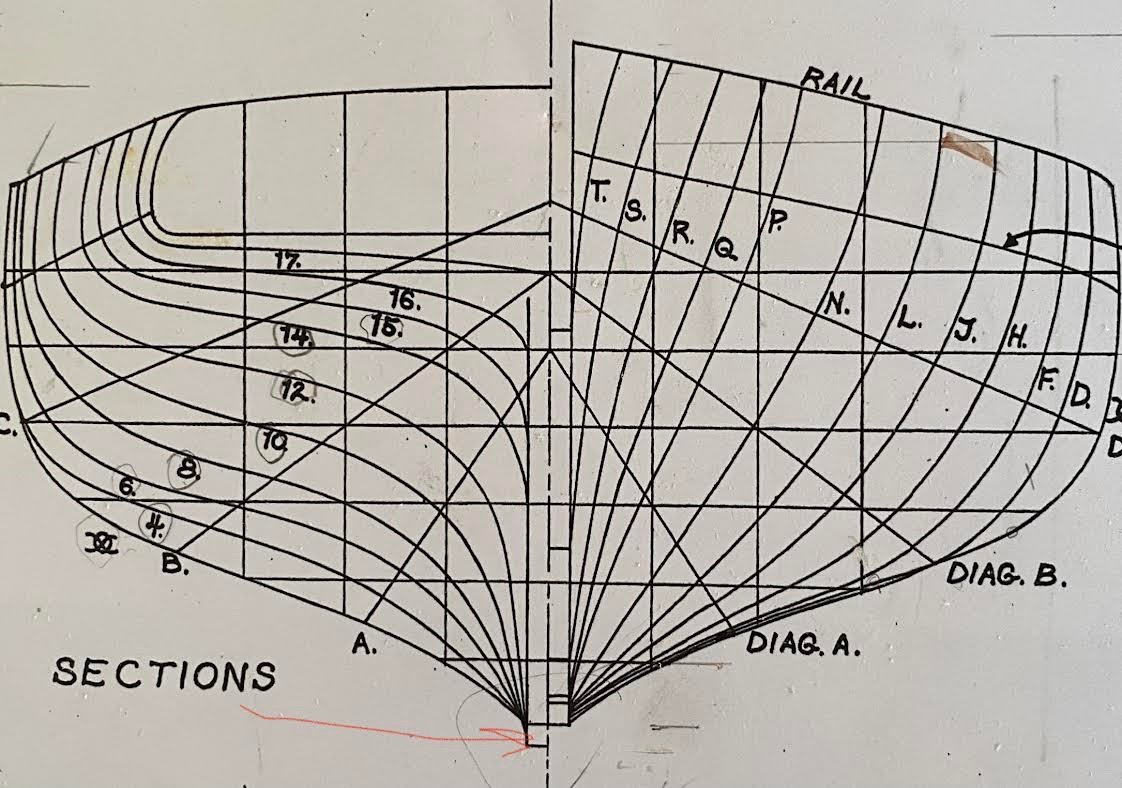
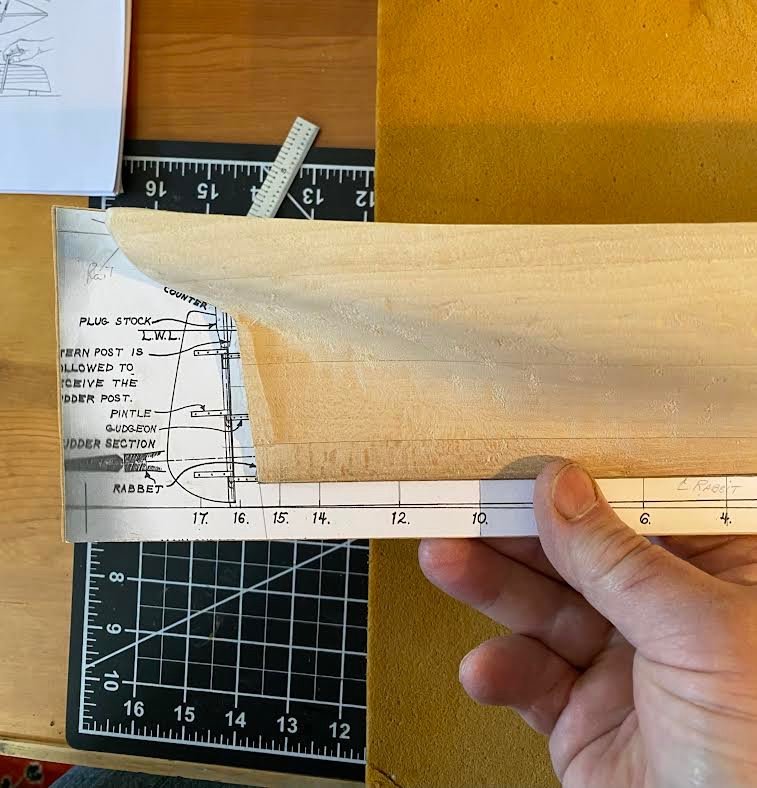
Thanks Nic. I assume that the top flat surface of the machined rail and the flat surface rabbit are to ensure proper placement of the templates and not to be altered. Here are some photos showing Sta. P and "L" (looks like a 7) showing how I cut the templates and how I've shaped the forward part of the hull so far, still not done from Sta P forward. From Sta. 0 forward the templates create a small vertical (notch, as shown in photos) surface off the rabbit then follow the curve of the hull upward from station F forward. Am I doing this correctly? Is there anything wrong I'm doing in these photos? Note: The first photo the centerline doesn't appear to line up, it does, l it was just hard to hold the template firmly and photograph. Tim
-
Question: I have the port side of the hull faired in nicely to match the templates, but when moving over to the starboard side, it seems the rail on this side is about .100 taller. Are the rails on this solid hull model off limits to shaving? It seems to be affecting only a few rear stations. The starboard side rail is about .200 and the port side is about .350 or less to the deck. I have not sanded or cut the rails at any time. The keel rabbit is square as per instructions.
-
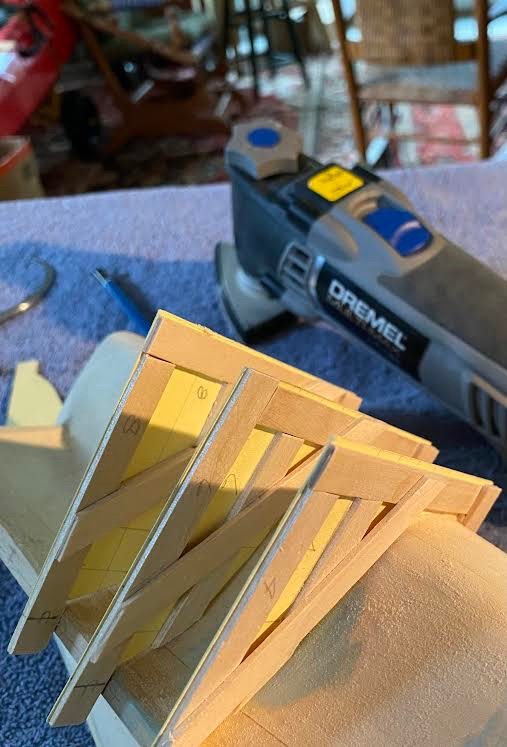
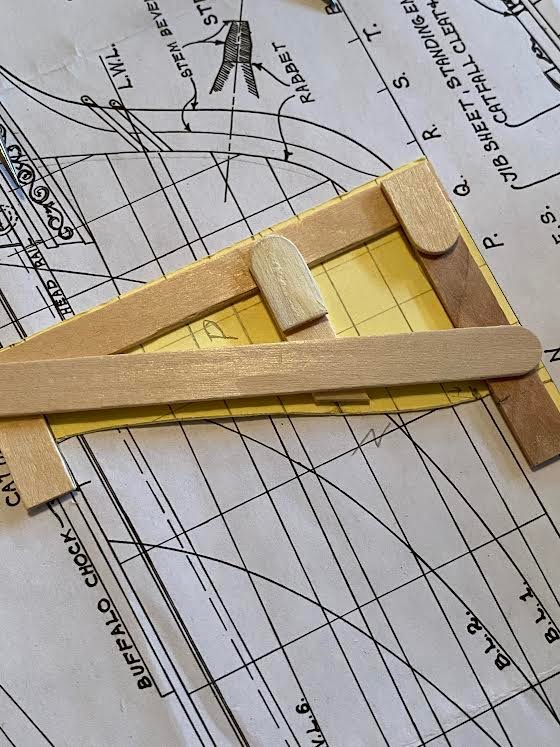
Thanks for the input Nic. Yes, it dries very hard as I have found out. I only had to fill a small section, which sanded/rasped out nicely, mainly up against the bulwarks b/w 8 and 10, so harder is probably better up there. I will use an auto filler as you suggest for a skim coat before sanding and priming. Luckily I realized the problem at Station 10 and stopped all work as I new something was wrong. Today I went over every template again, checking each template on on the half breath and sheer plan to verify correct rabbit vs.rail position from Station 0 through 15. I made the templates out of doubled up heavy duty card stock, but, flex was the problem the more you used the template. So I carefully reinforced each template the craft sticks, checking all the time against the print and making small corrections if needed. Now I have nice, stiff and accurate templates for use without having to make another set. My next model will have metal templates. Does Bluejacket have a favorite spray primer to use? I do not have an airbrush so I need to decide and choose correctly to avoid paint problems down the road. Here is a sample of a stiffened template. Not pretty but fully functional. This one looks off in the photo but its roughly positioned for the photo. The rail and rabbit are solid surface.
-
Welcome from coastal Virginia!
-
Welcome from coastal Virginia! Enjoy
-
Well, I made my first major mistake. When making the templates from the center station aft, I cut them all the same at the rabbit as shown on the print, I then realized my mistake looking at the print. Dummy me. I forgot to check each template from the rail to the rabbit at each station. The red line clearly shows what I missed. I was wondering why the templates were getting tighter as I worked aft. I was glad I drew all the waterlines on each template. Its all a learning experience. Picked up some Durhams water putty today, looks like I may need some.
-
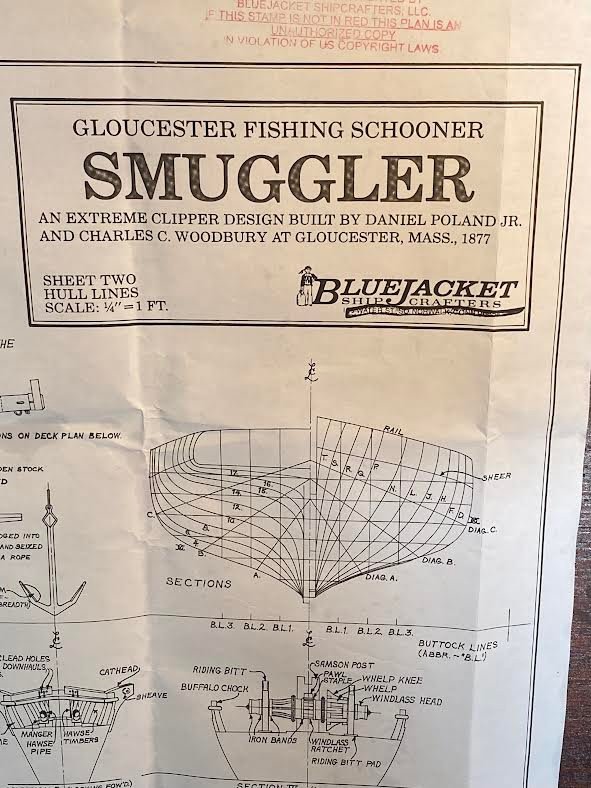
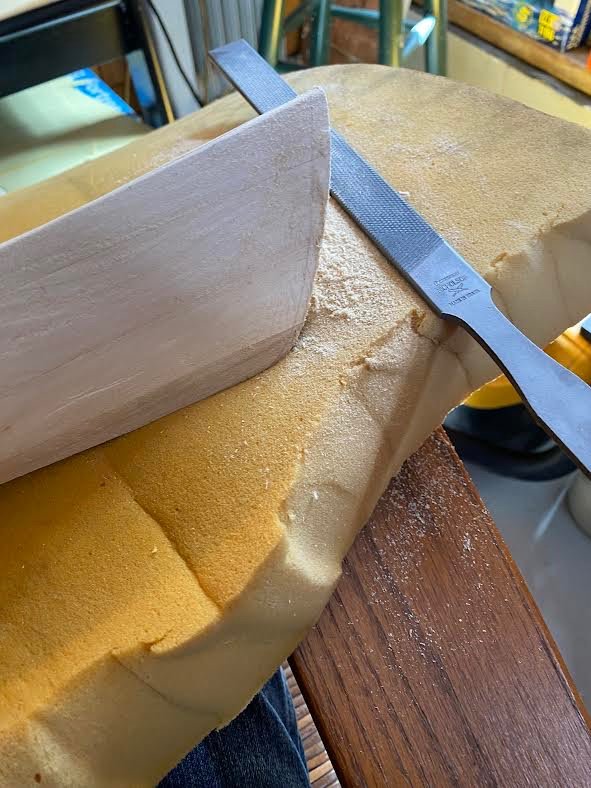
Today I started my second build, Bluejacket's Smuggler. My first build, the Grand Banks Dory was a simple plank of frame build and this being a solid hull, will be a new adventure for me. So studying the plans and reading up on the subject I started by creating the keel template. I scanned and copied the print ensuring that there was no difference in size after printing. When that checked out OK, I carefully cutout the copy of the keel/rabbit detail and laminated it on what I think is Birch, 3/16 thick. Very stiff and straight and checked for accuracy against the print, this is very handy when it becomes to trimming the solid core. No flopping around, just like a yardstick. After ensuring the keel was perfectly flat, I started trimming the transom with 10" coarse half round and rat tail rasps while always checking the template against the midship tick mark. When the transom had a decent fit, I proceeded to the bow and trimmed for an exact fit using a course rasp, again always cross checking while holding the template firmly against the transom .A final tweak her and there and it fit like a charm. A problem I encountered was the hull moving around in my lap while filing. I did not want it in a vice as sitting in my rocker is a comfortable position for me, as my back has seen better days. What did work, by accident, was a piece of Tempur foam material. No matter what angle your working, the foam holds/cradles the model with out shifting and offers outstanding protection for dings and dents and allows you to file with any pressure you want. Tomorrow I'll finish cutting out the station templates and after finding the centerline, will start fitting them. I'm guessing you just carefully remove material in the general area of each station template one by one, then as the manual says, rasp it smooth connecting the hollows created. Any suggestions are welcome as to how to create those cuts/ depressions with the templates. Cheers, Tim
-
Welcome Alex! This is the place to be. Tim
-
I'm following your build with great interest. Superb job! Beautiful detailing and paint.
- 50 replies
-
- 2
-
-

-
- Perry
- BlueJacket Shipcrafters
- (and 1 more)
-
My second Bluejacket kit, Smuggler arrived safely today, so it's back to the shop. What a beautiful kit! Will start a build log on it in a day or so. Spent the day reading the manual and studying the print. Tim
- 31 replies
-
- 2
-
-
- Grand Banks Dory
- Bluejacket Shipcrafters
- (and 1 more)
-
What an absolutely beautiful job on Smuggler!! Congratulations and thanks for a great build log, it will be very helpful as this could very well be my second build. The support you received from the members here and from the Bluejacket folks themselves during the build is reassuring. The solid hull concerns me, but hey, I get to buy some new tools, gouges and chisels, a secondly, I need the experience with a solid hull. I have a Wye River Bugeye I picked up at a thrift store a few months back that I was contemplating it as a second build, but I'm afraid she's going to have to wait a bit longer, probably quite a bit longer! Tim
- 44 replies
-
- 2
-
-
- smuggler
- first build
- (and 2 more)
-
Thank you for the kind compliment (and discount) Nic!
- 31 replies
-
- 1
-
-
- Grand Banks Dory
- Bluejacket Shipcrafters
- (and 1 more)
