


SiriusVoyager
-
Posts
502 -
Joined
-
Last visited
1 Follower

Recent Profile Visitors
2,992 profile views


-
 aaronc reacted to a post in a topic:
Work area pictures only
aaronc reacted to a post in a topic:
Work area pictures only
-
Admiral Rick reacted to a post in a topic:
Fischkutter by Bryan Woods - Laser Creation World - 1:35
-
Tecko reacted to a post in a topic:
Work area pictures only
-
Keith Black reacted to a post in a topic:
Hello and thank you for having me
-
SiriusVoyager reacted to a post in a topic:
HMS Beagle by Tecko - OcCre - 1:60
-
SiriusVoyager reacted to a post in a topic:
Albatros by vvvjames - FINISHED - OcCre - 1:100 - First Build
-
SiriusVoyager reacted to a post in a topic:
HMS Beagle by usedtosail - OcCre - 1:60
-
SiriusVoyager reacted to a post in a topic:
Muscongus Bay Lobster Smack by Kenchington - Model Shipways - 1:24
-
SiriusVoyager reacted to a post in a topic:
Norwegian Sailing Pram by Taken Aback - Model Shipways - 1:12
-

Hello and thank you for having me
SiriusVoyager replied to Danny_CZ's topic in New member Introductions
Welcome to MSW! -
Taken Aback reacted to a post in a topic:
The latest to begin the Model Shipways 3 kit set
-
Keith Black reacted to a post in a topic:
My introduction on Model Ship World
-
SiriusVoyager reacted to a post in a topic:
HMS Victory by ECK - OcCre - 1/87
-
SiriusVoyager reacted to a post in a topic:
Calypso by mandolinut - Billing Boats - 1:45
-
My introduction on Model Ship World
SiriusVoyager replied to ANDY GRAY's topic in New member Introductions
Welcome to MSW! -
Keith Black reacted to a post in a topic:
The latest to begin the Model Shipways 3 kit set
-
robert952 reacted to a post in a topic:
The latest to begin the Model Shipways 3 kit set
-
I have seen some of their videos on YouTube. I'm looking forward to seeing how this comes out.
- 37 replies
-
- 1
-
-
- Fischkutter
- Laser Creation World
- (and 1 more)
-
The latest to begin the Model Shipways 3 kit set
SiriusVoyager replied to Taken Aback's topic in New member Introductions
Welcome to MSW! -
 Jim M reacted to a post in a topic:
Lady Eleanor by Jim M - FINISHED - Vanguard Models - 1:64
Jim M reacted to a post in a topic:
Lady Eleanor by Jim M - FINISHED - Vanguard Models - 1:64
-
bruce d reacted to a post in a topic:
Ultimation tools
-
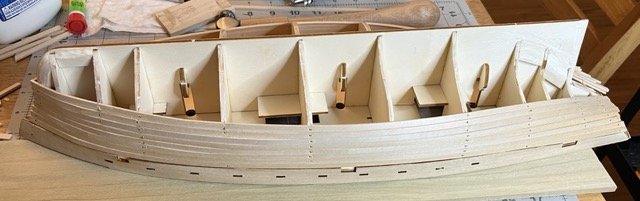
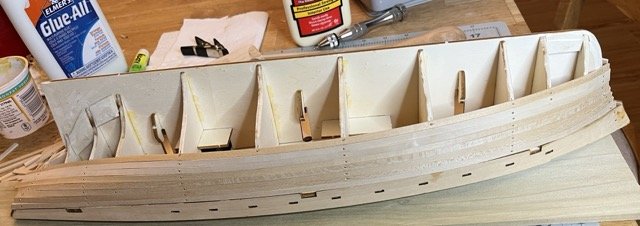
Wow, I can't believe that it has been over a month and a half since I lasted updated. It has been a busy couple of months with travel, kids marching bad, work, ect. but I have been slowly working on the first layer planking. In the past I have avoided using nails as much as possible. This time I used nails for most of the strips to try something different. It is definitely convenient and easy to hold the planks down, but I don't like having to file them down or sand over them. I think I will try to avoid them in the future. Like always, I am not too happy with my planking job, but its ok for providing the structure for the second layer planking. I looked back at my previous model and actually it looks quite a bit improved. First layer planking done. The wood got a little chewed up where I used a Dremel to file down some of the nail heads, but that is ok since it will all be covered. I am not sure why the keel pieces don't fit together snugly. This is cut straight from the sheet, no sanding or char removal. I am not sure if I missing something or if it is just not well designed. Fortunately it will be painted so I will just use some filler in the gaps. Much less wood filler than previous hulls. I also attach the keel to the first later of planking because I don't understand how anyone can get the shape of the hull so perfect that the keel, particularly the stem, lays on flush without any gaps. Next step is the second layer planking. 25:15/ 53:00


- 21 replies
-
- 2
-
-
- Cala Esmeralda
- Santa Eulalia
- (and 1 more)
-
With that supplied thread, a coat of beeswax can help keep some of that fuzz down. Great job so far!
-
Welcome to MSW!
-
Welcome to MSW!
-
Warped Dowel for Small Masts
SiriusVoyager replied to acaron41120's topic in Masting, rigging and sails
Maybe a hot Iron and roll the soaked dowel on a flat surface? -
Welcome to MSW!
-
Welcome to MSW!
-
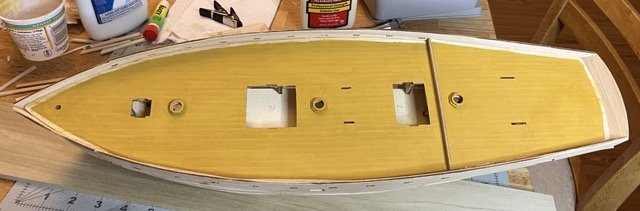
I repainted the deck and re-placed the bulwarks. It looks better now. I also started with the first layer planking. In the past I tried to avoid using nails. This time I decided to try using nails instead of CA glue.
- 21 replies
-
- 3
-
-
- Cala Esmeralda
- Santa Eulalia
- (and 1 more)
-
Welcome to MSW!
-
Drill bit suggestions
SiriusVoyager replied to SiriusVoyager's topic in Modeling tools and Workshop Equipment
I can't believe that I asked about this a year and a half ago, but I finally got around to trying out some drill bits from McMaster. I am pretty happy with them so far.