HOLIDAY DONATION DRIVE - SUPPORT MSW - DO YOUR PART TO KEEP THIS GREAT FORUM GOING! (89 donations so far out of 49,000 members - C'mon guys!)
×


Greg Davis
-
Posts
806 -
Joined
-
Last visited
Content Type
Profiles
Forums
Gallery
Events
Everything posted by Greg Davis
-
 This is really stretching my skill set, and I am learning a lot - so that is good. At the same time, the project is reinforcing my like of ship models from about 1750 to 1850!
- 288 replies
-
- 3
-

-
- Santos Dumont No. 18
- hydroplane
- (and 1 more)
-
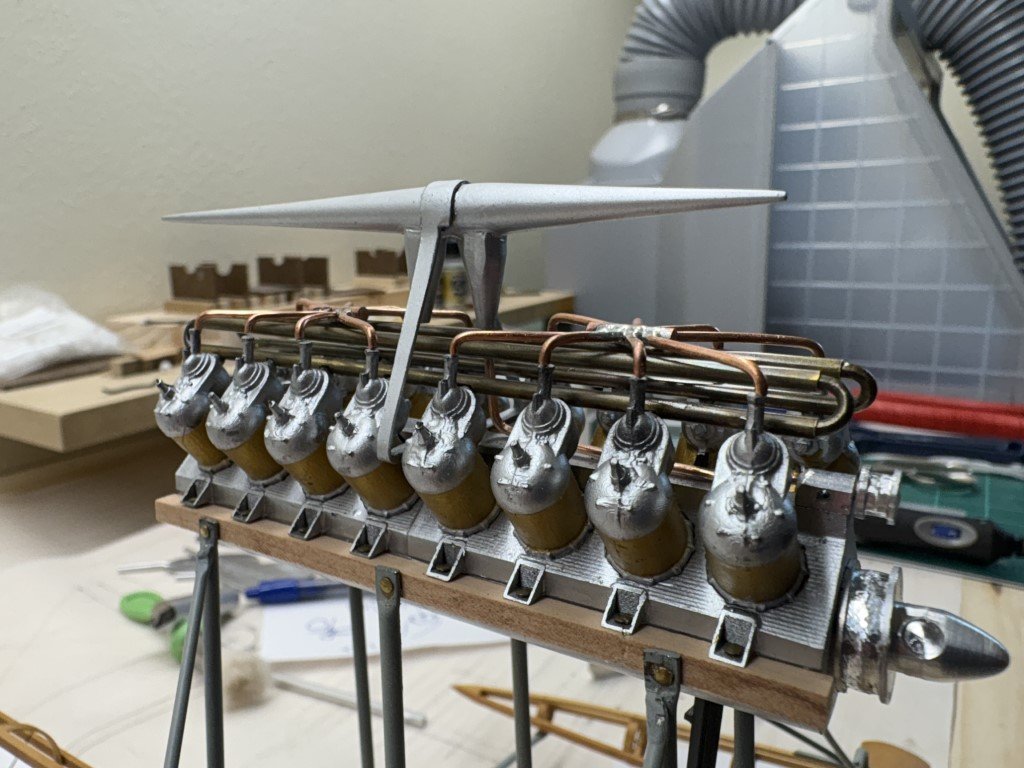
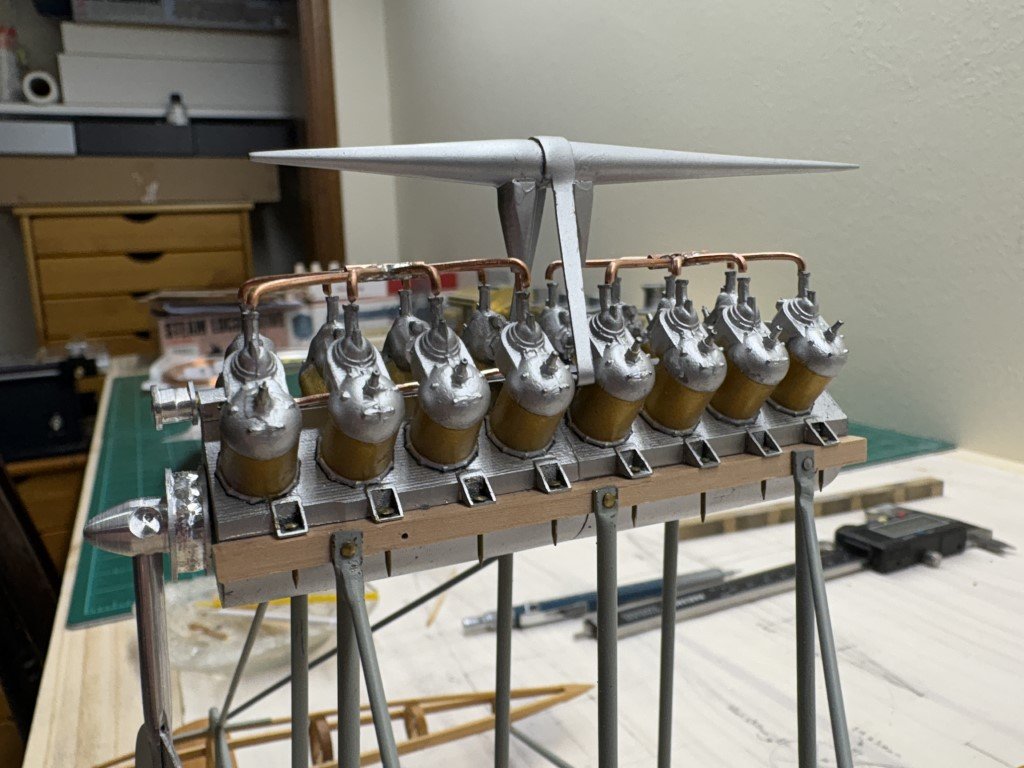
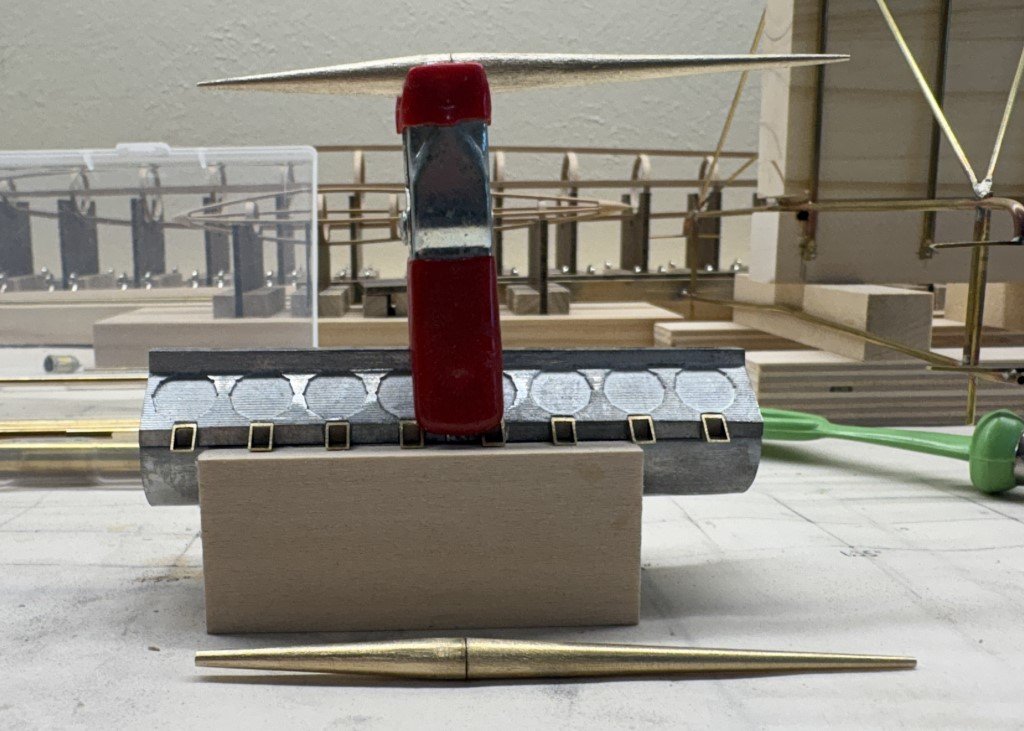
The radiators are now permanently connected to the model as are the copper air / fuel intakes. Next up will be the exhaust pipes. Having them in place will make fitting the front radiator piping easier and is almost necessary before adding the coolant intake manifolds to the exterior of the cylinders.
- 288 replies
-
- 5
-
-
- Santos Dumont No. 18
- hydroplane
- (and 1 more)
-
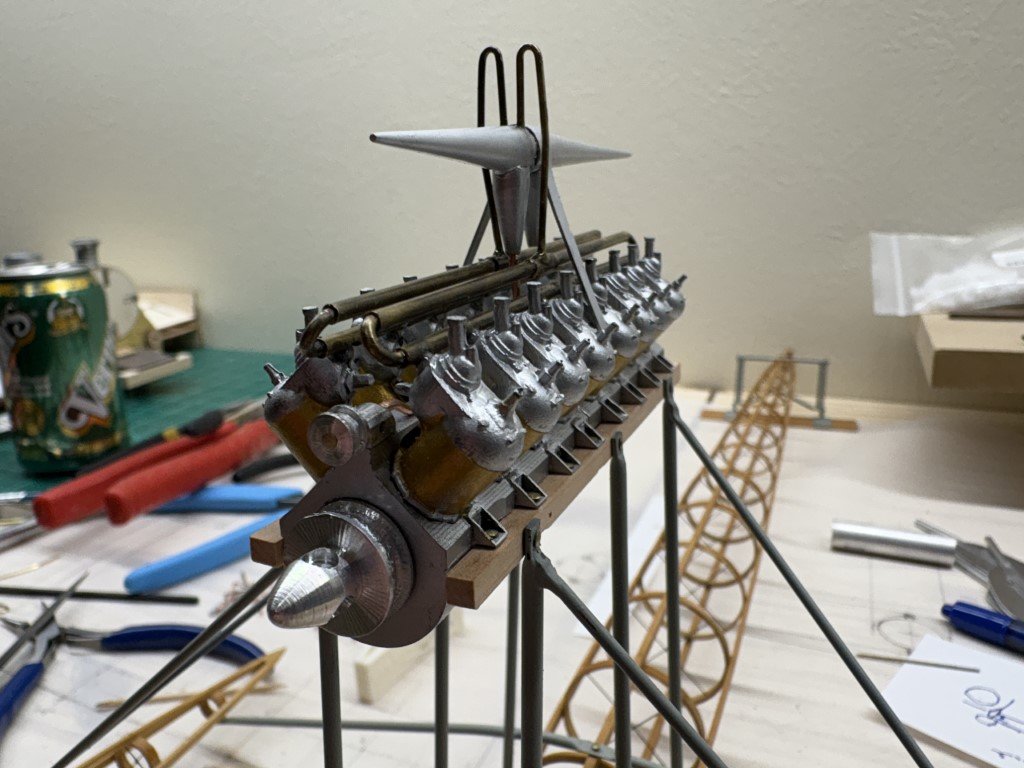
The engine block is 3.5" long - nearly 4" if you go to the front of the spinner.
- 288 replies
-
- 2
-
-
- Santos Dumont No. 18
- hydroplane
- (and 1 more)
-
Last bit of work for the day - the connections from the coolant pipes to the tank. Glad to have these two pieces in place. I had worried about being able to make and install the returns so that they looked similar to those on the boat. I also was worried about drilling holes into the tank and the upper level of the coolant return since they were already in place. Same fear as cutting through planking for gunports!
- 288 replies
-
- 5
-
-
- Santos Dumont No. 18
- hydroplane
- (and 1 more)
-
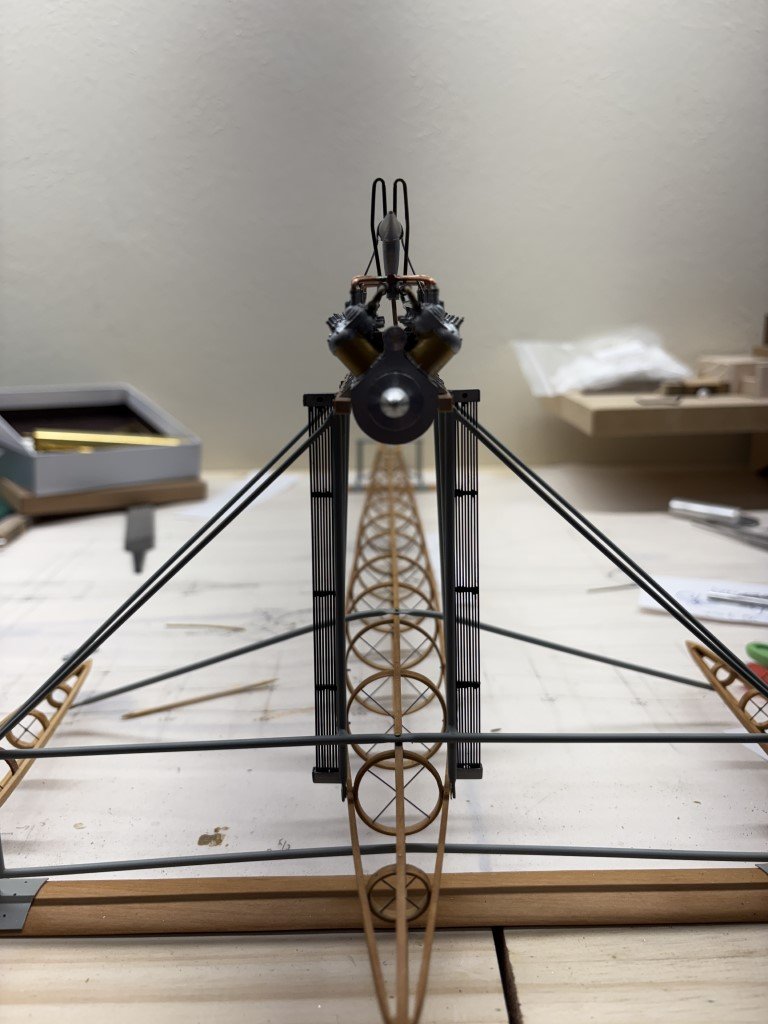
Coolant return piping in place: Still need to connect them to the tank above. Not a lot of space left to work fuel lines in below the tank! Trying to make sure there remains some room to have the exhaust pipes pass across the engine block.
- 288 replies
-
- 7
-
-
- Santos Dumont No. 18
- hydroplane
- (and 1 more)
-
Starting to add components to the engine. Added aluminum funnels to the tanks and then permanently connected the tank structure to the engine. Made a small structure to represent the front coolant pump and connected it to the coolant funnel with copper wire that represents tubing. Made and added a pulley to the pump - currently the pulley has the same depth as the big pulley on the propeller shaft. 'If' I can learn what the off-to-the-right front pulley did, then I will add it in and replace the coolant pulley with one half as deep (already made if this happens) and run a pair of belts off the big pulley. If not, then the coolant pump will get a single wider belt.
- 288 replies
-
- 8
-
-
- Santos Dumont No. 18
- hydroplane
- (and 1 more)
-
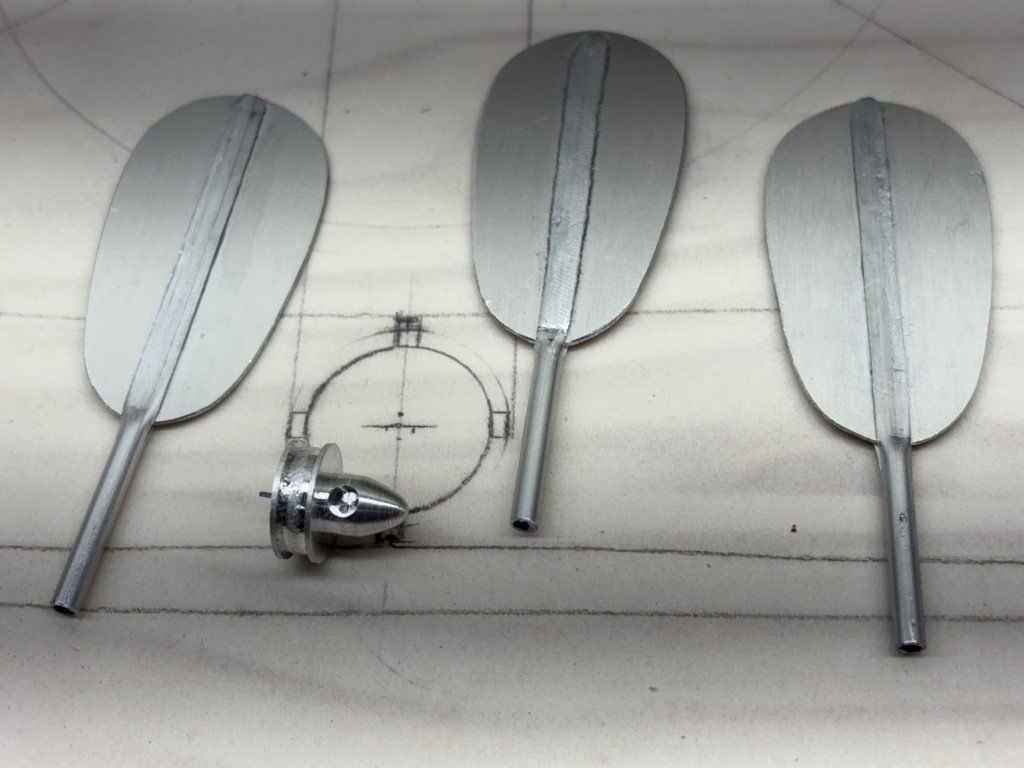
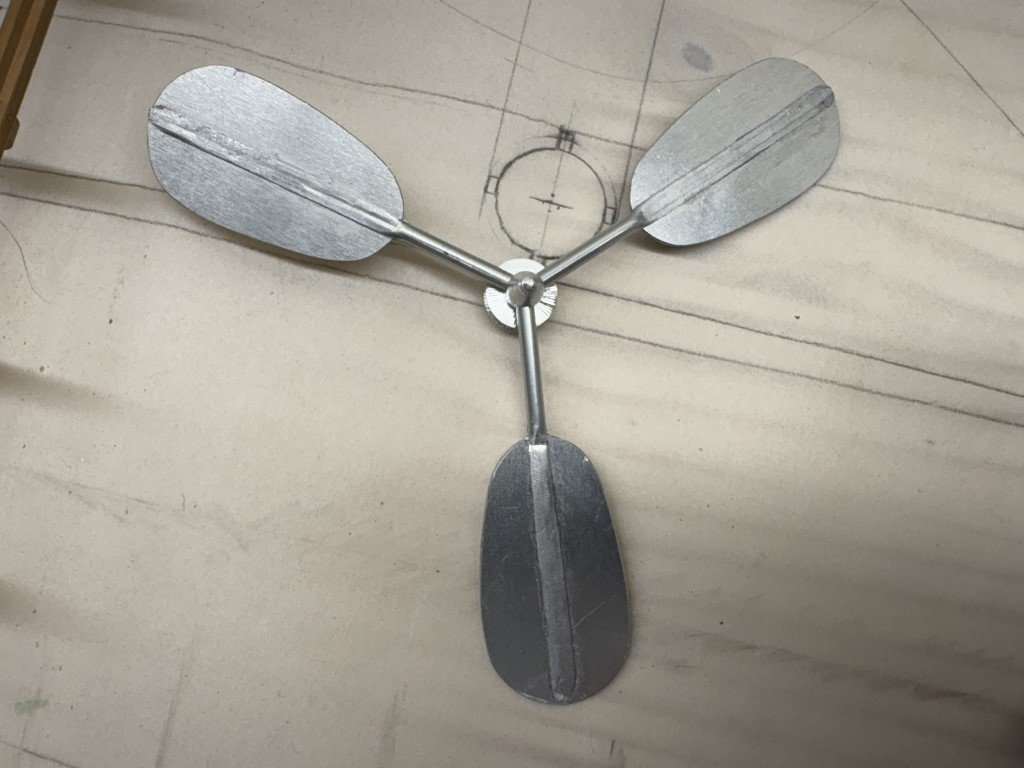
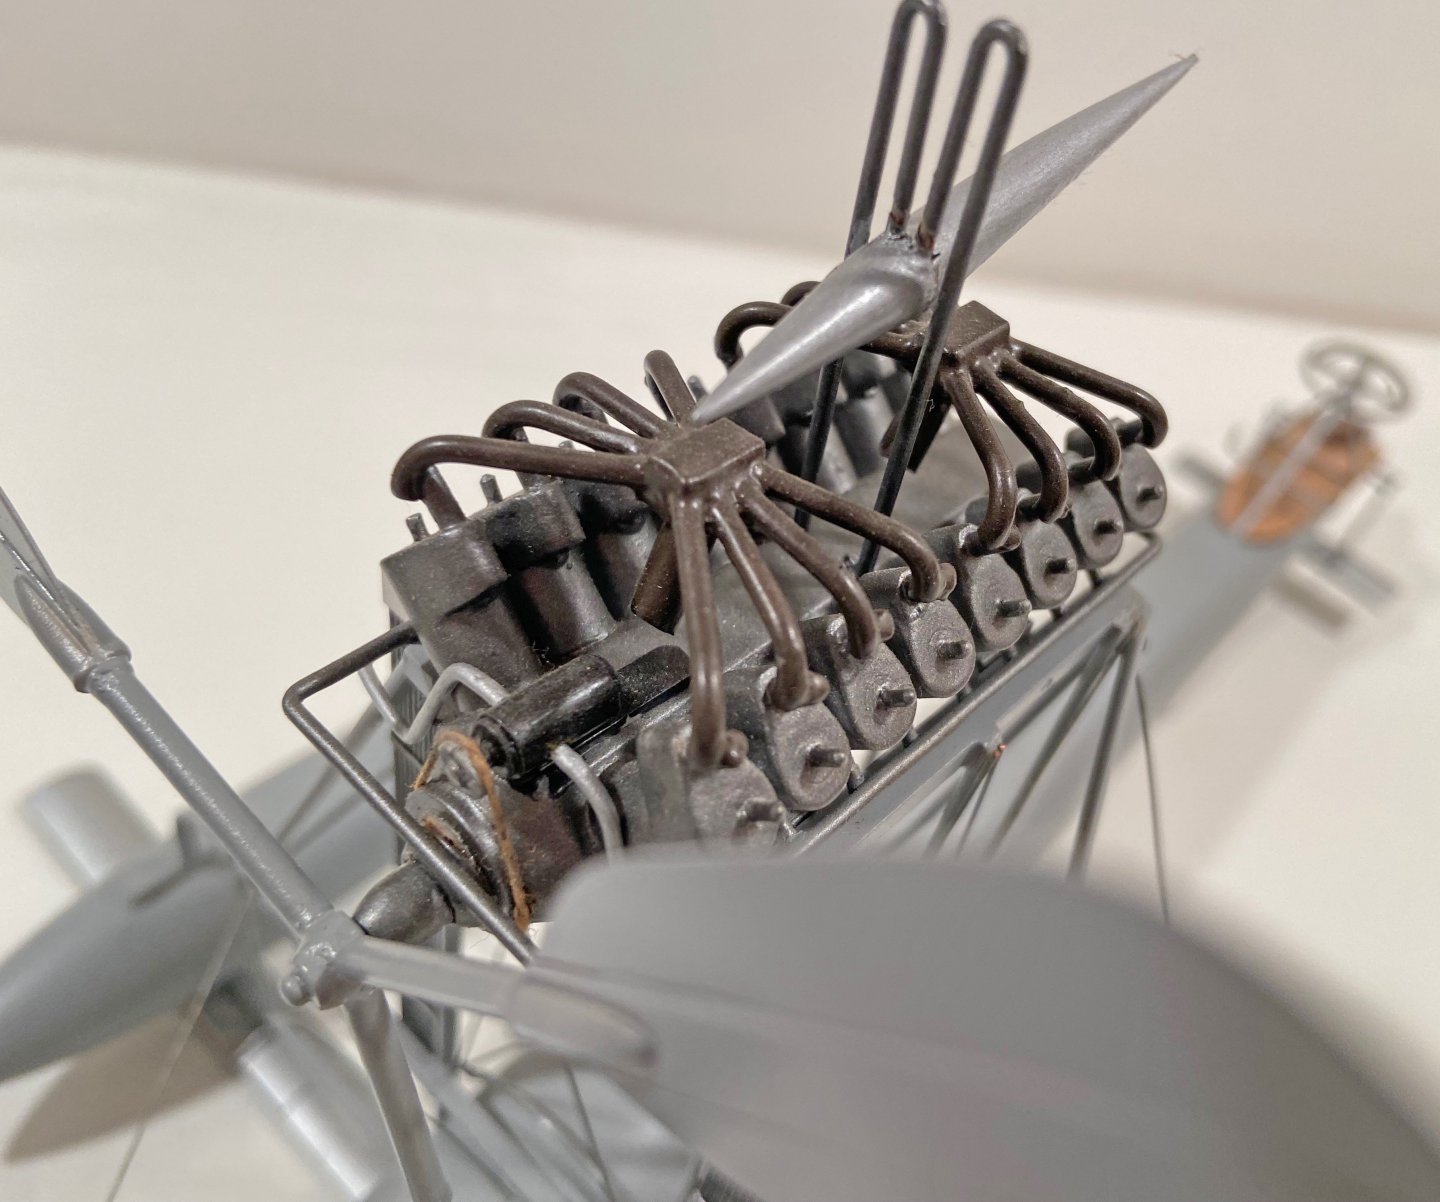
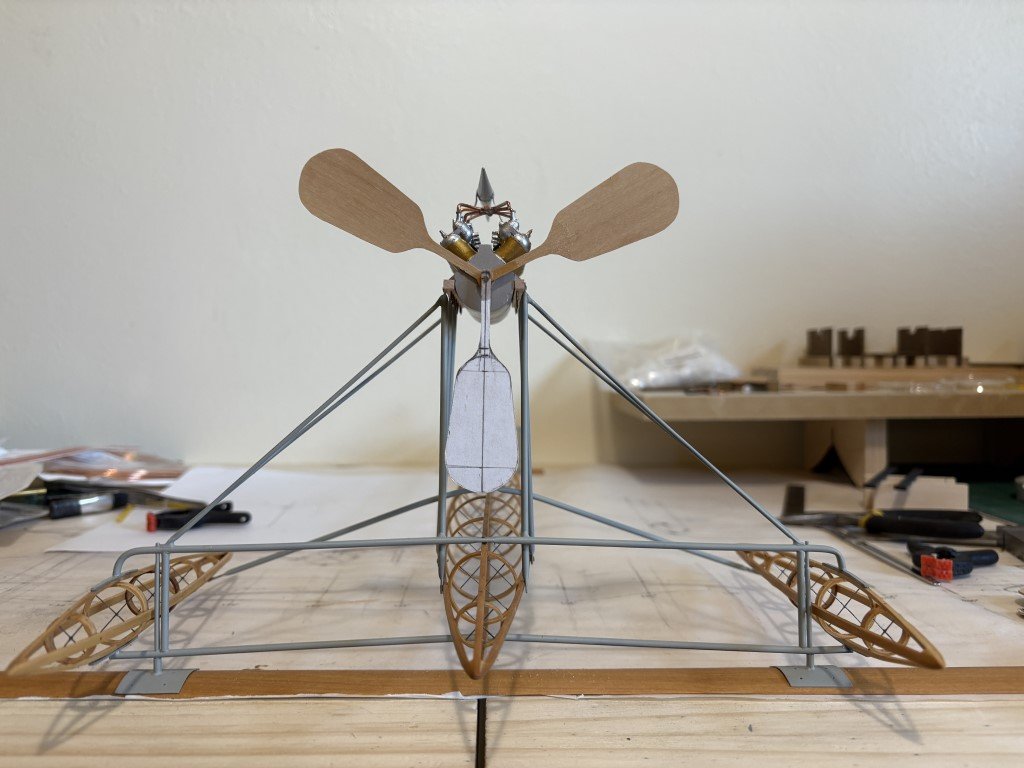
Today I felt the need to make something and take a break from understanding how Antoinette engines work. The project was the propeller components: blades, shafts, and spinner / big pulley assembly. All of these parts I made from aluminum. The three blades were simultaneously cut using a scroll saw. I had sandwiched 3 sheets of 0.032" aluminum between 2 sheets of 1/8" plywood and cut the together. The shafts are 1/8" aluminum tubing. The spinner / pulley took the most time. I milled it using a rotary table, thinking I would get a better result than turning it on a lathe. Here's what the parts look like in a trial fitting: Time to guess the pitch and then permanently fix the shafts into the spinner.
- 288 replies
-
- 7
-
-
- Santos Dumont No. 18
- hydroplane
- (and 1 more)
-
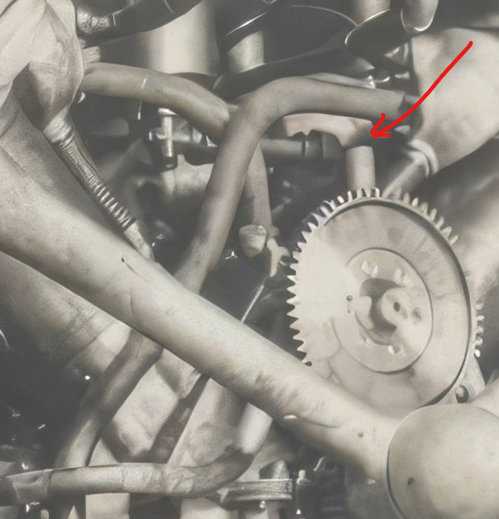
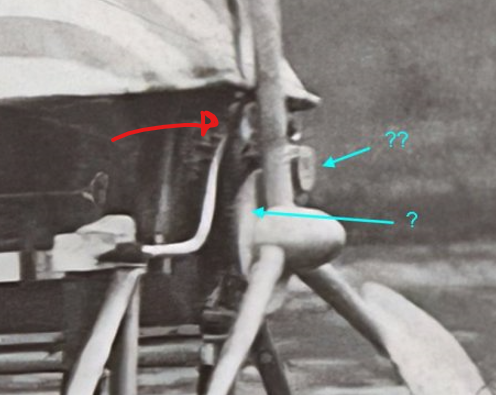
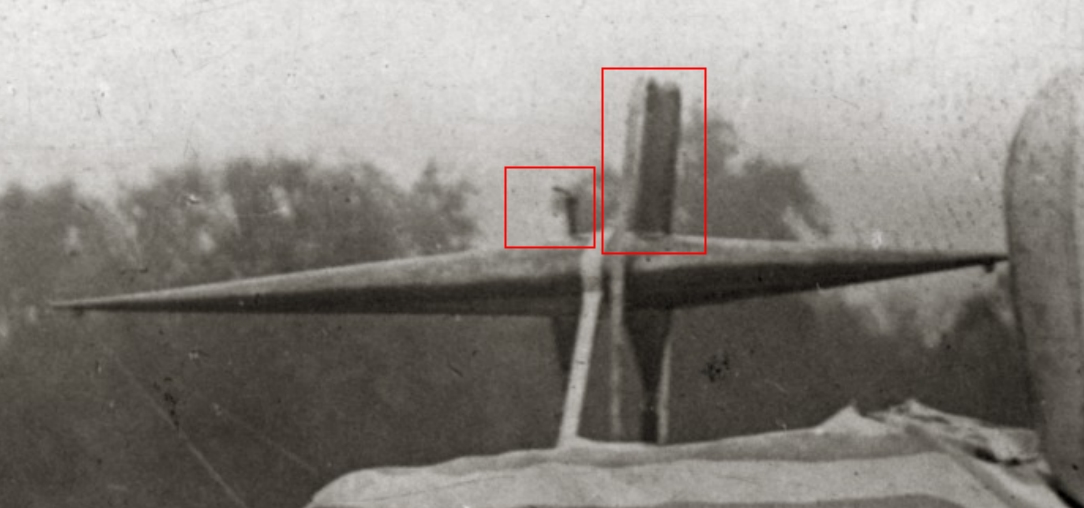
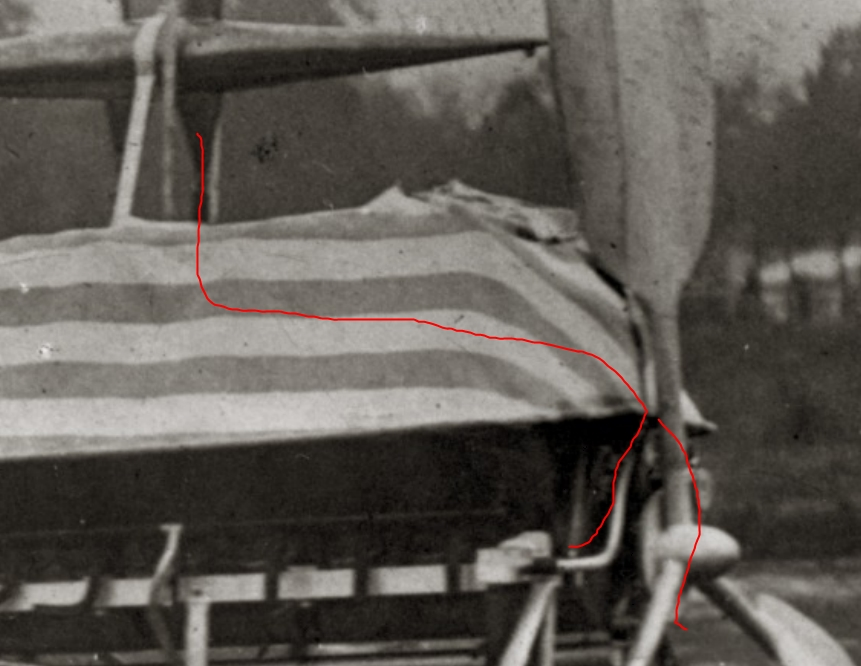
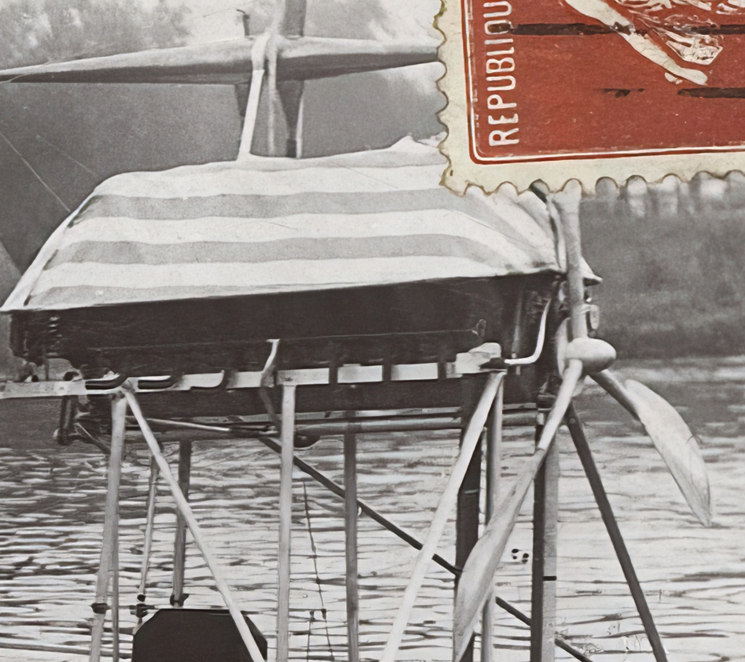
At first I thought that was part of the coolant system and that the two pipes that feed the coolant inlet manifold were connected to it. However, one of your recent clarified photos made it appear the coolant pipes go below that long tube. Here's a silly(?) guess for you to shoot down: this is a coolant pump and the tube is mostly a reservoir that is filled before the engine is run (how I don't know), there is a pipe that goes down from the tube and connects to the pair of pipes that attach to the coolant intake manifold. As you and others have indicated, with a short run not a lot of coolant is needed. Maybe there could be great reliance on a feeder reservoir and not so much on what coolant that is recirculated through the radiators. Please pick this apart!
- 288 replies
-
- 2
-
-
- Santos Dumont No. 18
- hydroplane
- (and 1 more)
-
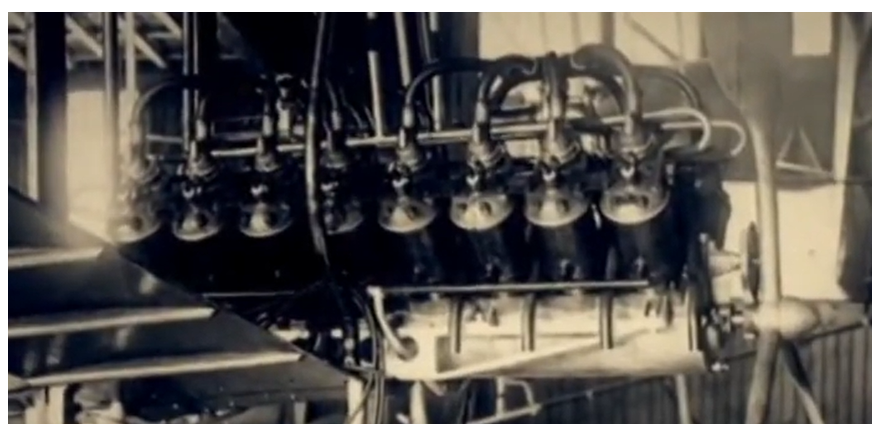
The engine that you are examining here looks different to me, in how fuel is delivered. I was under the assumption that there were two carbonators on the No18's engine that were fed by the rear portion of the conical tank. I thought the air/fuel mixture was then delivered through the spider-shaped manifolds. The engine you are showing here appears to have air intakes for each cylinder with fuel being injected separately.
- 288 replies
-
- 1
-
-
- Santos Dumont No. 18
- hydroplane
- (and 1 more)
-
Keith - When I made the fuel tank, I had made this note: I had taken measurements from pictures of the hydroplane and the 5mm (scale) diameter seemed reasonable, but I think I'm going to remake the tank with 6mm rods as this looks a little slim to me. I also did a bit of looking around on the web and found that an Antoinette V8 consumed fuel at 30L/hr. Assuming the V16 consumes twice that, i.e., 60L/hr or 1L/min, the tank I made would hold 10L of fuel or about 10min of run time. While it might be possible to do the two 1K passages at 100Km/hr in 10 minutes, it probably would be cutting things close. Moving to a 6mm tank (same length) the volume increases to a full size tank holding 15L (15min run time). I can see how the boat could be started, run a kilometer, turned and run back in that time frame. So, the current tank is probably just practice! I did end up making 6mm max diameter tank - this is the one I am using now. However, now that the thought is that the conical tank has fuel in the back and coolant in the front, the amount of fuel would be reduced back to approximately 10L; i.e., 10 min run time. I have no reference / knowledge of the actual 'rules' for this competition / prize other than the run is 1K and it needed to be done in two opposing directions. I don't know how long between the back-and-forth trials was permissible. I also don't know how great of a distance / time was allowed to accelerate the boat before entering the timed kilometer. Perhaps, there was an opportunity to refuel between runs. If so 10 min of run time should be quite sufficient! But again - all conjectural! Greg
- 288 replies
-
- 2
-

-
-
- Santos Dumont No. 18
- hydroplane
- (and 1 more)
-
That would seem plausible - I didn't see how the top pulley could operate if there was a gear attached to the camshaft, nor how the coolant pipes would make their way through. But if this is the case, do you think it is possible that the big pully ?, has two groves that allow separate belts for the two small pulleys; i.e., one belt goes to the upper small pulley that could be associated with the coolant system and a separate belt going to the pulley that is off center and perhaps driving another system?
- 288 replies
-
- 1
-
-
- Santos Dumont No. 18
- hydroplane
- (and 1 more)
-
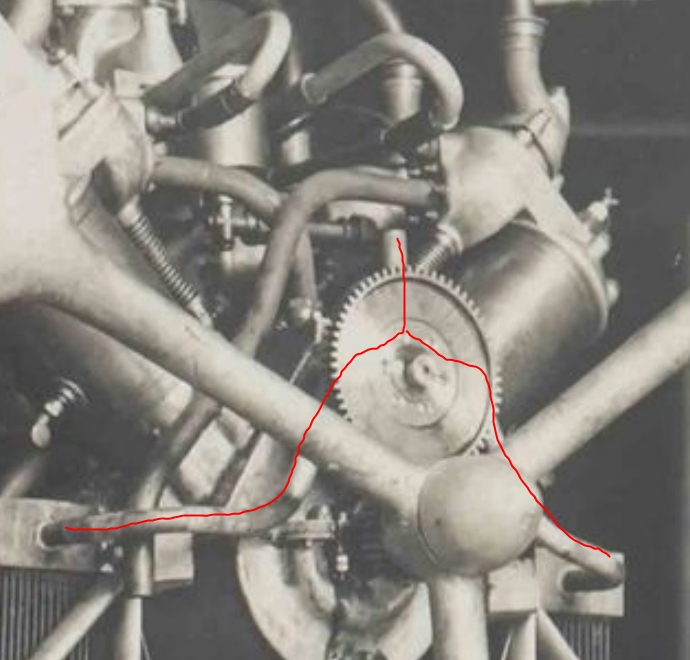
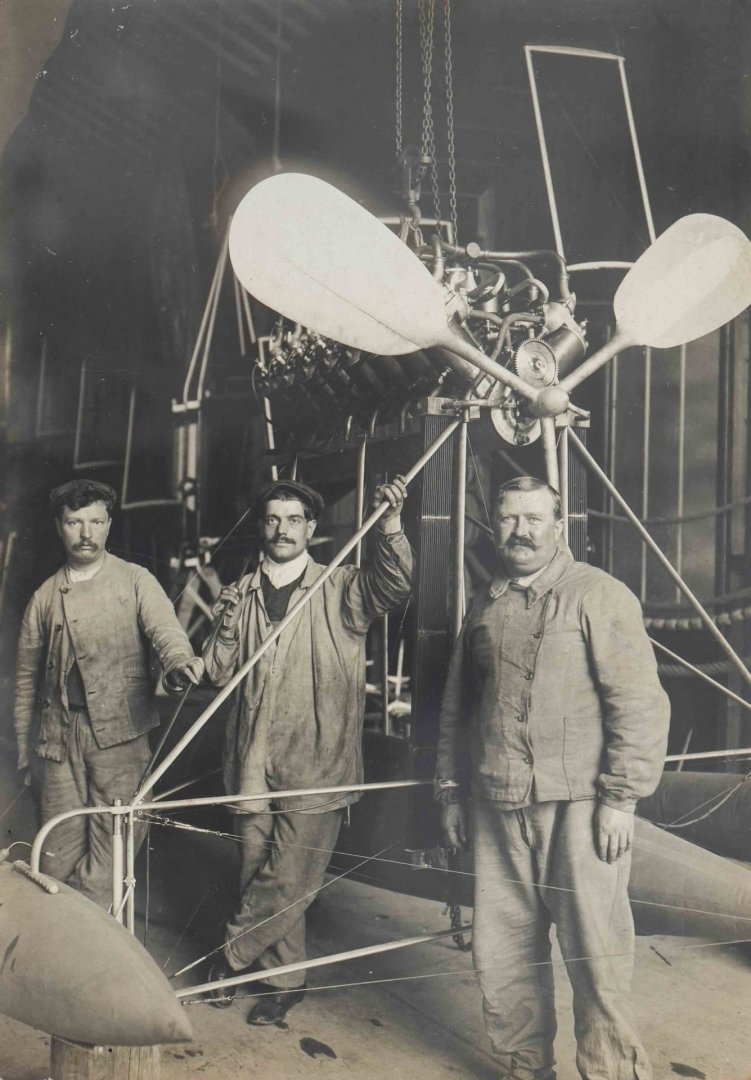
Craig - Are you suggesting that the smaller pinion gear is still behind ? in the picture below and the larger gear is still attached to the camshaft above; i.e., the gearing is exactly the same as when it was first installed on the hydro, except that a large belt drive pulley has been added between the pinion and the prop? Greg
- 288 replies
-
- 3
-
-
- Santos Dumont No. 18
- hydroplane
- (and 1 more)
-
I don't understand the gearing by the propeller. I believe the engine was a 2-stroke, so the gearing between the drive shaft and the cam shaft should be 1:1. Is the camshaft driven in the rear with a gear between the magneto and the engine? The gearing in the front of the No17 setup looks closer to 3:1 and then maybe reversed to 1:3 later.
- 288 replies
-
- 3
-
-
- Santos Dumont No. 18
- hydroplane
- (and 1 more)
-
The 'I don't know' and "Pipe end should go to bottom of radiator' are exhaust pipes! Craig - thanks again for helping me understand this machine Greg
- 288 replies
-
- 2
-
-
- Santos Dumont No. 18
- hydroplane
- (and 1 more)
-
Keith - This is a new concept to me! Something more to learn about. Greg
- 288 replies
-
- 2
-
-
- Santos Dumont No. 18
- hydroplane
- (and 1 more)
-
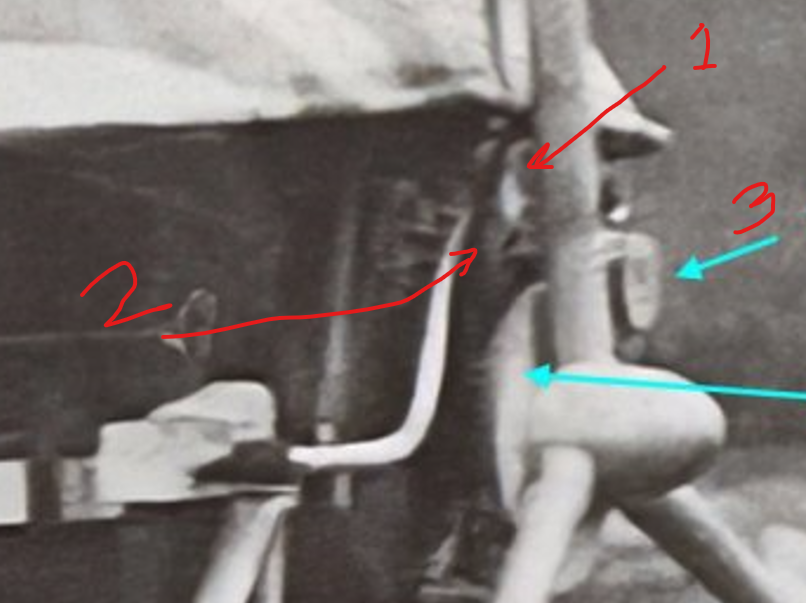
It should be clear by now that I am not an engine mechanic! Getting around 1970's - 80's racing bicycles was the max for me. Is it possible that this is the end of one of the pipes and it is currently unattached. The lighter colored object could be the second cylinder in? But here is another hypothesis: There a pinion gear at 2. The disk behind the propeller has a gear in the back and runs a belt in front. The belt in front go to pulley 3 a double pulley that also has a belt that goes back to pulley 1 and drives the pump. What is curious to me is what appears to be a flip in the gear ratio between the prop and the crankshaft between when it was on the No17 and when it was finished on No18. The setup in the picture you have above would spin the prop much faster than after it was modified. It also seems that the original setup would be more burdensome on the engine as it probably requires a lot of torque to turn the propeller.
- 288 replies
-
- 4
-
-
- Santos Dumont No. 18
- hydroplane
- (and 1 more)
-
Continuing on the subject! Here is a picture of the Francois Durant model that had been prepared for the 2009 Santos Dumont exhibition at Museu da Casa Brasileria (the only other model of the SD No 18 that I am aware of). While there are many omissions / questionable representations on this model, it does appear that he had concluded that there was a belt driven water pump up front. Today, while looking at the photo you last attached, it actually appears that there may be two belts / pulleys - one vertical that would operate the water pump, and one off to the right (in the picture) with another (unknown) function: The number of accessories on this engine is crazy! As I mentioned in an earlier post, I will be making numerous simplifications as currently I don't have access to information that would allow for more - or even make educated guess on more. Best I can hope for is to not horribly misrepresent the hydroplane and to hope that other modelers find the subject interesting enough to do a better job in the future.
- 288 replies
-
- 5
-
-
- Santos Dumont No. 18
- hydroplane
- (and 1 more)
-
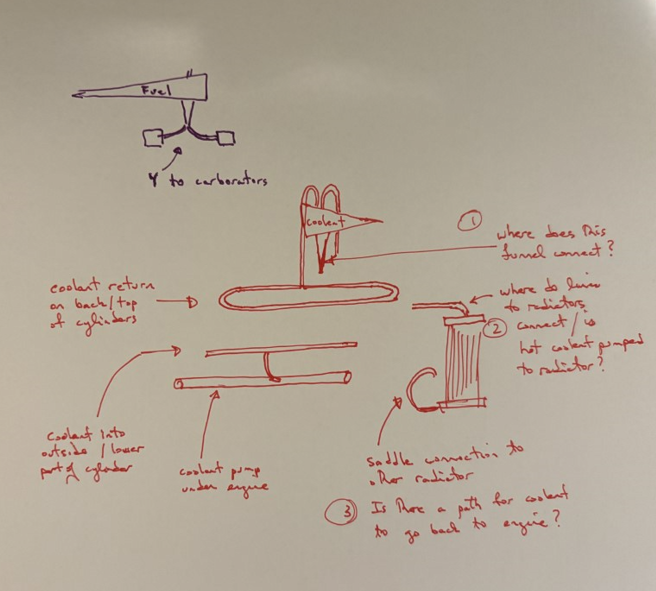
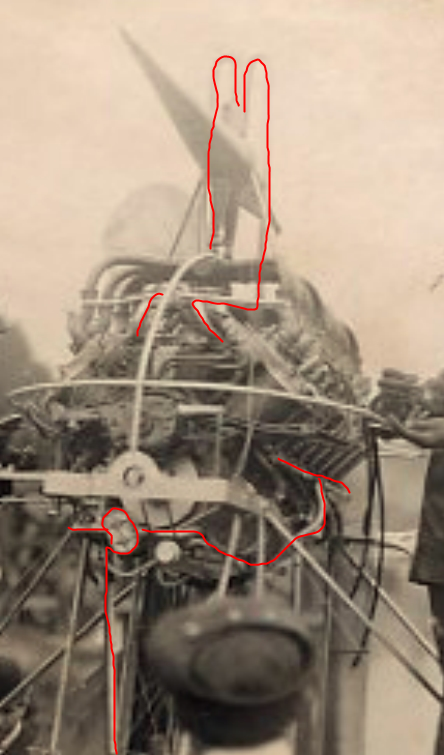
Craig - I feel you! Toward the end of February I spent a lot of time trying to better understand the fueling and coolant systems. I ended up having a lengthy and informative e-mail exchange with William Pearce (Old Machine Press and author of that nice paper on Antoinette engines). Here's how it went: On 2/19/2025 4:31 PM, Davis, Gregory wrote: William – With much thanks to you, I am making progress on the engine. Here’s what it looks like now. I’ve also made a brass fuel tank to add to the model. In the pictures of the No18 Hydroplane, there are two tubes / pipes that leave the fuel tank vertically, then bend over 180 degrees and go back down to the engine. Do you know the purpose of the tubes (pressurization?); but more importantly, do you have a feel for were they attach to the rest of the engine? I can’t decipher this information from the pictures I have of the boat. There is a picture of what is believed to be the same engine (when installed in the Santos-Dumont No 17 airplane). There are two pipes that come down in the same area, but to me, they look to connect to the coolant system and are perhaps unrelated to how the engine is set up for the hydroplane(?). If you can provide me with any guidance, I would truly appreciate it! Again, thank you very much as your help has been so instrumental to me, All the best, Greg _____ Hello Greg, Those parts look great. Amazing attention to detail. I've been staring at these photos for an hour, and I can't figure it out. They kind of do look like they connect to the cooling system, even on the hydroplane. Let's go down that road a bit... Maybe the tank is a coolant reservoir. The lines could be the coolant return lines pouring the coolant back into the reservoir. The middle two passages would then be the coolant lines taking the coolant into the cylinder Vee and to the front of the engine. The line then Ys into the two radiators. The outlet of the two radiators then Y back into a single line atop the central float. Coolant is then pumped back into a manifold at the base of each cylinder bank. The coolant flows up through the cylinders and into another manifold on each bank. The outlet of these manifolds pour the coolant back into the reservoir. Maybe it would work, but I don't really like it. However, I always thought the tank was a touch on the small size for a fuel tank feeding a V-16 engine. But then, where is the fuel? In the body? In the black tank that we discussed before? I just don't know. I wish we had some better images of the top of the engine. For what it is worth, it does look like the same engine and propeller in No. 17. I'll continue to think about this to see if there is a more logical answer. Again, fantastic work! Best regards, William _______ On 2/20/2025 1:44 PM, Davis, Gregory wrote: William – Is there any chance that the conical tank is subdivided with fuel in the back and coolant in the front? I think that there probably is still enough volume in the rear cone to fuel the engine for 2 kilometers and a turnabout. Greg _______________ Hey Greg, From the beginning, I always felt it was a fuel tank. I saw the downspouts with petcocks seemingly flowing to the carbs. Yesterday I thought about it being a split tank. The mounting band is probably covering any evidence of a seam, if there were one. The top certinally seems to have one "opening" with the coolant-looking tubes and another "opening" further aft. If the font was coolant and the rear fuel, it would make a lot of sense and also match up with some other (malformed) ideas that I have. Like, why have two downspouts for the fuel just a few inches apart? Surely a Y-pipe would have be far more simple and cheaper to create. Nether of the two downspouts are in the ideal location for a single-section tank, but they are in the ideal locations if the tank had two sections. Taking a different perspective... What purpose could the tall forward structure serve if the tank were just for fuel? I cannot think of one. Why is there another vent looking thing sightly to the rear? To me it looks like a cap with a vent. I'm not sure you really need that if it is just water in the tank, as I doubt the forward opening with its two pipes is perfectly sealed. I'm kind of leaning to the two-section tank theory. It is the best-fitting "shoe." Exclude the impossible, and what is left, however improbable, must be the truth. But it seems on the small side to me. William ___________ On 2/21/2025 4:25 PM, Davis, Gregory wrote: William – I like the idea of the 2-part tank and am willing to go with it until I come upon evidence to discount the possibility. So now I am trying to understand how the coolant circulation would work. Based on what you have told me and/or written about the Antoinette engines, I do understand that there is a coolant pump under the engine, that the coolant enters the jackets from the lower outside and leaves on the upper inside of the jackets. From the SD No17 setup, there is a connection from the top of the outlet piping to the tubes that go back up, over, and then into the coolant tank. I can also see that at the bottom of the radiators there is a saddle connection. There are 3 basic questions I have in terms of how the whole system connects. Once again, I am hoping that your expertise can provide guidance! Where does the funnel under the tank connect? I don’t see a direct path to the coolant pump under the engine. Is there a pair of pipes that leave the coolant returns that lead to the radiators – this would make sense to me – and is the coolant pumped into the radiators or is the flow passive? Is there a path for coolant to go from the lower radiator saddle connection back to the input pump? I am assuming the coolant system is closed, but maybe it is not – just carrying the amount needed for a run and the radiators are used so hot / scalding coolant doesn't spray out uncontrollably! I thought all of this would be obvious, but the answers are not coming to me presently. Also, currently, I believe the black box on the main pontoon is associated with pressurizing the pontoon and nacelles as there is flexible tubing leading to all three of these structures. Also, I don’t see any connections to the coolant system. I do remain curious on how that system works, but not as much so as how the coolant system ties together! Greg _____ Hello Greg, So glad you asked that question because I have already thought out how I think it works. Of course, I may be completely wrong, but it seems to fit. Coolant flows down from the forward downspout of the reservoir. It is then carried to the front of the engine where it Ys into the radiators. The Y inlet to the radiators just above the propeller It then flows through the radiators and Ys back into a single line atop the main float. The coolant then flows up a pipe (or maybe pipes) at the rear of the engine to the water pump. Each of the water pumps two outlets feed coolant to a pipe that runs under the engine and connects to a manifold that connects to the bottom of each cylinder in a bank. Coolant flows up through each cylinder’s water jackets and exits the top of the cylinder where it is collected by another manifold for each bank in the Vee of the engine. The single exit of this manifold delivers coolant back up into the reservoir via the tall vertical tubes. Gravity would allow the coolant to flow from the tank and through the radiators. Siphonic action may even help push the water back up to to the pump, but the pump is what is really pushing the water though the engine and up to the tank. Again, I may be completely wrong. But, this fits given what is visible in the photos and eliminates some of the questions that we are left with if it is just a fuel tank. Best regards, William


- 288 replies
-
- 5
-
-
- Santos Dumont No. 18
- hydroplane
- (and 1 more)
-
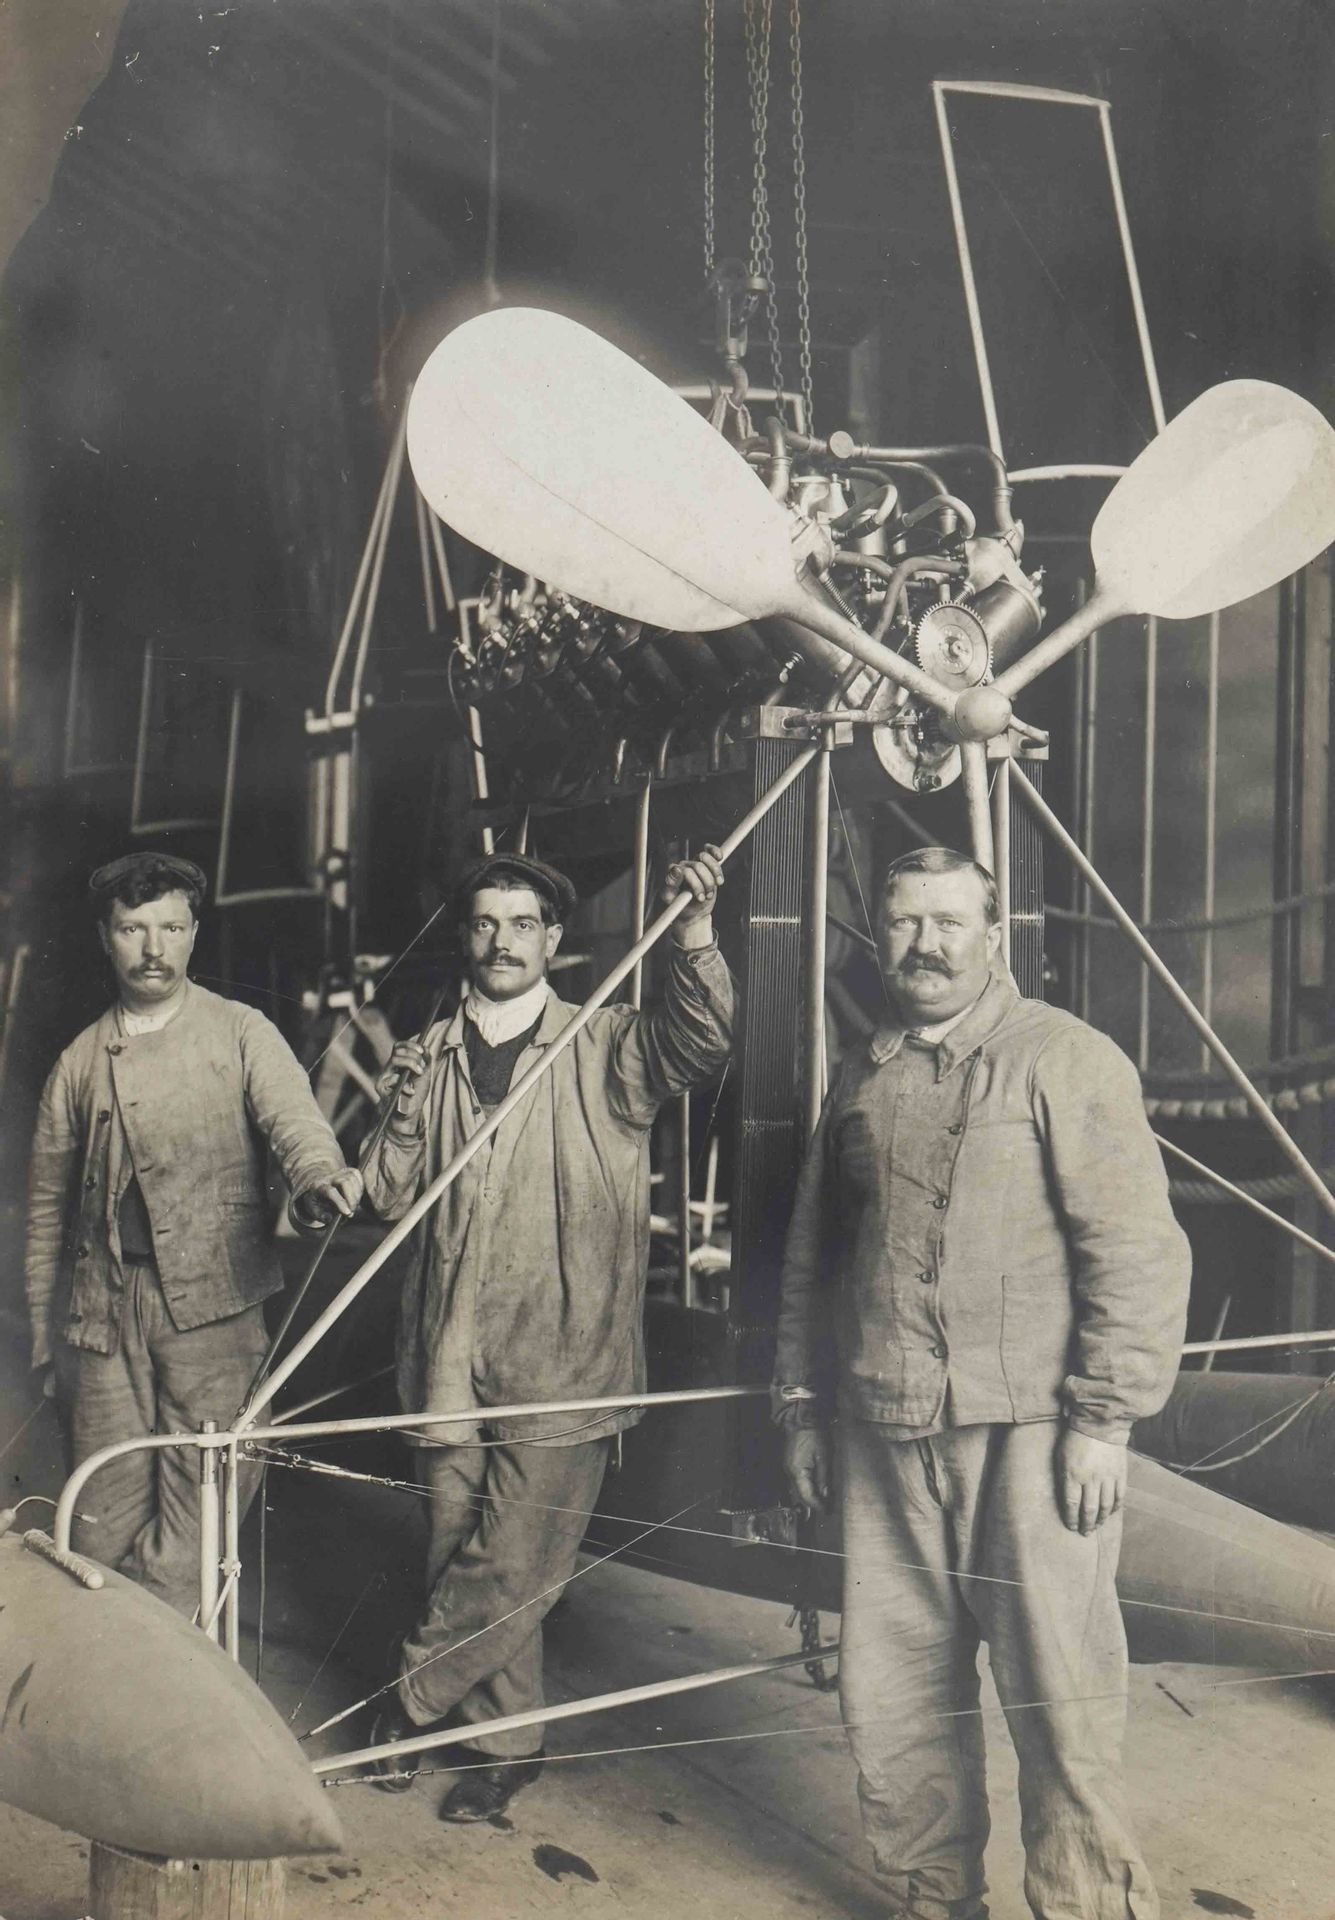
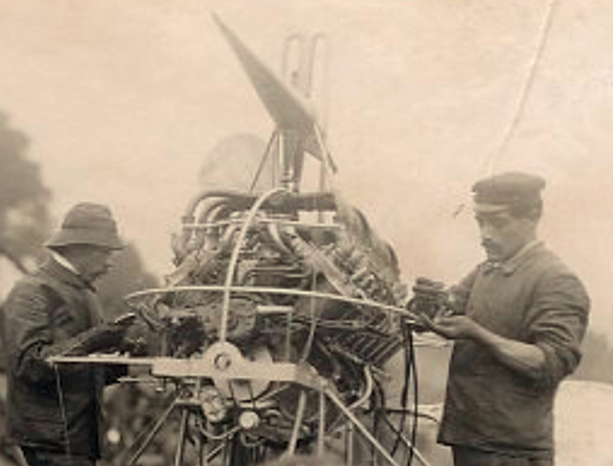
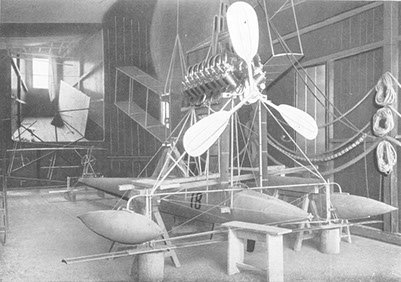
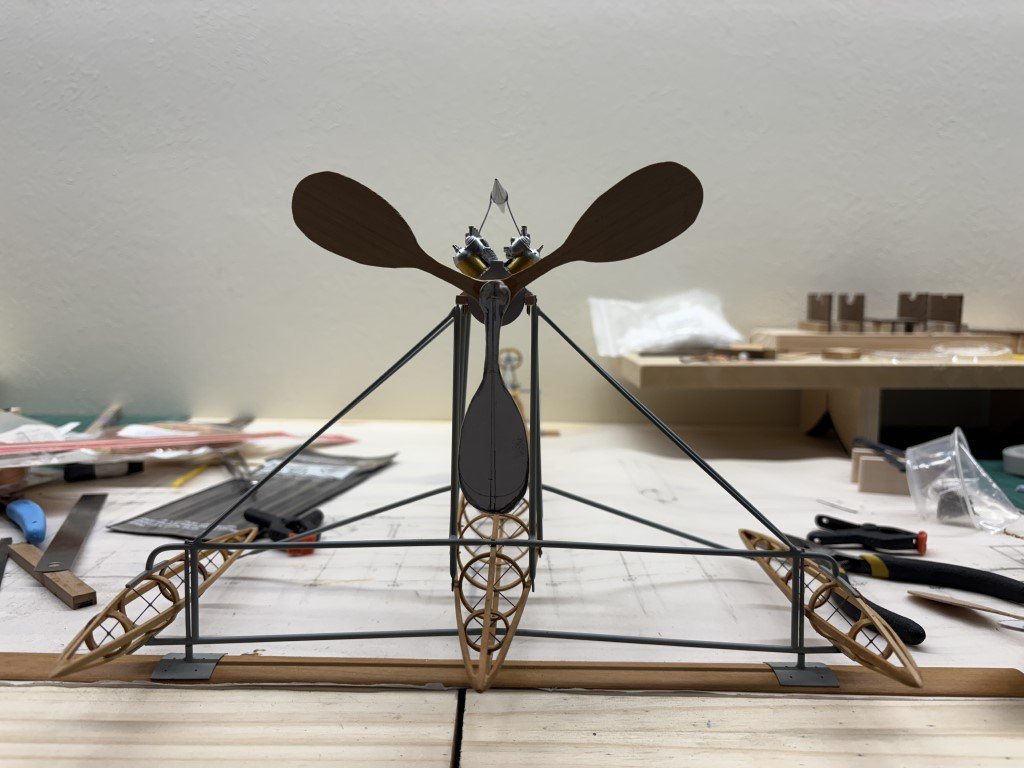
Craig - I really appreciate you taking the time to (re)check the blade to shaft ratio and I'm glad we came to a similar conclusion! I had been taking note of the prop/hull clearance both in pictures and in the previously mentioned video. It looks like there wasn't a good deal of space! I also had kept an eye on the approximate location where the blade tip intersects the diagonal brace from the engine pylon to the nacelles. The prop / hull clearance was the main reason that I though the first propeller mock-up didn't look convincing enough. Today I put together propeller mock-up No 3 (starting to use the SD numbering system, but don't want to make it to No 18 here!). This one is built to the 2:1 ratio and is scaled to match a propeller with a 2.25 meter diameter. This one looks pretty good to me currently. The blade shape still needs some refinement as it blends into the shaft - the transition seems a little abrupt right now. I think that some metal is coming out next. Also, I've made a decision to have the front of the engine as similar to how it sits in his workshop in this photo: The mechanics associated with the water pump up front is the same as in this photo: But not as it had been in the No17 nor when the engine was being installed on the No18: In the later (final?) set-up, it appears that the water pump is run off a belt drive from a larger pulley mounted to the propeller shaft. This arrangement wasn't present when the engine was being installed.
- 288 replies
-
- 7
-
-
- Santos Dumont No. 18
- hydroplane
- (and 1 more)
-
I found similar results when I made measurements on a number of photos. Tom - I think the shaft is proportionally longer on the 2-bladed propeller that is mounted to the No15 airplane, than on the 3-bladed used on No18 (and17). I agree that it looks much like 1:1 Craig - Generally, I'm getting close to a 2:1 ratio for the 3-bladed prop. Although it looked similar to a 3:2 ratio in at least one picture. I have a reference that claimed the prop diameter was 2.1 meters (~7 feet) and the first mock-up matched that figure, but it looks a bit too small to me. This is another try, with a larger diameter- closer to 2.5 meters (~8 feet) - and with a prop to shaft ratio approximately a 2:1. This one looks a bit to big to me! I've wondered about the prop diameter dimension; it was accompanied with length and width measurements of 10 meters and 6 meters, respectively. These three numbers were published in a document prepared for a Santos-Dumont exhibition - I don't have a primary reference for the propeller diameter. The same length and width were reported in an article published in Scientific American. (On the other hand, in one Scientific American article the nacelle length was reported as 1 meter which is clearly not true.) Also, the length (10m) and width (6m) are the nice round numbers one expects from Santos-Dumont. But 2.1 meters seems not to match! I can't seem to rectify the choice. I considered the possibility that the blade and shaft were each 1 meter and the .1 meter reflected a measurement associated with the spinner. But 10 cm (~4") is too big for the radius of the cone - diameter perhaps. So the decision will be between the semi-documented 13cm diameter (2.1 meter) or a larger 14cm diameter (2.25m), but certainly not 15.6cm diameter (2.5m). Going to need to sleep on this one - It would have been much easier to figure out measurements and shapes if the people taking the pictures in 1907 had squared up with the hydroplane - what were these photographers thinking?!
- 288 replies
-
- 6
-
-
- Santos Dumont No. 18
- hydroplane
- (and 1 more)
-
First propeller mock-up. This has some resemblance to the real one, but I think I'll probably need one or two more tries to really hit the shape. I think the blades need to be lengthened just a little bit ...
- 288 replies
-
- 10
-
-
- Santos Dumont No. 18
- hydroplane
- (and 1 more)
-
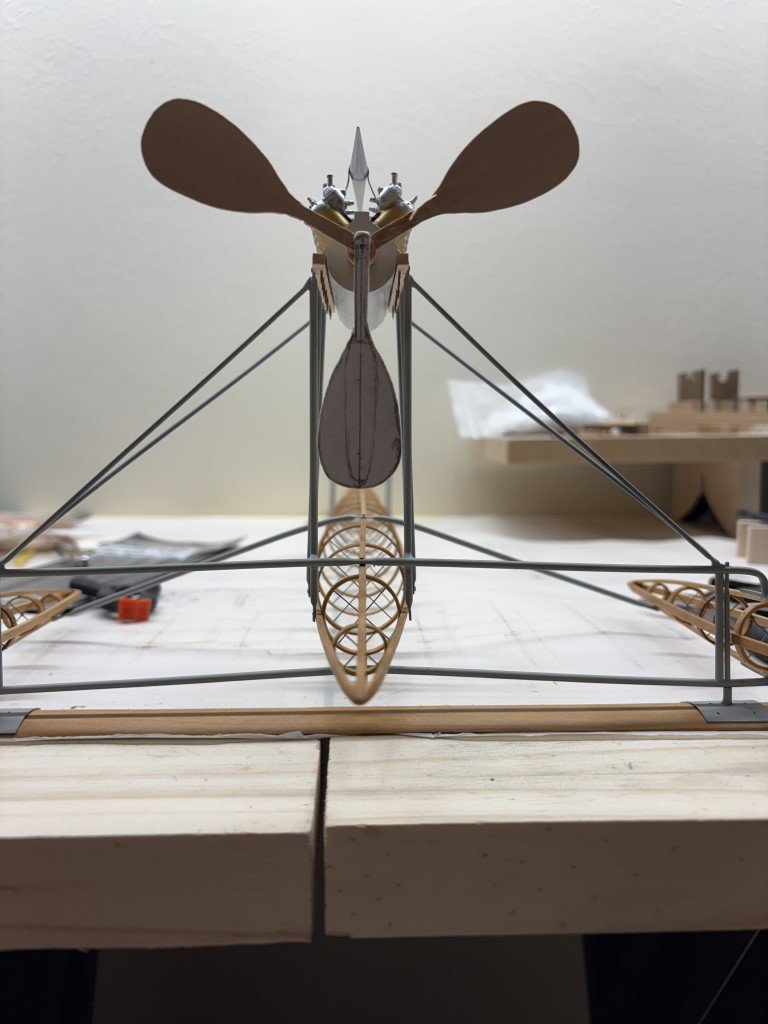
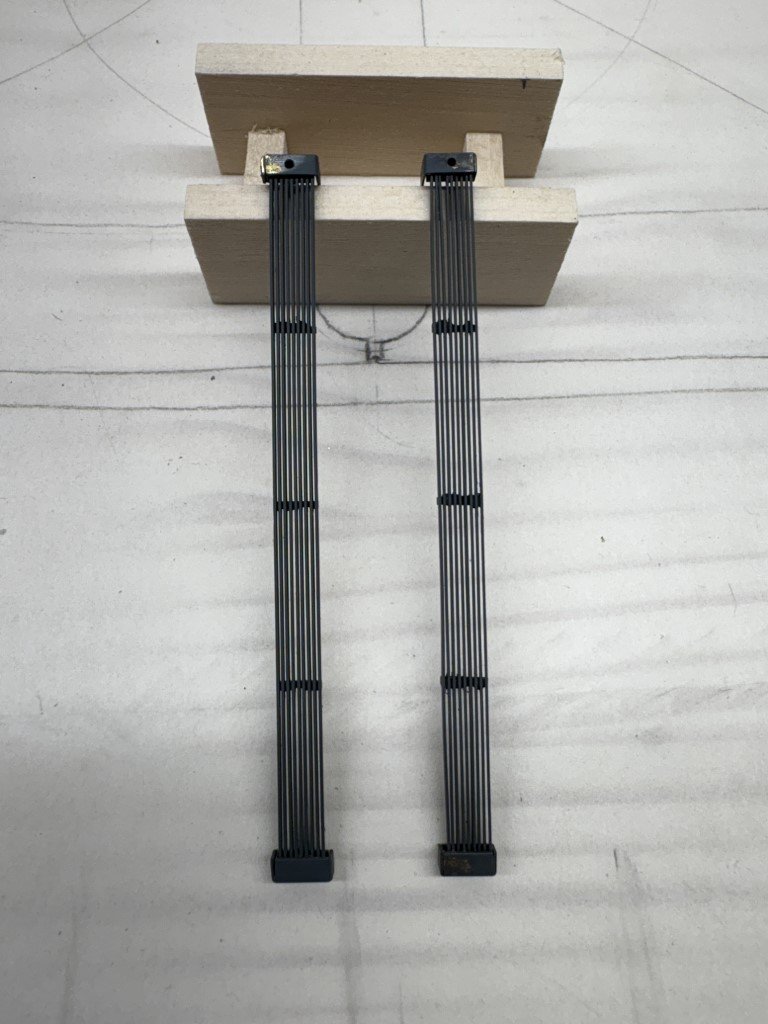
Finally a set of radiators have been fabricated! I'll paint the top and bottom caps aluminum before installing, but the metalwork is done including drilling holes for inlet (top fore) and outlet (rear aft) plumbing. Glad this is done-ish - onto another challenge: the propeller.
- 288 replies
-
- 11
-
-

-
- Santos Dumont No. 18
- hydroplane
- (and 1 more)
-
Which one is the Popular Mechanics plans?
- 288 replies
-
- 2
-
-
- Santos Dumont No. 18
- hydroplane
- (and 1 more)
-
That's a real nice look at the radiators! He first used these radiators on the No 15 airplane: I don't know what was used on the dirigible No 16 for cooling, nor on the No 17 airplane (which had the V16 and the three bladed propeller that made it to the No 18 Hydroplane). I don't think I noticed the radiators on the No 19 before, the belt drive always catches my attention! Greg

- 288 replies
-
- 5
-
-
- Santos Dumont No. 18
- hydroplane
- (and 1 more)
-
Craig - Are building one? I would love to see that! Greg
- 288 replies
-
- 2
-
-
- Santos Dumont No. 18
- hydroplane
- (and 1 more)