


Greg Davis
-
Posts
807 -
Joined
-
Last visited
Content Type
Profiles
Forums
Gallery
Events
Everything posted by Greg Davis
-
 Craig - Are building one? I would love to see that! Greg
- 288 replies
-
- 2
-

-
- Santos Dumont No. 18
- hydroplane
- (and 1 more)
-
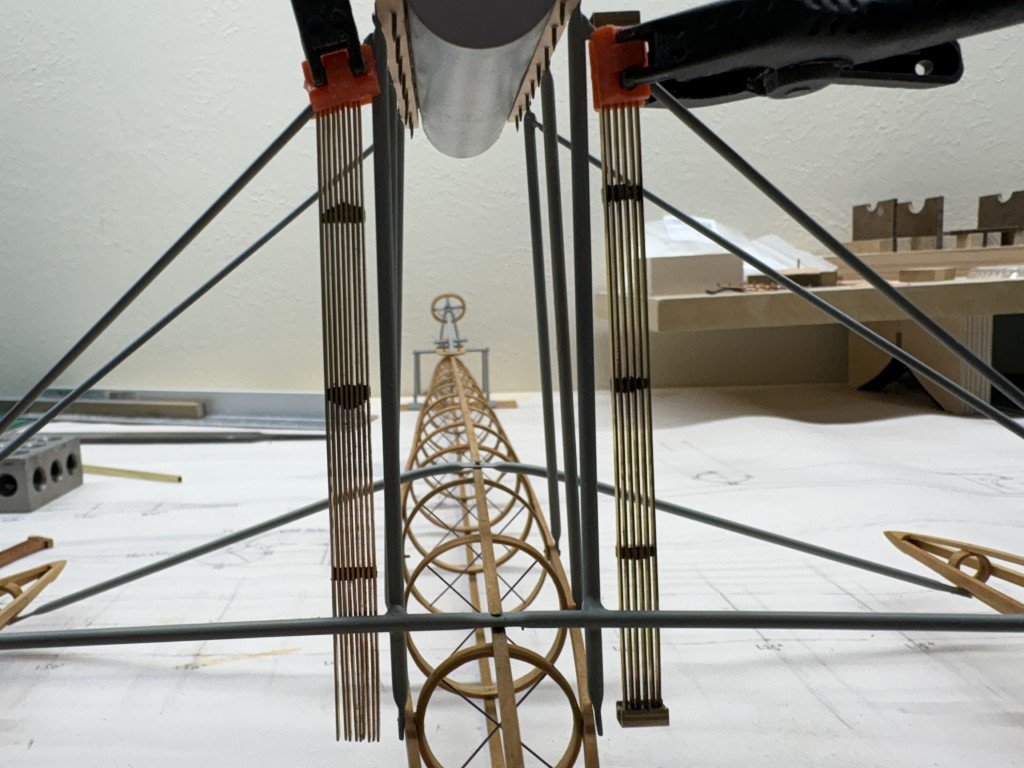
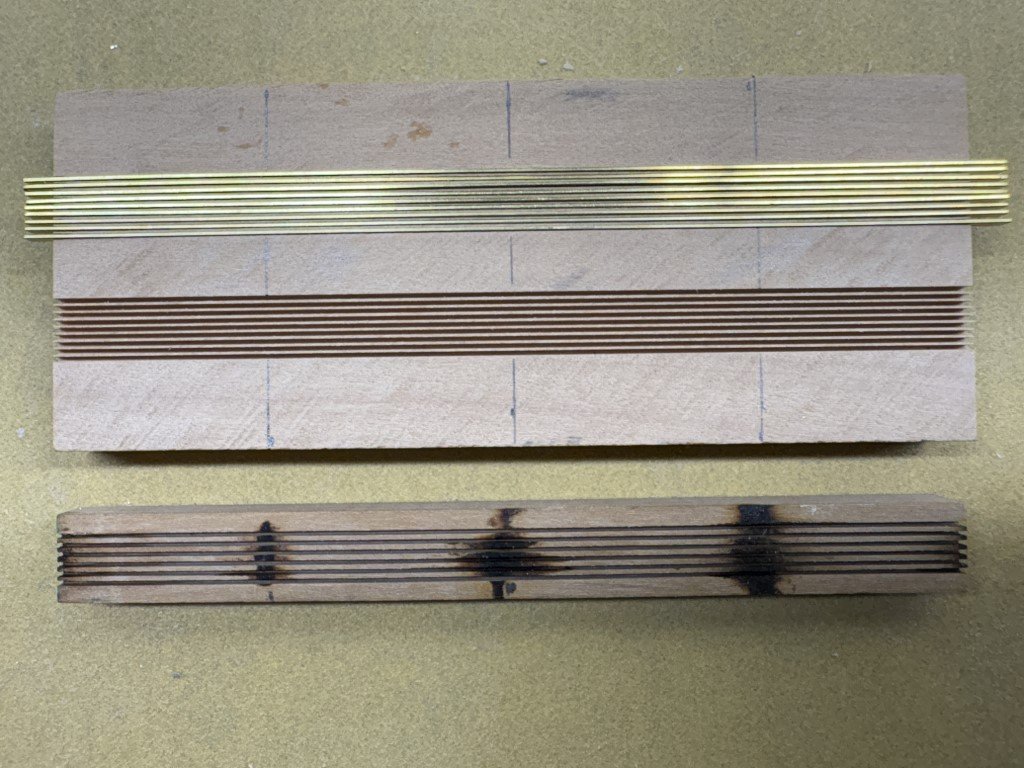
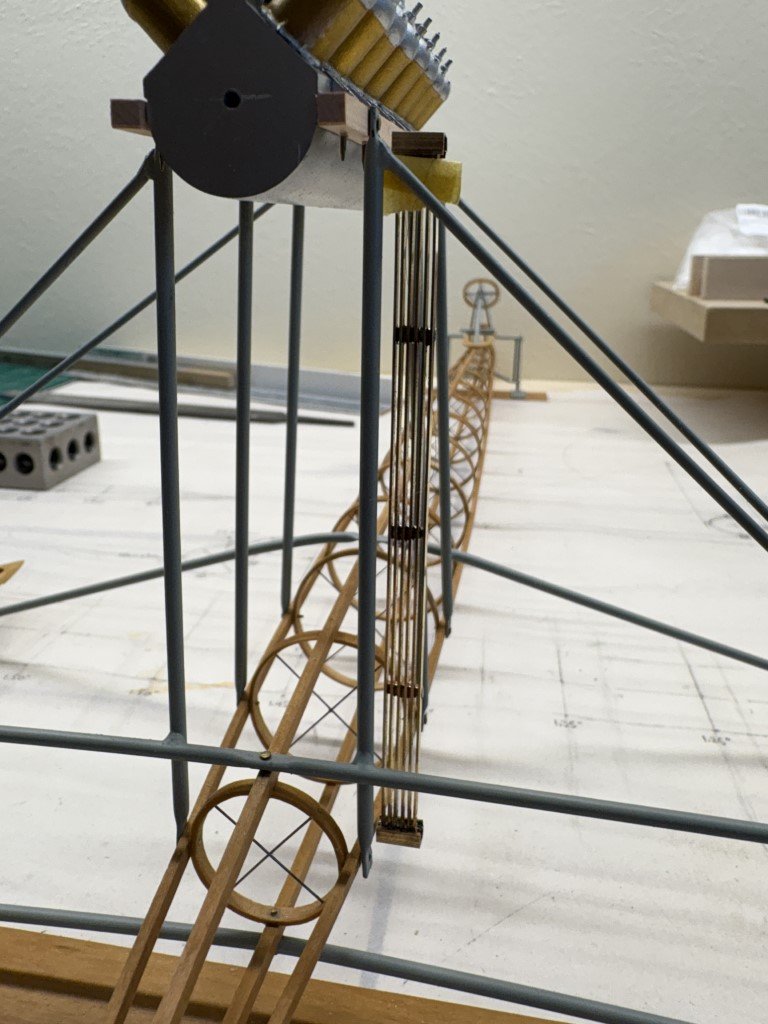
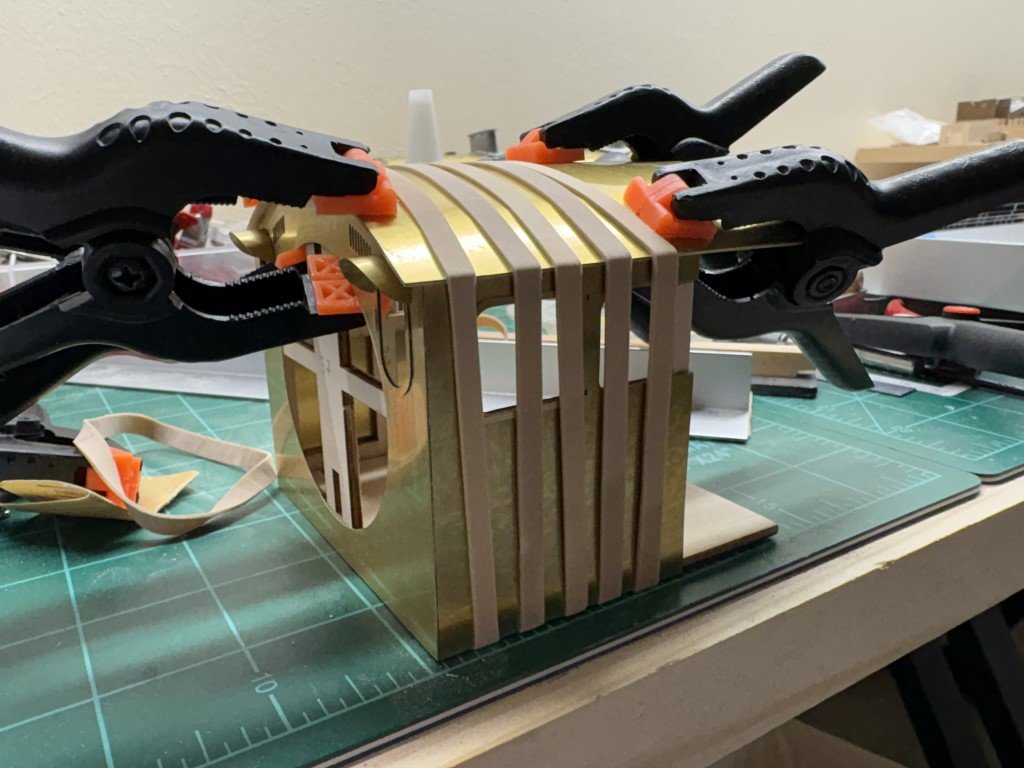
Here is what 9 fins look like as compared with 6. I think this will do! Still a bit of solder clean-up on the top two sets of joints. I have some smaller dimensioned brass square tube on order for the top and bottom caps. I had used 1/8" on the 6 fin attempt. It looks like I might be able to get 2mm square tubing which would give a nicer fit. Currently there are small brass strips soldered on the backside to hold the fins, but your glue and spacer idea would most likely yield a nice result - one that might get the fins even closer together than my slotted jig can achieve! Sorry about posting so often tonight, but this subassembly has just been getting to me and I the venting is helping!
- 288 replies
-
- 9
-
-
- Santos Dumont No. 18
- hydroplane
- (and 1 more)
-
New jig next to older jig - this is as close spacing as I am able to do as my thinnest slitting blade is 0.02". This will give me 9 fins in slightly more space than I had 6 before, but a little more width is going to be fine for the radiators.
- 288 replies
-
- 7
-
-
- Santos Dumont No. 18
- hydroplane
- (and 1 more)
-
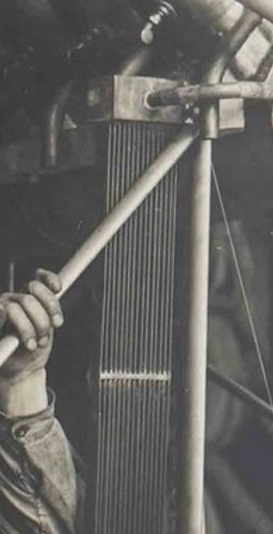
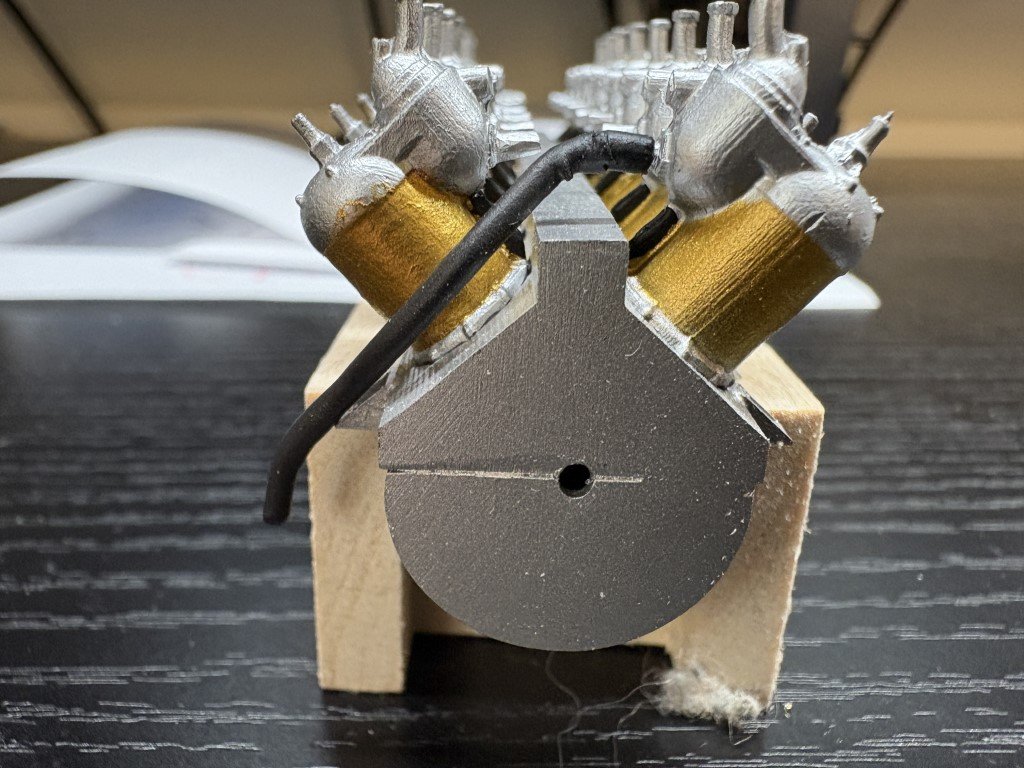
Ugh, just a bit frustrated today; now at trial some number much > 3 to make a radiator (2 are needed)! This one has vertical cooling fins made from 1/16" x 1/64" brass strip. It is reasonably rigid, but there is a bit more space between each than I would really like. I count 15 cooling fins in each radiator on the actual craft - this has only 6. I might be able to get the fins a little closer, but not by too much more. A couple of days ago, one of my many failed attempts was made by binding 15 strips of 0.3mm C. Boxwood (left over from making the hoops) together with thread. In this way I had the correct number of fins together with the very fine space between each; however, the structure was incredibly flexible and would not hold its shape well. Also, I wasn't able to paint it a satisfactory color. Maybe one (?) more try to get the fins closer and maybe make the radiator just a little wider. Best case may be 10 brass fins - we'll soon see.
- 288 replies
-
- 4
-
-
- Santos Dumont No. 18
- hydroplane
- (and 1 more)
-
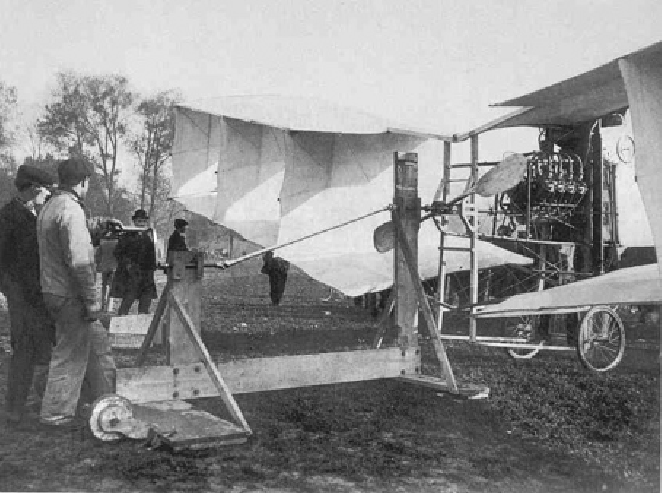
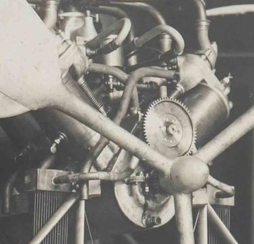
How they got the engine started is a great question - I have not seen a picture where the engine is running / propeller is spinning. I have seen a picture of how the SD 14bis was started: Can't imagine getting something like this out on the water and stabilized enough to crank it. Also don't see how anyone would be willing to stand in front of this beast and turn the prop by hand - just imagine the problem of not getting trapped between the pontoon and a nacelle and all of the bracing wires! A quick Google search indicates that electric starters were not used (commonly) on planes until after WWI, and that Charles Kettering received the first US pattern for an electric car engine starter in 1911 - the starting being used on Cadillacs starting in 1912. So the chances of an electronic starter on this engine / hydroplane seems unlikely.
- 288 replies
-
- 6
-
-
- Santos Dumont No. 18
- hydroplane
- (and 1 more)
-
It becomes more and more questionable to me daily!
- 288 replies
-
- 4
-
-
- Santos Dumont No. 18
- hydroplane
- (and 1 more)
-
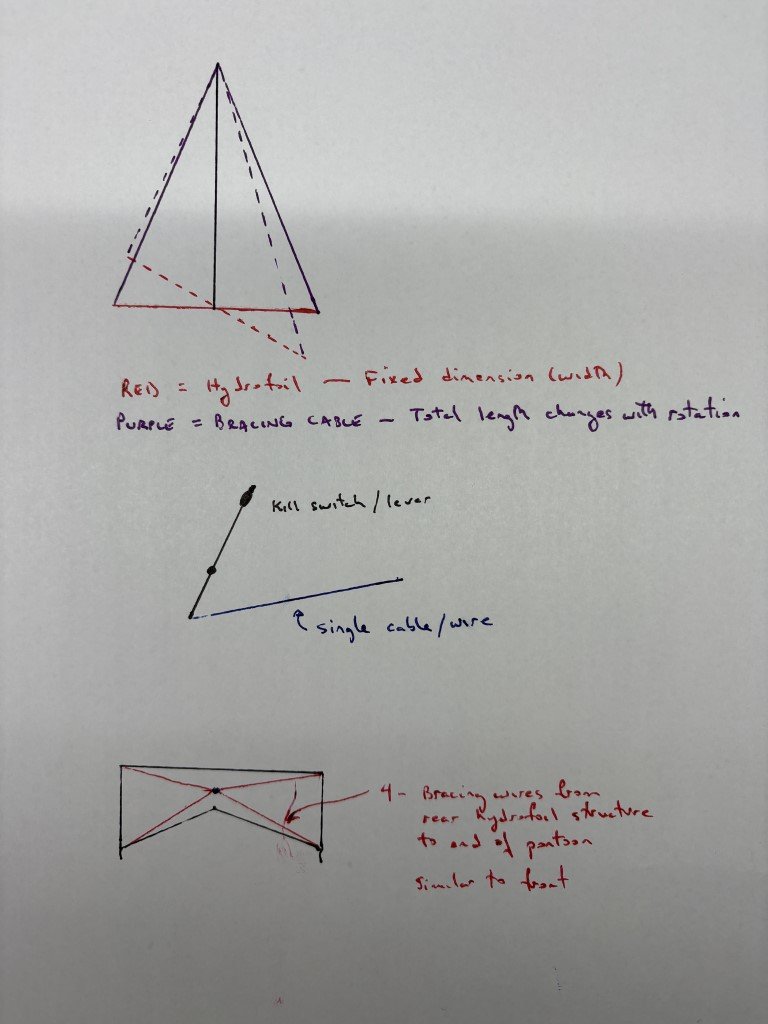
I believe that there is a small rudder in the middle of the rear foil. The first picture you have in your post had made me believe so, as well as pictures taken in SD's workshop where the rear hydrofoil is propped up in a way to keep the rudder from touching the ground. But perhaps most convincingly is the film showing the hydroplane being placed in the water at 54:15 in this video: Also notice that as the hydroplane is carried their doesn't appear to be rotational motion of the rear foil structure. This footage, together with the bracing geometry is what has prevented me from thinking the rear hydrofoil moved as a unit for steering. If the hydrofoil rotated the bracing wires (fore and aft) would need to change length - first and third drawings below. The other issue I can't rectify is that the lever on right - which based on Craig's wonderful enhancement - always is pictured at the same angle and has just one wire / cable leaving it (to the front). If the lever was to be used for steering, it could be pushed forward to pull back on the cable and steer to one side; however, there doesn't appear to be a mechanism to turn in the opposite direction. I did consider the possibility of a spring / bungie return, but again this goes against the bracing geometry questions I have. Craig's last picture, in some ways, increases the mystery - here it appears that the rudder post is rectangular and this makes me infer that the rudder could not turn independent of the hydrofoil. Santos-Dumont was known for his simple / purpose only designs. It seems strange to me that our collective analysis of a potential steering mechanism is not providing an obvious and clear understanding. Right now, I wonder about the possibility that there was not a steering mechanism at this point - simply a point and shoot set-up. Maybe it was only used when the hydroplane was towed and/or short test runs. Perhaps, the structure in behind SD in the later modified version of the hydroplane is a rudder box that made the boat steerable. Maybe it was worse that 'seat of the pants' and was not steering at all! I do really appreciate the additional input / discussion! Greg
- 288 replies
-
- 3
-
-
- Santos Dumont No. 18
- hydroplane
- (and 1 more)
-
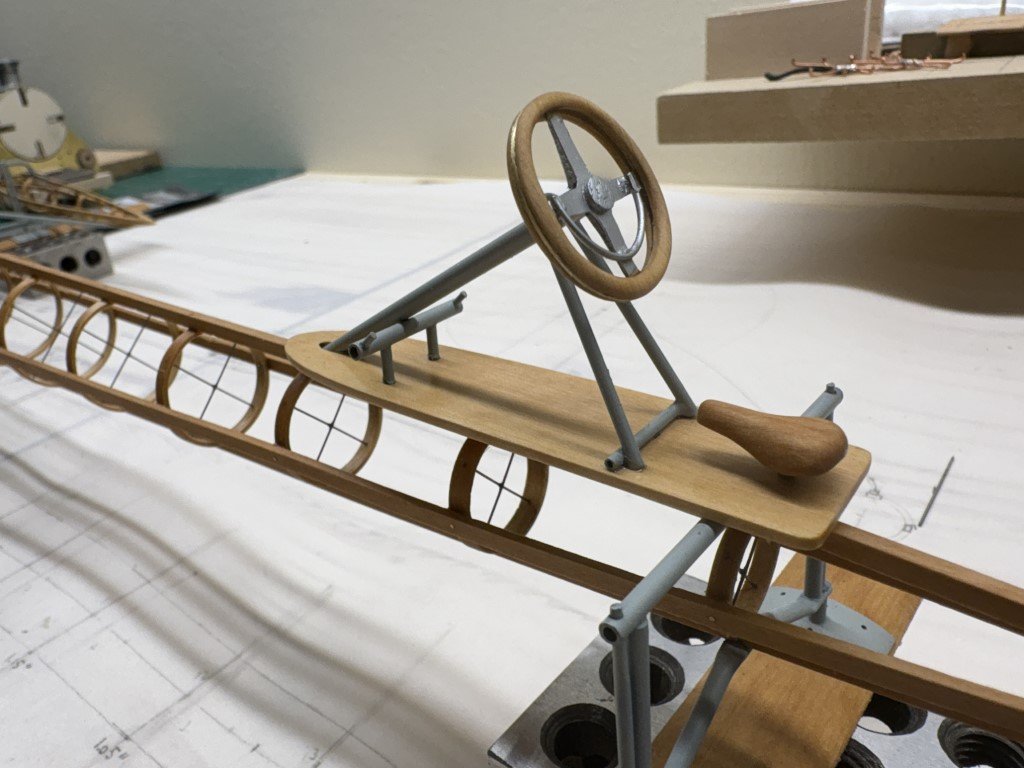
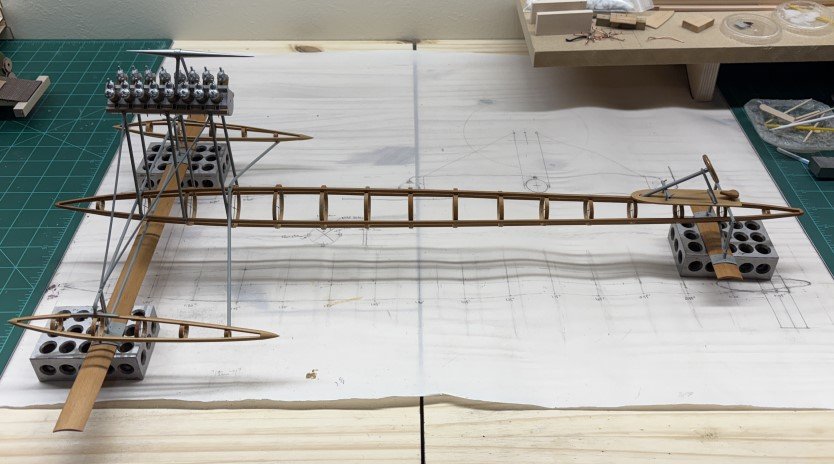
I've completed the cockpit. The steering column structure, footrest, and seatpost are painted grey-blue to match the other metal tubing; whereas the middle of the steering wheel has been painted aluminum. The supporting board has been oiled. I've decided to keep this as simple as possible for now so that the cockpit will be mounted in the forward position. Based on a couple of poor photographs, I believe that this was the cockpit location when the boat was first completed (with engine, propeller, etc.). I also believe that at this point the engine's throttle was mounted to the right of the steering wheel on an extension of the tube that crosses the base right-to-left. It appears that soon after the cockpit was moved back and a different throttling system was introduced - one that was more complicated and mounted directly on the steering wheel. For both locations of the cockpit, I am still not able to piece together how the steering column / rod would have been connected to the rudder. In particular, it appears that the steering column is mounted centrally - directly over the upper pontoon stringer. For structural strength reasons, it seems doubtful to me that the stringer would have been pierced to allow the steering apparatus to pass through it. Also, I have not been able to decipher if / where steering cables attach to the rudder. For a while a wondered if the rear hydrofoil turned with the rudder as a unit, but it seems that the geometry of the bracing rigging would prevent that. Without evidence, I don't want to guess engineer a mechanism so for now I plan on adding the bracing but not having a way to move the rudder. Hopefully, down the road I will fine (be made aware of) additional information that solves this mystery and then I can determine if I can add it to the model. Going with the premise that no detail is better than making stuff up! So here is what the model looks like with engine / fuel tank / cockpit all in place. Mostly engine / propulsion work left now - I think all the woodwork is done.
- 288 replies
-
- 8
-
-

-
- Santos Dumont No. 18
- hydroplane
- (and 1 more)
-
Trial fitting the fuel tank. Also seeing that there will need to be a specific order in which engine accessories are added. Things are going to get congested fast!

- 288 replies
-
- 13
-
-
- Santos Dumont No. 18
- hydroplane
- (and 1 more)
-
BR-18 Locomotive by Greg Davis - OcCre - 1/32
Greg Davis replied to Greg Davis's topic in Non-ship/categorised builds
A few more additions: finished the ash / cinder box subassembly that also supports the rear portion of the boiler; completed basic framing of the tender. Now the size of this model is starting to reveal itself! The way it is currently sitting gives a length of 26.5"; the advertised length of the completed model is 720mm = 28.35".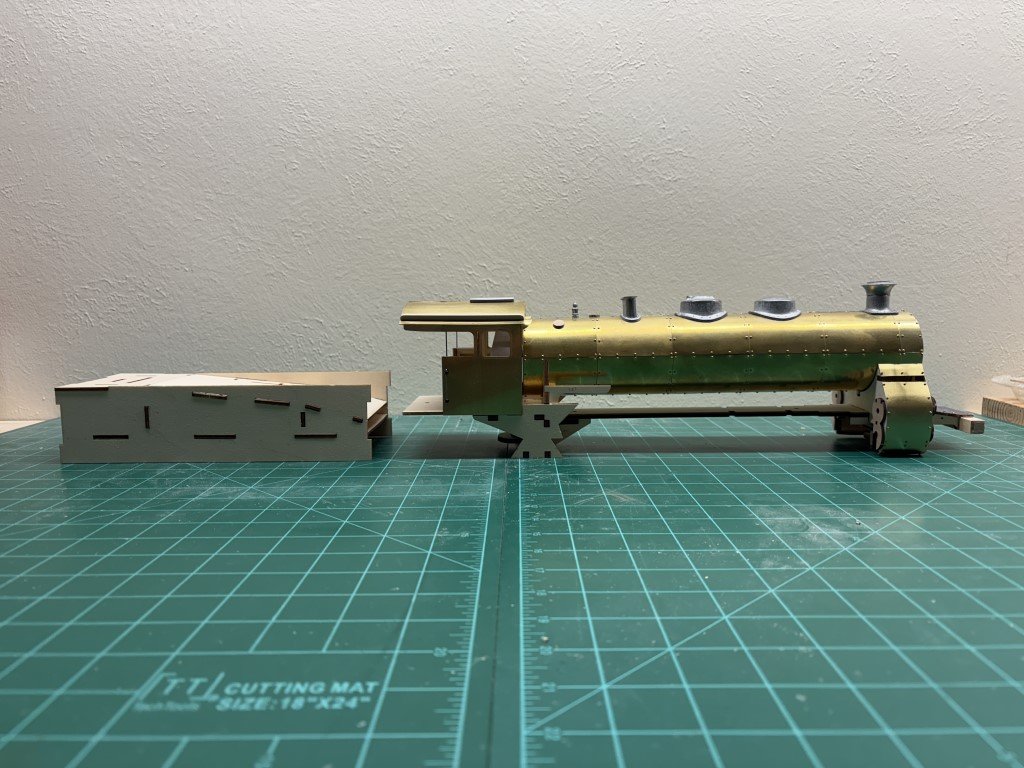
- 33 replies
-
- 10
-
-
Yes, it looks like wire is going to be the final decision. Tubing was a failure and solder doesn't bend into a sharp enough radius (for me at least). The soft brass wire experiment worked the best so far. I can give copper a go as well and see what bends the best, but also seems to be as structurally stable as possible.
- 288 replies
-
- 4
-
-
- Santos Dumont No. 18
- hydroplane
- (and 1 more)
-
It is something that should be filled in - a defect in the casting that I could not file out easily!
- 288 replies
-
- 3
-
-
- Santos Dumont No. 18
- hydroplane
- (and 1 more)
-
BR-18 Locomotive by Greg Davis - OcCre - 1/32
Greg Davis replied to Greg Davis's topic in Non-ship/categorised builds
The cylinder side cladding has been added, as well as a platform in front of the cylinders. Here's what the subassembly looks like along with the boiler and cab: Finally found a part that needed some more serious modification! The small brass sheets on the top of the cylinder sides were approximately 4mm too high (the dimension of the gap that is left between the two cylinder side pieces). After attaching the smaller pieces, a mill file took off the excess material with not much effort.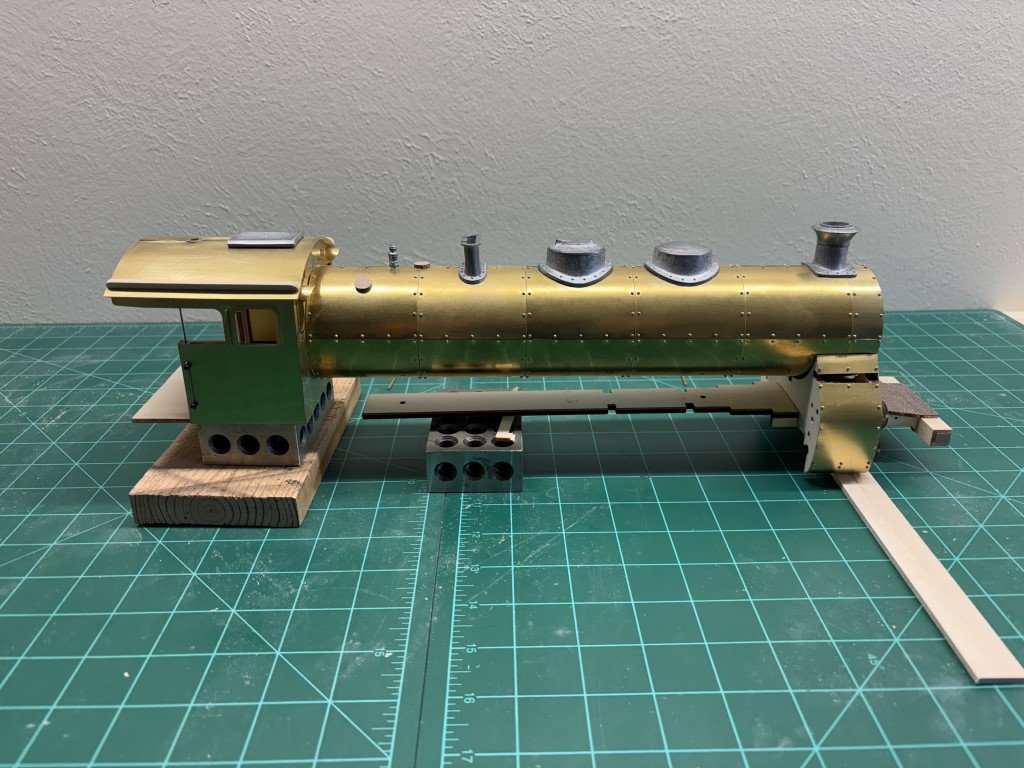
-
BR-18 Locomotive by Greg Davis - OcCre - 1/32
Greg Davis replied to Greg Davis's topic in Non-ship/categorised builds
There is a build log on Larger Scale Modeller where Quintillus added a motor, smoke, lights, and sound to one of these models: https://forum.largescalemodeller.com/topic/12631-occre-br-18-bavarian-dream/ My guess is that it would be even more of a challenge to add power to this model that would be strong enough to run nicely on a garden railroad - doesn't mean someone will not be up to that challenge. I am always amazed by what innovative work shows up! I will not be adding these accessories to my model; it will be static when finished. OcCre had marketed a large locomotive stand that could be connected to a motor that would turn the six drive wheels while being displayed. It appears that the large locomotive stand may still be available straight from OcCre for about $95, but it is not clear if the the display motor is included in that fee. OcCre also had produced a motor kit for their trams and locomotives. It is not shown on their website, but Ages of Sail is still marketing the product: https://www.agesofsail.com/ecommerce/occre/accessories/motorization-for-g-45-scale-trains-and-trams.html?srsltid=AfmBOorKvFtTO_v5FGacpvcZEHIi604QGQyIYps4TPfAzdiGzsDPXq9A If used on a locomotive, it would need to be incorporated into the tender. I looked at the LGB website - some really nice stuff their; sure would like one of the Shay Locomotives that are soon to be released, but starting a new hobby with a 4,000 euro locomotive is probably not in my beat interest for a long healthy life! -
BR-18 Locomotive by Greg Davis - OcCre - 1/32
Greg Davis replied to Greg Davis's topic in Non-ship/categorised builds
The last few days I have been working on two subassemblies - the firebox and the cylinders: The firebox has plywood front, back, bottom, and two trapezoidal interior pieces. The sides / top are planked with 2 x 4mm strips. Next it will be coated in spackle to fill gaps and grain so that when painted it will look more like metal and not like wood anymore. The start to the cylinder / undercarriage is also framed in plywood. The front / back shapes of the cylinders are plywood; the front having a brass piece laminated to it. I was very impressed in the match between the brass piece and the front plywood piece - the shapes and holes are dead on! When I cemented these two together I aligned them with the aid of two round toothpicks. The cylinder sides will be brass; the instructions call for five 4 x 4mm supports that go between the plywood formers and serve as attachment locations for pinning the brass. I decided to add additional filler wood to support the brass in the region, so the complete attachment region has a wood backing now.
-
BR-18 Locomotive by Greg Davis - OcCre - 1/32
Greg Davis replied to Greg Davis's topic in Non-ship/categorised builds
OC Thank you - I appreciate your complement! A good deal of credit needs to go to the kit designers, so far it has been impressive how well the assembly has gone. Greg -
BR-18 Locomotive by Greg Davis - OcCre - 1/32
Greg Davis replied to Greg Davis's topic in Non-ship/categorised builds
I have nearly finished the cab exterior. There still are 4 hook (?) castings that go on the roof - I do not know what their function is; anyway I seem to have been supplied with just 3 of them. I'm not sure it is worth the time to contact OcCre about this as they look fairly easy to fabricate from scrap material. Something to do another day! So here is the cab sitting up against the boiler. They don't get attached together until much later in the build - but it is fun to see them together. Only other note is that the grab bars on the side of the cab and the corresponding wires forming the aft side of the rear cab windows have been made with piano wire instead of the very soft brass wire supplied in the kit.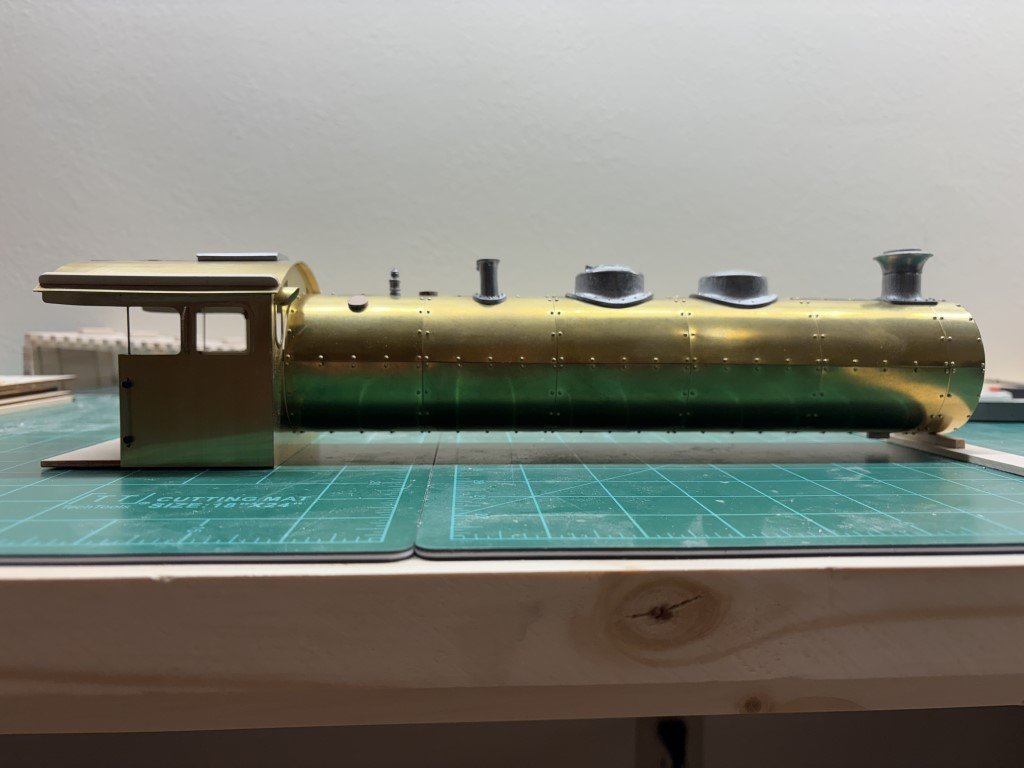
- 33 replies
-
- 14
-
-
BR-18 Locomotive by Greg Davis - OcCre - 1/32
Greg Davis replied to Greg Davis's topic in Non-ship/categorised builds
My pleasure - I am so glad you (and others) are getting some entertainment from this build! Greg -
BR-18 Locomotive by Greg Davis - OcCre - 1/32
Greg Davis replied to Greg Davis's topic in Non-ship/categorised builds
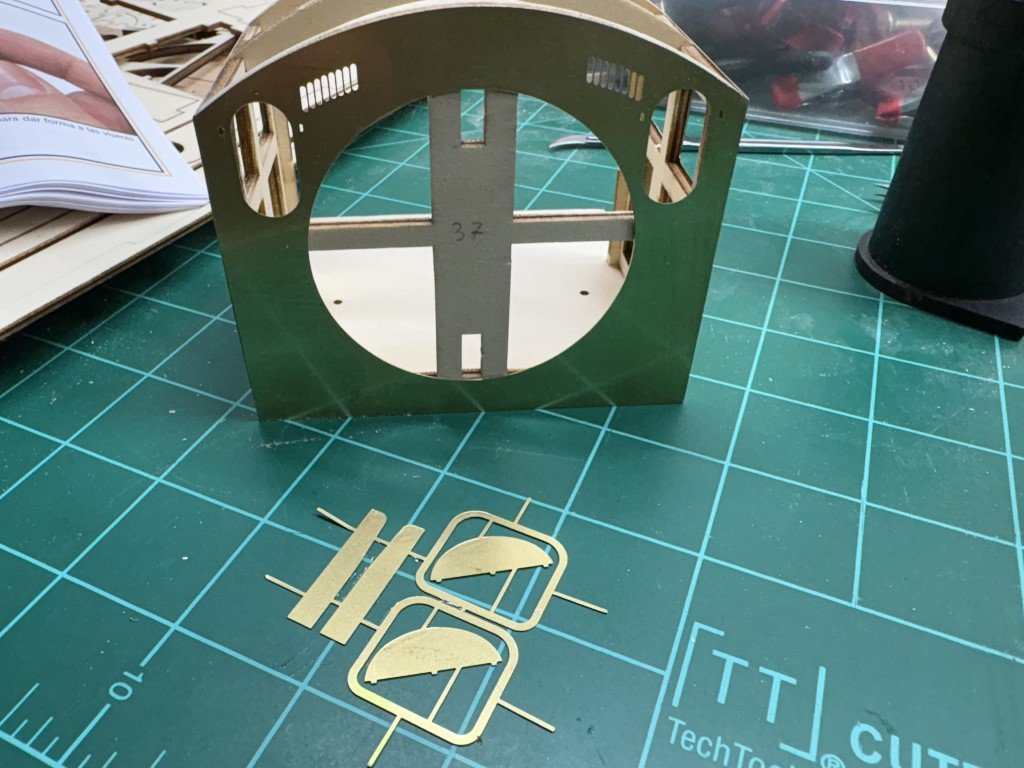
Taking a little break from my 'main project' - the Santos-Dumont No18 Hydroplane. It is not cooperating currently, so best to leave it alone for a few days. This is one of the reasons that I like to have several modeling projects going on simultaneously - always something else to do and a chance to step aside if needed. Anyway, over the past couple of days, I've been cleaning up and getting the brass cladding onto the cab. Here is the photo-etch / brass sheets provided for the cab: I've had little experience with photo-etched parts, but these seem to be nice. The front and side pieces fit and went on well: The semi-circular pieces need to be bent to provide front window visors. The main reason that I've included this picture is to note the 3 small protrusions on the flat side of the visor pieces. After detaching the two parts from there sprues, I needed to remind myself not to file them off when smoothing the sprue attachment locations even though they don't look a lot different from where the pieces were cut out. The three protrusions register and fit into the main front brass sheet. In the first picture of this post you can see the corresponding three small slots near the top of the window cutout. The curvature was massaged into the roof brass sheet and then the underside was planked with strip wood before being attached to the cab assembly. The instructions basically tell you to apply glue and hold the roof in place until the glue sticks. I don't think I could pull that off! Instead, I clamped the roof in place without glue - even though the roof is cut to the correct dimensions, this took me several trials to get it exactly where it needed to be. I then put on the rubber bands to pull the brass to the formers and the edges of the cab. Thinned white glue was brushed at the joints between the three curved formers and the roof. I'm going to let that dry through the night and tomorrow I'll run a bead of CA along the brass-to-brass junctions. I might not need the one along the front, but the ones where the roof meet the sides seem to be important.
- 33 replies
-
- 11
-
-
thanks! I have not seen any pictures that show the pipes with burns. In fact I have never seen a picture with the engine fired up! I have long wondered how they got the engine started. There is a picture of the SD 14bis being started with a large cranking mechanism, but that was on the ground and not in the water. I don't know about turning the propeller blades by hand either. I can only assume that the engine was started only a few times and wasn't run for long. There may have been so much torque from the propulsion system that once started it was turned off immediately. Related, there is a picture on the SD No17 airplane with apparently the same engine / propeller and the exhaust pipe are clean there as well. There is little documentation of the No17 and it is entirely possible that it was never tested for flight. It is possible it was abandoned and the engine then went to the hydroplane. Going on to his successful Demoiselle airplanes (No19 and No20), Santos-Dumont used smaller (20hp and 30hp) two cylinder engines. However, various Antoinette V16 engines were used to power airplanes in or about 1910. Here is a link to a great article on Antoinette aircraft engines: https://oldmachinepress.com/2016/05/28/antoinette-levavasseur-aircraft-engines/ . The author, William Pearce has been very helpful in answering many questions on how the V16 may have been set up in the No18 hydroplane. Greg
- 288 replies
-
- 5
-

-
-
- Santos Dumont No. 18
- hydroplane
- (and 1 more)
-
I can give that a try - it does sound like it would be easier to do! Thanks Greg
- 288 replies
-
- 5
-
-
- Santos Dumont No. 18
- hydroplane
- (and 1 more)
-
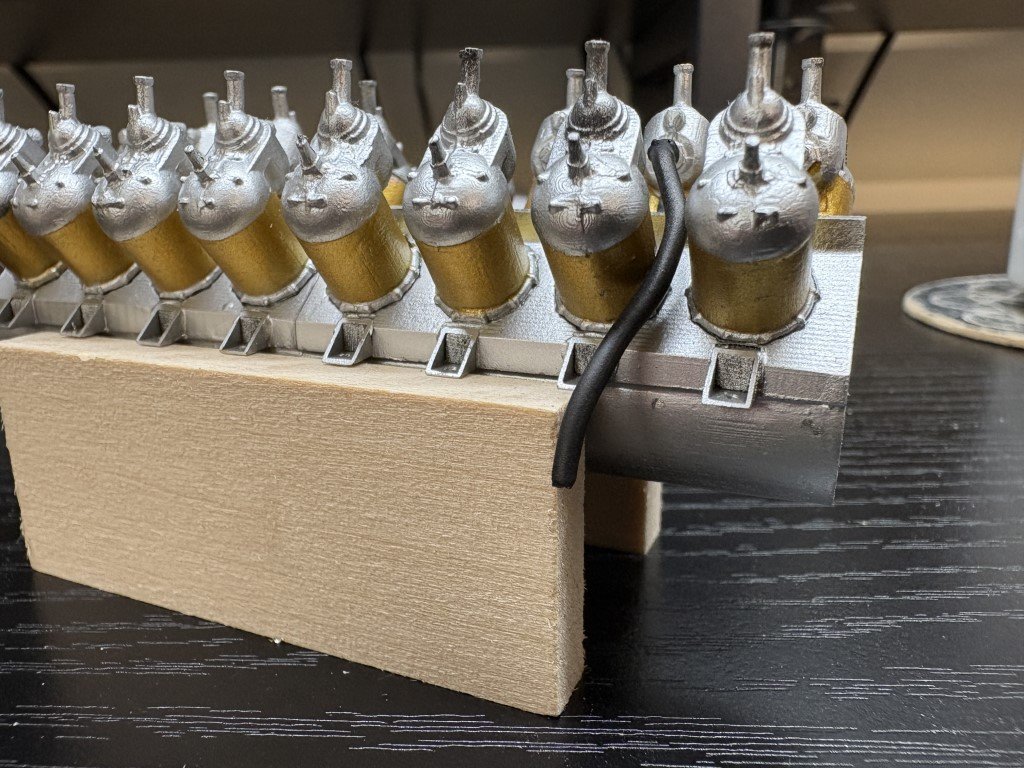
Today I began to work on / solve the exhaust pipe installation process. The pipes have quite a few bends and need to connect to a short stub on the cylinder castings. Several very failed attempts before getting to this version of which I've placed on two different cylinders to see how it looks: The shape is getting close (should be flat a bit longer across the top and there's a small blip in the tubing that I didn't shrink out well enough), but this is what the pipes are suppose to look like: This one has a 1/16" brass wire rod as a core. A short bit of brass tubing soldered to the start to form a coupler with the cylinder casting stub. Finally, black rubber shrink tubing was slipped over the wire and shrunk. I made enough attempts trying to bend brass and aluminum tubing to the exhaust pipe shape to believe that will not be an effective method of fabrication. Given that the exhaust pipes will be buried amongst other engine accessories I'm currently thinking that this may be a reasonable way to make the 16 needed pipes. Thoughts / comments?
- 288 replies
-
- 8
-
-
- Santos Dumont No. 18
- hydroplane
- (and 1 more)
-
Today's accomplishment was coating all of the wood with linseed oil - there is more surface area than you would expect! This will need to dry / cure for quite awhile. While that is happening, I plan to turn my attention to engine work.
- 288 replies
-
- 15
-
-
-
- Santos Dumont No. 18
- hydroplane
- (and 1 more)
-
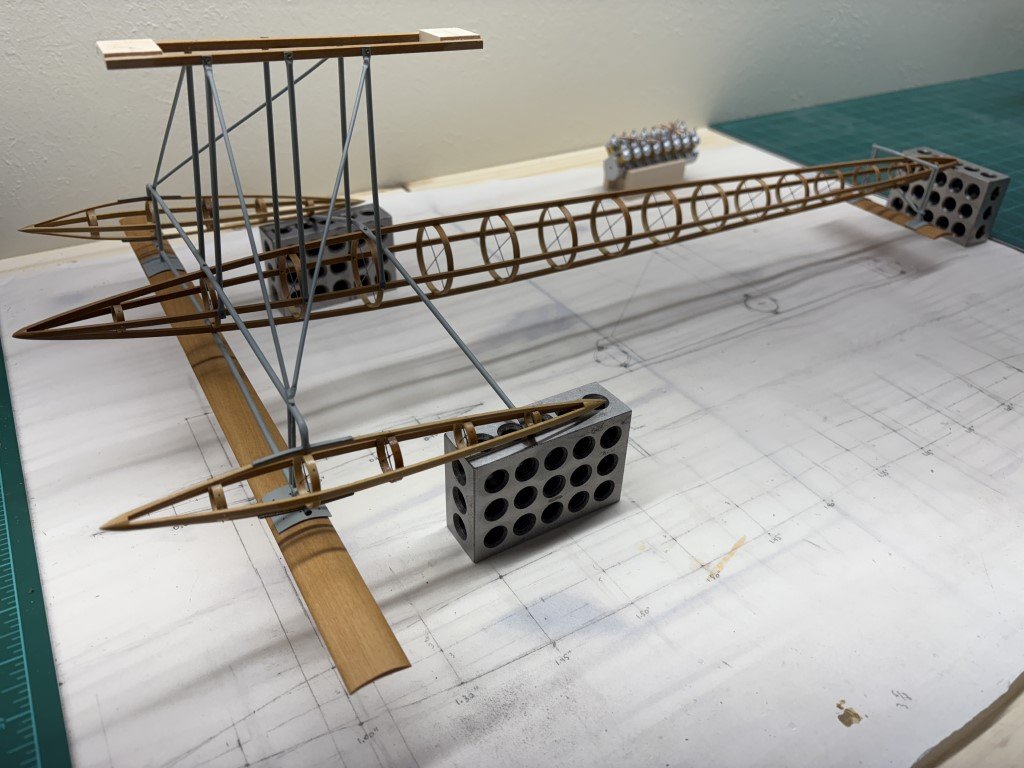
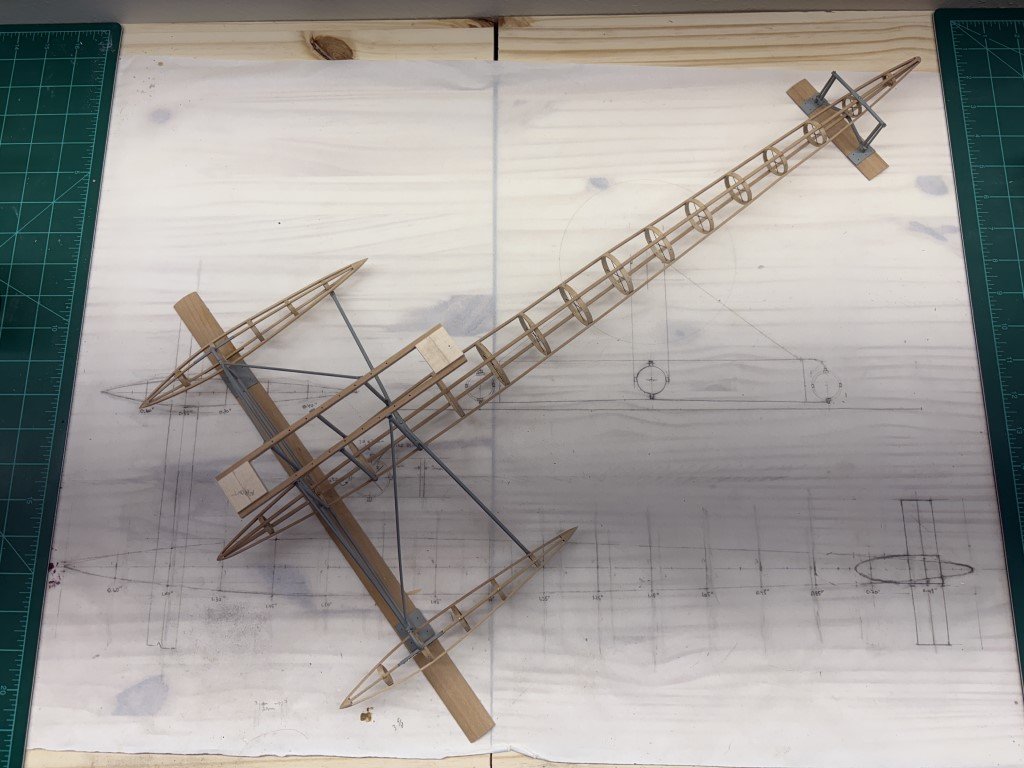
Again thank you so much to everyone that is watching this build come together! The nacelles and hydrofoils are now permanently connected:
- 288 replies
-
- 15
-
-
-
- Santos Dumont No. 18
- hydroplane
- (and 1 more)
-
Decades of amateur bicycle racing and countless hours of watching pro-cycling finally became useful on this build!
- 288 replies
-
- 5
-
-

-
- Santos Dumont No. 18
- hydroplane
- (and 1 more)