
FortressHarris
-
Posts
15 -
Joined
-
Last visited
About FortressHarris

- Birthday 10/03/1984
Recent Profile Visitors
169 profile views


-
 WizardOfOs reacted to a post in a topic:
Grand Banks Dory by FortressHarris - FINISHED - Model Shipways - 1:24 - first build
WizardOfOs reacted to a post in a topic:
Grand Banks Dory by FortressHarris - FINISHED - Model Shipways - 1:24 - first build
-
bbrennan737 reacted to a post in a topic:
Grand Banks Dory by FortressHarris - FINISHED - Model Shipways - 1:24 - first build
-
MajorChaos reacted to a post in a topic:
Grand Banks Dory by FortressHarris - FINISHED - Model Shipways - 1:24 - first build
-
FortressHarris reacted to a post in a topic:
Grand Banks Dory by FortressHarris - FINISHED - Model Shipways - 1:24 - first build
-
FortressHarris reacted to a post in a topic:
Grand Banks Dory by FortressHarris - FINISHED - Model Shipways - 1:24 - first build
-
Ryland Craze reacted to a post in a topic:
Grand Banks Dory by FortressHarris - FINISHED - Model Shipways - 1:24 - first build
-
ccoyle reacted to a post in a topic:
Grand Banks Dory by FortressHarris - FINISHED - Model Shipways - 1:24 - first build
-
FortressHarris reacted to a post in a topic:
Grand Banks Dory by FortressHarris - FINISHED - Model Shipways - 1:24 - first build
-
GGibson reacted to a post in a topic:
Grand Banks Dory by FortressHarris - FINISHED - Model Shipways - 1:24 - first build
-
FortressHarris reacted to a post in a topic:
Grand Banks Dory by FortressHarris - FINISHED - Model Shipways - 1:24 - first build
-
AJohnson reacted to a post in a topic:
Grand Banks Dory by FortressHarris - FINISHED - Model Shipways - 1:24 - first build
-
FortressHarris reacted to a post in a topic:
Grand Banks Dory by FortressHarris - FINISHED - Model Shipways - 1:24 - first build
-
FortressHarris reacted to a post in a topic:
Grand Banks Dory by FortressHarris - FINISHED - Model Shipways - 1:24 - first build
-
Bryan Woods reacted to a post in a topic:
Grand Banks Dory by FortressHarris - FINISHED - Model Shipways - 1:24 - first build
-
JacquesCousteau reacted to a post in a topic:
Grand Banks Dory by FortressHarris - FINISHED - Model Shipways - 1:24 - first build
-
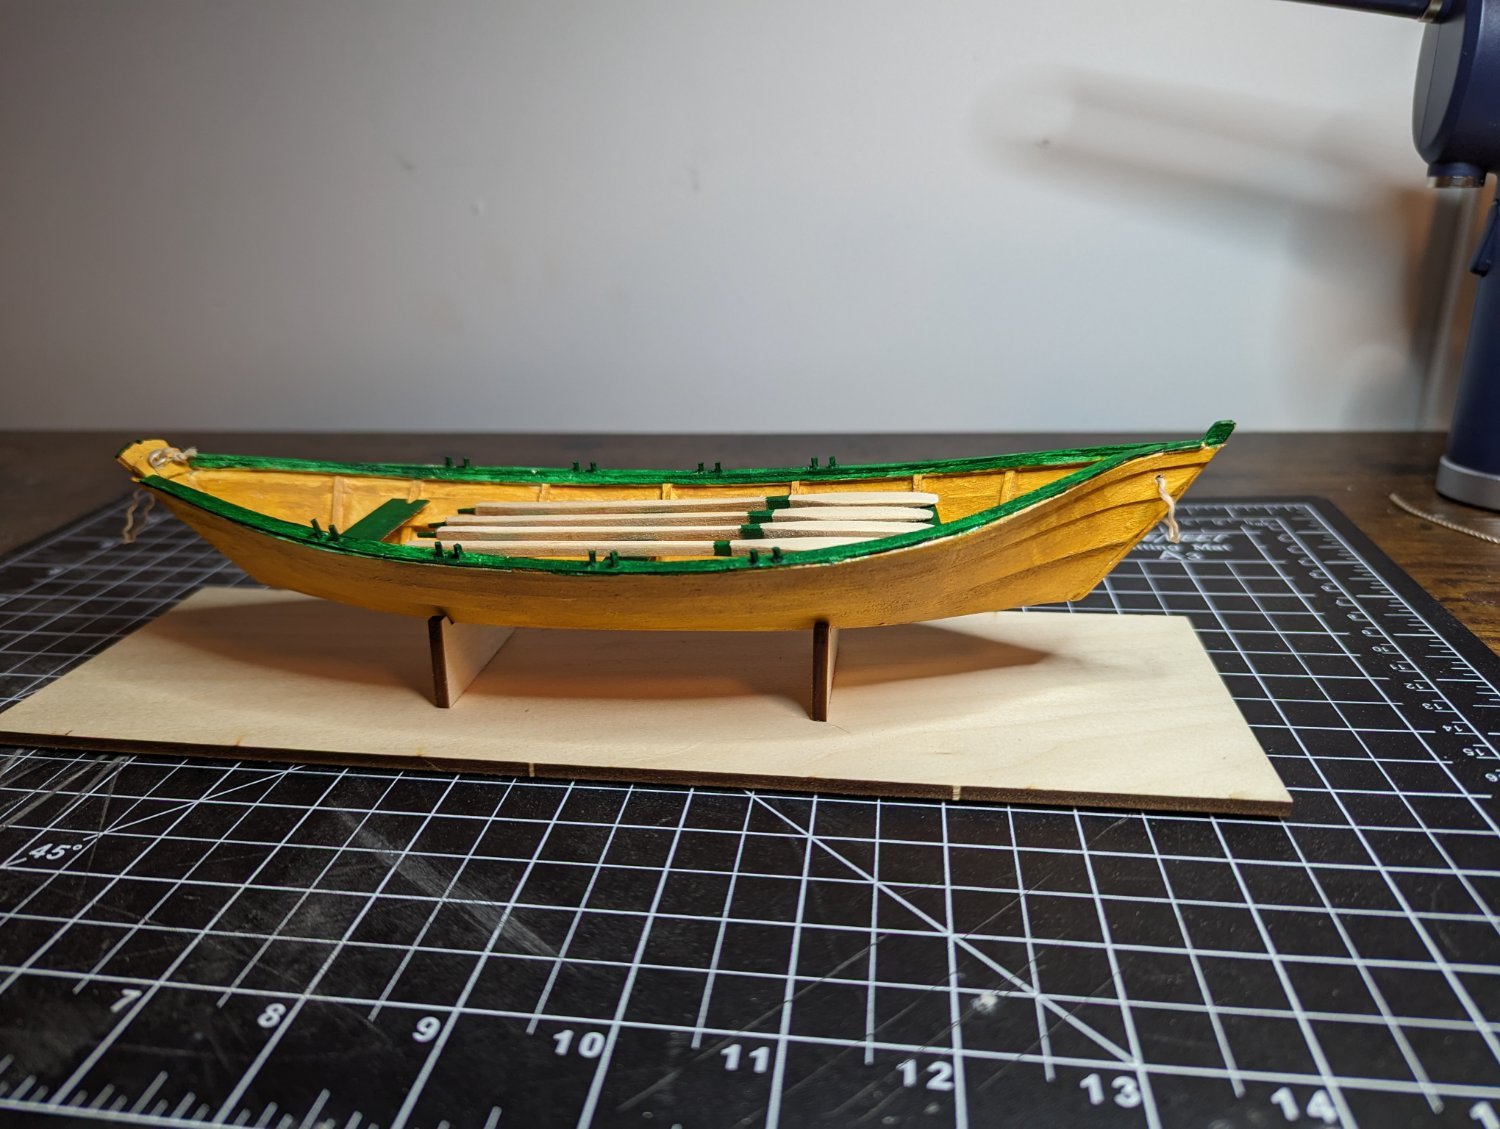
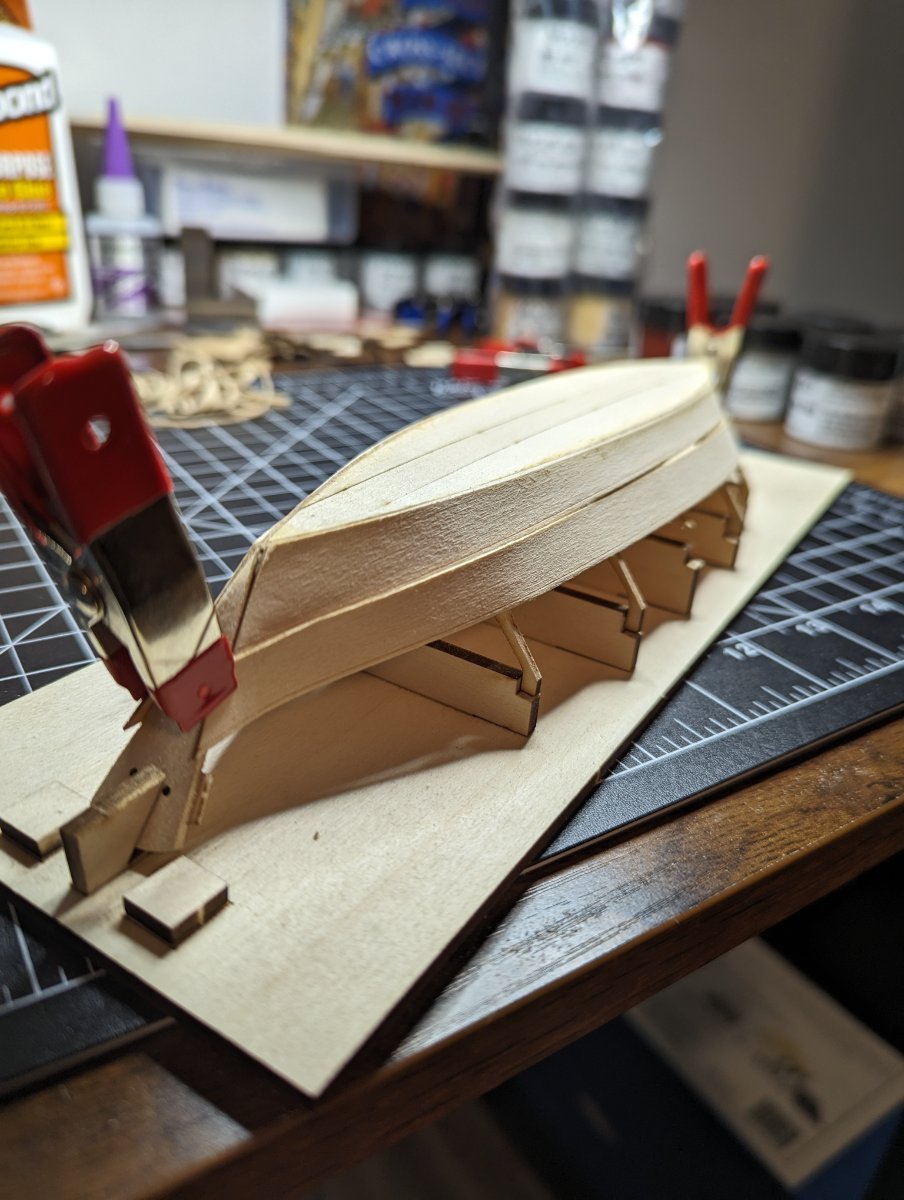
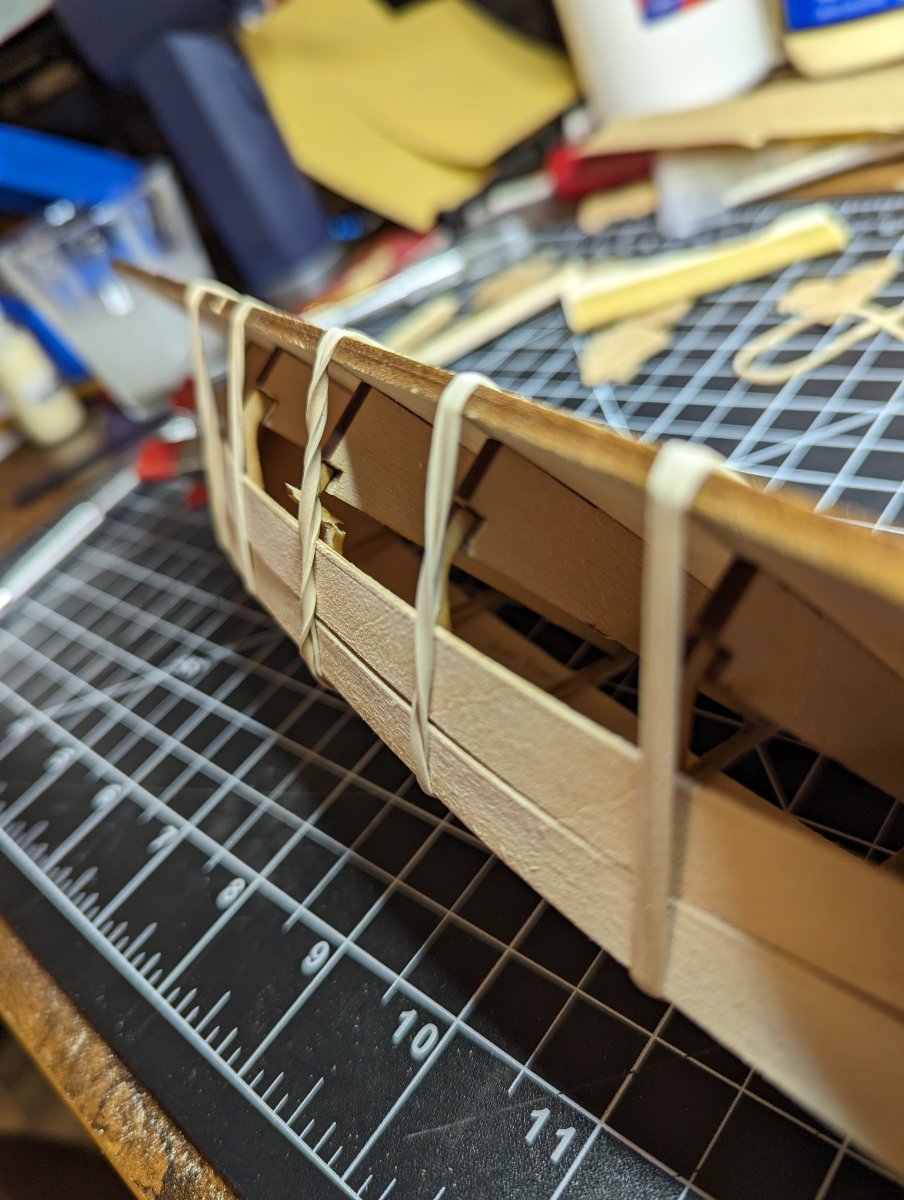
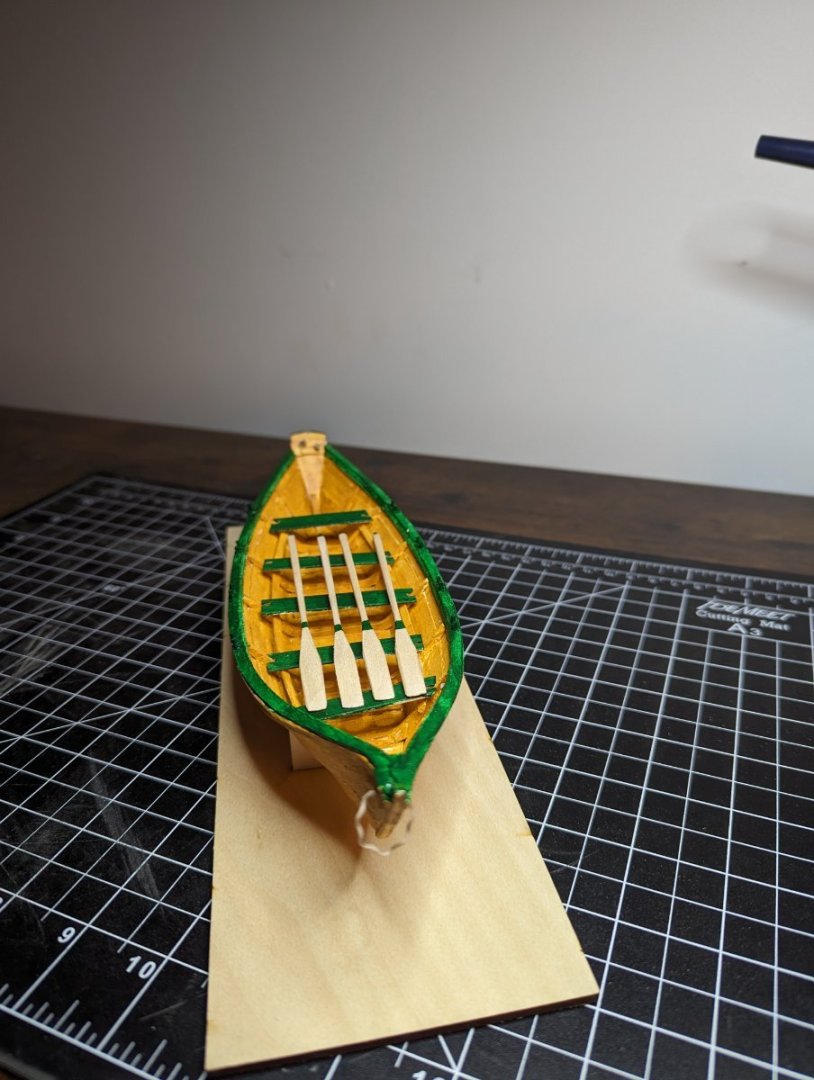
Okay, haven't lost my way(completely, at least) on this model, as with a lot of things, life got in the way. I've wrapped up the Dory! I've mostly faught myself on this model, having struggled on some reading comprehension and a developing skill set... Still, to sum up my last steps. The pinched bow did in fact come back to bite me on the cap rail as well. Ended up snapping this bit as well even after a heavy soak. I, of course, compounded this error by trying to bulldoze my way through and glued the cap rail right away making my later paint job that much more difficult. My next bit of difficulty after the paint job was attempting to thread the beckets. For the life of me and likely my skill set I could not get them through. I ended up de-braiding the provided 'rope' and used a singular strand. Having lived and worked a bit around the water I'm convincing myself that this is an acceptable shortcut as they are 'get the job done' piece of equipment and not in my mind crucial to replicating for reality. My final mistake on the model was of course yet another missed piece of reading comprehension and not sanding down the thole pins. As a result I ended up enlarging the pin slots with a small drill bit, cracking some of the both paint job and in occasional spots the cap rail itself. Covered all with a layer of paint and given the mistakes, relatively happy with the results. The model could use another layer or two of paint, but I'm not exactly looking to showcase this one. Overall it was a good experience and am looking forward to the next project, the next in the shipwright series, the Norwegian Sailing Pram. Definitely have some more lessons to learn and while I don't get overly excited about commercial-private ships/boats I'm definitely looking forward to improving my skill set and the model shipways series is to me, a great introduction. Thanks for all your support and bits of advice/ encouragement on the blog. This is a fantastic community and has an amazing group of individuals both in terms of experience/ skill as well as being generous and patient to complete novices.
-
bbrennan737 reacted to a post in a topic:
Grand Banks Dory by FortressHarris - FINISHED - Model Shipways - 1:24 - first build
-
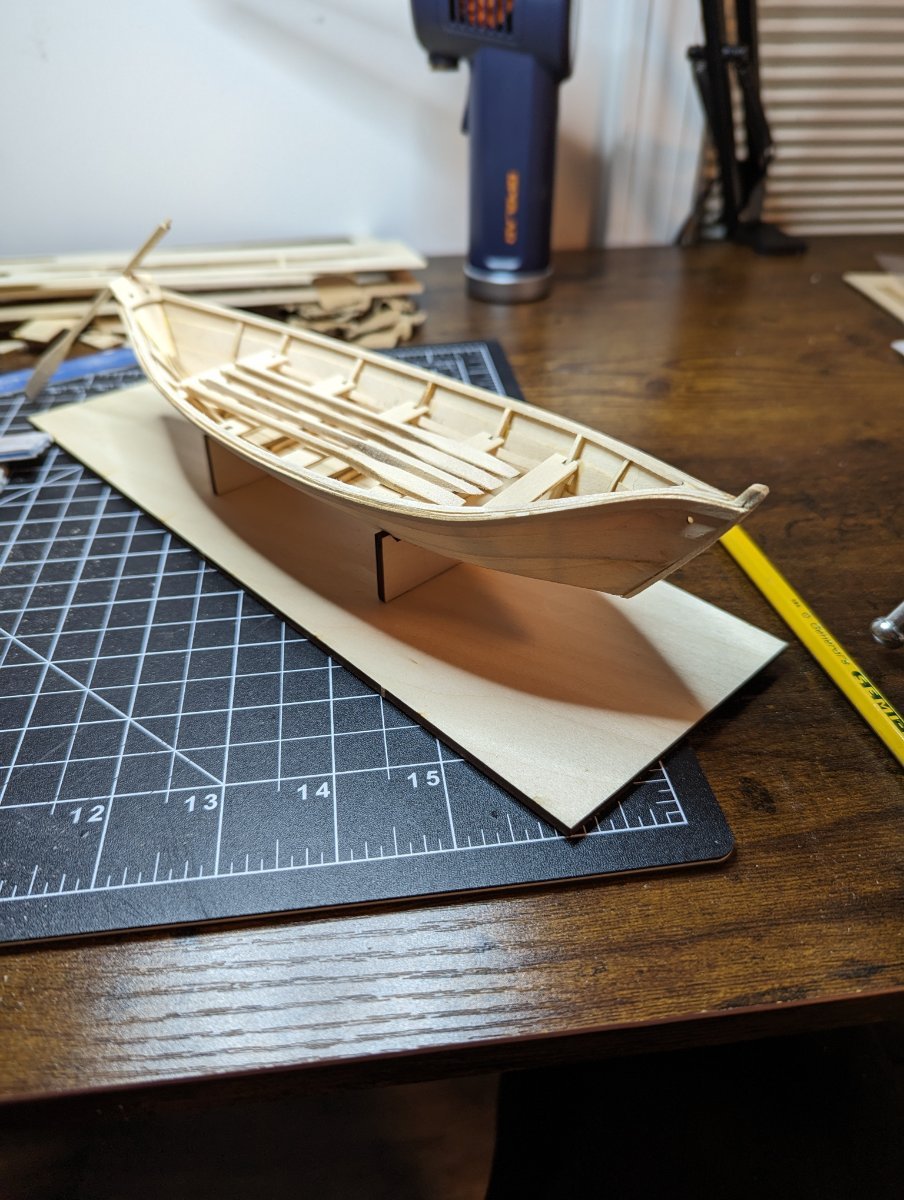
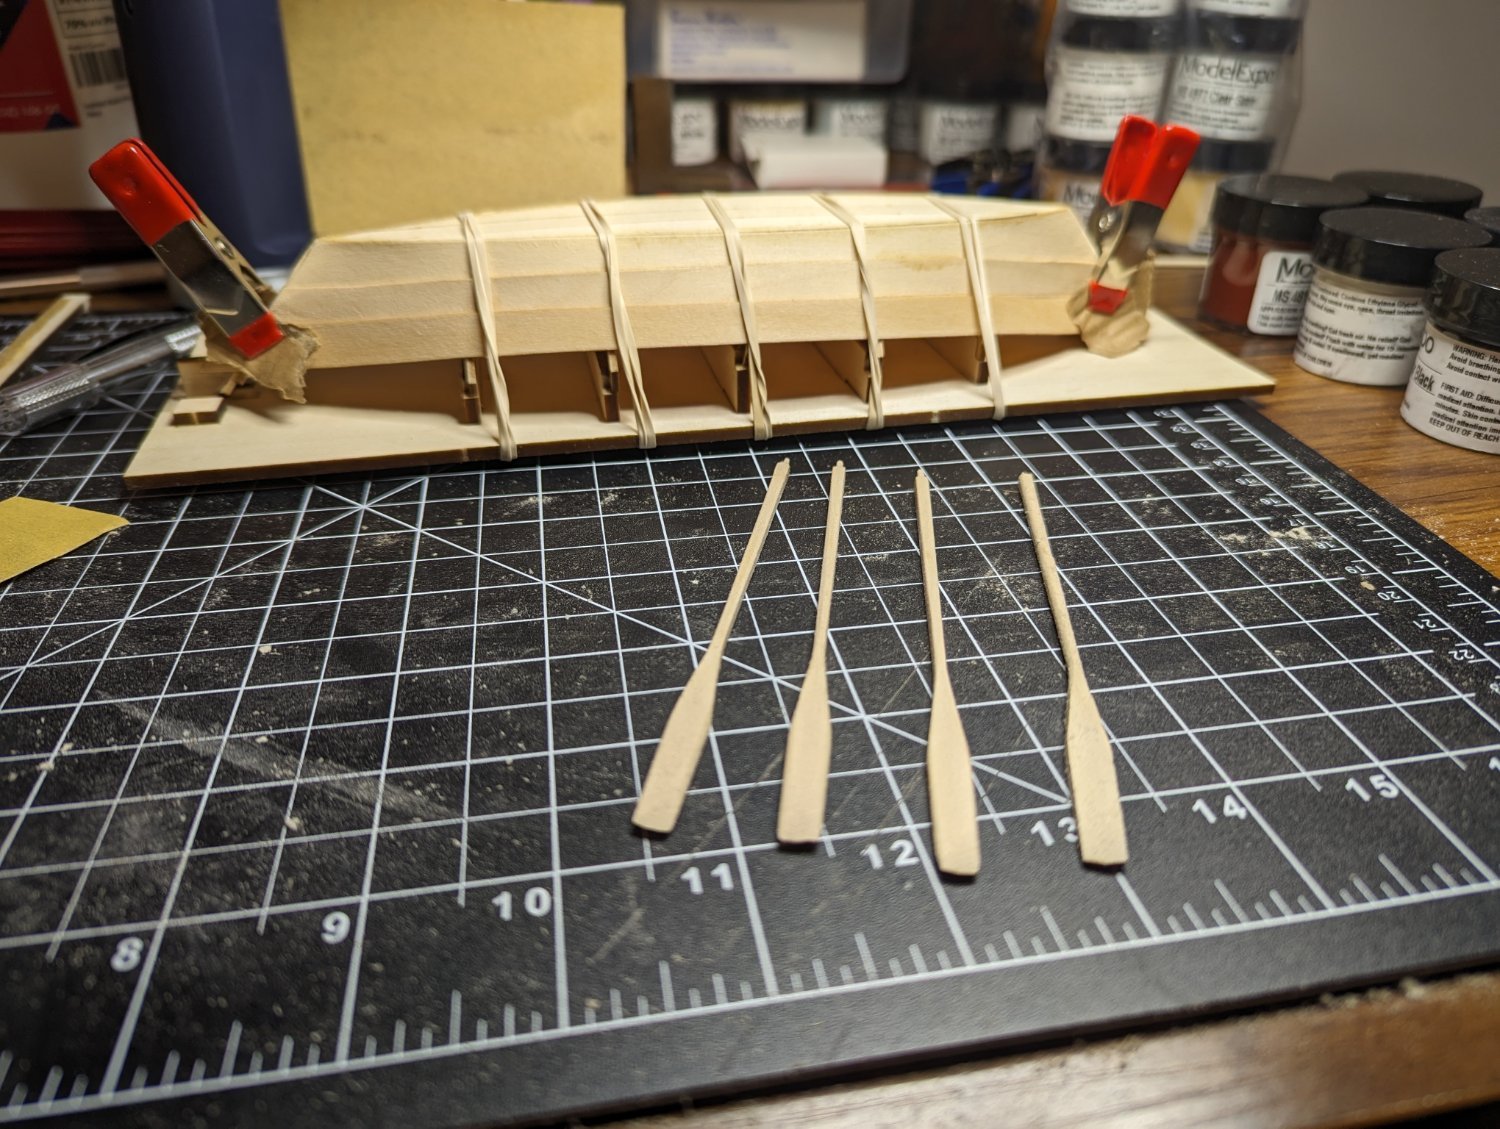
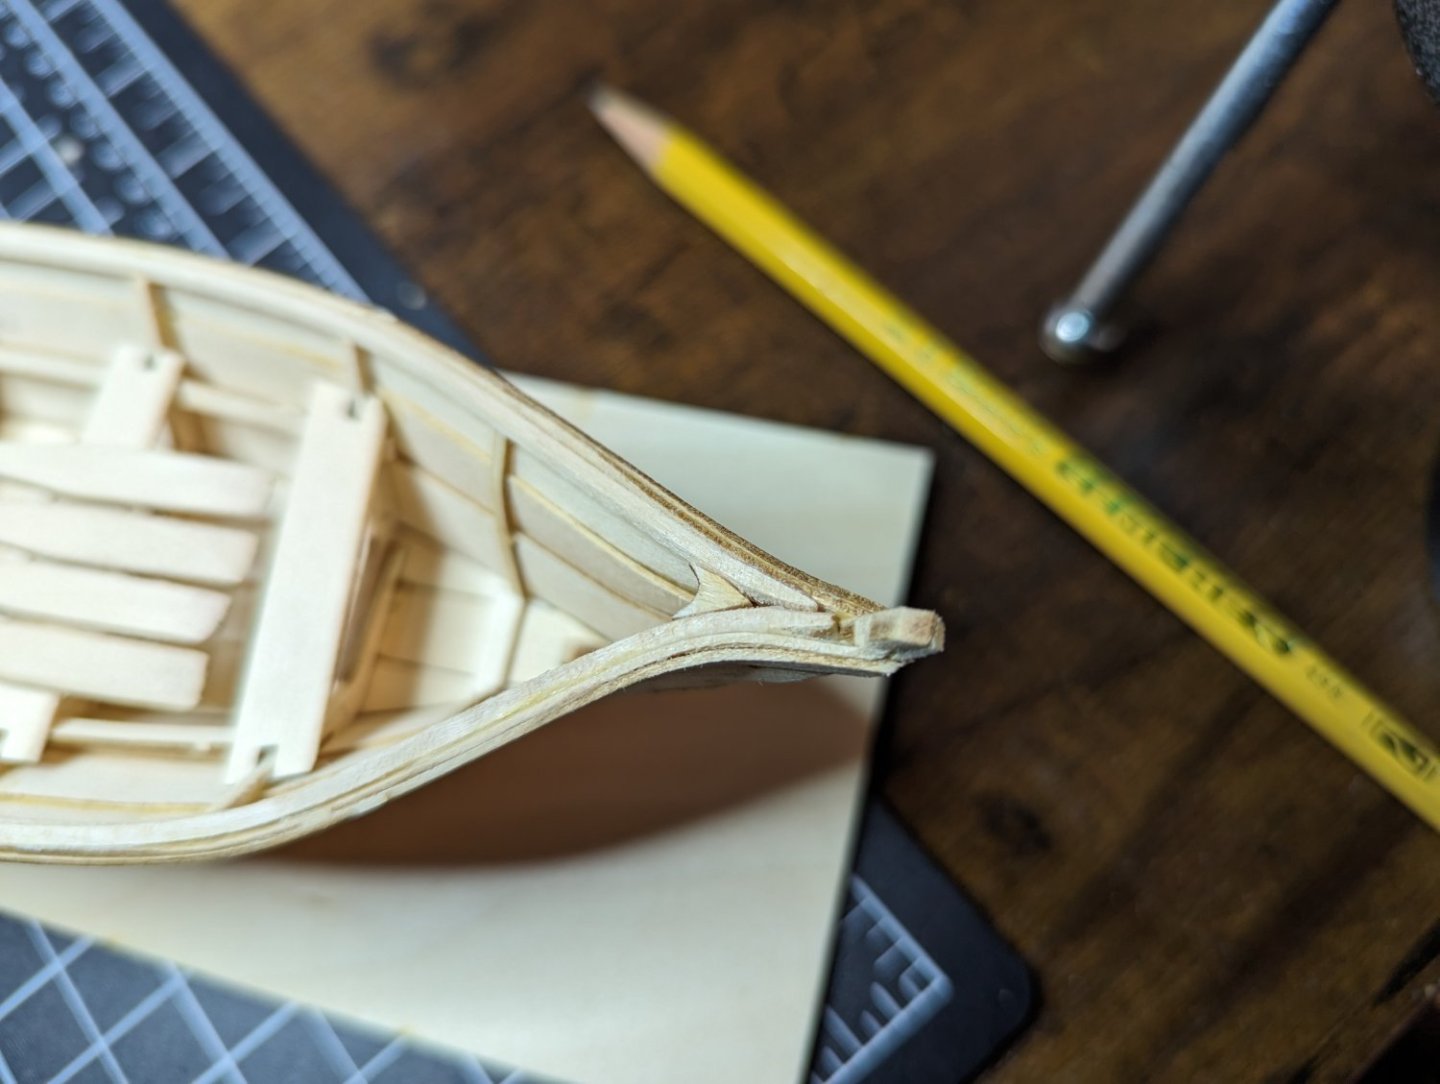
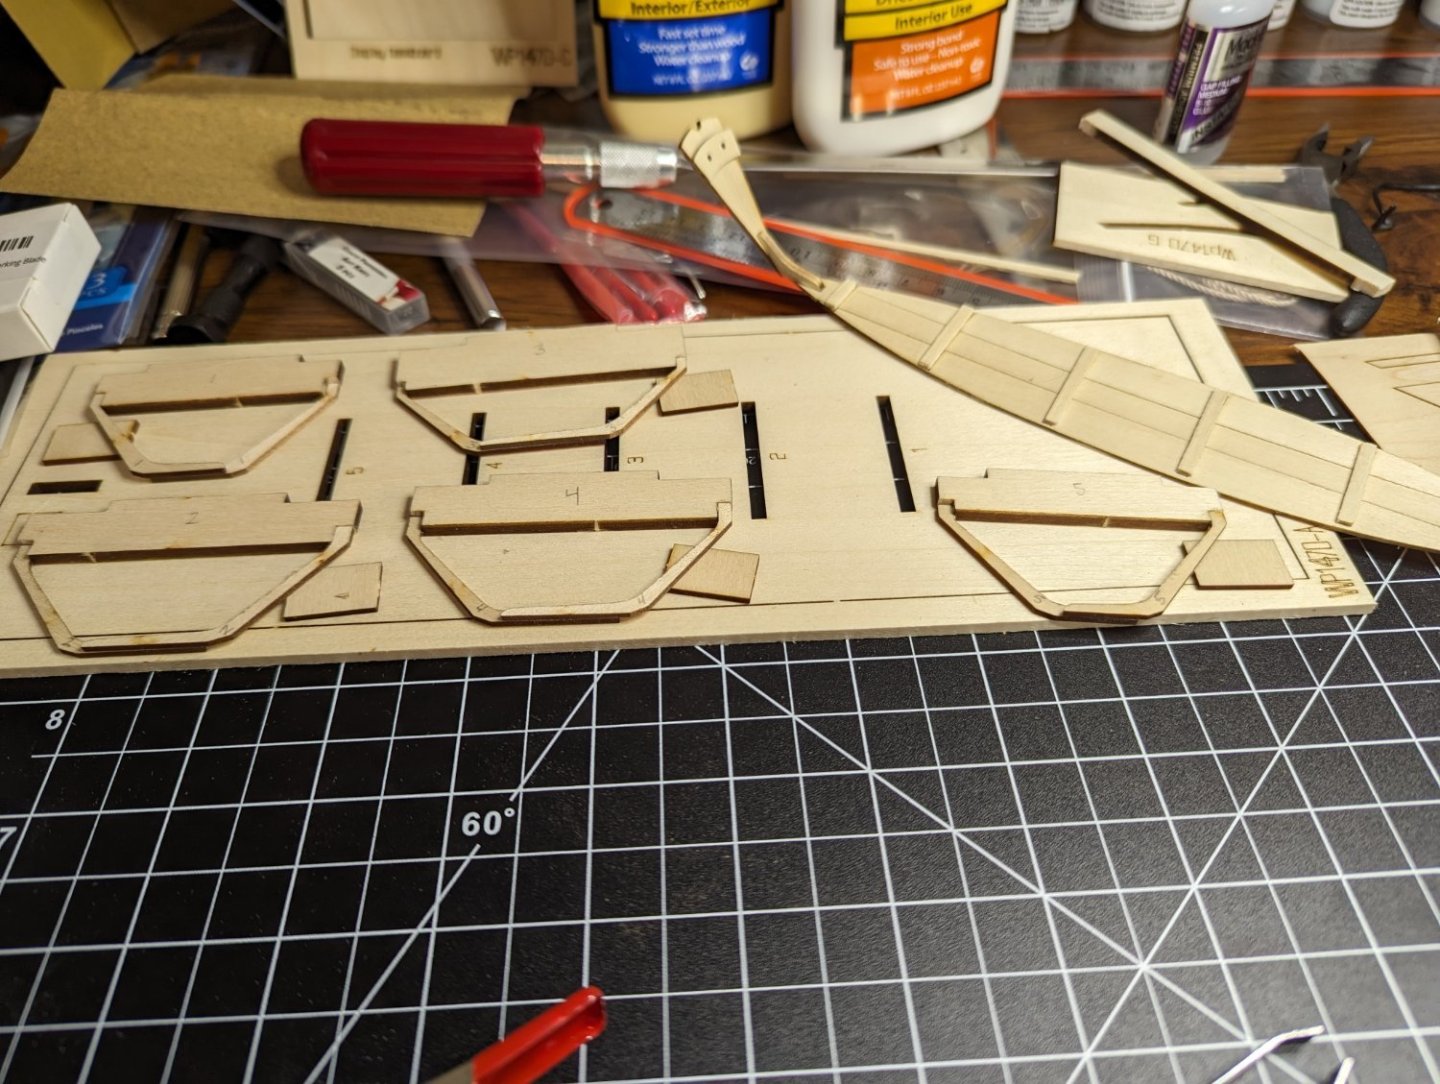
Back at it, and not too far off now. This little kit has been a great introduction and now that I'm nearing the end have already gathered countless lessons for the next build. Got the bands in as well as the gunwale this free afternoon. Also finished off the last of the thwarts and oar for dry fits. As mentioned up top as I'm nearing the finish noticing some rather grievous errors that I made early on and they are coming back to bite me on the final steps. Some will notice that due to my earlier failures of planking, the transom sits far too high(or rather the planks sit far too low) to the transom as compared to the instructions. Has led to a rather pronounced stern which given that these craft were meant to be stackable, I'm going to let that slide. My other mistake was on the opposite side, on the bow. My aggressive clamping led to a rather pointed/ uneven bend and actually also led to a snap on the gunwale as I attempted that install. A heavier soak and and a little bit of Frankensteining competed the gunwale to somewhat satisfactory results. I question how well the breast hook will achieve it's purpose given the severe pointed bow. That as clearly shown had to be given a severe sanding to fit. Thankfully this is a first attempt at wooden modeling and I'm okay with the results being somewhat imperfect. I'm still very much enjoying the hobby and am already looking forward to polishing this little kit off with my very questionable art/ painting skills.

-
Well done! I've very much enjoyed your progress on the model.
- 19 replies
-
- 1
-
-
- Grand Banks Dory
- Model Shipways
- (and 3 more)
-
FortressHarris reacted to a post in a topic:
Grand Banks Dory by bbrennan737 - FINISHED - Model Shipways - 1:24 - First Build
-
FortressHarris reacted to a post in a topic:
Grand Banks Dory by FortressHarris - FINISHED - Model Shipways - 1:24 - first build
-
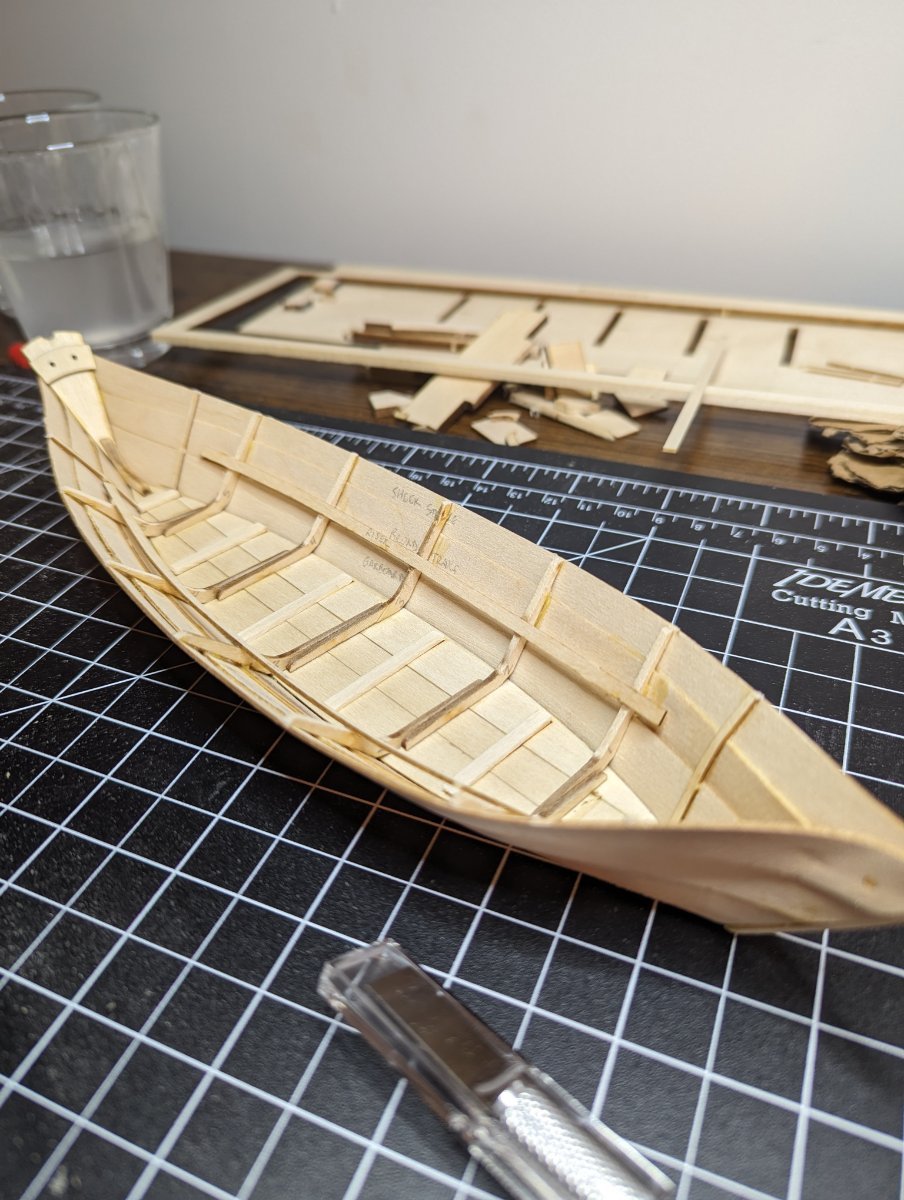
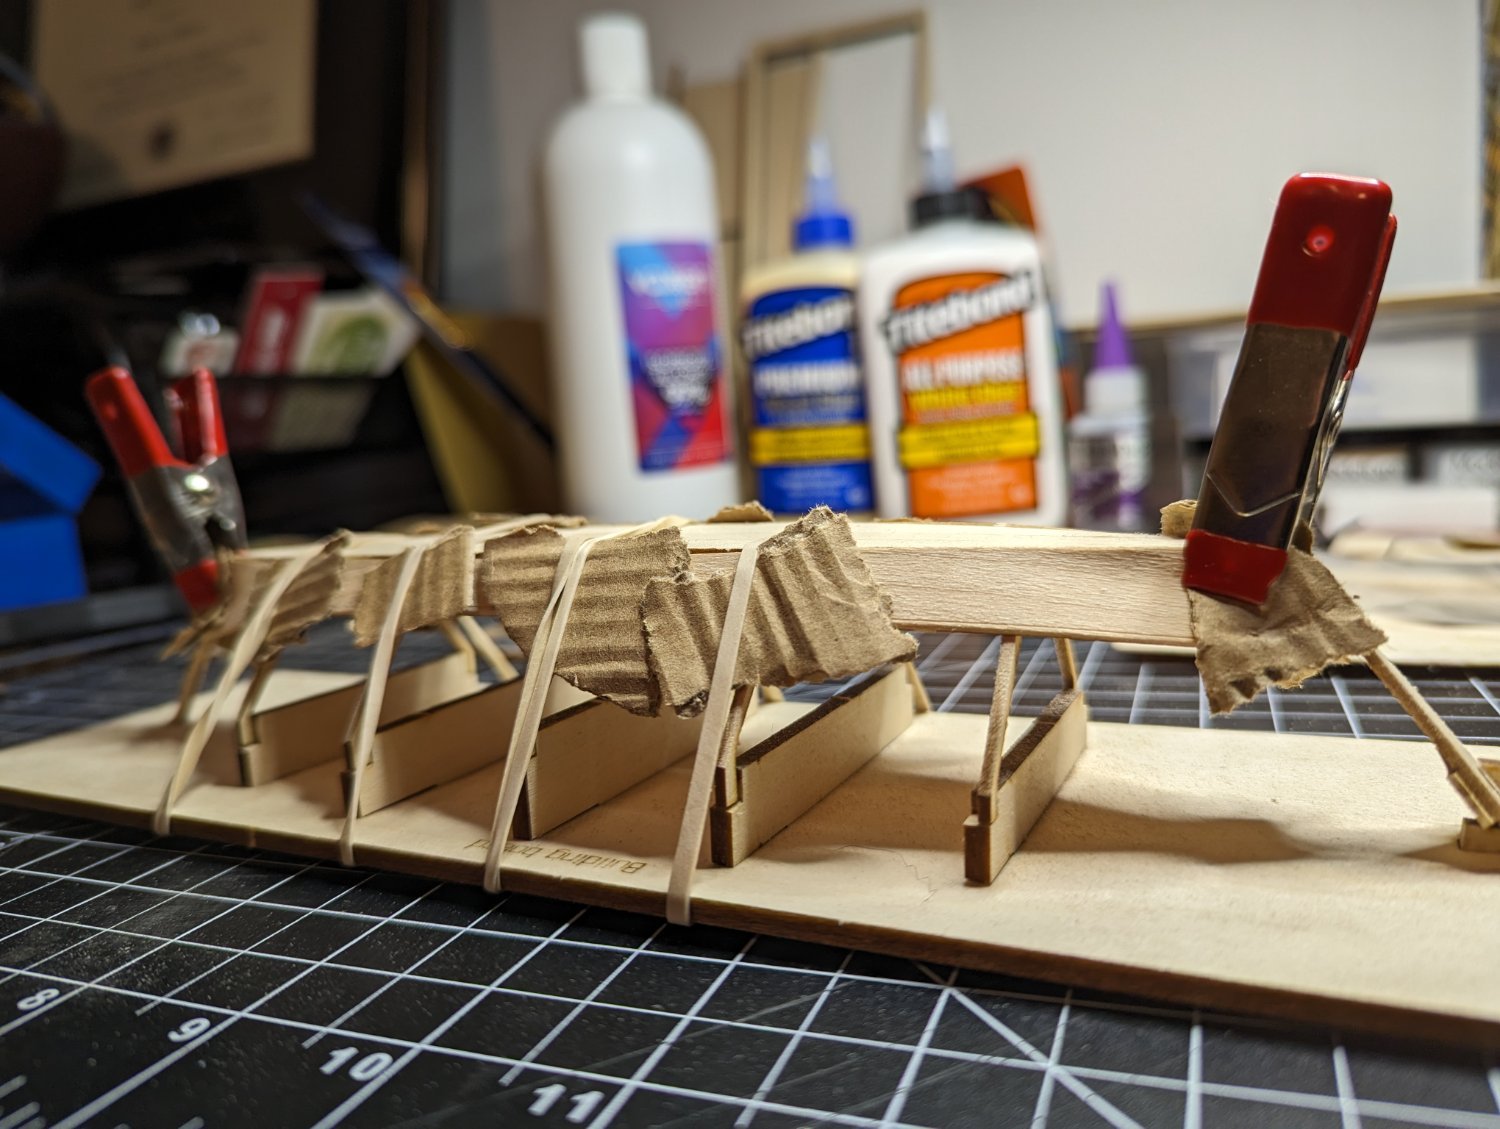
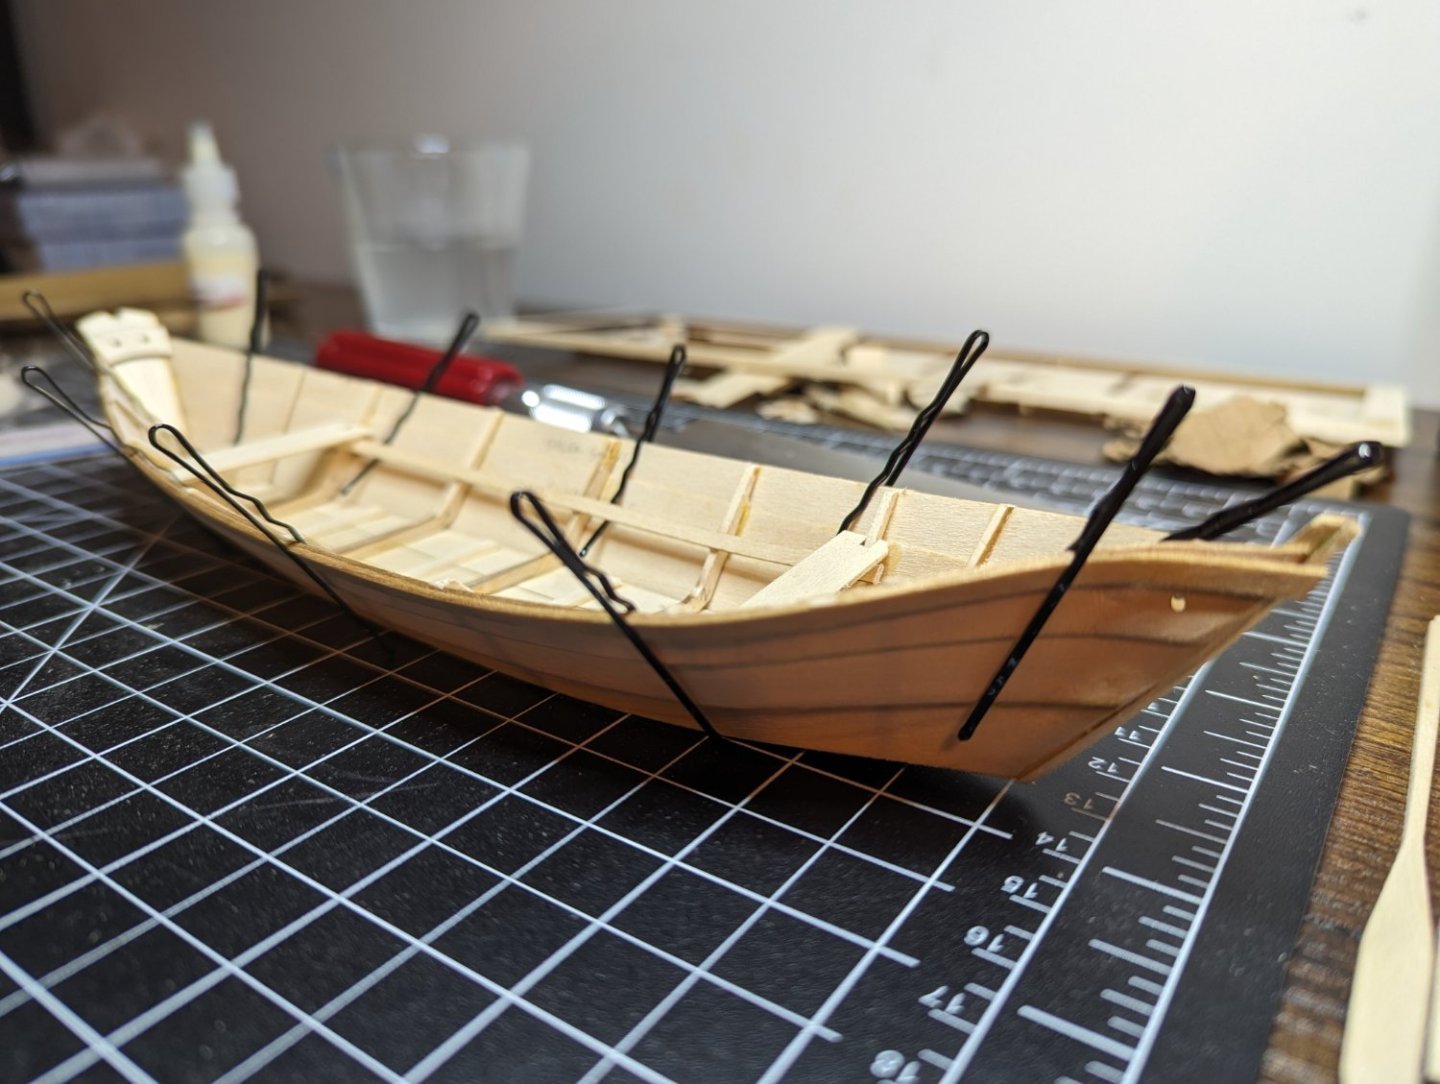
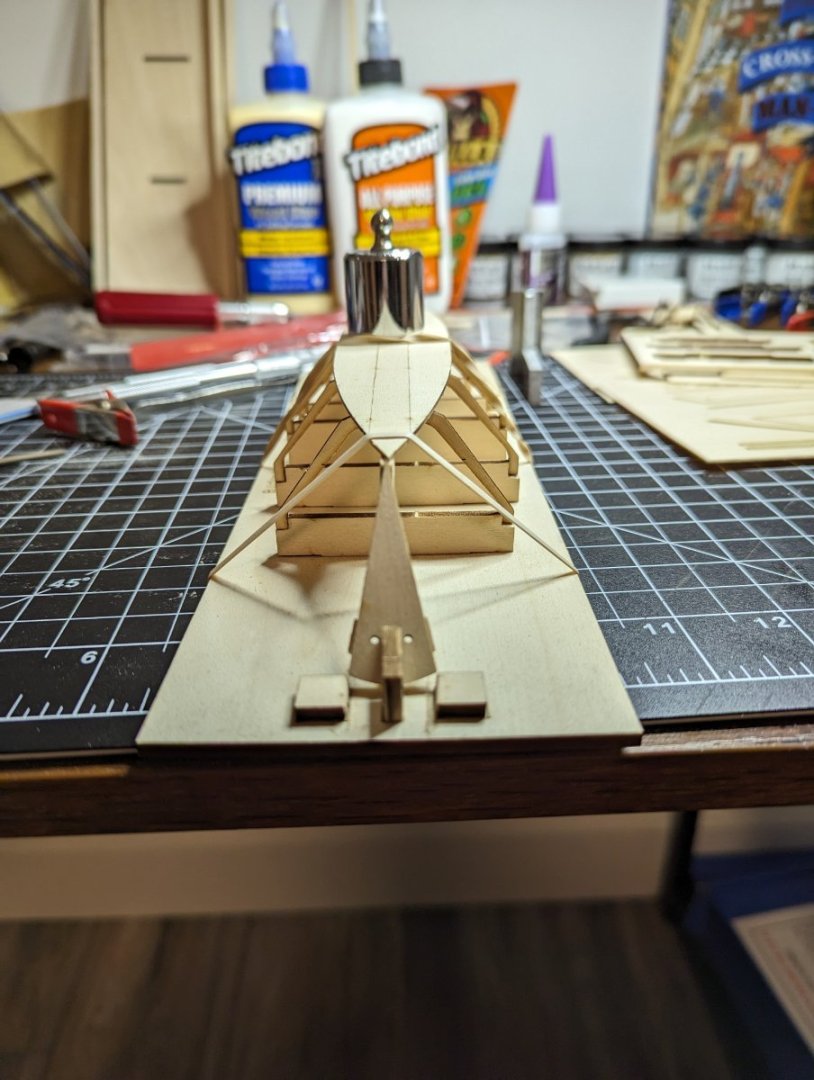
Small update, and still plugging away. I may not be working on the model quite as much as I'd like, but it seems most of my moments of slack thoughts tend to drift towards this hobby which I'm taking as a good sign, ha. Attached the side cleats and the risers, having finally caved and used super glue as I was having a difficult time figuring out how to clamp them down with out repeatedly dealing with shifts from the clamps. Started with the cleats and got a little too excited at the effectiveness of the super glue and as a result have one or two that I'm not thrilled with. Of course I compounded that a little by moving on to the risers and having the memory of a goldfish, fixed those in place slightly uneven. Thankfully it was at the next step where I briefly got confused about where to place the bands on inboard of the hull or on the outboard. Decided to take a refresh on the number of wonderful logs already on the Dory and quickly solved that brief conundrum. In the process I decided to try fit the two outer thwarts and decided to just shorten the risers to just under the thwart itself to fix my issue of the uneven risers. Very happy with the fit and look of it. Given that this is a first build and I've already learned multiple, multiple lessons, I'm okay with small imperfections and the challenges that can come with them. Having soaked and formed the bands to the hull I've rediscovered yet another one of my early mistakes. The planks do not match up with each other on the port and starboard. Thankfully it's not horrendous and the goal will be to just sand down the lifted side to match the other. Also a major shout out to @JacquesCousteau and his blog for using bobby pins for clamps. Stunned me on how easy it was to clamp the band to the hull and I wish I would've discovered/ tried this method earlier. That's all for today as I wait for the bands to dry overnight and I'll be back at it soon.

-
Hello all. Believe this is the right forum to ask this.... and hoping someone has information/ insight. I've ordered a future product from Caldercraft/ Jotika and have had no word from when it could be shipped. Did say it was in stock. Believe they're moving locations and wondered if that could potentially factor in a potential delay in fulfilling orders. Thanks in advance.
-
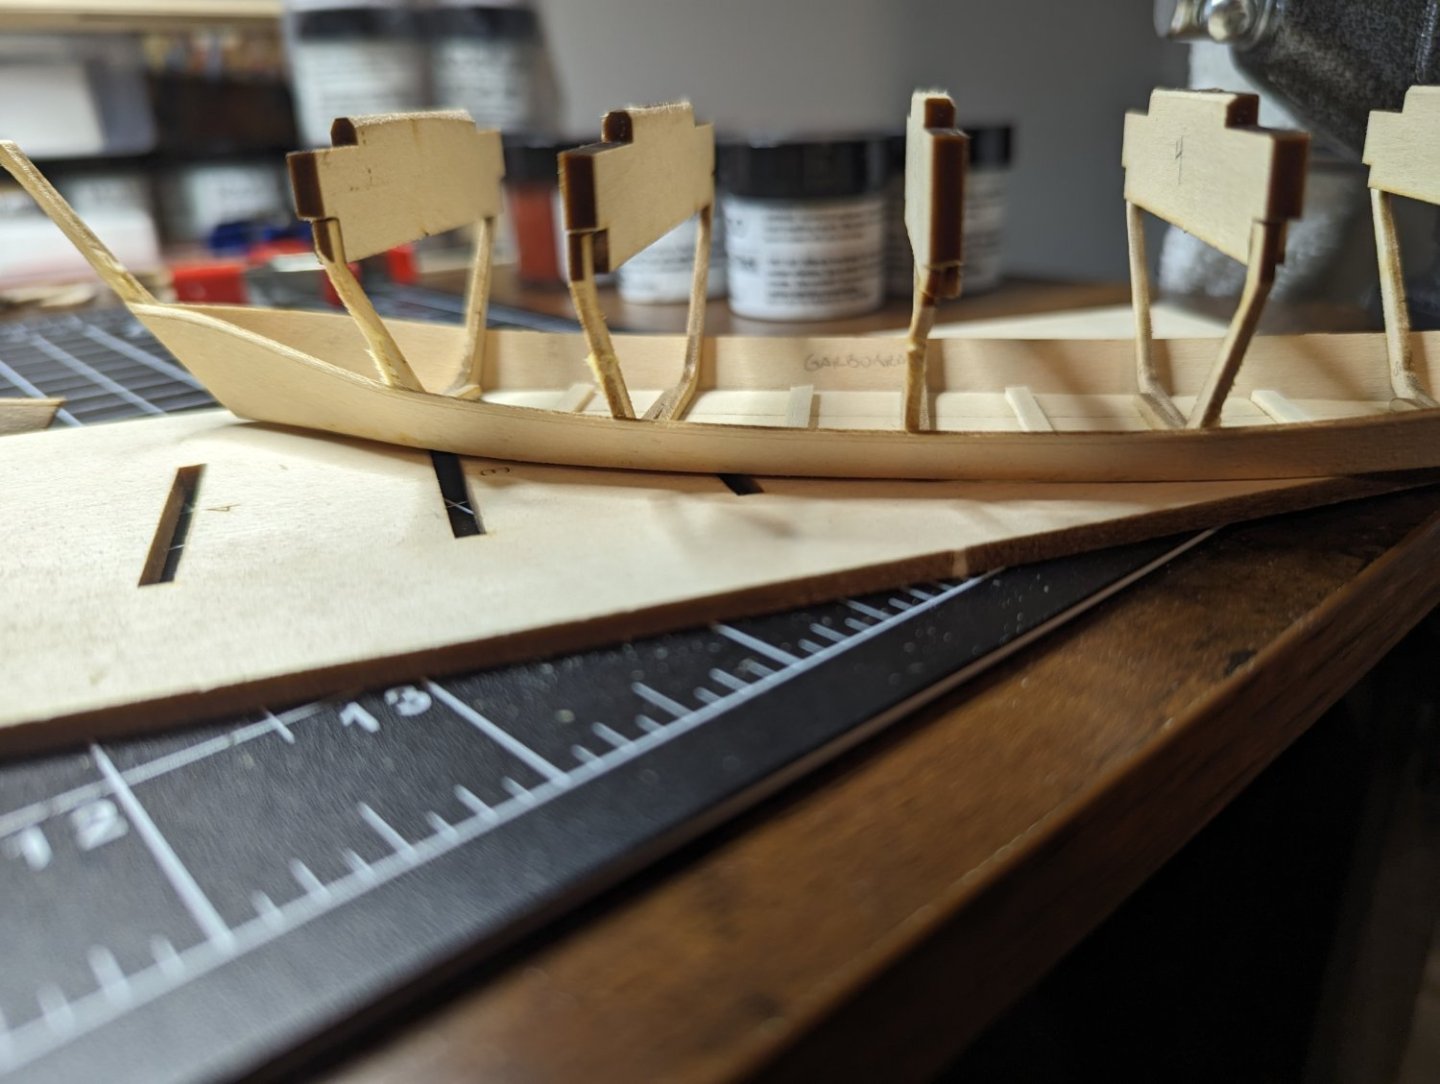
Well, not as much accomplished over the weekend as I'd hoped, but I'm sure that's quite a common phrase.... Made the decision to go back and try to undo my previous mistakes as I decided to go that route versus trying to adapt like I previously thought I might. I figured it would give me some worthwhile experience in using IPA as I'm sure I'll have to use it again in the near future. It was a good reminder on the use of patience. Framing a model boat isn't as immediately forgiving as framing a shed and lord knows I didn't need to snap another frame by impatience. Having finally removed the broad planks it also exposed my previously snapped frame. Which after a thankful somewhat easy separation from the building board I've attempted to Frankenstein back together. While there's a definite warp to it now I'm happier with having it back in place. Though we'll also see if it's a sturdy monster when I go to saw through it. With that back in place back on the building board and back to how I should have done it in the first place with some overlap and not attempting to make it flush. Turns out if one actually reads the instructions, the whole thing goes a bit smoother. Broad plank back on, and shaping of the shear plank set for overnight. Prior to wrapping up for the night I decided to also give my hand at the oars. I of course managed to not only make the first one have a bit of a unique style(far right)...but I also managed to snap it as well. Thankfully this was a pleasant snap and it fits rather well back together. The other three seem to have come alright together. A bit less of a curved body then I would like, but I can always come back to it. Overall, pleased with myself for the weekend and happy the build is back on track. Thanks as always for your words of encouragement and advice. They are always appreciated.

- 26 replies
-
- 10
-
-
Looking great so far! As others have mentioned elsewhere, be sure to keep in mind the ending look. Made a couple of mistakes on mine getting lost in the individual steps. I'll be keeping an eye on yours!
- 19 replies
-
- 4
-
-
- Grand Banks Dory
- Model Shipways
- (and 3 more)
-
Now, back to the build. Cleaned up the snap on the midship frame. Happened to be a pretty clean snap and not much to immediate recover. I think the goal will be to be finish off the planking and once the boat is cleared of it's building board see what I can do then. Since that was decided I moved on to the gluing of the broad plank. And here is where I've sort of made my second mistake and not clearly referencing the overall look of the model. I expected the planks to sort of meet flush with the slight beveling of the planks. Having just struggled on beveling the planks with them being so thin on not quite being able to achieve a good technique on doing so I also expected to not have the perfect fit. So when I went to glue them down I've got larger gaps then I was hoping for. Now in retrospect, looking at various pictures of the next steps, I've realized that there should be some greater overlap with the planks. Seeing as this is a first wooden model for me I've decided to press on as I'm hoping to use this as both a learning project for attempting to fix mistakes to overcome and as a reference point to look back on to see how far I've come. Thanks again for the time to read my ramblings.

-
Hello again all. Thank you so much for the replies to this log. They are very much supportive and encouraging. Still very much working out the basics of both wooden boat modeling and modeling in general. I've decided that on this build that I'm largely hoping to use it as a very much learning experience for myself and hopefully one or two others in the sense of pointing out some very basic mistakes/ interesting points that I've come across. The goal, the girlfriend and I have decided, is to show this eventually finished model next to what will be my actual goal in this hobby which is a third or first rated fighting ship. Still a lot to go before I get there and have decided to take it slow by working on this introductory series and some other models more basic models. Again, thanks for the words of encouragement, they are quite helpful both in terms of community and knowledge progression.
-
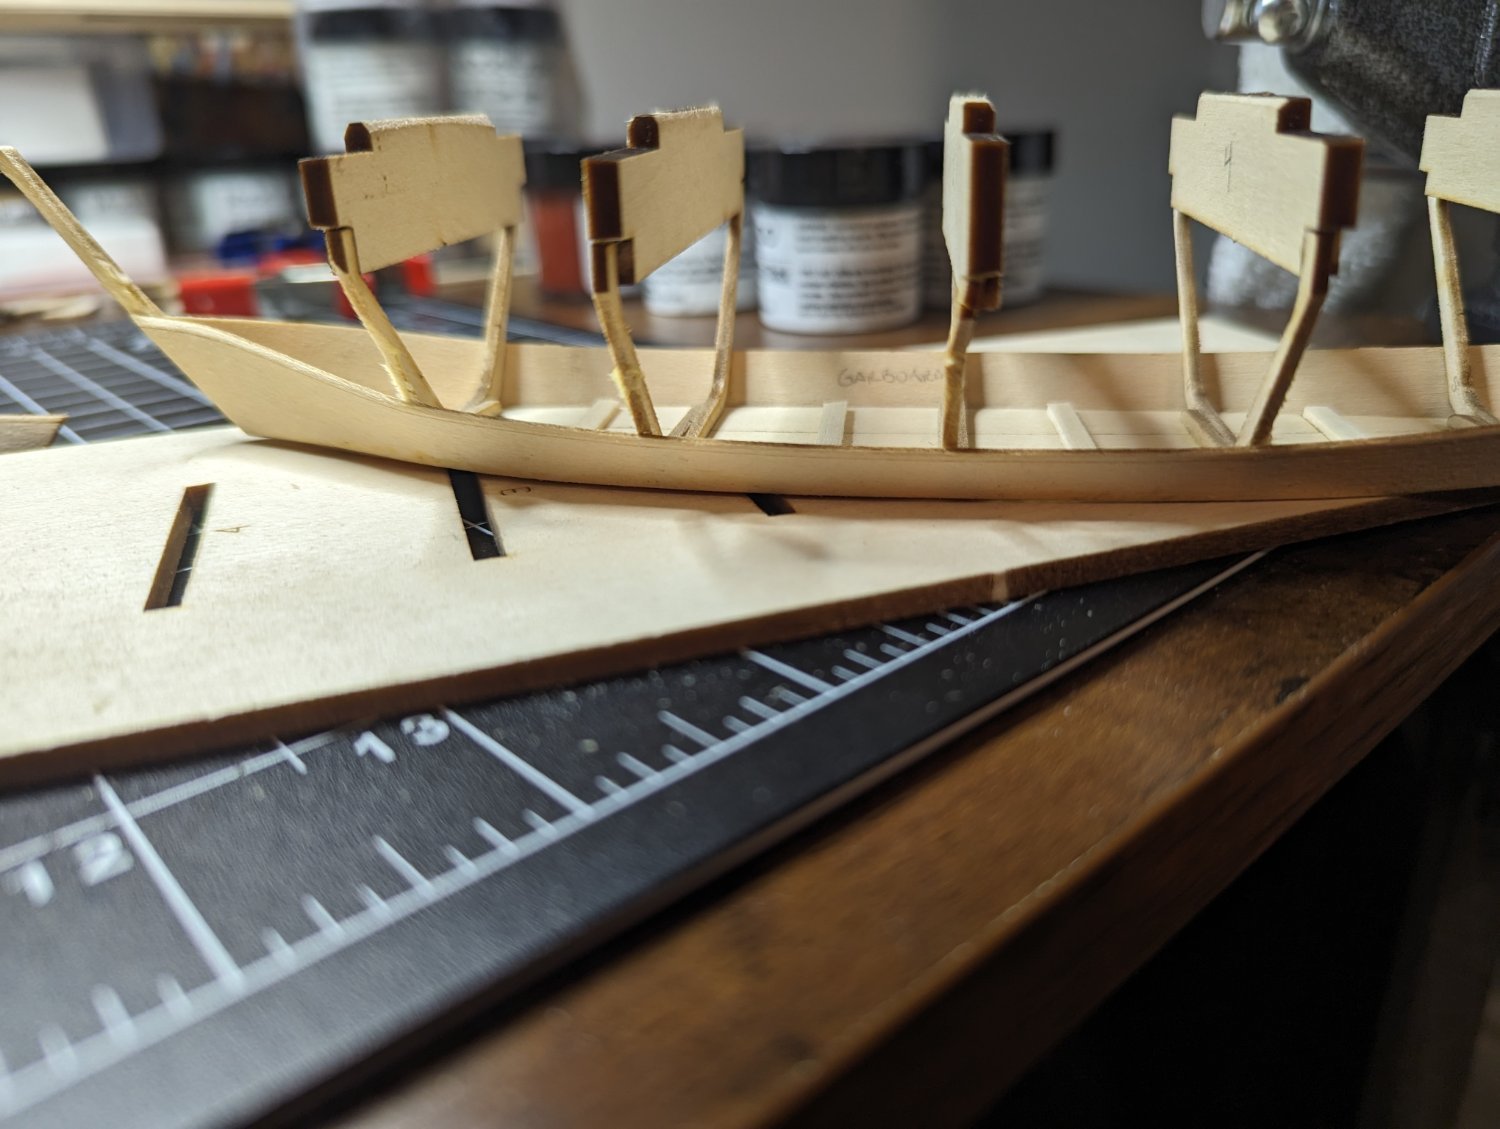
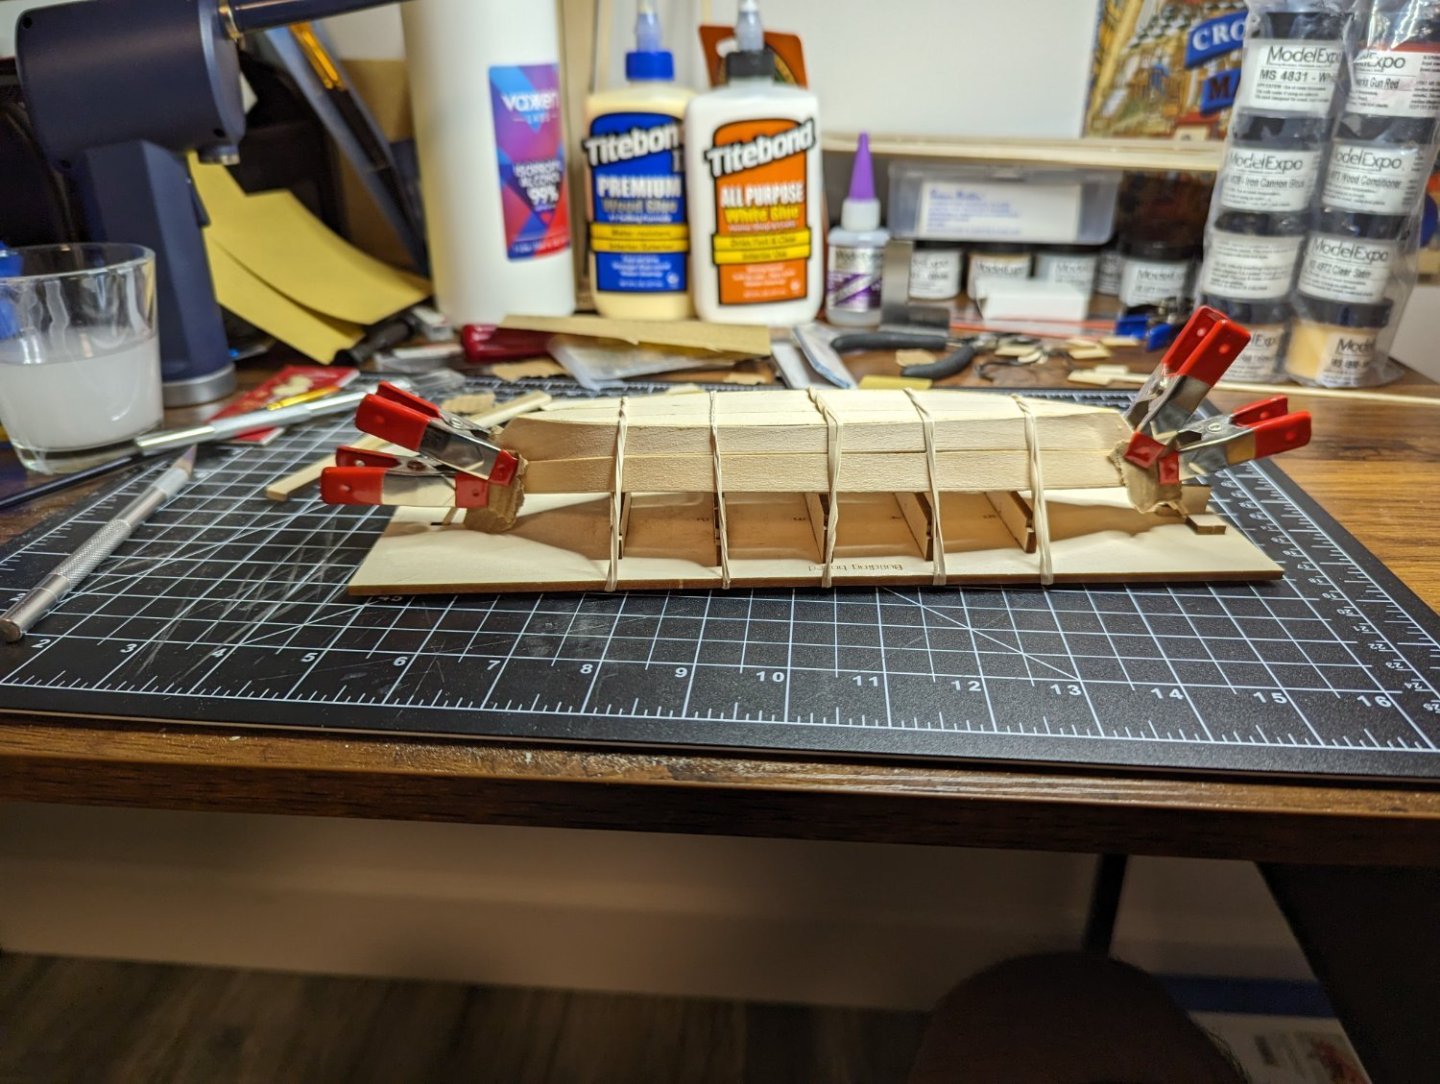
Been a bit and took off the weekend for life.... back to it now though. Started the planking and it's wonderful to see the amount of bend the wood can have. The garboard plank went on fairly easily and needed minimal glue/ sawdust fill to fill in the gaps. The broad plank is also in place for drying overnight, but unfortunately I've come across my first minor set back. Ended up snapping one of the frames by attempting to push up the broad plank to get minimal gaps to the garboard. I'll take a look at it tomorrow, but it should easily be fixable by either keeping it as is or fashioning an extension using scraps. TBD on that. Still very much enjoying working with material that a mistake is really just part of the hobby. Thanks again everyone for your own build logs. Always an inspiration.


-
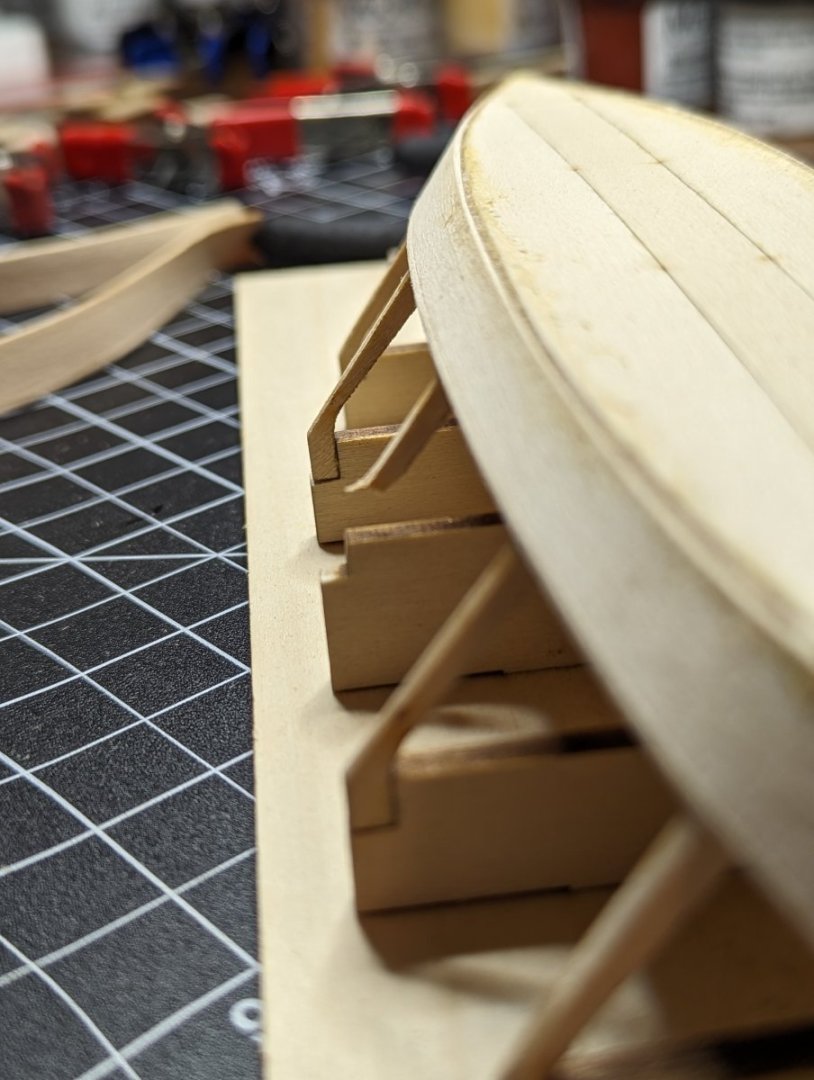
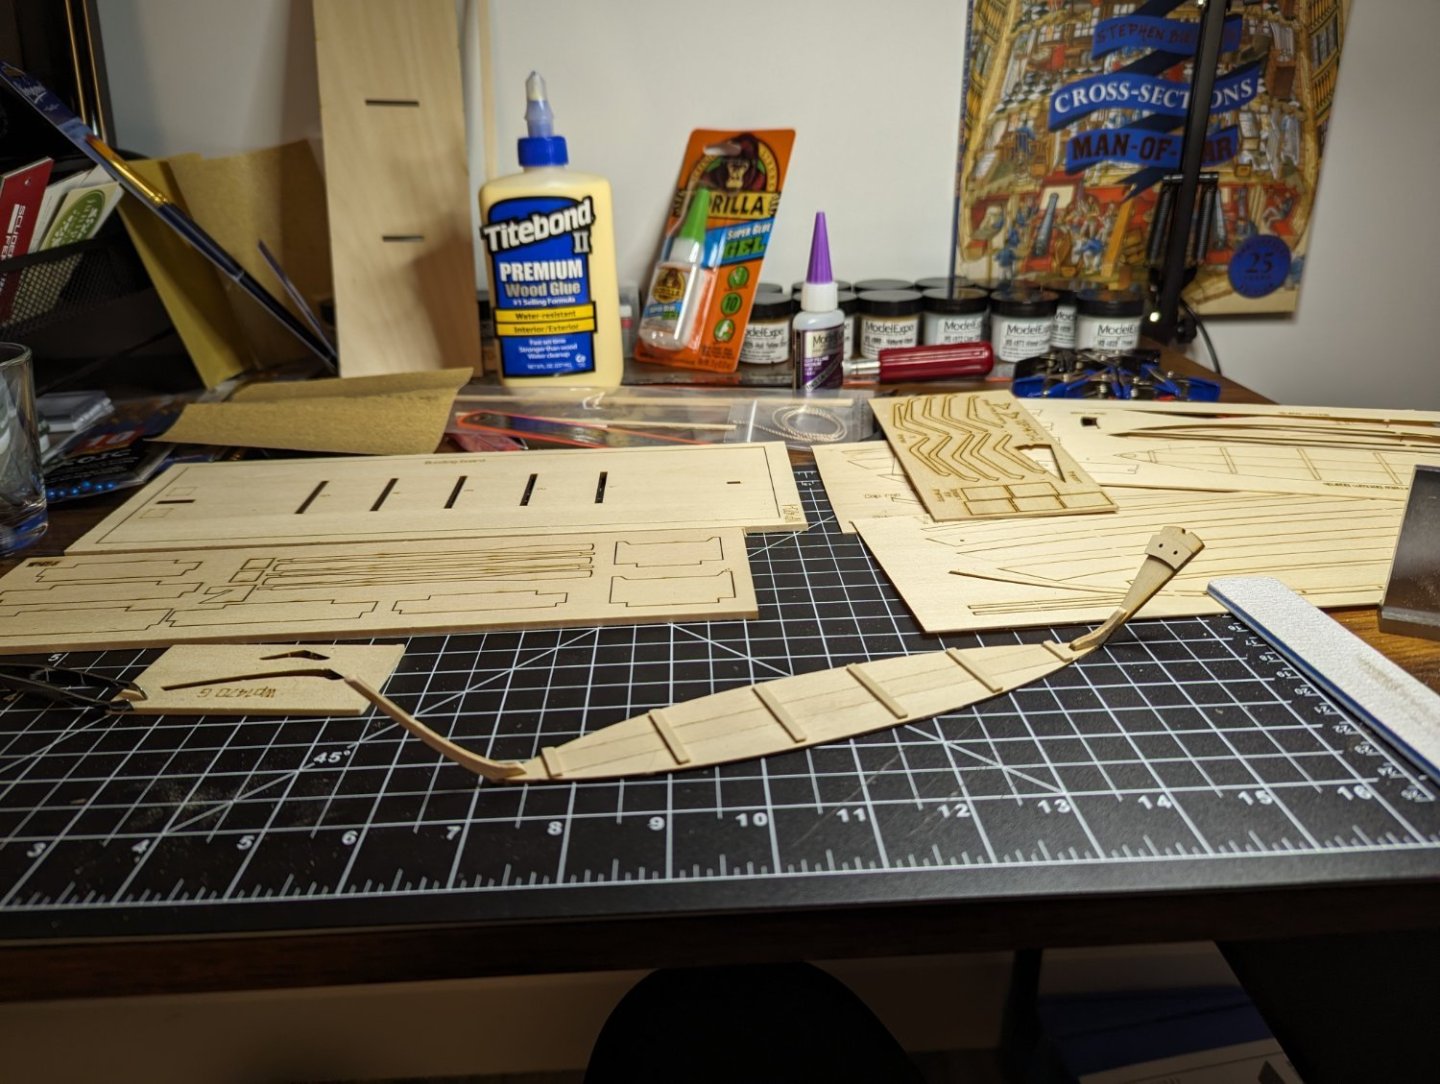
Following up the first post immediately as this is technically my second day working on it, but didn't get around to making the post until tonight. Tonight was all about setting up the framing. A little nervous as again the material is fairly fragile and my skills fall far behind most of the work that I've seen here. Had a couple of frames pop off from a lack of glue, but a quick reapplication seems to have done the trick. Not much time again tonight as it's a work night, hooray night shift....but I finished off with attaching the framing to the bottom. There's a few bits here and there that I'm nervous about the long term implications of, but seeing as this is my first model I'm accepting already that this won't be museum quality. Heck, if I get a cool from my nephews, it'll be worth it in the end.
- 26 replies
-
- 13
-
-
Well, here's the start. My first wooden ship model ever and my first model period in nearly 30 years. First things first, everything is a lot smaller than I remember and a lot more fragile. First bit went fairly well, it was nice to have the inserts here and there about some general tips. Honestly it's been so long and I'm not even sure I did it then, but the tip of using a brush for glue application was very helpful. Still a working stiff, so this is all I accomplished on day 1.

-
Hello everyone! Been sitting on the sidelines of the forum for a bit, while I contemplated returning to the world of modeling. Did a few plastic models(non-painting) when I was a preteen, but that's as far as my experience has gone. Now approaching my 40th, I've decided to turn this into my midlife crisis hobby, ha. Just started the Model Shipways Grand Banks Dory, and so far I'm very happy I read the forums for a bit before starting up. Thank you all, already, for your build logs. Everything is a lot smaller than I remember. Looking forward to reading many more of your build logs as I progress in the hobby!