HOLIDAY DONATION DRIVE - SUPPORT MSW - DO YOUR PART TO KEEP THIS GREAT FORUM GOING! (Only 13 donations so far - C'mon guys!)
×

PvG Aussie
-
Posts
402 -
Joined
-
Last visited
Content Type
Profiles
Forums
Gallery
Events
Everything posted by PvG Aussie
-
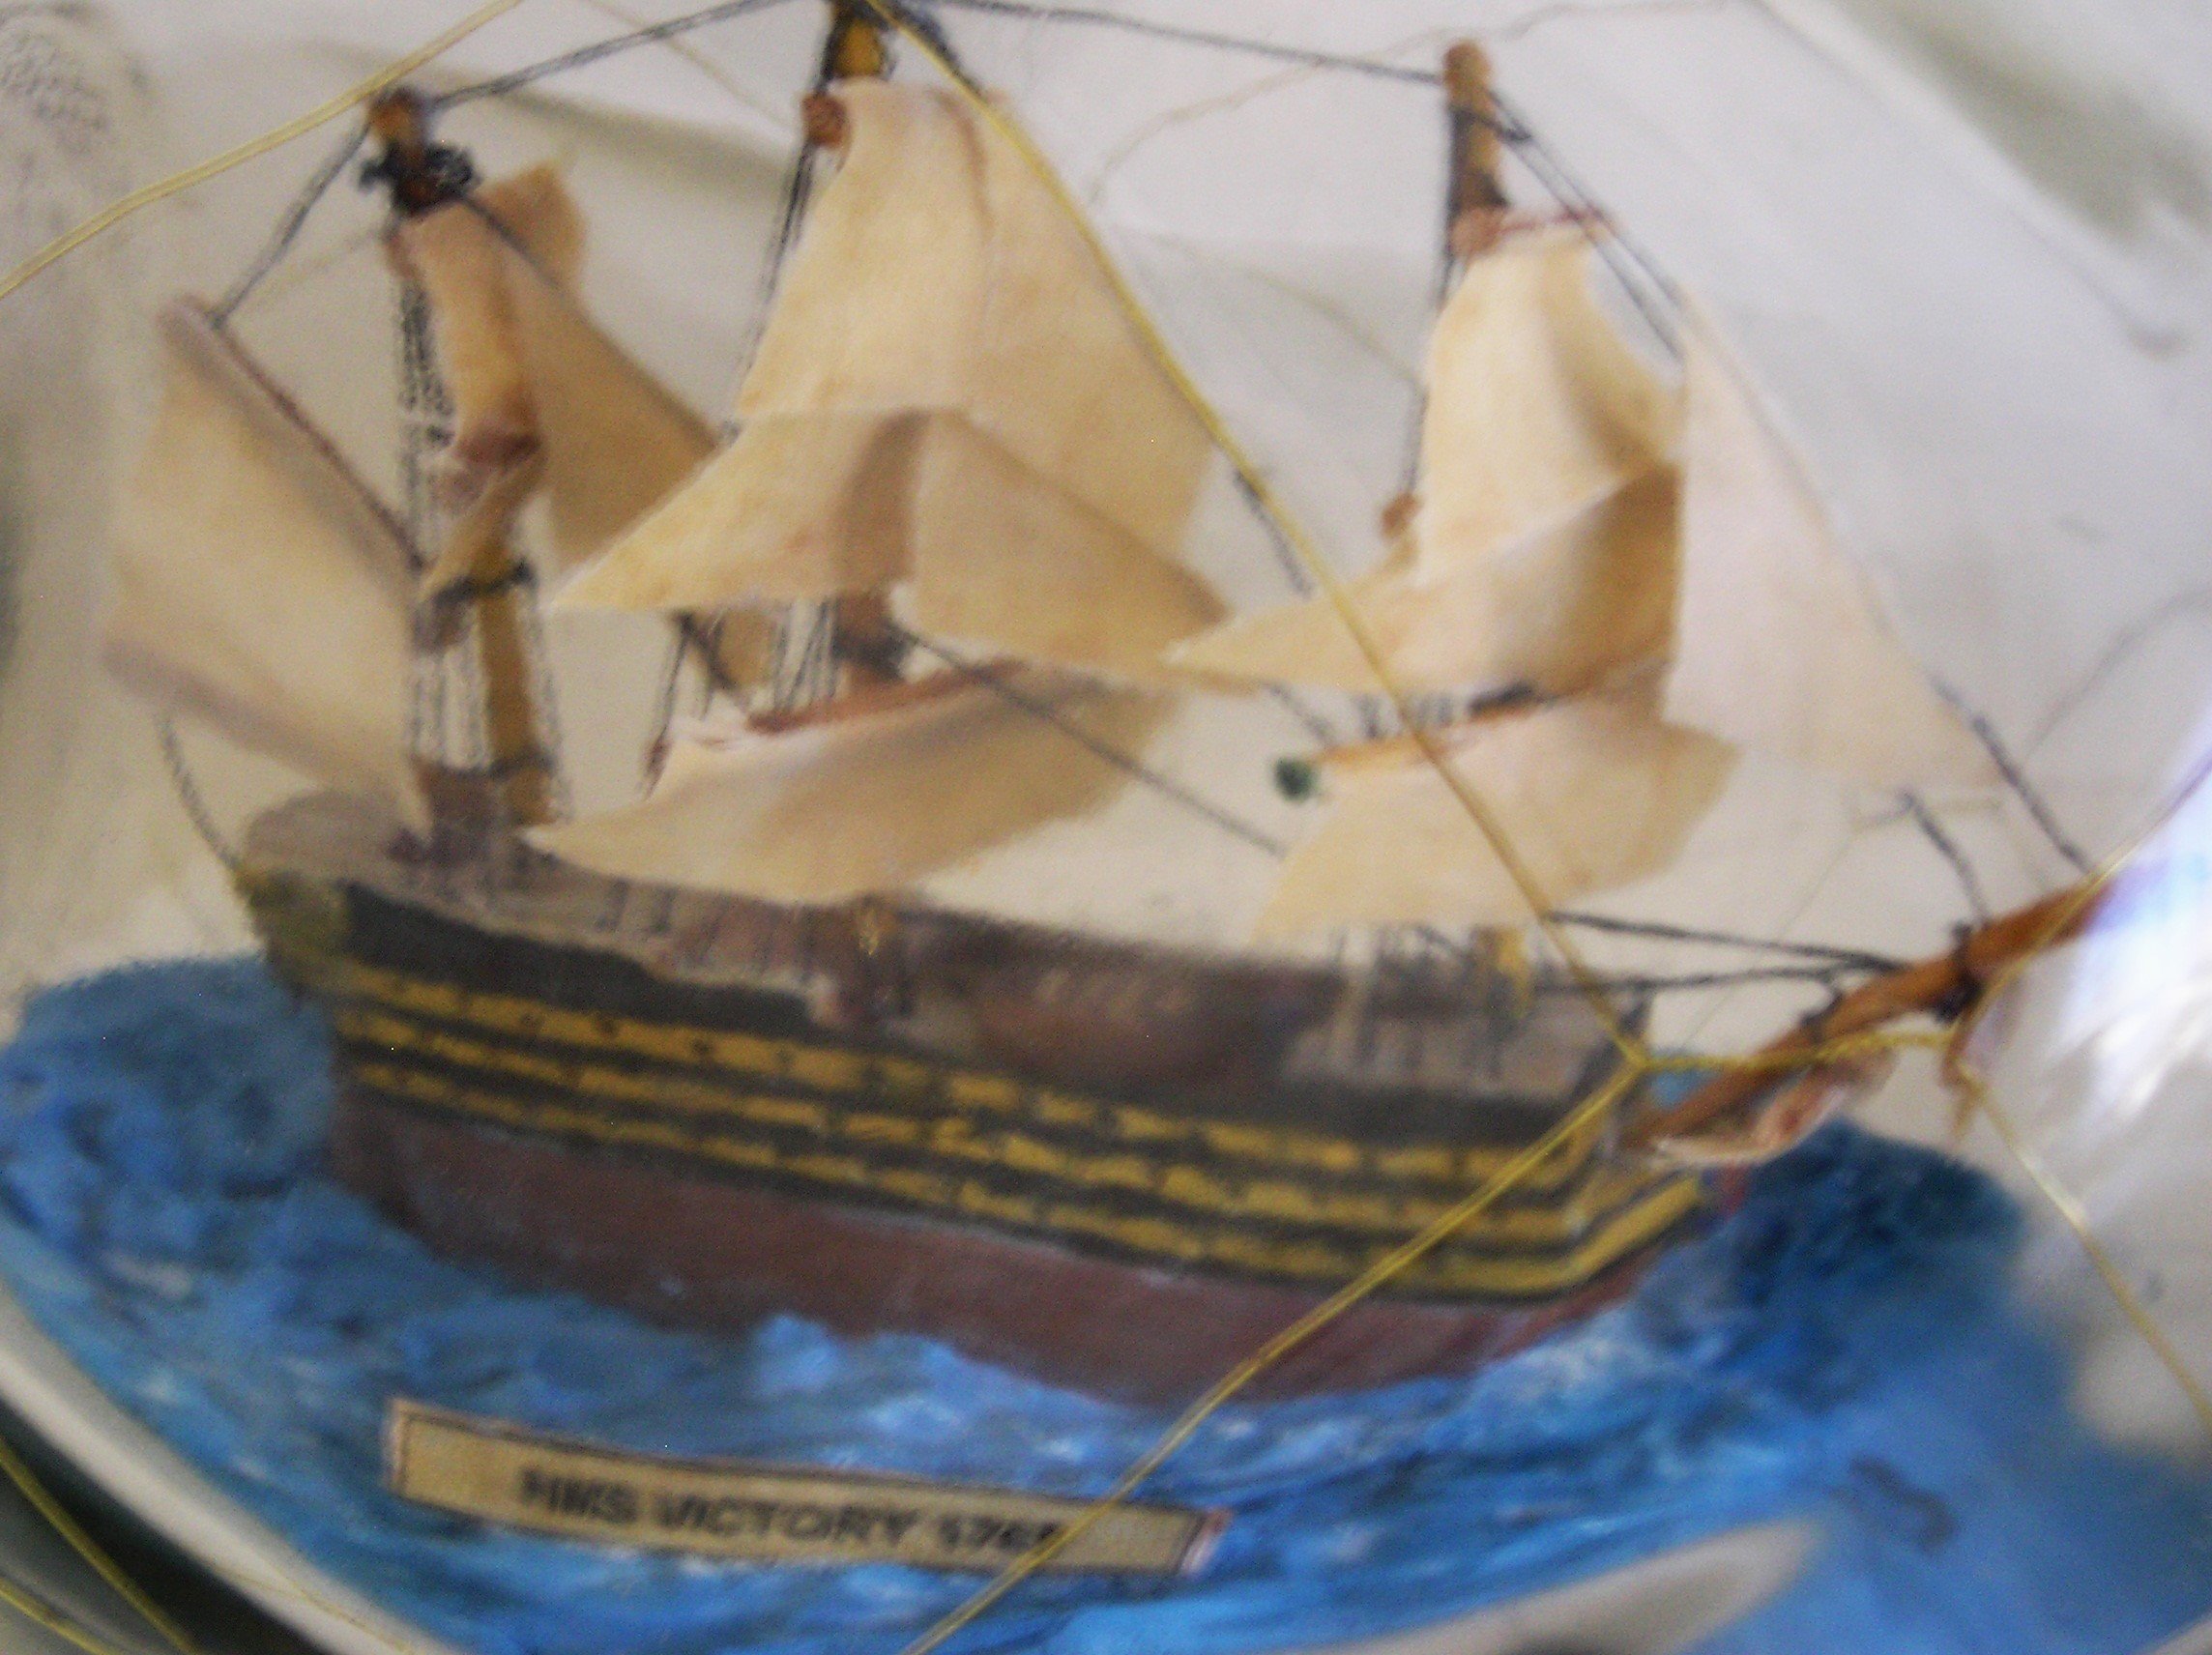
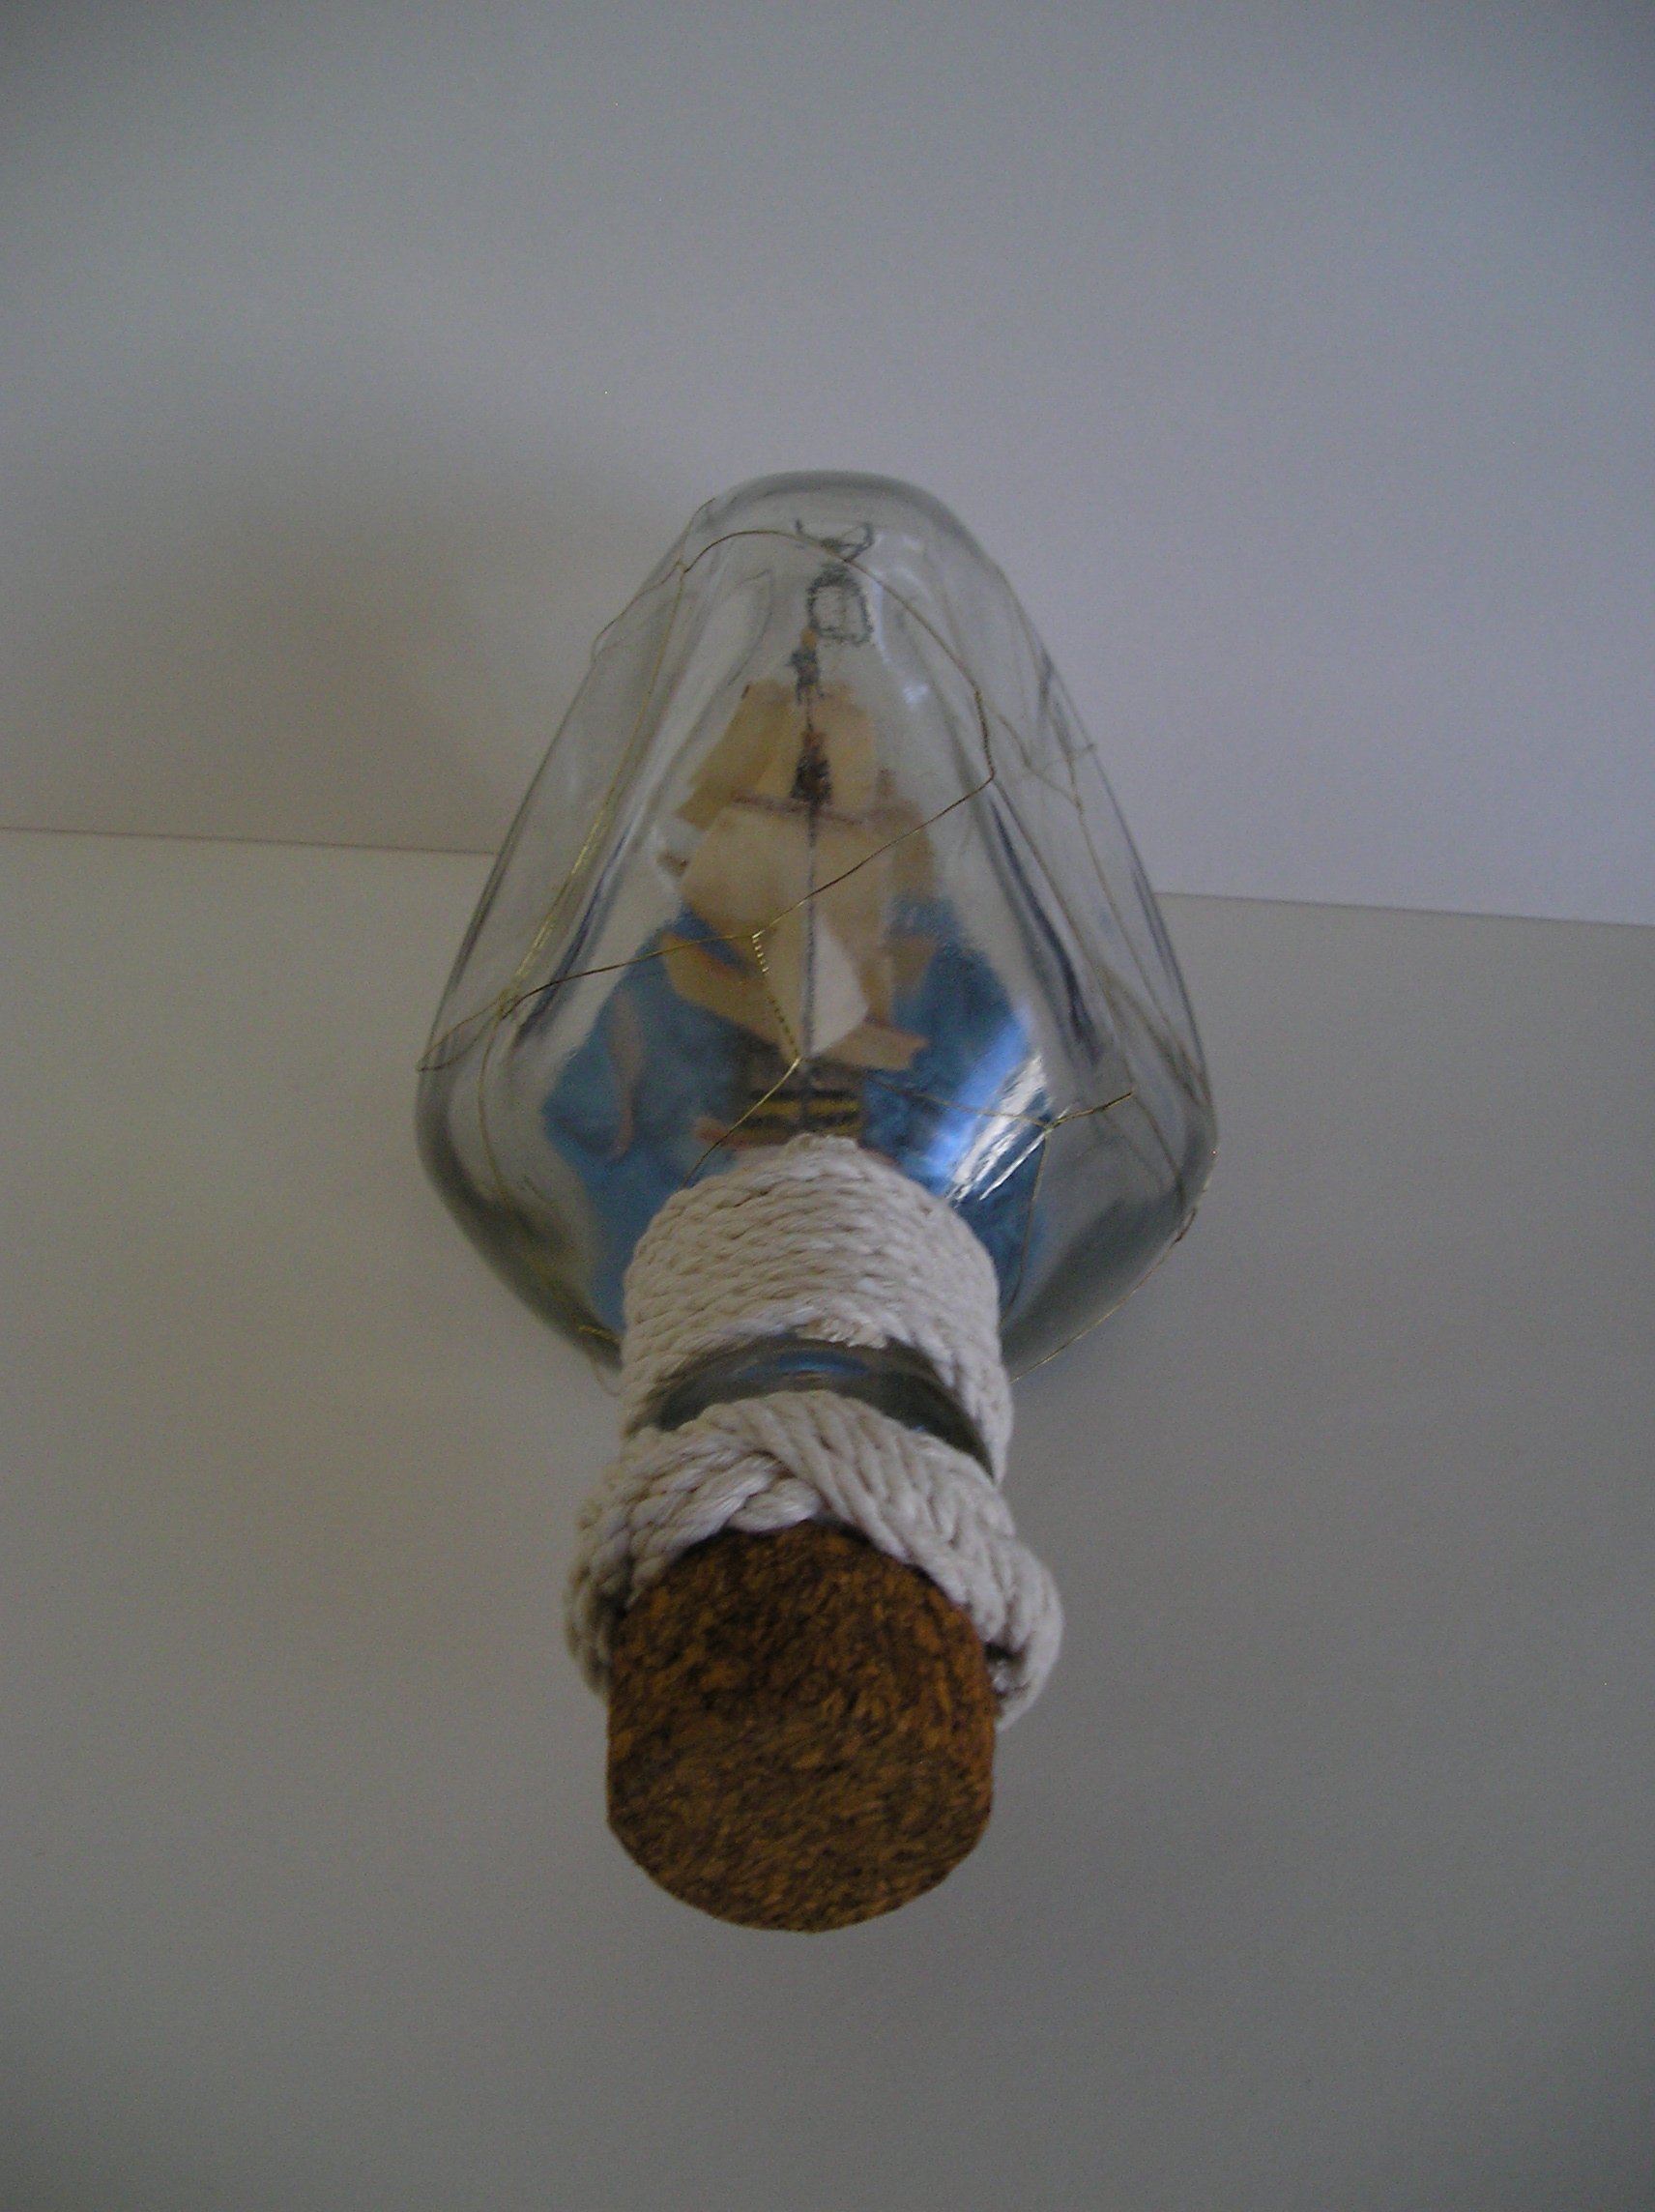
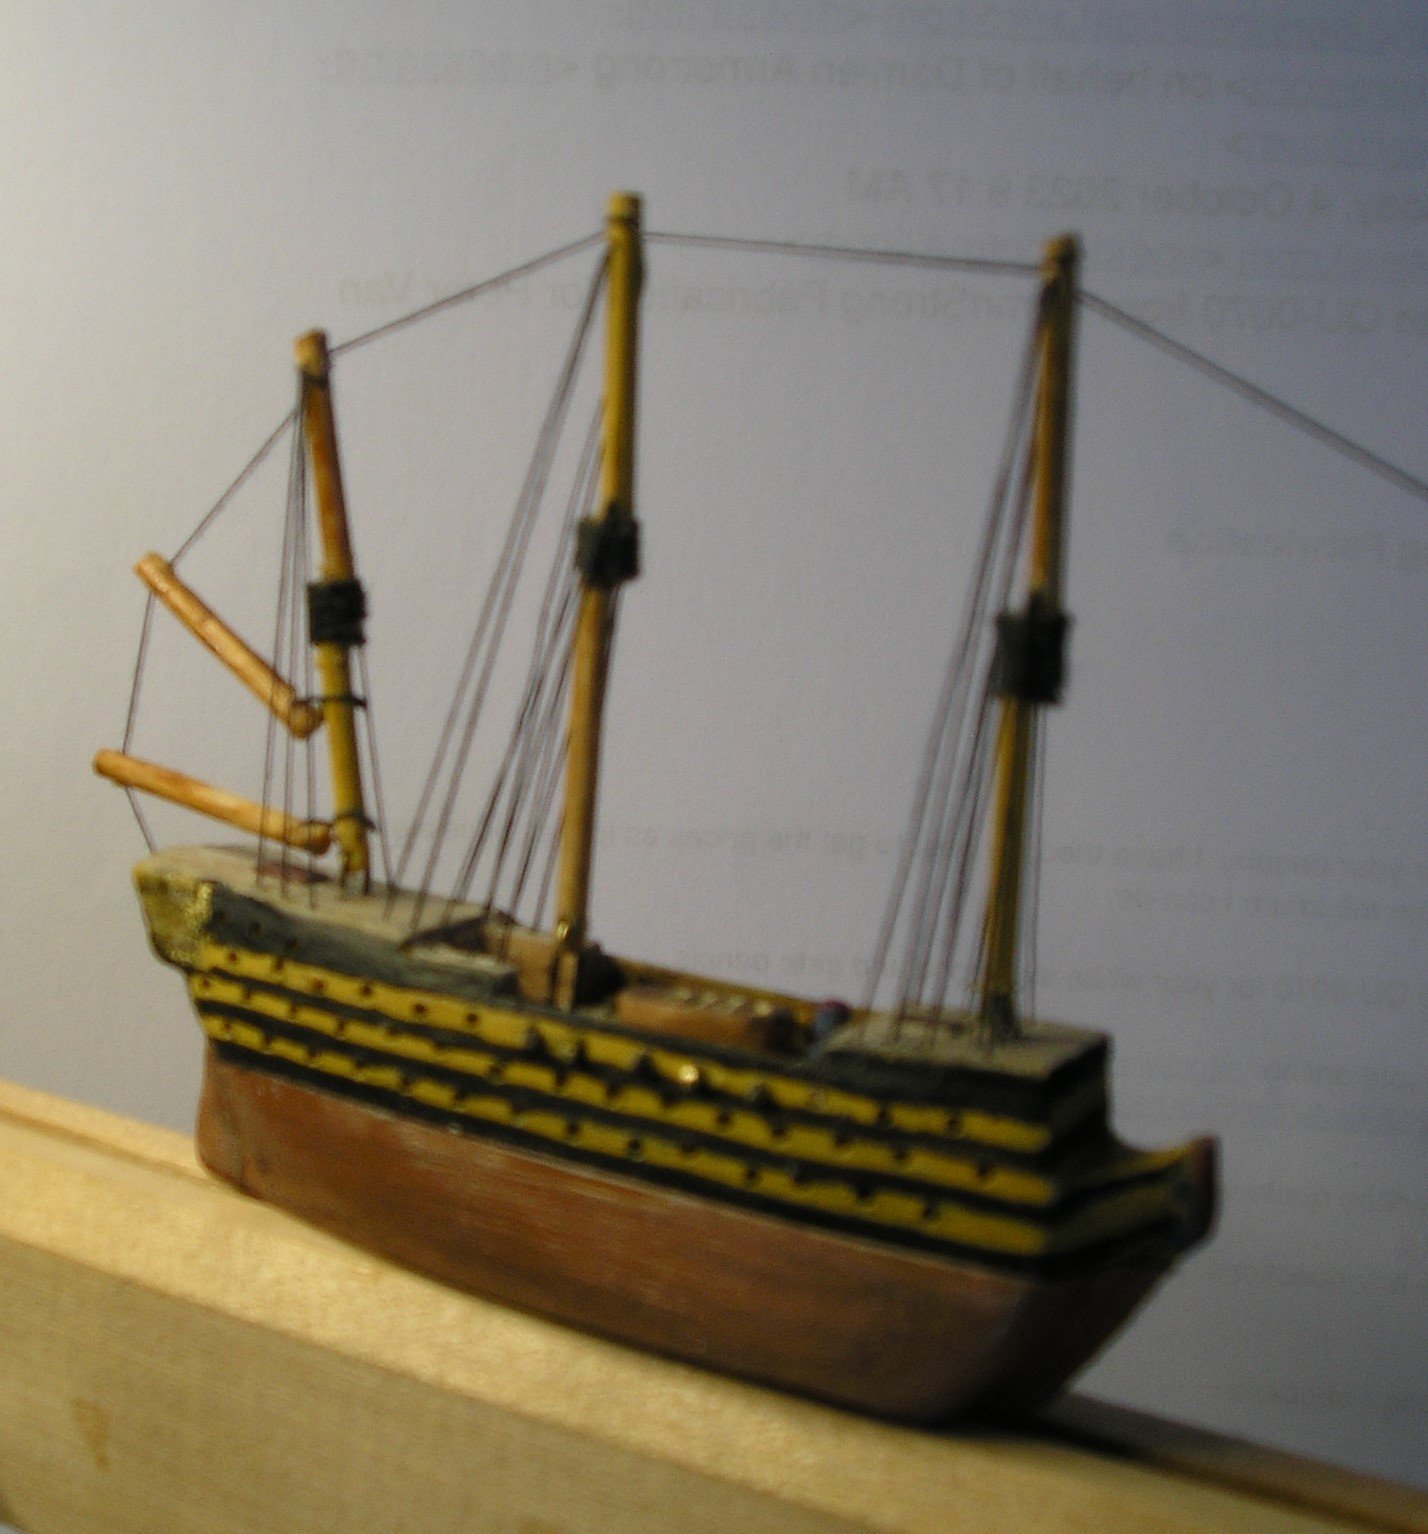
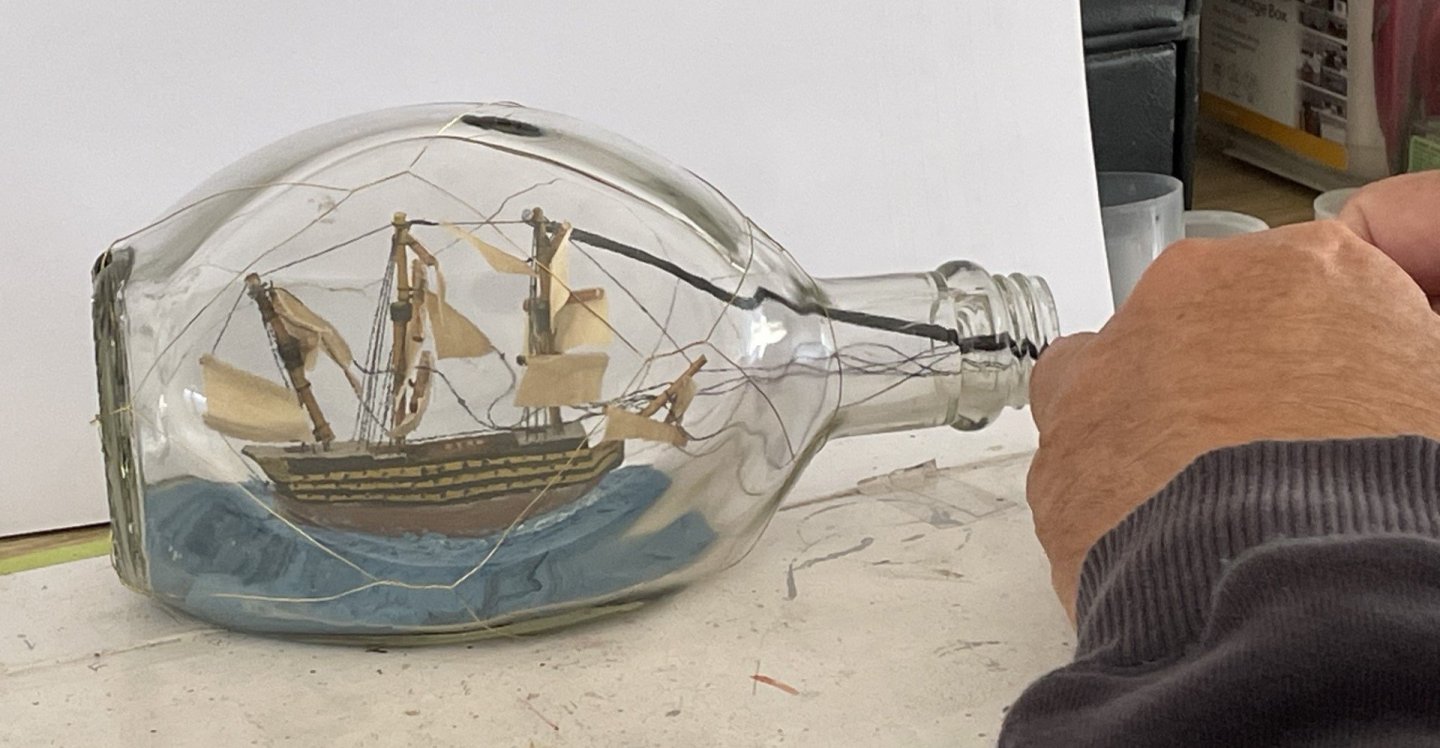
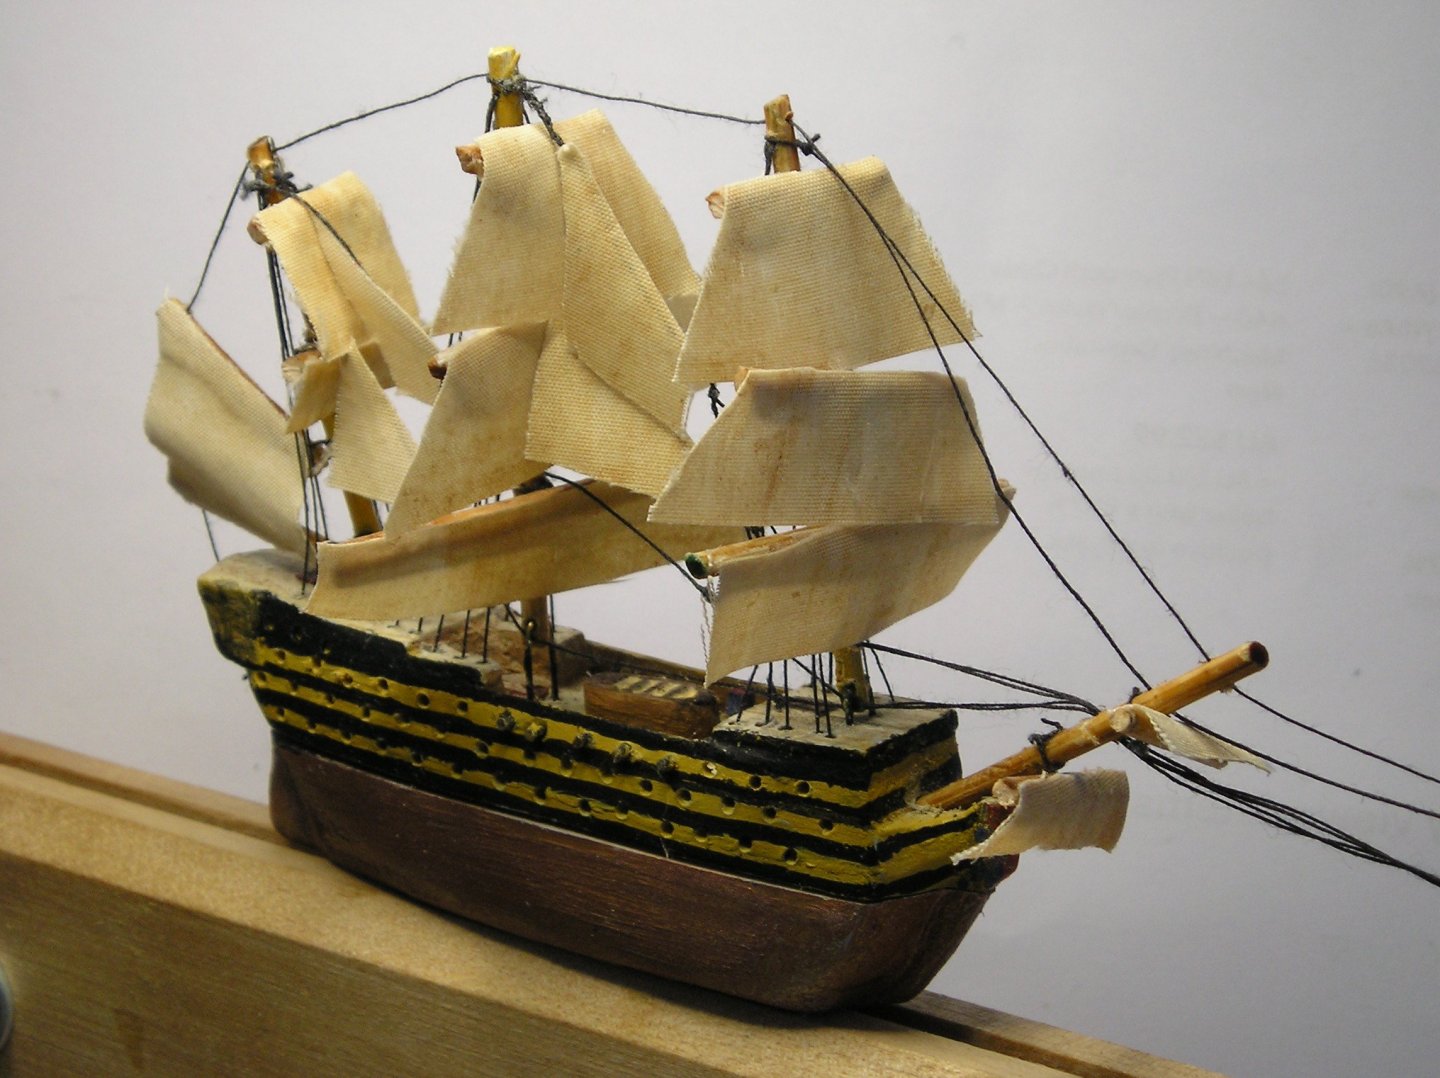
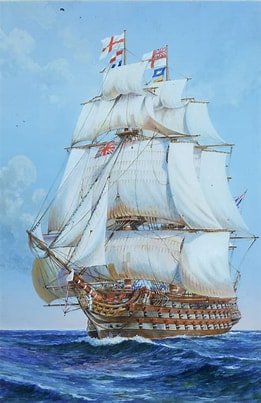
 The magic of ships in bottles! Pulling up the masts Then glued masts in place using thick CA glue. Straightened up all 17 sails. Added a home made cork, Aqua Magic, and did some rope work (including a triple turks-head-knot) AND IT'S FINISHED! A big THANK YOU to all those who followed me, gave me 'WOWS' and 'Likes' (It is the best encouragement possible.)
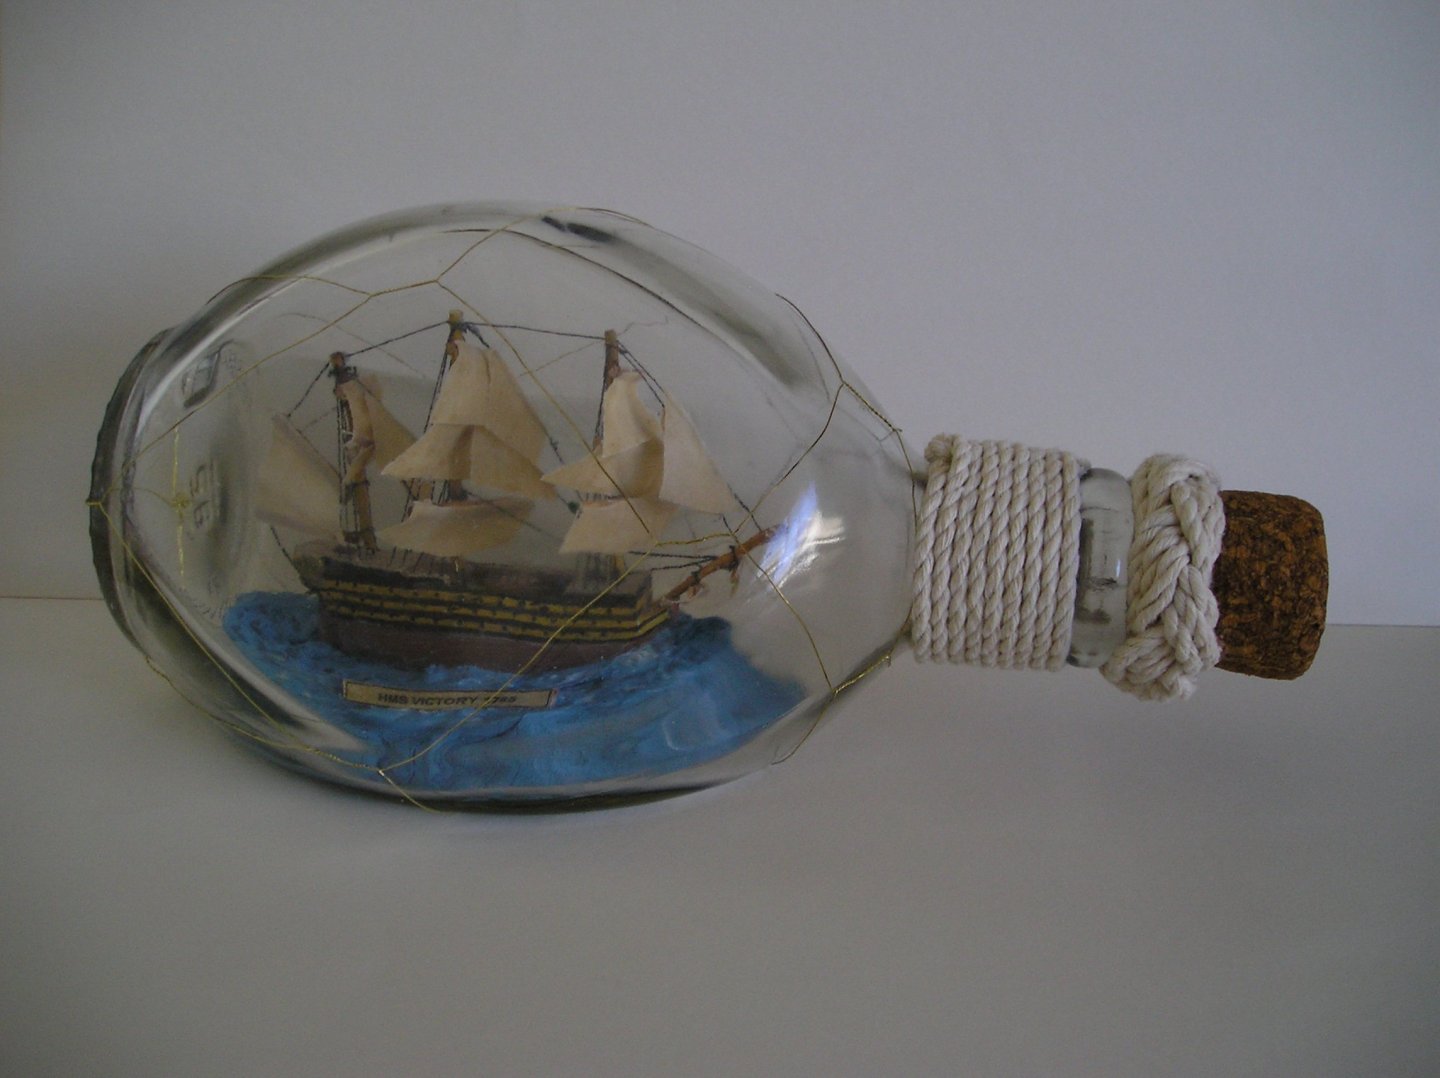


- 26 replies
-
- 13
-

-

-
Has anyone built the Wolfpack 1/72 PBY-3 Catalina Flying Boat? I'm not familiar with Wolfpack. Any issues as I am thinking of making it my next build?
-
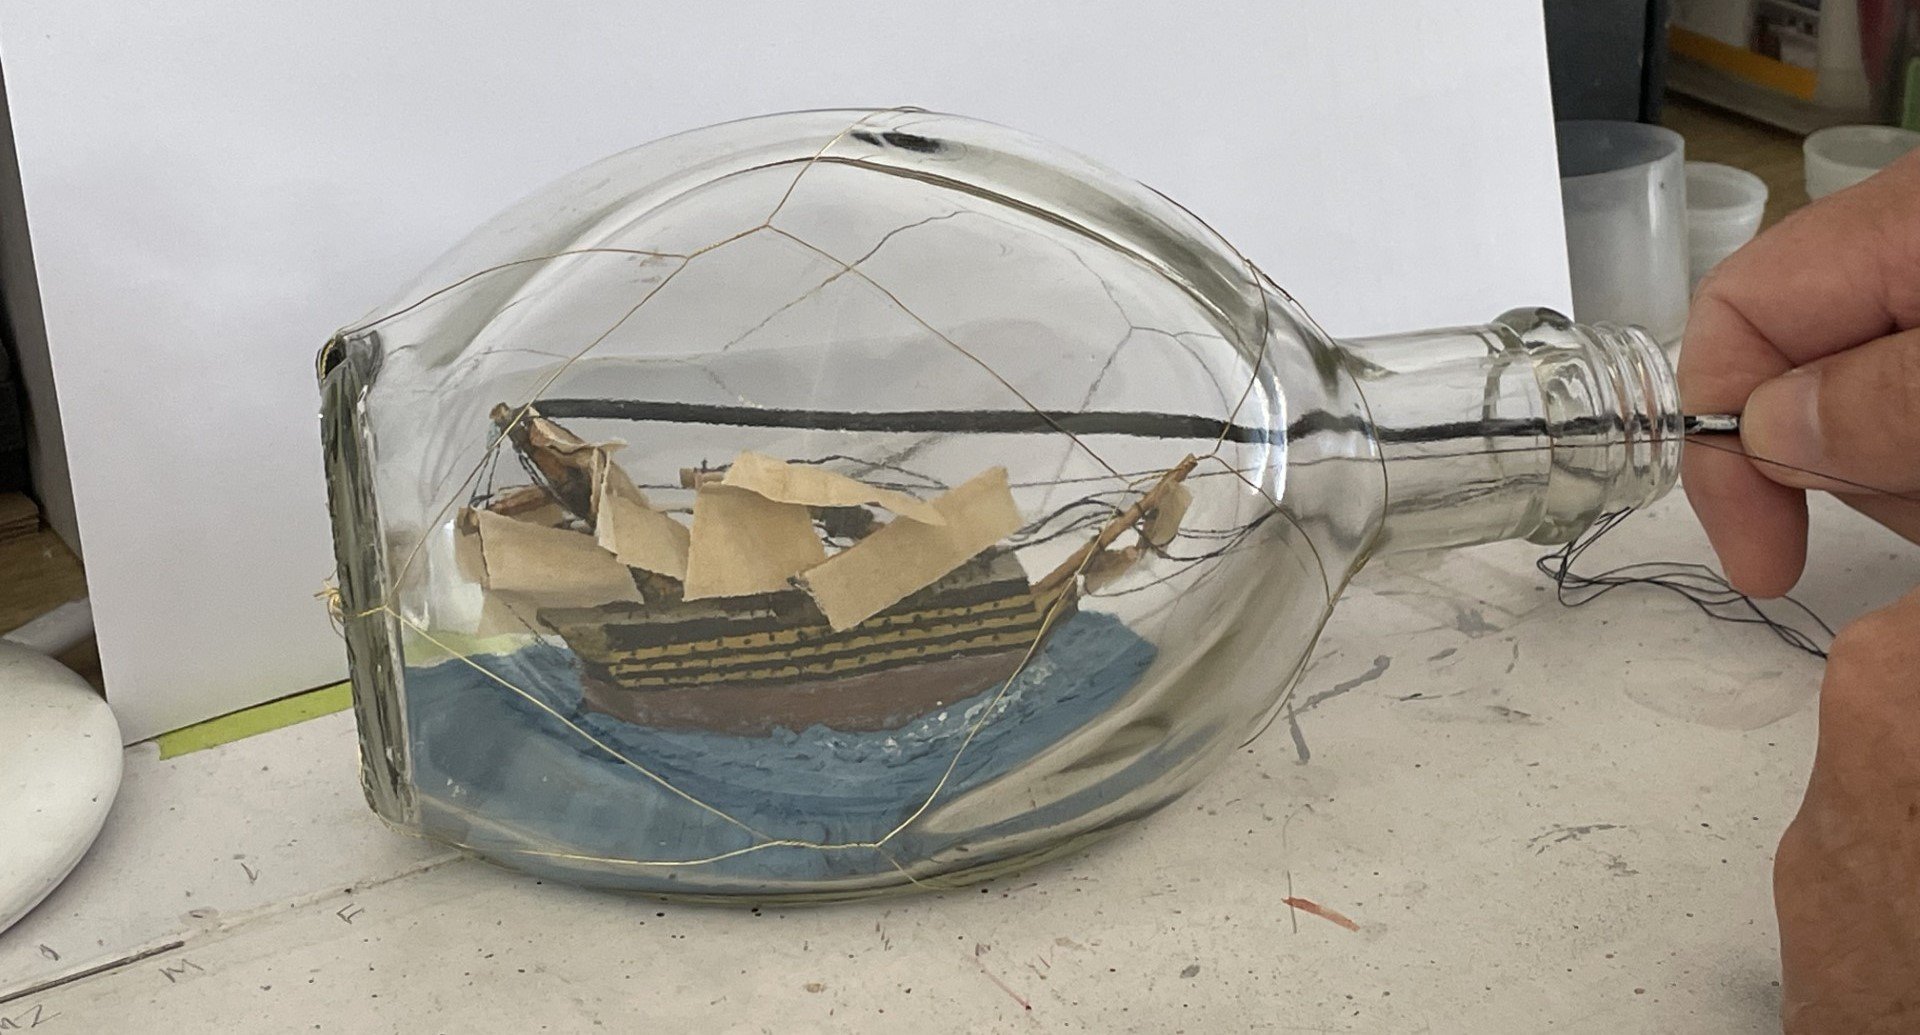
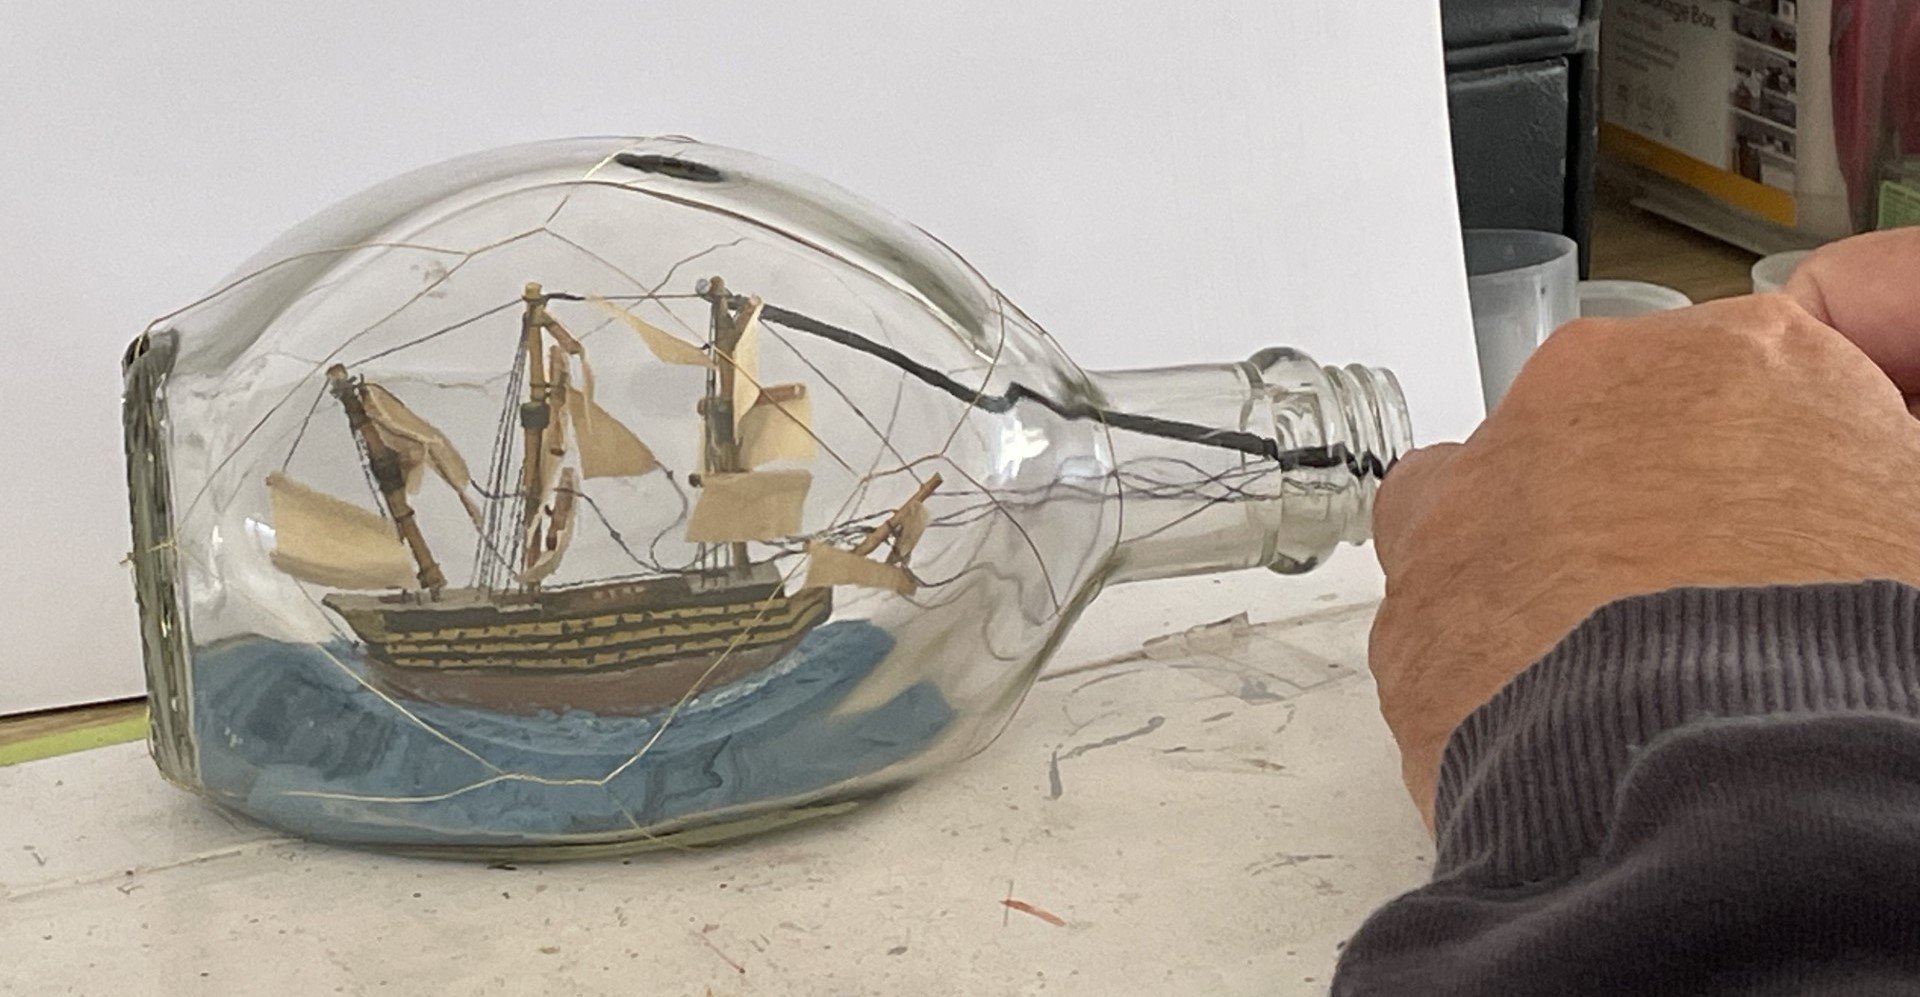
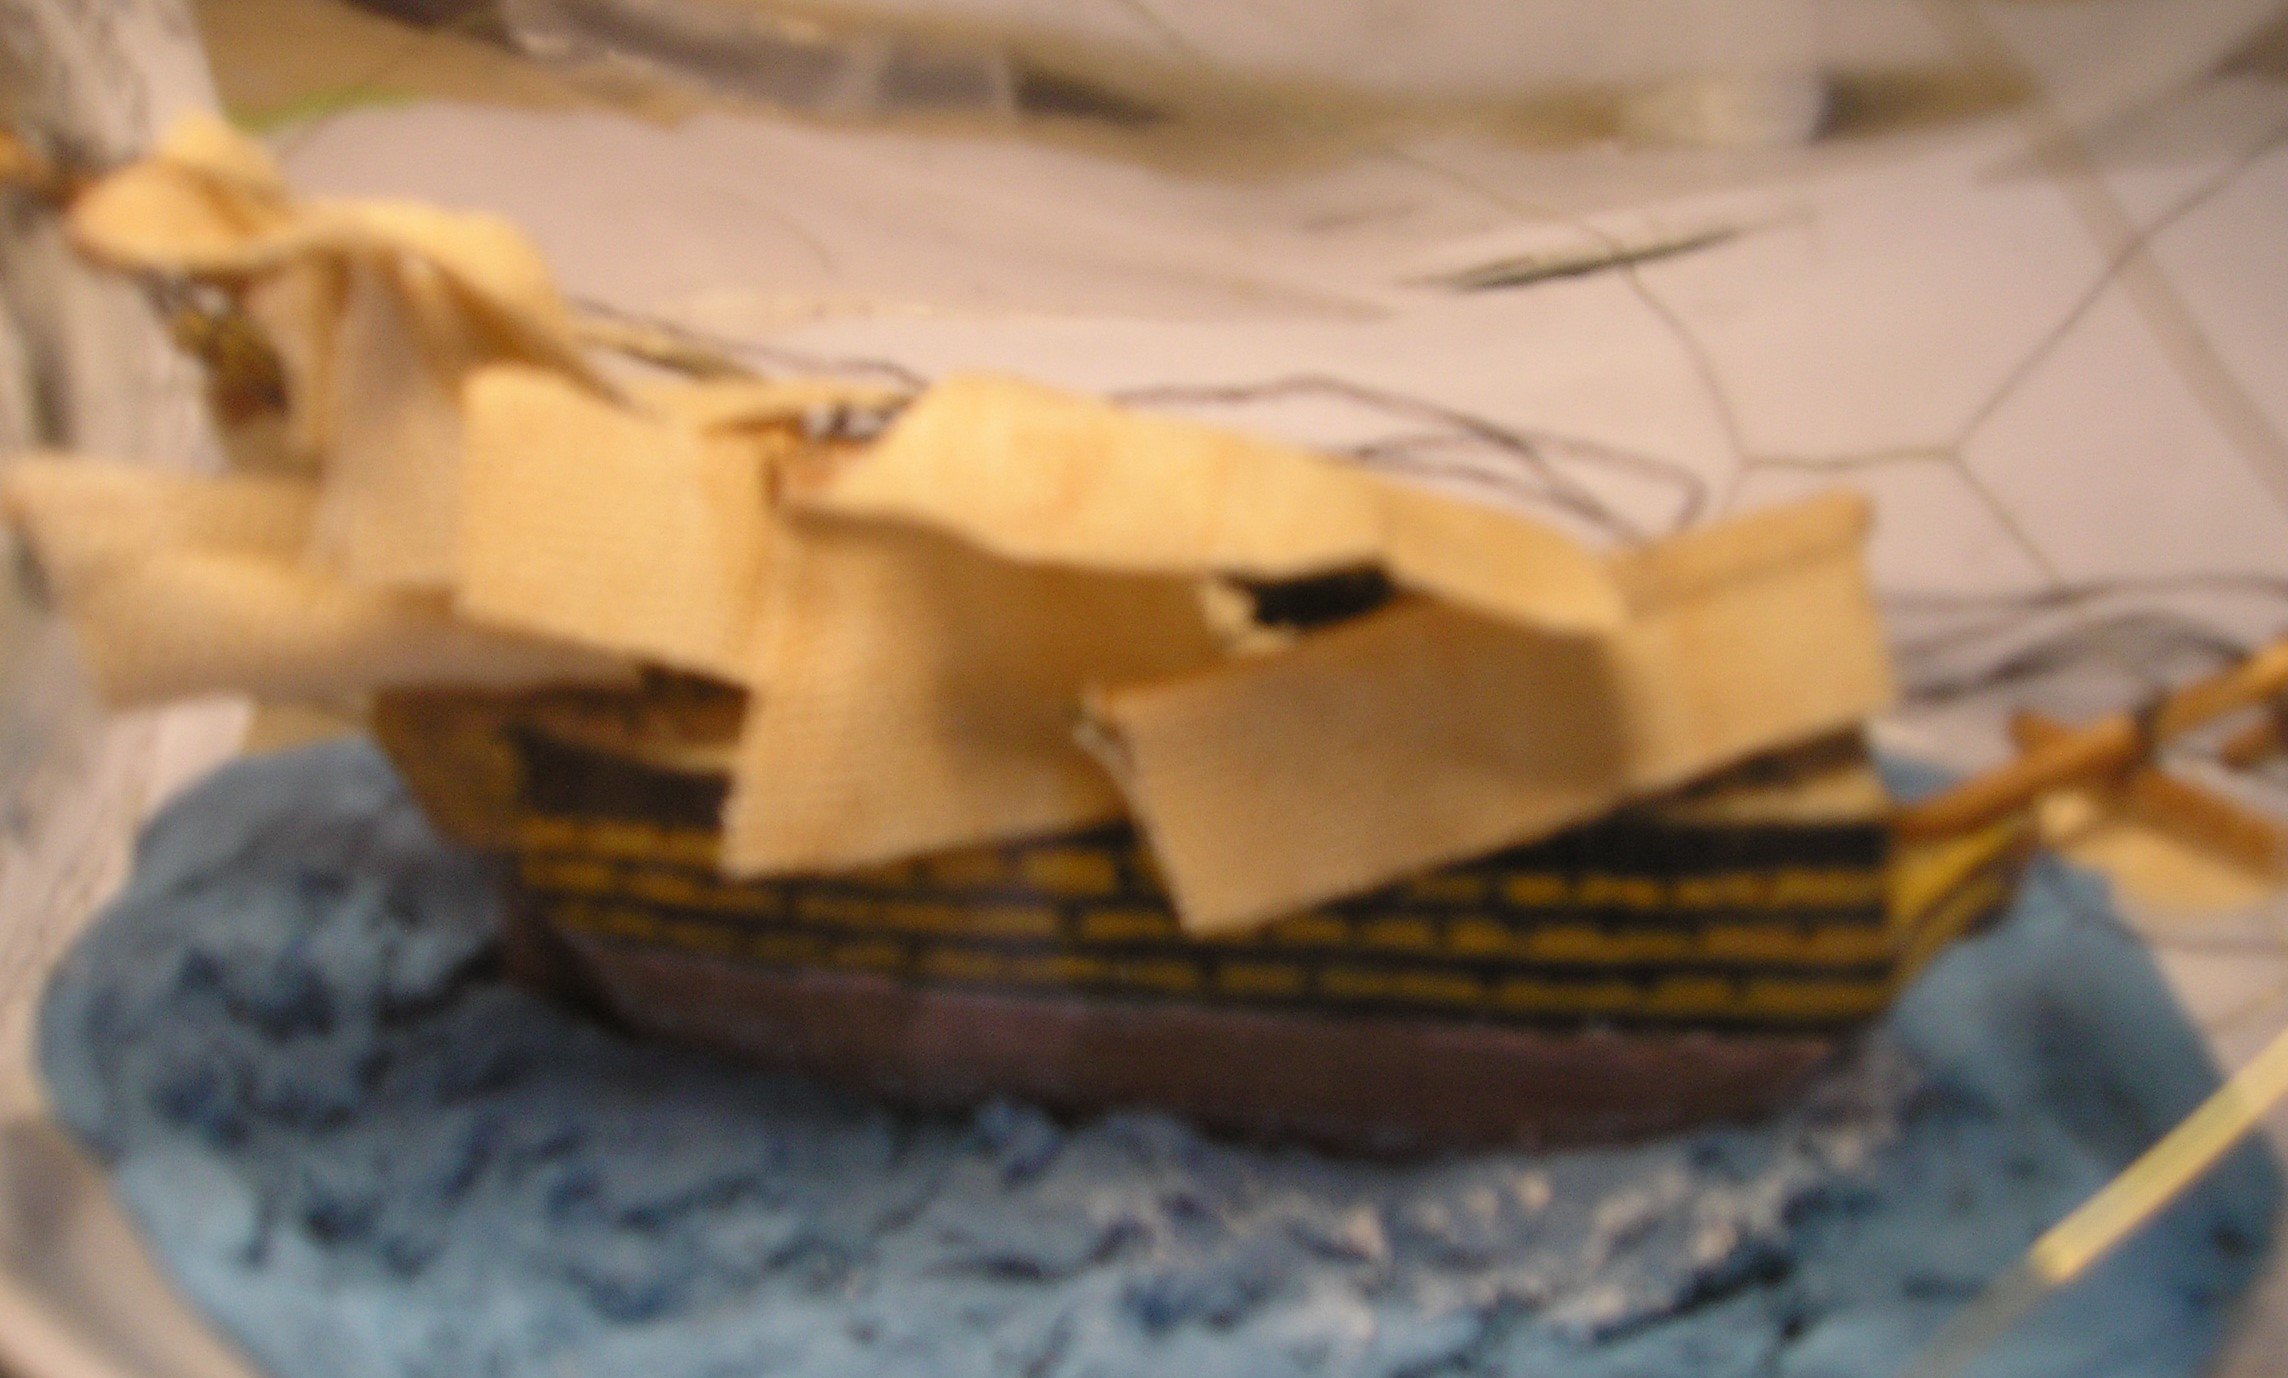
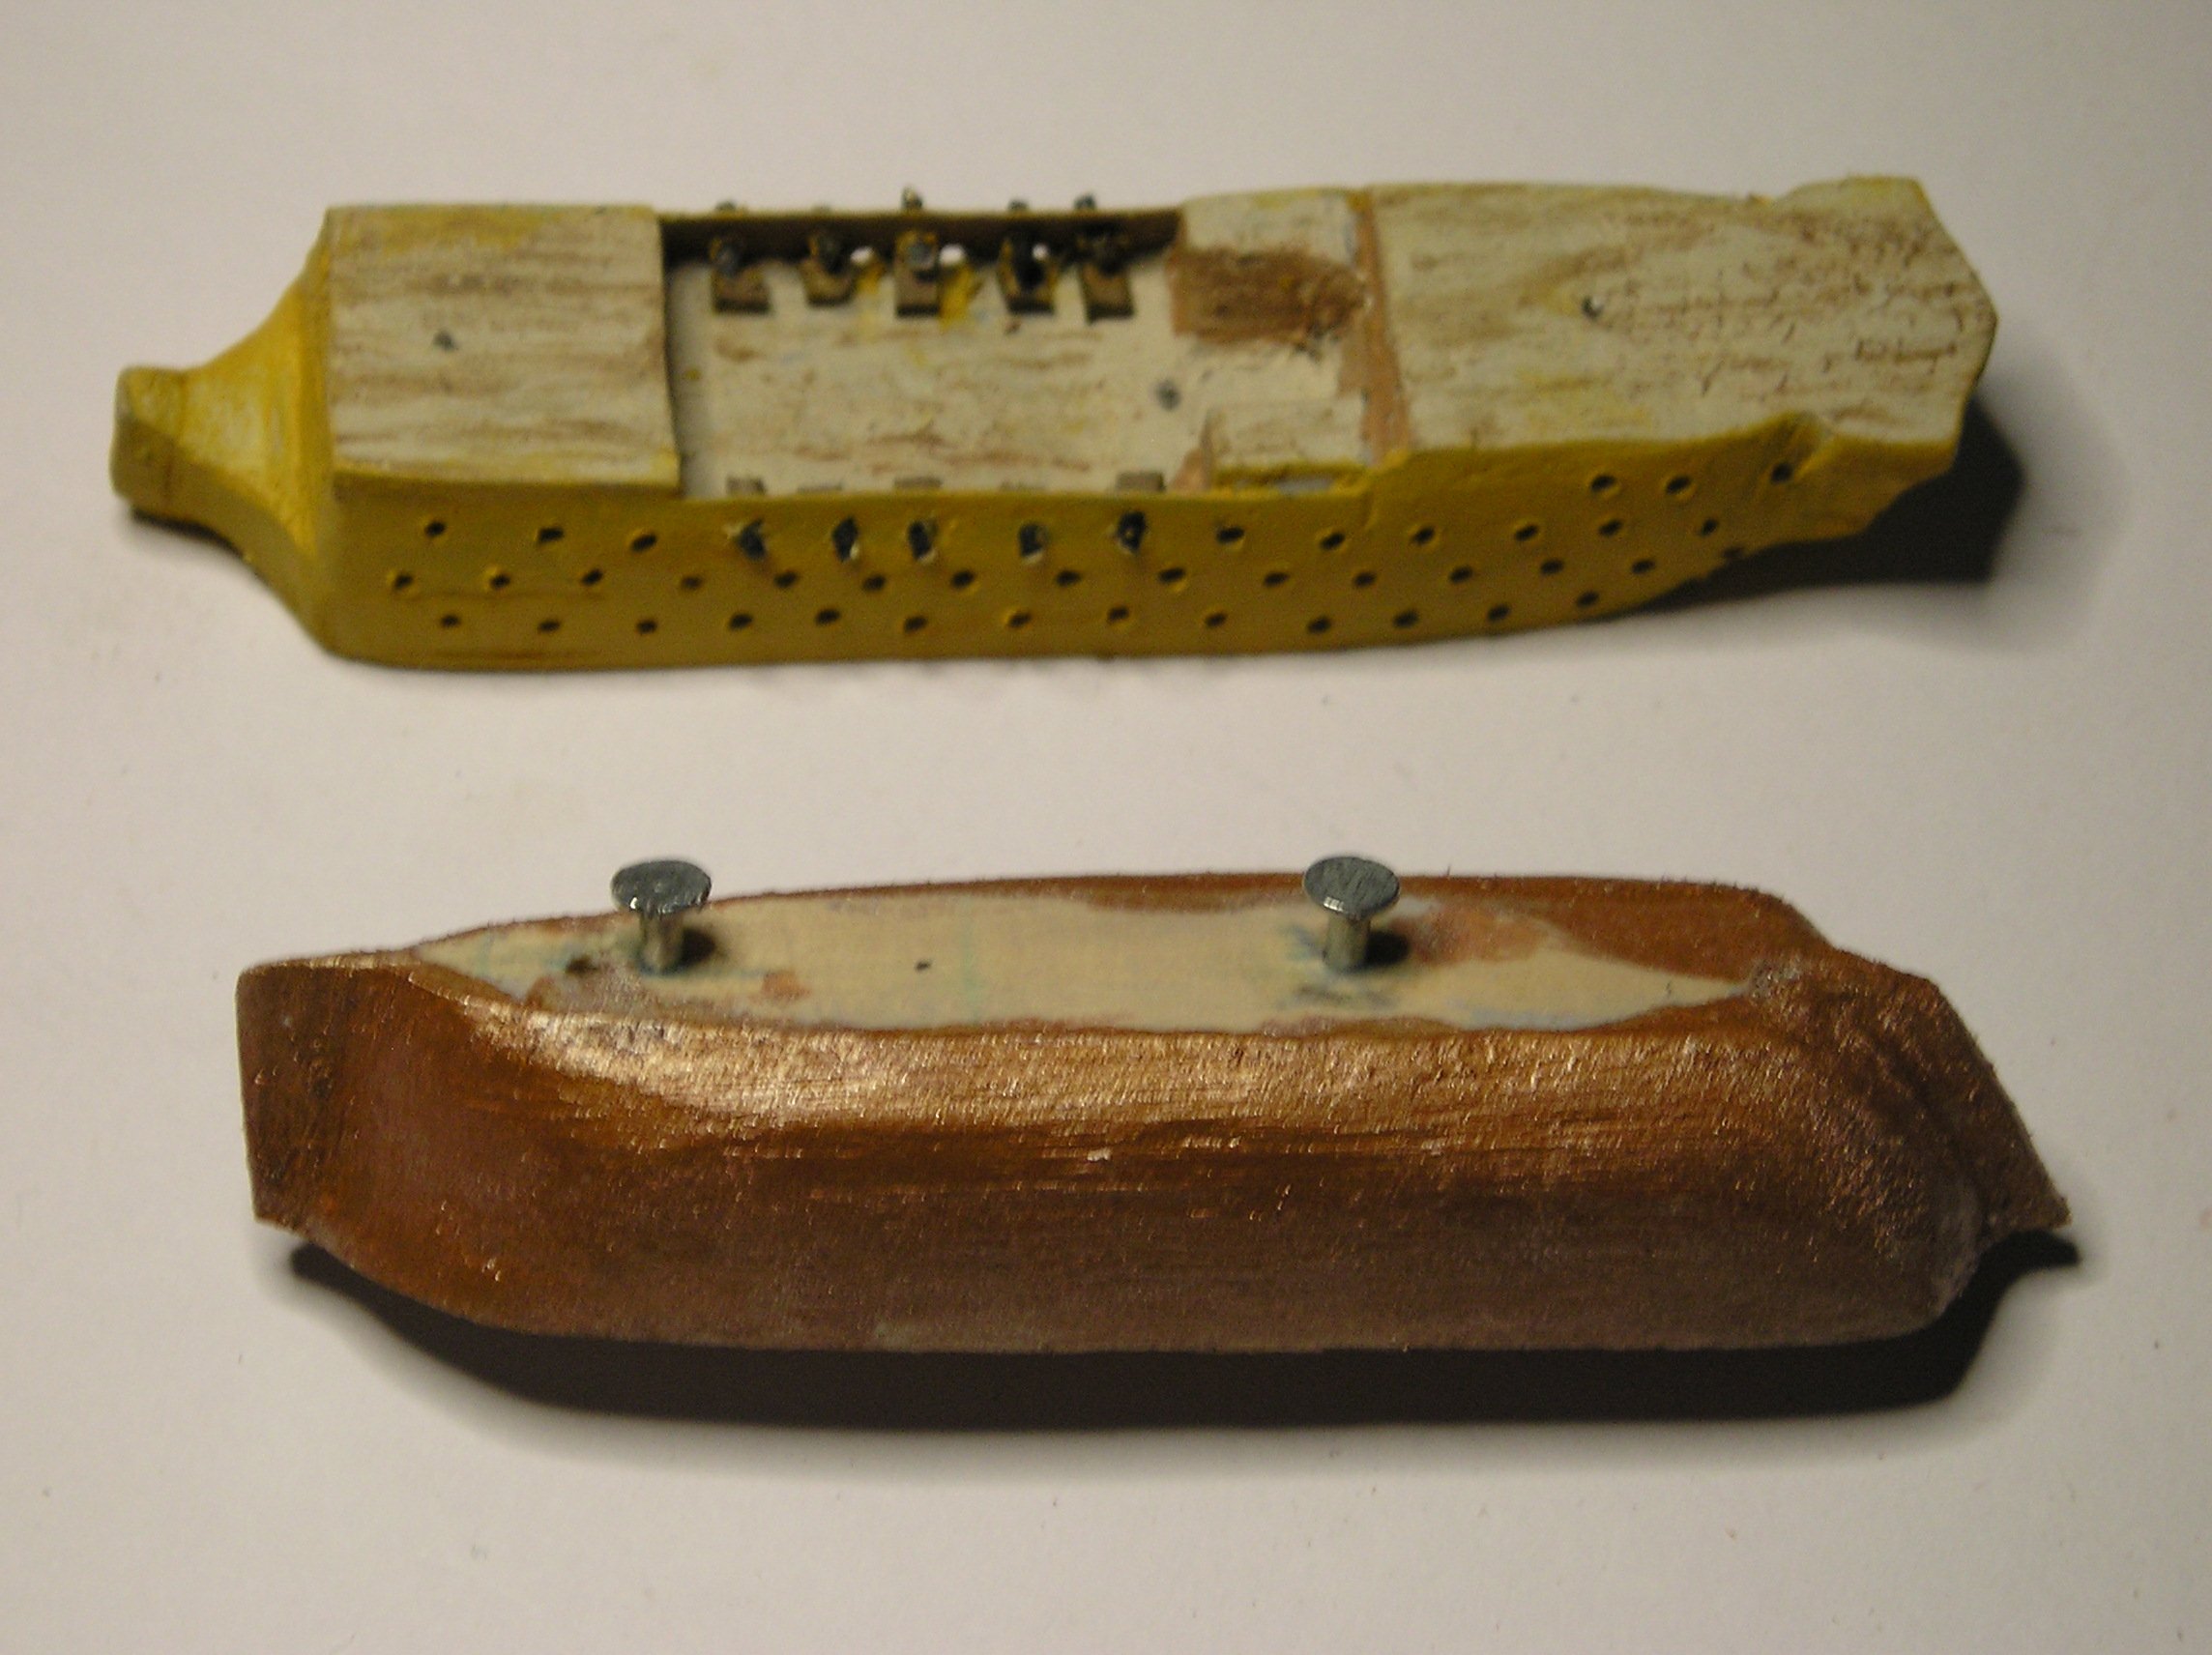
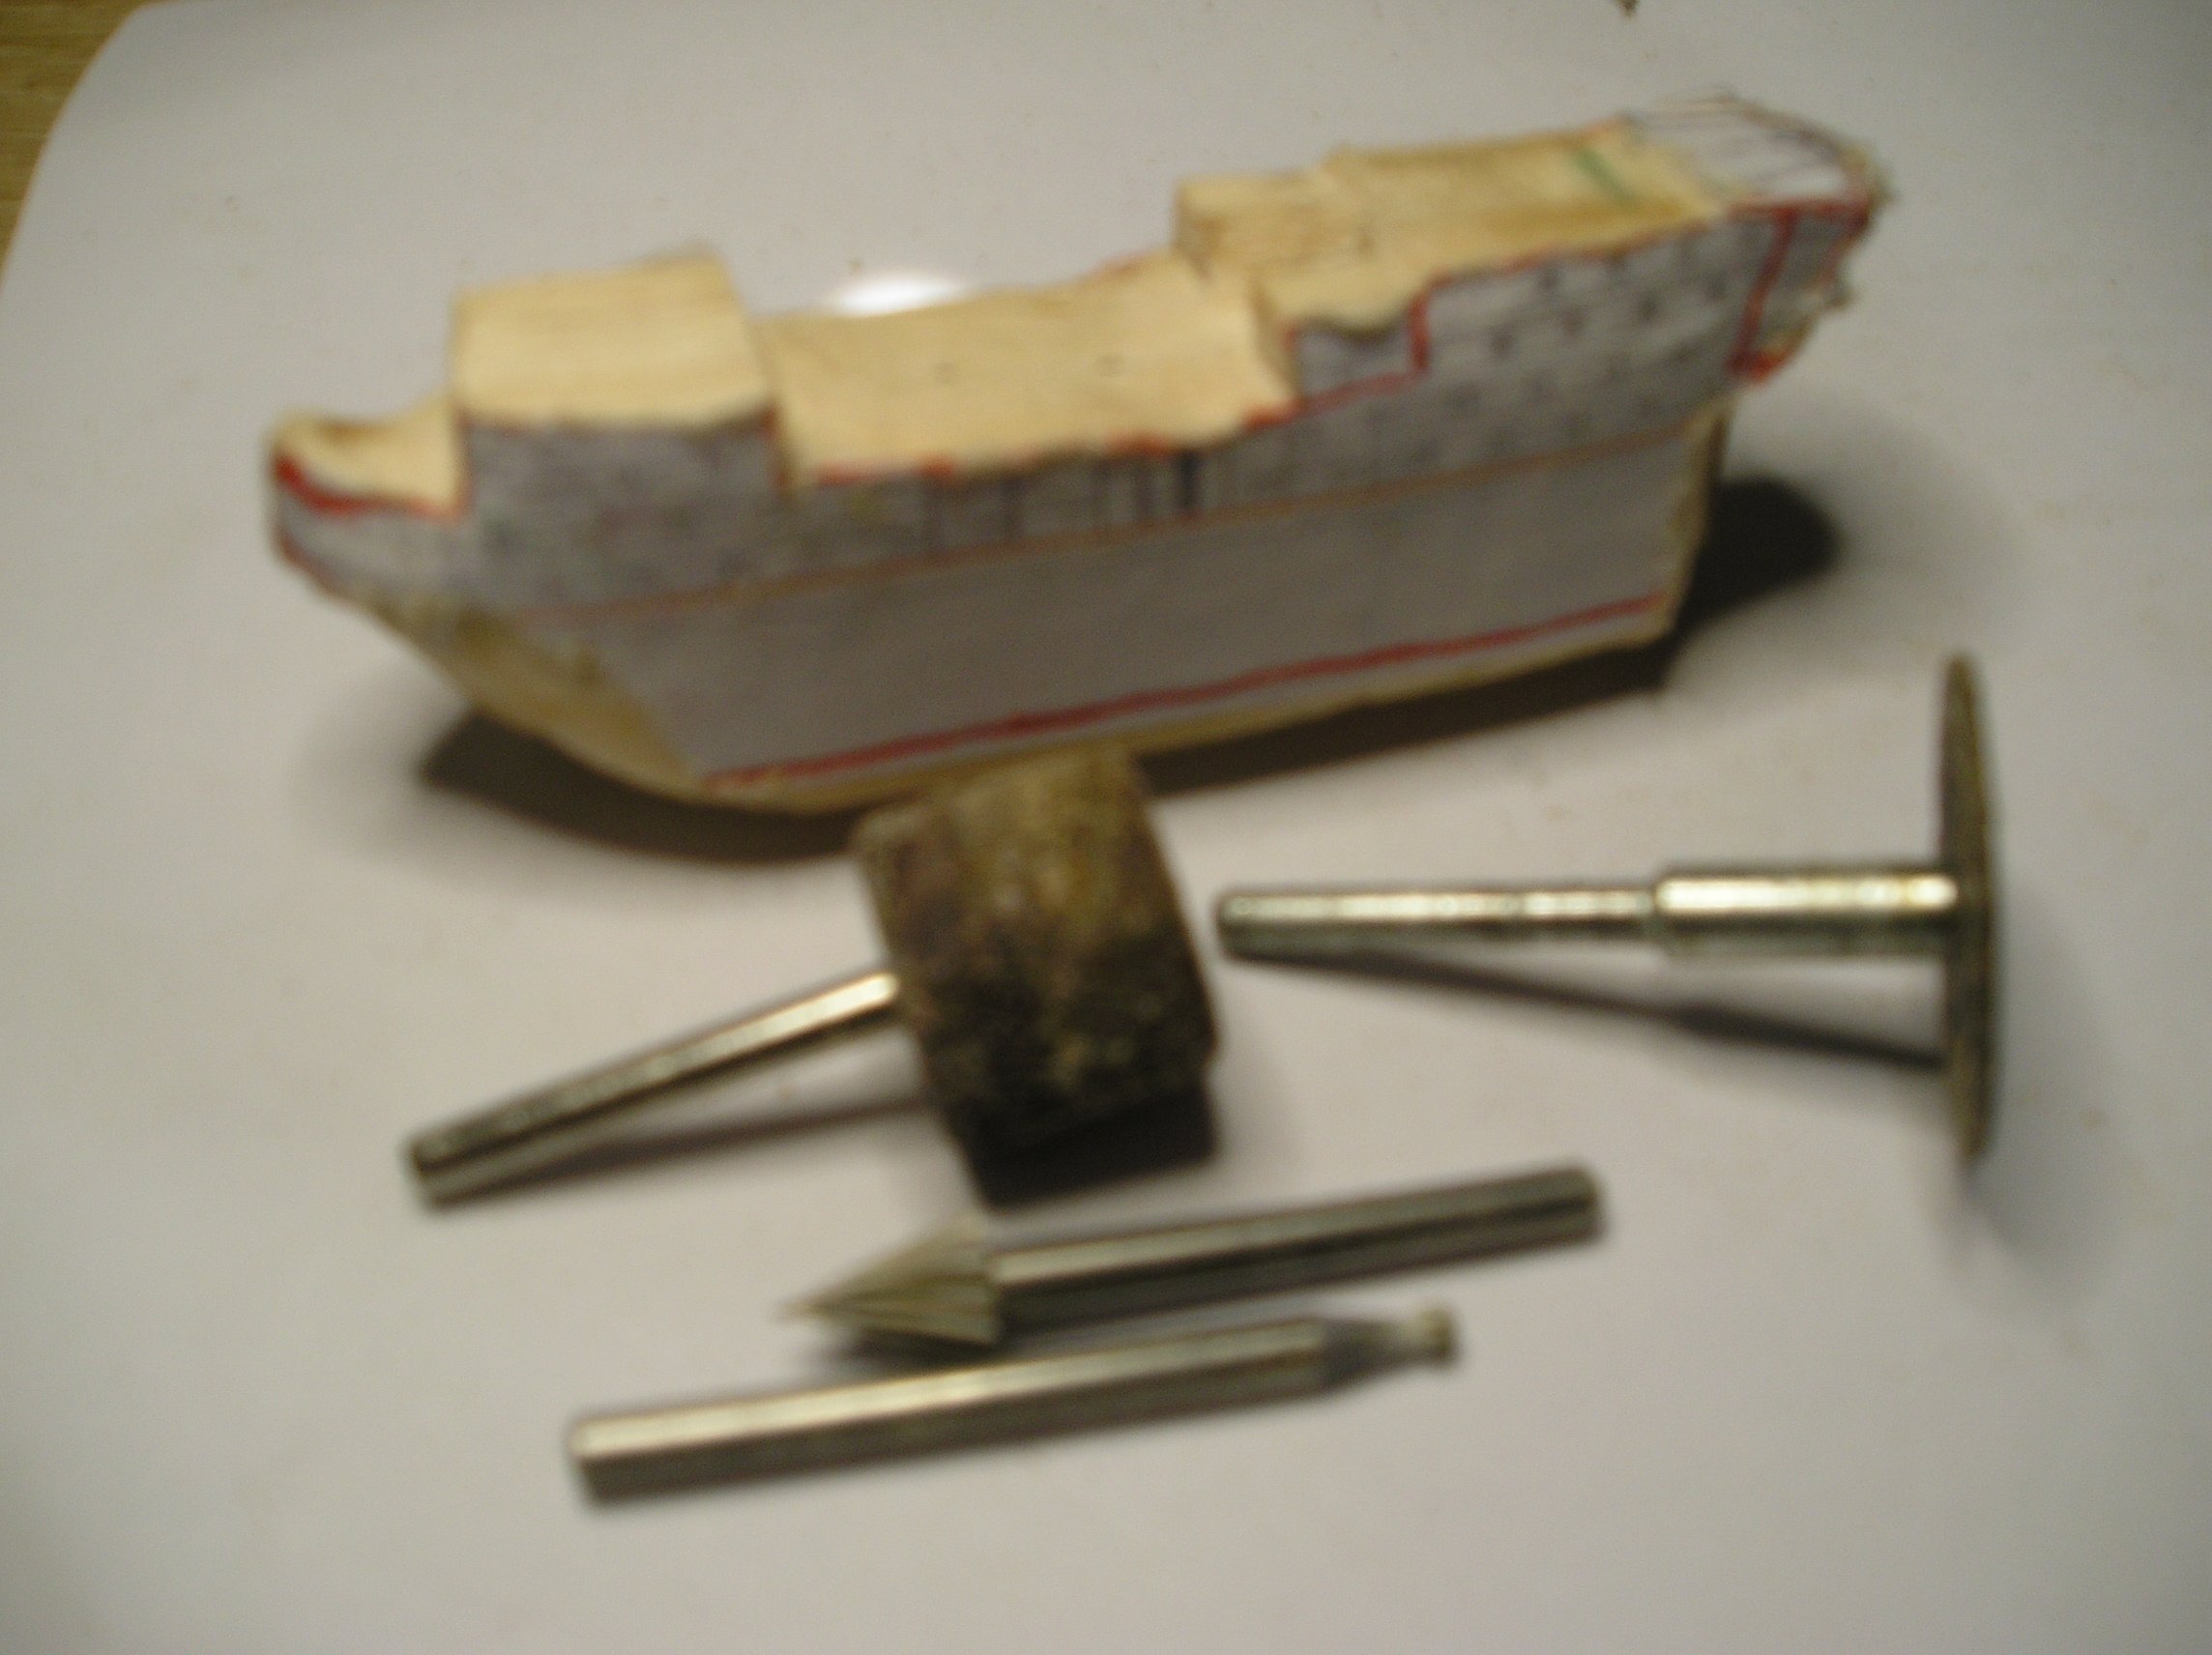
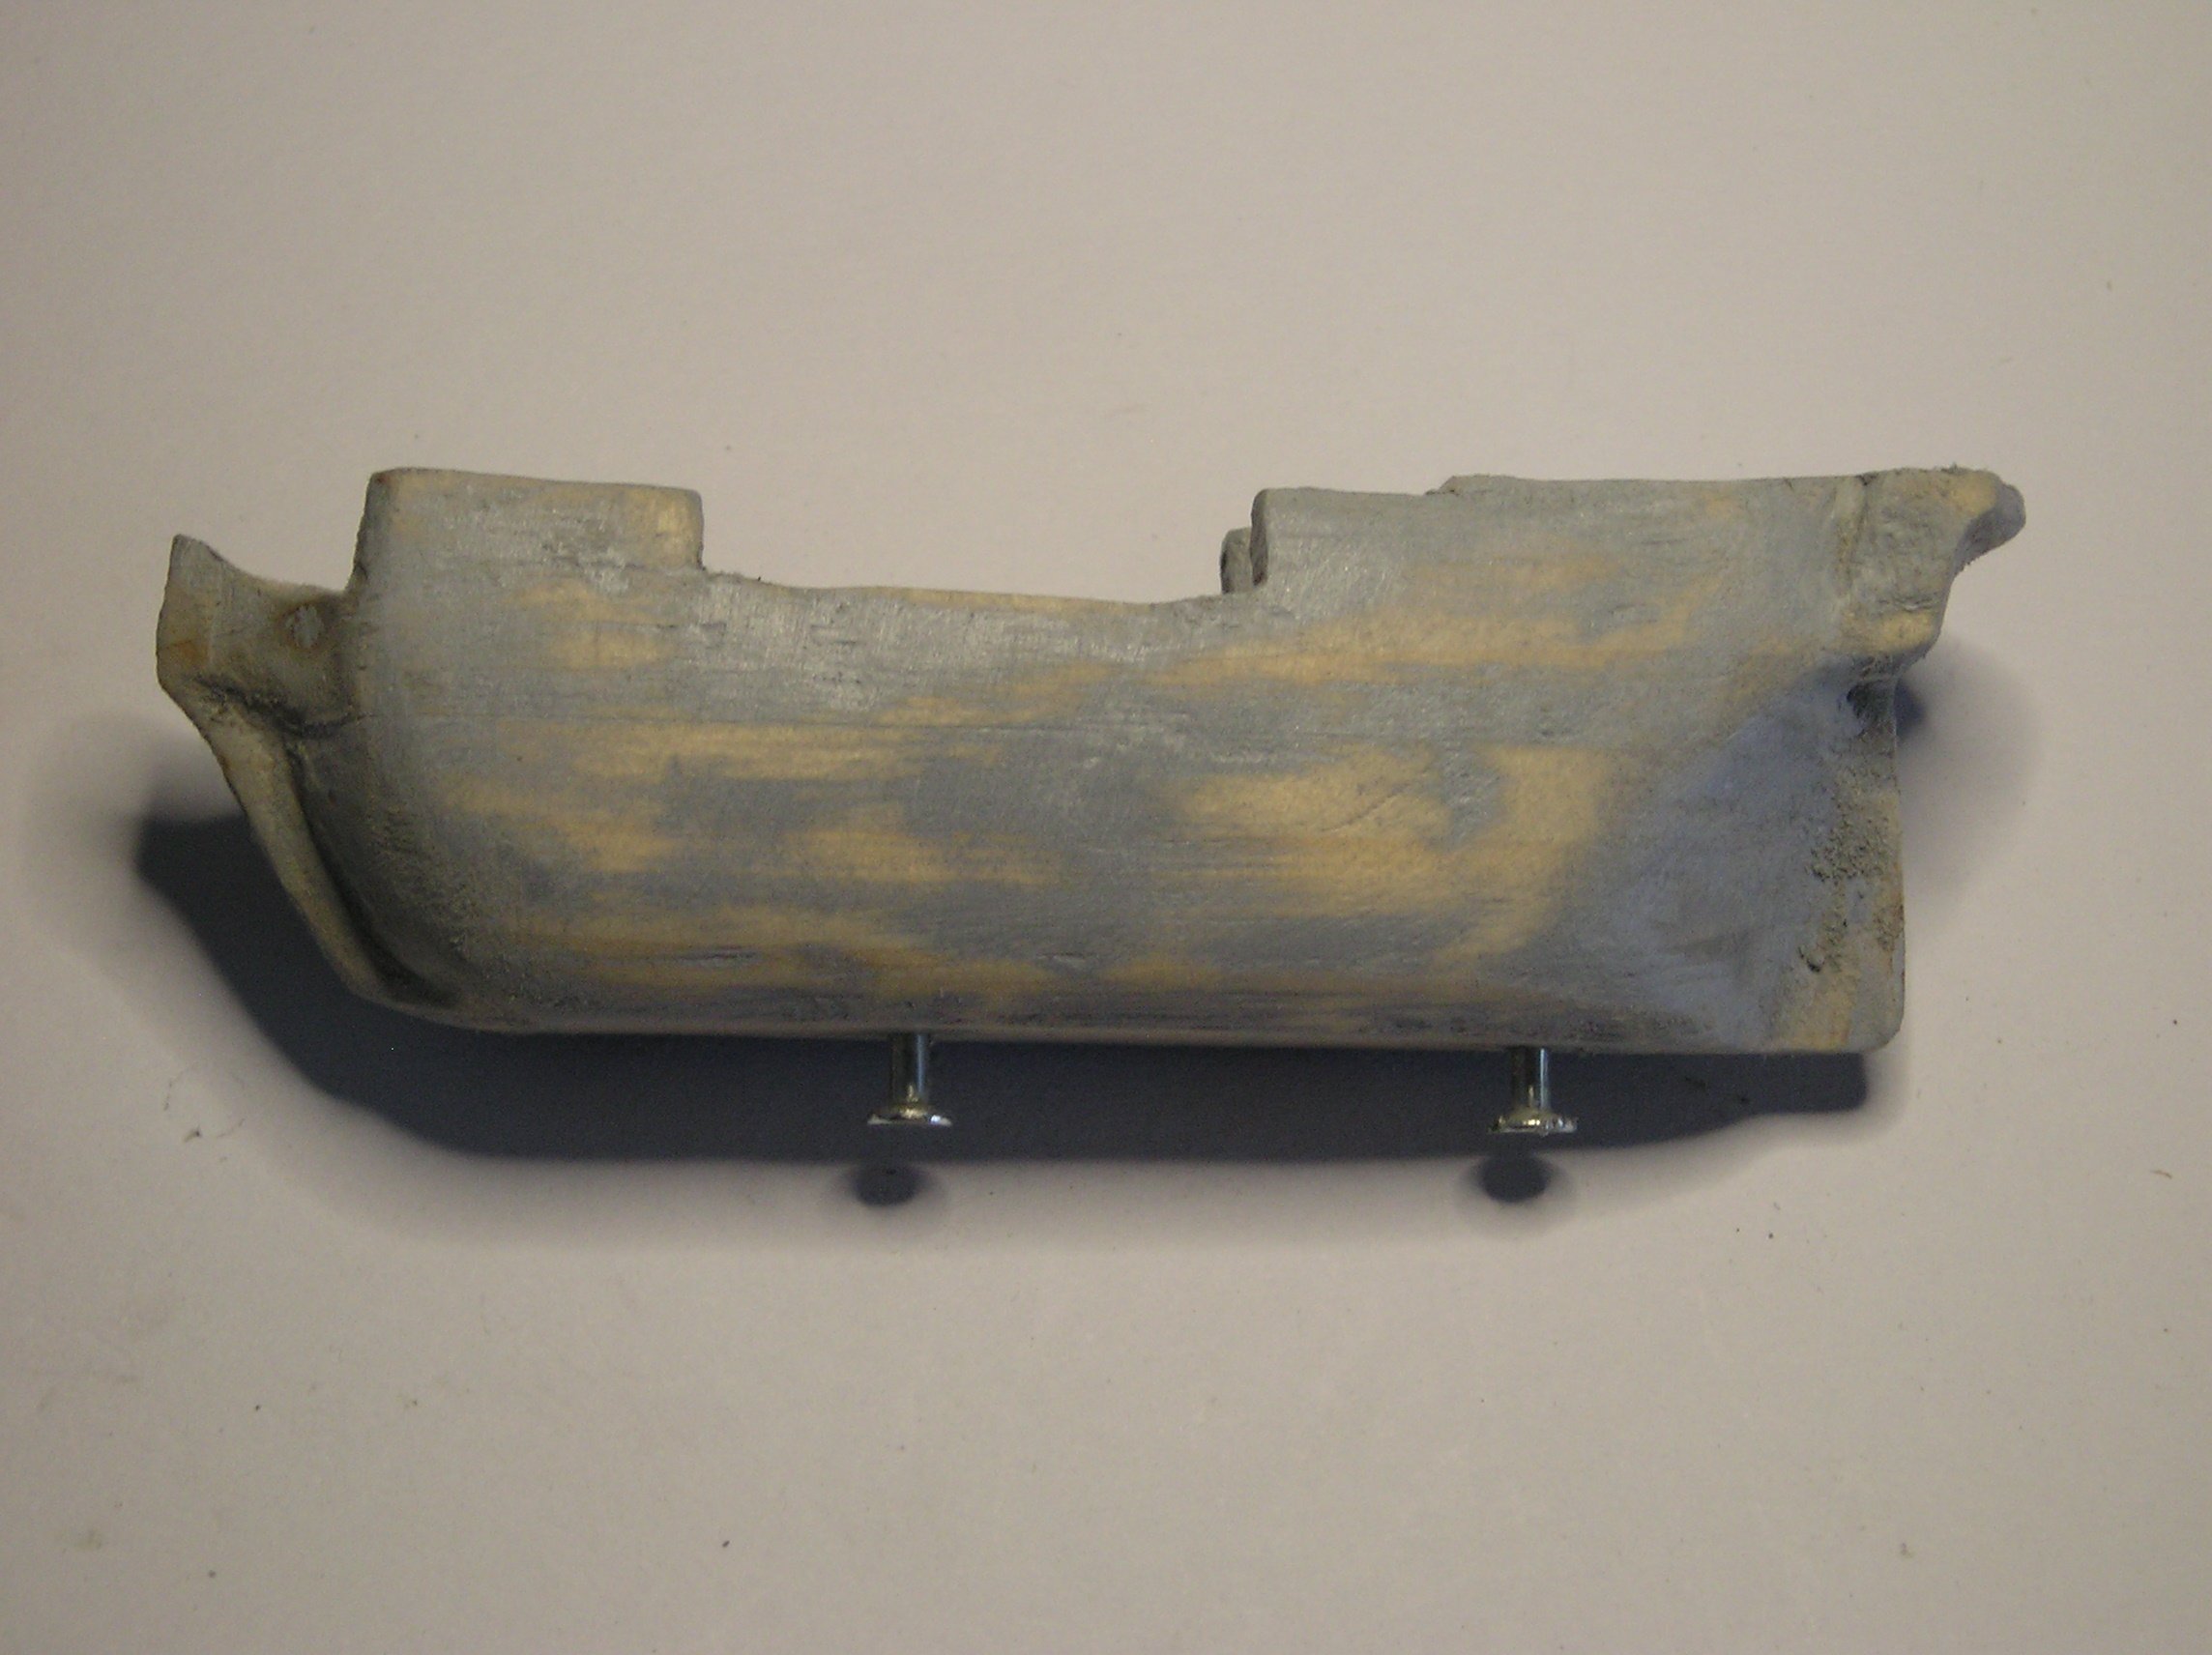
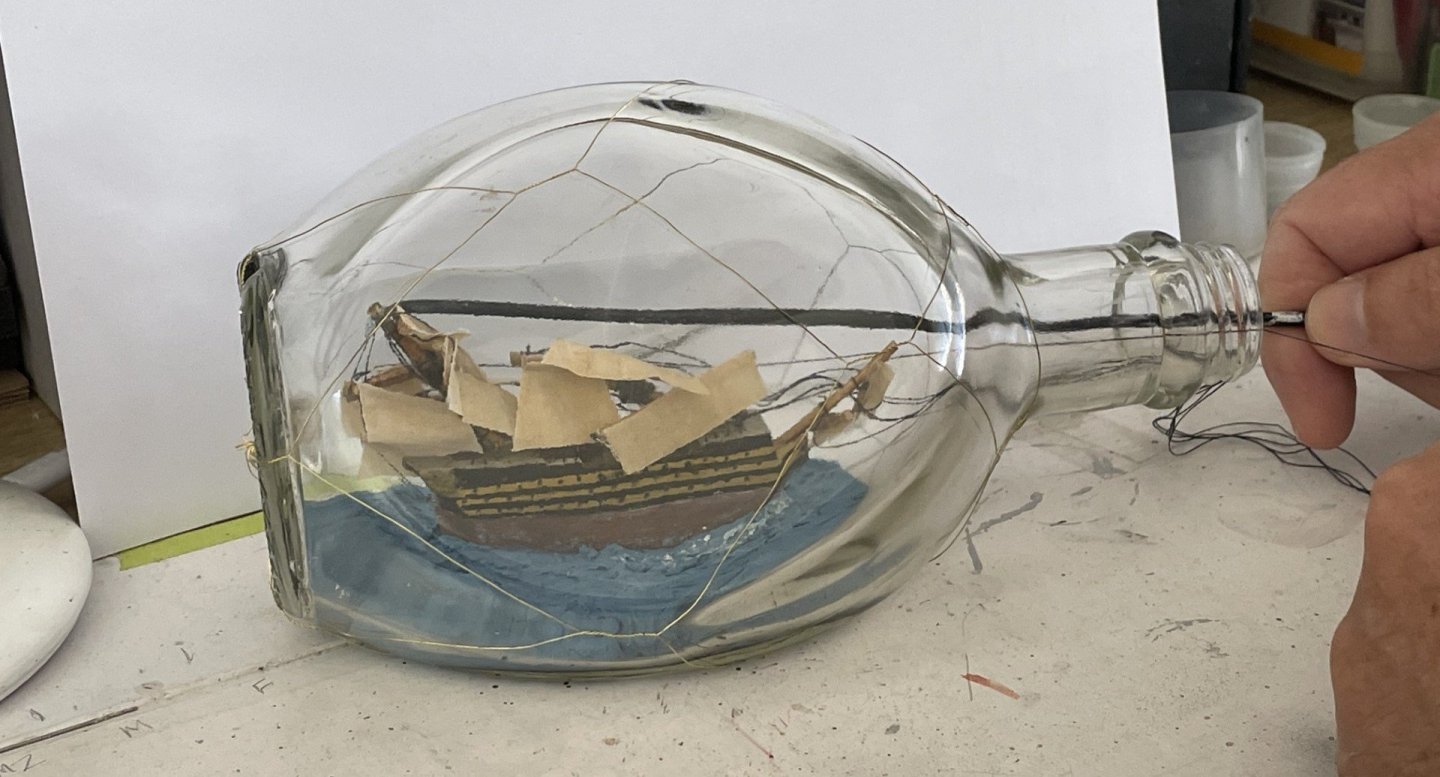
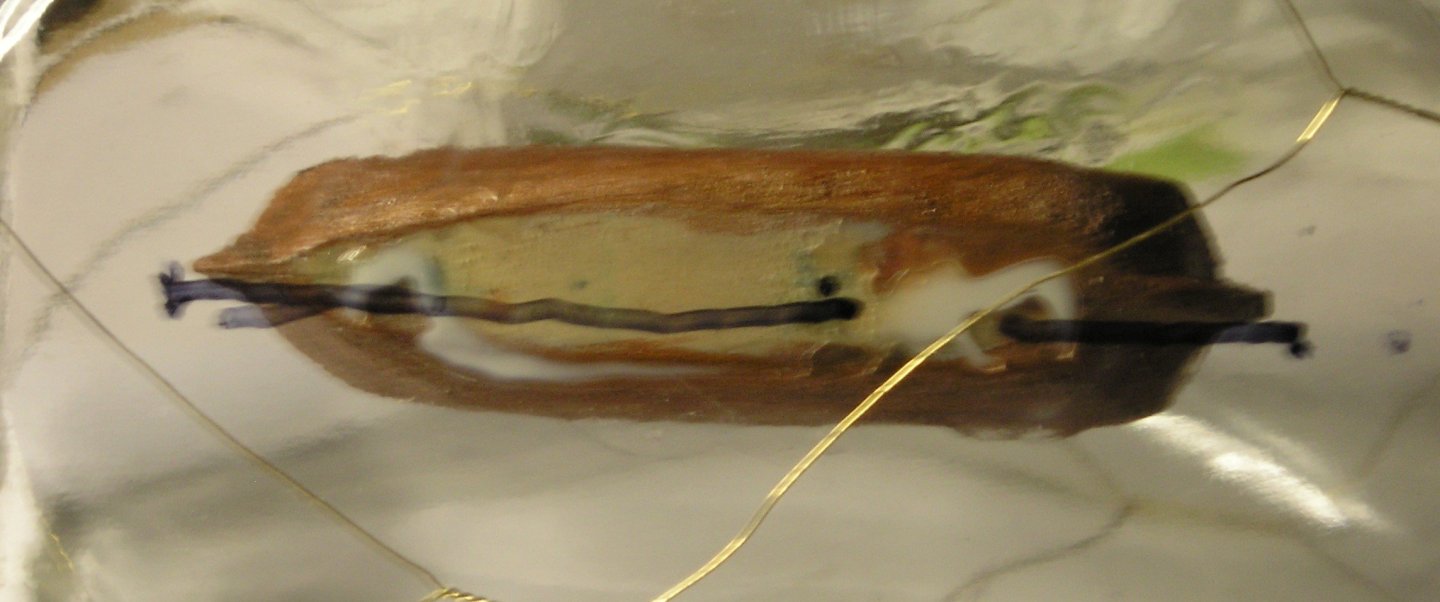
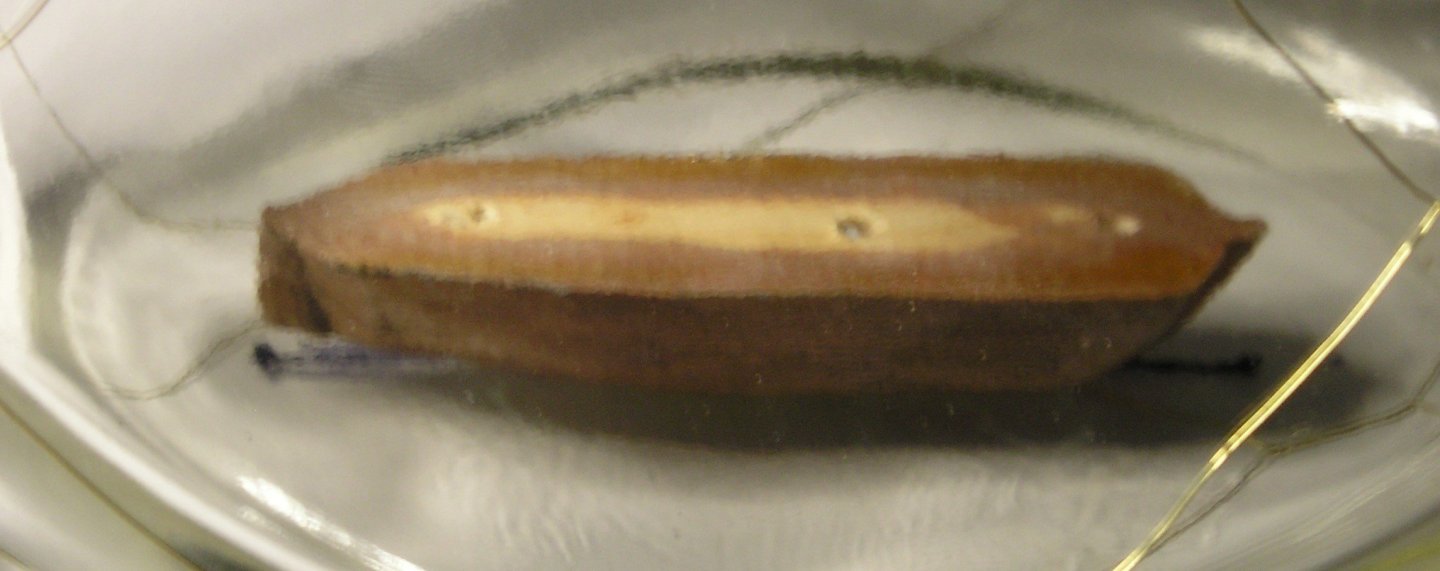
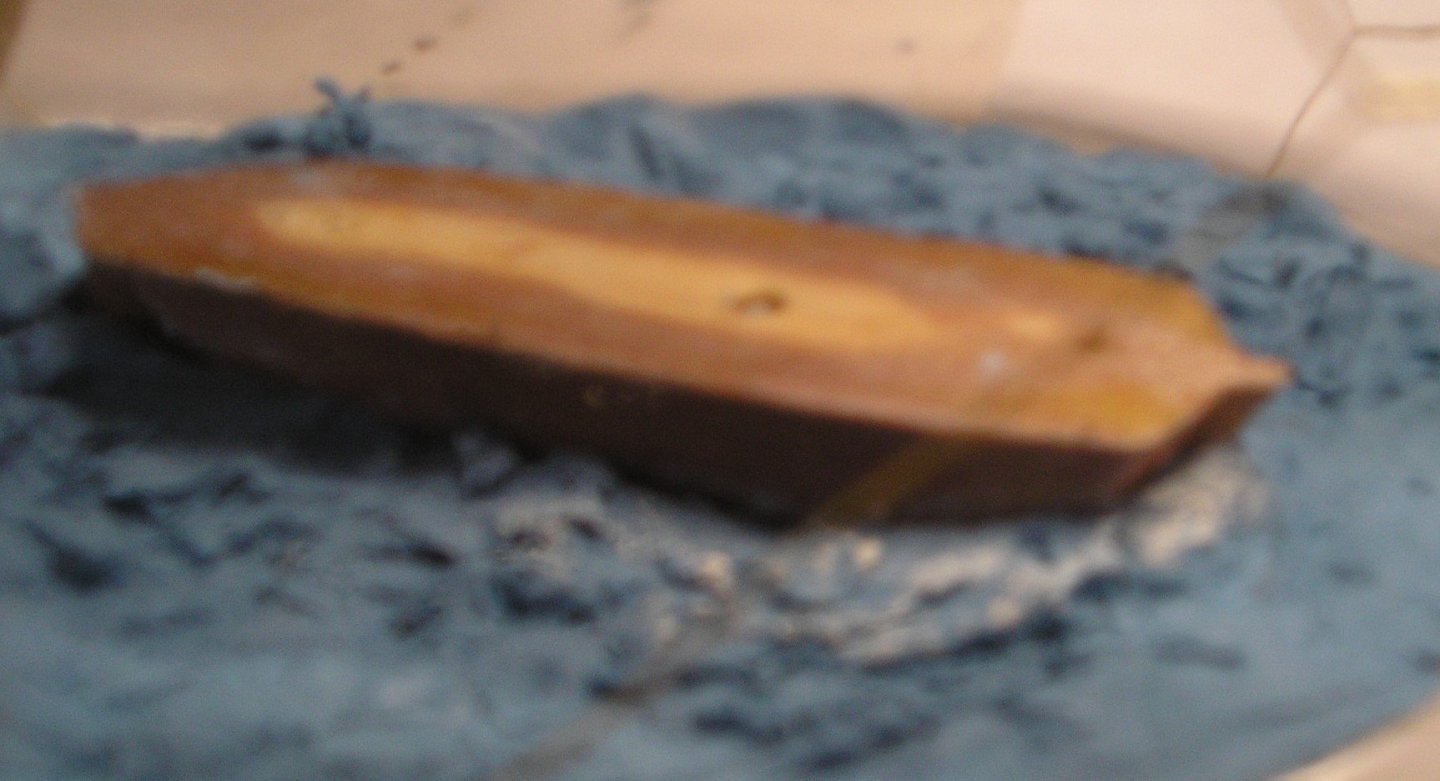
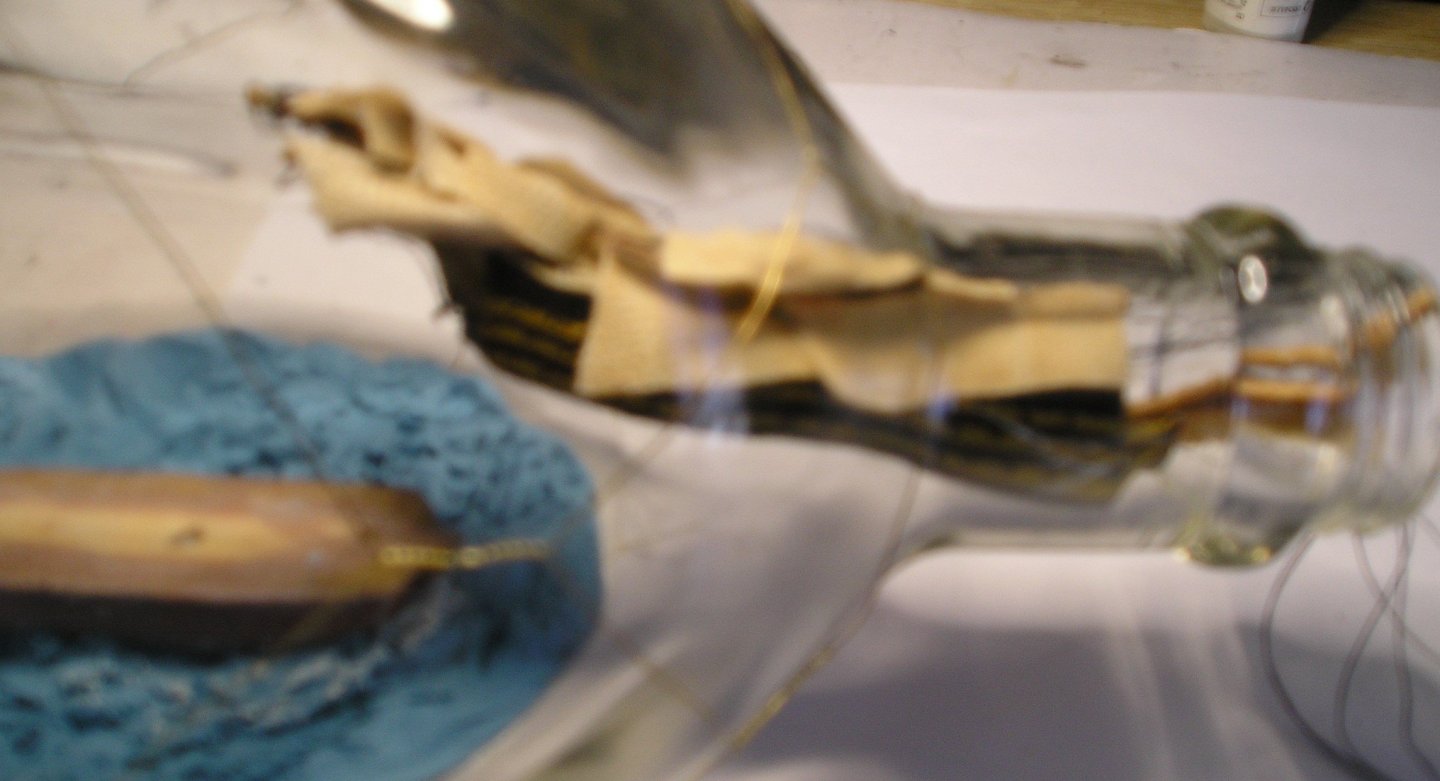
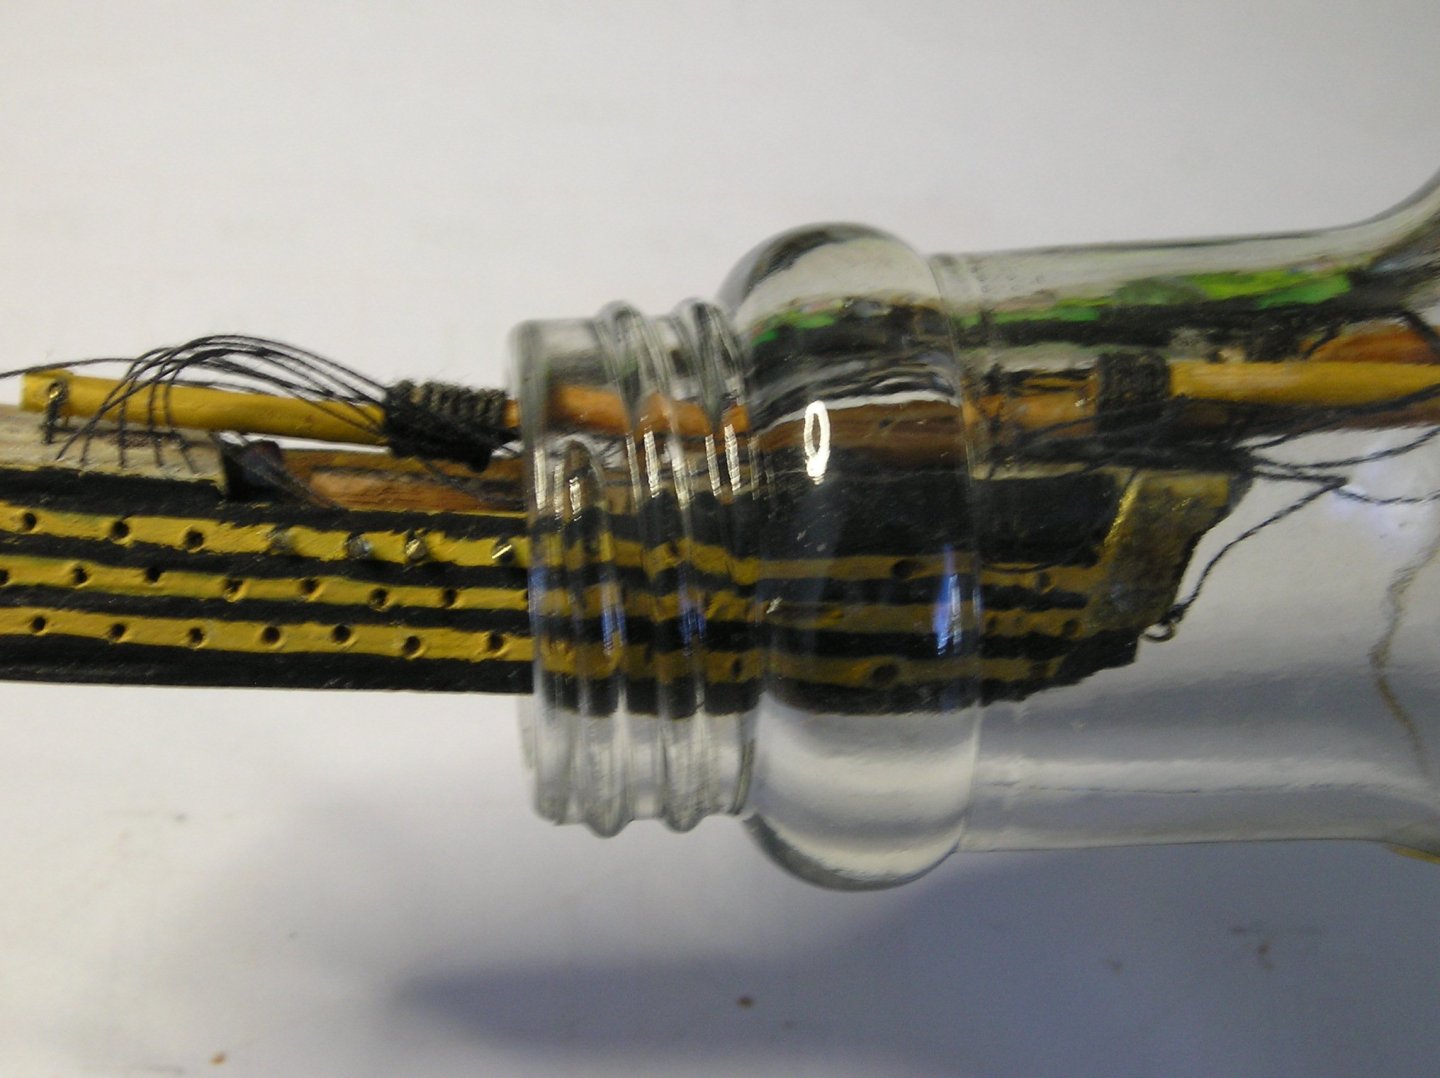
Time to tackle the bottle! (Not in the way you think! 😋) I removed the two nails from the BOTTOM of the lower hull. I also marked the bottom of the bottle in order to make sure I glued the bottom half of my model where I wanted it. I just used white PVA glue as it gives me time to place my hull and it dries clear. I left it overnight to dry. Adding white 'Mont Marte Modelling Clay' coloured with scraped blue oil free pastel, was a first for me and quite nerve wrecking. In fact it was pretty easy. I added white paint for effect. ( I forgot to add the 'Deluxe Aqua Magic ' to make the 'water' glisten. I'll do that later.) I was keen to get the remainder of the ship in. Added PVC glue to the base and made a nervous yet great start! No breakages I hope. The rest slipped in quite easily. And presto! Apart from the camera having trouble focusing through the bottle, everything went well. Another night drying and I'll raise the masts and sails. What a great day. Cheers


-
Chris, do you mind if I tag along as I have nearly finished my Victory SIB? Peter vG
- 146 replies
-
- 4
-
-
- Speeljacht
- Seahorse
- (and 2 more)
-
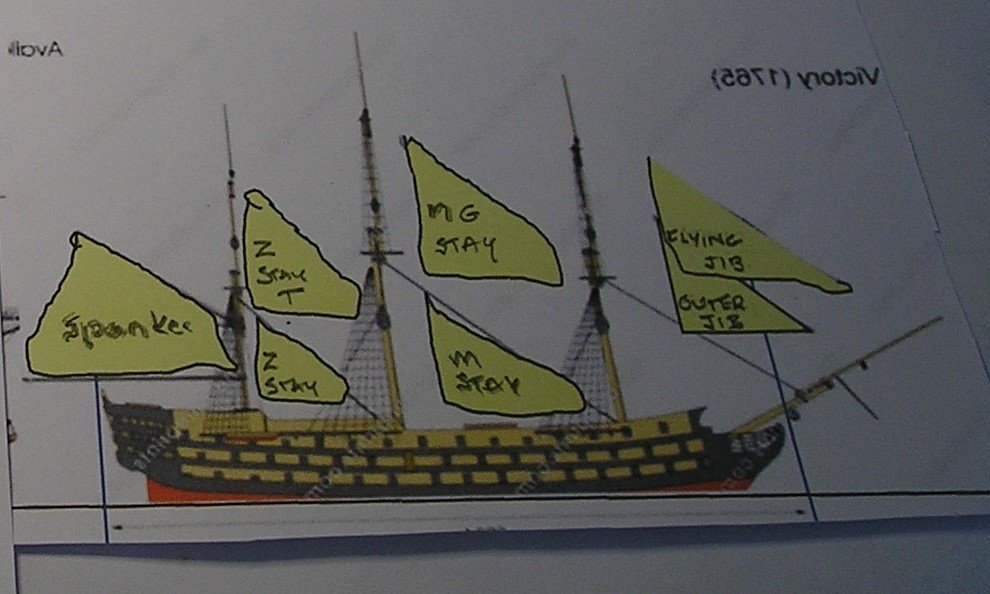
A quiet day today simply attaching all yards and sails, except for the Flying and Outer Jibs. These have to be added when in the bottle. There will be seventeen sails in total. Next step is attaching the lower hull to the base of the bottle and then adding 'the ocean' afterwards. Cheers,
-
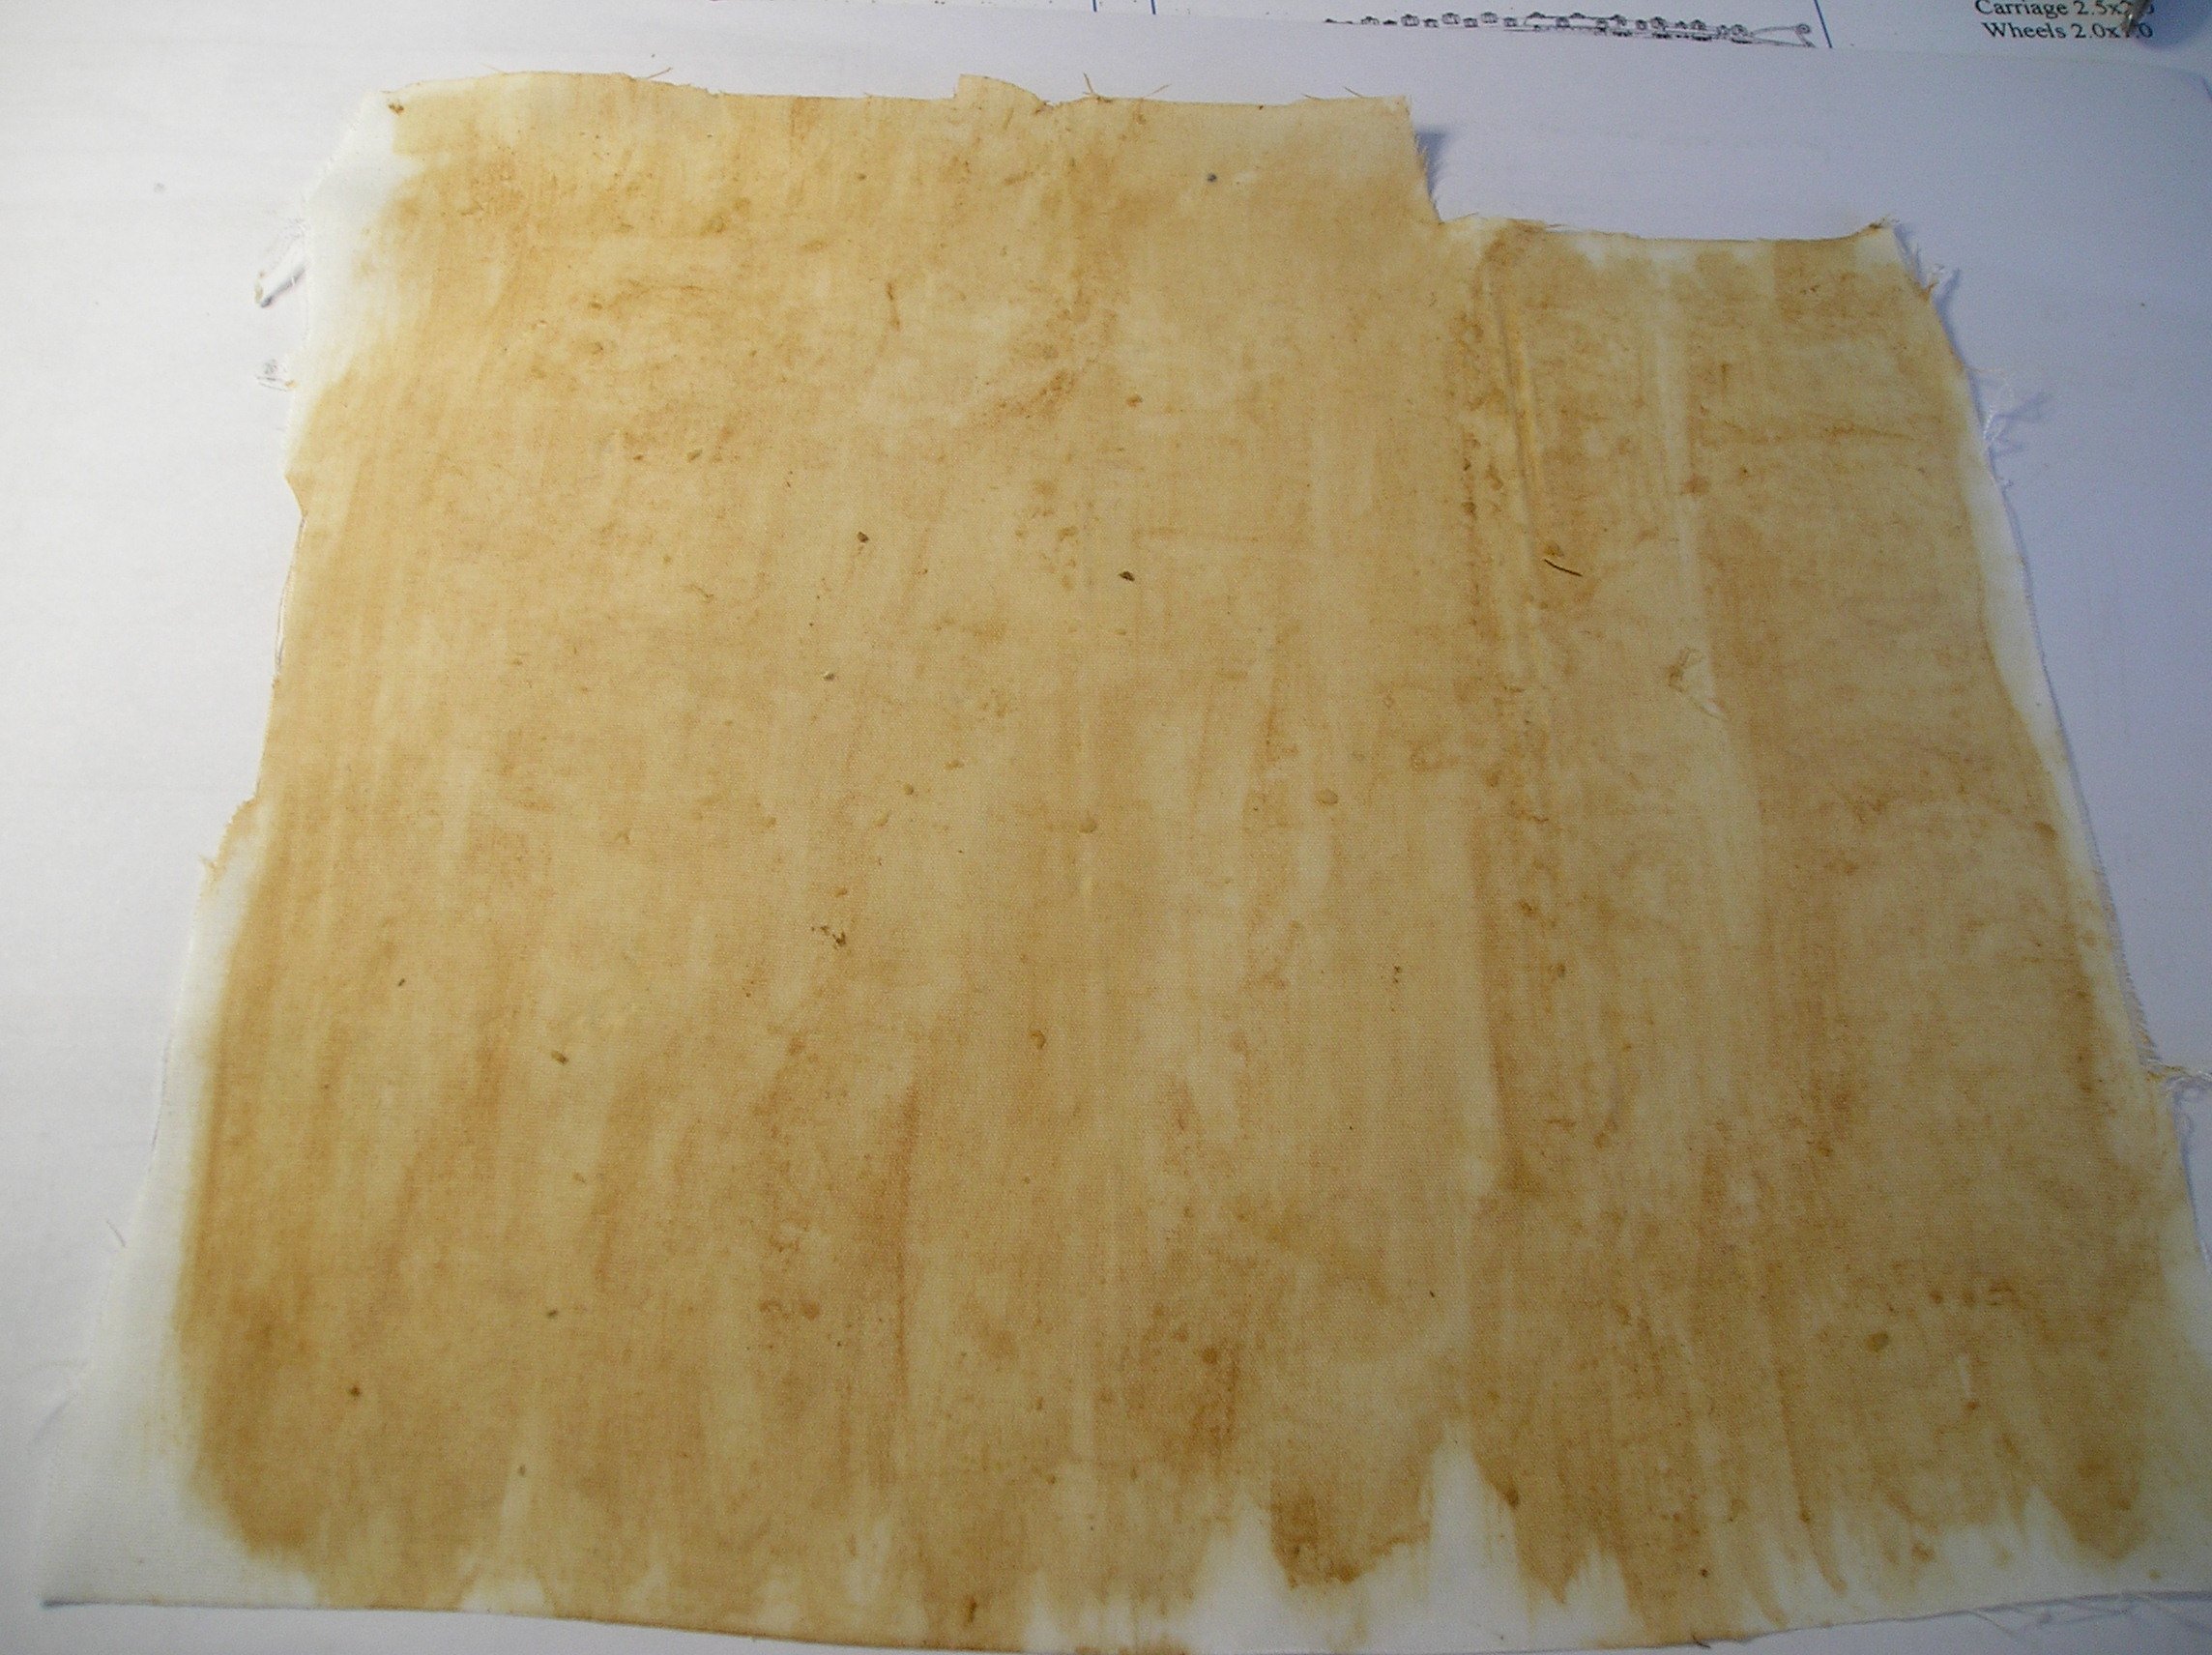
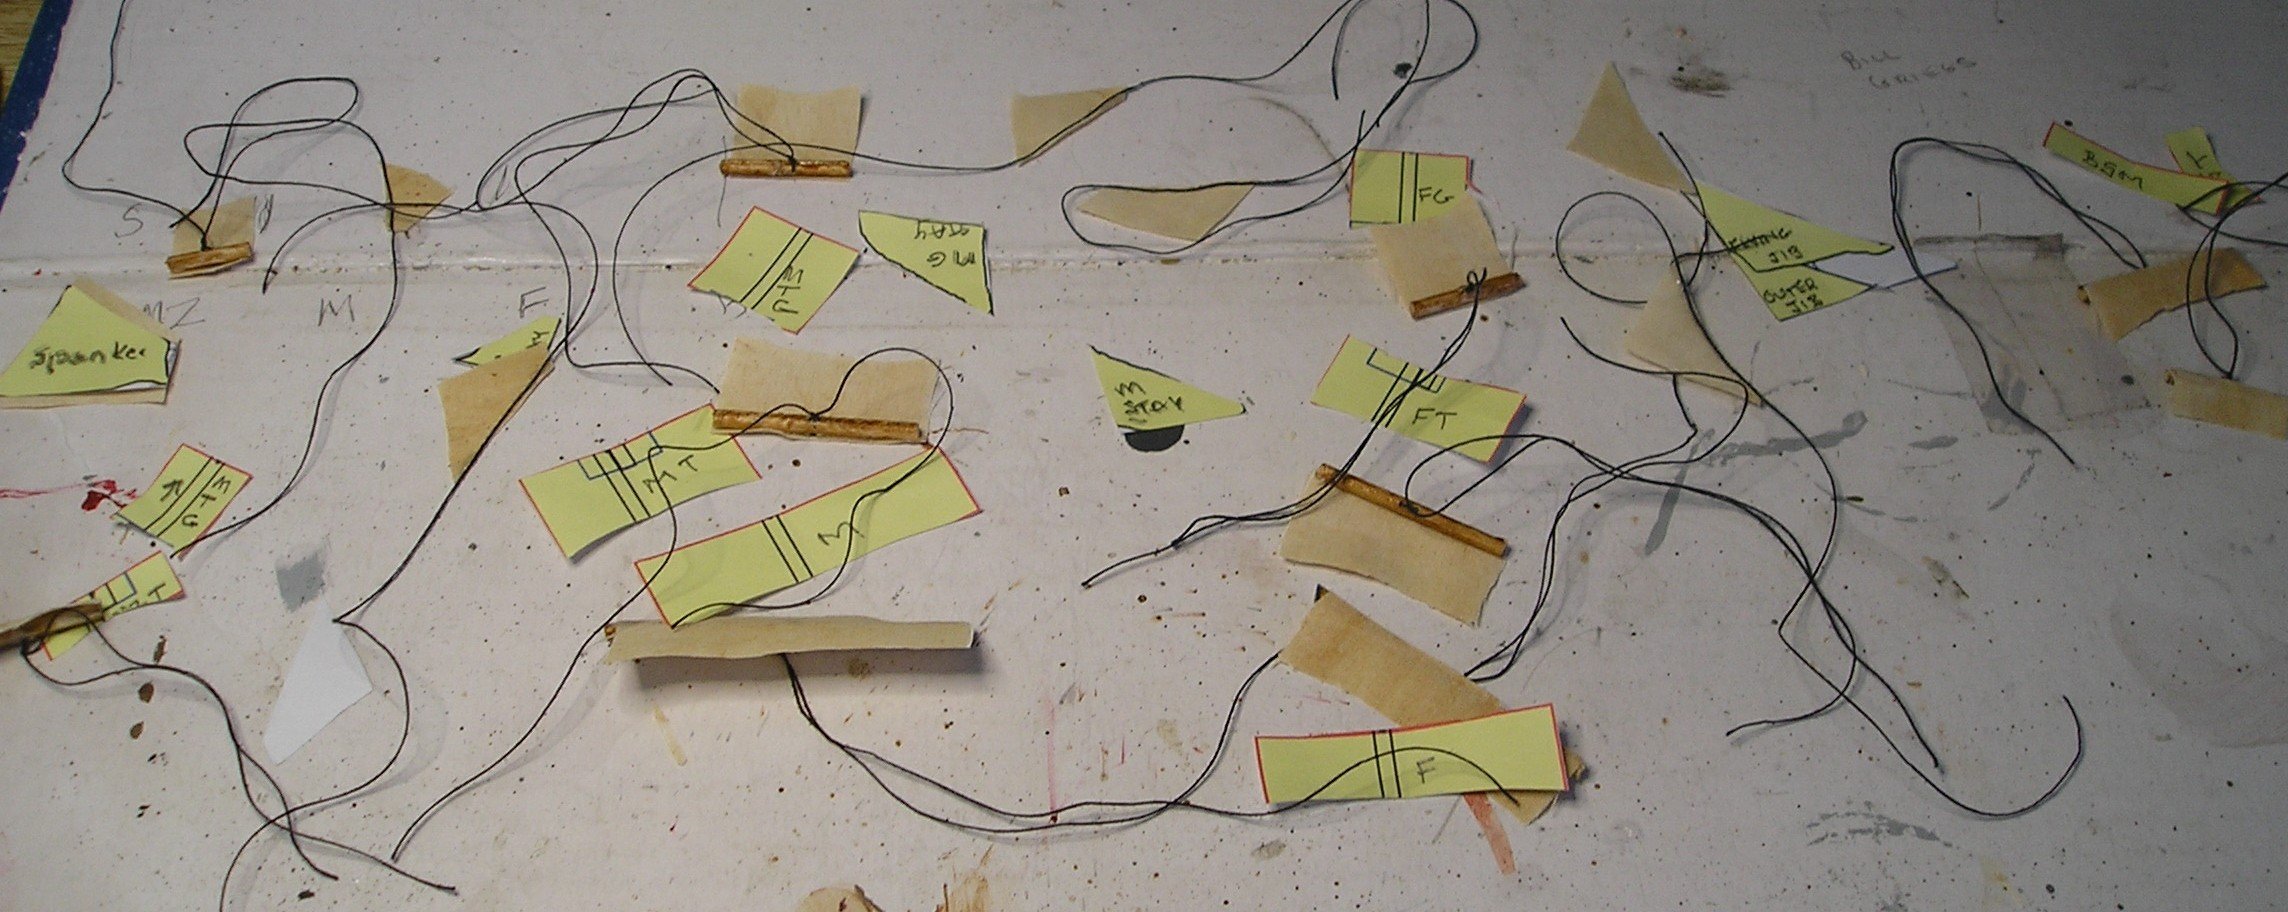
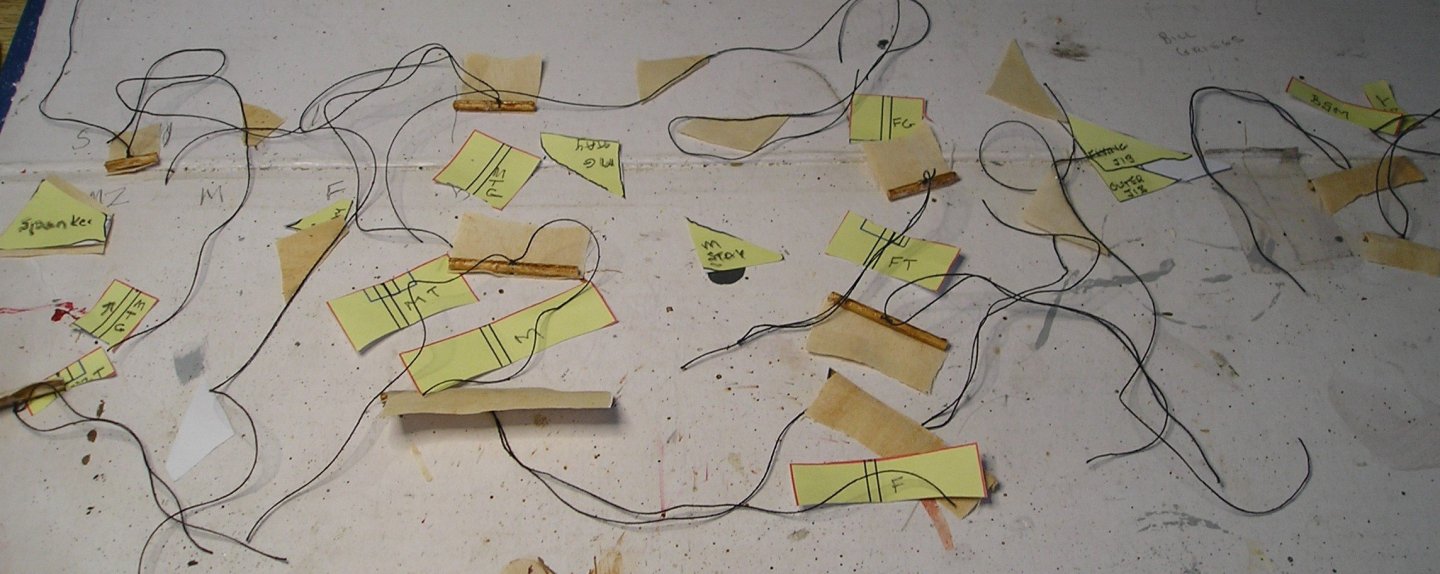
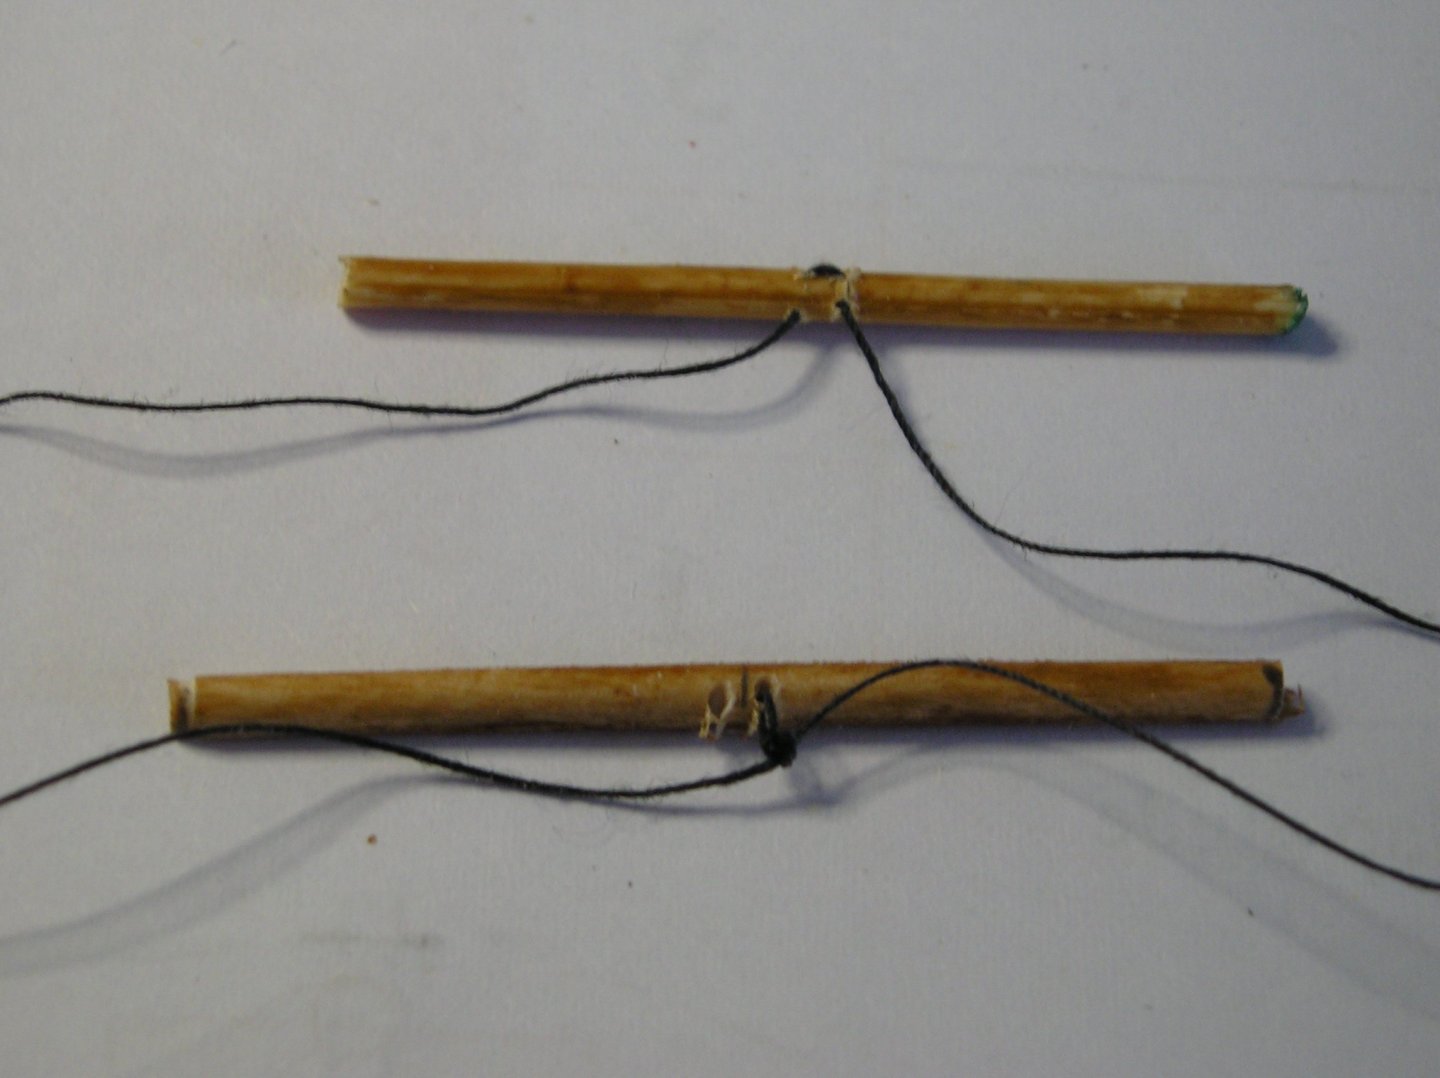
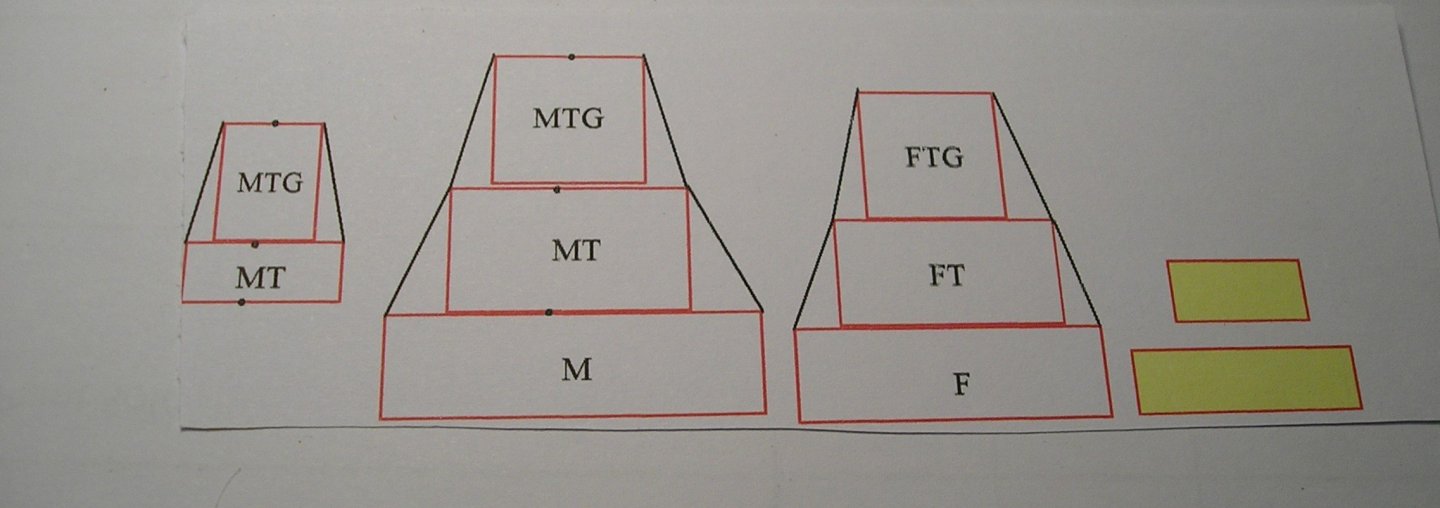
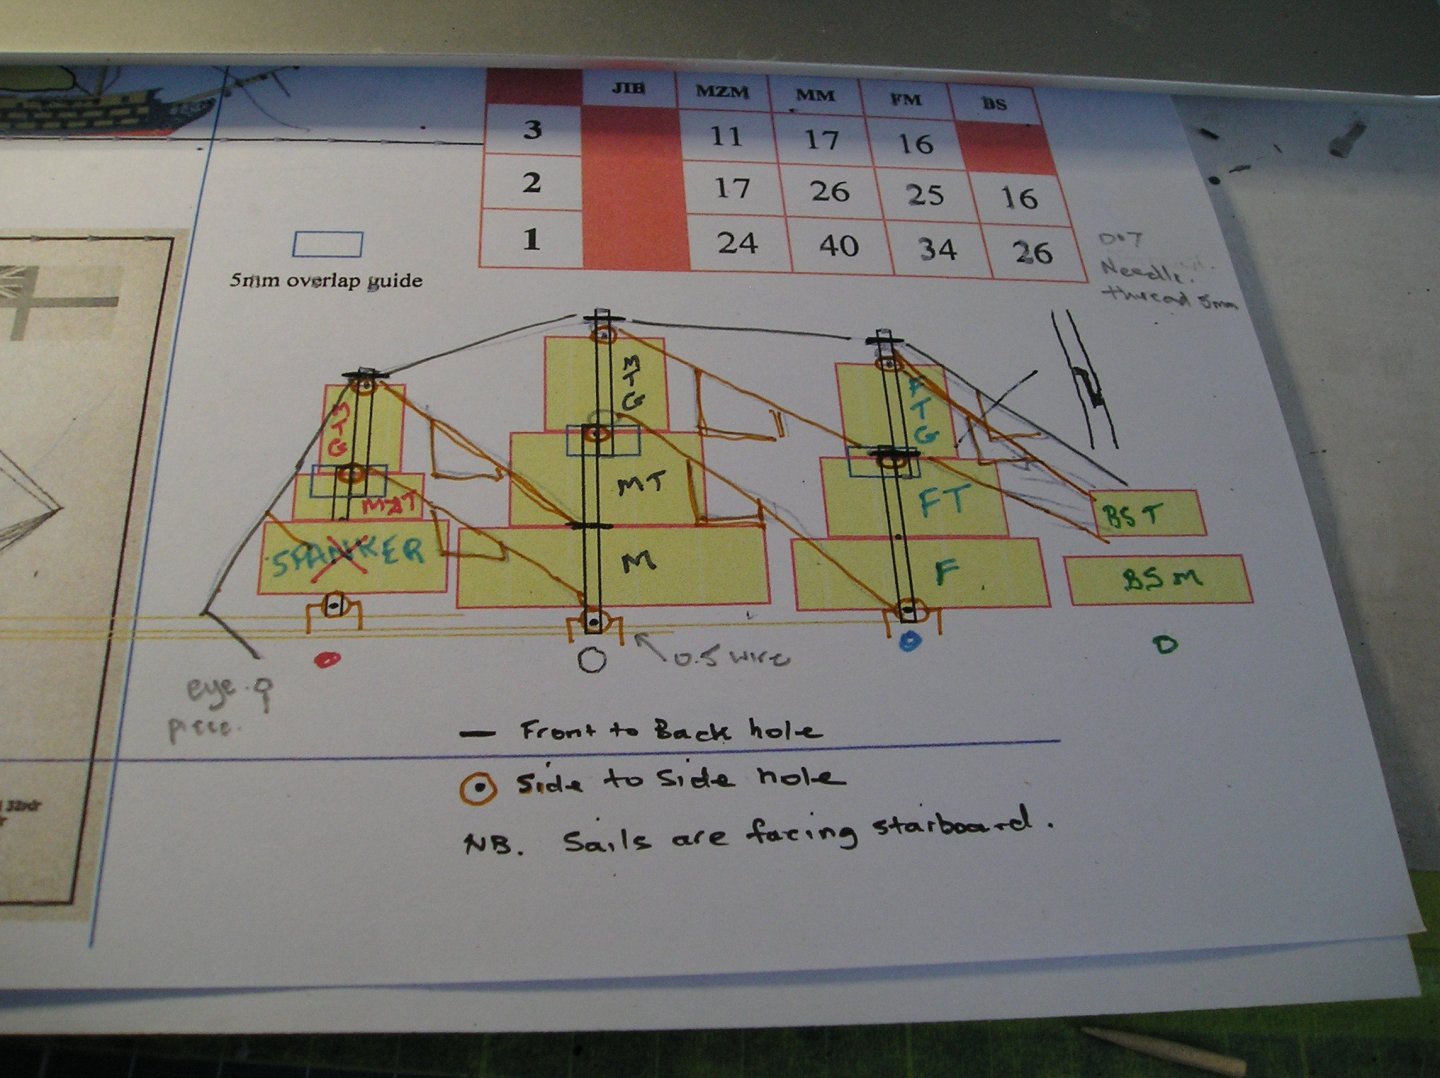
Progress in Rockhampton! 1. I tested the ship with masks to see if it fitted into the bottle. Yes! With a cat's wisker to spare. 2. I measured the mid point on each yard and then drilled a 0.7mm hole on each side. 3. Then threaded string through the two holes. Leave at east 70mm for each end of the strings. 4. Tied THREE knots using these two strings. Why three you may ask? The first holds the string in place. The second forms a swivel for turning the yard when getting it into the bottle. The third leaves the string running along the yard (Which is the right way for tying it to the masts and straightening up after it is put into the bottle). 5. I then labelled the sails on the diagram, 6. I chose and coloured my cloth with a light ochre. This was made from some watered down Vallejo 'Cork Brown'. I used a wide brush in order to add a bit of contract to the result. 7. Cutting out the labelled paper sail templates and the cloth was a little tedious, but rewarding when done. Note the spread of the bottom of the top and gallant sails, ie. cut along the outer black lines. 8. I glued them onto the yards using thick CA glue, keeping their labelled templates close by so I don't get confused. The glue did not show through on the front side of the sails. Anyway, I think that is enough for one day. Cheers,

-
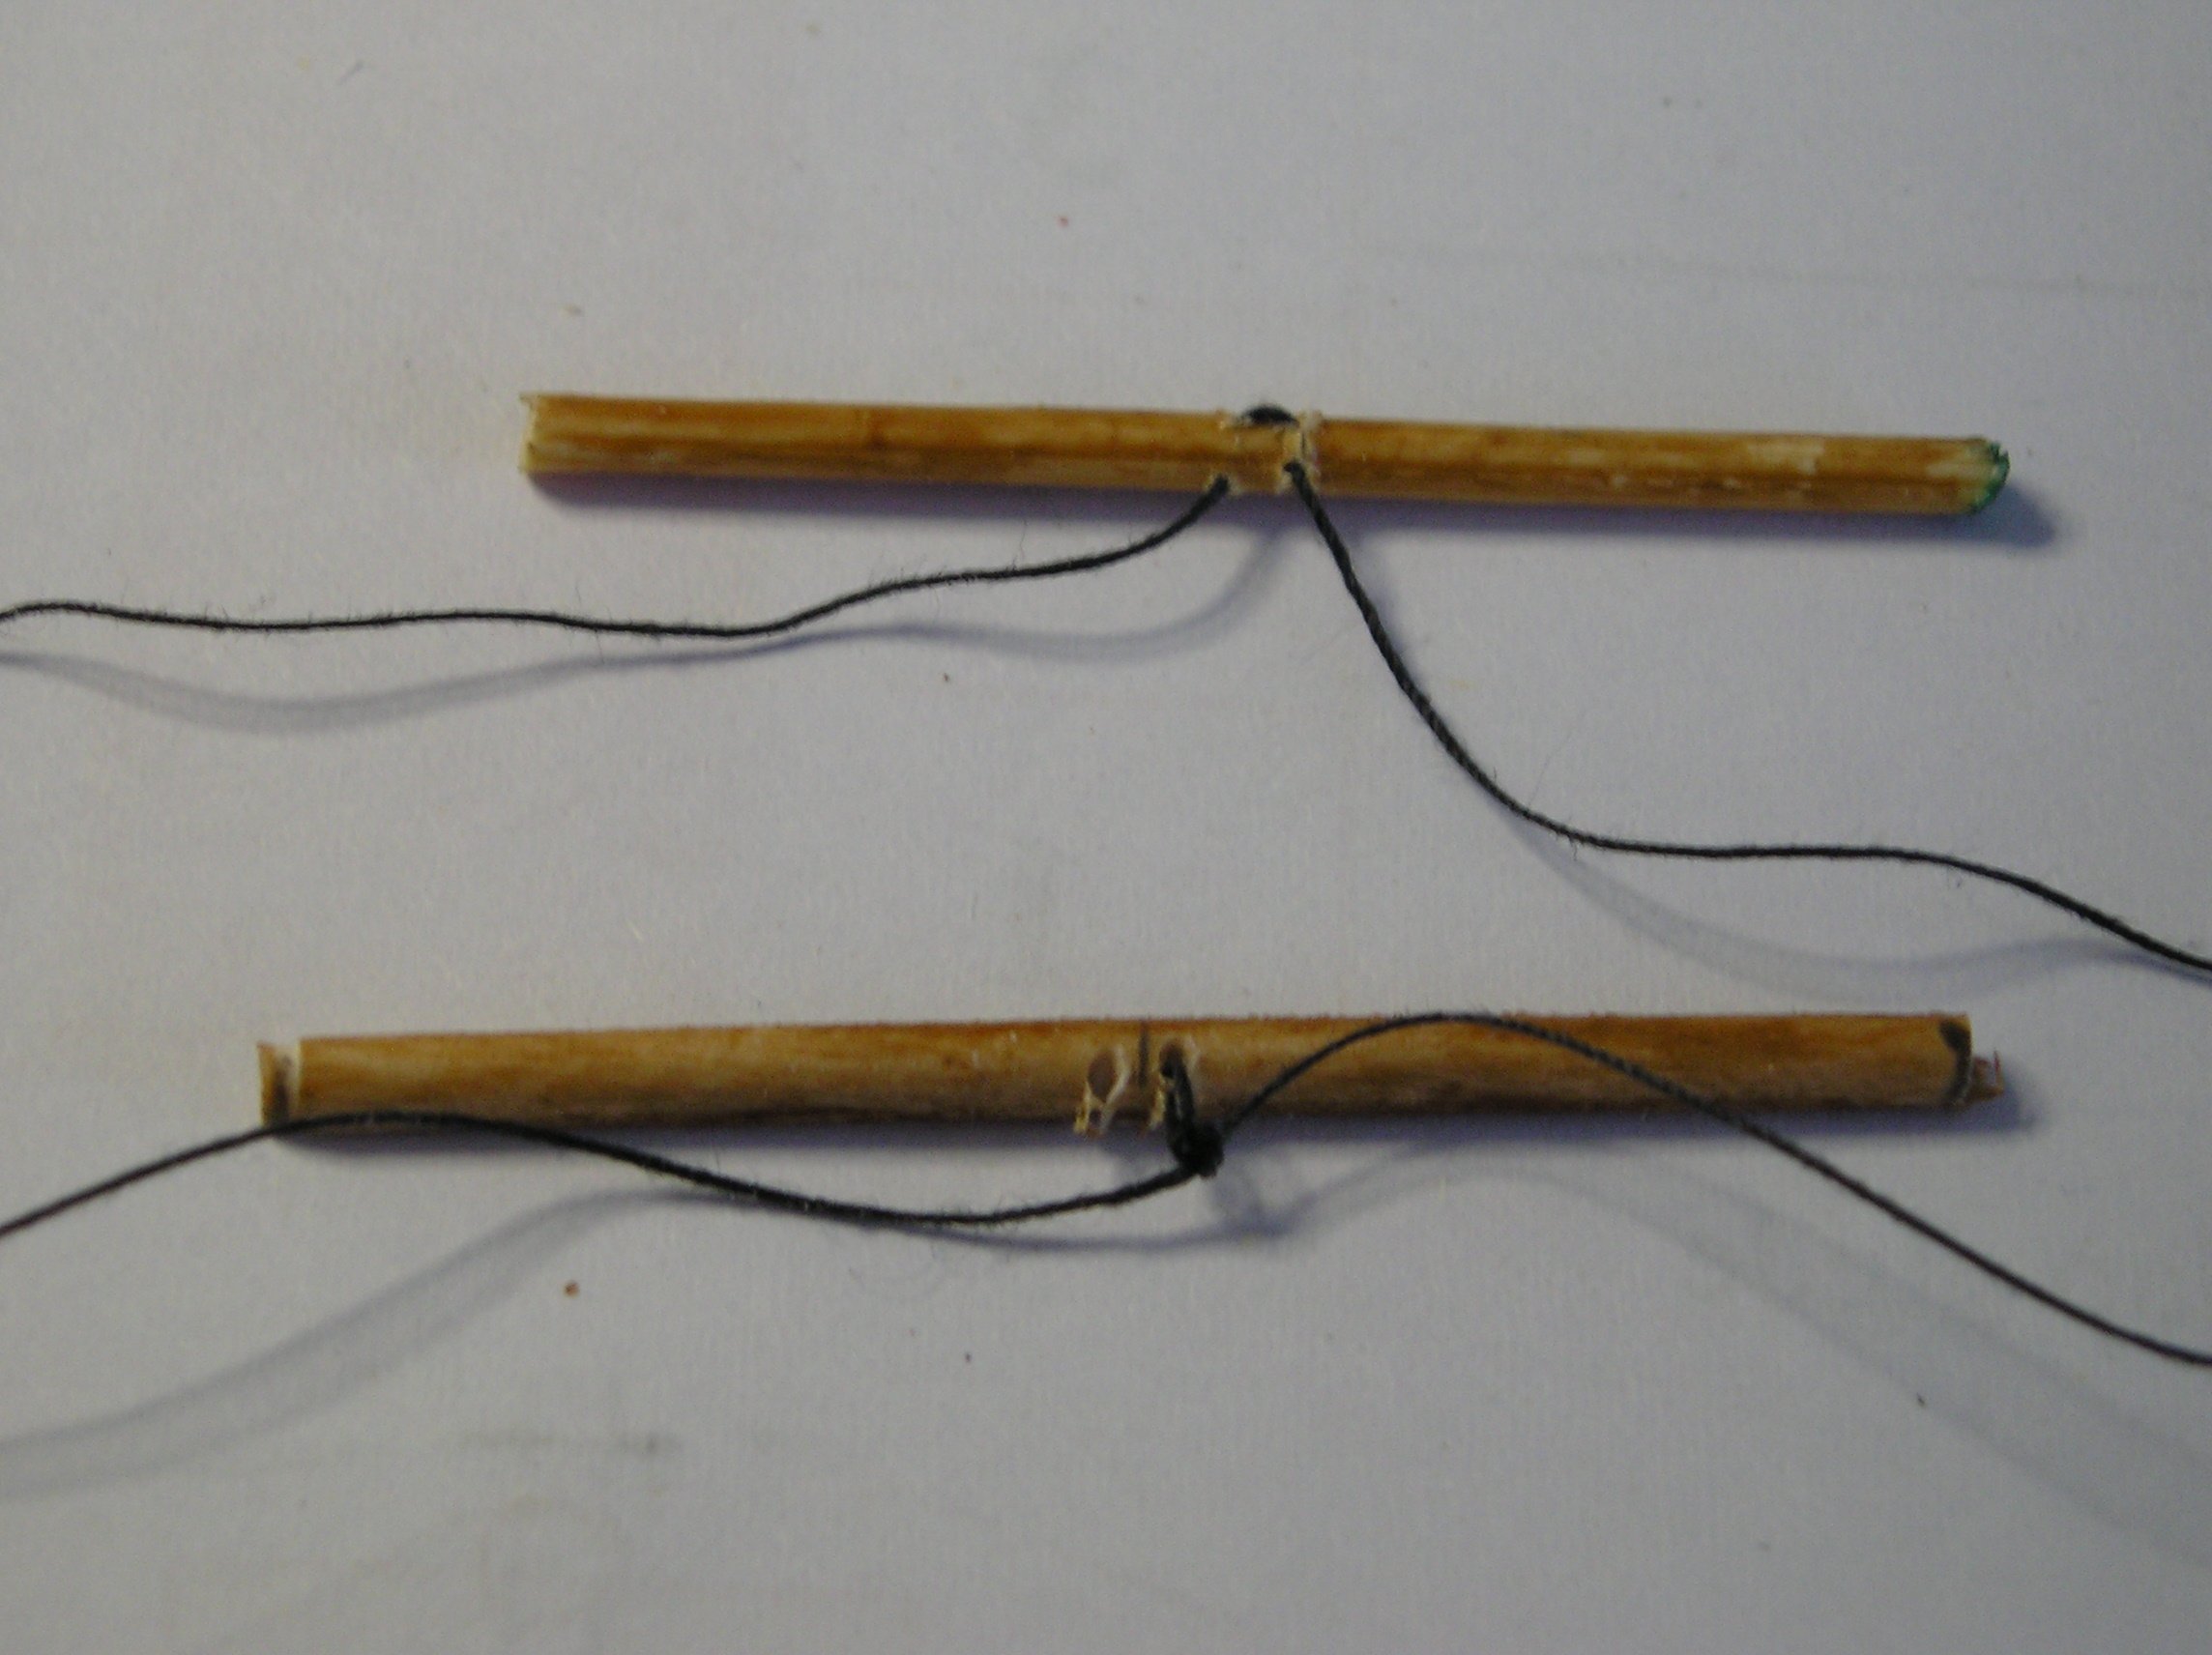
Thanks for all the likes! I'm wrapped. I did the shrouds today. First I drilled the 1mm holes on the top of the desk as I didn't want to mess up the gun ports on the side. Five each side and back from the base of the foremast and main mast. Three each side and back from the mizzen mast. They are 2mm apart from each other. Next I looked underneath and saw that a few holes missed their target . This is not an issue as I could simply gouge out the stray holes so I would not interfere with the flat surface. I do admit that it does look a bit like a dog's dinner but you won't see it later. ☺️ Finally, I removed the standing line from the top of the mast to avoid 'line clutter', then by using a 0.7mm thick neddle and thread, I started underneath the front hole of the foremast. I didn't secure the end, just left a long enough end to be able to tie a knot later (about 60mm). I went up to the lower side hole in the mast and down to the corresponding hole on the other side. Underneath, I simply came up the adjacent hole on the same side, up, through and down through again. On the fore and main mast I has three shouds going to the lower hole and two going through the upper side hole. When I finished each mast I tied the start and end lines together, making sure the mast is sitting where you want it, and then glued the knot with super glue. Two warnings. Use plenty of string for each mast. I started with 700mm on the fore and main masts. Also be carefull of glue on your fingers as you are sure to strip off some paint on your ship. I'm very pleased with the result. Sorry but I'm not mad enough to add ratlines to my shrouds. 🤪 I'm done for the day as we are celebrating my '21st' birthday this afternoon. Cheers


-
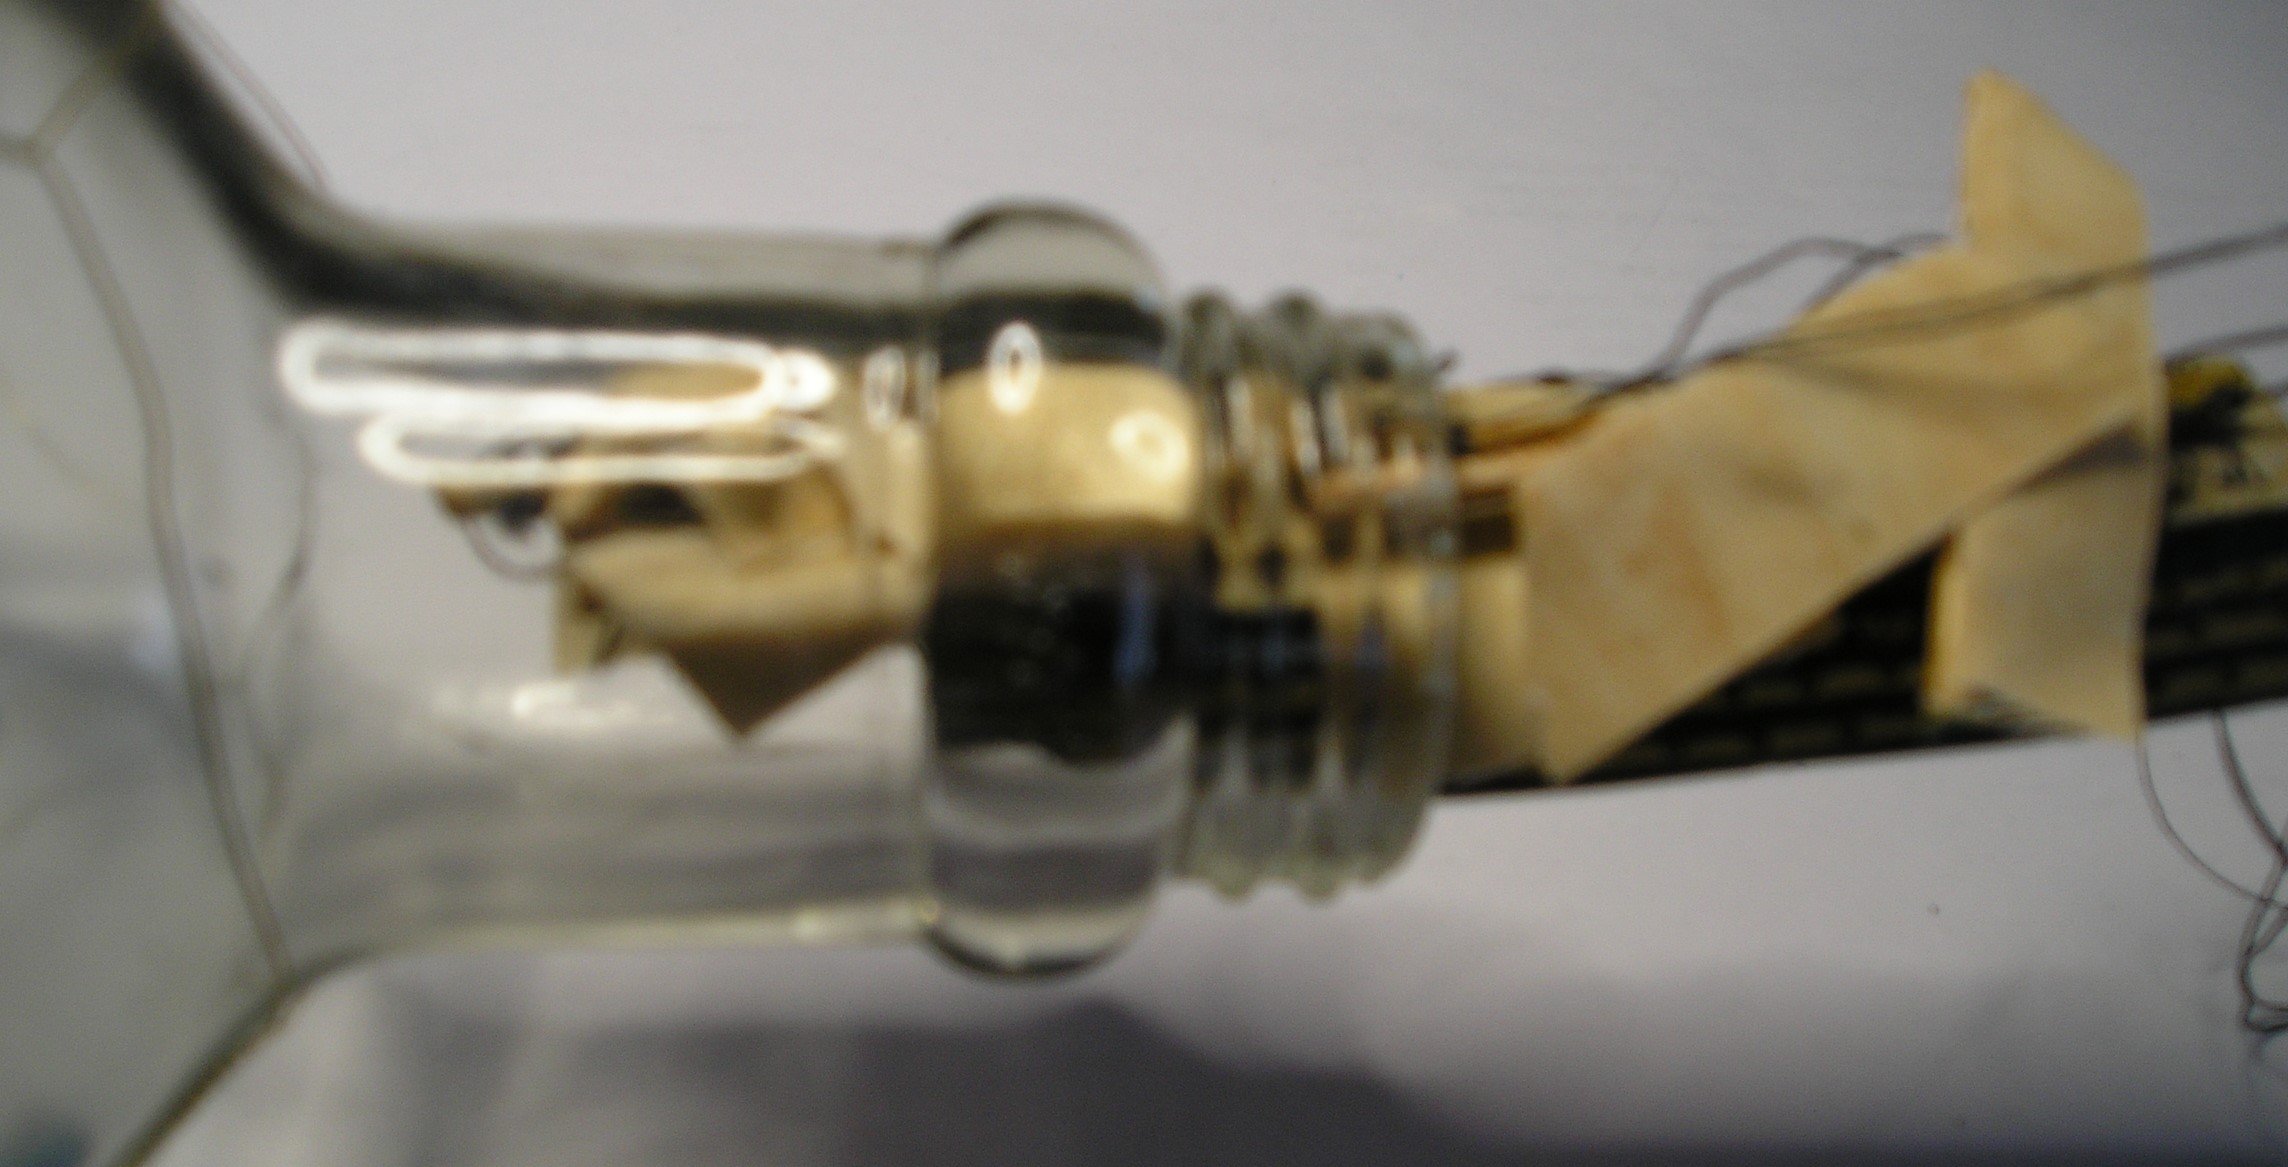
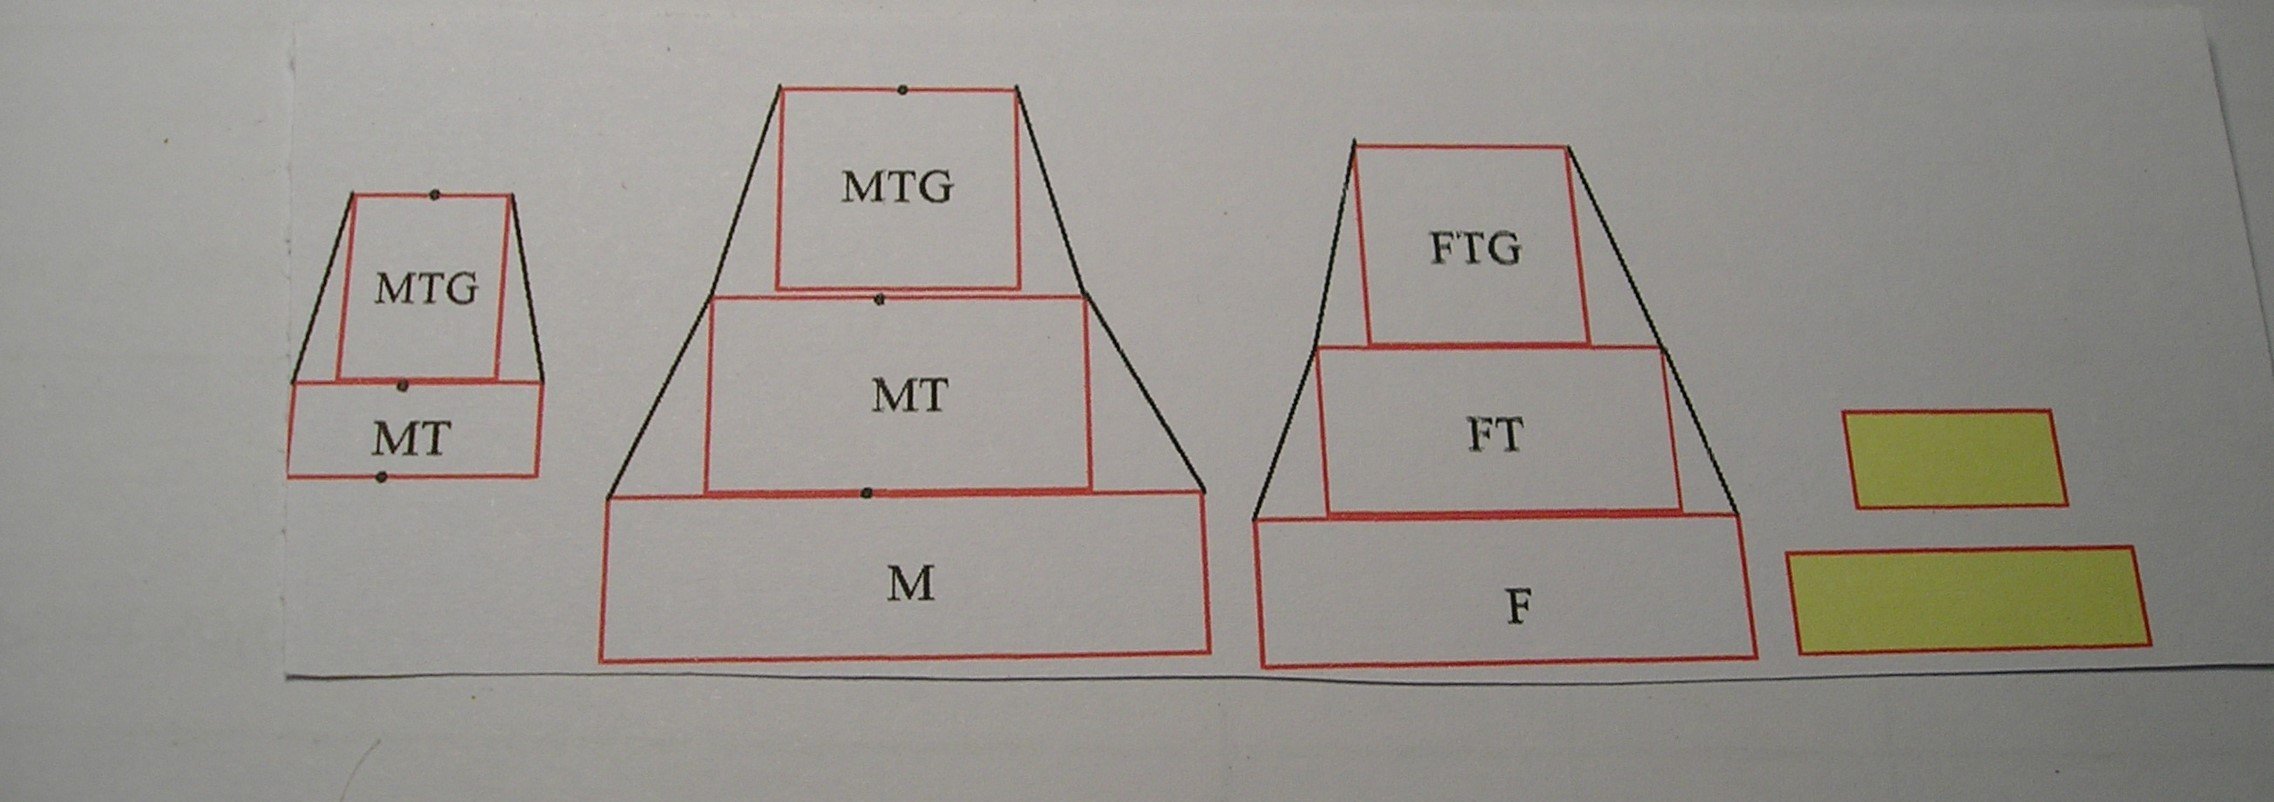
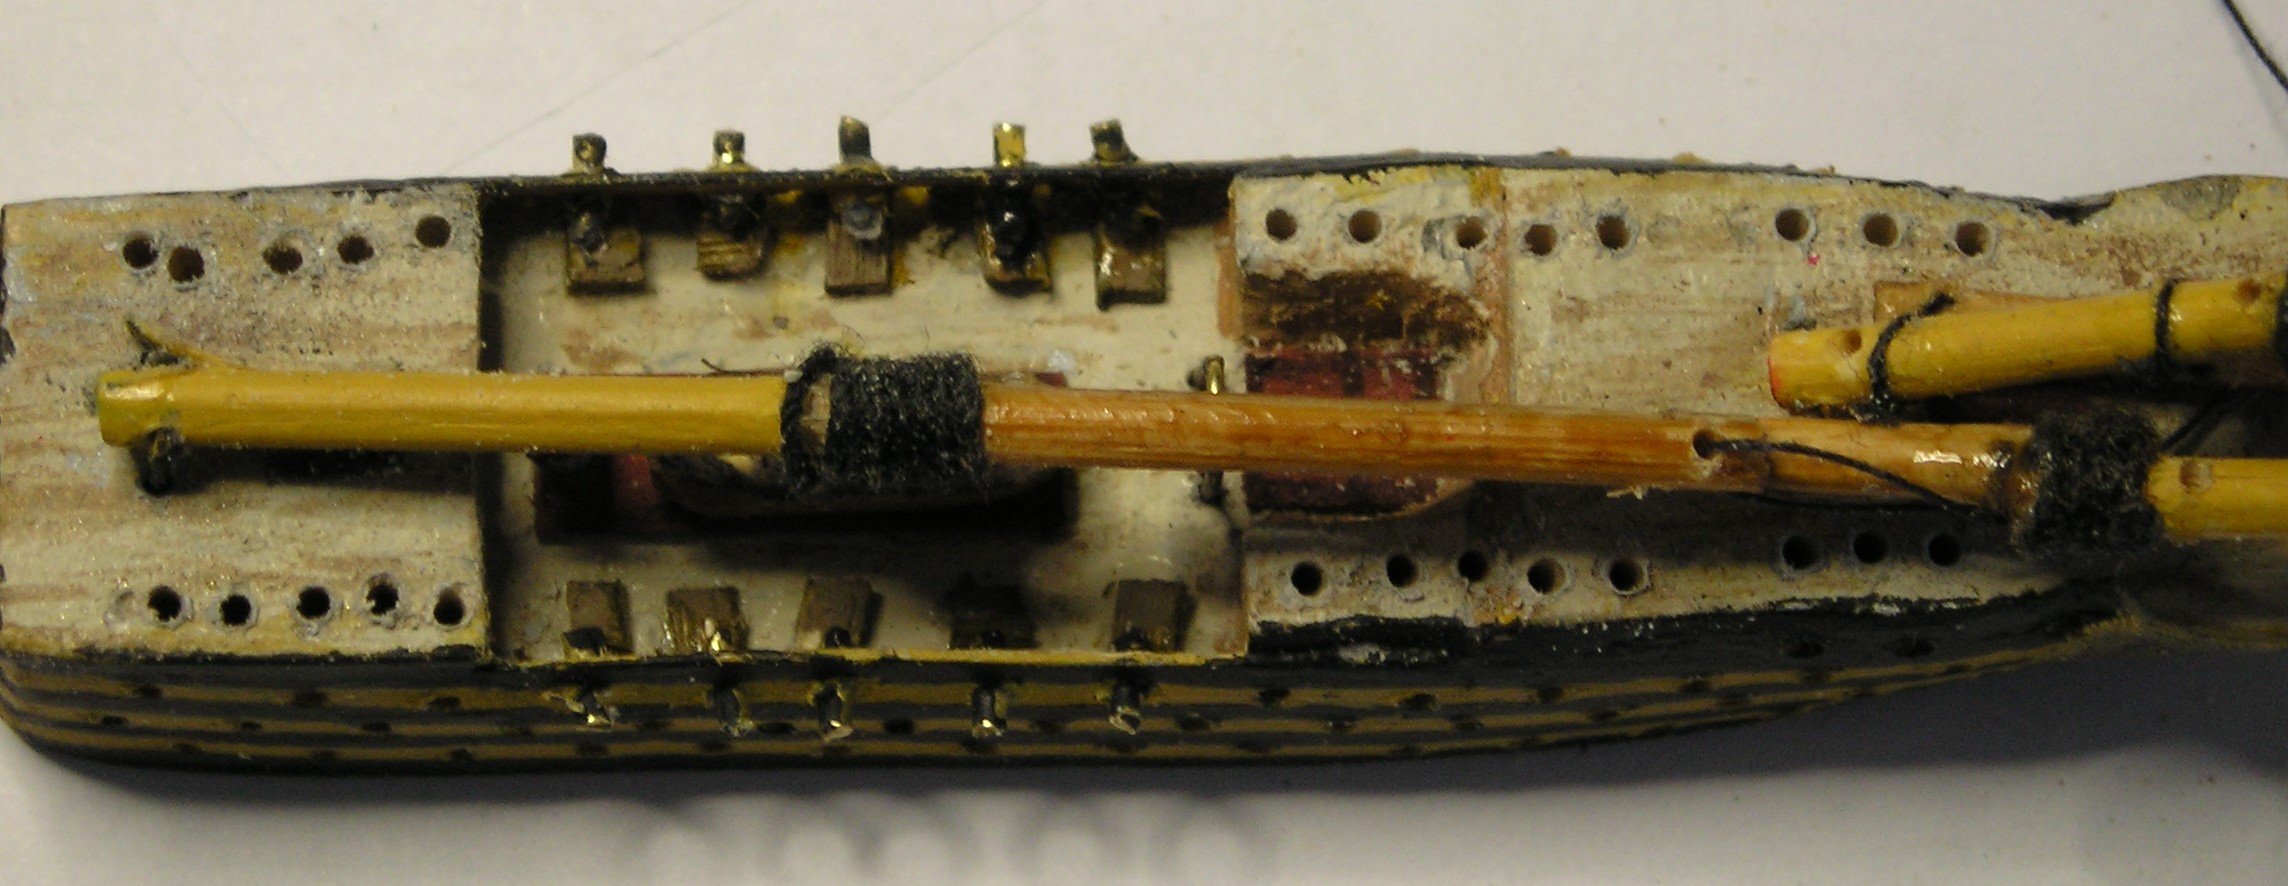
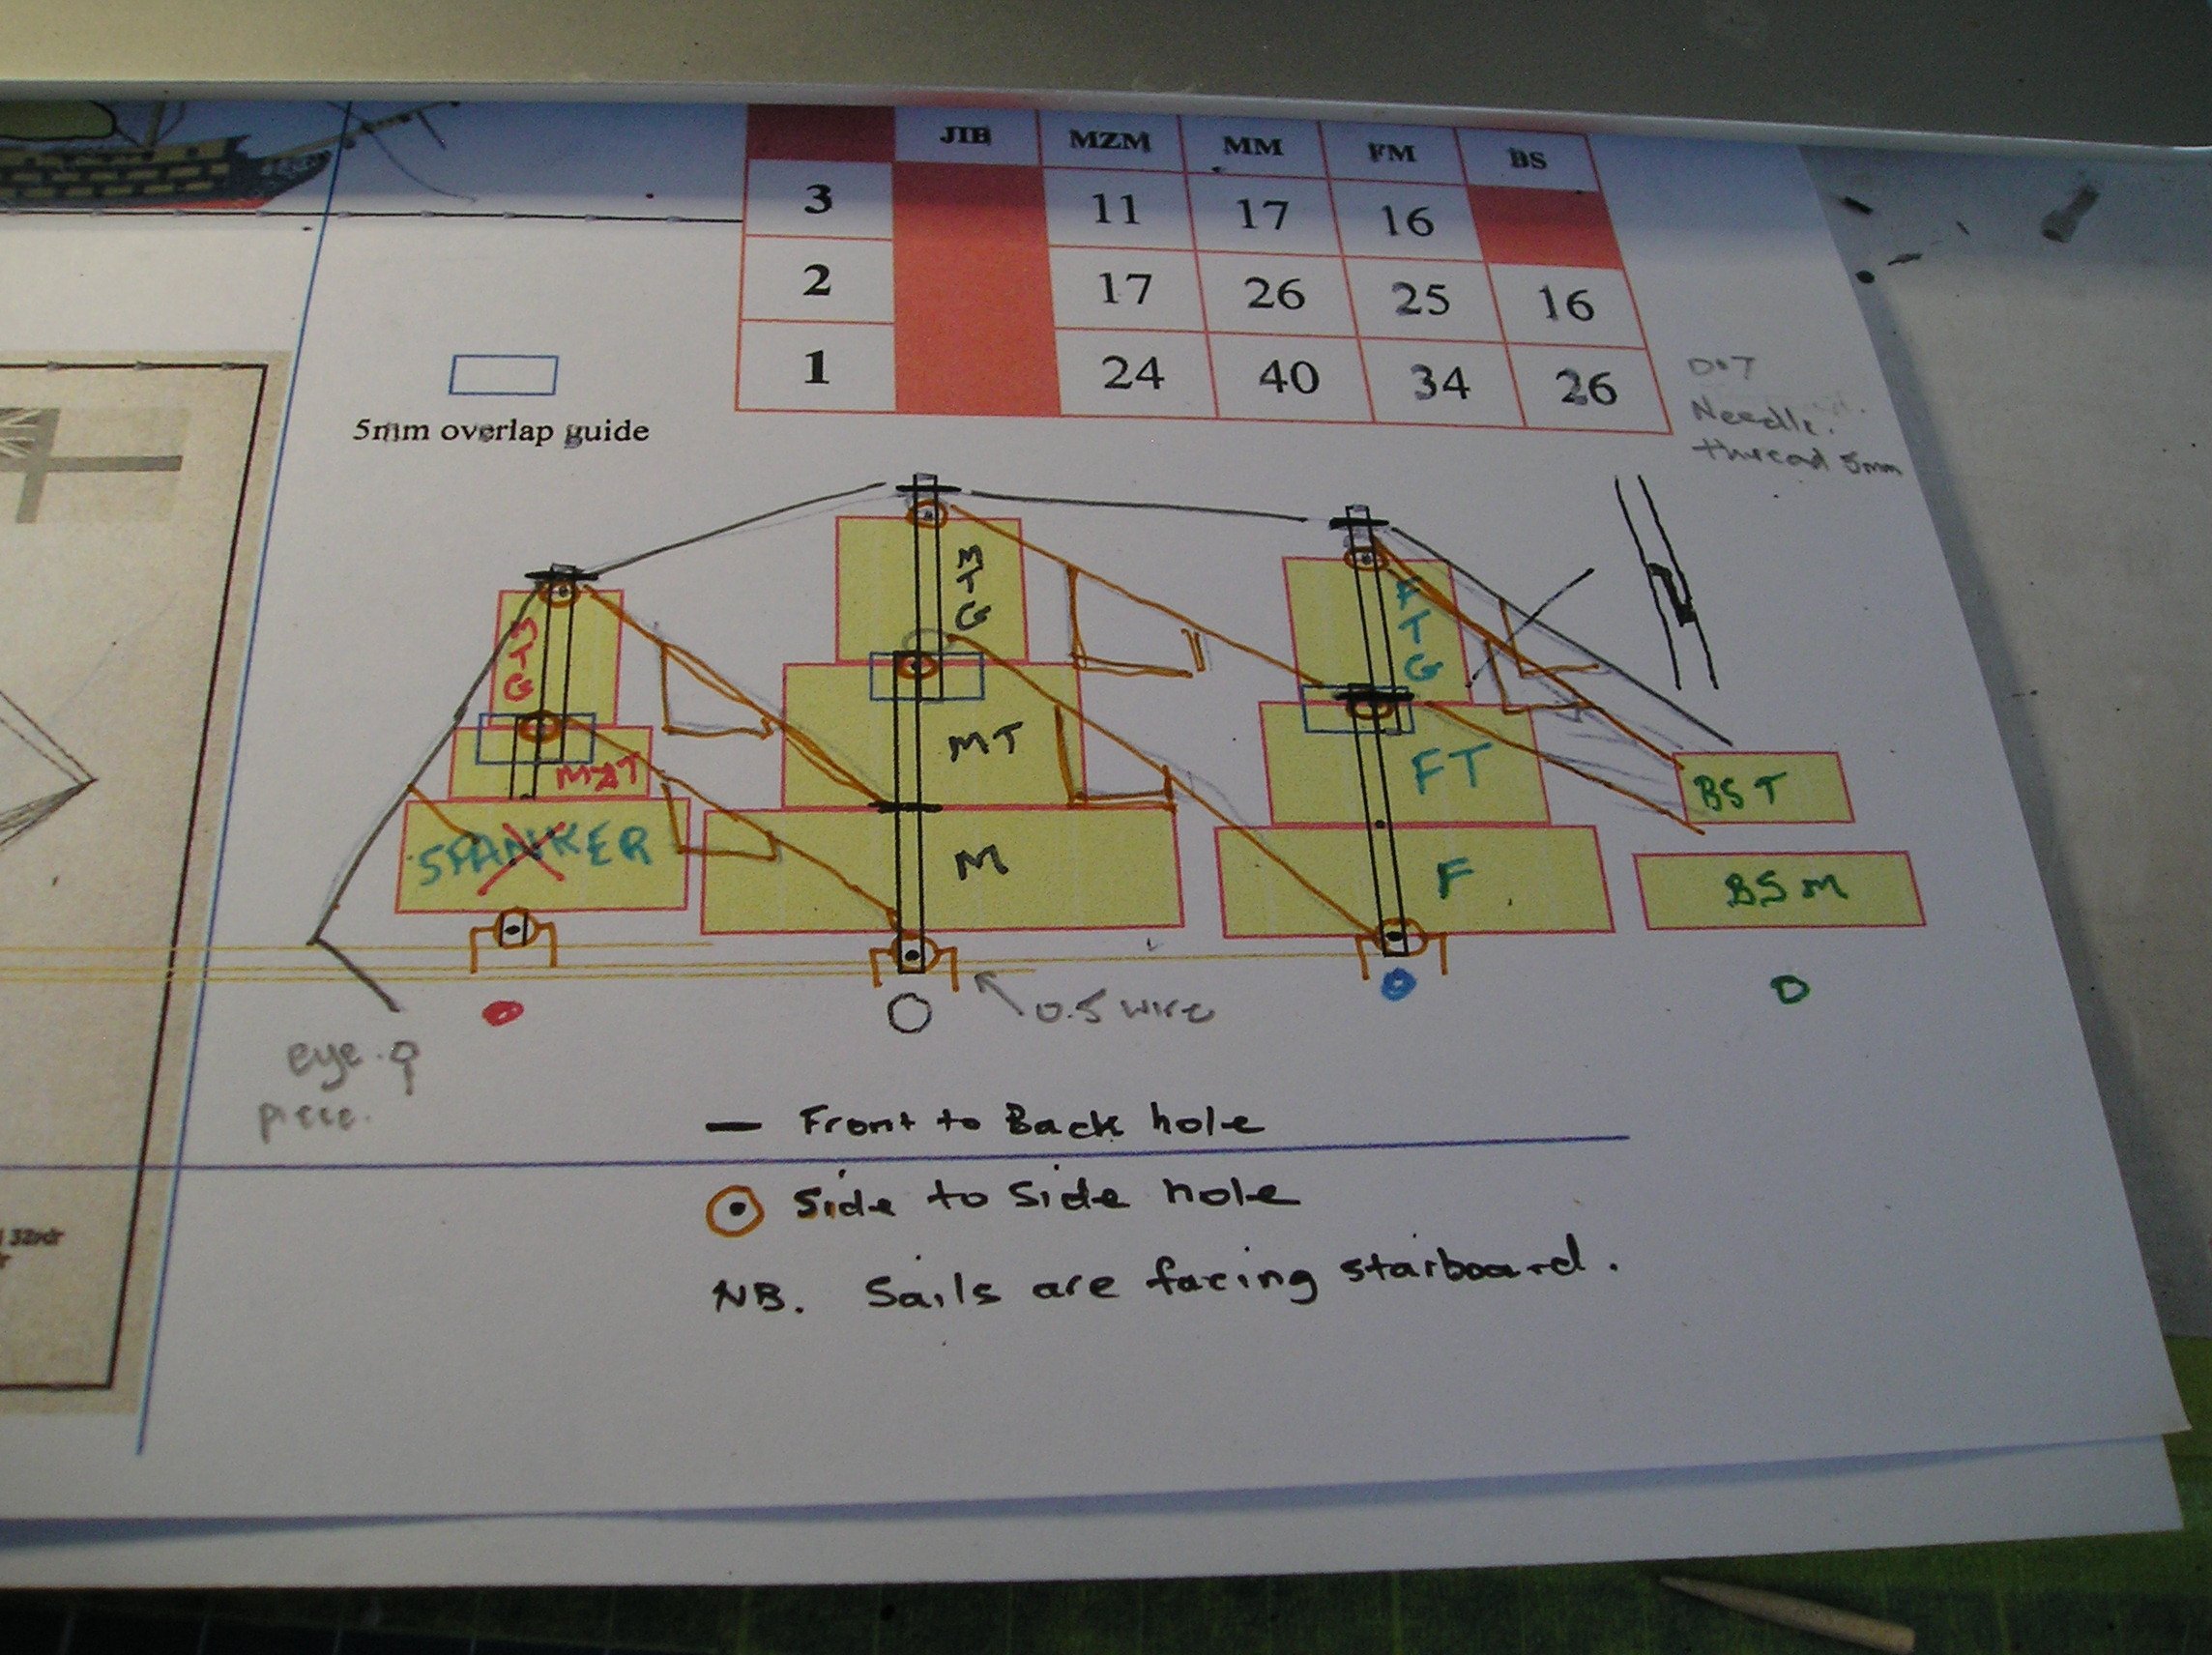
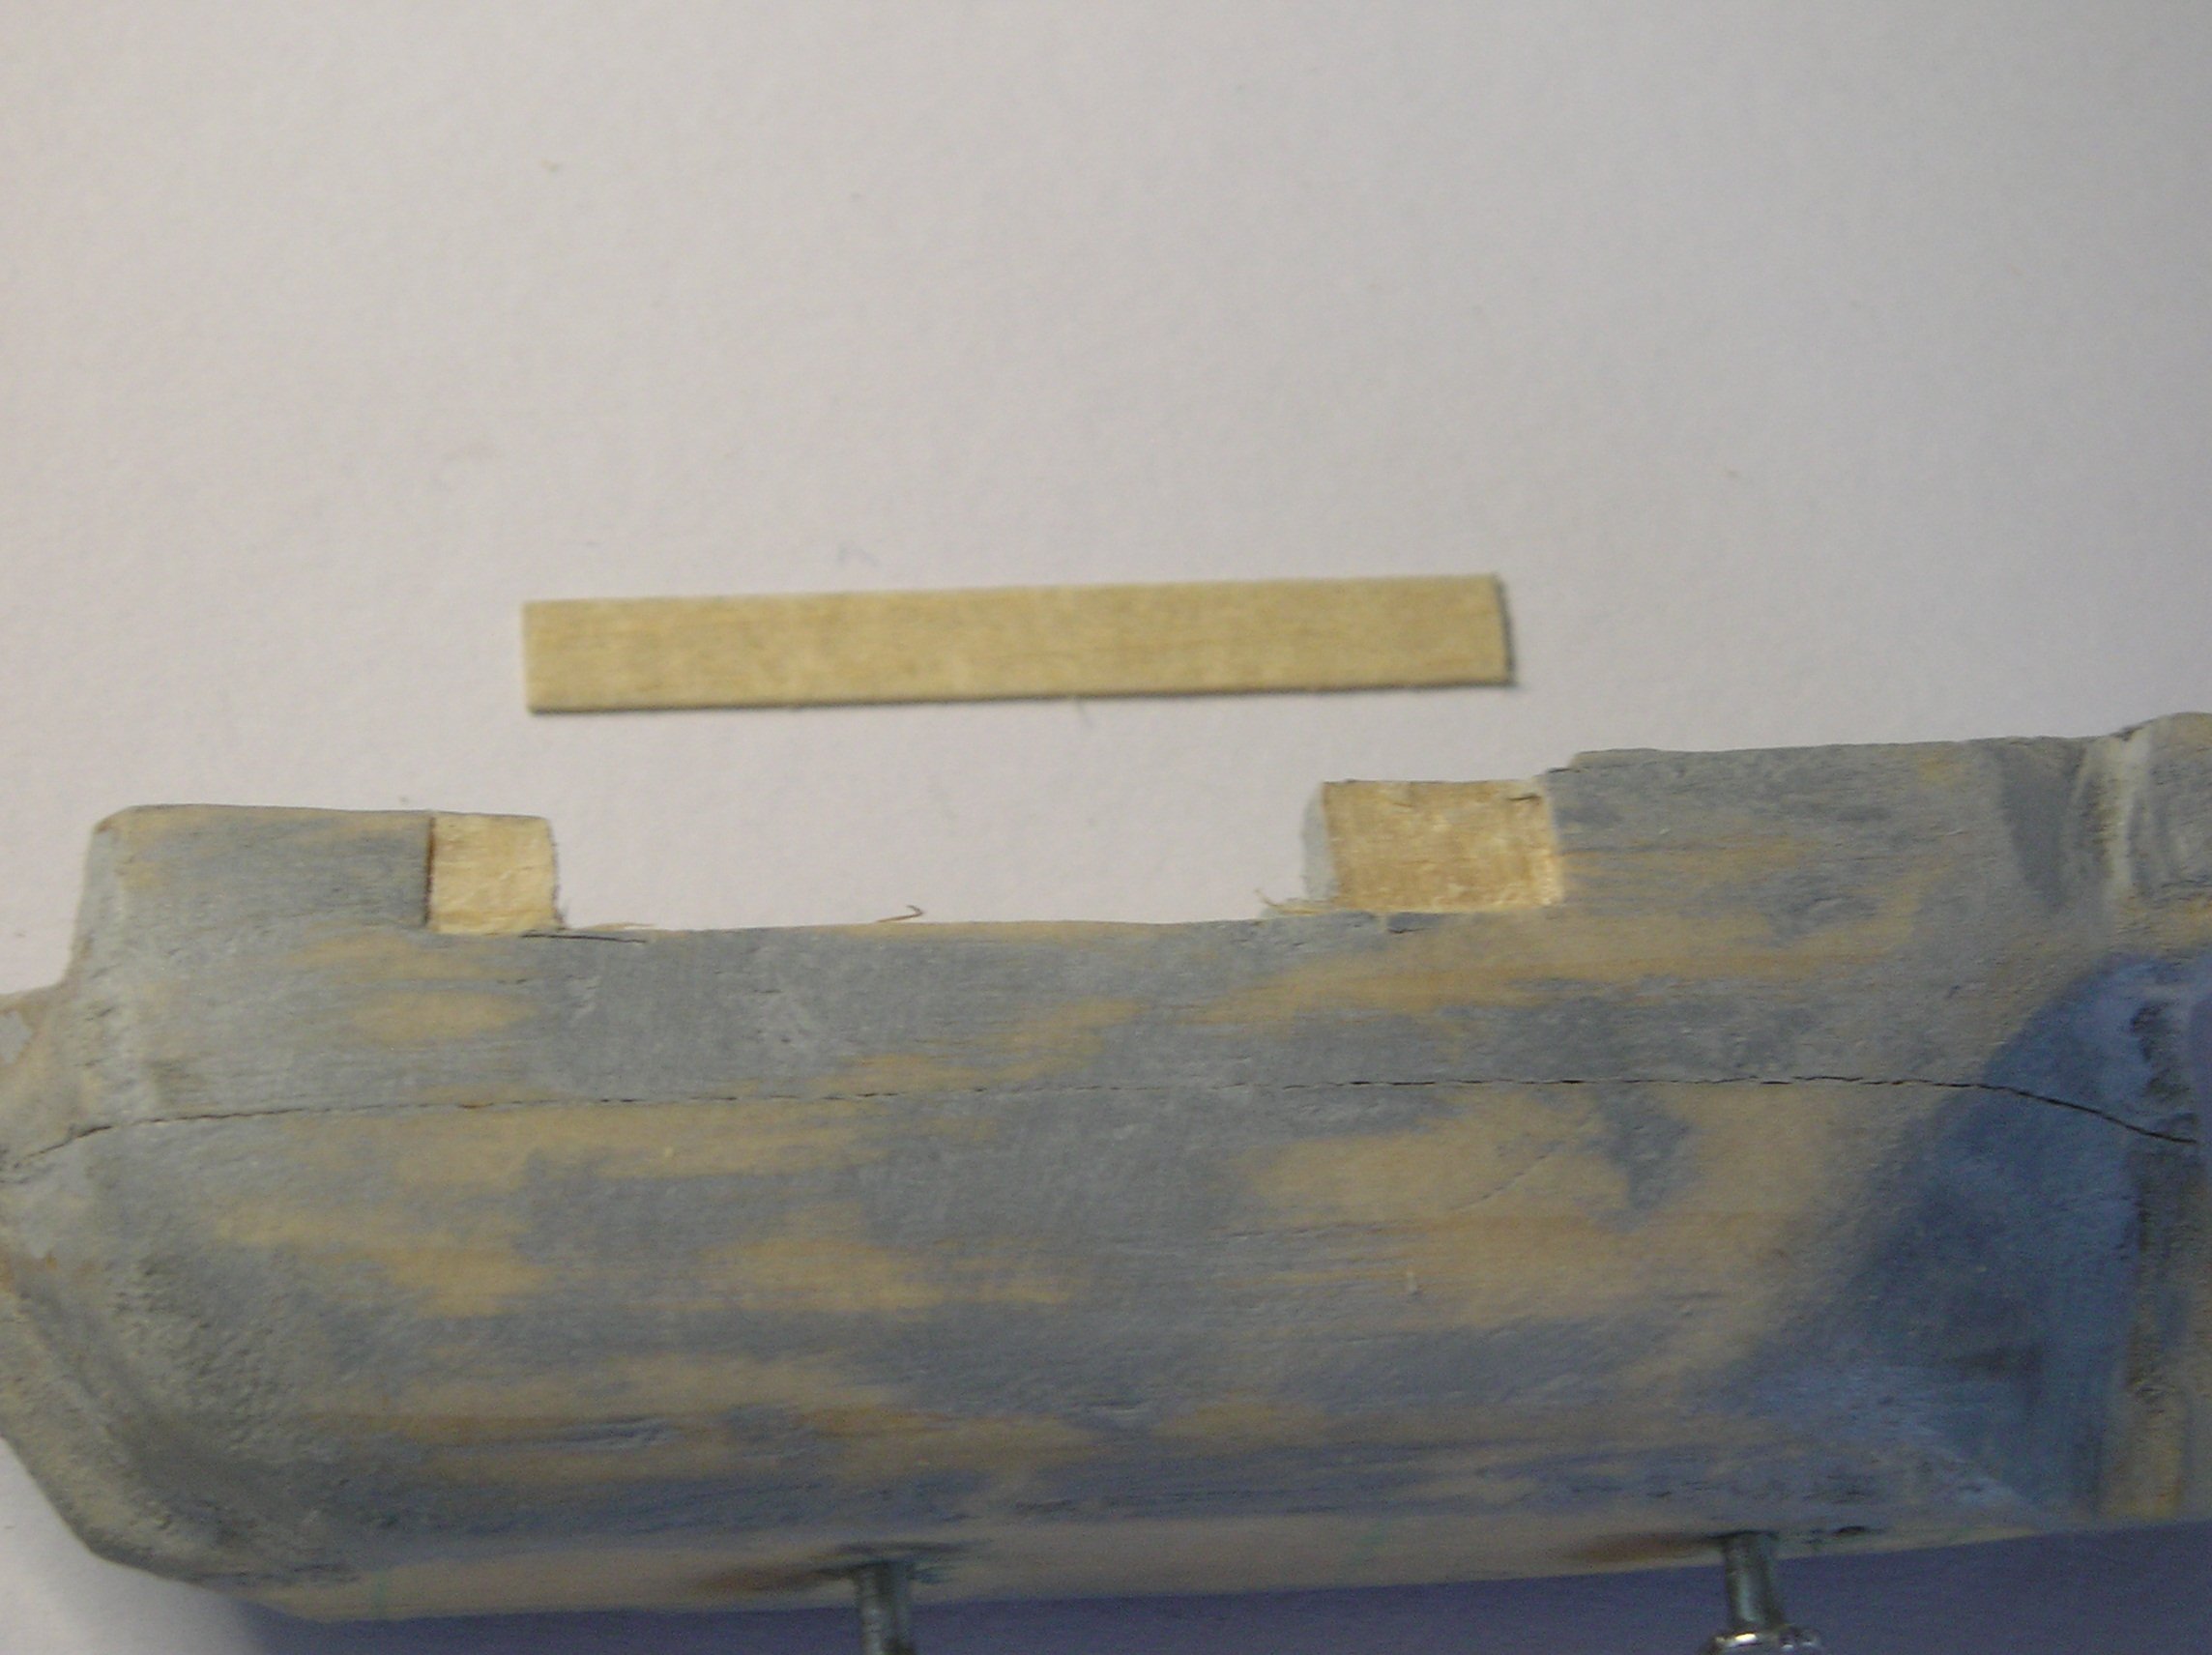
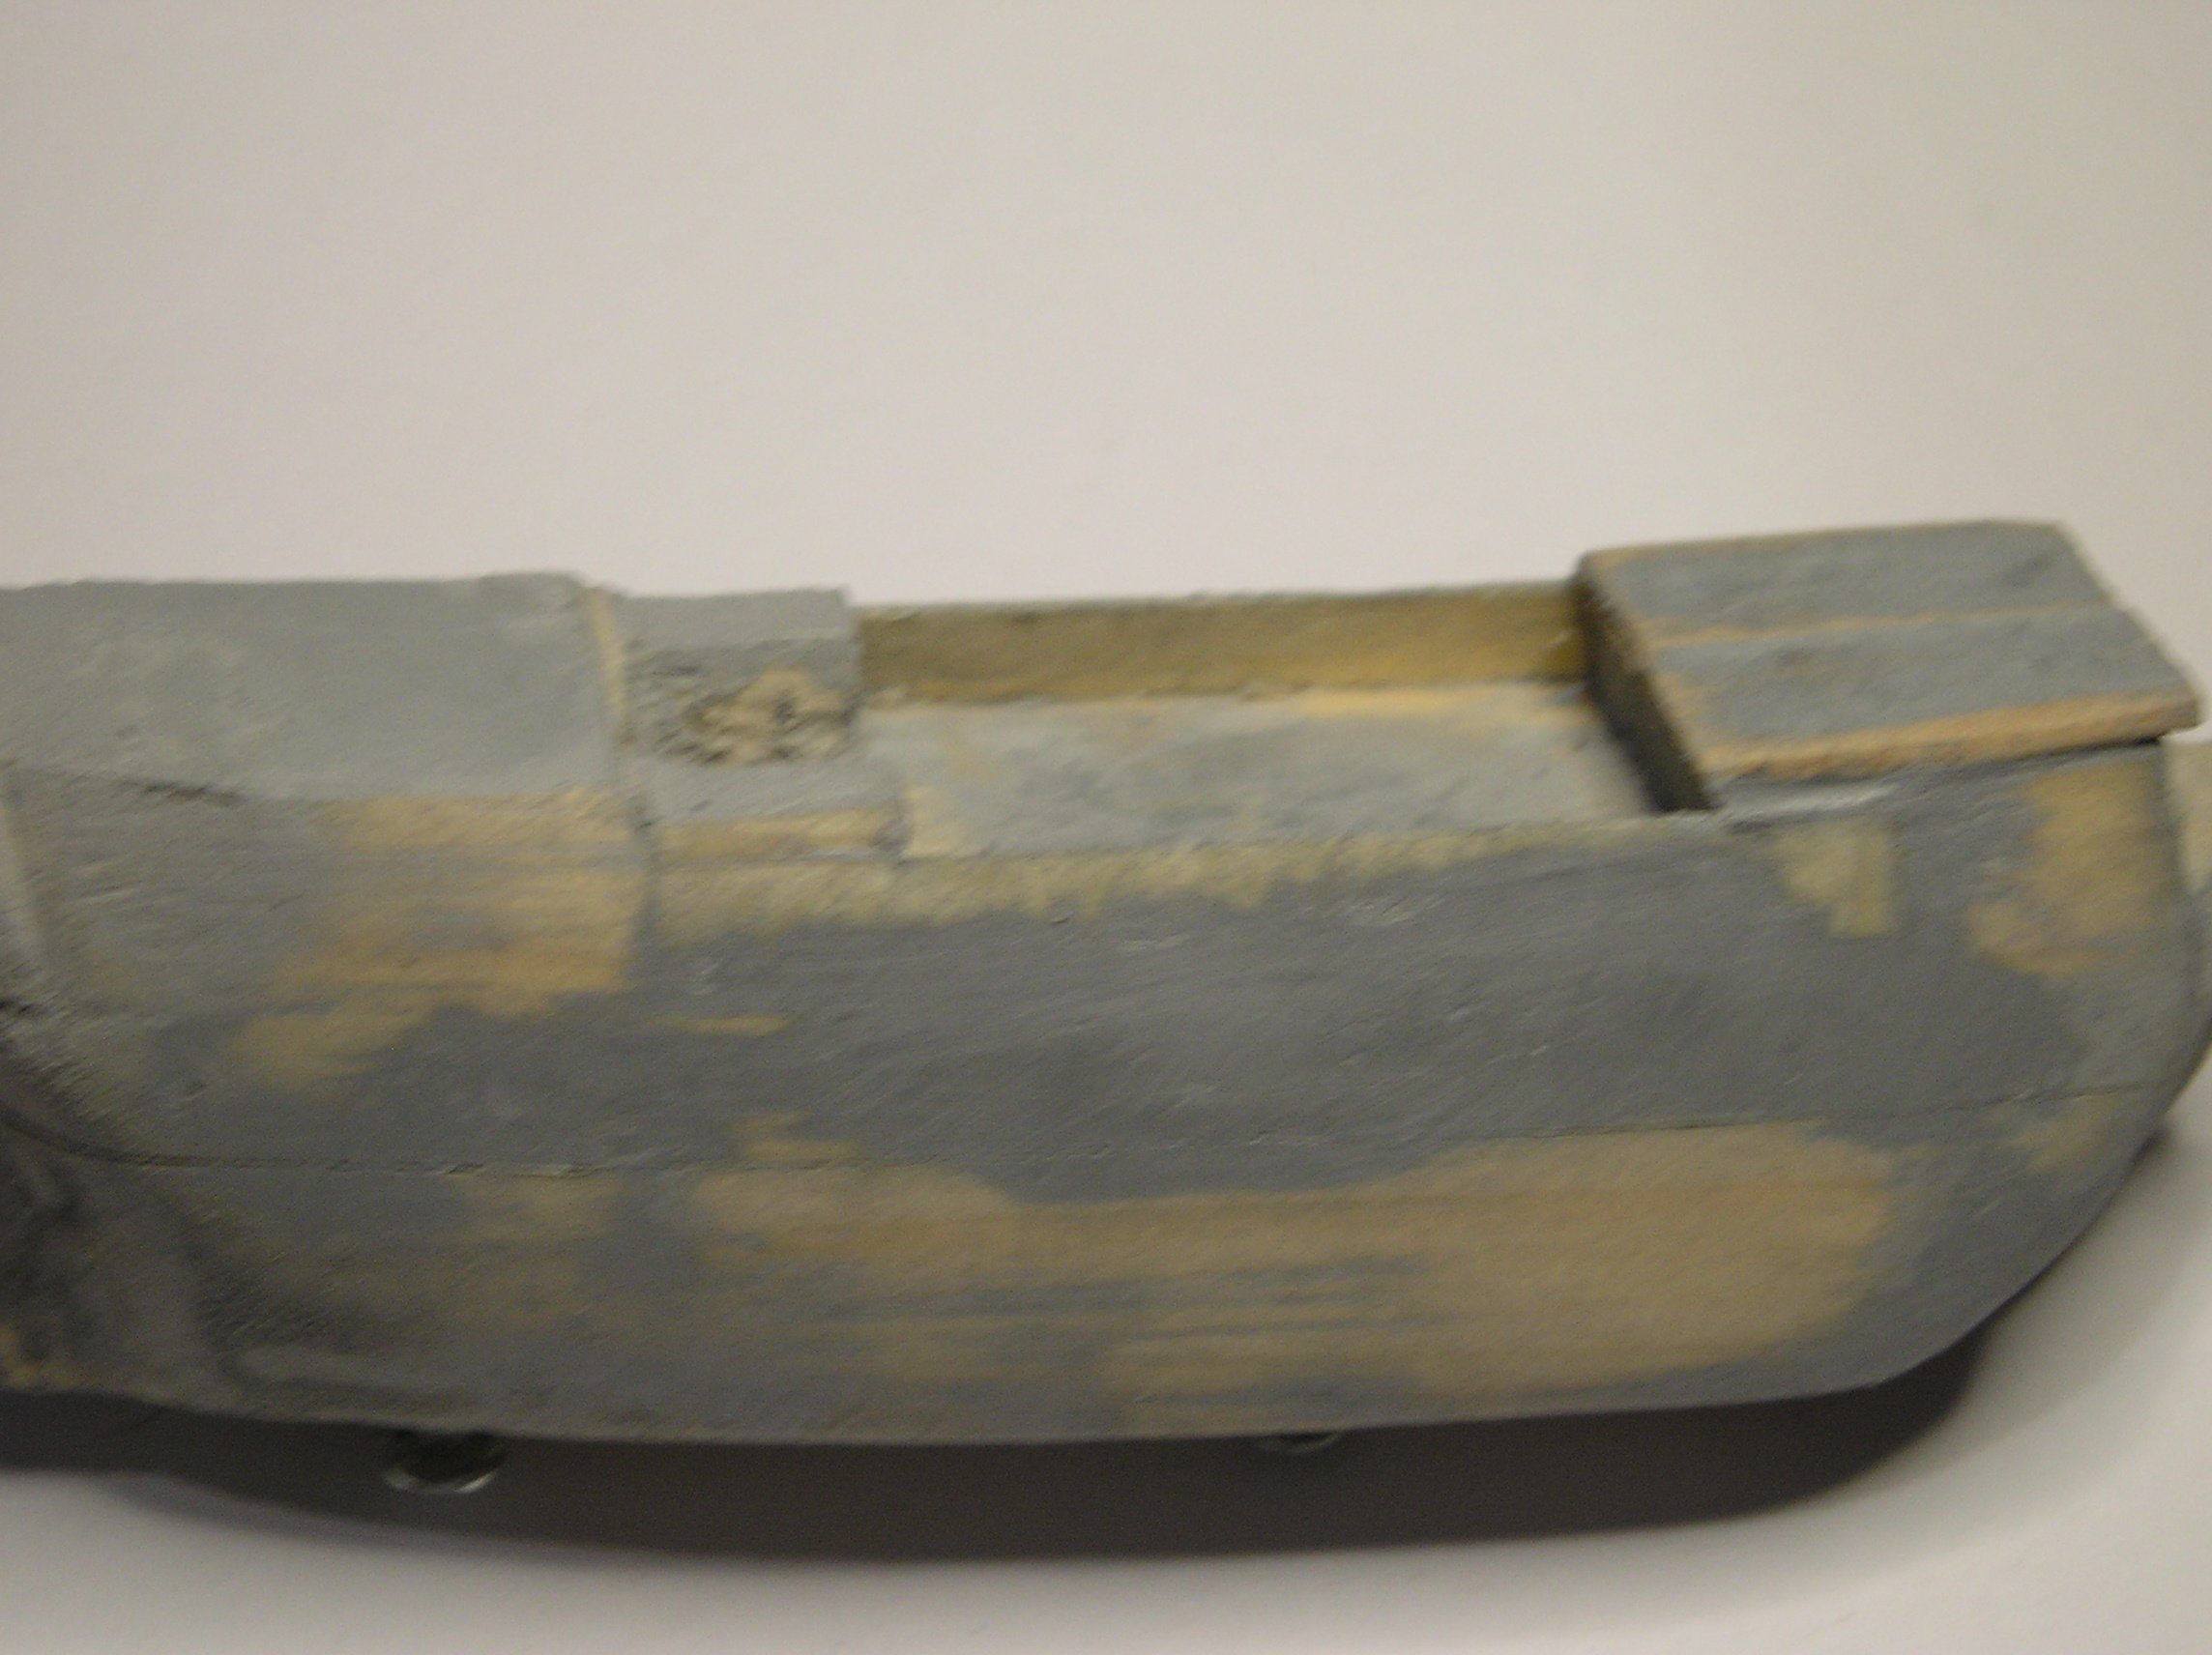
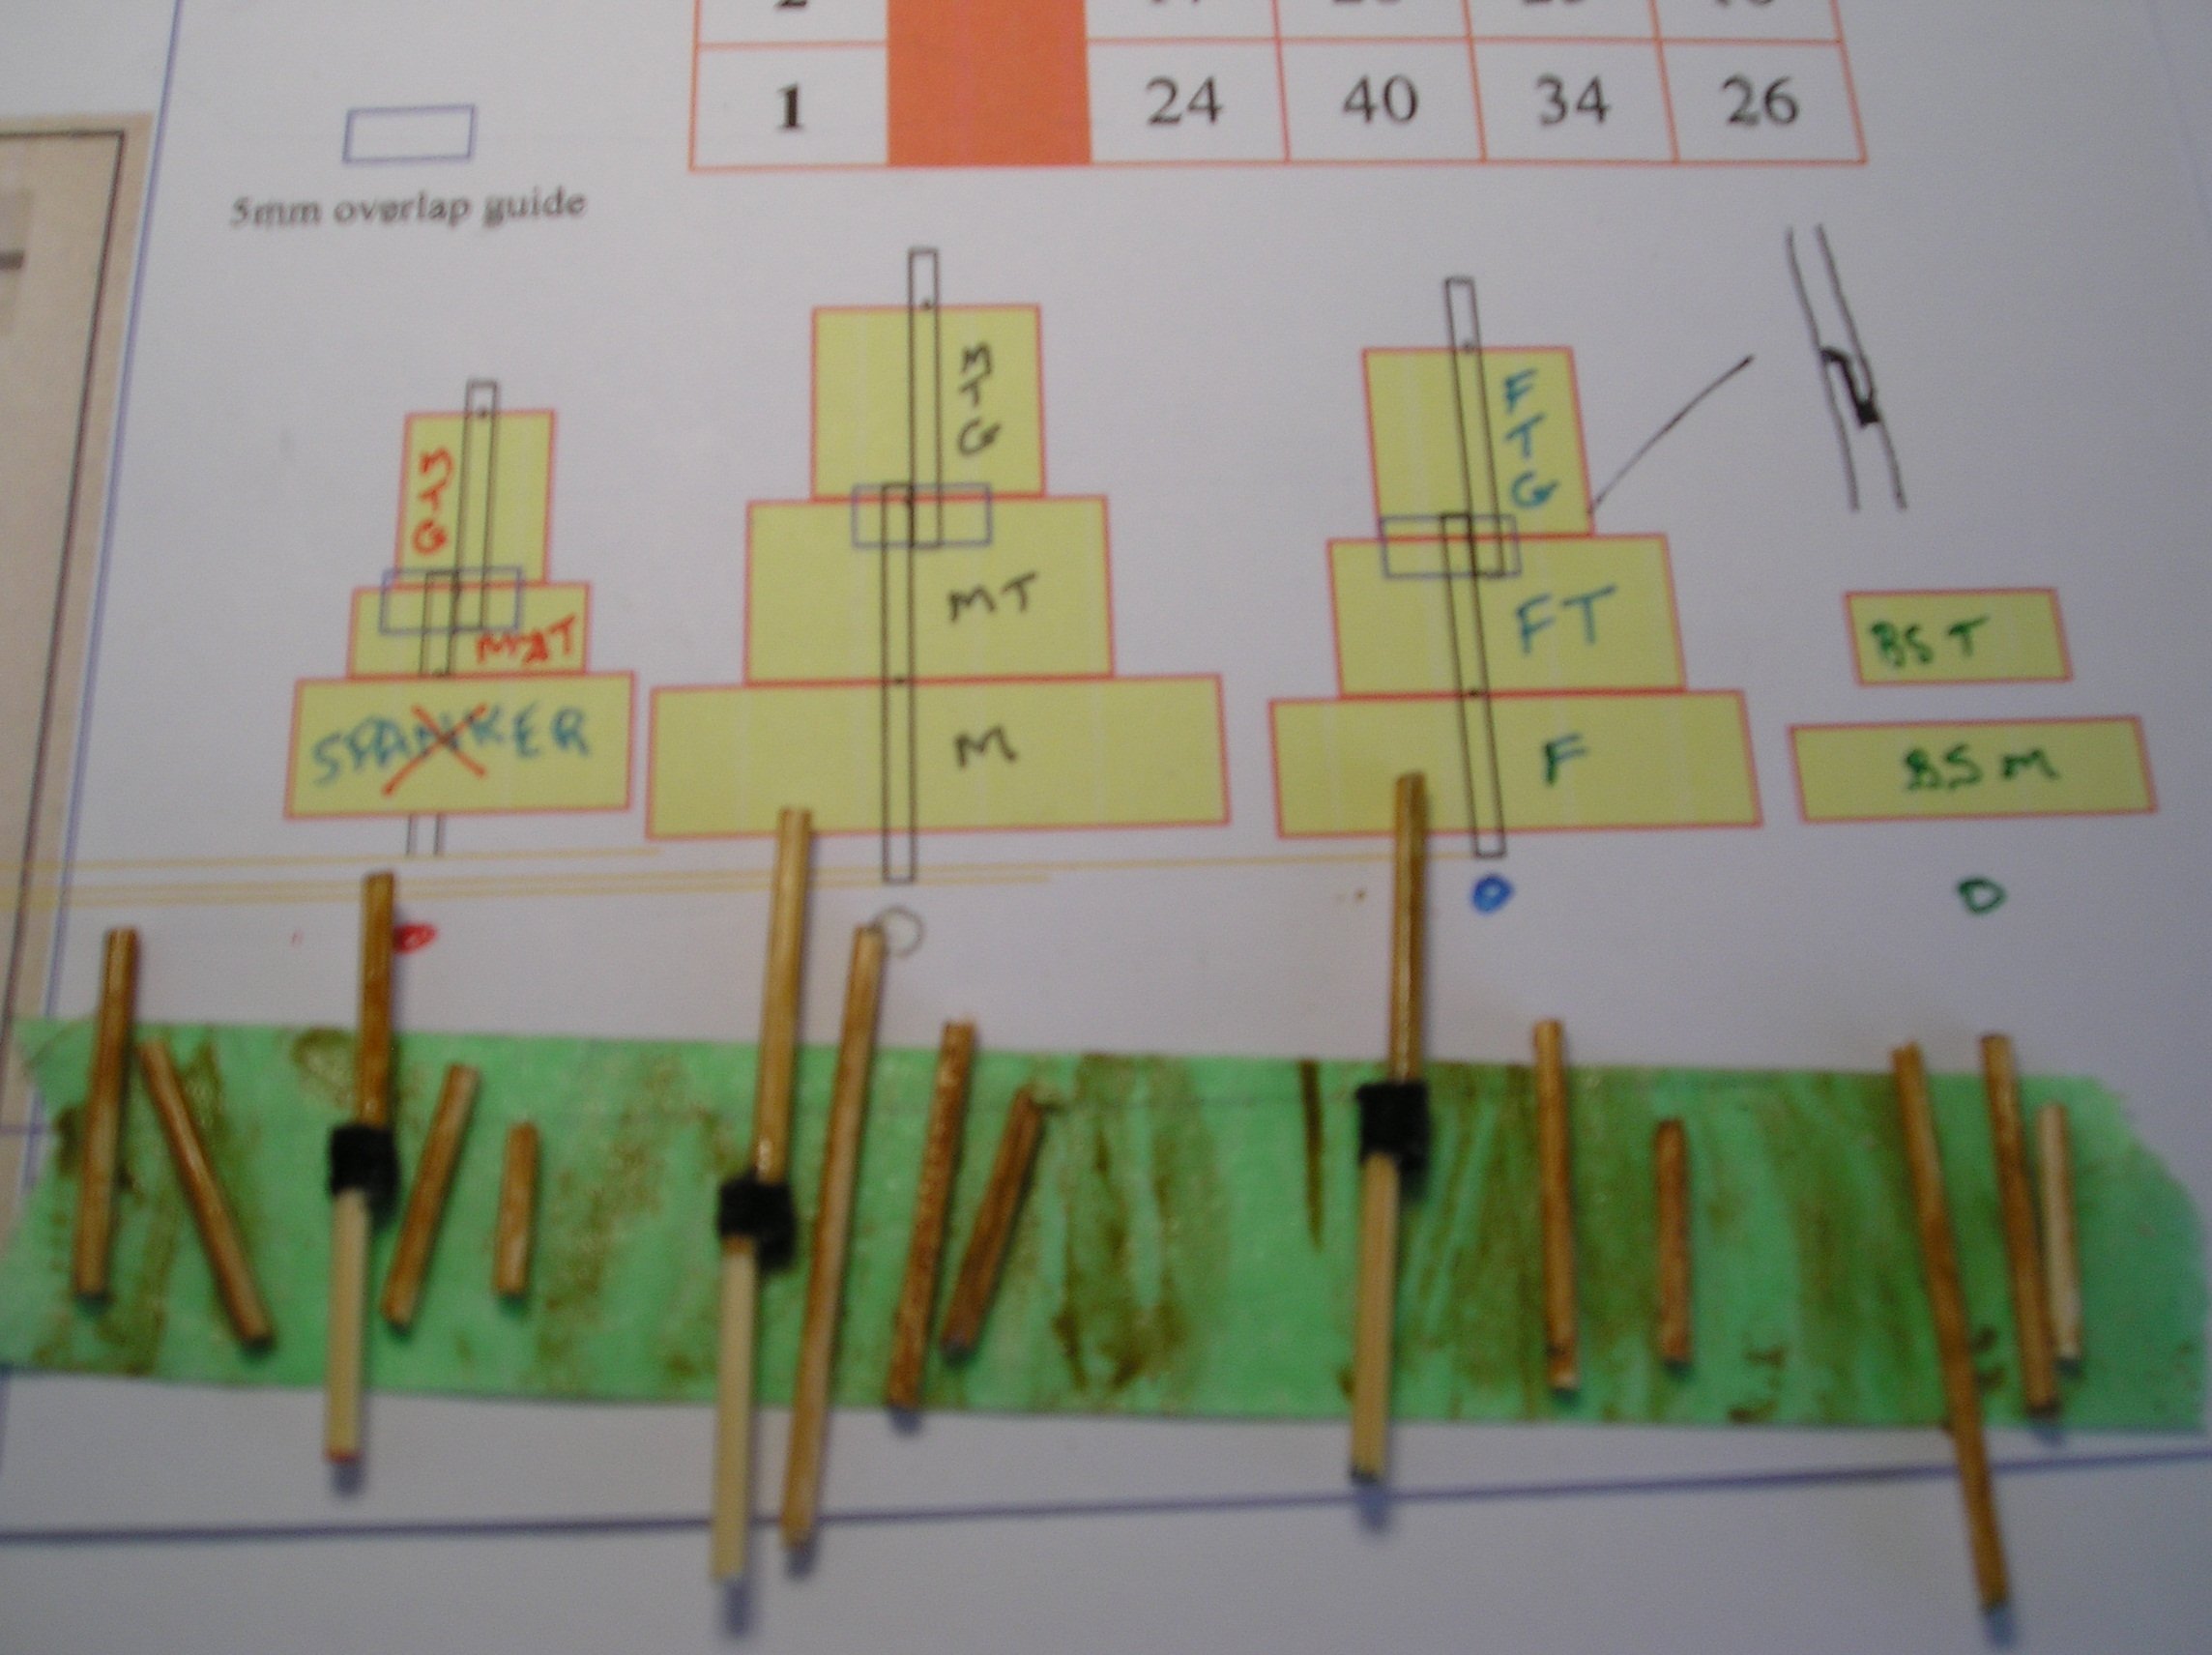
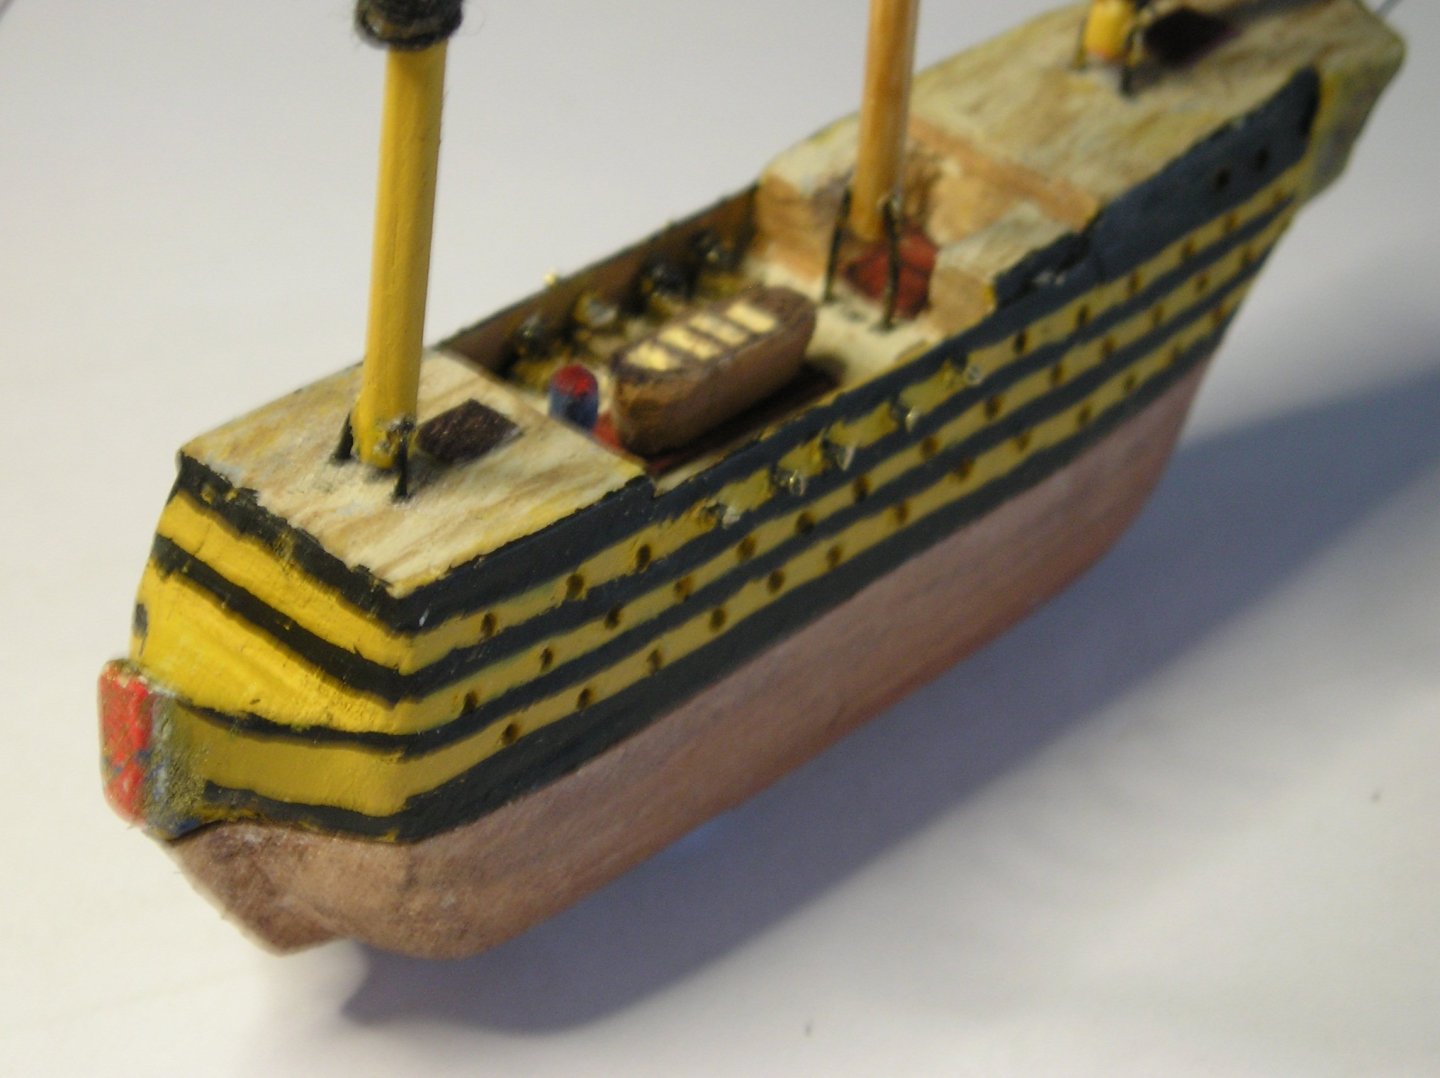
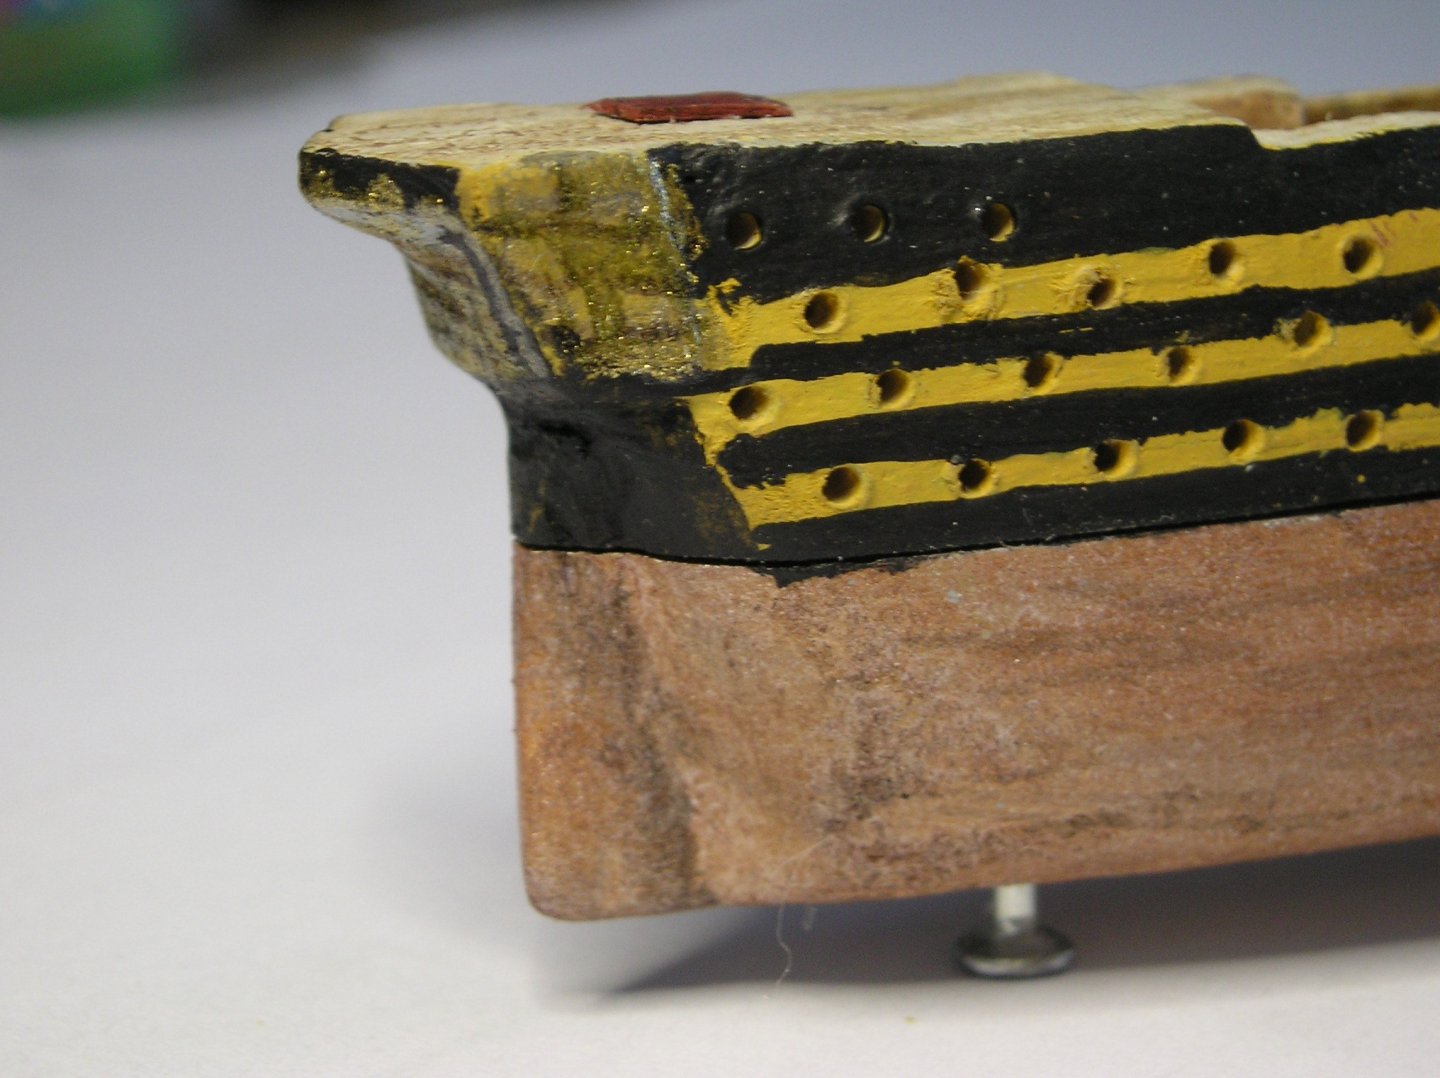
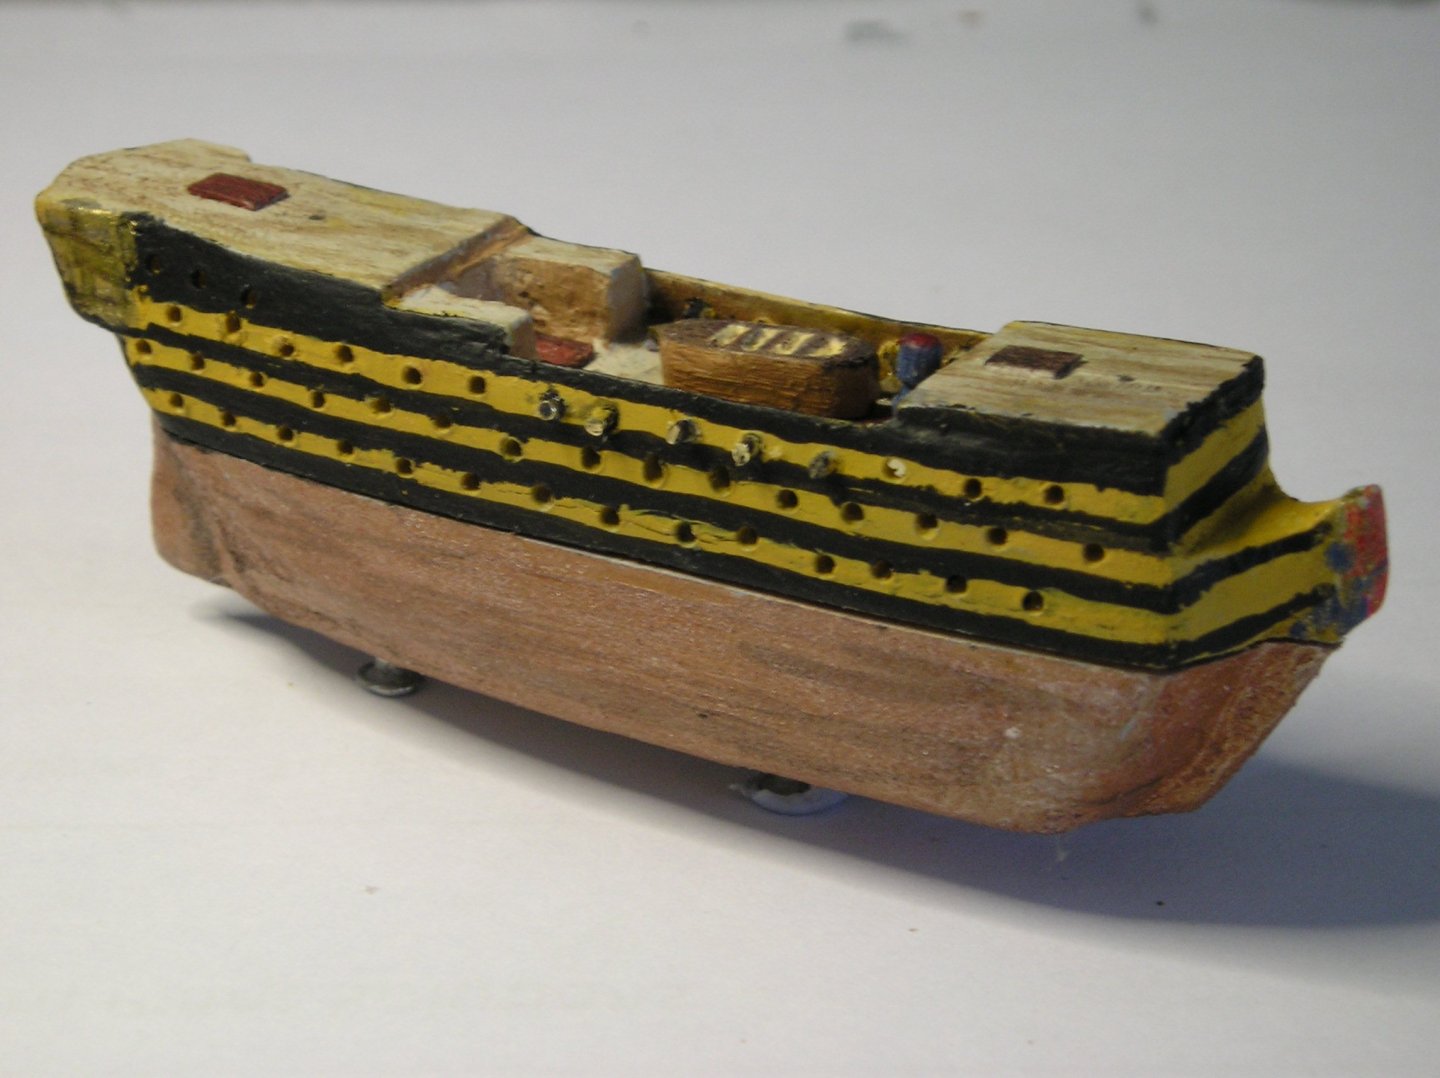
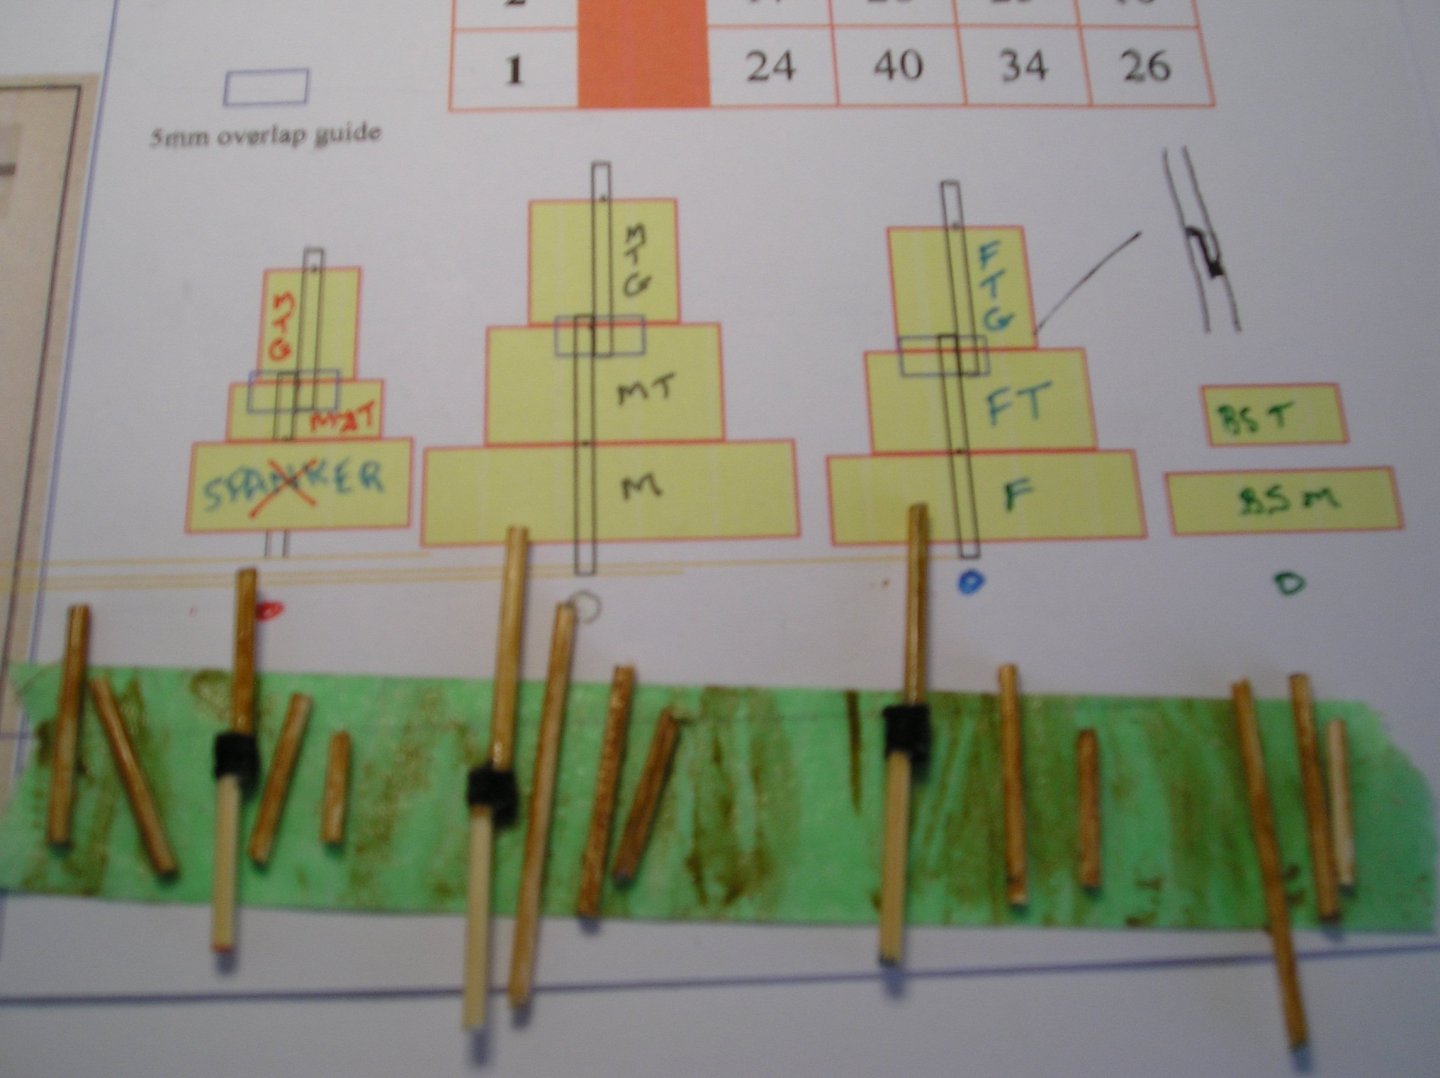
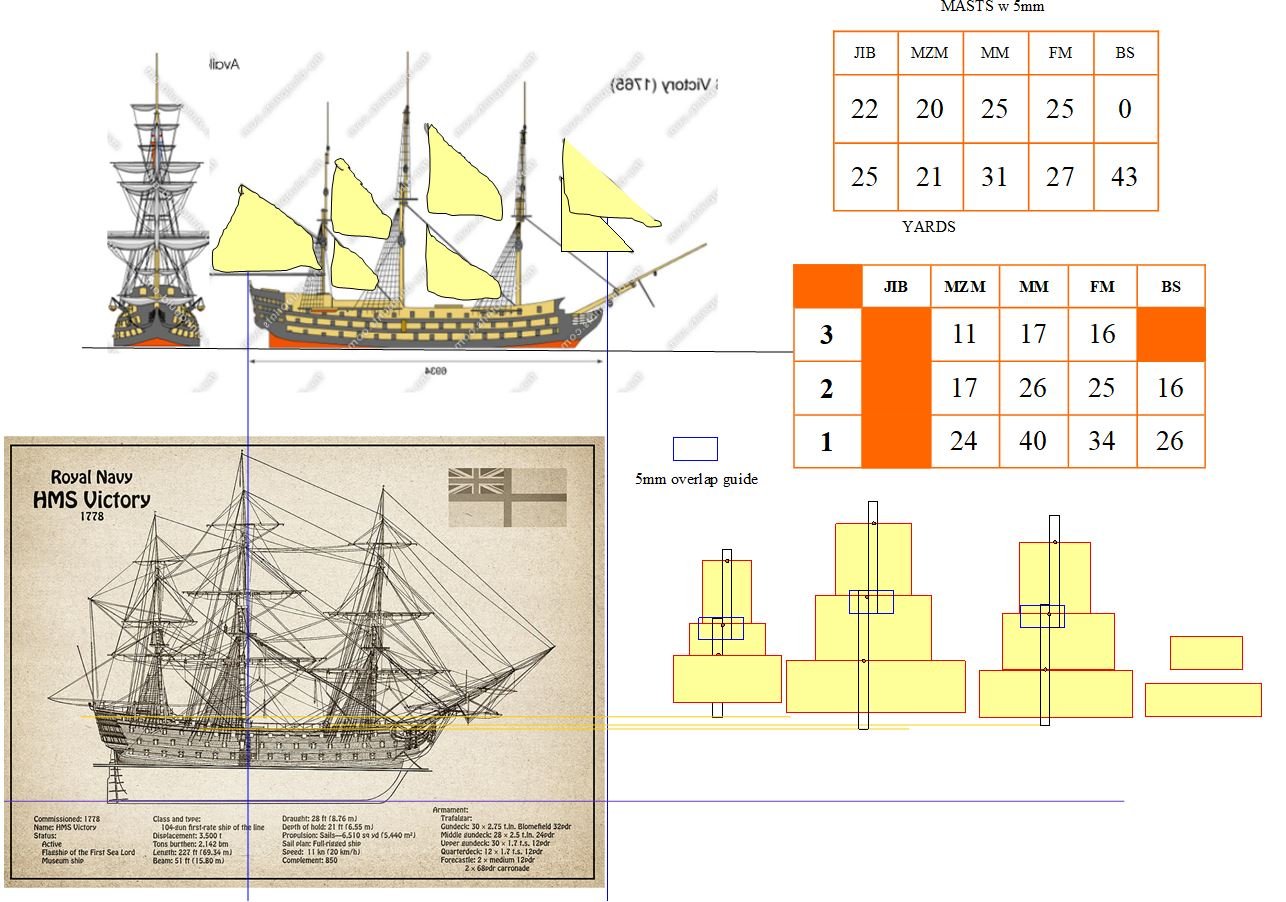
A top day! I was losing sleep worrying about how to paint the black lines on the sided of the hull. I started with 4mm Flexible Tamiya Masking Tape but that proved to be impossible, so with a fine brush I did it freehand and it came out well. I also added a little black Tamiya Panel Line Accent Color to weather the copper lower hull. I have to keep reminding myself that this ship is only 8mm/3inches long, and will be in a bottle to be viewed from a fair distance! At 2:30am I remembered that I needed to have a rigging plan before I could start on the masts and shrouds. So I made one! Before I added any masts I needed to carve out sections under the TOP section so that the shrouds can be added, (See THIS VIDEO from 5:30 to 10:30 minutes to see why). In the diagram below the black line corresponds to the location of the masts on top. The red sections are sized to allow 5 shrouds on each side of the front and main masts (5x2mm spacing), and the 6mm section is for 3 shrouds on each side of the mizzen mast (3x2mm). These sections were gouged out to 1-2mm deep. With that done I started drilling 0.7mm holes in the masts according to the diagram below. The rigging line will be 0.5mm thick, as will be the swivel wire on the bottom end of each mast. When adding the wire to the bottom end I made sure I had enough wire to allow the mast to fold horizontally over obstacles. In the diagram below you can see that the main mask is raised off the deck higher that the other masts as it needs to clear the poop deck. I glued the mast into the holes I drilled (0.7mm) and added the two booms for the spanker sail, a small eye bolt on the stern and I simply threaded the line from stern to foremast. DONE! Cheers


-
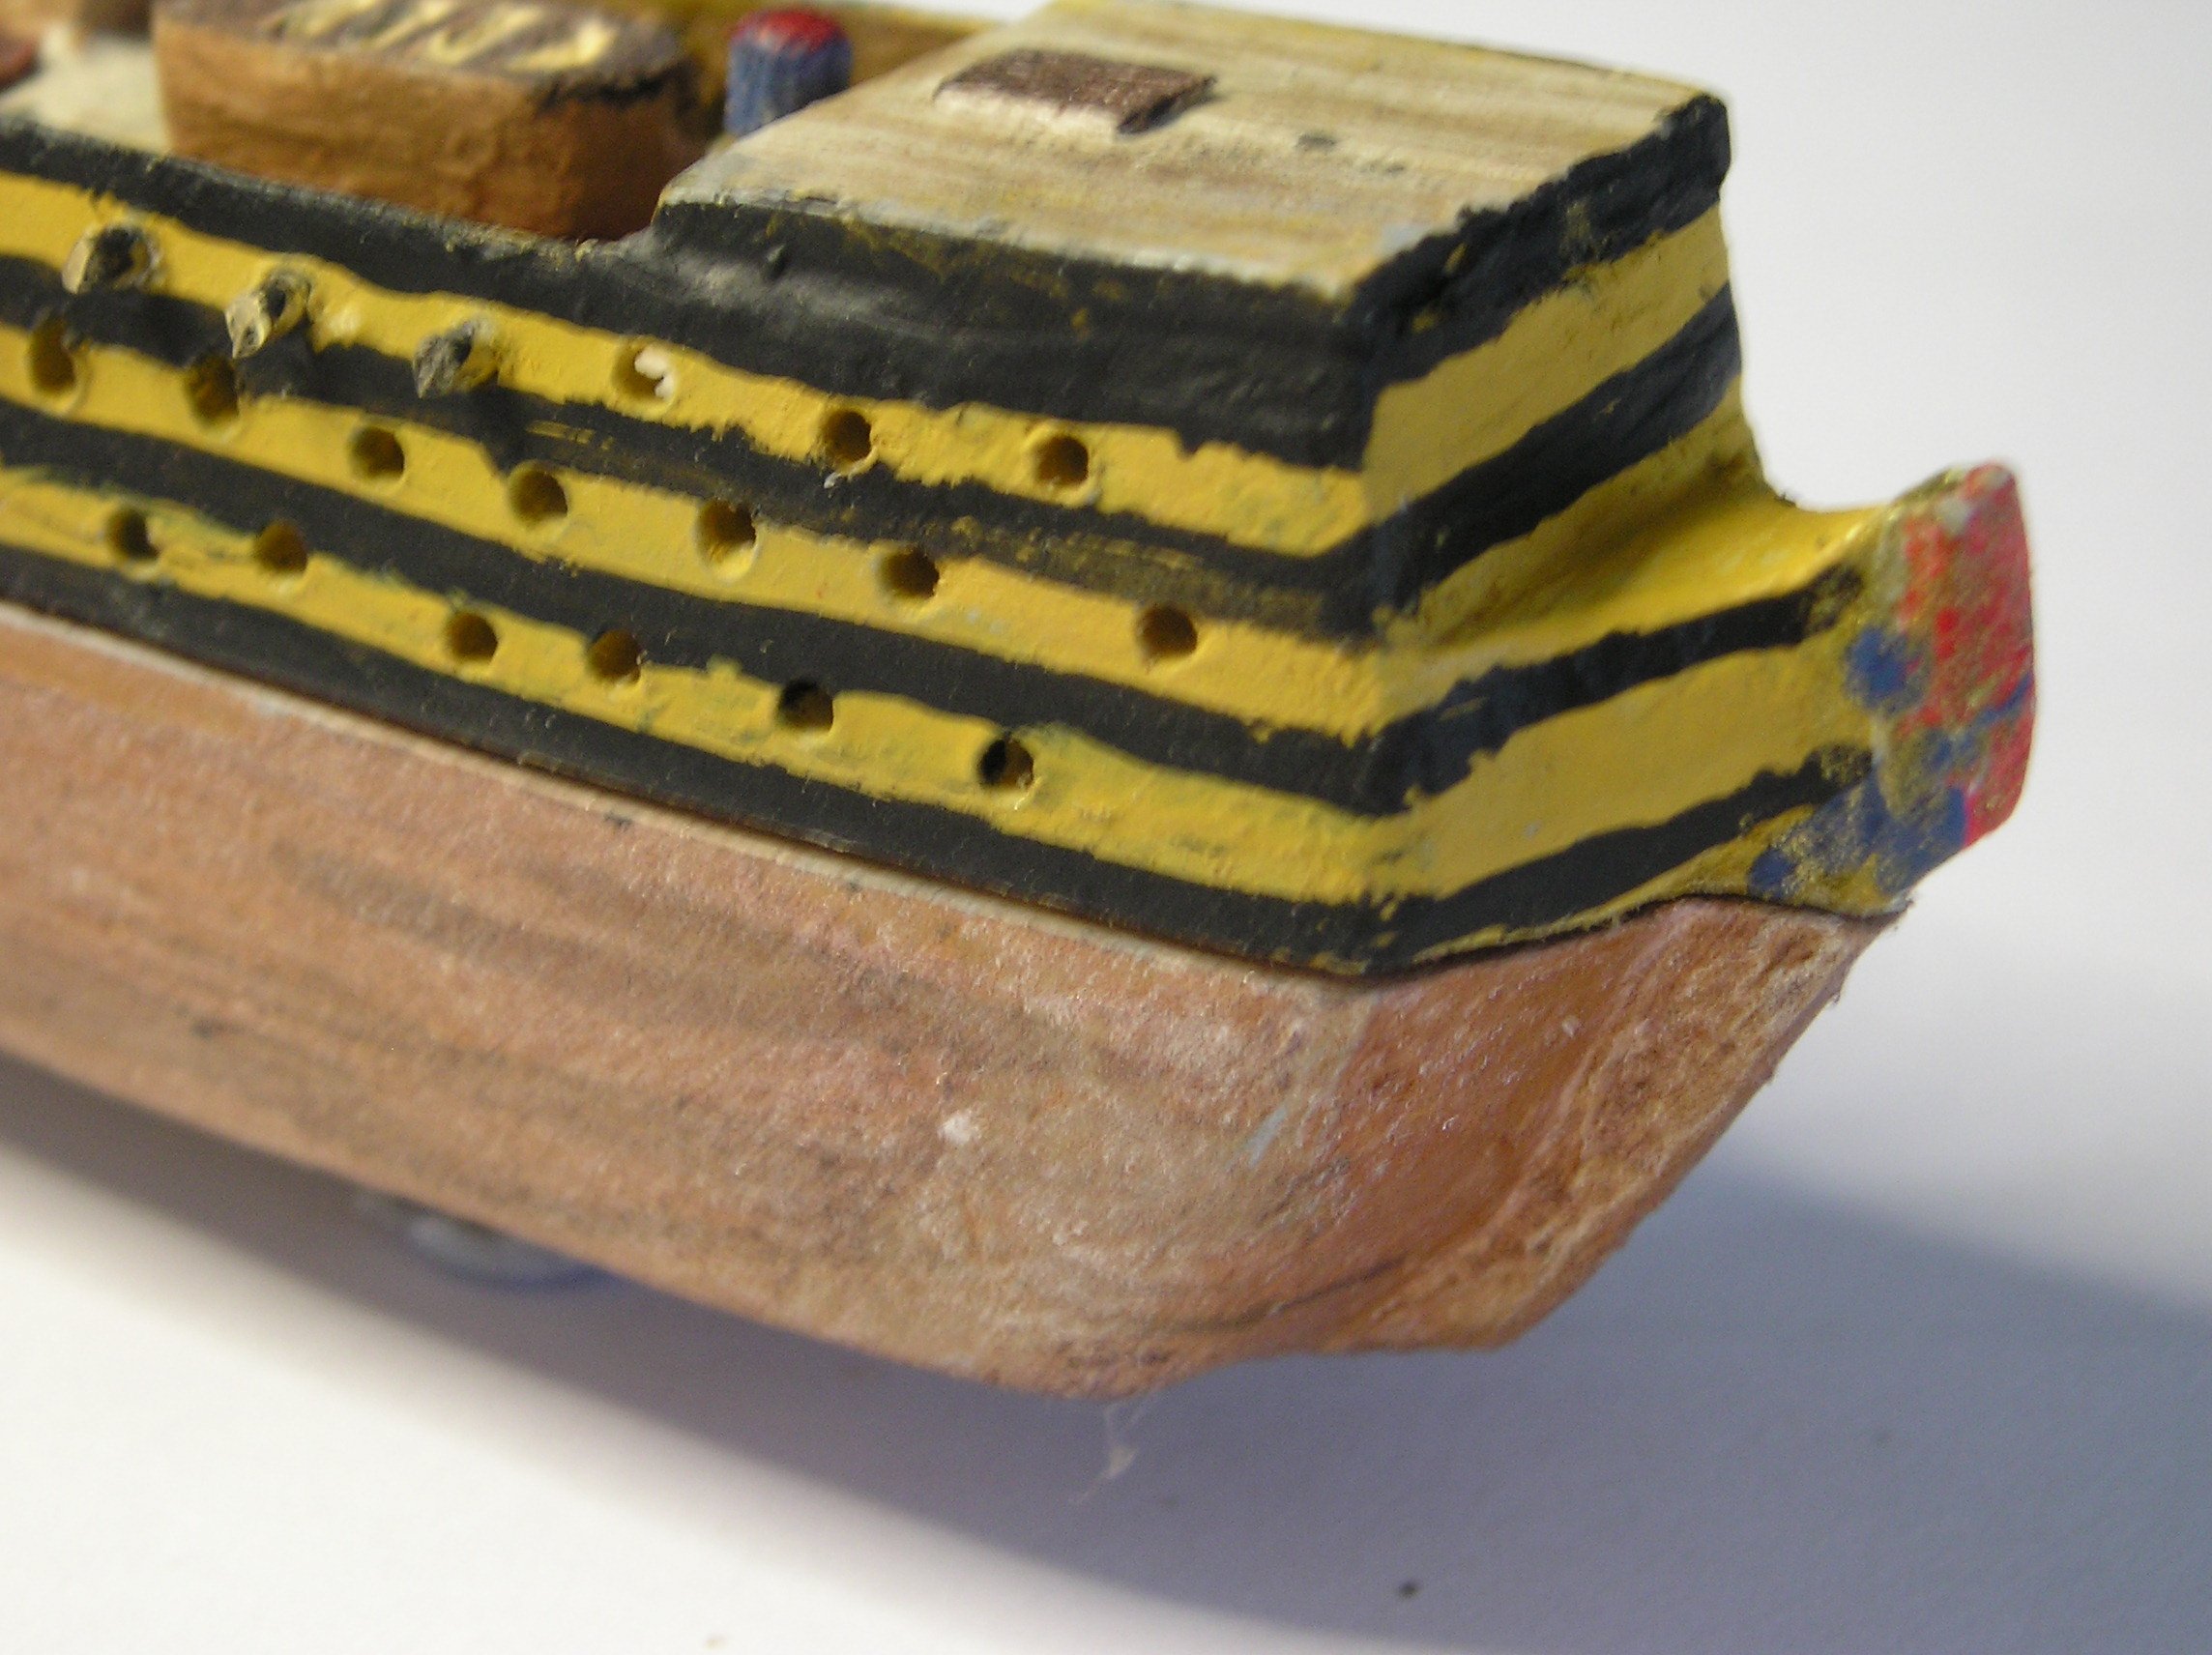
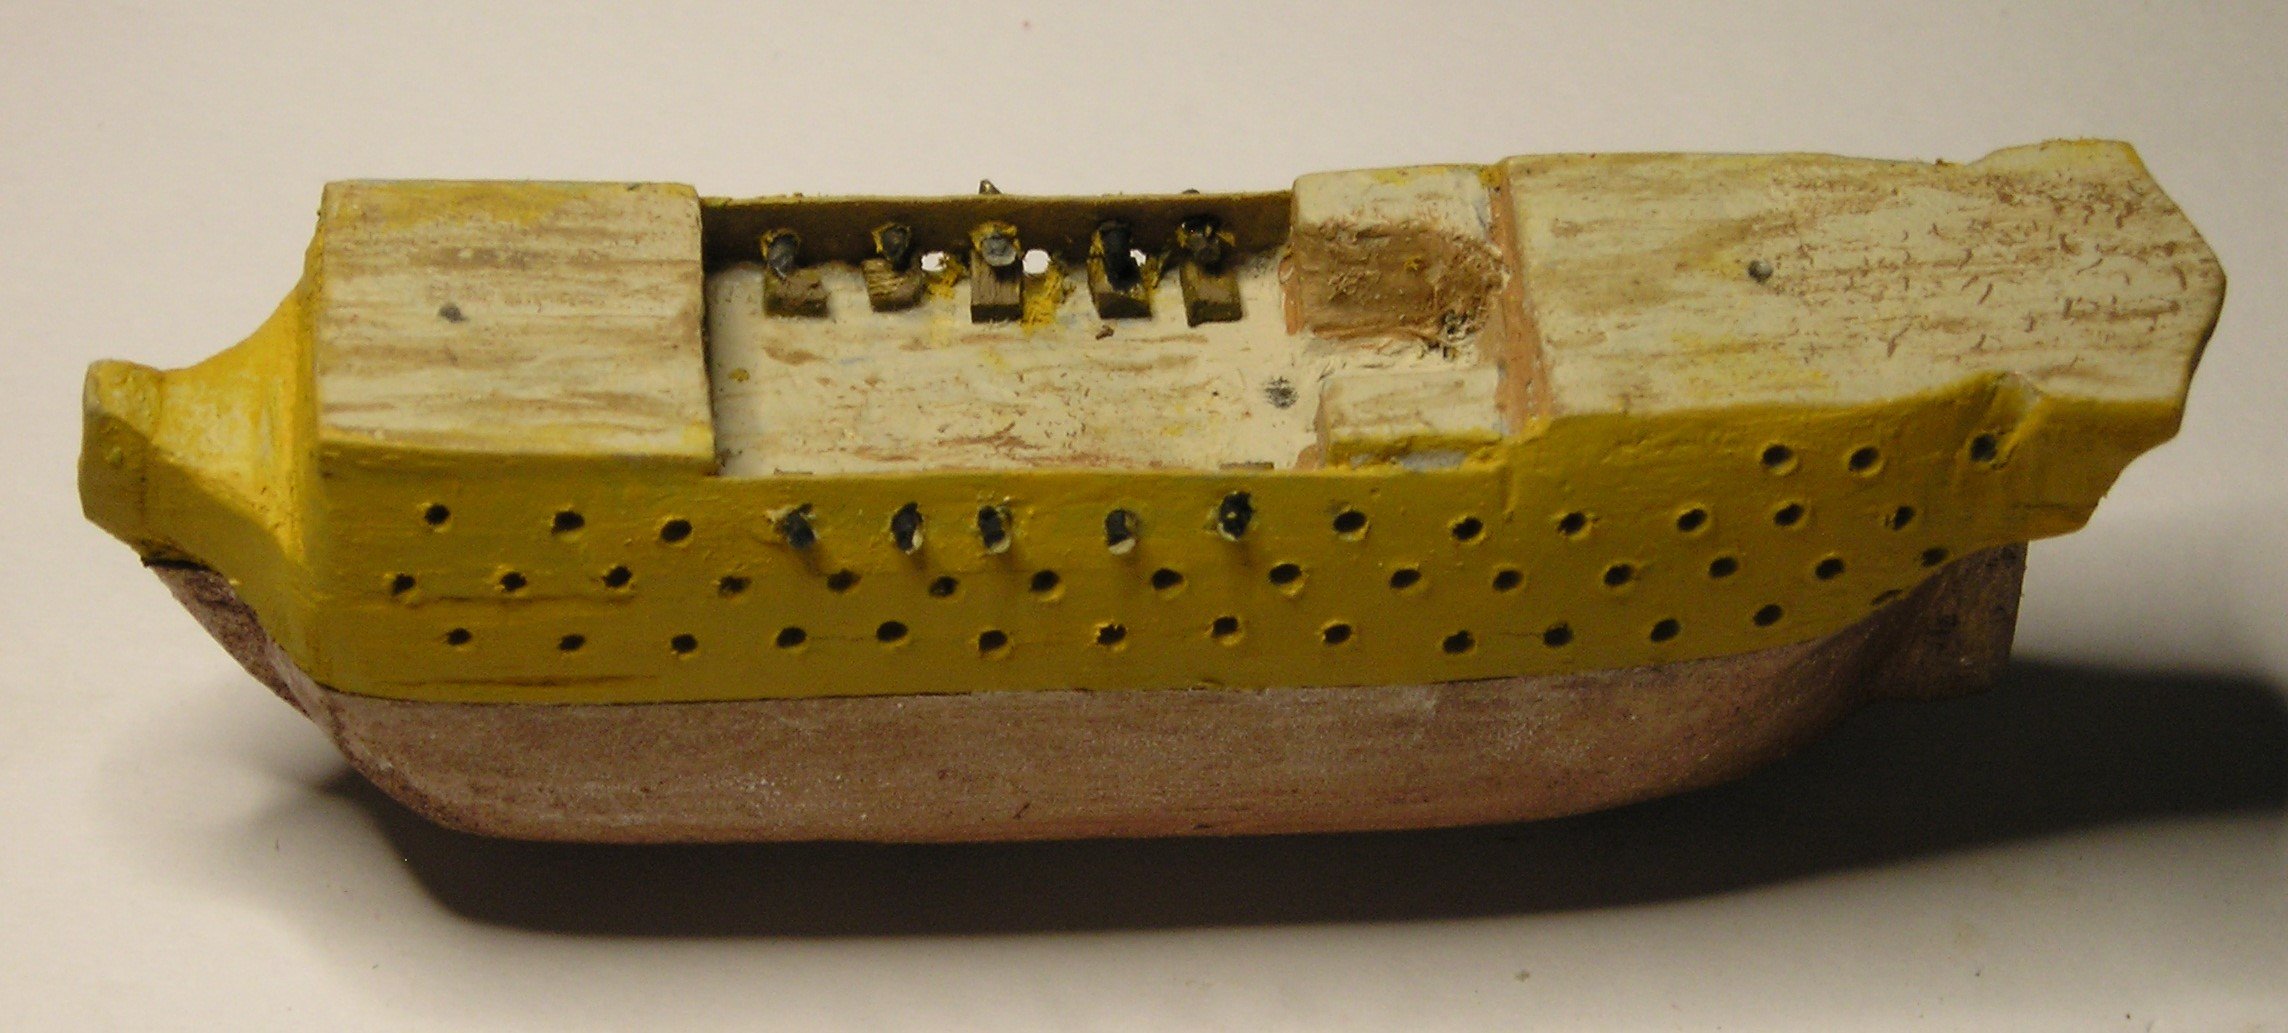
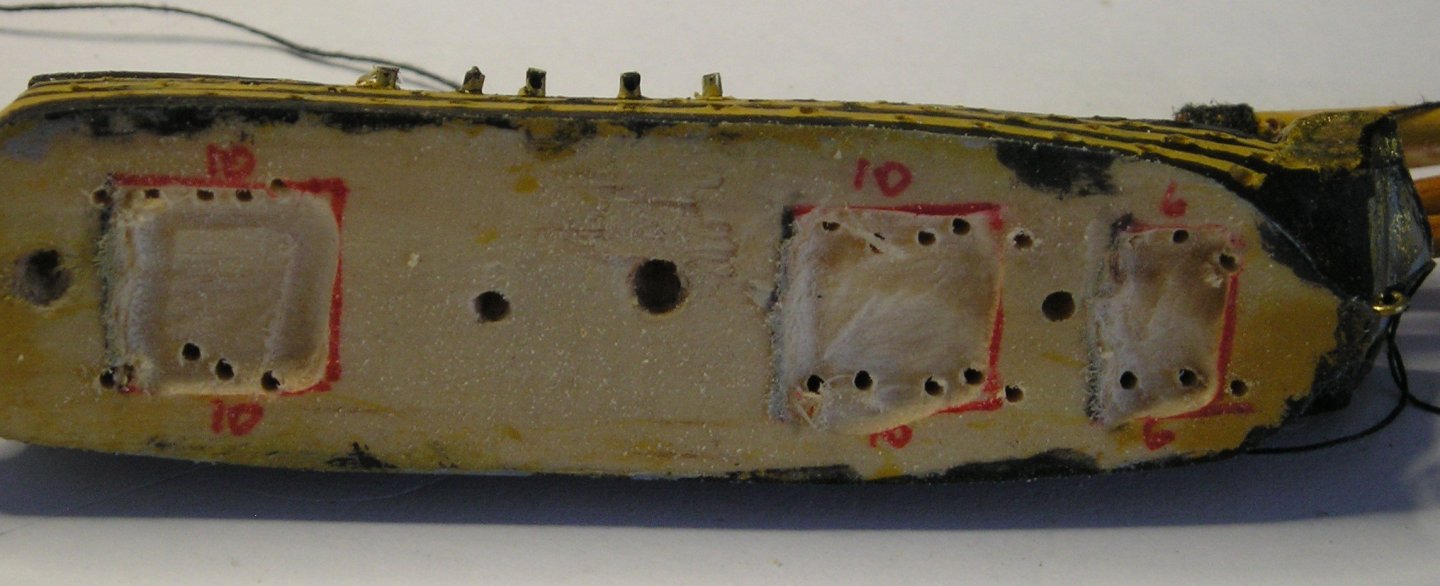
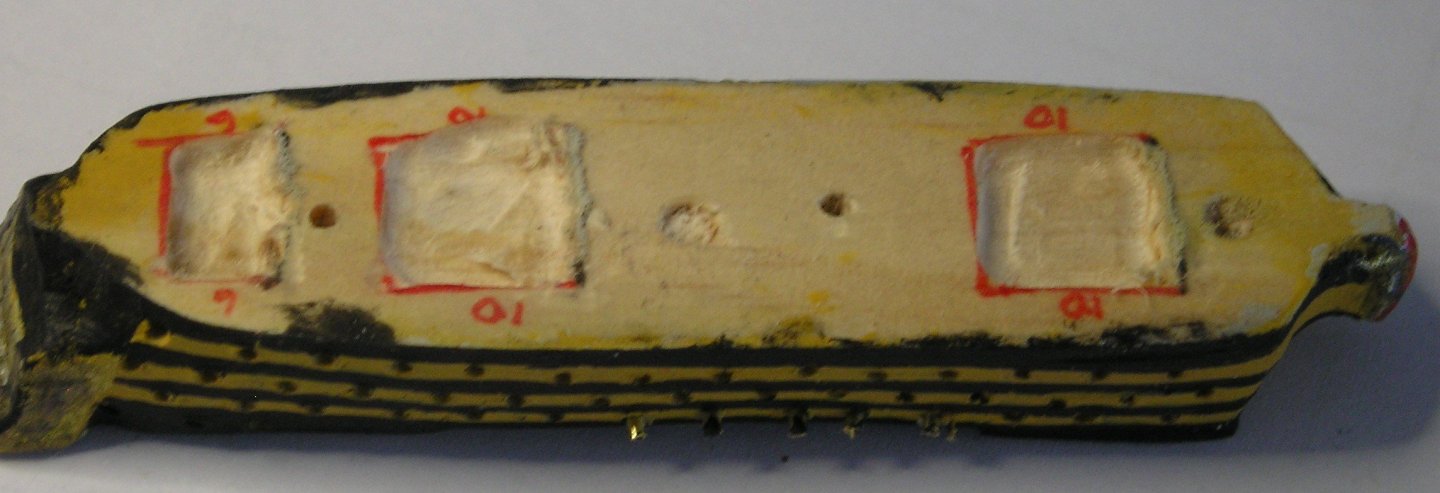
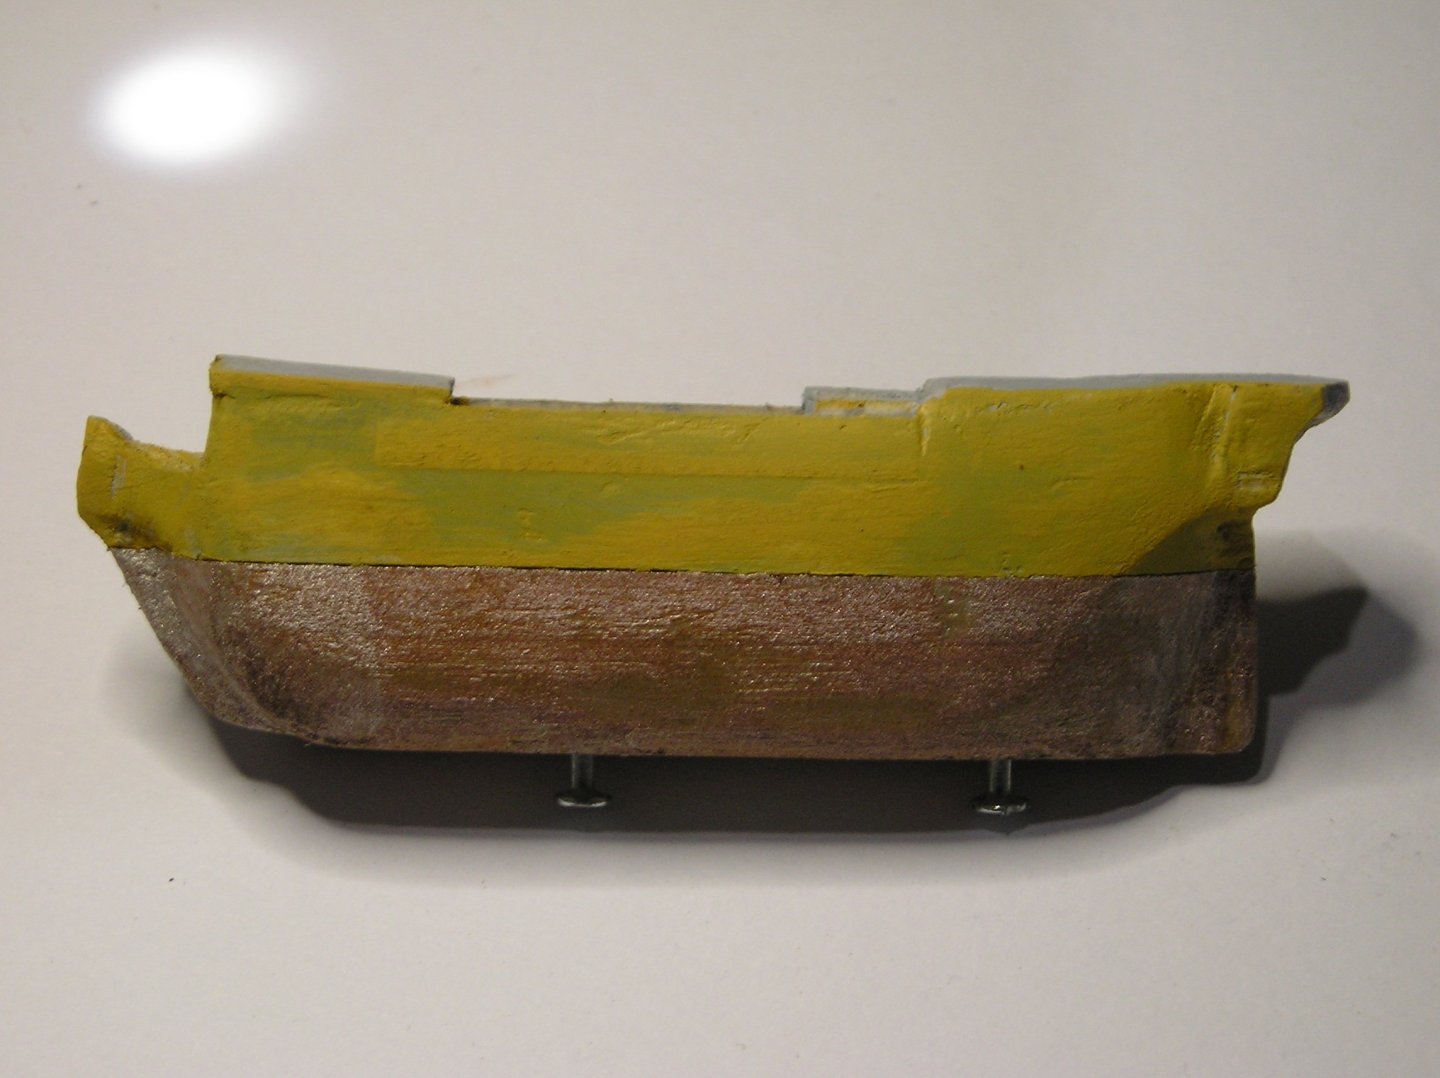
Not much time available to me today, but I did manage to do some painting, drill the gun ports, and add the guns to the main deck. So here's the evidence! I weathered the upper deck with Citadel Colour 'Wraithbone' and streaking of Tamiya XF-52 'Flat Earth' It looks better than the image suggests' I glued another diagram of the sides onto the sides and drilled the gun ports using a 1mm bit. Also then added the guns on the main deck (tricky but ok). More paint ... I like to paint the upper edge of the BOTTOM wood as sometimes the lighter colour may show when you join the two pieces. I'm happy with today's results. Tomorrow, given time, I hope to start on the black stripes on the upper hull and finish items on the decks. Have a good weekend, Cheers


-
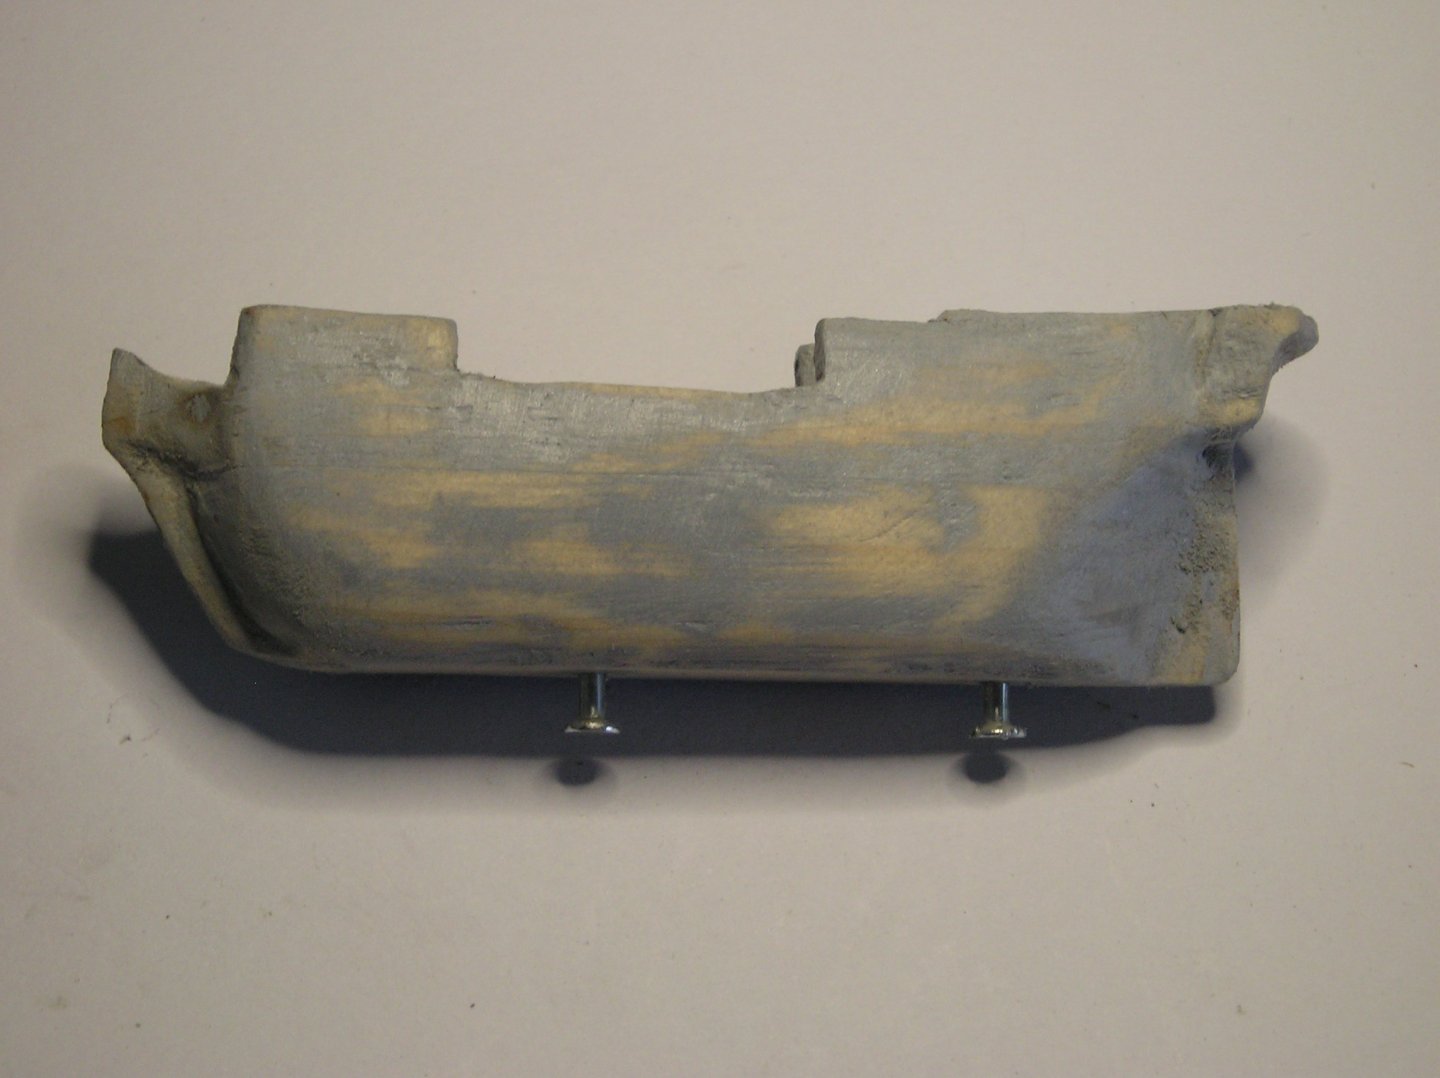
A short but productive day working on the gunwals, paint, masts and yards. I needed to build the gunwales on the sides of the main deck. I used 4.0x0.4mm basswood. A little Tamiya Putty (Basis Type) made the edges fit in nicely. I also needed to build up the forecastle with 1mm thick basswood to avoid lowering the gunwales to accommodate the cannons. By using the ready made diagram measurements, the masts and yards were easy to cut. The masts have a 5mm overlap which consisted of a filed recess to give the glue a flat surface to attach to and also help line up the mast sections. The threaded and glued ties also add strength and provide authentic effect. You may notice the colour coding on the mast bottoms so I don't get them confused. The top half of the mast are stained and the bottom halves are awaiting yellow ochre paint (as pointed out in my research). I used cocktail skewers and toothpicks for the masts and yards. Finally, the first coat of Vallejo Yellow Ochre (70.913) and Vallejo Copper (77.710) were applied. As it works out, the divide between the TOP and BOTTOM blocks is where the waterline is. NB: I still have NOT glued the two halves together. Tomorrow I hope to locate the portholes and start on the deck items and colour. Have a good one! Cheers,


-
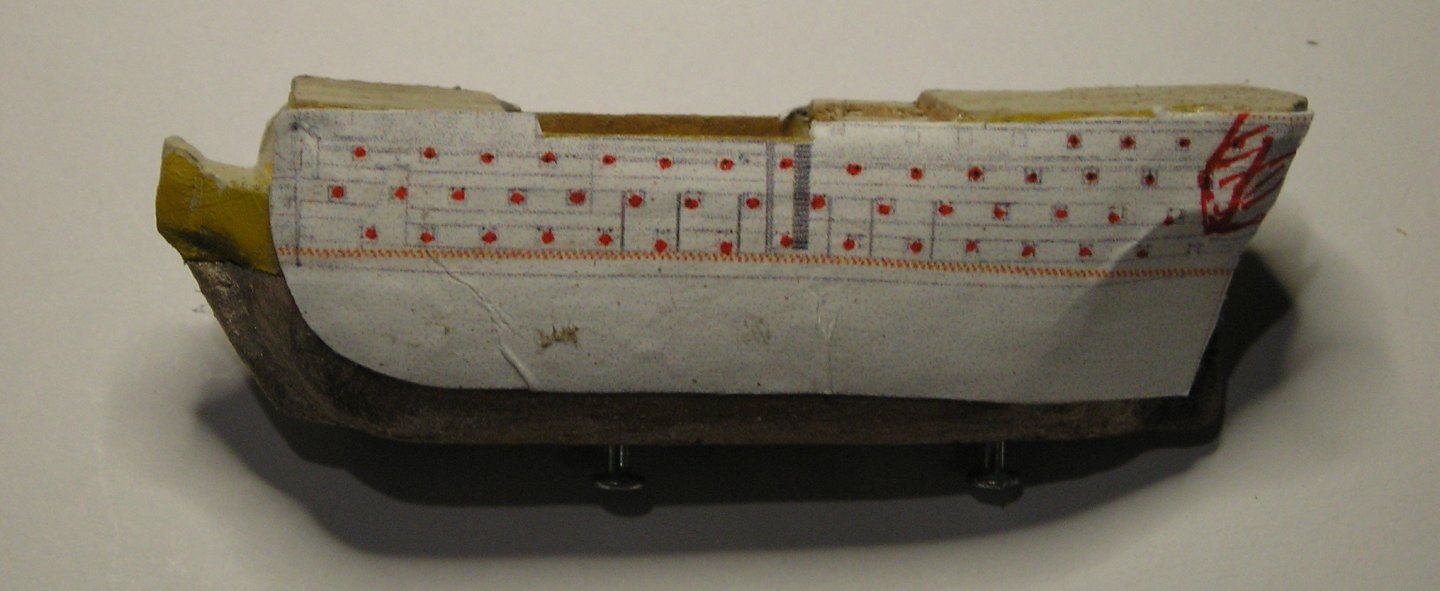
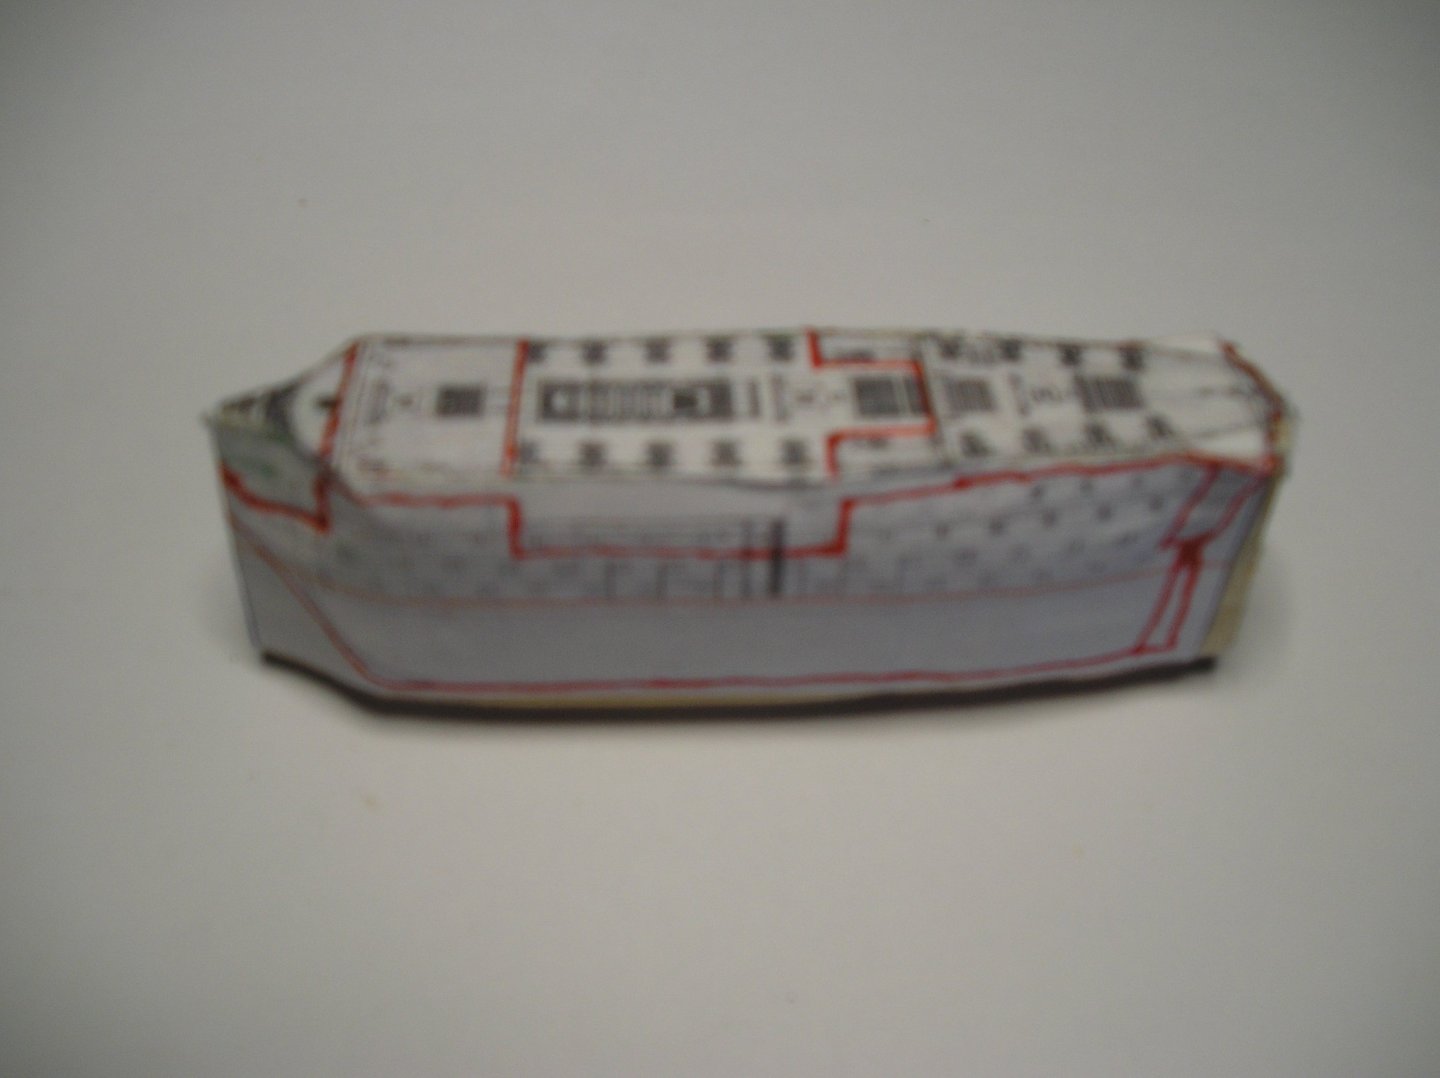
Next step is to do some serious shaping from top and side-on. I glued (using PVA) a scale diagram on each side of the blocks using the top plan to line up the sides, and the orange lines on the join. I used my Dremel but it still took about two hours. With the help of a primer and some putty, the result is as 'smooth as a baby's ................. cheek! It has been an enjoyable day. Cheers,

-
Brunnels, you have made a great start on this build. Enjoy every moment as it is a good looking ship. Cheers,
-
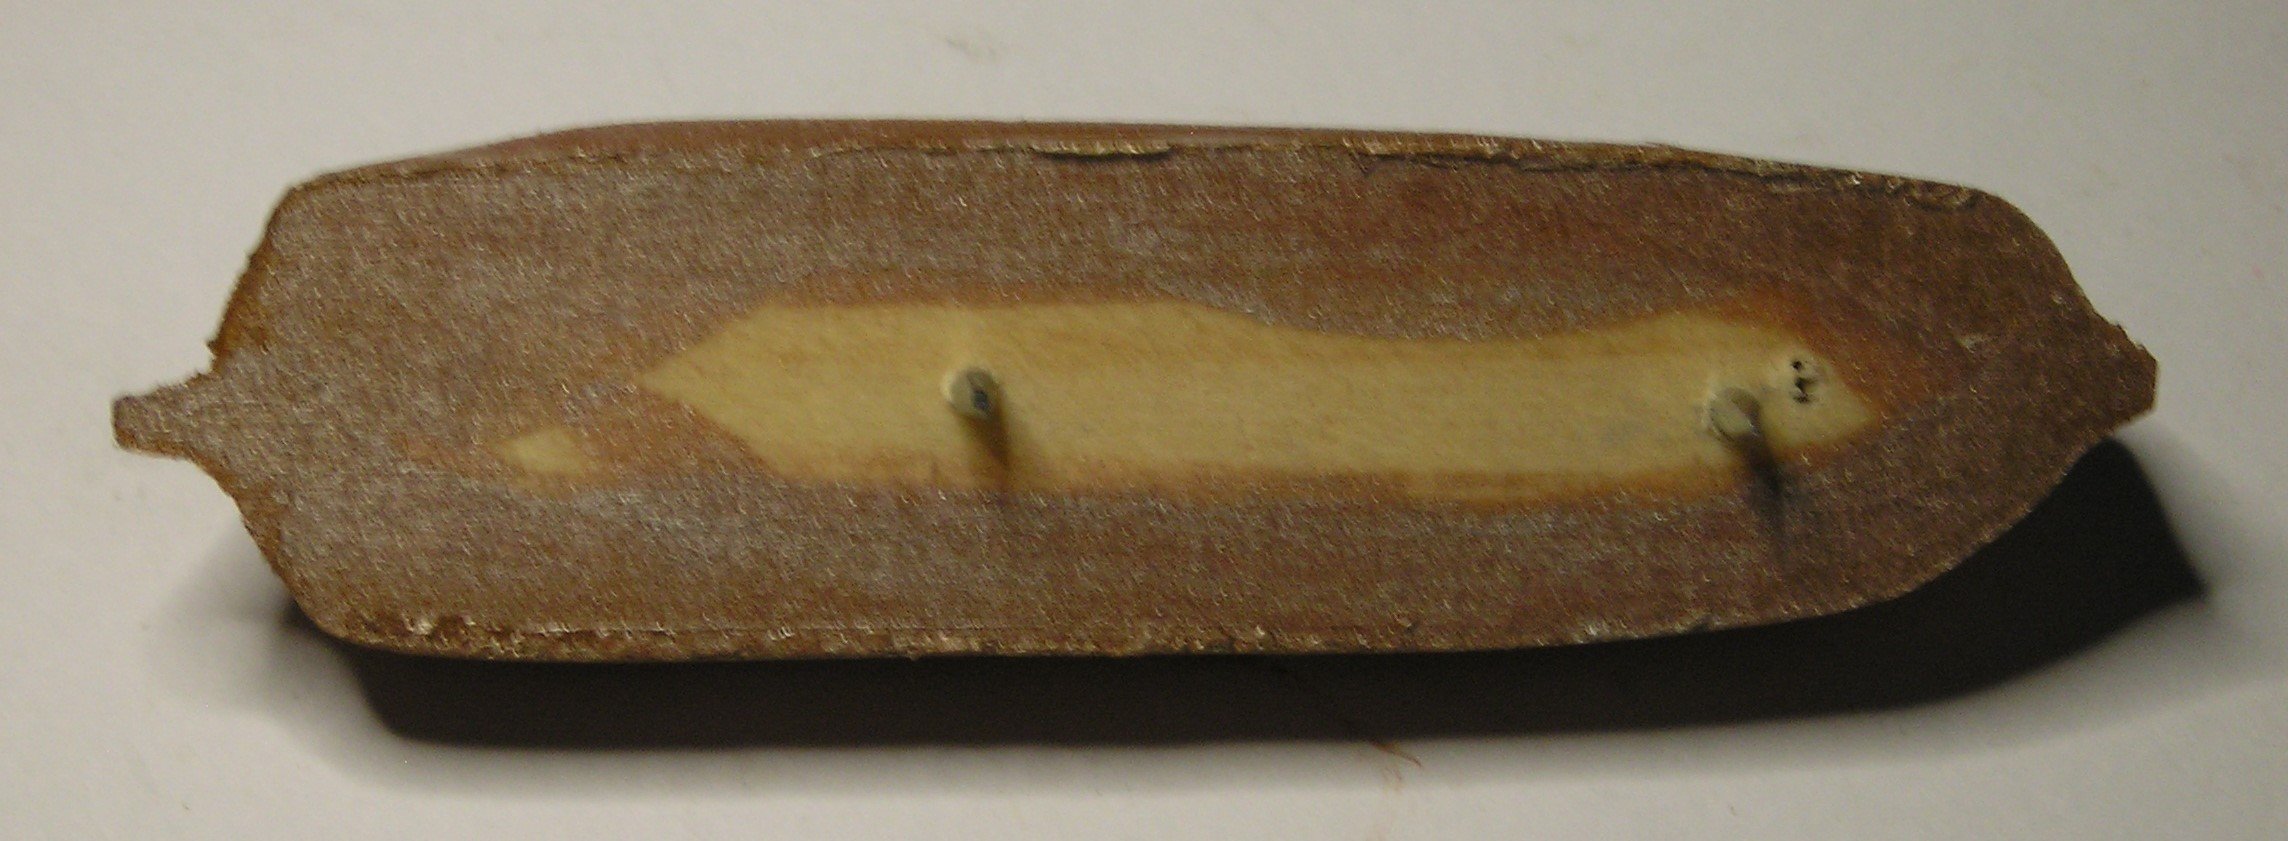
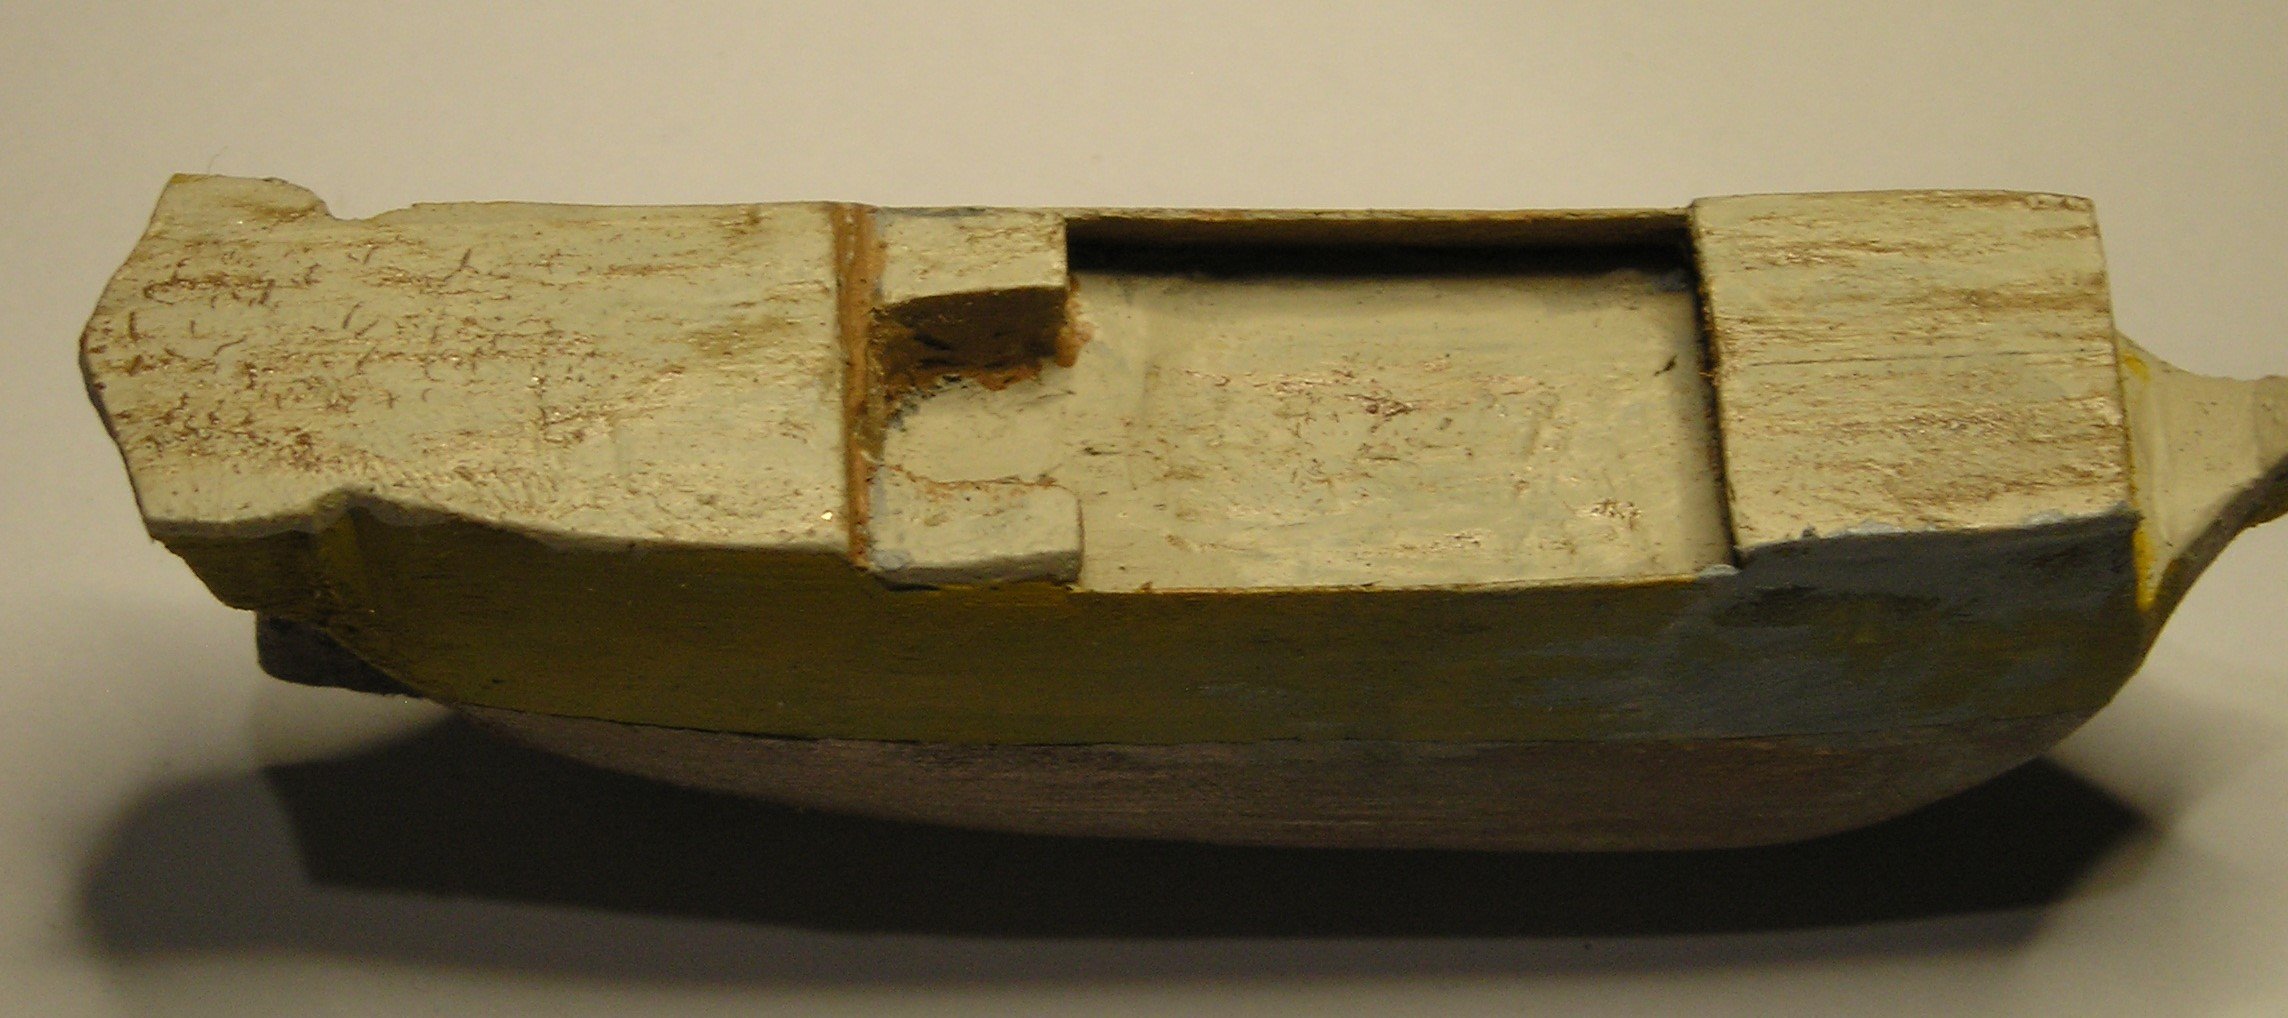
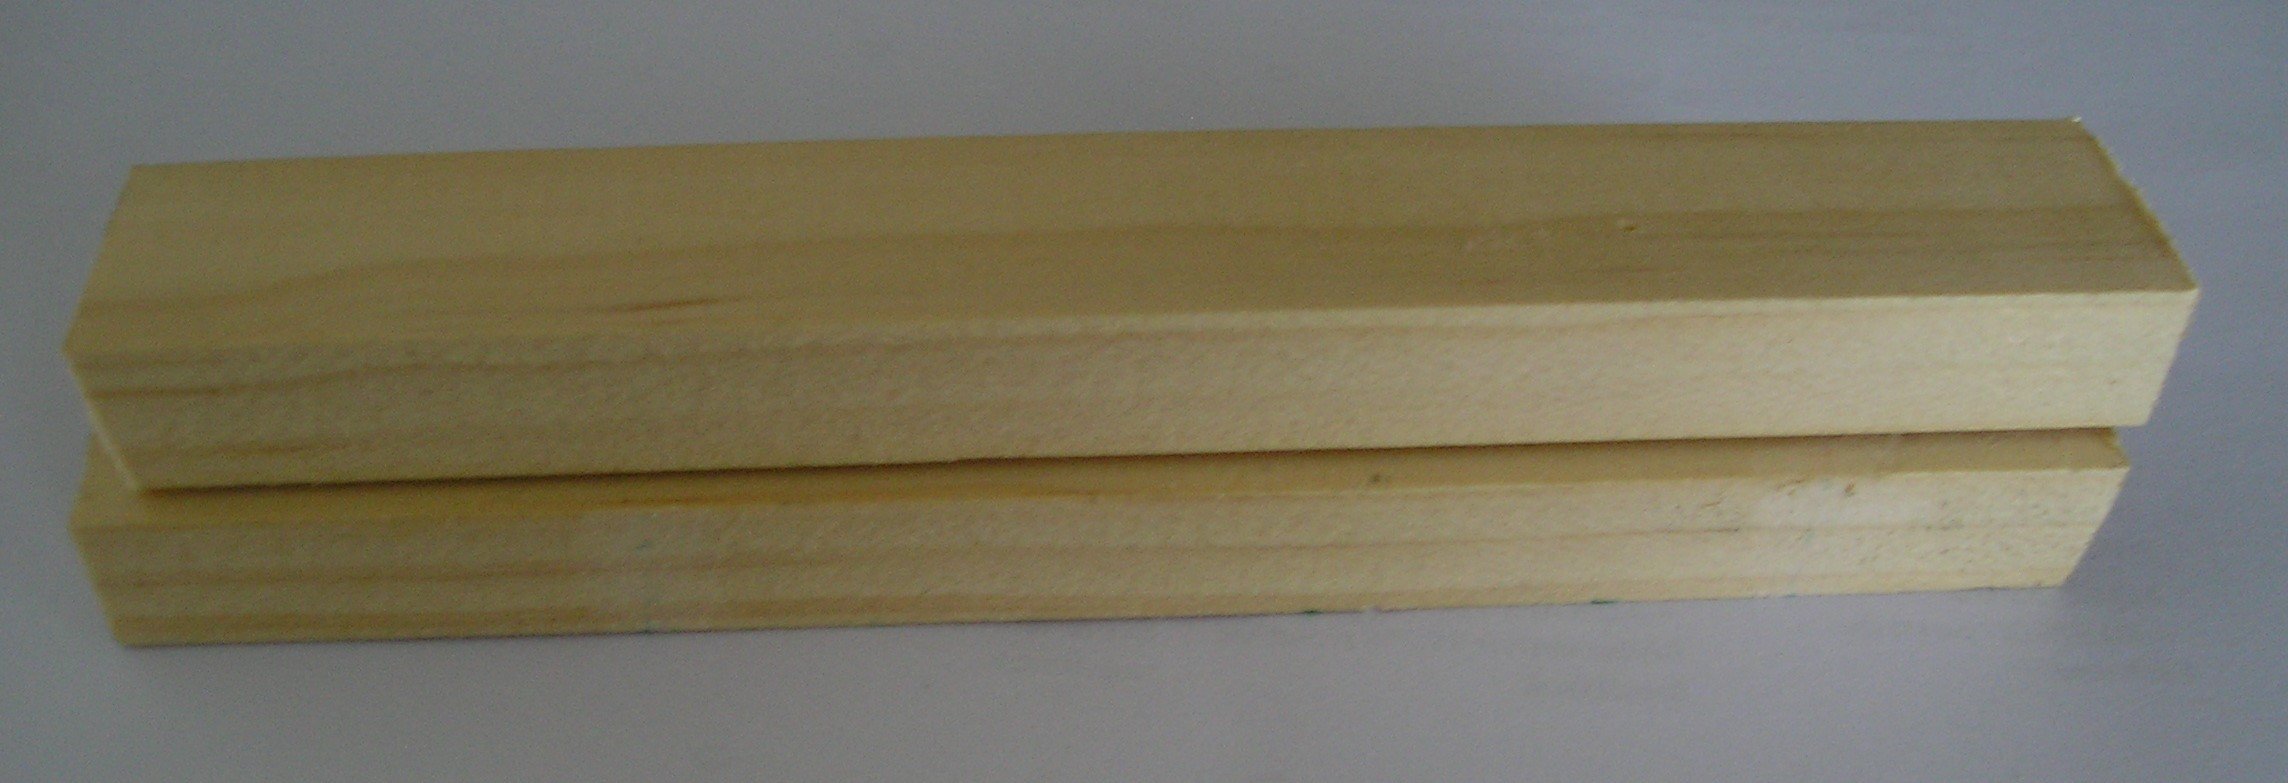
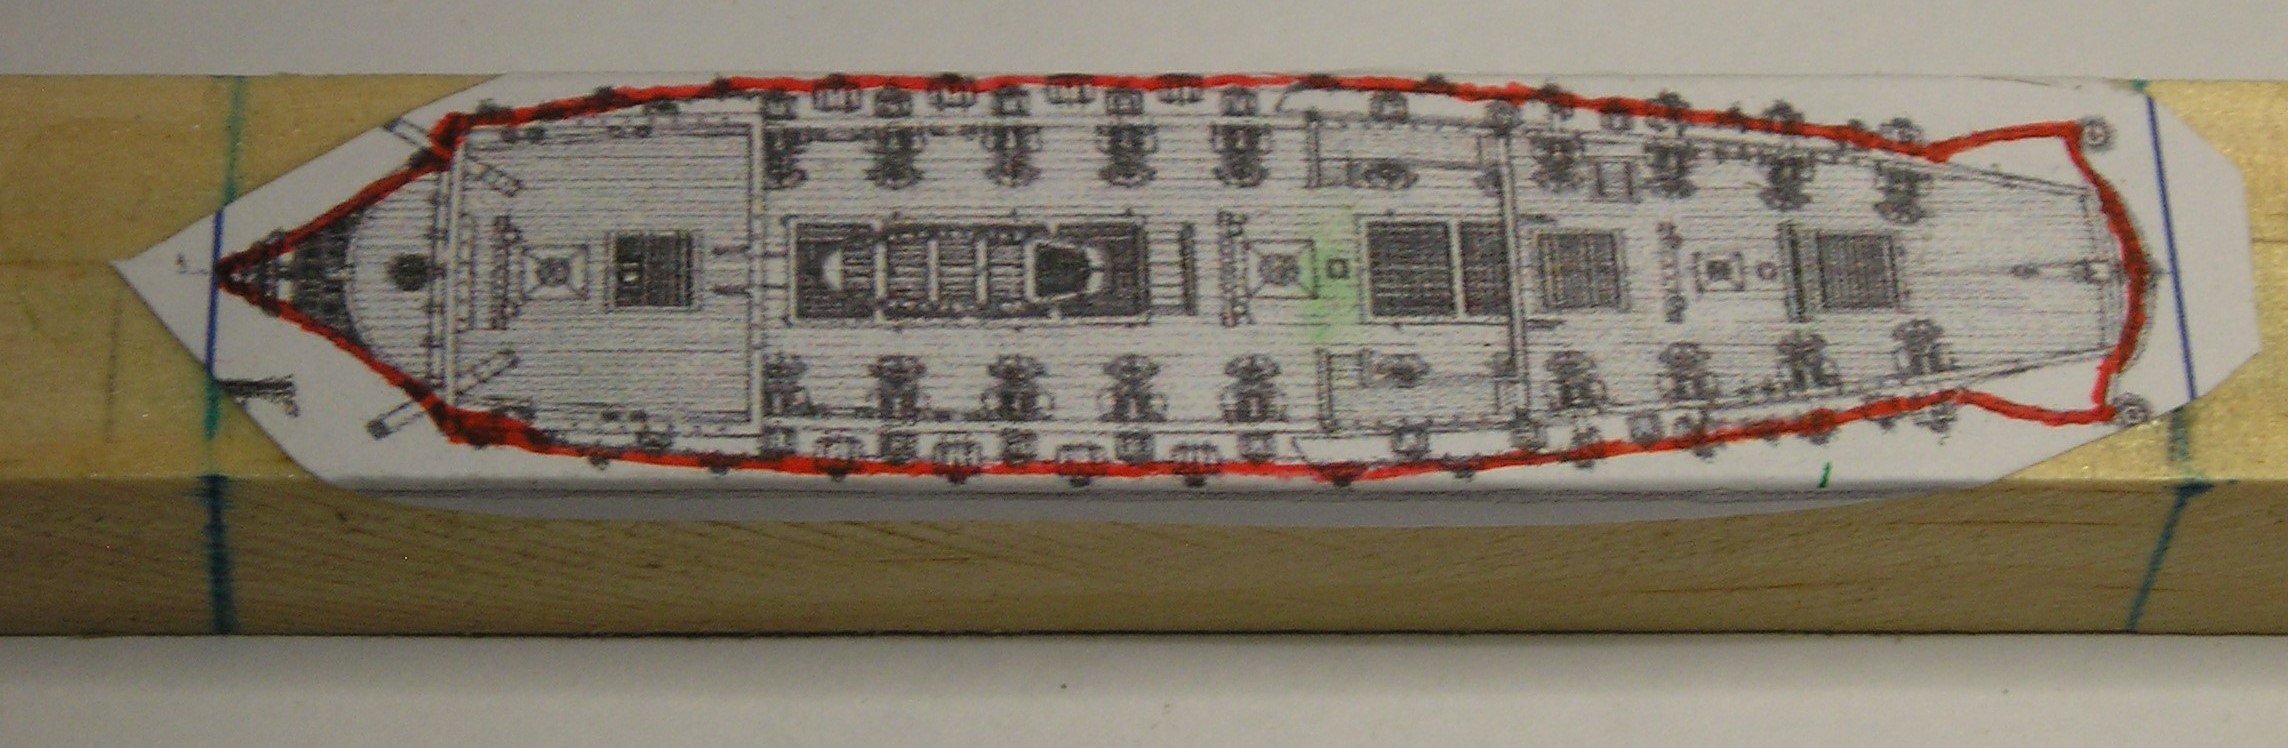
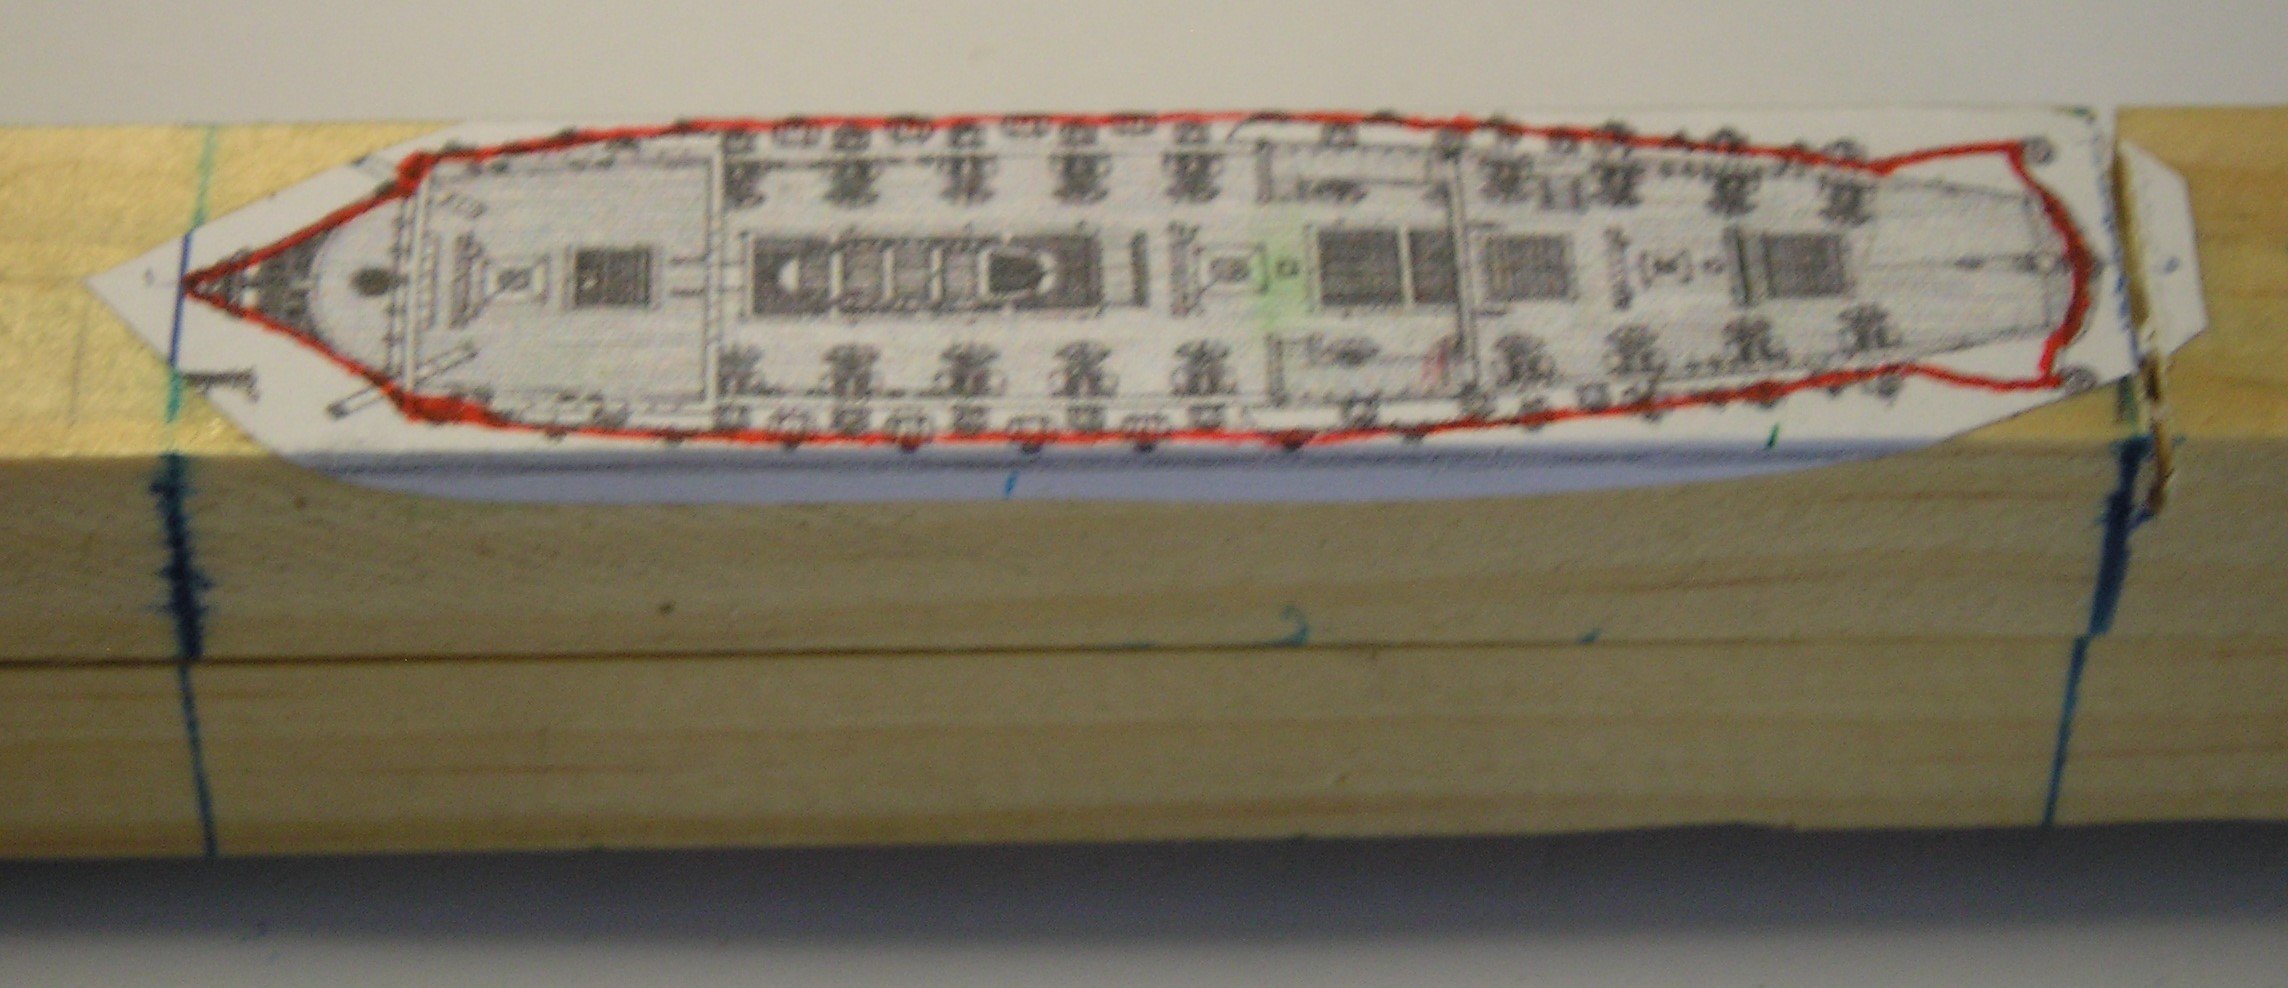
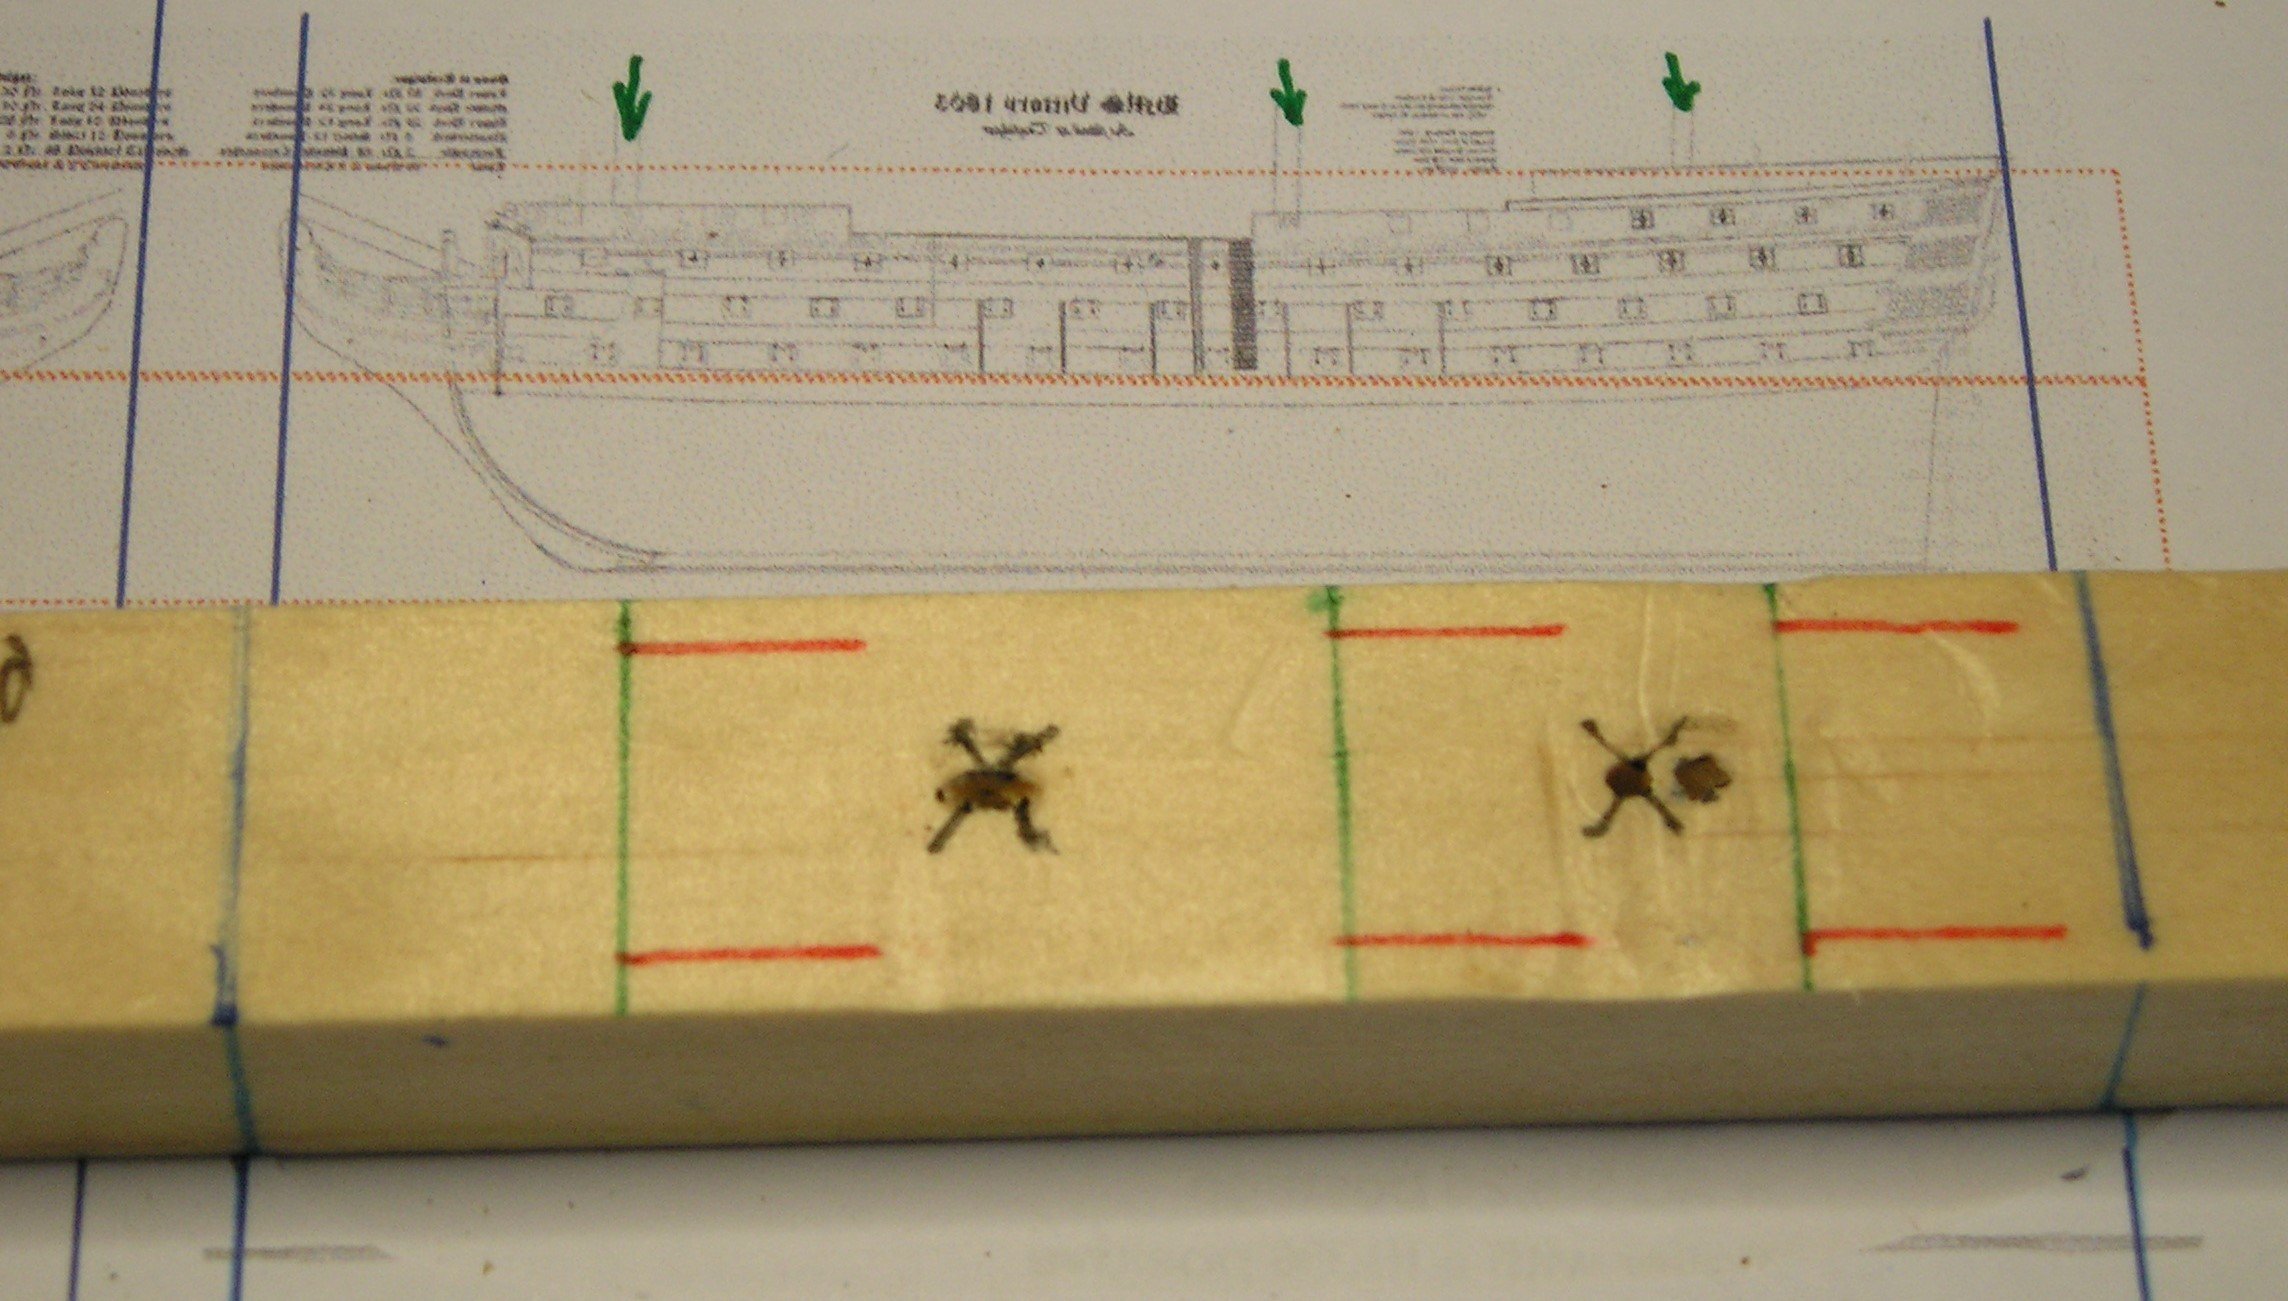
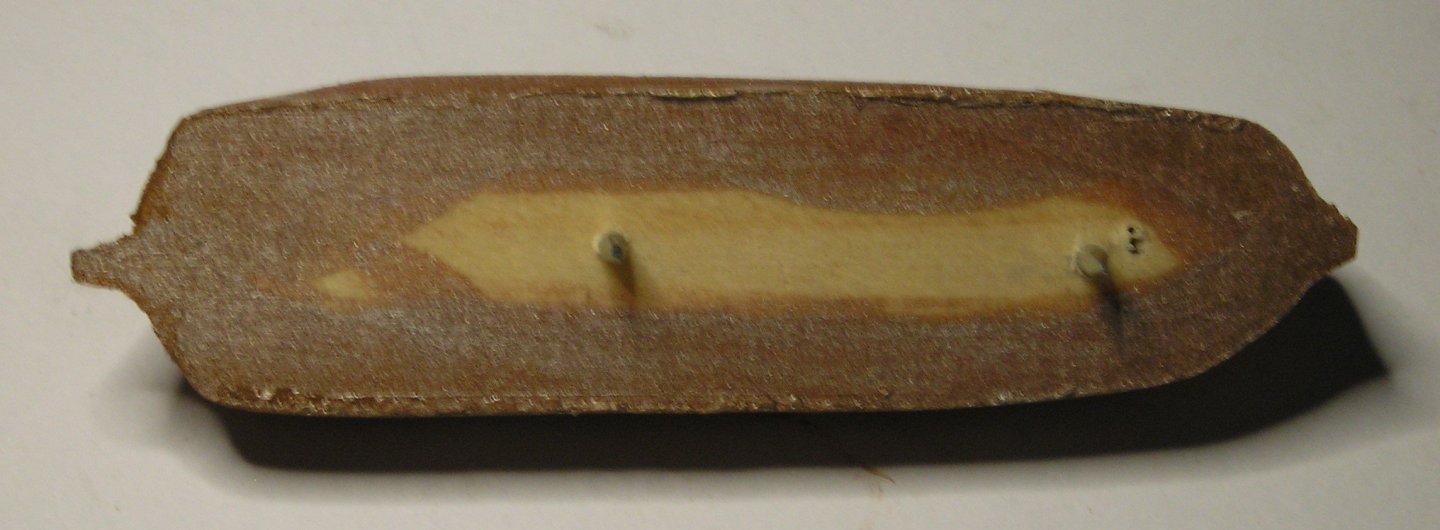
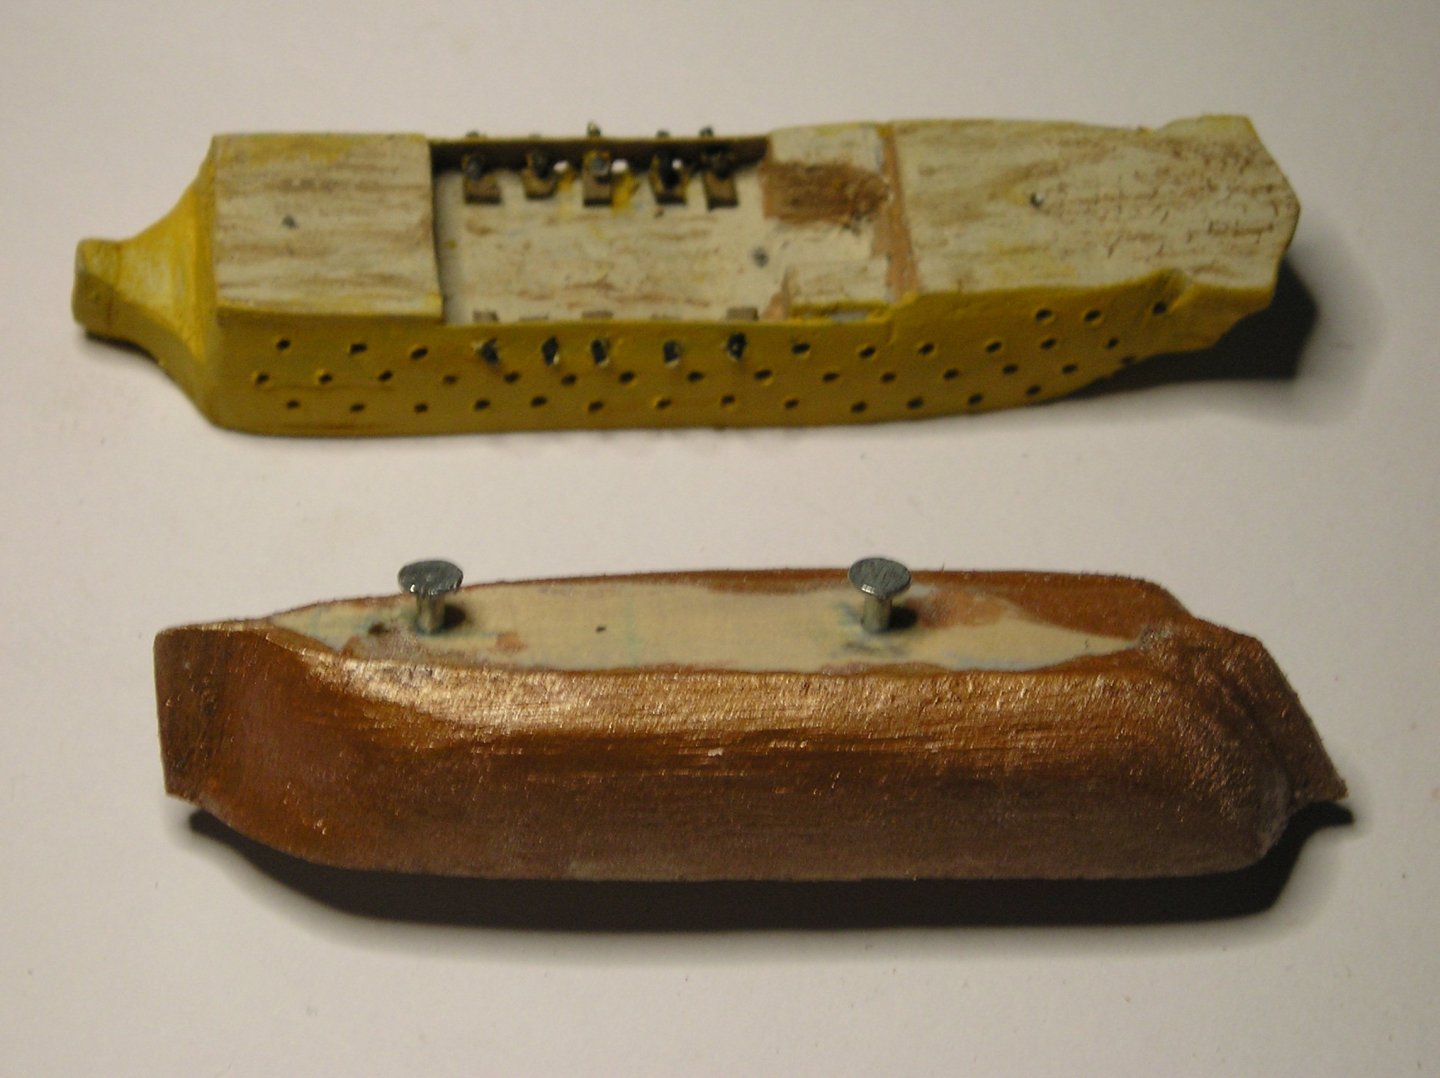
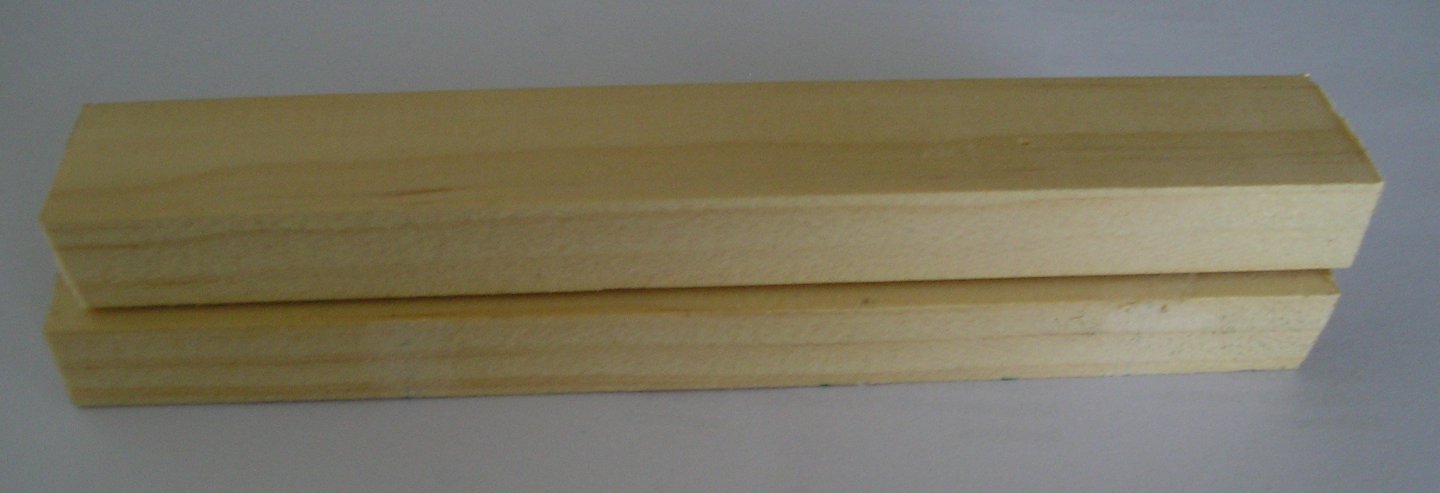
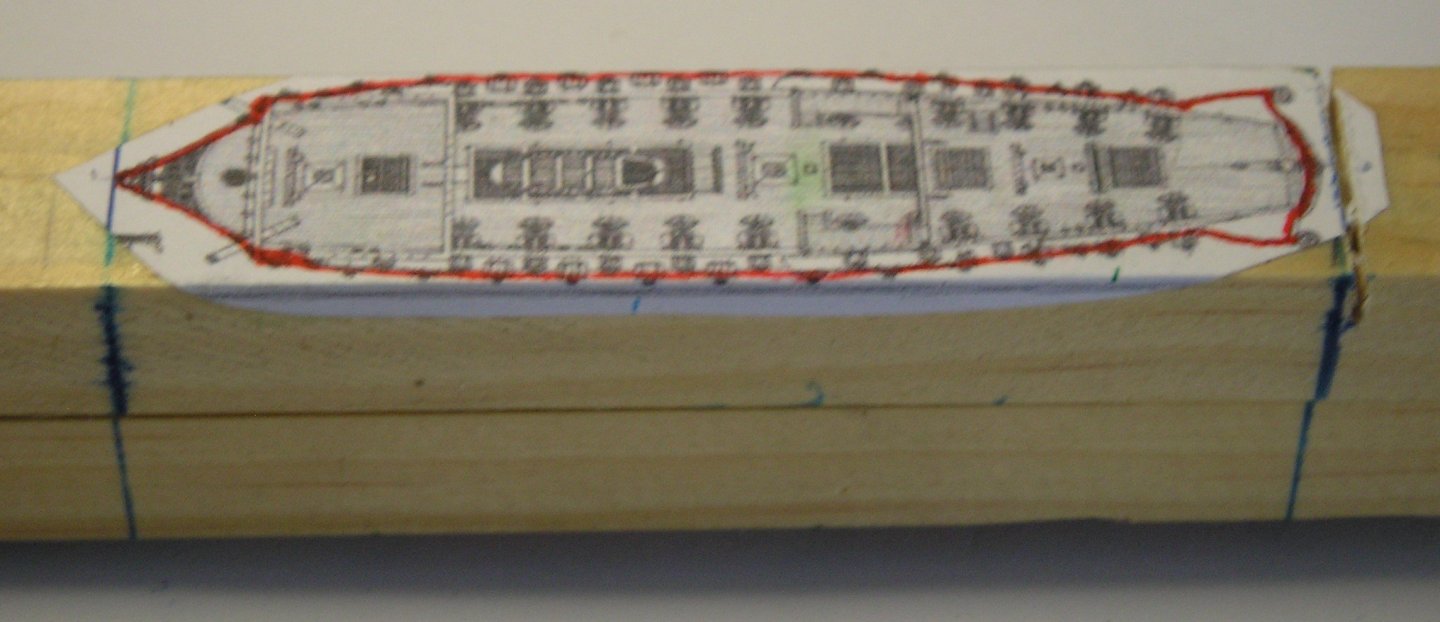
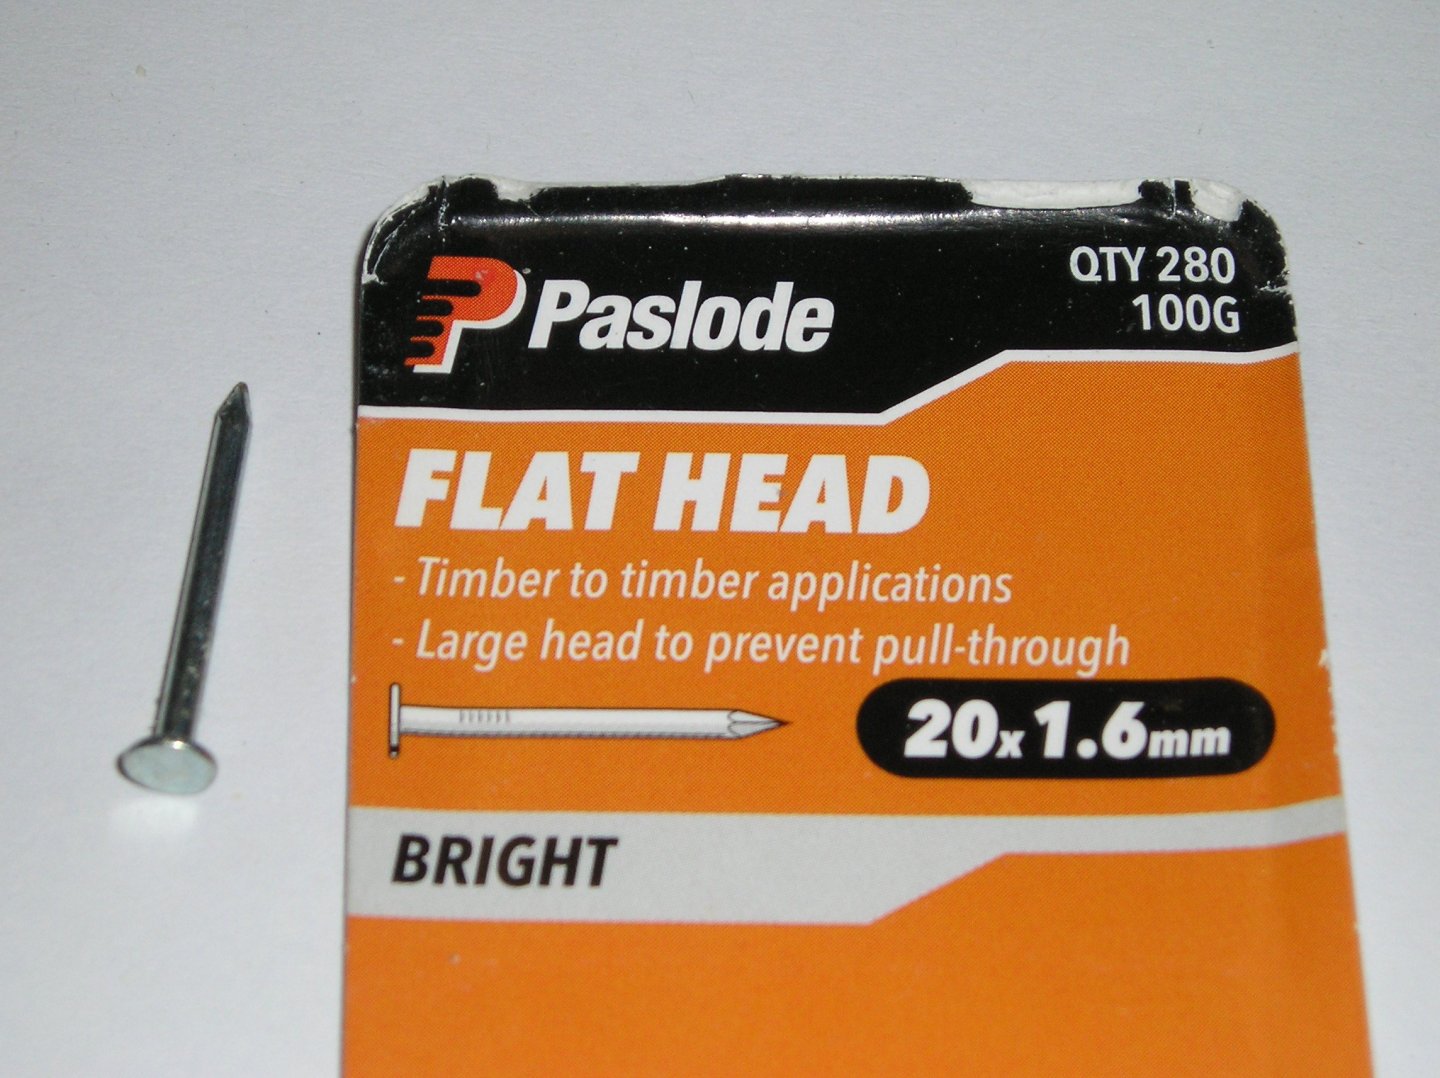
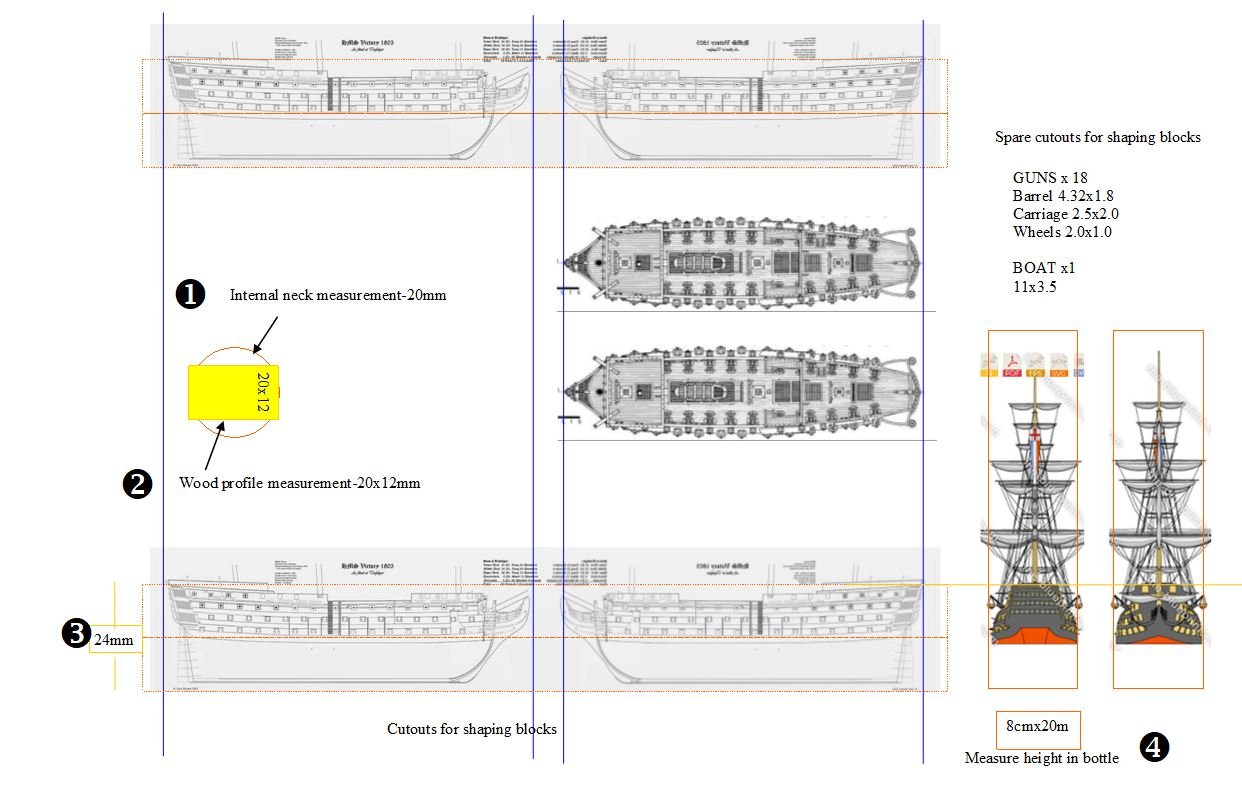
Thanks again for the likes. They are very much appreciated. Next step in my build is the prep for shaping and sanding the sides of my ship. 1. I started with two pieces of 20x12mm timber. I can only get pine or tasmanian oak. I prefer the softer pine. 2. I chose one piece to be the TOP piece. Then ran a red pen around the ouside edge of the scaled plan, cut and glued this view onto the wood. I used PVA glue. The sideways fit was pretty tight but just made it. 3. I drew and extended the blue lines from the plan view right around the two pieces of wood. I did NOT GLUE THESE TOGETHER! 4. Next I took the bottom of the BOTTOM piece of wood and laid it adjacent to a scaled side view of the ship, making sure the blue lines line up. I then marked with a green line where the masts go. Next I marked (in red) where the shrouds will be going. I'm assuming five shrouds on each side of each mast, separated by 2mm on the side of the ship, ie. 10mm long. The reason for this will become obvious later. Next, I marked TWO black crosses where the two nails will be going to temporarily join TOP and BOTTOM pieces of timber. These marks are away from the bow and stern, masts and shroud markings (please excuse the wrongly placed third hole in the picture). 5. Finally, I lined up the two pieces using the blue lines as a guide and nailed from the bottom up. I used 16mm flat head nails because they are not too long yet long enough to hold the two pieces together. I left two millimetres of the nail heads sticking out so they will be easier to remove later on. I did NOT USE GLUE at this stage as I will want to separate the two pieces later to get them into the bottle. Sorry for the 'long winded explanations' but I am trying to be as clear as possible. TIME TO SHAPE THE SIDES!!! Cheers,


-
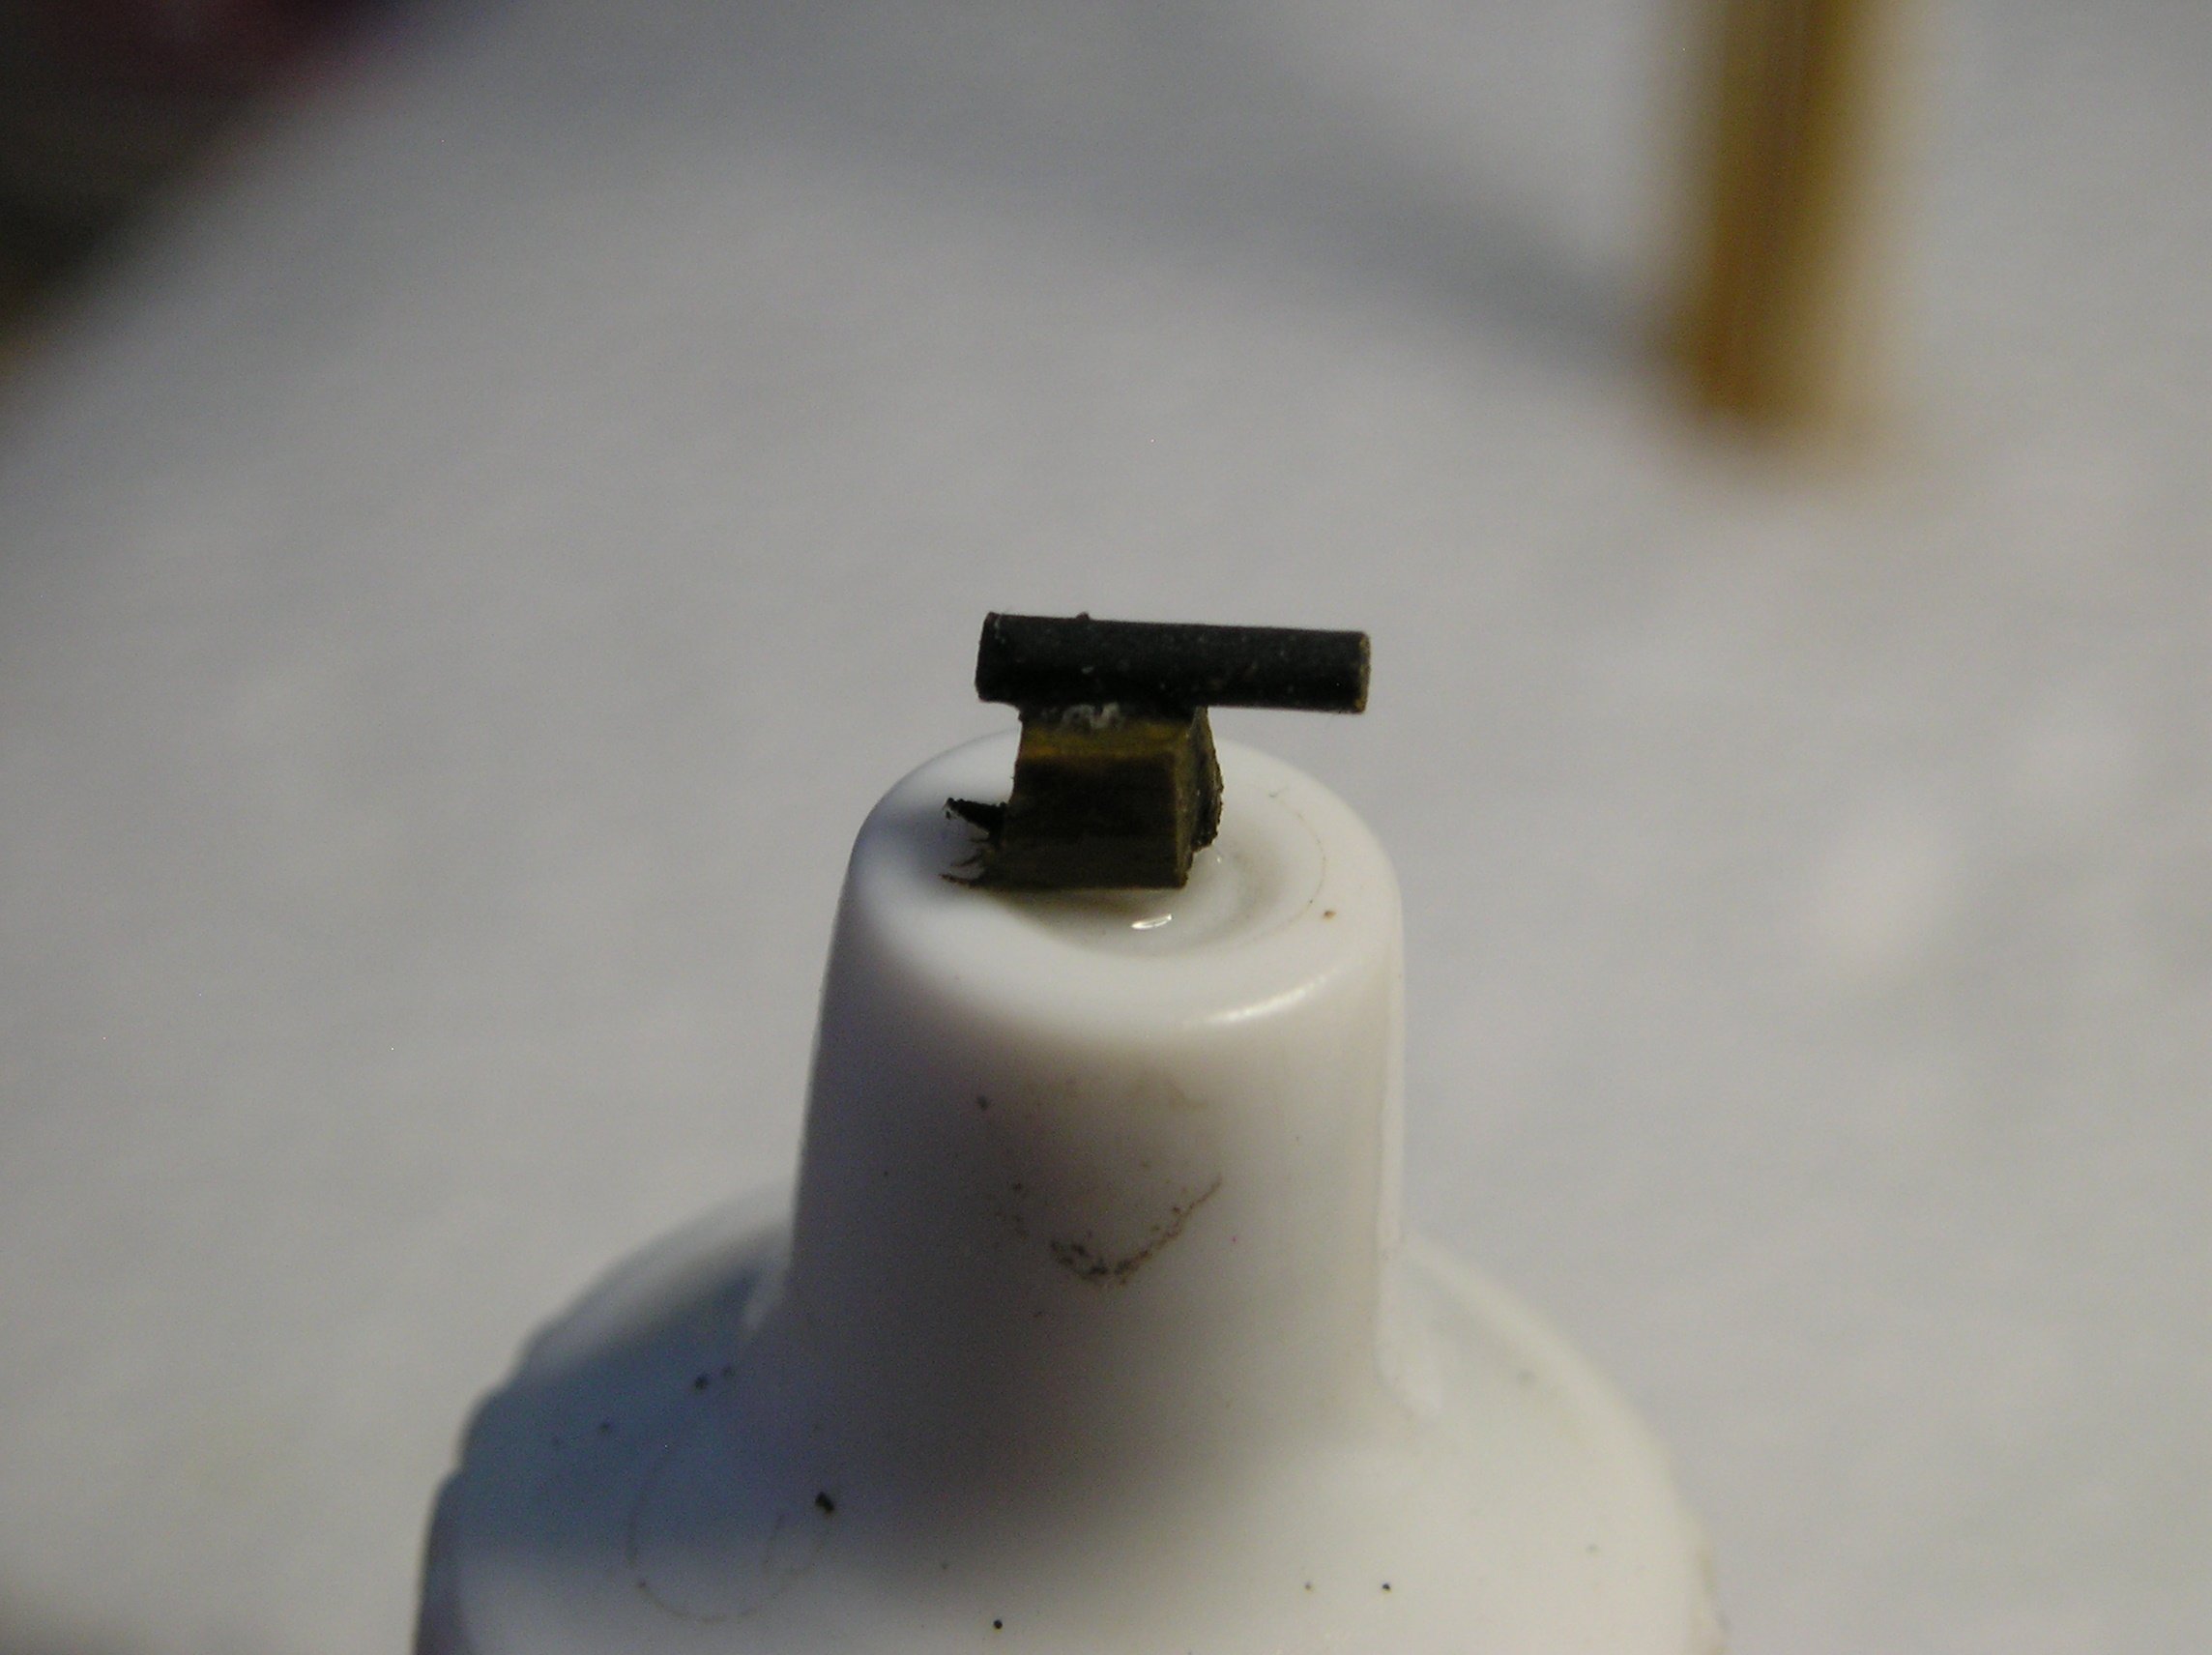
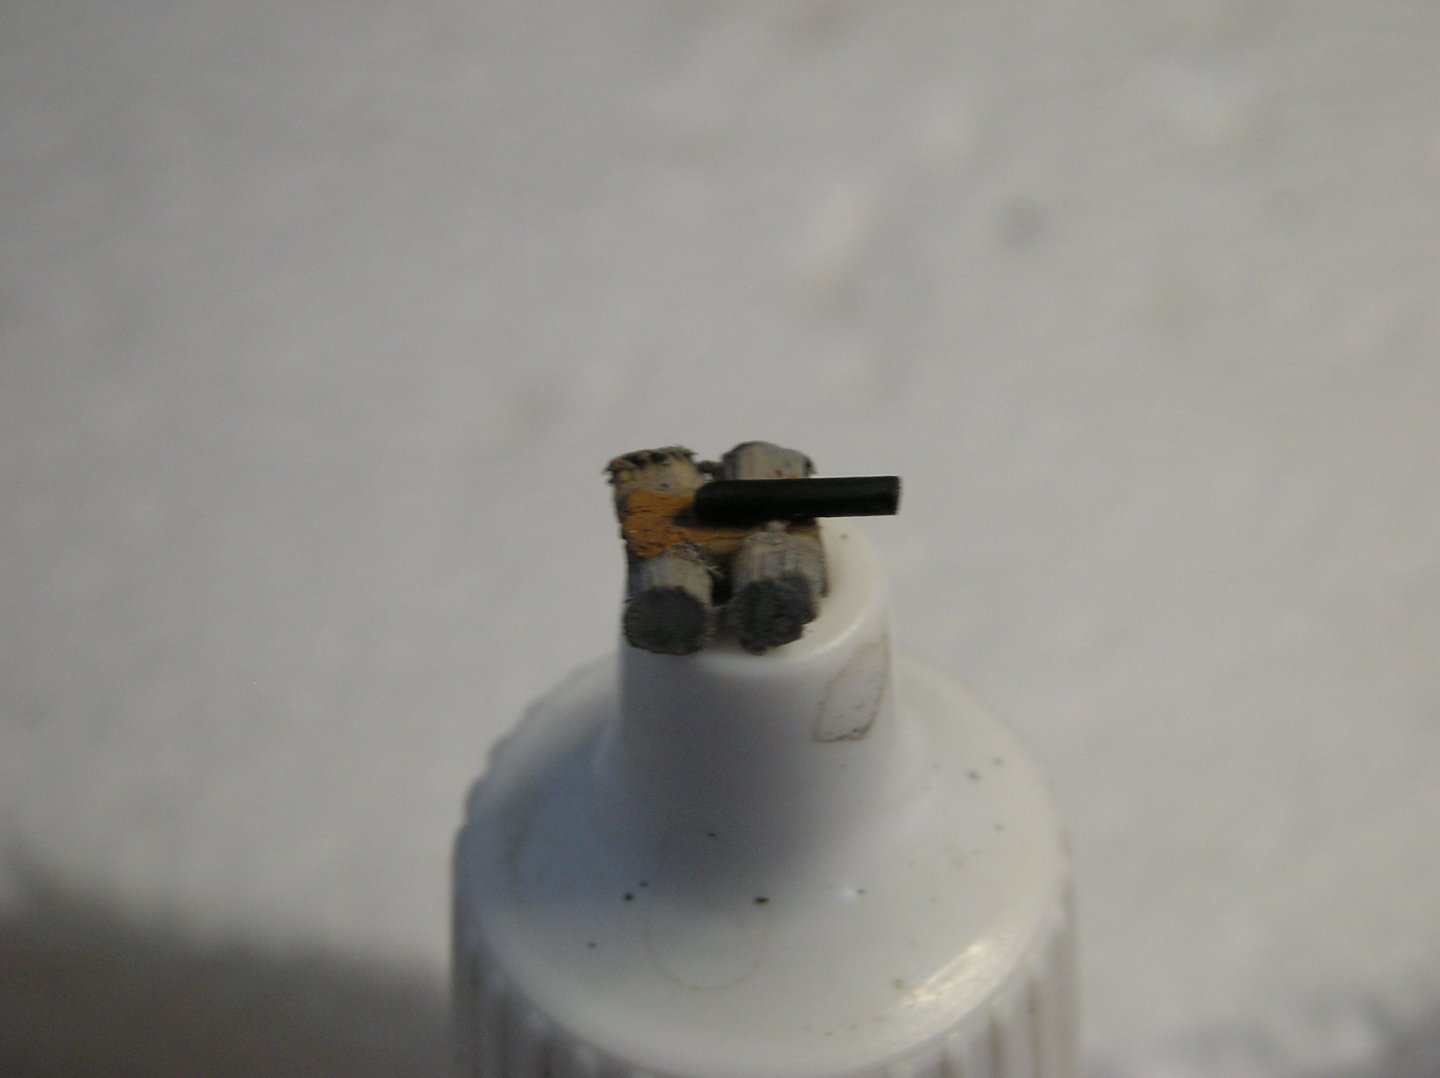
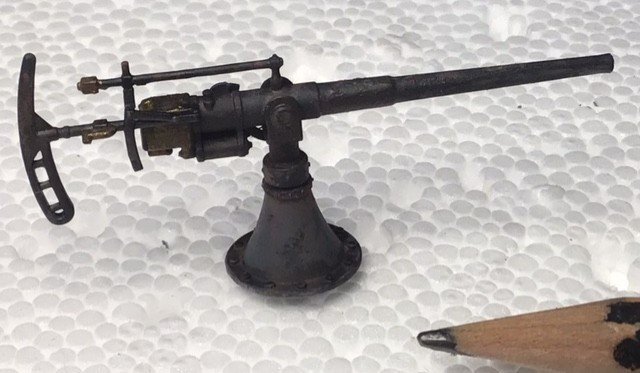
Thanks for the 'likes and followings'. While waiting for some things to arrive in the mail I thought I might make my deck guns. After three hours I made eighteen of them. This is one of them. Only trouble was that they were too large and out of scale when tested on the deck plan. So I then made eighteen of these! I think they will be fine. I also did my next page of sail estimates. Most sail measurements are close to what is needed, whilst their shapes need to be modified when cutting. I'm looking forward to the next stage of actually starting on the wooden hull Cheers,

-
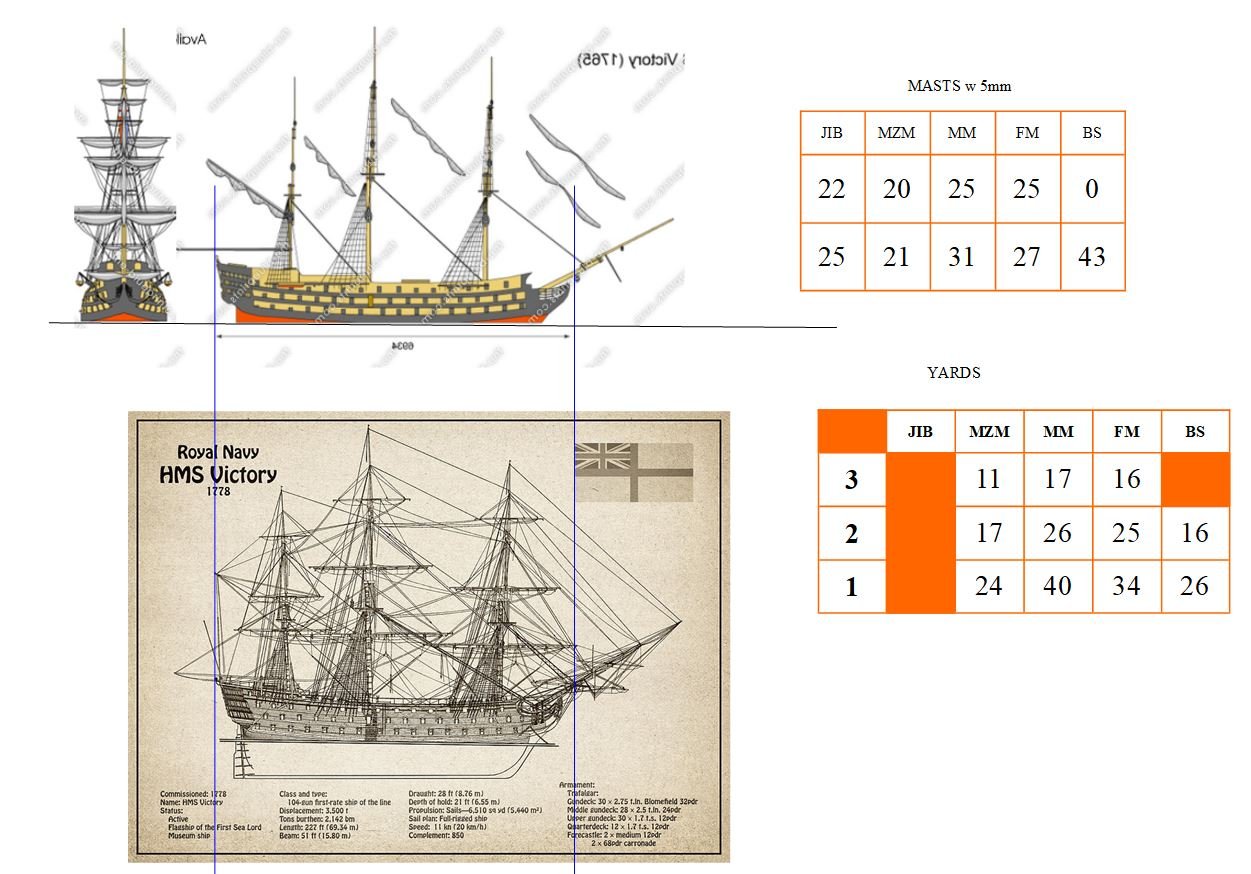
The next step is to calculate the height of the masts and length of the yards. The same principle as the previous post - find and scale diagrams and measure what you want. Cheers,
-
Having found the right bottle (Dimple 12yr old), I can do my scale drawings based on the 20mm inside diameter of the bottle neck. I start with the timber cross-section size (20x12mm) and extrapolate maximum length and height possible. I then copy and expand/shrink downloaded diagrams to get my scale diagrams. These can later be glued onto my joined [NOT GLUED!] timber pieces so as to commence shaping, The timber is represented by the orange lines. I think I have it right, Cheers,
-
I had better start with the basic look, ideas and materials. Then find a suitable bottle.
-
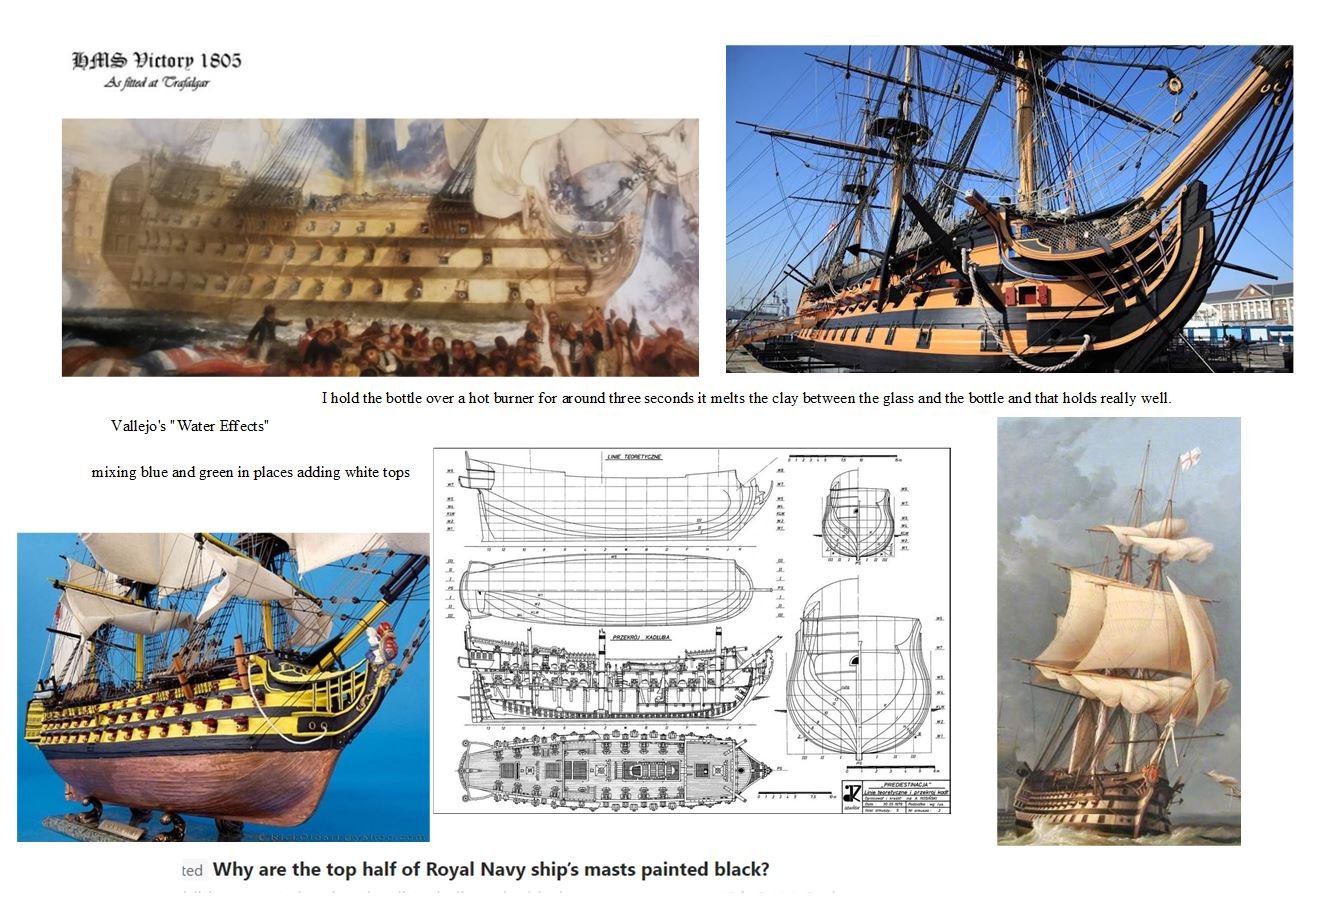
It's difficult to decide what to do next after you finish a build. Do you go with wood, plastic, cheap, expensive, ship, plane, 1/32 or 1/72, etc. So I have come to the conclusion that I want to put all my skills into making a HMS Victory - Ship in a Bottle (SIB). I've got the empty bottle, wood, paint and glue, so here we go. I count thirteen SIBs that I have done and given away to family and friends in the past two and a half years, so I really want to take my time and make this my best! They have generally taken between 50 and 60 hours so I imagine this one will take longer as the ship is more complex with its numerous decks, sails and cannons. One nagging question still remains. Are the hull colours black and yellow, pink or apricot? Help! Cheers,
-
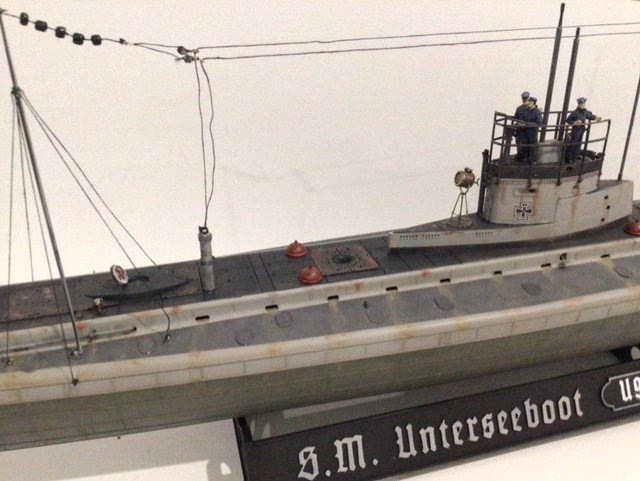
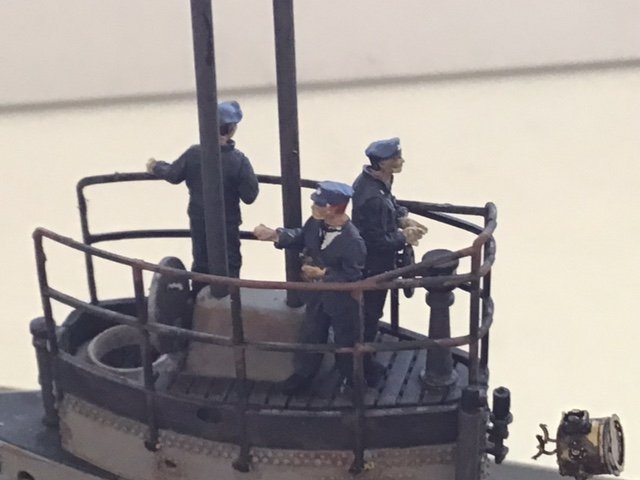
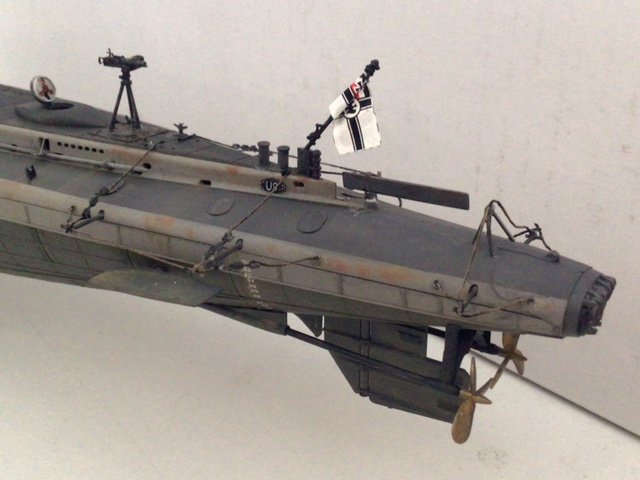
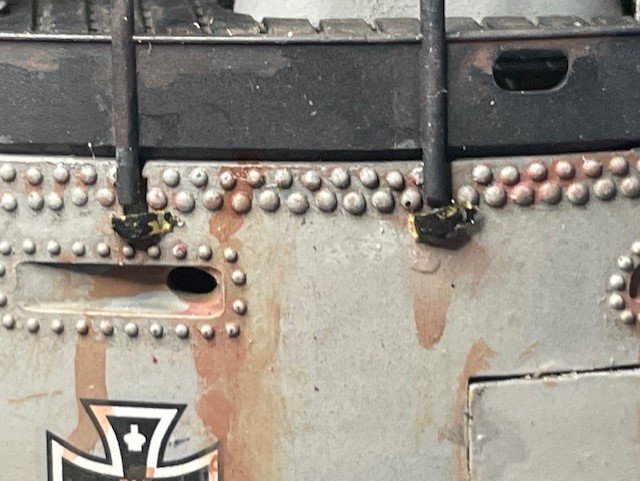
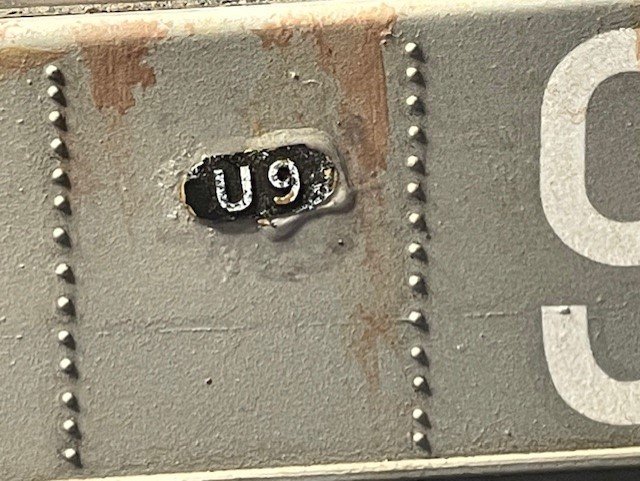
Finally the communication cables, front gun, crew and flag have been added! It is finished and I would recommend this build to anyone as the problems were almost non-existant. Thanks to those who have shown an interest and kept me going with comments, wows and likes. They are much appreciated. It has been an enjoyable experience, especially since I joined MSW in March this year. See the final MSM Gallery link here. Cheers and thanks,
- 36 replies
-
- 10
-
-
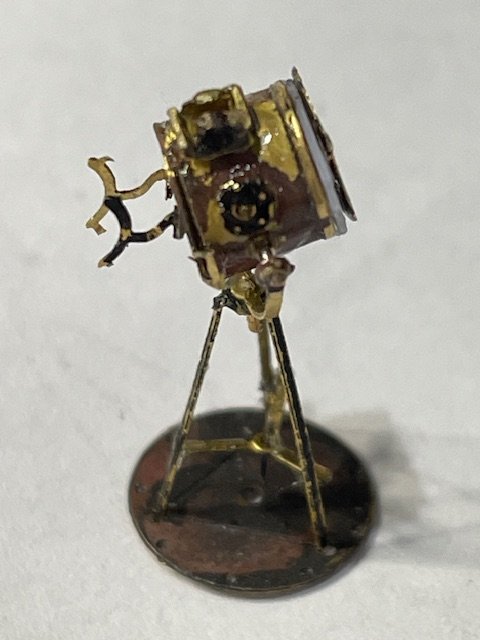
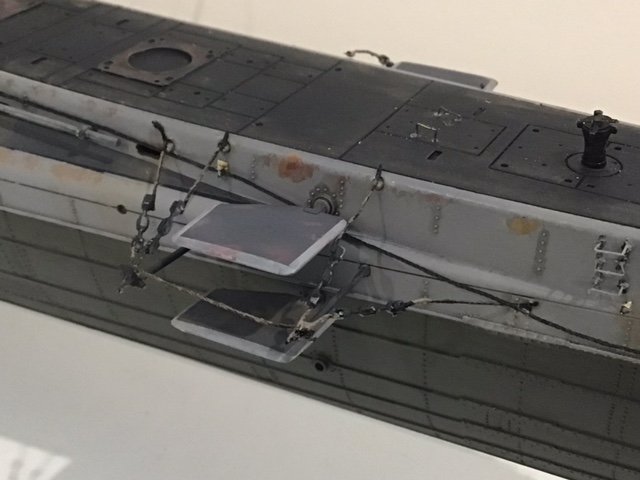
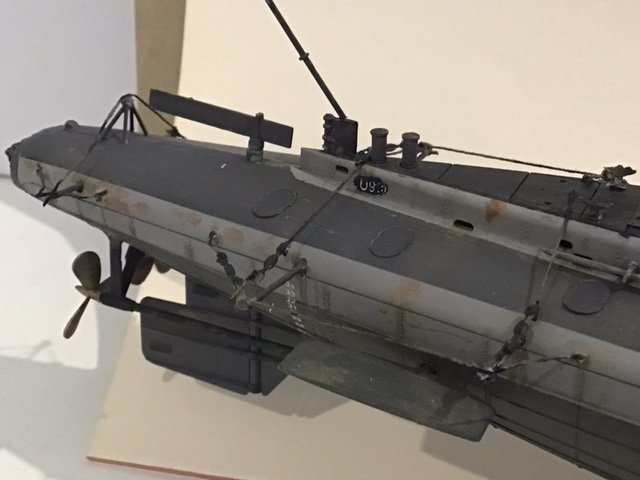
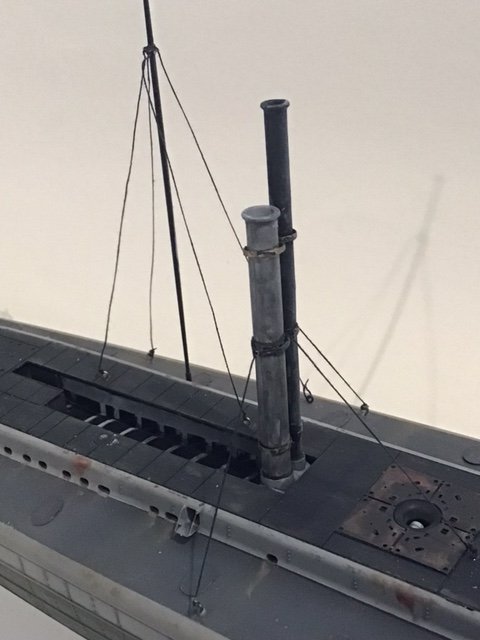
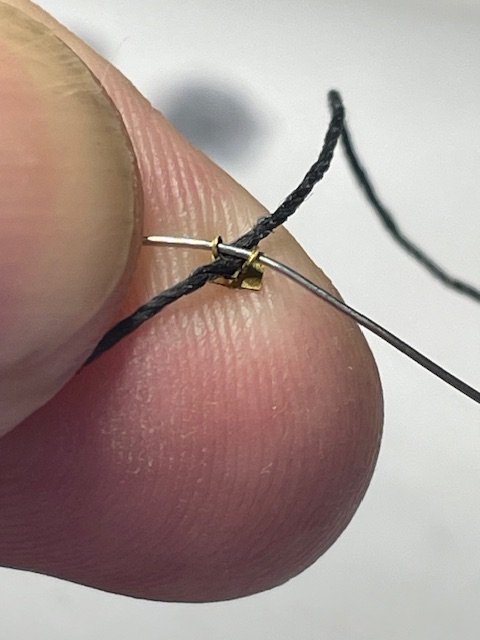
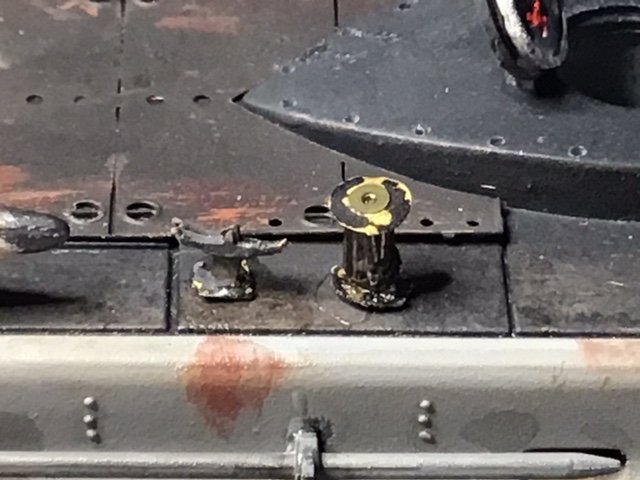
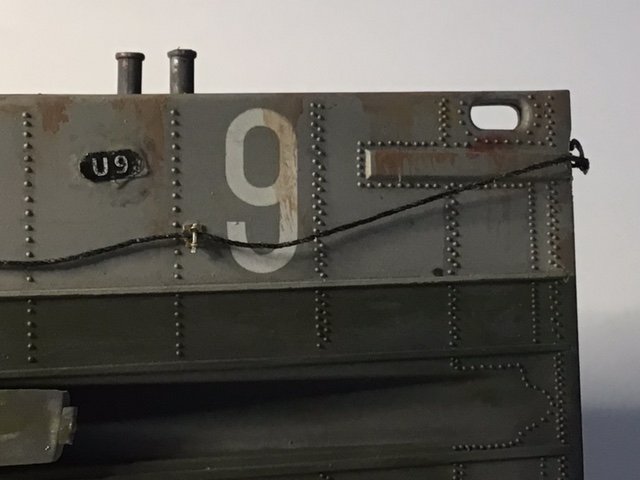
Thanks for the 'likes and wows' I certainly need them to keep enthused. I've finished the 'fiddly bits' but am now at the stage where I keep breaking things as the model becomes more conjested. Is it just me or does that happen to everyone? Anyway, progress is being made today as I: Completed the rigging around the diving planes, exhaust and air intake tubes, and set up the antenna posts in preparation for the wire strands. Have a great weekend, Cheers
-
Avro Lancaster Bomber by JKC27 - Border Model - 1/32
PvG Aussie replied to JKC27's topic in Non-ship/categorised builds
How is the progress going on the Avro Lanc? -
Fiddly bits, fiddly bits, and more fiddly bits! X10 X10 X12 Only X4 X3 X10 See what I mean! Cheers

-
I have found the answer to my 'flag question' thanks to the forum section on flags and http://www.modelwarships.com/features/current/flags/flags.html Cheers, Peter