


Dan Poirier
-
Posts
111 -
Joined
-
Last visited
Content Type
Profiles
Forums
Gallery
Events
Everything posted by Dan Poirier
-
Welcome!
-
Welcome!
-
 Looks good. It looks as if the lines are coated in something, what is that?
 -
I watched some YouTube videos on how to tie clove hitches, and that was a *big* help! I can tie them a lot faster than I had been doing, too. The clove hitches don't really want to stay tied if there's not tension from both sides, but I might have found a workaround. I soaked some thread in dilute glue and hung it to dry with a weight on the end, then used that for my ratlines. It stiffens the thread a bit, enough to make it easier to work with and hopefully less likely for the knots to try to spring open.
-
I've never done ratlines before, so I did a few practice rows that I expect I'll undo and redo until I feel more comfortable. I can already tell this is going to get tedious, though 🙂
-
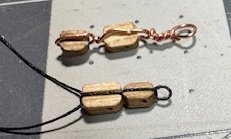
Just a quick update today. First, my 50-50 glue seems to be working better so far. Maybe my previous attempt was too thick to really soak in or something. I'm keeping my fingers crossed. Second, I started putting together some blocks for the backstays. My first try was with some wire I had, but it ended up out of scale and looked awful anyway. I'm switching to using some dark "rope" instead. And now that I see the picture, I realize I got the blocks in the wrong order there! Oh well, I'll try again tomorrow.
-
Kovalus, the Vanguard Sherbourne is a great model. I'm currently starting on the rigging on my own build. I'm sure you'll enjoy it.
- 9 replies
-
- 3
-

-
- Vanguard Models
- Sherbourne
- (and 1 more)
-
I think what'll I do is: Measure a 50:50 dilution of white glue more carefully and see if that works any better than what I've been using, which I just kind of threw together by eye. If that doesn't work, then use a tiny bit of CA on each one. Maybe if I'm careful, it won't soak through the seizing and into the shroud, and if I need to redo anything, I can just cut off the seizing.
-
The rope and seizing materials I'm using came with the Vanguard Sherbourne kit, and I can't find anything in the instructions to say what they're made of. I can't tell by looking at it. Maybe someone else familiar with this kit knows what the thread is made of?
-
CA (cyanoacrylate) "super glue"
Dan Poirier replied to Dr PR's topic in Modeling tools and Workshop Equipment
I was with you on how bad the packaging of CA was, until I tried this: I've been using it, a tiny bit at a time, for months, and the glue still comes out as well as it did when I first opened it. I don't know what magic they're doing in that nozzle and cap, but it works. (I'm not using that skinny pointy add-on spout; I just put a drop on a plastic scrap and use a pointy tool to transfer a tiny bit to where I need it.)
-
Well, I'm getting a wee bit frustrated. My seizings on my shrouds keep coming undone after I trim the loose ends. I'm tying a square knot and soaking it well with dilute white glue, then giving it a day or more to dry, so I'm not sure what I might be doing wrong. Maybe it's my dilute white glue? I keep reading "dilute white glue" but nobody actually says how dilute it should be - 50-50? 90-10 glue? 90-10 water? Or maybe something else. It tempts me to reach for the CA glue, but I'm trying to avoid that if I can.
-
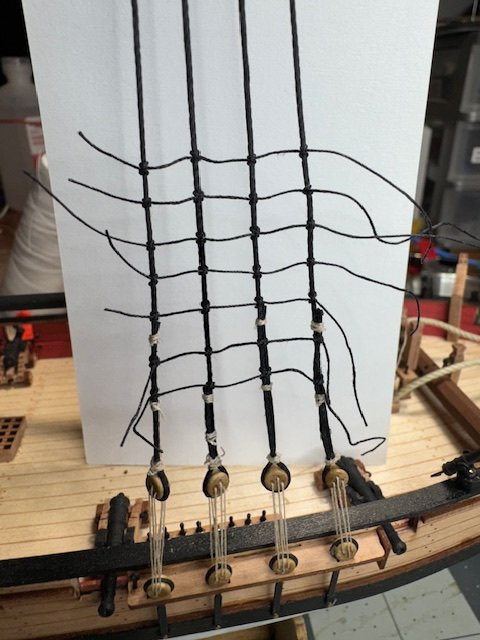
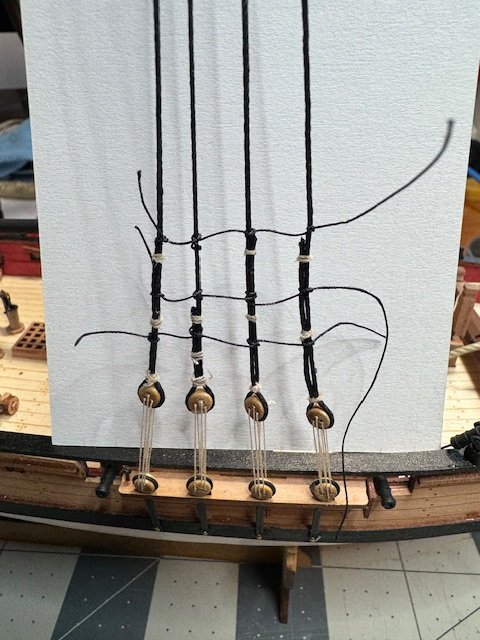
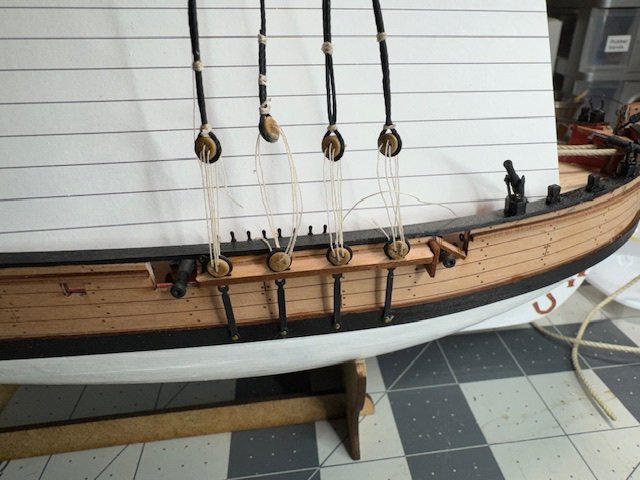
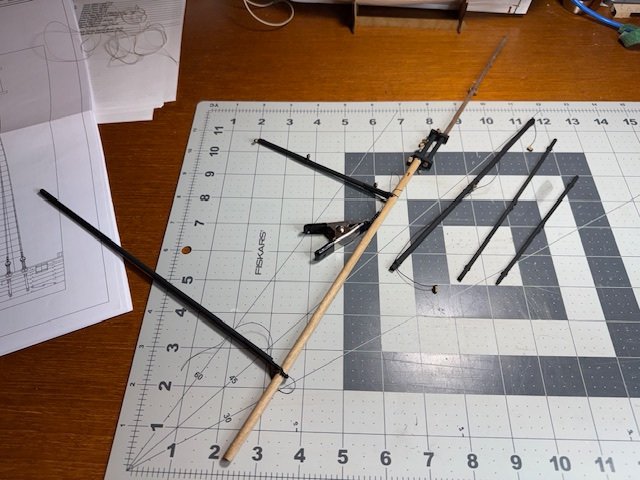
The mast is up, and I'm working on the shrouds. I'm just eyeballing the deadeyes' alignment. I just put the 3x5 card there so the camera could see the deadeyes, but those lines on the card look like they might be helpful 🙂

-
I'm just getting to this point in my Sherbourne build, and a part of me wonders if real life ships always had their deadeyes all lined up 🙂
-
Working on the rigging, I've learned something already. After tying a seizing and dabbing on a little dilute white glue, I need to wait until the glue is completely dry before trimming the loose ends. Otherwise the knots come loose and I end up doing it all over. Luckily, it seems a lot easier to fix mistakes in rigging than planking. At least, so far.
-
Thanks @palmerit for the suggestion. I'll take a look at your build log. I've also considered a paddle-wheel river boat, as those don't appear to have much in the way of hull. Even if there's a little planking, nobody is going to look at it on the finished model 🙂
-
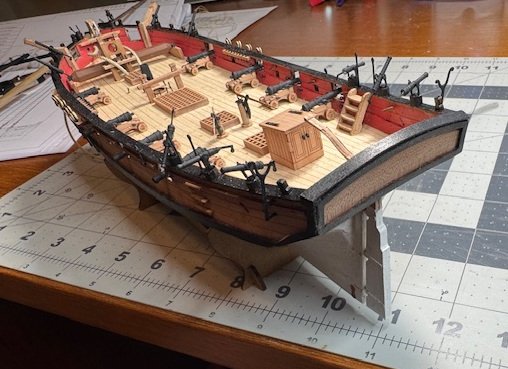
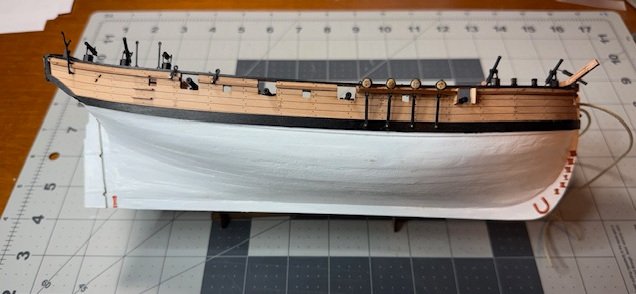
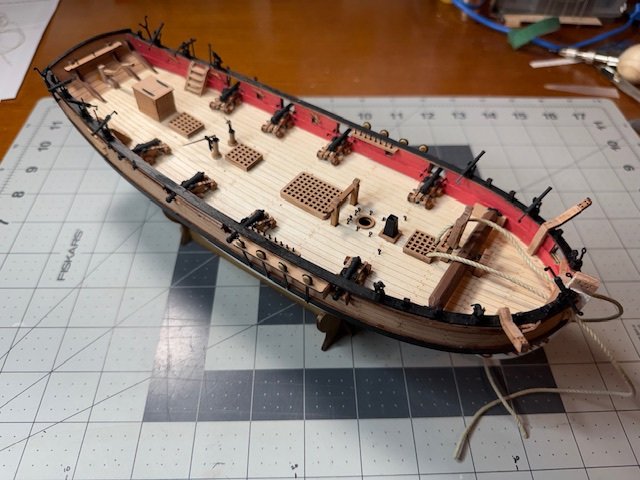
As I mentioned above, I smoothed the first planking and painted it, then moved on. There's a lot of tiny stuff on deck! My workbench magnifier is getting a real workout on this model. Now I've started on the masts, spars, what-have-you.
-
I've abandoned this project, having realized that planking is not something I'm equipped to do well. But I thought I'd post a few comments on the work I did on the kit. First, I tried to build it on foamboard. If I were starting over, I'd use something that was quite rigid, like 1/2 inch plywood. It doesn't have to be overly large. The project doesn't need a lot of extra margin around the actual hull, and keeping it smaller would have made it more manageable. I'd try to figure out a way to transfer the pattern to the board, rather than trying to build on top of the paper glued to the board. I'd dry fit everything short of the planking itself, as much as I could, before I started gluing things together. Some of the supporting boards I had to undo the glue and move more than once, because it wasn't clear early on that the positions of the supporting pieces were much more important than the instructions suggested. Finally, I'm wondering if I've missed something about the method described in the instructions for figuring out how to shape each plank. I was supposed to put masking tape over the last installed plank, overhanging the edge, and trace the edge on the tape, then move the tape to the thin board I'm cutting planks out of and use it to guide cutting the edge of the next plank. I used Tamiya yellow tape, and a 3mm HB mechanical pencil, and trying to mark the edge of the plank exactly where the tape is falling off the edge of the existing plank seemed impossible.
-
Long time, no update, sorry. I lost a lot of motivation after the U.S. election. Then it took me a few months to finally admit I am never going to "get" planking, and just get on with Sherbourne, accepting that. So, I've heavily filled and sanded the first layer of planking that I had completed, and just didn't bother with the second layer of planking. With paint, it looks good enough. Then I've gotten on with the bulwarks, stuff on the deck, masts, spars, etc. I'll post some photos soon.
-
Model-Expo can send you the right size nails if you contact them about the kit having the wrong size. No charge when I did it.
- 39 replies
-
- 3
-
-
- Norwegian Sailing Pram
- Model Shipways
- (and 1 more)
-
Absolute beginner here - new to ship modeling
Dan Poirier replied to AlanR's topic in New member Introductions
Welcome! I also think the Chris Craft speed boats look amazing. I haven't built any, though. -
I really enjoyed building the 3 MSW models that are recommended for beginners. The instructions had some hand-holding for beginners, just not as much as I was expecting and could have made good use of. At times undefined terms were used, or directions were incomplete. Still, I haven't built enough models to know whether there are others that are any better, or that's just par for the course. I've only gotten about as far as you with the Vanguard Sherbourne model, but so far I'm impressed with the instructions. There's more detail, and many more pictures, which is very helpful.
-
Looking forward to following along!
-
I'm having to extend a few bulkheads so they go high enough to line up with the bottom of the top rail on the diagram underneath. I'm also going to have to move a few of the spacer/supports between the bulkheads a little bit lower, so I can trim those bulkheads down to line up with the top rail.

-
Planking fan
Dan Poirier replied to Ironhead's topic in Planking Techniques's Planking Downloads and Tutorials and Videos
There's lots of good info here.