

Yann Kermeur
-
Posts
15 -
Joined
-
Last visited
Content Type
Profiles
Forums
Gallery
Events
Everything posted by Yann Kermeur
-
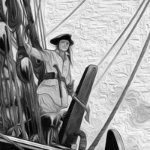
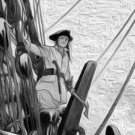 Hello company! Some news from Captain Bligh and his longboat Since the last post, I've: fitted the rudder, created a small battened deck for the helmsman, fitted some belaying pins to the cockpit for the ropes, installed a tiller for changing the tack, I've seen this on a tuna boat but I don't know if it's done on a longboat? and I've also tried a little ageing of the boat, just the inside and the stern for the moment ..... some views of all this: have a nice day .....
- 10 replies
-
- 1
-

-
- jolly boat
- Artesania Latina
- (and 1 more)
-
The project is progressing well and this model is really magnificent. Good luck with the rest
- 207 replies
-
- 3
-
-

-
- vanguard models
- Duchess of Kingston
- (and 1 more)
-
Hello, Work progresses slowly ..... A small attempt to age the deck ....The idea being to show a little wear due to the placement of the rowers' feet. The benches are level with the adhesive strips. here I'm puttingtying the hull .... and here after the painting have a nice day ....
- 10 replies
-
- 3
-
-
- jolly boat
- Artesania Latina
- (and 1 more)
-
Hi everybody ! keel installation, stern post and keel bow .... As for the rest, I did some research on the web about this boat and it clearly appears that there are many variants and the kit I bought is far from a proven historical version. Perhaps it's different with more prestigious boats? In short, I've decided to take a step back from the kit plan and try to make a few modifications that will in any case be no less valid, even if I make a few mistakes. first point : Here I find it a little odd to attach the pulley and rope on either side of the tiller. I'm going to move these two fixing points. Second point: In my opinion, there's a bit too much “bench” in the rowboat and, what's more, the black elements added on top next to the couples make the whole thing unnecessarily heavy .... So I'm going to remove a bench and fix the seats at the level of the existing couples (in blue) .... This will have the effect of shifting the mast a centimetre towards the stern .... and I'll have more space in the boat to add a few elements ... third point: Finally, for the oars, the kit proposes to create a half-round on the gunwale, which doesn't seem very practical for rowers, so I'd modify this point. Thank you for your attention and see you soon
- 10 replies
-
- 2
-
-
- jolly boat
- Artesania Latina
- (and 1 more)
-
Hi everyone The hull is finished, first sanding with 80 grain sandpaper to try and remove the biggest irregularities ... The hull planking is finished, and I'm going to think again about the choice of paint, but not necessarily the one recommended by the manufacturer.
- 10 replies
-
- 3
-
-
- jolly boat
- Artesania Latina
- (and 1 more)
-
hello, very good job ! I really like the way you have modified the capstan, very creative and deft.
- 86 replies
-
- 1
-
-
- San Francisco
- Artesania Latina
- (and 2 more)
-
yes , I agree with you, thanks for the comment. Here's the rest of the hull planking with the tapered strakes If I'd known, I would have tapered the second strake near the keel. That would have been easier for the width of the strakes at the bow.
- 10 replies
-
- 3
-
-
- jolly boat
- Artesania Latina
- (and 1 more)
-
Fantastic! it's really impressive and magnificent! I could think that you work in the field of cinema and sets, congratulations again for this creation!
- 19 replies
-
- 2
-
-
- flying dutchman
- pirate
- (and 1 more)
-
Hello everyone, The work continues slowly: Gluing the first strakes, they are not tapered from now on I'm going to start tapering the strakes Have a good day ...
- 10 replies
-
- 1
-
-
- jolly boat
- Artesania Latina
- (and 1 more)
-
Hi, there, What an incredible job, I'm impressed. What attention to detail and the result is truly stunning, well done!
-
Hi Well, the job's off to a good start, and I think that's the easy part for the moment ... The photoetched boards look good, with the part numbers already engraved on them . so if I've understood correctly, it's better to sand the fields to remove the laser burn for better adhesion of the glue.
- 10 replies
-
- 2
-
-
- jolly boat
- Artesania Latina
- (and 1 more)
-
Hello everyone, I've received myparcell and so I'm declaring the worksite open. First of all, may be I'll do mistake by using wrong words or terms here,because I'm not a native speaker, and in advance I apolozige, but it's something that I could improve with your help, so let's get started ! and it's with a big enthusiasm that I ope the box of my first kit !!! So everything's tidy, there's a little box with lots of little things, fittings, little cannons, brass and little pulleys but they're really small !!! I'm going to have to be really meticulous on this one, I can feel it! [url=https://servimg.com/view/20571041/6][img]https://i.servimg.com/u/f36/20/57/10/41/jolly-12.jpg[/img][/url] So I'm going to take it easy and try to post progress regularly. See you soon in the sawdust and glue!
- 10 replies
-
- 2
-
-
- jolly boat
- Artesania Latina
- (and 1 more)
-
Thank you all for your welcome !
-
Hello, nice job ! I like your base it's so original .
-
Hello everyone So I am a little 62 year old cabin boy. My first model was about fifty years ago, the Santa Maria from Heller I think, all plastic. I had finished it without painting it because there were no paint pots with it... My father told me: we will paint it later but after it is still harder. In short it remained all black with its beautiful white plastic sails and my goodness from the height of my ten years I was rather proud . It was the only model created by my little fingers. In my twenties, I played the diatonic accordion and with friends we were in sea shanties. I was a fan of the group "Cabestan" among others also without making a model the heart was always a little carried away ..... Retirement is coming in a month so I said to myself that (re)making models would be a nice way to occupy one's time by listening why not some sea shanties ... I am rather handyman at home and I like working with wood and I make lots of stuff. I am a fan of DIY. Well my wife said to me: it's true that you are a good handyman but ... are you meticulous enough for models? There you go the gauntlet is thrown and the challenge is accepted. I ordered from AL a model for beginners: HMS Bounty's (Jolly Boat) 1:25. I saw that some members did this kit. It's been a while now that I visit your forum and I have gleaned a lot of useful information and admired your work which motivates a lot to progress. I register here to share with you my naval adventures and especially to learn with those who will want to help a little cabin boy who has just embarked..... Thank you for taking the time to read. See you soon on the shipyards ....
- 18 replies
-
- 11
-