


gieb8688
-
Posts
118 -
Joined
-
Last visited
Reputation Activity
-
 gieb8688 reacted to knotty74 in HMS Victory by knotty74 - Billing Boats - Scale 1:75 - first ever ship build, wood or otherwise
Fig 5: False poop deck and planking both the quarterdeck and the poop deck
This was a huge area of planking and given it was going to be oak-wash stained when I finished (and hence be covered up), I decided to cheat a little and plank in long lengths, using the same pilot pen used for the deck nail effect, on the upper gundeck below, to then ink in the butt shift effect and the deck nails on the quarterdeck planking.
I still used the bonded nylon along the edges between the planks to simulate the caulking.
-
gieb8688 reacted to knotty74 in HMS Victory by knotty74 - Billing Boats - Scale 1:75 - first ever ship build, wood or otherwise
Figs 4 & 4A: False quarterdeck and cabins
Again, the false deck fitted between the various bulkheads with virtually no adjusting. Excellent laser-cutting! The cabin woodwork was quite fiddly to do. I fashioned the leading to the window frames out of a bar code printed onto some sticky labels at work and then cut out and stuck onto the acetate provided with the kit.
-
gieb8688 reacted to Jeronimo in LE BONHOMME RICHARD by Jeronimo - FINISHED
Hello friends.
Manufacture of ropes for the shrouds of the main mast.
Regards Karl
T e i l 5 7
-
gieb8688 reacted to tkay11 in HMC Sherbourne 1763 by tkay11 - FINISHED – Caldercraft – Scale 1:64 - A Novice’s Build
Just some more views of the general build now that the inner bulwarks are planked.
Tony
-
gieb8688 reacted to tkay11 in HMC Sherbourne 1763 by tkay11 - FINISHED – Caldercraft – Scale 1:64 - A Novice’s Build
Now to show the tapered planks I put at the top of the bulwarks bow and stern. I couldn’t mimic the outer planking of bending the planks to the curve of the bulwarks, as that would have left a really awkward fill by the deck at bow and stern. I therefore planked the first three planks parallel to the deck, and cut rebates in the 3rd plank at the top to allow some stealers at stem and stern. This is of course nothing like real life, but I reckoned that it was all going to be painted and that the joins of the stealers would be relatively hidden under the rail that goes on top of them.
The last picture is of the bows, showing just how badly I have done in achieving any kind of symmetry.
Still, it’s all down to the learning, and I’ll keep you all posted as I go along so you can put me right rather than trying to figure out very poor solutions for myself.
Tony
-
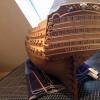
 gieb8688 got a reaction from reklein in HMS Victory by gieb8688 - Sergal - 1/78 - Restoration
It has been quite some time since my last post, but as you can see some progress has been made! Clearly some cleaning is in order!!
-
 gieb8688 got a reaction from Heinz6672 in HMS Victory by gieb8688 - Sergal - 1/78 - Restoration
It has been quite some time since my last post, but as you can see some progress has been made! Clearly some cleaning is in order!!
-
gieb8688 got a reaction from Heinz6672 in HMS Victory by gieb8688 - Sergal - 1/78 - Restoration
Adding a few recent pictures of progress. Holy cow are the shrouds time consuming! Then again, maybe working smarter instead of harder would have helped!
Thanks for looking,
Mark
-
gieb8688 got a reaction from Heinz6672 in HMS Victory by gieb8688 - Sergal - 1/78 - Restoration
Finally finished the shrouds on the foremast along with some misc. standing rigging. Moving on to the mainmast next.
-
gieb8688 reacted to Ray in HMS Diana 1794 by Ray - FINISHED - Caldercraft - A 38 gun Heavy Frigate
The main and mizzen top masts are now in place, and have all their shrouds and ratlines added, phew, I am glad they are all finished and that I split it up this way, as it did make the ratlines a lot less tedious to tie,I will now most likely add as much of the standing rigging that I can before fitting the tagallants masts.
I have also included some photos of Diana with Pegasus and The lady Nelson.
Firstly a lower fold down table I used to bring the rigging to a better level to work at
Main and mizzen masts
Completed ratlines
Some photos of Diana with Pegasus And some with The Lady Nelson as well
-
gieb8688 reacted to archjofo in La Créole 1827 by archjofo - Scale 1/48 - French corvette
Hello,
thank you very much for your kind words and the comments.
Here I show the continuation of rigging the carronades.
-
gieb8688 reacted to archjofo in La Créole 1827 by archjofo - Scale 1/48 - French corvette
Hello,
in addition to the breeching ropes for carronades I am also working on the breeching ropes for the 18 pounder guns.
A small detail for the height adjustment of the gun barrels had to be done. The straps of the wood blocks had to be installed.
In the background is the breeching rope already seen.
-
gieb8688 reacted to jim_smits in HMS Ballahoo by jim_smits - FINISHED - Caldercraft
And onto the second of my completed build posts!
The last part towards completion was the case. I've hinted that I was going to try something a little different and I'm immensely happy to say that I managed to complete the case without any mishaps. And here is the final result:
I ordered a wooden base and acrylic case from a supplier and also a sheet of blue acrylic. The sheet of blue acrylic was to simulate water level and I measured up the approx. dimensions of the ship at the water level and then deducted a few mm to be safe. I then cut out the approximate shape of the ship from the acrylic sheet. Then spent a long while iterating towards a good fit, using a dremel and then files, so that the ship rested in the acrylic sheet at the water line.
Once this was complete (and I polished out the scratches I accidently made), it was onto the main case. I need to drill four small holes to fit 10mm lengths of 3mm diameter acrylic rod through each hole to act as a rest for the waterline sheet. This was the most tense section as I could easily write off £80 worth of acrylic case. Stacked a load of old paperbacks and a piece of wood to brace the acrylic against. Then VERY carefully drilled a 1mm pilot hole by hand. Using the pilot hole I then used the dremel at its lowest setting to drill 2mm and then 3mm.
Everything worked out well and I'm very pleased with the final result.
Thank you to everyone who has followed the log and provided encouragement and support. Now I really must get back to my Snake build.....!!
-
gieb8688 reacted to jim_smits in HMS Ballahoo by jim_smits - FINISHED - Caldercraft
Pictures as promised!
This is the display case I received yesterday. Still some work to do on it though......
Here is the first nun buoy attached to the fore shrouds by two coils of rope. Thicker rope attached the bottom of the buoy is also lashed to the anchor.
And finally added guy pendants to the boom.
-
gieb8688 reacted to jim_smits in HMS Ballahoo by jim_smits - FINISHED - Caldercraft
And the build is complete!
Got all the little bits and pieces finished. Painted all the rigging hooks, added the second nun buoy and rigged to the shroud and anchor, added the last belaying coils and touched up the white paint around the rudder hinges.
Really happy with the completed build, and while it is not strictly my first build, it is my first completed build and it feels like a major accomplishment. I've added some images of the completed build itself but still got the completed to case to unveil!
-
gieb8688 reacted to FreekS in Admiralen-Class Destroyer 1929 by FreekS - FINISHED - Pacific Crossroads - 1:350 - PLASTIC
the model is finished. I've decided on the name Hr Ms Banckert. this destroyer was in dry dock in Soerabaya when the Japanese invaded Java, and was sunk (including drydock) by my other model Hr Ms K-XVIII (herself then destroyed by her crew). All 8 of the class were sunk in WW2, one by the Germans in Rotterdam and the others by the Japanese in the Dutch East Indies.
The first time working with PE and with airbrush has not been a disappointment. With a lot of patience it was well doable and the overall level of detail that Boris built into this model is very nice. pacific Crossroads has a set of models of many other Dutch warships that fought in the pacific, and I can certainly recommend then to anyone interested.
freek
-
gieb8688 reacted to mikegerber in Stavanger by mikegerber - Scale 1:15 - RADIO - Colin Archer design
Hello again
My studies and the beginning of the planning of “Stavanger“ go back to the year 2012. Again and again the work has been interrupteed by various reasons. But she was never out of my mind.
In June 2014, i stumbled on NRG'S MODEL SHIP WORLD. Originally because of the sensational images of 'Le Fleuron' by rekon54. Browseing the NRG-page i found the pilot by Michael Mott what inspired me and what newly motivated my work on “Stavanger“ – now i was ready to start with the build.
Mike
Below:
- start of the build
- wooden part of the keel
- stem
- stern
- raw frames
-
gieb8688 reacted to Pete Jaquith in Newsboy 1854 by Pete Jaquith - Model Shipways - Brigantine
Thank you for your interest in "Newsboy" 1854,
Next step is fitting the jibboom and associated head rigging. Key points include:
>>> Deadeye assemblies prepared with silver soldered rings
>>> Deadeye assemblies fitted to bow
>>> Jibboom / dolphin striker outfitted with eyebands
>>> Jibboom / dolphan striker fitted and head rigging installed
>>> Martingale stays and backstays fabricated from 27 links/in brass chain
>>> Balance of head rigging installation consists of tieing off the fore stays that pass down through the bowsprit bees and jibboom sheeves (following foremast installation)
Pete Jaquith
Shipbuilder
-
gieb8688 reacted to Pete Jaquith in Newsboy 1854 by Pete Jaquith - Model Shipways - Brigantine
Thank you for your interest in "Newsboy" 1854,
Additional mast assembly and outfit fittings. A list of special "Newsboy" rigging fittings typical of the mid 1800's is listed below:
Spar Setup
(1) Royal yard parrel assembly (special fabrication)
(1) Topgallant yard parrel assembly (special fabrication)
(1) Upper topsail yard parrel assembly (special fabrication)
(2) Upper topsail yard studding boom quarter iron (special fabrication)
(2) Upper topsail yard studding boom iron (special fabrication)
(2) Lower yard studding boom quarter iron (special fabrication)
(2) Lower yard studding boom iron (special fabrication)
(1) Lower topsail yard clevis assembly (Britannia casting)
(1) Lower topsail yard truss assembly (Britannia castings)
(1) Lower yard truss assembly (Britannia castings)
(1) Boom sheet assembly (special fabrication)
Mast Setup
(1) Main mast crane (special fabrication)
(1) Fore mast cap clevis assembly (special assembly)
(1) Fore mast clevis assembly (special fabrication)
(1) Iron stay assembly (lower topsail yard stay) (special fabrication)
This post completes mast fabrication and the fitting of mast ironwork. When construction resumes, mast sections will be assembled and outfitted with blocks and rigging lines per Rigging Setup Lists.
Pete Jaquith
Shipbuilder
-
gieb8688 reacted to Pete Jaquith in Newsboy 1854 by Pete Jaquith - Model Shipways - Brigantine
Thank you for your interest in "Newsboy" 1854,
Next step is assembly of mast sections and fitting mast ironwork. Key points include:
>>> Cross trees & fore top fitted
>>> Upper masts dry fitted and caps installed
>>> Mast / cap ironwork, bands, and clevis bands fitted
>>> Special fittings fabricated (silver soldered) from brass strip, tube, and channel sections
>>> Mast hoops fabricated from .020" x 1/16" basswood wrapped around larger dowel, cut to length, and glued
Pete Jaquith
Shipbuilder
-
gieb8688 reacted to Pete Jaquith in Newsboy 1854 by Pete Jaquith - Model Shipways - Brigantine
Thank you for your interest in "Newsboy"
With the deck framing complete, next steps include deck planking, waterways, covering boards, deck scuppers, hause & chain pipes. I enjoy this work as it requires some design work to optain the desired effect and with finishing it will start to give the model some color. Key points include:
>>> Deck planking fitted around hatch/house coamings, anchor windlass support planks, etc,
>>> Deck planking and margin planks fitted to waterway planks
>>> Deck planking nibbed into margin planks
>>> 1/16" x 3/32" deck planking
>>> Caucking simulated with black non-blead fabric markers (quick pass on one edge only)
>>> Waterways rise forward as covering board/plankshear have greater shear than deck planking
>>> Coamings, waterways, covering boards, and anchor windlass support planks left loose (final installation after painting and deck finishing)
It should be noted that this arrangement is typical of vessels build with machine cut planks. Prior to the advent of machine sawed planks, ~1800, deck planking often curved and was nibbed inboard into adjacent planks.
Pete Jaquith
Shipbuilder
-
gieb8688 reacted to Aleksei Domanov in HMS Vanguard by Alexey Domanoff - Amati
Got some free time to continue nailing. Use handmade blacked brass nails with round head.
I can't make good photos of these nails, its look pretty good in real.
-
gieb8688 reacted to Aleksei Domanov in HMS Vanguard by Alexey Domanoff - Amati
Marking jig 2.0
Simple and effective
-
gieb8688 reacted to Aleksei Domanov in HMS Vanguard by Alexey Domanoff - Amati
Just to remember how she looks
-
gieb8688 reacted to Gaetan Bordeleau in Le Fleuron by Gaetan Bordeleau - FINISHED - 1:24
Detail on the second picture;
In certain cases, drawing must be fitted to fit the space.