

Padeen
-
Posts
181 -
Joined
-
Last visited
Reputation Activity
-
 Padeen reacted to chris watton in Newsworthy updates from Chris Watton
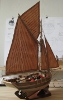
I would never show treenails for something as small as 64th scale, not even caulking. I notice that caulking is actually only slightly darker than the planks themselves, sometimes as near as damn it the same colour. The only two models I have ever 'caulked' is a 24th scale cutter and the 32nd scale Scottish fishing boat - even then I used a wood filler and sanded it back. It looked a lot more natural and realistic, being a slightly different shade than the planking. Black thread or lining the edge with a black pen isn't for me....
Yes - full rigging. The main mast is about 520mm long...
I feel I must edit this post to add that what I wrote regarding treenails and caulking is entirely my own personal opinion - this is a very subjective area - I have seen many models that look superb with caulking and treenail effects added, and in no way does it detract from the overall finish of the model, if executed well.
-
 Padeen got a reaction from mtaylor in Licorne by mtaylor - 3/16" scale - POF - TERMINATED LOG
Aïe! Reminded me of my taking out the bark of a branch with a cutter and suddenly seeing the blade in the middle of my thumb and blood dropping... just when I was thinking "don't do that! this blade towards your hand is not a good idea"... 'seems always obvious afterwards, doesn't it? Well, I'm glad your injury wasn't more serious, Mark.
-
Padeen reacted to mtaylor in Licorne by mtaylor - 3/16" scale - POF - TERMINATED LOG
Here's the right and SAFE way to do it. And I'm wondering if this bad and then the correct way should be posted in the tools section as a reminder...???
The jig and workpiece are properly secured to the mill table using clamps.
The cutting bit is run down to correct depth and bingo.... no movement, a perfect cut at the perfect width.
Sidestory.. I'm debriding the wounds earlier and applying fresh bandages and my Admiral saw the mess and winced. A bit later she sees me working at this and says: "Nothing slows you down, does it?". My response was the usual "It's just a flesh wound". She looks at me and said: "No more Monty Python movies for you". This from the lady who after surgery is back lap swimming....
-
Padeen reacted to Jim Lad in Stag by Jim Lad - FINISHED - Scale 1:96 - English Revenue Cutter of 1827
Thank you all for your encouragement! I have to say it wasn't a nice feeling to see that pair of deadeyes just dangling in the air! The situation wasn't helped by one of the security blokes wandering past while I was trying to fix it and having a look. "What's happening?" "The pin somehow came out of this deadeye strap." "Hmmm. Obviously a totally incompetent model maker." Grins and walks off while contemplate the penalties for 'securitycide'.
John
-
Padeen reacted to mobbsie in HMS Pegasus by realworkingsailor - Amati/Victory Models - 1/64
Hey we've all put symbols up as a sub, it lets others know of our annoyance and frustrations.
We've worked and some still are and there isn't one person who hasn't used colourful language at some time.
Better a symbol than a binned build.
mobbsie
-
Padeen reacted to Jim Lad in Stag by Jim Lad - FINISHED - Scale 1:96 - English Revenue Cutter of 1827
Oops! First thing I did this morning when I got the Stag out at the museum was to start 'sweating up' the shrouds prior to finally securing them. Blow me down if the lower deadeye strap pin on number two starboard didn't carry away when I put a bit of pressure on it!
I've no real idea what happened as it was fine last time I touched it, and when I went to try and drill the old pin out of the upper end of the chainplate there didn't seem to be a pin in there. Very strange!!
Oh, well! A bit of fiddling with some copper wire for a strap and another piece for a pin and I was back in business.
A little black paint and all was well again - just don't tell the foreman rigger or there'll be hell to pay!
Once the shroud was back on and they were all tensioned correctly on both sides, I put in some time making a start on the ratlines. Hopefully I can finish them off next time I'm in.
John
-
Padeen reacted to mtaylor in Le Mirage by Sjors - FINISHED - Corel - Wood - 1:75
Nice fix on the channels and chainplates. As for the holes.... cannonball holes?
-
Padeen reacted to chris watton in Newsworthy updates from Chris Watton
Hi,
I am sorry it took so long to re-register - but I have been very busy - plus my internet has been intermittent.
Whilst developing and building the Victory prototype, I have made many changes 'on the fly' - sometimes for realism/previous part not quite right to adding more detail - especially the stern windows.
I have just completed the boat designs, anchors (100mm long!) and made four new cannon barrel masters - here are some pics:
Copper plates laid in two distinct bands:
Rudder is very easy to copper.....:
Main Channel:
Checking the cannon masters:
As for release dates for kits, I am sorry, I cannot help. I have as much idea as you, as I only design and develop the kits, and have nothing to do with release strategy....
Chris
-
Padeen reacted to realworkingsailor in HMS Pegasus by realworkingsailor - Amati/Victory Models - 1/64
So.. I'm breathing again.
After madly whittling down some cherry wood strip, I successfully finished the fore topgallant mast. Whew... glad that's over with...
So for the record.. a few pics, first off, the carnage of broken spars (including what I hope will be the last known photo of the infamous minty mast)
Then, the final results for the fore and main topgallant masts.
And a few pictures of them dry fit in place...
Now just waiting on a few extra bits to arrive in the mail, and I can begin the lower standing rigging... I hope...
Andy
-
Padeen reacted to Jim Lad in HMS Pegasus by realworkingsailor - Amati/Victory Models - 1/64
Brighten your day; liven up your breath; try all new minty mast. Available from your local supermarket now!!
Sorry about the mast, Andy, but at least you seem to have taught a couple of Yanks to spell 'colour'. Now, if you can all just learn to say alumin - i - um!
John
-
 Padeen got a reaction from realworkingsailor in HMS Pegasus by realworkingsailor - Amati/Victory Models - 1/64
Mmm... sorry about the mast break, Andy. Well, good side of this: thus you can practice turning masts! (just kidding, there must have been bad words involved I guess...)
-
Padeen reacted to popeye the sailor in America by popeye the sailor - FINISHED - Billing Boats - 1:72 scale
thanks Adeline. it did for this ship, because of all the mast hoops. nothing was tied, except for the standing rigging. it just made it easier all the way around. thanks for the good word
I know Keith.....the skis are on the table. I've been putting most of the focus on the AmericA......but I will get to them. I sent some pictures to Midwest.......I got almost a carbon copy of what M&M / Mars said about the fun ship. I'm holding off on the gallery pictures until I get the skis in place. thanks for the good word as well.
thanks Bob.....made me especially happy to get the shrouds in place.....one more sail to go. I can tie everything in place in the meantime.. thanks for the good word
-
Padeen reacted to popeye the sailor in America by popeye the sailor - FINISHED - Billing Boats - 1:72 scale
ya gotta laugh.....the best part is.......it was 100% correctable it started like this.....it began with drilling the holes for the blocks and rigging........after I cut it to length, of course.
when the blocks and the peak halyard line was rigged, I laid it on the sheet. I would have taken the picture on my desk, but you wouldn't see it too good.
At the bottom of the outer corner, I attached blocks that I took from the deck. this is the corner that is furthest from the mast. note the way the pleats run.........I lashed it on........
good thing I used white glue for the end ties. I quickly undid it and fixed it
when this dried enough, it was time to rig it up....throat halyard first
then the peak halyard
here is a shot of both gaffs
see......no harm, no foul. I have no problem posting my mistakes.......if one person sees it and learns from it........then I did good by doing it. glad I made your day Daniel
-
Padeen reacted to mtaylor in Licorne by mtaylor - 3/16" scale - POF - TERMINATED LOG
Played with a mockup of how much of the gundeck will really be seen. It was a real eye-opener to me.
The first pic show both the foredeck and quarterdeck and walkways mocked up and on "beams" The second shows how much is actually visable.
Based on this, there's not going to be a MkV deck, but I do want that whole deck smooth as a baby's backside. And all appropriate furniture in place.
Back to sanding and sanding and sanding and.....
-
Padeen reacted to newbuilder101 in HMS Pegasus by realworkingsailor - Amati/Victory Models - 1/64
I have to be careful with my glasses....of all things! I was up close and personal with the masts and yards, while rigging my Mayflower, and hooked my glasses. I leaned back and my glasses were dangling from one of the blocks! Fortunately nothing was harmed, but I now know the potential for disaster. :mellow:
-
Padeen reacted to realworkingsailor in HMS Pegasus by realworkingsailor - Amati/Victory Models - 1/64
OK, ok!... Don't get all bent out of shape...
I've got the battens done on the main top, next step will be to do the bands and cleats, then the main mast will get painted up.
Foremast all painted and the wooldings put on, I had to joggle the spacing a little bit, but it's not really noticeable unless you attack the thing with a ruler.
Also got the bowsprit all cleated and painted up, and yes according to the plans, those cleats are supposed to look like that.
And just for good measure, a couple of overall shots.... nevermind the mess on the workbench... the paint revolution has not yet come...
Now... is that better?
Andy
-
Padeen reacted to Sjors in Le Mirage by Sjors - FINISHED - Corel - Wood - 1:75
I shall be careful Mark,
I have to learn Anja how she have to work with those tools.
And the first aid kit are close by…..
Do you want to help me with the cleaning or is now everybody running away
-
Padeen reacted to Dan Vadas in HMS Vulture 1776 by Dan Vadas - FINISHED - 1:48 scale - 16-gun Swan-class sloop from TFFM plans
Carl, those are the Draft (or Draught) Marks - a gauge of how much the ship is loaded.
Rudder Coat
A feature rarely seen on a model is the Rudder Coat - a tarred canvas that prevents water from entering through the helm port.
I made it from 1500 thread per inch Egyptian Cotton, which I colored with diluted Walnut wood stain. This was then PVA glued into place - one face at a time allowing each one to dry before proceeding to the next :
Wedges were used to hold the upper edges in place while the glue dried. The extra will be trimmed off later :
Danny
-
Padeen reacted to realworkingsailor in HMS Pegasus by realworkingsailor - Amati/Victory Models - 1/64
Hi Adeline, just missed you
I'm going to end up finishing this build by hand.
Sorry to hear about the rain... But at least it's not snow
From just a quick skim through the book, there is a lot of good info that will supplement the kit diagrams nicely. Just what I needed, I hope
Andy
-
 Padeen got a reaction from JerseyCity Frankie in HMS Sophie by JerseyCity Frankie – FINISHED - brig from Patrick O’Brian’s Master and Commander - Shadow Box
Ah... the taking of the Cacafuego by the little Sophie! Do you plan to build a model of the Xebec in your collection?
Your little model is wonderful: so much detail at this scale, well done! I think I am going to follow your builds with as much pleasure as O'Brian's novels...
-
 Padeen got a reaction from popeye the sailor in America by popeye the sailor - FINISHED - Billing Boats - 1:72 scale
Hi Popeye,
I just discovered your log: you are doing a great job! I particularly admire what you made of the skylight and your rigging skills.
Following on...
-
Padeen reacted to realworkingsailor in HMS Pegasus by realworkingsailor - Amati/Victory Models - 1/64
I think it boils down to the fact that the ultimate expression of this hobby, as far as intricacy and accuracy go, is the scratch built plank on frame model... So within those parameters... It is inevitable... It is unavoidable...
Andy
-
Padeen reacted to Dan Vadas in HMS Vulture 1776 by Dan Vadas - FINISHED - 1:48 scale - 16-gun Swan-class sloop from TFFM plans
Pintles
I made the rudder Pintles from 1.6mm thick brass sheet. First I milled most of the inside, leaving a thin piece at the bottom for strength while the rest of the work was carried out :
Then I cut each piece from the main sheet, sanded the angle at the fore end on the disc sander and drilled the holes for the Pins and bolts :
I filed out the thin centre and silver-soldered in the Pins :
Next job was to mill the rebates for the straps and recess the fore ends. For a Mill Cutter I ground the point of a 1.6mm drill flat - perfect tiny cutter (note - I only left a very short piece protruding from the chuck so it wouldn't snap off). The last two pics are of a dry-fitted pintle :
Then I lightly blackened them to simulate bronze :
And finally another dry-fit :
Danny
-
Padeen reacted to Sven in HMS Victory by Sven - FINISHED - 1:600 scale
Thanks Salty and everyone else that has been following this log, I have enjoyed it immensely and with all your encouragement I have done a lot more than I thought I could! There also seems to be a bit of a motorbike subculture among us modellers as well!
Finally it is finished, mounted on small brass pillars and installed in the glass cloche acquired by the admiral.
It took about 200 hours.... I am looking forward to doing another!
Matt
-
 Padeen got a reaction from trippwj in Le Mirage by Sjors - FINISHED - Corel - Wood - 1:75
And don't despair, you'll find the will to work on Le Mirage again after a little break. And nobody forces you to modify the chain plates on this one if you don't feel like it: you'll know for the next...