samueljr
-
Posts
339 -
Joined
-
Last visited
Content Type
Profiles
Forums
Gallery
Events
Everything posted by samueljr
-
Sorry Bob (Let's not hijack Wayne's thread) Wayne, I actually did drawings of the masts and yards based on Prebele's notes/logs . I don't know if I have them anymore Sam
-
Bob Sorry about the "under development again" line that was / kinda an inside joke when I put it on m y profile. I was doing some design work for a couple of different manufacturers on spec. I've got to take that thing off. I did want to do ESSEX larger but my bosses wanted it at 1:76 (scale conversions) were just a pleasure to do - lol Sam
-
The scale was requested by Eric Snow (who was managing ME at the time) It is the same scale as the CONSTITUTION. He felt the same scale would (obviously) give a sense of size and proportion to a contemporary vessel and might even spur multiple purchases - Sam Cassano Jr Wayne, the kit is based on the original launch appearance so the best source of masts & yard sizes would be Prebele's notes / logs that list them. After that you've got to decide what year / era you're going to present and research to that time frame as there were considerable changes made to the rig as was the actual appearance and armament Sam
-
I've added two like new condition AOS book titles to my library reduction sell-off THE NAVAL CUTTER ALERT THE SHIPS OF CHRISTOPHER COLUMBUS Each is in like new condition Each is $35.00 plush shipping or both for $60 plus shipping Other titles can be found on my earlier thread I'm also adding the entire runs of MODEL SHIP BUILDER and SHIPS IN SCALE magazines PM me with questions or order(s) I'll be updating the list next week Thanks - Sam
-
SCUPPERS
samueljr replied to samueljr's topic in Building, Framing, Planking and plating a ships hull and deck
To everyone who responded - THANKS! I've been experimenting with a few different solutions and I'm leaning towards the less is more philosophy. The scupper lining is a great detail if subtle enough - too much and it looks like a gaping hole in the waterway. I'm either going to go with Druxey's acrylic paint solution (thanks David) or just a thin paper for for the lip. The issue other than size is the consistency of the shape. Thank's again to everyone Stay well Sam -
Hi I'm working on a commission project in 1/4" scale and am looking for a good treatment/method of the internal lining of the scuppers. I've got (I think) the exterior discharge under control but am looking for the inboard / intake (waterway) side. I recently saw a thread where the builder did a nice job of it and I can't remember the thread. It wasn't focused on the scuppers, it was just one of the details illustrated. Any help and/or direction would be appreciated. Moderators, if this should be in on deck thread please move Thanks! Sam
-
First off I'd like to thank everyone who inquired and purchased books - THANK YOU! Attached is the remaining inventory - still some really great titles available. I'm running a special sales promotion - spend $20.00 dollars and get your choice of any $5.00 book for free (just pay s/h charges). Spend $35.00 or more and get your choice of any two $5.00 books for free (just pay s/h charges). Book selection is based on availability - first come - first sold. Please PM me with any questions Thanks again - Sam BOOK INVENTORY 111219.pdf
-
- 1
-

-
Fernando Hello. Thanks for checking the list unfortunately the BEAGLE was sold already - sorry. I'll be posting an updated list next week when all the transactions are completed. If anything changes I'll let you know. Thanks! - Sam
-
Lou Thanks for your interest, unfortunately BELLONA has been sold. I'll be posting an updated list sometime next week once the first "round" of sales are paid for and shipped. I've sold quite a few books. If anything changes I'll let you know Thanks - Sam
-
Thanks Lou! I didn't realize that not everyone would not be able to open the EXCEL file. My apologies to those who couldn't Sam
-
I've got a number of projects in front of me and have come to the realization that the library I've accumulated is no longer necessary. The books are "graded" on the scale used by Amazon (I've tried to be as objective as possible). The prices listed do not include shipping as I'll use the least expensive method dependent on weight. distance. etc. Just as an FYI - Live in Western New York State I can accept paypal Please PM me with any questions. Thanks! - Sam BOOKS FOR SALE AMENDED 101819.xlsx
-
Thank you to all for the "likes" through the project and for the words of encouragement. It's not always easy (or comfortable) not following the crowd. Michael, I am an unapologetic kit basher and have several on my work bench in various states of completion. I just don't know where I'm headed next. Also I've been given the opportunity to throw my hat in the kit design ring (again) by one of the Manufacturer/Sponsors of MSW. I've stated the initial beta testing of bulkheads )so far - so good) and will know in the near future if we're going to move forward with the project. Sam
- 47 replies
-
- 4
-
-
- queen anne barge
- Syren Ship Model Company
- (and 1 more)
-
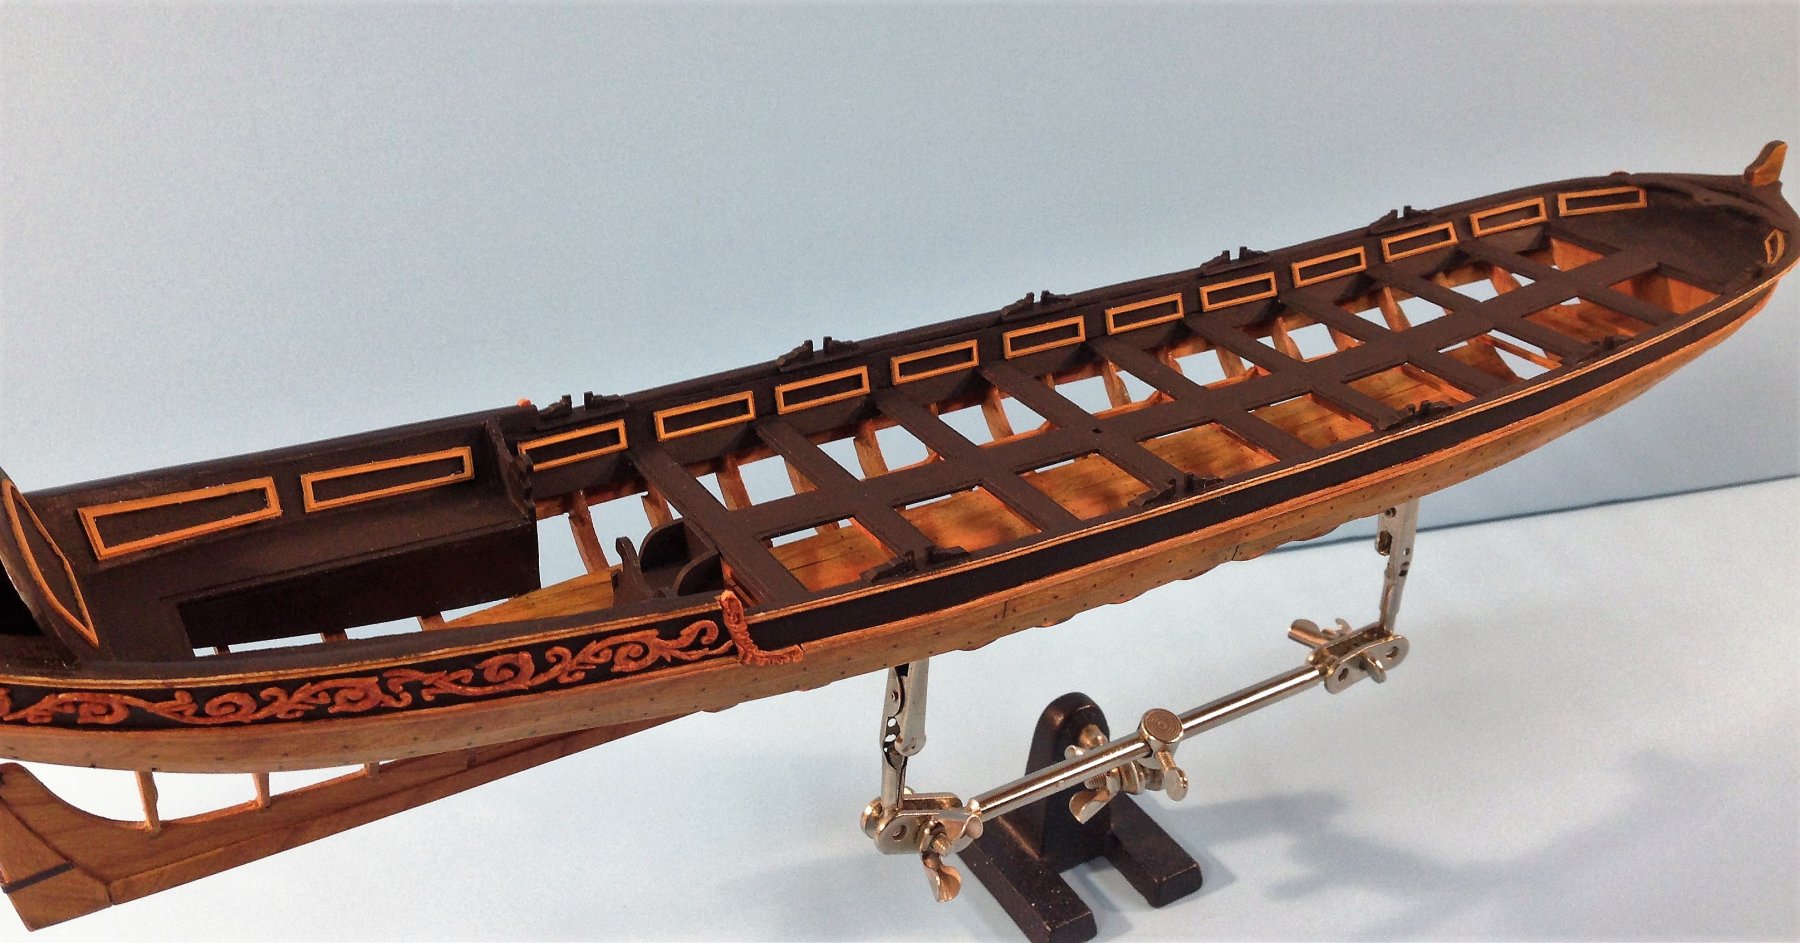
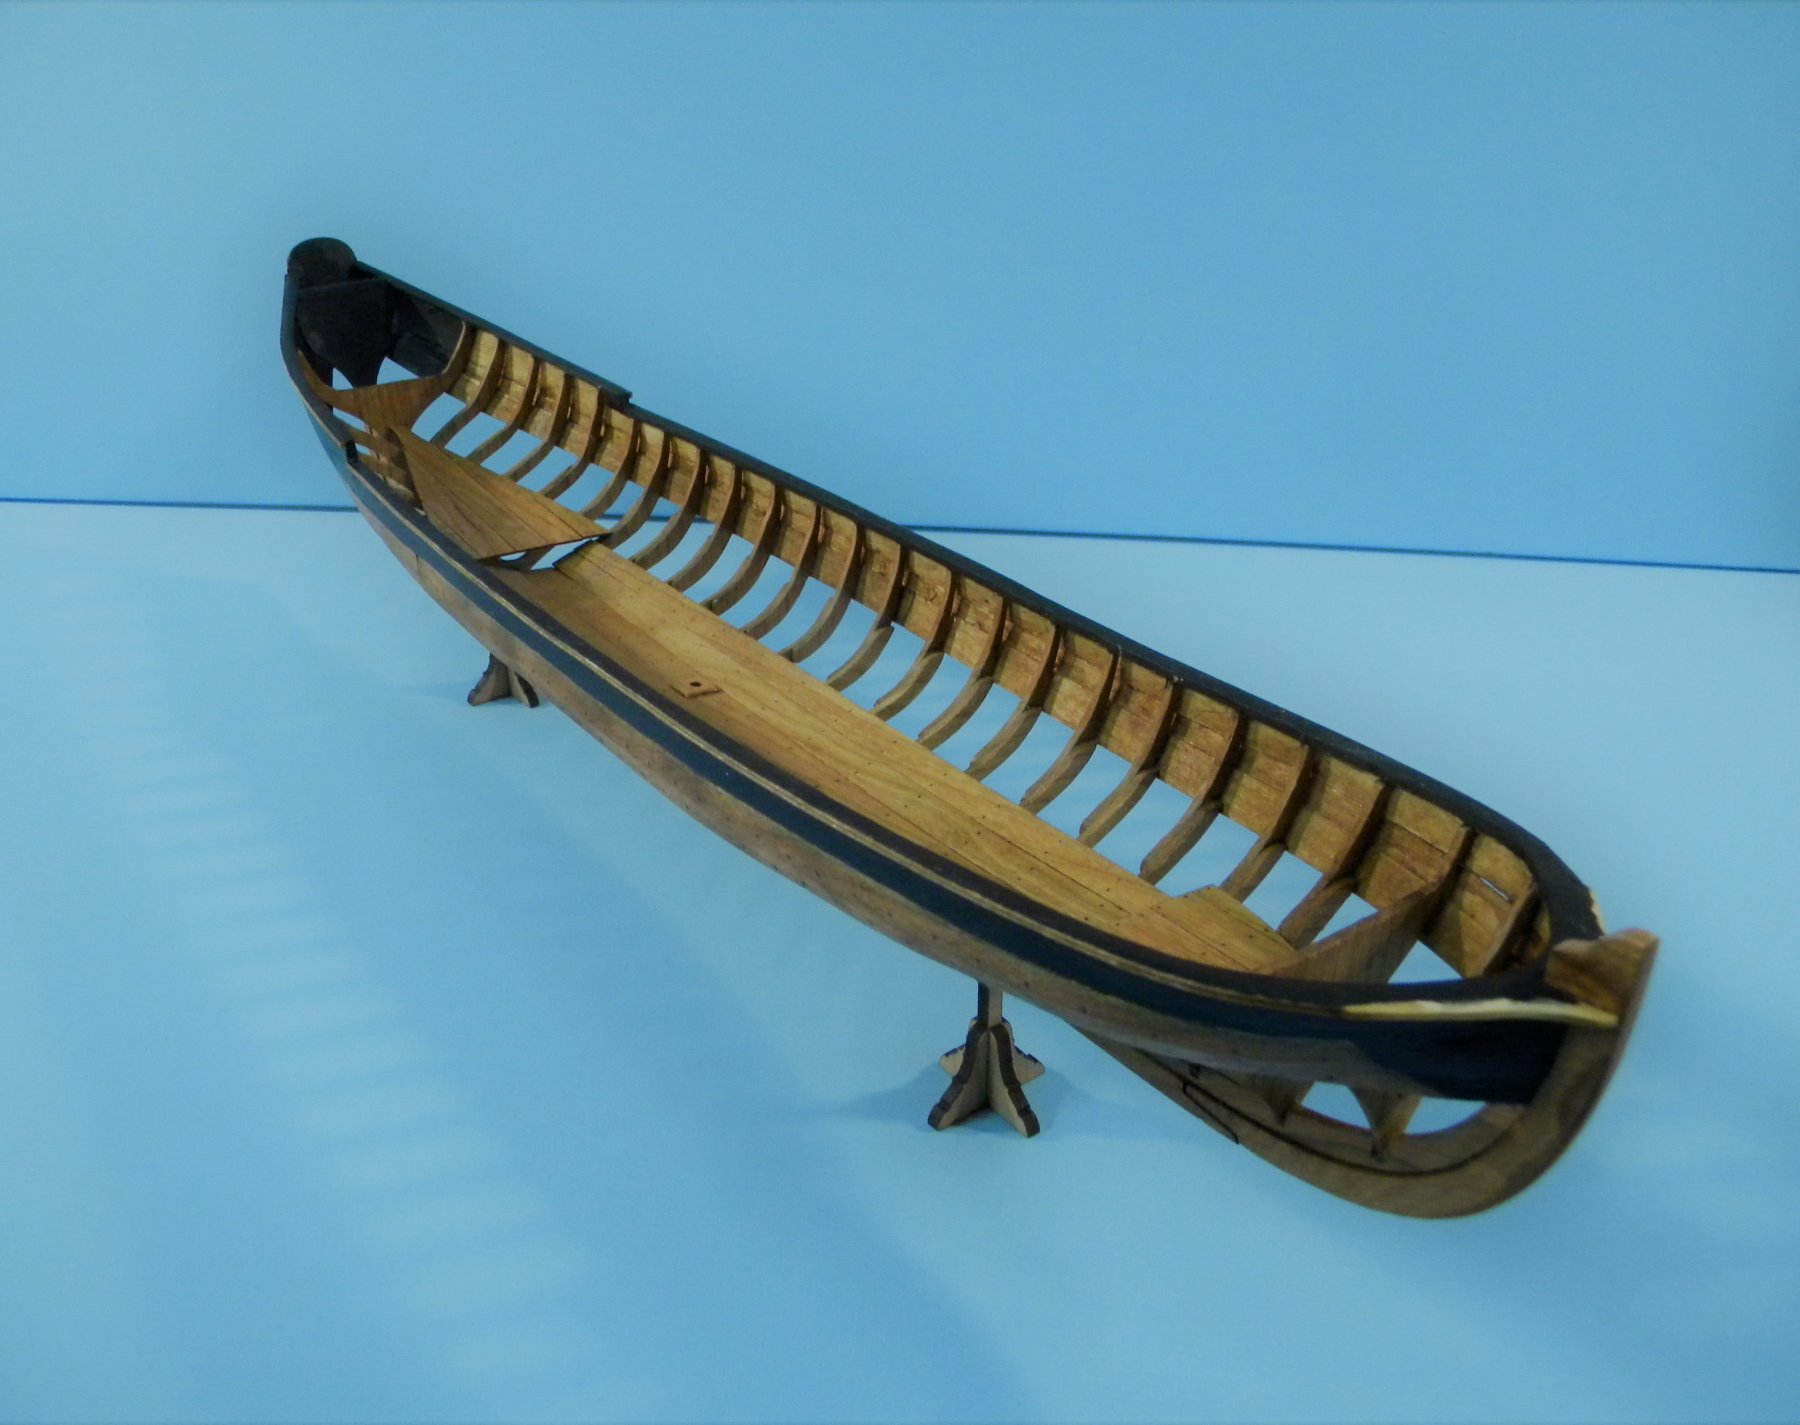
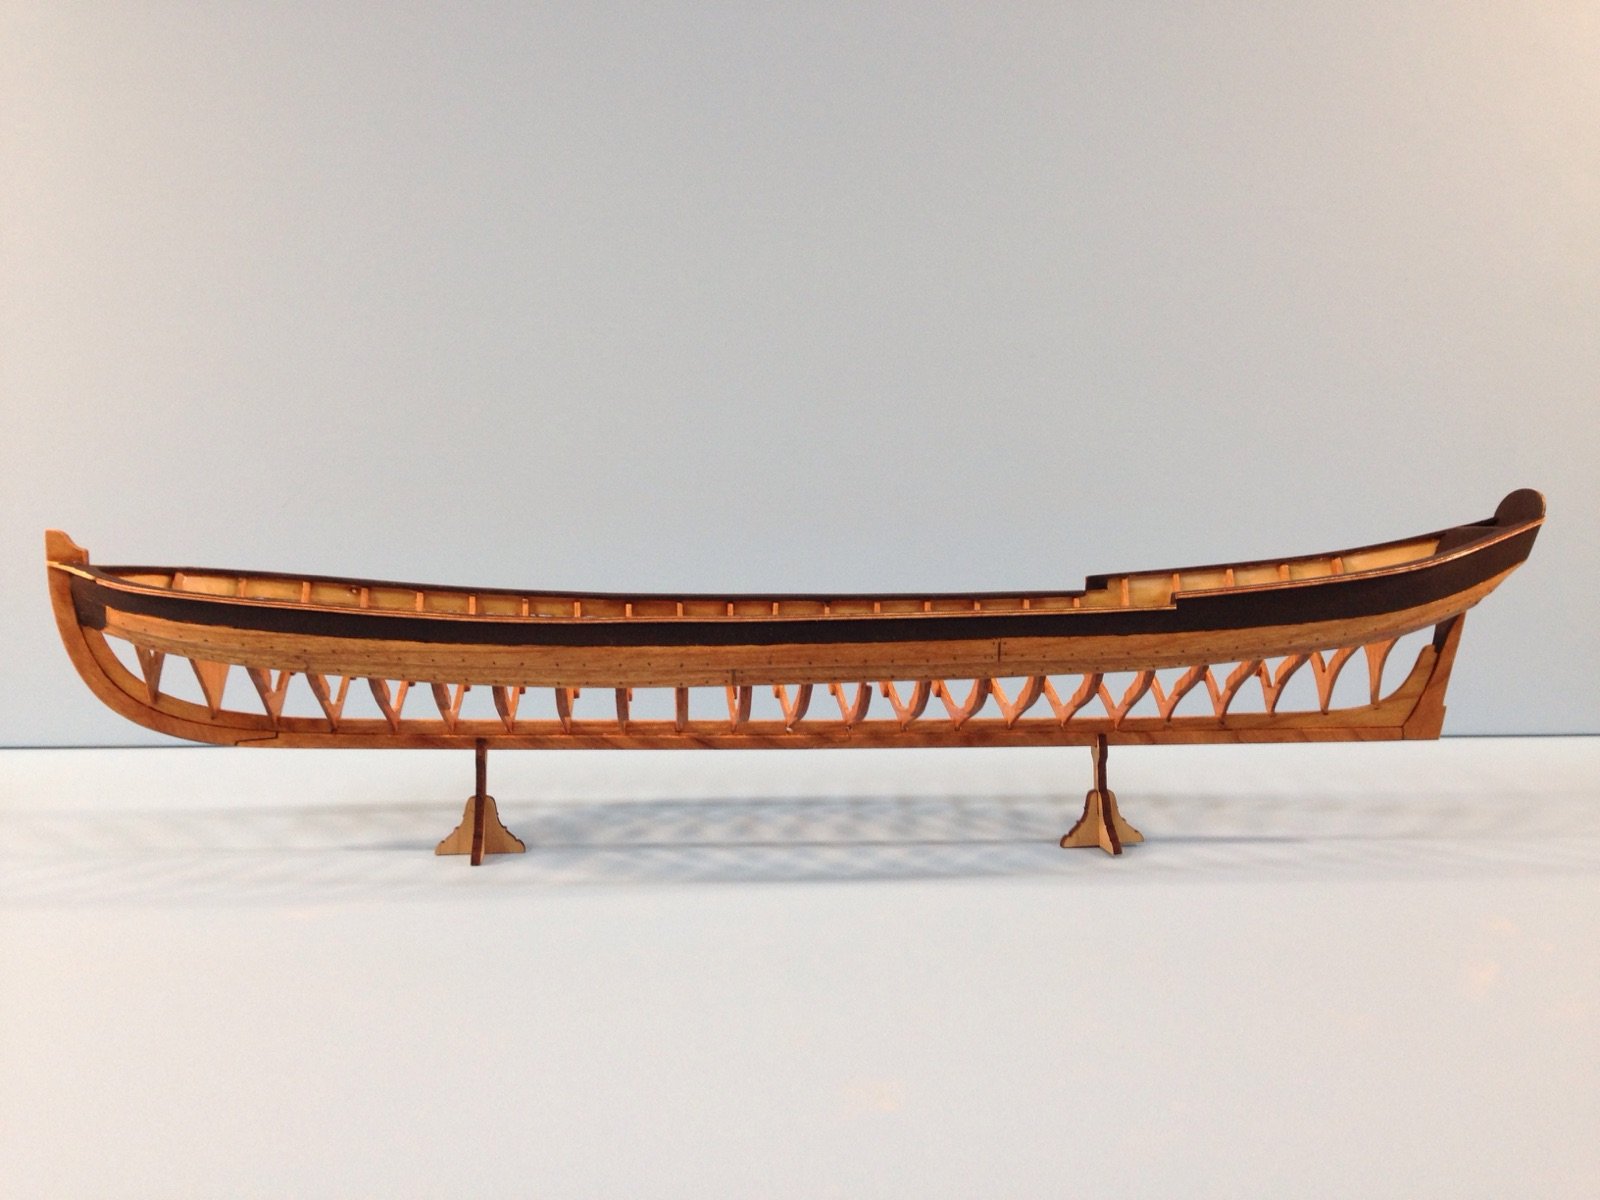
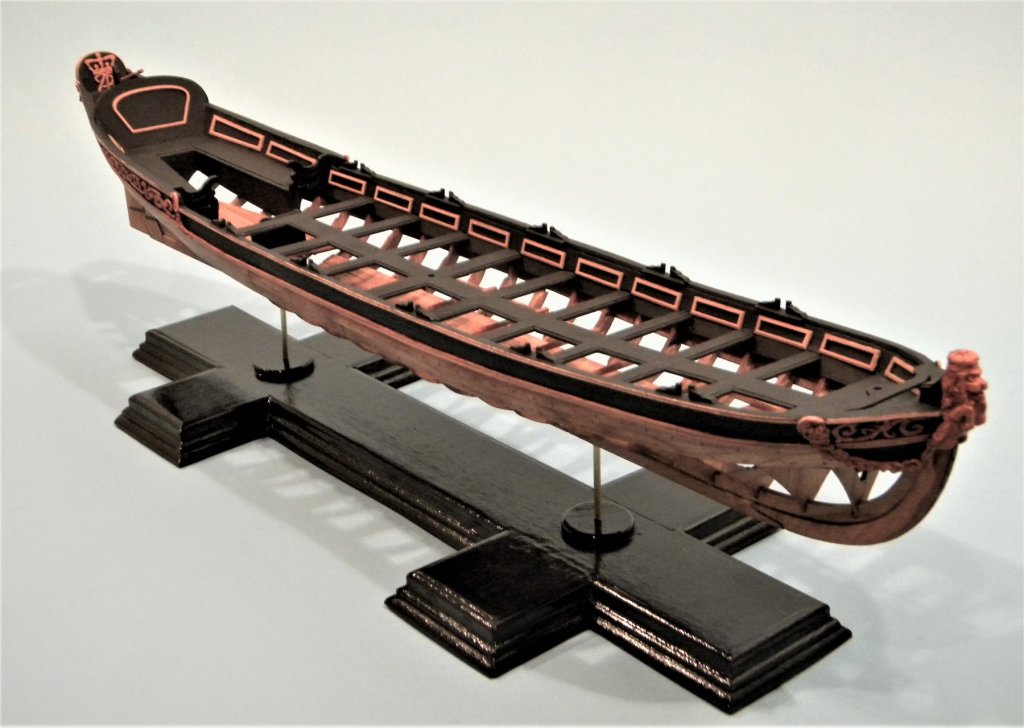
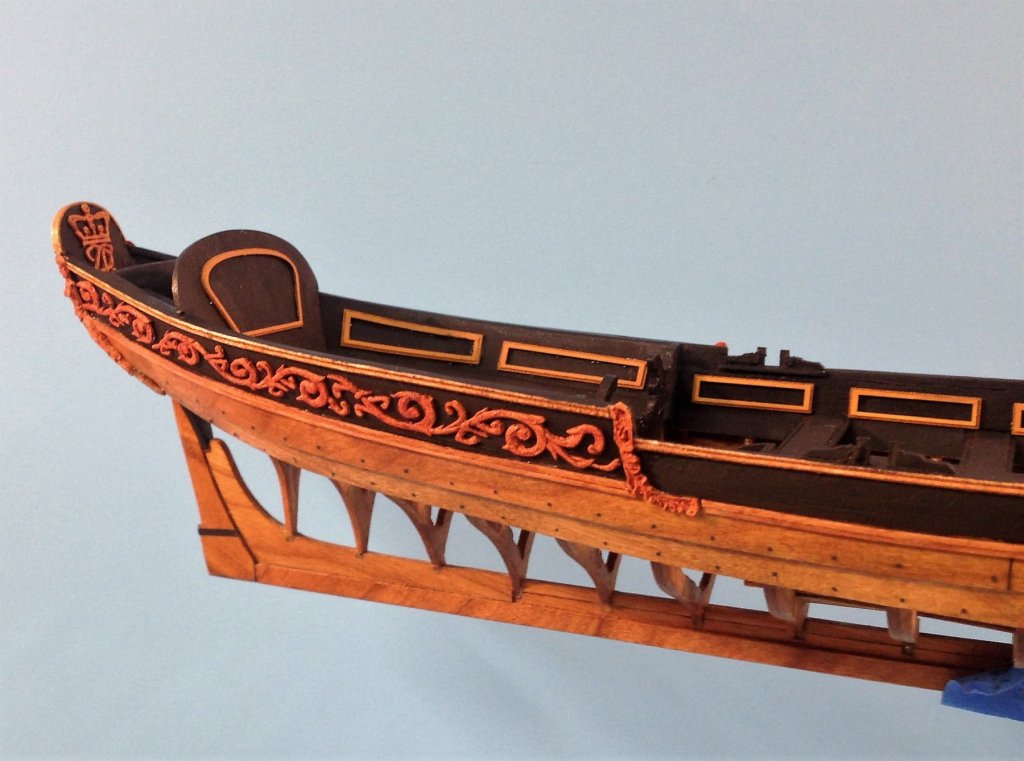
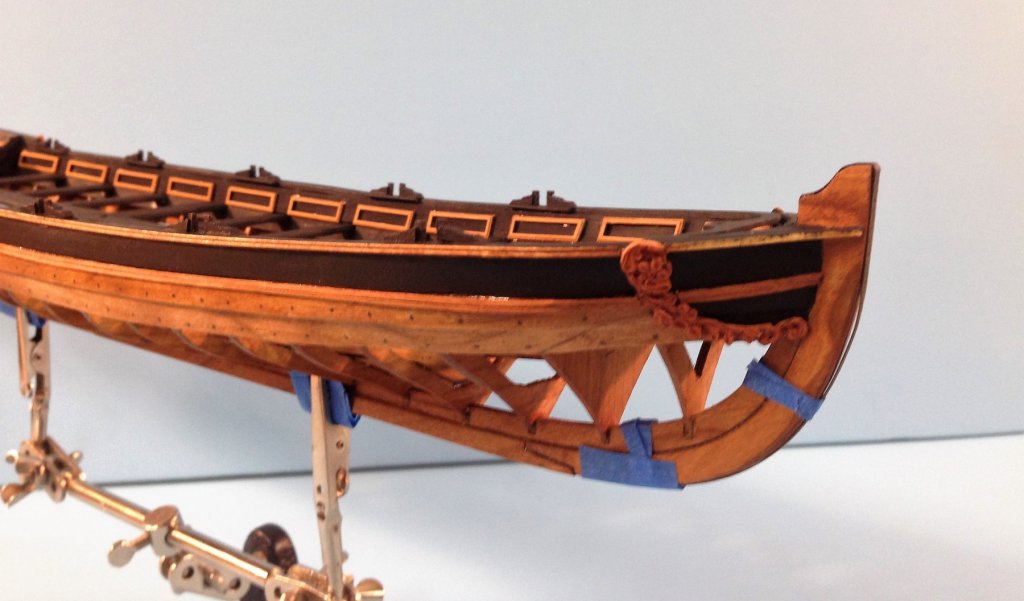
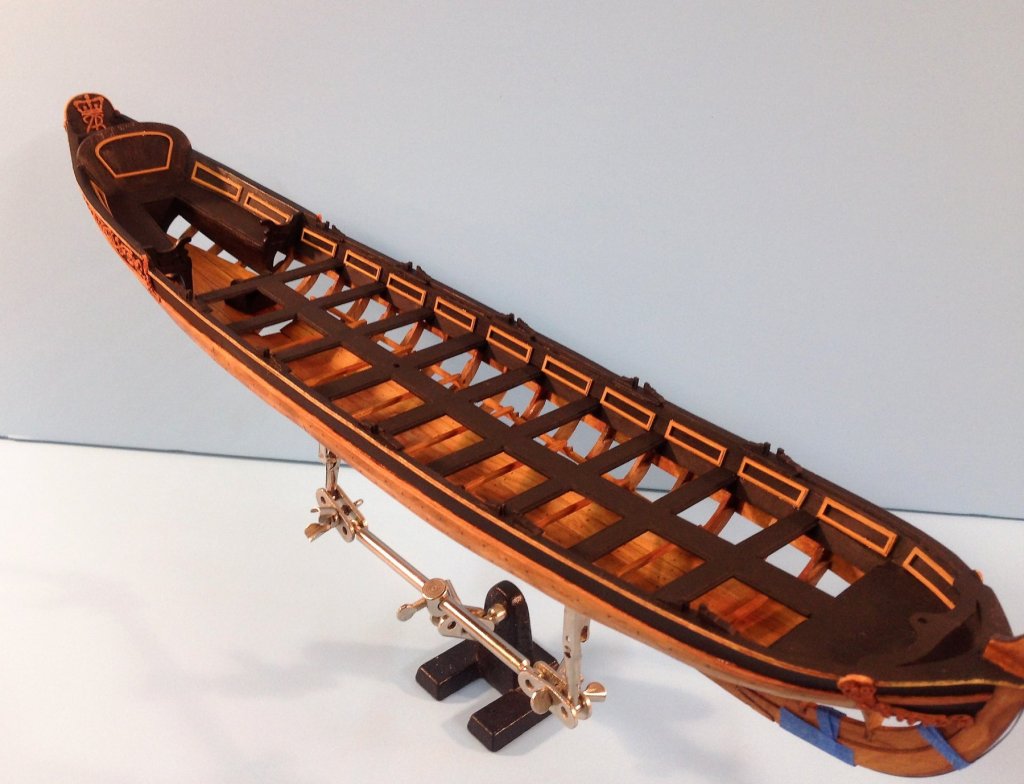
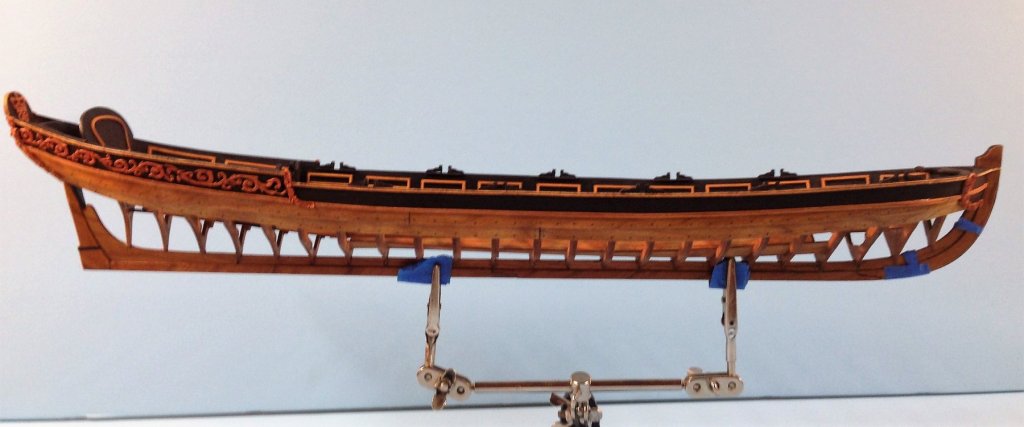
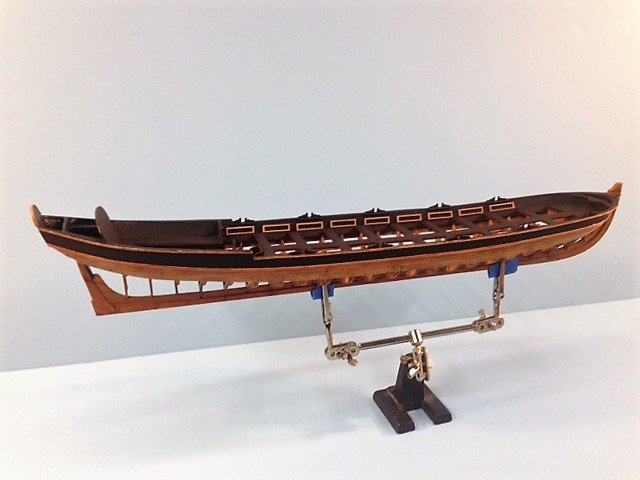
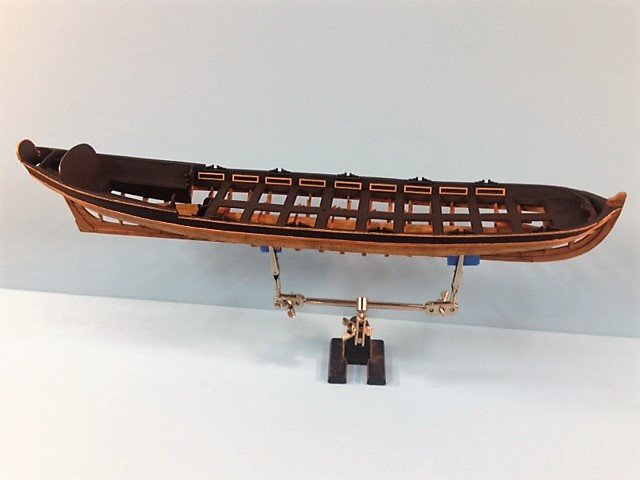
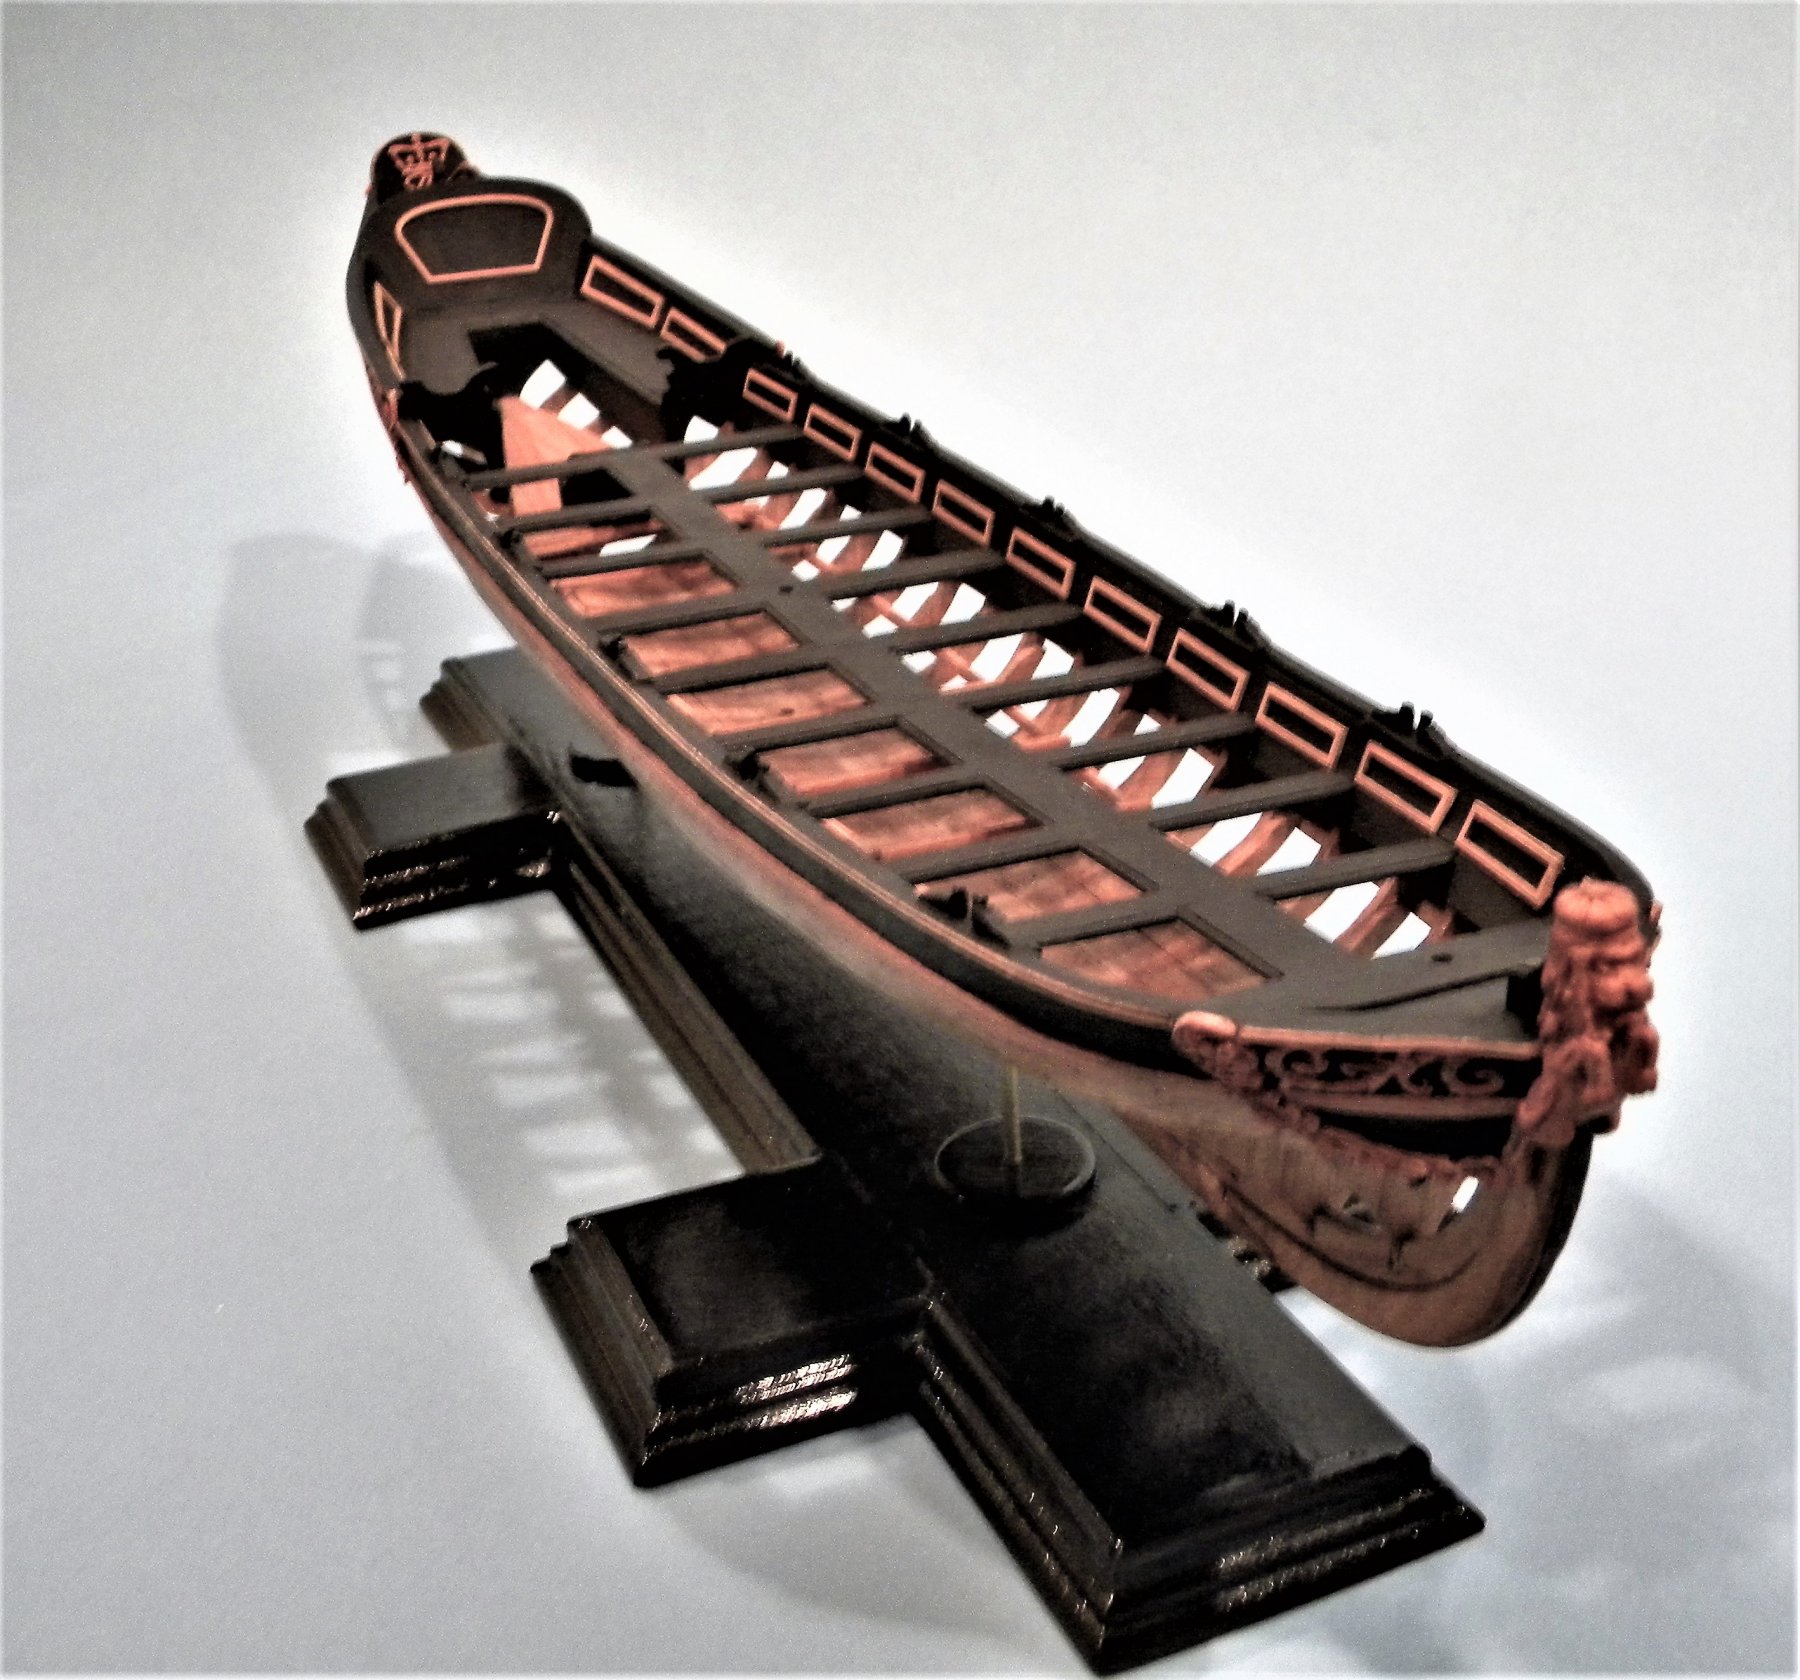
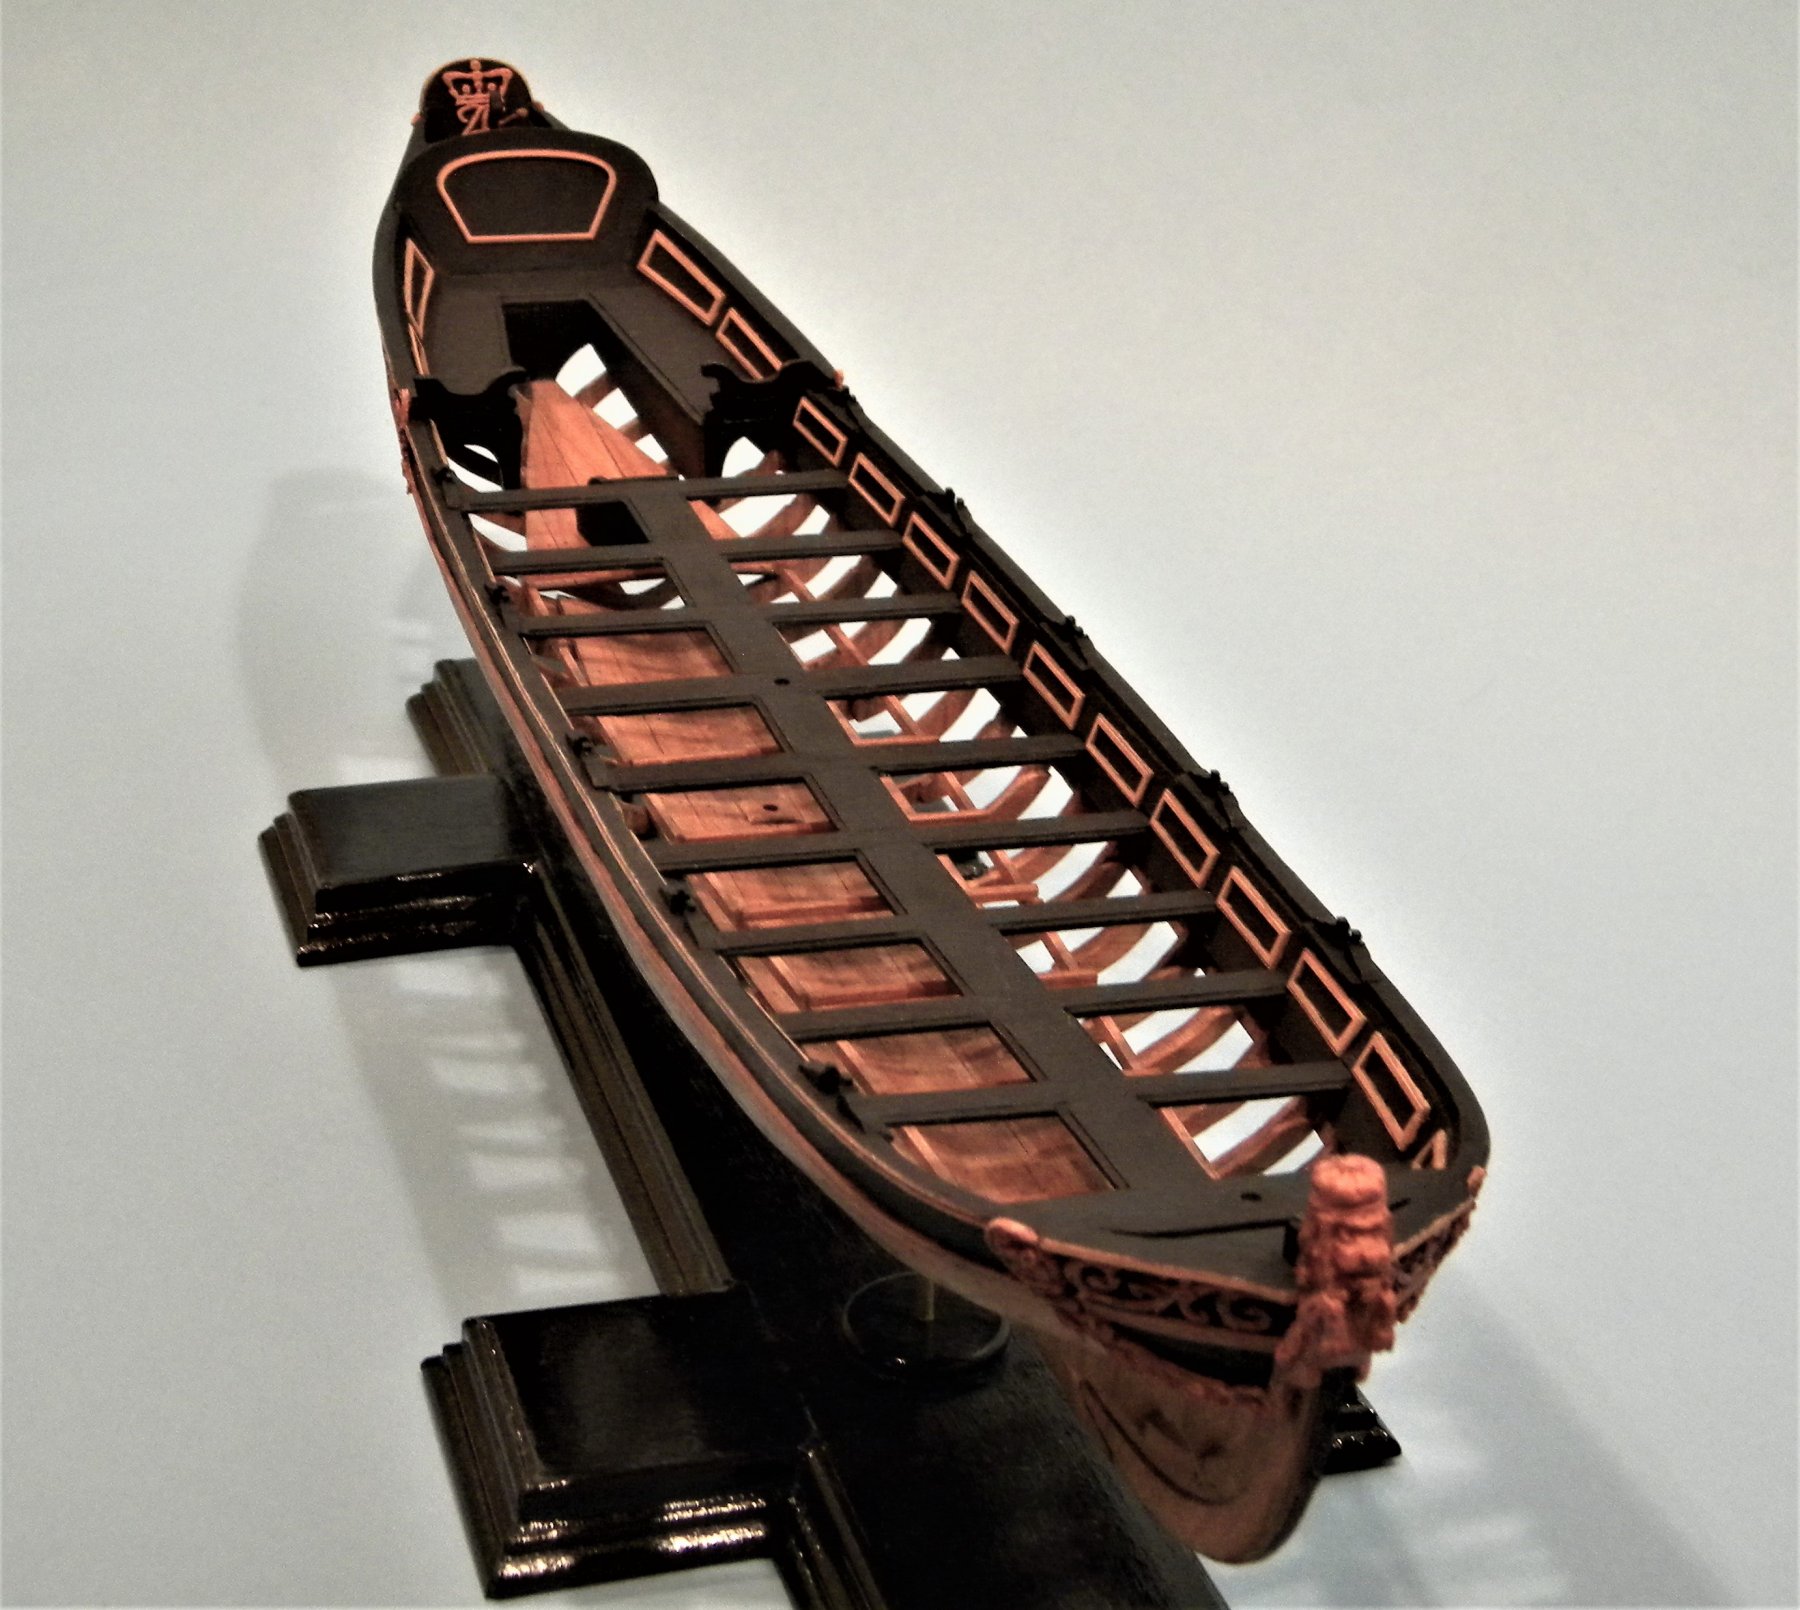
Well this is it. The BARGE is complete and on it's permanent base. For my purposes as I've said there will be no flags, sweeps or internal decorations. Thanks to everyone for checking in. On to the next project ............................................


- 47 replies
-
- 15
-
-
- queen anne barge
- Syren Ship Model Company
- (and 1 more)
-
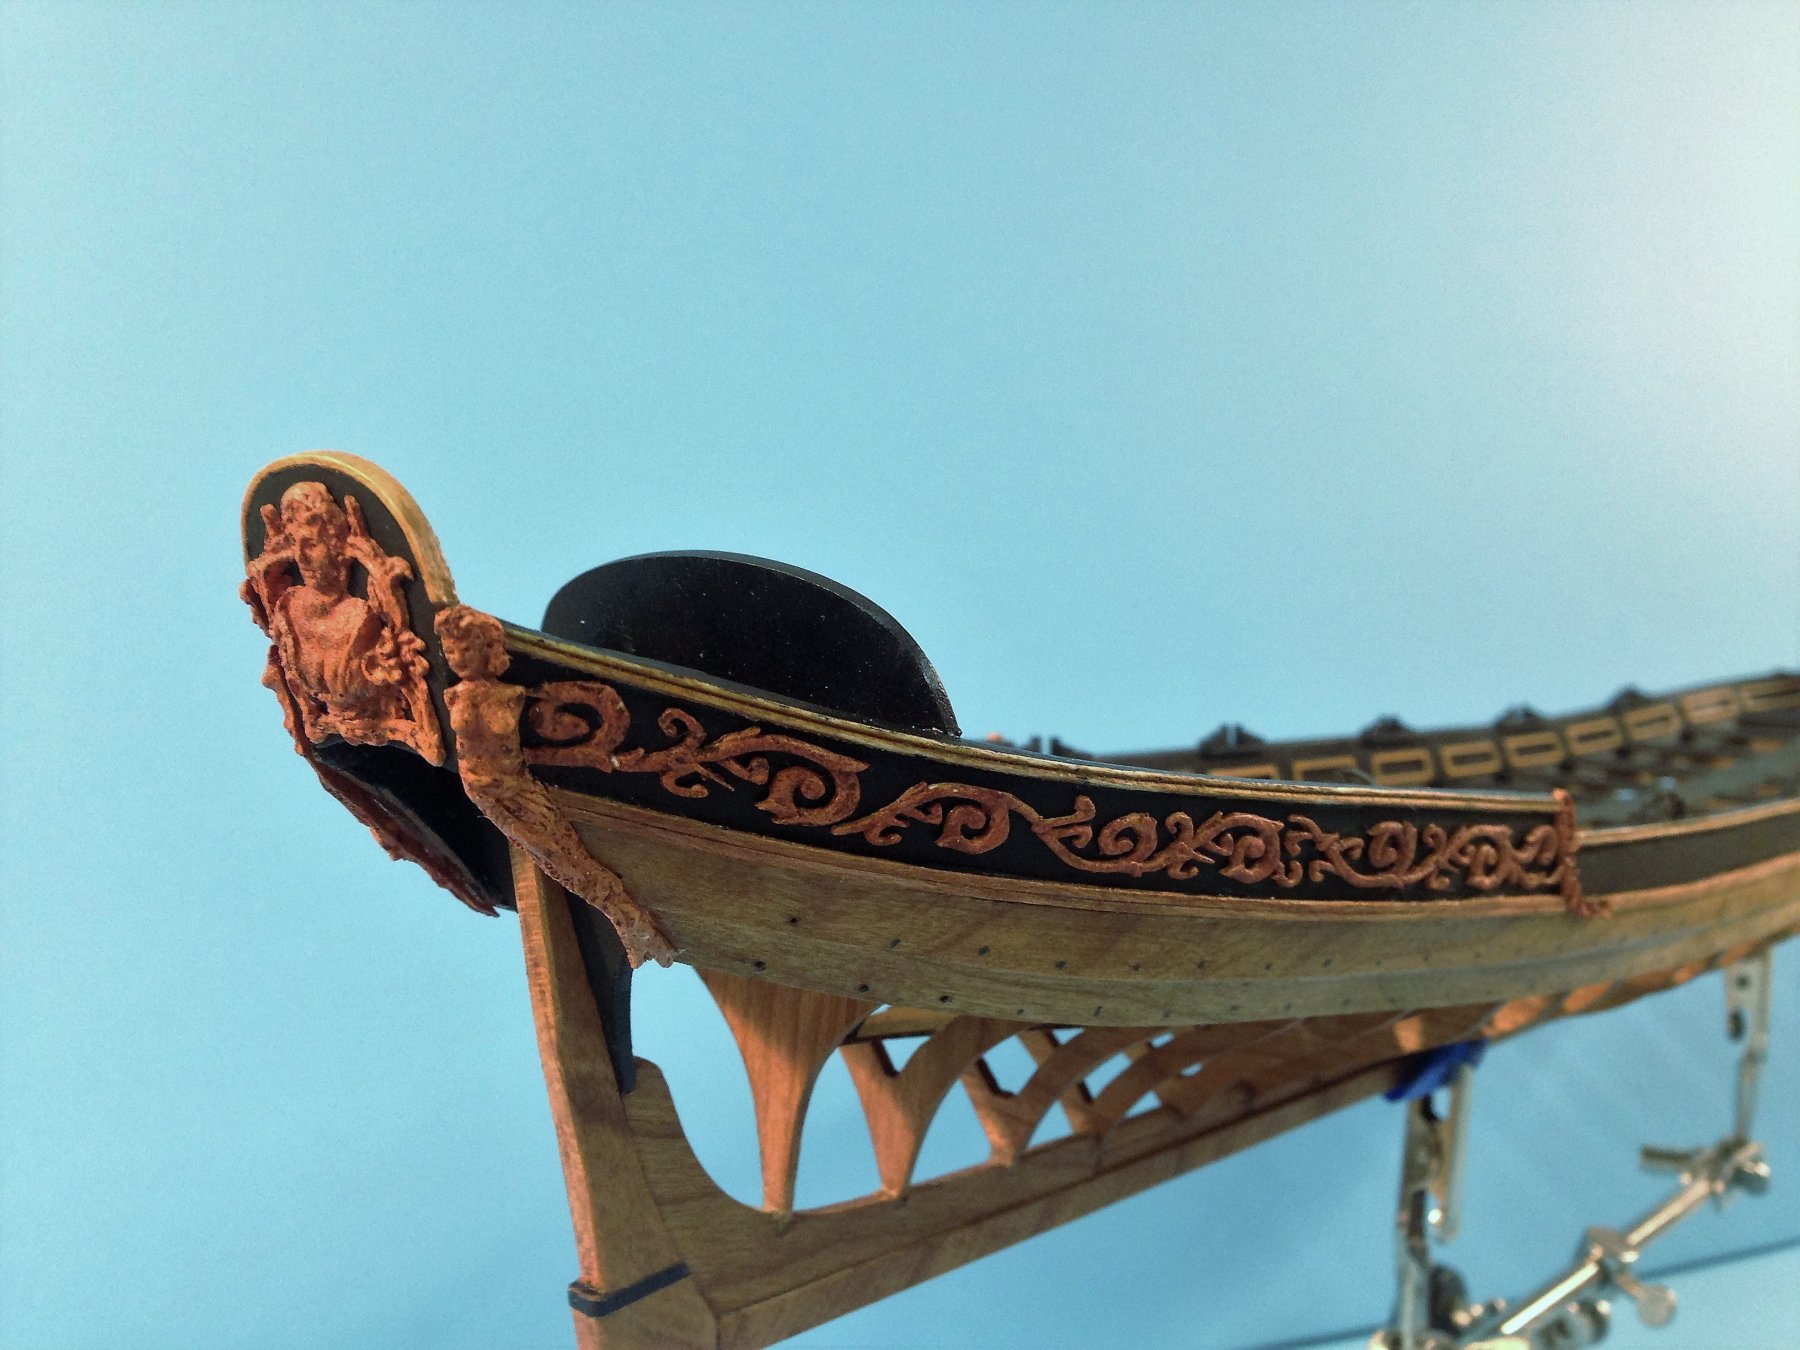
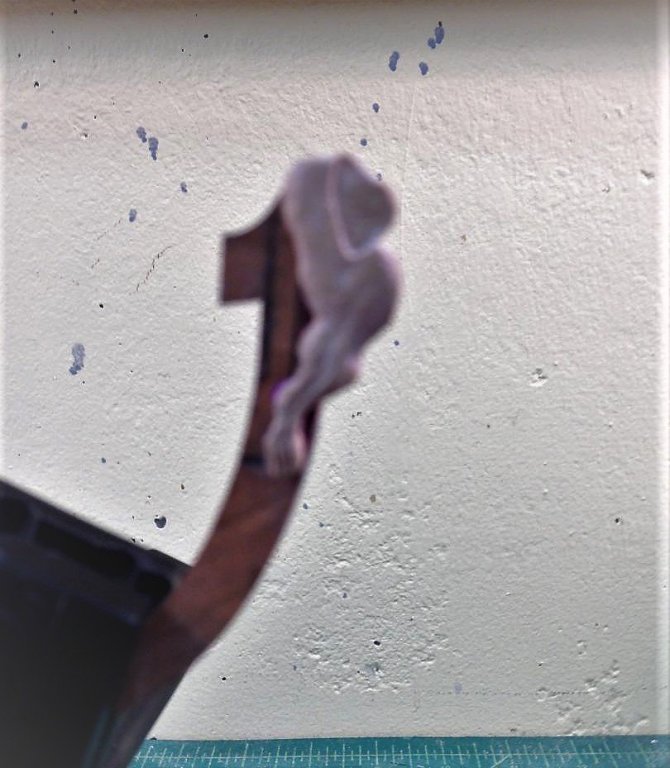
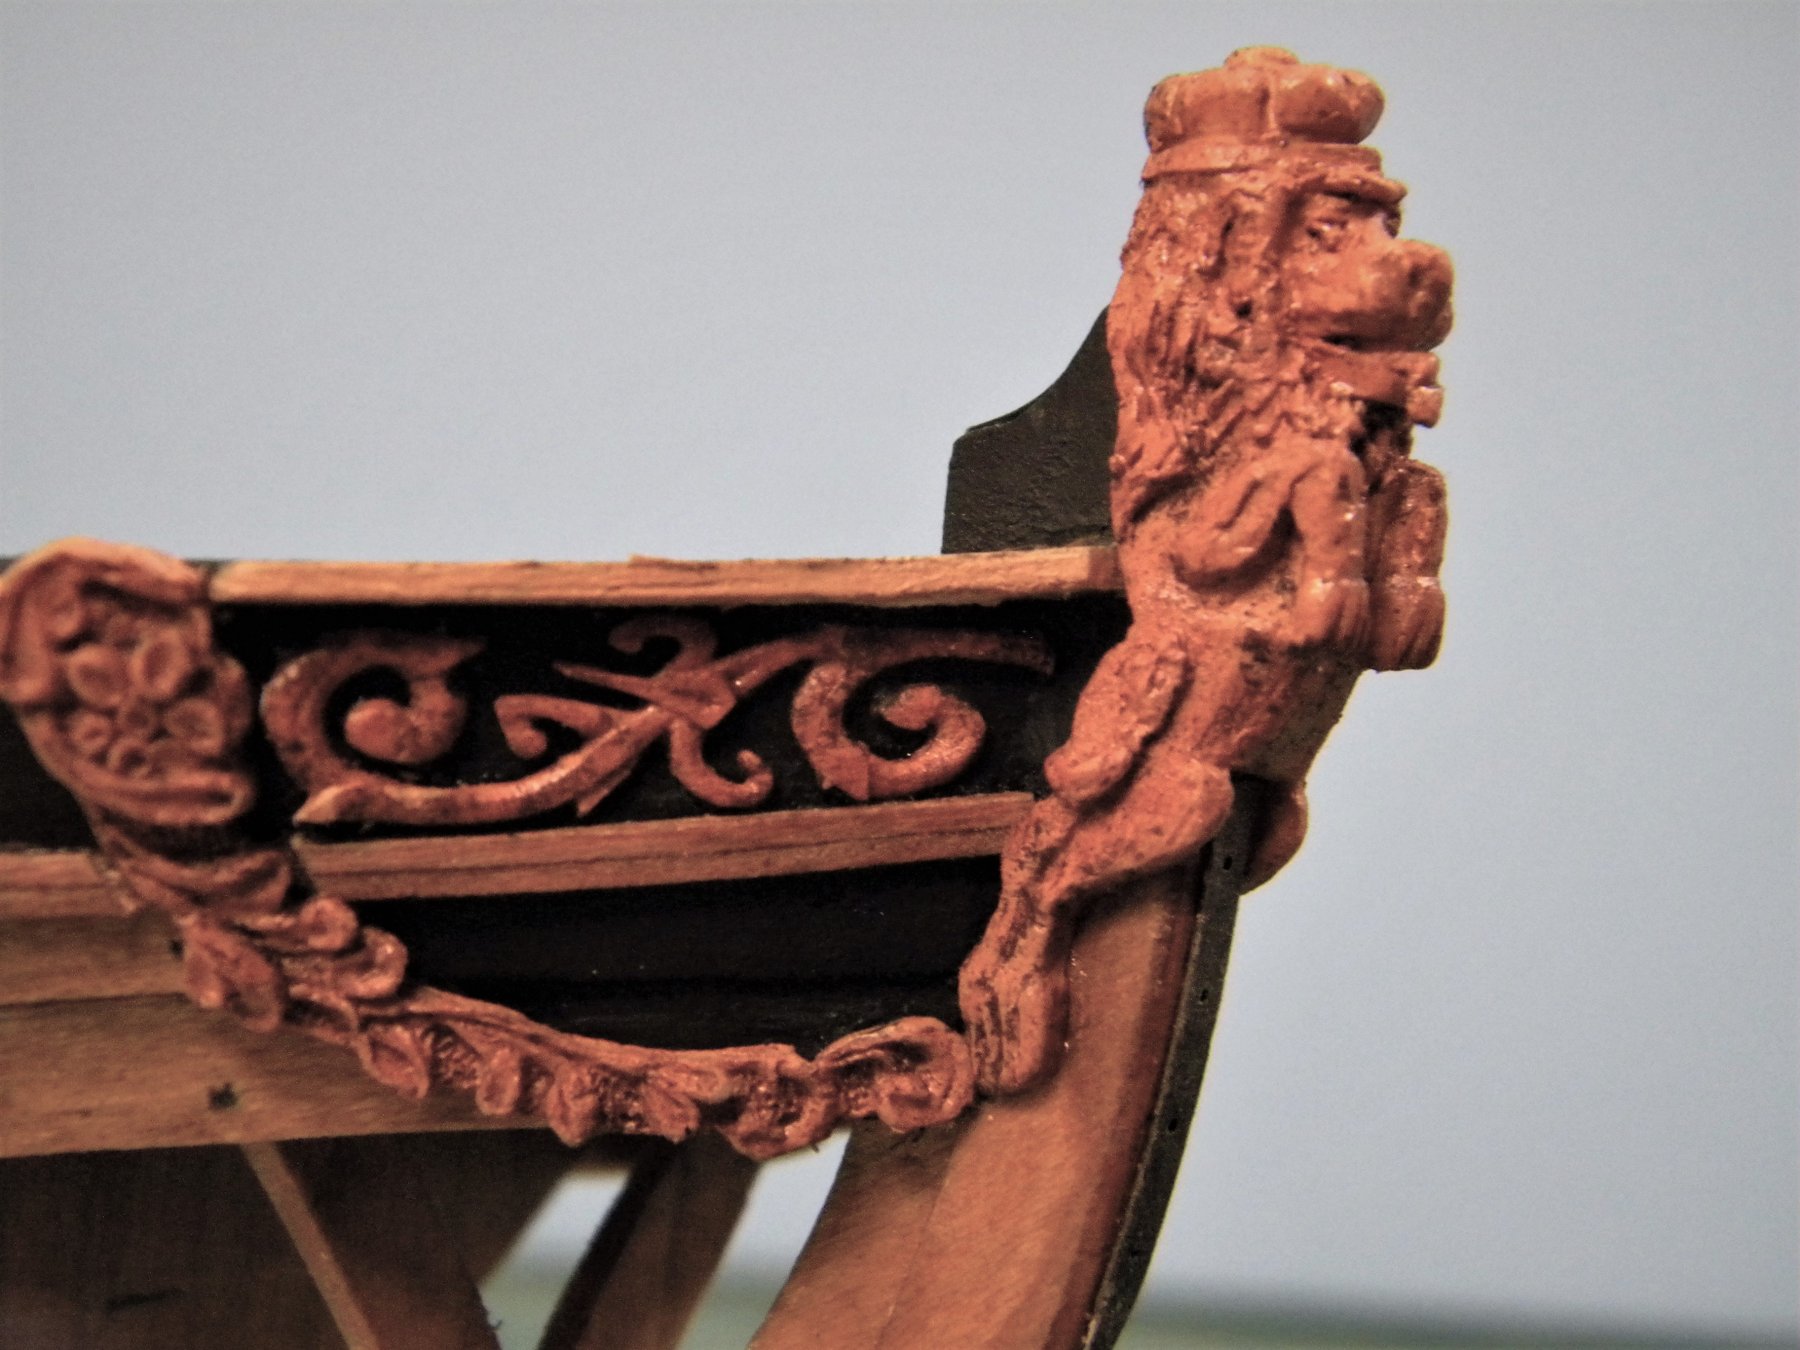
Good morning Russ Thank you! The build is done except for the base which I'm just starting to construct. I'm actually happy with the overall appearance given my goal from the outset. Once it's mounted I'll break out the camera and take a few pics. The phone I'm using is picking up a lot of red. Here's a little better shot of the figure head. It's about 2'-08" in scale. It's a little taller than I set out for but it looks proportionally right. My wife wants to know why it's tongue is sticking out? LOL! Are you going to be able to make the February meeting in Rochester. Sam
- 47 replies
-
- 5
-
-
- queen anne barge
- Syren Ship Model Company
- (and 1 more)
-
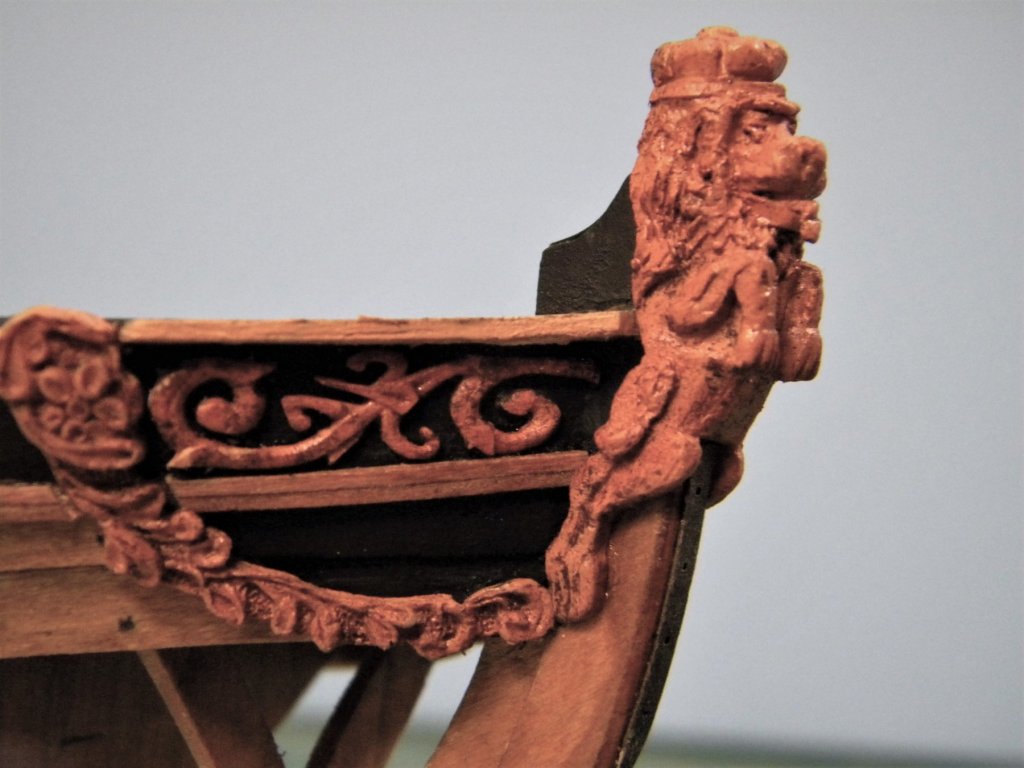
Figure head and additional scroll added. The only item left is the tiller (it's been turned, I'm deciding how to finish it) There will be no frieze inserts, flags or oars on the build. Only a simple base.
.thumb.JPG.a25dd29bfda924c6cdcedcd5290f2d1f.JPG)
- 47 replies
-
- 7
-
-
- queen anne barge
- Syren Ship Model Company
- (and 1 more)
-
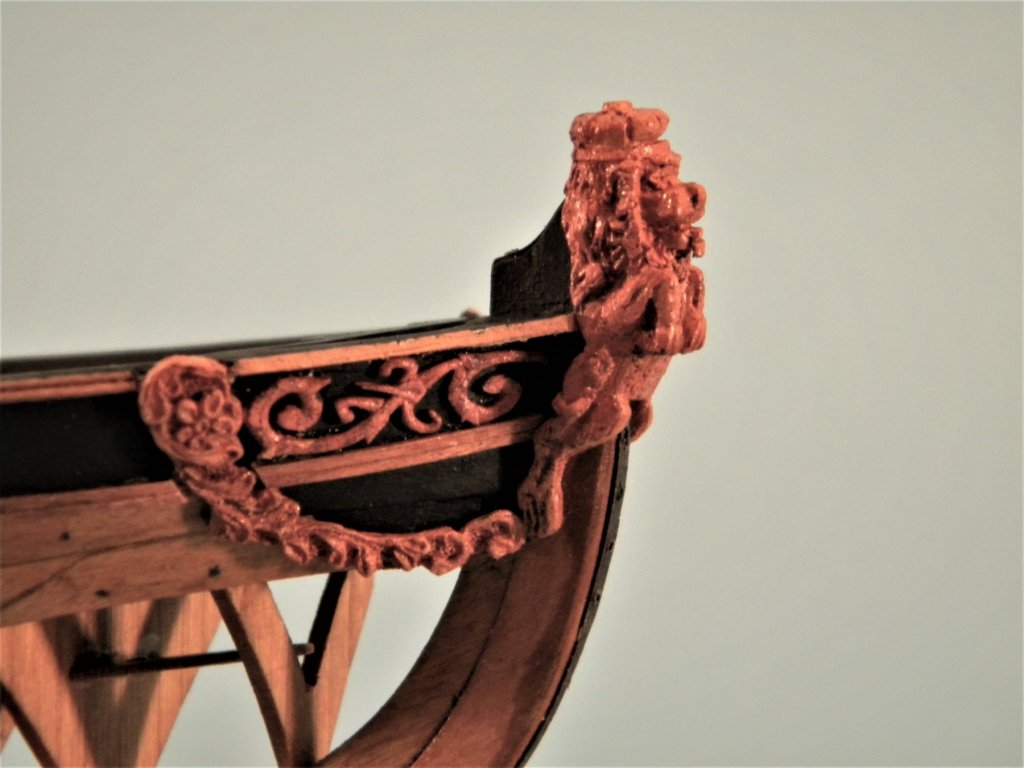
Just a quick update on the BARGE's bow. I've ordered another set of the cast scroll pieces from Syren and am pretty certain they will be added on. I've attached a pic of the lion figure head I'm considering. I made it out of sculpey. What you see is only a silhouette (it's about a 1/16" thick and is glue sticked on the stem. I think the proportion looks acceptable. It's about 1-3/16" tall so I'm holding close to my goal of about 2'-03" in scale. The black line at it's feet is where the bottom of the existing bow wreaths are. Sam
- 47 replies
-
- 3
-
-
- queen anne barge
- Syren Ship Model Company
- (and 1 more)
-
Well working my way through the carvings. I decided to go with the resin set from Syren. They are beautifully done and have a great amount of detail for such thin and small elements. The process I followed to transform (?) them is the following After washing they were primed with the paint I had mixed to match the cherry of the kit. It is close (not exact) but provides a good foundation color I then scraped a couple of earth tone pastels ( a brown and a more golden color) into powder and dusted the pieces I then dry brushed them from the inside sides of a can Golden Oak stain. This did a couple of things it started to create more depth on the pieces' edges and also gave a little luster with the oil from the liquid When this was dry I very lightly swept the pieces with a brush of acrylic sepia brown and buffed with a soft tooth brush As I've been saying all along I am trying to mimic the style of some of the Eastern European builders. Don't know if I've got it but I think I'm close. I have to decide what to do with the stern. The blue tape is holding the strap on currently. I am debating whether to add in some scroll from the half -wreaths forward above the middle molding. I am also toying with the idea of a lion figure head. I've started sculpting one that would be about 2'-03" in scale so as not to over power the lines. ODF attached. ????????????????????? Sam BARGE LION MOUNTED 022718.pdf


- 47 replies
-
- 13
-
-
- queen anne barge
- Syren Ship Model Company
- (and 1 more)
-
Thanks Jim I stated when this started (so looooong ago) that I wanted to try to get a more older look to it. Say along the lines of Alex's CUMBERLAND (and please I would never even dream I am close to that level of building) just trying to get that look. Sam
- 47 replies
-
- 1
-
-
- queen anne barge
- Syren Ship Model Company
- (and 1 more)
-
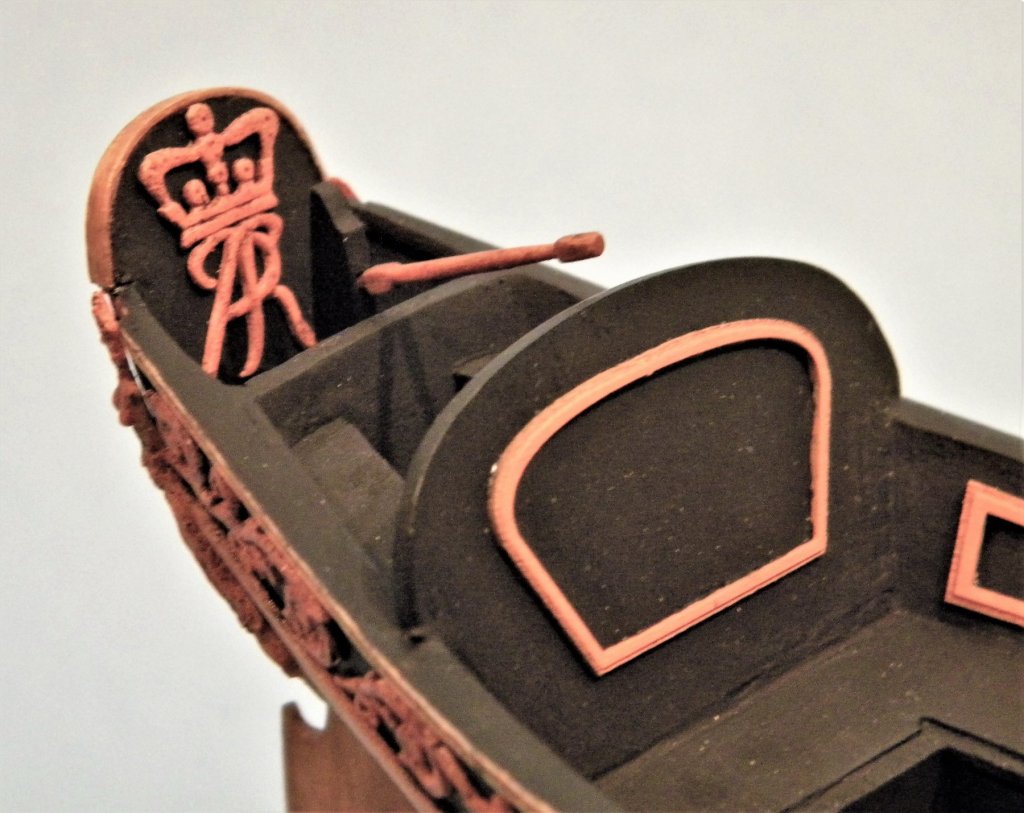
Early New Year's resolution - FINISH BARGE! The pics aren't that good (taken with an old IPhone) The cherry wood has taken on a nice warm hue with the cut golden oak stain. The black is Winsor Newton Galleria Mars Black. The frieze panel frames were actually "washed" with a thinned down paint I had color matched to a stained scrap piece of the cherry wood from the kit. It took the "edge" off of the boxwood color and with the char bleeding through a bit it matched on tone to the build. The paint is the base color I am going to use on the castings. I purchased the resin set from Syren and will use the paint and then weathering powders to simulate the cherry of the kit (hopefully) Hope everyone is doing well and is having a great holiday season Sam
- 47 replies
-
- 9
-
-
- queen anne barge
- Syren Ship Model Company
- (and 1 more)
-
Joe Do yourself a favor and bash the kit against a wall, on the floor , a nearby table top - any hard surface will do. Whatever you decide - PLEASE leave me or any mention of me out of this. What I designed NEVER made it into production - EVER!!!! Any questions, comments, or complaints should go to the kit's (proto-type, manual, plans) designer - BOB CRANE care of Model Expo Sam
-
I HAVE THE FOLLOWING ISSUES FOR SALE. PLEASE PM FOR PRICING AND QUESTIONS THANKS - SAM MODEL SHIPWRIGHT (All very good condition) Vol 2 No 4 Summer 1974 (HC) Vol 2 No 3 Spring 1974 (HC) No 73 (PB) No 74 (PB) No 83 (PB) No 109 (PB) No 110 (PB) No 112 (PB) MODEL SHIP BUILDER (All fair – good condition) No 16 March/April 1982 No 23 May/June 1983 No 24 July/August 1983 No 26 Nov/Dec 1983 No 28 May/June 1984 No 34 March/April 1985 No 50 Jan/Feb 1988 SHIPS IN SCALE (All very good condition) May/June, July/August 1984 May/June, Sept/Oct 1987 Jan/Feb, March/April, Sept/Oct, Nov/Dec 1989 May/June 1990 March/April, Sept/Oct 1998 Complete Year 2000 Complete Year 2001 Complete Year 2002 Complete Year 2003 March/April, May/June, July/August, Sept/Oct, Nov/Dec 2004 Complete Year 2005 July/Aug, Sept/Oct, Nov/Dec 2010 March/April, May/June, July/August 2013
-
Pandora by marsalv - FINISHED - 1:52
samueljr replied to marsalv's topic in - Build logs for subjects built 1751 - 1800
Marsalv Outstanding, what else to say. I see you listed 3,750 hours, any idea of what the cost for the build was? Congratulations Samuel -
Yes it was an aftermarket product I'll get it done.
- 47 replies
-
- 4
-
-
- queen anne barge
- Syren Ship Model Company
- (and 1 more)
-
I will try. What width am I shooting for including the molding (which added a "skinny" 1/16")? Back to the 5/64th's? Thank's Sam
- 47 replies
-
- 2
-
-
- queen anne barge
- Syren Ship Model Company
- (and 1 more)
-
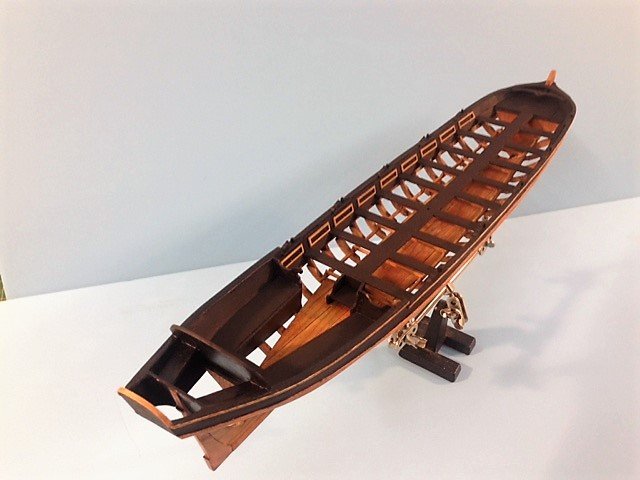
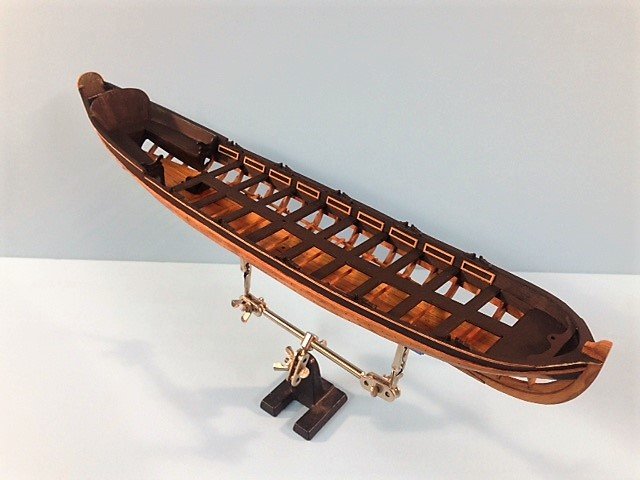
OK so I skipped a few steps here but this is where I'm at. It's been pretty by the book (kinda') As I stated initially I wanted a deeper color scheme so I've opted for a first coat of 50-50 thinner and minwax golden oak stain and then a full strength (lightly applied) of golden oak. I then hit everything with a wipe on poly. The paint is a windsor newton galleria black (the usual 97 (LOL) thin coats). I have ordered cherry sheets to make the lower molding out of cherry to match the finish. The top moldings are ripped from scrap from the kit. The bow is painted full black as I saw some images of barges with a full field of color. I thought the paint between moldings looked a little "race stripey" for my tastes. The carvings (or in my case all castings) will be a gilded gold with a dull finish. BTW I have purchased the resin castings from Syren and they are beautifully done. For those of you who are wondering why the keel is doubled the kit as designed CAN NOT withstand a fall from a table top to a concrete floor. After several attempts I was left with the option of re-enforcing the keel or starting over. I am thinking if continuing the frieze pattern onto the bench arms. I've attached a mock-up of it - opinions????? Also I have accepted Chuck's "challenge" and will be doing some additional carvings/details to the bow.............. to be continued Sam ARMS WITH INSERT030518.pdf


- 47 replies
-
- 11
-
-
- queen anne barge
- Syren Ship Model Company
- (and 1 more)


.JPG.76fd55054cd7e0b49dcf9a0bc88c4a63.JPG)