HOLIDAY DONATION DRIVE - SUPPORT MSW - DO YOUR PART TO KEEP THIS GREAT FORUM GOING! (Only 13 donations so far - C'mon guys!)
×


7 Provinces
-
Posts
190 -
Joined
-
Last visited
Content Type
Profiles
Forums
Gallery
Events
Everything posted by 7 Provinces
-
 Even though it is (again) a bit disappointing, I cannot say I am really surprized, given the other "inaccuracies" like the color of the hull and the bowsprit, the place of the grate at the steering wheel, the lack of fake stanchions, the form and size suggested for the scuppers and so on. I got the feeling that this has been a quick & dirty release without caring about being true to the original. The name "Bluenose" seems like a lure where "early 20th century schooner" might have been more approriate.
 -
Today I was looking at sizes and scaling down to model size for the length of deck planks for instance. I would like to cut the deck planks to a more normal size even though they are already mounted. I think I can make a tool for that. However, I am not sure how long the deck planks should be. This brought me to compare the manuals of Billing Boats and Model Shipways again. Apart from the fact that I did not find any information about the length of deck planks, I did find something else which startled me and made me question the whole concept of trying to make anything on the ship correct to size: the MS model is 1/64 and yet it is shorter (by about 5 cm / 2 in.) than the BB model at 1/75! However, the overall height of the MS model surpasses the BB model by 1.6 cm (5/8 in.) and the width is roughly the same . so I looked up the original sizes and did my own calculations. Billing Boats claims that the model is 1/75. However when looking at the original size the overall length of the model is roughly 1/56 and the width is around 1/59. The height is somewhere in between. This means that, apart from the fact that the scale is closer to 1/57 than to 1/75 (a typo made by the manufacturer?? ), the proportions are not correct either. This means in my case that the deck should have been around 5% or 0.8 cm (5/16 in.) wider . The scale of the MS model would, according to my calculations, be around 1/59 (except for the height which I think is around 1/55). Anyway not the 1/64 displayed on the box. From now on I will treat all sizes (plank length, deadeyes, boxes, …) as somewhere between 1/55 and 1/60 (whichever is more convenient for that part). I will have to ignore the proportional issues though...
-
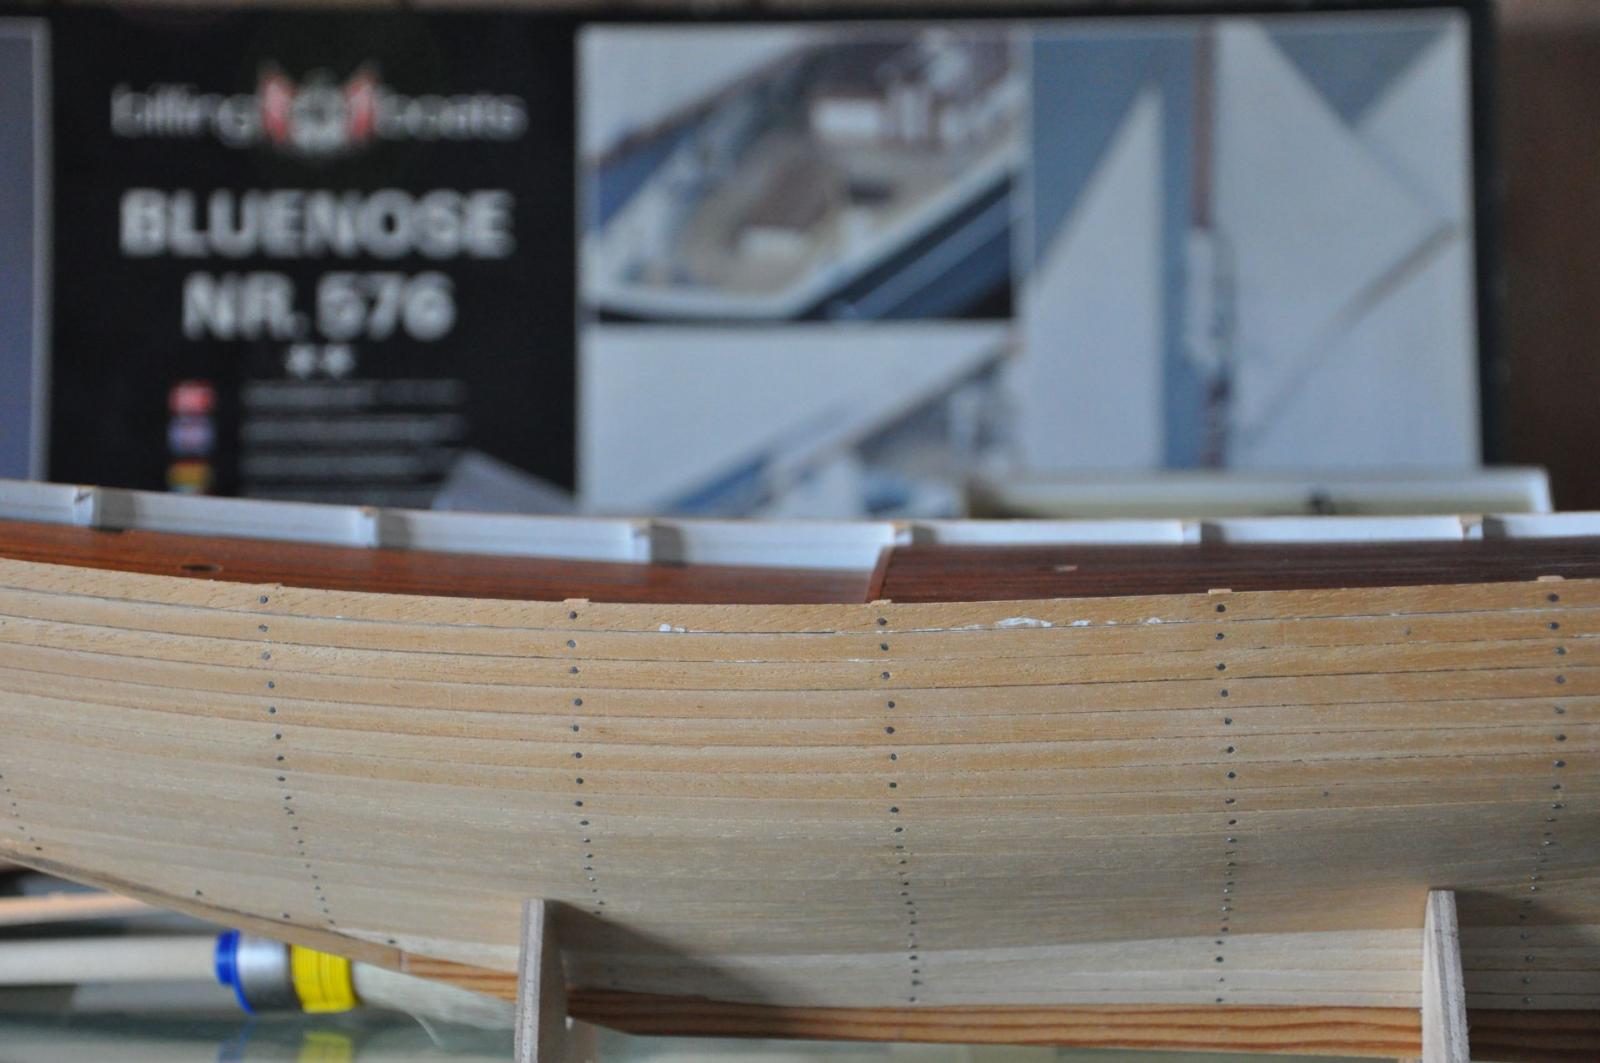
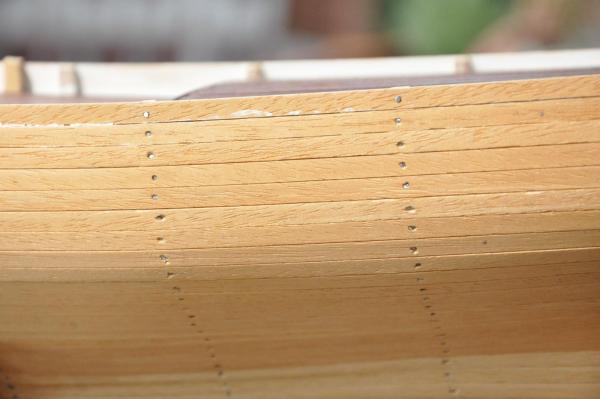
Last week I was able to countersink most of the nails using a center punch. The topmost nails I could not countersink as these would come out on the other side (stanchions). It is easier to remove the heads on the outside of the hull.
- 127 replies
-
- 3
-

-
- Bluenose
- Billing Boats
- (and 1 more)
-
Hi Julian, It's interesting to see this "other interpretation" of the same kit to compare with. I can see that the original builder also did not use the original instructions by Billing Boats. Or just chose to do things differently. The rail is an example. According to BB this is just one long strip. I have seen the technique used by the original builder in the Model Shipways (kit 2130) instructions. Both the BB and MS instructions can be found in the internet by the way. I try to find my own way and use both instructions for reference. Anyway the absence of the BB instructions is not a big loss . Interesting also to see how the deck was done. This is one of the flaws in my model which I intend to deal with soon. I am interested to see what you will do with the fake stanchions as well. I am working on these as well at the moment. It looks like I will put three fake stanchions between each pair of bulkhead stanchions. But from pictures I am not sure whether or not this would be the same throughout the length of the ship. At least at the aft there seem to be fewer stanchions (visible). Great to see you have started your Bluenose log, I will definitely be following it closely!
-
That's what I thought. Yet I have no idea about the sizes so I don't really know what I am looking for...
-
Julian, Yes it is a beautiful ship. That and the fact that I thought it would be a good model to learn on made me choose it as my first wooden ship. I hope you do get to building it and to creating a build log. Whatever you do, enjoy it!
-
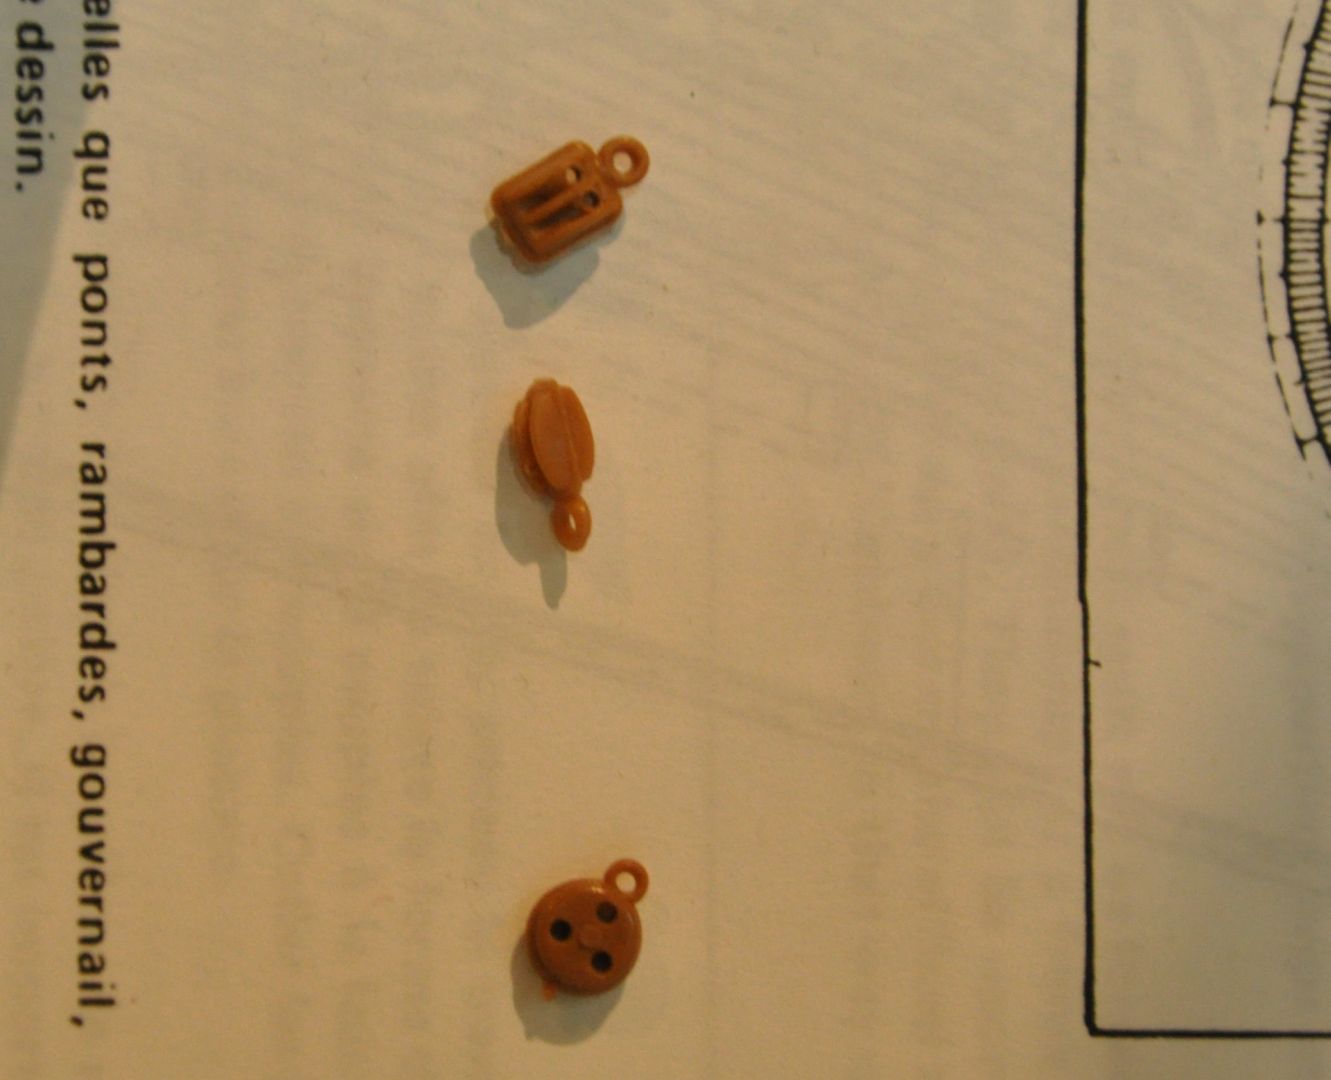
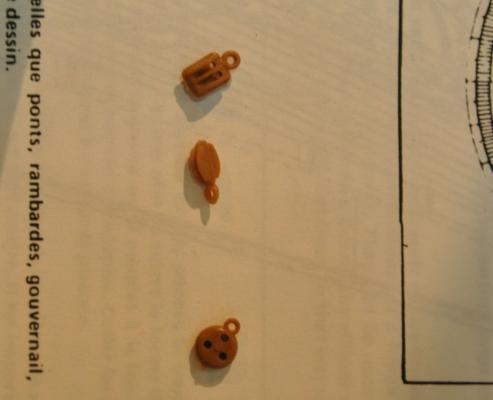
David, Thanks for your input, it's always welcome. As to the warpage I think it originates from the deck. As far as I remember the deck was warped before I mounted it and the rest was straight (I might be wrong though). At that time I did not think that the warped deck would warp the whole hull so I did not soak it or anything and just put it together. I did not heat and bend any plank either for that matter... Everything was put together straight out of the box Anyway the warpage is not that bad and is hardly visible when not looking along the length of the ship. I'd rather try to get it right on a next ship as to take this one apart and start over. As stated in my second post I do not really mind that the deck is dark. Sure I have seen a few very nice light or multicolored decks on this forum, but, looking at the pictures of the Bluenose I have the feeling that this color cannot be off by far. Pictures of the Bluenose (black & white) show the deck (almost) black and pictures of the Bluenose II show the deck almost the same color as my model. So I'll leave that for now. I do plan to do some sanding and probably varnish in semi-gloss, but I am not sure yet. And that I will test first More of that later in a future post. The kit comes with one layer of planking. I also thought of using a nail punch. Any holes this leaves are easy to fill. Do you think this will work? I am not sure this will not cause damage like splitting planks or so and the angles are not so easy at some points. Easy to slip off the nail or worse. Still if I leave them they will at some points look through the filler (and filles sands down easier than nails) which is not nice. Alternatively I could sand the nailheads off with a dremel and then put on the filler. And hope the planks do not come off . I do have another question to you or anyone who reads this: the kit comes with a lot of ugly plastic parts which I look to replace with better parts or scratch built parts. The first I will need to replace are the dead-eyes (and the bocks for that matter). The blocks and dead-eyes in the kit are all the same size (6mm; and all wrong I suppose). So basically I am looking for the right sizes for the blocks and the dead-eyes. I have searched the forum but did not find an answer yet. From pictures I derived that the dead-eyes would have been about the size of a man's head. On my model this would mean no more than 4mm. But is that practical? And the blocks have different sizes but in the pictures I do not realy have references (like a head) for an estimation. I would really appreciate some tips on this as I have no experience whatsoever with rigging and the instruction booklet... well they seemed to have run out of paper by the time they got to rigging
-
By the way: as a preparation for this work I have downloaded a lot of pictures from the Nova Scotia Archives and printed all of them in A4 size. This really helps, the pictures are a great source. Sometimes in this log I refer to pictures, and then almost always these are meant. Sometimes I would have liked to post these pictures with circles around the items I address in the text, but the pictures not mine to post so I will refrain from that. Anyway, I think these would be a great help to any Bluenose builder.
-
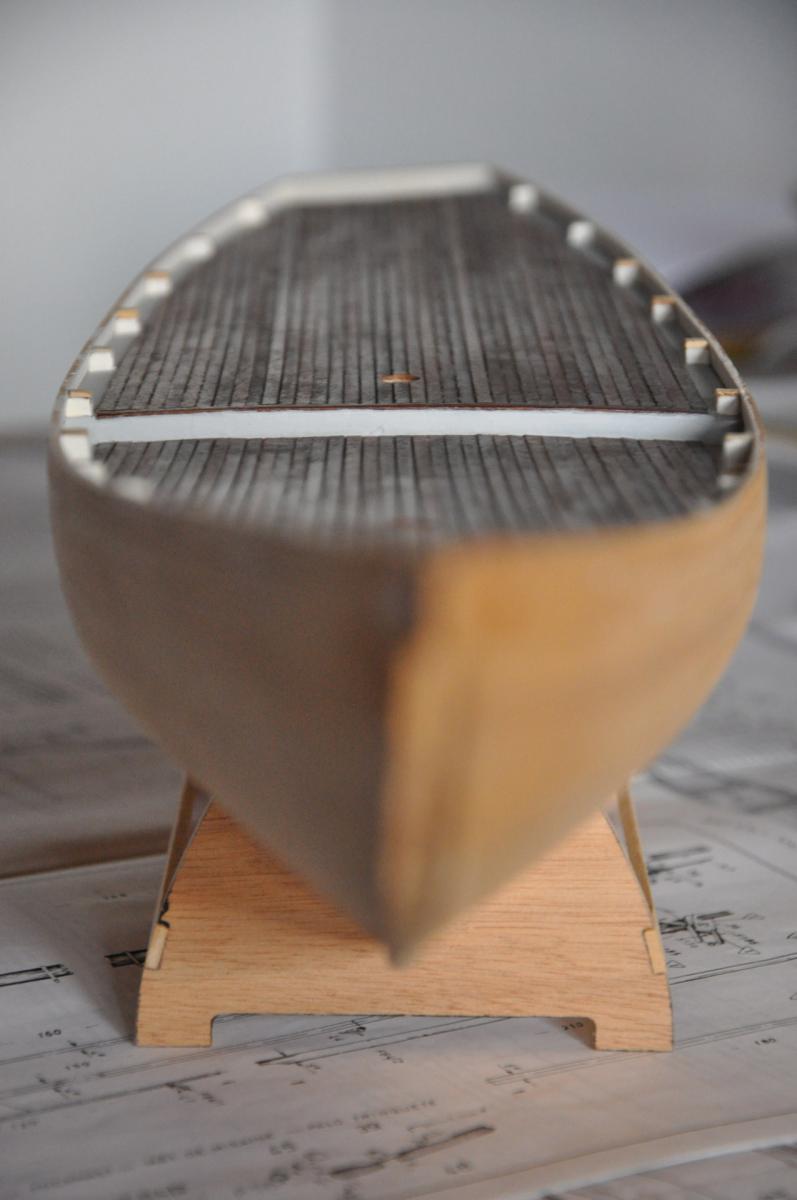
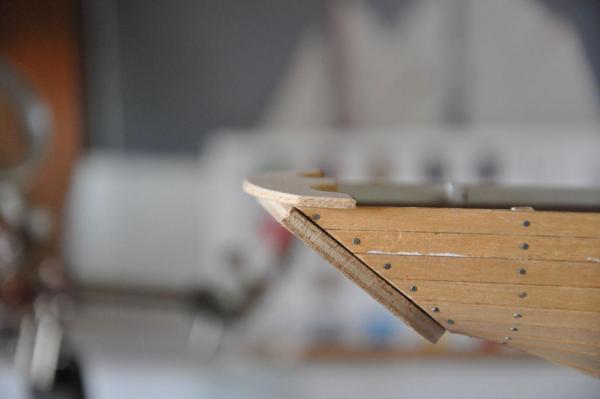
I have started to work on the stanchions and the transom. I have reshaped the stanchions first with a power tool with cutting disc for the rough work and then I made them nice and even with sanding sticks I made. Now they are less deep (size from the hull towards the deck) and I can start to create the fake stanchions. Overview of the resized stanchions. Now there is more room for the waterways. Close-up on the work I did on the stanchions Also I have created a new slope between the deck and the transom which, in my eyes, better matches the pictures of the original (from Nova Scotia Archives).


- 127 replies
-
- 2
-
-
- Bluenose
- Billing Boats
- (and 1 more)
-
Hi mrcc, looking forward to sharing tips and experience on this kit with you! I am actually a slow builder given the fact that I can only spend few hours on it, so I do not expect my build log to make quick progress. Actually I did not start a log at all up to now for this very reason... I hope you'll share your progress anyway ;-)
-
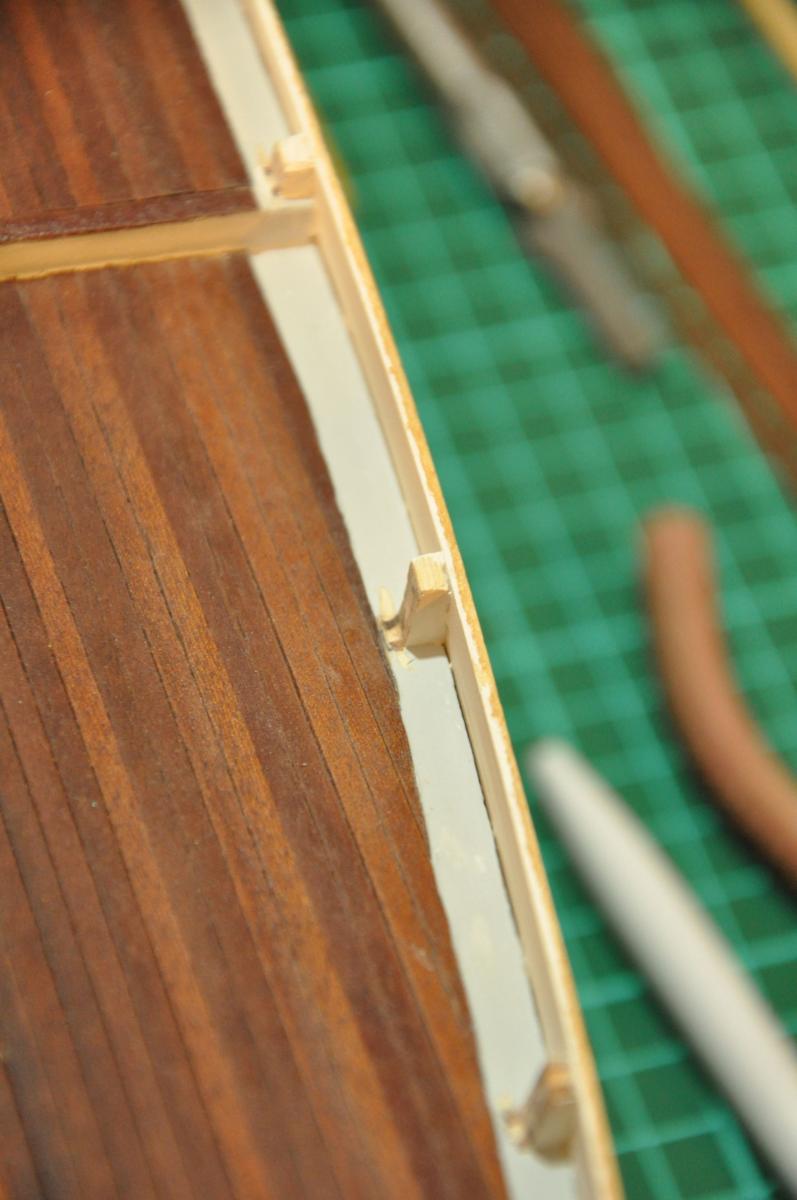
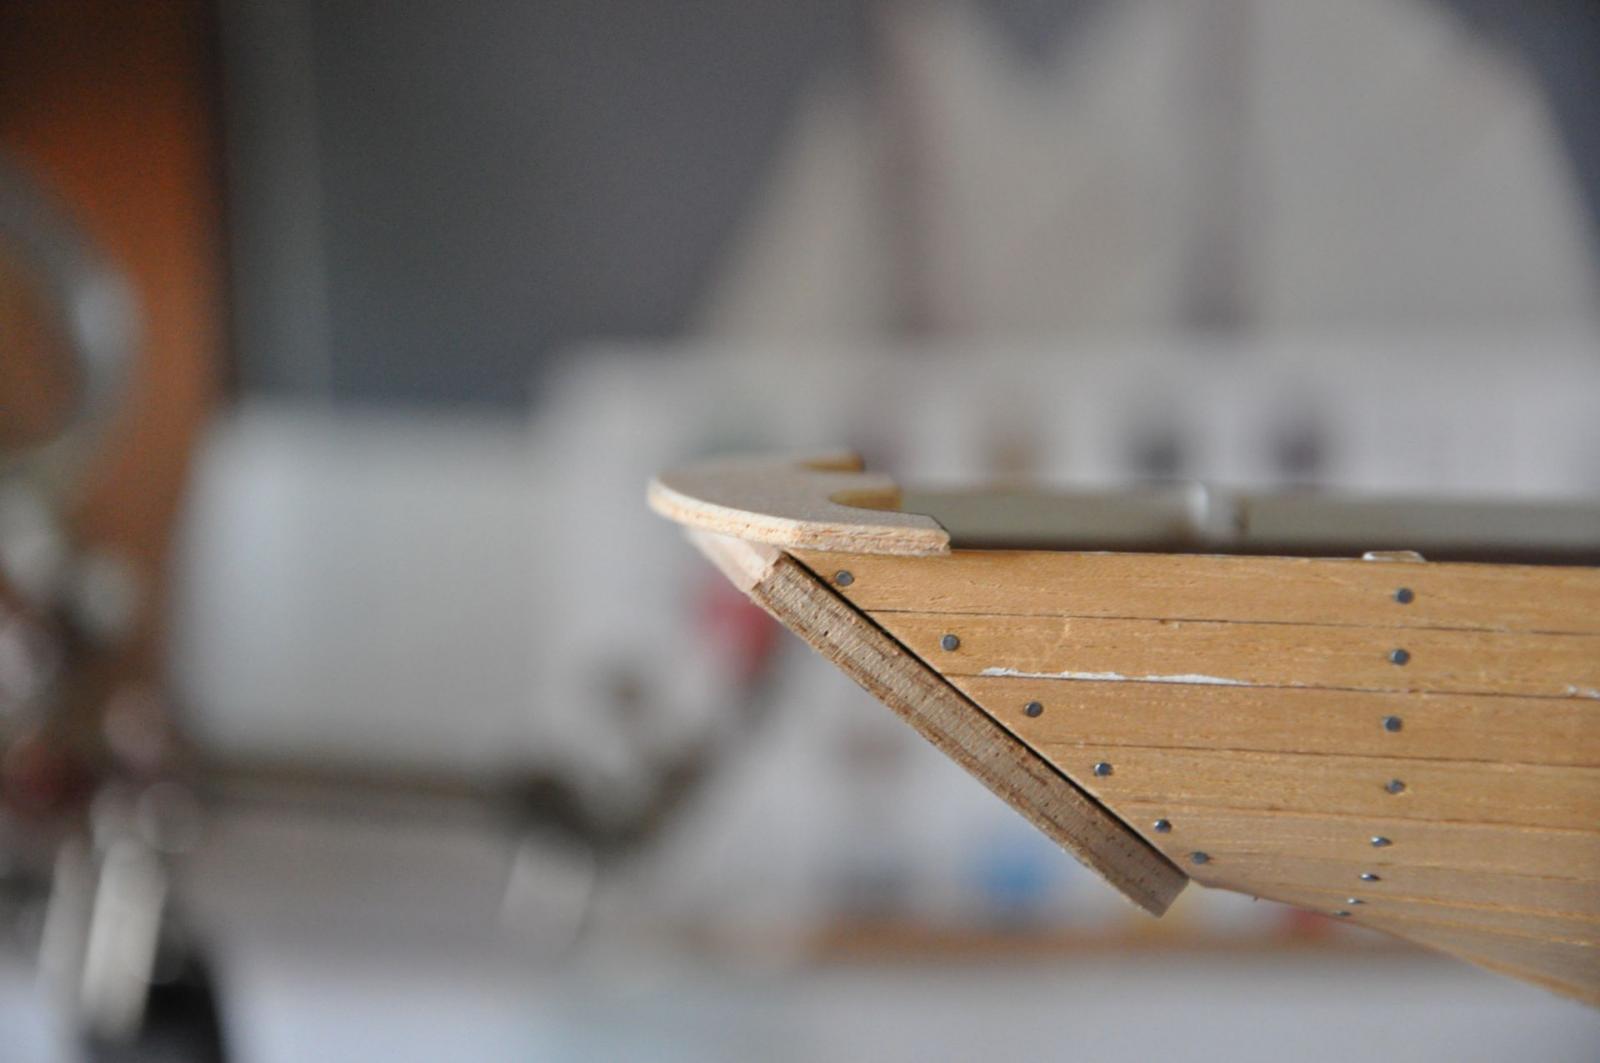
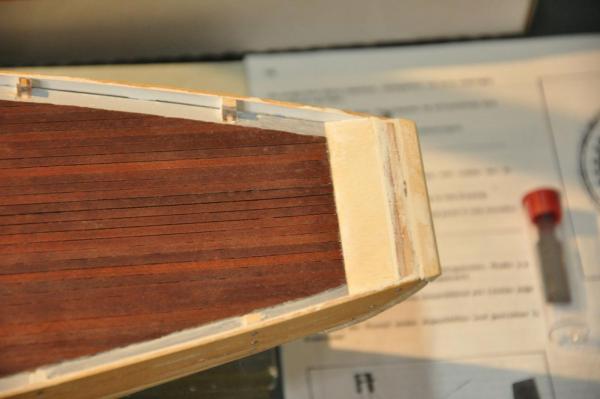
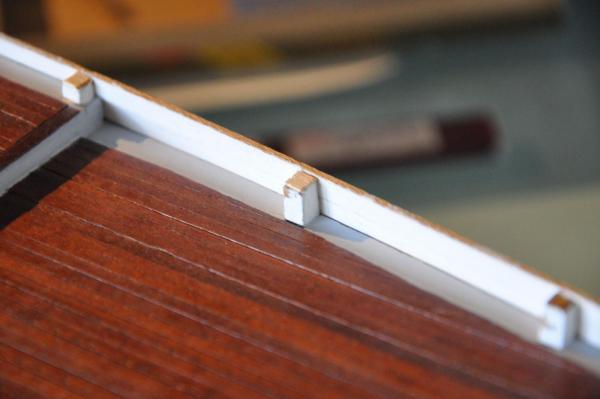
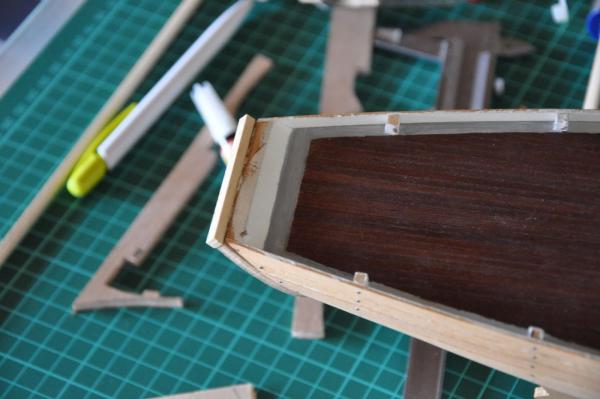
I figure the deck and the stanchions, waterways, scuppers, etc. need to be done first before mounting the rail and finishing the outside of the hull, so that is where I’ll start. Looking at the deck and the stanchions, there are several issues which I noted (picture): 1. Deck: I have planked the deck with the mahogany supplied. I have done this as neatly as I could, with long strips fore to aft, and was happy with the result. Now I have come to realize that: a. No plank is that long. I will try to find a way to cut the planks even though they are already glued in place, maybe with a narrow chisel? b. The strips are mahogany. The real Bluenose deck was of Douglas Fir. Not quite the same color. However, on pictures of the Bluenose (black & white) the deck appears almost black, suggesting it to be fairly dark and on (color) pictures of the Bluenose II (a different ship in many ways, I know) the deck has quite the same color as mine. So I will leave it like it is. c. In instructions of other manufacturers I read about nibbing. Not in mine as you can guess so there are no nibs on my model. Looking at pictures of the real Bluenose I can’t make out any nibs either so I will leave this like it is as well. d. According to the instructions the waterways are grey. In fact, they were natural, like the deck. So I will plank these with the same mahogany with which I planked the deck 2. Stanchions: a. The bulwark stanchions are too massive. According to the drawings this is correct and there was no hint in the instructions to reshape these before planking. Since it will be near impossible (for me) to reduce the width (fore to aft size) without collateral damage, I will only adjust the depth (hull to deck size) in order to be better able to fit the waterways b. There are only the bulwark stanchions (11) per side and, according to the drawings, that’s all there is. So I will have to create fake stanchions from scratch. Since I have no real reference as to how many there should be and mine are too wide anyway, I will place 2 or 3 between each pair of bulwarks, whichever looks better. 3. Aft section and transom: a. There is a gap between the transom and the horizontal piece lying on top (picture 5). I will fill this with a piece of wood (picture 6). b. The deck should run all the way to the transom. The kit instructions show it stops about 1 cm in front of the (inner) transom piece, leaving room for a waterway (picture 6). On pictures of the Bluenose I saw that there is some sort of construction underneath the horizontal piece (a winch?) and that the slope seems to reach more forward to meet the deck. I will fix this by making a new slope. c. The horizontal piece itself does not have the right shape and there is no construction underneath, so I will need to draw and make these from scratch. Picture 5: Picture 6: the strip to fill the gap on the transom and the deck not running all the way to the transom
- 127 replies
-
- 2
-
-
- Bluenose
- Billing Boats
- (and 1 more)
-
Hi, I have started this kit in 1994. At that time I was used to do some plastic modeling (aircraft, tanks) mostly in 1/72, some RC cars and wooden sailing planes. Also, at that time I took the contents of the kit as they were without judgment. I built the keel and the bulkheads, planked the deck, painted the waterways and did most of the planking of the hull. This was done by December 1998. Then it sat on shelves and tables (always in my vicinity making me feel guilty) for around 12 years when I decided to pick it up and finish the planking of the hull. By that time I saw that the hull is warped, but there was no way to correct this at that point without having to rebuild the whole thing. Another 3 years later, last summer, I decided to start working on it again. I did some research, joined this forum and drilled the holes fort he masts. Then it sat on my desk again… Around two months ago I have taken up work again. I started with creating some space where I can work. This helped ;-). Again I did some research and made some decisions: There are some building mistakes I made early on (2 decades ago). The result is that the build is not quite like I would have liked it to be. Examples are the warped hull and the planking to which I will get back later on. I have decided to go on with what I have so far. I will try to make the best out of it, but I will not rebuild anything. The kit is very limited. The instructions are abysmal, a number of parts are made from plastic and not very detailed and on a number of accounts the drawings are just plain wrong, as is the color scheme. I have decided to just enjoy this build for what it is and not be too strict about historic correctness. Still I will use the information at my disposal to correct the kit where I feel comfortable that this is done relatively easily (this is my first build after all). Examples are the colors and the placement of some deck structures. Picture 1: looking at the hull from front to aft you can see that the hull is warped. Looking at it any other way this is not so apparent however. I have decided to leave it like it is. Picture 2: planking was done 16 years ago and 3 years ago (the newer part is still light of color). Picture 3: planking mistake at the bow: somehow 16 years ago I planked onto the center keel as it was. No word about bearding lines or rabbets in my kit’s instructions… Since I am going to fill and paint the hull I think I can fix this with a Dremel and some filler. I’ll save that for later. First I want to get the deck, waterways and stanchions, etc. in shape. What worries me a bit is all the nails in the hull. I remember it was great fun planking using a dot of wood glue and fixing the plank with little nails (like in the instructions) because it added to the sense of "building" something (of wood). However I am not sure what I am going to do to make sure one does not see the nails through the paint as some most heads have not been sunken into the wood (this would split the planks).


- 127 replies
-
- 1
-
-
- Bluenose
- Billing Boats
- (and 1 more)
-
Hi Paul, I am not an expert, but I am in an alike situation. I have joined this forum almost a year ago with the plan to restart my Bluenose project which I left untouched for 15 years. I also have the Billing Boats kit in 1/75, but mine must be a bit younger since it has been bought in 1995 and bears another number (576). I have, like you, built the kit up to planking, but I did not fill and sand yet. Anyway, like you I have found out that there is a striking mismatch between the real Bluenose and the kit. One could wonder where the designers got their inspiration... After giving this some thought I have decided to continue this build and just enjoy it for what it is, get some experience from it (this is my first build) and then move on to another ship, maybe eventually another Bluenose in a bigger scale. I just think it is a waste to throw it away while I could be having fun building it even when it is not accurate. I for me will change some things where it is feasible based on information I found about the Bluenose. Like the colors which the kit got totally wrong, the place and shape of some items which I have not yet built, etc., However I will not rebuild parts which I have already built, since somehow I do not like to totally undo what I did 16 or 17 years ago… As to your questions: 1. I would complete it, learn from it and build a more accurate version later 2. Does it matter? I think it does not, unless you do not have the drawings anymore and need to scale from other drawings or when you want to put figurines on it? 3. Why replank the hull? Since this is a ship where you paint the hull anyway, you can fix the hole in it and paint it. If you do a good job, you won’t see the difference. As for replanking the deck: can’t you plank the deck on top of the one-piece deck with very thin finer, using the drawings on the deck as guidance? 4. I would not redo the railing. Is it so bad? Can’t you achieve a reasonable improvement by touching up? See point 1.: I would build this ship, but just for the fun of it, not to try to achieve the maximum in terms of detail and accuracy. I would start a new one for that. Hope this helps you in any way… Jan-Willem
-
Titanic Sinking Mystry Solved: New Evidence Emerges
7 Provinces replied to Hank's topic in Nautical/Naval History
So... who then sank the Olympic?? I like the Viking tactic: build ships of wood, instead of metal