HOLIDAY DONATION DRIVE - SUPPORT MSW - DO YOUR PART TO KEEP THIS GREAT FORUM GOING! (Only 13 donations so far - C'mon guys!)
×


7 Provinces
-
Posts
190 -
Joined
-
Last visited
Content Type
Profiles
Forums
Gallery
Events
Everything posted by 7 Provinces
-
 Schnu, the other side of the story is that any company must make profit, otherwise it has no reason to exist and will go bankrupt sooner or later. My point is just that this necessity does, in my opinion, not quite fit to the needs of a model builder. But, as a model builder, you have the possibility to invest time (and money) to enhance your model. I just think that sometimes the choices made by the companies are a bit awkward. I would rather have them leaving things less detailed or even incomplete (for the modeler to work out or enhance) then have them make things more detailed but just plain wrong... About the oil: I used hard oil (hartöl / huile dure) by Auro which I bought in Bern, but I am quite sure another furniture oil will do as well. Auro is just less toxic . In my last experiment I have first oiled the wood and then varnished it (over the oil). The effect of the oil was reduced (or masked?) a bit by the varnish but it still turned out well enough for my purpose where I did not sand. The part which I sanded after oiling and before varnishing lost the effect of oiling. Now after a week or two it still looks good to me so I am going to use that technique. I would recommend for you to do a little test as well before you do the whole ship. you never know how well your wood responds and it would be a shame to redo the whole ship, wouldn't it? And a simple test does not take that much time (and can be fun as well, plus you learn ) About the charcoal: well I did it the wrong way of course. I had to: since I have planked the deck almost 20 year ago ( I must be getting old) and there were no internet forums at that time and I completely trusted the (non-existent) manual, I did not do any caulking because I did not know. So I had to do it after the deck planks were on the deck, which complicates the thing a lot, since it is not easy to get the color between the planks. If you color the sides of the planks before planking the deck, you do not have this problem. I tested this in my last test as well. Anyway, it it true that charcoal smears when you do not fix it with a spray after drawing. But there are "charcoal pencils" out there which are like a normal pencil to hold, so your hands won't get dirty using them and you will not make black stains on your ship (or elsewhere) with your fingers. Then, I found out during my test that the charcoal did not penetrate my wood (you might need to test this on yours), meaning that after sanding only lightly the excess charcoal was gone. It did, as far as I can see, not affect the rest of the planking (via the sanding dust for instance). But my wood is fairly dark so maybe it is just not enough to be seen on my wood. Again: test it and you'll know it Good luck!
- 127 replies
-
- 2
-

-
- Bluenose
- Billing Boats
- (and 1 more)
-
Hi schnu, thanks for stopping by in my log Yes there is a big difference between oiling and varnishing and it doesn't stop there. You can also wax the wood, stain it, and and and. I am really not an expert on this but I came to the idea of oiling wood because of two tables that I have which are made from nut wood, which I have oiled. The main difference to varnish is that the oil is sucked into the wood where varnish is, like paint, a layer on the wood. So the wood keeps its natural feeling when you touch it. It still feels more or less like untreated wood. Also, when you scratch it (lightly), you can just sand the area a bit, oil it again and you'll see no damage. When you scratch the varnish or paint, you will probably have to sand the whole object and varnish or paint the whole object again to make it look like it did before. There are different oils you can buy and you will find that most of these will make the wood look more "lively" by enhancing the contrast. So, if the wood has a nice structure, you will see it better after oiling. This is generally not the case when varnishing (in my limited experience). However, varnishing seals off the wood which oil does not. Like Julian already remarked, oiling may need or generally needs to be repeated every so often. Hence my attempt to oil and then varnish. As to the scale, yes it's a drag. I suspect the source of the errors to be quite a wide range, from "human error" to the producer of the kit just refitting a similar old kit with some changes and sell it as a model of the new ship. In my case, there probably were several schooners around with rough similarities to the Bluenose. Maybe they just took the drawings of one of these, made some changes for the "known specifics of the Bluenose" and called it the Bluenose. I don't know. Another likely case it that at this scale some things need to be simplified and there are different ways to do this. In the end I fear it is a question of budget. It takes a lot of time and money to do the research and there is always a point where a company says the budget is used up and the rest of the research needs to be replaced by assumptions. This sometimes leads to odd choices I think. And is a contrast to the world of their customers the modelers, which generally do not want to rush but instead take the time to get the details right. Anyway I try to take it lightly and enhance the model where I feel I can do it and where it makes sense In that sense: I did not measure the door yet
- 127 replies
-
- 1
-
-
- Bluenose
- Billing Boats
- (and 1 more)
-
Nice progress schnu, you seem to be able to work very precisely with the tools you have and you have a good eye for detail. Interesting that you notice the scale issues. I myself have found several scale issues on my Bluenose (in fact, the whole thing is out of scale) and I am starting to think this is part of life as long as you are building from a box In line of what Vivian said (and the rest of us thought) I (would) deal with it the pragmatic way: enhance what you can and what makes fun from scratch or by modifying parts, leave the rest as it is. After all, you do this for fun, don't you? But I think you figured that out already
- 58 replies
-
- 1
-
-
- la candelaria
- occre
- (and 1 more)
-
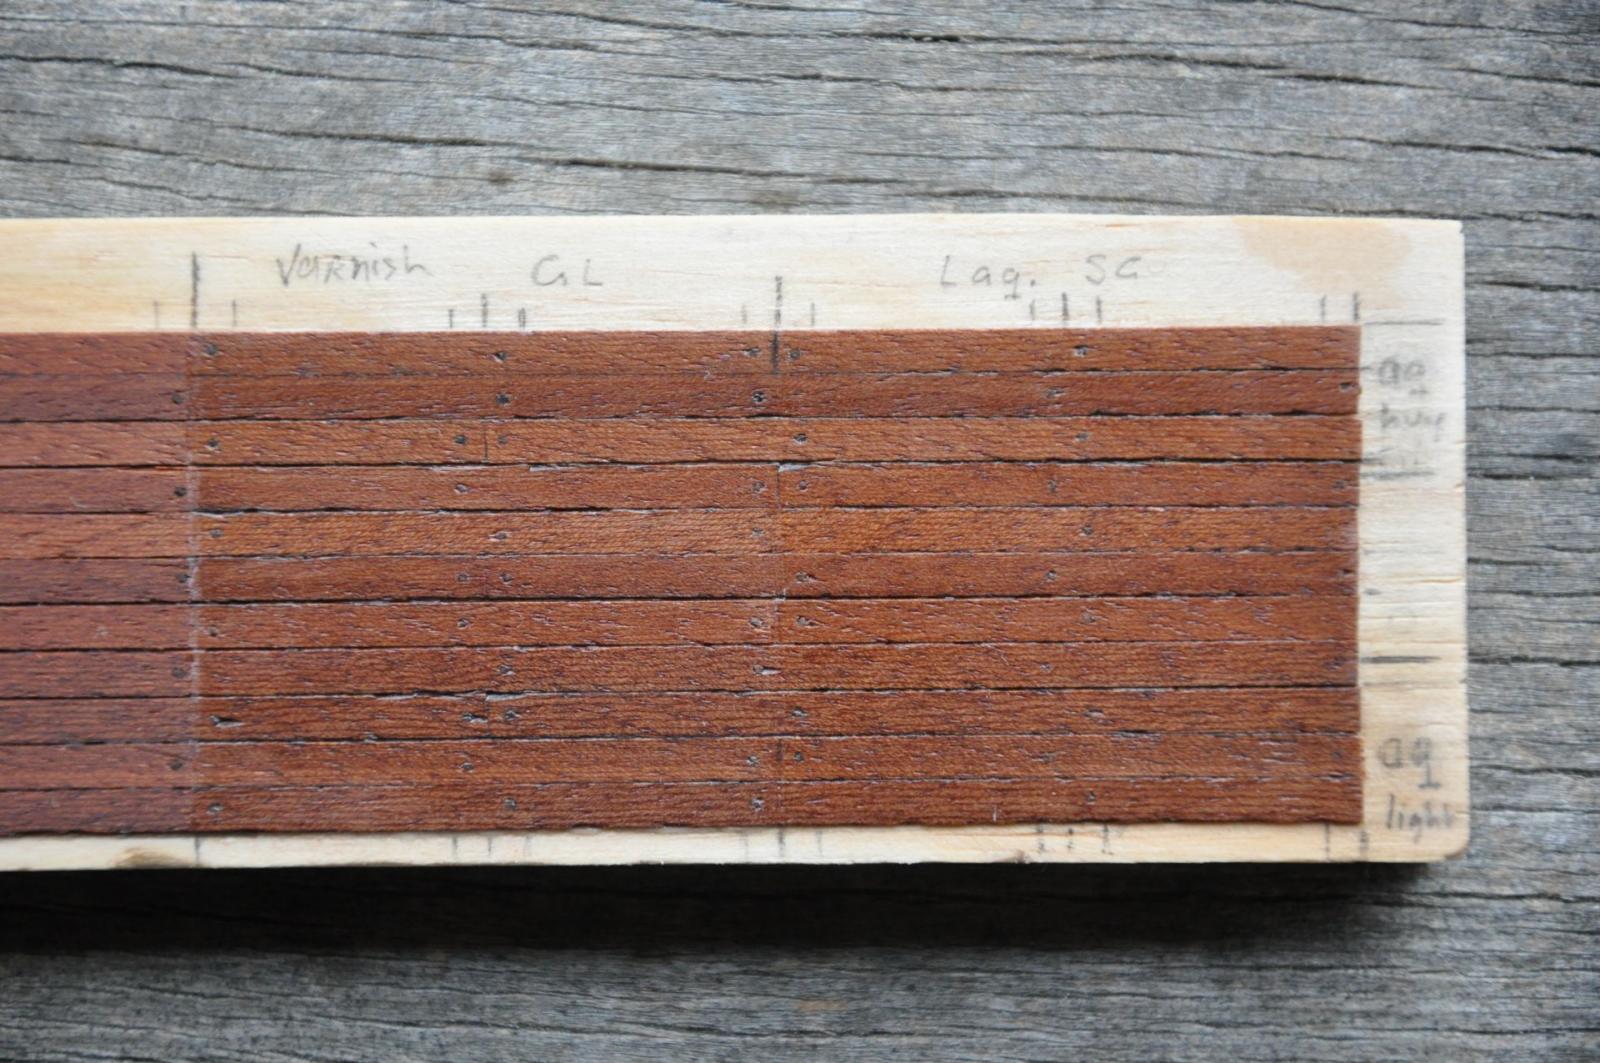
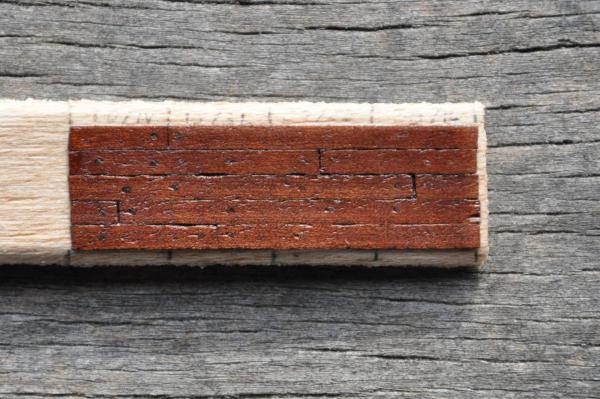
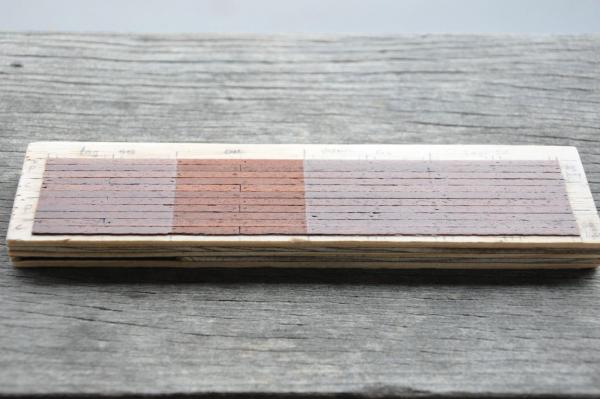
Hi there, Here are the results of the tests with oil and varnish. Only oil: Varnish applied over the oil: Here I need to say that the deck is divided in 4 parts again. On the outer left part I applied 3 layers of varnish without sanding. The mid left part I sanded after the oil and before the varnish. The mid right part I sanded after the oil and before the 1st and 2nd coat of varnish. The outer right part I sanded before every coat of varnish (3 times). I like the unsanded but varnished part (outer left part) best. It seems that sanding counteracts the effect of the oil and the trenails are almost not visible anymore. Varnish has, to some extent, the same effect unfortunately. But, on the left most part trenails can still be seen and I think they should, realistically, probably not be more visible than that.
- 127 replies
-
- 2
-
-
- Bluenose
- Billing Boats
- (and 1 more)
-
I just tested that on a new - smaller - test deck. I oiled the whole test deck and it looked great, just matte. Then I lightly sanded 3/4 of it before applying the semi-gloss varnish. On the other 1/4 I applied the varnish without sanding. At the moment this is only 1 layer of varnish but I can say following already: a) varnish seems to hold well on the whole surface (sanded and unsanded) b.) after varnishing the whole deck appears slightly darker than after oiling or after only varnishing c) the trenails appear more subtle than after oiling only but more clear than after varnishing only d) on the part of the deck which I sanded the trenails are harder to discern than on the part which I varnished unsanded. I will have to see tomorrow in daylight though and then I will take some pictures and post them.
-
Hi Bob, I agree on the semi-gloss. And on the charcoal (is also warmer) although I must say that it is hard to discern any difference. The purpose of the last phote os to show that the part which I treated with hard oil is not lighter of color than the varnished parts, but just matte. In the first 3 pictures the light is such that one could believe the oiled part has a lighter color. This however is not the case. I have built another - much smaller - test deck yesterday and today which I also oiled and I am now going to varnish it. With and without sanding, to see if there's a difference.
-
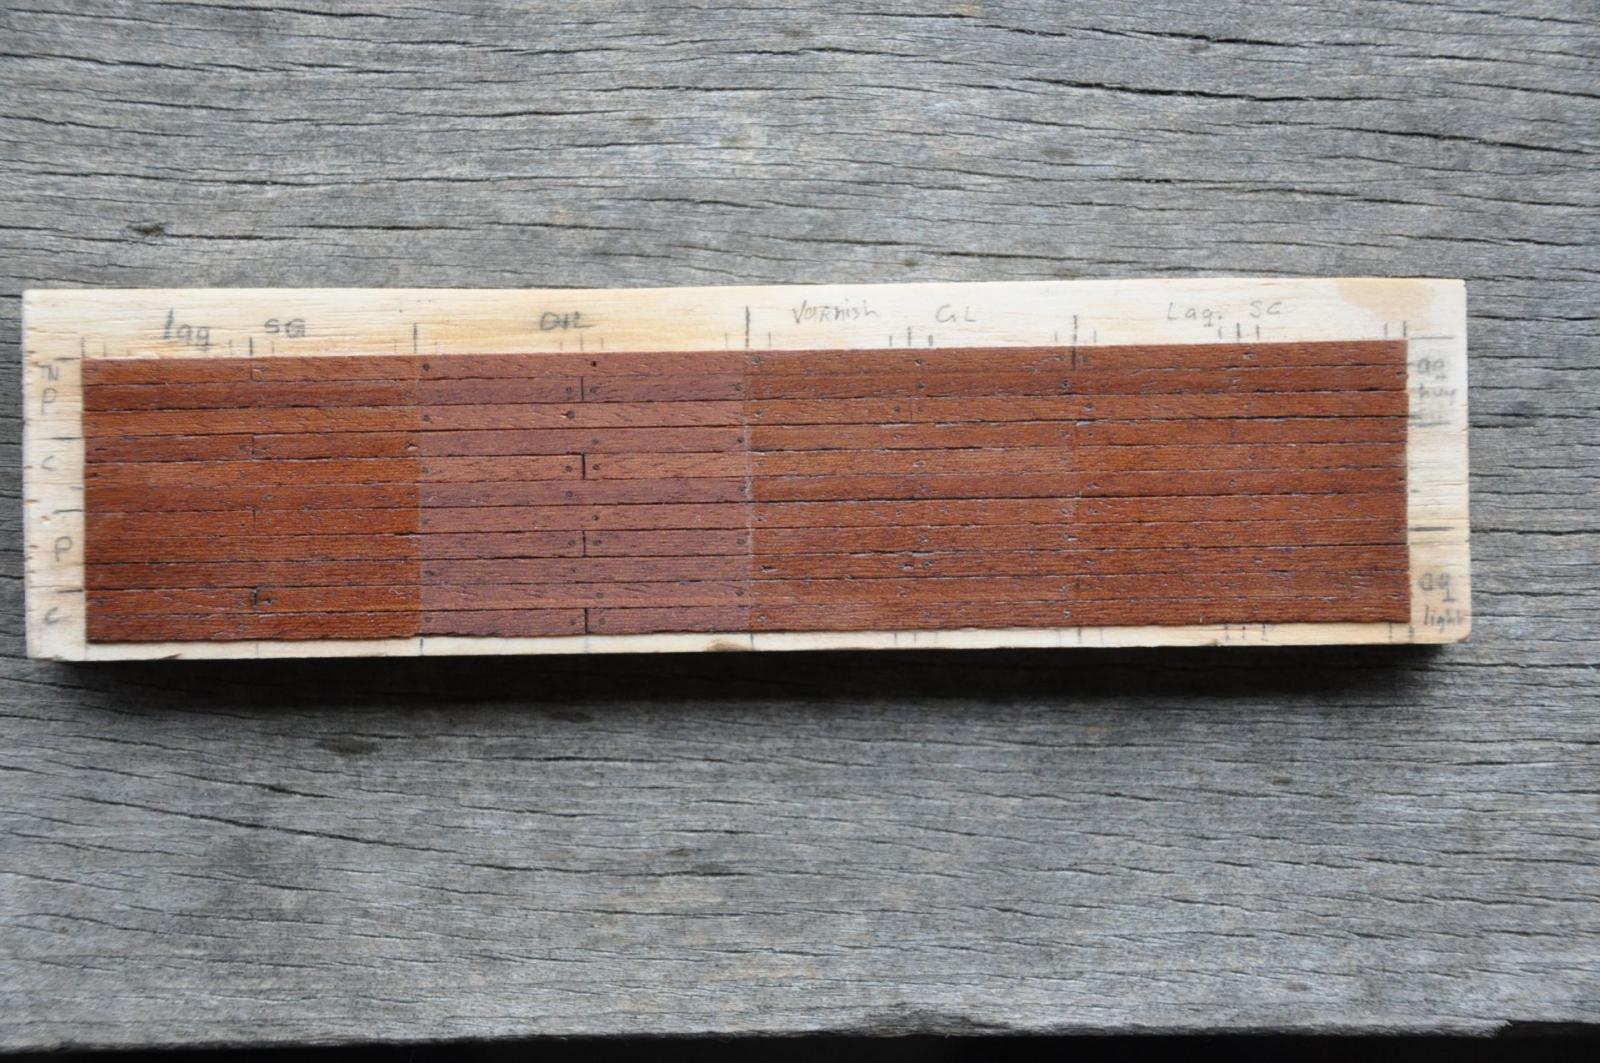
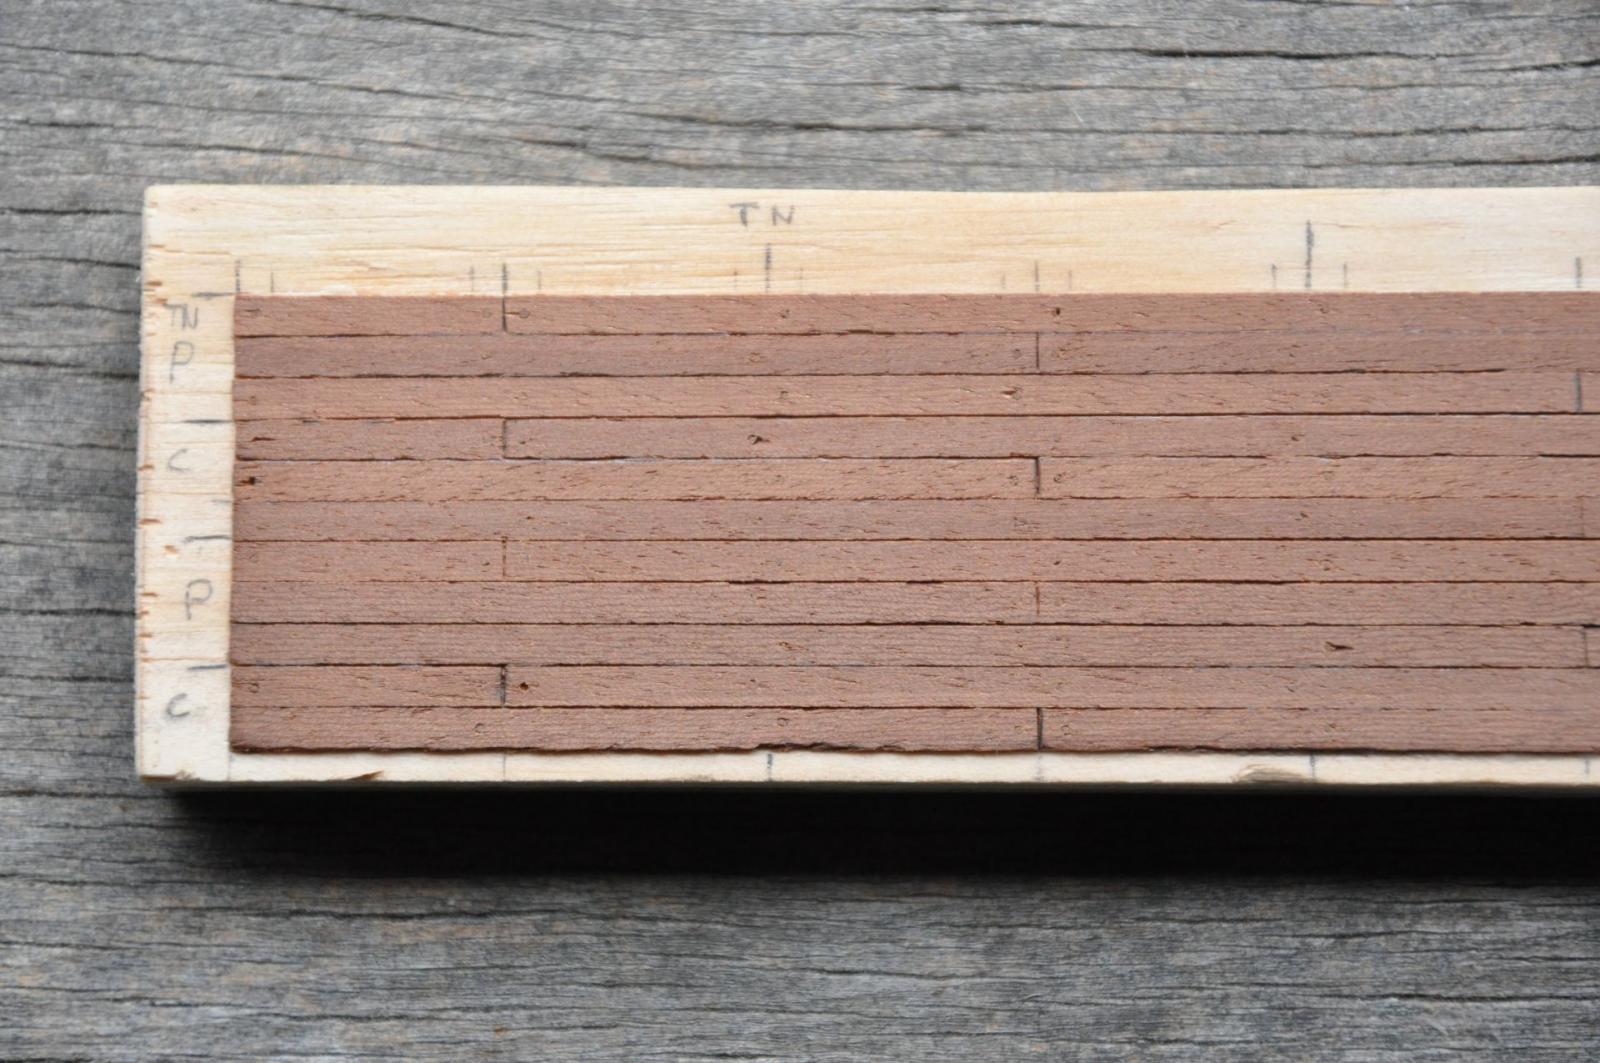
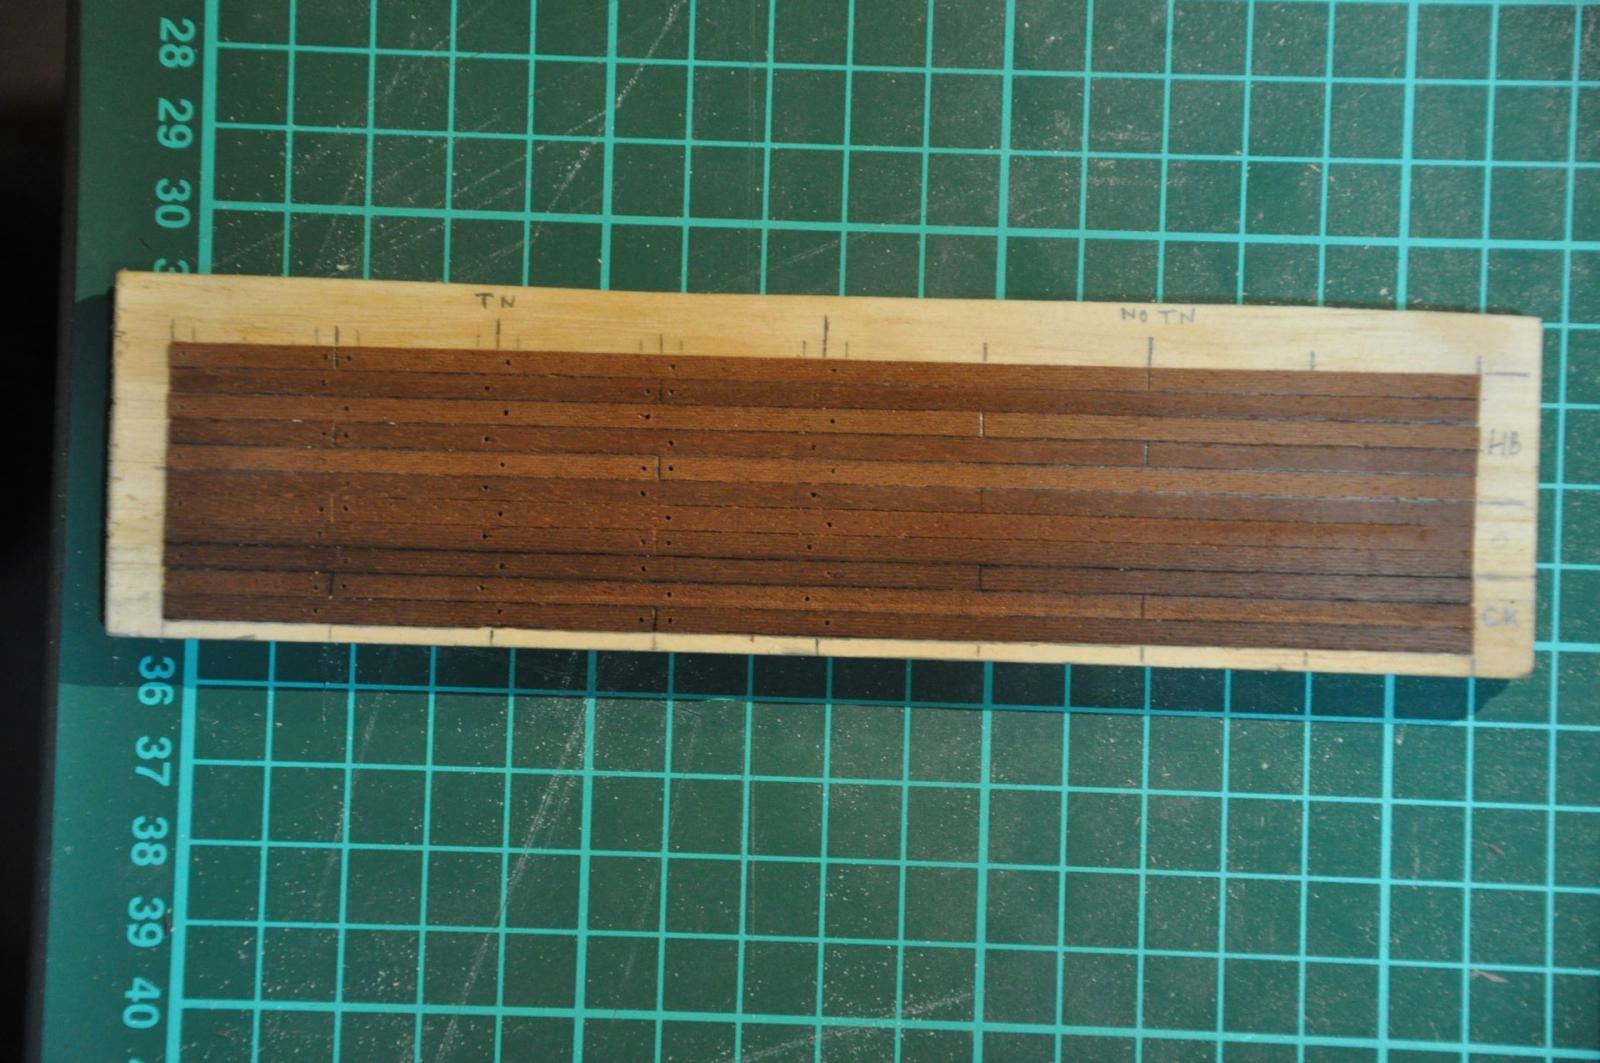
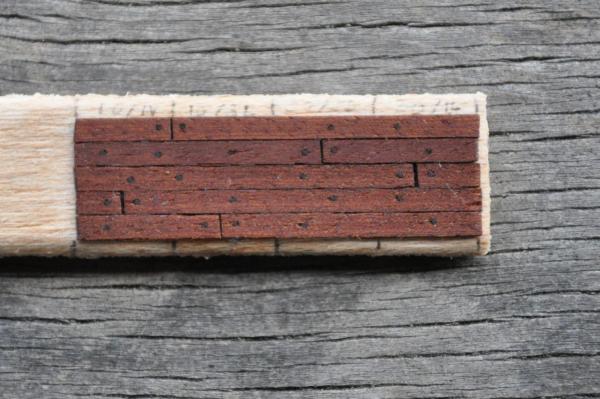
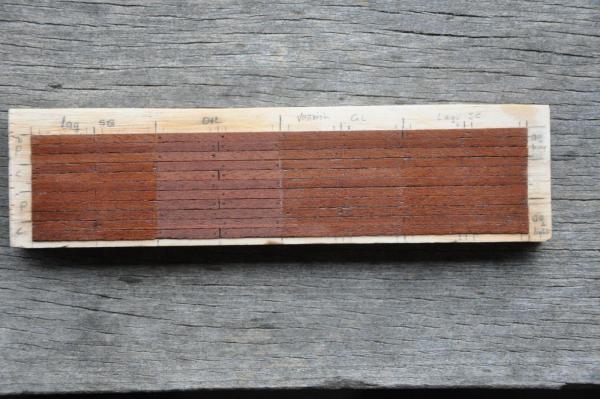
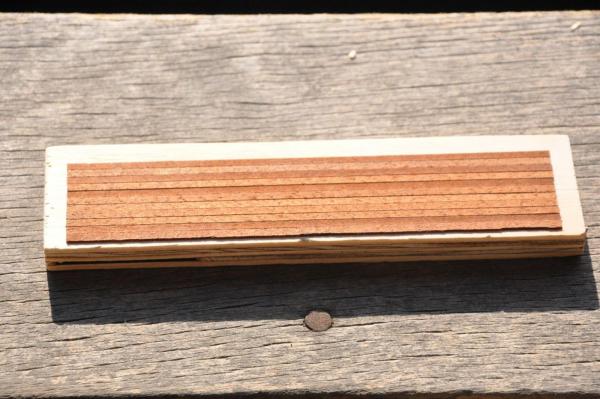
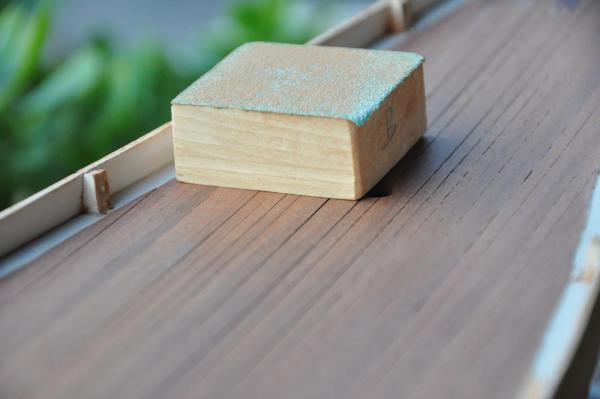
I have now finished testing. I could have tested more, as I’ll explain later, but the whole area has now been tested upon. What I did since the last post: I have started to varnish with different types of varnish, semi-gloss and gloss, both acrylic basic indoor varnish. I have also though about a “wash” and decided against it in favor of another technique which I hoped would give a bit more contrast to the whole thing. The technique which I tried was to use a very sharp black aquarelle pencil (Caran d’Ache Supracolor Soft) and gently wash it down/rub it in with a small brush and water. This is on the right-hand half of the testing piece. My conclusions are: after sanding (lightly) and varnishing none, or close to none, of the caulking can be discerned, irrelevant of the technique used the varnish brings out the trenails a little more but these are still hard to see (on the far left) the use of the aquarelle pencil brought out the trenails a bit more (I lightly touched the trenails with black and then brushed with water; right-hand half of the testing block) after three layers of varnish, there is (almost) not difference between gloss and semi-gloss (semi-gloss are the 2 quarters on the outsides) oil brings out the trenails very nicely without having to use a pencil or anything the oil however leaves the wood very matte. I like the semi-gloss varnish because it is close to how the wood came in the box. The pictures show the test block with: outer left: caulking top 5 planks with HB pencil, bottom 3 planks with charcoal, in between no caulking. Finish with semi-gloss varnish (3 layers) middle left: caulking top 5 planks with HB pencil, bottom 3 planks with charcoal, in between no caulking. Finish with Auro hard oil (one layer) middle right: caulking and trenails top 3 planks with Supracolor Soft aquarelle pencil and water brush (heavy application), bottom 3 planks with Supracolor Soft aquarelle pencil and water brush (light application), in between no caulking or trenail coloring. Finish with gloss varnish (3 layers) outer right: caulking and trenails top 3 planks with Supracolor Soft aquarelle pencil and water brush (heavy application), bottom 3 planks with Supracolor Soft aquarelle pencil and water brush (light application), in between no caulking or trenail coloring. Finish with semi-gloss varnish (3 layers) So now I could go on testing. I would like to have the result of the oil, but under a varnish. Maybe it is possible to varnish the oiled part? It still feels very dry and not oily at all. However if I try to varnish this oiled part I will have given up my reference of which look I like. So probably I will have to do a separate test...

- 127 replies
-
- 1
-
-
- Bluenose
- Billing Boats
- (and 1 more)
-
Hi Julian, Thanks for the suggestion of the wood putty. I read about filling the holes with wax before, but not about the putty yet. The thing I keep asking myself is: probably on the real ship they used the same wood for the trenails as for the deck planks. So probably the trenails were not all that visible to start with apart from the grey/black muck which might appear after some time on the edges. So should I deliberately make trenails in a different color just so that it can be seen that I made these? I doubt it. But I can't get my mind off the fact that I do like the pattern on the deck. I guess it is back to the testing deck for me....
-
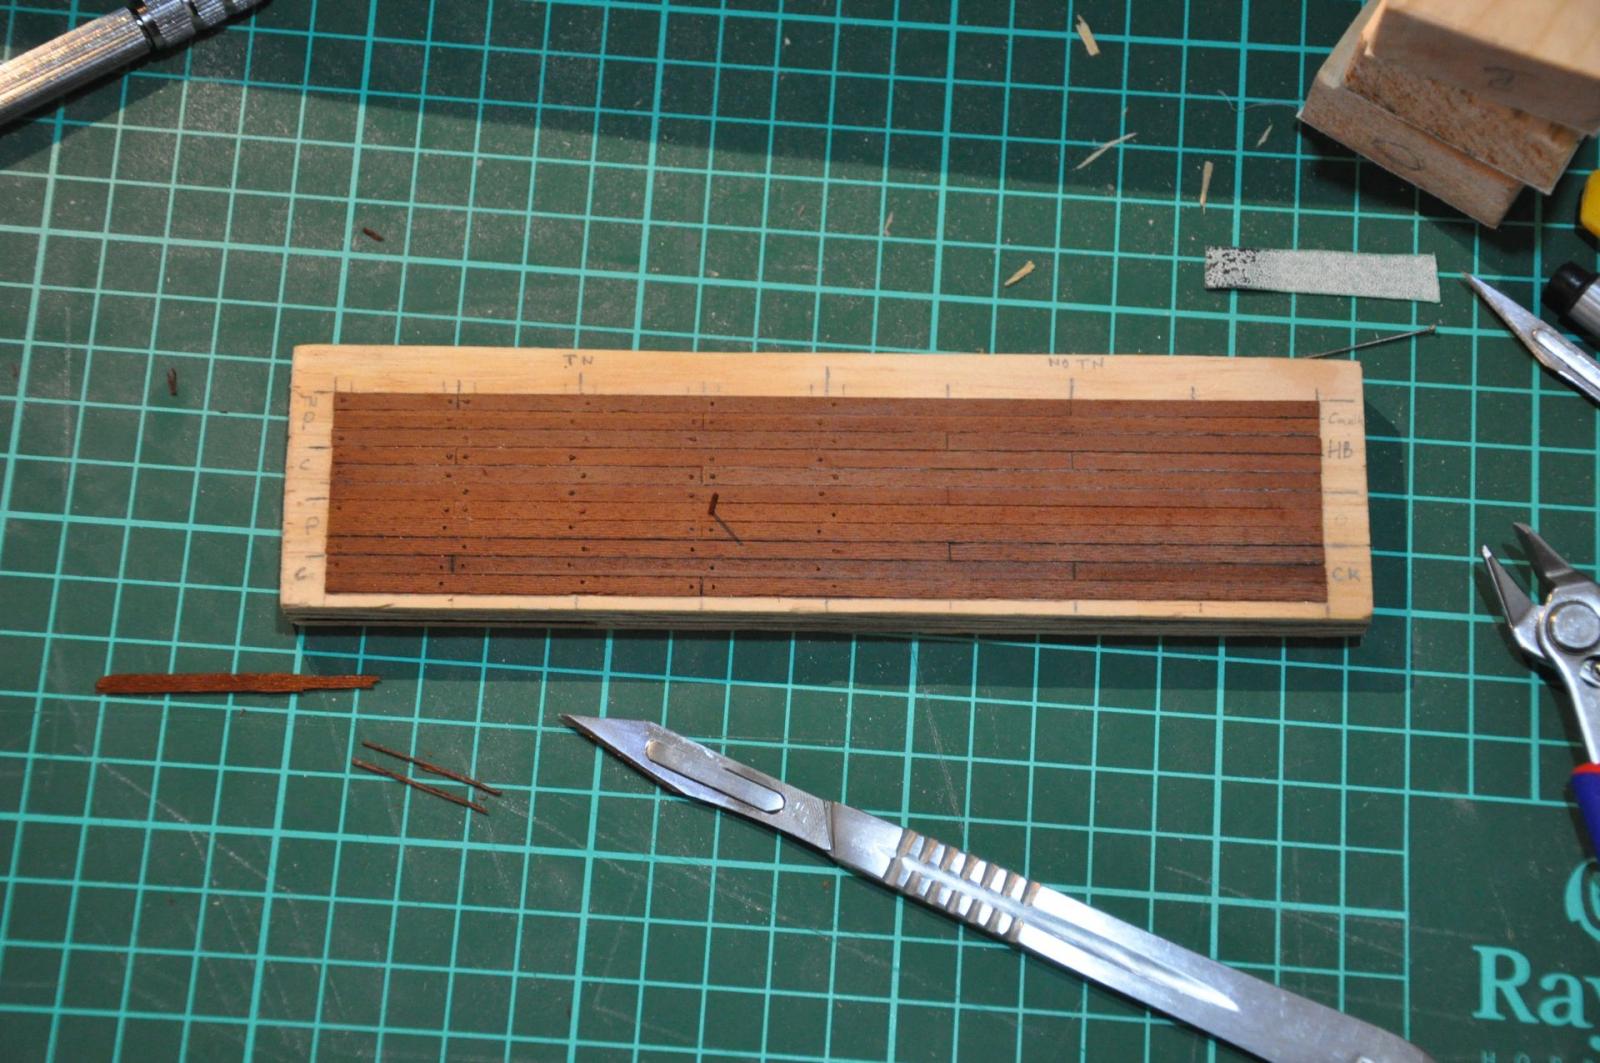
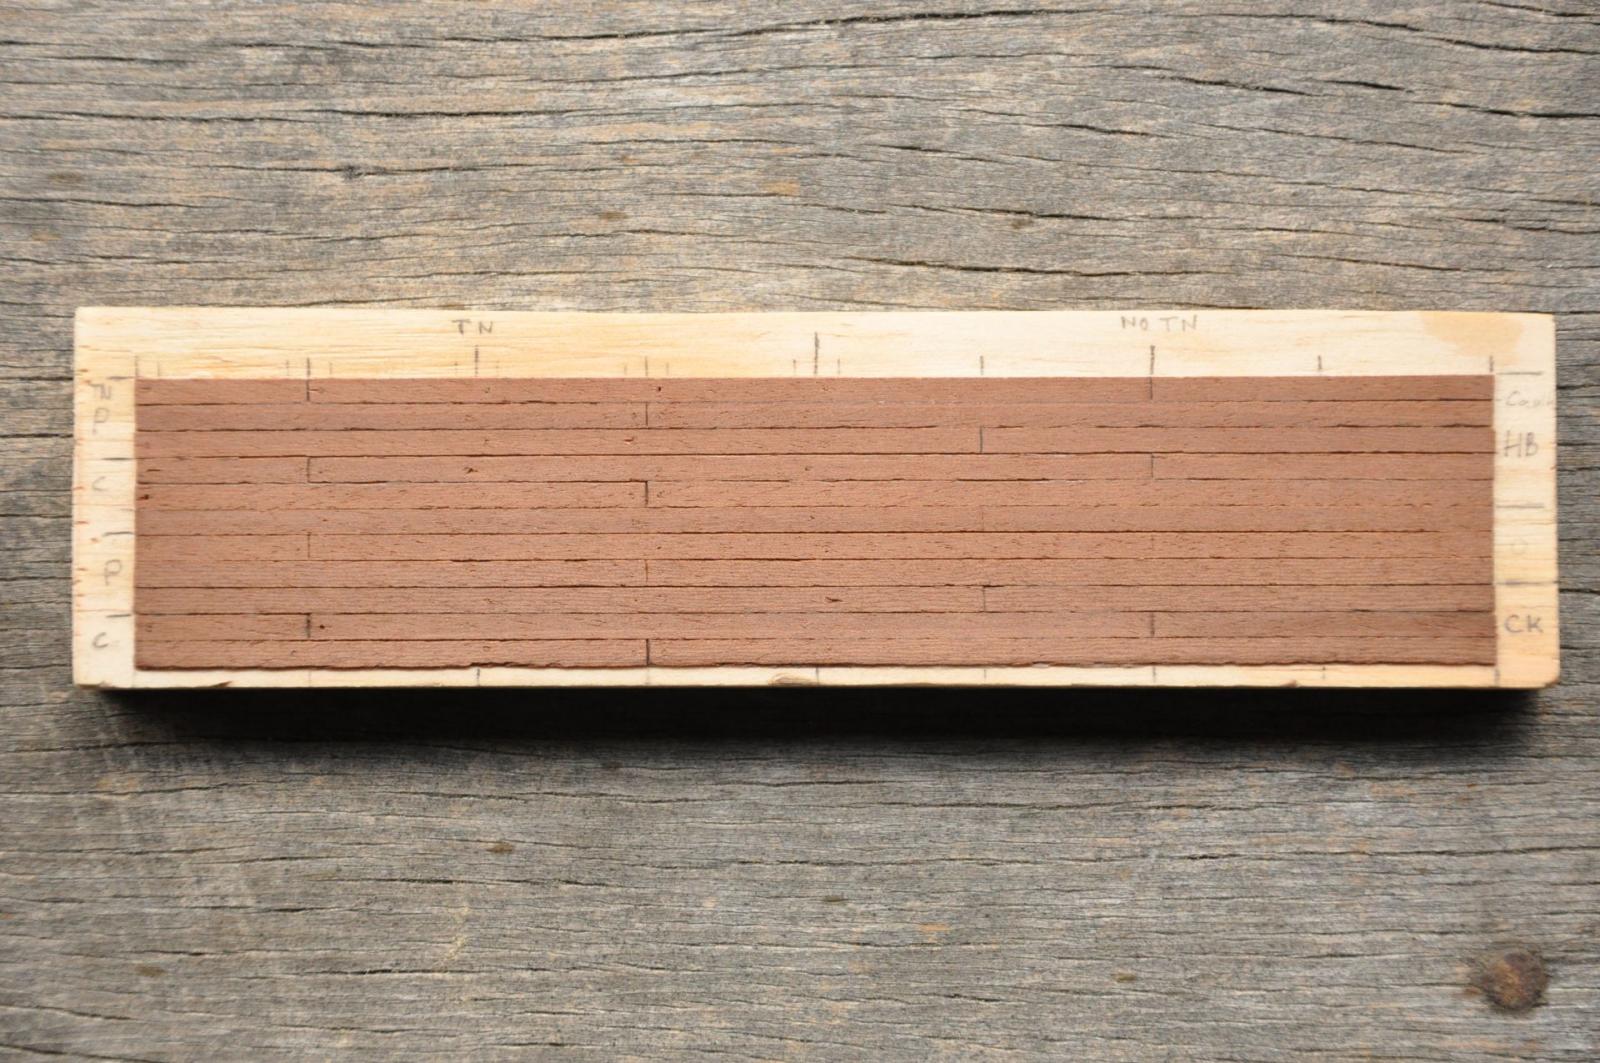
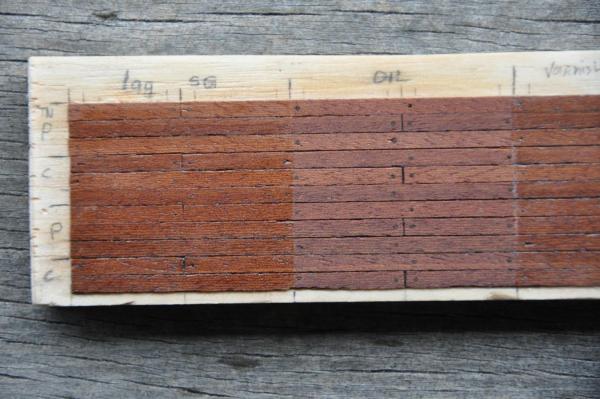
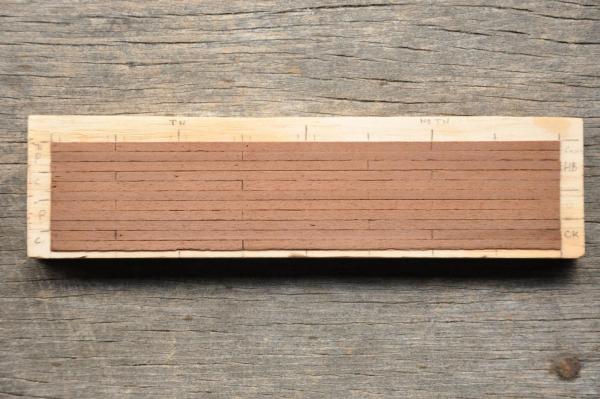
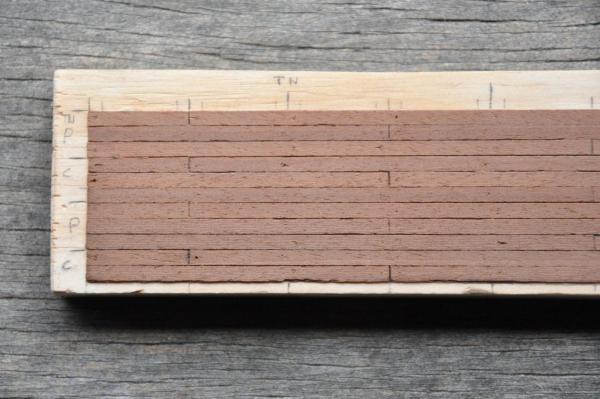
Hi all, I have had another idea for the trenails which I have tried on my test deck now. Instead of using (light color wood) cocktail sticks I realized (or two bits of stored information miraculously collided in my brain) that the deck planks are 0.7 mm thick. Which is the same size as the diameter of the holes I drilled in the deck… So I sought out a particularly thick deck plank bit and cut off a small stripe with a scalpel, trying to make it square (or about square). I tried this for trenails and I can only say it worked perfectly. Here’s a picture of the progress. I started on top with three rows of just plain wood. Then I did three rows where I rubbed the length of the wood with charcoal. To no effect as it turned out. Then there’s another three rows of plain and two of “charcoaled”. My conclusions from this test are that a) this will be the easiest way for me to do the trenailing, by using the same would I think the effect is more subtle and realistic and c) the charcoal treatment has no effect and can be omitted. After I finished the trenailing I did a very licht sanding with 180 grit paper. You see the result below. As I hoped the too wide charcoal lines have gone from the top of the deck planks and the only caulking left is what is between the planks. From the picture I would say this is just about next to nothing. There is little or no difference between the top five (HB pencil), middle three (no caulking) and bottom three (charcoal) planks. This means that when I want to have caulking, I need to do it after sanding the trenails and with a pencil, because the charcoal lines are too wide. Then to the trenails: also these are hardly visible anymore . Subtle is good but I had hoped for a little bit more visibility. I was going to proceed to the varnish, but now I am contemplating trying a wash first. If at all possible I would like to reach the effect of dirt or grease in the creases. With creases I mean the creases between the different planks and between the trenails and the planks. In this way it would all stand out a bit more, like more contrast. I have two problems with that however: 1) I do not know with what to do this best and 2) the planks itself also have lost of creases. I do not mind a bit of weathering, but the creases within the planks should not compete with the ones between the planks… Last consideration for now: somehow I always assumed I will varnish the deck. For some reason I also thought of the practical side here that I could just wipe off any stains from painting the stanchions if I had used gloss varnish on the deck However, some time ago I thought this might be a bit too much, so I also got myself a pot of semi gloss varnish. I wanted to try both on the test deck. But now I think I will not use gloss at all and I think of oiling the deck or maybe even waxing it. I do have some wood oil, but no wax. My experience with the oil is that it tends to enhance the contrast and brighten the details in the wood, which could obviate the need for a wash. Any ideas about this?

- 127 replies
-
- 1
-
-
- Bluenose
- Billing Boats
- (and 1 more)
-
Hi Gary, good to read that everything arrived well and complete. I work on a glass tabletop (which I can illuminate from below), but I rarely work on the glass itself. It is very practical because, as you mentioned, it is FLAT, you do not lose small pieces, etc., but I do not really like the touch of it (cold and hard) and it does not react well to sanding paper, powertools like a Dremel and it is not a good surface to cut on. So I put a big cutting mat on it It will be great however to put your model on or even for glueing things which need to be flat (keel etc.) because glues do not tend to stick to glass as well as they do to wood. Regarding the flag: my kit contains (a crappy version of) the red ensign. I am not going to use it because it would make my model look like a toddler's toy From the pictures in the archive (the link I posted) I can conclude that the Bluenose bore all kinds of flags or none at all, depending on the occasion (quite a few pictures taken during races). There are a few pictures where the bears an ensign and from the shades of gray I would conclude it is the red ensign.
-
Nice job Chris! Interesting part on the staining and ornament painting. If you would like to share more of this, you can do so in the Shop Notes, Ship Modeling Tips, Techniques and Researchsection of the Forum. I know this will be appreciated by lots of us! Thanks for sharing your interesting build log.
-
I wish you good luck with that!
-
Hi Bob, just to say that yes, your information about the lines/ropes is very helpful and I thank you very much for taking the effort. Jan-Willem
-
Good progress Julian! I like the way you deck and stanchions look now. What kind of paint did you use? Is it acrylic or an enamel? And: is the damage only superficial or did the wood suck up the white paint? When it is only superficial there is nothing that beats careful removal of the upper layer with a chisel or an abrasive tool. If you have problems reaching the spot: have you considered a chisel like the one by x-acto (there are other brands as well of course)? Or to use a Dremel-like tool with a small engraving stone? If the wood sucked up the paint it is more difficult. But I can imagine that the mahogany would not suck up that much paint, given its density. Maybe after removing a bit by abrasion you can touch up little spots with a bit of mahogany stain? Another direction of thinking: I saw on pictures that a deck gets very weathered over time, especially at the edges I suppose. Maybe as a last resort you could consider a "weathering" which would cover these white stains... Or leave them be, or put something on it. Look at this picture for instance: http://novascotia.ca/archives/virtual/Bluenose/archives.asp?ID=196&Language= Chains and hooks lying around and even lots of white where you also have white. I understand that this might not be what you envisioned for your model, but at least it would be a realistic alternative... Good luck on this one and let us know how it turned out!
-
Julian, Bob, thanks a lot for your input. You are right, the HB caulking is more subtle which is a very important quality. I hope to be doing the trenails soon and then some sanding and varnishing. Then we'll see the final outcome I figure that if I go for the pencil I will try an 6B or 8B pencil as well. I think this will be as subtle because of the sharp point but just a little more black. Julian: no I did not varnish or wax yet. This is just the sanded surface. The upper picture was taken outside in the sun, the latter inside under several lights. this may explain part of the difference. Also working on the wood, drawing the caulking and drilling the holes, may have left some marks from touching or rubbing the wood.
-
I was not able to do much lately but I did start working on the tests. First I tested caulking. As with the model I first planked the test deck to only do the caulking afterwards, since I need to replicate the same circumstances to be able to compare. There are two issues: 1) how to get the caulking color in between the deck planks and not on them and 2) to find the right color/medium to make the coloring with. I started out with a 0.5 mm HB pencil which I sharpened additionally with sandpaper. Since HB is fairly stabile it is easy to get between de deck planks without breaking the pencil. On the picture the left-hand side is treated with the pencil and the right-hand side is left as is. In my opinion it did came out not too bad, but what I do not like is the grayish-silver shimmer of the pencil color in certain light conditions (i.e. when it reflects the light). So I went out and got myself a charcoal pencil. The problem with these is that they break and even crumble very easily. They cannot be sharpened with a pencil sharpener (I had to find out), so I used a scalpel and paper to get a sharp point. While doing the caulking it has to be re-sharpened after every 10-20 cm or so of use and even then I did not really get between the planks without also coloring some of the top of planks which makes the caulking stand out too much. However I do like the deep black color very much which, in my opinion, goes very well with the mahogany deck. I hope that after sanding the deck again some of the color on top of the planks will be removed. On the picture you see the top part done with the HB pencil and the bottom part with the charcoal. In the middle there are still some planks without caulking. On the right side where the light reflects you can make out the grayish-silver shimmer of the HB pencil which I do not like. The charcoal has a much deeper black color. The picture shows the holes which I did for the trenails as well. I drilled the trenail holes in a pattern according to Gene Bodnar’s practicum. According to the practicum, trenails for deckplanks up to 6” were 1,5” to 2” in diameter, which was the case with the Bluenose. In my case this means that I chose to drill holes of 0.7 mm diameter (60 x 0.7 = 42 mm ≈ 1.65”). So the left side has trenail holes now and the right side does not. I am not yet sure how to make the trenails. I do not want these standing out too much, nor do I want them to be lighter of color than the deck planks. I am thinking of soaking cocktail sticks in mahogany stain and hope they will suck up the color, at least at the tips. Then I would apply some charcoal and glue them in. A more elaborate alternative would be to glue some deck planks together and drill holes in it with a hollow needle and use the little cylinders extracted from the needle. But I am not sure that I want to go there… Any ideas and comments are welcome

- 127 replies
-
- 1
-
-
- Bluenose
- Billing Boats
- (and 1 more)
-
Hi Gary, welcome to the forum and to the group of people building a Bluenose As you might have noticed there are a lot of Bluenose build logs here on MSW which contain valuable information. I am building a Bluenose myself and have discussions about issues with fellow Bluenose builders on a regular basis via the build logs which is very helpful. Another great source which you might want to check out is http://novascotia.ca/archives/virtual/bluenose/default.asp?Language=English Here you can find lots of original pictures of the Bluenose. In fact I downloaded and printed them all for reference I'll be following your log with interest!
-
Yes I agree. I would also do the priming first and then affix the chainplates you don't want those details too much clogged with paint.
-
Hi Julian, did you already think about the chainplates and deadeyes? It seems to me to be something you want to have done before painting the hull or at least before painting the upper part black. See also the build log by Bob (bhermann). May be worth a thought...
-
Interesting idea, I have no experience with tack cloth and I do not know whether or not I can get it here. I was already thinking about using a wet cloth or pressurized air (like from an airbrush). I'll have a look around in the next days. I can then try it on the test deck
-
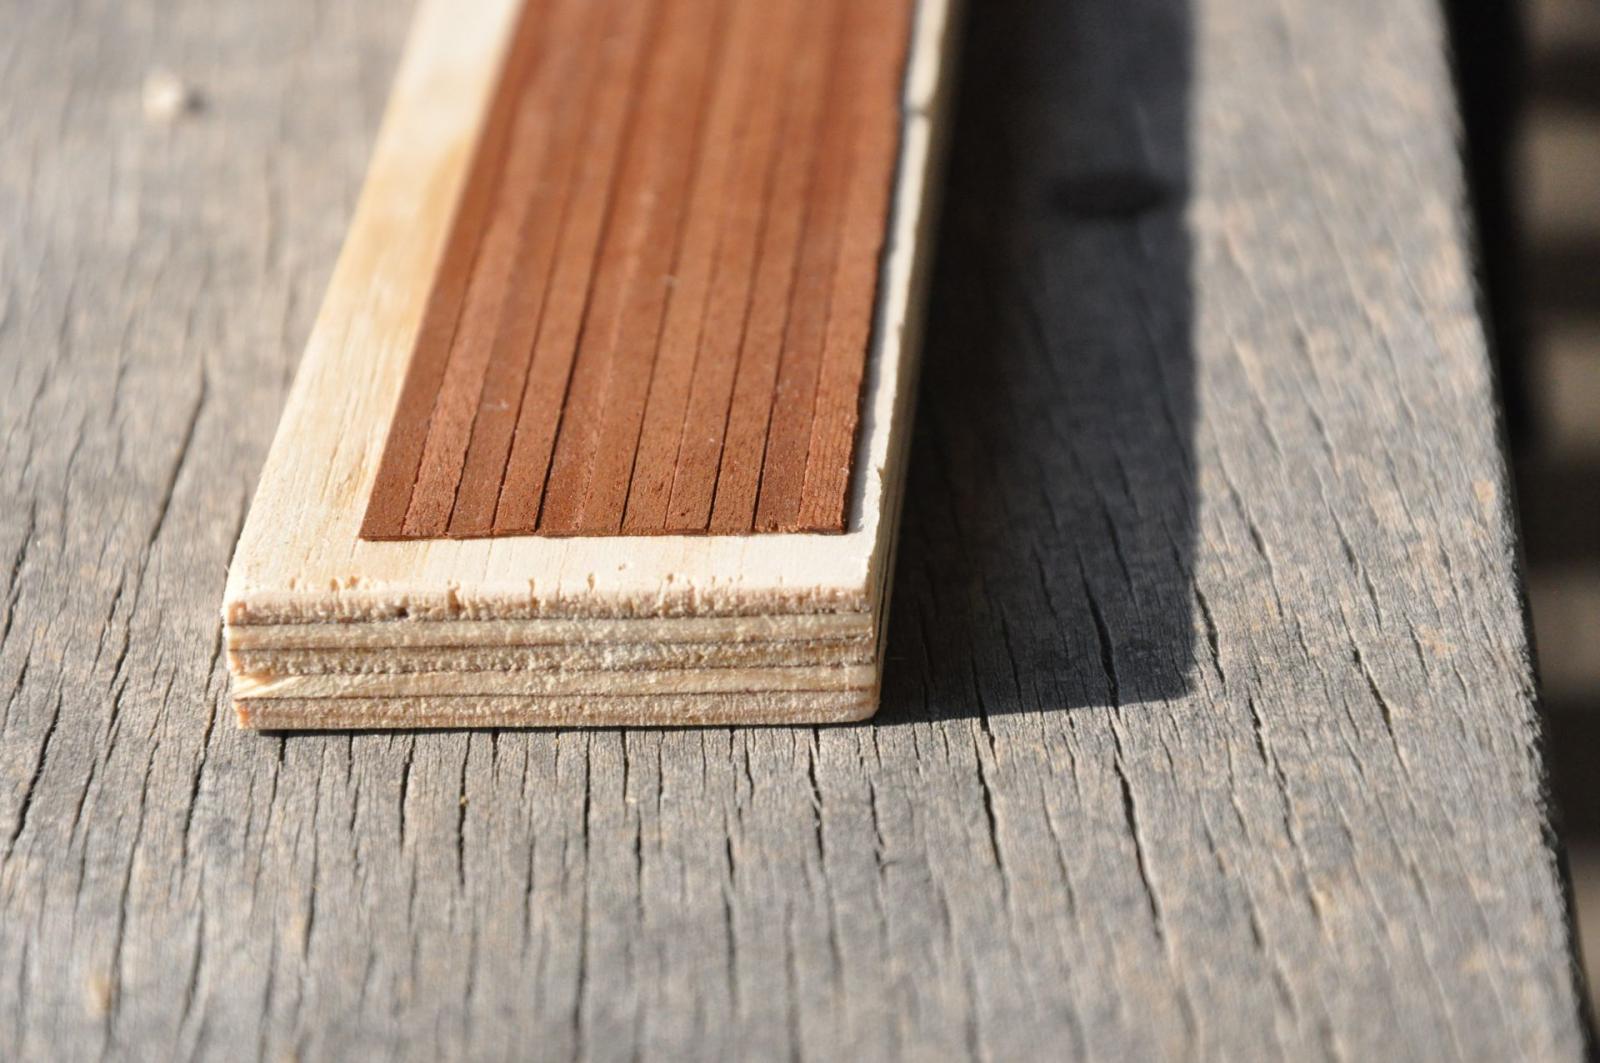
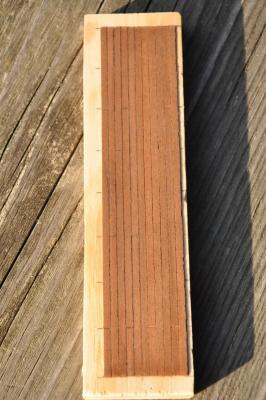
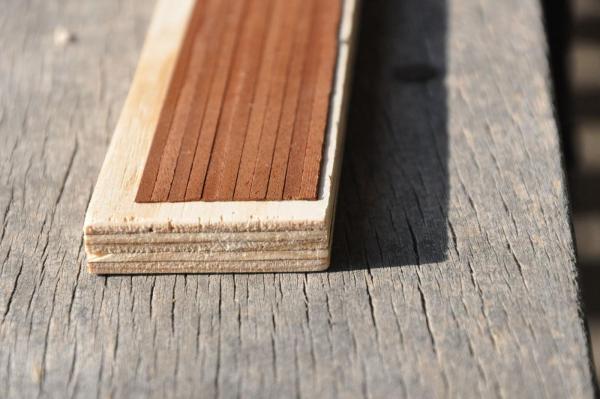
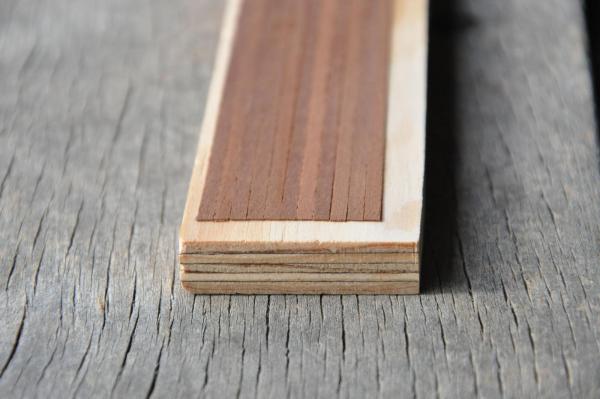
The other thing I started to work on but did not achieve the progress with which I would have liked to) is the test stand for the deck. I have identified 4 areas to test: cutting already mounted planks to size, trenailing, caulking and varnish. I did not get to the testing itself, but I was able to create the test deck on a piece of scrap wood. The deck is 16cm long and 11 planks (33mm) wide. The test deck: As with the deck on the model, this deck was made of planks of different thickness: As with the deck on the model, I have sanded the deck down to get an even, level deck: I hope I will find the time to begin the testing soon…
- 127 replies
-
- 2
-
-
- Bluenose
- Billing Boats
- (and 1 more)
-
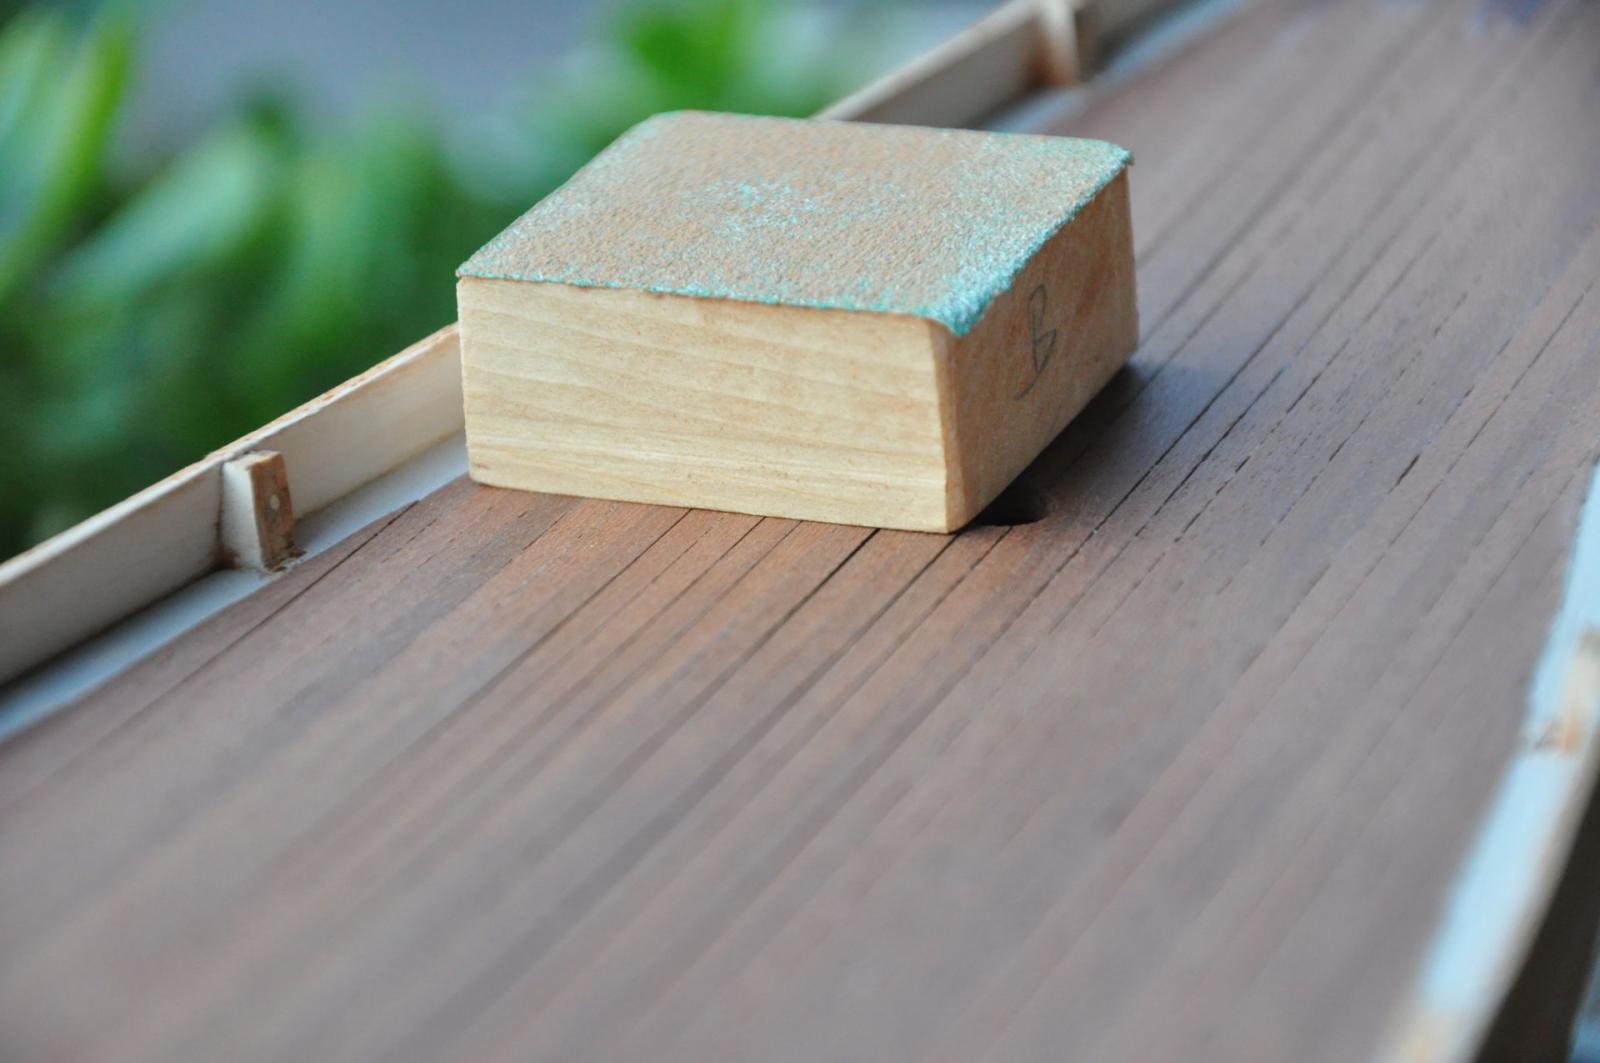
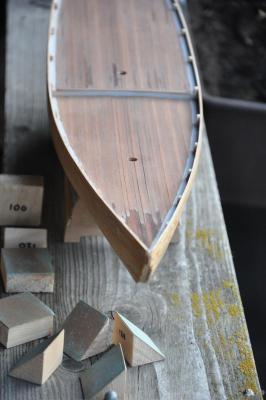
During the past weeks I spent some time doing research and asking questions on MSW (mainly to Bob aka bhermann; he has been helping me a lot) to find out what I can do in terms of deadeyes, chainplates, blocks, etc.). I want to have a concept for this soon since in my opinion I need to fit the chainplates and the deadeyes before painting the hull: the chainplates need to be fitted through the rail and sunken into the hull at least partly. In addition to this my time during the weekends has been very limited so I have only little progress to show for. First of all I continued creating the fake stanchions. 75% is now ready for mounting, which I will do only after the deck is finished. Then I have also continued sanding the deck. I found that the mahogany deck is quite something else in terms of hardness than the other wood in the kit. The sandpaper on my sanding blocks was wearing thin so fast that I decided to create another 6 blocks bringing the total to 8 (3 100 grit and 5 120 grit). After another hour or so of sanding these were worn down and it looks like this: The dark spots have not been touched by the sanding paper yet and I think I can eliminate these in the next “sanding session”. Sanding is done when there are no more dark (untouched wood) or light grey (barely touched/lightly sanded) areas anymore, which means the deck is level across a few deck planks. I put a sanding block on the deck to “check” this. In fact the deck is more level than it looks. When I glued the deck on some 20 years ago I did not think of (and the manual didn’t mention to) sand the sides of the planks or making fake caulking. So now some planks have rough sides which cause gaps between planks. It’s not very bad but it makes some planks stand out like they were not level with the rest.
- 127 replies
-
- 2
-
-
- Bluenose
- Billing Boats
- (and 1 more)
-
Hi Bob, I have yet another question: I have decided that I do not only want to get myself some decent deadeyes and blocks, but I also want to replace the rope. In the Billing Boats kit there are three spools of rope of unknown lenght. There is no specification of thickness so I hat to measure with the caliper and therefore the thickness is an "educated guess". There is one spool with 0.25mm (0.01") white rope, one with 0.5mm (0.02") tan rope and one with 0.75mm (0.03") tan rope of a slightly different hue. Now I saw in the Model Shipways manual (unfortunately I do not have plans, only the manual) that the kit supplies following line diameters: 0.009", 0.017" and 0.03". Unfortunately the manual does not mention which diameter goes with which color. It also mentions that on the plans more different diameters are mentioned, but can be substituted with these 3. I really like the looks of the rope which Chuck sells. He sells his rope at different diameters than the lines supplied in the MS kit though. This is not a problem on itself, but I lack the information based upon which I can decide which rope to buy. I was thinking of getting 0.008", 0.012", 0.018" and 0.025". Would that make sense? Or is the 0.008" or the 0.012" superfluous? I think it depends what it is used for and that is the information which I am missing Could you please help me out here? Much appreciated! Jan-Willem
-
Bob, that is an interesting idea which I did not think of: the top masts being unshipped. Since I have no nautical knowledge whatsoever (but always interested to learn ) I could not have though of this possibility. However, when this would be the case, then I would expect to see the deadeye anyway or at least the chainplate. I guess they would not remove the chainplate, close the hole in the rail with putty and redo the paint just because of unshipping the top masts would they? Anyway, since I will be trying to build the Bluenose with full rigging and sails this will not really be an issue. I think I will try blackening as well but I have never done this and I do not even know where to get the stuff to do it with where I live. Seems to be not the healthiest stuff as well . Well first I'll need to do the deck and get the deadeyes... I'll keep you posted!
-
Important is that you like it though. I have already considered painting her light grey / egg shell because I think it would go nicely with the mahogany deck But since this would more or less "undo" the fact that I am changing a lot to the kit to make it a more accurate resemblance I decided to go with the anti-fouling paint / copper red color (or an approximation).