HOLIDAY DONATION DRIVE - SUPPORT MSW - DO YOUR PART TO KEEP THIS GREAT FORUM GOING! (Only 13 donations so far - C'mon guys!)
×


7 Provinces
-
Posts
190 -
Joined
-
Last visited
Content Type
Profiles
Forums
Gallery
Events
Everything posted by 7 Provinces
-
 Looking very good! An idea about the brass or aluminum foil you use to substitute the brass: have a look at the build log of mrcc (the bluenose log). He uses cardboard instead and it seems to me that paint sticks better to cardboard than to any metal really. Anyway it looks good.
 -
Absolutely right. Sometimes the exact sizes to scale do not give the desired effect and you have to opt for something else. My kit did not come with dark rope either. There is white and two shades of sand or beige. Rat lines are the thinnest I believe. Anyway I will have to get some other rope as well when I get there..
-
I think it is not realistic to get the correct line for everything, since there are 24 different sizes listed for the main rigging of an (any?) American fishing schooner. I wonder if it is at all possible to get ropes at these increments. Same goes for blocks by the way. I think one almost will have to settle for 3-5 main sizes and use these as an approximation, at least at this scale. I know I will...
-
Hi Julian, I have never rigged anything till now so I can't tell you how it looks, but I can tell you that: In my Bluenose kit there are three rope sizes: 0.25 mm, 0.5 mm and 0.75 mm. According to the plans, the 0.75 mm. is meant for the shrouds. The Model Shipways kit, according to the instructions I have, comes with 0.009" (0.23 mm), 0.017" (0.43 mm) and 0.030" (0.76 mm), so it is similar. According to Chapelle, shrouds (of American fishing schooners ...) used to be 6 3/4" circumference. Since circumference is 2r x Pi and you need the diameter which is 2r, this should have been about 2.15". At 1:64 this makes 0.0336" = 0.85 mm. Hope this helps
-
Looking great! You never even notice that it is cardboard!
-
Good luck and please share the results!
-
Hi Mike, I took a look at your log which I found because you posted in my log to be honest I must say that your build is looking exceptionally well and your log is very inspiring even when it is way beyond what I feel I can do at this moment. Keep up the good work, in the meanwhile I'll grab a seat to watch it!
-
Phil, some thoughts on your questions: I currently do not use an airbrush for I have none I was going to get one and I want to get back into plastic modeling as well (yes it has been 20+ years as well) because I loved to do that and especially the painting, weathering, etc. which in the old days I did with a brush. This kind of got frustrating when trying to paint a bigger surface Anyway, to get back to the point: I thought of the way ships were painted in the old days and I figured it would be better to use the old 2" brush. I mean, just look at what Bob Ross could do with it . No seriously I think I will paint with a couple of good brushes rather than with an airbrush or spray can. Even though at the scale we are working at you would probably not see the uneven surface the deck help left after painting the mast hoops.. Edit: BTW I currently use home acrylics for my Bluenose. Up to now this has worked ok (but I did not have to paint much yet). However I read somewhere that model acrylics tend to flow better than home acrylics which, of course, made me curious. As to tapering the masts: I think there are some tips and tricks in the woodworking part of the forum (or you can post a question there) and in some build logs (I think of Bhermann's Bluenose). Most will involve a lathe however I fear. If you do not have access to a lathe and the masts are not too long why not try to use a drill? Secure the mast in the drill and let it rotate at a moderate speed. Wear a glove on your other hand and put sandpaper in the palm of the glove and run it along the rotating mast. Make sure you run even strokes to have an even tapering or slow down near the tip for a convex form. Do not forget to keep moving, otherwise you will have dents. It is like paintig or filing: long even strokesand not too much pressure. Rather repeat it a lot than trying to get it in one go. Depending on the drill you use you might be able to secure it in a vise and have two hands free to do the sanding... Good luck!
-
Thanks guys for the great feedback! @Philty: I started my Bluenose 867 km. from where I am now . Her in Europe that means there's a country in between (Germany). I moved 8 times since and hope to move for the last time in less than a year from now. I also hope to have a bit more time after moving @Mike: welcome, you'll need patience here as you may have noticed I give my paints and glues a lot of time to cure
- 127 replies
-
- 3
-

-
- Bluenose
- Billing Boats
- (and 1 more)
-
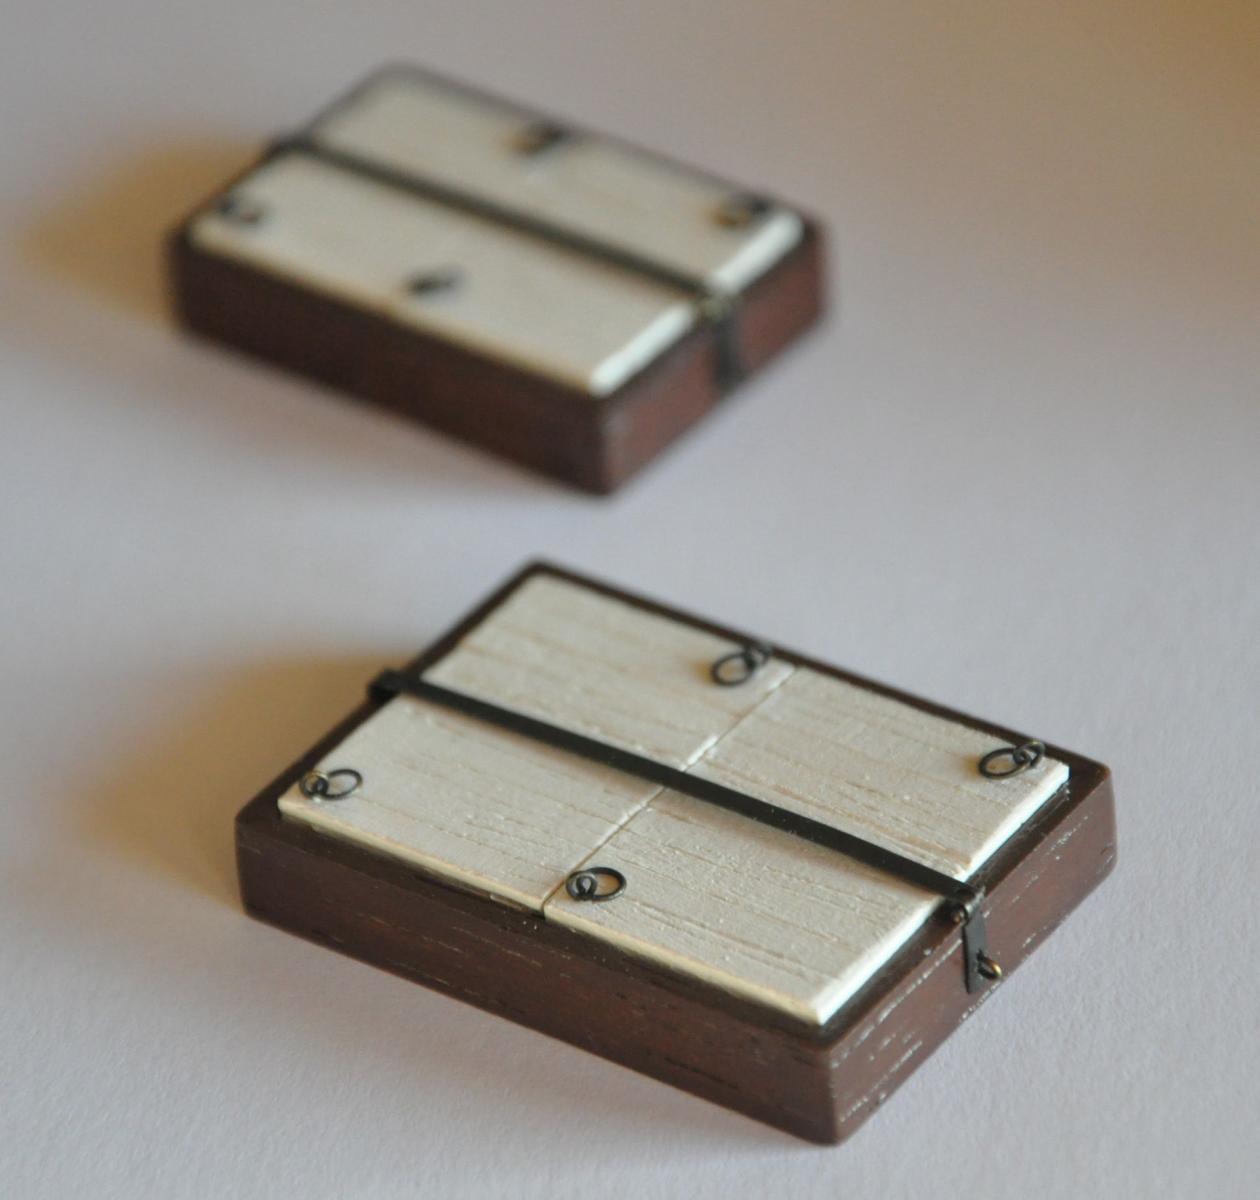
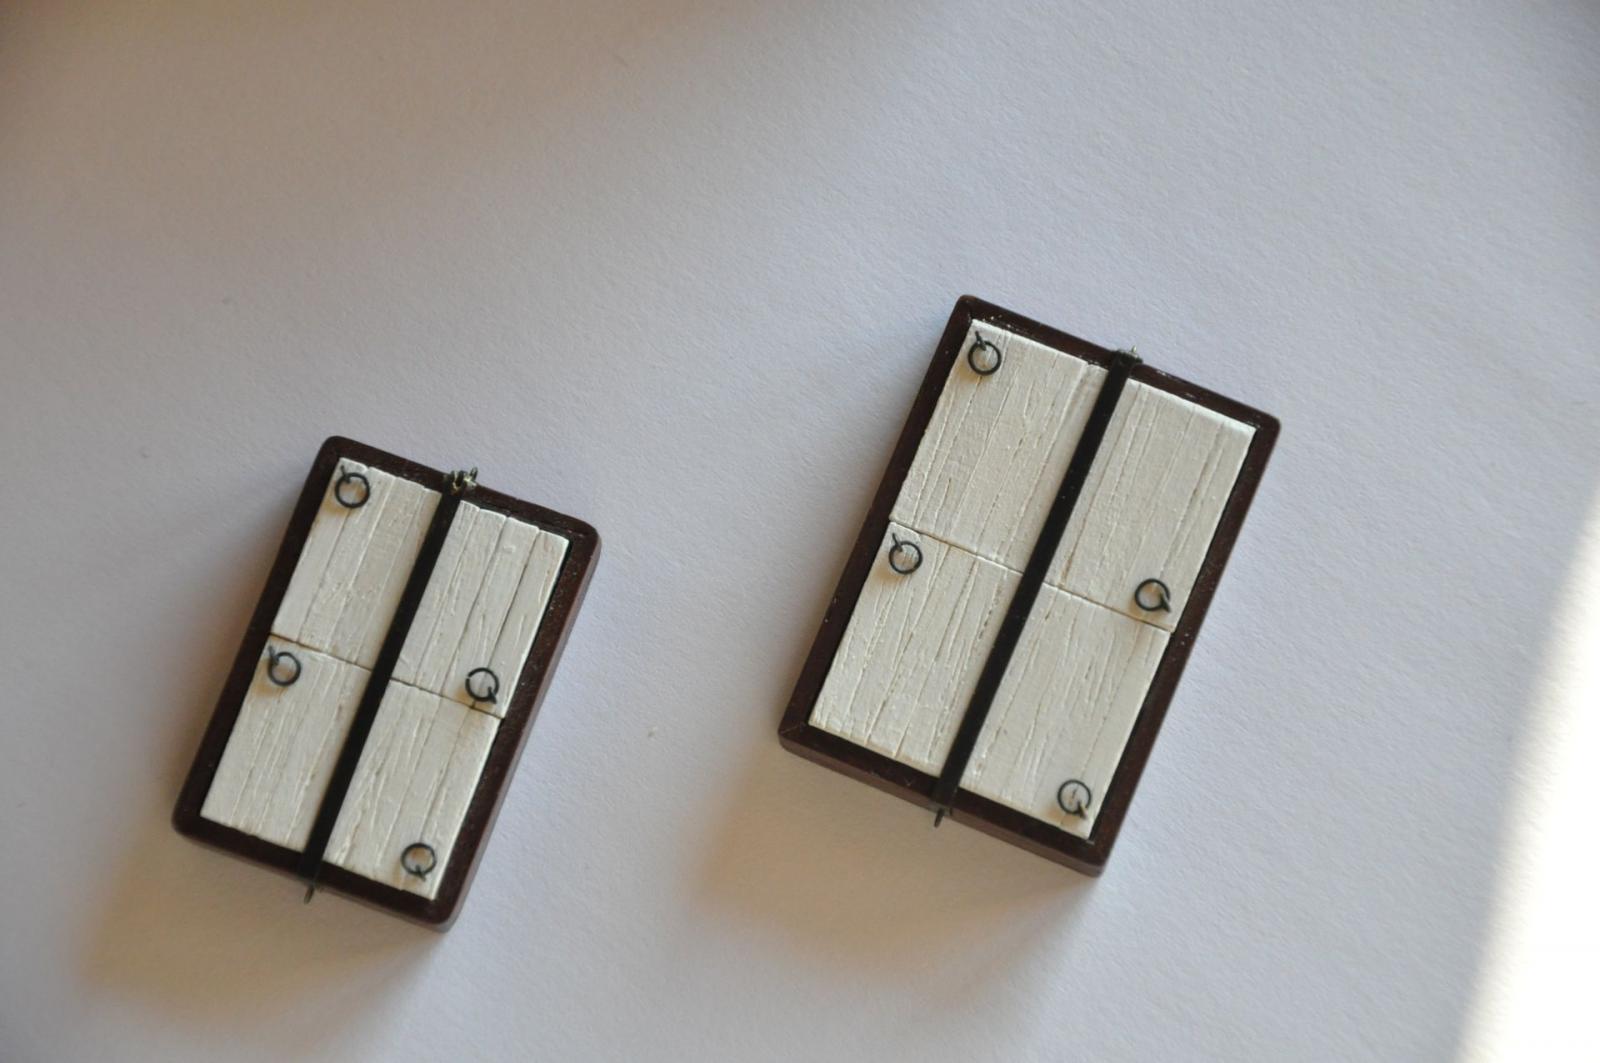
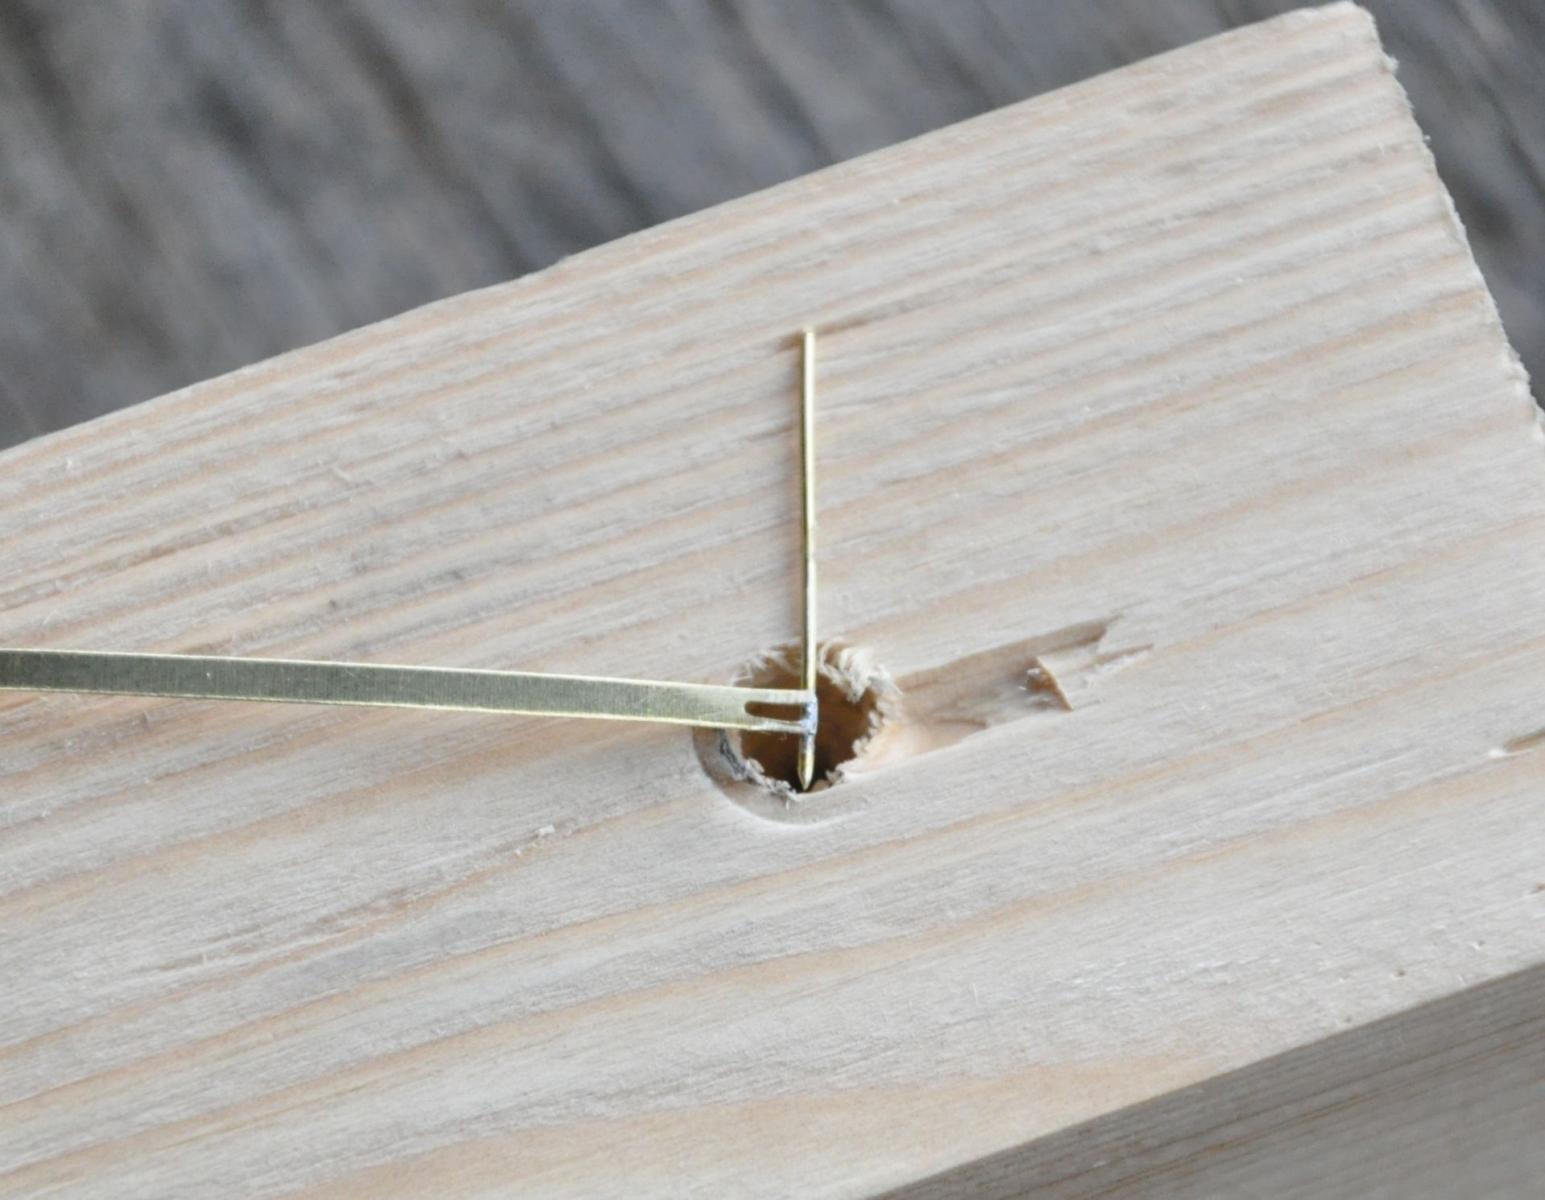
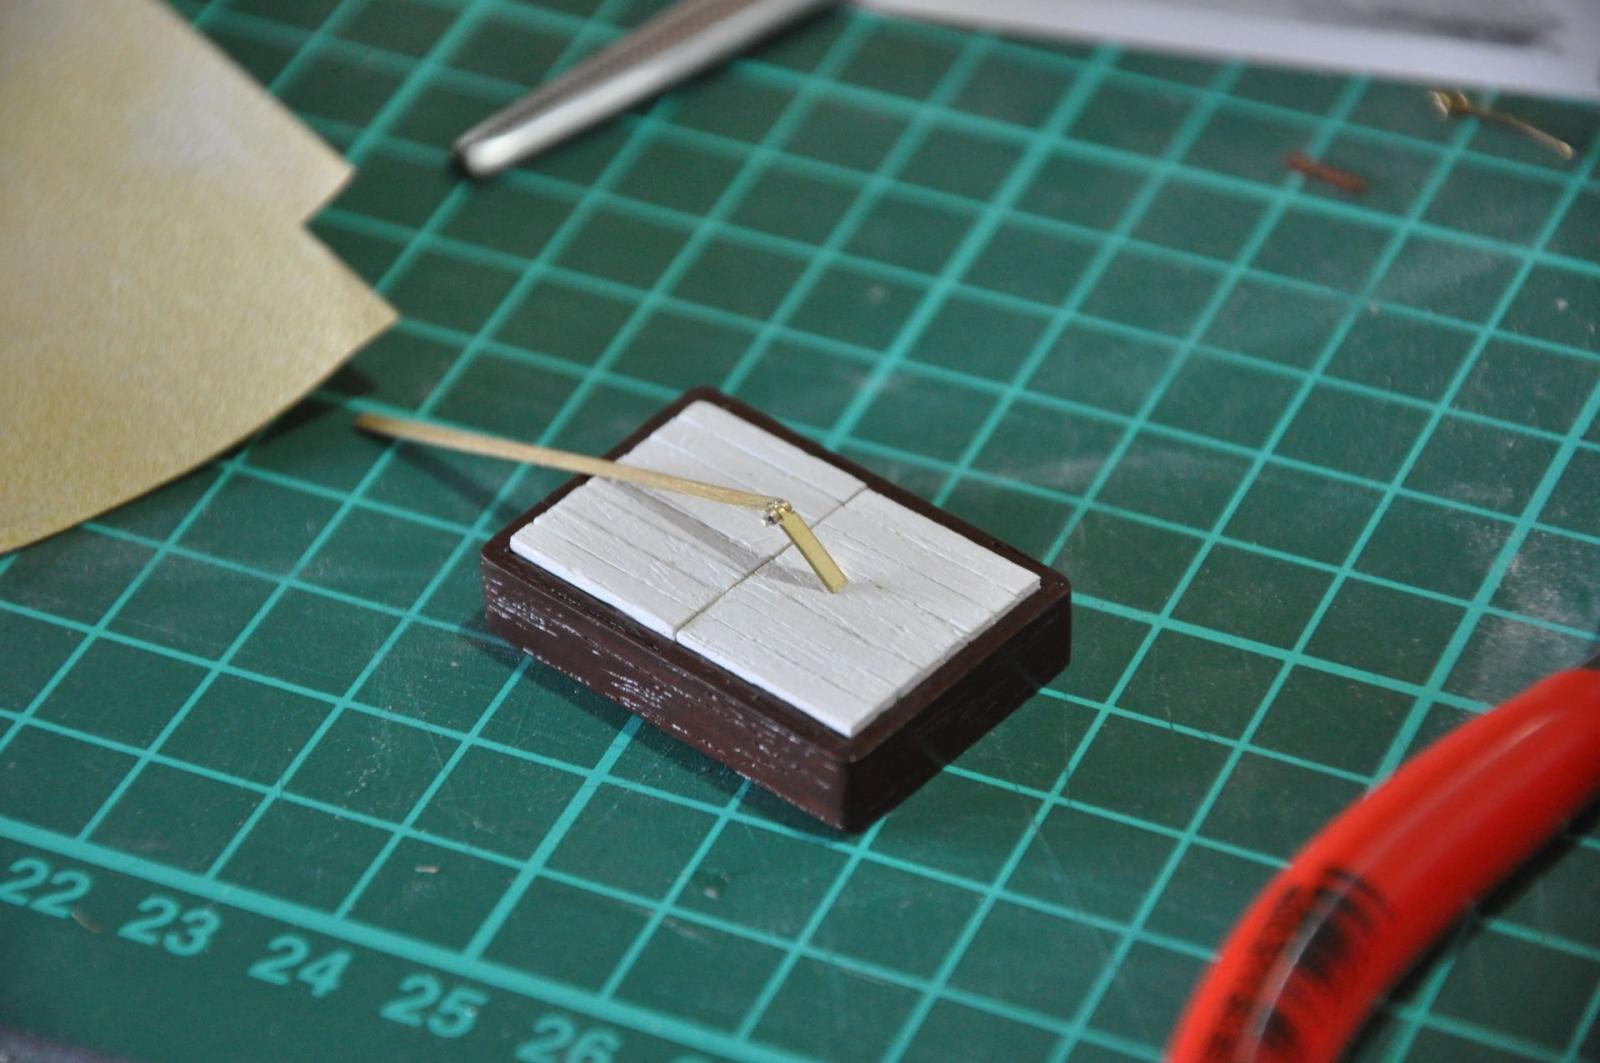
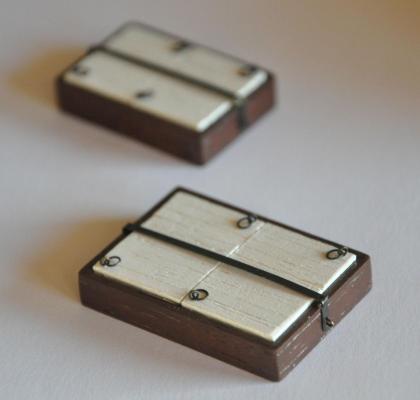
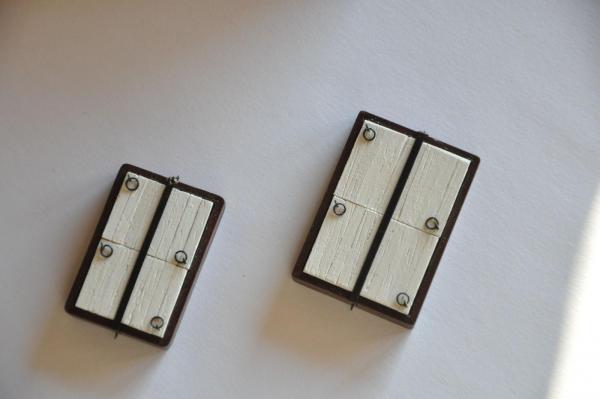
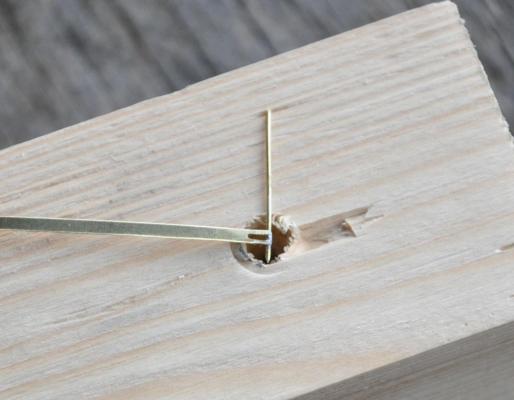
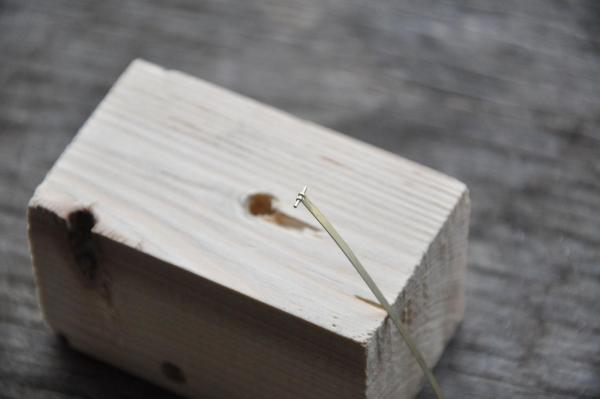
Thanks everyone for all the likes! Yesterday I finally found some time to assemble the fish hatches. I blackened the brass parts from the last post (sticking to the 0.4 mm brass wire for the ringbolts) already weeks ago. I did not even rinse them at the time but they looked ok so I treated them with some oil to get the satin finish of used parts. Then I assembled the parts carefully, only using miniscule amounts of CA where absolutely necessary. This was basically where I stuck the wire into the holes I drilled. I started out with 0.4 mm holes for the 0.4 mm brass but found out that I needed too much force to stick the wires in and I was afraid to damage (or un-blacken) them. So I drilled 0.5 mm holes after which I needed some tiny amounts of glue to make sure they stuck. The bars have not been glued down but are held down by the wire loops. Here are the results:
- 127 replies
-
- 7
-
-
- Bluenose
- Billing Boats
- (and 1 more)
-
Thanks Julian! I see this ship as a kind of a testbed to see what is possible and what not. Most of my mess-ups happen because (or when) I try to speed things up. So everytime things start to get difficult or when I see a mistake starting to happen I force myself to slow down (even more). Leaves me with some nice results here and there and the wish to speed up the build . It never is perfect...
-
Well Phil, either your gauge is off or you made so much progress that you need to do a quick re-gauging, because from what I can see from the pictures that is some great work you are doing. So maybe your experience with ships is not so much (like mine) but you seem to be able to do very neat and exact work, which goes a long way Except for the upside-down pictures maybe
-
John, if I remember correctly there have also been issues reported with the use of Blacken-It on K&S brass. Read the Blacken-It trials for more. Maybe it is the K&S brass which does not let itself be blackened so easily? On another note: I use a blackening product from Germany (nerofor; see my build log) which is completely hassle-free. I did not try it on K&S yet (but I will) but compared to procedures as seen in the blacken-it trials it is sooo much easier: just rub the brass with steel wool, de-grease (with acetone or so) and apply the Nerofor (brush or soak). Afterwards rinse with water. But here's the thing: I have parts which I blackened months ago which I did not rinse and these still look great! No sweating or anything. Good luck with your project!
-
Nice work on the dead-eyes and the dories Julian. The dead-eyes are a part of the build on which I already had many thoughts but I am not there yet. I like your approach with the hooks, it looks good!
-
Hi Chris, nice work on the lanterns. When reading your post right now I had two ideas to hide the wiring better. Maybe it is still of use to you? you mentioned that the lanterns are metal and conduct electricity and you have to protect the wires from touching the lantern. I would try to use this as a feature by connecting one pole of the LED to the lantern and the other to a wire. In this way you need only one wire and let the lantern feature as the other wire. On the inside of the ship you can attach the other pole to the lantern. For instance: source attached to minus wire, minus wire attached to LED, LED to lantern, lantern (on inside of the ship) to plus wire, plus to source. Just like a lot of halogen desk lights. If you cannot solder to th lanterns, use conducting glue. Since you will not have any serious current running in the wires, why not reduce the wire to just one (or two or three) strands? This will be much thinner than your wires. You can probably insulate these with paint (lexan paint??) or glue in the places where it is needed. You also might take a look at telephone wire. It is also very thin. I hope this helps you in any way
-
Thanks Popeye! Unfortunately no. . I started to take pictures when I restarted the build and joined MSW. Without the build log I would not have thought of taking pictures. Plus I did not have a digital camera back in 1994
- 127 replies
-
- 1
-
-
- Bluenose
- Billing Boats
- (and 1 more)
-
Hi Jon, looking great, your Bluenose! I like the combination of the anti-fouling red with the natural wood. Looks very handsome. I fear my Bluenose will be a lot darker ;-) How did you make the mast hoops? Thanks!
-
Hi Don, I wonder what has become of your Bluenose, since I am building the same ship (also Billing Boats). Did you get the chance to work on her since January 14? I would be interested to see what she looks like!
-
Bob, thanks for your comments and you are 100% correct. Actually the wire is 0.4 mm in that sample. I think this is ok for the eye-bolt (even when it is too thick for the scale) but I would prefer the ring just a tad thicker. The next thicker wire that I have (and which is easy to obtain where I live) is 0.6 mm. (the two samples on the bottom). I like the contrast but it is definitely too thick. Perhaps I should make another effort to look for 0.5 mm. brass wire (I need to be able to blacken it).
-
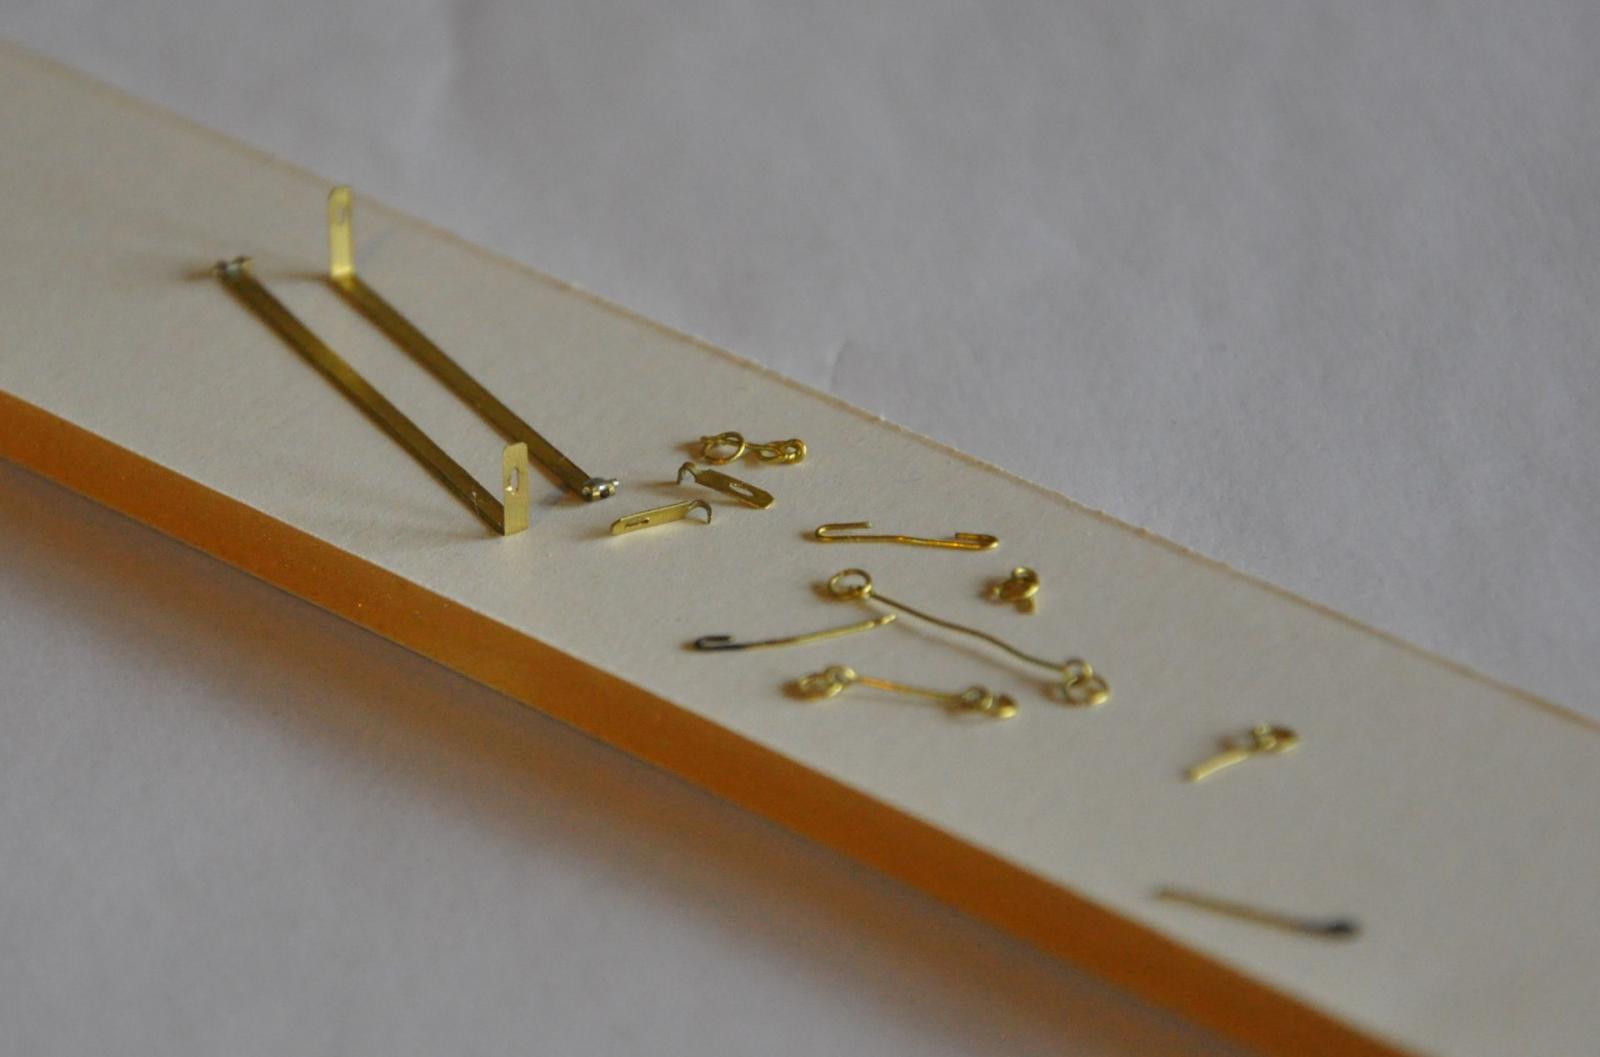
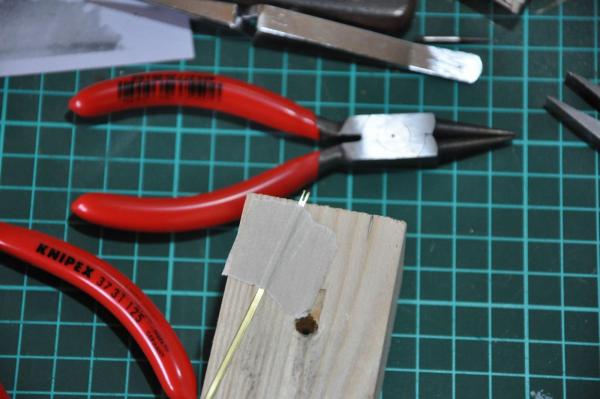
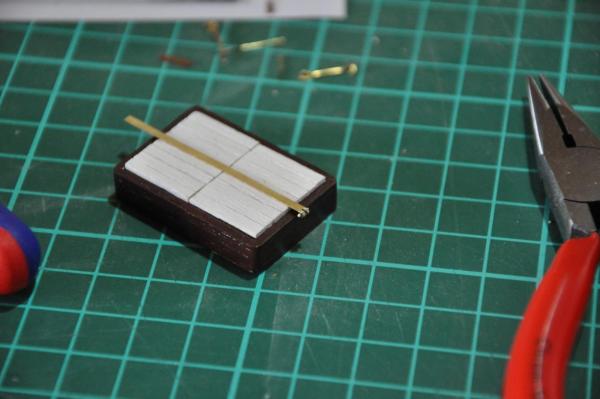
Hi there, here’s what happened since May. It is only very marginal progress but I am posting it anyway, let’s say to keep the momentum Glued the now painted hatches and hatch covers together. Made some test ringbolts in different sizes from brass wire with different diameters. When trying to create the ringbolts like illustrated in Chapelle more or less exactly to scale, they seem too small and the wire too thin. It seems to me that making the ringbolts a bit bigger looks better and adds something to the model even when it is not realism. Here’s a picture of some tests. In the end I went with something like the one on the top (left top when looking straight at it). I liked the thicker, bottom ones but I did not want to overdo it. The one on the top is already too big as it is. Also created the hatch cover bars. Cut the brass sheet with a hobby knife which went well for the brass strips but not so well for the knife Then made the hinges. Since the hinge is wrapped around a wire which is thinner than my smallest pliers I had to wrap the strips around the wire directly. For this, I cut an incision with a Dremel cutting disc, then soldered the hinge to the brass wire and bent it around it. After cutting the wire and sanding, the product looked like this: For the other part of the hinge I used the same strip but cut away the sides and left the middle, then bent it into shape and “hung” it from the wire like this: Then I cut the slots into the strips where the wire loops are going to come through. On the picture below the parts I was going to blacken. Here you can see the cover bars with the hinges and next to it the other parts of the bar which are hooking into the hinge and hanging down the side of the hatch. The rest is wire loops and ringbolts. In the meanwhile I have also blackened the parts (imagine the progress ) but not yet assembled the fish hatches to their final state. Hopefully there will be more soon…


- 127 replies
-
- 3
-
-
- Bluenose
- Billing Boats
- (and 1 more)
-
Not quite sure. I have seen diameters from say 1 to 15 mm. but I bet there is more. There are different types, the hard thin ones (the stuff which used to be around a pack of NiCd cells) and the softer ones which are a bit like elastic band. Have a look in an electronics catalogue, you should find it there. Cheers!
- 396 replies
-
- 5
-
-
- Idea
- Bright Idea
- (and 1 more)
-
Let's just say I trust this stuff more than I would any glue. I have seen it being used to keep the rope ends of a kid's swing together and do away with the sharp ends and after years of (ab)use, rain, sun, frost and heat it was still intact. I have seen it in electric installations older than me and for instance on engines in direct contact with oil and fuel for years and years and still in one piece. Good enough for me In fact, now that I think of it, it could be used to hold things together as well in places where glue is not practical.
- 396 replies
-
- 7
-
-
- Idea
- Bright Idea
- (and 1 more)
-
Well, this kind of shrink tubing is more like plastic than like rubber, isn't it? Especially after heat-shrinking it gets quite hard and stiff. I do not recollect seeing any of the typical disintegration which is typical for rubber. As a reference you can have a look at old electric installations which were secured/insulated/finished with shrink tubing. It is not unbreakable but I have seen very old installations which under adverse circumstances have remained intact. Very good idea!
- 396 replies
-
- 8
-
-
- Idea
- Bright Idea
- (and 1 more)