HOLIDAY DONATION DRIVE - SUPPORT MSW - DO YOUR PART TO KEEP THIS GREAT FORUM GOING! (Only 68 donations so far out of 49,000 members - Can we at least get 100? C'mon guys!)
×


7 Provinces
-
Posts
190 -
Joined
-
Last visited
Content Type
Profiles
Forums
Gallery
Events
Everything posted by 7 Provinces
-
 Thanks Tuffarts! Getting new blocks is on my todo list. Probably will order those from Chuck's company.
 -
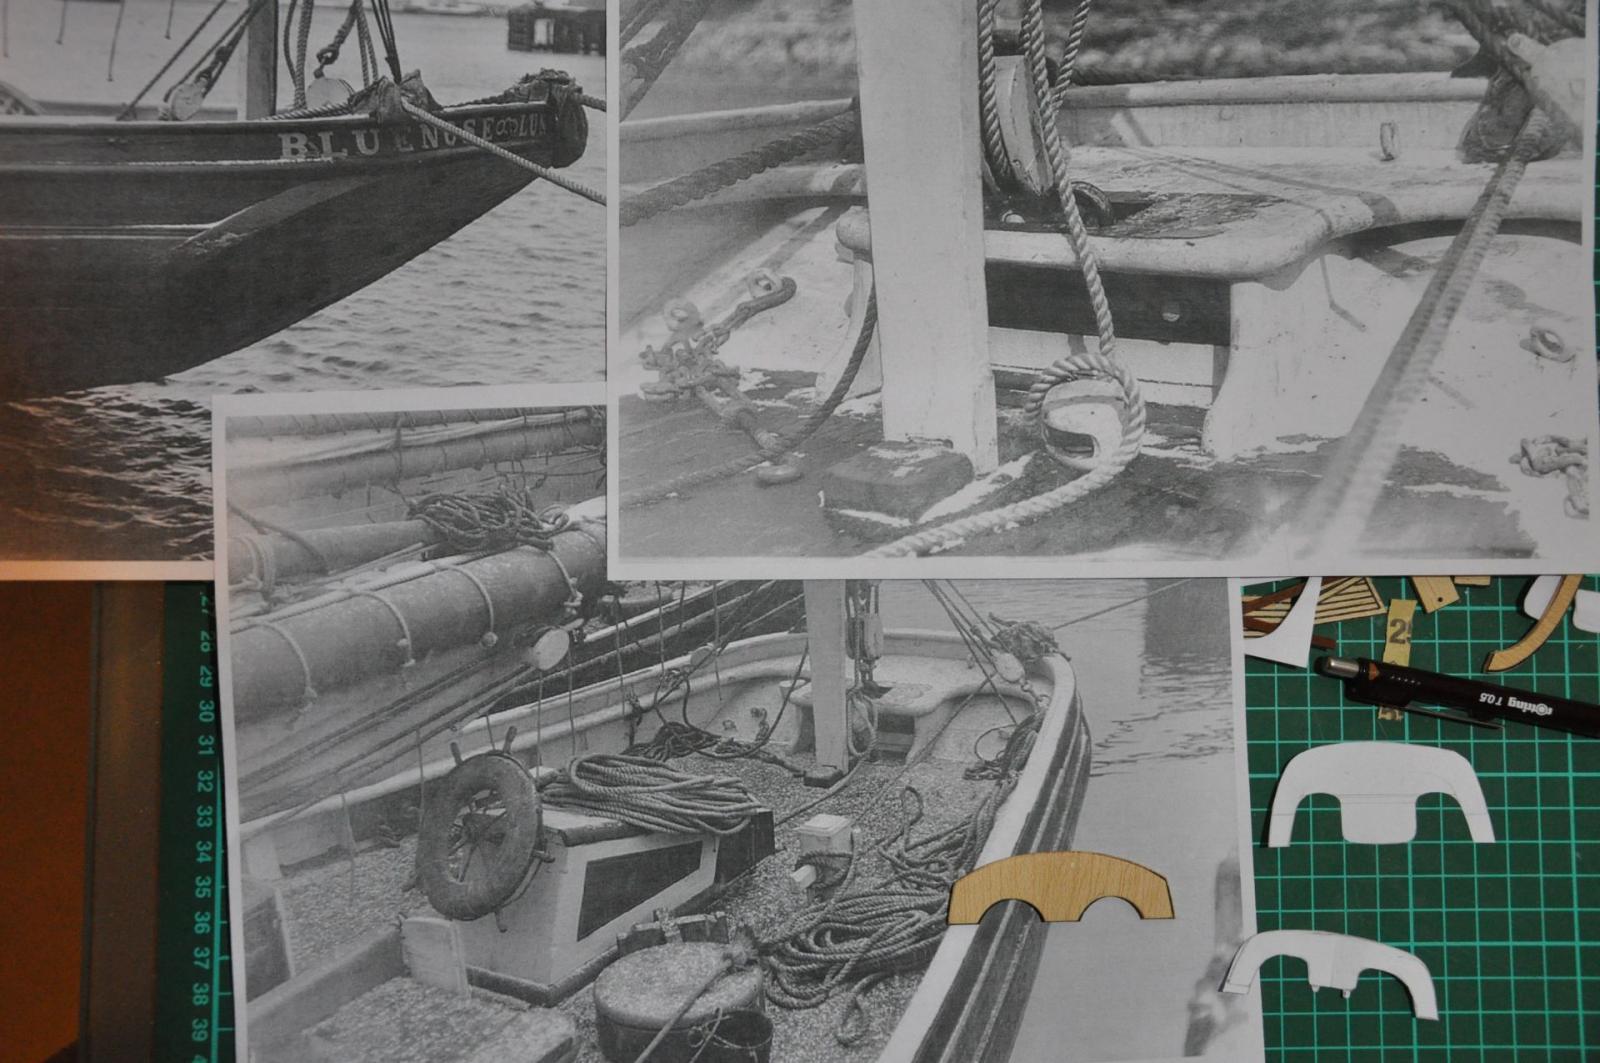
Meanwhile, Howard I. Chapelle's "The American Fishing Schooners" arrived. I find the book interesting yet very complicated. Makes me feel I need to read a few books with basic nautical knowledge first to understand what he is writing about. Also most drawings and plans seem to match the logic and rules of design described in the book, but the photos from the Nova Scotia Archives often tell a different story. Seems that not all schooners were built by the rules, or, maybe more likely, several things were changed, repaired or exchanged over the years on a ship, which leads to the fact that the photographs show a different setup. Just a few examples which come to mind: on the pictures there are no straps on the hatches, only one portlight on the side of the cabin trunk and no windows in the doors, the rrofing of the cabin trunk is different, to name but a few.
-
After ironing the plywood it has straightened out even a little more over night, especially the roof of the cabin trunk. With this I have put the cabin trunk together (the structures on the roof not glued on). The roof does pull the corner up a bit as expected, but this could be overcome when gluing the trunk to the deck. However, this was only a test. As described above the dimensions and details of the cabin trunk are not right so I will build one from scratch.

- 127 replies
-
- 1
-

-
- Bluenose
- Billing Boats
- (and 1 more)
-
Yes Julian, you are probably right. And: the warpage in the roof has miraculously decreased even a bit further over night. I will probably be trying to build this cabin tonight just to see how it goes. But still I will also build a cabin from scratch which will more closely resemble what I see on the pictures. Now that I have better information I just cannot stick to the kit's cabin. Same will apply to the hatches and the forecastle I am afraid. Last weekend I have started to modify the wheelbox as well..
-
The sides are not warped or almost not. I am however afraid that the roof will prove stronger. You are right, the smaller parts are not as affected except for the 42's (I do not know what to call these). Anyway I will build the cabin from scratch due to the size differences so the warpage will not be a problem. As a comparison and just to try it out I will also build the original cabin (or at least the basic structure).
-
Thanks a lot for your input Schnu! I have noticed that the wood that Smartwood33 sells, comes straight from Arkowood... The Swiss post is a bunch of criminals if you ask me. When you order from abroad they tend to sit on it for a week or so in Basel (opening the package to check, they do this as a service for the customs) and charge you around 20 CHF for the "service" plus the import taxes, which can be as low as 5 CHF. Anyway, if the value of the package (including shipping!) is below 62.5 CHF you are safe. But you still might have to wait a week until they opened the package and checked it. Incredible service. Thanks for the other shop's link: I think however that I will try my luck in Zürich, since the french language is not compatible with my mouth As for the plywood: I need to find another solution anyway, since the roof of the cabin is precut and too small/wrong shape. But, for argument's sake (and because I was curious) I took the iron to the wood and tested it. What I found is that with and iron you can quite easily bend wooden strips etc. Just as long as it is one kind of wood. The problem is that plywood is a laminate of different kinds od wood (often) and usually the grain of the layers are in different directions, which is what makes it relatively strong at a low weight. This however makes the process of straightening very hard. If you heat or soak one layer, mostly another layer is affected as well. So, what I tried is I ironed the sheet and it bent the other way. Then I ironed the other side and it bent back. But all the way back, still not straight . So I ironed again and put 10 kgs of weight on it, maiking sure it was flat. After a while I took the weight off and it immediately sprang back to the original shape. The last thing I tried, and this at least partly worked, was to lock one side of the sheet in a vise and iron the other side while pulling it into shape. I held it until it cooled down and this was a partial success; the warping has decreased by about 50%. See the pictures below, the top one is before, the second one is after. I think it would be possible to get a better result with a lot of effort and time, but I did not want to spend so much time on this test.


- 127 replies
-
- 1
-
-
- Bluenose
- Billing Boats
- (and 1 more)
-
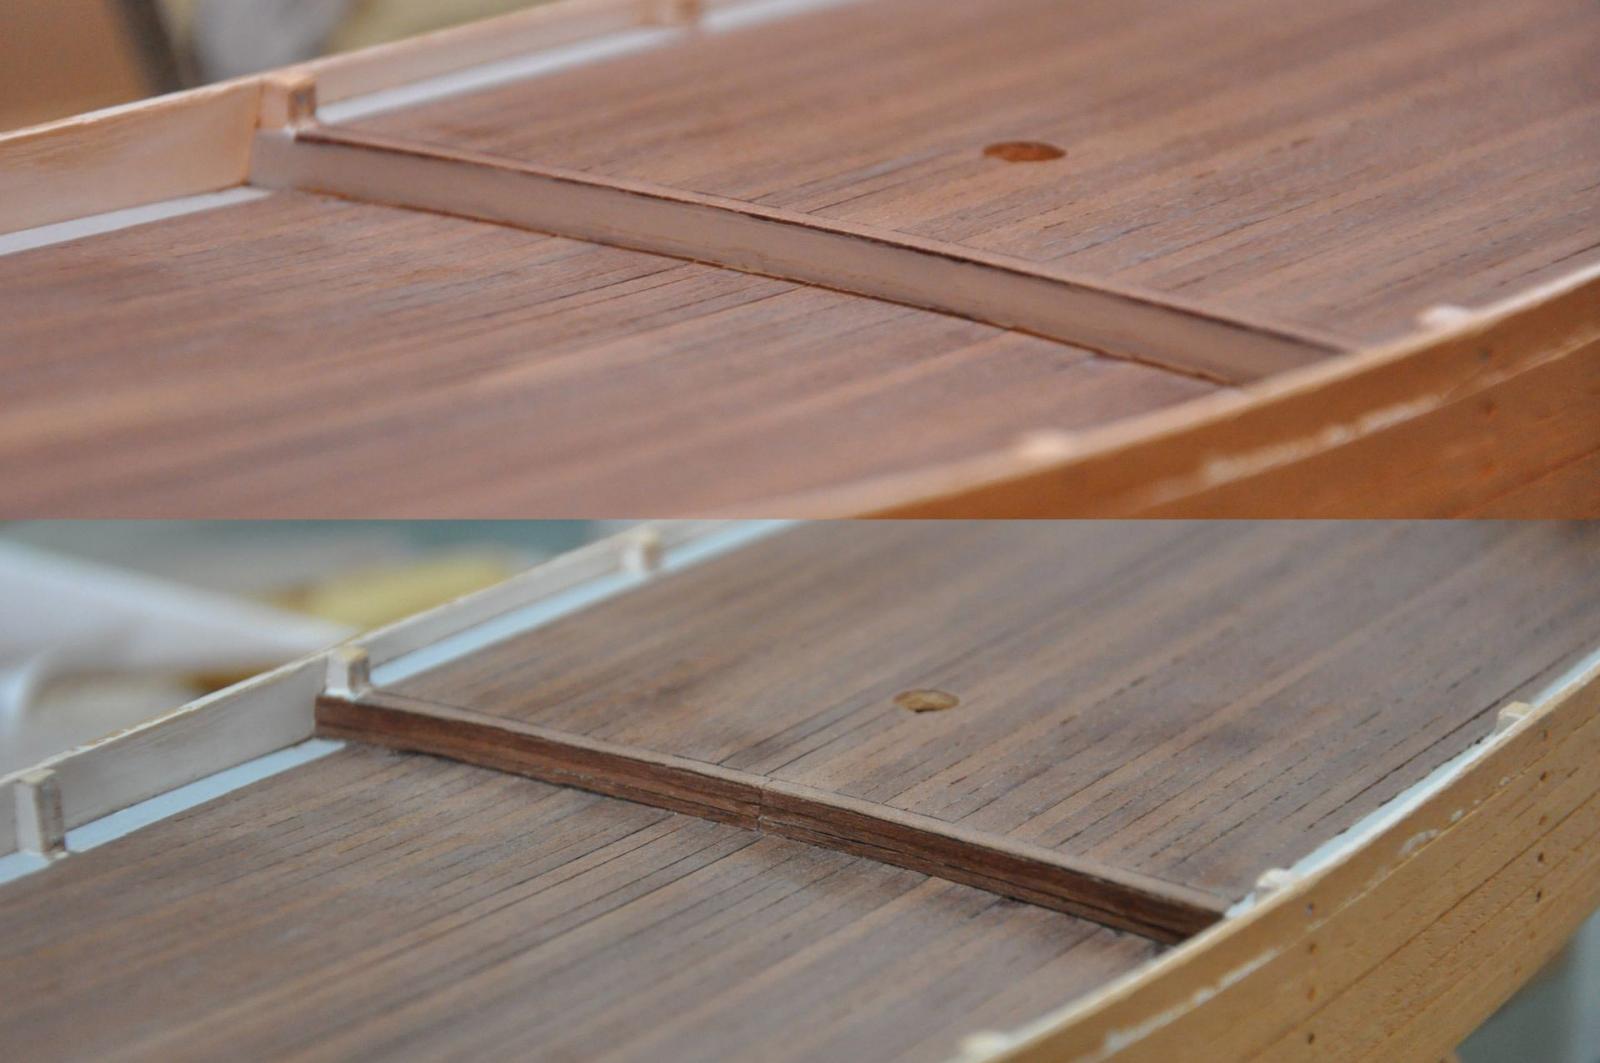
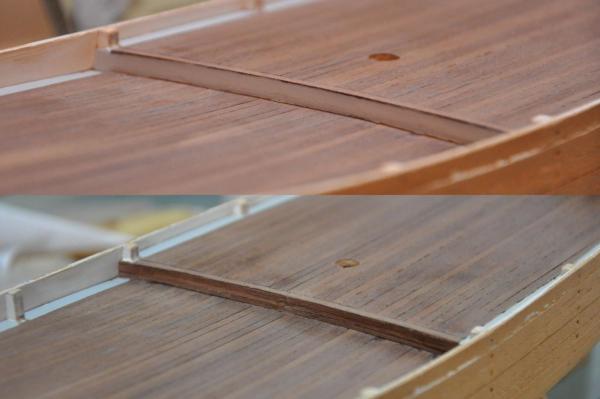
Yesterday evening I was able to do something which had been bugging me for a long time now. Between the foredeck and the aft deck there is a step. The great beam, which is visible between the decks, had been painted grey like the waterways, as per the instructions in the kit. Looking at the Nova Scotia Archive pictures, this is not correct. I assume that this beam was natural, like the waterways and the deck. The visible part of the beam on my model is about 5 mm high, which is a little more than the width of 1,5 deck plank. So I cut some deck planks to length and in halve (laterally) since this also makes the bending easier in this cramped space and it allowed me to glue in three times the same strip per side, which looks better than one wide strip and one narrow strip. See below the before and after pictures:
- 127 replies
-
- 4
-
-
- Bluenose
- Billing Boats
- (and 1 more)
-
Wow great topic. Good thing to get all these ideas together in one thread. I hope to contribute in the future
- 396 replies
-
- 3
-
-
- Idea
- Bright Idea
- (and 1 more)
-
Thanks Schnu for the information. I have visited the websites. I did not find Smartwood, but I think this is Smartwood33 right? This looks quite good. The thing is, I would like to source my wood from a local store when possible, which, it seems, is not. That is a pity since a local store gives you the possibility to check what you buy, compare different products and get advice on which to buy and you can buy only one strip if needed. this is also why I had not looked on ebay yet. But you are right, you can buy the wood much cheaper there. It is a bit tricky though since you are paying for shipping as well which makes buying small amounts not interesting but when buying larger amounts you will have to pay customs, taxes and handling fees at the border, since the offers are all from abroad. I will check out the Bauhaus, but to be honest I fear it is not very different from Hornbach, Obi, Coop Bau & Hobby, etc. which do not sell wood for model buiding (some of the round wood or profiles may be usable though). The plywood they sell is very coarse, not thinner than 3 mm and more suited for hobbying in general than for model ships. Did you already visit Wieser Modellbau in Zürich? It looks promising although I did not find wood in their e-shop amongst all the other materials they sell. I think I will just give them a call and see. No, I did not yet try to iron the wood. I did read some threads on straightening out wood. One interesting article said only to soak the concave side of the wood. My problem is that the wood looks like a helix. So both sides are kind of concave But what the heck, I'll give ironing a try. I'll keep you posted on the results.
-
Schnu, I made this piece from a scrap piece of wood where the warpage is almost too small to see and will (I think) disappear when the piece is glued to the hull. Today I took out the pieces of wood from under the books and weights only to see that they sprang back into the warped form in a matter of minutes. All effort in vain . So now I will have to search for wood. The scrap pieces are not big enough for the cabin and the cabin from the kit does not have the right proportions anyway and is pre-cut so there is nothing I can do, I need to build it from scratch. The main question however is where to get thin wood? Would you happen to know where to get wood for hobby purposes, like 1 or 2 mm thick? I only know where to get balsa (and then only a few sizes and when it is in stock) and I was looking for something more "stable" like plywood, birch, beech, pear, cherry, ... In Switzerland it seems they only sell wood for furniture and construction, not really for modeling If you would know where to buy that it would be a great help. Thanks! Jan-Willem
-
Yes thanks Matija, I already thought it would be the same thing as what you helped Julian with. Thanks for the confirmation, it is really hard to see from the pictures.
-
Thanks Julian, happy New Year to you too, and to all others stopping by Actually this was one of the first things that I noticed wrong in the kit (after the color scheme of course: I mean, gold below the waterline? really?), just by looking at the photographs from the Nova Scotia Archives, which are freely accessible and a very good source in my opinion. Just too bad Mr. McAskill did not take many more pictures..
-
Thanks Matija. Your input already helped: I was able to compare the shape of the part I created in my last post and I have seen from the drawings that the shape of the deck structures are not right in the kit. Further, I found from comparison with the old photos that the basic shape and size of the structures on the plan you sent me seem to be accurate even if some details do not match the photos of the Nova Scotia Archives. I am still waiting for both the Bluenose book and the American Fishing Schooners book, but I will probably use your plan for the shape of the deck structures and the old photos for the detailing.
-
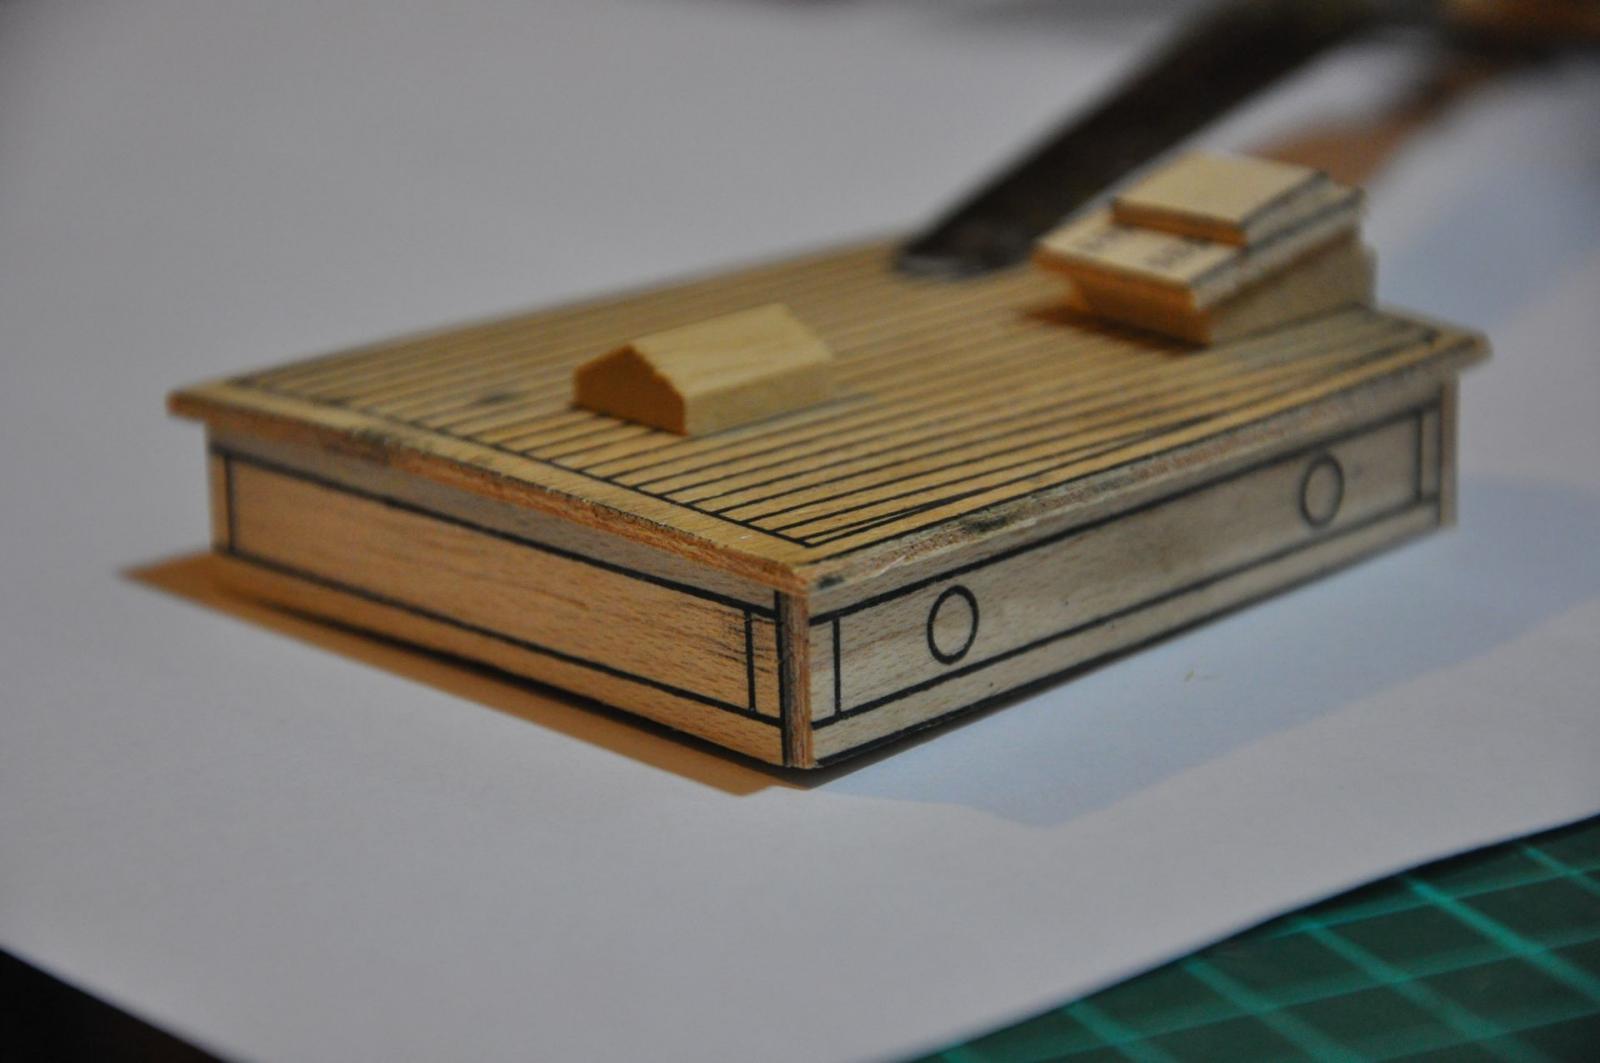
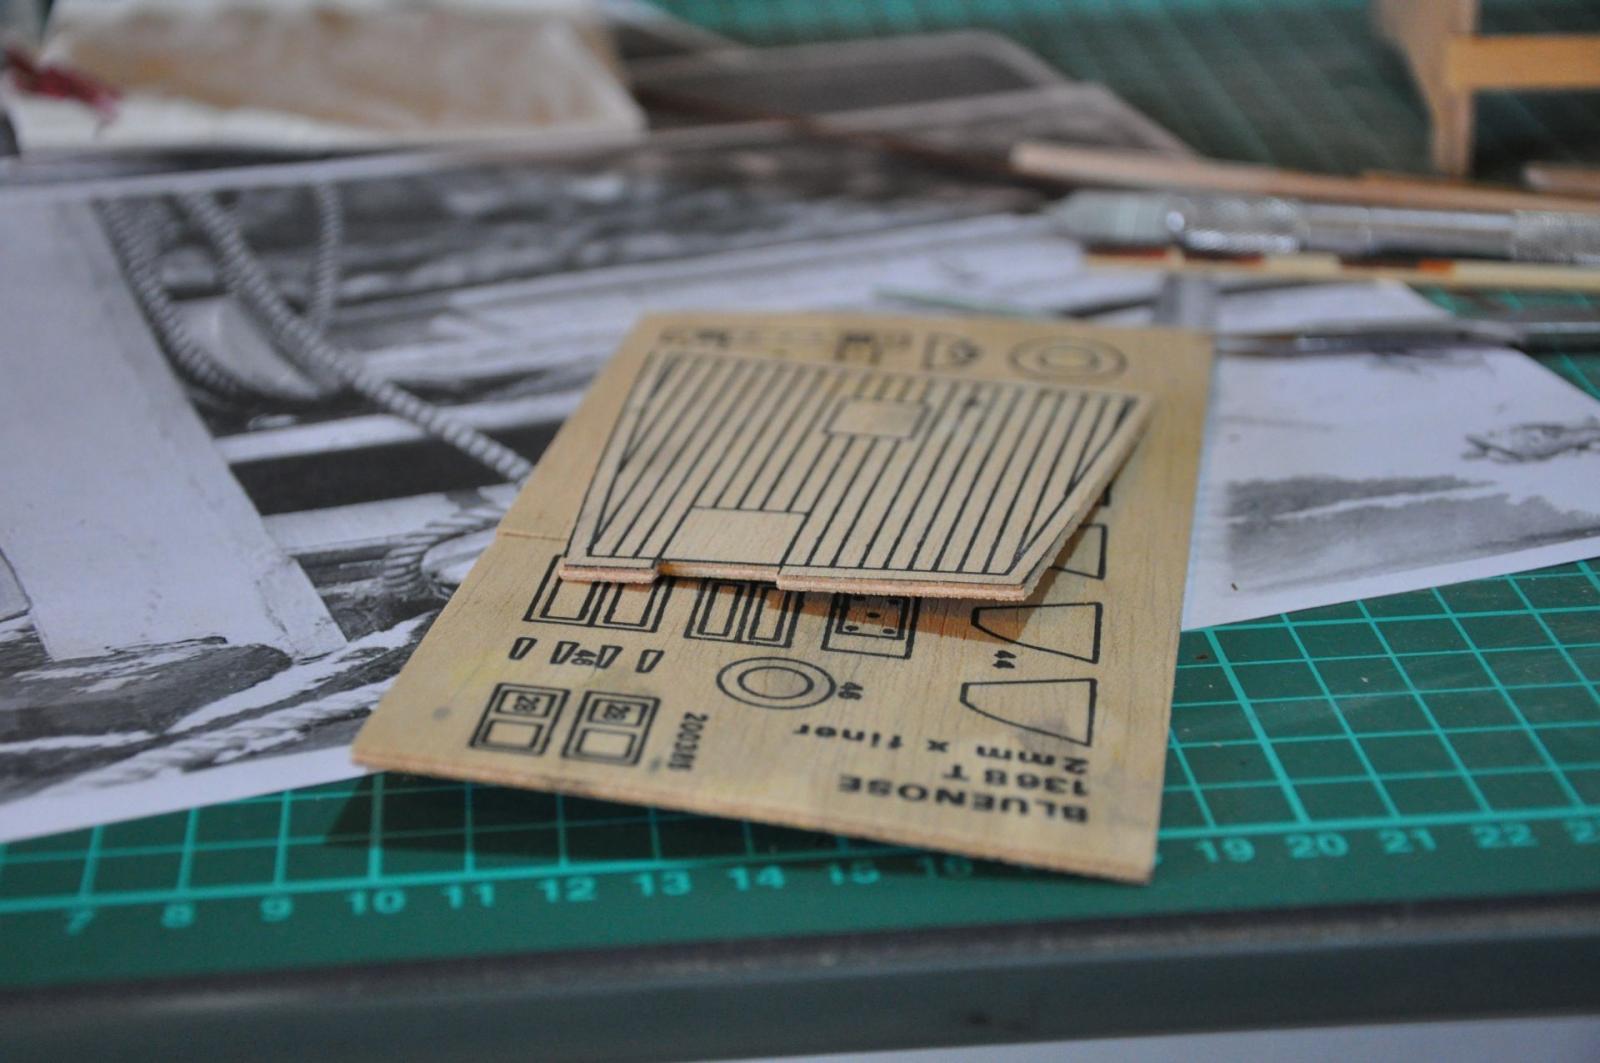
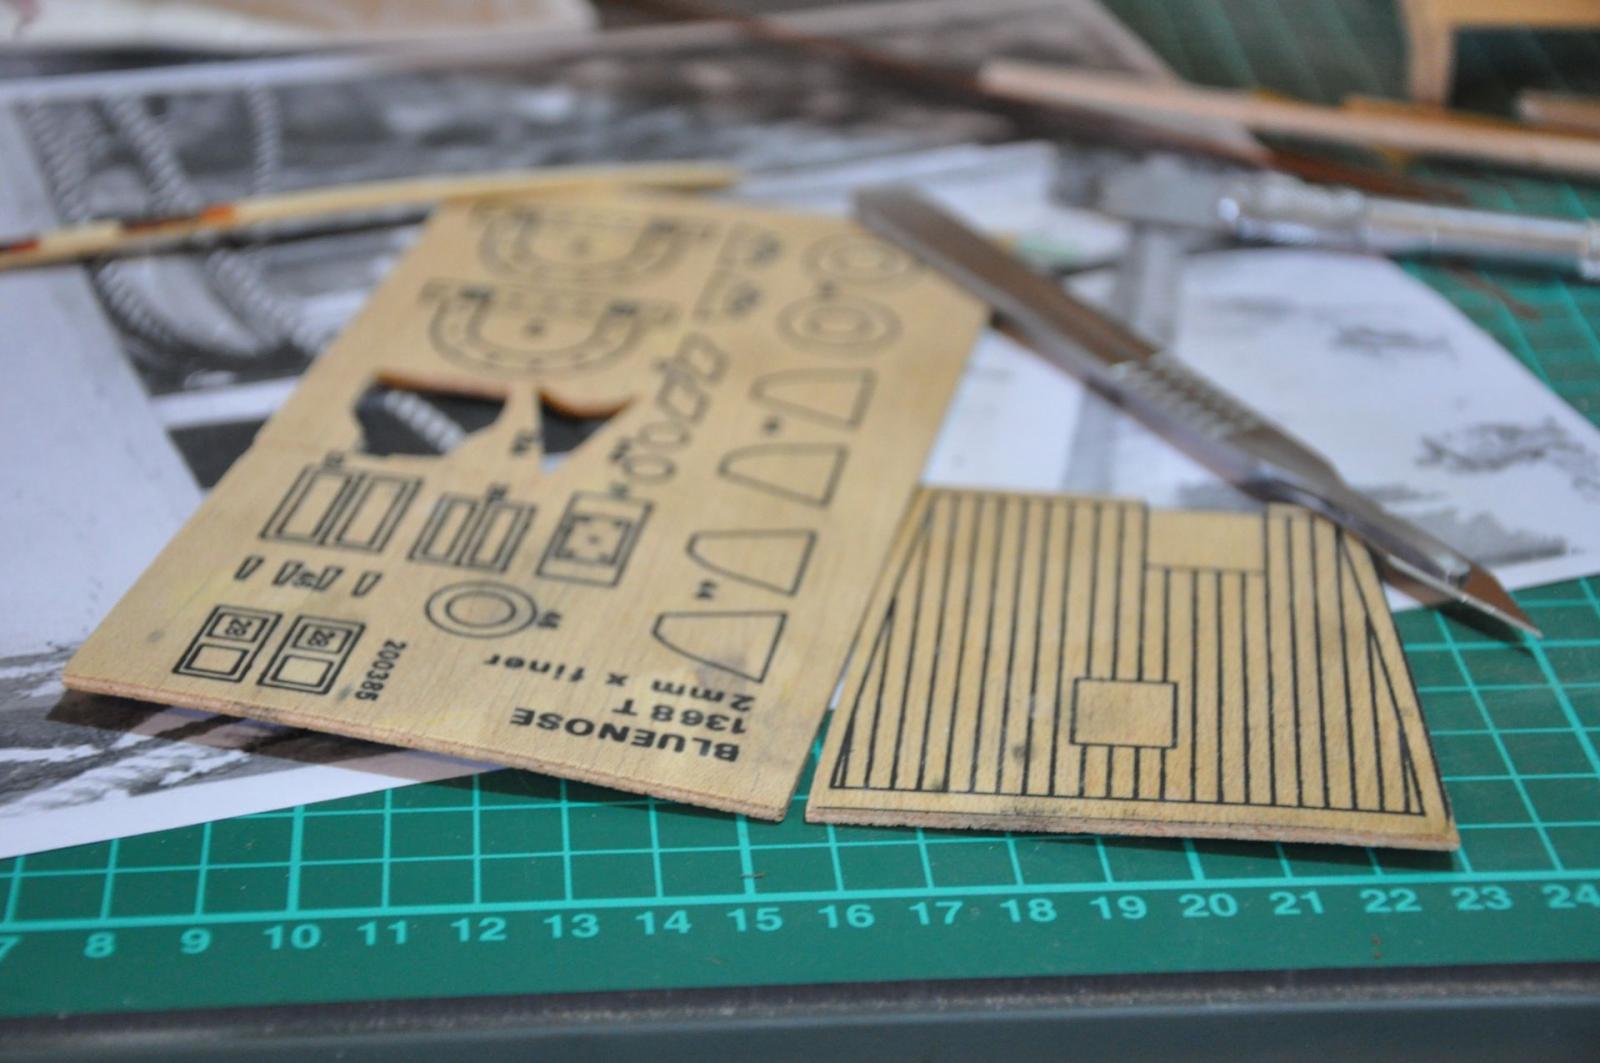
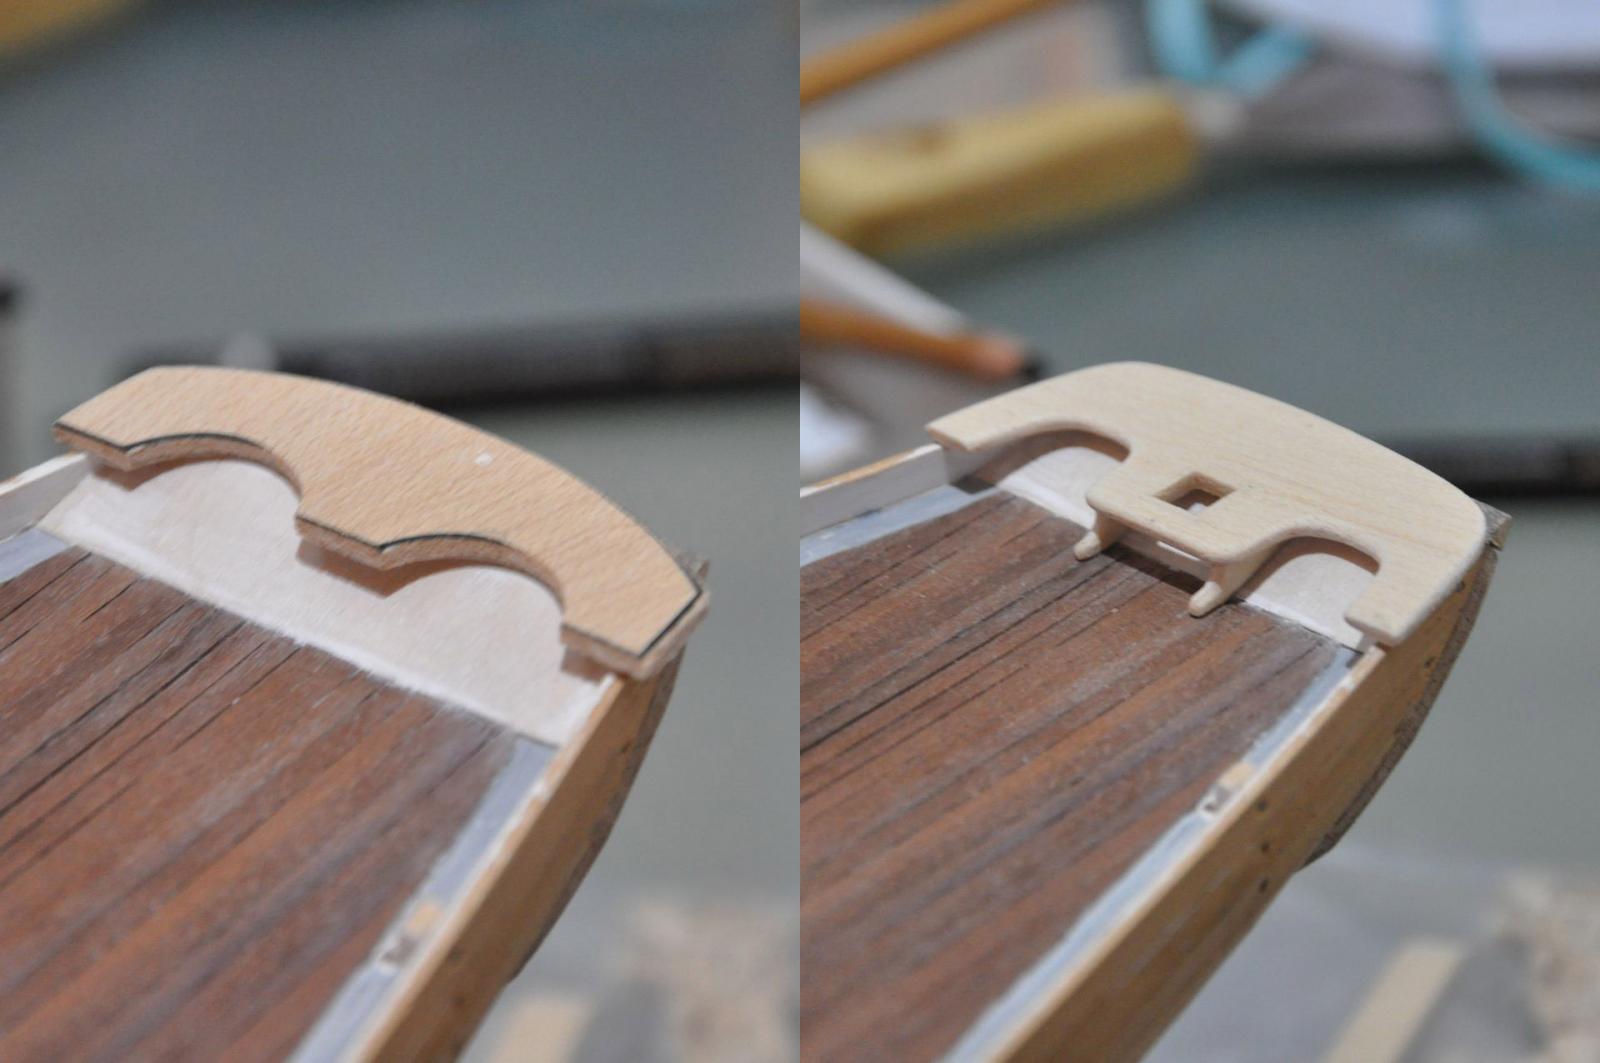
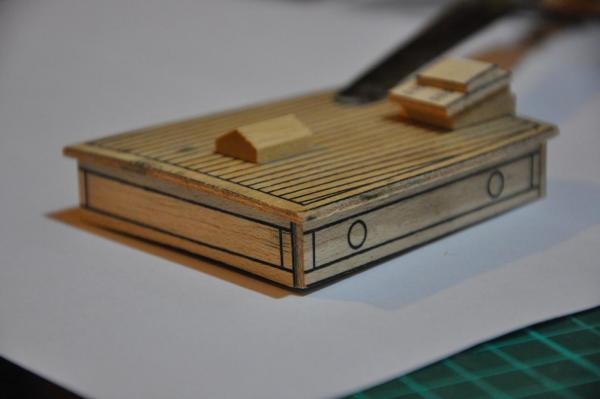
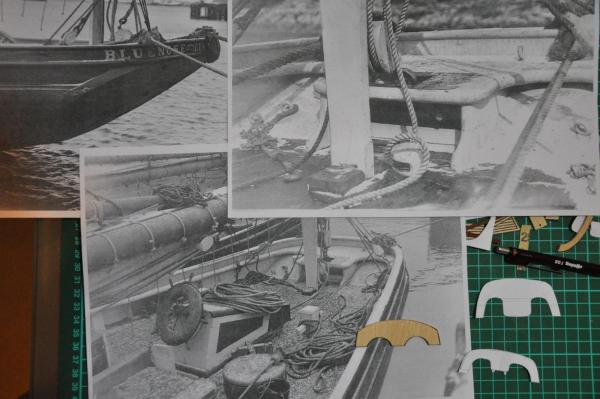
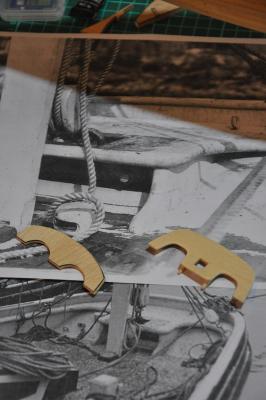
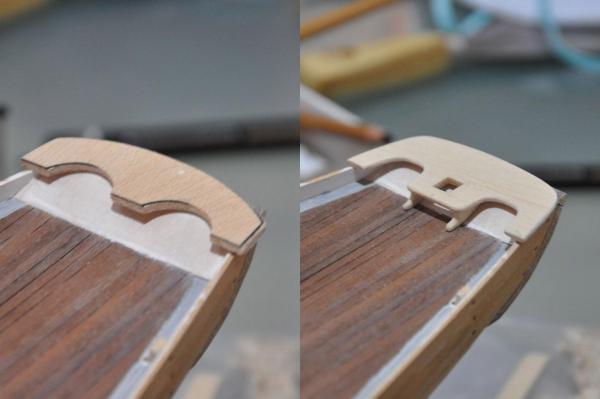
After quite some time of not being able to spend even a minute on my Bluenose, I have finally found some time on the last day of my Christmas holidays to start working on her again. I decided that, before I finish the deck like in my tests I need to cut out the shapes of the deck structures. For which I would need to build the deck structures first. As luck would have it, the 2 mm. plywood from the box on which I find the parts, partly drawn, partly cut, are warped in such a way that I can only use the smallest parts as it is. So I first need to straighten that out. So I soaked the plywood and pressed it under weight only to return the next morning and see that the wood had gotten mildewed. Well, not good of course . So I washed and disinfected the wood and tried again, now adding paper towels to deal with the moist and changing these every few hours or so. I am beginning to think I would be better off building these parts from scratch next time. Waiting for the wood to dry and hopefully have the right shape (flat ) I started to rebuild part 29 from scratch. Part 29 from the kit does not have the right shape (see also my 2nd post, point 3c and picture 5). It does not fit the hull really well and it is not like what I find on pictures of the Bluenose. On this picture you see piece 29 lying on the picture and two possible shapes to replace it with made out of paper just next to it. The bottom shape is more or less drafted from a plan which I received from Matija (thanks Matija) and just above that my own interpretation from looking at the pictures and my model. As you can see I made the middle part much wider since from the pictures this seems to be about 1/3 of the width of the total shape. The result is shown on the pictures below: on the left side the original part, on the right the new part. The first picture shows the parts on the photo as comparison, the second picture shows the parts on the model.
- 127 replies
-
- 2
-
-
- Bluenose
- Billing Boats
- (and 1 more)
-
Did you at least get your powertool for Christmas then?
-
Happy new year Schnu. I hoped to get a lot of work done on my Bluenose but the progress has been very marginal due to other obligations. Unfortunately I am not in school anymore so I have to make time during the weekends mostly. Good to see you back working on your ship again. I hope to see some progress soon
-
I like the way your deck looks julian! Even if it's only a picture, I like the color and the finish. I am sure the real thing looks better still. Makes me think again about the semi-gloss varnish I have planned...
-
Dear Matija, I found your log through Julians log, which I follow (we happen to build the same kit). I am truly amazed by your work and craftsmanship. Keep up the good work, as it is inspiring to look at.
-
Julian, I have no idea either what Billing Boats was thinking. It does not appear in the instructions at all (I just checked, I am not yet at this point with my build ), only on the plans. On the box there is one picture where you can just make it out and there it just appears stained or painted brown. No pins no nothing. On the picture which link I posted yesterday (zoom in!) it seems that the square is cut out and some metal part (a ring?) is partly sticking trough to which a block is attached, just like Bob wrote only you cannot see the cast metal part since the dory is blocking the view. To me this looks much like the construction which I already had a look at when planning to change part 29 of the kit (planned but did not do it yet). Here is the picture which I was looking at for that: http://novascotia.ca/archives/virtual/Bluenose/archives.asp?ID=196&Language= To a total layman as I am this looks to be a very similar contraption. Maybe Bob can shed some light on this?
-
Hi Julian, I have not spent so much time on deck furniture yet, but I kind of assumed there would be pins on top of this structure to tie ropes to. The front mast also has a structure for this if I recollect correctly, though that one looks different. The only picture I can find which shows (part of) this structure would be this: http://novascotia.ca/archives/virtual/Bluenose/archives.asp?ID=201&Language= But I cannot say there is much resemblence. Maybe Bob knows more, from the MS perspective. Other than that I'd say: when it's not there, don't build it
-
Nice progress Chris, I like the grating and the rudder. Your methods of painting the ornaments and staining the wood really seems to work very well to make things look realistic.
-
You're probably better off painting it by hand. AFAIK the scroll work was buff or yellow anyway...
-
Hi Julian I like what you write about the "advantages" of the Billing Boats kit. You are right, it does make you look for answers where you normally would have followed the kit, which is interesting indeed. Amongst all the downsides of the kit (of which most could be easily corrected in a re-issue IMHO), you are fully right in saying that it is anenjoyable build indeed (to be honest I cannot compare to other kits yet). And yes, it is a ship with beautiful lines. When glueing cardboard always be careful with water-based glue (like the white glue). I haven't tried this, but I would probably use a good universal hobby glue. In Europe this would for instance be UHU Hart, but I have no idea if it is available in Canada. I would probably carefully roughen up the area of paint where the glue is going to be. You could do so by glueing some sandpaper to a stick with the same width as your cardboard strips and either use a ruler to run the stick along or cover the parts not to be sanded with tape. anyway, she's looking nice! Have you decided what to do with the deck yet? Do I see this right, you sanded the deck but did not varnish yet?
-
Thanks David. Yes I suppose you are right and maybe I should not even be thinking of doing this. Still I have seen some nice examples on this forum which made me want to do this as well . No really, I kinda like the looks of it. But you are right, realistically one would probably not see any of this in this scale and I should let the idea rest probably... Well I haven't been able to work on her lately and I think this situation will continue for another few weeks, so: time to reflect and think about what I want to do. I have samples now to base my decision on.
-
Thanks schnu! The pencils are PITT CHARCOAL by Faber Castell, you should be able to get them in a shop where they sell art equipment. I also did not know these before but came across them in search for a pencil which was "as black as possible" for my caulking. You won't find any blacker than charcoal I would do a lot different with my ship as well if I had to start over. But that is for a next project. I can only say that it's because of this forum that I learned so many new things. I am by far not the first one to experiment or write about decks here , but reading the other contributions and seeing what other do let's say "inspired me" to go beyond what the manual says (that easy ) and do a bit of scratch building and testing myself.. And that makes the hobby that much more interesting!
- 127 replies
-
- 1
-
-
- Bluenose
- Billing Boats
- (and 1 more)