
HOLIDAY DONATION DRIVE - SUPPORT MSW - DO YOUR PART TO KEEP THIS GREAT FORUM GOING! (78 donations so far out of 49,000 members - C'mon guys!)
×


popeye the sailor
-
Posts
16,007 -
Joined
-
Last visited
Content Type
Profiles
Forums
Gallery
Events
Everything posted by popeye the sailor
-
 nice job so far Jack........I don't do enough armor. am I rubbing off on you?...........see.....it's kinda fun to research the production dates of older models. it can get interesting when you can trace the same kit from company to company.........the 1:72 Stuka kits I built has been produced by at least three different companies! I've seen this kit on oldmodelkits..........Alan has quite a selection to choose from I look on scale Hobbist to check out the time lines. it shows how many time the molds changed hands look'in good !
 -
that is a splendid model Jack! very well done I do believe there is a site where you can get 'eye decals'..............I recall seeing them, but I can't place where {no pun}. a good place to start would be military figures.
-
Scalehobbist is in Nashua.........they have a pretty good selection. I was just looking at your new build, and I saw the others on the site, but did not see the guy with the cart. perhaps he's shown in another section. I'll bookmark the site.....thanks!
-
nice work! gee, you could do a 'Walking Dead' scenario with these guys. very nice work indeed!
-
I've seen the old Aurora figures around..........and Atlantis is beginning to reproduce some of the old animal kits. but I've never heard of these kits..........truly off the beaten path very nice job !
-
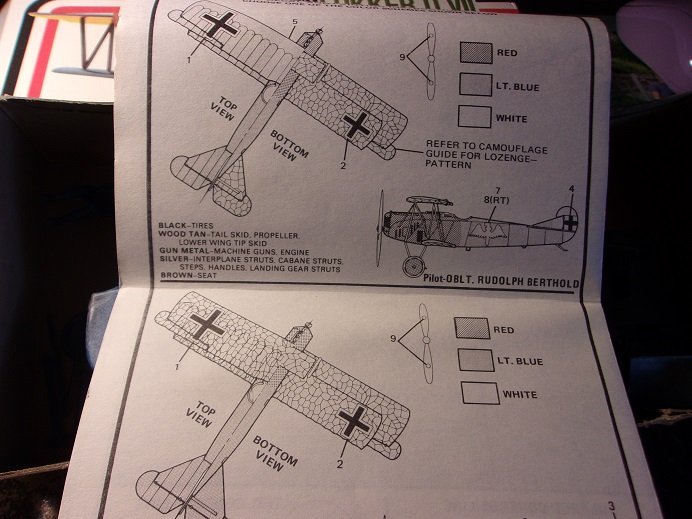
hi all.........thank you for the interest I also want to thank whoever changed the title, but I have to get a few things for it before I start. I thought this to be a method too juicy to ignore. this scheme has been done before.......I'm not uncovering something new. I want to go over the directions.......answering your comments as I go. for starters Egilman......correct sir, there are multiple camo patterns used. there are kits out there that even supply the covering {not sure what they are made of} to add the authenticity to the model. decals can be purchased and companies like Eduards, Roden and Wingnut, even include them in their kits. I've seen some of these kits.........a bit expensive for my taste {but the subjects are beautiful}. as is mentioned in the Aurora directions, the upper surfaces and the lower surfaces are two different planes. the upper plane is the darker surface. in a four-color camo scheme, the base color is medium tan, with the following colors greenish orchid, light olive, and dark blue/gray. for the lower plane, which is done in lighter colors, the base color is light mustard, followed by forest green, pale green/pink, and dark green/purple. keen to note is that there was no rhyme or reason........if they ran out of a roll, another roll was used, they didn't bother to match up the colors, creating a visible seam. adding a primer color under decals sounds like a very good idea. I'm not sure how I'm going to do this. thanks for the head's up believe it or not Ken........that is the method Aurora directs the modeler to use. only the lower plane needs to be done for this model. so, this will be the underwings, the underside of the stabilizer, and the underside of the fuselage. trapping carbon paper between the model parts and the template, the designs are traced onto the parts and painted by hand afterwards. one would need a fine point for the tracing........would transfer the lines to the parts, but not damage the template. for an added bit of detail, the directions mention that the wing and stabilizer ailerons would be installed after the wings were built, so alteration of the pattern position should be considered. I might try and import the template into the decal maker I have. I can also try photo shop. one hurdle I see would be the color spectrum that each one of these programs use. the colors might not be exactly what the directions specified. an alter though I have, is that the dark blue/gray, pale green/pink, and dark green/purple are either/or colors....could be one or the other. this definitely would open the door to a camo scheme consisting of several colors..........but I'm not a color counter, and to say that I've seen it, I cannot say. for those who have done this, my hat's off to you.........I have been wanting to try this, seeing that this camo is quite prominent in all the pictures I've seen. one does not need to be a Picaso, the directions state. the overall look of the camo will hide small goofs thank you, folks, for your well wishes and concerns over our recent setback here at the homestead. out of eight rooms {including the bathroom}, six of them have been affected in one way or another. I haven't seen it, but I hear that the third floor is in pretty tough shape! I gave the gent on second floor credit for lessening the damage to our apartment...........that guy {even though he is an avid pot smoker}, was like a one-armed paper hanger in his efforts to catch the water onslaught with buckets and whatever would hold water. third floor did absolutely nothing....they just sat back and watched! they were moving anyway, and they did so the day the demo work began in their apartment. second floor have no recourse, being section eight.........their rent is shared by the state, and they have no renter's insurance. we on the other hands are limited as well. even though we have renter's insurance, we would end up paying out more to relocate, and to remain here, we would have to pay the rent here to keep it. then I heard that he told his insurance company about the vacancy on third floor, and they are going to pay him two months' rent for 'loss of use'. he has been urging us to relocate, and this makes me suspicious that he would try and do the same to us. we are not going to pay one dollar more on something that we did not cause, nor will we sit back and watch him make money over it either. while he states that it's not his fault either, he is the landlord and should have control on the Maintenace of his property. preventative maintenance is important too! there is so much I can go into, but I don't want to cause retaliation at this point, so we will stay for the time being and see what happens. I fondly refer to the place as Kruger's funhouse
-
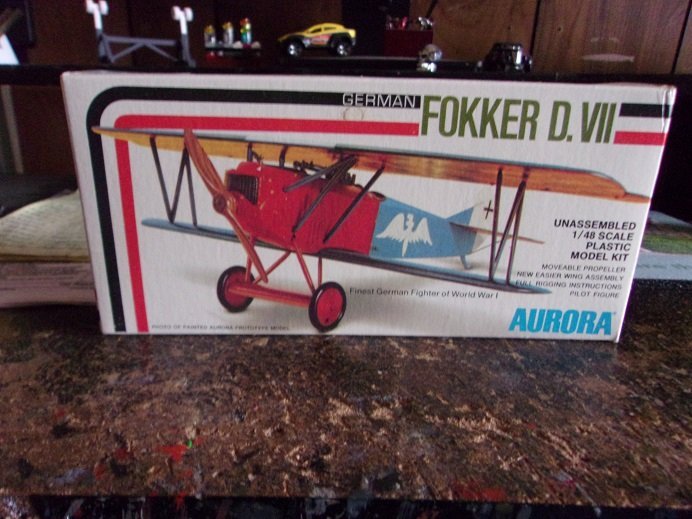
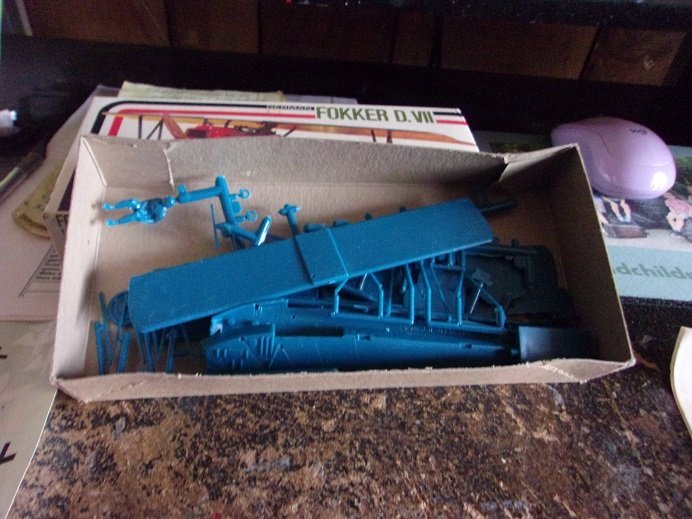
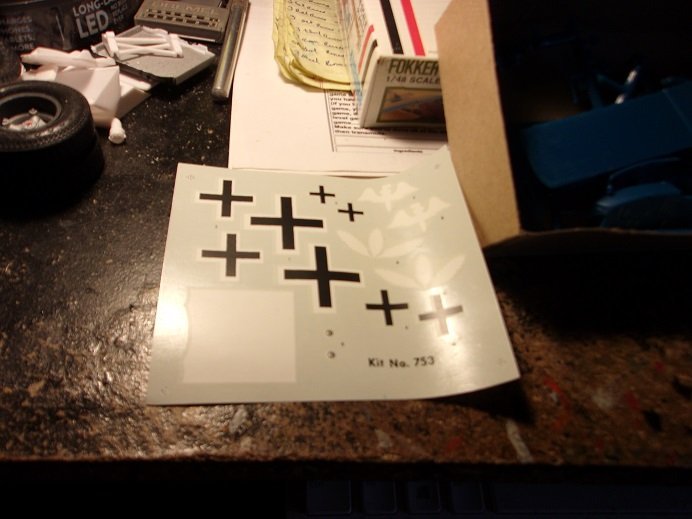
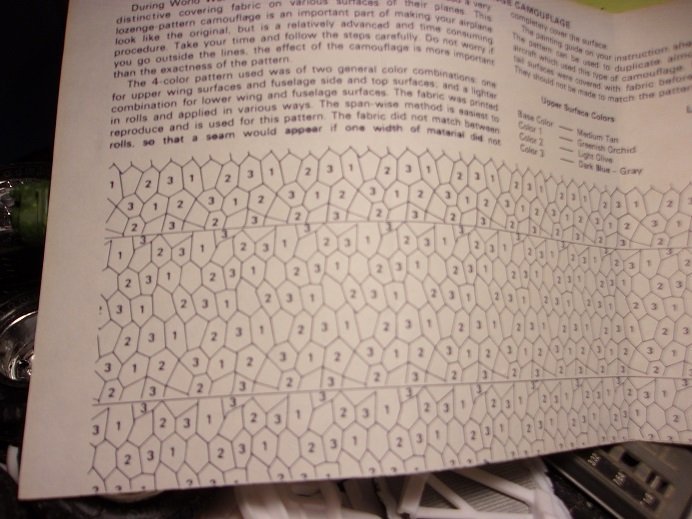
hi all........it's been a while since I last contributed anything. the apartment is still in disarray since we got flooded in December. for those just tuning in, we had a huge rainstorm in December........the roof peeled in the wind and sent water into all three floors of the apartment house. we are on the first floor, so we suffered a lot less than the other floors. so at this time, wall are torn open.......the hobby room is empty. I even had to put away the table in the computer room. leading up to this, I was slowly working on another ship.........of course it got put on hold, but I hope to start posting on that one soon {quite a journey to go on it}. my desk seems to be the only surface I have to work with..........nothing new about that I got a few models this past Christmas.........a Japanese war ship, couple of cars.....another B 25 {monogram}........and this little ditty, an old Aurora kit {my love for these old German birds proceeds me}. the kit was produced back in 1976. it depicts Rudolph Berthold's plane, likely when he was in Jasta 18. he and a comrade named Hans Muller came from Jasta 15 - 1917.........Berthold was promoted to commander. by 1918, he transferred and August Raben took over. interesting turn of events over there........I would need to find the rest of my notes. both of these commanders adopted the raven as their insignia. anyway........the subject here is the lozenge camo that these planes wore when they rolled off the assembly line. when they got to the field, they were painted in the squadron colors. Berthold's Boys {what they called their squadron} was painted in blue and red. Rabin's Ravens, as August called his squad, was done in red and white. also, each pilot could add a bit of artwork to designate their identity. what didn't get decorated or painted over, usually remained in the lozenge camo. the kit is molded in blue plastic.......likely a move by the manufacturer to aide the modeler along with the painting. nice, but I would have been happier if the model was molded in white.........gonna be tough to cover over this blue......let alone the shade of blue the decals..... I have a photo from Pheon decals covering both squadrons. the crust of the biscuit lies here.......the diagram for the lozenge camo pattern......... the sheet is about ten inches long.......the wing span of the model is 7 1/2 inches. I found it interesting that older kits, this level of detail was explored. I will get into the directions a bit later........fot the moment, gotta go

- 6 replies
-
- 13
-

-
that looks to be one busy model! I have a small collection of Billings catalogs and I've not seen one pictured. {you've peaked my interest } where did you find the drawings? look'in forward in seeing your progress!
- 299 replies
-
- 6
-
-
- lightship
- Feuerschiff Elbe 1
- (and 1 more)
-
hey there Andy........your diorama is coming along nicely reading your ideas with the figures, I had the thought about just embedding the bases in the foam. but after seeing how rough the foam was after sculpting out the mud holes, I see now it would be a terrible idea. look'in forward in seeing this all come together great job thus far!
-
one thing I forgot to mention.........once you print the decals, they need to be sprayed with a product called decal bonder, which is sold by Testor's as well.
-
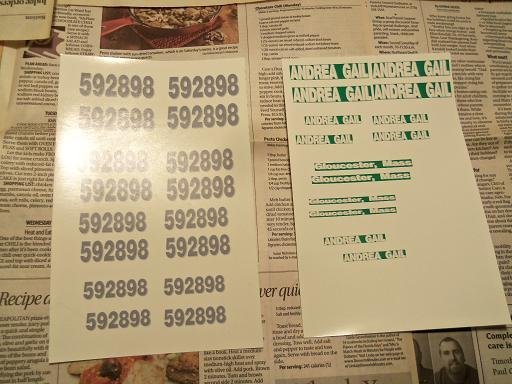
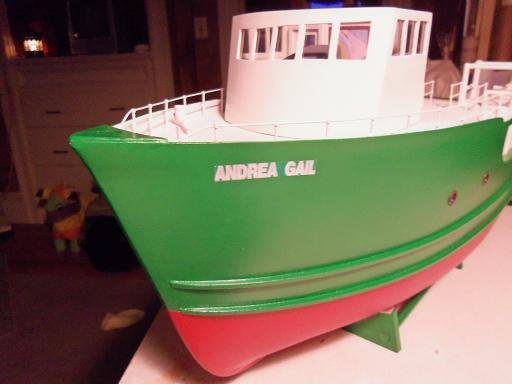
I ran into the same thing when I built the Andrea Gail. I had bought the Testor's 'Decal it' program: DECAL-SYSTEM with this program, you can make decals from the list they supply, but with the add on for it, you can import graphics and print them. using white decal paper, I made up the name and transom decals. since the A.G. was painted in Emerald Green, I was able to change the background color to blend in with the hull. colors can be changed to anything in the spectrum, as long as your printer can handle it. at the time I did this, the only printers I knew of that could do white, were the alps printers. very few printers on the market were non cartridge printers. many new ones have come out since then. paint shop can do this as well.........I'm not sure of the color spectrum though, but it is a little harder to gauge the sizing of the decal. metallic colors can't be done with either program hope this helps you.......black isn't too hard to deal with
-
other builds in the same ship configuration and type may also give you ideas. if your new to the medium, ideas are the basis for creativity. you'll find that in some kits, the way they show to assemble aspects of the model may not be the best way to accomplish the task........I have found this in kits I've built in the past. starting a build log on your project is a good thing too.........other folk will get a visual of your progress and issues, and may be able to suggest and share ideas they might have used.
- 28 replies
-
- 1
-
-
- artesania latina
- constellation
- (and 1 more)
-
hi there I've not built this model, but I've done a few like it. you would use the thicker strips to plank the hull. the thinner strips would be for the outer hull.......you must need to double plank the hull. are the darker strips thin as well.....if so, they are likely what you must use for the hull. the light colored thin stuff would be for planking the deck. after laying it, you can stain it to whatever color you prefer.
- 28 replies
-
- 1
-
-
- artesania latina
- constellation
- (and 1 more)
-
don't listen to that guy...........you did one hell of a good job on it! very nicely done!
-
such an interesting model Yves............your making me want to pull out my B&M snowplow ! so nice to see some train builds so much detail...........superb!
-
very nice work Jav.......the choice of wood you used eye catching {especially the second one} nice selections of planes too........how many are in there?
-
The AMX-13 project by RGL - Heller - 1/35
popeye the sailor replied to RGL's topic in Non-ship/categorised builds
nice to see these rare kits....they look so cool! great job with the detail........Awesome! -
hello to all! nice to see a few new folks looking in....don't be afraid giving insight....that's what MSW is all about it's you new folk that come to the table with different ways of doing stuff unfortunately, I don't have anything new to report, but I've still been busy. you ought to post a picture of one of your flat cars with trailers on it Ken. going out on a limb here, but this trailer might be suited with G scale.......perhaps a bit larger, if there is such a scale I don't believe there were 53 foot trailers back then........I think the largest would have been a 48'. when I started at Wally, we had 48' and 53' trailers. they used the 48' trailer for locations that were tight on space.........53' for everything else. Marcy, New York had the 48' trailers that had air hook ups and electrical in the buck plate {rear}..........I forget the term, but two trailers could be hooked together. browsing through web sites, I've found that many back in the day, used the 48' as a subject.......I believe AMT had a kit featuring two pup trailers {I think they were only 27'}. tankers, flatbeds, dry van, reefers.......maybe a couple others. quite a few of them are old kits...........I've seen very few 53' trailer kits though......odd?!? the 'Smokey and the Bandit' trailer being a prime example thanks again for the good vibes.......sorry about not looking in sooner. I should have something soon
-
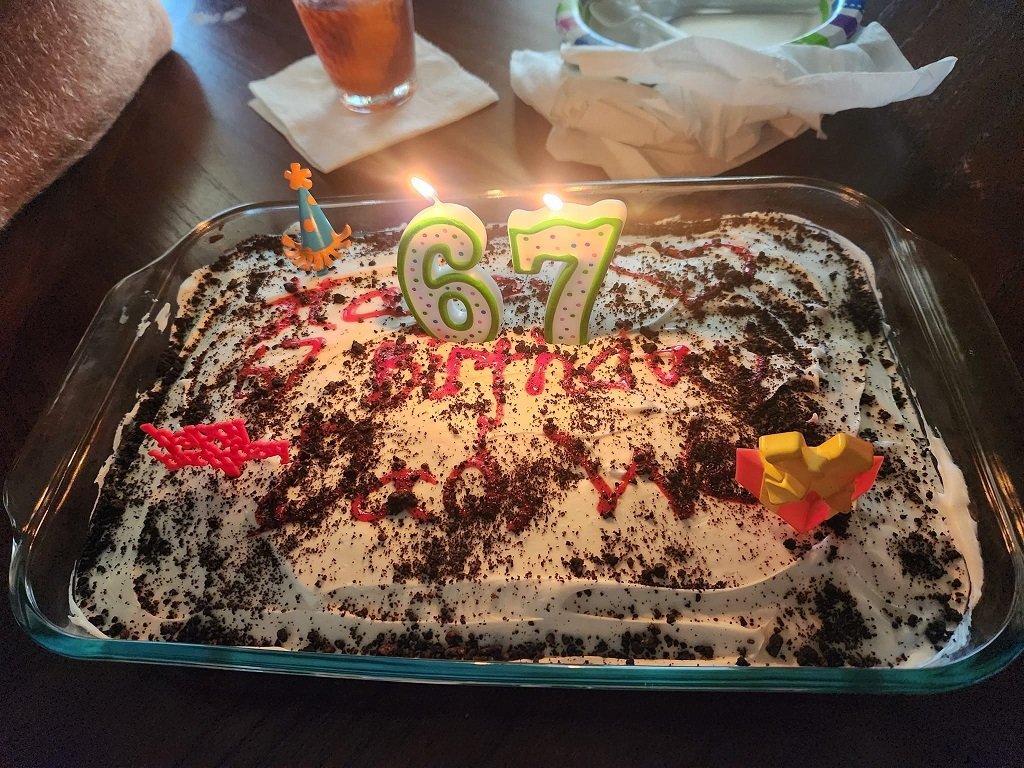
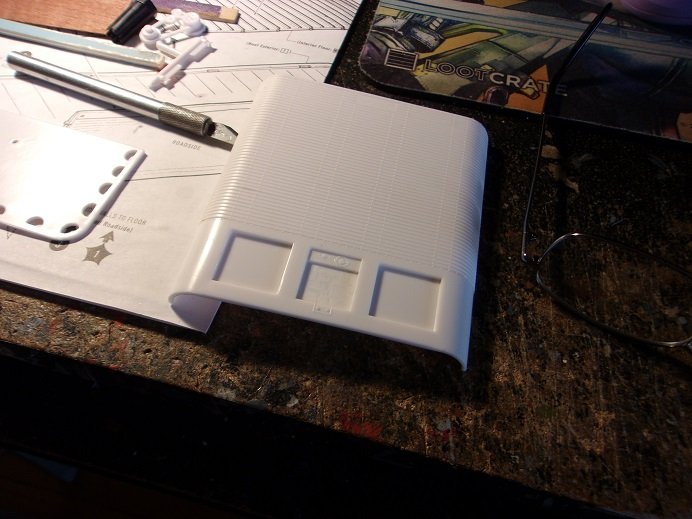
hey there folks! finally, I get to pop in to report an update on the project, as well as what I've been up to. in short, my health is still good......made a major improvement on the leg issues, but one 'small' issue is yet to be tested {I'll leave that one up to the imagination }. the Murano is inspected and no reappearance of the check engine light..........I am soooooooo stoked! now to take care of a couple more things I want to do, before 'ole man winter shows up. another birthday came and went...... it's all hype folks..............67 isn't so bad! I hope I feel the same when these numbers are reversed! had a very good day. so, this brings us to the update.............it's not super huge, but time allowed me to tinker, so I'm not complaining. I'm not really liking windows 10..........I can't seem to do thing I used to do with windows 8. the update begins with painting around the front edges of the underside, and installing the approach plate. I will wait to add the kingpin until later, for fear of knocking it off. then I took a look at the tandem dolly and what I would need to do, to install the stop bars. there is one for the back too, that I will need to drill holes for. the approach plate and the front apron were masked off and painted in the under carriage gray. to add the front wall, I had to double up on the posts {ribs}, in order to cover the abnormalities. I had to allow for how the part was molded. the inner radius on both sides and along the top were painted aluminum, since these areas would be visible. the bottom wood panel was added, along with the scuff liner. molding was added to separate the panel to create a top and bottom. the use of this molding is optional.........some manufacturers don't use it. for those who do, when repairs are made and plywood is replaced, if it is damaged, some techs will cut out the bad part and put the replacement panel up without it. the nice thing about adding this interior detail, is I don't have to be concerned with how it looks. heck, I might even add in some graffiti, but leave out some of the colorful stuff I've seen. EG/example: 'for a good time call.....................' I'm debating whether to hit this with a flat lacquer. it's really flat and natural as it is, but I will need to add some color to the floor {blend in some grime, drybrush}. the landing gear was the next aspect to look at. I'm going to show the model with the legs lowered.........the other one I will do with them raised and attached to the tractor. I will do the interior differently too. the wheels that are seen on these legs is an early version. it was thought to be a smart idea, in the event that the trailer was moved without hooking up to a tractor, or it was jostled while being back under by one. I'm sure there were many scenarios where the use of wheels would be a plus. modern trailers utilize a simple plate, or a saucer {or square} dish called a sand shoe. wheels would often sink into bare ground and would need to either be set on pavement or cement surfaces {square or otherwise}. the sand shoe changed all that and made the trailer more 'all terrain'. to arrest the wheels in place so they wouldn't fall off, they either used a bolt pin, or a large pin was driven through the axle. since trying to emulate a bolt type fastening was impossible for me to do, I went for the pin idea. holes were drilled through the axles and brass rod was inserted through them after the wheel was put in place. with this done..........it's time for paint. I hope to have more for you soon. I want to get some paint on the body, and get the roof on.


-
love it! the beauty of this is the dust issue..............I think you solved it! great job!
-
awesome looking model!..............so clean and well detailed! sweet! 🤩
-
thanks for look'in in gents. I've made a little more progress and should have more for you soon here it is..........August. it's my birth month..........another year older I have a doctor's appointment next week. I wonder what the topics will be this time. so far............no check engine light, so I must have done something right. inspection should be easy peasy
-
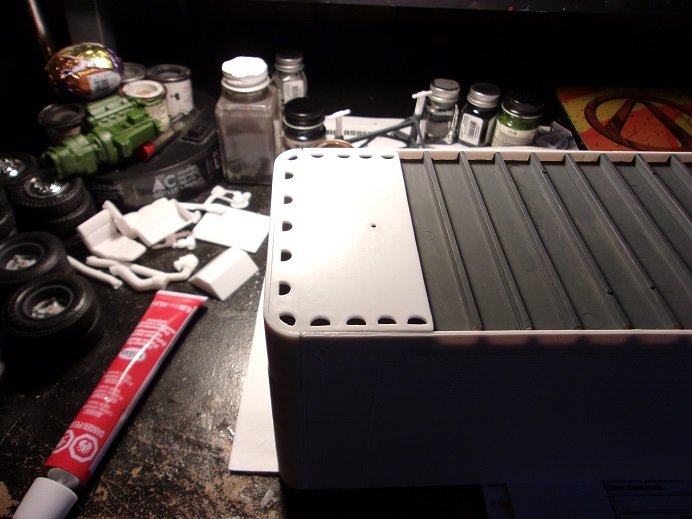
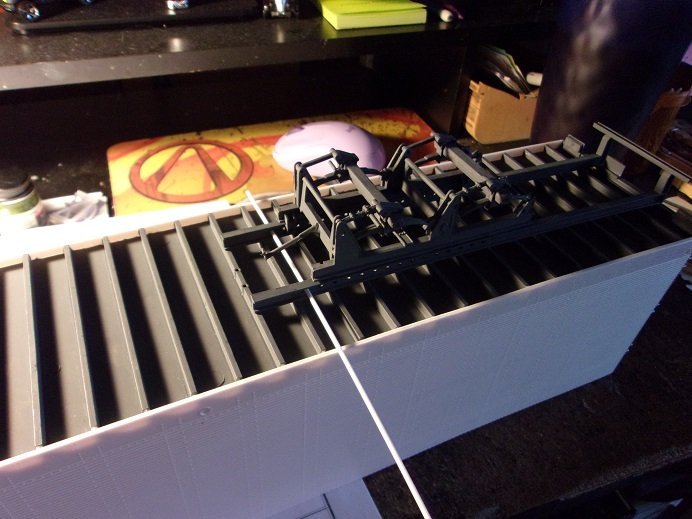
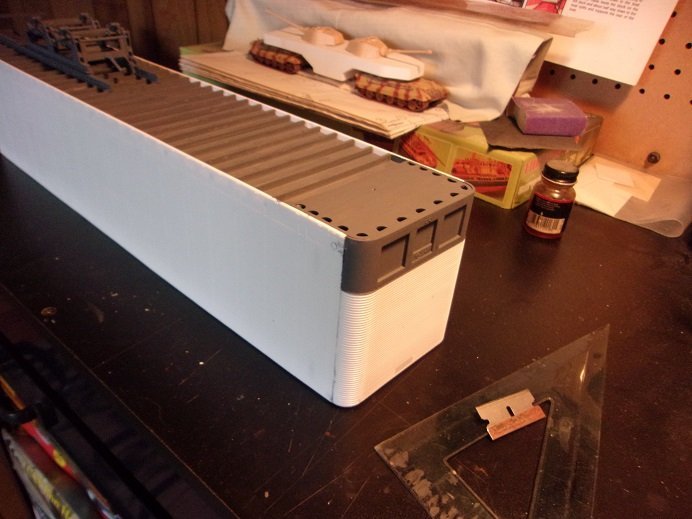
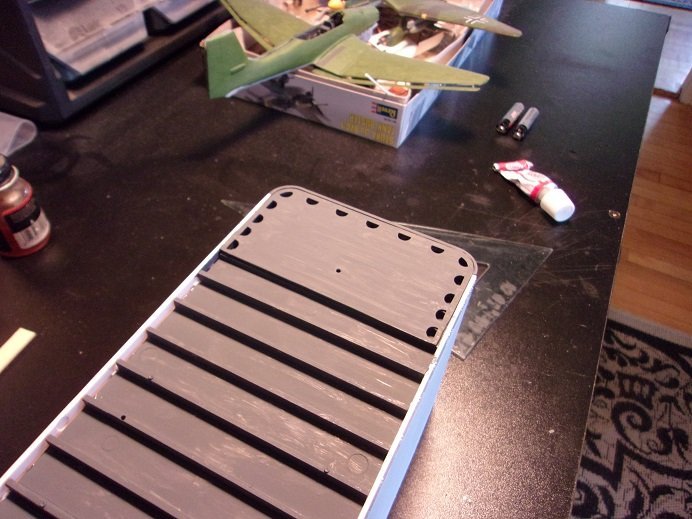
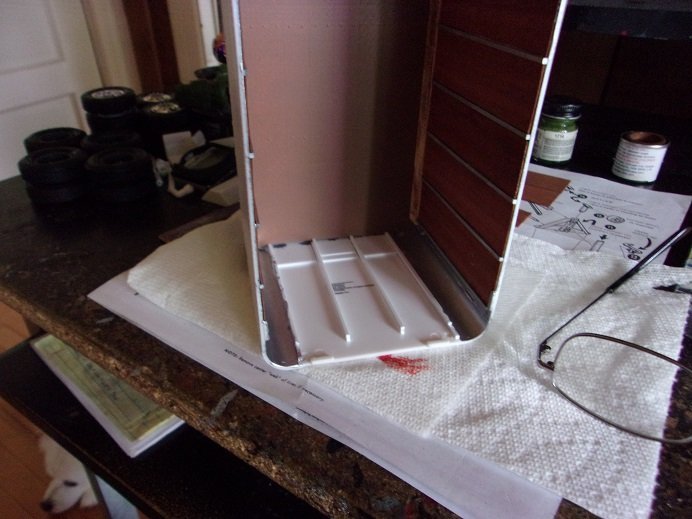
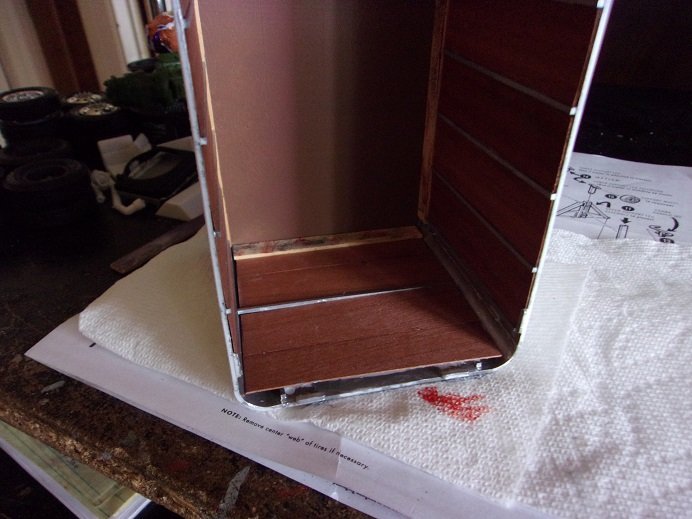
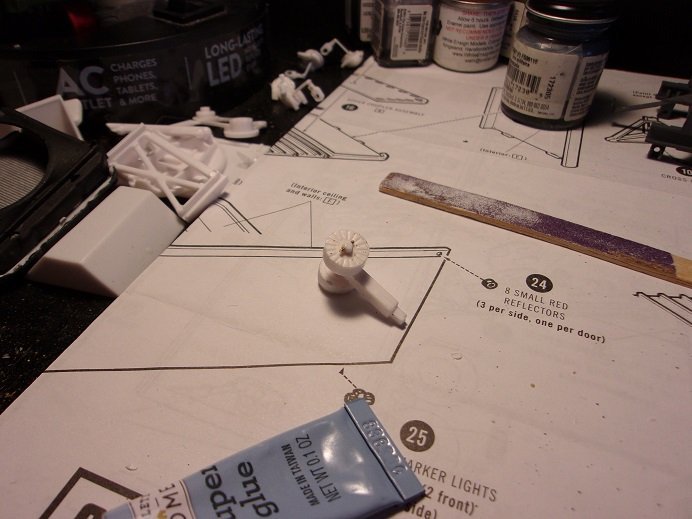
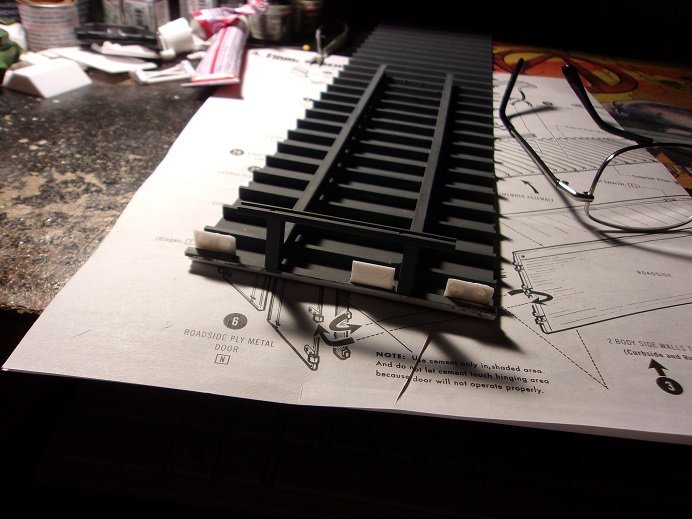
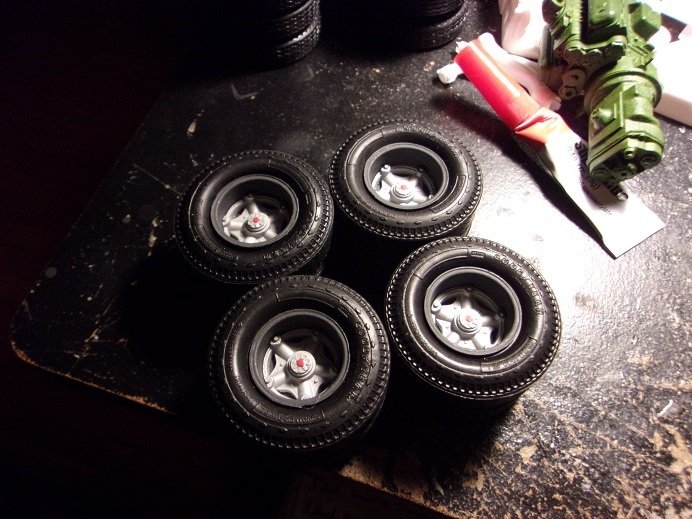
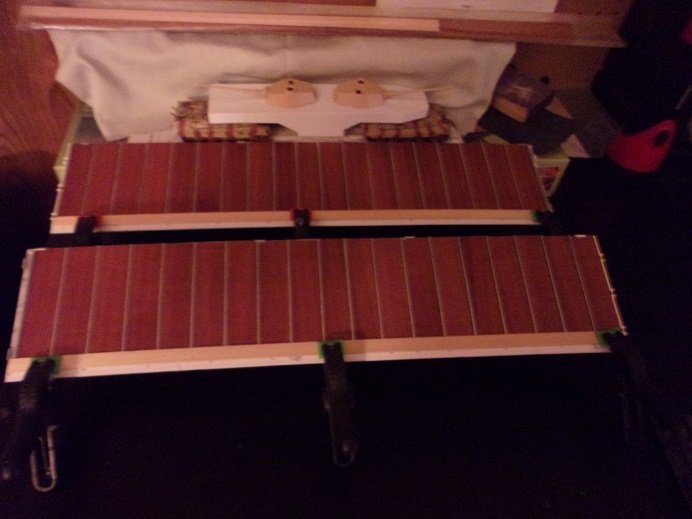
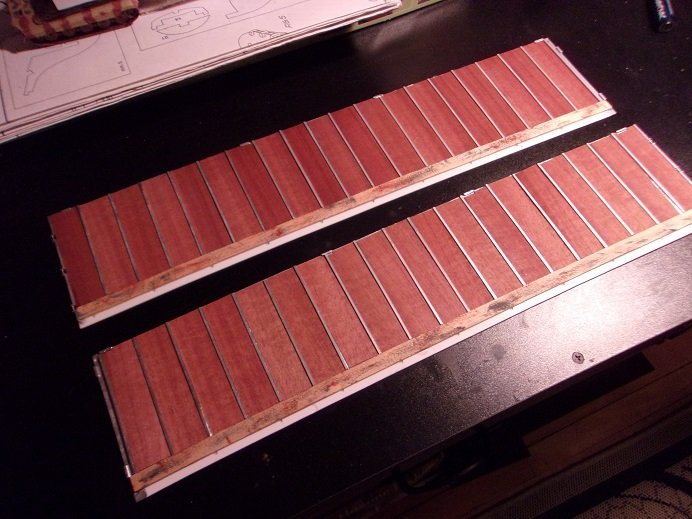
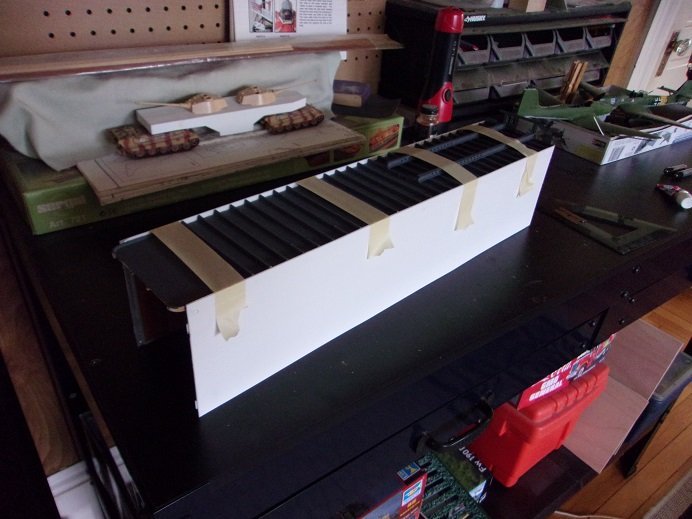
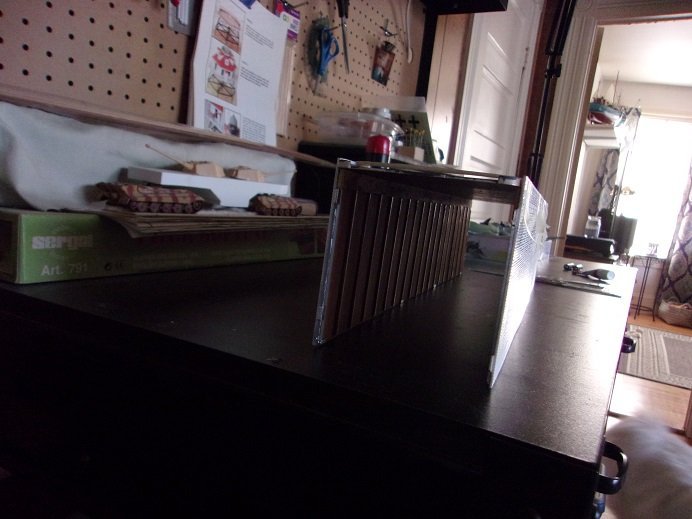
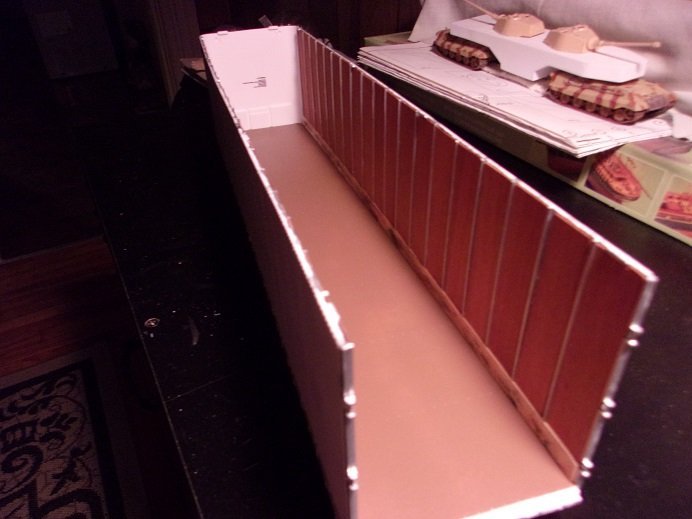
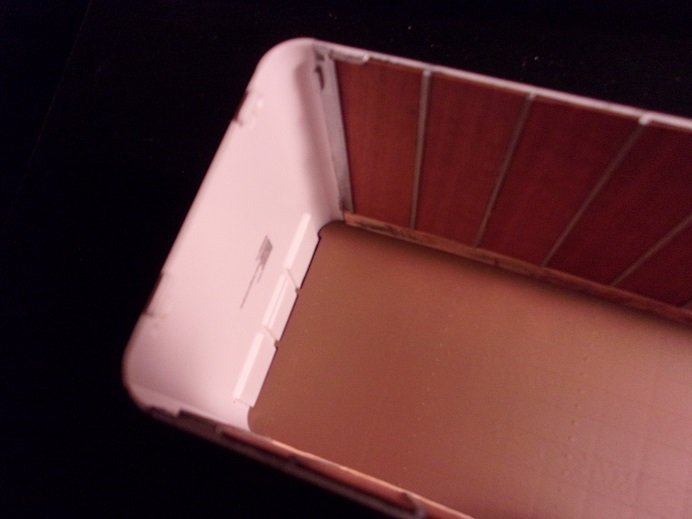
hey there. I know it's been a while, but life continues to get in the way. I guess it's become my way of life one thing I can tell you...........if someone asks you to replace a catalytic converter {bank 1} on a Nissan Murano, politely refuse and walk away! preferably as fast as you can! I replace the bank 1 cat on our Murano, and it was not fun. I did hear that there is a product out there that will revitalize cats in the event your check engine light comes on but remember that it's only a quick fix and replacement is inevitable. besides, I already bought one, a price tag of $500.00.............the cheapest one I found. one can pay up to a grand! I had a dealer check out the check engine light and give me an estimate on what they find. for them to replace it is around #3,300.00. another code they checked out was for the EVAP, and they found it was a leaking Purge Valve. that had a price tag of $440.00 to replace. I did it myself for less than a hundred bucks. work continues on the model. I added the light boxes and the license plate bracket. I to modify the bracket because it didn't fit right. the tires and hub are assembled. the wood inserts are completely done on both sides. the scuff liners weren't cemented in place. they were removed and grubbied up with paint to simulate scuffs. cemented in place, they now look like this. I was going to wait till I sprayed them with a flat lacquer, but I decided to partially assemble the box. the glad hand detail has been removed from the front wall. ...........and then added to the box. I figured it would be easier to detail the front wall with it in place. I had to make minor adjustments to the side walls to get them to fit. I was pretty much spot on with the tolerances. the front wall looks worse than the picture. it didn't fit as well. this will be covered up with the inner wall panels, so the gap will not be s. there is the approach plate that will be cemented to the underside of the nose, and that will cover it from the bottom as well. there is still much more to go. hope you are all well


- 39 replies
-
- 10
-
-
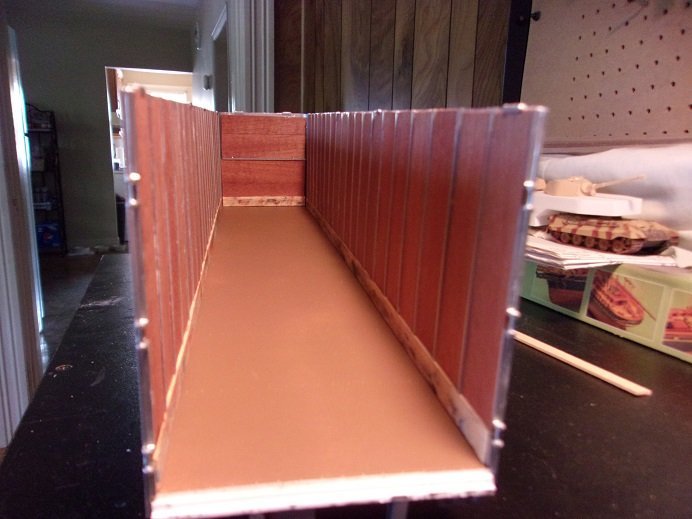
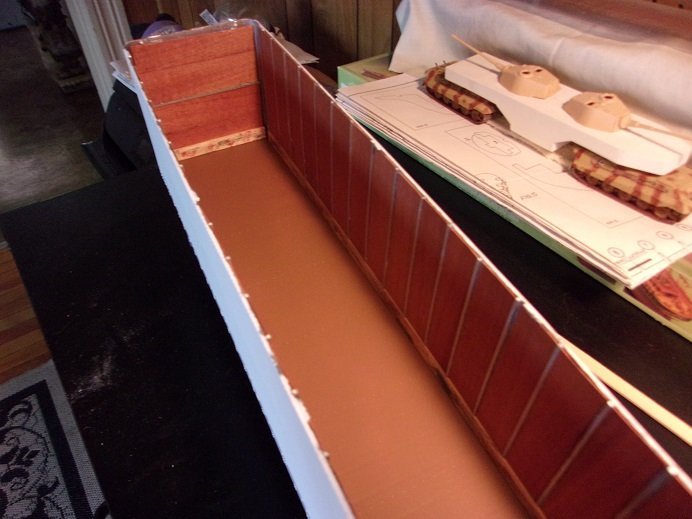
hey folks minor progress thus far.........nothing to brag about yet. I thought I'd pop in and say hello. the trailer is about 20 inches long, but the truck is a little longer. the frame alone is just over 12 inches long. I should start the log on it too, so you can see where I'm at on it. pertaining to the glad hands..........the kit is not designed to be joined together. there are no hoses that connect the trailer to the truck, nor is there a way to connect it electrically. further back, there are no hoses to the brake chambers, but they do supply enough hose for the tandem hoses. they can be joined as a display, since the kit has parts to show the landing legs to be in the raised or lowered positions. I will do my best to add in some of these short comings and make it look a bit more interesting. I need to add a registration box {bill box}........and since our trailer are fitted with GPS, I might try and do something for it as well. good to see you look'in in Craig........enjoy!
-
I've always wanted to buy one of these kits..........but the closest I can come are two of the Monogram kits {1:16}. nice to see another log of these great models


