HOLIDAY DONATION DRIVE - SUPPORT MSW - DO YOUR PART TO KEEP THIS GREAT FORUM GOING! (Only 75 donations so far out of 49,000 members - C'mon guys!)
×


popeye the sailor
-
Posts
16,007 -
Joined
-
Last visited
Content Type
Profiles
Forums
Gallery
Events
Everything posted by popeye the sailor
-
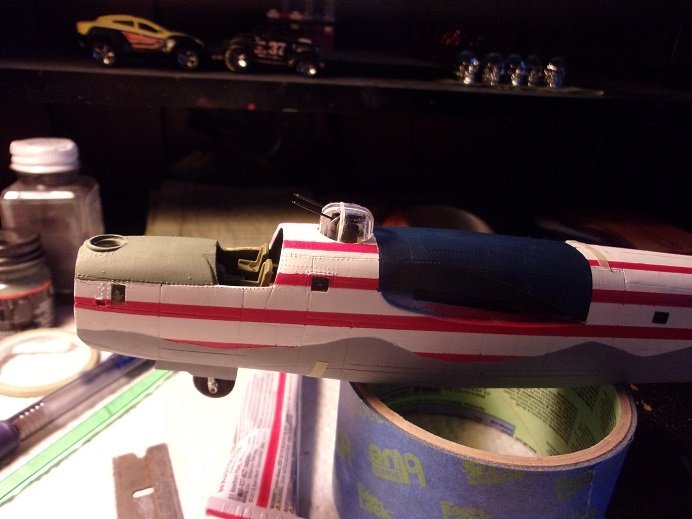
 I completed the nose gear repair. this is probably the easiest repair I've made yet..........having that flat part that was so easy to drill through. all I had to insure was the angle that the gear protruded. I was hoping I could highlight the flat part in there....best I could do. other added parts are the belly turret and the skid plate. the skid plate is interesting.......I think they took note of the damage to the belly turret, that B 17's received in some of their less than perfect landings. I used window maker to fill in the critical gaps. when touched up, I want to keep these lines, barring these obvious gaps. more soon
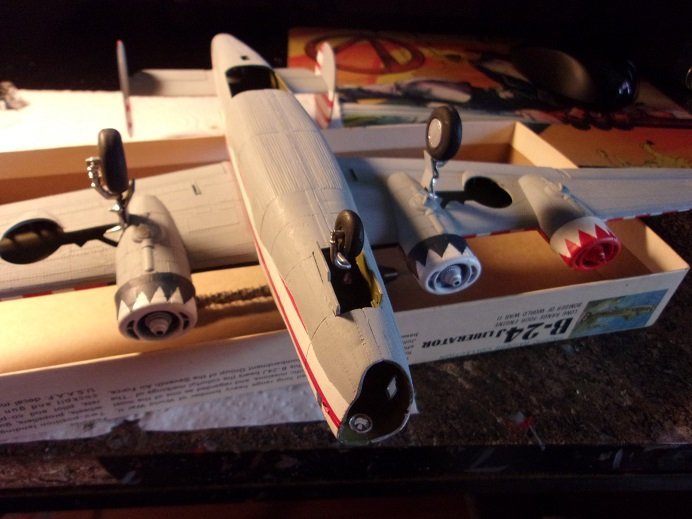
-
superb job on the Yak.........great camo!
-
super nice..........
-
P-51, LaGG-7, and Do-17 by Javlin
popeye the sailor replied to Javlin's topic in Completed non-ship models
nice looking aircraft I've been thinking of doing a P 51 as my next captured German plane.........either that or a Spitfire -
yes........this shows the primative nature of the older model kit. the model enthusiasts of today has gained quite a few insights and details of the models we build........we've come to expect much more this is a good trait that stayed with the mediums as we evolved.....we've always wanted to add an aspect of detail, not found in the normal 'out of the box' kit. one person added this.........and another person added that......pretty soon we arrive to the idea that the kit really isn't as detailed as once thought. the model manufacturer sees this as well, and the model kit evolves along with the expectations of the modeler. the modeler CAN dictate the detail content in the models they buy! I guess this is one of the reasons why I look at when the kit was produced.......it gives you a fair idea of the research that went into it. digress if I may...........look at the example of the Revell 1:96 ship kits. they are a series that I hear so many touts about. I hear so much about the shortcomings with the plastic eye bolts, the hollow masts, and lack of critical detail..... ......one has to take into account, when these kits were produced. a couple were produces as early as 1956.......the year I was born! to make matters worse, these kits didn't go through any retooling as time went on. Revell flooded the market with these kits, and this added to the problem in updating the kits. even today.......on E-bay these older kit still surface. I love these kits......I think they are the some of Revell's best offerings. I've never run into the issues that some have complained about. the company in the U.S. has changed, leaving Revell / Germany as the prime holder of the name. Mindset has been changing as well.........model kits were model kits, made primarily of plastic. outside of the metal axles you get in car kits, very few used different materials in their kits {some kit even had plastic axle rods}. today, with detail reorientation and higher expectations, aftermarket parts like resin and P.E. have begun to be included in kits. for folks who are much better modelers that I, this is great news. it brings the challenge level back up to what they expect in their kits meanwhile.........back on earth...... I hope to do something on it this week custom work today has kinda gone back to the nostalgic, leaving the original patina on the cars they do....make.....build trucks seen to showcase the brunt of this styling some look really cool!
- 19 replies
-
- 10
-

-

-
hello Mike.......I see you've made some mighty fine progress! paint really makes what you've dons so far stand out nicely........the launchers came out especially well!
-
you don't do any masking? your a freehand freak.........aren't you? I'll send all my figures to you.......mine keep coming out look'in like circus clown
-
here is a small update on the progress of this model. the testing I did on that tape showed that unpainted, the glue did not transfer to the model. it peeled off as it normally would. so I would suspect that the thinner, and leaving it on the model a prolonged period of time, caused the adhesive to separate from the tape. I tried a couple of things, but without damaging the paint, I had no other choice than to scrape the adhesive off....including the paint {flat black}. going over it later with some sand paper smoothed the areas out good enough to repaint the underside. I have since removed the tape for the cockpit......this did not result in the same unsatisfactory result........and that came out reasonably well { a few touch ups}. one other sticky wicket that I know of is the rear bumper. there are serious gaps along the sides where they meet the body. I will need to fill these areas in with plastic strip and fit the bumper. I bought some Plastruct strips for the PT boat.......I can use some for this {only a little bit}. so this is where I'm at on it. I guess paint the affected areas and I can continue
-
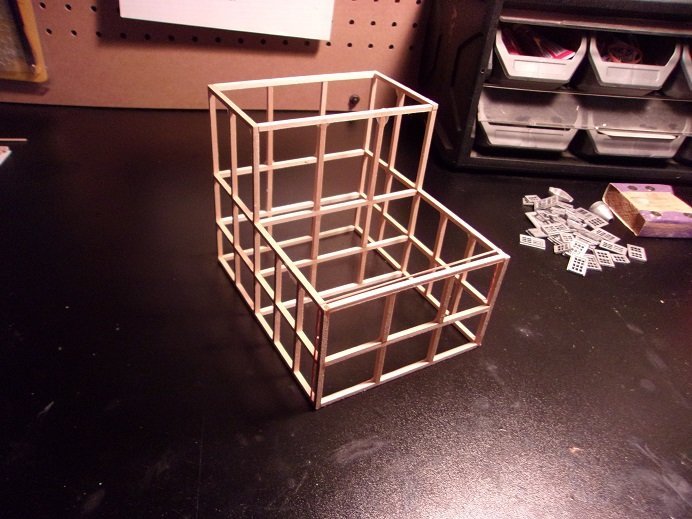
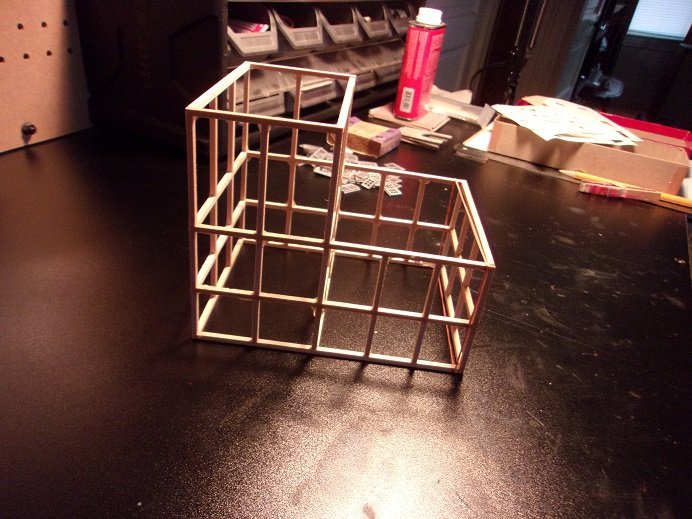
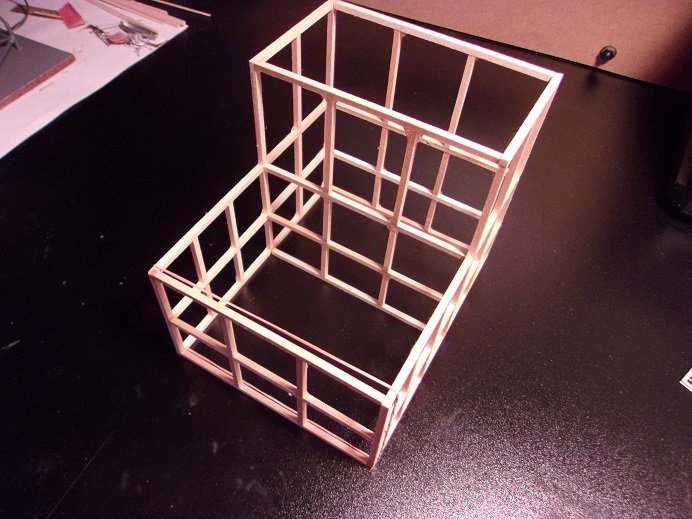
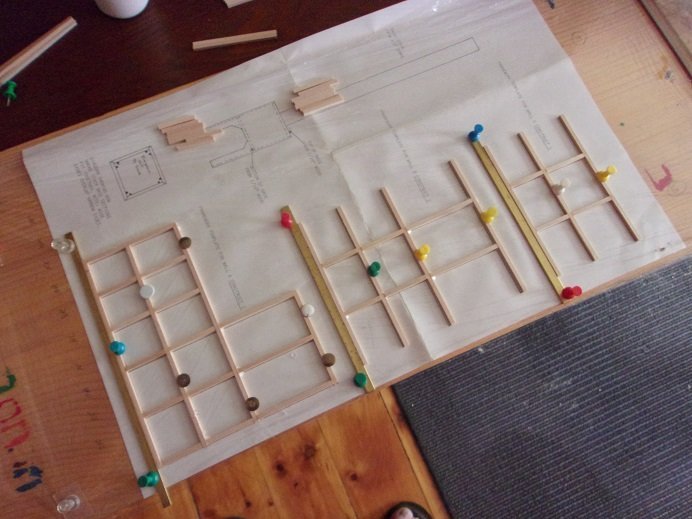
it took me a minute to figure which end was up, but the framework is now assembled. one thing I did notice are the doors......and the way they go all the way to the floor. the base for the frame is outlined in 1/8th strip. once the doors are cut out from the frame and put on the exterior of the building, the doors will not fit. I will need to raise the door openings 1/8....this way the doors will fit full height. it's nice to be able to try out the new crane light on table black. the admiral never got to ask me why it was so urgent to get one for it now to work on the outer panels for it.
-
I have them book marked Ron......thanks I listed a few earlier in the log......probably have some that I overlooked. gluing the frames together at the moment
-
WOW! I see nothing wrong with your skill set Greg...........I'd NEVER get a 1:350 plane to look like that! and your gonna have crew to boot!.......simply amazing......you've really set the bar VERY high! superb!
-
beautiful work OC........and you say MY paint is striking..........look whose call'in the kettle black
-
thanks OC........I saw that Oldmodelkits has another Warbirds kit available.........and another Pacific theater kit {which I still have}. I'd definitely get the warbirds kit, but I wouldn't get another of the other.......nice kit, but not worth the price very easy to come up with another subject.........I'm try'in very hard not to think of one!
-
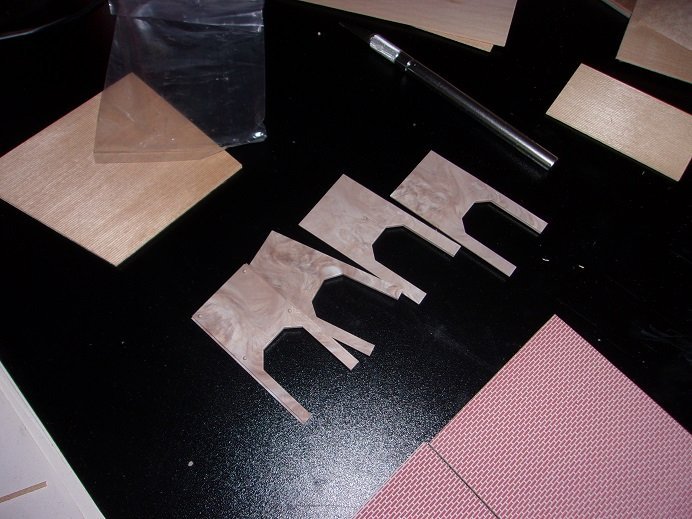
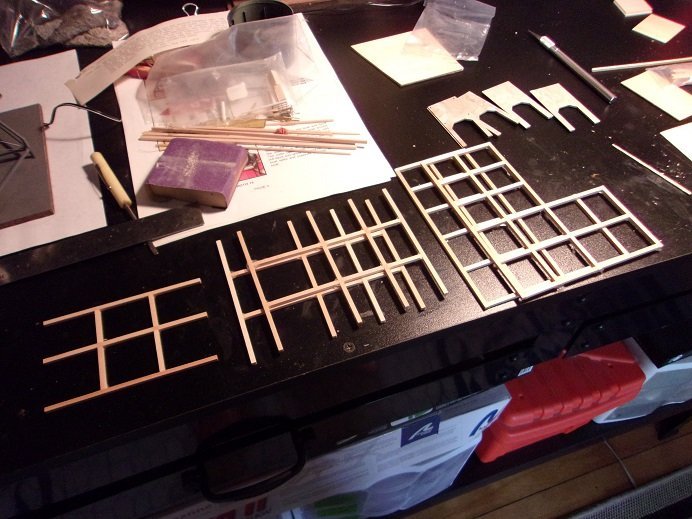
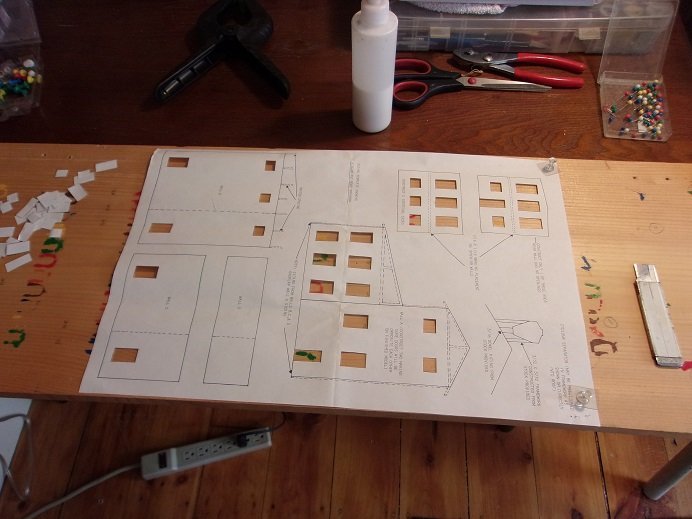
that must be a Maine emblem on the side........nice picture so as mentioned, I started to toy with it. I was looking at the smokestack parts..........these pieces {plastic} lock together. I do have a strange urge to turn this into a double smoke stack. the sides that make up the boiler house......the measurements indicate the sides, the back and the front. I will have to pitch the roof, as well as cut out the windows and doors. I got out the pine board that I turned into a boat slip, and clamped it to the table. the templates were laid out and covered with plastic wrap. from here, the first volley of frames were cemented together. these parts came pre cut......but I did get shorted a couple of pieces {one was even the wrong size}. I always keep a supply of 1/8X1/8 strip handy. the frames on the left and center required two of them.......the one on the right does not. I used brass to act as a bumper for the base strips. when I knew they were sufficiently dry, the two were pulled off and the other pair was laid down. this morning I pulled them up and still need to clean them up a bit. I really don't want to cut the panel templates out of the sheet, but my first idea isn't working out too well. the sheet was laid out and the windows and door were cut out first. my initial idea was to simply slide the parts under the paper......but the first one I did looks a bit off. I first thought that there was something on the other side, but there isn't. so I will cut them out to get a better gauge on the cut outs. this is now done. I did make it over to Hobby Lobby today.....would have made it over yesterday after our hair cuts, but we got rear ended by a young fellow in a Mazda. we are ok........he is Ok. our car has a broken bumper {covering} and the trunk lid is somewhat sprung......still works though. his car.......well, he's gonna need a face lift they do have some stuff.......didn't have the brick, but they had the corrugated aluminum sheets! I showed them to the admiral.........and she decided to scratch on the surface on one of them I'm like.........."don't do that!!!" when she saw the scratches, she told me to grab another one from the rack.........the last one was even worse! to be honest, they all had minor dings and stuff.......she only added to it. I can scriber it out I think I can order other things if I need to........they also have a fair selection of scenery stuff here more proof that women love sales........she saw that all kits were 40% off.........so now SHE was looking! I looked but wasn't interested in buying one.........so she starts to point out some that must have caught her eye........yess, yess......very nice.......a 1:48 scale Black Widow.........she loved the purple color of the Joker mobile........and one that looked like my old olds Cutlass........ I was going to pick up a 1:800 U.S.S. Indianapolis {Academy}, but the 1:16 '57 Chevy Bel Air convertible won out. I should have picked up another Lindberg 'nose art' B 17 {it was only $9.00....marked down}, but I put it back {could have gotten two kits!} oh well.......I guess I do have SOME restraint she was even looking at helicopters and tanks........my grandson Chase asked me why I never build tanks. I'd better stop talking about it now........'cuz it's mak'in me feel like a first class fool...coulda walked out of there with more I still have one in the wind.......it won't ship till the beginning of October, because they are on holiday. can't tell you what it is, 'cept it pertains to this subject. what I can tell you is "yule love it!" count on me to bring you something wild and interesting more on this soon
-
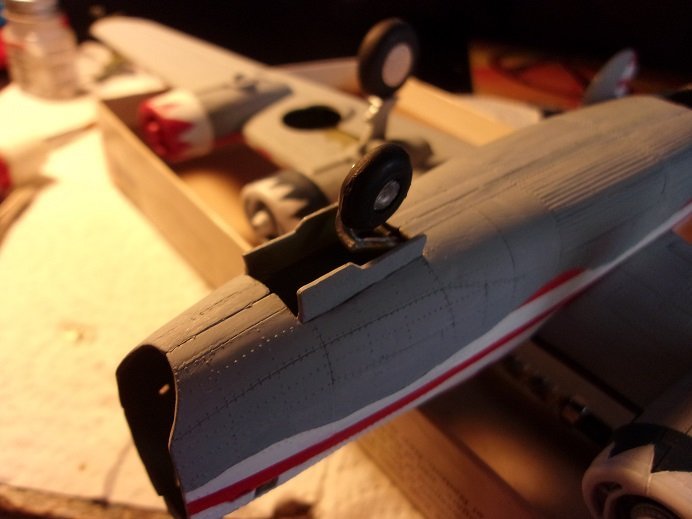
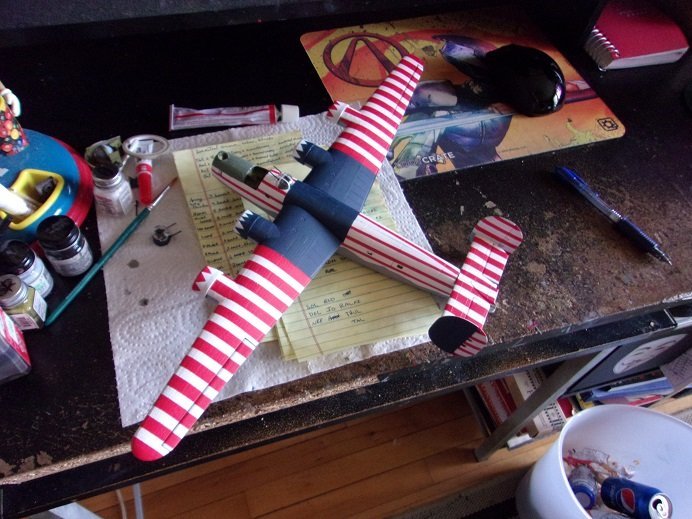
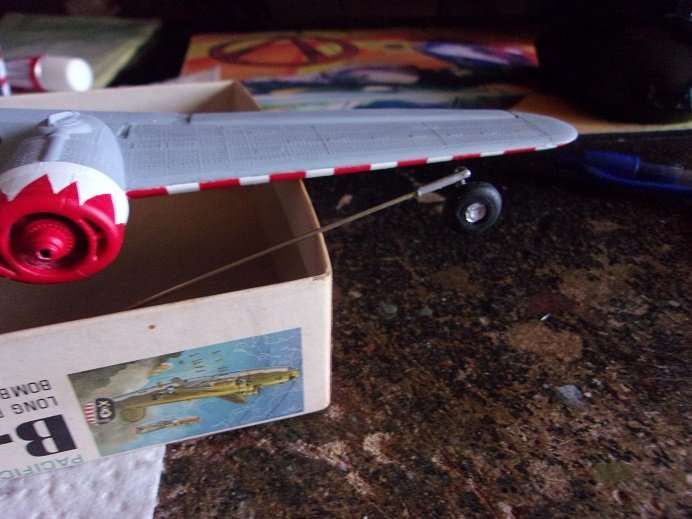
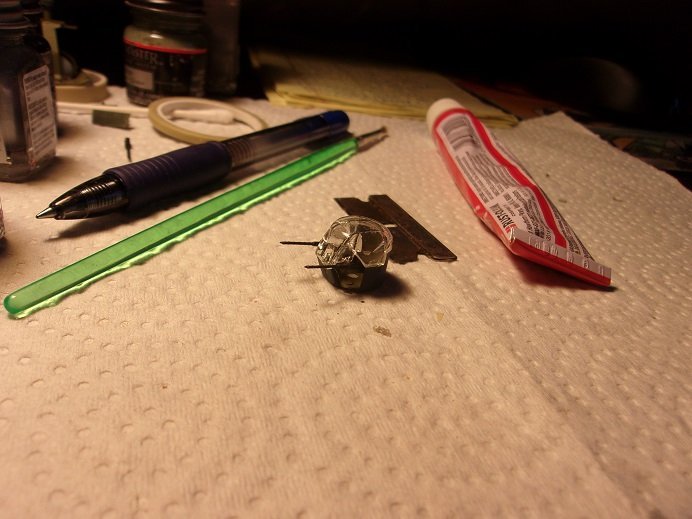
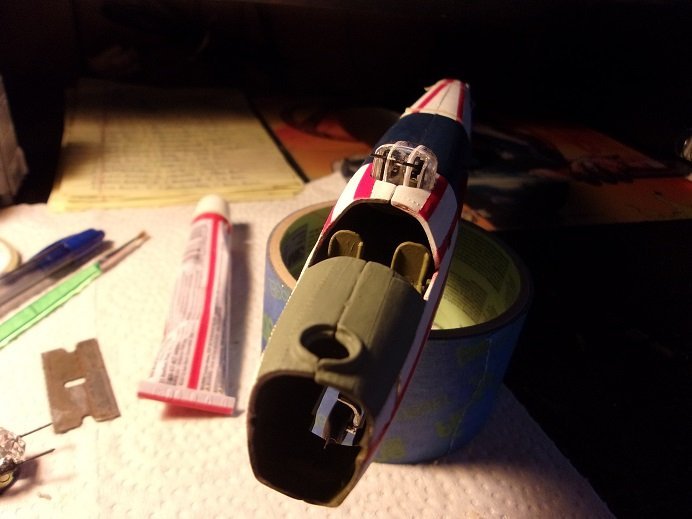
thought I'd show you all where I'm at with this project. I trimmed a sliver fron one side of the fuselage tail and cemented on the tail section...minus the tail turret {can't see them getting broken}. the nose bubble was added to the top of the nose, as well as the radar bulb that sits on top too. I still need to paint it. the last cowl was added too.......took a bit, but I finally got a handle on touching it up. I think the cowl design came out rather cool these were taken before the nose bubble was added. to be honest, I don't know whether to salute, or wind my watch I figured that I had better get the repair done so I can move on. the gear door was easy enough, since it wasn't totally broken off. with a small drill, the nose gear tube was hollowed out enough to accept a brass rod. I'll drill a hole in the stub that is still in the fuselage and cement it back in place. I think I figured out some sort of pattern for the stars....better I think, than to put them on willy nilly. more soon
-
WOW! great paint job.........gonna look sweet when fully assembled
-
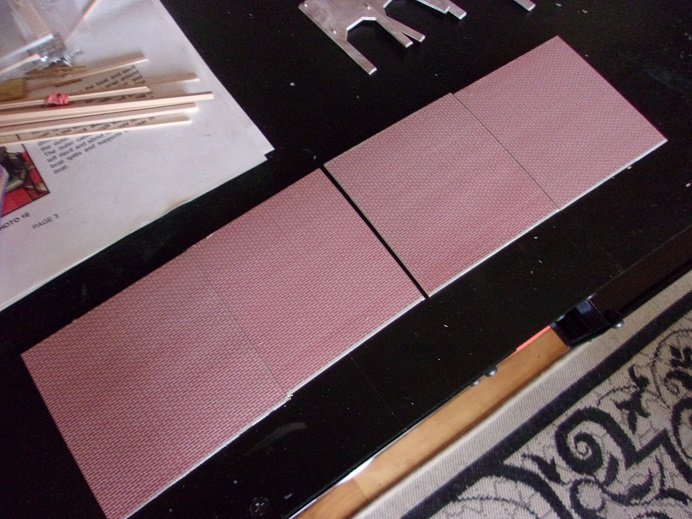
nice looking plow Jim........I've found a few pictures when I was doing some research on it. mine came with the aluminum, but he had already cut it to shape.......tried to fit it, but I think he might have done it wrong or something. other ones I've seen, it appears that the aluminum was not used and they did something else. I'll get mine out and pop a few pictures......the camera I was using at the time wasn't too good.....might even be my camera savvy I painted mine in kind of a brick red color...I was in the process of assembling the wings when I put it away. same as you, ships took over my world. I did notice that whoever owned the Keystone kit tried to start it..........found a bead of glue on one of the brick parts. I have started on it......assembling the framework for the power house. the brick sheets are for the boiler house........there is a slip of paper outlining the shortcomings with the parts. they will need to be trimmed. also shows that the roof is pitched, so I will have to cut the sheets anyway, as outlined in the description, the boiler house was made of brick, rather than wood, in the event of explosions and fires. hard to see that this was a two story building..... the instructions are a bit scant on measurements, which does make thing a little confusing, but I'm sure I can figure it out there are pictures........I'll get some to you when I have more. gotta be the angle of the shot Craig.......it looks like there's no back end on the plow . I remember your trip
-
thanks gents....the major assembly has begun there was a bit of a mishap........the starboard wing fit a little loose, and in getting it to seat, the plane slipped and the nose gear broke off. one of the gear doors got put out of joint.....but that's a minor thing. the one grace is that since this model is tail heavy, there won't be much weight on the nose gear when mounted on a stand { I plan on doing like I did with the B 25}. so I'll get that fixed and continue........pictures soon! thanks again for all the super kind comments!
-
book marked! I'll do a browse later.....thanks for the link I did notice a huge ganglia of tracks there, and two groups of buildings. I'll check them out in further research. oldmodelkits has a large assortment of train kits........a few structures. some are reasonably priced. one did catch my eye....but it's not HO. I'll see it in October........ I hope to get started on this soon.....
-
nice job on the wheels Kevin........shame the bug bite was severe we'll wait for the stage to come back............errrrr..........it did have a driver on it, didn't it
-
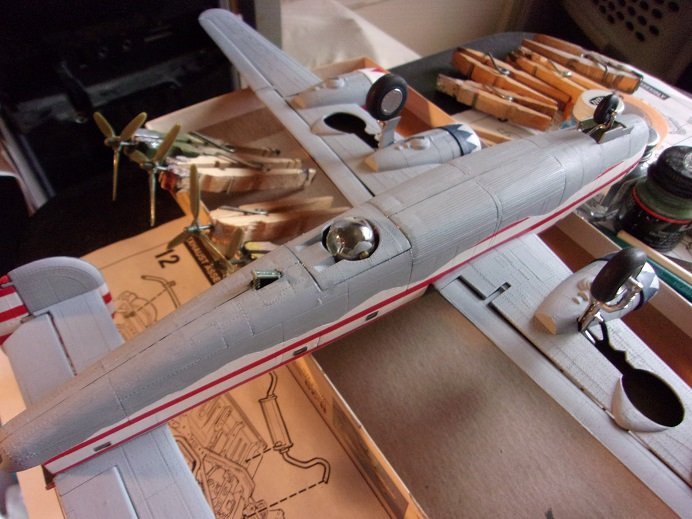
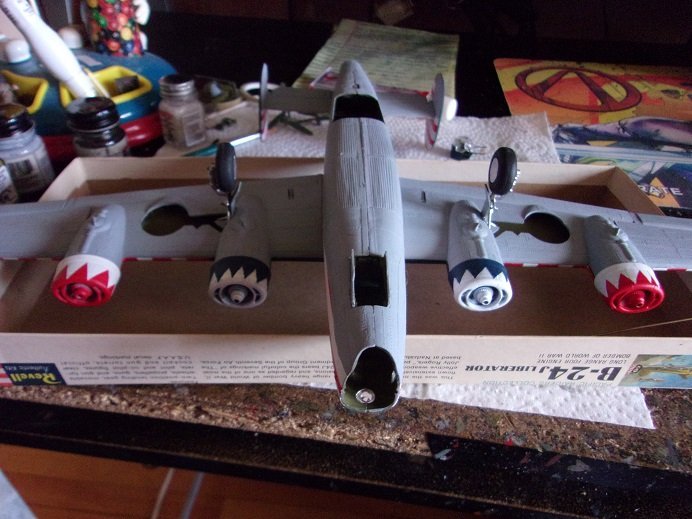
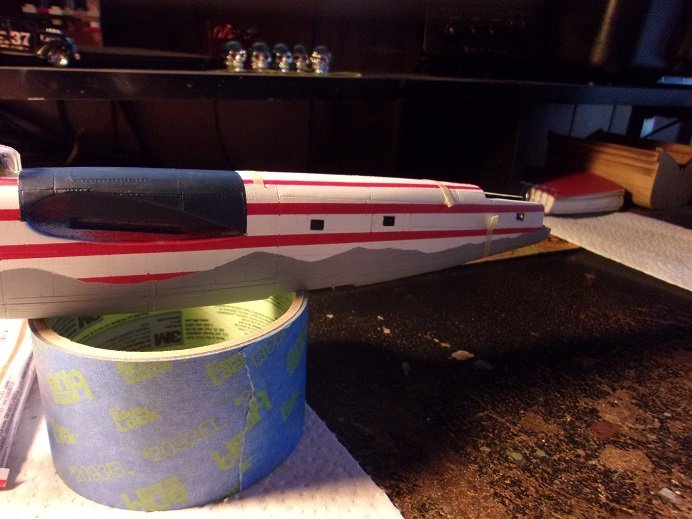
thanks Ken.......I'm impressed with it too. definitely temps me to do another, but of an actual plane. I've been doing more touch ups.......I'm hoping to finish up the last cowl and get it on there. I already made the fit adjustments......for some reason, the inboard cowls are different, and makes me wonder if I got the pairs backwards. this looks to be the case, because the inboard cowls are # 49A, and the outboard are # 49B. hopefully the next update will show the plane together. I do know one thing........I will not do a blue and white combination again thanks to all who hit the like button..........
-
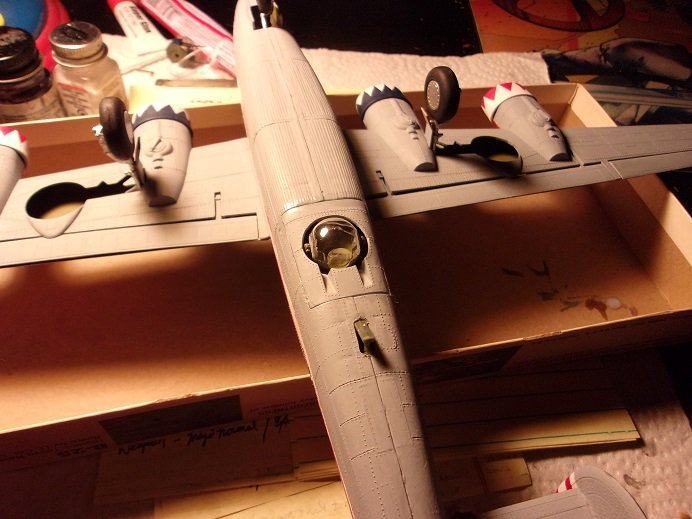
as mentioned.....more has been done. the frames are barely visible on the tail turret glass, so I didn't bother with them. it is assembled and ready to be added when the time comes. questionable about the open spaces, but this is it. the fuselage is together now........the tape still on, but is now removed. the dorsal turret was trapped in the fuselage.......it's free to move, but it's very tight {no matter}. the nose and blue field has been touched up.....I'm working my way around the fuselage to clean it up. one of the blue cowls is ready to be added to the wing. it didn't fit very well though.......I cut out the 'flatted' sides inside, to make them rounded. it was cemented in place when the fit was good. I tried to touch up the other one from all the bleeds, but it is too soon. this one here dried for a couple of days before I touched it up. I will just have to wait till the paint is totally dry before I attempt it again. still other things I can do though
- 107 replies
-
- 10
-
-
you dio is coming along nicely.......looks even better now that you starting to fill it out also glad to hear your enjoying the airbrush......your gonna love how much further you can stretch the paint supply not to mention the uniform coat your able to put down. I grew up on a small farm as well.....we had a window to throw it out of. but.......someone had to knock the pile down when it got up to the window. hell bud........I did it bare foot! where do you think I got my big feet! keep up the good work.......really looking good!
-
not to mention, it's really an unknown at the moment when this kit was produced........I've yet to find any dates. there is a train yard, but it's not Keystone. I think I'm tracking down a place, rather than a model company
-
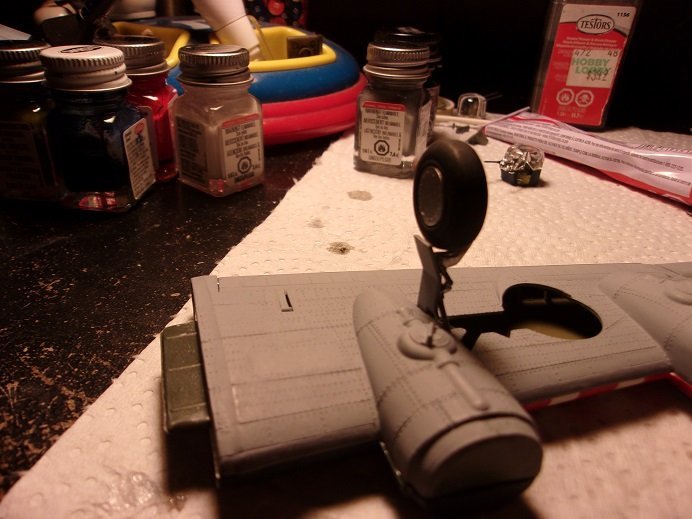
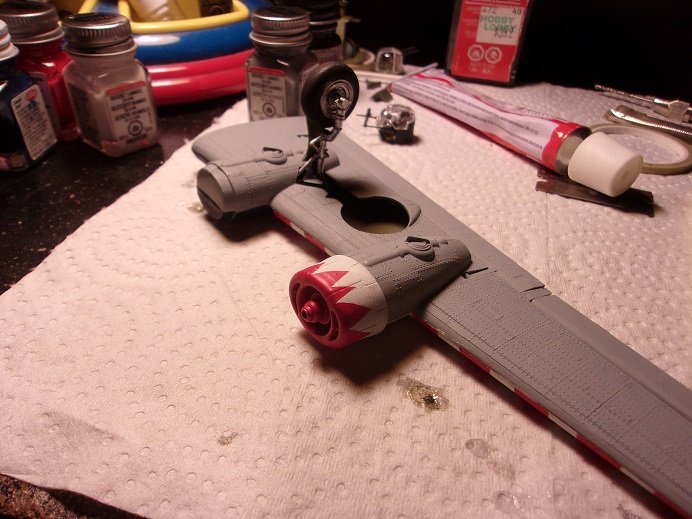
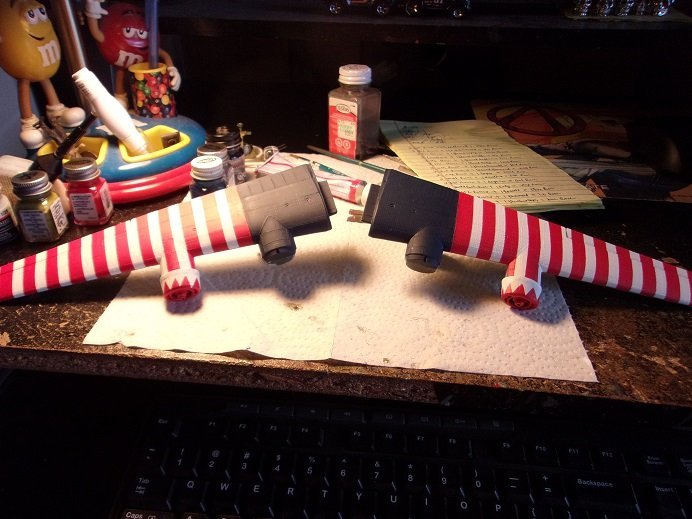
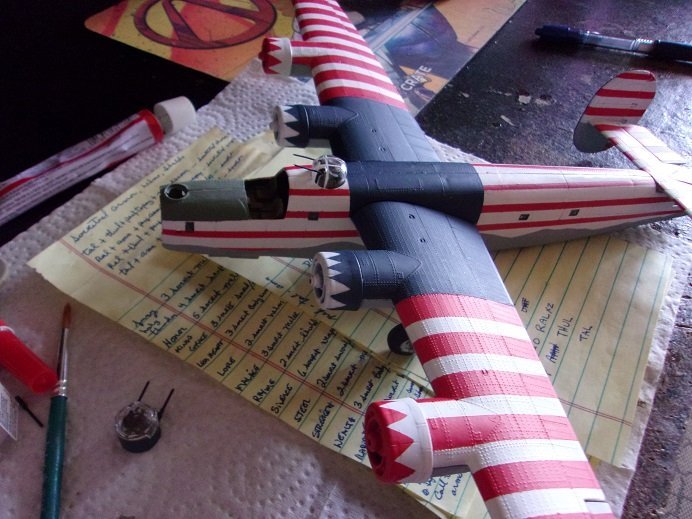
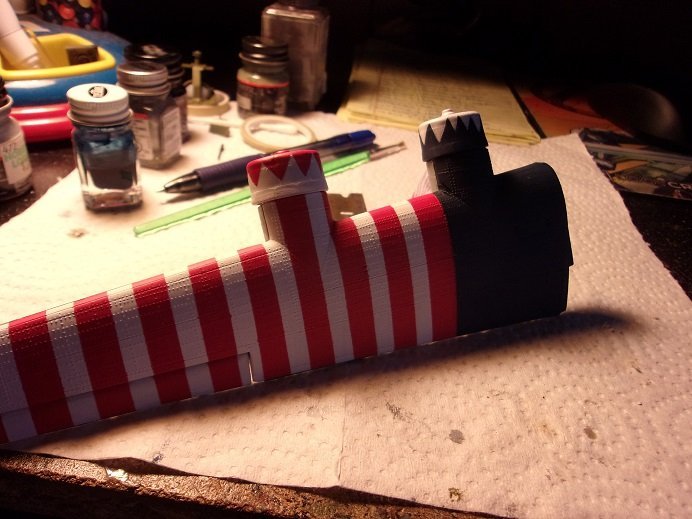
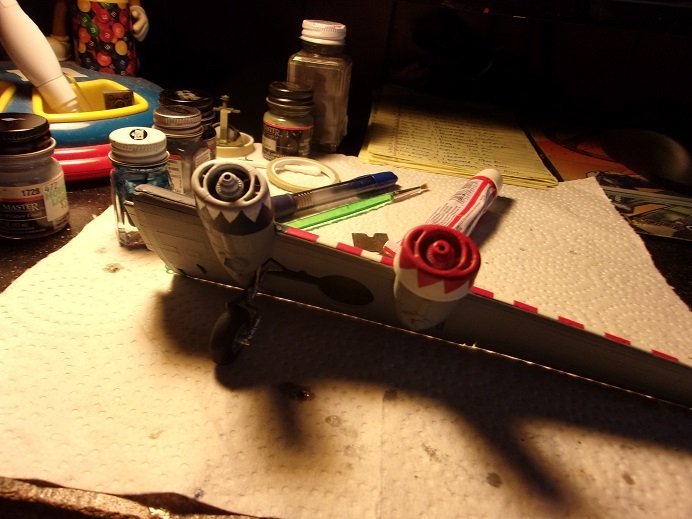
thanks OC ....bit bit closer towards the big step. I went to put the gear doors on the main landing gears and found that I should have done this before the wing was assembled. a short part of the doors fit inside, and now there is no room to do this. there are two locator pins on the gear and two holes on the door.......seeing that the top pin is just inside the opening, I cut off part of the door and slid it in. I did the same with the other wing gear. I also painted the fourth nacelle cowl........the outboard cowls are done in red and white. this was done by cutting a strip of tape in half lengthwise, and then cut triangular pieces out of it. wondering what to use for a backing for the tape....I though about what might not stick badly, so I used parchment paper. this proved to be too poor of a sticking surface, but I used it anyway, clamping the tape down firmly so I could cut it. in the end it worked, but the combination of paints were another issue. the red and white came out good......but my decision to paint the inboard cowls blue, came out less than perfect. even with the final cowl, I will need to do some touching up. the outboard cowls are added to the wings. I've made more progress since this was done........I'm waiting for the last cowl to dry, before touching it up. more soon