HOLIDAY DONATION DRIVE - SUPPORT MSW - DO YOUR PART TO KEEP THIS GREAT FORUM GOING!
×


Thanasis
-
Posts
651 -
Joined
-
Last visited
Content Type
Profiles
Forums
Gallery
Events
Everything posted by Thanasis
-
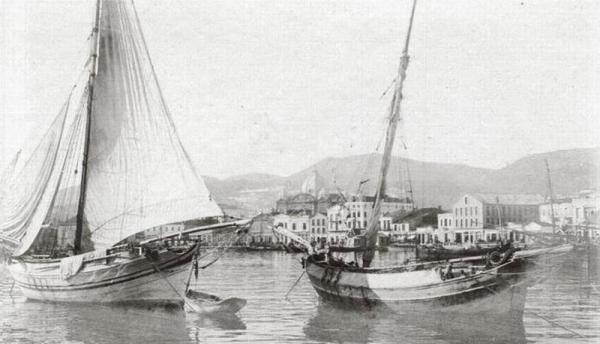
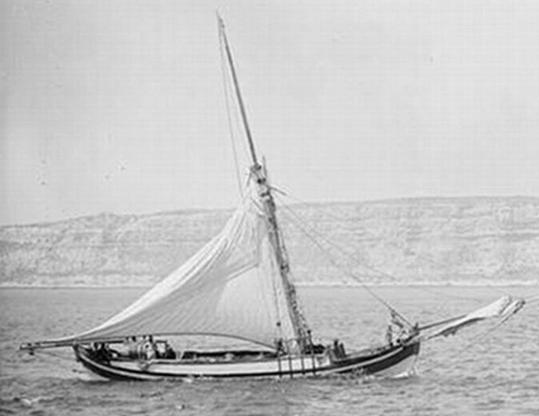
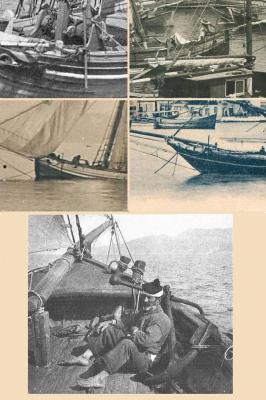
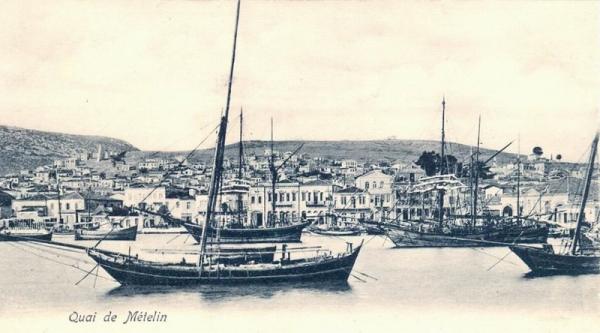
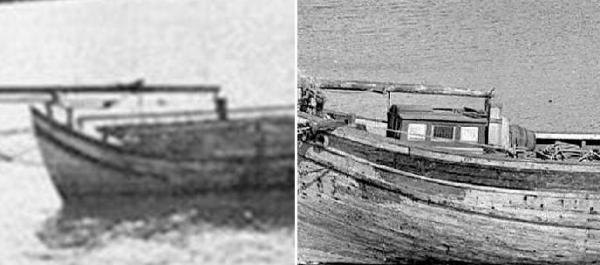
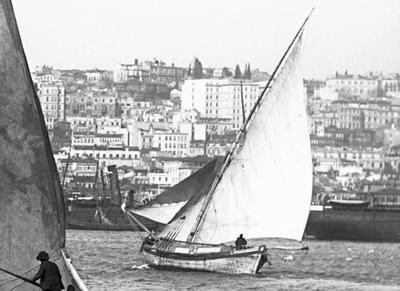
Hi Mauro. It's a beautiful boat and I'm looking forward to see the model... I have met these boats in many photos in our archive (3w.naftotopos.gr), sailing also in Aegean sea. Do you know whether these boats could be departing from Adriatic or it was part of the fishery of the Dodecanese, while the Islands were Italian colonies. The below photo is taken in Crete. Thanks
-
Hello bibounde. Assuming that there is some sort of history about the real ship in the manual of the model, which refers in the "Turkish Independence War", then yes I agree that the "challenge" is already set... Was ever Ottoman empire or Turkey ( later) occupied by some other nation, so that should fight for its independence...? Just food for thought... I wish you good luck with the model. Thx
-
Hi all. Mike I agree with all you have written but mostly I like the: "I believe a hobby should be fun and not stressful." For me it would be more stressful, when while I have already paid for something, that ended impractical. Something of mine, from the DDM days... Thx
-
Many thanks for your comment Elia and the so many likes... Jörg, I had no luck again ...I guess I have to be registered first but it's ok. I feel nice just to know that another Gr. model has been built with the joy of a fellow modeller. Thx
-
Well, with no doubt it's a small world... You found the drawings for your model (Skaphee) in Rc magazine no. 227 in an article which I wrote... for my good friend Bouzounis. He is an excellent modeler but unfortunately he doesn't go well with English language.... I found the title of your build log in 3w.segelschiffsmodellbau.com but I didn't manage to see your model...Don't know why. Thx
-
Thanks for your comment Joerg and let me express also my good impression meeting a non-Greek who is dealing with the traditional ship models of my country. I have seen your work on "Agios Nikolaos" and it's very impressive.. As about suitable plans and without the intention of an advertisement, there are accurate hull drawings in the book which has been mentioned at the start of the built log.Those plans I follow in my models. Sadly our team's effort (3w.naftotopos.gr) to spread Gr. ship models by finding a kit company, offering plans-rigging details and copy rights with no any fee, didn't work out due the prerequisite number of secure buyers...! Thanks
-
Need help with rigging on the French Chebec Indiscreet.
Thanasis replied to DougM's topic in Masting, rigging and sails
Hi. A German speaking mate may help. Thx
-
Hi all and thanks for sharing. Just food for thought (inspiration) from a retrieved tip of mine, from the days of DDM. Thanks

-
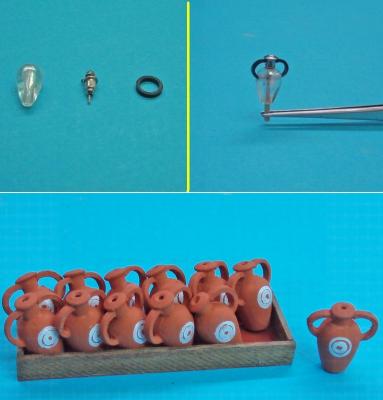
Thank you each one and every one, for your kind words. I really didn't expect this welcoming since I think I have violated many rules in this build log ... Thank you all. Turksailor. Thank you for your kind words. I don’t want to spend much care or much money on my models. I see it just as a relaxing-joyful hobby that has to follow a low budget. So answering your query, yes I have used just simple modeling brushes and no, I didn't apply any primer. They have been applied three layers for every color and four for the white one. Steeve. Thank you also for your kind words. The funny thing is that, while I was dealing with one of those beads to form a pitcher, it dropped me on the floor. Bending over to pick it up, I hold it upside down the way I was dealing with. And then I realized that it would look better (closer to the real one) if I go forming it that way… Thank you.
-
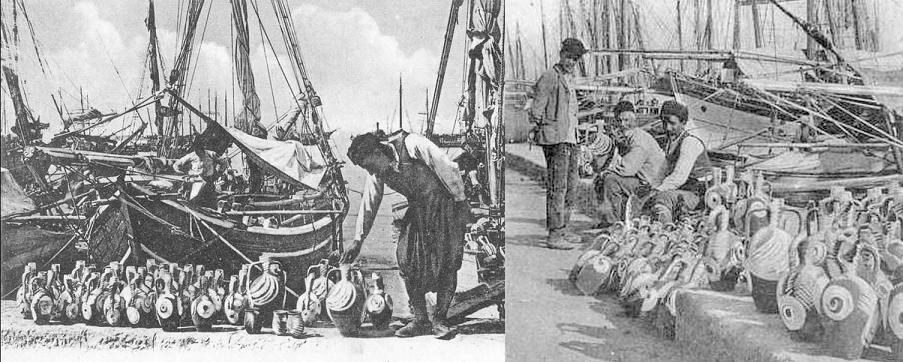
Finishing my model I wanted to make also something that I would place it on the deck as a decoration. From my photos I stood on some, which are showing islanders in front of their boats, having spread their trading stuff at the dock, usually clay pitchers. I thought it would be nice if I could manage to place such a cargo on the deck of my model. I wasn't thinking to handmade something from clay, since the pitchers should be identical and elegant and I'm not that skilled. So as always do, I went to the "place of inspiration", a local fake jewelry store. I spent about an hour watching all of its stuff and making combinations in my mind. I bought some beads and ear-piercing items and by cutting in half plastic rings, I came to what I wanted. A proper painting gave me a good result. ..................... Thank you all, that ignoring the warning had the kindness to follow my build log. You can see the finished model at the gallery. http://modelshipworld.com/index.php/gallery/album/1182-aegean-tserniki-vessel-rigged-as-penna/


-
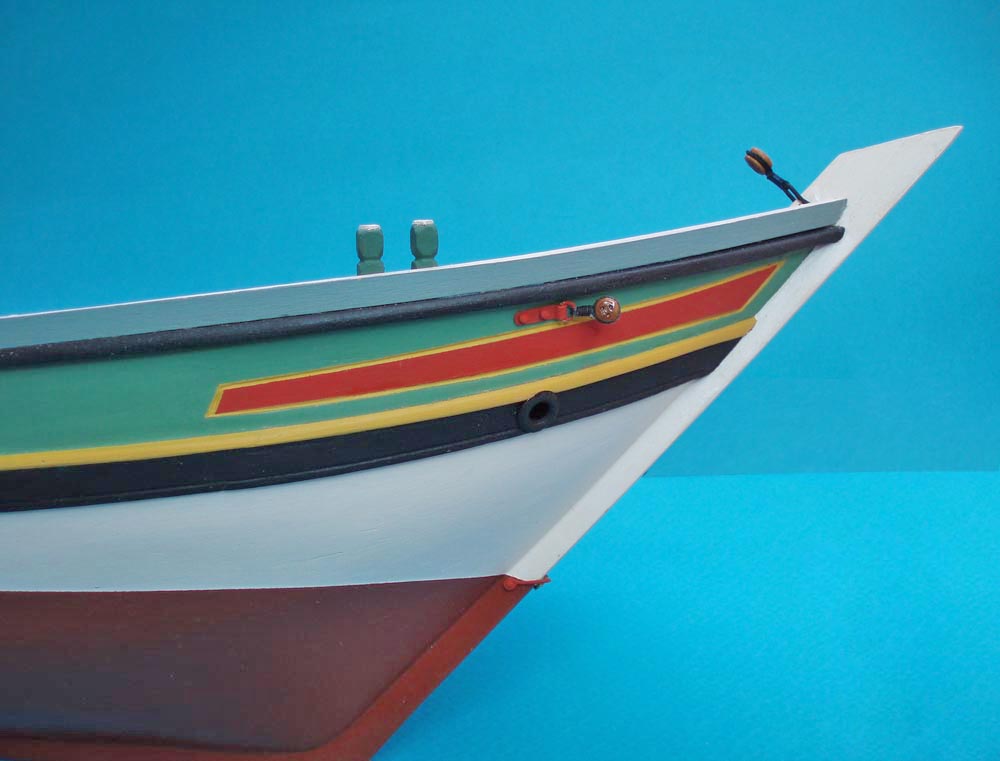
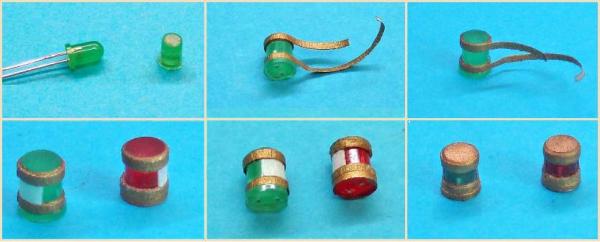
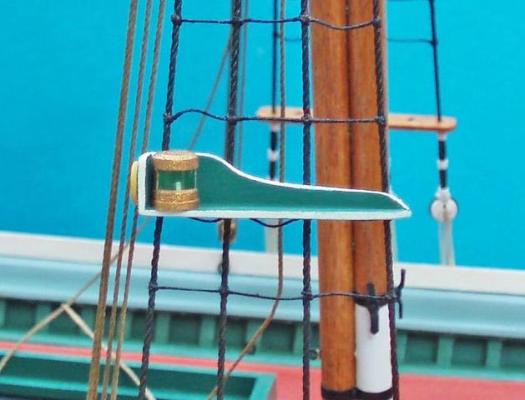
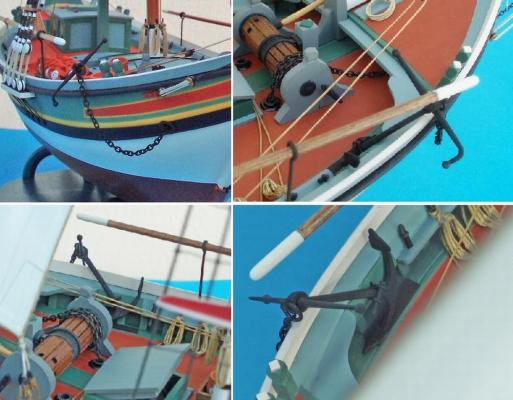
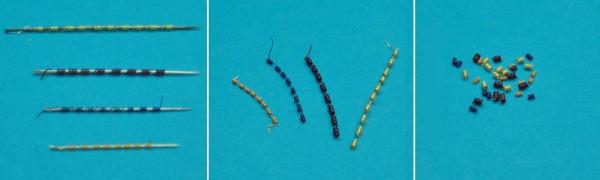
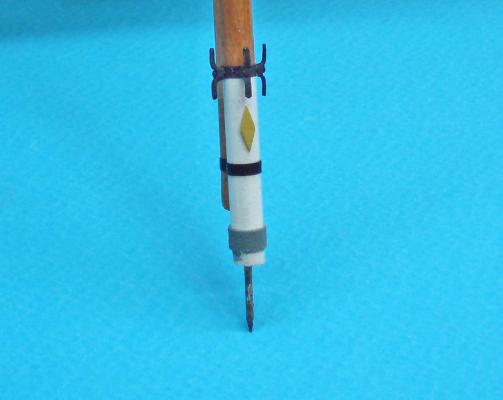
Thank you all. Navigation lights After many tries with unlikely materials, I turned back to simplicity. I took two colored led lights in a proper size, I removed the wires and gave them a “hair cut”. With the use of a rotary tool, I turned their curved end, to flat. Then I cut gold painted narrow paper strips and by making loops I covered the upper and lower parts. Every loop was secured at its end with ca glue. I used more gold paper to cover some of the middle part. To finish, I painted gold the flat upper part. I think I had a decent result... Place of the anchor. As you might have noticed in all previous photos of the real boats, appear not to have something (e.g. a cathead) that would suggest how the anchor was being raised to the side of the boat. Well, there wasn't anything. The anchor was being raised at sea surface by a windlass and then by the use of some pulleys (the same attached on the mast for lifting the cargo), it was being hoisted to the deck. Moreover, there wasn't any particular place to be stowed on board. It was just being leaned and secured on the gunwale, as is shown in photo from another Gr. boat*. * The photo shows a member of a French mission in a Gr. boat circa 1900 in Cyclades Islands. ......................... So I did the same on my model...
-
Thank you all. Thanks Bob but I think it’s far away from being a lesson. I can accept it as a lazy-sailmaking, though… It was something owed from my previous build log. http://modelshipworld.com/index.php/topic/2601-tsernikoperama-from-greece-by-thanasis/#entry69074 Thanks
-
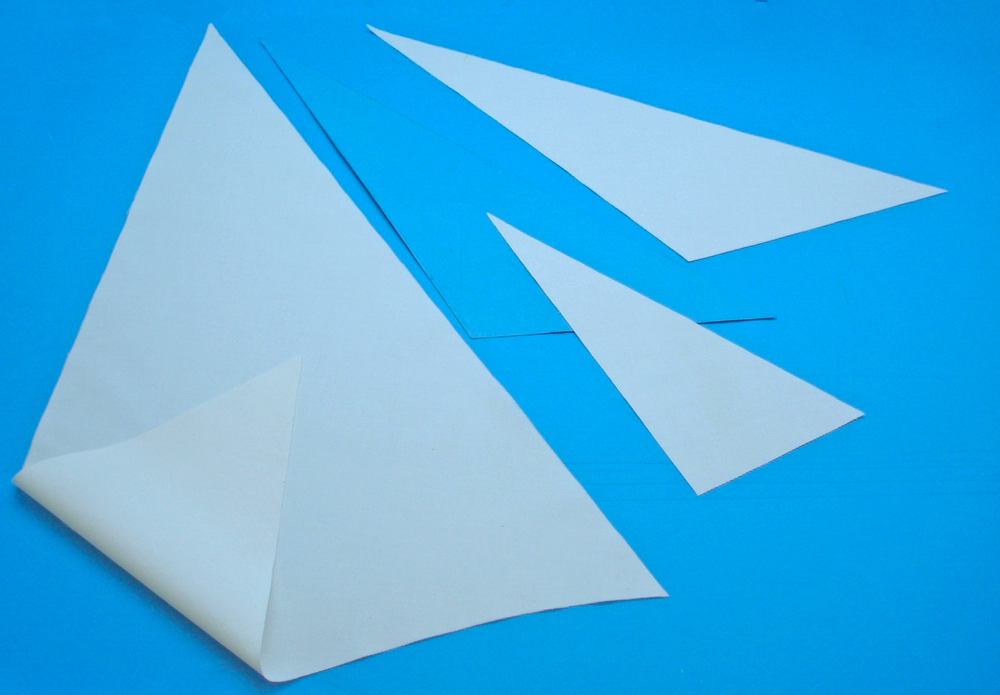
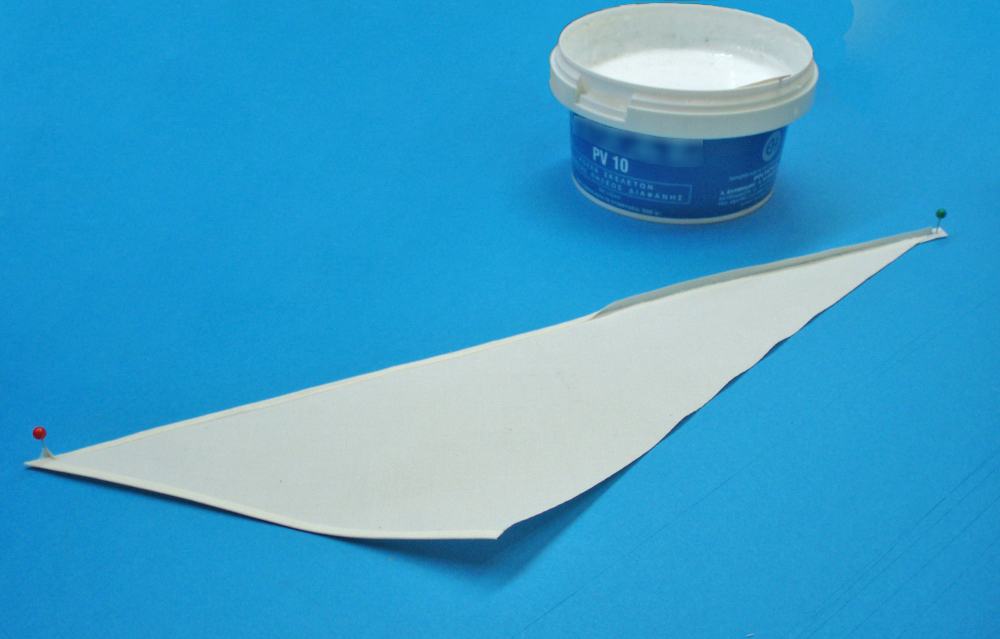
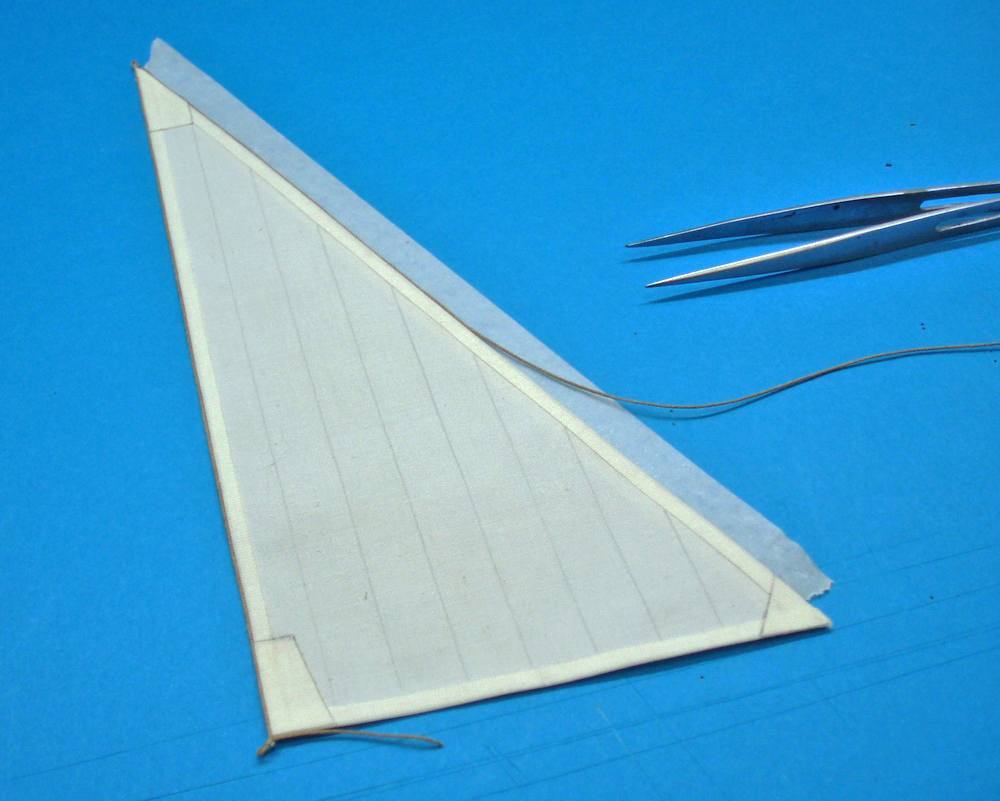
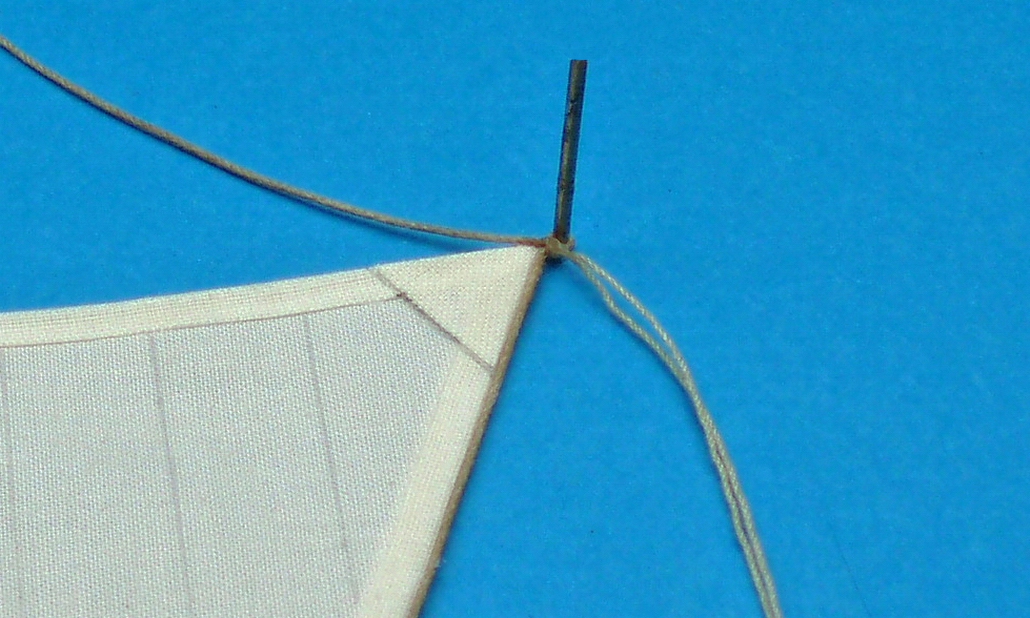
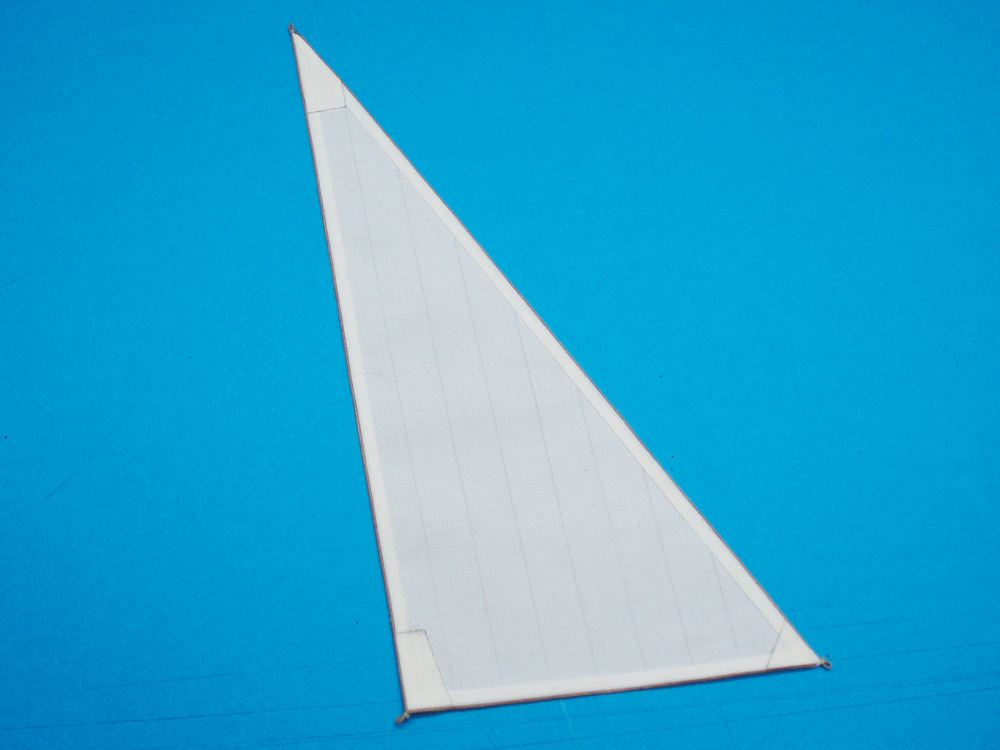
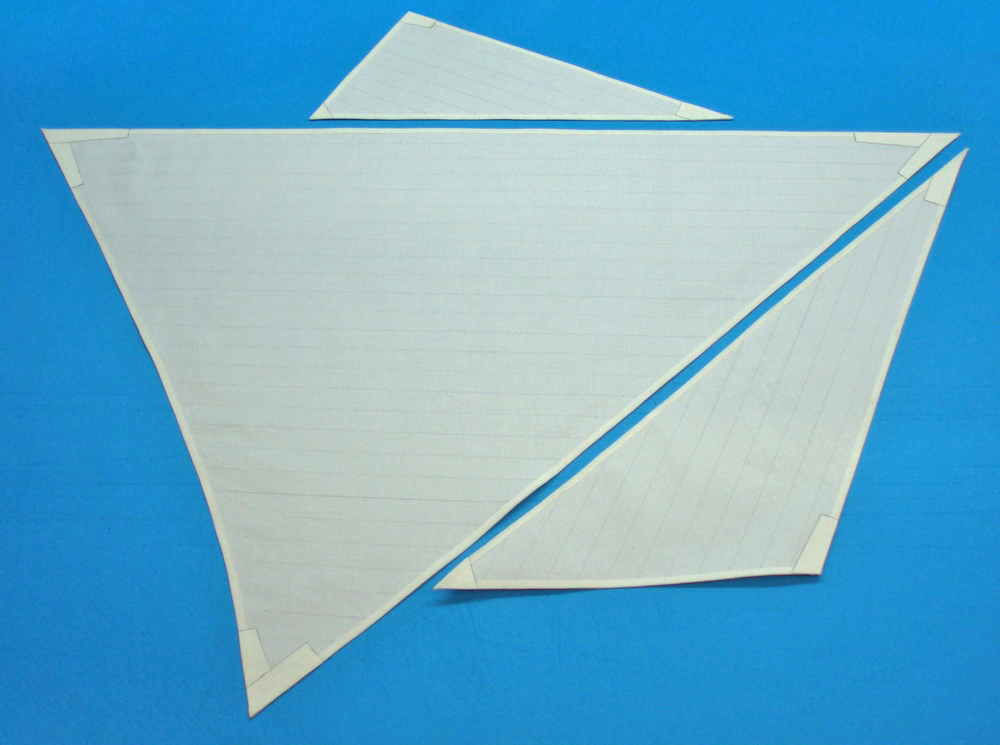
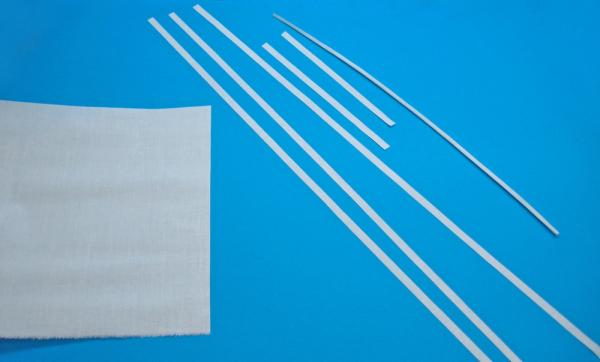
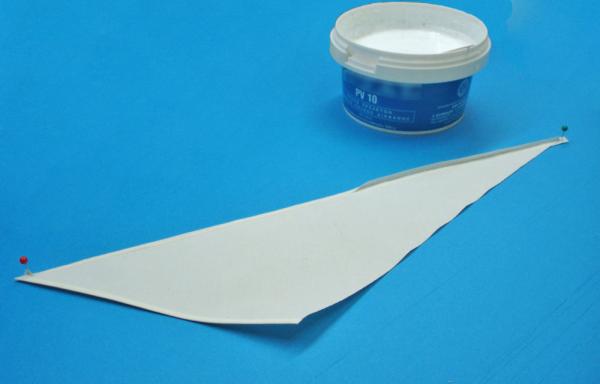
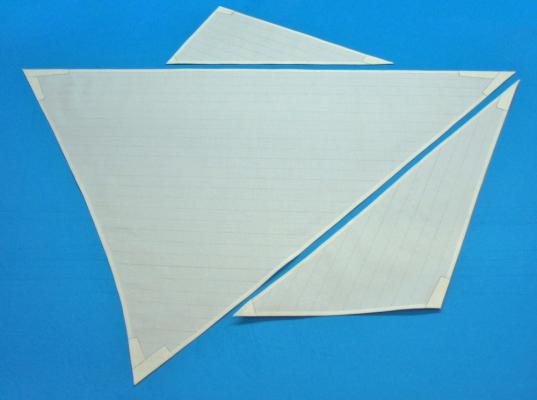
Still here?...Thank you. Sails I started making the sails by measuring their imaginary lines on the model. Then, I transferred their shape on a thin cardboard and made the needed corrections in contrast with the model. Finally, by using those cardboard sails, I cut new ones from a thin cloth. On another piece of cloth, I applied a mixture from water and white carpenter’s glue in a ratio of 3/1. When the cloth-mixture dried, I cut long strips and in a width as the half of the size of the supposed leaf (panel) of the sail. I used those strips to cover the edges of the sails by folding them over and secured them with white glue. I also cut and placed reinforcement patches from the same stiff cloth. Boltrope. I started placing the bolt rope using white glue (what else…?) and forming eye splices at the corners. I had read that following this method, some mates had used waxed paper in order to avoid glue-messing on the working surface. I used just strips of masking tape and by working on its sticky surface-side, I had no problem… Some more details had to follow before the end. Thanks


-
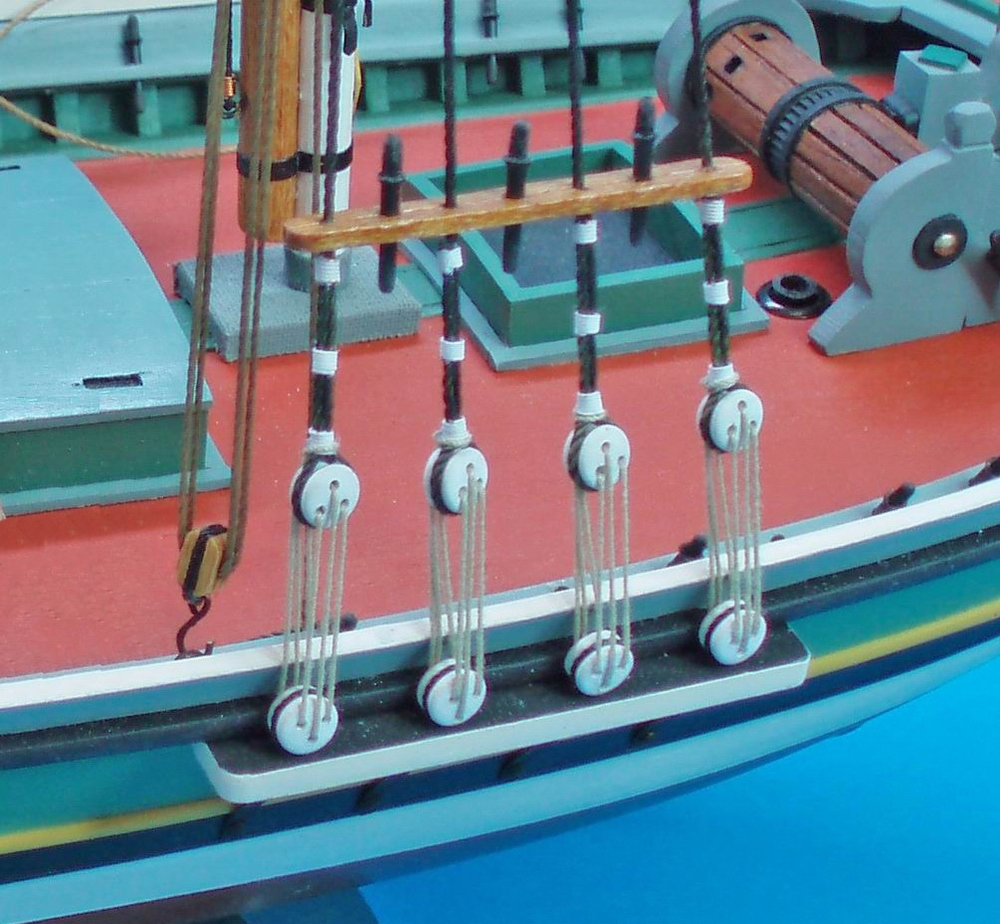
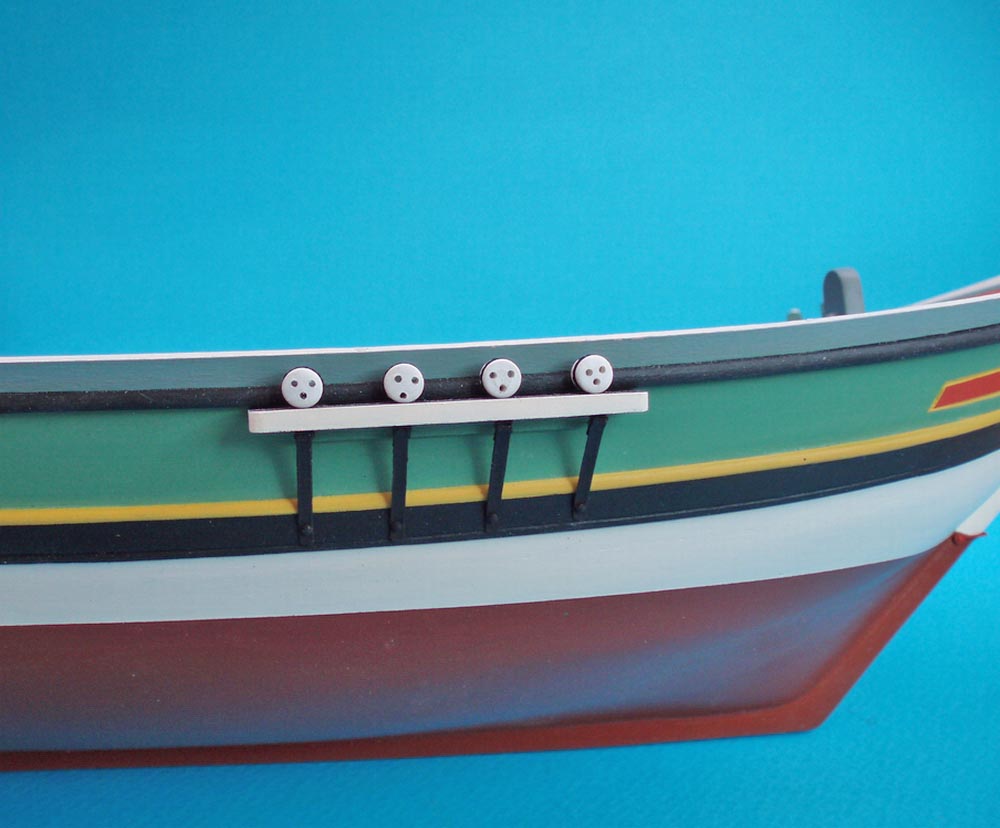
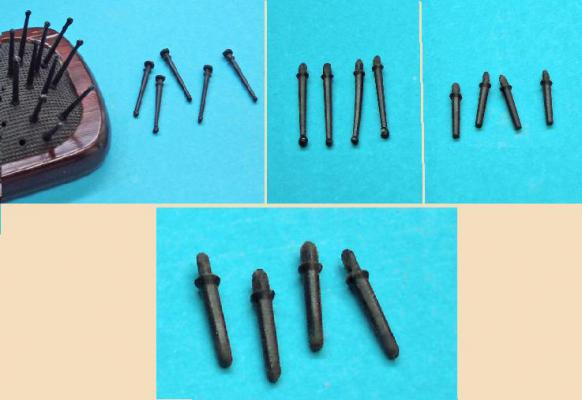
Thank you all but be ready for another (likely) disturbing tip of mine... Belaying pins... How many and with what cost? I read in market about 2,50 € (2,78 $) price per about 20 pieces.! Really...? How about 1,50 € ((1,67 $) per 60 pieces... From a low cost shop I just bought a hairbrush with plastic pins (1,50 €). See the outcome in photos… So, the belaying pins were placed and ............. I was ready to set sails…
-
Multiple seizings are also prepared. False seizings of course...Either from glued thread or wire, makes no difference in cheating... Some of the rigging phase. Thanks


-
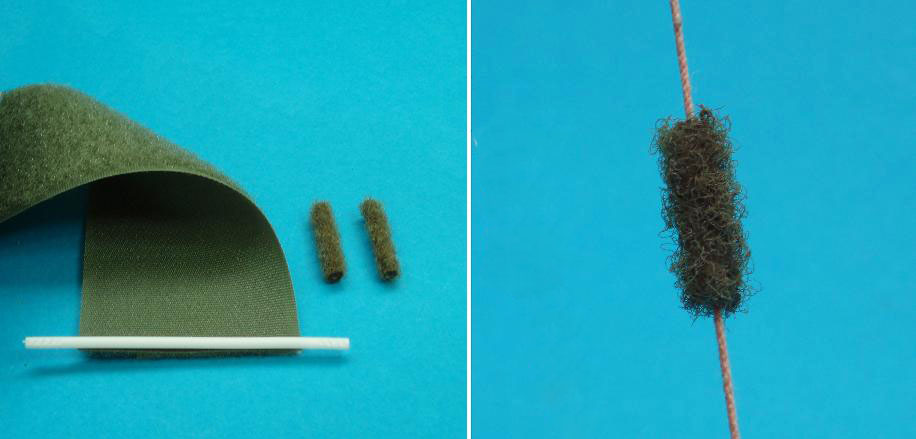
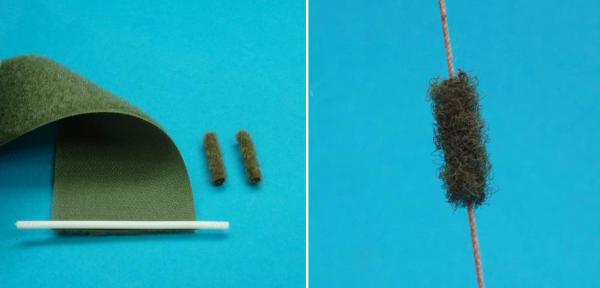
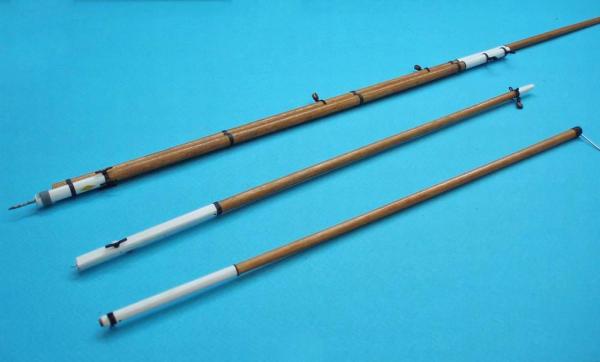
Baggywrinkles Baggywrinkles came out easily. Although I had made some experiments in the past, this time I followed something different. So I made them by folding a piece of a Velcro tape, (the piece with the loops) over a small tube (e.g. from a cotton swab) and the use of ca glue. For those who are going to try this method, cut a piece of Velcro at a length as close to the perimeter of the small tube. You will cut the extra length afterwards. Then leave the tube to be strong glued on the edge of the Velcro tape and then start the folding, using the ca glue and making small progress every time. And some progress on Mast-"half boom"-Jib boom. Thanks Ps: Sorry for my English...
-
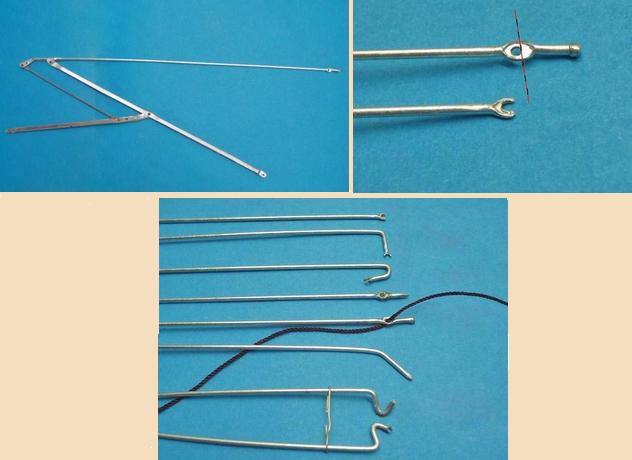
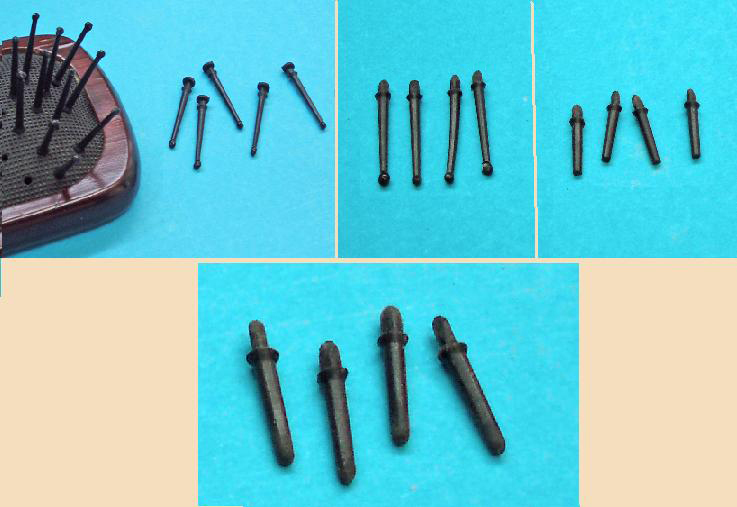
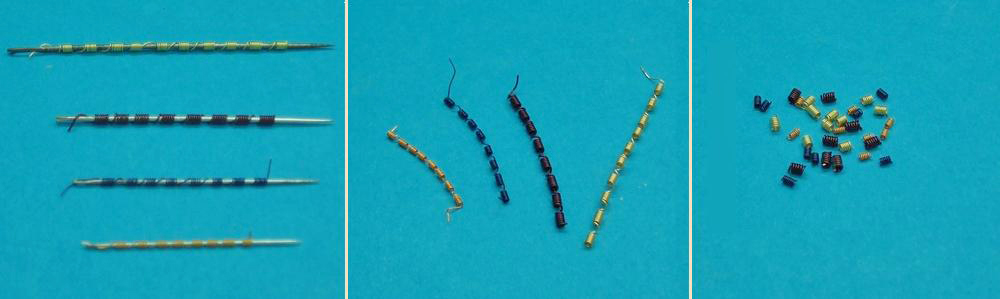
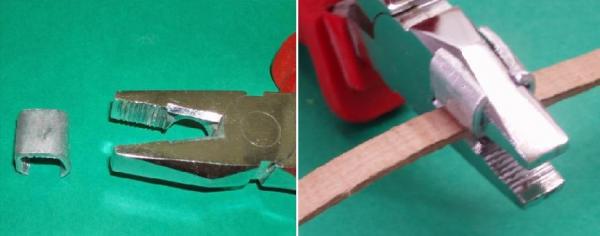
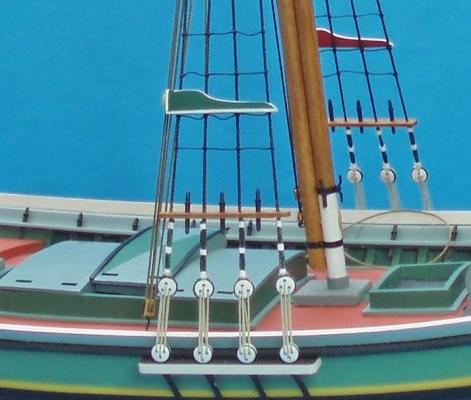
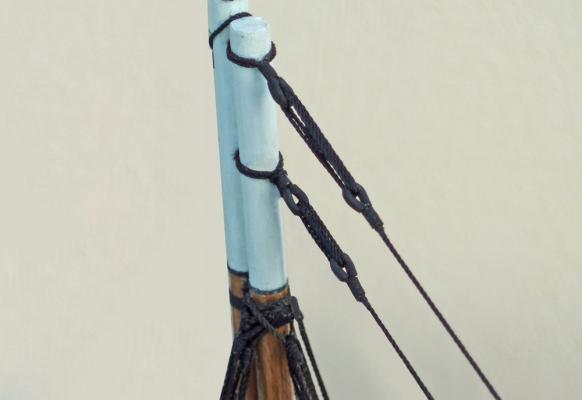
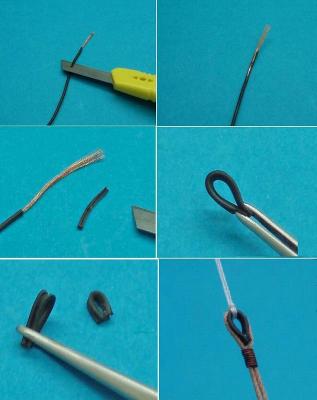
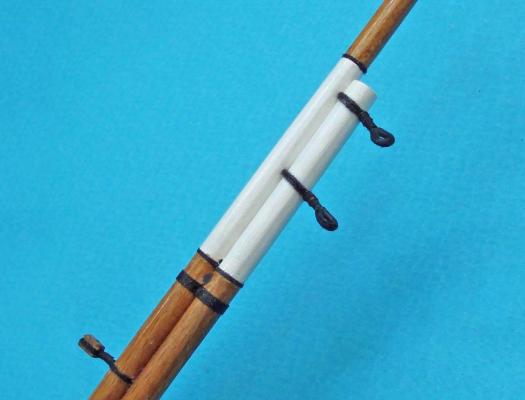
Thank you all. Before I start the rigging, I had to prepare some details… I had noticed that, all of these penna rigged boats had their two forestays attached in the mast by the use of two hearts. So to be accurate I had to build those all four thimbles... At this scales...ouch. But it wasn’t only this... Some of the boats in photos appear having baggywrinkles attached on the last, towards to the stern, shrouds. So I had to add also two of those in the list… Thimbles I had some ideas on how to make thimbles (e.g. to bend a thick needle of a syringe and then file the outer side) but I decided to go with something easier… So I took a piece of cable in a proper diameter and leaving the wires inside, I removed some of it (a peel)…Then I removed the wires and took a piece of the damaged cable. In fact now I had a tube which has been opened at its length. Then all I had to do was to bend this tube, leaving the groove at the outer side of it and from which the thread was going to pass making a loop. I prepared four of those thimbles and attached the two of them on the mast.


-
Thank you all for your comments-likes. Vaddoc You are not a "poor amateur" and you know it (I have seen the way you work)... I don't like to take many photos while I work for many reasons.. It takes time-I have many back and forth but most of all I consider myself as "an example to avoid". Wait to see...

-
More.... Thanks

-
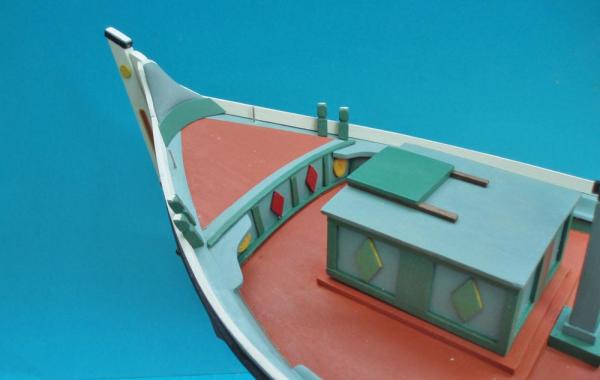
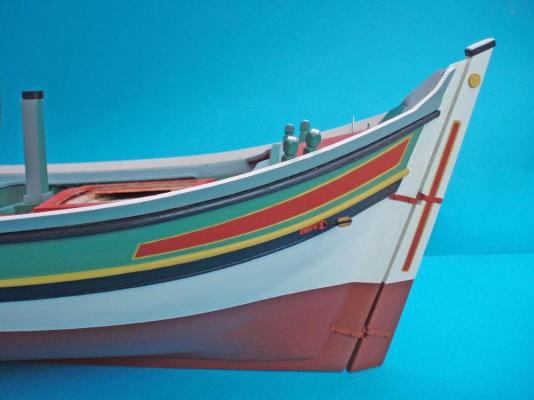
Painting phase...Long and time consuming... Even a Gr boat, I wanted to give her also an oriental character, since the interaction between the two Nations was continuous. After many combinations I came up to this...


-
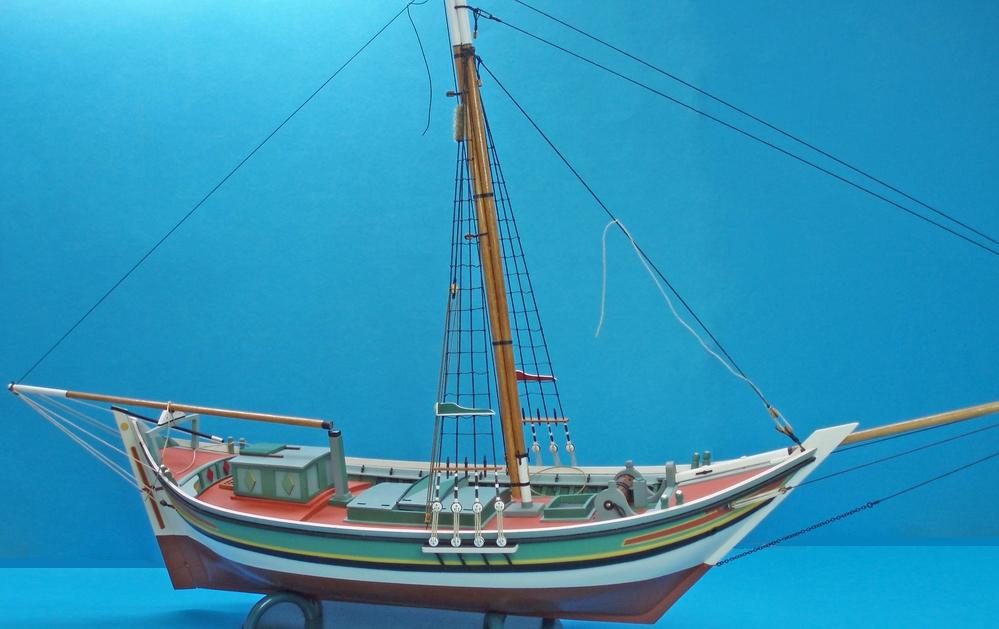
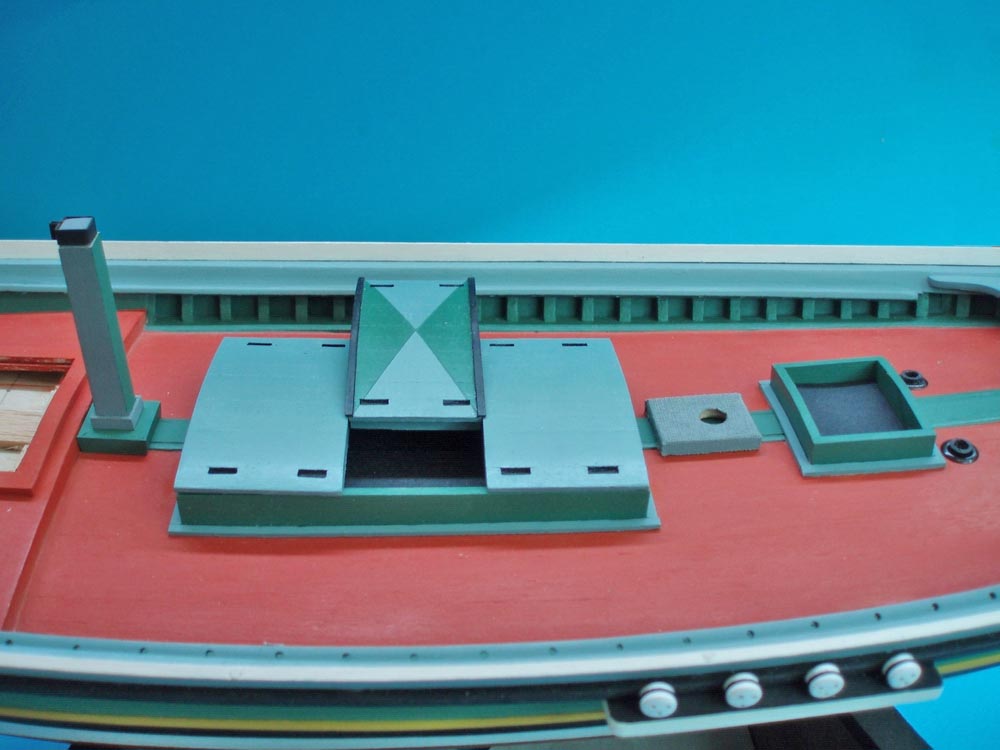
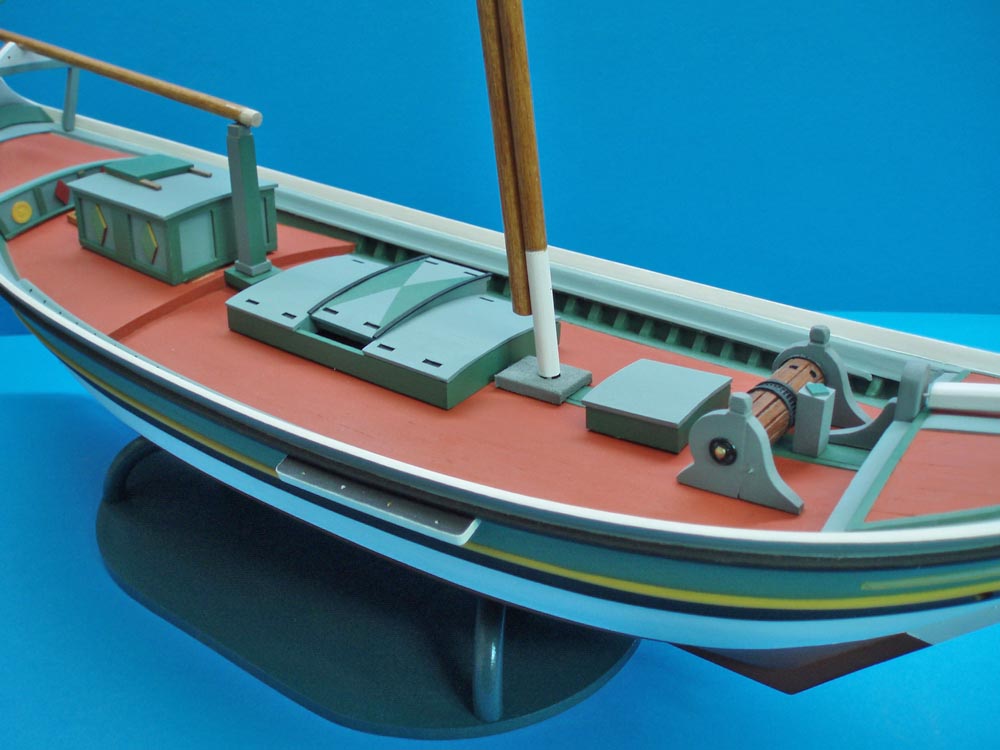
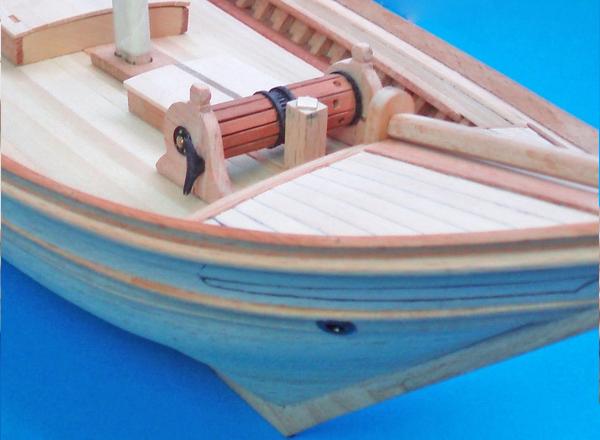
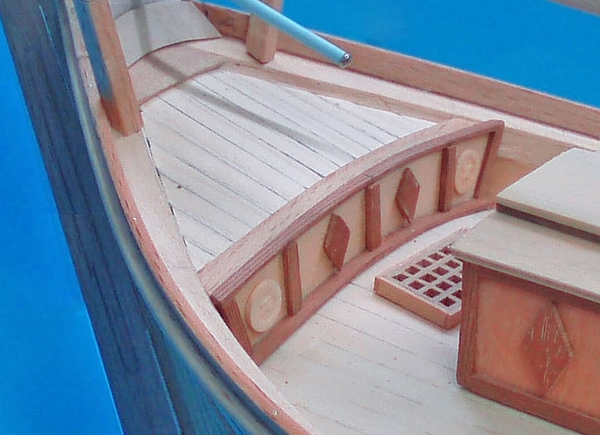
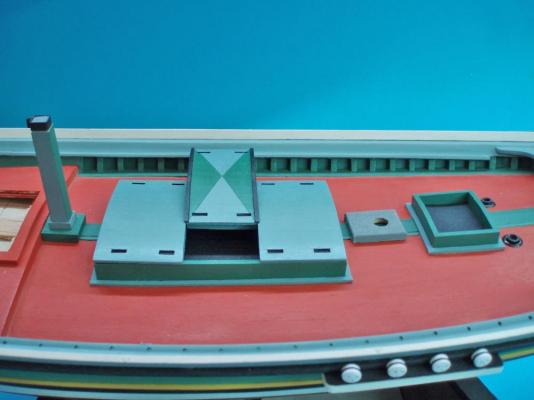
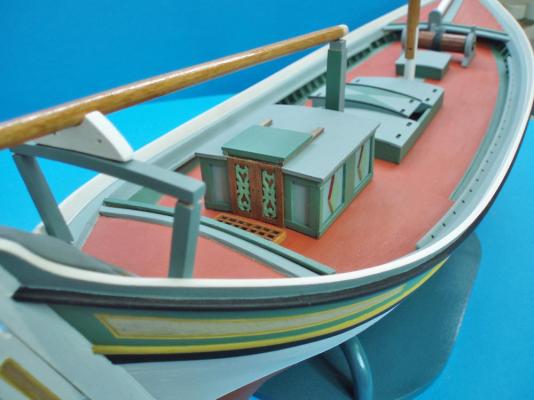
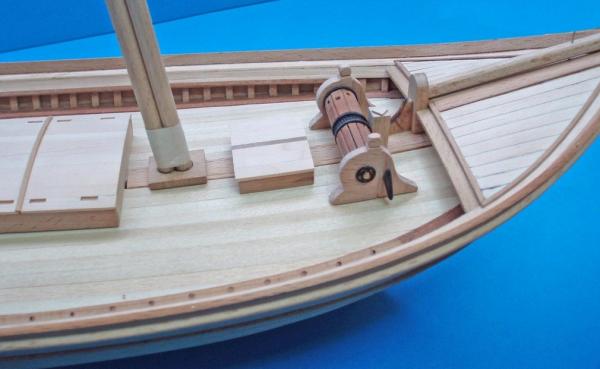
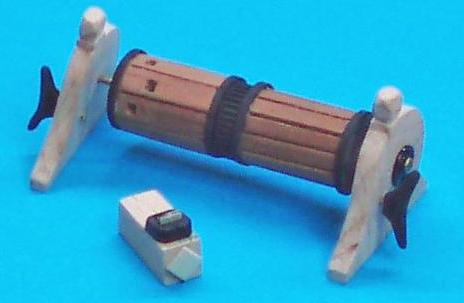
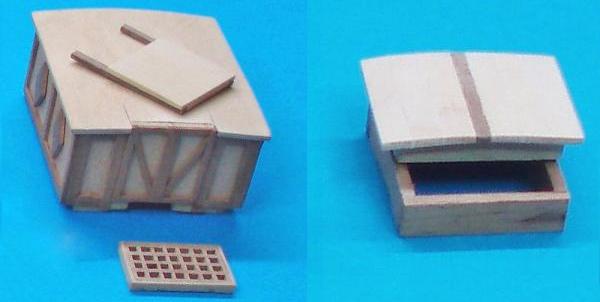
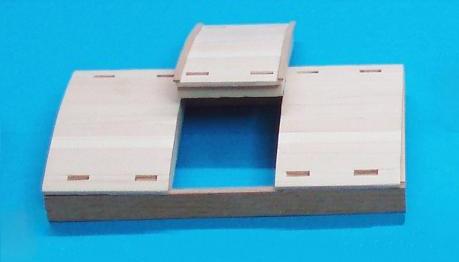
So, placing all fittings on the model I had a first impression on how it was going to be… And a closer look on some details. Windlass Decoration board Bridge- "Katsoulas"- tiller- rudder I have forgotten to mention that the scale it’s 1:24 Thanks


-
From what I have read, the centerboard method was never used in Greek shipbuilding at the era of sails. In contrary a keel weight (from stones) was a common practice, almost in every type of Gr. hulls-vessels. I’m almost sure that Tserniki vessels rigged as penna, should have keel weight, which in a combination with its draught (pretty much great), was giving the necessary stability. As about a fix boom I can only guess that, alike the bowsprits in many Gr. vessels, this “half-boom” was also chosen to be constructed as movable, facing that way the traffic congestion in some ports, or to have the ability (by moving them) to approach (with prow or stern) narrow docks. Thanks
-
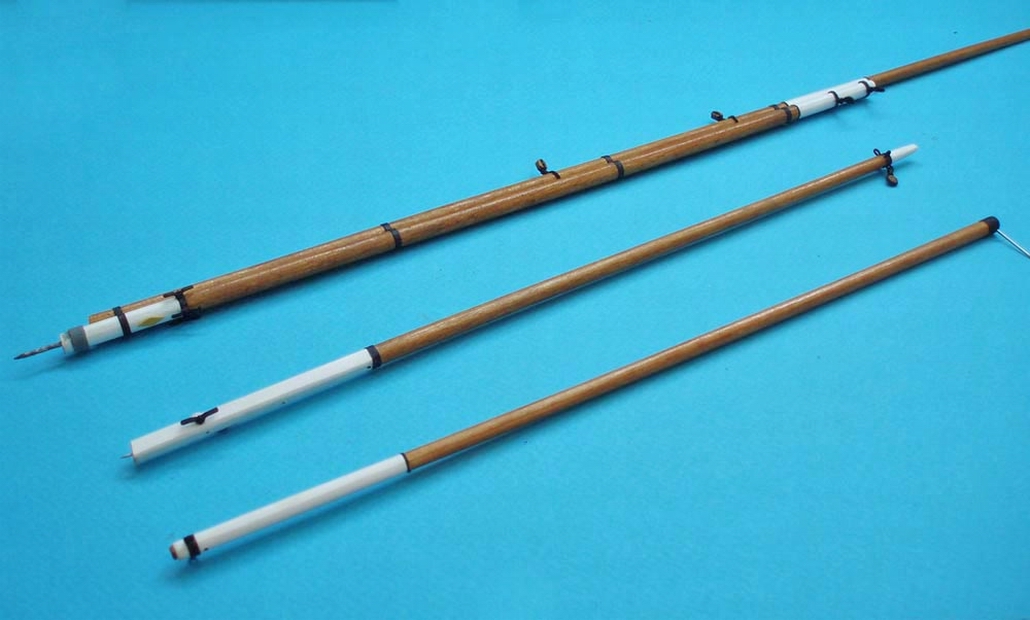
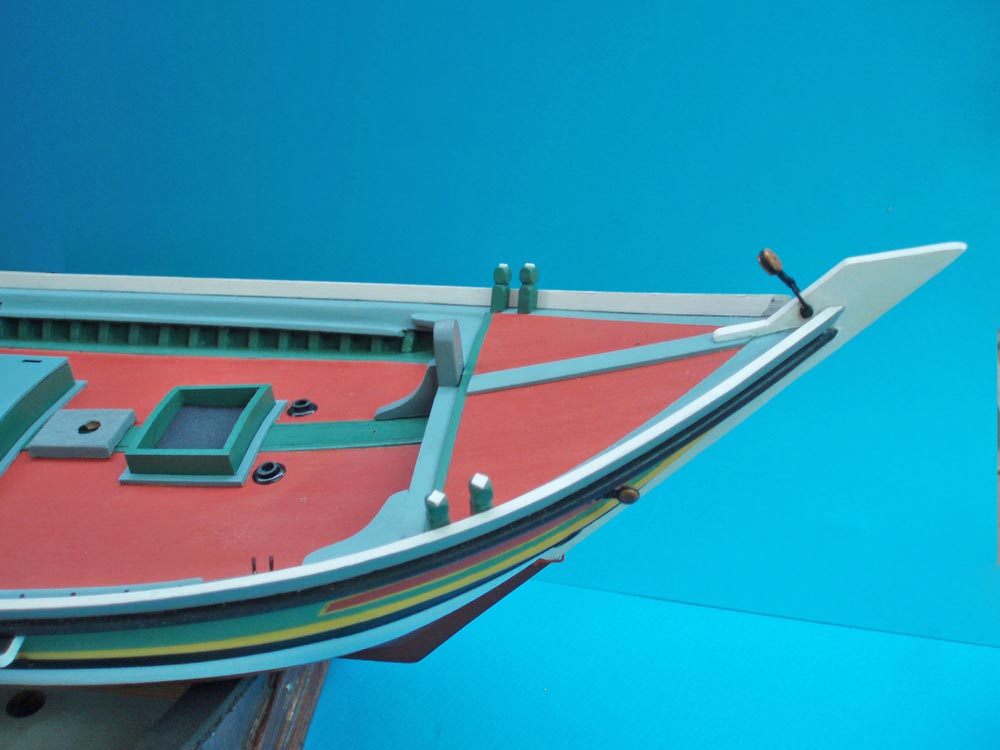
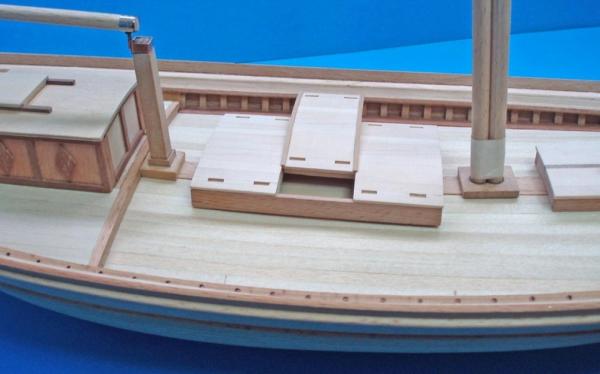
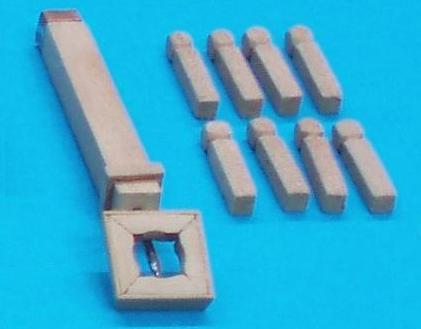
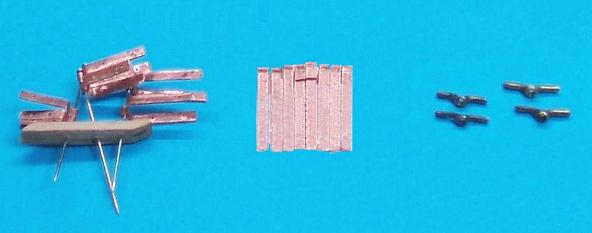
After the theory, some progress… So, making a summary, I had to build… A windlass for the anchor. Even at that time was already in use the pump handle windlass, I chose to make a simple one, since some of those vessels didn't have at all. A coach-roof and a small hatch. A cargo hatch. The stem for the “half boom” and some bitts. A decoration board for the poop deck. The “κάτσουλα” (katsoula). A peculiar wooden piece that used to be formed by the shipwrights at the upper end of the stern of Tserniki vessels, connecting that way the two sides of the gunwales. Two options of a tiller. Some metal work…rudder hinges- chaineplates-cleats. Thanks


-
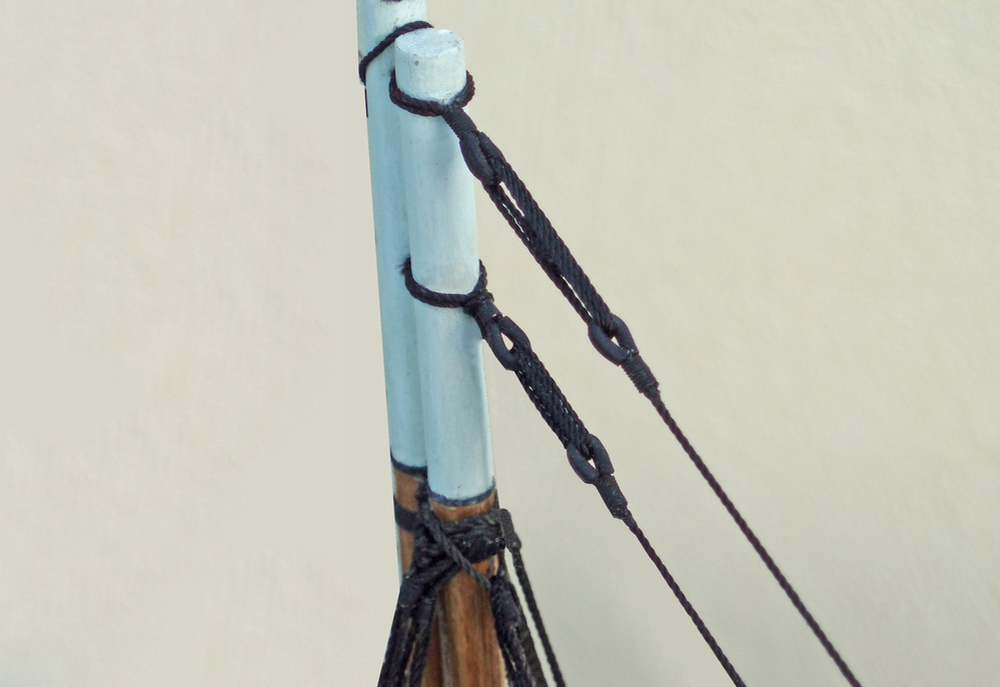
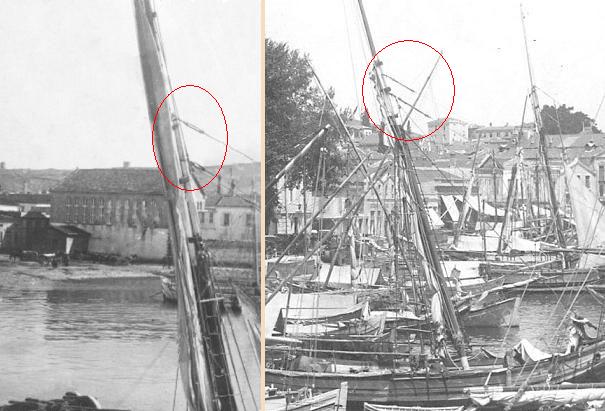
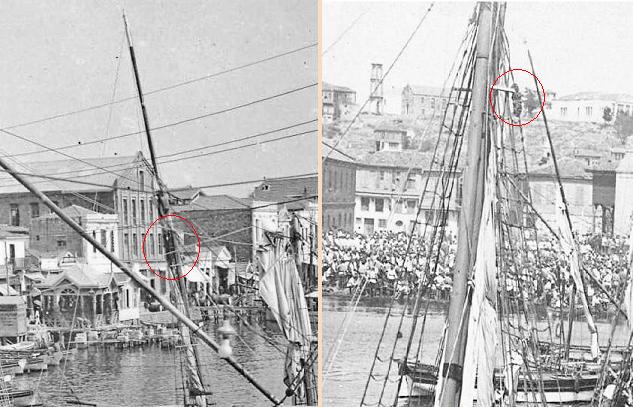
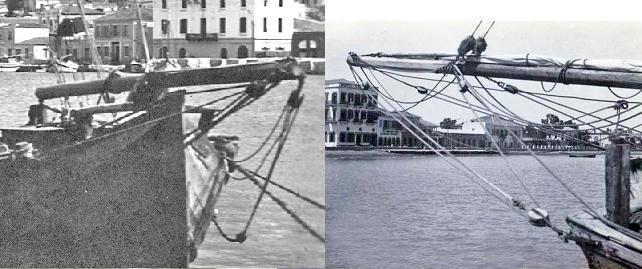
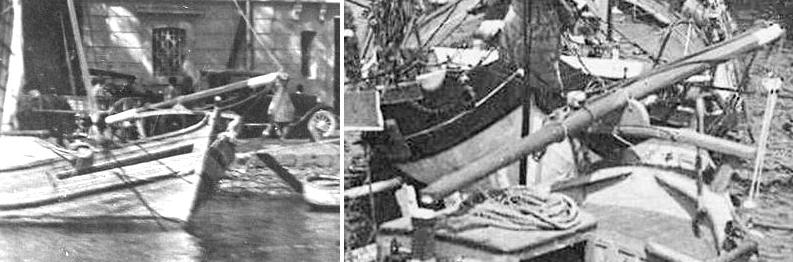
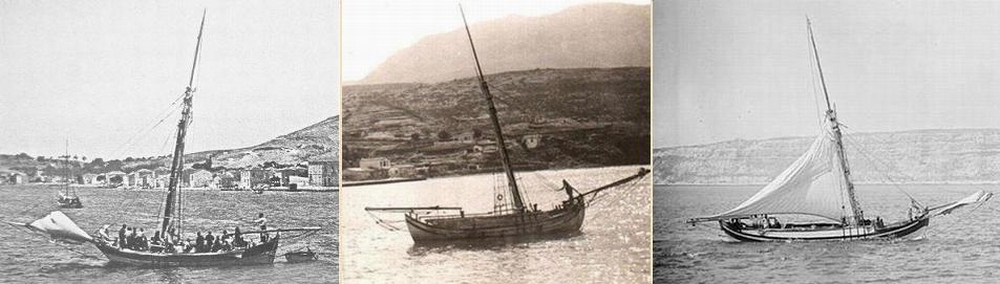
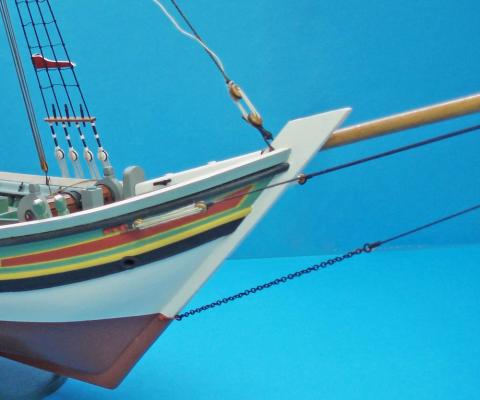
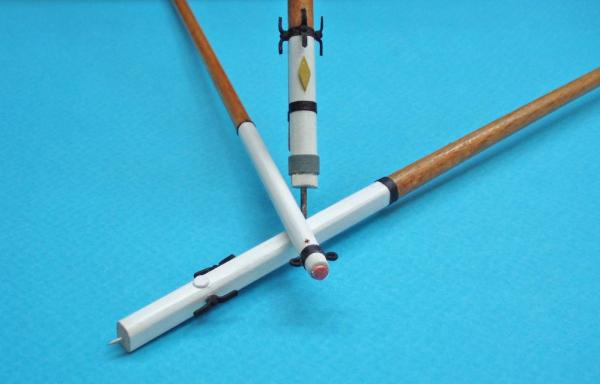
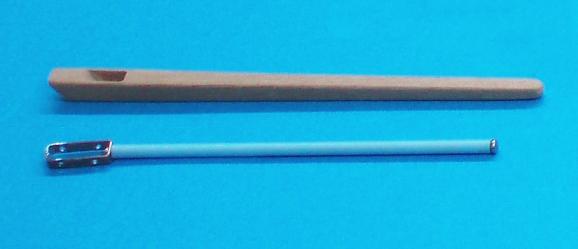
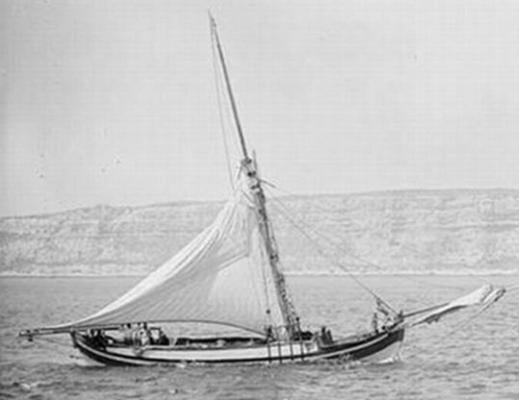
Thank you all. Vaddoc that’s a good question… Certainly more free space on the deck must be the first reasonable explanation. But having been dealing with this rigging, I have come to another possible theory. Starting from the joint of the “half-boom” with the stem, we can see that this was not something special...Just a metal dowel attached at its one end, which was passing through a ring (tube) at the top of the stem. This was giving the ability for certain and limited movements-maneuvers. In all photos showing those vessels sailing, this “half-boom” stays secured on the “bridge”, which should be both considered as immovable…. Again from photos, I found that there were two kinds of rigging for the “half-boom”, assuming for different sizes of vessels. I consider both kinds just only as securing lines, rather than tackles to handle the “half-boom” in sailing. I have also noticed that the sheet line of the sail, usually appears just holding the clew, going through the edge of the boom although some times appears also as a part of let’s say it “boom traveler”. So in conclusion and without being a sailor, I think there was no need for a typical boom (would be a long and heavy with additional rigging) just only a pole (boom) to keep the sail extended from the stern. The handling of the sail was being made by loosing or pulling the proper lines-ropes (in this case the sheet line, instead of moving the boom). See the below photo. The vessel is in state of reefing, having lowering the top of the sail. There were no reefing points, guessing in an absence of a typical boom. ............. Thanks


-
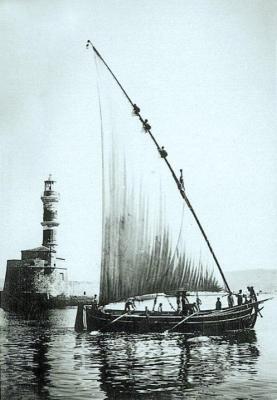
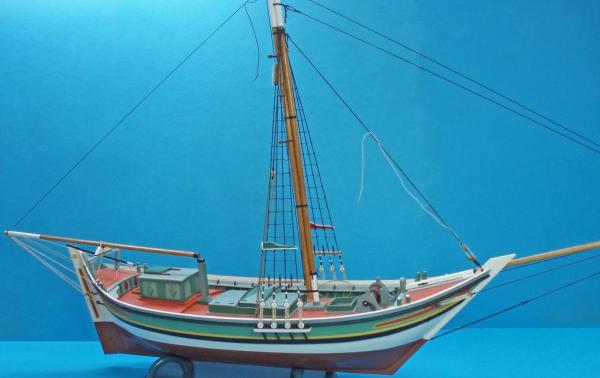
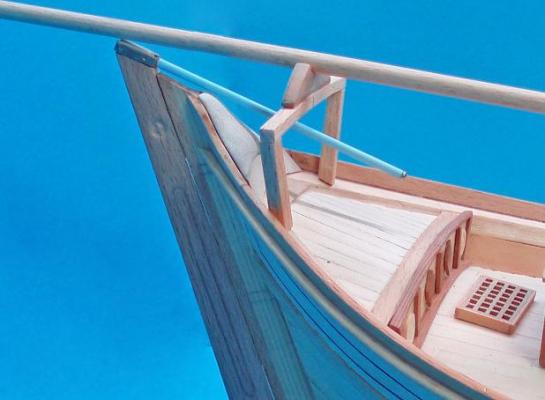
What was strange but attractive in that rigging, was a kind of boom, which was holding the external edge of the mainsail. This “half-boom pole” was attached on a stem towards the stern, while it was also supported by a construction known from other vessels, which was called as “bridge”. Measuring all available drawings and photos in proper angle, I found that the position of the stem varies from 2/3 to 3/4 of the length of the boat, while the length of the “half-boom pole” is about the half of the boat’s length. In addition I had the information that according to the Greek book “About ships’ rigging” of 1919, for the typical version of penna (normal boom), the mast was usually placed at the 1/3 of the length of the boat and in an angle of 10°-15° towards the stern. Then I felt ready to go on.