Thanasis
-
Posts
653 -
Joined
-
Last visited
Content Type
Profiles
Forums
Gallery
Events
Everything posted by Thanasis
-
A Greek proverb says: "When you hear of many cherries, hold a small basket”... The ship models can be seen also there: http://greekshipmodels.com/en/home/ Thx

-
Thanks Jack. Unfortunately there is nothing to give any clue about those boats. I haven't found any similar boat or rigging in Gr marine tradition. Although they both have "penna" (Bermuda) rigging, it differs from the "penna" that was used in Gr. vessels. In addition the rudder and the tiller don't have Gr. character... Many thanks
-
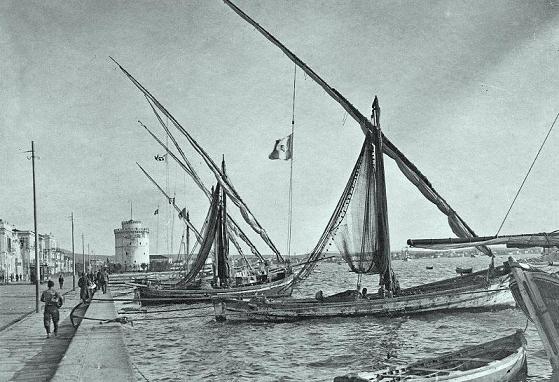
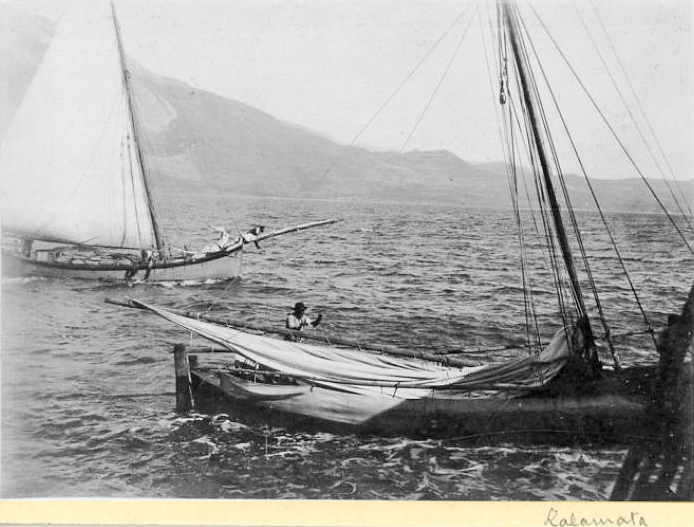
Hi Jack and thanks for the info. Do you Know whether the boats in the photo (taken in Kalamata Peloponnese-SW Greece) belong also to Italian marine tradition (hull and rigging). Thanks
-
What are these? does anybody knows? thanks.....
Thanasis replied to BIGMAC's topic in Masting, rigging and sails
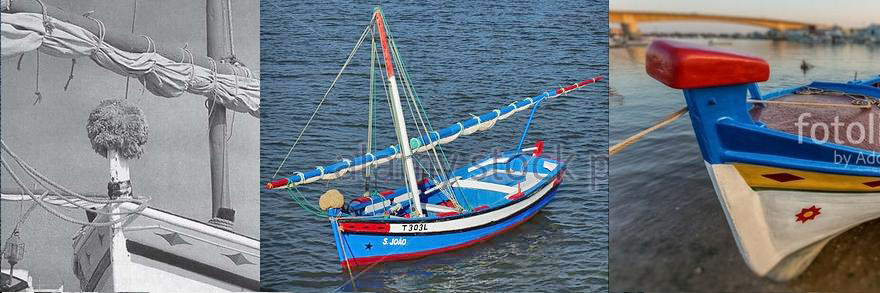
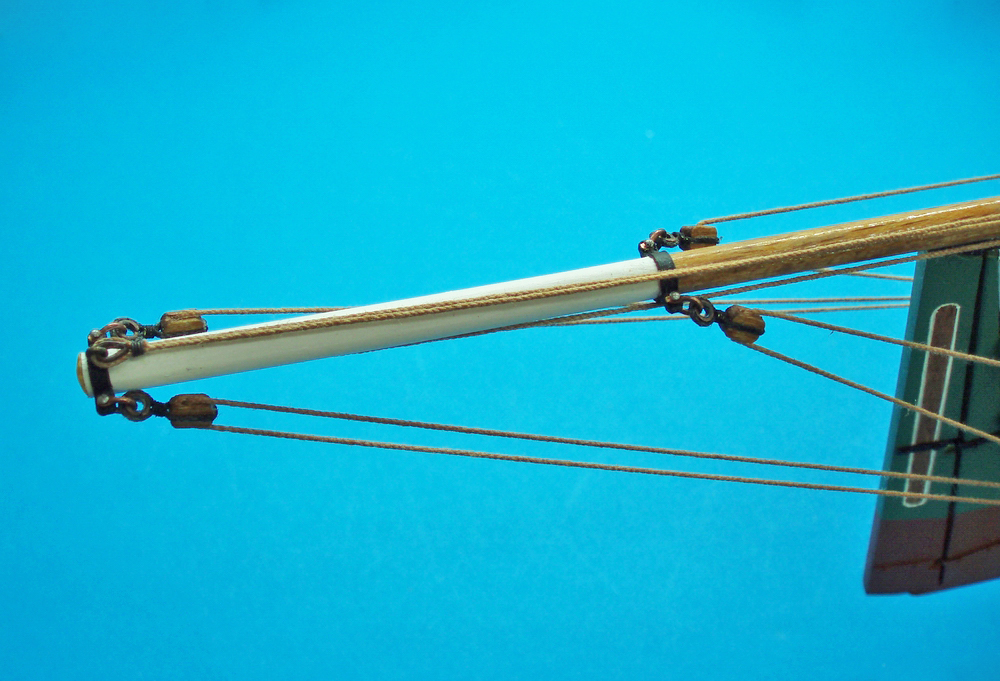
Hello all. Portuguese fishermen might still use something similar, not to say the same at least at the end of the stem of the galliot bow. From the photos I guess that, either they were using something made of rope like the "baggywrinkle", or they might would cover a proper wooden shape, with a sheepskin. That would explain what it seems like heavy load at the edge of the yards. What remains, is to ask a Portuguese fisherman, about the name or even the construction of that. Thx
-
Making Shackles my way…
Thanasis replied to Thanasis's topic in Metal Work, Soldering and Metal Fittings
EJ_L. Many thanks for your comment but it isn’t my idea. As I mentioned before, I just recall it from the past, having seen it as another member’s tip. I wish I could remember his name to give him the deserved praise. Wefalck, say that nothing happened. Really no hard feelings at all. Just to mention, that being ship modeler from almost 20 years, I faced twice that an idea of mine was "stolen" and was presented in forums as their ideas. I won't tell you the tips nor the nationality to protect them just only it was in the days of DryDock models forum. In one case, he probably didn't manage to come in a result and in addition, he had used one of the photos of my own presentation. They were run out of luck and I found them.... Through the messages we exchanged, I felt the embarrassment and their shame when I demanded to delete the posts and forget the issue. So, having this experience, I couldn't even think to copy another's tip and present it as mine. It wouldn't make me richer. Thx
-
Making Shackles my way…
Thanasis replied to Thanasis's topic in Metal Work, Soldering and Metal Fittings
Thank you all for your comments mates. Wefalck. I accept you explanation, although I would prefer this 'tongue-in-the-cheek' expression been placed at the beginning of your sentence, or with a more relevant emoticon... To set you free from the translation (you may write it if you like) just tell me whether in the text is there any reference on haemostatic pliers with hole to make scratch marks, or small hinge to shape the shackles over. I won’t expect to find any reference on PC processor though. In case of not, then the word “exactly” (the same), should be used with care. Thanks -
Making Shackles my way…
Thanasis replied to Thanasis's topic in Metal Work, Soldering and Metal Fittings
Thank you all for your comments mates. wefalck . Thank you also for your notice. Well, believe it or not I wasn't even thinking to involved with ship modeling back in 1980 (at my 18) therefore at that time I wasn't following any ship modeling magazine and especially in German language, which I don't speak or write. Wanting or not to accuse me, and being (me) a bad user of the English language, what really bothers me in your notice, is your words "probably" (I don't read German) and the "exactly" (same technique). By those words what I get, is that you have doubts whether this technique is not a copy and you decided to share it with the forum. I really can't read the text in the pdf of your link, so apart from what I can see (a drawing which shows a piece of wire being flattened at its edges - what else someone could think at first making shackles), I would like to translate the text and point me out the "exact" same procedure. Many thanks -
Making Shackles my way…
Thanasis replied to Thanasis's topic in Metal Work, Soldering and Metal Fittings
Many thanks for your compliments mates. Happy modeling to all. Thx
-
Making Shackles my way…
Thanasis replied to Thanasis's topic in Metal Work, Soldering and Metal Fittings
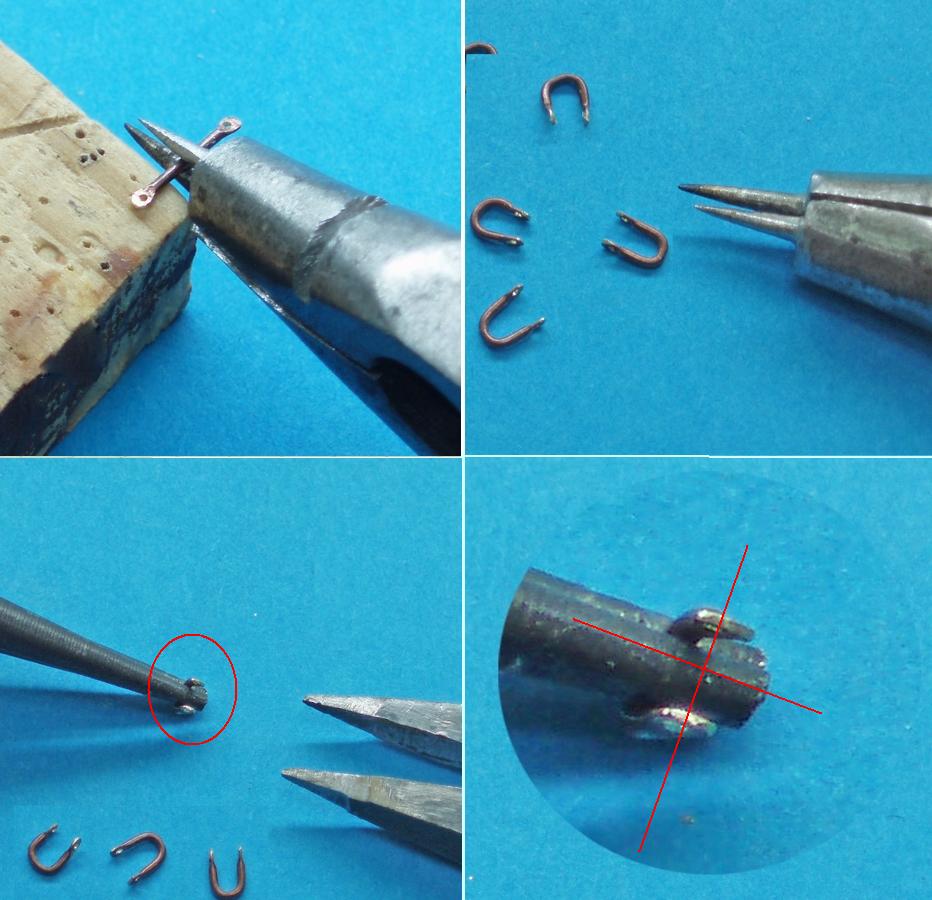
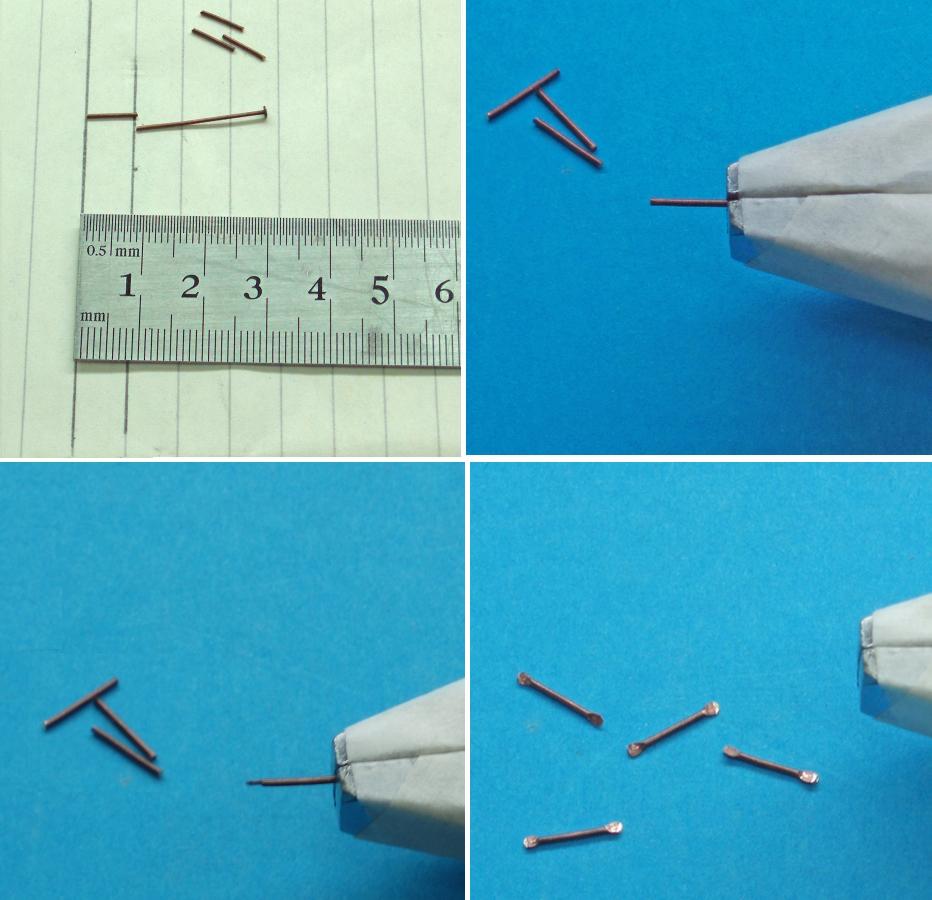
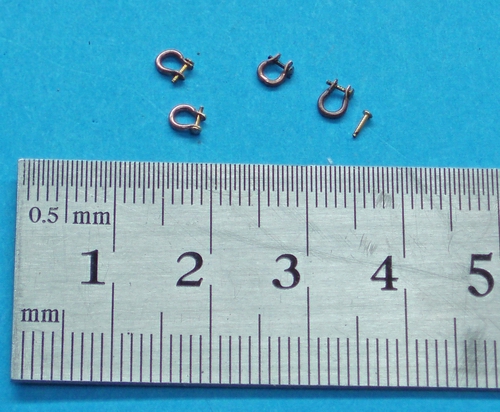
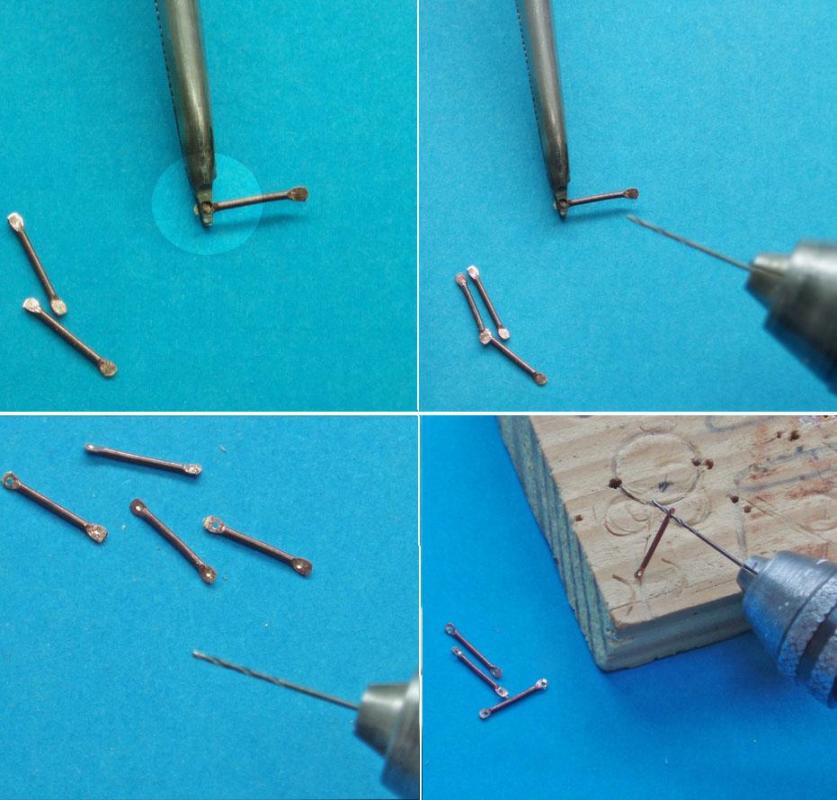
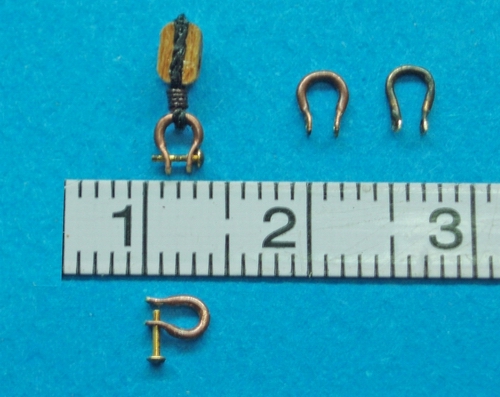
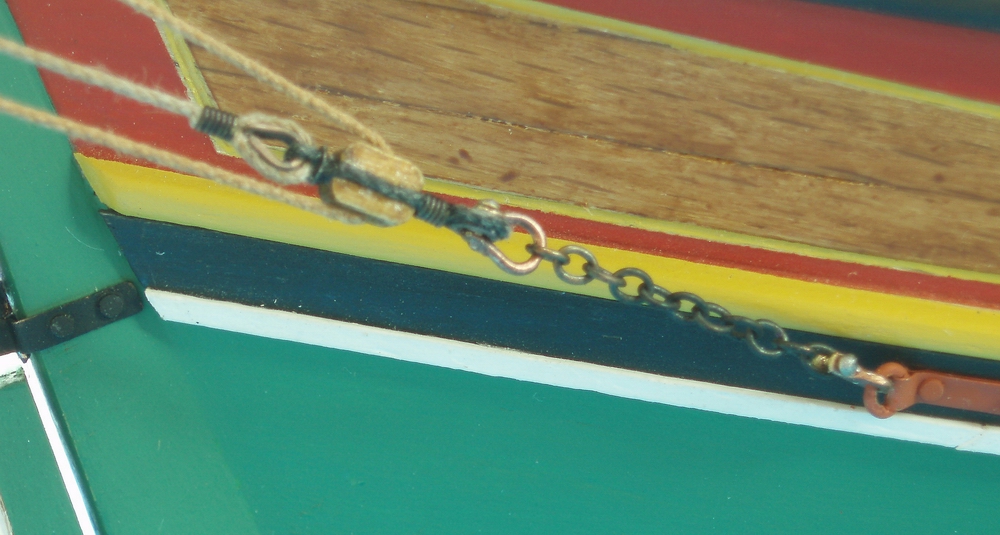
What has left is the “key” of the shackle. You might find your way to represent that “key” but following the above method, you have to consider at least the diameter of the holes of the shackles. It’s rather rare to find something to look like nail…3-4 mm long and with less than 0,50 mm in diameter. Thankfully I recalled a tip from another mate some years before. For those who are not familiar with the inner of a pc, the processor has one of its surfaces full of pins. What I did, is to set up a small fire in my backyard and take the last offer of an Athlon processor…. Then I collected many and ready for use “keys” for my shackles. For those who will follow the same tip, you will find that many of those pins come out with some lead on their head. Don’t panic. Just keep them with a tweezers over a lighter's flame… .................................................... That’s all mates. I hope at least I have inspired you and I’m sorry if you get tired with the use of English language... Many thanks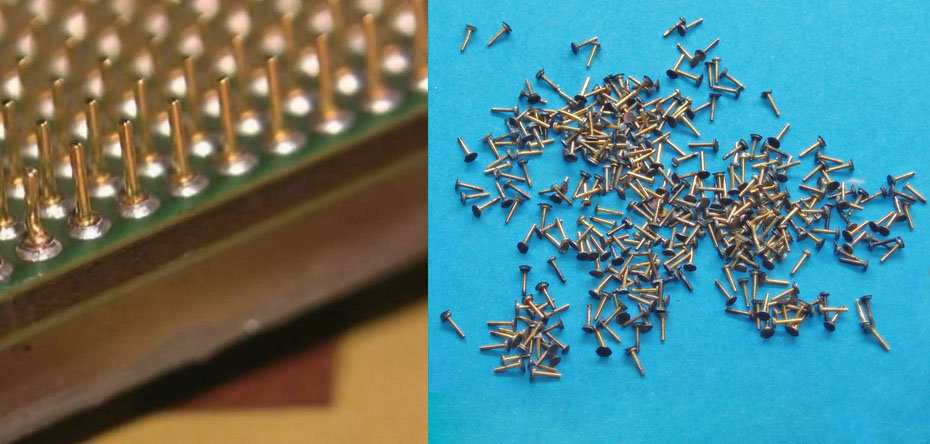

- 35 replies
-
- 26
-

-
Making Shackles my way…
Thanasis replied to Thanasis's topic in Metal Work, Soldering and Metal Fittings
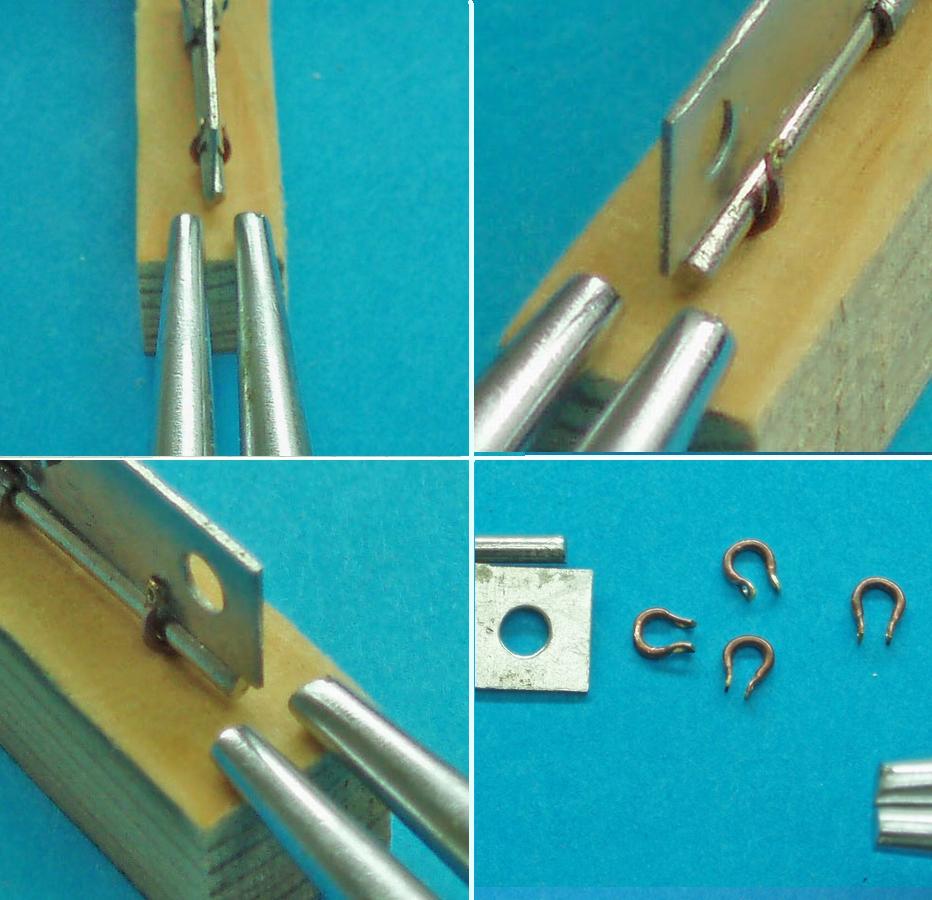
Next stage is to give a general “U” shape to those metal pieces. -So by the use of a rounded nose plier on the edge of a surface (I suggest a wooden one), push each piece to bend it. Be aware, not to exert pressure at the edge of each piece but on the not flattened part of it. Because of the flattening and the hole, the edge has been weakened and you might ruin it. That’s why I mentioned “on the edge of a surface”. -It’s also important to bend them symmetrical so that the edges be equal to each other. -At this stage, when you have “U” shaped them all…you must align the holes on each metal piece by both axis. Finally, we come to the last stage. Take every “U” shaped metal piece and place it under that modified hinge and in specific, between the pivot and a wooden pad. Then with a round nose plier exert pressure on the metal piece at the same time at both sides of the hinge. One or two passes will give you that “Ω” shape-the result you want. No need to mention, practice always leads to improvement…

- 35 replies
-
- 19
-
-
Making Shackles my way…
Thanasis replied to Thanasis's topic in Metal Work, Soldering and Metal Fittings
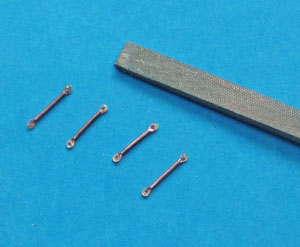
Ok, let’s set a Shackles producing line…. You may choose your way for each of the following stages but I’m showing what I do… -Take a piece of paper and draw two lines at the total length that a shackle should has to be, depending on the scale you work. I work at 1:24-1:26 scale so I found suitable the 8-9 mm length. Place the wire between those lines and cut as many pieces you want to transform into shackles. In the photo is shown those ear piercing nails I use and incidentally the lines of the page are printed in 8mm space. ! -Take the heavy duty pliers and place each end of those pieces between its jaws, up to the line of the masking tape. Exert pressure and you will have a flat part on each end of the wire. Try to create those flat ends at the same level, although it will be a correction, later in the process. Remember, the tape was placed at 2mm on the flat space, so it helps you not to measure every time how much part of the wire should be flattened. When you finished with the flattening, it’s time to use the haemostatic pliers. Take each piece of the wire and place each of the flattened parts between the jaws of the h. pliers under the 0,50 hole you have made. Then with your rotary drill, and through that hole, try NOT to make a hole but a scratch mark on the flattened surface of the wire. You might have some holes (as in photo) on some of the pieces but this is not the aim at this stage. There is only one hole in the nose of the h. pliers, so if you try to make a hole in the wire by force, you probably will need a drill bit, for every hole you open…You can finish the job later over a wooden pad by the help of the scratch marks. At this stage and if you like, you can round a bit the edges by the use of a thin file.
- 35 replies
-
- 15
-
-
Making Shackles my way…
Thanasis replied to Thanasis's topic in Metal Work, Soldering and Metal Fittings
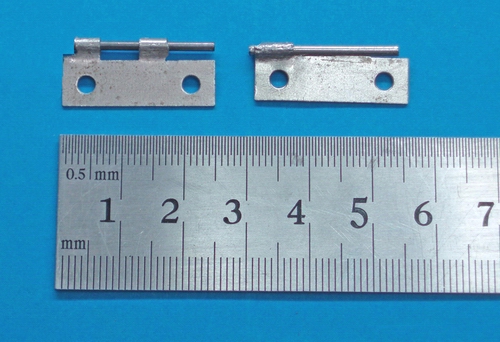
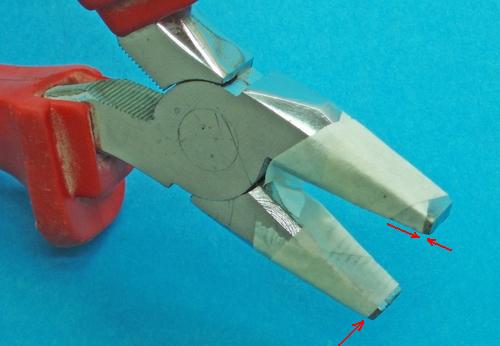
Before you start you need to make some modifications, as below. a.Take the haemostatic pliers and if it’s necessary trim down (about to 4mm/ 0.15748 ‘’) one part of its nose. Then, making first a scratch mark on the surface of the same part, make a hole at 0.50 mm. You might need some drill bits here… b.Take the part of the hinge and modify it as in photo. Namely, remove the pivot cut off the inner support and bring down the other support so that the pivot can be as close to the main part of the hinge. c.Take the heavy duty pliers and place pieces of masking tape on both parts of its nose, leaving a flat space about 2mm/ 0.0787402’’. That’s all for now mates, thank you and stay tuned…
- 35 replies
-
- 13
-
-
Making Shackles my way…
Thanasis replied to Thanasis's topic in Metal Work, Soldering and Metal Fittings
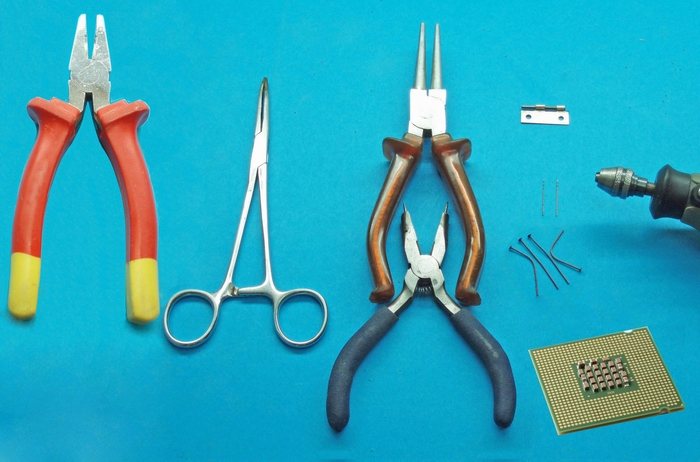
Ok here we go. Tools you will need. The basics in your workshop but I consider also as necessary, what is shown in the below photo. A heavy duty pliers, with some flat space (3-4 mm / 0.15748’’) at the edges of its nose. A haemostatic pliers with as much can be narrow nose. If you can’t find this kind of pliers, you can use instead a strong self closing tweezers. Your round nose pliers (small and larger). One part of a small hinge, with the pivot. Drills bits at 0,50 mm diameter. Soft wire at 0,73 -0,75 mm in diameter (I think is suitable for the 1:24- 1:26 scale of my models). I used those in photo ear piercing nails, finding them suitable in dimensions and convenient in color (no need to paint them) … And finally an old PC processor...

-
Making Shackles my way…
Thanasis replied to Thanasis's topic in Metal Work, Soldering and Metal Fittings
Thank you all. Nils, assuming that you're referring to thimbles, it might be another presentation for this... Thx The ruler in in cm.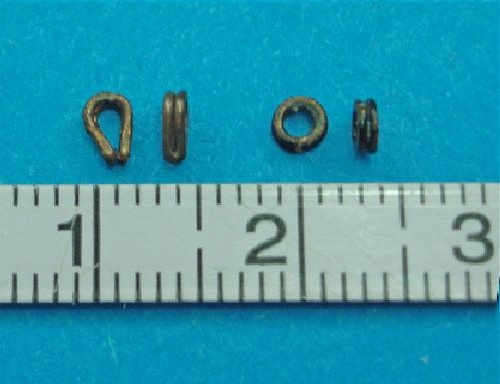

- 35 replies
-
- 16
-
-
Hi all. In my last model (is coming soon) I've been challenged to make some more metal work. So I decided among others to deal also with the shackles. You know, the nautical item shaped as the Greek alphabetical character "Ω”... I didn't want to spoil my lazy way of making models, so I made relatively reasoning... Perhaps someone has also found an "easy" way to make shackles but I'm happy with my way. Consider, I managed to make 12 pieces in 40 minutes, with minimal failure...and there are over 30 shackles in my model. Just give me a few days time, to set up a presentation. Thx The ruler is in cm.

- 35 replies
-
- 28
-
-
Take a look there... http://modelshipworld.com/index.php/topic/11087-panderma-ferry-by-bibounde-turkmodel-scale-187/ Thx
-
Mehmet, your good preparation is evident on your model. And yes, There are still some of those vessels in Kalymnos Island, although are painted like clowns to attract the tourists ... Keep up the good work. Thx

- 83 replies
-
- 3
-
-
- sponge boat
- finished
- (and 1 more)
-
Merhaba (Hello) neighbour... Beside a very good model, you had the guts to deal with the aging.! Congratulations for both of them. Thx
- 83 replies
-
- 4
-
-
- sponge boat
- finished
- (and 1 more)
-
Hi all. There's a pdf file titled as "BRONZE AGE SHIPS AND RIGGING" which can be found by a web browser... I haven't read it (sorry ancient ships don't attractive me) but you might find something useful within its lines.. Btw... If my opinion counts, you're making a wonderful model. ! Thanks
-
Proxxon Micro MBS 240/E Band Saw Review
Thanasis replied to Blue Ensign's topic in Modeling tools and Workshop Equipment
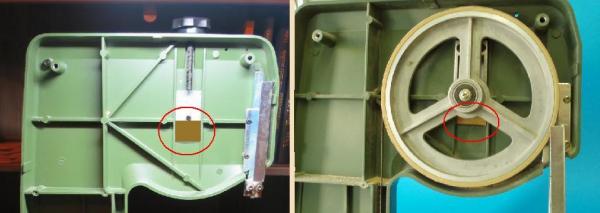
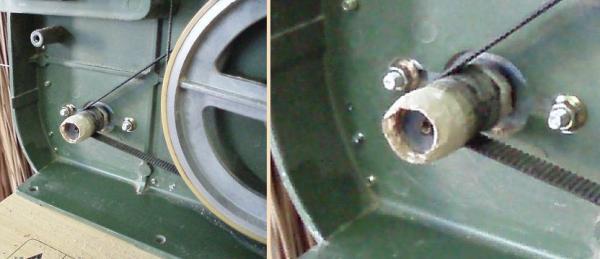
Hi all. I join you in this thread of Proxxon band saw users and I would like to add my experience. Noises can also being produced by the ball bearings on the blade guide. The same can happen if for some reason the lower, inside the case, blade guide has moved-turned from his vertical position. At this case you might come even to a broken saw band. Alexandru. I think you’re right guessing that the noise and the result of the broken saw blades might comes from the worn plastic on the wheels. In addition I consider the upper wheel (as adjustable) as the main responsible for the failure. What I faced was that for the same reason of the worn plastic on the upper wheel, the band saw blade was stepping in and out of a formed by the use groove. That was causing me either broken bands or bands that frequently were slipping out of the wheel. After some thinking I came to a simple solution which is still working…I placed a small piece of wood (it could be from plastic) in 3-4 mm (0.11811 inc) of thickness, at the bottom of the slider of the upper wheel. See photo. This way and by screwing the back knob (tensioning the blade), the wheel comes to a position where it will be spinning with a small angle, towards to back of the case.…This angle “forces” the band saw to stay at the inner part of the plastic, preventing from stepping in and out of the formed groove… In a way it fixes an alignment…See whether it might work for you as well… As another option you may try filling (or replace the entire plastic) the formed gap-groove by making-placing loops of insulating tape around the wheel. I have seen it in the web but I haven’t tried it (yet…). Another tip to keep the drive belt in tension when it’s been loosened by the use, is to make some loops from paper tape on the motor pulley. With the drive belt in its position and by turning the motor pulley by the hand, you apply layers of tape on its surface and from the free side. After some loops there will be a "new" tension. If you face the problem where the belt slips over the pulley, then you can extend the length of the pulley, so that the belt can rotates in a longer surface. You can do this by using some cylinders (from plastic or rubber) at the same diameter of the pulley. These cylinders can be placed as extensions and stay in place by applying paper tape over them. Although I have bought a new belt, I keep using the first one (from the factory) to see how long is going to last…I have been using it in this form over a year by now. Last tip, you can replace a worn brush from the motor belt with an old toothbrush. Seen it in web... Needless to say before anything else, unplug the band saw. You may find my tips a bit of crudity but it isn't the right time to spend money in Greece. And please don’t stay on my poor English… Thx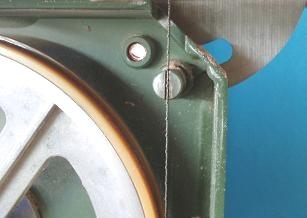
- 47 replies
-
- 11
-
-
Thank you all for your kind word mates. I wish you similar successes... Maristella, in addition I wish you all the best to your company and wanting to intrigue you... Greek traditional boats are also "sails of the Mediterranean". Thx
-
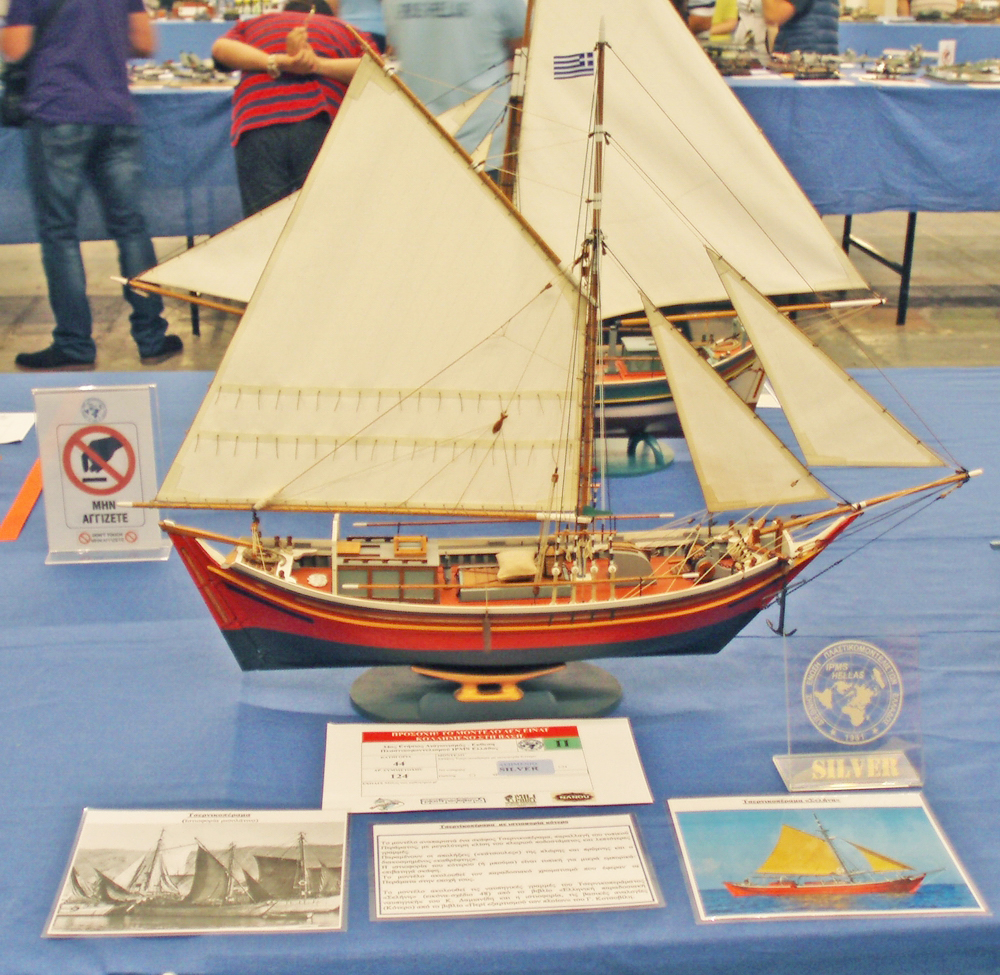
I would like to share my joy with you mates... My model won the silver prize (2nd place) in the 34th Greek Scale Modeling Exhibition of the I.P.M.S. gr, last Sunday. Thx

-
I would like to share my joy with you mates... My model won the gold prize (1st place) in the 34th Greek Scale Modeling Exhibition of the I.P.M.S. gr, last Sunday. Thx

-
Even late, I wish you happy birthday Mauro and many beautiful models on your workbench... Thanasis
-
Well, I haven't met anything in Gr. bibliography for these kind of boats, neither for the construction nor for the use by the Greeks... It could had been a case of use in Ionian Sea (Adriatic) although I consider it as unlikely. As about the nationality... I have at least ten old photos of those boats but only one with flags on them which leaves no doubt about the origin... Thx