


Adrieke
-
Posts
1,625 -
Joined
-
Last visited
Reputation Activity
-

 Adrieke got a reaction from mtaylor in King of the Mississippi by Adrieke - FINISHED - Artesania Latina - Scale 1:80 - with LED lighting
good progress today with the railings and the cabling
I think I will only just get by with the supplied white 0.15 thread for the cabling. which meant there wasn't enough because I would also needed it for the little bit of rigging. for that I used some tan thread from the GF kit
-
 Adrieke got a reaction from Piet in King of the Mississippi by Adrieke - FINISHED - Artesania Latina - Scale 1:80 - with LED lighting
good progress today with the railings and the cabling
I think I will only just get by with the supplied white 0.15 thread for the cabling. which meant there wasn't enough because I would also needed it for the little bit of rigging. for that I used some tan thread from the GF kit
-
 Adrieke got a reaction from Script in King of the Mississippi by Adrieke - FINISHED - Artesania Latina - Scale 1:80 - with LED lighting
good progress today with the railings and the cabling
I think I will only just get by with the supplied white 0.15 thread for the cabling. which meant there wasn't enough because I would also needed it for the little bit of rigging. for that I used some tan thread from the GF kit
-
 Adrieke reacted to Piet in Hr. Ms. O 19 1938 by Piet - FINISHED - scale 1:50 - submarine of the Royal Navy Netherlands in service 1939 - 1945
Hello again friends,
Between a few domestic chores like getting on the roof of our house and cleaning the gutters and trimming a small tree from a few low branches, I did make some progress. I'm almost finished with the side anchor Yes, that's something to smile about, more tedious work behind me.
Now I need to figure out how to fasten a cable to it AND stow it into a blind hole that's filled with foam and wood and is now also closed off. I may have to resort to an "unauthorized" trick butI really would like to lower and raise the anchor with a cable attached to it.
Okay, I'll show a few pics of how I have made the anchor, except for the center post, that one I made yesterday.
The total width of the anchor must not be more then 18 mm and the length including the shackle is 34 mm. I had to stick with the Wasteneys style anchor except for the shape of the flukes due to the width constraint and It's really looking good to me.
There is still some final detailing and fine filing to dress it up nice before I can install it. So please judge the pics accordingly, it's still not the final piece, that'll be tomorrow when I have assembled the whole thing.
This is a layout of the parts and pieces I needed to make the fluke arms. Each square on the cutting board is ½ inch, this gives you an idea how small I had to work with. The bottom piece is 0.2 mm thick brass sheet, the brass tubes are 3.1 mm and 2.1 mm which are soldered together to make one thick tube. The two side pieces are 0.1 mm by 3 X 9 mm. They form the attaching braces for the fluke center piece that's made from 1 mm thick 3.1 mm wide brass flat stock that I cut 20 mm long. I then peened one end flat and soldered two square pieces of 0.1 mm flat shim stock to make the fluke. I had to use two wooden clothes pins and a steel office clamp as a heat sink. Then it was a matter of filing till I had the desired shape I was after. If I recollect this whole operation took about 2 ½ hours. You can see the finished fluke arm to the left. I did not make a pic of the second one yet but it too is semi completed. Just a little tweaking and polishing like the rest of the anchor. The main hinge pin for the fluke arms to the central post will be a piece of 1.5 mm brass tubing. Both fluke arms will be spot soldered to this hinge pin and rotate on the center post.
This shows the center post of the anchor with the raw shackle in process to be made. I had to solder two pieces of the 3.1 X 1 mm together with a length of 32 mm. I bend the ends of both pieces to form a V to be able to lay the copper tube assemblies in and soldered that all together. Then shape and clean everything up and drilled a 0.7 hole in in the other end for the shackle hinge pin. This pin is a small brass nail with a 0.7 mm diameter.
The shackle is cut from a 0.3 mm piece of brass flat stock to be shaped into a shackle form. It also has a 0.7 mm hole drilled in both ends.
This shows the raw shackle on its side.
Here we see the semi finished shackle next to the center post and the hinge pin. As you can see there is still some tweaking to do to the shackle. Yes, it should have been a little longer but I am also hight constraint
This shows the shackle pinned to the center post.
A pic I got from the Internet of a Wasteneys Smiths anchor.
A pic I got from the Internet of a Hall anchor.
This is a pic I got from Remco. This is taken at the navy Museum in Den Helder, the Netherlands. I really like the shape of the flukes and tried to make mine kinda similar.
This is another pic Remco send me from the same Navy museum. Also very nice but would not work for me.
Cheers,
-
Adrieke got a reaction from mtaylor in King of the Mississippi by Adrieke - FINISHED - Artesania Latina - Scale 1:80 - with LED lighting
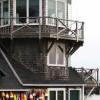
hello Dragzz
look at this picture the back off deck 2 and 3 need to be right above each other
when you fit the 3rd deck on top of the 2nd deck stateroom with the pre cut slots you will notice that the 3rd deck doesn't line up at the back and is a bit forward. if you adjust the pre cut slots till the decks are equal at the back you will see that the 2 holes for the smoke stacks will line up too as will the holes for the slanted poles
-
 Adrieke got a reaction from mobbsie in King of the Mississippi by Adrieke - FINISHED - Artesania Latina - Scale 1:80 - with LED lighting
good progress today with the railings and the cabling
I think I will only just get by with the supplied white 0.15 thread for the cabling. which meant there wasn't enough because I would also needed it for the little bit of rigging. for that I used some tan thread from the GF kit
-
Adrieke reacted to dragzz in King of the Mississippi by dragzz - Artesania Latina - scale1/80
ok now what i have done is glued bottom of the stateroom and the top of it but not glued to the 3 deck yet as i got to do the vent befor i do that there are some caps that will have a strip of wood that will cover them here some pic
-
Adrieke got a reaction from Piet in King of the Mississippi by Adrieke - FINISHED - Artesania Latina - Scale 1:80 - with LED lighting
thanks Mark. hopefully I l be spared of any more breakage :|
cabling on one side is all done, as is the little mast and flag. I have now started on the railings on this side
I know a few of you are hoping for some pictures with the lights on, but you l have to wait till I have her finished
-
 Adrieke got a reaction from avsjerome2003 in SS Vinal Haven by TBlack - FINISHED
Tom
i found some eagles HO scale at this site http://www.musketminiatures.com/
it says they make the detaqils themselves , so might be an idea to contact them and see what they got in your scale
also found this topic on a railroad forum on how to make your own eagle in HO and O scale with a parts template
http://www.railroad-line.com/forum/topic.asp?TOPIC_ID=21628
-
Adrieke reacted to TBlack in SS Vinal Haven by TBlack - FINISHED
Adrieke, This is a fabulous find, and thank you very much for the lead. Initially, I was intrigued by the tutorial on building my own eagle, but then realized they were trying to model the real bird. Of course, I'm modelling a casting of an eagle. I think the way to go is with the musket miniatures offering; the price is certainly right.
Tom
-
Adrieke reacted to Dan Vadas in HMS Vulture 1776 by Dan Vadas - FINISHED - 1:48 scale - 16-gun Swan-class sloop from TFFM plans
Thank you to all the guys who hit the "Like" button for my last post .
Forecastle Timberheads
I've marked and drilled the slots for the Timberheads, and also made and dry-fitted 8 more of them to check if the angles were going to need changing yet. Fortunately all the Forecastle ones are straight, so I can make 8 more before I have to adjust my jig. The bad news is that all the quarterdeck ones will need to be cut on at least four different angles - it could have been worse .
Danny
-
Adrieke reacted to RGL in HMB Endeavour by RGL -FINISHED - Artesania Latina
As the other Endeavour club members are getting on with it, i thought that i'd try and keep trundling on with the Topmasts. The backstays now completed, just on to the stays and their mice next. I'd just like to say I'm crap at photography of small stuff - but at least it hides the fluffy lines. iPhones are not the best if cameras but very easy.
-
 Adrieke got a reaction from Rick in King of the Mississippi by Adrieke - FINISHED - Artesania Latina - Scale 1:80 - with LED lighting
yes I might replace it later on :mellow:
for now work continues on the steam stack cables. its tedious but I am enjoying it , possibly because I know its now all coming together
the 3 red arrows show where the mast has been broken , its holding for now
-
Adrieke got a reaction from mtaylor in King of the Mississippi by Adrieke - FINISHED - Artesania Latina - Scale 1:80 - with LED lighting
thanks Mark. hopefully I l be spared of any more breakage :|
cabling on one side is all done, as is the little mast and flag. I have now started on the railings on this side
I know a few of you are hoping for some pictures with the lights on, but you l have to wait till I have her finished
-
 Adrieke got a reaction from robert1965 in King of the Mississippi by Adrieke - FINISHED - Artesania Latina - Scale 1:80 - with LED lighting
thanks Mark. hopefully I l be spared of any more breakage :|
cabling on one side is all done, as is the little mast and flag. I have now started on the railings on this side
I know a few of you are hoping for some pictures with the lights on, but you l have to wait till I have her finished
-
 Adrieke got a reaction from popeye the sailor in King of the Mississippi by Adrieke - FINISHED - Artesania Latina - Scale 1:80 - with LED lighting
thanks Mark. hopefully I l be spared of any more breakage :|
cabling on one side is all done, as is the little mast and flag. I have now started on the railings on this side
I know a few of you are hoping for some pictures with the lights on, but you l have to wait till I have her finished
-
Adrieke reacted to Dan Vadas in HMS Vulture 1776 by Dan Vadas - FINISHED - 1:48 scale - 16-gun Swan-class sloop from TFFM plans
No worries Elmer - plenty more where that came from .
I've finished fitting all the Planksheers. The port quarterdeck one is completely finished, others are in various stages.
You can clearly see the two-piece construction on the forecastle ones. This is necessary (even on the real ship) as it is impossible to fit the planksheer over the timberheads owing to the changing angles of the latter.
Don't forget, I'm "cheating" here - I'm not making the timberheads as part of the top timbers. I find it much easier to cut the moldings into their tops on the bench rather than on the ship .
Danny
-
Adrieke got a reaction from Script in San Ildefonso by Sjors - FINISHED - OcCre - 1:70
sorry Sjors but that box behind the serving machine is too distracting
-
Adrieke got a reaction from mobbsie in San Ildefonso by Sjors - FINISHED - OcCre - 1:70
sorry Sjors but that box behind the serving machine is too distracting
-
 Adrieke got a reaction from Sjors in San Ildefonso by Sjors - FINISHED - OcCre - 1:70
sorry Sjors but that box behind the serving machine is too distracting
-
Adrieke got a reaction from Piet in King of the Mississippi by Adrieke - FINISHED - Artesania Latina - Scale 1:80 - with LED lighting
yes I might replace it later on :mellow:
for now work continues on the steam stack cables. its tedious but I am enjoying it , possibly because I know its now all coming together
the 3 red arrows show where the mast has been broken , its holding for now
-
Adrieke got a reaction from mtaylor in San Ildefonso by Sjors - FINISHED - OcCre - 1:70
sorry Sjors but that box behind the serving machine is too distracting
-
Adrieke reacted to Auvergne in Bireme Greek Warship 480 B.C. by John E. - Auvergne - Amati - Scale 1:35
Zeus Cat,
This was a very nice post you made and wonderful advice. My hat is off to you and I thank you, kindly. I have since moved on but the holidays have made me lazy. It is back off to school for me so the model making will be much slower. I have the Bireme in the paint facility in my shop and will not give her up...every project I have done does seem to have a way to resurrect itself so letting her sit for a while is surely a great idea.
Thanks Zeus!
John
-
Adrieke reacted to dragzz in King of the Mississippi by Adrieke - FINISHED - Artesania Latina - Scale 1:80 - with LED lighting
adrieke u have done great job for just your second build i have no more to say but outstaneding job
-
Adrieke reacted to enemeink in Prince De Neufchatel by emeneink - Model Shipways
masting and rigging has finally started. I've been making an effort to work on her for at least 30 minutes a day seems to be getting me somewhere. I worked a little more over the holiday weekend so i was able to finish the assembly of the fore mast and start to get it placed and get the standing rigging placed.