

Jeronimo
-
Posts
730 -
Joined
-
Last visited
Reputation Activity
-

 Jeronimo reacted to Zbigniew in Le Commerce de Marseille by Zbigniew
cont...
Thanks Mark and Michel.
-
-
Jeronimo reacted to Decoyman in Chaloupe Armee en Guerre by Decoyman - from the Delacroix plans
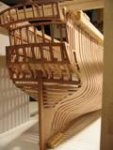
As I suggested in my last post I needed to sand off the end of the mould so that the keel assembly fits properly. This was hard work, but pretty straightforward. As you can see in the following pictures the keel now drops over the frames with no problem.
The next issue was how to stop the frames sticking to the mould when the components were glued together. I took all the frame parts off the mould and gave it another good polish. Then, starting at the MC position, I assembled each frame over the mould, glueing the futtocks to the floors with medium cyano and using the pushpins again to hold everything in the correct relationship. Once the glue was reasonably dry I removed the pins and then the frame. If the frame was stuck I held a piece of wood against the side of the joint and tapped gently until it popped off. Once or twice a frame became glued quite firmly and a bit of the mould came away stuck to the inside. The MDF is actually quite soft, so can be removed easily, and it is certainly better for a bit of the mould to be stuck to the frame rather than a bit of frame stuck to the mould. Occasionally the futtock/floor joint was a bit dry and came apart, in which case I just put everything back on the mould and re-glued the joint.
The small dots on the sides of the floor and futtocks mark the glued faces.
The next step was to drill through the frame joints twice each and insert short lengths of 0.5 mm brass wire. These represent the bolts used on the prototype and also strengthen the joint because they are glued in. Once these were dry I trimmed the over-length floors and futtocks using a razor saw and then rounded off the upper corners in each case. Finally I sanded all the exposed faces, making sure there were no traces of glue left around the joints and the ends of the bolts.
The finished frames were put back onto the mould and pinned in place, making sure the sides were vertical.
I made every other frame to start with so that I had more working room.
I haven't quite finished the frames yet - there are three still to do.
Next time: making the rebates in the sides of the keel and finishing the frames preparatory to fitting the keel.
Rob
-
Jeronimo reacted to archjofo in La Créole 1827 by archjofo - Scale 1/48 - French corvette
Hello friends,
thank you for the kind comments.
Nine out of twenty carronades I have now assembled.
Here are some impressions:
-
Jeronimo reacted to archjofo in La Créole 1827 by archjofo - Scale 1/48 - French corvette
Hello,
I hope that's what you mean:
-
Jeronimo reacted to archjofo in La Créole 1827 by archjofo - Scale 1/48 - French corvette
Hello friends,
thank you for the kind words.
Meanwhile I have already mounted 4 carronades.
-
Jeronimo reacted to tlevine in HMS Atalanta 1775 by tlevine - FINISHED - 1:48 scale - from TFFM plans
The sixth beam set is relatively straight forward. The aft bulkhead for the boatswain's cabin was temporarily removed to make installation easier. The pillar is supposed to go through the hatch coaming. I cheated and it is simply glued to the surface of the coaming. There is a tenon on the superior aspect of the pillar with a mortise on the under surface of the beam.
-
Jeronimo reacted to tlevine in HMS Atalanta 1775 by tlevine - FINISHED - 1:48 scale - from TFFM plans
The crosspiece of the bitts is comprised of two different wood species. The fore section is oak and the thinner aft section is elm. Both of these are light-colored species so I did not want a stark contrast between the two pieces. I used pau marfin for the "elm". The crosspiece is attached to each pin with two bolts. The metal work for the bitt will wait until I have a few other metal projects, although the holes to accept the metal pieces have already been drilled.
-
Jeronimo reacted to tlevine in HMS Atalanta 1775 by tlevine - FINISHED - 1:48 scale - from TFFM plans
The bitt standards are knees that extend anteriorly from the bitt pin. They are let into the deck beams and ledges by 1". I rough-cut the standard and then cut in the notches using the Preac saw with the blade elevated 1" above the table. To make things more interesting, the round-up of the deck needs to be taken into consideration. Also, the deck slopes upward towards the bow but the bitt pin is perpendicular to the water line. That angle had to be cut on the aft side of the standard so it would fit snuggly against the pin. Once I was happy with the fit, I transferred the shape of the standard onto the rough piece and cut it to the correct shape. The edges are beveled.
After the starboard standard was fabricated, the port one was made. The pictures show the port standard before and after final shaping.
The standards are bolted to the underlying frames. The cable stopper hole is drilled near the intersection of the pin and the floor height. It is 2.75" in diameter. I used a #60 drill bit and then enlarged and rounded over the hole with Swiss needle files. The hole is barely visible in the last photo. The color difference betweeen the pin and the standard is because I put finish on the pin but will be delaying putting any finish on the standard until after the deck has been installed.
-
Jeronimo reacted to tlevine in HMS Atalanta 1775 by tlevine - FINISHED - 1:48 scale - from TFFM plans
A delayed thank you to Maurey and Pavel. Druxey, the tracks are now installed and, like so many details that we add, are now almost invisible! But we all know they are there...
Beam sets 9 and 10 are in place. The only unusual items are the opposed lodging knees at the dead flat. I did not have thick enough wood with me this week to make them, so they will be installed next week. They will be identical to the ones on the lower deck. Look at page 10 of this build to see how they are shaped.
-
Jeronimo reacted to tlevine in HMS Atalanta 1775 by tlevine - FINISHED - 1:48 scale - from TFFM plans
Beam set 7 includes the opening for the fore hatch. These carlings are a little larger than the standard ones. As I am building the lower deck structures as I move aft, it was time to build the aft sail room. The fore sail room is one of the small rooms on the port side near beam set 4. This was a fun little structure to make. The lateral walls have louvers to allow ventilation into the room. I do not own a mill so the mortises for the louvers were made with an 11 blade. On Atalanta, the door into this room is a slider, not a hinged door. Consequently, the door must be made wider than the opening and it will be on the outside wall of the sail room. There is a pillar on the inside wall precluding placing the door there. Not having built a sliding door before, I went over to the local stable and looked at my horse's stall door. The latch is a L-shaped bolt on the door with a U-shaped piece of metal on the door frame to receive the bolt. The bolt measured 3" x 4" x 3/8". This would require making a u-shaped channel 0.01" square. Needless to say, this is well beyond my skill set so I have a flat piece of metal on the door frame representing it instead. Decking was placed under the assembly on the starboard side. The last two pictures show the sail room assembly before and after a coat of finish.
-
 Jeronimo got a reaction from JerryGreening in LE BONHOMME RICHARD by Jeronimo - FINISHED
Hi friends,
construction and installation of the pumps.
Karl
T e i l 3 8
-
Jeronimo reacted to michael mott in LE BONHOMME RICHARD by Jeronimo - FINISHED
Wow!..... where are my knitting needles..again!
Amazing work Karl, you set a very high bar.
Michael
-
Jeronimo reacted to AnobiumPunctatum in LE BONHOMME RICHARD by Jeronimo - FINISHED
Wow, really great work. I hope that I can see your model in real life.
-
Jeronimo reacted to WackoWolf in LE BONHOMME RICHARD by Jeronimo - FINISHED
I agree with Remco, the detail that you have put into the beams and everything else is a shame to hide. Excellent work. You blow me away every time I see new updates. Keep the pictures coming.
-
Jeronimo reacted to SJSoane in LE BONHOMME RICHARD by Jeronimo - FINISHED
Karl,
Beautiful work, and a level of carefully crafted detail that sets the standard for everyone else.
Best wishes,
Mark
-
Jeronimo reacted to dvm27 in Speedwell 1752 by dvm27 (Greg Herbert) - FINISHED - Ketch Rigged Sloop
It's been a few months since I've posted an update to my build log of Speedwell. All four platforms are now in place, as are the shot locker and galley stove. Besides the wales, there will be very little external planking in order not to cover those wacky, fun to make shifted and cast toptimbers.
The single wale was made of holly and stained with Fiebings black leather dye (off the model).
The two completed fore platforms
The very small shot lockers accommodate the three pound cannon balls
The very small shot lockers accommodate the three pound cannon balls
The galley stove was made of brass over a holly plug
-
Jeronimo reacted to dvm27 in Speedwell 1752 by dvm27 (Greg Herbert) - FINISHED - Ketch Rigged Sloop
Geoff - there are four 6-32 threaded bolts securing the model to the baseboard.
Ben - we will be offering the plans just as soon as I finish her. She's make a nice follow-up to a Swan, Echo or Triton and is not nearly as large.
-
Jeronimo reacted to dvm27 in Speedwell 1752 by dvm27 (Greg Herbert) - FINISHED - Ketch Rigged Sloop
Thanks for all your comments!
Remco - There's no need to fix Fiebing's dye. It covers and penetrates beautifully and buffs to a nice finish. As a matter of fact, they recommend applying it to wet leather.
Learner - I adapted my stove from Lavery's Arming and Fitting... It depicts an iron firehearth contemporary to Speedwell. Brodie stoves appeared decades later, c.1780. Here are a couple photos of the strove during construction. All brass parts were constructed over shaped plugs of holly and glued with J&B Weldbond. This creates a very strong bond and fills the joints which can then be sanded. The finish is automotive gray primer followed by automotive black.
Mark - trunnels are drilled and applied after the wales are in place. They are easily touched up using the dye on a q-tip. Kind of a wasted exercise though as they become invisible.
Speedwell is a nice little project at 1:48. She'll fit easily on my one remaining shelf.
-
Jeronimo reacted to kruginmi in HMS Druid by Krug - FINISHED - 1:48 - Hahn
Still working along but good to see some progress. All I have left on this rudder is all the scale nails to hold the strapping on - hopefully tonight.
The top three bands and the tiller arm bands are from wrapped paper. These areas are not seen on the finished ship so I thought it a great place to try out the technique. Worked very well and I will add to my options in the future.
I added a faux end post on the stern of the rudder. The actual tiller arm was cut down to a more manageable square and inserted into a hole that was initially drilled then squared off. You can't tell. The backup up tiller hole had to be more lifelike but after methodical progress turned out great.
The true test is to try out the resultant work in the space and see if everything lines up. Success. I love it when a plan comes together.
I need to power through those scale nails. I had no idea how much effort and beauty rudders have. Chemistry, metallurgy, shaping, joinery... If you can do a successful rudder you can do an entire ship.
Mark
-
Jeronimo reacted to kruginmi in HMS Druid by Krug - FINISHED - 1:48 - Hahn
Thanks Brian and Lou - slow but keeping at it!
I started to blacken the metal and thought I would share my approach (this did not come easy at first!)
The process includes three containers that each metal piece goes through, acetone, blacken it (thinned) and finally water. I will not touch the piece until it has finished through the process, only with forceps.
The acetone is used to thoroughly clean the metal and is left in for 10 - 15 seconds, with some mild shaking of the container to insure no air bubbles or contact with the bottom of the container is masking some oil. Upon completion the parts are patted dry. On a side note, I get my acetone in small quantities by going to the nail polish remover aisle of the general store.
The blacken- it solution is 1 part patina, 10 parts water. Any more and the solution produces globs of black stuff that wipe off the metal and is quite messy. This was my initial mistake years ago. The green measuring cup is from a Miracle-Gro mix and is perfect - the small end for blacken-it, the large end for water. The parts generally go in for about 5 minutes or so with some mild shaking again. Again, patted dry upon completion.
The water is to wash off any blacken-it remaining then a final patting dry. The results on the top two pieces of the rudder metal work are the result of this process. Pretty straight forward one you have the right chemicals!
I have opted to hand drill the holes in the metal and other than sore fingers the going is fine. Tomorrow I hope to make some scale nails, finish the drilling, and get the metal work affixed. I am thinking about adding rudder chains so that may be a little more work.
Cheers, mark
-
Jeronimo reacted to kruginmi in HMS Druid by Krug - FINISHED - 1:48 - Hahn
Finally on the other side of that rudder. This whole assembly was a whole lot more than I ever thought it was going to be. I will never look at a rudder the same way again!
I am pretty proud of the result - kids actually looked up from their IPODS when I went to show them so I will take that as a compliment. At least the three year old was audibly impressed. I can actually think of buttoning up that berth deck now (once I get the tiller arm rigged in, well, once I make the blocks so I can rig the tiller arm in....).
Oh well, Here is to the Victories of Today!
Mark
-
Jeronimo reacted to Gaetan Bordeleau in Le Fleuron by Gaetan Bordeleau - FINISHED - 1:24
something like this?
-
Jeronimo reacted to WackoWolf in La Créole 1827 by archjofo - Scale 1/48 - French corvette
Excellent work. Now that is a Beautiful picture, love it. Keep the pictures coming, I enjoy you walk through and excellent machine work. Thank you.
-
Jeronimo reacted to archjofo in La Créole 1827 by archjofo - Scale 1/48 - French corvette
Hallo,
thanks for the nice comments.
Currently, the brass parts of the carronades are burnished.
Here is a photo of a carronade with all parts before assembly.