

Jeronimo
-
Posts
729 -
Joined
-
Last visited
Reputation Activity
-

 Jeronimo reacted to EdT in HMS Naiad 1797 by EdT - FINISHED - 1:60 - 38-gun frigate
1:60 HMS Naiad 1797
Part 182 – Anchor Lining
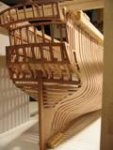
Once the channels were finished, except for a few ringbolts, the anchor lining could be installed on the finished side. The anchor lining protected the hull planking from damage by the anchor after catting, when it was being lifted and secured to the side.
The first picture shows a layer of 3” thick planking being fastened to the wale.
From the top of the wale to the fore end of the fore channel, a panel of three inch planks was constructed. The next picture shows the supports for these, three stanchions.
I could find no spec for these so made them each a sturdy 6” x 6”. They are bolted at the channel and just above the top of the wale.
The last wo pictures show the finished installation.
Ed
-
Jeronimo reacted to EdT in HMS Naiad 1797 by EdT - FINISHED - 1:60 - 38-gun frigate
1:60 HMS Naiad 1797
Part 181– Deadeyes and Chains
I will admit that making deadeye chains is one of my least favorite tasks, so it is well that it comes near the end of the project when my desire to get finished overcomes my reluctance to working on these. I find it difficult to exactly measure the required lengths of the chains and lack the patience to make all the easily deformed pieces straight. However, having said that, the task must be faced. There are a lot of steps to the process I use. I will merely summarize.
Turning the deadeyes is the easy part. I use a shaped cutter as shown in the first picture.
After these are polished in the lathe and parted off, the holes are drilled with the aid of the indexing head in the mill, The next picture shows a finished deadeye fitted with its binding,
For the large deadeyes the bindings and chains were made from 20-gauge copper wire. When stretched this is just slightly (⅛”) larger than specified. Close enough, when considering that wire sizes are limited.
Once the correct binding size is found by trial and error, the assembly shown above is used to help determine the length of the two chain loops that connect to the bolt at the top of the preventer plate. This measurement is taken as shown in the next picture.
The next step is to find two links to fit this measurement. I do this by selecting two from a group made by wrapping wire around a tapered plate then parting off a number of loops of increasing size. The next picture shows the tapered plate being wrapped with pre-stretched wire.
The next picture shows three stages in making a soldered loop.
The lower loop in the picture is as-cut. The middle one has had its end curved to close the gap for silver-soldering.
The loop at the top has had a small amount of copper-phosphorus solder paste applied and is ready for the heat.
After soldering, the toe loop is crimped around a wire at the bottom end and soldered at the bottom. The middle loop is then fitted between this and a binding loop and soldered. The deadeye is then fit into he binding and shaped around the deadeye. The next picture shows a set of these hanging from pins in their final locations.
After assembly the chains are test fitted at the measured location. Since the model will not be rigged they need to be taut for appearance purposes. If the chain does not fit in the measured location, I try it at other places until a nice fit is found. When the set is complete the chains are polished up, straightened and blackened. They are then installed. The next picture shows the completed chains on the fore channel.
Ed
-
Jeronimo reacted to EdT in HMS Naiad 1797 by EdT - FINISHED - 1:60 - 38-gun frigate
1:60 HMS Naiad 1797
Part 180– Finishing the Quarter Gallery
In these last phases of construction some of the items are small and the descriptions short – like this one.
The starboard quarter gallery has been worked and reworked quite a bit as I have deciphered its construction. The last remaining issue was the enclosure atop the upper finishing. My original interpretation of this is shown in the first picture.
I was never satisfied with this arrangement. First, the enclosure is too low based on the original sheer draft. Also, the aft end of it is unsupported and open across the back. Fixing this has been on my “to-do” list for some time.
On ships where the scallops at the ends of the taffrail are convex, there is sufficient height for the enclosure to butt against the taffrail. On the Naiad draft, these scallops are clearly concave, so at the end of the enclosure the cap rail on the taffrail is lower than the top of the enclosure. After quite a bit of searching, I finally found a reasonable reference showing a comparable configuration in John Franklins model of Egmont in the NMM. I replaced the enclosure shown above with the modified version shown below.
In this construction, an athwartship section is installed to meet the height of the side enclosure at the correct height. This seems a logical solution. The enclosure acted as a cistern, undoubtedly lead lined, that provided water the toilet facilities in the quarter gallery, so with the addition of the aft section, a level barrier is provided.
Here is another view.
In this construction the height of the enclosure is at the height of the sheer rail as shown on the drafts and the back section completes the basin enclosure at that height - a much better solution.
Ed
-
Jeronimo reacted to EdT in HMS Naiad 1797 by EdT - FINISHED - 1:60 - 38-gun frigate
1:60 HMS Naiad 1797
Part 184 – Case Base
First let me thank those of you who commented on the last post and all who have commented in the past. Your thoughts have been very much appreciated.
Having started this log with the drafting of the plans, It seems reasonable to continue to the very end with the construction of the display case. In this part I will discuss the base, which I needed in order to take final photos of the model for Volume II.
The case is designed so the model can be displayed on the base with the top removed. The top will later be made, glazed with cell-cast Plexiglas® sheet. The corner posts will be installed in square mortises in the corners of the base, screwed from the inside and will be removable..
In the first picture, the long wide 4/4 K/D cherry plank shown in the last part has been cut in two. It will be edge joined to form the base panel. This piece was left over from the material for the Victory case.
The pieces are oriented so the grain will hide the center joint line. The faces to be joined are not quite straight and will need some work to fit neatly. In the next picture the joint edges are being squared and straightened using a 22” joiner plane. This long plane will straighten the edge, but care (and patience) is needed to make it square.
Finally after a fair amount of test fitting and planing the two pieces are matched and ready for gluing.
Titebond dark glue has been applied to both edges in this picture and the pieces will next be positioned and held in place with pipe clamps until dry – as shown in the next picture.
This picture shows the top of the base panel. It is still damp from washing the excess glue from the surface. Most of the joint will later be covered with wood chocks to simulate a shipway of sorts.
In the next picture the top panel has been cut to size and sanded. Side rails have been molded and are being fastened to the top panel using corner pieces that will also hold the vertical case stanchions, plus glue blocks along the inside corners. Since the inside corner pieces are glued on their end grain, they are also screwed to the sides.
The next picture shows the case posts being fit into the corner mortises.
These posts will later be cut to length and slotted to fit the glass. Note in this picture that the side rails were rabbeted on the inside top edge to form the base slots for the glass.
In the next picture wood chocks for the shipway are being installed down the center.
The blue tape defines the line for these and the pieces at the sides set the spacing. In the next picture the model has been brought back to mark the holes through the base.
Holes were then drilled to accept the original bolts used to hold the model to the building board. The model was then set up and aligned so the side supporting struts could be fitted and glued between extended chocks as shown.
In the next picture the base has been lightly stained and a polyeurthane wipe-on finish is being applied in several coats.
Finally, a picture of the model on the finished base.
Later, when I complete the case I will post that construction.
Ed
-
Jeronimo reacted to Dan Vadas in HMS Vulture 1776 by Dan Vadas - FINISHED - 1:48 scale - 16-gun Swan-class sloop from TFFM plans
Trucks
I gave a bit of thought on the easiest way to make the Trucks (wheels) without resorting to using dowel - the grain would run the wrong way, although at this scale it would be difficult to pick the difference.
The Trucks are 4" thick, the Hind Trucks are 10.5" in diameter and the Fore Trucks are 12" diameter. On larger guns they were made from four pieces of timber with the grain running crosswise to each other and bolted together, but a 6-pounder's trucks were made from one solid piece.
I started off by cutting a strip of timber a little wider than the required diameter. I set up a simple stopper jig on my mill vice by CA'ing a couple of pieces of scrap to the top and drilling the 2mm centre hole. Then I cut the piece off square on the table saw.
To hold the piece into the lathe for turning the outside diameter I used a spare mandrel from my Dremel accessories. The screw was only 1.7mm, so I turned up a small brass sleeve to give a snug fit to the hole. When tightened it held the piece of timber beautifully.
I found it difficult to remove the truck from the mandrel, so I drilled a slightly smaller hole than the truck in a piece of scrap. By placing the piece over the hole I could easily remove it by pushing it into the hole :
There was a burr on one side of each piece after turning it, so to hold the rather awkward round piece without damaging it while sanding I drilled another hole in my piece of scrap which was slightly larger than the diameter of the truck and a bit less than it's thickness. The piece protrudes slightly from this hole, and a couple of wipes with a sanding stick soon removes the burr :
A view of the progress so far. The carriage sits on top of a 5 cent piece :
Danny
-
Jeronimo reacted to Dan Vadas in HMS Vulture 1776 by Dan Vadas - FINISHED - 1:48 scale - 16-gun Swan-class sloop from TFFM plans
Thanks again to Kevin, Sjors, Mark, Janos and Aldo - I'm really pleased with the way the guns have turned out too. It was well worth the effort and expense of buying the barrels and capsquares, there was NO WAY that I could have made them as well as this , although it took quite a bit to "finish" them.
Here are a few pics of all the completed carriages. Rigging them up will be the next job :
Danny
-
Jeronimo reacted to Dan Vadas in HMS Vulture 1776 by Dan Vadas - FINISHED - 1:48 scale - 16-gun Swan-class sloop from TFFM plans
Thank you Robbyn and Mark.
Hardware
The final details of the guns are the various items of hardware - the five Loops for the Training Tackles, the eight Bracket and Transom Bolts, and the two Breeching Ring/eyebolt assemblies.
The breeching rings and eyebolts were the most difficult parts to make, as they are joined together but silver-soldered independently so they actually work. :
Danny
-
Jeronimo reacted to Dan Vadas in HMS Vulture 1776 by Dan Vadas - FINISHED - 1:48 scale - 16-gun Swan-class sloop from TFFM plans
Quoin
Between the Bed and Barrel is a wedge-shaped piece called the quoin. It's function is to change the elevation of the barrel. This was accomplished with the aid of crowbars, and the quoin was either pulled backward to elevate the barrel or pushed forward to depress it.
I made the quoins from English Box for a bit of contrast. The handle at the aft end is a cut-off and lightly blackened brass belaying pin :
Here are some progress pics of one of the guns so far. All that's left to do is make 56 eyebolts and 16 breeching rings, and fit another 64 bolts :
Danny
-
 Jeronimo got a reaction from dafi in LE BONHOMME RICHARD by Jeronimo - FINISHED
Hi friends.
Thank you all for the comments.
Kevin, Ports of the pumps.
Karl
-
 Jeronimo got a reaction from JerryGreening in LE BONHOMME RICHARD by Jeronimo - FINISHED
Hi friends,
new pictures of the construction progress of the Bonhomme.
Regards Karl
T e i l 28
-
 Jeronimo got a reaction from Jaroslaw in Le Fleuron 1729 by rekon54 - 1:24
Hello to all.
LE FLEURON 1729
Does anyone want build this model?
The mograph with all buildings plans (M= 1:48) from G.Delacroix / J.Boudriot, France.
I am selling this 25% under the original Price ( 128,00 EUR )
plus shipping costs.
Top condition, minor signs of use.
Pay-Pal OK and accept.
Karl
-
 Jeronimo got a reaction from Luca in LE BONHOMME RICHARD by Jeronimo - FINISHED
Hi friends,
new pictures of the construction progress of the Bonhomme.
Regards Karl
T e i l 28
-
 Jeronimo got a reaction from freewheelinguy in LE BONHOMME RICHARD by Jeronimo - FINISHED
Hi friends.
Thank you all for the comments.
Kevin, Ports of the pumps.
Karl
-
 Jeronimo got a reaction from Stockholm tar in LE BONHOMME RICHARD by Jeronimo - FINISHED
Hi friends,
new pictures of the construction progress of the Bonhomme.
Regards Karl
T e i l 28
-
Jeronimo got a reaction from freewheelinguy in LE BONHOMME RICHARD by Jeronimo - FINISHED
Hi friends,
new pictures of the construction progress of the Bonhomme.
Regards Karl
T e i l 28
-
 Jeronimo got a reaction from Dubz in LE BONHOMME RICHARD by Jeronimo - FINISHED
Hi friends,
new pictures of the construction progress of the Bonhomme.
Regards Karl
T e i l 28
-
 Jeronimo got a reaction from EdT in LE BONHOMME RICHARD by Jeronimo - FINISHED
Hi friends,
new pictures of the construction progress of the Bonhomme.
Regards Karl
T e i l 28
-

-

-
 Jeronimo got a reaction from aykutansin in LE BONHOMME RICHARD by Jeronimo - FINISHED
Hi friends,
new pictures of the construction progress of the Bonhomme.
Regards Karl
T e i l 28
-
 Jeronimo got a reaction from Hannerl in LE BONHOMME RICHARD by Jeronimo - FINISHED
Hi friends,
new pictures of the construction progress of the Bonhomme.
Regards Karl
T e i l 28
-
 Jeronimo got a reaction from janos in LE BONHOMME RICHARD by Jeronimo - FINISHED
Hi friends,
new pictures of the construction progress of the Bonhomme.
Regards Karl
T e i l 28
-
 Jeronimo got a reaction from BareHook in LE BONHOMME RICHARD by Jeronimo - FINISHED
Hi friends,
new pictures of the construction progress of the Bonhomme.
Regards Karl
T e i l 28
-
 Jeronimo got a reaction from gjdale in LE BONHOMME RICHARD by Jeronimo - FINISHED
Hi friends,
new pictures of the construction progress of the Bonhomme.
Regards Karl
T e i l 28
-
 Jeronimo got a reaction from Michiel in LE BONHOMME RICHARD by Jeronimo - FINISHED
Hi friends,
new pictures of the construction progress of the Bonhomme.
Regards Karl
T e i l 28