

puckotred
-
Posts
430 -
Joined
-
Last visited
Reputation Activity
-

 puckotred got a reaction from Canute in 1/32 1929 Orient Express Sleeping Car No.3533 LX - Amati
On my way to hold up a bank or jewelry store... This is one must have, even if it's not a ship...
-
 puckotred got a reaction from marktiedens in Nuestra Senora del Pilar de Zaragoza by marktiedens - FINISHED - OcCre - scale 1:46
Mike
Well, they are small, so small I actually misplaced the whole bag... But quality was good, very uniform in size with no blemishes.... ceramic I think.
-
 puckotred got a reaction from BETAQDAVE in 1/32 1929 Orient Express Sleeping Car No.3533 LX - Amati
On my way to hold up a bank or jewelry store... This is one must have, even if it's not a ship...
-
 puckotred got a reaction from mtaylor in 1/32 1929 Orient Express Sleeping Car No.3533 LX - Amati
On my way to hold up a bank or jewelry store... This is one must have, even if it's not a ship...
-
 puckotred got a reaction from James H in 1/32 1929 Orient Express Sleeping Car No.3533 LX - Amati
On my way to hold up a bank or jewelry store... This is one must have, even if it's not a ship...
-
 puckotred reacted to marktiedens in Nuestra Senora del Pilar de Zaragoza by marktiedens - FINISHED - OcCre - scale 1:46
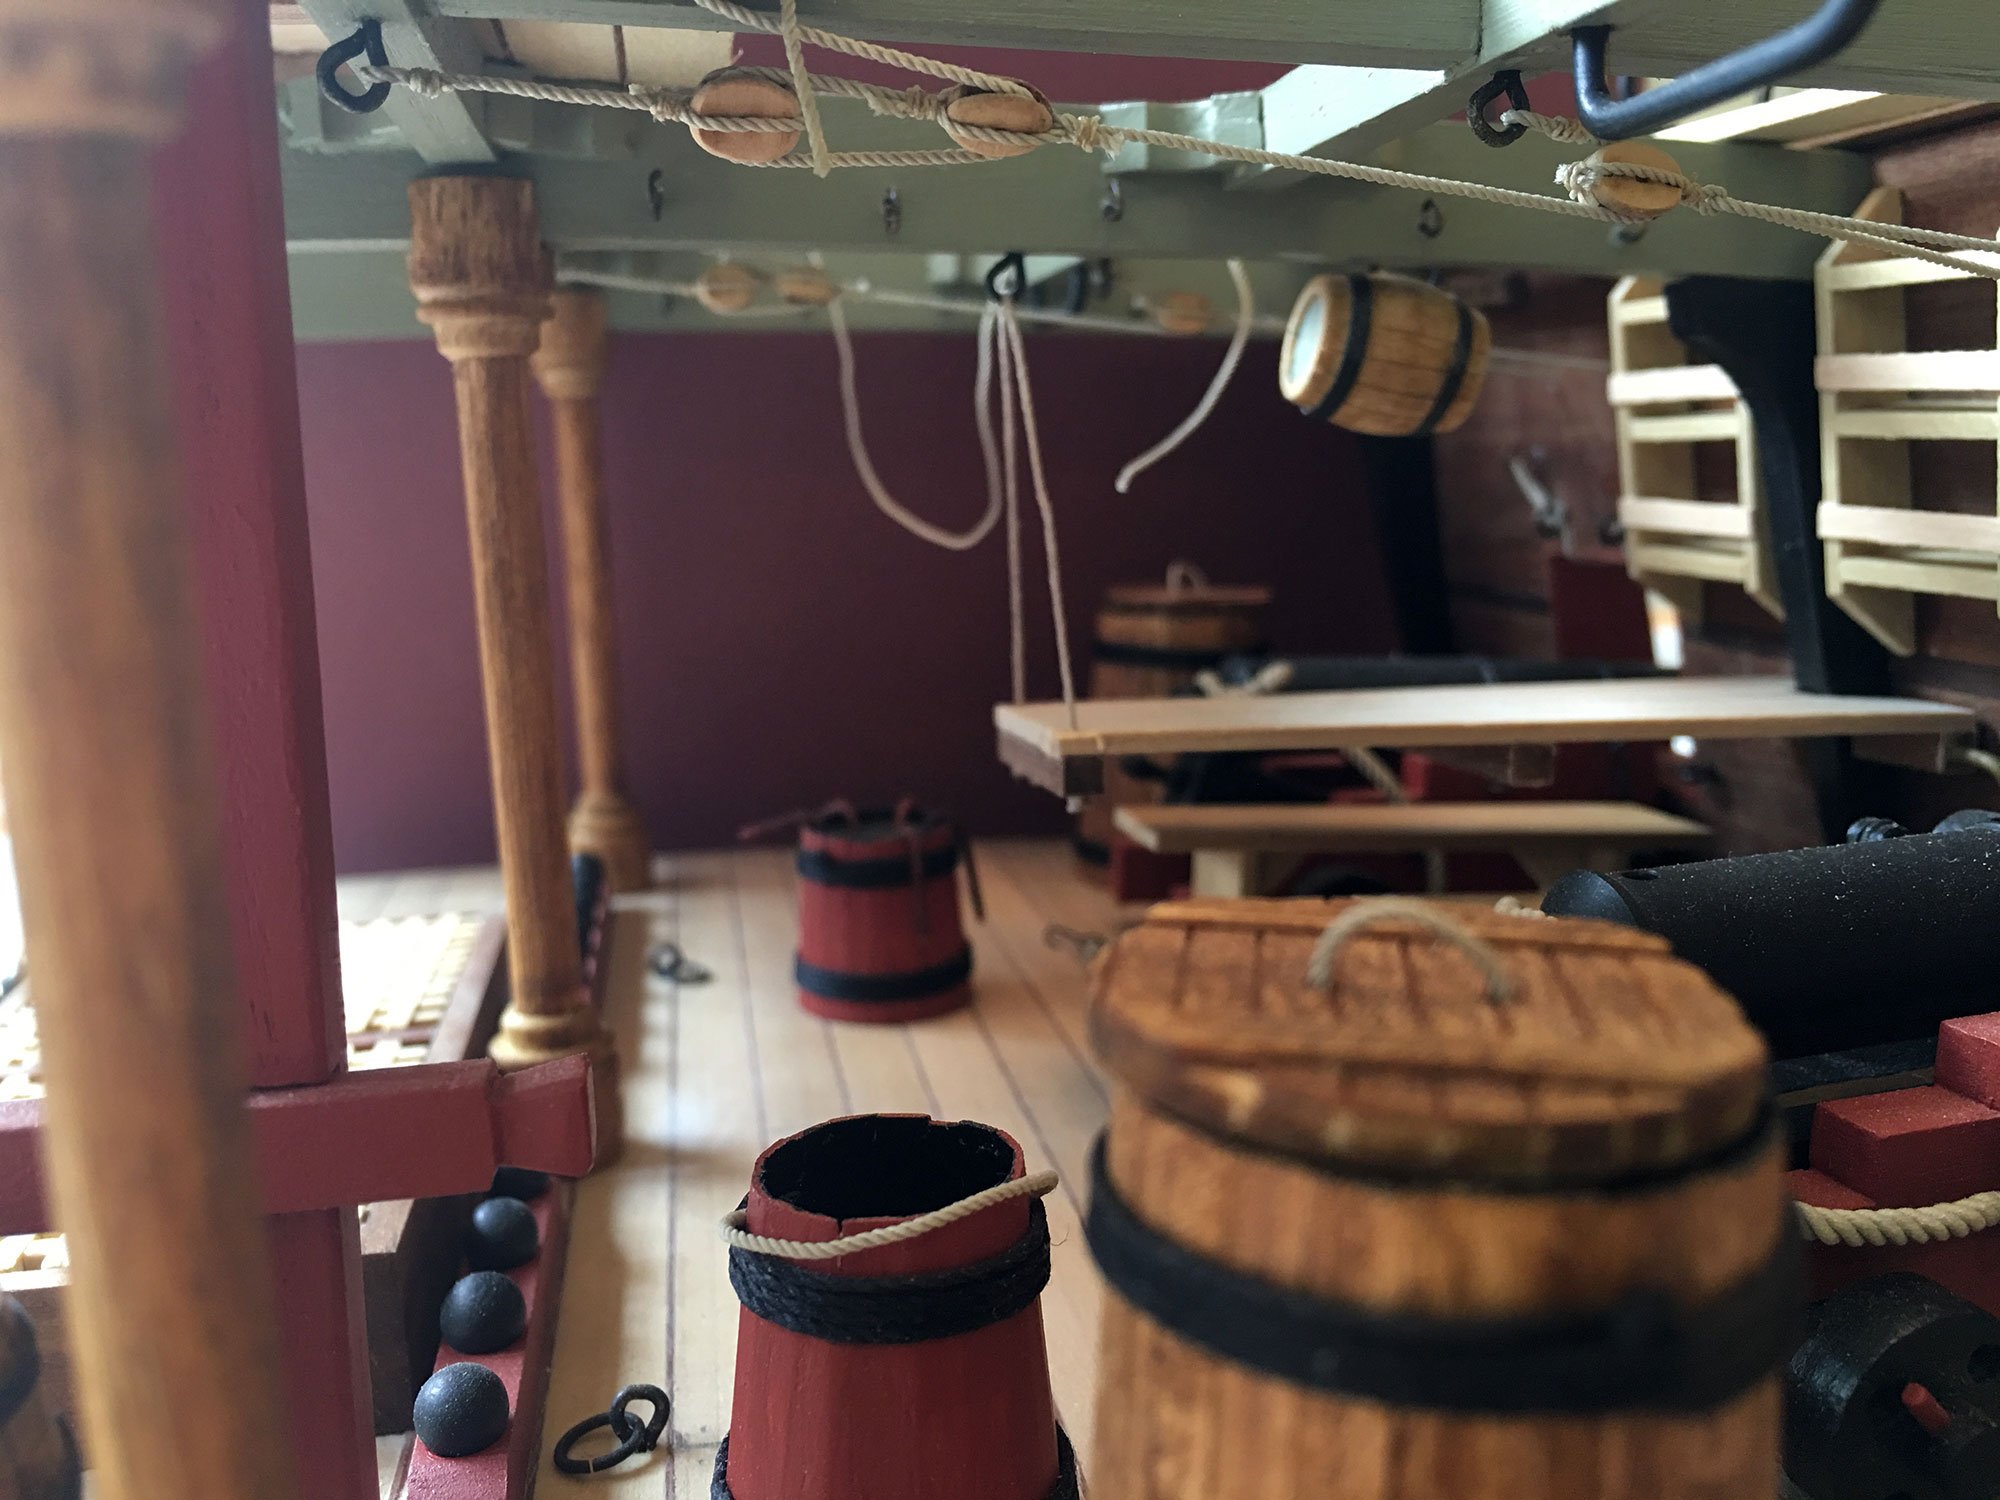
Hi again - one thing I forgot to mention about the pinrails - there are 2 of them that go on each side of the ship`s bell that are not mentioned or shown in the written or pictorial instructions. BUT they are shown on the overhead plan sheet view & the belaying plan,so I added them. All those pinrails are not glued in place yet - I want to get the guns with carriages done on the second gun deck first while I still have access to them(only the breech ropes will be rigged on them). I can see now that I should have left those gangways at the waist off until those guns were in place.
Mark
-
puckotred reacted to James H in 1/32 1929 Orient Express Sleeping Car No.3533 LX - Amati
1/32 1929 Orient Express Sleeping Car No.3533 LX
Amati
Catalogue # 1714/01
Ok, I know this isn't a ship kit, but it is very much a wood and photo-etch model, and from Amati. I hope you enjoy!
The Orient Expresswas a long-distance passenger train service created in 1883 by Compagnie Internationale des Wagons-Lits (CIWL). The route and rolling stock of the Orient Express changed many times. Several routes in the past concurrently used the Orient Express name, or slight variations. Although the original Orient Express was simply a normal international railway service, the name became synonymous with intrigue and luxury travel. The two city names most prominently associated with the Orient Express are Paris and Constantinople (Istanbul) the original endpoints of the timetabled service. The Orient Express was a showcase of luxury and comfort at a time when travelling was still rough and dangerous. On June 5, 1883, the first Express d'Orient left Paris for Vienna. Vienna remained the terminus until October 4, 1883. The train was officially renamed Orient Express in 1891. In 1889, the train's eastern terminus became Varna in Bulgaria, where passengers could take a ship to Constantinople. On June 1, 1889, the first direct train to Istanbul left Paris (Gare de l'Est). Istanbul remained its easternmost stop until May 19, 1977.
1929 Sleeping Car shown from 4.00minutes (new upholstery)
The onset of World War I in 1914 saw Orient Express services suspended. They resumed at the end of hostilities in 1918, and in 1919 the opening of the Simplon Tunnel allowed the introduction of a more southerly route via Milan, Venice, and Trieste. The 1930s saw the Orient Express services at its most popular, with three parallel services running: the Orient Express, the Simplon Orient Express, and also the Arlberg Orient Express, which ran via Zürich and Innsbruck to Budapest, with sleeper cars running onwards from there to Bucharest and Athens. During this time, the Orient Express acquired its reputation for comfort and luxury, carrying sleeping-cars with permanent service and restaurant cars known for the quality of their cuisine. Royalty, nobles, diplomats, business people, and the bourgeoisie in general patronized it. Each of the Orient Express services also incorporated sleeping cars which had run from Calais to Paris, thus extending the service right from one edge of continental Europe to the other.
The kit
Amati had been publishing videos and photos of this then-upcoming kit on Facebook for a few months, and even though trains aren’t really my thing, this one looked intriguing with its 1920s/30s wooden opulence, so when Amati said they would ship one out to me to look at, that was very exciting. I knew this was going to me one large kit, but I had no idea! The model itself is 1/32 and the box is the same size as their1/72 HMS Vanguardthat I recently took a look at. Whilst the box doesn’t weigh as much as that kit, it’s certainly packed out with some heavy metal. The box lid itself is decorative, depicting the finished model and some period imagery. You will also note that this model has a section of track on which to display the sleeping car. Lifting off that large lid uncovers a complete box with a tabbed, lift up lid, adorned in the Amati logo as standard for these large releases.
Chassis parts
Inside the box, we have plastic trays full of parts, two smaller Amati boxes, a large thick plastic sleeve with paper/wood/metal components, and sleeves full of timber strip and brass section strip. There are also a series of folded plans and TWO perfect-bound, full colour instruction books which look sumptuous. Lifting all of these out uncovers two card covers that when removed, show a whole swathe of photo-etch brass and nickel-silver sheets, and a bag holding three sections for the base onto which the rail tracks and sleepers will mount.
Amati’s 1/32 Orient Express Sleeping Car kit consists of:
1 x gloss card for carriage ceiling mouldings 1 x decal sheet for carriage signwriting and stencils 2 x gloss paper sheets with printed interior wood panelling and carpets. Also contains illustrations of exterior coach work for reference 2 x laser-cut ply sheets for the carriage chassis 5 x laser-cut ply sheets for all side and internal walls/construction of the carriage. 1 x tape of yellow self-adhesive trim of different widths 2 x white trays of cast and turned components, chain and wire. Parts include radiators, tissue dispensers, towel rails, wall mirrors, bottles and holders, soap racks, door handles, coat hooks, locks, eyelets, cabin lights, ventilation panels, electrical sockets, decorative cast exterior crest, spring-leaf shock absorbers, nuts, bolts, boiler, etc. 2 x boxes of components, contains parts such as sofa/bed carcasses and cushions, cores for the armrests and hanging headrests, rolling stock wheels and axles, sink units, stools, carriage entry tunnels, etc. 1 x pack of brass strut sections Various timber lengths of varying size and type 3 x MDF track base sections and stirrups 4 x sheets of photo-etch nickel-silver parts (internal main carriage wall panelling and hinges etc) 17 x sheets of photo etch brass parts (chassis, bogies, roof and roof sheathing, exyerior main carriage walls, etc. 1 x sheet of pre-cut acetate for windows 6 x parts and plans sheets 2 x full-colour instruction books
Now, a little about the model itself. Whilst the Orient Express is known for its amazingly high standards, these sleeping cars only had a single WC for the whole carriage. Amati has created an entire, accurate interior to this model kit, of which the toilet and small boiler closet are also included. To be able to see all of these details, the lid, constructed from photo-etch and rolled brass, is removeable.
White card inserts for she shaped interior ceilings are included, and this would provide an amazing opportunity to add some soft lighting which would set off each of the cabins. Each of those cabins is intricately detailed, and whilst have no per-cabin toilet facilities, each cabin does have facilities for passenger ablutions. These come in a stylish curved-door unit which contains sink and other things which you’d expect to see in this area, all intricately reproduced in this kit. The walls of the cabins are wooden panelled, and all of the cabin creature comforts are present, including seats, cushions for arms and head etc, and ceiling racks for storing luggage. Remember, these cabins were pretty compact as passengers spent the day in other areas of the train too. An access corridor runs alongside the cabins, and of course, these are fitted out with radiators etc. In all, an impressive piece of rail history that Amati has gone to pains to recreate here.
The sleeping car is based on two lengths of laser-cut timber which sit atop each other to produce the main frame of the carriage. On the real thing, this would of course have been metal, so bear that in mind when building and ensure you seal any timber and rub down before filling, priming and painting in black. Added to the metal framework are lengths of heavy-gauge photo etch that create the authentic appearance of the carriage chassis. Other plates etc. are fitted out with miniature nuts and bolts. Brass section strips are also fitted to the entire length of the exterior frame, adding authenticity and some rigidity to the model. There is also a main bolt towards both front and rear of the carriage, onto which the moveable, wheeled bogies will mount. After all, your train won’t just roll in a straight line!
The underside of the sleeping car is incredibly complex with some superbly engineered and cast leaf-spring suspension for the buffers, couplings, photo-etch battery housings, compressed air tank, etc. Assembling the rolling stock/bogies themselves is broken down into over EIGHTY separate stages in around 20 pages of the first construction manual. Of course, all of the parts for this are manufactured from either photo-etch, cast or turned parts, and a photo-etch bending tool really should be mandatory if you wish to tackle this model. After all, if you are willing to shell out 890€ for a kit, then it’s foolhardy not to progress with the required tools.
For the base, Amati has supplied three parts on dovetailed MDF which is profiled for display purposes. The positions of the sleepers is also engraved onto the top. I have to say that the fit of these is so precise that virtually no joint can be seen when they are put together. If you flip them over, you’ll note that there is a pencil mark to show you which part is the best match. Two MDF splints are then to be glued into the underside channels. Now, I don’t think that MDF is a strange material for the base, as you may wish to paint this, but one omission, for me, is any material that can be used to infill between the buffers, such as the gravel/stones. This would have been a nice addition so as to hide the MDF.
The tracks themselves are supplied as brass sections which need to be cut to length. As per the real thing, the tracks are attached to the sleepers by the correct hardware. I would use an assembled wheel/axle section to properly ensure that the tracks are equidistant at both ends, as well as traditional measuring. I would also look at either painting the tracks in an iron colour, or if you can immerse them in a shallow bath of burnishing fluid, then that would also fit the mark.
With the base of the model now built, the time has come to assemble the carriage itself. This initially starts with the Head A and Head B bulkheads, followed by the fitting of the interior corridor wall. Onto this are fitted the interior compartment walls, creating the cabins. Please note that a lot of paper cutting will be required as the internal walls in their antique finishes, are printed matter and will need to be fixed to the pre-sealed internal plywood walls. This will also be enhanced with actual timber framing too. The printing of the wooden walls is very, very nice and should look as good as trying to emulate this using precious timbers.
Besides, this approach means we all stand a level chance of success. Actual timber will be used to line the panels, adding to the realism. The carpets are also to be cut from paper. You will need to pick up some paper-crafting skills too as the numerous head rest and arm rest cores, sofa/bed chassis and stools, will need to be wrapped in the same matching paper and neatly fashioned around corners. There are some good techniques to be found online, such as dampening the paper to make it easier to mould around corners etc.
Each cabin will also have its own wash locker, and these are constructed separately and then installed. As well as having all the mod-cons, for the 1920s, the doors on these will actually hinge open and closed. You won’t have this option for the cabin doors though, but these can be posed in any position using the nickel-silver etched parts. The main carriage exterior walls are sheathed in photo-etch brass which will be painted, and the trim/decals added. Internally, those same walls are plated with the nickel-silver panels. I don’t know the reasons for change in material from brass, but the panels are superbly produced. Remember, there’s no actual silver in those parts. Instead, it’s an alloy of zinc, copper and nickel.
To construct the carriage’s roof, a series of photo-etch frames are interlinked with longerons that have raised pips. Once the basic frame is assembled, a series of individual brass panels are then rolled into shape and the holes in these used to lock over the raised pips of the longerons. Whilst you can use CA generally, I would suggest that the pip areas are soldered and filled before then being filed back flush to the roof. The roof is then painted white. Internally, the card mouldings are then shaped and sealed/sprayed white before decorative wooden edging is applied.
Instruction manuals
Two full-colour instruction manuals are included, showing the various stages using photographic images and clear text in English, with Italian also. Each step is very easy to understand, in the way that magazine part-works are designed to be straightforward. There’s nothing here that should catch any modeller out, meaning that the only thing you need to have some experience with is photo-etch. Each manual is landscape in format, and perfect-bound, as a novel would be etc. Paint references are used where necessary and supplied in FS codes.
Plans
A number of these sheets are simply for helping the user to identify the various PE parts and wood parts, with a couple of others showing the rail carriage in various plan formats. All line drawings are clear to understand shouldn’t provide the modeller with any issue.
Decals
A single sheet of waterslide decals is included for the exterior livery signwriting etc. Print quality looks excellent. It could be worthwhile trimming any of the clear carrier film as close to the actual decal as required.
Conclusion
This isn’t a cheap kit by any stretch of the imagination, but it is an epic one in every sense. The Orient Express kit is a sort of crossover between vehicle and doll’s house building, with some beautiful period features in the mix. It’s certainly a project that will command a lot of time from you in order to achieve the very best outcome. You really do have to be reasonably adept with photo-etch metal in bending, curving and folding, and although you don’t strictly need to, some elements would be better soldered than glued. A lot of attention to detail has been made here, from the kit detail itself, down to little things like the cut-out paper décor not lying across folds in the sheet paper. The instruction manuals are also a work of art and should be a cinch to follow. Projects like this are usually once in a lifetime, so if you fancy doing something pretty unusual, then this has certainly got to be a major contender. These kits are hot off the press, only having being released within the last 2 weeks, so get them whilst their fresh!
My sincere thanks to Amati for sending this kit out for review on Model Ship World. To purchase, check your favourite Amati shop or online retailer. Tell them you saw the review here on MSW.
-
-
puckotred got a reaction from marktiedens in Nuestra Senora del Pilar de Zaragoza by marktiedens - FINISHED - OcCre - scale 1:46
Did you not have 5x5 left over when you did the deck beams early in the build?
Someone was drunk at Occre at the time they made this kit, even the pictures from the instructions show the 5x5mm pinrails with extra long belaying pins
Those brass discs are the gun carriage wheels I think...
Again, a great build!
-
puckotred reacted to marktiedens in Nuestra Senora del Pilar de Zaragoza by marktiedens - FINISHED - OcCre - scale 1:46
Oh - dummy me,I was looking through the wrong box for the timber. There is actually plenty of 5x5 strips. Anyway,the walnut is much stronger than what they supply. After looking further ahead in the instructions,those brass discs do indeed seem to be for the gun carriages - thanks for pointing that out. I will go stand in the corner now............
Mark
-
puckotred reacted to marktiedens in Nuestra Senora del Pilar de Zaragoza by marktiedens - FINISHED - OcCre - scale 1:46
Update - all the rest of the pinrails with their newel posts were made. Issue one - the instructions said to use 5x5mm for the posts. There is no 5x5mm wood in the kit,so I used some 5x5 walnut strips I had for the posts. Issue two - they also said to use 5x5mm wood for the crossbars on the posts next to the masts. Well,the belaying pins are too short to use 5mm thick crossbars,so I used 2x6mm for them,which is what all the other belaying pin racks are. Don`t know why they would want 5mm thick crossbars for those 4 - even at this scale that would be way too thick. The sheaves were made by drilling holes,then filing the area in between with a really small round file. There are some brass discs in the kit which are probably meant to be used for the sheaves,but I decided not to use them since I don`t have a milling machine to make nice,smooth slots - would probably be hard to see them anyway after running ropes through the holes. Finally, they were painted red & brass pins were added to the bottom for added strength.
Mark
-
puckotred reacted to greenstone in MASTER-KORABEL NEWS
Thanks to the offers on the forum, we decided that there will be four scales boat kits: 1/96, 1/72, 1/64 and 1/48
Thank you very much for your opinions, gentlemen!
-
puckotred reacted to James H in 1:72 Ragusian Galley 18thCentury - MarisStella
1:72 Ragusian Galley 18thCentury
MarisStella
Available from MarisStella for €147 plus shipping
The Republic of Ragusa was a maritime republic centred on the city of Dubrovnik (Ragusa in Italian, German and Latin; Raguse in French) in Dalmatia (today in southernmost Croatia) that carried that name from 1358 until 1808. It reached its commercial peak in the 15th and the 16th centuries, before being conquered by Napoleon's French Empire and formally annexed by the Napoleonic Kingdom of Italy in 1808. It had a population of about 30,000 people, out of whom 5,000 lived within the city walls. Its Latin motto was "Non bene pro toto libertas venditur auro", which means "Liberty is not well sold for all the gold".
The Dubrovnik galley was an integral part of Dubrovnik's war fleet, which in the seventeenth and eighteenth centuries, had only a few small warships (at most ten), operated solely because of frequent harassment and looting by pirates and cargo ships at that time. The Galleys were stationed in Dubrovnik and Mali Ston. Other Croatian coastal centres had this type of ship, along the eastern Adriatic coast: Kotor, Omis, Senj, and others. The Dubrovnik galley was driven by both wind and rowers (Galiot), who were both sailors and soldiers, as was appropriate, but there were also condemned criminals that rowed the State ships. Their main feature was their speed, and they were used for military, police and customs purposes, courier services, and for the transport of diplomats and senior civil servants. They were also used for the transportation of goods at the expense of the State.
The kit
MarisStella’s kit range is currently undergoing an upgrade, and most certainly in terms of their boxing. This one comes to me in its original incarnation, with a deep midnight blue thin card lid with all printing and imagery in gold ink. This does look quite stark but very attractive. I’m told that the new appearance will have finished model imagery on the box. MarisStella have said they will send over examples of the upgraded kits for us to look at on MSW, so we’ll get to see those changes first-hand in the next months. This release comes in a fairly weighty box, and lifting the lid off, we are first presented with a product leaflet, sheet of printed flags and a thick 122-page manual which is spiral-bound. All of these items sit on a cardboard tray which when lifted out, reveals the kit materials below. A large cardboard cover first needs to be lifted out to access the kit itself.
Inside, several bundles of timber and dowel sit on top of two laser-cut sheets of plywood for the main bulkhead and keel construction, two sheets of laser-cut walnut, several fittings packets, another very thin sheet of laser-cut ply, one fret of photo-etch brass parts, pre-sewn sails, and a packet of rigging cord. Apart from the main sheets of ply and the timber bundles, all other elements within this kit are packed into clear sleeves that are either stapled closed or heat-sealed. My sample arrived with everything in good order.
This POB model is designed very traditionally and is constructed around a 3-part false keel and a set of 15 bulkheads. The ply used for this is 4mm thick, and like all other parts on the main two constructional ply sheets, everything is very cleanly laser-cut, with an absolute minimum of scorching.
One thing I noticed on all of the ply sheets is the laser-engraving and marking of where other components will fit to. I quite like this approach as it helps to ensure correct and precise construction throughout. That engraving has also been put to good use on the display stand elements that can be seen on these two sheets. These are also supplied in English, Italian and Croatian text, and contain a little engraved scroll work. You may opt for something a little glitzier with your build, but then again you may be perfectly happy with the parts that MarisStella provide here.
In between the various bulkheads, some 8mm² lengths of lime have been included that can be cut to length and wedged in to keep everything straight. I believe some of the other kits have lengths of dowel which slot continuously through the bulkheads. I would’ve liked to have seen similar here, but at least the timber is included. It is also suggested that this material be cut up and used to create the bow and stern filler blocks, although you might like to use balsa for this purpose.
Two sheets of walnut are supplied, one of which (the narrower and thicker sheet) contains the keel components. Although you will need to cut the rabbet into these, the positions for this are engraved onto the parts and the manual clearly shows how this is done.
The other walnut sheet is lighter in colour and thinner than the previous, containing parts for the gun carriages, rail cap strips, cabin bulkhead, and transom, channels etc. Again, and where appropriate, more engraving is present for constructional accuracy. All walnut sheet timber is of high quality with good grain that shouldn’t split etc.
A very thin sheet of birch ply is included for the head rails, transom and cabin door detail etc.
All strip stock in this kit is also of the same standard, with numerous bundles of timbers of different sizes and types, including European Walnut for the hull planking. There is some natural variation in the colour of the walnut planks, so I would look at possibly grouping them, so wood of the same tone is used the same for both sides. This model also has a single-planked hull, unlike the double-planked that we so commonly see these days. However, the deck is double-planked, and the planks sit directly atop of the bulkheads, with no thin ply deck to lay first. The second layer of deck planking is supplied as beech strips.
Various lengths and diameters of dowel are included, and all supplied in walnut. These are tightly grained and have excellent natural colour.
This is one model that really would benefit from having sails fitted, just to highlight the elegance of the shape. A feature of MarisStella kits is that the sail material is pre-sewn. By this, I mean that the shapes are lightly printed to a piece of pre-aged sheet and the inner stitched lines are present. All you need to do is to cut out the sails and sew the outer edges. Sail colour is akin to natural linen and looks good to use without any further ageing trickery.
Two anchor packs are included. These contain a metal anchor that is painted black, a separate walnut stock, and some brass bandings that would look nice if they were also blackened.
Another pack contains 3-eye rigging blocks, single blocks, eyelets, belaying pins, and parrel beads. There is some colour variation in the block colour and all look to be made from walnut.
One length of 1mm brass wire is included in one fittings pack, as are two 4mm cannon for the bow. These are finished with an antique patina and may benefit from being blackened in some way. I would use Gunze Dark Iron paint which is then burnished to an iron finish.
A reasonably thick sheet of photo-etch parts is also included, containing head rail decoration, transom decoration, rudder straps etc. Quality is again excellent, with reasonably thin tags to remove the parts from their positions. Tag positions are the only clean-up that will be required with these parts.
A single packet is included that contains four spools of natural finish rigging cord in 0.25, 0.5, 0.75 and 1mm diameters. One length of 1.25mm is included separately, as is a 1mm length of black rope.
Every vessel of course needs a flag and both this and a pennant are supplied here, laser-printed in colour onto paper. You’ll need to furl these realistically and they could’ve done with been thinner, possibly from tissue paper, but will still look very attractive when flown.
Instructions
This 121-page spiral-bound A4 manual also has a clear plastic cover to protect it. Each of the constructional stages are illustrated by generally uncluttered CAD line drawings that are annotated in English, Italian and Croatian. Some drawing details are a little small, such as the eyelet positions, footplates etc. so maybe magnify those a little. A very comprehensive section on making the sails is also included. Illustrated construction takes place over 83 pages, and this is then followed by the building instruction text and list of parts.
Plan
A large single sheet plan is included that contains pretty much every dimension/measurement you'll need and the line drawing quality is excellent. To prevent any piracy, I have only included a portion of that plan here, with no bulkhead shapes.
Conclusion
A very nice kit of a very unusual subject. I’ve seen so many model ships of antiquity, but this is one that seems to bridge the gap by being of a generally ancient style, whilst being an 18thCentury vessel. MarisStella’s design is nice and easy to follow and is coupled with high quality materials and drawings. In all, an excellent package that will provide many hours of pleasure for a very reasonable price. As this is single-planked, I would recommend this to intermediate modellers.
My sincere thanks to MarisStella for sending this kit out for review on Model Ship World. To purchase directly, click the link at the top of the page, or head over to your local MarisStella stockist.
-
puckotred got a reaction from Canute in MASTER-KORABEL NEWS
Yes, I know that, I was just trying to be ironic
-
puckotred reacted to xodar461 in Revenge 1577 by xodar461 - FINISHED - Amati - Scale 1:64
To start, I test fitted all the bulkheads onto the false keel. Nothing is mentioned in the manual re: cutting a rabbet but i decided to proceed. The stern has to be trimmed down otherwise it will be wider than the rudder post when the planking is placed. The lowest extent of each frame was marked and the rabbet was cut from was below the frame. Here is a pic from the stern:
And here is the rabbet from frames 7-9.
-
puckotred reacted to xodar461 in Revenge 1577 by xodar461 - FINISHED - Amati - Scale 1:64
Here the frames have all been fitted and glued. Only one frame glued at a time and the false decks were used to maintain correct alignment. The frames were also tapered at the bow an stern.
Note that frame 1 extends pretty far below the curve of the false keel. This is because a slot is present to fit the stem. In order to get an idea of the true curve here, i fitted a think piece of scrap wood to the keel as you can see in the next 2 pics. This area is not well seen in any of the photos in the manual and one may think that more material need to be removed from frame 1. Nothing worse than finding out later that too much wood was removed!
-
puckotred reacted to xodar461 in Revenge 1577 by xodar461 - FINISHED - Amati - Scale 1:64
After the frames have been attached, the first deck to place is the orlop. Although the manual shows this as 1 piece, the kit splits the deck down the middle for 2 pieces - much easier to fit this way. The deck is planked off the model and then glued onto the frames. The hatch coamings and gratings are then fitted. As others have pointed out, the gratings are photo-etched brass and not wood. One problem with replacing them with wood is that the grating openings may not be to scale - often they are too big. As this deck is deep within the ship, it won't be too visible anyway so I'll decide later if I want to change out to wood for the upper decks. here are pics of the deck pre and post application of satin poly. I think the gratings are acceptable.
Also note that I have decided to not use treenails to the deck. At this scale they would be barely visible anyway.
-
puckotred reacted to xodar461 in Revenge 1577 by xodar461 - FINISHED - Amati - Scale 1:64
An interesting issue arose when i fitted the main deck after planking. It seems that the central part of frame 4 is too high. Before doing anything drastic, time to figure out what, if anything, may have gone wrong. here is a pic to show the details
the red arrow shows how much the frame is off. If not corrected, the main deck will not seat correctly onto frames 2,3. there are 2 decks that are fitted above this one and the alignment of those 2 seemed correct when I dry fitted them. Also, where frame 4 meets the bearding line seems OK too (yellow arrow). Here is a shot of the plan
Looks OK here too. this is how the deck is seated with nothing done. Red arrows show the gap.
As I could find nothing wrong with the alignment of the overlying decks or with frame 4 at the rabbet, I have to assume that the frame is off by a few mm in the area of the yellow circle - so this is what I trimmed down.
now deck is seated perfectly along frames 2-4. hopefully I don't have to modify anything else as the upper decks go in.
This is the planked main deck, not yet sealed with poly
Jeff
-
puckotred reacted to xodar461 in Revenge 1577 by xodar461 - FINISHED - Amati - Scale 1:64
More decks now planked and installed. Main gun deck, bow deck, raised lower deck and rear deck. I decided to use a softer graphite pencil (#9) to simulate the caulking as a standard #2 was a bit light (note the difference between the main gun deck and the other decks at this level).
The bow deck was partially planked and then installed as it has to be bent to insert down the frames. Grating frames are left open for now. Still not sure if i want to use the etched brass. The next pic shows more beams in place to support the upper decks as well as the aft most frame #14 now installed with the bare upper stern deck. Beams 6B, &b are half frames with support columns. This is one piece in the kit and the support column was not that good.
Here is one from the kit and my replacement. The foot of the handmade column is longer than the kit as the beam sits in a square hole in the main deck. If the foot of the column was as short as the kits version, the round part of the columns would end at the deck. I made one that way before i realized that this would not be a good look
Here they are installed:
A ladder is installed from the main to the lower deck:
And finally, a few pics of the whipstaff assembly, capstan and rear gallery deck planking. The tiller arm is temporarily inserted to show how the whipstaff will connect to the rudder.
So far no more surprises. The gaps in the planking on the side galleries are to allow fitting of the side patterns. It will be important to get them correctly positioned as they determine the height of the gunports from the deck. I will show some pics with a few cannons in a future post. I also plan to fill the bow and stern with basswood that will allow for a better purchase of the hull planks. I also plan to install some lighting in the lower decks as all this work will be invisible one the upper decks are in place and the hull is planked. The kit comes with some PE brass lanterns and I hope to be able to put the light in them and run the wires through the frames and out near the keel. Here is a link to show the the kind of light i am taking about:
https://www.modeltrainsoftware.com/flickering-led.html
I will have to work out the lighting details before i progress much further with the build.
Jeff
-
puckotred reacted to xodar461 in Revenge 1577 by xodar461 - FINISHED - Amati - Scale 1:64
Past few weeks have been spent installing the below deck lanterns. I decided to add a light to each one to hopefully illuminate some of the work done in the lower decks. The light s are 1.8 mm orange LED that flicker to simulate a flame. To hang the lanterns a hole is drilled in the corresponding beam with some support wood on either side as the hole will weaken the beam. I then gouged a small trough in the beam to fit the wiring. The wires were then run through the beam and down a trough in the frame to exit beneath the lower deck. The photos illustrate some of the work.
Below is an LED test fitted through the beam and frame
A close up on one lantern:
Wiring complete for this one:
Multiple lights installed. lots of wires!
A total of 10 lanterns and 4 LED "torches" will be installed. All can be run with a nine volt battery.
Jeff
-
puckotred reacted to xodar461 in Revenge 1577 by xodar461 - FINISHED - Amati - Scale 1:64
Work on the lighting now complete. All the wires have been joined together with the one lead wire exiting from the keel. This will be eventually connected to a 9 volt battery in the final display. It will be interesting to see how much is visible when the ship is planked. Red arrow in second pic shows an LED meant to represent a torch. The LED wont be visible, only the flickering light will be through the hatches
Here are a few pic of the helmsman's platform and whipstaff assembly.
And finally, I decided to add some filler wood to bow and stern - basswood of a variety of thicknesses - showing one side sanded and the other still rough. Stern has been mostly sanded to shape
Next up - a few cannon carriages have to be fitted before any side panels are placed. I may rig the ones at the stern. Others nay be a bit difficult to rig based on their location.
Jeff
-
puckotred reacted to xodar461 in Revenge 1577 by xodar461 - FINISHED - Amati - Scale 1:64
After a long interlude...Several cannons need to be fixed in place prior to placement of the side gun port patterns. 2 small cannon carriages are placed at the stern. No issue here with the barrels temporarily placed
the plans call for one small carriage at the bow. Problem here is that in the picture of the finished model on the box, this cannon seems to be a large one and there is no way it will fit in this space and be centered in the port. This one is on the same deck as the other large cannons. I ended up using a small one here as the instructions say to do. So I will be short one small and have one extra large. Not an issue now, but easy enough to deal with...just could have one port closed.
next issue was the 2 large carriages towards the stern. When placement was tested, the bulkheads interfered with centering of the cannon in the port. next 2 photos illustrate the problem.
The fix was easy enough...trim back both bulkheads in order to make them more like frames. Luckily, the MDF is muhk easier to trim than plywood!
Since i had to make a few small and large cannons, I figured I may as well make them all. This way I can test cannon placement with the gunport patterns. one of the aft ports was a bit off so about 1.5 mm was taken off the lower edge. Before trimming, I checked that this would not affect the wales as one comes close to this port. Should have room to spare above the wale.
The cannons...
Next step is to affix the side gun port patterns.
Jeff
-
puckotred reacted to AntonyUK in Revenge 1577 by xodar461 - FINISHED - Amati - Scale 1:64
Hi Jeff.
Nice job again on the fixes.
The lighting looks real good. Will make a nice visual detail in the evenings.
On the point of the full size replica Backer is correct. I have walked and been around the ship... it's a mock up.
Large sheet panels on the sides. Looks like they interlock quite well.
All the best.
Antony.
-
puckotred reacted to xodar461 in Revenge 1577 by xodar461 - FINISHED - Amati - Scale 1:64
After the lower gunport patterns are in place, it is time to lay the first planking. Here are a few photos of the progress. no real problems encountered at this stage. Photos also show a bit of wood filler used to smooth out some areas where the planks join the port patterns.
Almost done
First layer finished. It was very helpful to have the bow (up to frame 4) and stern (frame 13-14) filled with wood to allow extra purchase for the planking. Photo seems to show some unevenness to the planking but is is actually quite smooth as can be see from the bow and stern shots
Stern planking using a pattern supplied in kit
-
puckotred reacted to xodar461 in Revenge 1577 by xodar461 - FINISHED - Amati - Scale 1:64
The lower gunport patterns have gunport frames glued to the inner aspect of the pattern as can be seen below
Although this area will be covered by the upper deck, I did not want to leave them like this as I planned to secure the cannons with not only glue but rigging. This would require some internal planking. First step was to add some deadwood to the internal gunport pattern. I used some MDF from the same pallet that the gunport frames came from. The ships frames were still a bit wider so some planks from those used for the first planking layer were used to make up the difference.
Finished...