


Bob Cleek
-
Posts
3,374 -
Joined
-
Last visited
Content Type
Profiles
Forums
Gallery
Events
Everything posted by Bob Cleek
-
Sorry for the confusion. I was in the middle of an edit, so you caught only the beginning of the post. Check out the link I provided above to the U.S. Amazon and eBay websites and you'll see they are both offering new and used copies. Beyond that, I expect the cost of shipping is prohibitive. We keep hearing that in recent times on all sorts of modeling essentials. The cost of an item on the opposite side of the Pond seems to almost double when the shipping is added. We have U.K. books listed on U.S. eBay, so I'm not sure why it doesn't work the same the other way around. Is it possible the "not available" status is a result of some sort of E.U. customs issue?
-
It was an expensive book when first published and seems to have remained so. Apparently, it was until rather recently only available directly from the publisher, Ancre, in Nice, France. The Art of Shipmodeling - Bernard Frolich - Ancre There are now new and used copies available on U.S. Amazon (The Art of Ship modeling: Bernard Frolich: 9782903179847: Amazon.com: Books) and U.S. eBay: (https://www.ebay.com/sch/i.html?_from=R40&_trksid=p2334524.m570.l1313&_nkw=The+Art+of+Shipmodeling+by+Bernard+Frolich&_sacat=0&_odkw=The+Art+of+Shipmodeling&_osacat=0) Believe me, we feel your pain over here, as well. We have to pay the same exorbitant shipping costs from the U.K. to the U.S. that you apparently must in the opposite direction. I believe this increase in shipping costs was attributable to the fact that all shippers seem now to be sending everything air freight. Time was, you could order something from Europe and it might take three or four weeks to get here, but the shipping didn't break the bank unless you wanted to opt for air freight. Now it's all air freight whether you need it or not. On top of that, you may also be paying the price for "Brexit," but I'm not really all that familiar with that issue, of course. Perhaps you might consider having a friend who is making a run to the South of France "smuggle" a copy back for you from Ancre. It's really a valuable resource.
-
I believe that The Art of Shipmodeling has reached that pinnacle of universal reference work that it is simply referred to by its author's last name: "Frolich." I see where, inexplicably, Amazon has it for sale new for $70.00. That's a steal at less than half the price most of us paid over the last 22 years since it was first published. I'd grab a copy in a hot minute if I were you. There's a wealth of information in it. But beware! Do not confuse The Art of Shipmodeling by Bernard Frolich with The Art of Ship Modeling by Richard Mansir, which is an entirely different book. It's "Frolich" that you want to make sure you are buying. If it's classic books on modeling technique and "tricks of the trade," I'd strongly recommend: The Techniques of Ship Modeling, by the late Gerald Wingrove: The Techniques of Ship Modelling by Wingrove, Gerald A. Hardback Book The Fast 9780852423660 | eBay There are always a few used copies on eBay (both hardcover and quality paperback) so shop for the lowest price, usually less than ten bucks used. Ship Modeler's Shop Notes, Volumes 1 and 2 from the NRG. There are always used copies of these on eBay and Amazon. New copies are available from the NRG store through this forum. As for Volume 1, I'd advise you get a newer printing with the spiral binding which permits the books to be laid flat on a workbench or tabletop when working from them. The original binding was a glued spine paperback and the glue dried out and the pages come loose. My copy of Volume 1 is held together with a bulldog clip. I should bring it to Staples or one of those places and have them spiral bind it for me. William Frederick's (1874) Scale Journey: A Scratchbuilder's Evolutionary Development, by Antonio Mendez C. This book was "remaindered" on eBay a couple of years ago for seven bucks a copy and I grabbed one. It's focus is radio controlled sailing scale models, but its content is a survey of technique, and it is full of subjects not found elsewhere, especially regarding tools and shop practices. It would take you years of following build logs on MSW to pick up but a fraction of the how-to-do-its in this book. Unfortunately, it appears to have become something of a collectable at this point and Amazon is now selling them for $47.00. If you watch out for a copy on eBay, you may get lucky and snag one for closer to the price when they were selling off the remainders new. William Frederick's (1874) Scale Journey: A Scratchbuilder's Evolutionary Development: mendez, antonio: 9780975577202: Amazon.com: Books I checked eBay just now and see where they have three between $50.00 and $169.00! (Let this be a lesson to modeling library builders everywhere!) Plank-On-Frame Models and Scale Masting and Rigging, Vol. 1: Scale Hull Construction and Plank-On-Frame Models and Scale Masting and Rigging, Vol. 2: Scale Hull Construction by Harold A. Underhill. This two-volume set is a classic and there are lots of used copies on eBay for surprisingly reasonable prices. (Still in print, new copies run around $90 per volume!) plank on frame models underhill for sale | eBay Masting and Rigging: The Clipper Ship and Ocean Carrier by Harold Underhill. This is what I'd call the Bible of the last days of commercial sail. If you are interested in clippers and windjammers, as well as general rigging practice at the highest level of its evolution, this book is it. Used copies are available very reasonably priced on eBay. Masting and Rigging: The Clipper Ship and Ocean Carrier for sale | eBay These titles are recommended for their treatment of general modeling practices and techniques more than for specific research data on specific types and periods. When your interest becomes focused on a particular type of vessel in a particular period, there are specific reference works that become "must haves," but they tend to be expensive (some running more than a hundred dollars and up) and sometimes very difficult to find. If you continue to pursue your interest in ship modeling, you will find yourself acquiring a library of some value and doing that easily becomes a related hobby in and of itself.
-
Definitely. Any acidic residue in or on the wood is to be avoided. A mild soap solution, dishwashing liquid, or the like, should be sufficient. For the particularly obsessive types, a short dip in a baking soda and water solution should neutralize any acid, I expect.
-
Yes, I don't see any reason why the Byrnes drawplate can't be sharpened. All it takes is a flat surface, some fine abrasive sheet that will cut metal decently, and the patience to do the bit of handwork required (which I expect could actually be substantial if the drawplate is hardened steel as I expect the Byrnes model is. I've also used razor blades as well as hacksaw and drywall knife blades as stock to grind my own scraper shapes which works fine once you master the shaping. I use a rotary tool with a diamond burr or a metal cutting ceramic disk. It takes a careful touch, of course. l've never tried to sharpen the Artesania Latina molding scrapers. While I haven't found the need to do so as yet, I expect it would be possible, but how effective, I'm not sure. Further experimentation is in oder! The Artesania Latina scrapers are a bit pricy and not essential for ship modeling until you run into a more complex molding shape that's required. Simple 1/8" half rounds and larger probably just as easily made with DIY scraper. Artesania Latina scrapers come into their own when the more detailed and complex trim and molding shapes that are much more difficult to grind yourself are required.
-
Ah ha! I know the name of that tune. Back in the days before the Dictionary of American Naval Fighting Ships ("DANFS") ( https://en.wikipedia.org/wiki/Dictionary_of_American_Naval_Fighting_Ships ) was posted, in part at least, on the internet (https://www.hazegray.org/danfs/) I had acquired for free in a "junk books pile" a set of the nine-volume "Encyclopedia Britannica" of U.S. Navy ship histories and photographs going back to "day one" of the U.S. Navy less one volume. Published by the Naval Historical Center, the large and expensive, somewhat limited edition series had been out of print since 1991 and there was little chance of my ever obtaining the missing volume. Then, one day when I had some time to kill, I was perusing the stacks of the county main library which I rarely visited and I spotted a DANFS volume! Unbelievably, it was the one volume that I didn't have! I checked the card catalog and there was no listing for any DANFS volumes in the library's collection. I took the book to the head librarian and explained my situation, the fact that it appeared this volume was an "orphan," and that there was no sign of it or the rest of the set in the card catalog. Explaining my interest in maritime history, I asked her as nicely as I could if it were possible for me to buy this rather esoteric research book from the library so they could use the money to buy another book more likely to be read by the library's patrons. She looked at the volume and noted it had a library stamp and all that in it, but nobody had ever checked it out. She looked at me and said, "I have no idea where this book came from. It should have been culled from the stacks long ago. If we kept every book that came into our possession, we'd quickly run out of shelf space. Just take it. We're glad to get rid of it and I'm happy to see it go to somebody who wants it." Thanking her profusely, I walked out with a free book which, considering its value as the "missing link" to a now complete DANFS set, I would have gladly paid a fair price for! I'm not so sure whether you'd be so lucky with a set that's worth close to a thousand bucks, though! You can always try. Stranger things have happened! BTW, I just ran a search on the DANFS set and there's a complete nine volume set for sale on eBay right now for a rather excellent price of $101.19 with free shipping! I'm not sure why, but there it was: https://www.ebay.com/itm/325989377449?chn=ps&_trkparms=ispr%3D1&amdata=enc%3A1qIDhXgXvR8eXOOj6-pkOmQ61&norover=1&mkevt=1&mkrid=711-213727-13078-0&mkcid=2&itemid=325989377449&targetid=4580771614098651&device=c&mktype=&googleloc=&poi=&campaignid=603247547&mkgroupid=1234752552191001&rlsatarget=pla-4580771614098651&abcId=9316119&merchantid=51291&msclkid=4c8398c3d71f1a7cd709fedb7e6913fd Note that "complete" eight volume sets were the original set. The ninth volume was an additional supplement updating additional vessels. Prices for complete sets appear to be running closer to $200 to $300, plus shipping. Anybody who's interested in U.S. Navy fighting ships really shouldn't miss this opportunity.
-
Well, I learn something new everyday! Thanks for the clarification, guys! It makes sense that a metalworking drawplate might have a slight chamfer on the "exit" side of the plate to allow for a bit of 'wiggle room" as the wire exits the plate. I guess I've just been lucky in obtaining woodworking drawplates without knowing the difference. My Byrnes drawplate is marketed as useful for making trunnels nails, but doesn't mention any further distinction regarding its use for wood or metal one way or the other. It has "(T)hirty precision holes cover the range from .016" through .059" - at 1:48 (1/4" scale) that represents full-size trunnels of 3/4" diameter through almost 2" in diameter!" The smallest holes on the Byrnes drawplate are so small as to be nearly invisible when viewed from the back ("exit") side and I had to hold it up to the light to see them without a magnifying glass. The back of the Byrnes drawplate is perfectly flat and the "exit" side of the holes aren't chamfered. Like all things "Byrnes," this drawplate is an elegantly finished tool, although I can't imagine ever needing a .016" diameter dowel, nor finding a species of wood that would draw down to such a size without breaking! (Some species of long-grained bamboo, perhaps?) The cheesy drawplate I got first from Micro-Mark has 24 holes, which are not numbered as to size. The smallest hole looks to be about the same diameter as the smallest hole on the Byrnes drawplate, but the largest hole is around .125", a bit more than twice the diameter of the largest hole in the Byrnes drawplate. Thus, the Micro-Mark drawplate provides a wider range of sizes in a fewer number of holes and therefore a much less gradual progression of hole sizes. This fact makes it a lot more difficult to use with the narrower holes because each successively sized hole takes a much larger "bite" out of the material at each step in the shaving process than a greater number of holes over the same size range which tends to encourage breakage, . The "exit" side of its holes aren't chamfered. The second drawplate which I acquired, (if memory serves, on eBay,) has 83 holes running from about .125" to what looks like a couple of steps smaller than the smallest hole on the Byrnes drawplate at .016, a rather wide range of sizes with three and a half times as many holes over the same range of sizes on the Micro-Mark drawplate. This fact greatly reduces the problem of breakage characteristic of the Micro-Mark with its greater a progression between sizes. While the Byrnes drawplate is marked with wire gauge sizes for each hole, neither of my other two are. The larger drawplate I got off of eBay is better finished than the Micro-Mark drawplate and, of course, the Byrnes drawplate is impeccably machined. (I have no idea where any of their manufacturers get the bits that drill the smallest holes!) My largest drawplate is about .225" thick. The Byrnes drawplate is about .125" thick, and the Micro-Mark drawplate is about .096" thick. The Micro-Mark drawplate decidedly lacks the "heft" of the other two. Given the example of the Byrnes drawplate, I "lapped" the other two on their back ("exit") sides to "sharpen" their wood-cutting edges by taping a few abrasive sheets to the machined cast iron table of my Unisaw and took them down to a uniform surface finish of about 600 grit. This markedly improved their cutting smoothness. I have on a few occasions drawn annealed fine copper wire through these plates with acceptable results, but never having done so with a "real" metal-working drawplate I can't offer any comparisons between the two types of plates for drawing wire. I would expect that a goldsmith or silversmith would be far more demanding of the results than my limited experience permits! As much of a conclusion as I can offer from my limited experience is that a woodworking drawplate can be made to draw metal wire, albeit perhaps crudely by professional jewelers' standards, but a metalworking drawplate cannot be used to "shave" wood at all, at least not without taking the back ("exit") side of the plate down below the chamfer to the level of the sized hole alone as noted in the comments above. That said, while I've found this to be so only with round-sectioned material, I doubt the same can be said for many, if not all, of the many other drawplate section shapes available for drawing wire. It certainly would be convenient to be able to get out half- and quarter-round wood trim on a drawplate, wouldn't it? I currently produce half- and quarter-round trim stock with an Artesania Latina scraper applied to the edge of a suitably-thicknessed strip of wood and then cut the shaped edge from the strip on my Byrnes table saw and have no complaints beyond the tedium of the scraping. For those unfamiliar with these handy tools, they come in three separate sets ("Set A" through "Set C") of three scrapers each. Every shape is different. Available in the U.S. from all the "usual suspects" and sometimes on eBay. Priced between USD$10.00 and USD$17.00 per set of three scrapers. Pictured below approximately "life-sized." (Note below: Not my hairy thumb!) Note: I find it more effective to hold the scraper in a jeweler's hand vise with the vise jaws close to the working edge of the scraper. This further stiffens the scraper and gives better control of the scraper, not to mention saving wear and tear on fingertips! SET "A": https://artesanialatina.net/en/micro-tools/1295-micro-moulding-scrapers-a-shapers-for-wooden-plastic-models-miniatures-8421426273007.html SET"B": https://artesanialatina.net/en/micro-tools/1296-micro-moulding-scrapers-B-shapers-for-wooden-plastic-models-miniatures-8421426273014.html SET "C": https://artesanialatina.net/en/micro-tools/62355-micro-moulding-scrapers-c-shapers-for-wooden-plastic-models-miniatures-8437021128222.html
-
I have no experience with "blue mold" holly, but I've dealt quite successfully with mold on other wood species by bleaching it with a solution of oxalic or citric acid and water. Oxalic acid is sold in crystal form in paint stores as "wood bleach." (Don't buy "teak bleach" or other such products. Just get plain oxalic acid crystals marketed as "wood bleach" 'and follow the instructions on the container.) As I said, I haven't ever bleached moldy holly, but, to one degree or another, I've had success with bleaching other wood species. Oxalic acid wood bleach is relatively inexpensive, so you won't be out much if it doesn't work and you'll always have it to try on other species that you want to bleach back to "just cut" color. Do wear nitrile gloves or the equivalent when working with oxalic acid solutions. It's not particularly dangerous, but prolonged exposure to skin can cause acid burns and soaking your fingers in the stuff, which will first attack the soft flesh beneath your fingernails, but only start hurting several hours after exposure, is one of those things you'll probably only ever do once in your life. (Don't ask me how I know this! )
-
The Micro-Mark drawplate you've mentioned is insanely overpriced. If it is anything like the same item I once naively purchased from Micro-Mark ages ago, it's junk, probably made in India or Pakistan. Drawplates are not inexpensive. The decent ones are made to high tolerances of accuracy from high-quality steel, or even tungsten, but they run in the same price range, if not lower, than the crummy low-quality one Micro-Mark offers. The fact that Micro-Mark claims its "regular price" is $75.00 is ludicrous! Rule one on tool buying (which in this instance I broke, to my dismay) is to only buy a tool when you need it and then buy the best tool of that type you can possibly afford. Quality compromises will allow you to get a lesser quality tool, but in this instance, the Micro-Mark drawplate is at the bottom of the barrel in terms of quality and priced equivalent to, if not more than, professional level jeweler's drawplates sold by the top jewelers' tool supply companies. Drawplates come in various size ranges as well as a wide variety of extrusion "shapes.' You can get drawplates that will produce wire sizes with "star" shaped cross-sections, as well as squares, half-moons, diamonds, half-rounds, and so on. Obviously, a simple round shape drawplate is the easiest to make and will therefore be less expensive that the more difficult to fabricate shapes. While Micro-Mark is always an entertaining catalog and their sales are sometimes quite worthwhile if you know what you are buying, the best source of quality ship modeling tools will often be found in the catalogs of professional supply houses that cater to jewelers, and in dental and medical instrument supply houses. Check out what Otto Frei, one of the largest jewelers' supply houses, has to offer: Drawplates & Drawbenches — Otto Frei Otto Frei's least expensive offerings are priced about the same as Micro-Mark's offering, and up, but you should be able to expect that you will be getting a better quality tools from them. (Rather commonly, retailers that focus on the "hobby" market, will sell lower cost, lower quality products than retailers that focus on professional customers.) There is also a plethora of jeweler's drawplates listed for sale on eBay. Of course, eBay is definitely "buyer beware country," but if you examine the listings closely and avoid buying from an Asian distributor of knock-off tools, you may find some good bargains: jeweler's drawplates for sale | eBay
-
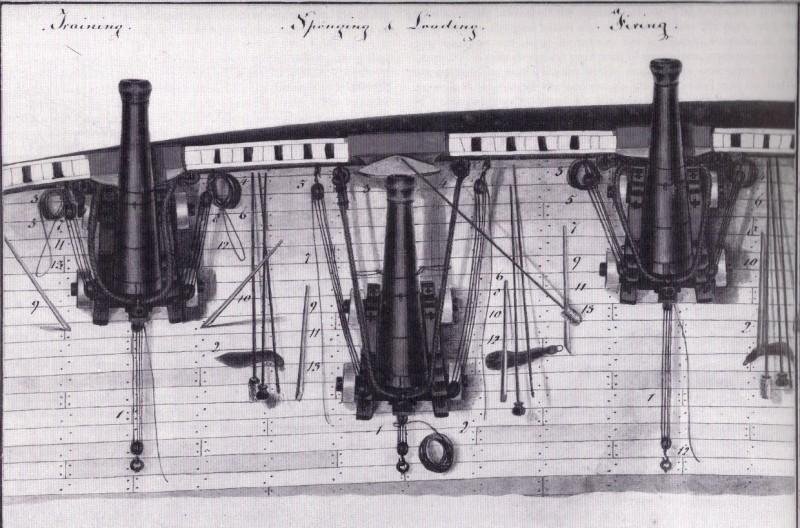
It wasn't until I posted the below comments that I saw Allan's post from Caruana. Fortuitously, it seems my deductions were correct. It appears that The History of British Sea Ordinance, volumes I and II need to be acquired! I was not familiar with the work. Thanks, Allan! On second thought, having just looked up The History of British Sea Ordinance, volumes I and II, I'm afraid I'll just have to pass at $450 each used on eBay! Thanks again, Allan! *********************************************************************************************************************************** I believe it had to be a little bit of both, depending upon the size of the gun, first and foremost. As the saying goes, "Different ships, different long splices." Heavier guns had larger breaching ropes and larger rope tied through rings doesn't lend itself well to the mechanics of tying knots, so bends are the more common means of attachment. Then again, three well-done seizings will hold as well as a knot and be easier to remove that a knot that's been pulled tight by repeated jerks from a bucking cannon. For lighter guns, which will have smaller breaching ropes, they might dispense with bends entirely and just employ seizings, particularly where the rope is turned about a thimble on the ring or, as in one instance illustrated below, a thimble on a clevis pin. For the purposes of modeling, the modeler may well decide that in the case of a smaller scale model, that a bend around the ring isn't a sufficiently noticeable detail to merit the work to tie them, while on the other hand, in the case of larger scales (and especially "gun station models") a proper commitment to accuracy at the finest level of detail possible will mandate that a proper bend and seizings are done. The below contemporary drawing of heavy guns shows what appears, albeit unclearly, to be breaching ropes that have been bent around the ring, much as a cable was bent around an anchor stock ring with an anchor bend finished with the bitter end whipped. In the below drawing the use of some sort of bend (an "anchor bend" it might appear) is used to secure the breaching rope to the ring in the same fashion as would a cable be fastened to an anchor stock ring with a bend and three whippings, the first being a throat seizing. Here again in the below photo of a gun station on an unknown museum ship, apparently perhaps of later construction than your late 18th Century, a purpose-built toggle and clevis fitting with the clevis passing through a thimble about which the breaching rope is simply seized with a throat seizing and two common seizings. Here, the thimble precludes the bend about a ring and provides a neater, more elegant connection. Detail of above arrangement, albeit without a throat seizing: Below are photos of guns rigged "for sea," rather than "for action." (Modelers always seem to depict all their models' armament rigged for action, even to the point of all guns run out port and starboard, which would only occur on a rare occasion when the ship would be "breaking the line" and firing as her guns bore simultaneously on the enemy ships of the line to port and starboard (and to devastating effect as Nelson demonstrated at Trafalgar.) When the guns were not manned and rigged for action, they would be rigged for sea, meaning that all extraneous tackles and implements would be stowed (likely below), the barrel would be secured, more likely in the fashion shown in the first picture, than in the second, which isn't clear as to what is being used to secure the barrel, although it is not the breaching rope), and then the gun would be secured to prevent its movement on the deck in a seaway perhaps with its tackles set fast. (If the ship were sailing in any fashion which would cause her to heel when the guns were in action, the leeward guns would have to be restrained from rolling "downhill" towards the rail by their inhaul tackle, while the windward guns would have to be restrained from running backwards inboard by their outhaul or "training" tackles.) In the first picture below, however, the positioning of the gun is incorrect. In a seaway, the guns would not be stowed run out through the bulwark or through open gunports. Not only would open gunports be hazardous in a seaway (the lower deck ports often being only mere feet above the waterline) but the stability of the ship would be enhanced by bringing the weight of the guns as far inboard as possible. The above "stowed" options may warrant more research as to the exact practice common in a given navy at a given period. I included these for the sake of completeness. Although cannon depicted as rigged for sea are rarely seen on models today, they can be a lot less work to model than gun stations rigged for action and, if one must, there's always the option to combine the two conditions, with a couple of chase guns run out and perhaps two, four, or six stations rigged for action as if the larger modeled vessel were running down a much smaller quarry.
-
Probably a receipt for the purchase of the bone or synthetic material would be a good first step. If a real problem was anticipated, I expect you could get a certificate from some sort of testing laboratory that confirmed, through DNA testing, perhaps, that the bone was not from a protected species. Bone, of course, is readily distinguishable from ivory, but I expect your concern is well-founded that it would be difficult to distinguish a piece of cow bone from a piece of bone from a whale or an elephant short of some sort of scientific analysis.
-
Not side-tracked at all. Interesting thoughts. Ivory is, of course, out of the question and I suppose elephant bone would also be similarly unavailable and illegal to trade in most everywhere in the civilized world. The laws are labyrinthine, though. Sometimes ivory is still released on the world market from various legitimate sources, such as national "treasuries" of confiscated poached elephant ivory. Some nations permit antique (over 100 years old) ivory items to be imported and/or sold, while others do not. Some permit exceptions for possession of musical instruments containing ivory, such as antique piano keys. Reportedly, the acquisition of "legal" ivory is not recommended because, due to changing national and international law, products made from protected endangered animals change so fast that one can't rely on any one law remaining in effect for any great length of time. As you probably know, the same is true for protected woods, e.g., African ebony and Brazilian rosewood, etc. These international trade restrictions commonly adversely affect musical instruments (with stories of famous musicians finding their prized antique instruments confiscated by the customs authorities when they travel internationally to perform, but they certainly threaten the same sort of nightmare for any "traveling" ship model which may contain now-prohibited endangered materials. My dentist is a very accomplished miniature carver, producing very fine human figurines of about an inch tall out of various materials used for dental prosthetics and the like. Not that I otherwise ever look forward to going to the dentist, but I'll have to ask her when I see her next what synthetic ivory-like materials are best for carving small details. Plastics pose the problem of possibly melting from the heat of a rotary carving burr, but there must be stuff dental technology has developed to get around that. As for bovine bone, one source I've found that's quite convenient is our pet stores here in the U.S. I don't know if the same is true in Germany, but all U.S. pet stores sell sterilized, fully dried cow bones in various shapes and sizes which are for the enjoyment of people's pet dogs. (They also sell "smoked" flavor cow bones, but these are stained brown and don't appear as the boiled, dry white bones used in the French prisoner-of-war bone models.) While I haven't gotten around to it as yet, I expect that when the occasion arises next, I will try cutting up some of these bones and epoxy-laminating them where necessary to obtain the size and shape of stock I require. Straight leg bones of eight to ten inches are available, as are knee and hip joint bones. The joint "balls" have a finer-grained texture and polish up better than the non-joint bone and can be as large as around three inches in diameter and solid throughout. Animal bones do have one minor drawback, however. If a rotary dental burr is used to carve them and the burr gets hot enough from friction to burn the bone material, it has a rather disagreeable aroma. I expect, though, that using a modern air turbine dental handpiece with a water-jet cooling feature should negate that. I think, though, that most carvers using dental burrs prefer to use the old belt-driven laboratory "dental engines" which are much easier to control in a "high(er) torque - low(er) speed" mode than the newer turbine and micro-motor handpieces that operate on a "low(er) torque - high(er) speed" basis and the slower speed should keep the heat down if one takes care not to overdo it.
-
Use of “other power tools”
Bob Cleek replied to kgstakes's topic in Modeling tools and Workshop Equipment
Yes, I've considered the Cricut as well. My daughter has one. The manufacturer's specifications indicate that grown wood or veneer up to 2.4 mm thick or plywood up to 1/8" thick (why they mix the measurement systems, I have no idea) can be cut on the machine. I suppose, theoretically at least, that computer data for an entire ship model, in some cases, at least, could be sold for use on the machine to cut out all the parts for a decent model. In theory, at least. It would have to employ some card stock modeling techniques. The machine surely has many applications for modeling, although most all of which I'm aware are already well-covered by existing technology. They seem to be a lot of fun to play with. Whether you need one or not, is up to you. -
This thread seems to have reached the level of sophistication where this short video of how N.G. Herreshoff measured the offsets from the carved half-hull models he initially created as the basis of each of his designs. It works great for a half-hull model-sized subject. Obviously, it would be rather cumbersome to build the instrument he used for the scale models he carved! While he used a geared dial measuring device, I expect a similar device with a scale on the measuring bars would work as well, albeit with less speed. All in all, it's a great illustration of how a table of offsets works. (The speaker is using a laser pointer and you have to look closely to see it on the screen in the video.)
-
That might be worth a shot. I'm sure there are contractual restrictions between German Frers and HR concerning disclosure of design details, but German Frers may be the one who held onto control of that distribution. I'd suggest approaching them as a ship modeler wishing to build a model of the design and ask if there is a way they can provide you with information sufficient to base a model on without compromising any intellectual property interests they may have. I don't know exactly how they do it, but most naval architects do produce what they call "study plans" of their designs which, while appearing to provide details of hull shapes, are not exactly accurate in ways that preserve the confidentiality of their actual work. Often, these "study plans" are sufficient to produce adequately accurate details for modeling use. You may get lucky and be able to obtain a "study plan" of this vessel from the actual design firm that drew it.
-
An excellent light duty tool system given the price point. Well worth what they charge for it, although it becomes far more effective if used with the much more powerful low-speed/high torque power source of a variable-speed foot-controlled Foredom flex-shaft machine with a standard one-inch diameter handpiece. Vanda-Lay advised me they can provide a holding fitting for these upon request (or one can be easily machined from stock aluminum plate.)
- 1 reply
-
- 4
-

-
Don't hold your breath waiting for a naval architect to provide you gratis with the only thing he has to sell. You are no more likely to find another modern yacht designer to provide you with offsets and/or lines of their designs than you have been with HR. What you are asking for is the designer's "stock in trade." This is their intellectual property and if you want it, the best you can do is hope they might sell it to you in a "study plan" form suitable only for building a reasonably accurate scale model. (In some cases, design firms will sell "licenses to build" models in the same manner as a license to build a full-size boat, but very rarely will they release the actual table of offsets essential to building an accurate full-size boat. (See: Model Plans – Laurent Giles Archive ) "(S)ome contract that makes me not giving away the blueprints and some other points and it would be fine." isn't sufficient because once "the genie is out of the bottle," it can't be put back into the bottle again. What you are seeking is the information essential to producing the yacht they've designed and once that information is released, anybody can build one for themselves without paying the designer a dime for it. Surely that eventuality is somewhat far-fetched in the case of a fiberglass production hull, but after working for a yacht brokerage, I can attest to more than a few "pirated" designs which made their manufacturers a lot more money than they ever did the original designer. (A couple of prime examples being the several fiberglass knockoffs of L.F. Herreshoff's famed H-28 design and the once popular Westsail 32 cruising yacht.) Some of these "pirates" even went so far as to invoke the name of the original naval architect in their advertisements. In other cases, buyers opted to purchase the knockoffs instead of the originals knowing they were pirated copies at a lower price without any need for the pirates to advertise that fact. You are expecting the designer to provide you with all that he has to sell and so you get the same sort of reaction you'd get from asking Coca Cola for the secret recipe for their soft drink! I know your expectation is entirely innocent, but from the design firm's perspective, their "lack of cooperation," as you perceive it, is entirely understandable. I think it's highly unlikely that you will find a way to get a proper representation of this hull, legally at least, because the designer is not only "uncooperative" in responding to your request for it, but also because nearly every yacht designer who wishes to assert a proprietary interest in their intellectual property will intentionally take steps to effectively withhold information essential to the use of their work product in order to protect their rights to their work. I understand that this particular design "is the yacht you love," but, as often as not, love is unrequited. If it's any consolation, yachts with which we fall in love are like streetcars: there will always be another along in fifteen minutes. I suppose you could take the lines off of one of these boats when it was hauled, (There's technology for doing that these days short of taking hundreds of individual measurements by hand.) but only you can decide if that is worth the effort and expense involved, assuming that you can find someone to permit you to do so. I am not a CAD wonk, so I don't know if it is so, but I think intuitively, if not factually, that it should be possible to find a CAD program that will optically digest all the data points available from the various depictions you do have, modify all of them to the same scale, and conduct a matrix analysis of those points to obtain as complete as possible a digital definition of the shape, supplementing this structure with interpolated data points where the same are missing and thus produce as accurate a hull shape as what data you have permits. But that's about it as far as accuracy goes. Otherwise, it seems you'll just have to pine away and mourn your unrequited love until such time as the next object of your affection comes along. Keep in mind that if your lust is excited only by modern designs, I think you will find the same obstacle with any of them that you've found with the HR design presently being considered. Should your tastes expand beyond the "modern," so also will your choices, since in times past there were designers who wrote for either historical purposes, such as Howard Chapelle and Harold Underhill, or for publication in books and periodicals of the day catering to home builders, such as John and William Atkin and L. Francis Herreshoff, and therefore provided the tables of offsets for such designs as they intended to be in the public domain and used for non-commercial purposes. Your determination is admirable. I expect most everyone who builds ship models has run aground on the same shoals you have. It seems to go with the territory. It is always interesting to conduct mind exercises of the same nature as this one, but in reality, there is very little new under the sun when it comes to ships and the sea because pushing a solid through a liquid is elementally limited by the immutable laws of physics. Probably as far back as man ever set about traveling upon the sea, one fellow was trying to figure out how it was that another's log canoe was faster than his and the faster log canoe hewer was trying to keep his secret to himself so as to retain the advantage of his design. I don't think we've progressed any further from that point to this day. As Dirty Harry said, "A man's got to know his limitations." Other's may still have better ideas which haven't occurred to me, but until one of those comes along, I think you've reached the point where you're just "flogging the poodle" here. Your options are to just forge ahead and build the best-guess model you can make of what this boat looks like below the waterline, knowing it can never be anything more accurate than your best guess, and enjoy the process and the result, ... or not, and move on to another boat that can be accurately modeled, if that is your intention. Never forget that whatever we fall in love with we must take as it is, "warts and all." Any infatuation that is predicated upon a belief that we can change the flaws inherent in the way we found the object of our love is inevitably destined to end in disappointment, be it boats or anything else.
-
I'm with Jaager on this one. Given the scarcity of fine quality linen thread these days, the professional museum curators seem to have accepted Guttermann "Mara" polyester thread as sufficiently archival for laying up scale rope for museum models. There is no problem coloring polyester thread with black India ink. India ink is basically lamp black and shellac thinned with water. The shellac will ensure the lamp black sticks and doesn't smear and will also stiffen the line. Clear shellac will do the same for purposes of stiffening the line without changing the color. Quality thread like Gutterman's Mara doesn't have any noticeable "fuzz," the reduction of which was the primary purpose of waxing line in the past. (Fuzz can also be removed by "flaming," running the line quickly through a flame to burn the fuzz off. It would seem waxing line is a practice that can be dispensed with entirely if polyester filament thread is used to lay up the line.
-
Proxxon mini lathe verdict
Bob Cleek replied to Srenner's topic in Modeling tools and Workshop Equipment
I don't doubt the satisfied testimonials from those who have the mentioned Proxxon woodturning lathe, but to my way of thinking, it's a lot of money to spend on a machine that doesn't do the job any better than a shop-made jig and an electric hand drill. (Hold your drill in a vise or clamp it to the bench somehow and rig a "pillow block" with a hole in it at the other end clamped to the bench to steady the other end of the stock and prevent whipping.) An accurate taper on any mast or spar is, in my experience, at least, easily achieved by using a plane to "knock the corners off" down to the proper taper and then finish-sanding it round past eight or sixteen sides, depending upon the size of the spar diameter. If one wants to make sure the taper is fair and not "wavy," as one should, the solution is to sand the spar with a long, flat batten with sand paper attached to it. If the batten is kept flat against the stock as it turning, the taper that is developed will be as fair as the face of the flat batten. You will have to do that to turn a spar on these lathes that have been mentioned. There's no way you will be able to turn a fair taper over the length of a spar using a turning tool on a short tool rest. Unless one has a lot more need for a milling machine than to work hexagonal flats on wooden sticks, it's a very expensive way to get that job done. You don't need a mill and if you have the money to buy a mill, you'd get a lot more use out of a Byrnes table saw for less money. It only takes eight passes on the table saw using the taper jig and a "vee-trough sled" to hold the squared stock on edge to take the last four cuts to form the tapered octagon and you'd be done in no time with accuracy to .001 one the Byrnes saw. Don't forget that, although woodturning lathes have less need for tooling, you can expect to put at least as much money into tooling for a metal working lathe or milling machine as you did into the bare bones machine itself, and that's just to do the basic evolutions possible on the lathe or mill. Your concern is well-thought out. A woodturning lathe simply spins a stick or block of wood so you can run a cutting tool against it to make shapes. Neither this Proxxon lathe nor the Chinese offerings pictured will do anything more. They will not cut threads. They cannot be upgraded to cut metal. You can turn wood on a metal cutting ("engine") lathe, but not the other way around. You will spend every bit of $500, and likely closer these days to $800 to purchase a Chinese Sieg "7X" (the longer the better... I think they go up to 7"x14") and the same amount again to get the tooling you'd need to have it do all it can. (You get what you pay for on these. Don't think you're getting a bargain if you see "the same lathe" for a lower price at Harbor Freight or a "flashier" one from MicroMark. They are built to the retailer's specifications and if you buy a cheap one, you are going to have to fettle it yourself to get results anywhere near the accuracy you ought to want. Only buy one from the Little Machine Shop or Grizzly. They stand by theirs.) Sherline and Taig also offer quality machines that will do similar work, albeit on a lighter machine and with less of a selection of after-market (and considerably less expensive) tooling. Those three are your options, the Sieg's being the least costly. You can cut threads on each of them and you can turn wood and metal on all of them. They are far more versatile than a woodturning lathe. If one purchases the Proxxon woodturning lathe or an equivalent, they will have to additionally purchase a separate metal working lathe if and when they want to turn metal or plastics. If they want one, fine. There's nothing wrong with the Proxxon lathe except that it's a lot of money for what little it does and in my opinion that same money would be better spent invested in a more versatile tool. Unless you want to specifically buy a lathe, in which case I'd definitely say money spent on a metal working lathe is money far better spent than money spent on a woodturning lathe, it seems like all you really need in addition to the drill motor or drill press you already have is a flat stick with some sandpaper glued onto it and perhaps a nice little hand plane. -
There's just no getting used to the level of detail at that scale which you are accomplishing with this model! It's a fascinating piece.
-
Ship Ribbing with CAD?
Bob Cleek replied to Sanjith_D's topic in CAD and 3D Modelling/Drafting Plans with Software
I believe there are a few kit manufacturers that have done this and sell kits with laser-cut wood for assembly. (See the "sponsors" list on the right side of the forum home page. E.g., Syren Ship Models and Vanguard Ship Models.) Syren Ship Models has a special "installment purchase" group build project for the frigate HMS Winchelsea (1764) going on at the moment. It's a beautiful model and extremely high quality. See: HMS Winchelsea (1764) by Chuck Passaro|A plank on Bulkhead scratch ship model project|32 gun English frigate (syrenshipmodelcompany.com) Syren Ship Model Company|Boxwood ship model rigging blocks|Ship Model rigging rope |turned brass cannon| Chuck Passaro There are a number of forum members doing CAD modeling and publishing their progress in CAD "build logs" which you can review to get a sense of what's involved in what you are asking about. I must confess that I am a "board and tee-square" draftsman and my knowledge of the CAD technology is general and theoretical, but not practical. As do some others, I find that the manual drafting techniques which I learned long ago in school continue to serve me well for my purposes. There are many advantages to CAD drafting, particularly in terms of presentation to untrained eyes. The ability to produce a 3D rotating projection of a shape as complex as a ship's hull that is instantly understood by any viewer is an amazing feature, as is the easy replication of various modifications in the design process. For those of us who were taught to "read" draughts and thus acquired the ability to "see in three dimensions" the shapes depicted in traditional orthographic projection the advanced features of CAD are "overkill" for modeling purposes. In fact, if you are contemplating creating a 3D CAD file of a particular historic vessel, you will have to learn to read the original orthographic projections in order to translate them for loading into your database anyway. (And from what I've seen looking over the shoulders of the CAD wonks who are doing that in this forum, translating draughts into CAD can be quite a challenging task that I've decided is beyond my ability to master in the time I have left in this life! ) To get as good an idea of what you are considering getting into, I suggest you read and follow "CDR Ret's" fascinating "build log" of his digital recreation of SS Galilee, an 1891 merchant brigantine designed by Matthew Turner beginning at: As for laser-cutting wooden parts for a model, I expect Chuck Passaro of Syren Ship Models knows as much about applying that technology to creating parts for ship models as anybody and he has addressed it in his many posts on this forum. I would only say that the specifics of laser-cutting technology are way above my pay grade, but I do know that the primary advantage of laser-cutting is in its ability to repetitively produce large quantities of identically shaped parts. This makes it particularly useful in the manufacturing of multiple ship model kits. On the other hand, if you are scratch-building a "one-off" model, getting out your shaped parts is faster and probably a lot more enjoyable doing it the old-fashioned way than spending hours and hours programming a laser-cutter to then burn the parts according to your data, after which you will have to sand the char off all the edges! As for basswood, I expect as you research your options based on the data here in this forum, you will conclude that it is not a prudent choice of species for the purpose you intend. While it's frequently used in lower- and middle-quality range model kits, and as a soft wood it is easily worked, it is really only suitable for painted finishes and presents finishing challenges even then. It is not suitable for fine carving work which requires a fine-grained hard wood such as box or apple, nor for planking that will be finished "bright" (showing the wood's natural color.) Given the sort of model you are interested in building, I expect you will conclude upon further analysis that there are other wood species that are more easily worked, stronger, and, if you intend to finish any of it bright, far more attractive than basswood. Think of it this way: basswood is like the wood 2X4 dimensioned construction lumber is made of and what you are contemplating building is a Steinway piano. (Don't let the cost of expensive finish wood species scare you off. A ship model requires so little of it that building with cheap wood is a foolish economy in the end.) I'm not trying to scare you off at all. I just want to give you what I hope is some direction for finding out what you will probably need to know to get where you want to go. There is always a tendency for newer modelers to "bite off more than they can chew" and there are some significant learning curves to be conquered before anyone can accomplish the incredible level of workmanship that can be seen from what some of the masters of the craft post in this forum. Very few of us will ever achieve such levels of artistic accomplishment, but we all can certainly try. The trick is not to be too hard on ourselves as we journey towards becoming better and better at it nor to discourage ourselves by unreasonable comparisons with prodigies. The greatest enjoyment in modeling ships is simply in the doing of the thing. -
The notched covering boards are exquisite, especially at that scale! Bravo! Glad to hear you are doing well, also. We all worry about Ukraine.
-
They've been doing it for a long time here in the U.S., too. Thankfully, they haven't gone as far as "subscription heated seats," but my 2015 GMC Sierra pickup truck came with all the electronic "bells and whistles" including GM's automatic crash emergency reporting locater, GPS dash screen, Sirius internet radio, and so on. All I would have been interested in was the GPS, but it all came with the upgrade package, so I had to buy it to get the upgraded interior I wanted. The catch is that all those services are only included for the first year after you buy the vehicle. After that, they shut down and they start sending you solicitations to subscribe to keep them going. While the GPS still works, they want something like a hundred bucks a year to upgrade it to reflect map changes. I passed on that, and I'll take my chances. I can always use my smart phone GPS app if I end up "driving off the edge of the old map."
-
Looking at the three lines "hanging loose" at the bottom of the picture and identifying them by numbers one through three running from left to right, I believe the intended purchases will be realized if lines one and two are secured to a deck fastening, be that an eyebolt, cleat, or belaying pin (if such were in use in your period,) leaving line three as the fall or "heaving part," which would be run through the sheave in the knight's head post and lead away as convenient to permit a hauling gang to pull it horizontally in unison.
-
From your post, it's clear you are an experienced and quite competent painter, so I'm intrigued by your preference for natural bristle brushes, given your preference for water-based acrylic paints. I have always been under the impression that only synthetic brushes should be used for applying water-based coatings because water will soak into natural bristles and cause them to soften, thereby ruining the intended "snap" of the brush as well as it's shape when the water-soaked bristles swelled. This was a particularly hard and fast rule with high quality natural bristle brushes, which are quite expensive. Natural bristle brushes were only to be used with oil-based paints. My cousins were third generation commercial painters and they used to keep their high-quality Chinese boar bristle brushes under lock and key at the shop. Those were only issued to the union master painters who knew the difference and could be trusted not to use them for applying latex paint! How do your expensive sable hair brushes stand up to use in water compared to a similar grade of synthetic bristle brush? Do you notice any difference?

