The Gimps Chimp
-
Posts
172 -
Joined
-
Last visited
Content Type
Profiles
Forums
Gallery
Events
Everything posted by The Gimps Chimp
-
 Hi Clementine, Looks like the second planking turned out just fine. You've done a nice job of fitting the rails too. The one thing I would say I've found helps is, before fitting any timber just give it a light sanding to remove any fibres. It's a lot easier to sand before fitting than after. Your build is looking good and coming along in good time. At this rate you'll be finished before me Chimp
 -
I guess it's 'Horses for courses', what suits one doesn't necessarily suit all. As long as we can all find a way that works for our own style of building. It's good that we have so many different options to choose from
-
Hi Clementine, I suffered a similar issue on my build. After sanding I think it's not so obvious and looks okay. As with most parts of the build it's a learning curve and hopefully we're all learning all the time. It's great there are people here, like Allanyed, to point us in the right direction, and many thanks to them. During my second build I've acquired so much additional knowledge and skills that I'm looking forward to being able to practice them in my third build. Let's all keep learning Chimp
-
Hi Allan, Thanks for your comment. Regarding the kit, I'm finding there's quite a few 'substitutes for reality'. I'm now of the opinion that cheapness of kit is a false economy, especially when you consider your investment in terms of time spent building the kit. However, having said that it's been a useful learning experience. I don't think I could scratch build so I'll have to stick with kits. I already have my next build waiting, Caldercraft's HMS Granado. I'm determined to finish the Beagle before I make a start on that one. Chimp
-
Many thanks for your comment Prowler. Let me know how you get on with the ropewalk if you decide to make one. Chimp
-
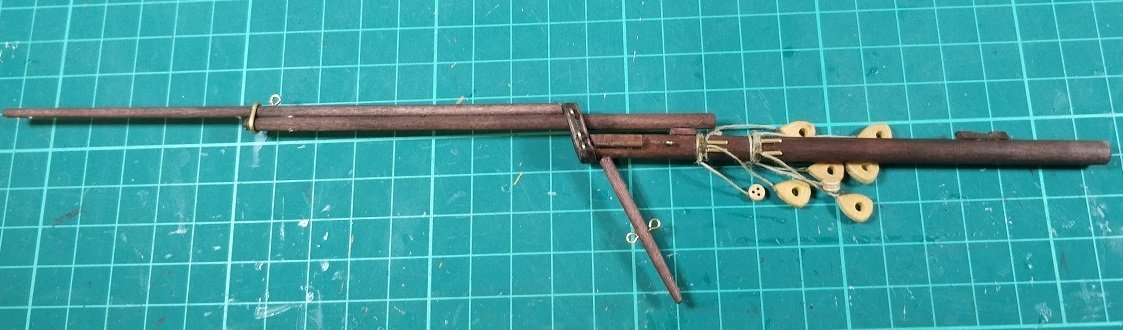
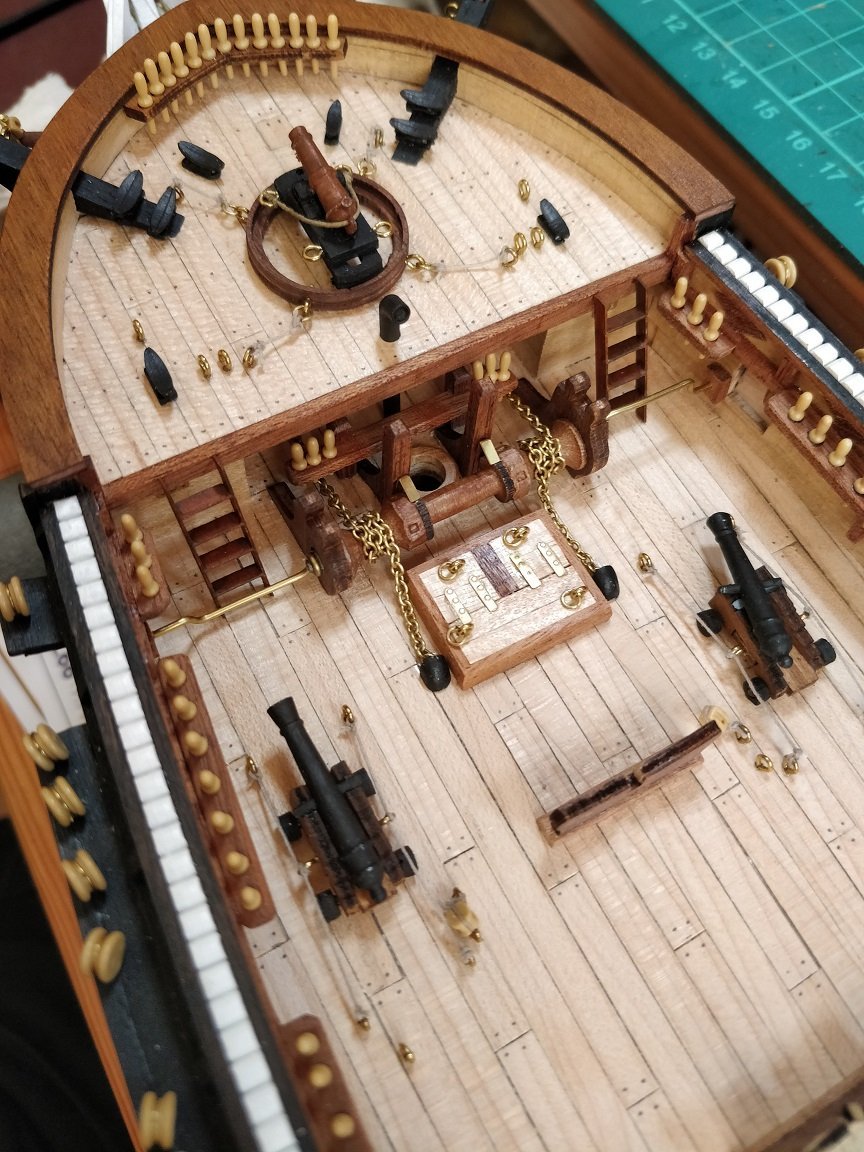
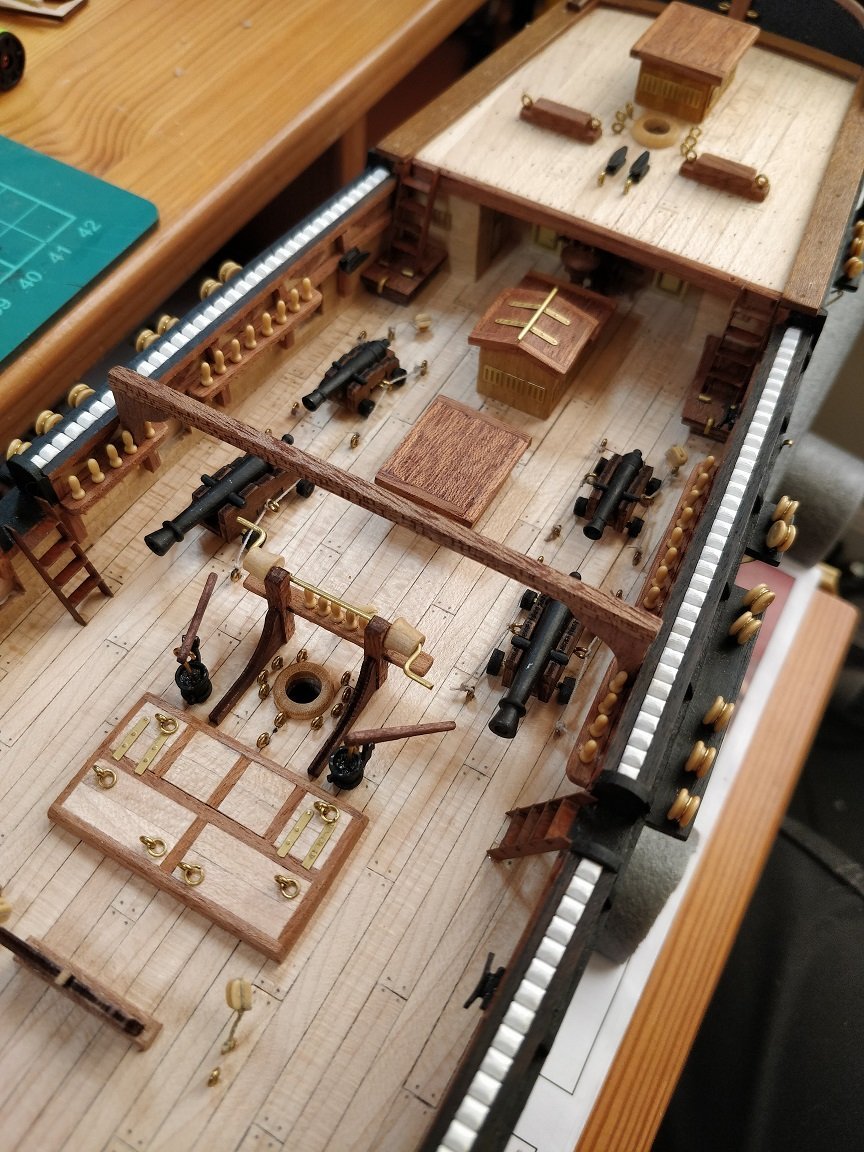
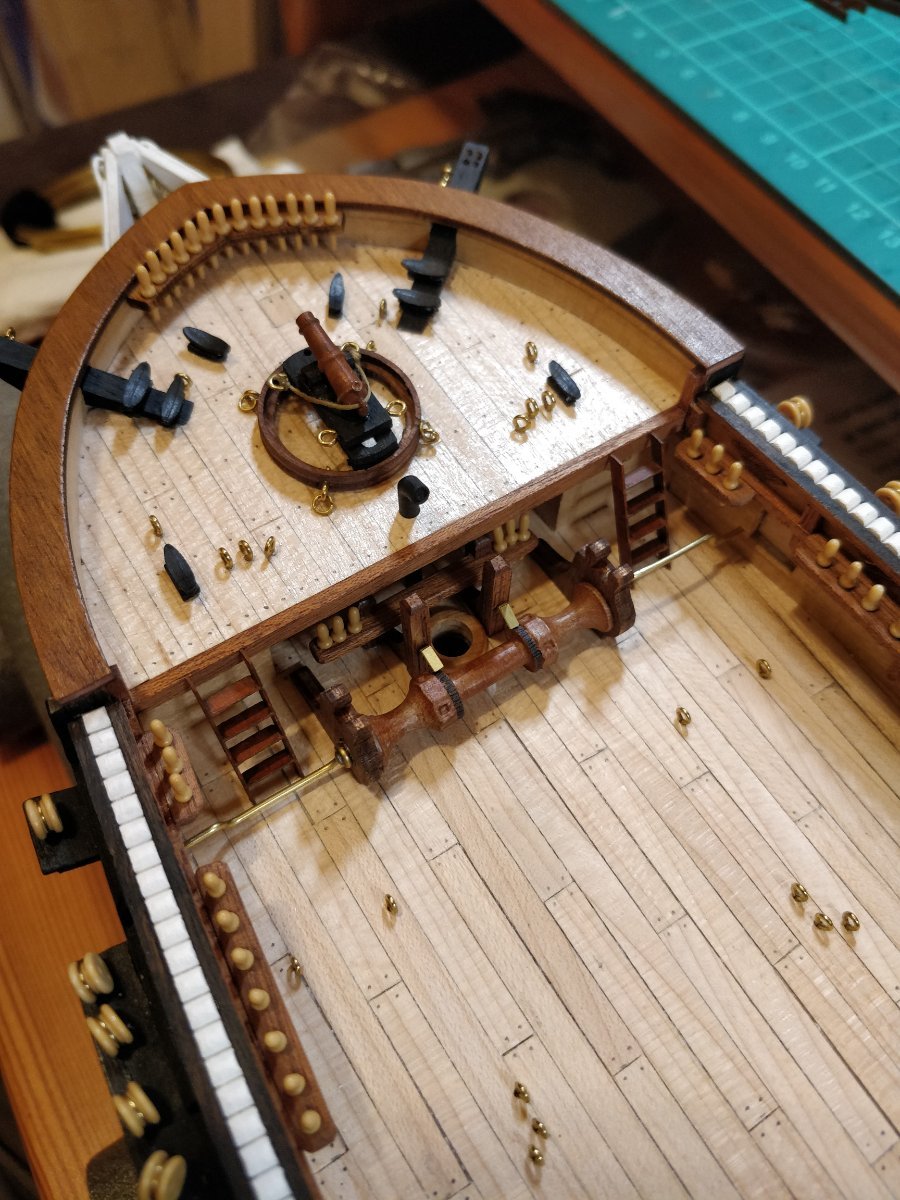
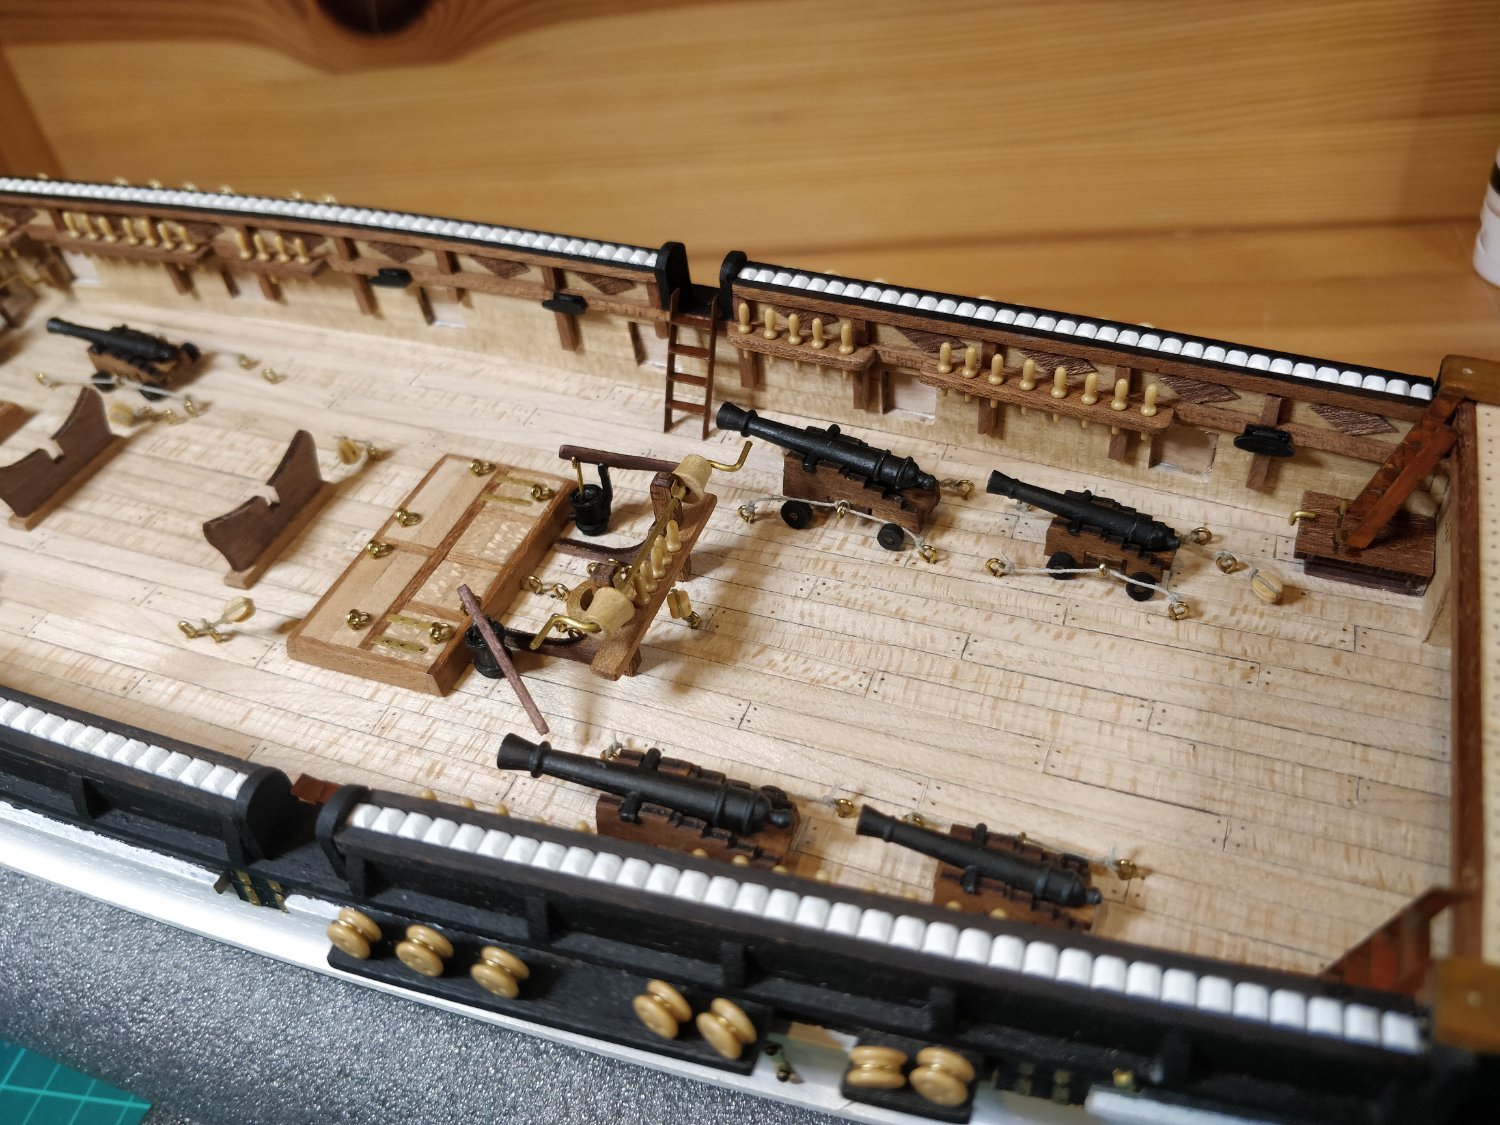
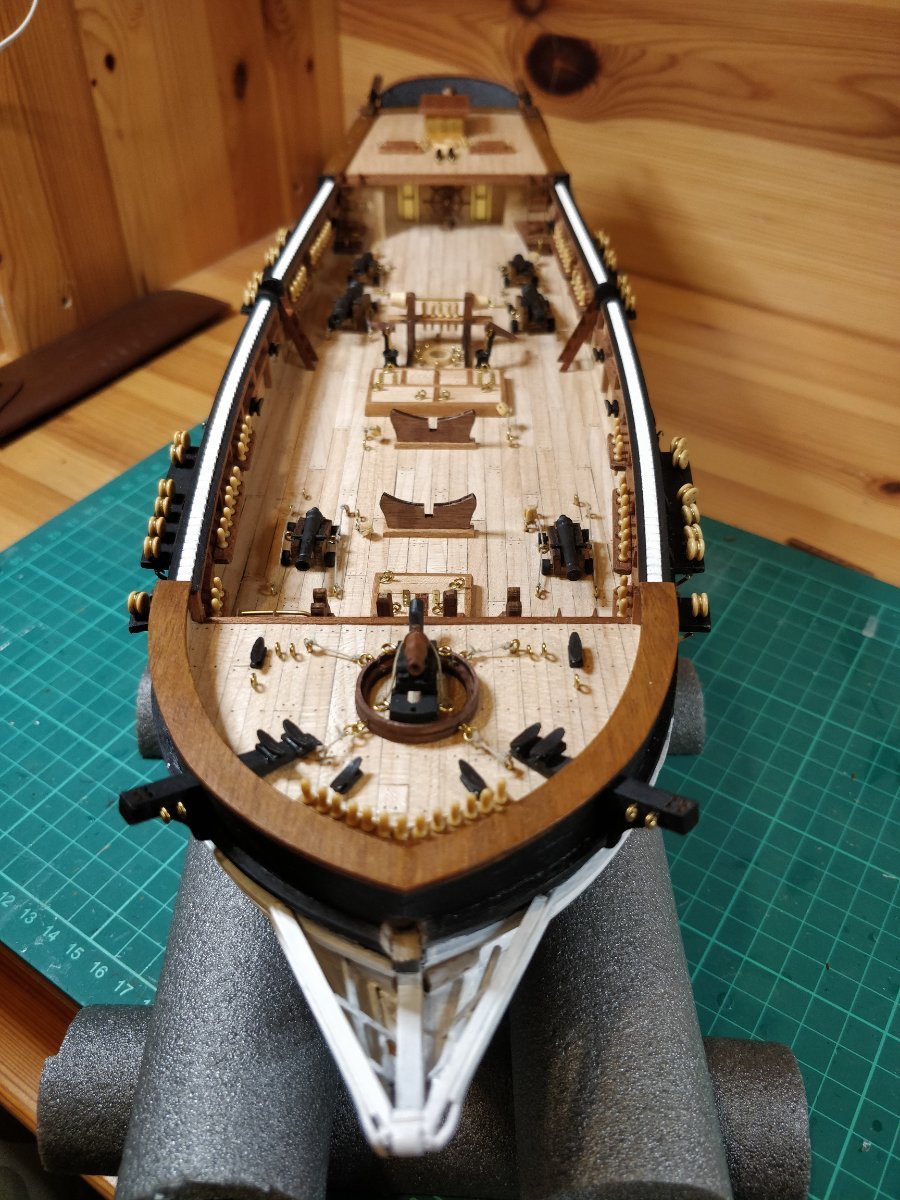
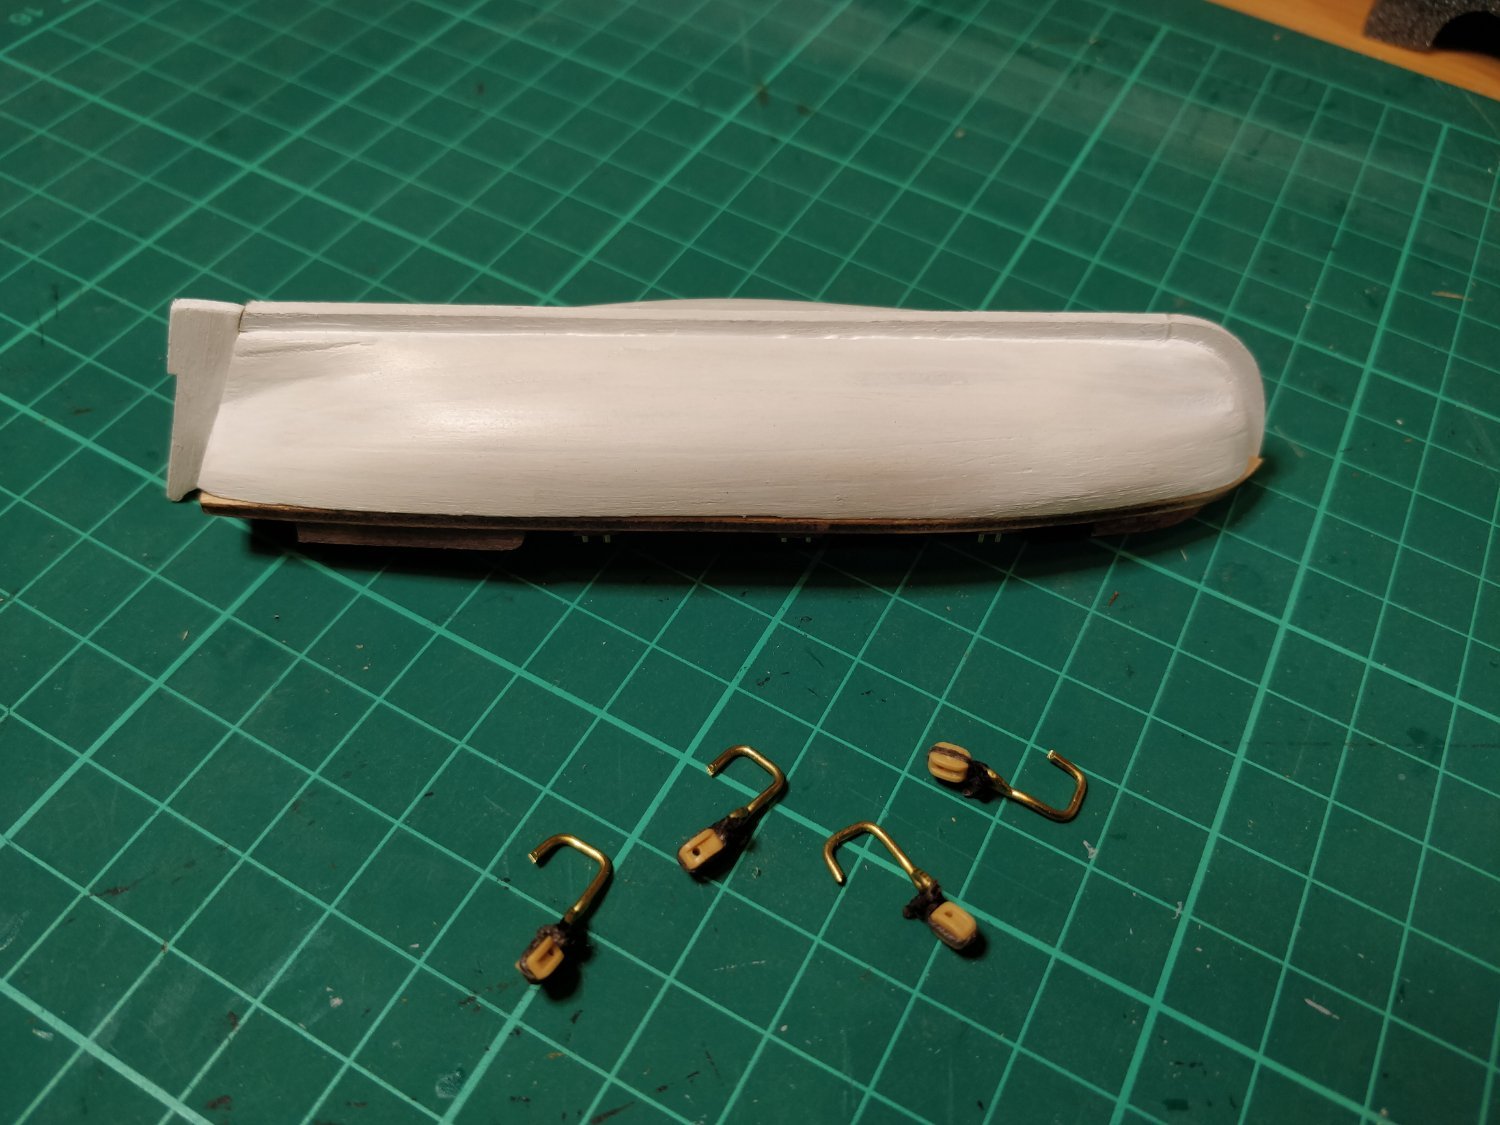
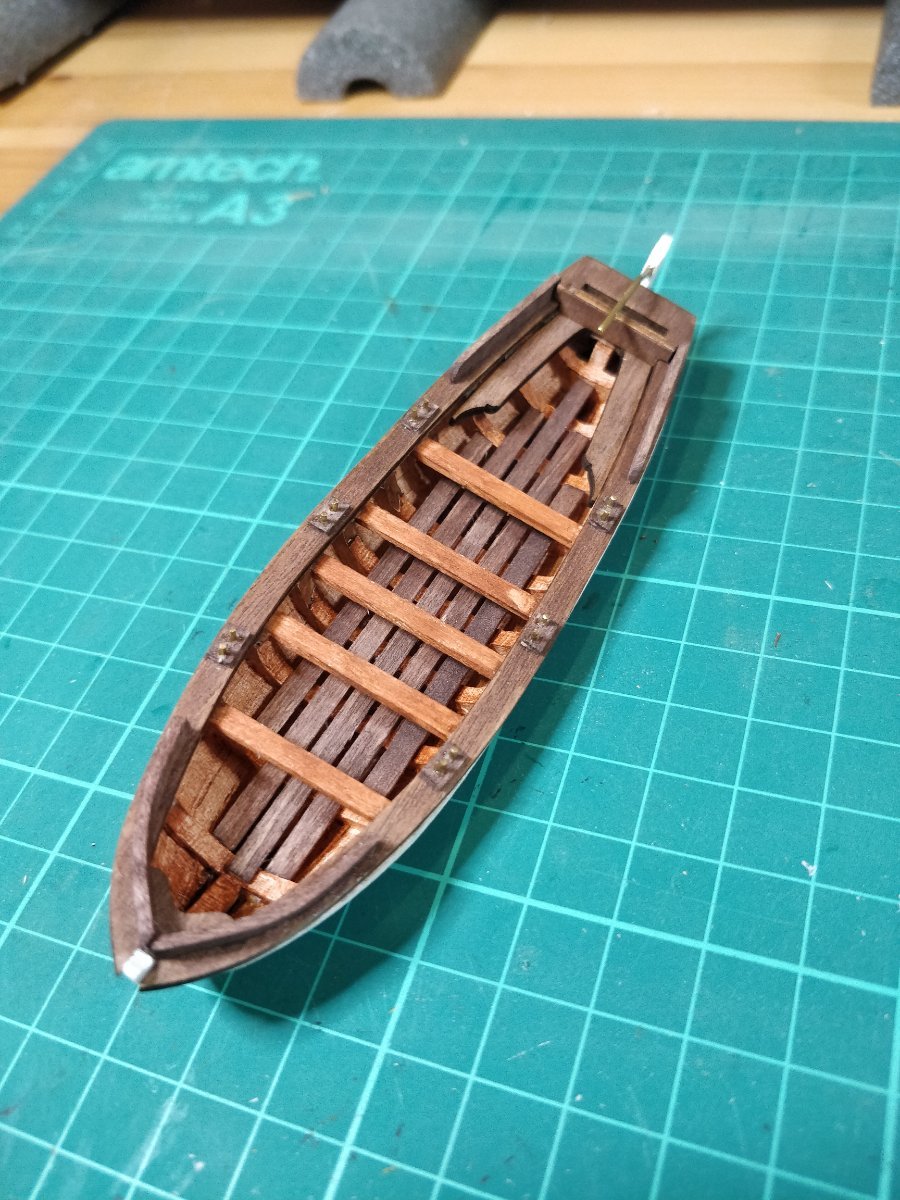
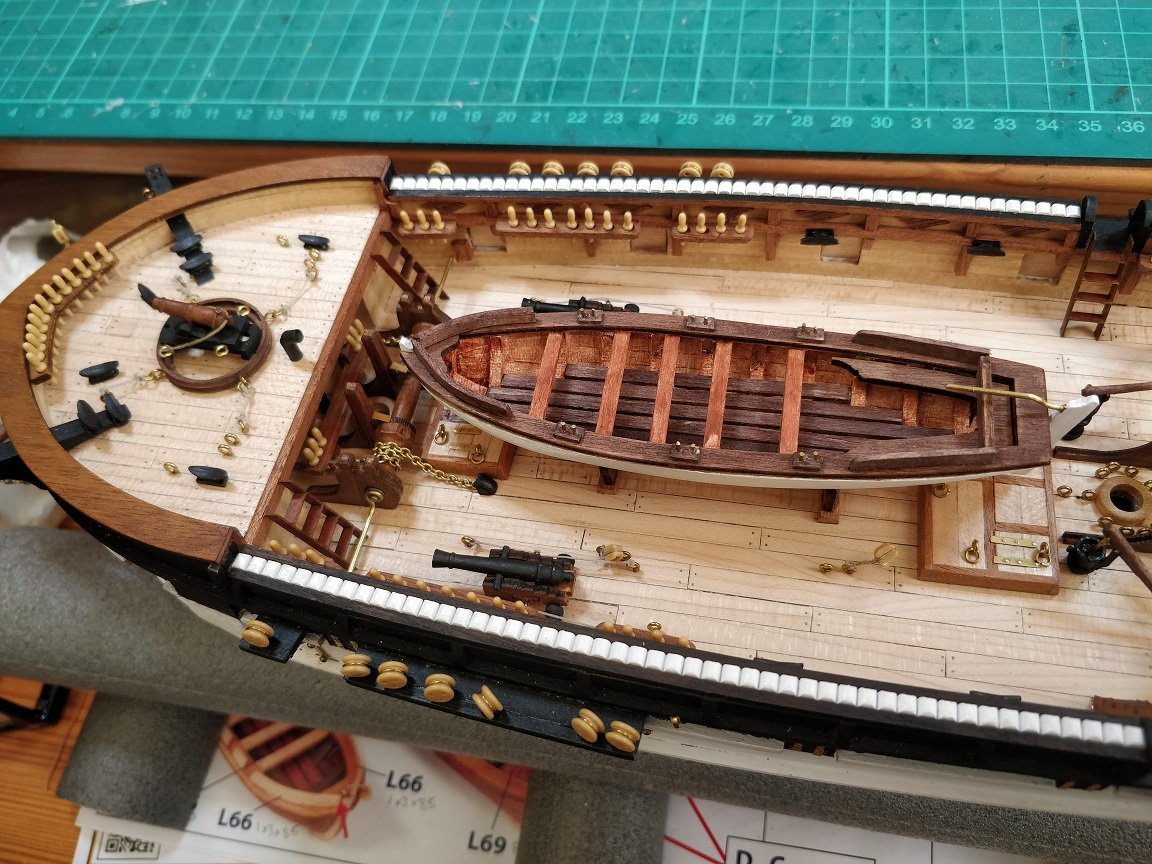
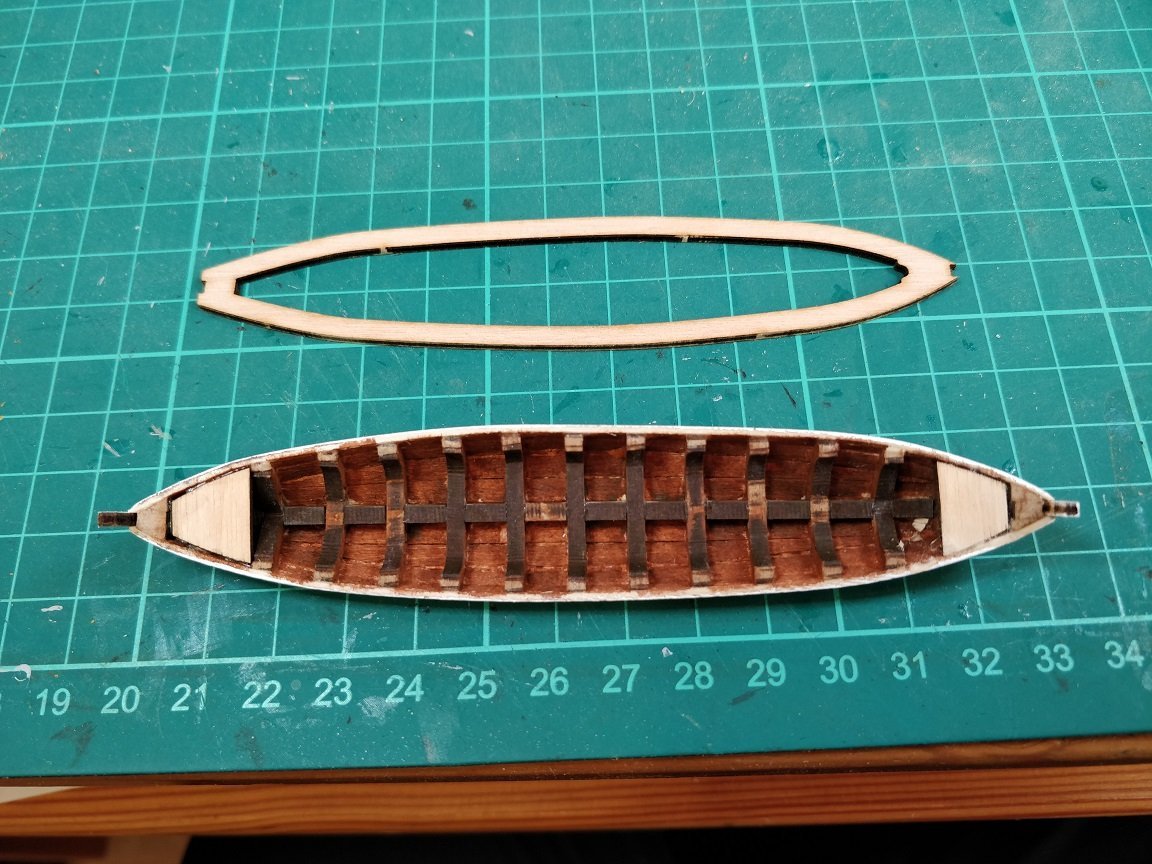
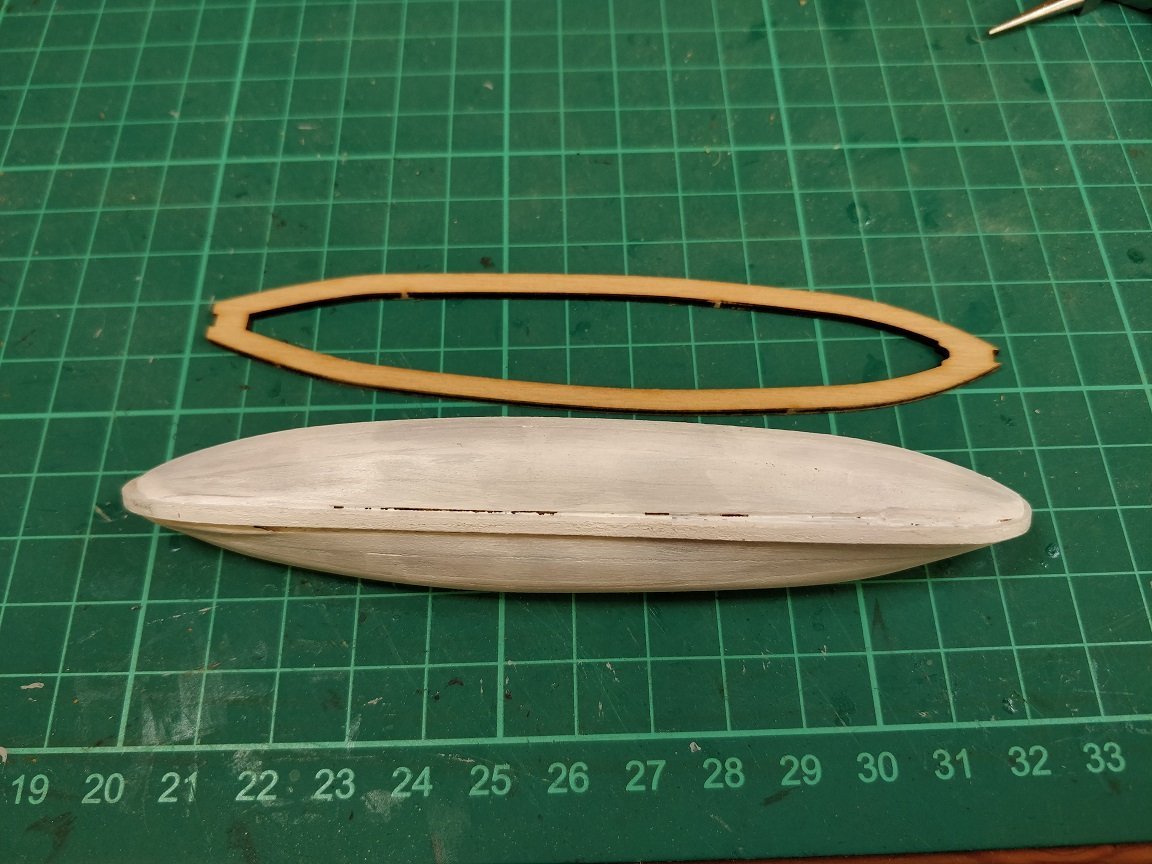
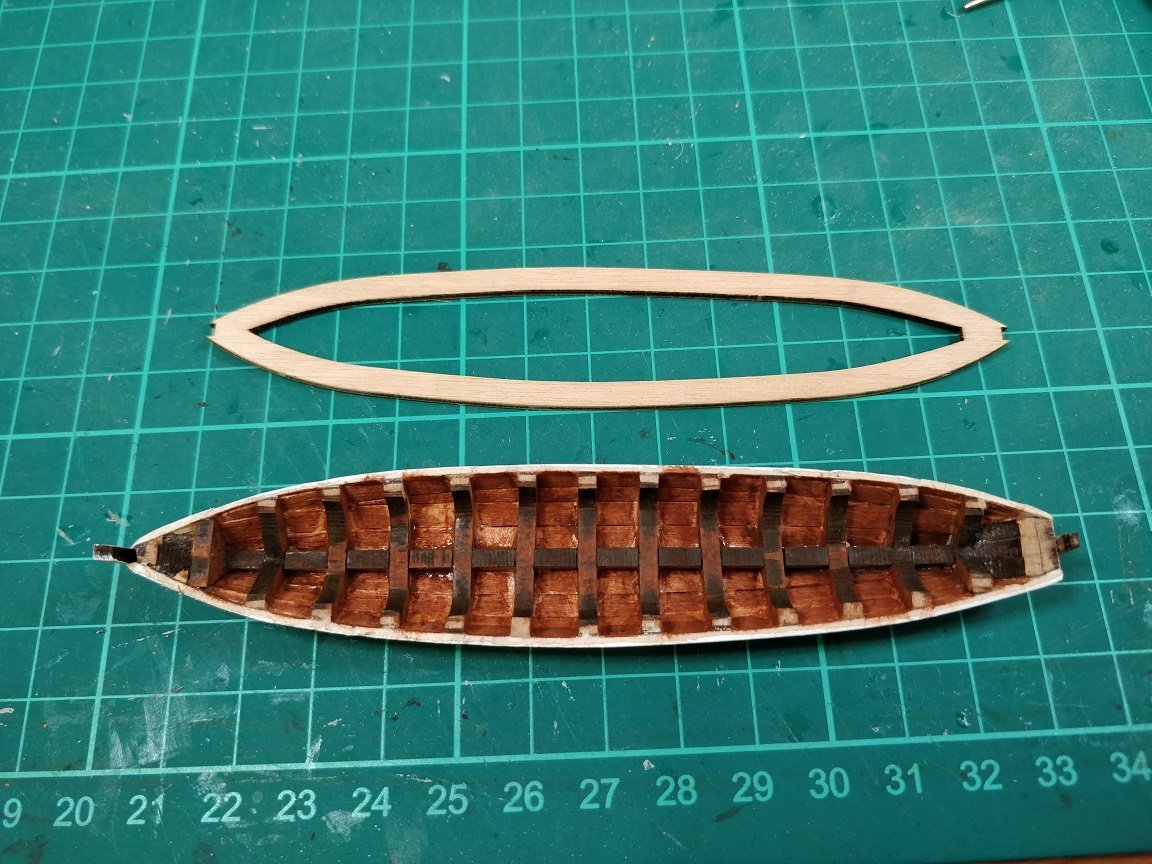
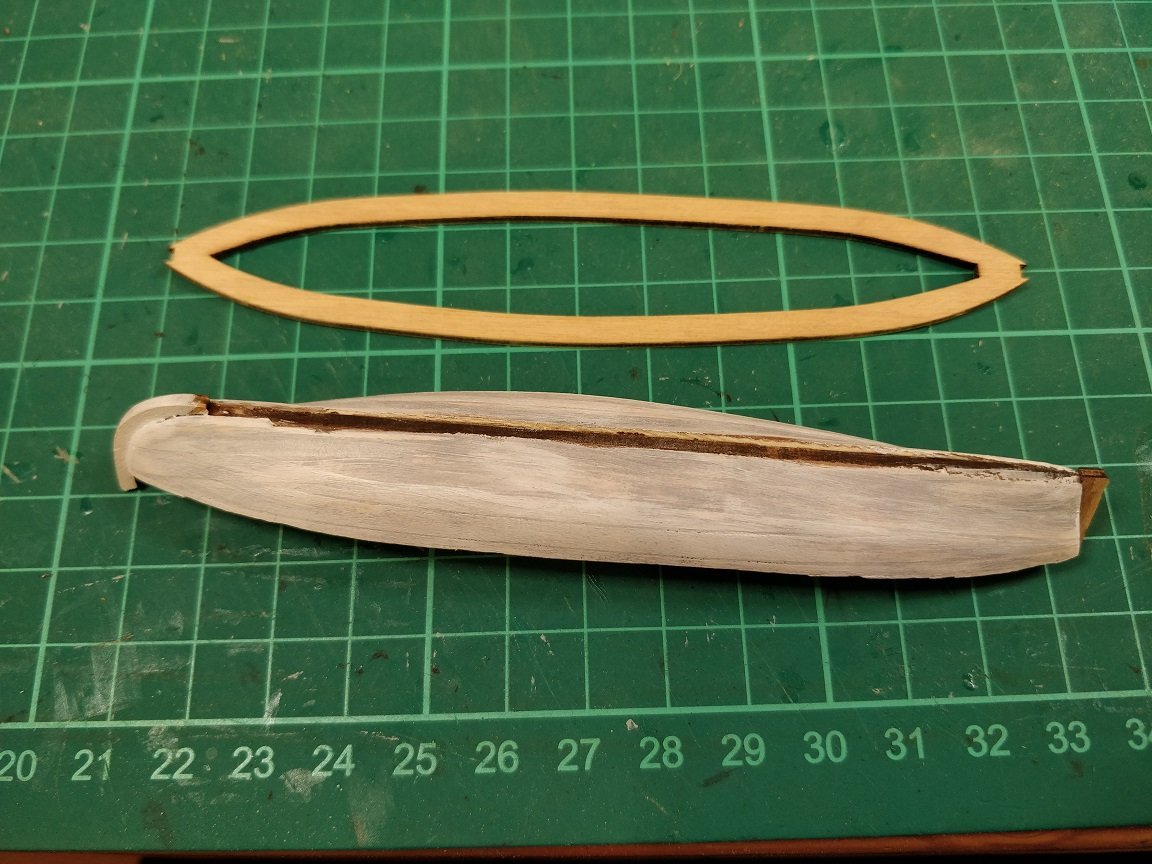
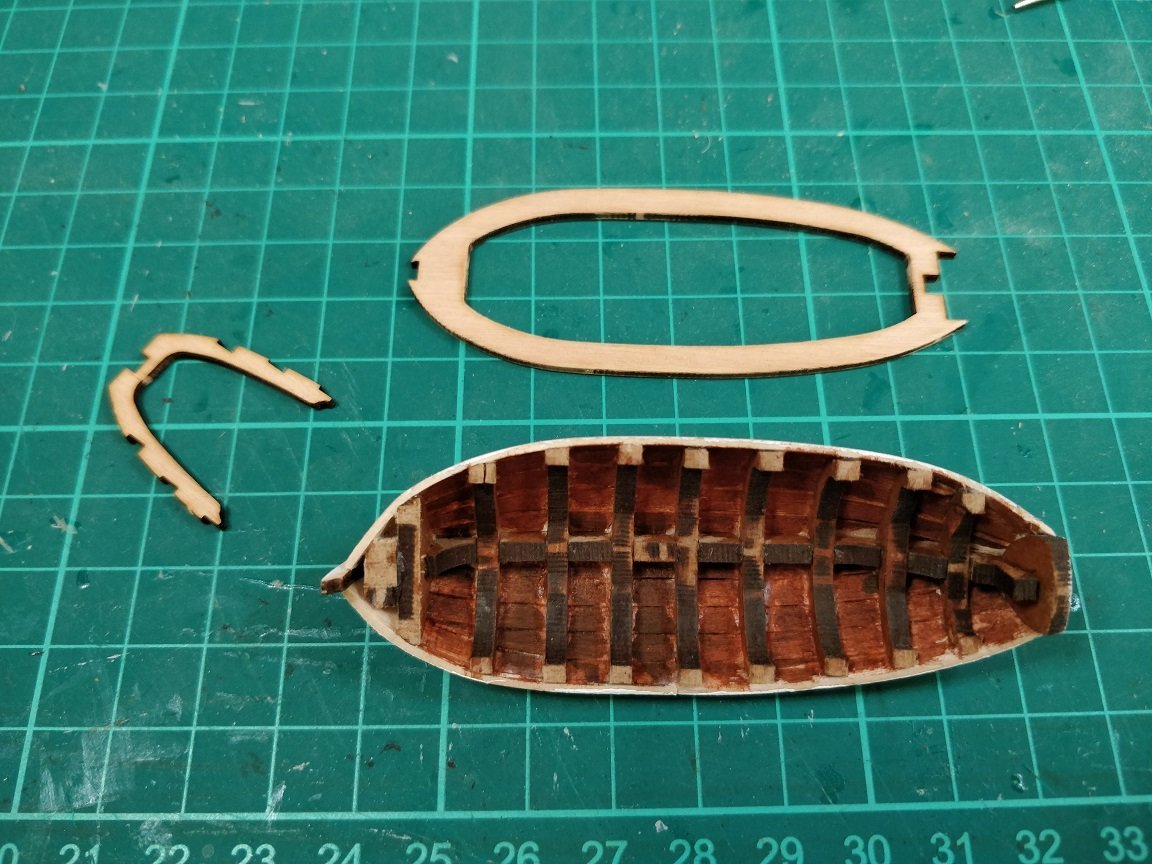
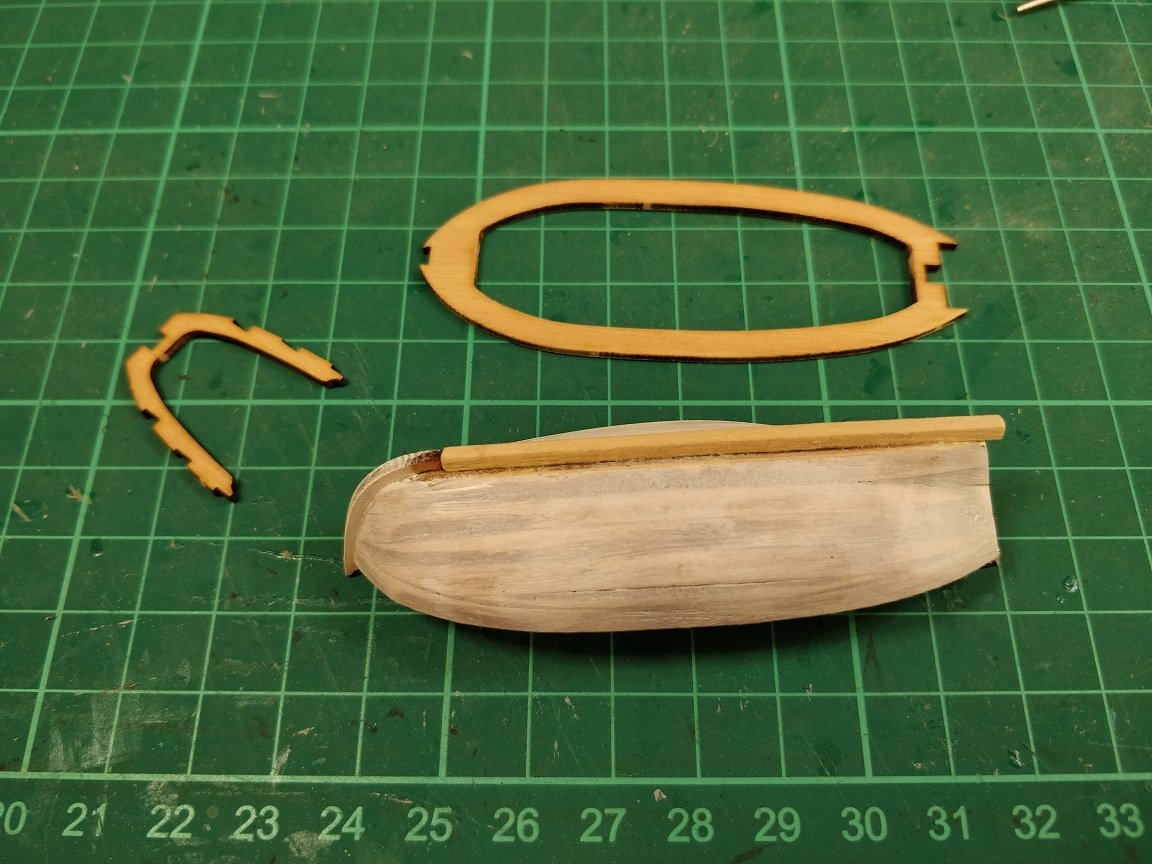
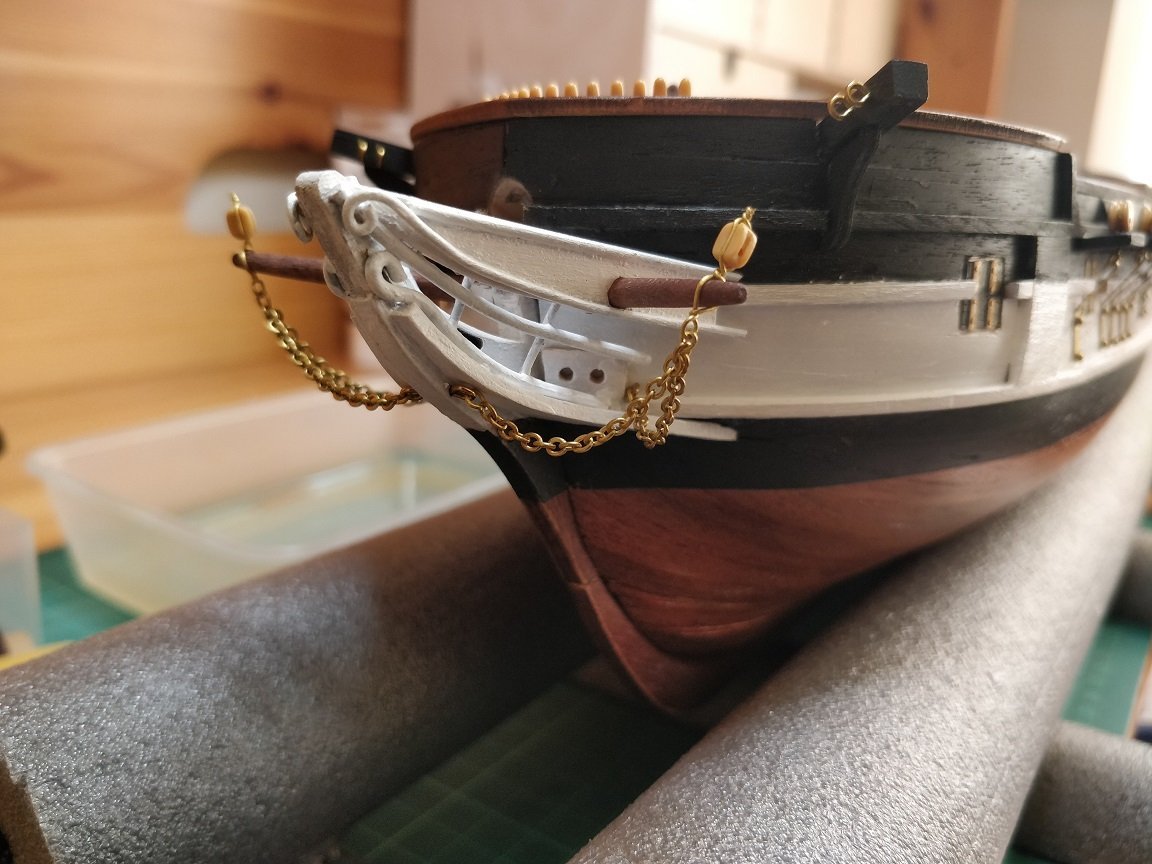
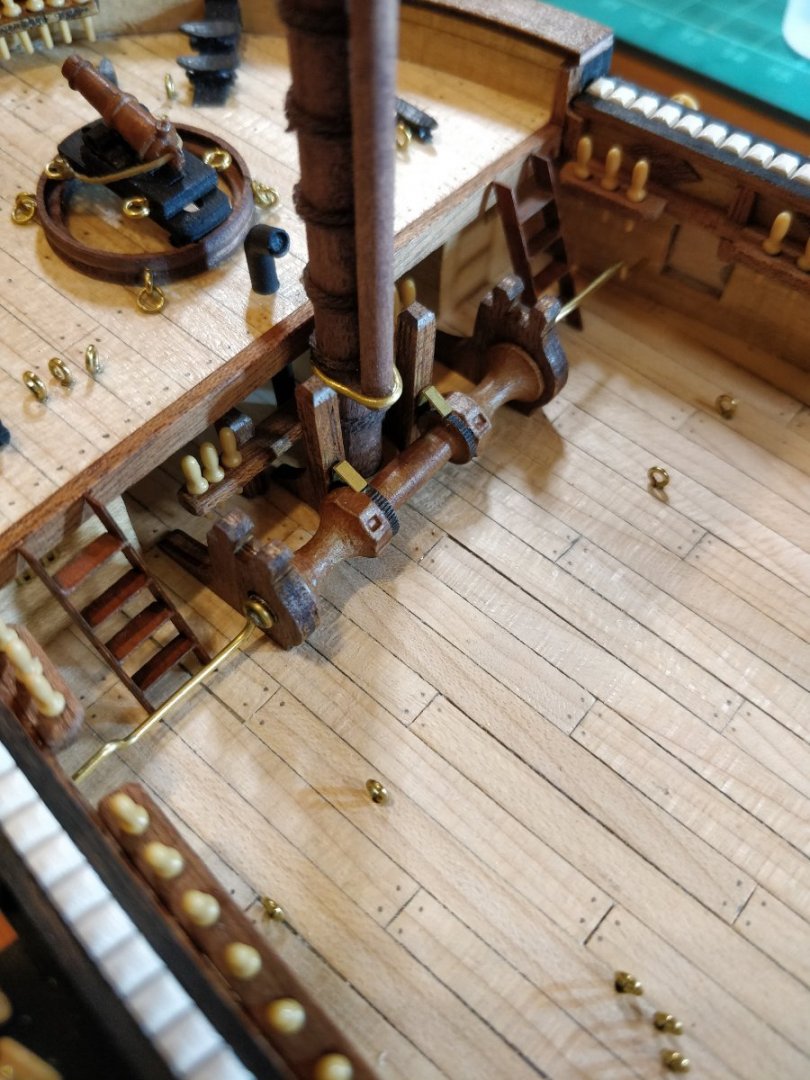
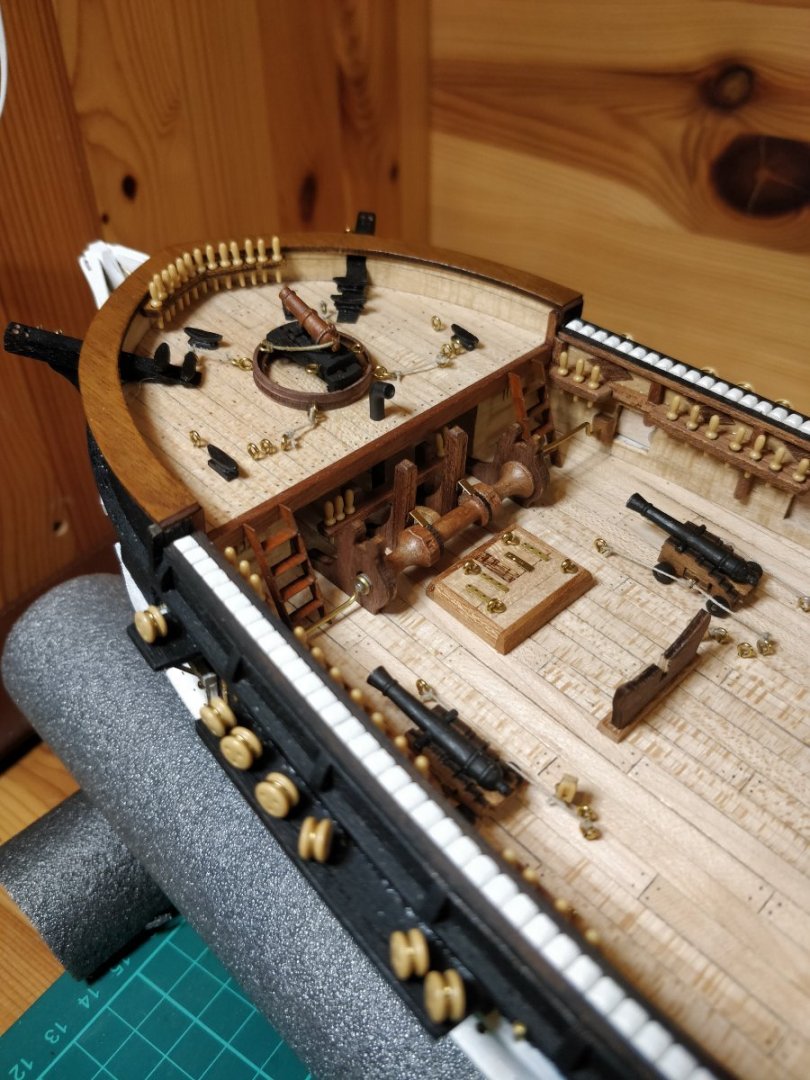
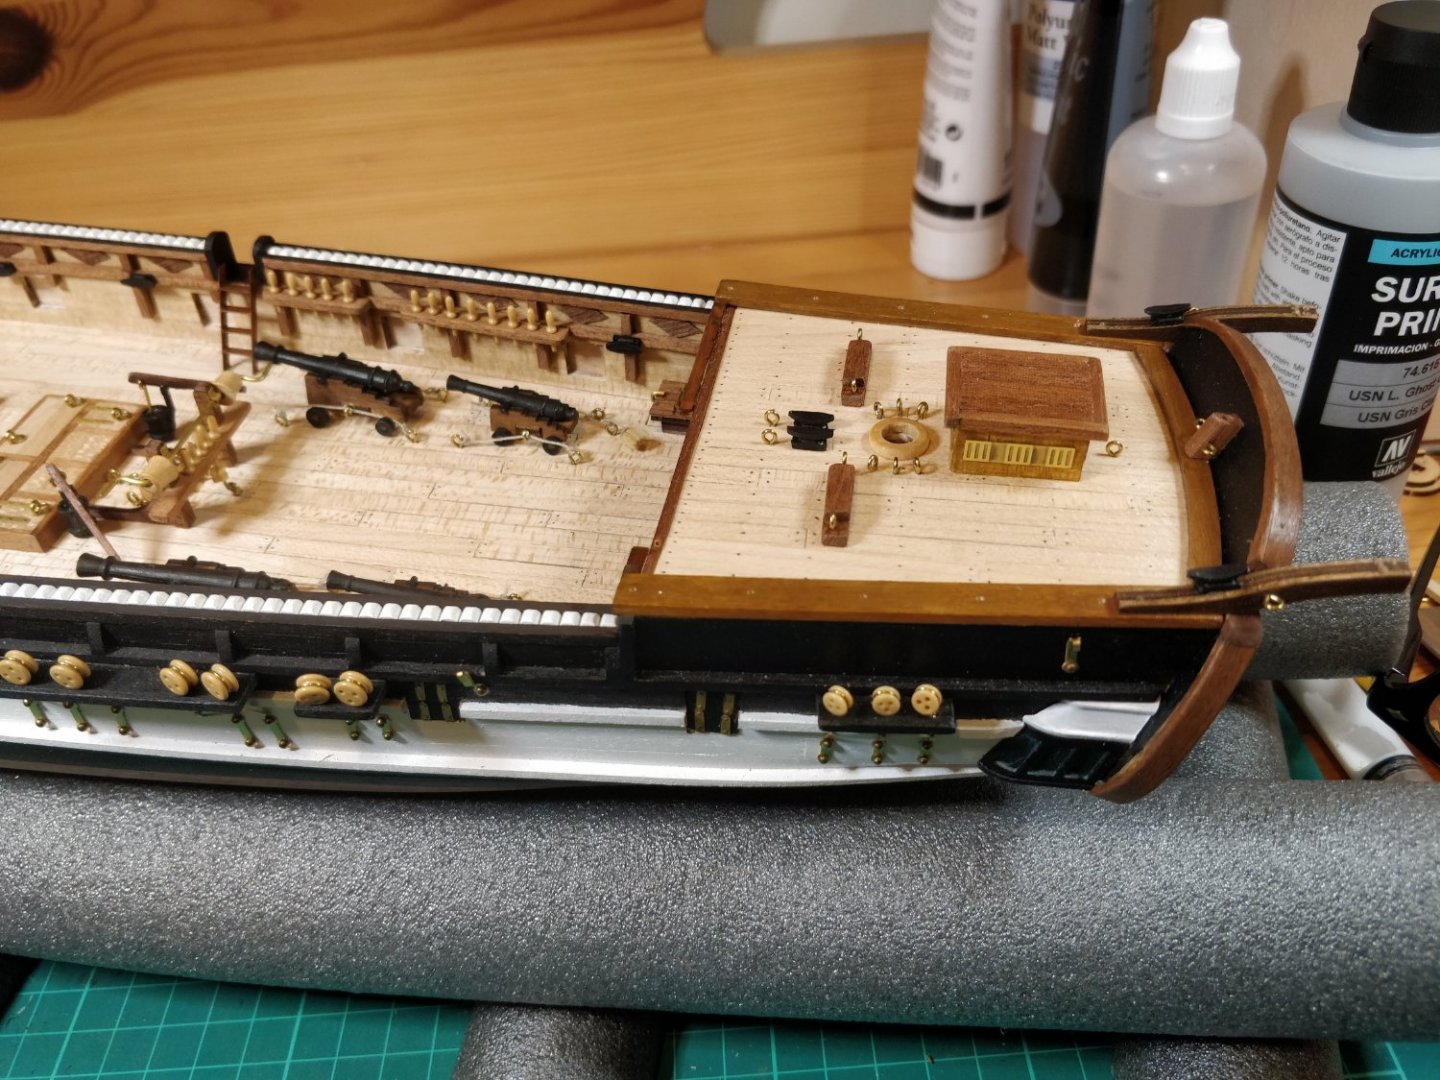
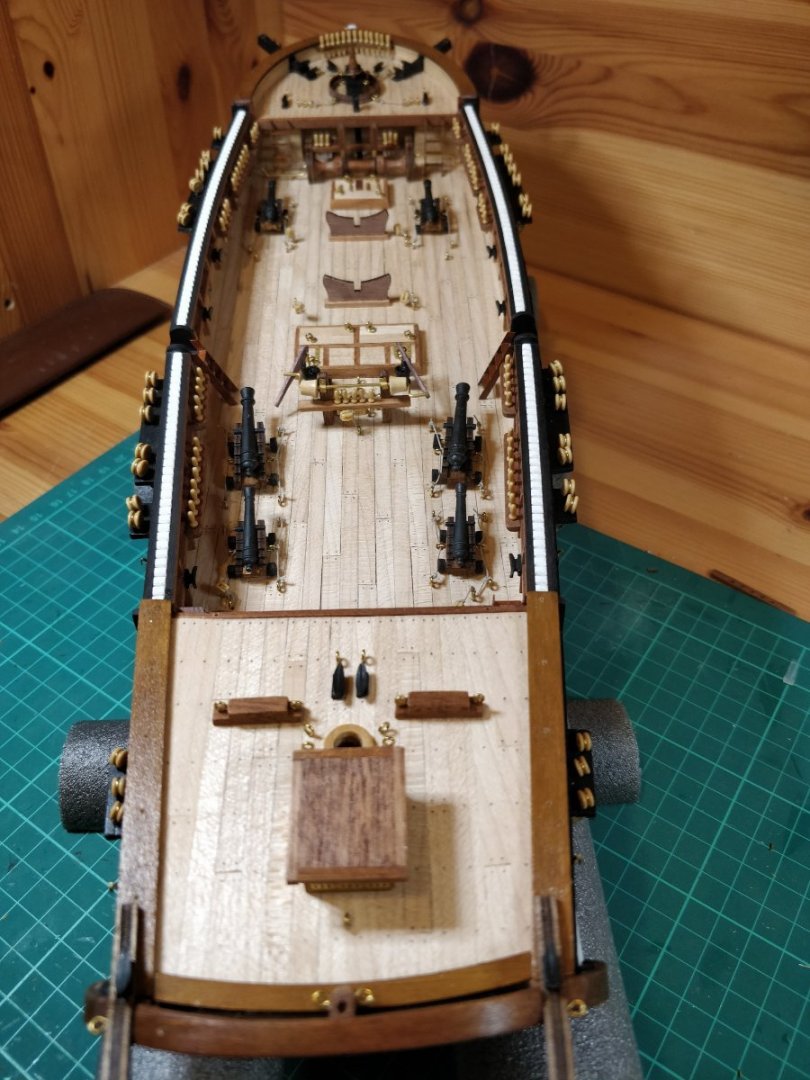
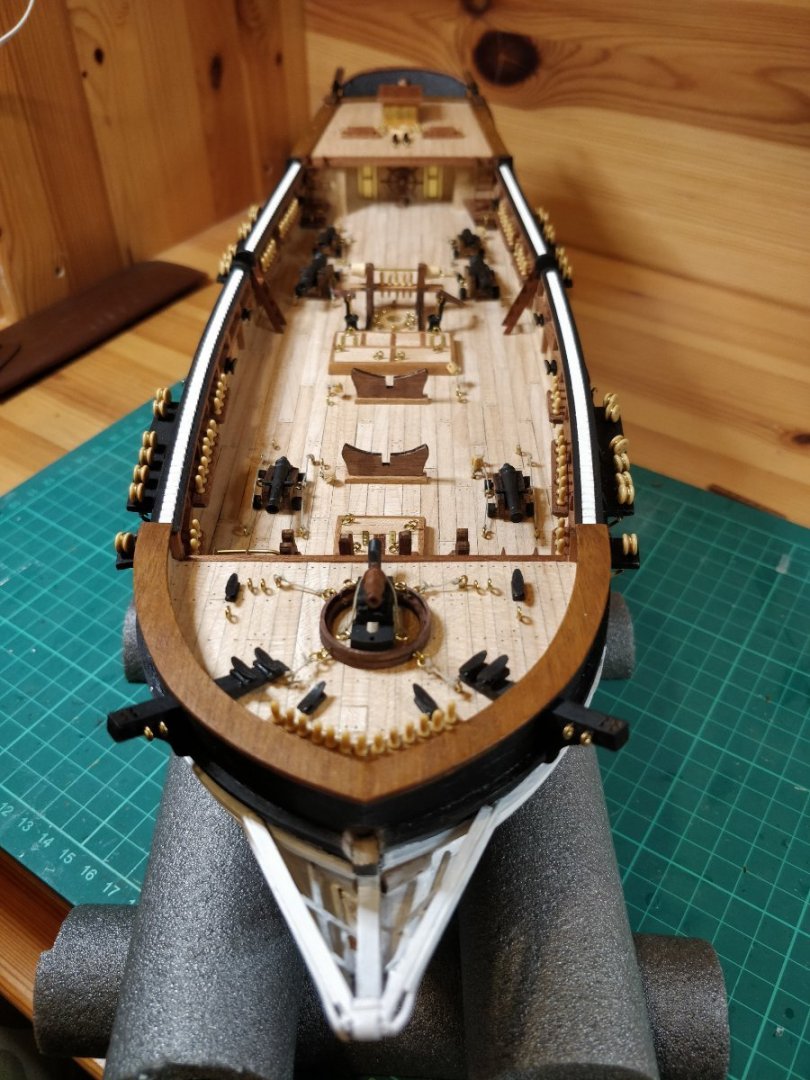
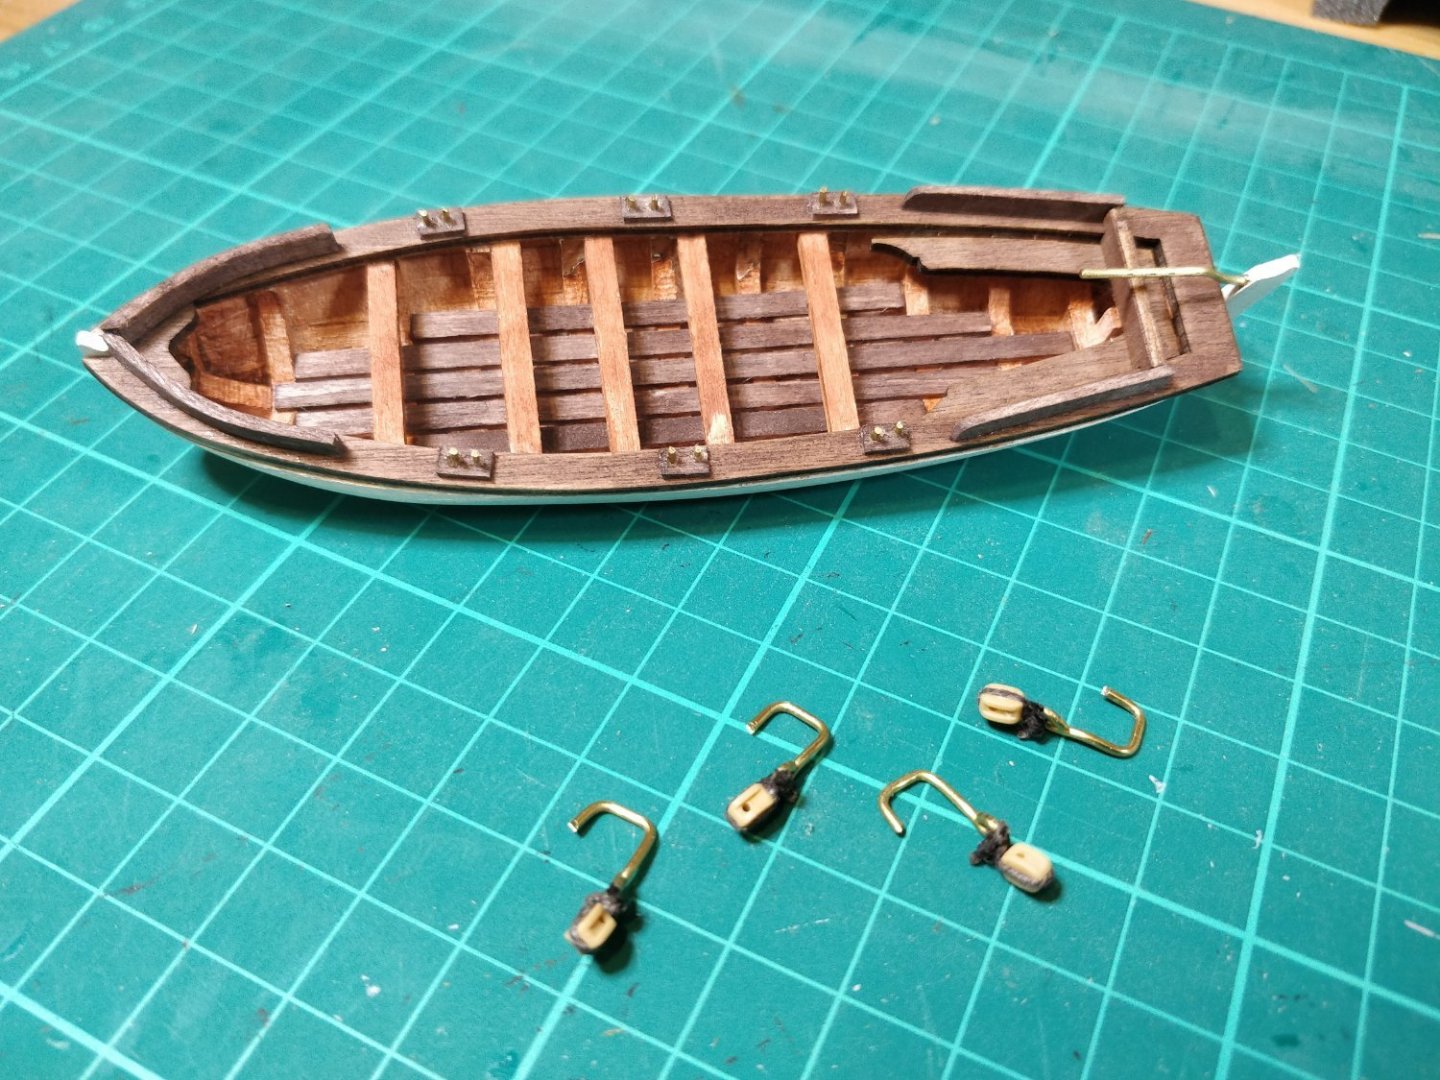
Progress is still gradual but at least it's still progress. There are just so many deck fittings! One of the first things I done is to start fitting some of the many chains. First of all there was the anchor chains. These run from the area under the forecastle, wind around the windlass, then run to the chain pipe on the main deck. This sounds easy to achieve, and I guess in principle it is. However, as I had just spent the previous week fitting other deck fittings to the deck under the forecastle it made the job so fiddly. To be fair there isn't really any other option but to do it in this order. The difficult bit is getting the chain right into the forecastle and then getting the CA glue onto the end of it. I ended up using a length of 1mm brass rod from the kit which I bent over the end by 2mm to form a small hook. I then used this to push the chain into position. Then keeping everything steady I applied the CA glue using a very long applicator, kept everything still for a few minutes and hopped for the best. It worked well much to my relief. Not sure what I would have done without the long CA applicator tube. Once the glue was set, wrapping the chain around the windlass and gluing it to the deck was very straightforward. Once set, the chain pipe is fitted in place. Some other chains I've fitted are the bumpkin backstay chains, 'What are they!' I hear you cry. Well apparently they are..... probably easier to look here: Bumpkin link It's not crystal clear from the instructions just where and how these are fitted but after some research on other build logs and watching the Occre video of the build on YouTube I think I've achieved something which looks acceptable. I've also finished off fitting the structures to the rear of the ship. These are the two companionways for the captains cabin and the mess room. Also the ships wheel was fitted. I have decided not to fit the sounding winch, compass and the four davits just yet as I feel they may be vulnerable during fitting the rigging. Hopefully they should be easy to fit once the rigging is completed. In the following photo the rowing boat is just placed on the deck supports for effect. It's not yet fixed down, again so it doesn't imped access during rigging. I just hope once the rigging is completed I'll still be able to get the boat back in and be able to strap it to the deck. I'll have to keep an eye on the progress and make a judgment as to when is best to secure it in position. I've also spent some time working on the other three small boats. I started working on these much earlier in the build but never finished building them. I've got to the stage where they are now planked and I'm working on the fittings. In the instructions it shows them being stained but I'm not overly happy with that so I've decided to paint them, like the one in the photo above on the main deck. Not sure if this is accurate to the time but I feel it would have been. I would be interested in hearing anyone's opinion on this. You may have noticed that two of these three boats are very similar. If you are building this kit my advice would be to either just make one of these at a time or cut out the parts and keep them in separate containers as some of the parts are very similar but not identical. Working out which bits go with which boat can be a challenge. So until the next time...... Chimp


- 146 replies
-
- 12
-

-
Hi Clementine, Feel free to come an view my build log at: What I found easiest was to start at the top and work down. Bulwark planking is easy as it's flat and straight. I worked down into the centre keeping off the bow and stern where shaping is required. Then I jumped to the bottom and worked up. Again this is all relatively straightforward. At the bow and stern wedge shaped pieces of planking can be cut and fitted to fill the gaps between adjacent planks. You'll soon find the knack of cutting the correct angle. Working up you'll eventually meet with your planking coming down. This is where you will find some thin slithers, odd angles and shapes my be required, but by this time you'll be an expert of knowing how to cut these. If you end up with small gaps then use a brown coloured filler. As for gluing I applied PVA to about 90% of the centre of the plank and used a dab of CA at each end to hold it in position while the PVA dried. I applied the PVA, fitted the plank then peeled back each end and applied the CA. Pressed into place for 20 secs, job done. I left a small gap between the PVA and CA as I'm not sure it's good to let them mix. Maybe other will tell you different. That's what worked for me. I'm sure there will be some shouting NO!!! at all this and advise another way, I will be interested to see what others suggest. This is only my second ship so I'm very much still learning. Good luck!! Chimp
-
Hi Clementine, Your model is progressing nicely. The second planking is very thin and will follow every contour of the first layer. It may be worth using a little more filler to get that really smooth finish. Chimp
-
A good application of filler will hide a multitude of sins. The first planking is just a base for the second layer.
-
Hi Todd, Thanks for your comment. I'm not aware of any 3D printed ropewalk details on this forum. I posted this on a different thread about my experience of making rope: The Zip file required to print the ropewalk was posted there. If this link doesn't work I'll post the file in this thread. Chimp
-
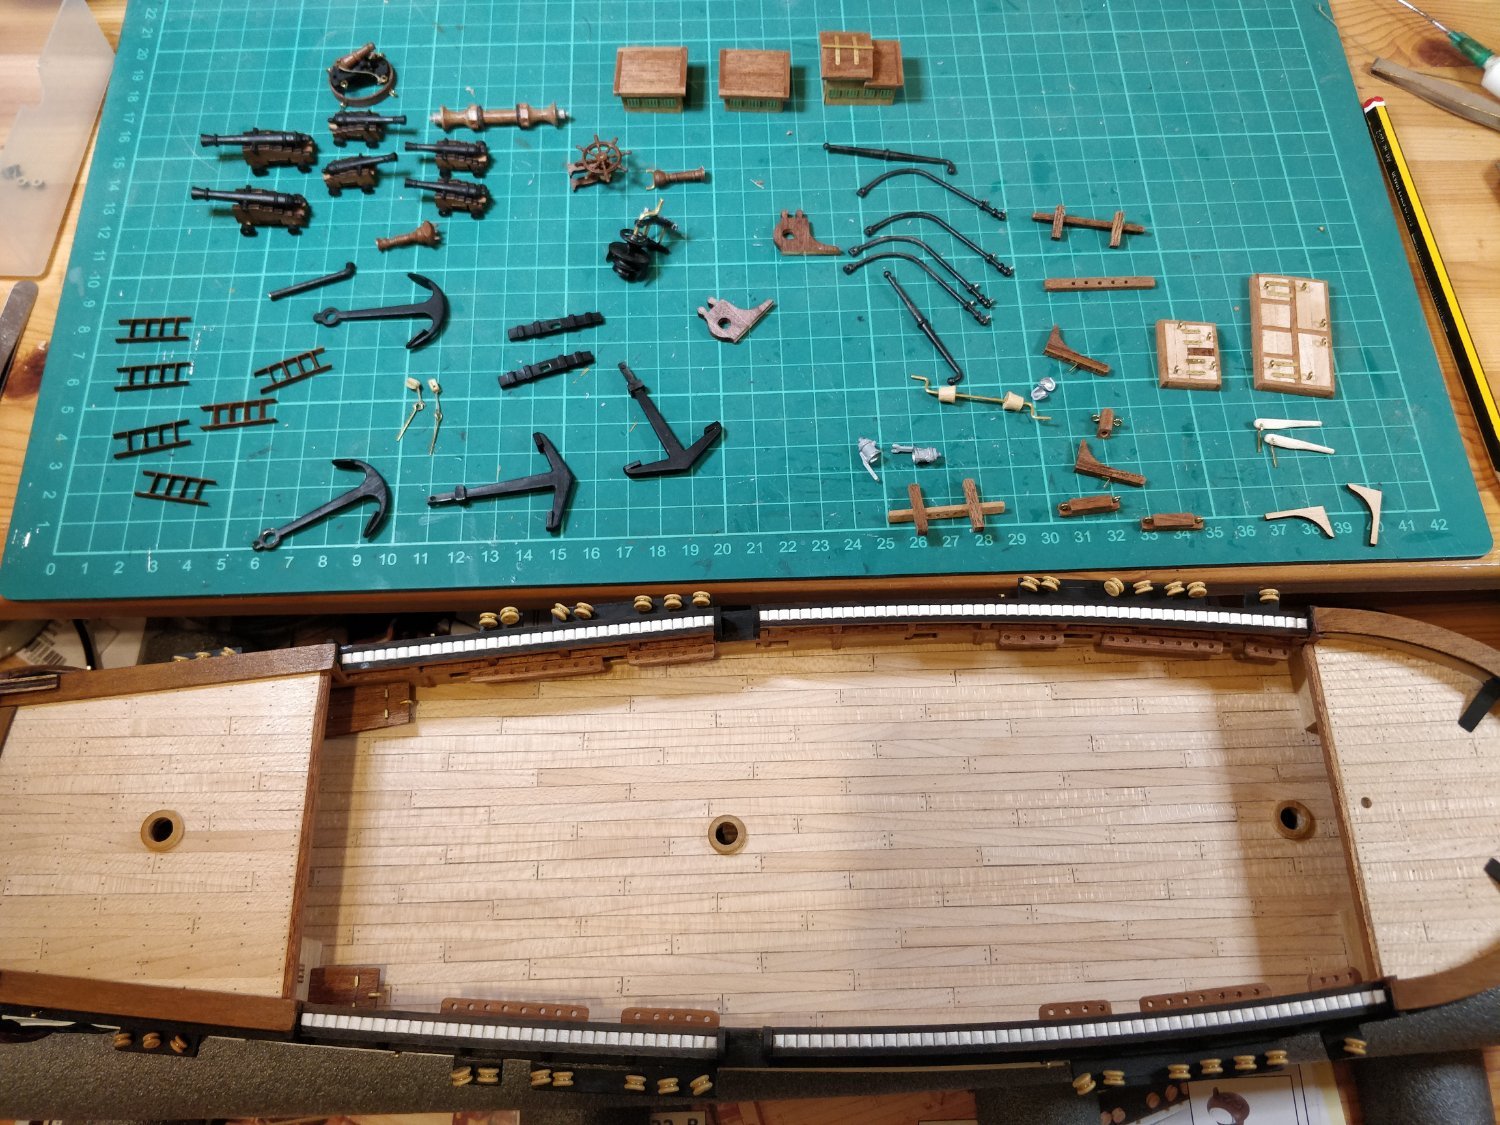
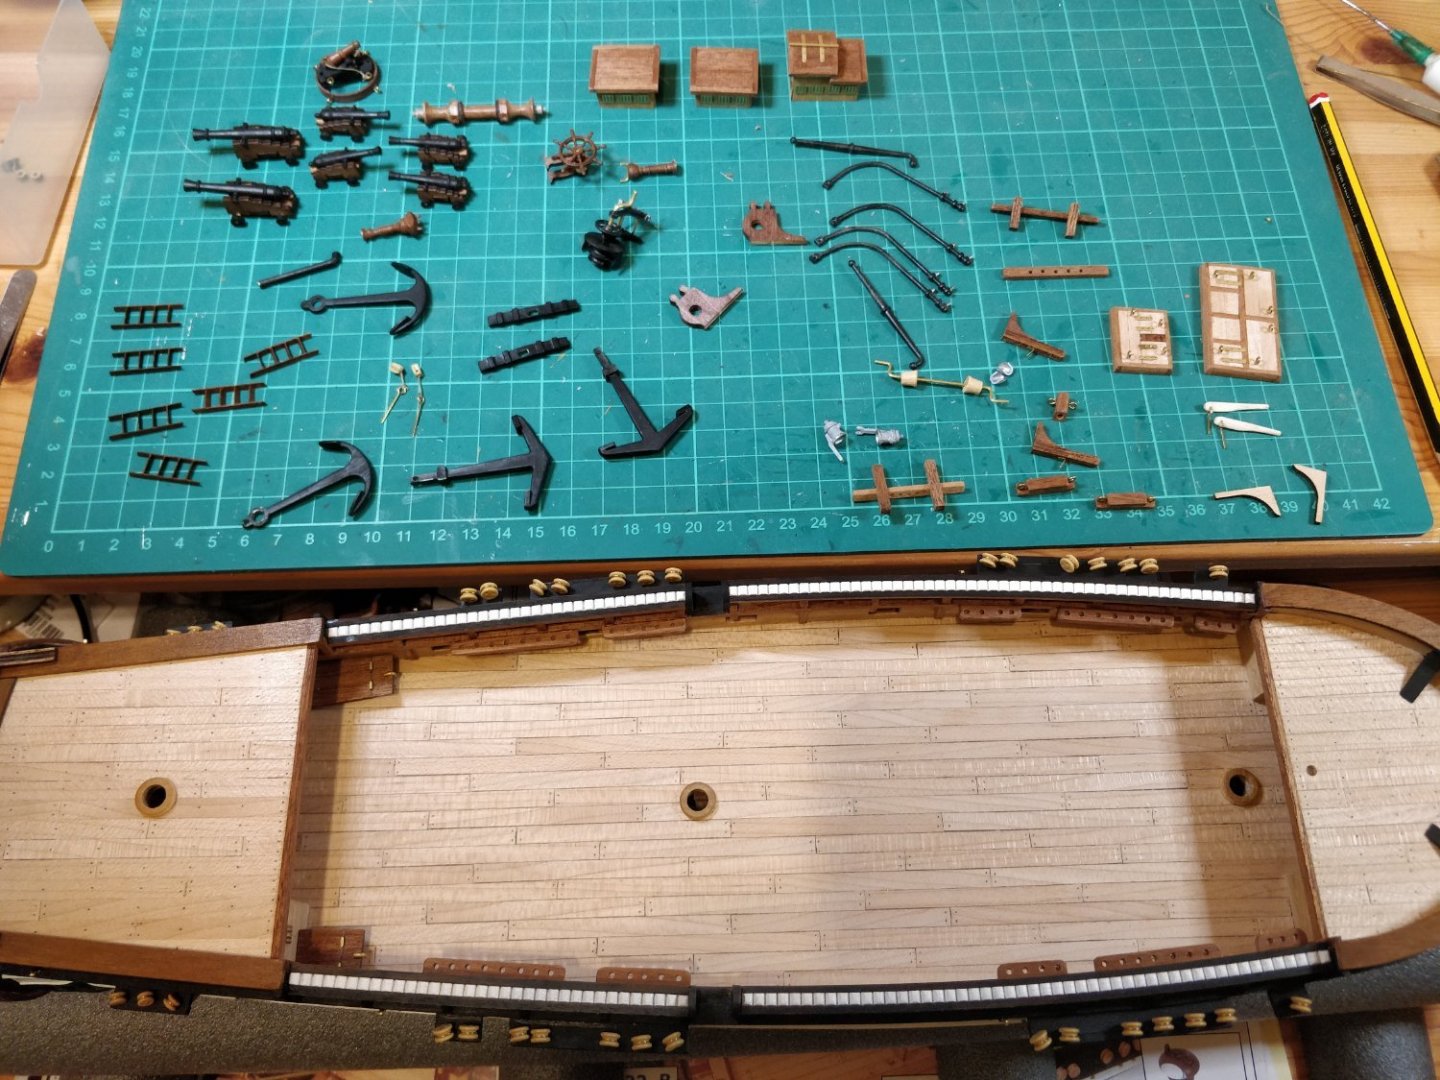
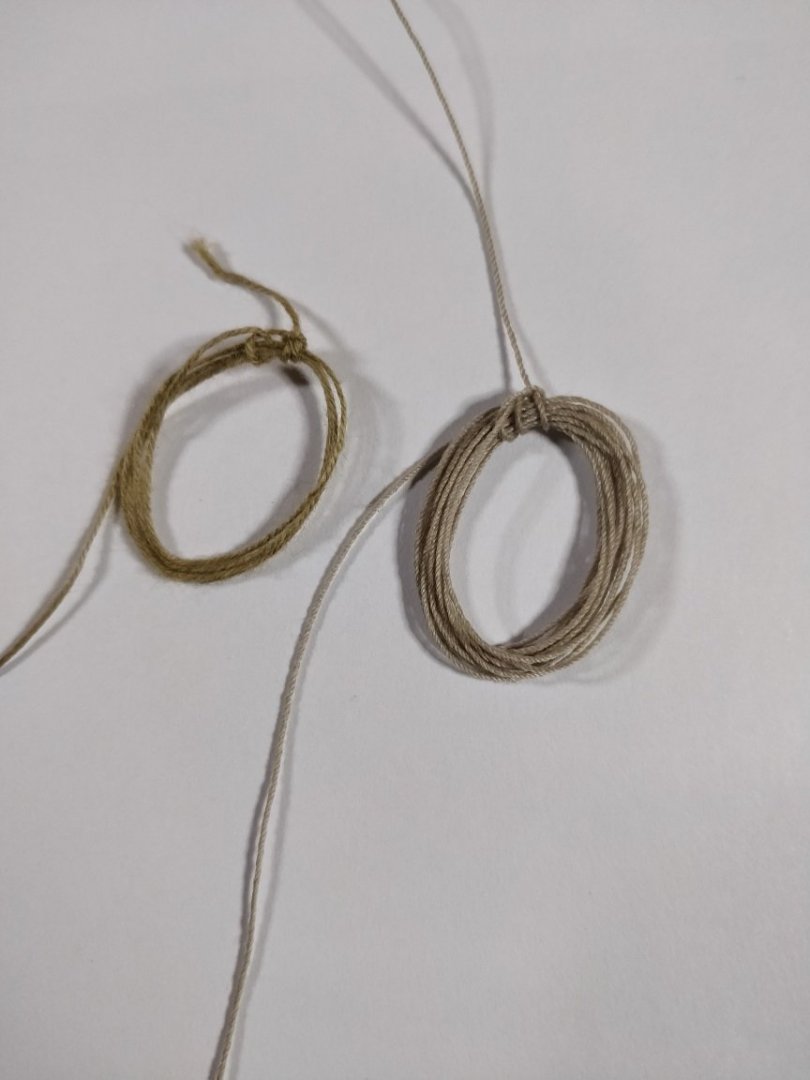
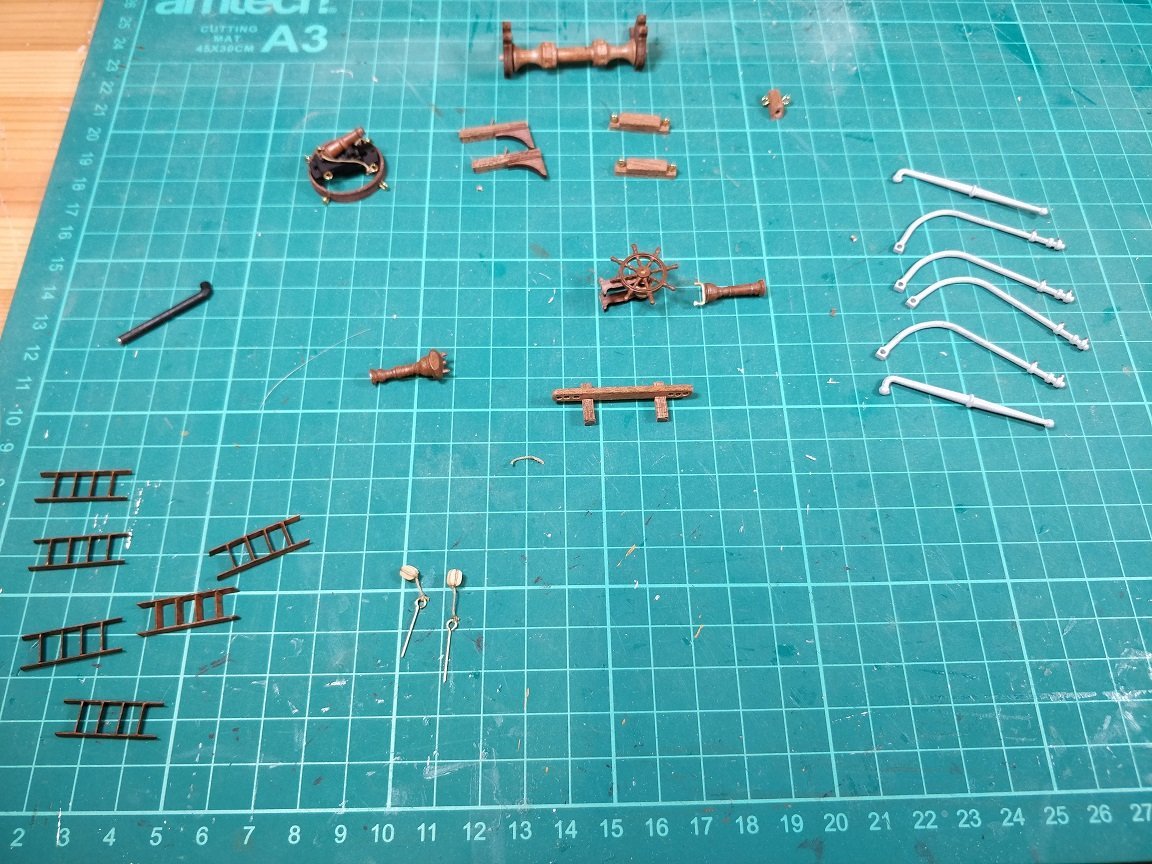
It's been two months since my last update so about time for another. With the change in the weather and the garden coming back to life, the competition for time has been difficult. I've been able to grab an hour here and a half hour there. Progress has been slow but it's still moving forward. I've been working on the deck fittings, and there's a lot of them. Nothing too difficult just time consuming getting them all done. I've also managed to acquire a 3D printed ropewalk so have been practicing making rope, with mixed results. Here is a photo of kit supplied rope (left) alongside my rope (right). Here's a photo of some of the deck fittings to be placed on the empty deck: Most of the deck fittings were straightforward to make. The only bit which was disappointing were the axles for the cannons. If using the dimensions given in the kit the wheels are spaced far too wide apart for the smaller cannons. I should have checked before gluing the wheels on. Once I realised my mistake it was too late to remove them without damaging them so had to cut the axles and glue the four wheels on individually. Not a big problem, more annoying in that it would have been so easy to give the correct dimension in the instructions. But then I guess that's another lesson learnt by myself during this build. A little bit older, a little bit wiser.... The next series of photos shows the progress I've made getting the fittings actually fitted onto the deck. Now I just need to keep the momentum going...... Chimp


-
Good to have you here E Z Breeze. Will you be making a build log? It's about time I updated mine. Work has been progressing but it's been painfully slow at the moment Chimp
-
Hairy/fuzzy rigging thread
The Gimps Chimp replied to The Gimps Chimp's topic in Masting, rigging and sails
You're a braver man than me Stuglo. I tried passing a naked flame very quickly under the 0.15mm thread and didn't have anything left. To try that after fitting to the model when access is limited, well as I said, you're a braver man than me Chimp -
Hairy/fuzzy rigging thread
The Gimps Chimp replied to The Gimps Chimp's topic in Masting, rigging and sails
Hi BranPie, I was talking with a mechanical engineer friend about making a ropewalk and about gears and bearings. He then quickly found the files for a 3D printed ropewalk which had been posted on another forum by someone called "epicdoom". My friend then printed and assembled the device and gave it to me to do my worst. It functions well but has some limitations. I'm still experimenting with it but it does produce reasonable rope. It uses standard 608Z skateboard bearings which I managed to get from Amazon at £7 for 30 bearings (you only need 5 for the ropewalk). I've attached the files needed to this post. Chimp Ropewalk.zip -
Hairy/fuzzy rigging thread
The Gimps Chimp replied to The Gimps Chimp's topic in Masting, rigging and sails
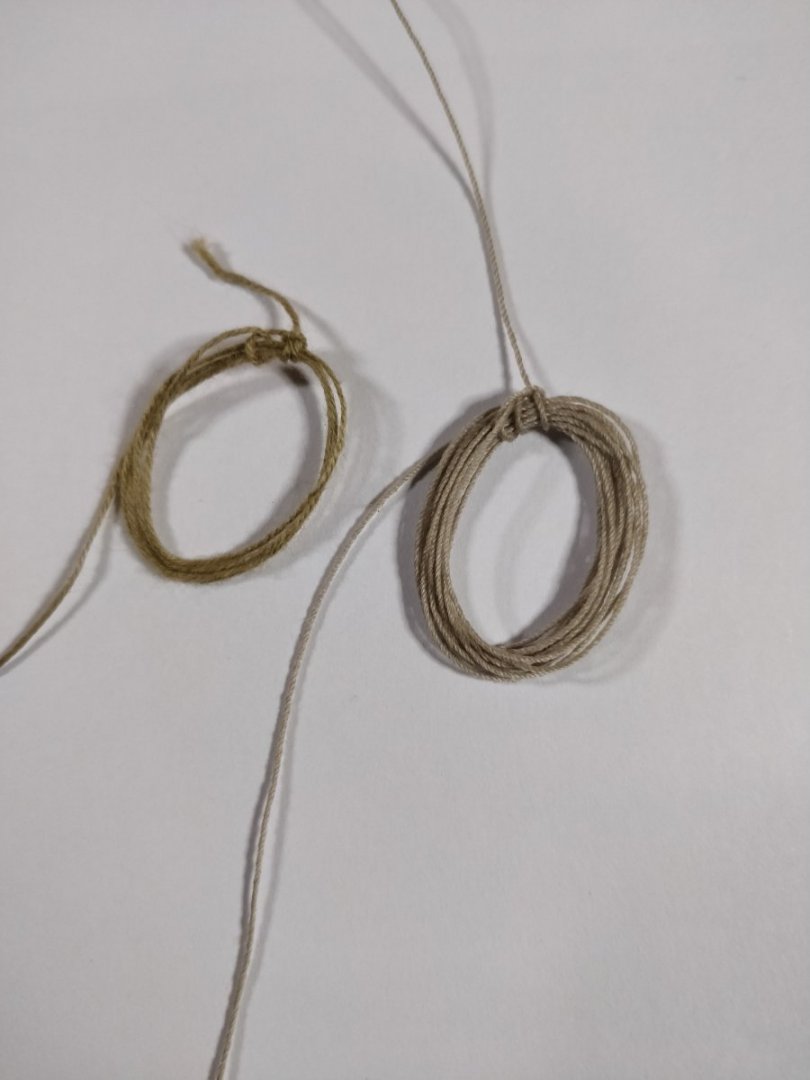
A quick update on where I am with rigging thread: I've just got hold of a crude 3D printed ropewalk and some Guttermann mara 100 thread. Here is a photo showing the different threads/rope. Leftmost is the base Guttermann mara 100 thread 1st right is the supplied 0.15mm OcCre thread 2nd right is my first attempt of rope with three strands of mara 100 Rightmost is the supplied 0.5mm OcCre thread The photo below shows two coils. On the left a coil of OcCre 0.15mm thread and on the right a coil of my homemade rope. I know my homemade rope isn't perfect but I'm very happy with the result so far. I now need to practice my ropemaking skills to try and perfect the process. The mara 100 thread and the resulting rope is much less hairy/fuzzy than the supplied thread so I'm now happy to spend the time rigging my ship. Chimp
-
Hairy/fuzzy rigging thread
The Gimps Chimp replied to The Gimps Chimp's topic in Masting, rigging and sails
I've just received my order of Tacky Wax and have given it a go. It certainly appears to work well and the resulting thread is significantly less hairy. My only concern is, after having applied a layer of this wax will it remain tacky and encourage airborne dust to stick to the rigging? Any thoughts? Chimp -
Recommendations for new member
The Gimps Chimp replied to JayBee750's topic in New member Introductions
Hi JayBee, welcome to MSW. As a relative newcomer to model ship building myself, I thought I would give you my thoughts. Like yourself, I had previously enjoyed modelmaking for many years, mainly plastic kits. I found moving into building wooden ships a significant step up in many areas. I had briefly transitioned from plastic to wood by building a few cheap laser cut models which can be built in a few days. I'm now on my second ship build, which incidentally is Occre's HMS Beagle. My first build was Caldercraft's HMS Ballahoo. I chose Ballahoo as it was relatively inexpensive and looked straightforward, with limited rigging. To be honest, I was half expecting to not finish the build but I stuck with it and was very pleased with the final result. I then moved onto something a little more complex, Occre's HMS Beagle. I'm finding this build has a number of challenges compared to the Ballahoo. There are a complete set of instructional videos on the Occre website which are very useful for the beginner. However, the supplied instructions are often confusing, contradictory or wrong. Many errors are highlighted in the numerous build logs on this site. The quality of the parts are, in my opinion, not as good as Caldercraft parts. I'm finding the rigging thread particularly hairy/fuzzy. Unfortunately I don't have any experience of other manufacturers yet. I think one of the main drawbacks of HMS Beagle as a first build is the amount of rigging. Compared to the Ballahoo it's in a different league. My suggestion would be to 'cut your teeth' on an easier kit. As suggested above, I would encourage you to start a build log of your kit. This allows others to follow your progress and also allows subsequent builders of the ship to learn from your experiences. I relied very heavily on build logs during my first build. It also keeps you in touch with other members of the club. Initially I was a little embarrassed to post my inexperienced progress in a build log as I thought it would be judged against the expert builders here. I shouldn't have worried, as members here will give nothing but praise and encouragement. There is no competition here, we are all just trying to do our best. I hope you find some of my thoughts helpful and whatever you chose to build I wish you the best of luck with it Chimp -
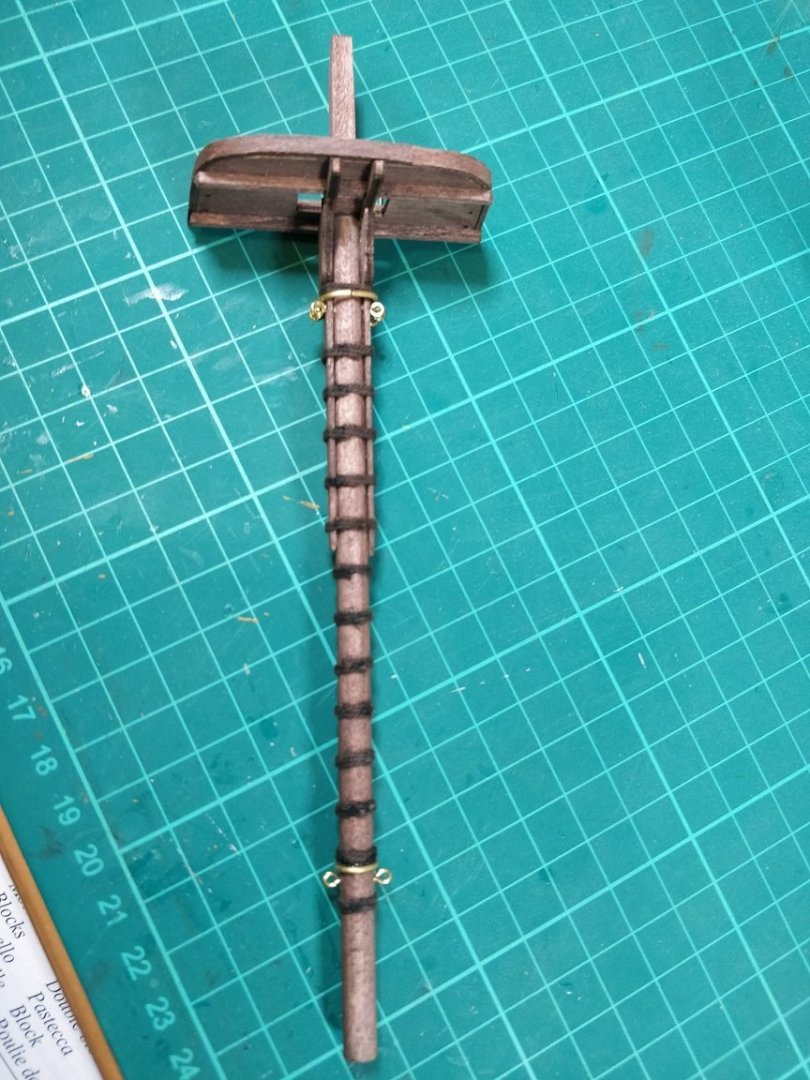
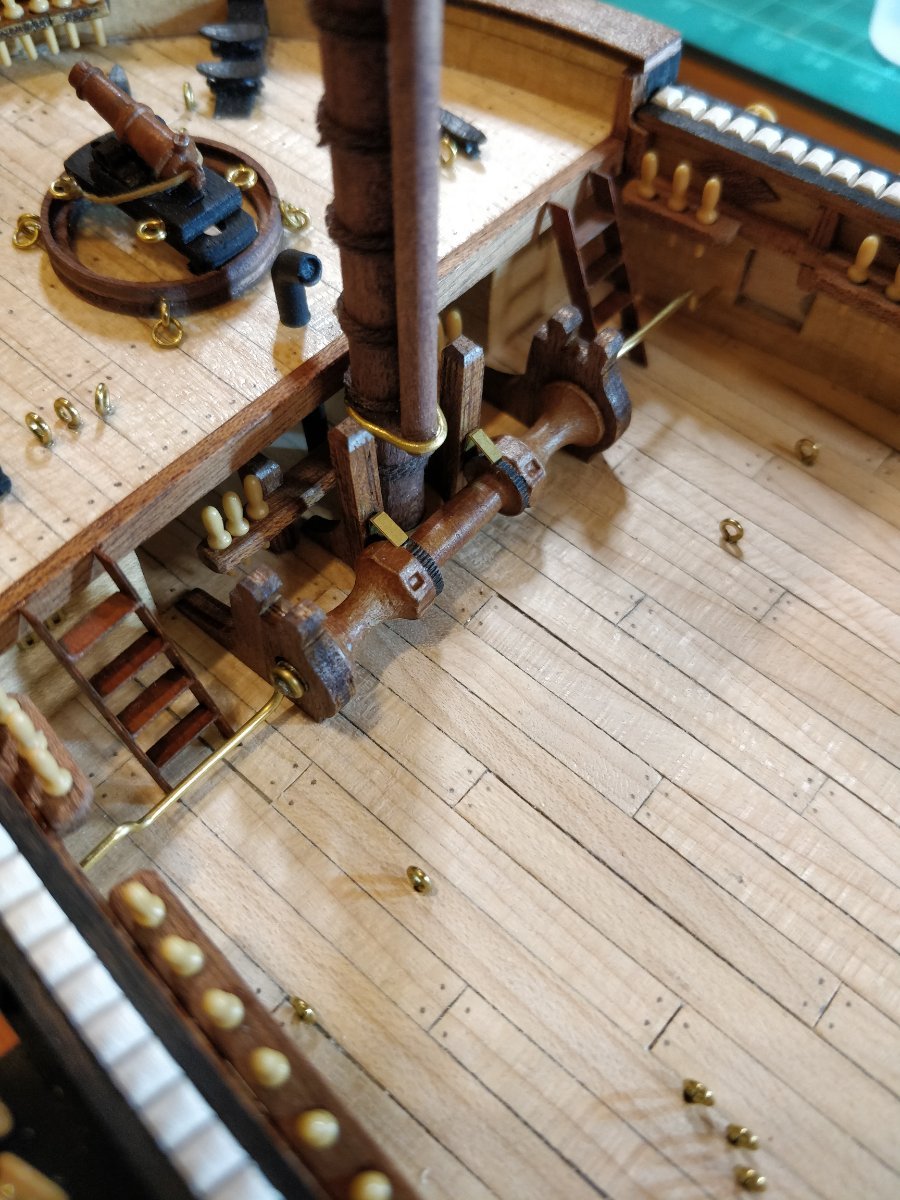
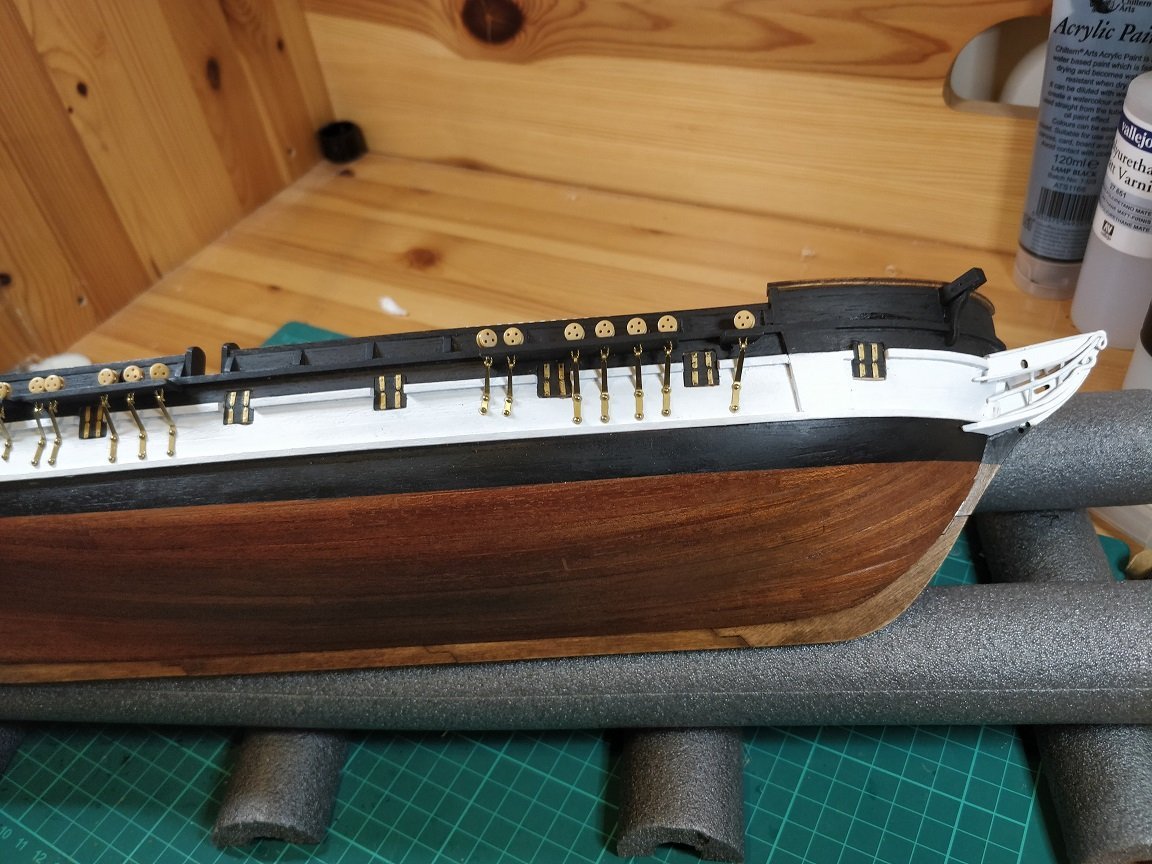
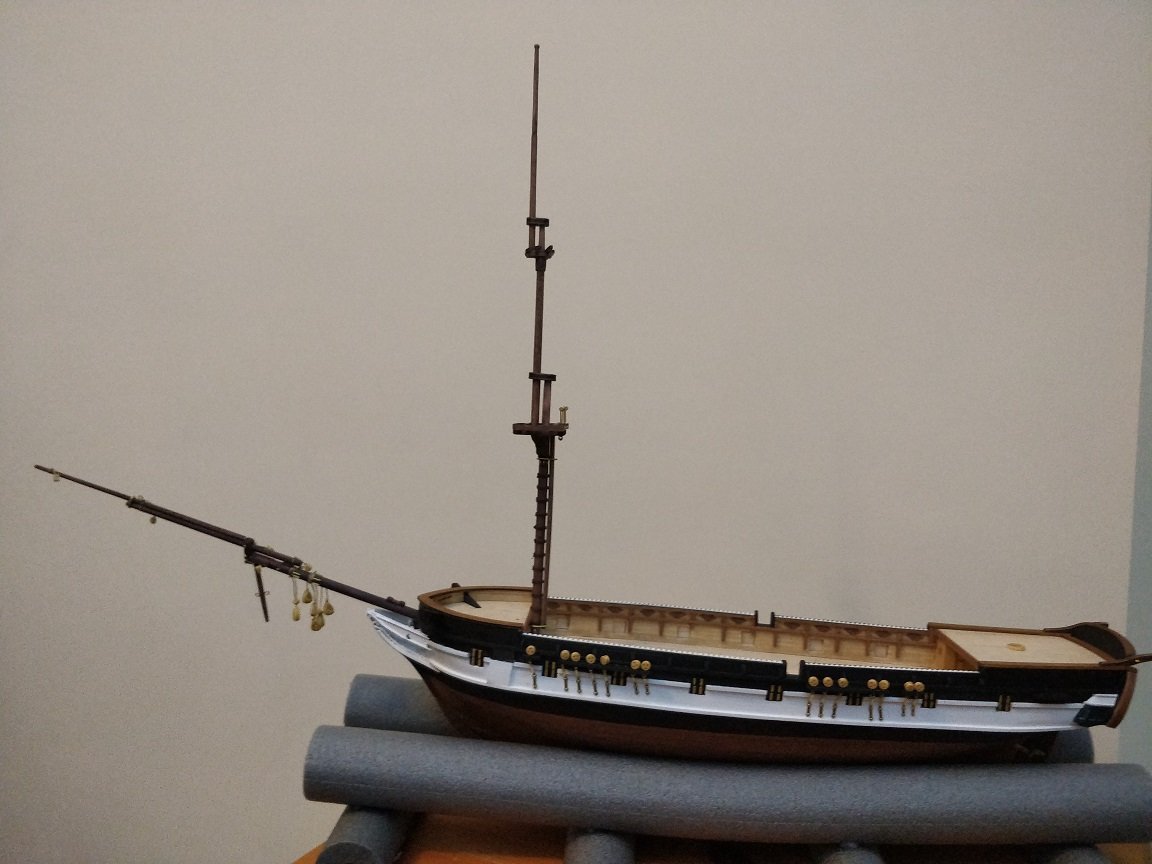
Progress over the last couple of weeks has been slow but sure. I now have all the deadeyes fitted. Getting this complete makes a big difference in the ship's appearance. I've used 0.4mm wire instead of the supplied 0.5mm wire, mainly because I have 20m of the 0.4mm wire which I had left over from my previous build and there didn't look to be a huge amount of the supplied 0.5mm. I think the twisted wire looks better than the plain wire and was easier to fit. I've also got the rudder fitted. Again, this was a bit fiddly but I think it turned out okay. With each of these tasks being completed my confidence is increasing. I've also done a dry fit of the bowsprit and completed foremast. It's becoming clear just how big this model is going to be. Now I need to progress all the deck fittings. I'm surprised just how cluttered/packed the deck is. There wouldn't have been much room to manoeuvre on deck in addition to the many trip hazards. Chimp

-
Hairy/fuzzy rigging thread
The Gimps Chimp replied to The Gimps Chimp's topic in Masting, rigging and sails
That's exactly what I've ordered and from the same supplier. Delivery was a bit pricey but that's what it is. Many thanks Chimp -
Hairy/fuzzy rigging thread
The Gimps Chimp replied to The Gimps Chimp's topic in Masting, rigging and sails
Getting hold of the Gutterman mara thread is proving difficult here in the UK, not sure what it's like in other parts of the world. I've now ordered some mara 100 to give that a go. This will be my first experience of rope making so will be interesting to see how it goes. As you say Gregory, this whole topic is a 'can of worms' and I do wonder if I'm overthinking things. My current skills of ship making are, shall we say, 'limited'. This is only my second model. However, as I'm going to be spending many hours of time and effort on this I would like to be happy with the result, and I'm always happy to learn new skills. Many thanks for your help Chimp -
Hairy/fuzzy rigging thread
The Gimps Chimp replied to The Gimps Chimp's topic in Masting, rigging and sails
I've just ordered some. Let's see how I get on with it. Many thanks Chimp -
Hairy/fuzzy rigging thread
The Gimps Chimp replied to The Gimps Chimp's topic in Masting, rigging and sails
Just a quick update to my original post: I've now got some beeswax and given that a go. As previously suggested, this makes things a little better but doesn't solve the problem I'm now looking into making my own rope. Everything I read on this site suggests it's relatively straightforward. Having started to look into the topic I'm generating more questions than answers. The kit I'm currently building is HMS Beagle at 1/64 scale. The supplied thread is 0.15mm and 0.5mm. Would it be unreasonable to expect to make 0.15mm rope? Should I just use Gutterman polyester thread, if so which size ...... mara 120, mara 100, mara 70 ...etc. I think three strands of Gutterman mara 70 should give me a good 0.5mm rope. Chimp -
Hi Dean, Sorry to hear of your current situation and I hope your good lady makes a full recovery. Don't feel embarrassed about any aspect of your build, she's looking fine. I too feel I could do better especially when compared to some of the work we see on the site. I know I've still a long way to go but we are all learning and gaining experience the more we do. I'm hoping my skills improve along with my confidence. I'm also working on the Beagle but some way behind you after also taking some time out. I'm now back in the game and progressing, albeit at a slow pace. Hope you get the time to progress your build. Best wishes Chimp
-
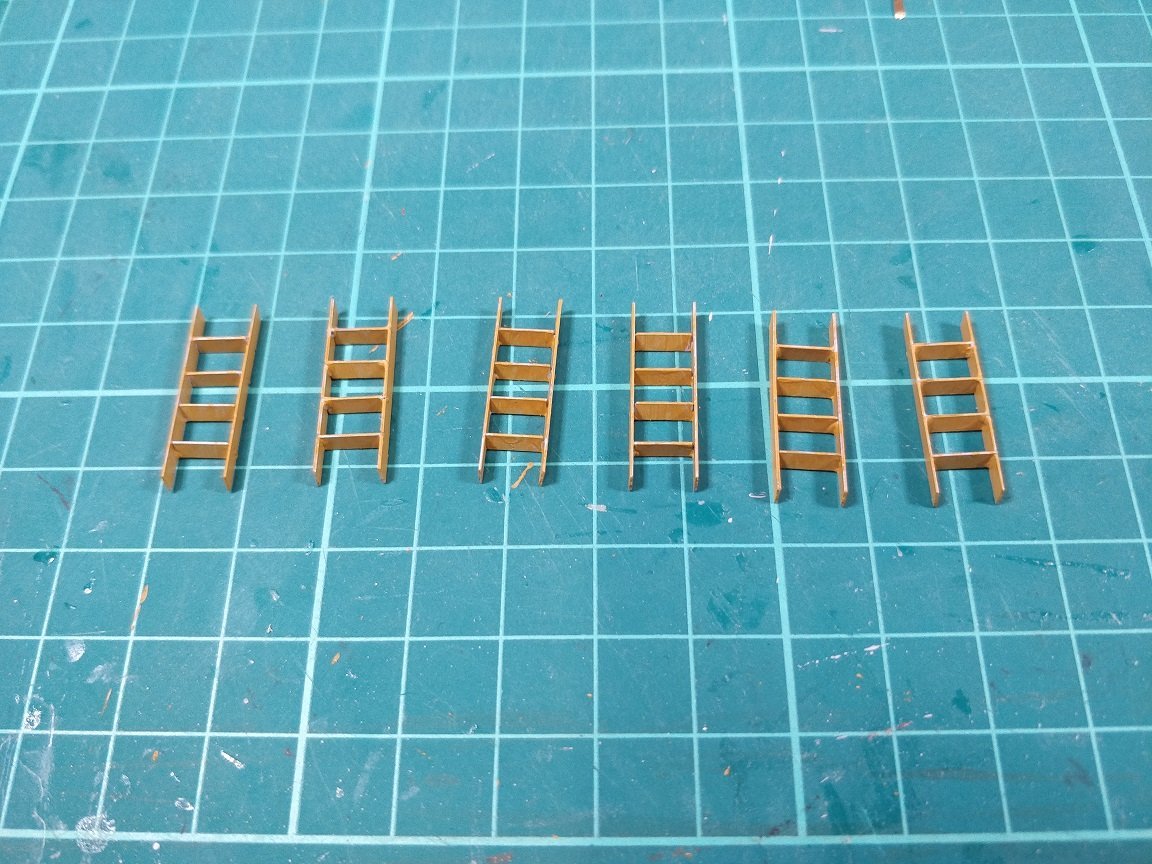
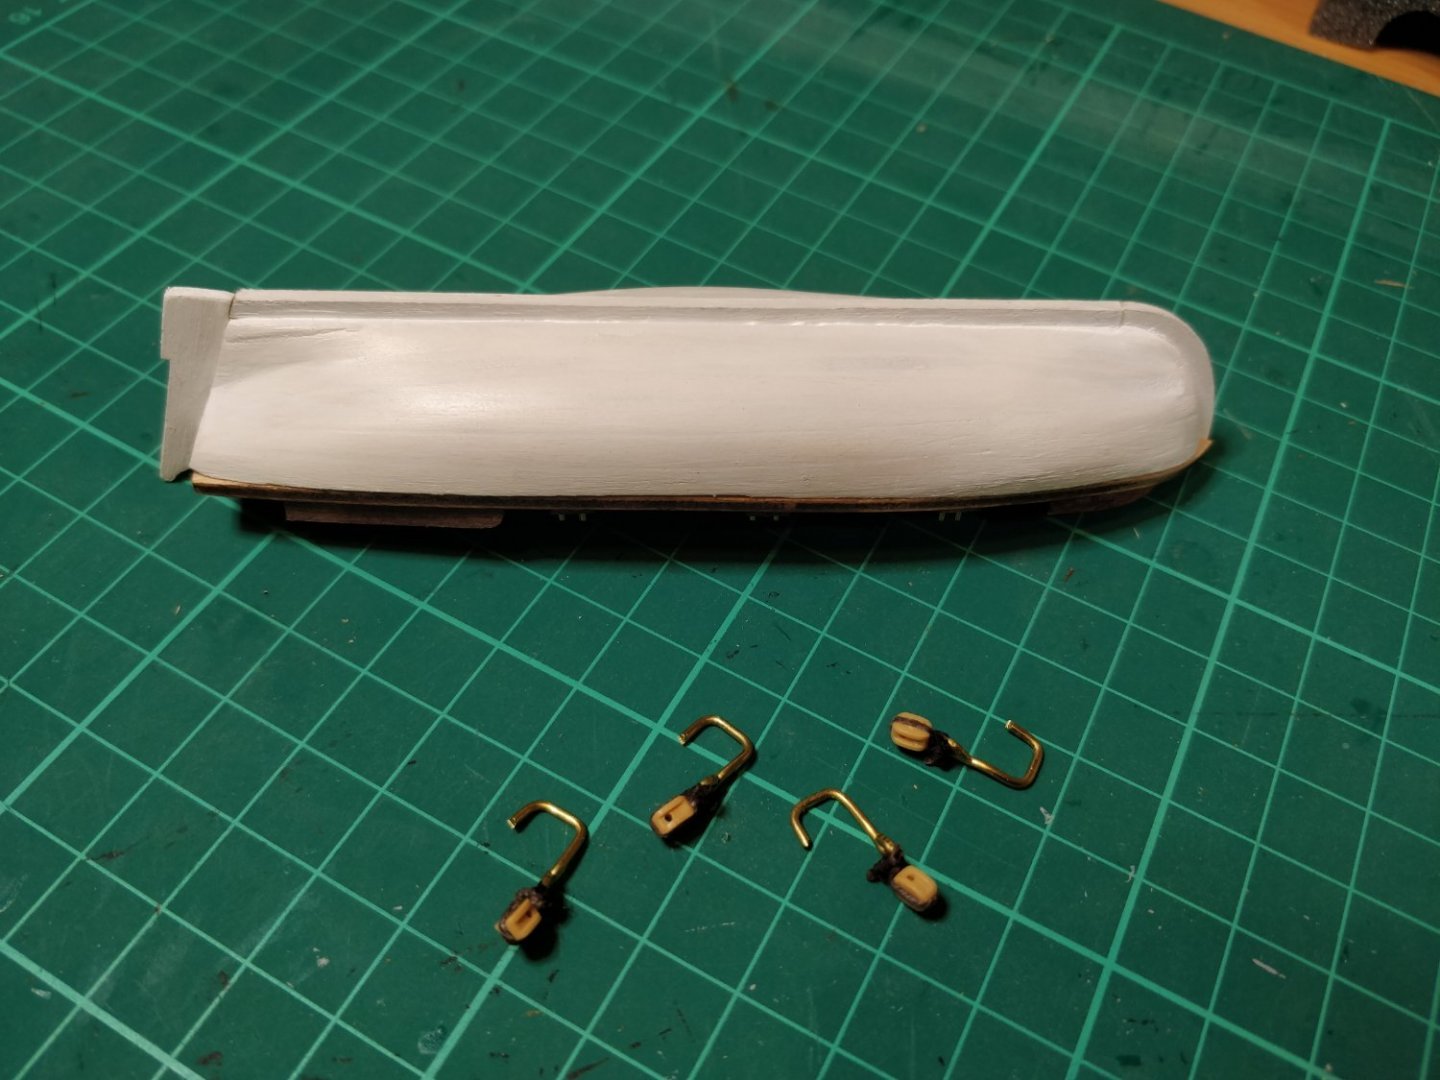
Progress over the last week has been limited. I've now all but finished making the bowsprit. The foremast has had a few bits of metalwork added. I've also assembled the six ladders, primed and painted a base coat. These ladders were a lot fiddlier than I expected. Not sure why they are made from brass in the kit. Maybe if made from wood then they might be too flimsy given the thickness. Chimp