


robdurant
-
Posts
796 -
Joined
-
Last visited
Reputation Activity
-

 robdurant got a reaction from Pirate adam in HMS Crocodile 1781 by Pirate adam - 1/48 scale - POF
She certainly is a handsome subject. I wish you all the best as you set out to build her.
-

 robdurant got a reaction from mtaylor in HMS Crocodile 1781 by Pirate adam - 1/48 scale - POF
She certainly is a handsome subject. I wish you all the best as you set out to build her.
-
 robdurant reacted to Henke in HMS Agamemnon by Henke - Caldercraft - 1:64
Dear friends,
Although there is a sort of hiatus in my Agamemnon build I thought I could show something else. A relative of mine sent me a picture.
It depicts my father with one of his model boats. I think the photo is taken around 1947-48. He later became a naval architect but unfortunately passed away many years ago far too early. Later in life he a built a sailing boat in scale 1:1. Is there a gene for particular ship modelling gene which is passed on for generations?
Does anyone recognize the model?
I hope I am not getting off topic in my build log?
Best regards
Henrik
-
 robdurant got a reaction from CiscoH in HMS Bristol 1775 by robdurant - Scale 1:64 - Portland-class 50-gun ship - as built from NMM plans
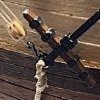
A little history - Bristol was caught in the great hurricane of 1780, and dismasted along with HMS Hector... the image below is public domain:
There's a particularly lovely model of Bristol in the Art Gallery of Ontario, in Toronto; pictures of which can be found on Wikimedia. The link below from the Art Gallery itself suggests this model was built in 1774, making it contemporary - perhaps even the builder's model. https://ago.ca/collection/object/agoid.106283
-
robdurant got a reaction from CiscoH in HMS Bristol 1775 by robdurant - Scale 1:64 - Portland-class 50-gun ship - as built from NMM plans
Hi all,
I've often been very taken by the Joseph Marshall paintings, and in particular by the paintings of the admiralty model of Portland from the bow and stern quarters. (Here in low-res courtesy of Wikimedia Commons)
That led me to explore the National Maritime Museum archives, and I came across the plans for HMS Bristol, her sister ship. That accompanied, with my stumbling upon RIf Winfield's book The 5o Gun Ship, which includes plans for another Portland class ship, Leopard meant I was well and truly smitten.
A good number of plans survive for Bristol on the National Maritime Museum, and so, I figured (probably foolishly) that it would be wonderful to try and create as closely as possible the admiralty model shown in Joseph Marshall's paintings of Portland, but as her sister-ship Bristol. Having completed a model of HMS Diana, the Artois class frigate (as her sister ship Ethalion), and having made my way through a fair bit of Barque Stefano, both of which I have modified a fair bit as I've gone, I'm reasonably confident I'm up to the task of doing this as POB, but the big question is, how to recreate the frames... I don't think I'm up to fully framed yet - that will probably be the model after, so some POB / Joseph Marshall-painting-style-POF mash-up is the aim, with frames showing below the wales, and planked bulkheads above... As I'm designing it, I'm reasonably confident I can make this work, but there'll be plenty of planning before I make any sawdust.
So. Right now, I have the following plan as a high res printout - this low-res version is from wikicommons (I couldn't stretch to the £100 license to buy a digital copy) and lots of low-res images. I'll add to the collection as I go. This is enough to begin planning internal structure.
The full size plan is in 1:48, and it's stunning! From that tiny snapshot of history where the Admiralty had plans drawn up on completion of a ship, as well as at the beginning of construction - hence the decorations are all drawn out.
So. This post is as much as anything a pin in the map - a starting point, and a statement of intent. If you'd like to join me for the journey you're extremely welcome. It'll be slow going, I'm sure, but it should be fun, and if it turns out anything like the picture in my head, it'll be really wonderful in the end
-
robdurant got a reaction from CiscoH in HMS Bristol 1775 by robdurant - Scale 1:64 - Portland-class 50-gun ship - as built from NMM plans
Hi all.
Apologies that this build has stalled from my perspective. The post here will explain
Blessings on you all.
Rob
-
 robdurant got a reaction from egkb in Barque Stefano by robdurant - MarisStella - 1:63
Hi all.
Apologies that this build has stalled from my perspective. The post here will explain
Blessing on you all.
Rob
-
 robdurant got a reaction from mtaylor in HMS Bristol 1775 by robdurant - Scale 1:64 - Portland-class 50-gun ship - as built from NMM plans
Hi all.
Apologies that this build has stalled from my perspective. The post here will explain
Blessings on you all.
Rob
-
 robdurant got a reaction from AJohnson in Barque Stefano by robdurant - MarisStella - 1:63
Hi all.
Apologies that this build has stalled from my perspective. The post here will explain
Blessing on you all.
Rob
-
 robdurant got a reaction from Halsey in Nordkap by robdurant - Billing Boats - 1:50 - RADIO
Hi all.
Apologies that this build has stalled from my perspective. The post here will explain
Blessing on you all.
Rob
-
 robdurant got a reaction from Jack12477 in HMS Bristol 1775 by robdurant - Scale 1:64 - Portland-class 50-gun ship - as built from NMM plans
Hi all.
Apologies that this build has stalled from my perspective. The post here will explain
Blessings on you all.
Rob
-
 robdurant got a reaction from Javelin in HMS Bristol 1775 by robdurant - Scale 1:64 - Portland-class 50-gun ship - as built from NMM plans
Hi all.
Apologies that this build has stalled from my perspective. The post here will explain
Blessings on you all.
Rob
-
 robdurant got a reaction from KeithAug in Nordkap by robdurant - Billing Boats - 1:50 - RADIO
A few more planks on the starboard side, and the sides added to the centre part of the keel.
-
 robdurant got a reaction from Dulrakk in Free Picture Resizer Application I programmed (to solve those image rotation woes) *Microsoft Windows 10 and 11 only*
Auf deutsch...
-
 robdurant got a reaction from Ras Ambrioso in Nordkap by robdurant - Billing Boats - 1:50 - RADIO
My day off today has given me a good shot at getting some things done on Nordkap. I've opened up the scuttles (?) and built and installed the recesses on either side of the bow for the anchors. Each hole was started with a drill, and then opened up carefully with a craft knife and then a file. Once glued in place, the anchor recesses had any gaps filled with a wood, superglued in place, and then sanded flush.
I've also installed the cap rails... These were temporarily pinned while they glued, as otherwise they don't sit flat on the tops of the bulwarks.
Built and installed (temporarily) the rudder... before I glued the two wooden parts together, I bevelled the front edges to create a v-shape that the rudder post could sit in. Once glued together, the rudder was sanded to make it narrower at the rear - I always think rudders look slightly strange when they're chunky at the back... it just looks wrong to me. Then it was time to go into town a get a pasty for lunch!
I also made some progress with the bow weather deck and stern superstructure (this is easier once the cap rails are on, as the height of the rear area of the superstructure is determined by the cap rail (to ensure there's no gap).
Finally, it was all cleaned up, and another coat of the Eze-kote resin was painted on to seal all of the exposed wood on the outside of the hull (and in the scuppers). I need to do some testing to see whether I can put Eze-kote over the deck planking, or whether I'm better off with just matt varnish...
Thanks for following along.
Rob
-
robdurant got a reaction from Ras Ambrioso in Nordkap by robdurant - Billing Boats - 1:50 - RADIO
So... here's the progress.
I did a lot of reading up, and the whole question of whether to use fibreglass along with the resin, or whether the resin itself is enough seems to be very much a Marmite one... I've opted to try without the glass. Many have said they've had success this way, and it certainly seems to have done the job from all I can tell. Time will prove me right or wrong I am grateful to you, @Ian_Grant for your advice, and you will absolutely have the rightn to say "I told you so" if this heads south as a result of my decision 🤣
Lots of prep, four coats of Eze-kote, with very light sanding in between, and the hull has taken on a lovely sheen - re-installing the prop and rudder shaft with some grease, and it was time for a test in the bath. It's years since I've done this, and I thought I'd ask my son to give me a hand... Here are the results. There was a brief false alarm as we mistook some bobbles of carpenter's glue for water coming in, but thankfully it was all a false alarm. She's dry as a bone inside.
Here are some photos of her.
In addition, I've begun marking out the deck for planking. The strips of planking provided are pretty rough, but thankfully I have a shedload of tanganyika left over from my HMS Diana, Caldercraft kit, that I'll substitute. Before I do that, I need to cut out the bulkwark openings (the anchor port, and the scuppers), and then paint the edges of the deck that will remain unplanked. Onwards and upwards!
As always, thanks for looking in, and for the likes, advice and encouragement.
Rob
-
robdurant got a reaction from Ras Ambrioso in Nordkap by robdurant - Billing Boats - 1:50 - RADIO
That's some cool looking stuff you've got there, Ian... and that book looks great, too. I've been really enjoying watching your progress with your Roman warship. A magnum opus, to be sure!
Okay - so here's the plan for waterproofing... Having sanded the hull some more the other day, I noticed that when I hold the hull up to the sun, I can see not only thin areas where the planking had gaps, but more than that, I can see pinholes where the planks and the filler haven't completely bonded... Suffice it to say, if I were to try and float this boat right now, the water would be getting in right away... So... I've had a bit of a look around, and this is the plan.
It's called Eze-Kote, and it's designed specifically as a finishing resin, but it's water based, so clean up is easy, and it's low odour - it's a much nicer chemical to be dealing with. In addition, I've bought the lightweight glass fibre they recommend to go with it. I wanted something very light weight, so that it forms round the hull shape nice and easily, and is relatively smooth out of the box.
Last time I used fibreglass resin, I used automotive stuff, and both the results (I used fibreglass mat, not knowing that was a disaster in the making), and the resulting headache and rough breathing for a few hours after were enough to tell me I hadn't taken enough / appropriate precautions, so I'm hoping this experience will be far less unpleasant.
I'll let you know how I get on, but there's a little more prep to be done first round the prop shaft and rudder post. I'm working on the assumption that good prep is always time well spent.
Thanks for looking in, and for the advice and encouragement.
Rob
-
robdurant got a reaction from Ras Ambrioso in Nordkap by robdurant - Billing Boats - 1:50 - RADIO
Thanks @Ian_Grant - yes, I need to source some light fibreglass cloth. I'm hoping to get a really smooth hull before I fibreglass it, so that the tidying up after is as limited as possible.
I've gone through a few more rounds of filling / sanding, and it's really starting to look quite neat - these photos are from half way through the process. In-between filler and sanding, I put on a coat of grey primer so I can see where the peaks and troughs are...
The new speed controller arrived, so I've set up all the electrics and tested them. They'll do the job nicely. Things have moved on since I last made a radio controlled model, and this clever speed controller works out which way is forward based on the first direction you push the throttle stick on the radio control! Clever stuff! I had to solder a new receiver plug onto to the servo for the rudder, but otherwise, all very simple and easy. Rudder is channel 1, and Throttle channel 2. I tested the motor with an AA cell before I soldered on the speed controller to check that the prop would rotate in the correct direction - (clockwise as you look from the stern). It ended up as shown below.
I've also been looking at what colour to put on the hull... I don't want a bright blue, but something a little more towards the teal end, and somewhat more subtle... To that end, I've been experimenting... I need to re-run these experiments on grey primer, as I suspect the mix will need to change, but the picture below gives some idea of the colour I'm looking for... It's a 1:2 / 1:3 ratio of Vallejo blue/green and Vallejo blue... I tried Andrea Blue but it was too light.
I'm looking for something like the top left tone... Admittedly that tone will look different on each screen that displays this, but I've been looking at this in daylight and under daylight bulbs, and I'm pretty happy with the tone in real life. Having a 1:2 / 1:3 ratio makes it very easy to replicate should I need to. I just get the appropriate number of bottles and mix them in their entirety.
Big thanks to everyone for looking in
Rob
-
robdurant got a reaction from Ras Ambrioso in Nordkap by robdurant - Billing Boats - 1:50 - RADIO
So... it seems like something of a crime to cover up planking, but I've used some car body finishing filler (polyester-resin) to begin making the hull watertight... and now begins the sanding... and more sanding... and then filling... and then sanding... and (you get the picture...)
First comes the filler...
Then, after 20 minutes it's set enough to be sanded... and it's worth sanding it sooner rather than later, as it only gets harder... I'm using a very coarse paper glued to wood to ensure I don't sand peaks and troughs into the hull... This is most certainly a job to be done outside, with a mask on, and with the door inside shut... the amount of dust is considerably...
It's a start. And it suggests that I will, indeed, end up with a watertight hull.
Thanks for looking in and for the likes and encouragement
Rob
-
robdurant got a reaction from Ras Ambrioso in Nordkap by robdurant - Billing Boats - 1:50 - RADIO
I've reached a milestone - the hull is closed up. I've also cut out the beams where the deck opening is to give space to access the motor, rudder servo, battery, etc...
Thanks for looking in, for the likes, and the encouragement
Rob
-
robdurant got a reaction from Ras Ambrioso in Nordkap by robdurant - Billing Boats - 1:50 - RADIO
Thank you for these suggestions, Ian.
I've moved the linkage in from the end of the servo arm to be approximately the same distance from the pivot as the on the rudder horn. I agree that this is a more sensible setup. As far as the rudder horn holes, I'm not sure why they'd be designed like that, but that's how the Billing Boats part came (unless I've just misidentified the part, and I'm using something that's meant for another bit of the build, which is entirely possible! 😂) I'm not too concerned about a small amount of slack in the system, as this is a scale fishing boat and not a high performance motor launch, so I'm not anticipating I'll need to be doing any precision manoeuvres at speed. It feels remarkably secure, and there's not a lot of slack in the system, so I'm happy enough. It helps keep the budget under control, and it's how I've always done it in my other RC boats
There's not a huge amount of "interesting" progress to show, as I'm essentially just planking the other side of the hull to close her up... but I have planked vertically around the stern to bring the planking out to the same level. I've used offcuts of the planking strips to do this.
And, planking on the starboard side, so far... I can normally get between three and five planks on in a session... The first nine planks from the bottom of the hull are full width... It won't be beautiful when it's finished, but it will be a solid base to fill and smooth. Planks are glued to the bulkheads, and edge glued to make it as solid as possible. The clamps towards the centre of the hull are to help the planks to glue nicely edge to edge, and to avoid clinker, as the bulkheads have quite a distance between them.
-
robdurant got a reaction from Ras Ambrioso in Nordkap by robdurant - Billing Boats - 1:50 - RADIO
Thank you for the words of encouragement, @Ian_Grant. Yes, the prop-shaft and prop are from George Sitek - I've always been really impressed with their product, and that's no less true on this occasion.
The rudder servo tray is constructed, with the servo mounted and fitted... I've also installed the motor on its own tray and mounted that between two bulkheads. Everything's screwed in place so that it can be removed as necessary through the access hatch above. The receiver will go next to the rudder servo. A bit of brass wire has been used as the linkage between the rudder post and the rudder servo. This is bent so that it doesn't hit the bulkheads as it passes forward. Altogether, I'm quite please. Here are some pictures of progress so far.
I'm really glad I decided to do all of this before planking the other side closed... it's made life WAY easier
-
robdurant got a reaction from Ras Ambrioso in Nordkap by robdurant - Billing Boats - 1:50 - RADIO
Thanks for the likes
Planking continues... Port side is now planked, and starboard side well underway... I'll leave the serious sanding until I've got the whole hull planked.
Also, the right parts for the universal coupling, along with a new motor arrived...
-
robdurant got a reaction from Ras Ambrioso in Nordkap by robdurant - Billing Boats - 1:50 - RADIO
A quick update... I've added the first three rows of planking on starboard and port, and also filled in the stern between the bulkheads with balsa. To get a nice curved shape, this seemed like a necessity, especially as this model has only a single planking layer.
-
robdurant got a reaction from Ras Ambrioso in Nordkap by robdurant - Billing Boats - 1:50 - RADIO
With the help of some of the planking pins, I glued the deck down. Once the glue was in place, I placed the deck, and the Aliphatic glue (Carpenter's glue) gave me enough time to predrill holes for planking pins, and secure the deck to make sure it was well in contact with all of the deck beams. Clamps were used round the inside of the deck opening.
I left it overnight to set, and then pulled the pins back out with some needlenose pliers... nice and easy.
And here's a different shot showing something of her lines...
Thanks to those who've looked in