MORE HANDBOOKS ARE ON THEIR WAY! We will let you know when they get here.
×


mar3kl
-
Posts
178 -
Joined
-
Last visited
Content Type
Profiles
Forums
Gallery
Events
Everything posted by mar3kl
-
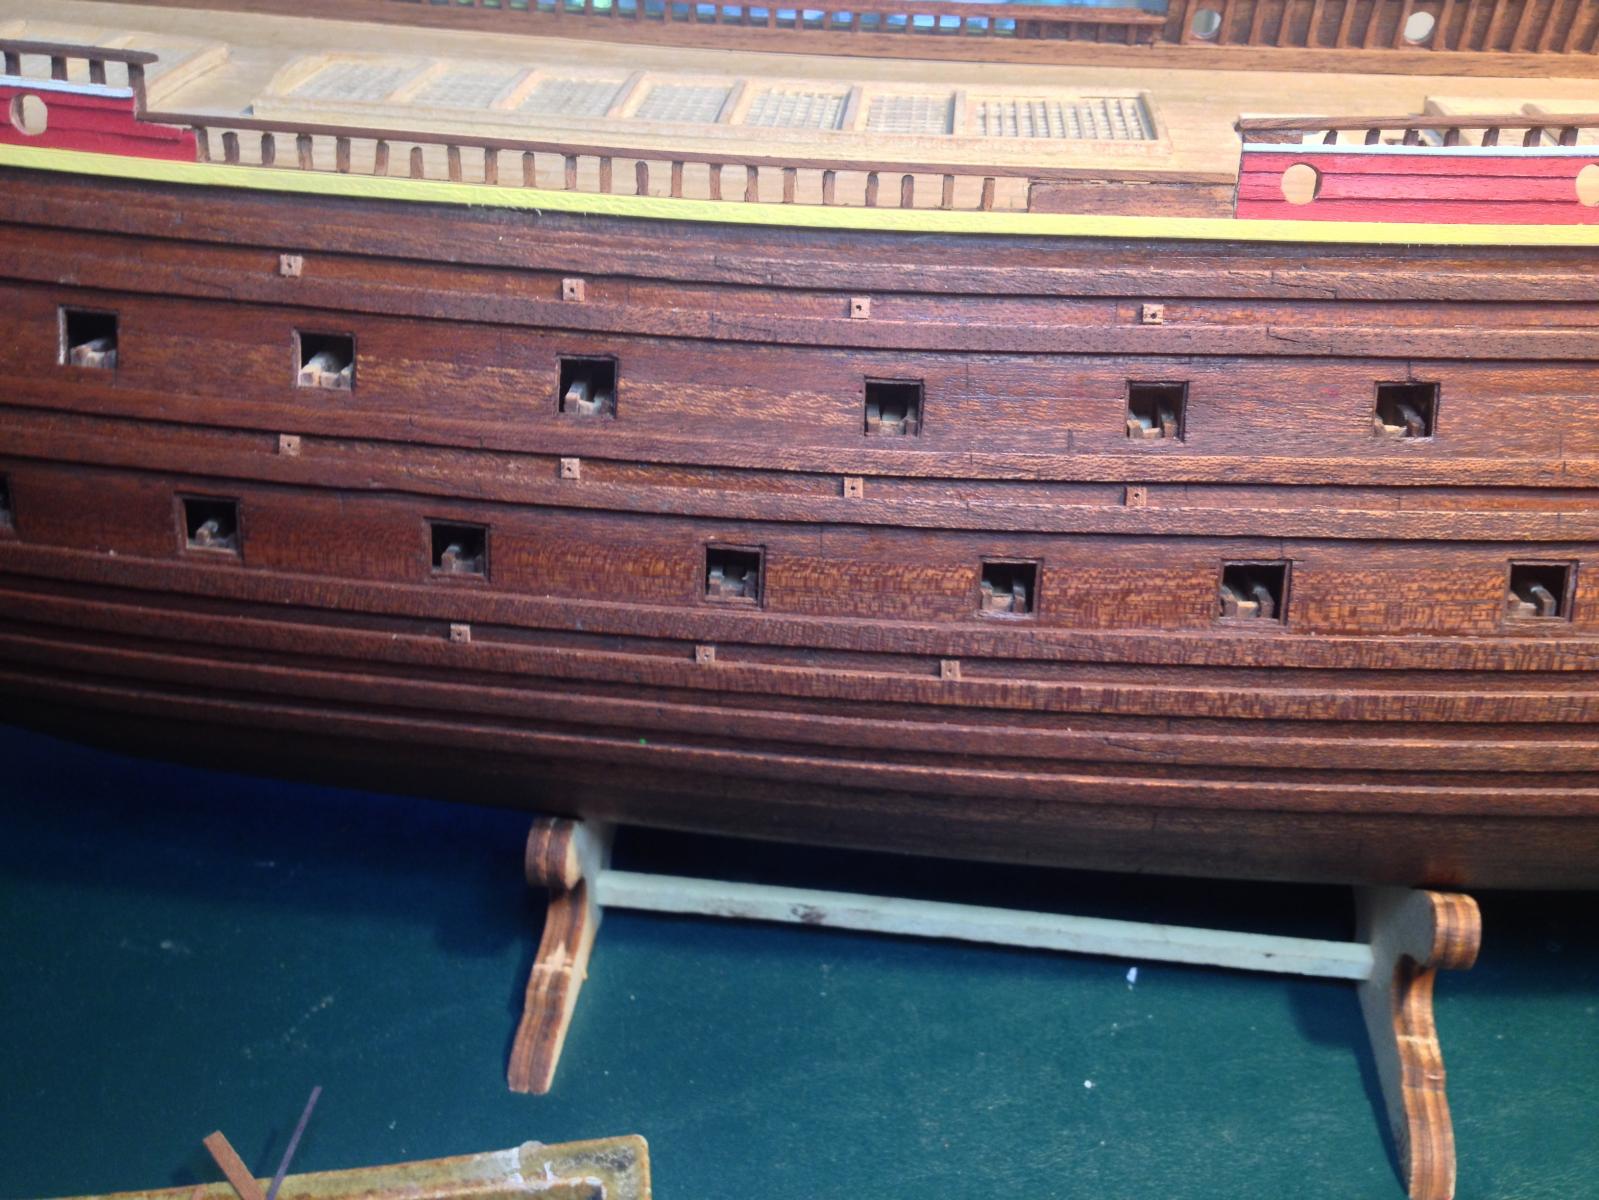
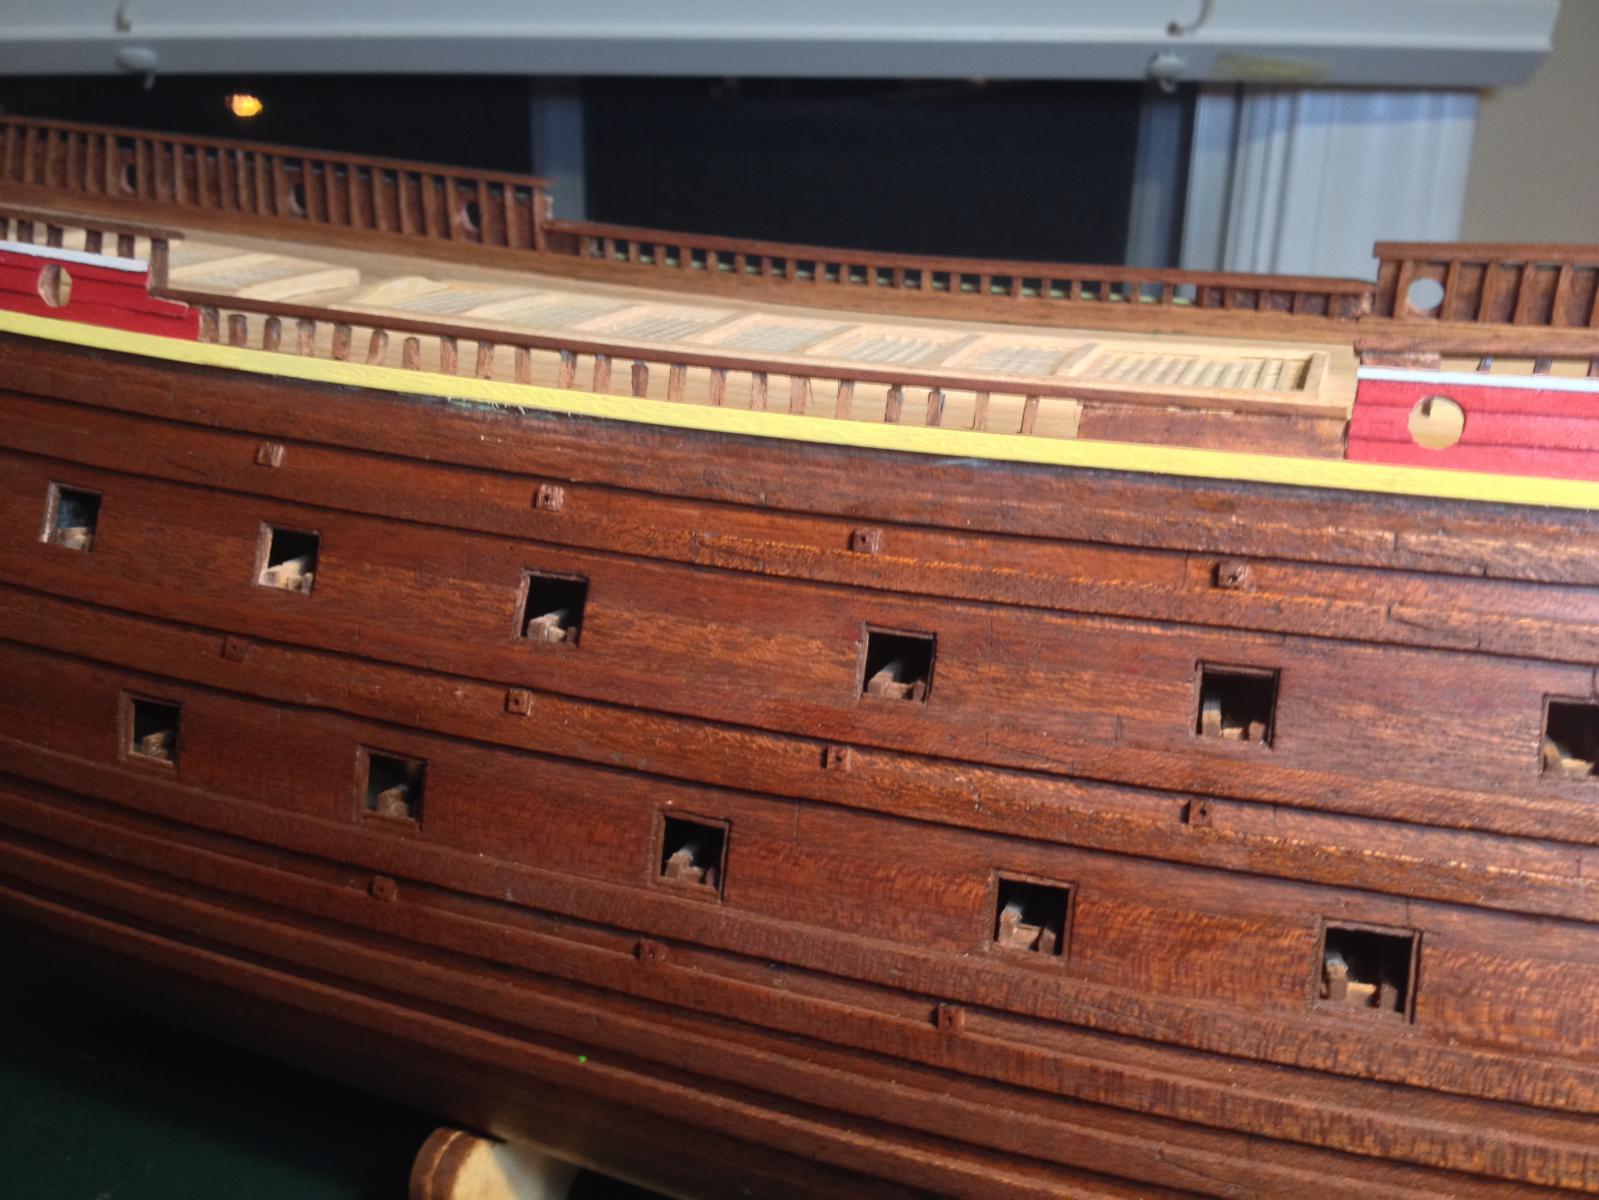
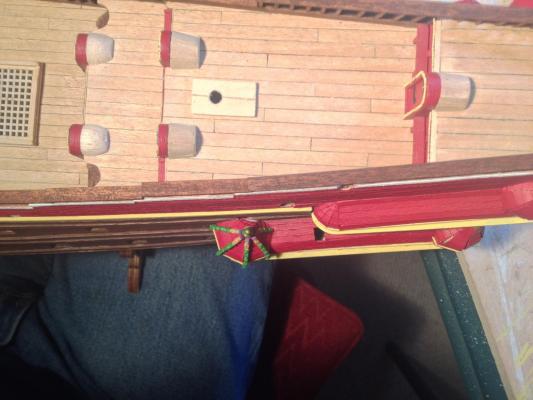
This was a small project to fix the poop deck gun ports. The kit has them as semicircles, but they are completely circular on the real ship. I decided to lower them so they could be circular. First I created the lower circular part of the port: Then I filled in the upper part with a small piece of wood having a circular profile on the bottom. Worked nicely. Next up will be the round gun port decorations...
- 249 replies
-
- 4
-

-
- billing boats
- vasa
- (and 1 more)
-
The earlier pages in the build log show how I set up the ports and carriages, so you can see what you think of the approach. I think you can see enough of the carriages to warrant constructing them instead of using false cannon and a backing strip, but that's purely personal preference. It's certainly less work to go the false-cannon route. You might want to mock up one of each and see which you like better. mark
-
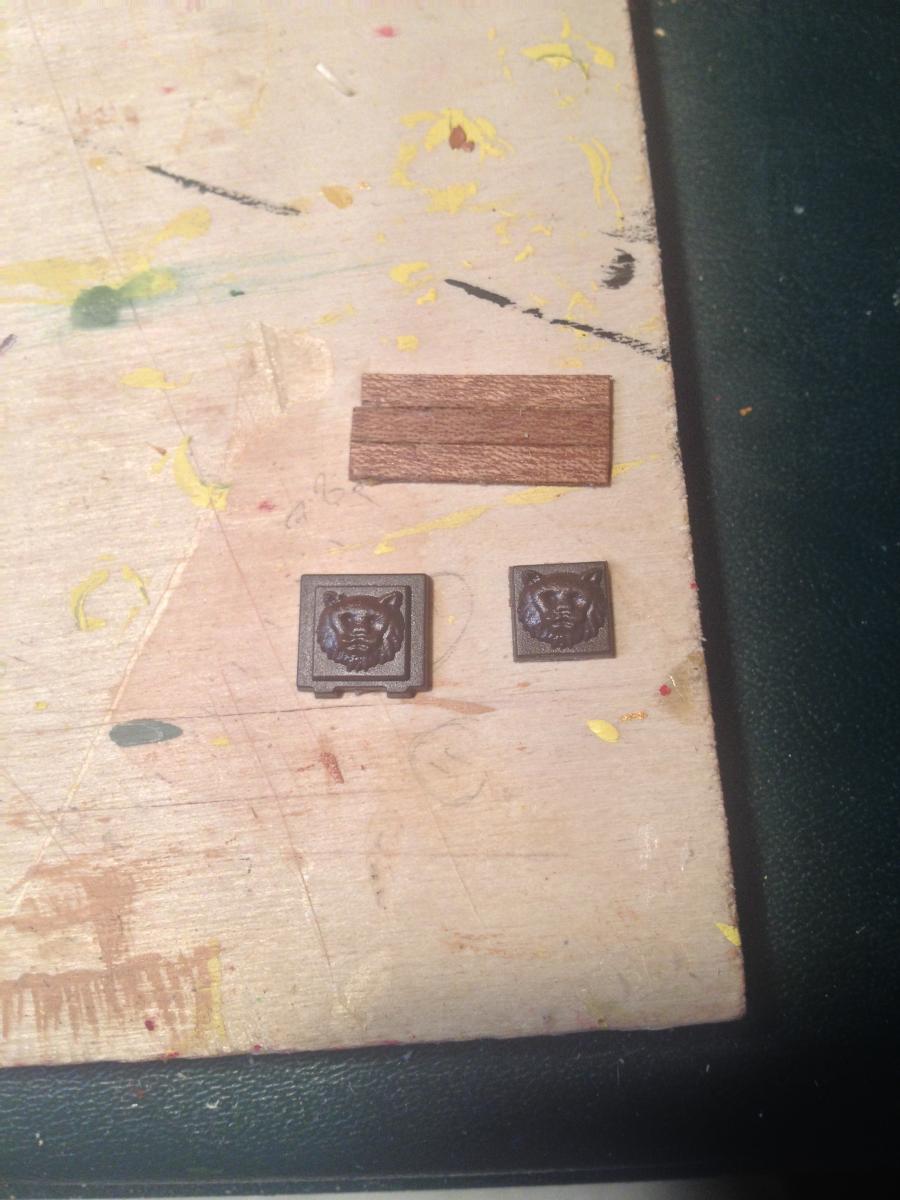
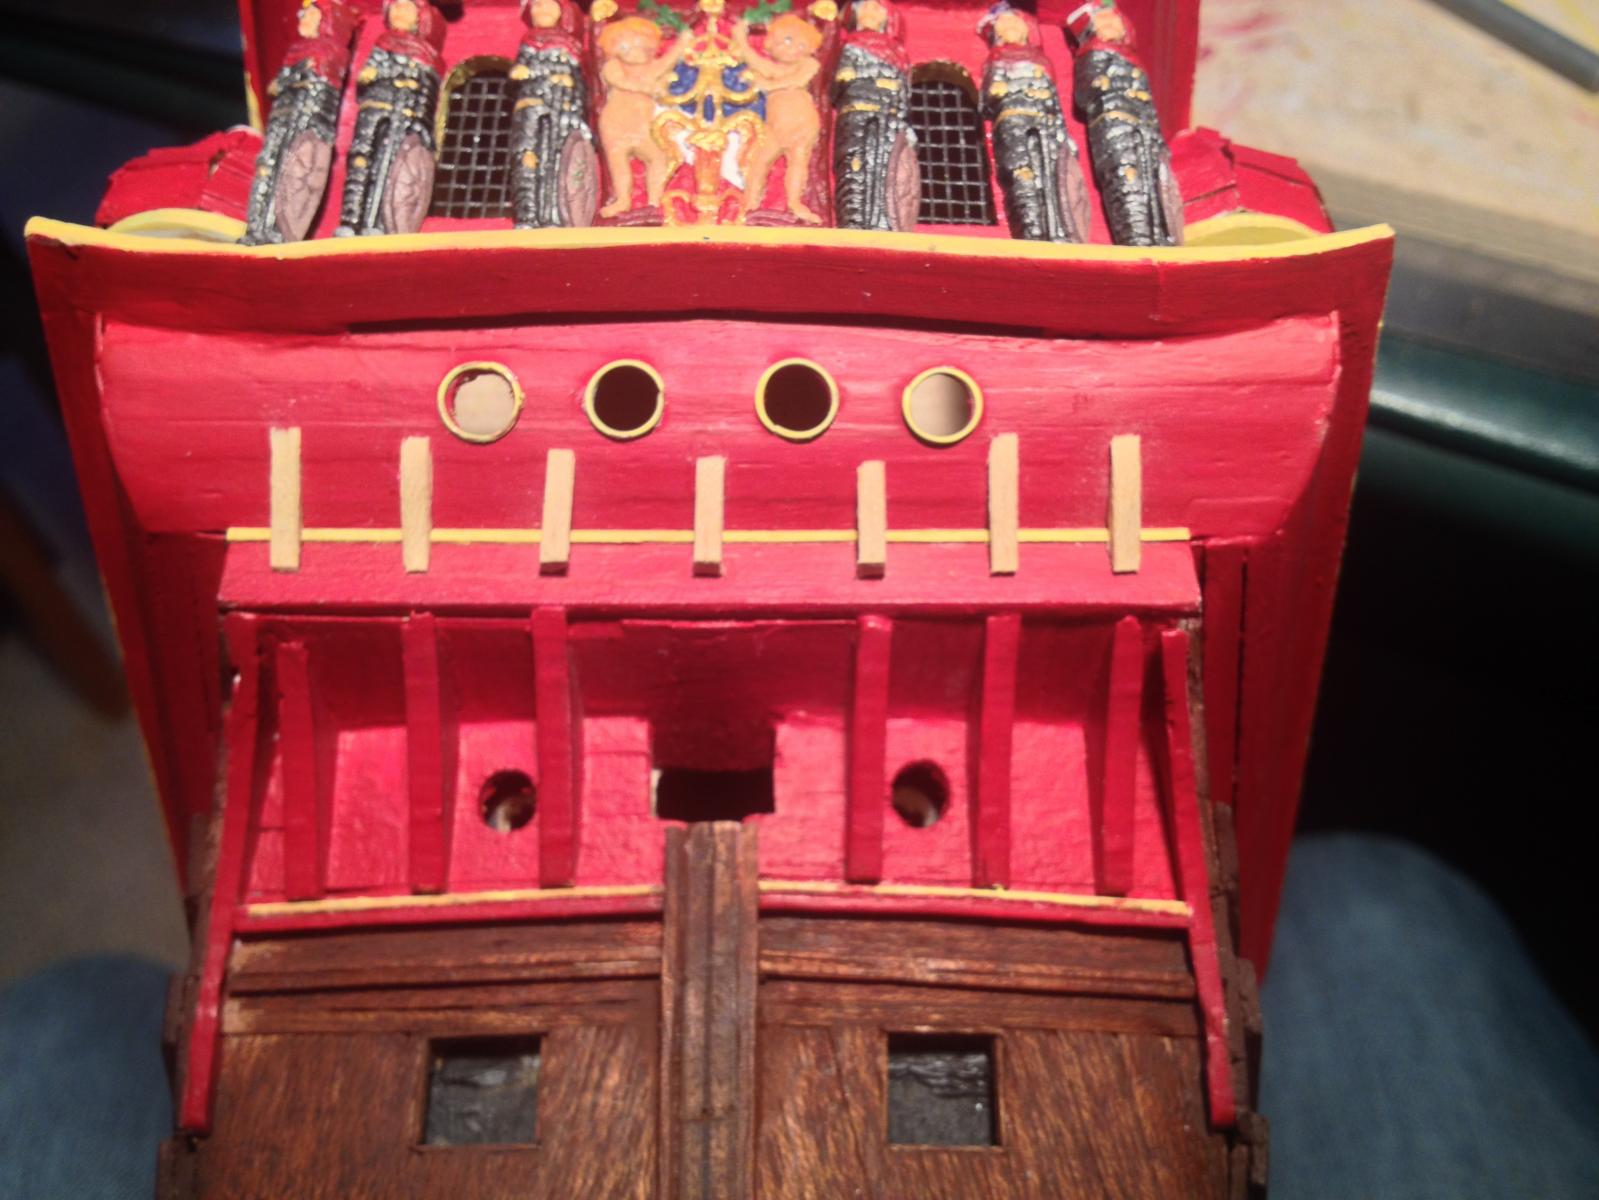
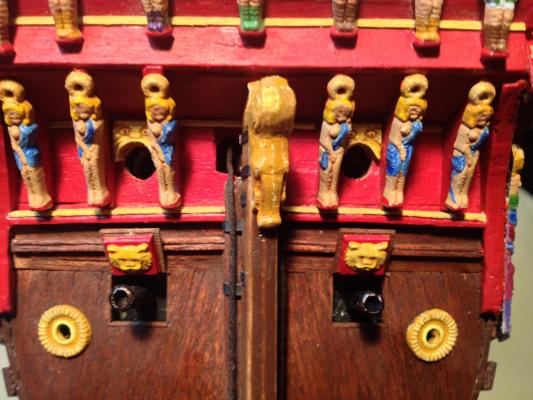
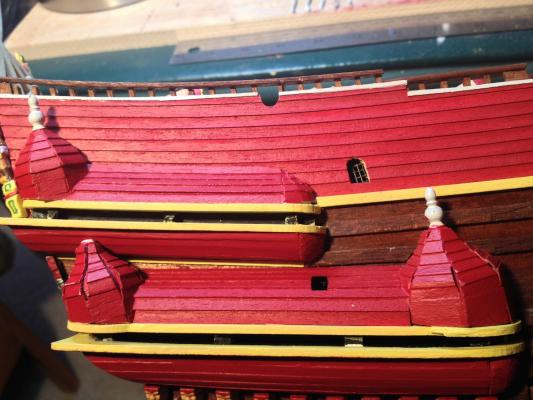
I decided to finish off the stern by doing the rear gun port lids and false cannon, and adding better doors at the top of the transom between the grotesques. The kit provides plastic port lids. They have a raised center section with lions embossed on the top. The lions are quite nice actually, although they need a dark wash to bring out the detail (otherwise they look more like bears than lions). Since the lids are supposed to be unpainted wood, I couldn't use the kit parts as provided. Instead, I cut the edges off, leaving only the center section, which needs to be painted completely. I thinned the section down a bit, then built the port lids from three strips of 3mm mahogany laid edgewise. Here are the port lids and decorations prior to painting. You can see the lid prior to and after cutting off the edges: I then spray primed all the lids at once, with a medium flat yellow ("Demon Flesh" miniature primer, if you are interested :-). After that, I put a thin layer of pale yellow on the lion heads, and followed that with a dull ochre wash. The result picks out the lion mane and other details rather nicely. Add a red mouth and red for the remainder of the lid, and I was done. The painted decorations on the wood lid work out rather nicely, I think. The cannon were sprayed with flat black primer, then washed with dark bronze. Here's the result: Then on to the doors. What I did originally was simply scribe lines on the base of the transom and paint the result red. It looked OK, but the "doors" were recessed and I decided I wanted them flush. So I scratched some doors from pieces of wood and dropped them in the recessed, then painted them. Here's a photo of the finished stern:

- 249 replies
-
- 6
-
-
- billing boats
- vasa
- (and 1 more)
-
I recall from my previous model 14 odd years ago that the ratlines became a meditative experience after a while. I suspect my fingers still remember how to do a clove hitch. Yours look very nice - I agree arranging them by eye is the way to go. mark
-
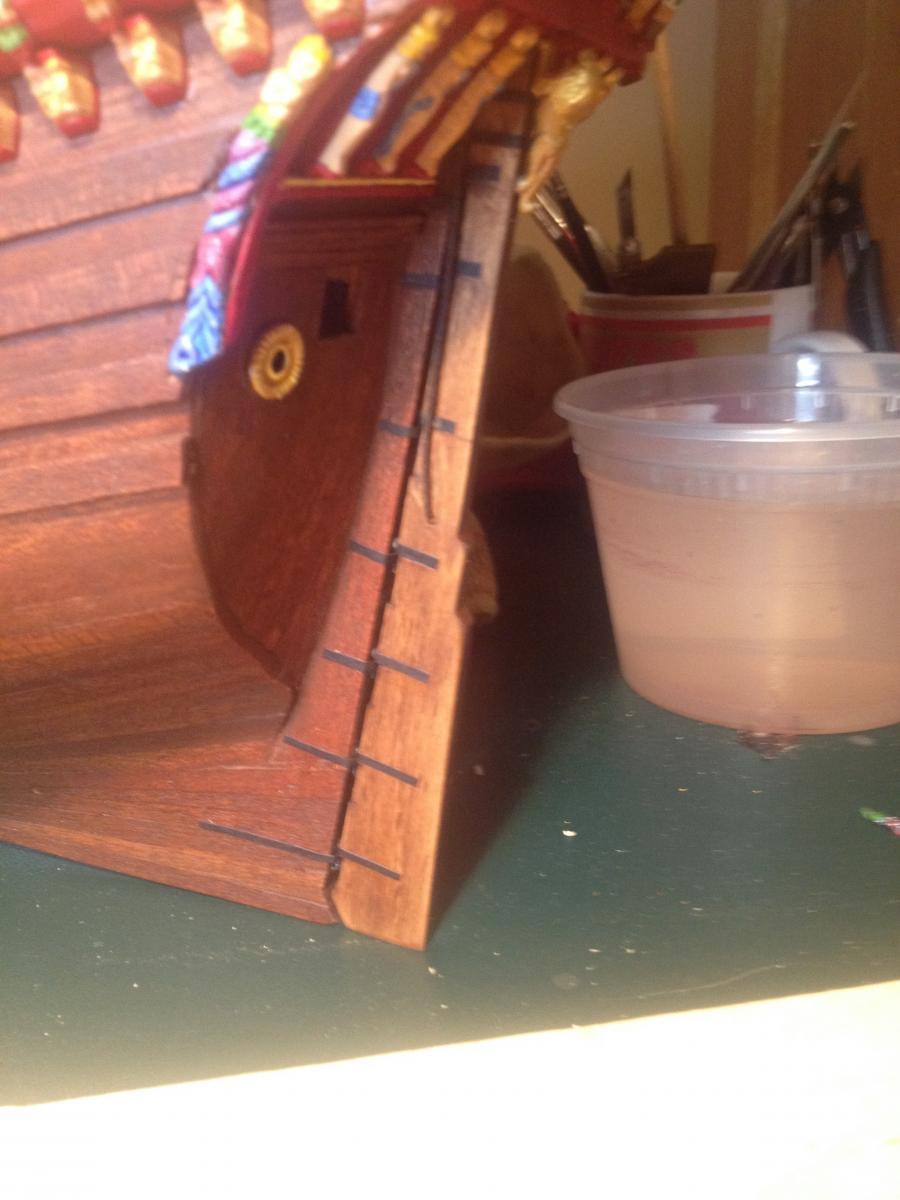
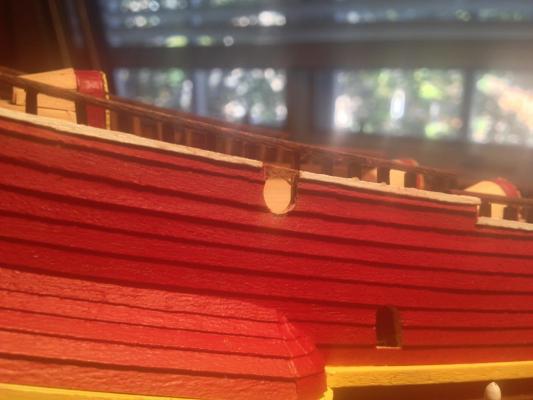
The kit plans don't show the scuppers, but again there are enough photos out there that I was able to scratch them. Rather than just drill holes in the hull, I made small squares with holes in them and attached them to the planking. Here they are after mounting: And after staining:


- 249 replies
-
- 5
-
-
- billing boats
- vasa
- (and 1 more)
-
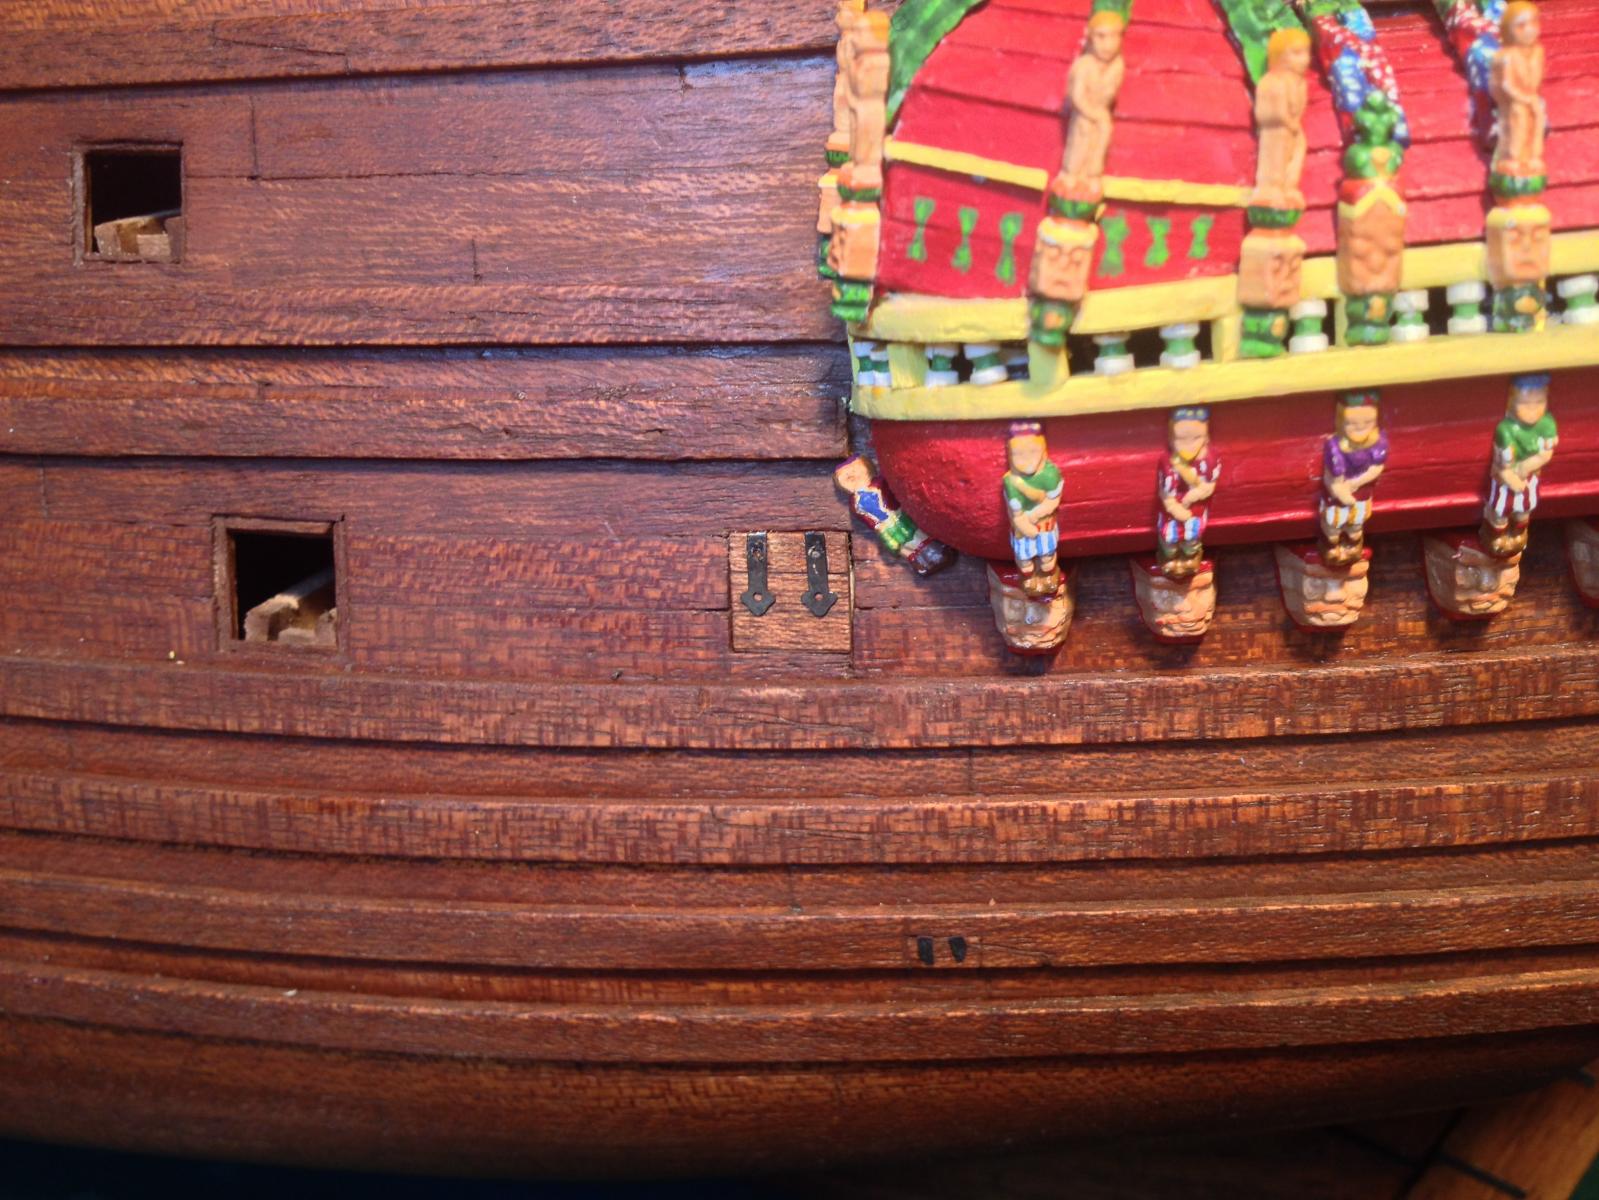
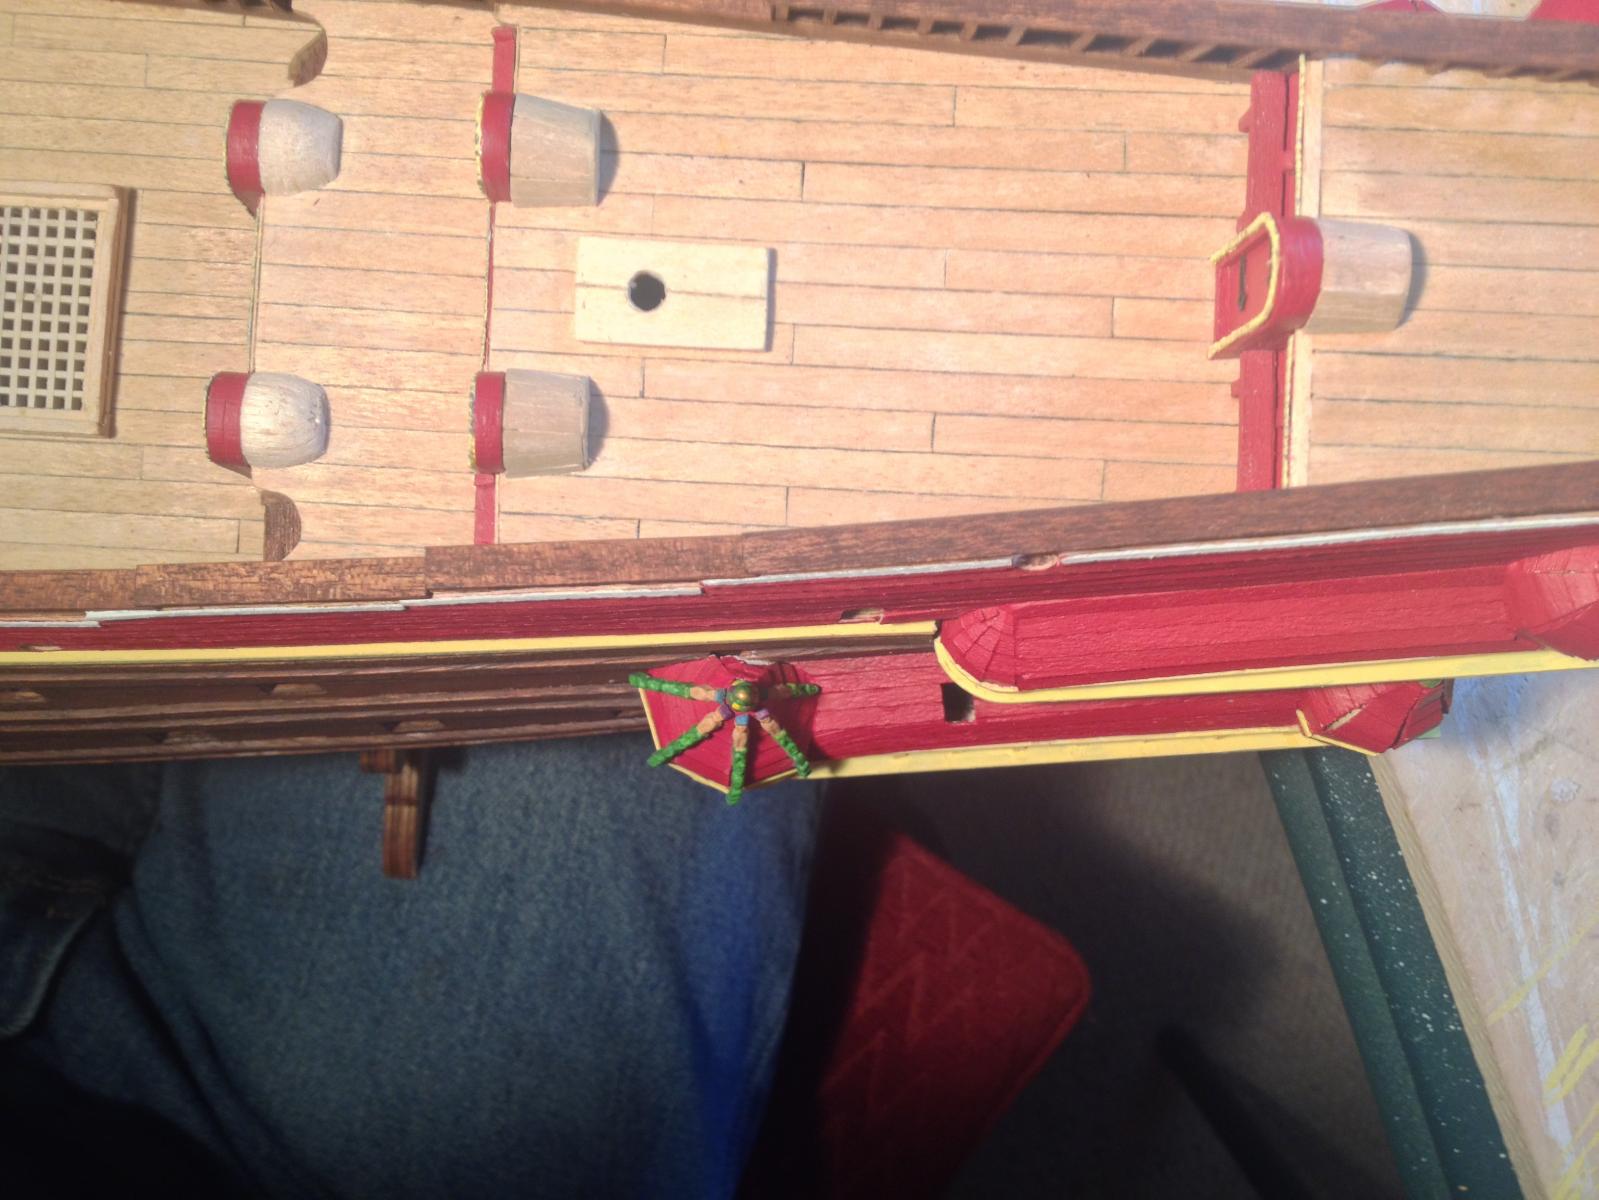
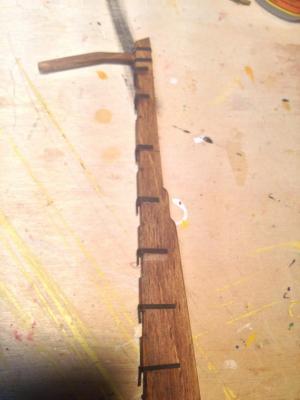
Port lid and hinges for the rearmost port. I understand from Fred Hocker that the rearmost port was actually known to be open with a cannon in place, but I didn't get that information until I had closed up the hull, so my port follows the 1:10 model. The hinges are from Amati - the kit doesn't provide any. I blackened them chemically. The rope for opening the port will go on at the very end of the build. You can also see the small message port. I didn't trust myself to cut an opening and make a lid for it, since it is very small and crosses one of the wales. So I contented myself with scribing an outline and putting some small paper hinges on it. I don't like the effect, so I'm trying to figure out how to improve it.

- 249 replies
-
- 5
-
-
- billing boats
- vasa
- (and 1 more)
-
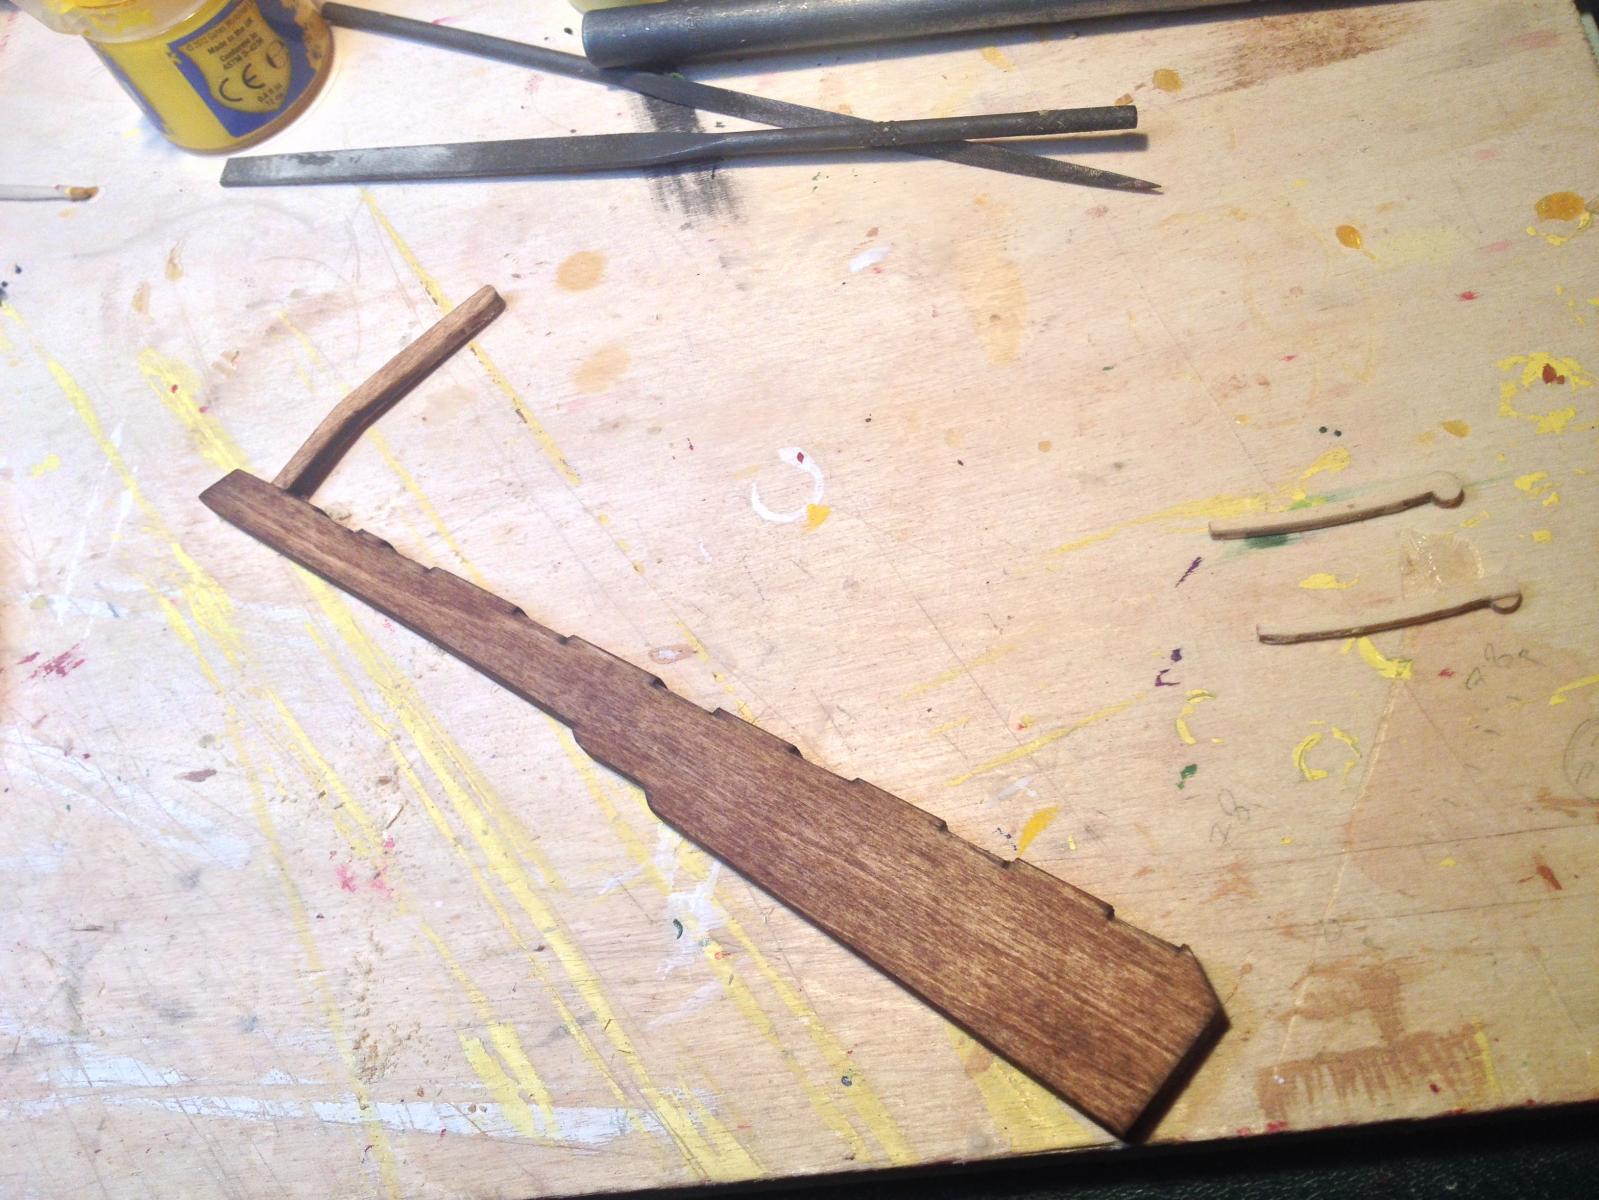
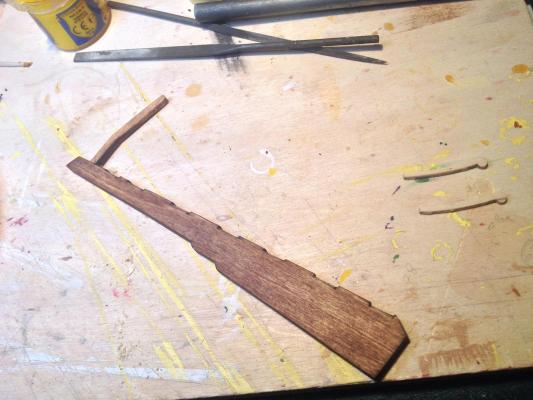
I decided to deal with the rudder now, rather than at the end of the build, because I want to finish the stern completely and see how it looks. This may be a bad idea since the pintles and gudgeons will be fragile. The plans for the rudder are not very detailed; fortunately there are lots of pictures of the real model and Matti's build to steal from :-) To begin with, there are no cutouts for the hinge pins, so I made those and attached the tiller stub: I then added the pintles and hinge pins. The kit provides some thick plastic pieces that wrap around the end of the rudder, but there are only 6 instead of 7, and they also look over-scale, so I didn't use them. I had success with my first model using construction paper painted black, so I tried that here. The hinge pins are planking nails with the heads cut off: And finally the rudder in place. The gudgeons are also black paper. I used wood glue to attach the paper hinges to the hull and the rudder, and sealed them with flat acrylic medium. The result is pretty fragile - the only points of attachments are at the hinge pins - so we'll see how it holds up. The plans don't show the tie rope, but various sources have it in their drawings, so I added it. I assume it's to keep the rudder from falling off accidentally. The sources I looked at don't show rudder chains; the portals on either side are for tow ropes. You can also see the lion sculpture in place. Only the head is gold - the rest is dull ochre. I don't think King Gustav would have approved of lots gold leaf down near the waterline where it wouldn't be highly visible...

- 249 replies
-
- 5
-
-
- billing boats
- vasa
- (and 1 more)
-
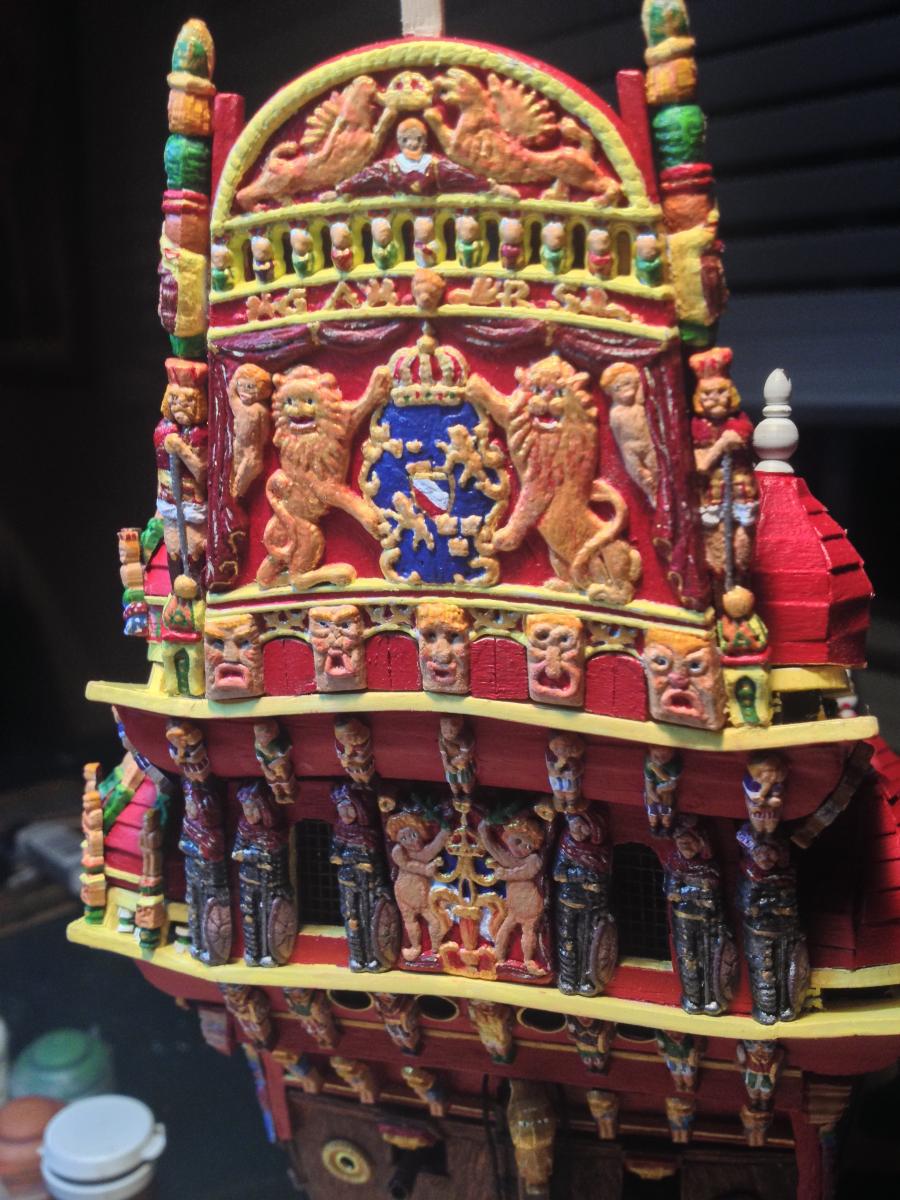
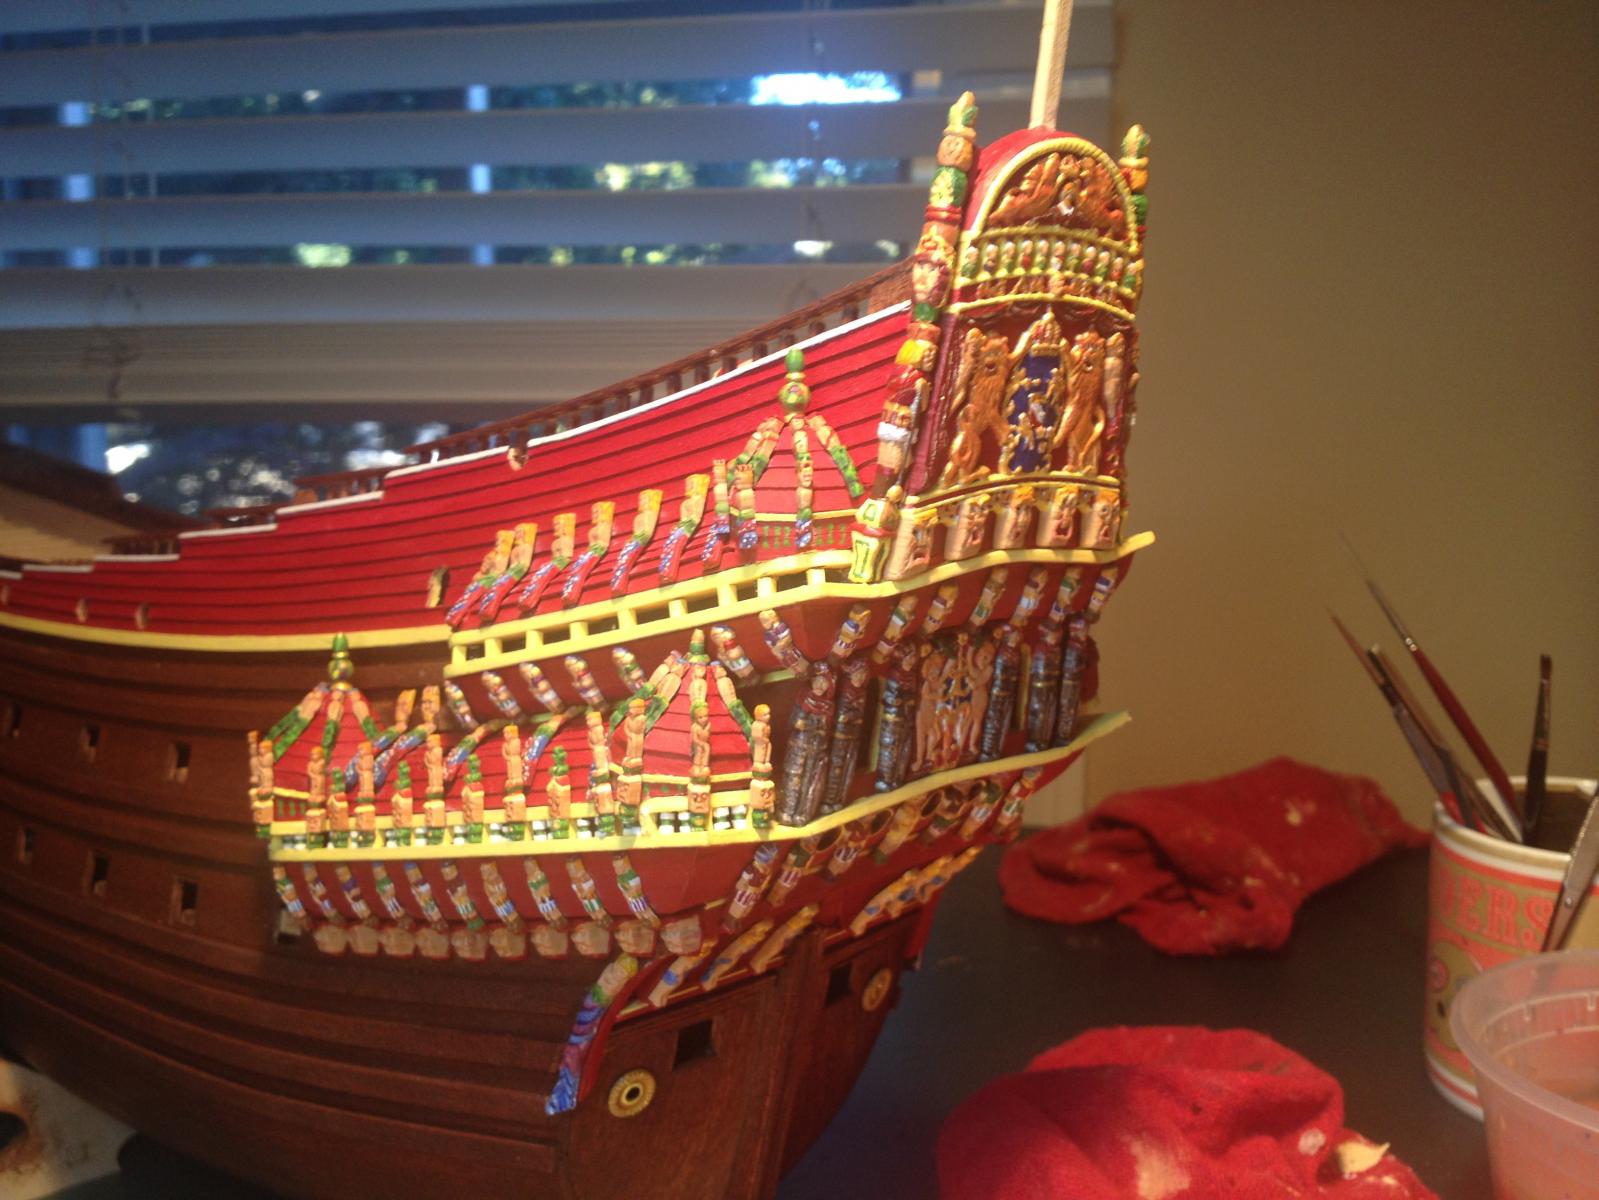
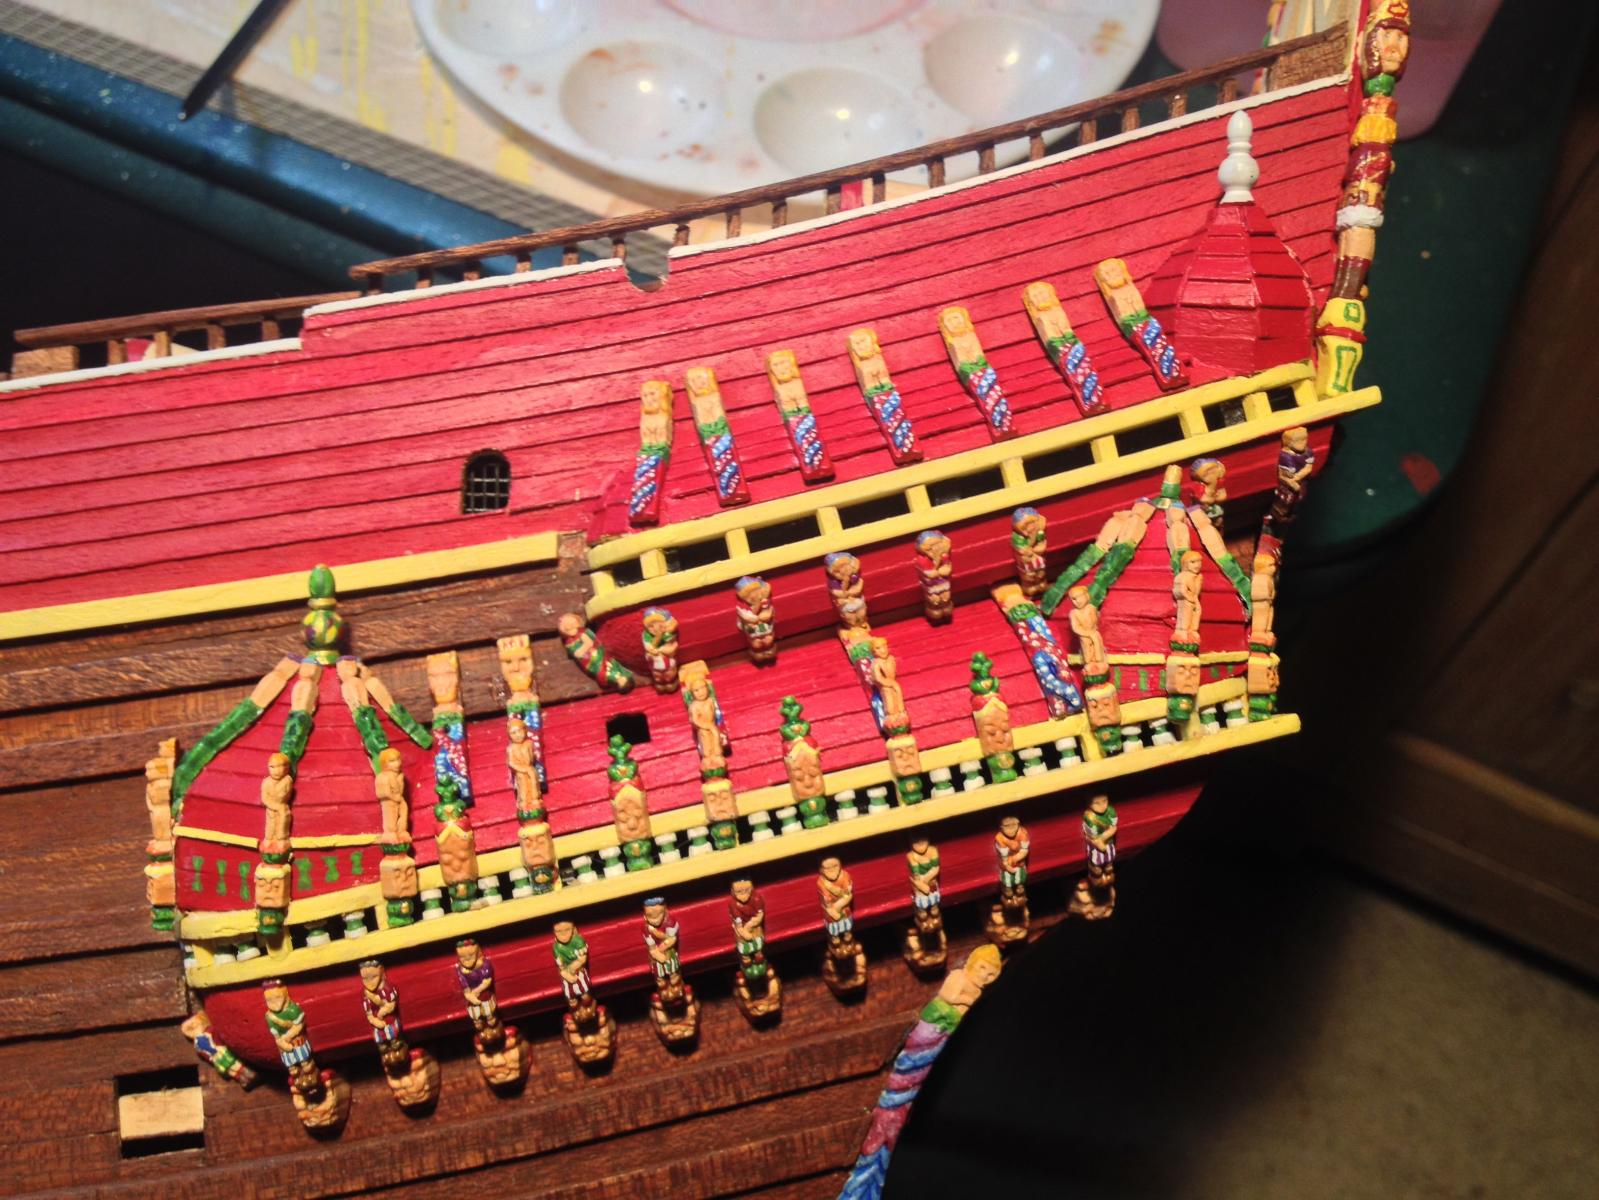
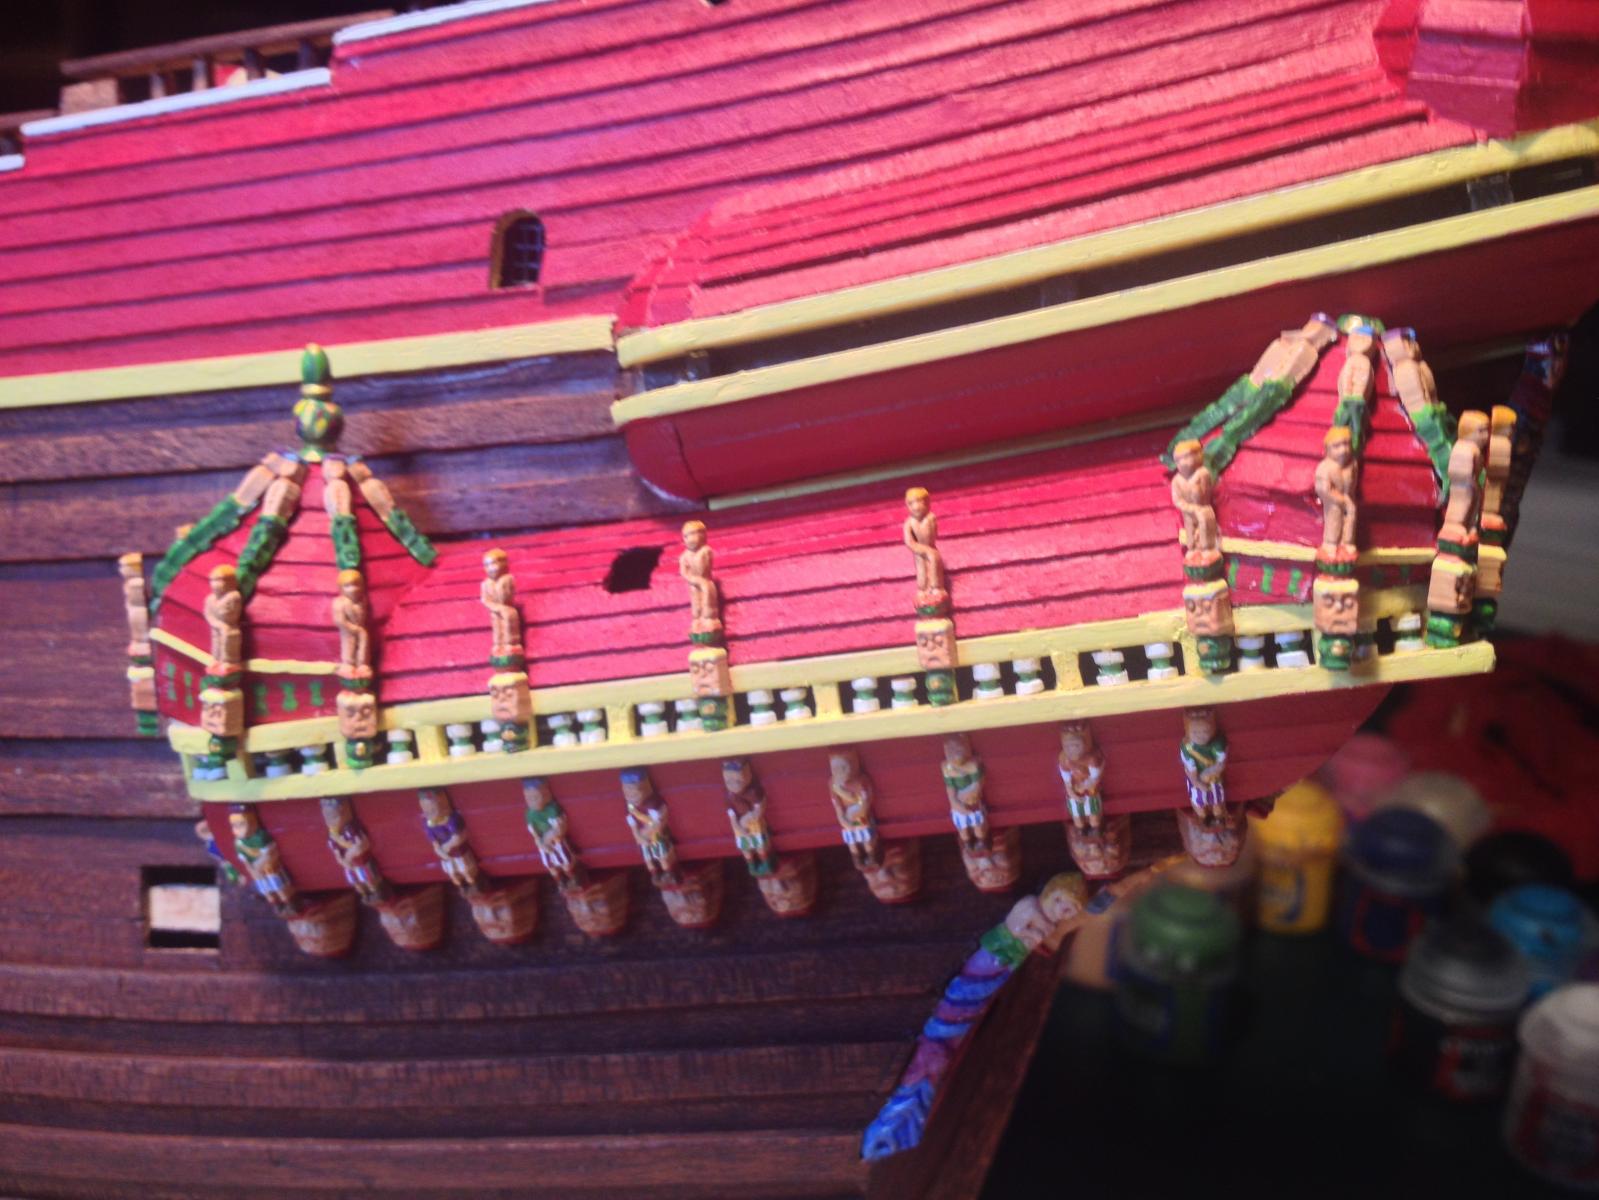
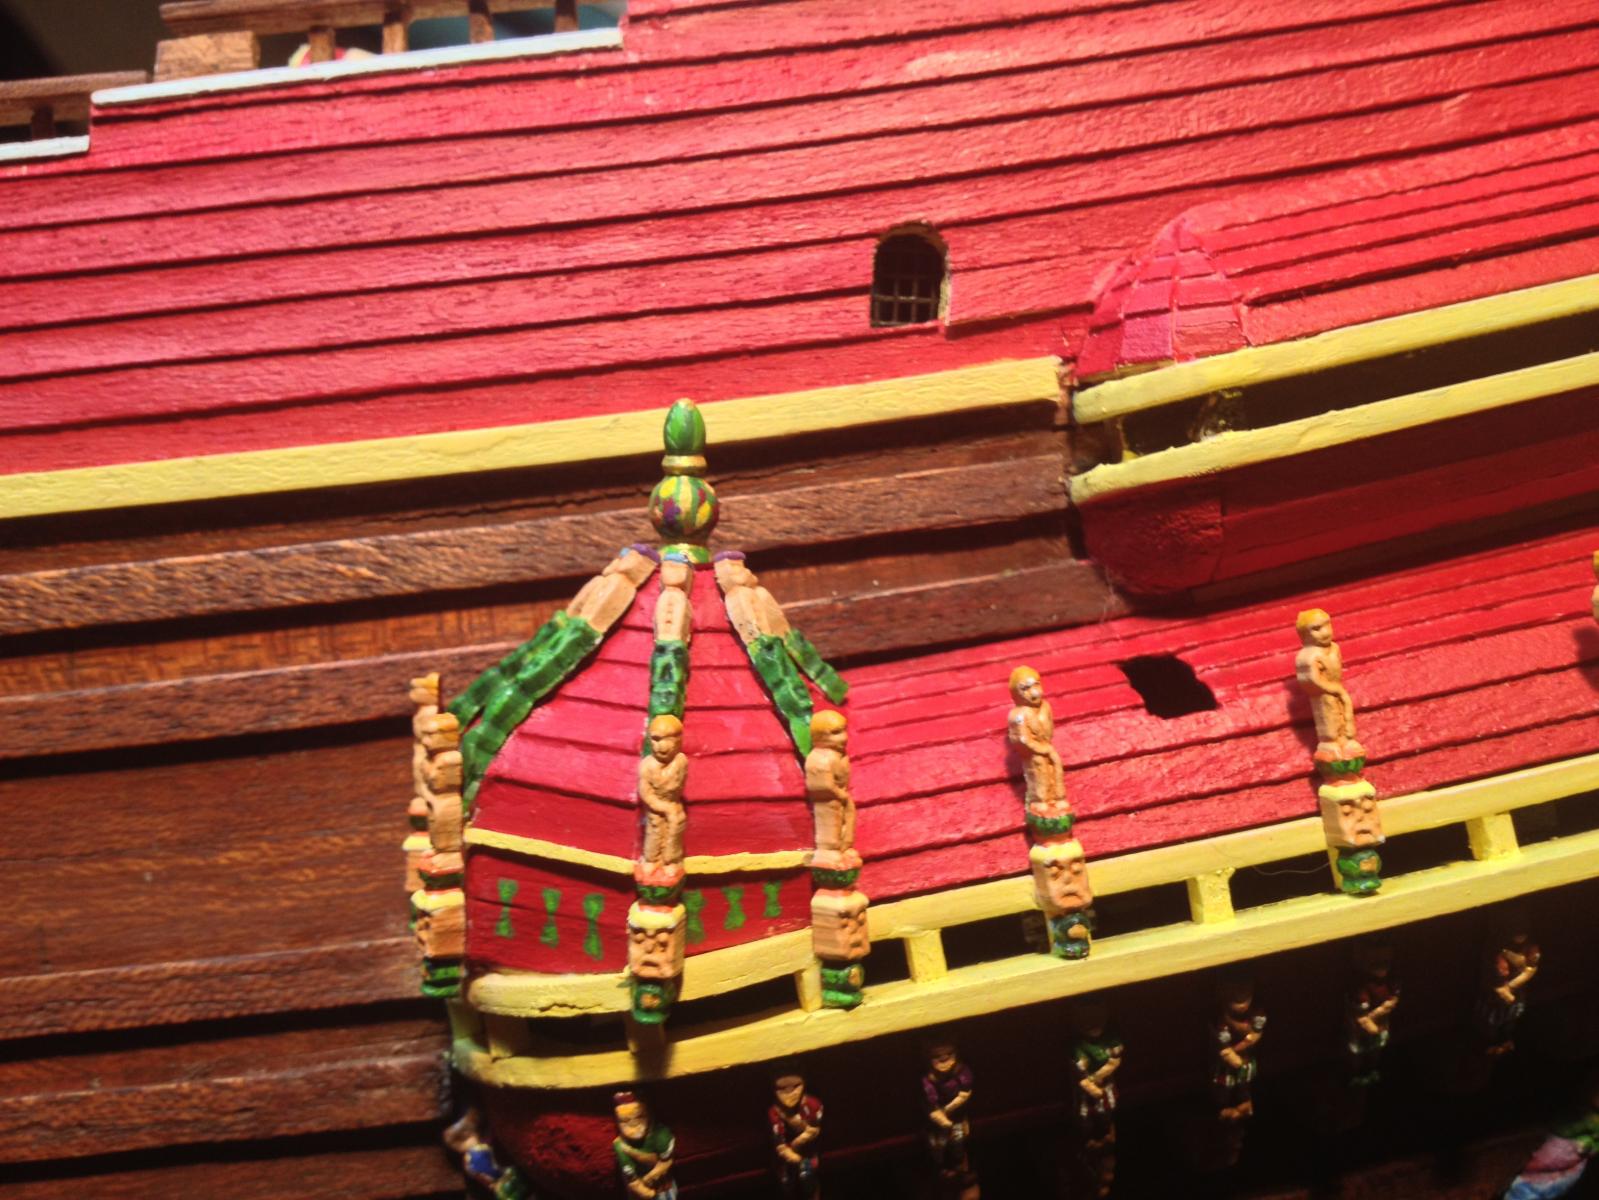
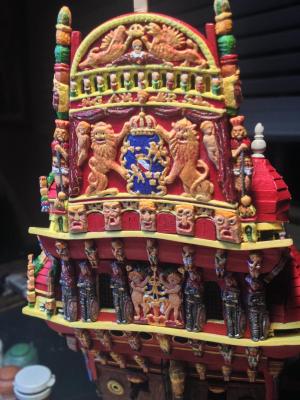
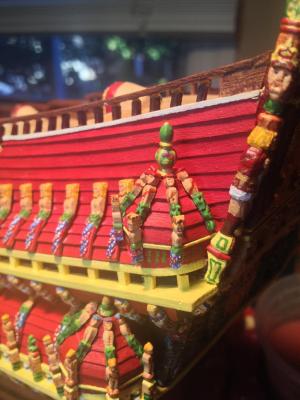
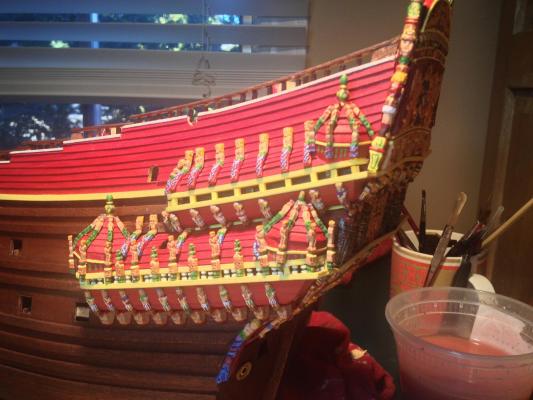
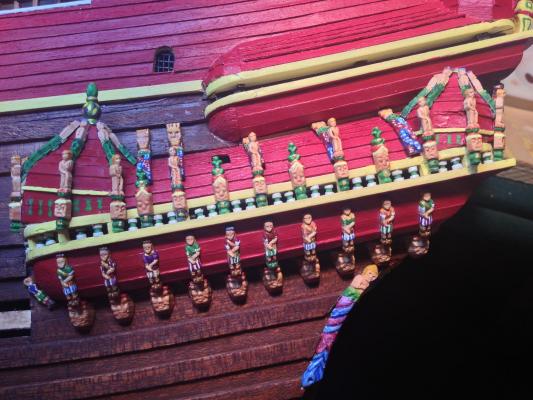
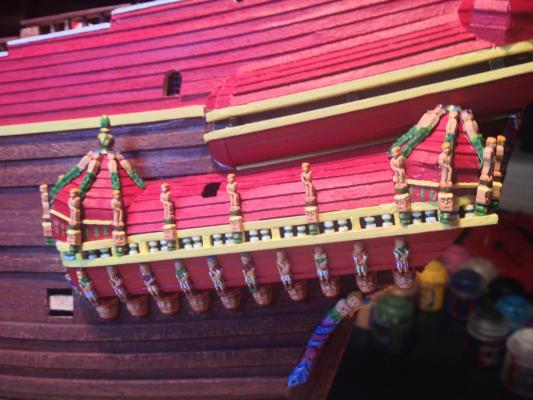
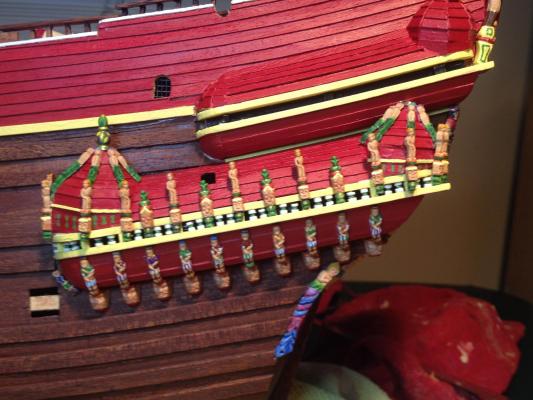
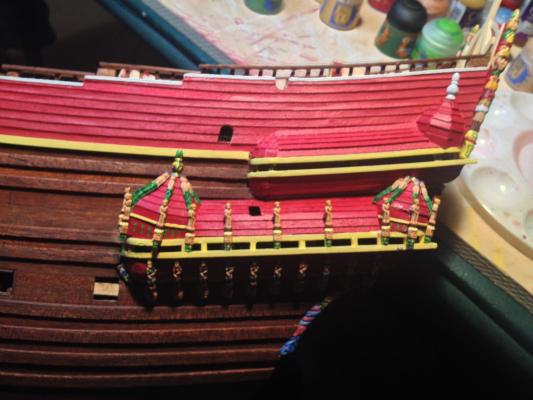
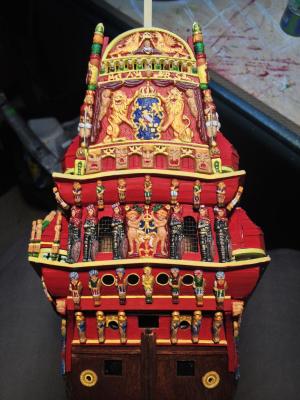
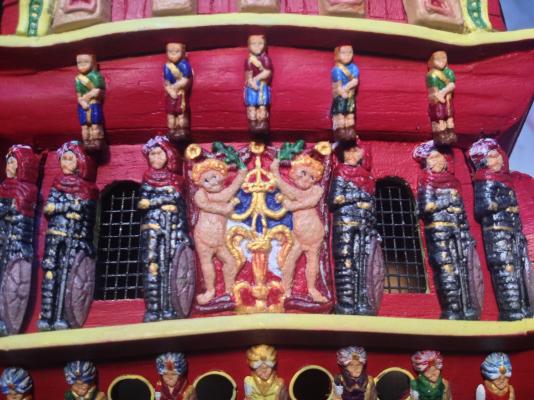
And now I've added the tritons on the rear tower of the upper gallery, and finished one side of the stern (except for the balusters - still waiting for my drawplate to show up). And there was much rejoicing. I really enjoy painting the figures, but it's also a huge amount of work. And the finished galleries together. If I counted right, each pair of galleries has 74 sculptures. Just for comparison's sake, here's the completely unadorned other side: And finally, this is what the stern of the ship looks like so far. Nothing exceeds like excess! I still need to tweak some things, but it's by and large the way I want it. I think at this point I'll take a break from painting and finish up some structural stuff on the outside of the hull - the rudder, message port, rearmost gun port lid, scuppers, etc.

- 249 replies
-
- 5
-
-
- billing boats
- vasa
- (and 1 more)
-
Are you using the kit-supplied thread or buying from scale rope suppliers? I haven't really looked at the kit-supplied stuff yet, but the first model I built had thread that was way out of scale and I needed to replace it to get it to look right. mark
-
Hola Karl - I thought about that after reading your build log, but I didn't want to risk messing up the iron and getting in trouble :-) mark
- 249 replies
-
- 1
-
-
- billing boats
- vasa
- (and 1 more)
-
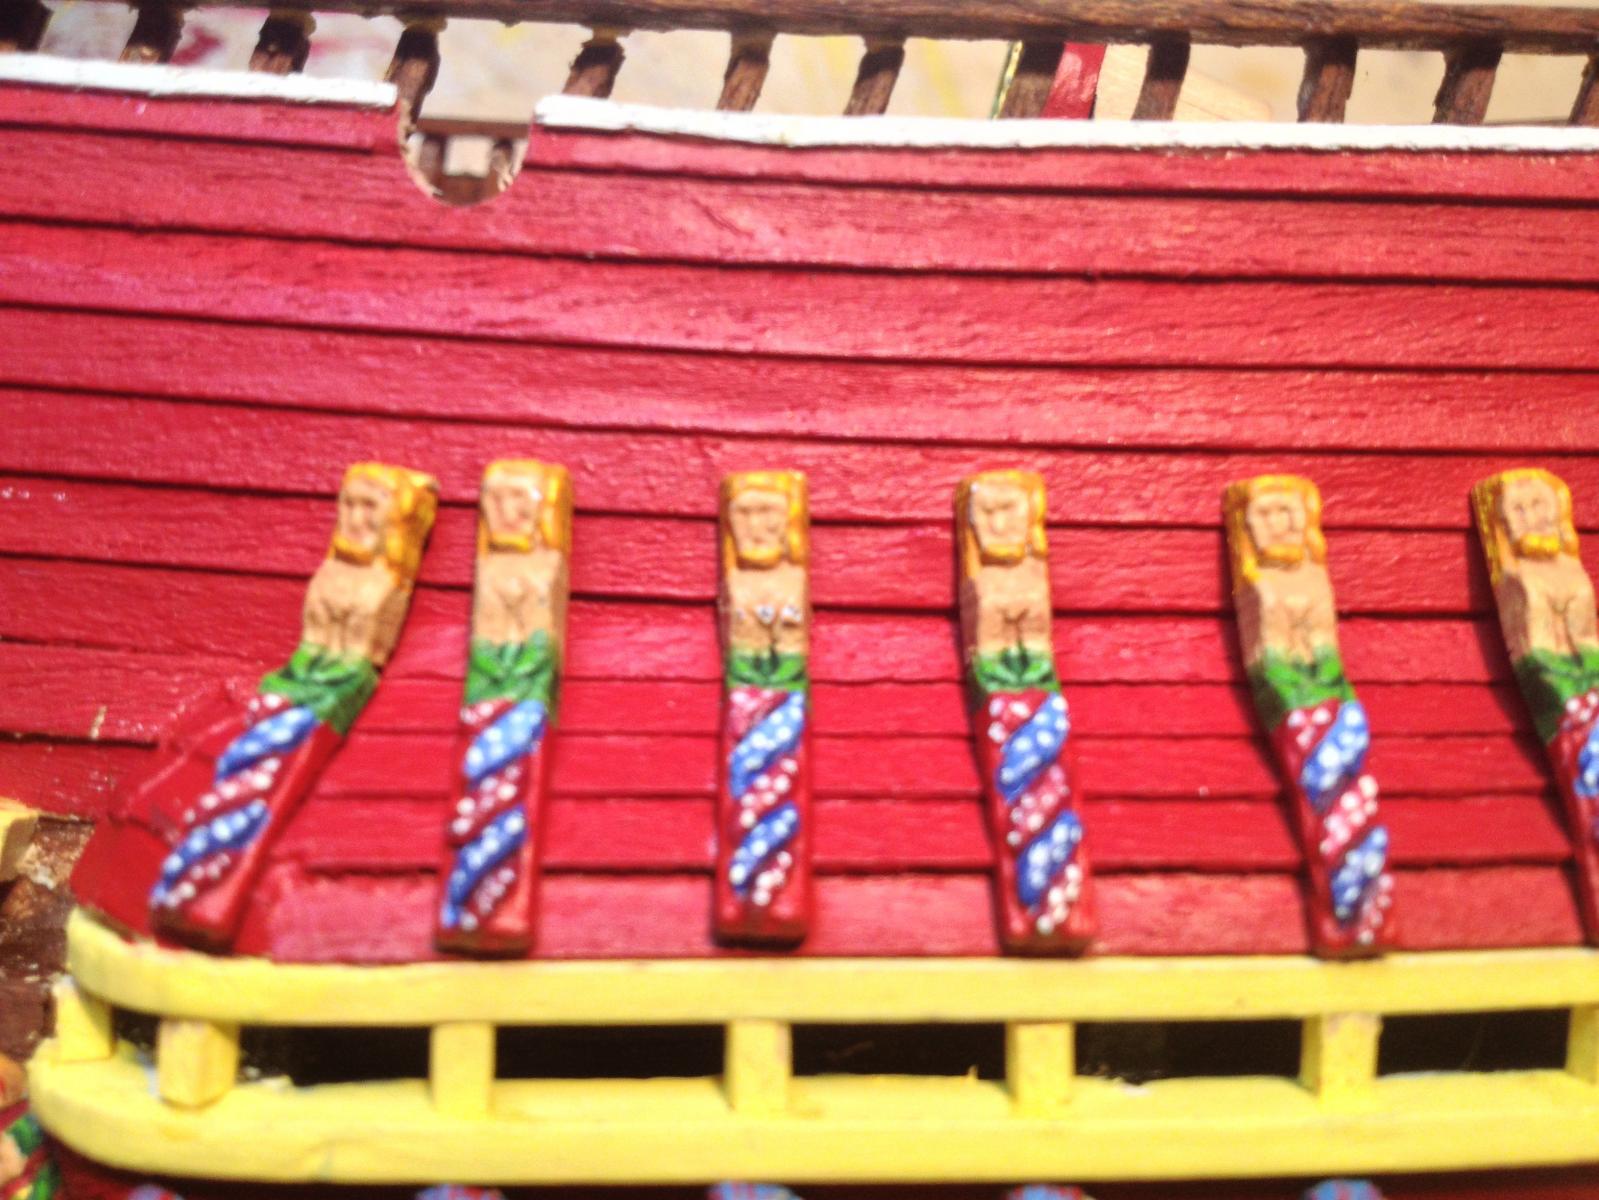
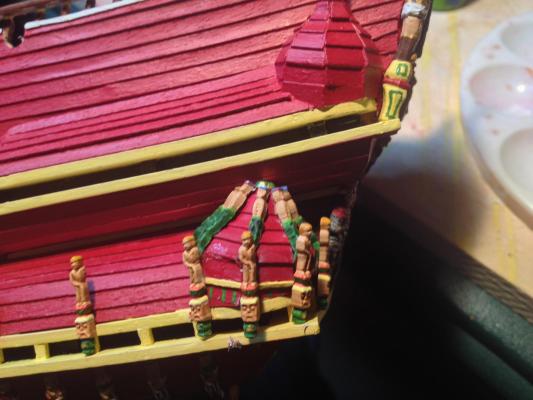
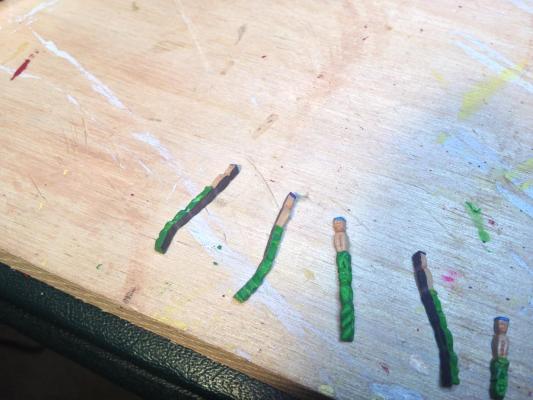
Here are the upper gallery tritons. Again, they had to be thinned about 50% in order to bend without cracking. I did break one, but some CA glue fixed it nicely, another good thing about plastic figures. I also added balusters in the gap between the roof and the lower part of the gallery. The real ship has small faces here, but I had to make do with square pieces of wood. I will fill in the gaps between the balusters with very thin turnings and try to paint some detail on them. Here you can see the full upper gallery, with the lower Gideon sculptures, still looking a bit like Greedo from Star Wars. The lower figures were particularly difficult to bend to shape, since they are short and thick. Even with thinning, they had a bad tendency to crack. And finally, the full effect. I still need to do the tritons on the tower roof, and the thin balusters. The latter will have to wait until a drawplate that I've ordered arrives.


- 249 replies
-
- 2
-
-
- billing boats
- vasa
- (and 1 more)
-
I'm not a quick builder - I'm catching up posting stuff that I did a few weeks ago. I'm almost done with the backlog, then it'll slow down. mark
- 249 replies
-
- 1
-
-
- billing boats
- vasa
- (and 1 more)
-
Beautiful rigging work. If you stick with clove hitches for the ratlines, you should be able to avoid twisting - it's a little more challenging to avoid twisting if you use half hitches. On my first model I had good success with the water/white glue mix mentioned above, plus pushing down slightly on the centers of the lines with a toothpick until they "set", to give a hanging appearance. I think you'll find CA way too blunt an instrument for this stuff. mark
-
Matti - it's almost like the towers in your photo above aren't actually level with the waterline, but tilt forward somewhat, making the angle between them and the gallery less extreme. And the vertical sculptures along the galleries are perpendicular to the waterline, not the gallery, which seems to look OK because the sculptures on the bottom of the gallery seem to be tilted somewhat as well. All in all very complex. I'm leaving mine alone and backing away slowly. Here are some photos of the large tritons on the roof of the lower gallery. Again, the kit sculptures are not bad. They are flat and rectangular, with the detail of the triton's face, body, and tail raised above the base. If you paint the base red to match the gallery roof, it looks pretty decent. I really liked the effect of fish scales that the painters of the 1:10 model achieved, but it's very difficult to do on a small figure, so it ended up looking a little more spotted than I would like. Thinning the sculptures is critical because of the bends required, and the neck line had a bad tendency to want to crack . Luckily the hot water strategy seems to be working well. The bases of the middle sculptures needed to be shortened to fit properly. And the finished lower gallery. I'm pleased with how it turned out - lots of sculptures, all needing alignment with one another to look right. I still need to go over them a couple of more times and fix little details once I get to look at the finished result for a bit. And on to the upper gallery, which thankfully has fewer sculptures.

- 249 replies
-
- 2
-
-
- billing boats
- vasa
- (and 1 more)
-
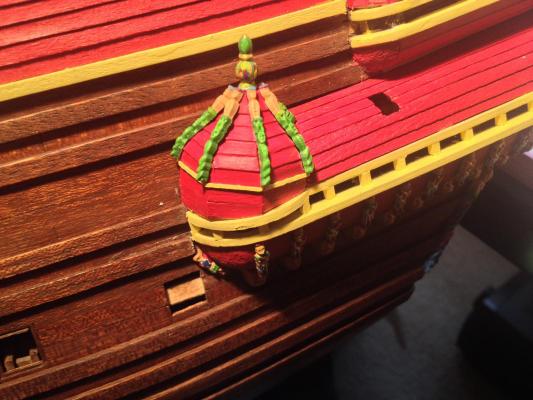
I tried an experiment here. On the real ship, the lower gallery is marked by alternating cornices and taller sculptures of men playing instruments. In between these sculptures are narrow balusters, painted in green and white on the 1:10 model. The kit models them as unadorned square sections of wood; I thought I'd try something different. I found a bunch of turned toothpicks, cut them up, painted them, and installed them between the sculptures. I'm not sure I like the effect, but I'm going to give it some time. I think they may be slightly too large, and I may end up replacing them with narrower-diameter balusters, even if painting detail on them will be difficult. Certainly the ones on the upper gallery need to be narrower. Here I've added the smaller cornices. They are of course somewhat different from the real ship - larger, I think - but they look OK. I've also added some detail around the base of the towers. The front tower is supposed to have an ornate gun port at the front, but the kit doesn't provide anything and I have so far avoided getting into the custom carving business. You can also see here that the rear tower is missing its finial. I had to chop it way down to get it to fit under the upper gallery. It was either that or cant the entire tower outward, which looked odd. I'm in the middle of looking around for something small and finial-like that I can add to the tower without running into the gallery above. Now I just need to add the tritons on the roof of the lower gallery and my first gallery will be complete in all its 50 sculpture glory. Then three more to go...
- 249 replies
-
- 3
-
-
- billing boats
- vasa
- (and 1 more)
-
At its core it's just making stuff. Wood's a great medium because you can shape it very easily, and if you make a mistake you can fix it, or throw it out and do it over. Same with the painting - just repaint it until you like the result. My other hobby is classic cars, and there the mistakes are harder and much more expensive to fix :-). mark
- 249 replies
-
- 1
-
-
- billing boats
- vasa
- (and 1 more)
-
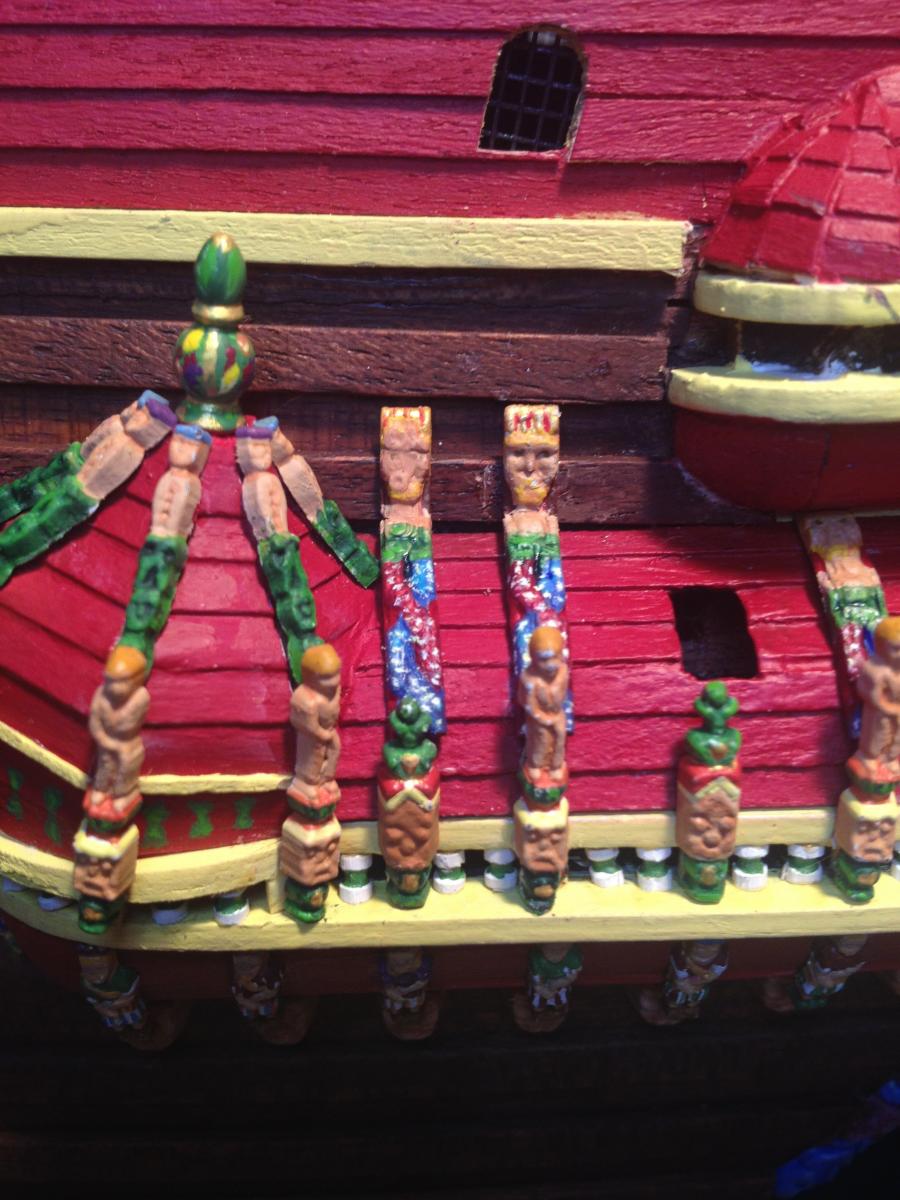
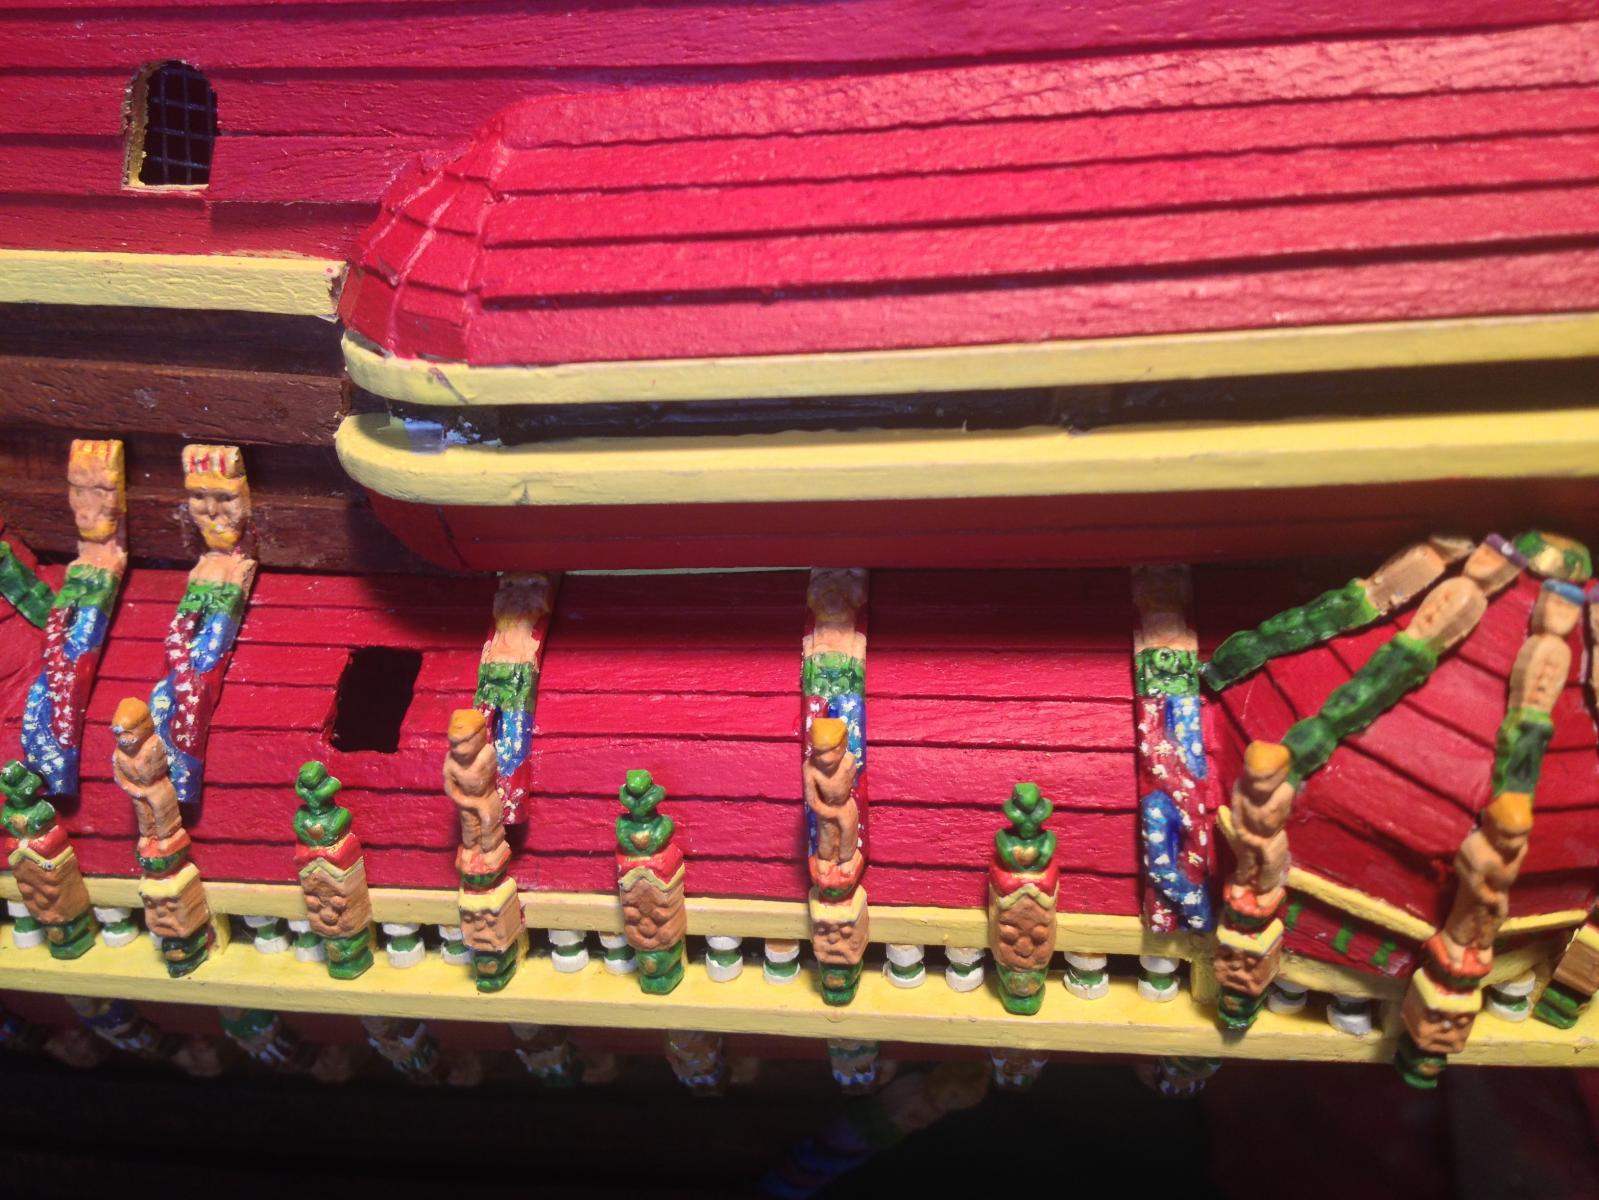
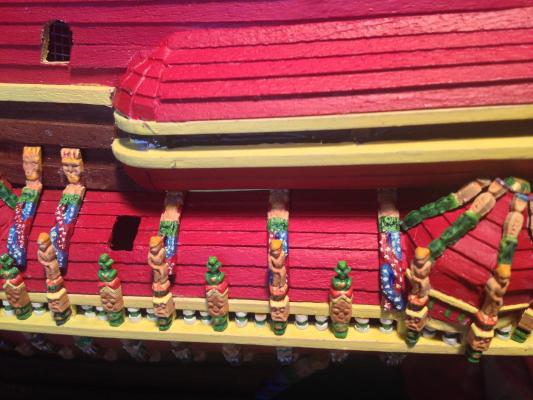
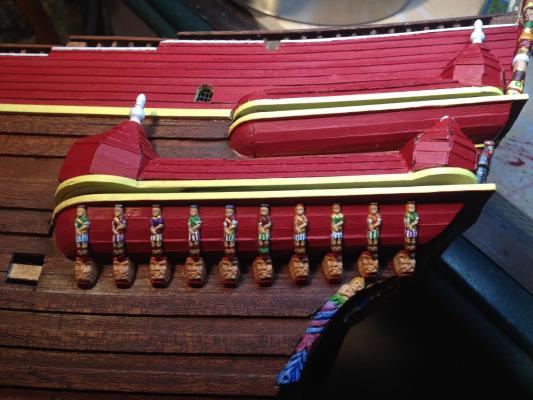
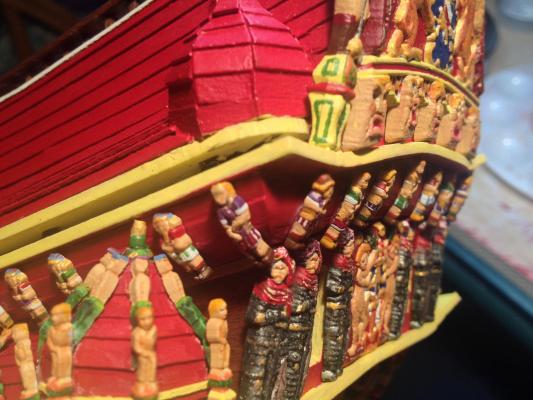
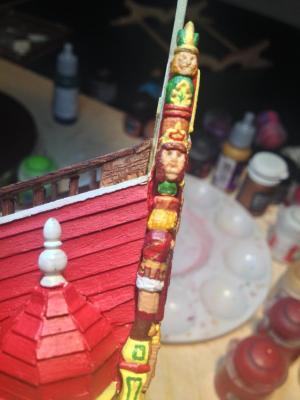
Next up were the vertical statues that run the length of the gallery and around the base of the towers. The kit sculptures are all the same here, whereas the real ship uses different sculptures to surround the base of the towers. The main problem I had here was one of alignment. The gallery slopes and the towers don't, so the sculptures around the tower don't align at their bases because the gallery drops away and in order to keep the tops level, the bottoms can't be level with the line of the gallery. All in all making me wonder whether I got the gallery framing wrong somehow, since it all looks quite nice on the real ship and the 1:10 model. Notice here that the small tritons on the towers cover the gaps in my shingling rather nicely. I'm quite pleased with how the tower shingling came out given all the curves and reshaping involved. Another alignment problem: the sculptures around the tower base need to be vertical, so I needed to decide whether the sculptures along the gallery would be vertical as well. I tried it and they looked a little odd, not aligning well with the sculptures at the bottom of the gallery or with the balusters between the upper and lower parts of the gallery. So I installed them perpendicular to the gallery, which meant they didn't line up quite right with the ones on the tower bases. Next up are the smaller cornices between the standing sculptures. I also need to go back and clean up the painting a little, adding darker washes on the figures. I may also dress some of them, since the painting on the 1:10 model has some of the figures naked, and others wearing loincloths.

- 249 replies
-
- 5
-
-
- billing boats
- vasa
- (and 1 more)
-
Here's where the serious sculpture bending began. I followed Matti's advice and thinned the pieces down about 50% to get them into scale and make them more pliable. A dunk for a few minutes in near-boiling water and they softened nicely. I then bent them into shape (slightly different bends for each one), and painted them. The sculptures are small enough that there isn't much detail on them. Here's a top view of the installed sculptures - you can see how they make 5 parts of an octagon, which came out nicely. And a view from the side. I tried to put some detail on the finial - the 1:10 has various pieces of fruit in relief around the main part, so I did some small splotches of color and highlights here and there. Next I need to slice the tails of the sculptures vertical to match the vertical sides of the towers, since additional sculptures will attach there.
- 249 replies
-
- 3
-
-
- billing boats
- vasa
- (and 1 more)
-
The only info I have is similar to yours - the ropes were for towing. I may set them up as rudder ropes anyway, just because it'll look nice. The rings on the womens' heads are just odd. If I knew what they were supposed to be then I could do something with them, but now they just look jarring. If I can chop them off and get the rest to look OK I will. mark
-
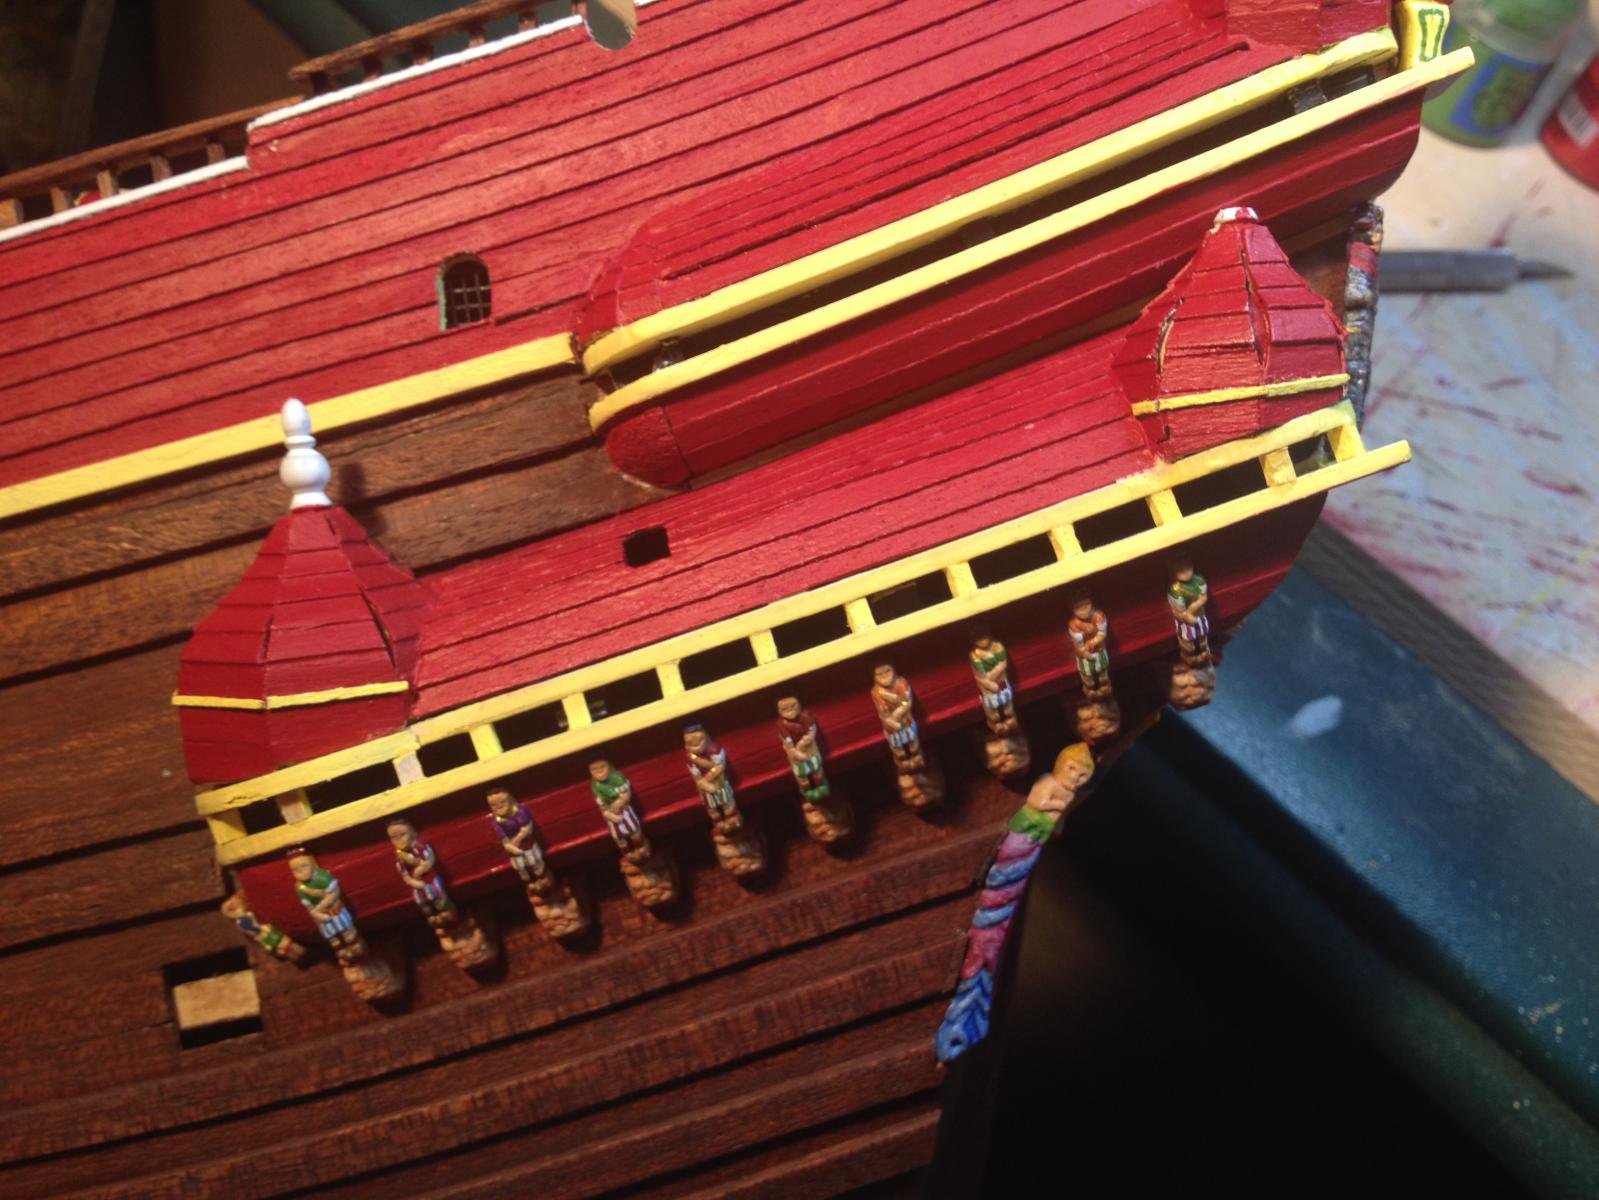
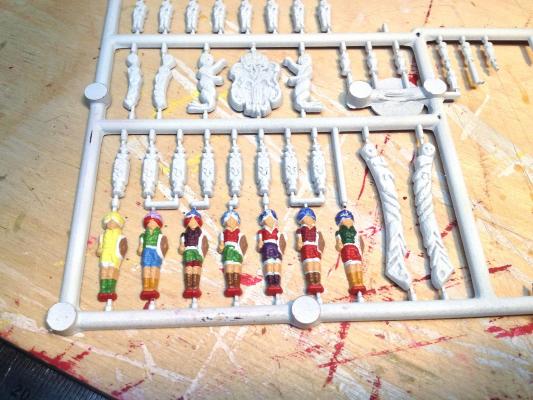
Time to start encrusting the quarter galleries with sculptures. I started with the bottom row of faces, and added the warriors above. The spacing's important, since it needs to match the sculptures that will sit vertically on the sides of the galleries. The kit sculptures are not bad here. The warriors are the same as the Gideon sculptures on the stern and the small Roman emperors on the beak, but reasonably close to what's on the real ship. The faces are different from the ship (and all the faces on the real ship are themselves different from one another). Here's a view of the finished and mounted figures, as well as the curved herm at the rear of the hull. That was another case of having to think ahead - the curve of the hull needs to match the curve of the sculpture, so I test fit the whole thing while I was doing the hull. Next up were the small tritons on the lower towers - I made some molding to better define the boundary between the roof of the tower and the sides. I'm still not sure I got the galleries quite right, but it's way too late to change them. It's possible the rake of the galleries is too pronounced, making the difference between the angle of the towers (horizontal) and the gallery (tilted) too great. We'll see whether covering the galleries with sculptures minimizes the difference.

- 249 replies
-
- 3
-
-
- billing boats
- vasa
- (and 1 more)
-
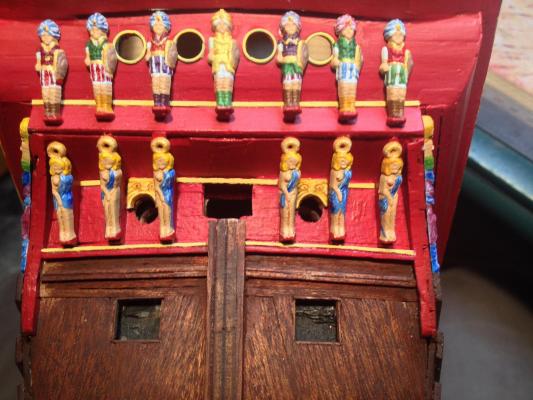
And now for the final set of sculptures on the stern, on the buttresses that support the great cabin rear gallery. It's hard for me to tell what these are supposed to be on the real ship - they look like a strange kind of elongated herm maybe. The kit sculptures are women with circles (halos?) on their heads. These are the first sculptures I painted that obviously needed bending, a task I approached with a healthy dose of fear. Luckily it worked out fine. There are many different suggestions for bending out there - Karl's of using a clothes iron, Matti's of using a soldering iron, etc. I tried the soldering iron approach on a test piece of plastic and I couldn't get a good feel for it. I thought about using a clothes iron but was worried I'd leave residue on it and get in trouble. So in the end I chose very hot water, which I'm happy to say works great. Thank goodness these sculptures are plastic. They require thinning to bend without cracking (and even then I got some cracks), but once you do that, just dunk them in near boiling water for a few minutes and they become nicely pliable. Here's a photo of the installed sculptures. I'm not sure I like the circles on their heads so I may end up chopping them off. It depends also on whether the resulting height of the sculptures will be so different from the height of the buttresses that it would look odd. At the same time I enlarged the lower gun ports and installed the sculptures above them. The sculptures include a complete circle around the port, which I chopped off, first because the result was too wide, and second because as far as I can tell the original ship's was just a sculpture on the top. And finally a view of the finished stern area. It's from later in the build, so you can see some of the gallery sculptures too.
- 249 replies
-
- 4
-
-
- billing boats
- vasa
- (and 1 more)
-
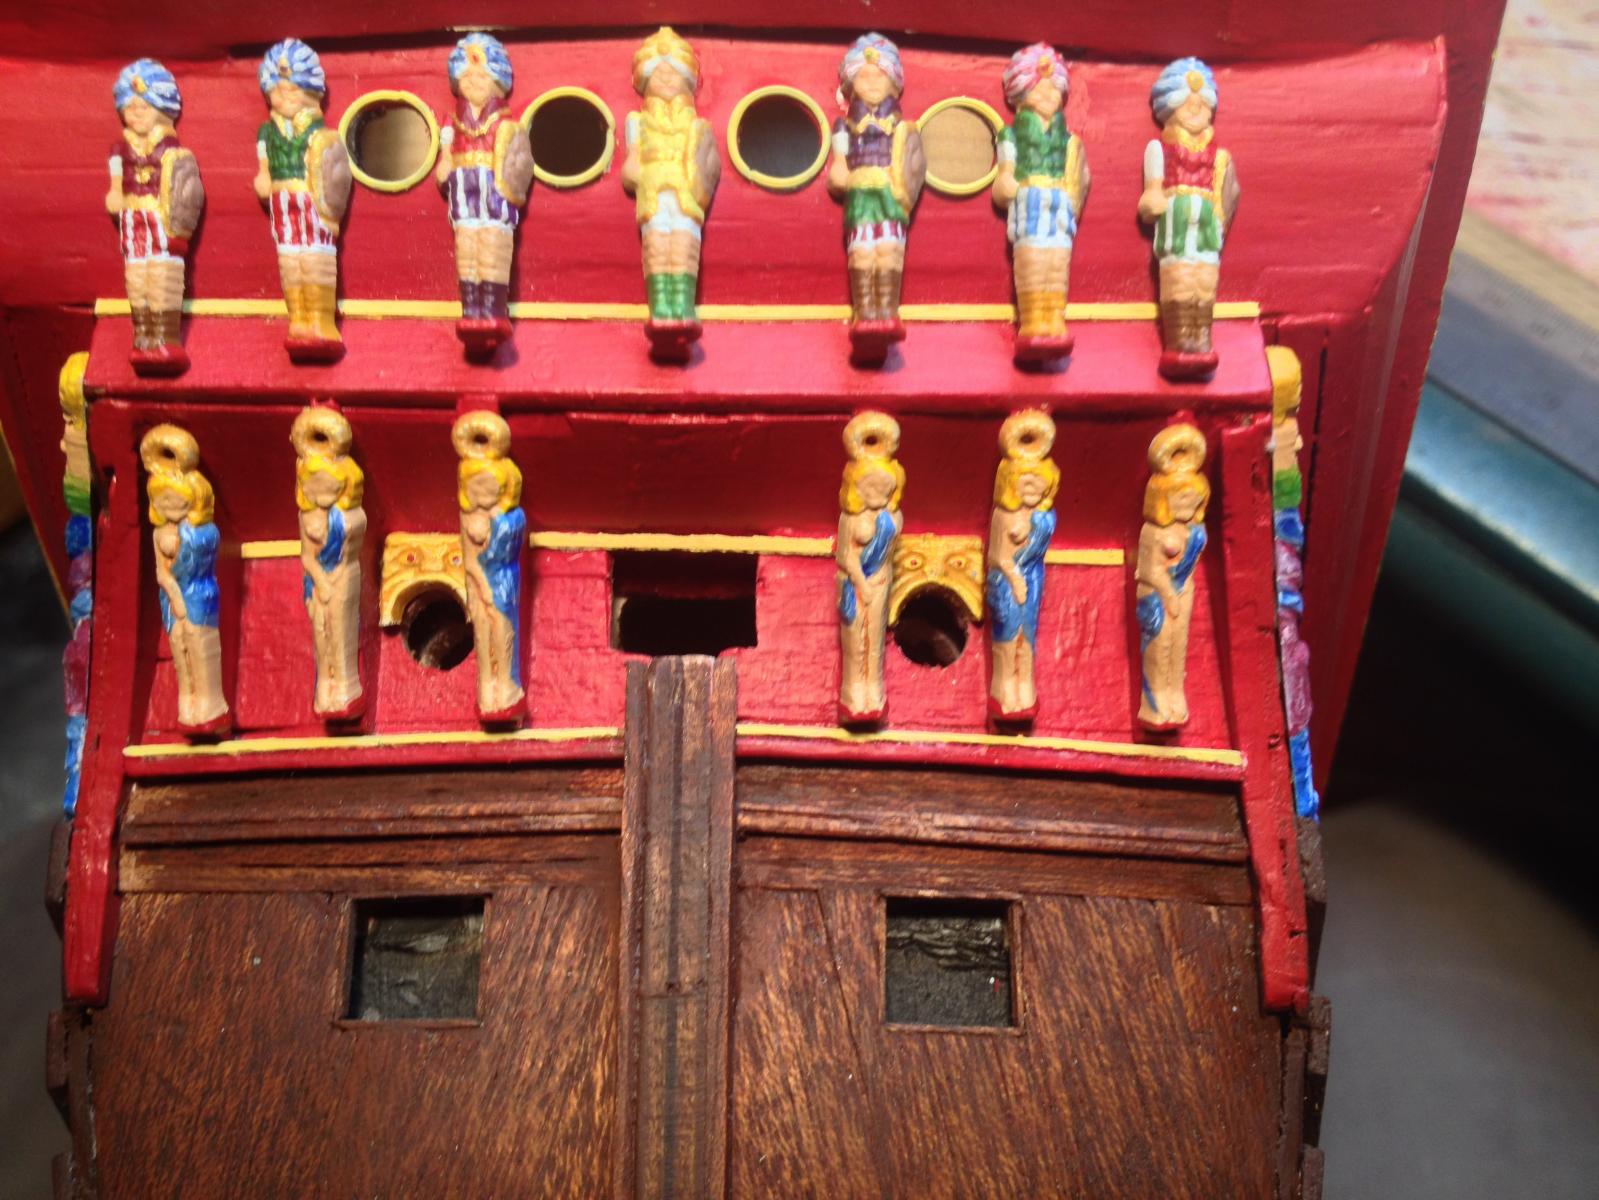
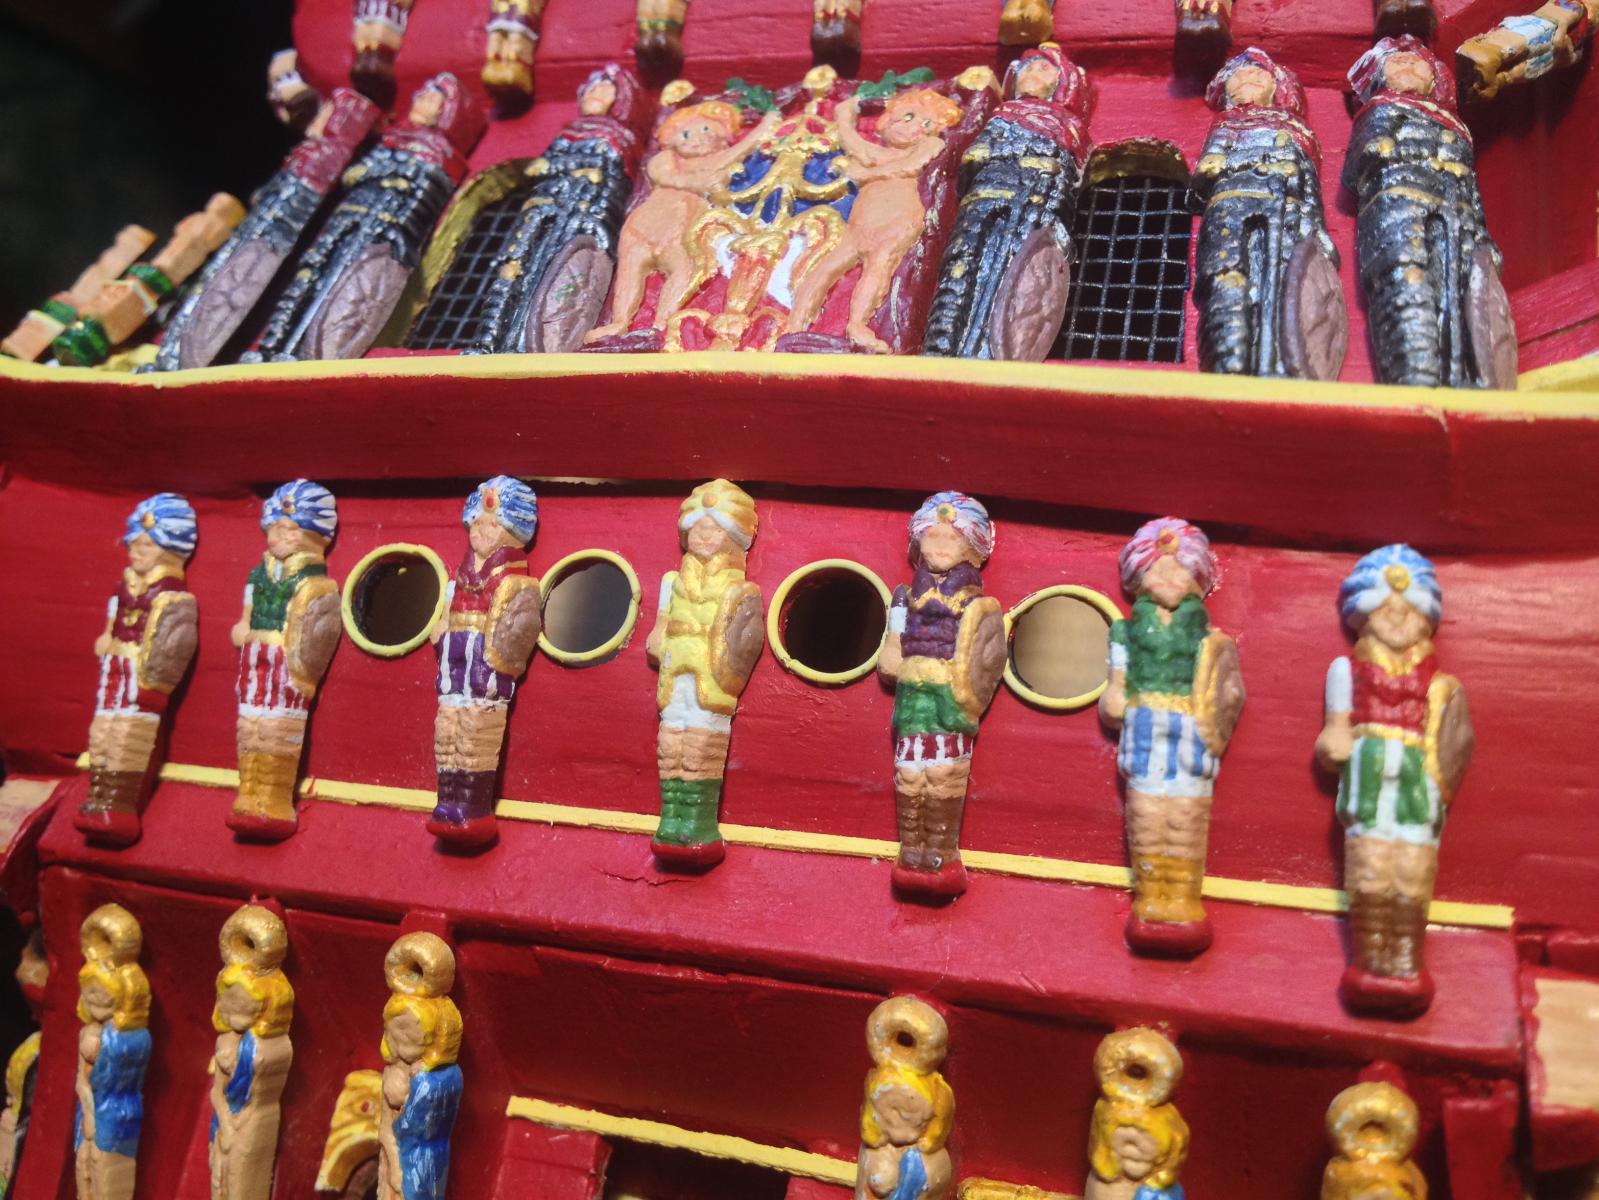
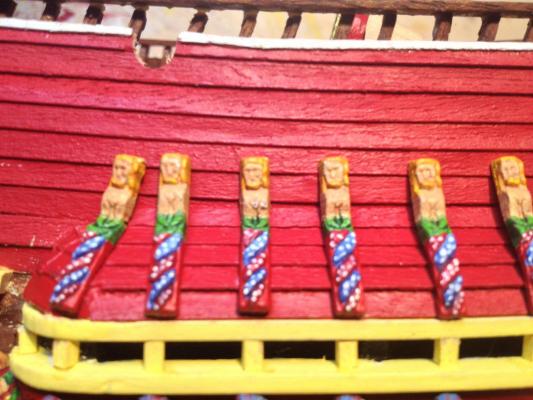
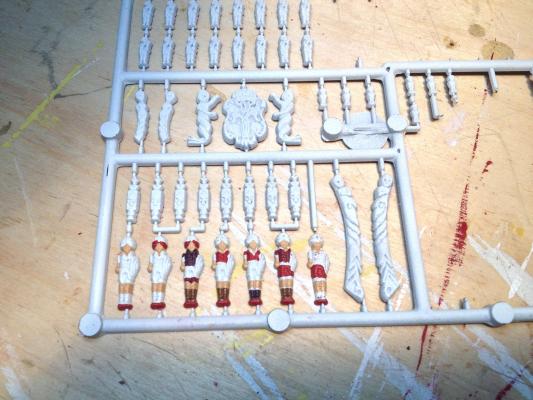
Next up was King David and his merry band of warriors. The kit provided sculptures are pretty good here - the only major differences are that David has no harp, and the sculptures all have turbans instead of feathered caps. I couldn't tell whether the figures were supposed to be bent or not, so initially I made a set of mounting plinths so the figures could lie straight without gaps underneath them: Here's a picture of the figures on their sprues - I find it easier to paint them that way, then detach them and paint the attachment points separately after filing them down. And here they are mounted to their plinths. I wanted to leave them there for a while and see how I liked the straight look versus curved look. Once I got more comfortable bending figures later in the build, I decided to go back and remove most of the plinths, leaving only the ones on the ends flat because the available height didn't lend itself to bending. I then bent the figures and re-mounted them. Here's where I wonder whether the plank below the warriors was indeed supposed to follow the curve above, since it would have kept each sculpture the same distance from that plank. Oh well, too late to change it.


- 249 replies
-
- 4
-
-
- billing boats
- vasa
- (and 1 more)
-
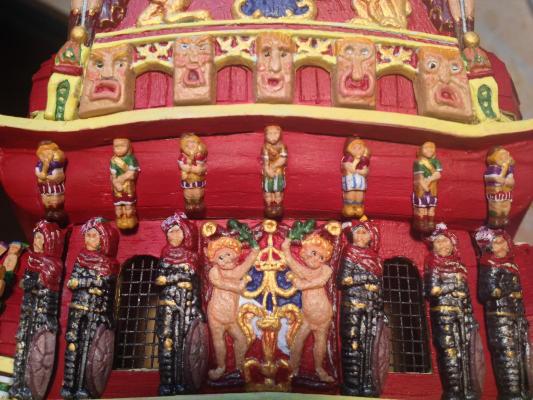
I didn't like the five Gideon warriors between the medieval knights and the transom grotesques. They are the same as the Roman emperors on the beak, and the sculptures on the lower half of the lower quarter gallery, and because they are a bit too tall for the space, I needed to cut off the very tops. I removed them and repainted them with more detail. I discovered that they did a somewhat more accurate job with the sculptures on the lower part of the upper quarter gallery, and on the real ship those are the same as those on the transom. So I ended up intermixing them. The kit provides more quarter gallery sculptures than I could fit nicely - I had two left over - so I decided to alternate them with what was originally on the transom. The quarter gallery sculptures are smaller than the transom ones and fit better, but their detail is worse. I think they are supposed to look like they are blowing some sort of trumpet that wraps around the back and over the shoulder; the effect makes them look enough like Greedo from Star Wars that I had to resist the urge to paint the faces green. Anyway, I did the best I could with them: And a view of the extra sculptures on the corners, again alternating the original transom sculptures with the quarter gallery ones. I think they make the transom area look better connected with the quarter gallery.
- 249 replies
-
- 6
-
-
- billing boats
- vasa
- (and 1 more)
-
Your planking nails look beautiful. I thought about doing the same but couldn't deal with the repetition of installing 3000 of the little guys. I think you're right though - if you use a darker stain you won't see the nails unless you looking very closely. Still, you will know you got the detail right. mark
-
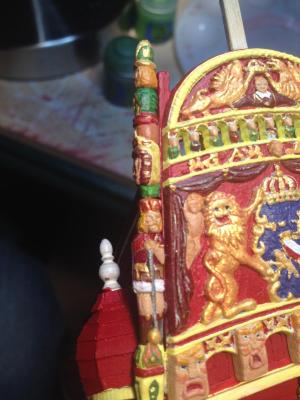
My next project was the posts. They are 3-dimensional, composed of two halves that you glue together. I had already cut away enough of the clinker planking on the sides of the hull that the posts could sit reasonably securely. I also had to scratch some extensions as part of the inside framing of the transom, since the kit doesn't specify them and their transom top isn't quite the right shape. The lower post sculpture is a king and matches reasonably with what's on the real ship. The upper sculpture is completely different from what's on the real ship so I had to invent a color scheme for it. Here's the first cut: As I did with the other sculptures, I let it sit there for a while and figured out what I didn't like about it. Then I added more detail - some highlights here and there, and some outlines. I've found when you have two colors near one another and they are at all similar, you really need a contrasting border between them. That's particularly true for the shade of gold that I use - it tends to blend in with whatever's around it unless you make a clear border - I did that for the kilts on the kings. A side view, where you can see the scratched extension behind the top of the sculpture. Next up were the Gideon warriors between the transom grotesques and the medieval knights.
- 249 replies
-
- 4
-
-
- billing boats
- vasa
- (and 1 more)