MORE HANDBOOKS ARE ON THEIR WAY! We will let you know when they get here.
×


mar3kl
-
Posts
178 -
Joined
-
Last visited
Content Type
Profiles
Forums
Gallery
Events
Everything posted by mar3kl
-
Lovely work. I've been debating whether to hang sails or not, and yours look quite realistic. mark
-
Thanks for the positive comments - keeps me motivated. mark
-
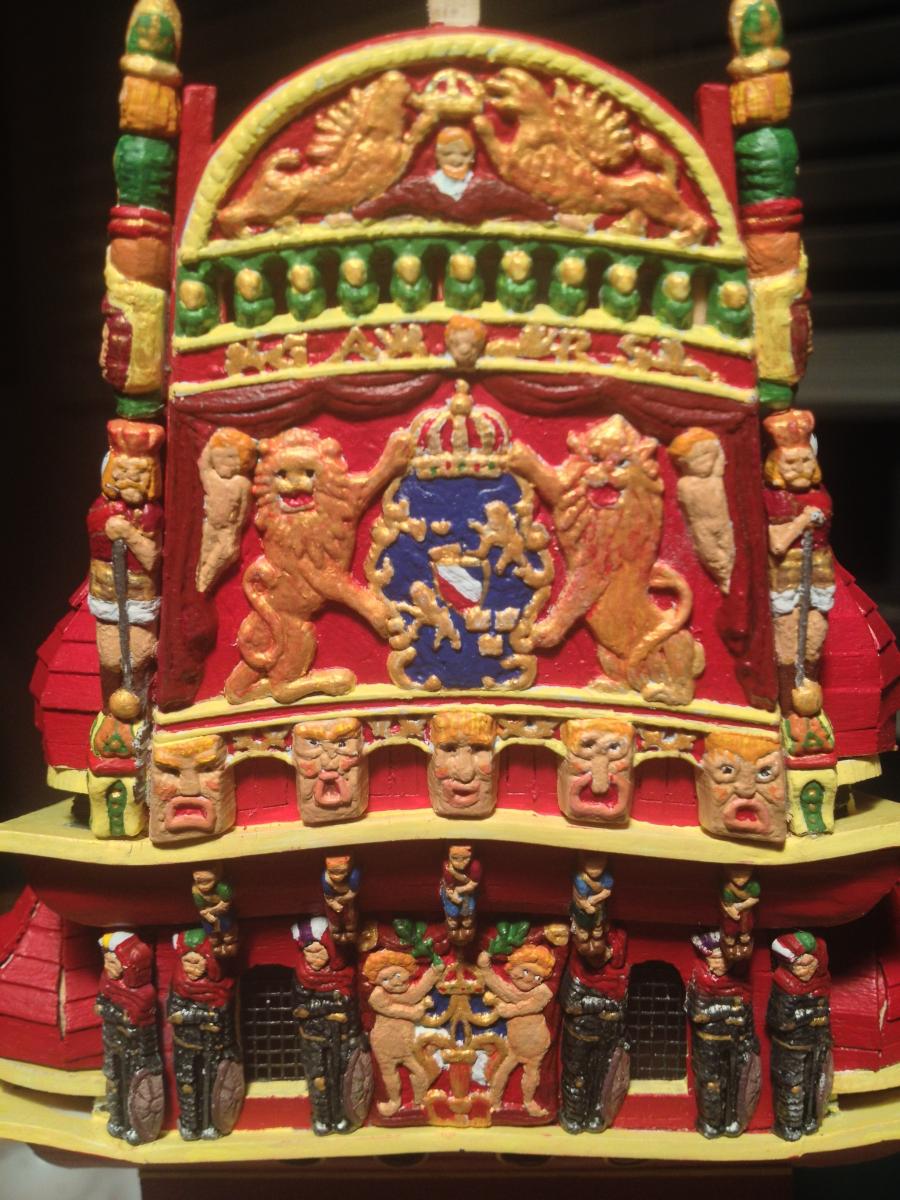
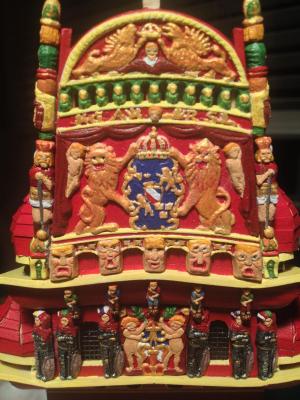
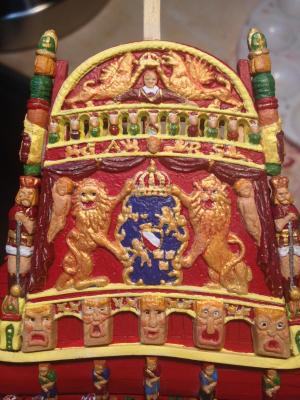
The large transom sculpture was a lot of fun to do. The kit sculpture has some pretty good detail on it, and it's challenging to get it all out and visible. The first photo is my first attempt, and I was still remembering how to paint so I didn't get it all quite the way I wanted. The row of busts at the top have very little detail - basically blobs - and I wasn't sure I could get them to look like people. So I decided to paint them green and gold and make them look like balusters rather than people. The lions and gryphons went through a few iterations, and I finally settled on a red wash that picked out the details pretty well. The grotesques at the bottom were also fun. There's not quite enough detail to get teeth to look good, but the result still looks nice. The center shield isn't present as detail on the figure - it all needs to be painted in, which was also challenging. Definitely my favorite part of the build so far. Here's the current result. As I got more comfortable painting again, I added a bunch more detail here and there. It's subtle, but I think the effect is very nice. I decided to paint the row of busts at the top as they are on the 1:10 model, even though the faces have no detail. The different colors on the arches above the busts were difficult, but I'm happy with the result. You need to zoom in if you want to see the full effect. I tried doing green inserts for the gryphon wings as they are on the 1:10 model, but it didn't look right, so I went back to gold with a red wash. Some highlighting for the curtains, gold edges at the base, and I decided to leave it alone. That's the problem with this kind of painting - it's easy to get lost in details and endlessly tweak things. With so many sculptures, eventually you need to move on to the next area. Which for me was the large posts on either side of the transom. I have close-up photos of them which I'll post next.
- 249 replies
-
- 6
-

-
- billing boats
- vasa
- (and 1 more)
-
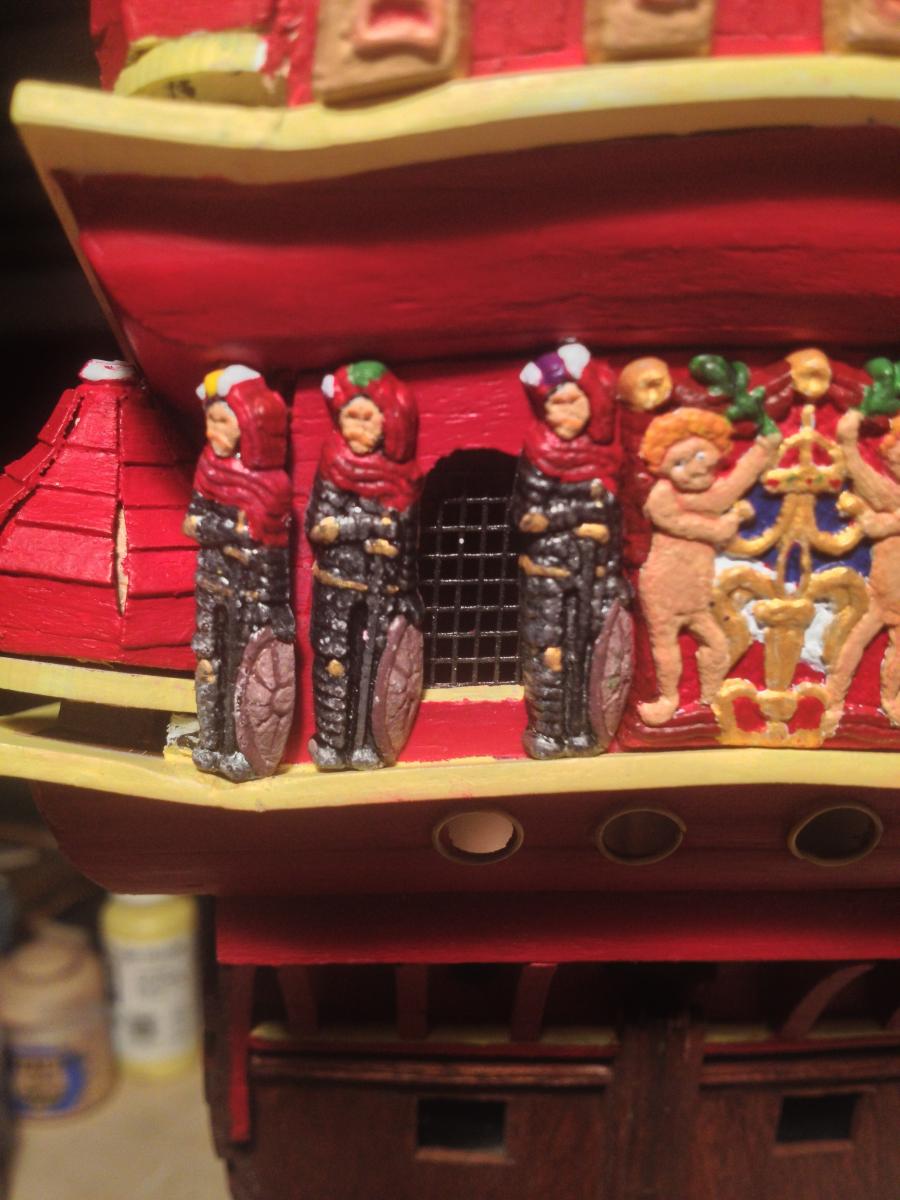
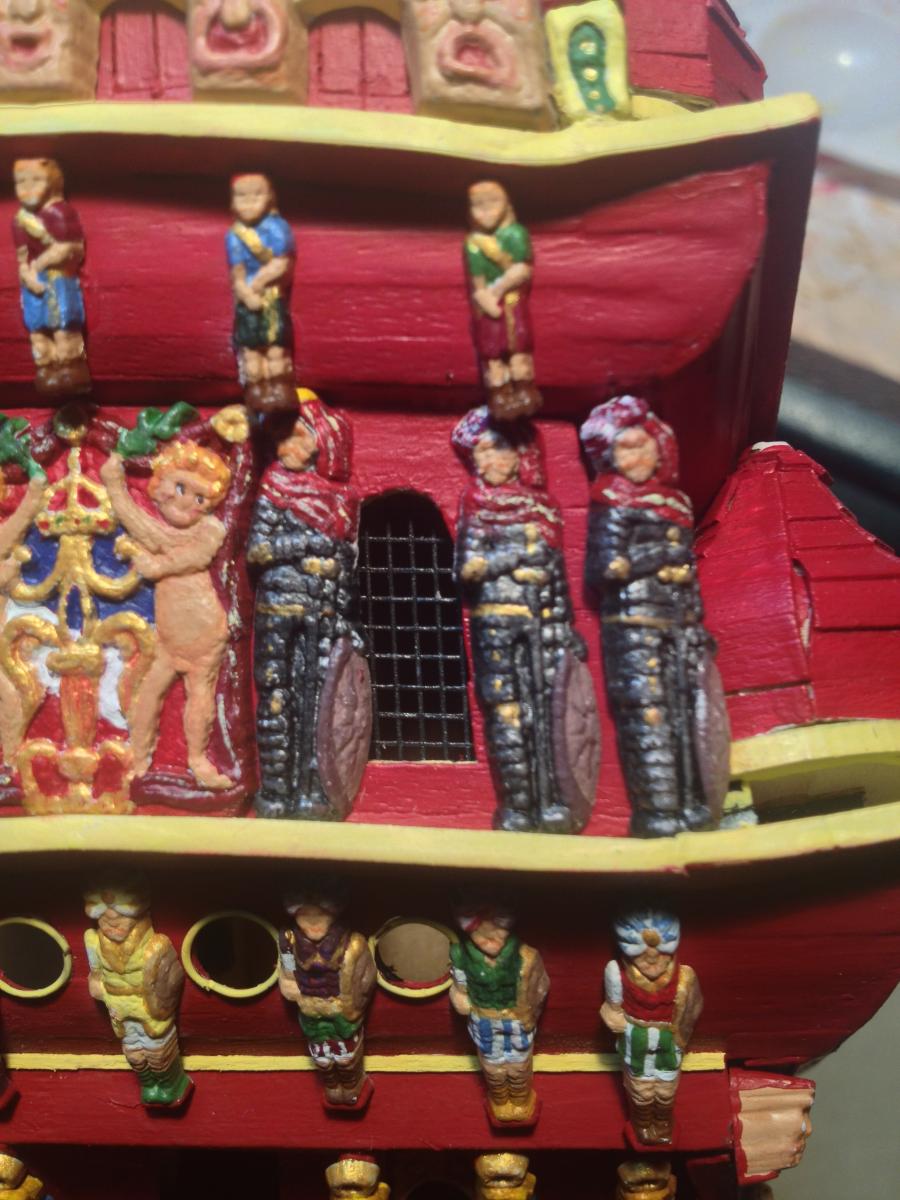
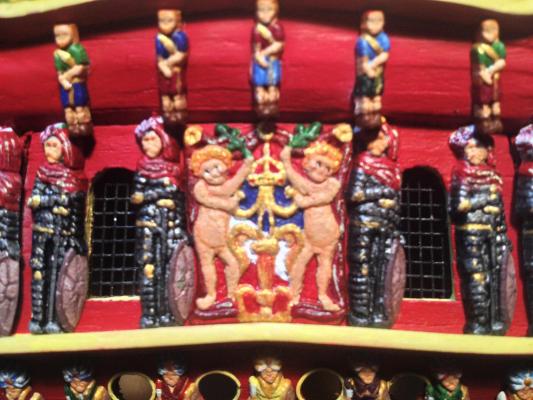
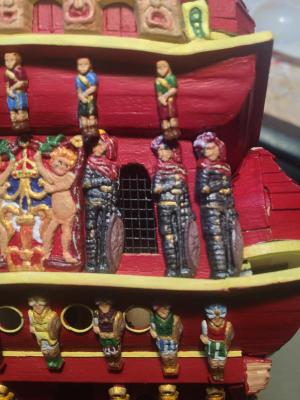
The first cut at the cherubs installed, plus the medieval knights. I had to be careful and measure the knights before I built out the quarter gallery framing, and they still didn't fit perfectly because one side of the planking above their heads was ever so slightly lower. Luckily the planking was flexible. Once I looked at the installed figures for a while, I found various things I didn't like, so I added a bunch of detail and changed a few things. The cherubs have more highlighting and accents in the crevices to bring out detail. The knights have some added highlighting on their capes as well. I'm still not happy with the Gideons above the knights. They are the same sculptures as the small-size Roman emperors on the beak, and look totally different from what's on the ship. I think I'm going to remove them, add more detail, and then replace a few of them with sculptures from the upper quarter gallery, which have the correct musical instruments. We'll see how that turns out. The kit models the knights differently from the actual ship, particularly on their heads. The ship sculptures have feathered caps, and the kit sculptures have turbans. This is a recurring theme on other sculptures too - seems like the kit sculptor had a thing for turbans. So trying to emulate feathers on turbans was a little interesting, but the result isn't too bad. Next up, some photos of the large transom sculpture...

- 249 replies
-
- 8
-
-
- billing boats
- vasa
- (and 1 more)
-
I used the primer because the plastic was such a dark brown I was concerned I wouldn't get good coverage with light colors. It also made the details a bit more visible when I was painting. Even so, I use a magnifying lamp so I can see well. My eyes aren't as good as they were 20 years ago :-).
- 249 replies
-
- 1
-
-
- billing boats
- vasa
- (and 1 more)
-
"Over the top" is a great way to put it, and the main reason I decided to build it. After my first model 13 years ago, I thought "done that, no need to do any more", but the Vasa made a big impression on me as a kid when I went to the Vasavarvet in the early '70s. The whole "nothing exceeds like excess" aesthetic was too compelling to pass up.
- 249 replies
-
- 1
-
-
- billing boats
- vasa
- (and 1 more)
-
At least to get to the tops you had ratlines to climb. I have no clue how the sailors were expected to walk on the bowsprit with no handholds and all that pitching up and down. Maybe they weren't expected to hoist sail there very often. mark
-
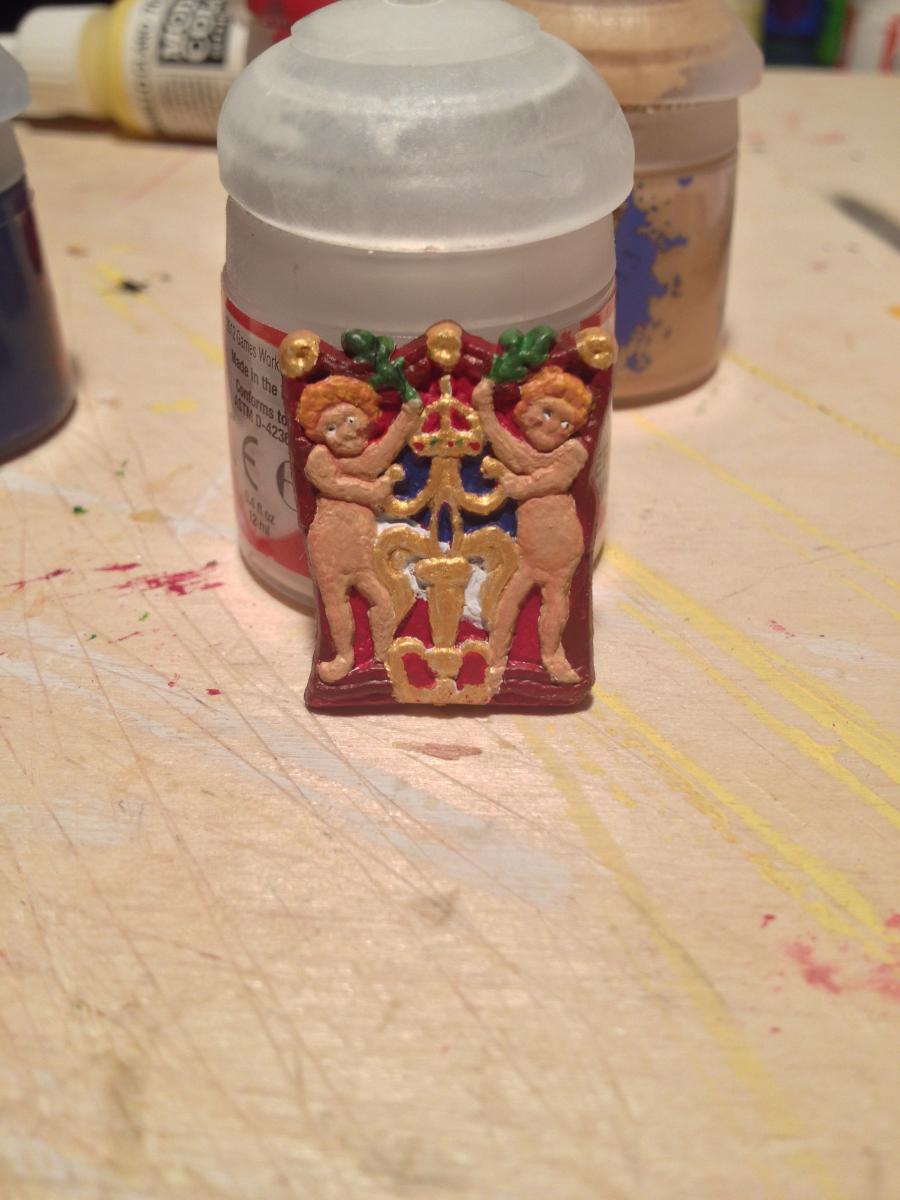
And finally it's time to paint sculptures. There are hundreds of the little guys (and some not so little). They are all made of plastic, not metal. That's actually a good thing, since they are easy to bend and easy to thin, and there is going to be a Lot of bending and thinning during this process. The sculptures are molded in brown plastic, which I primed white, using spray enamel so it wouldn't clog any details as brush paint might. The quality of the molding and the detail on the sculptures is good enough. Their accuracy is all over the map - some are pretty correct, some are completely different from they should be. A recurring issue is that the kit re-uses a particular figure in different places, doubtless for cost reasons. So a Roman emperor on the beak will also appear as a Gideon warrior on the stern. Not a big deal. And there are some sculptures that are missing completely, so I may have to take up wood carving or learn 3D modeling and printing. I use gaming miniature matte acrylic paint by Games Workshop and Vallejo. Easy to mix, dries quickly, very finely dispersed pigment, and no nasty fumes. I tend to prefer muted colors because they look better at scale. Here's my first attempt at the cherubs on the stern. It was my first painting of this sort in a good many years, so I ended up going over it a few times to improve things, but as a first cut it wasn't bad.

- 249 replies
-
- 4
-
-
- billing boats
- vasa
- (and 1 more)
-
Beautiful job, especially with saving things afterward. Now I have to make sure my construction in that area won't have the same problems.
-
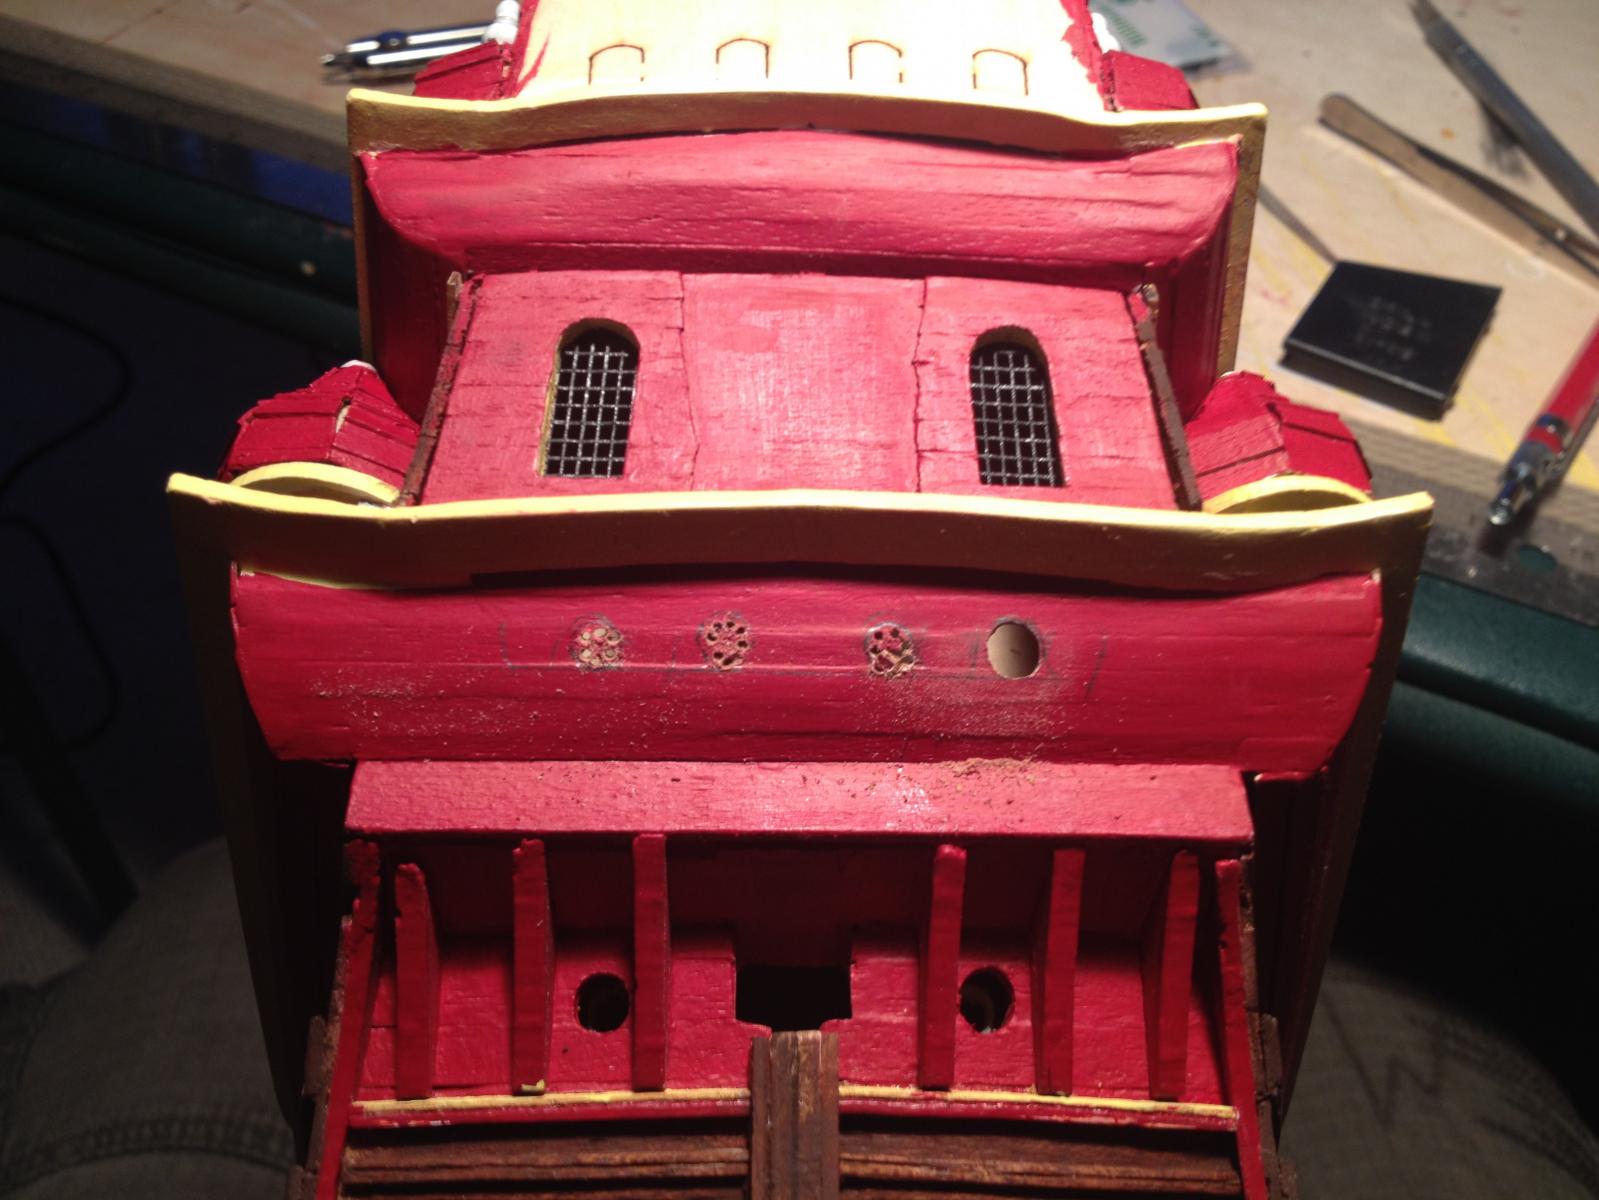
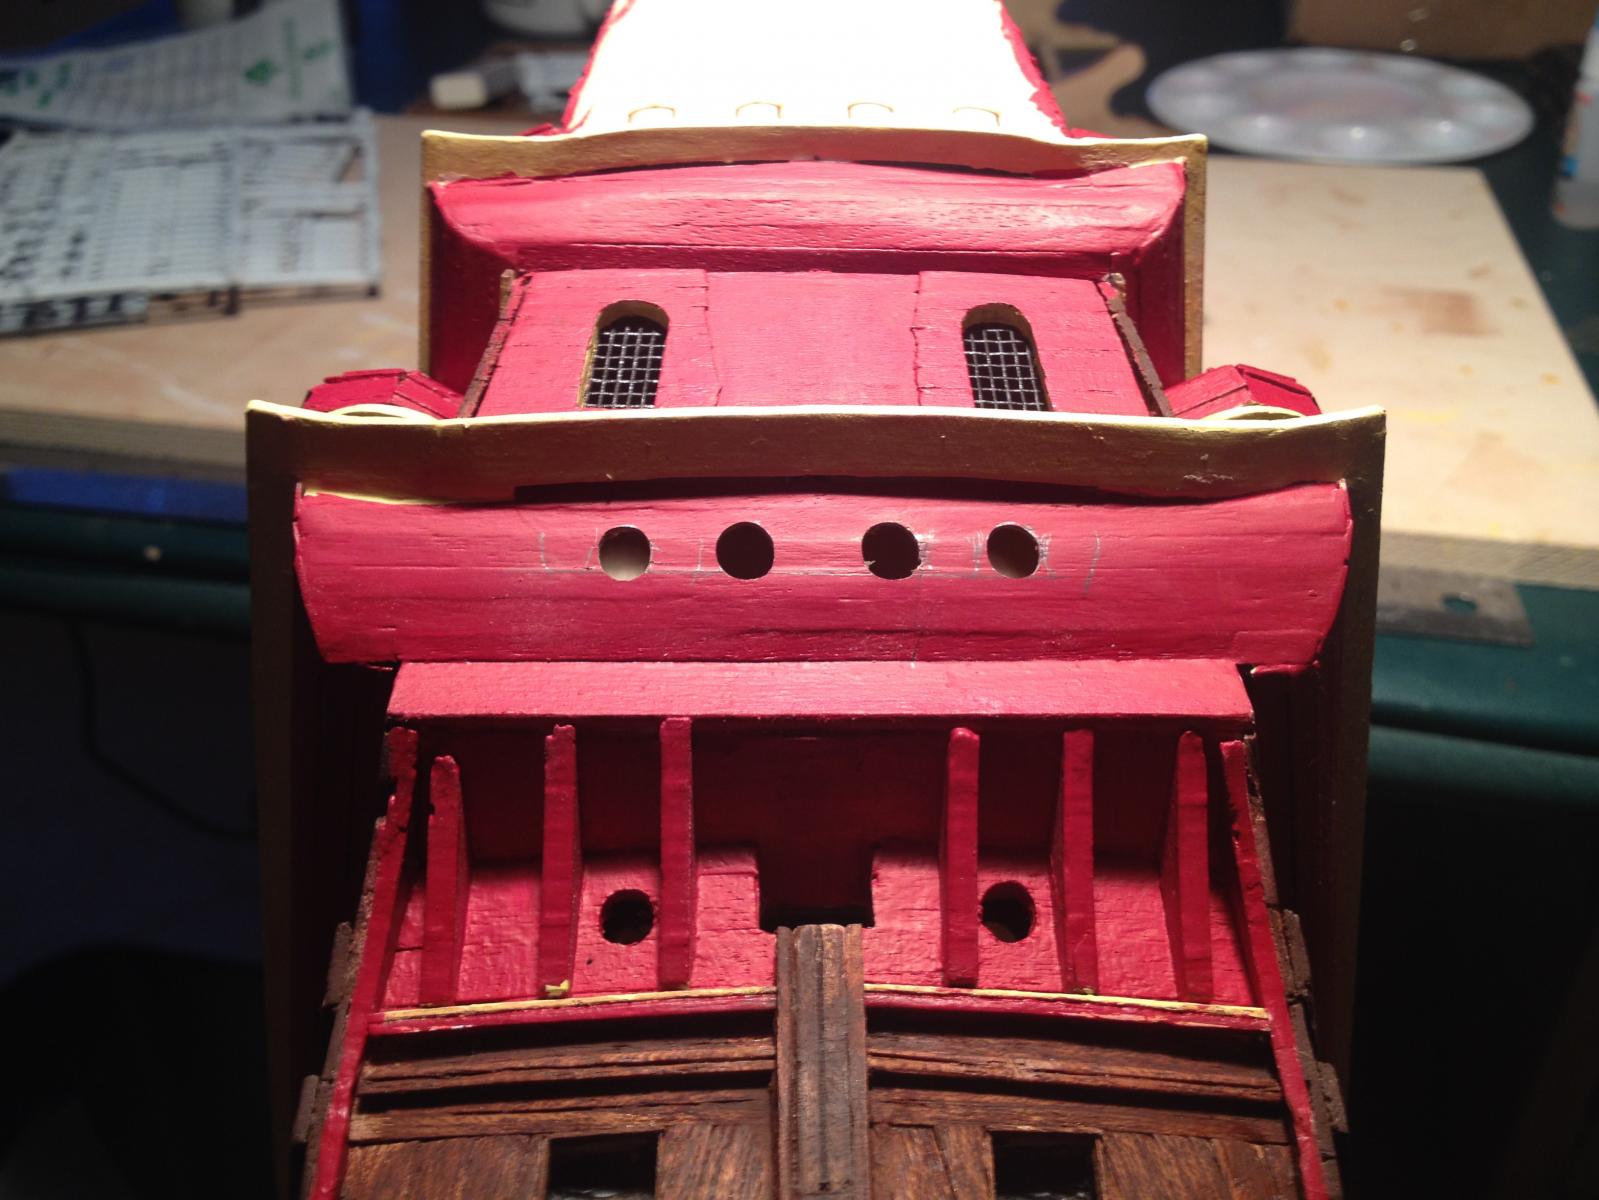
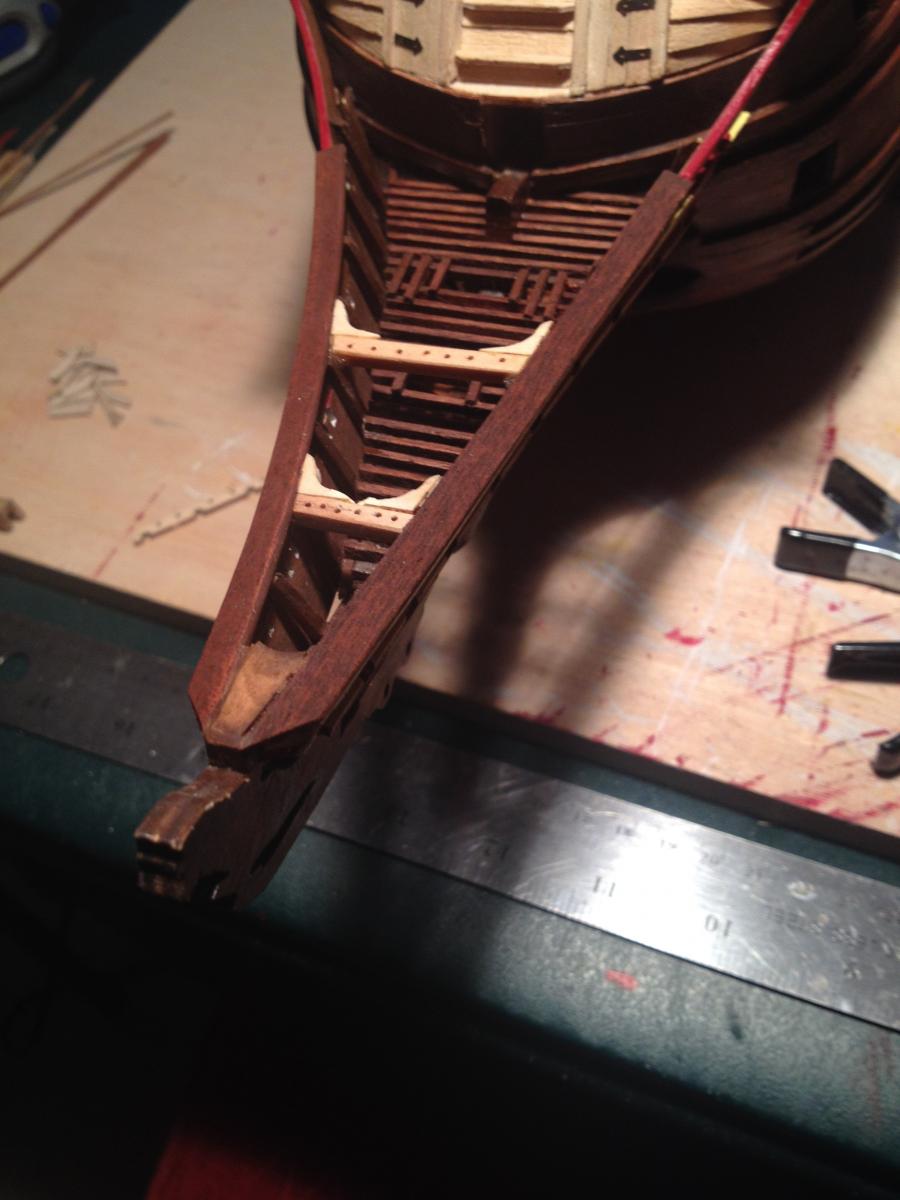
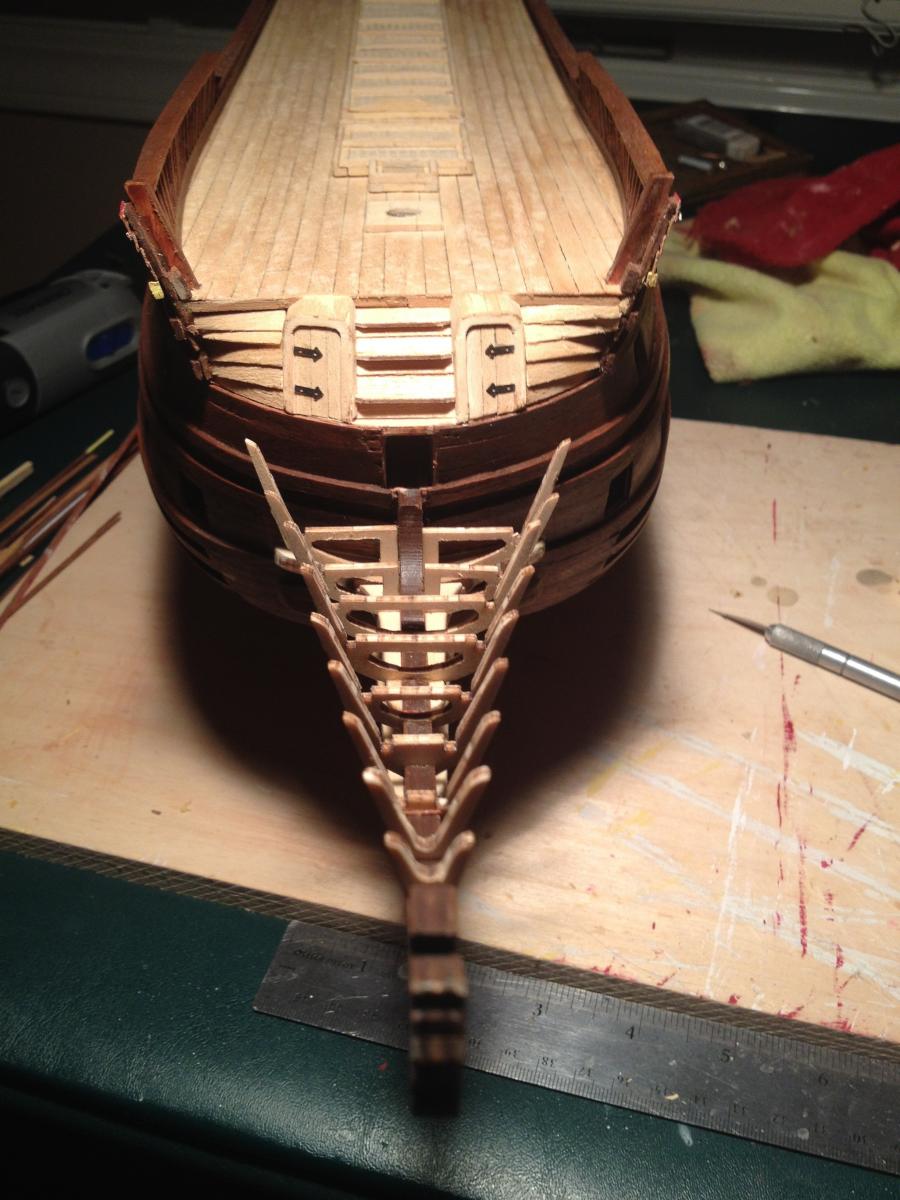
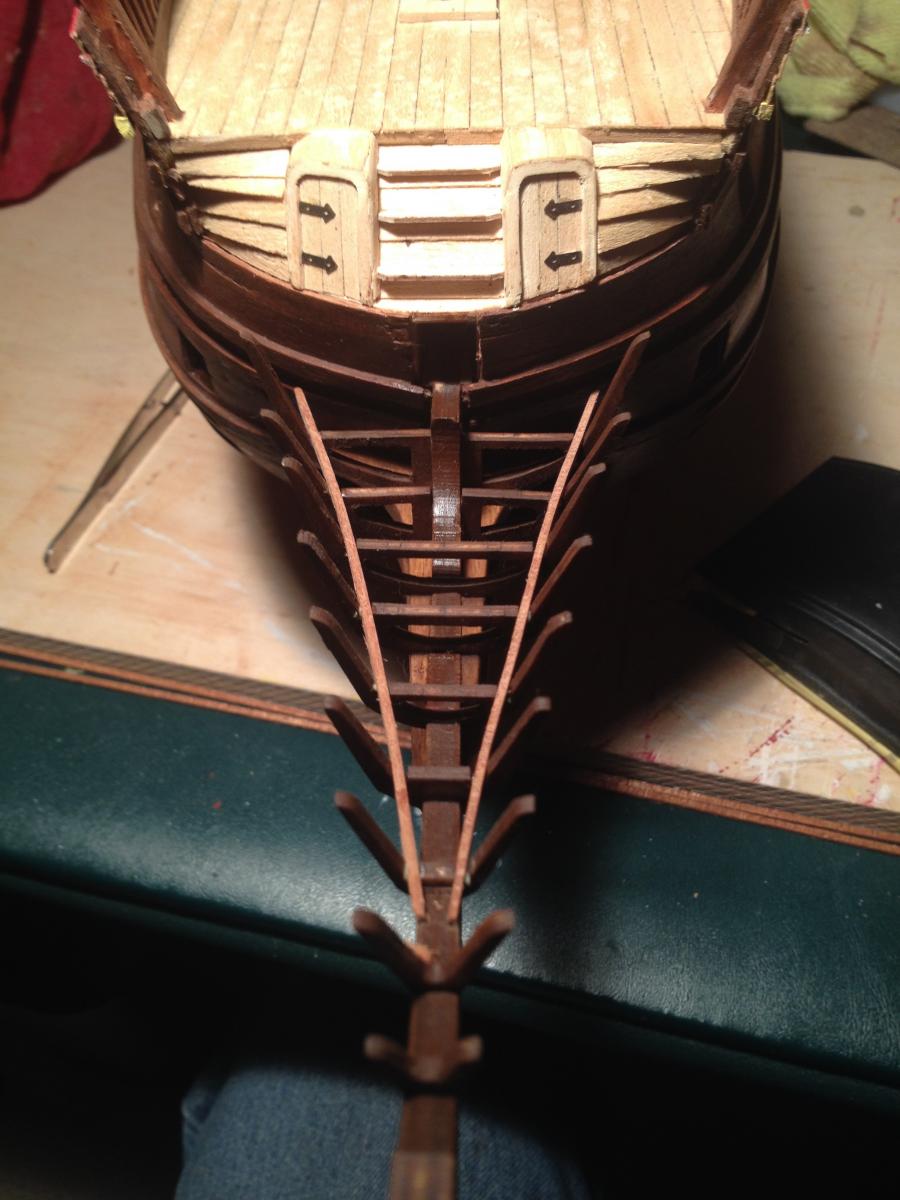
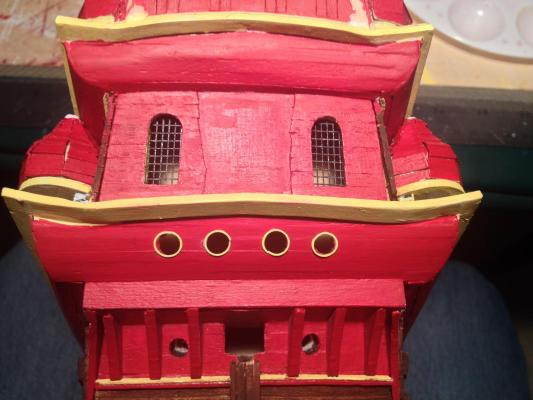
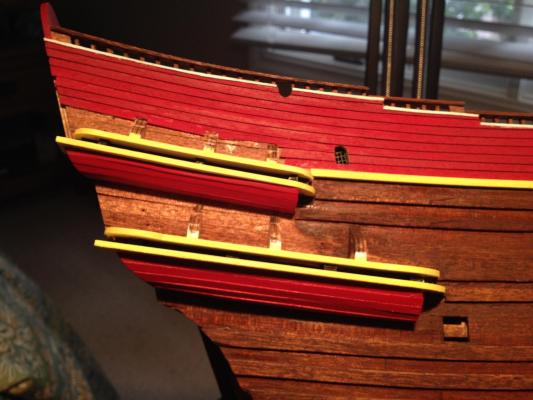
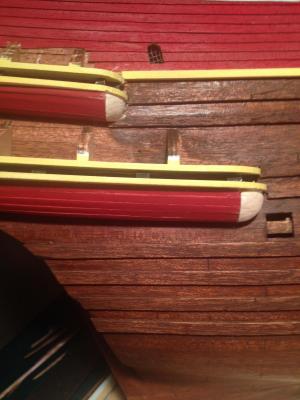
And back to the transom area, and the ports for the four swivel guns. The kit doesn't say anything about these in plans or instructions, but some of the photos seem to show port outlines made from two pieces of wire twisted together and then the result bent in a circle. I thought open ports would look better. You can see the process in the first photo - I drilled very small holes in a circular pattern and then used a very sharp knife to connect the holes and remove the center. Here you see the result after cleaning up with a round-profile file. The markings on the wood are where the medieval knight sculptures will go. I needed to be sure they were spaced correctly around the ports. As an aside, I found it very helpful to look ahead to where sculptures would go while constructing the stern area. Just a few millimeters of difference will prevent sculptures from sitting properly. I didn't do this as dilligently as I should have on the quarter galleries, and made some mistakes. And the final result with the port outlines. They are thin copper wire, bent around a chopstick. The chopstick in question tapers from one end to the other, so finding the correct diameter was easy. I still need to mess with the two lower ports - they are too small. But I'll wait to do that until the sculptures above them are in place and I can match up the curve of the sculpture with the curve of the port.


- 249 replies
-
- 6
-
-
- billing boats
- vasa
- (and 1 more)
-
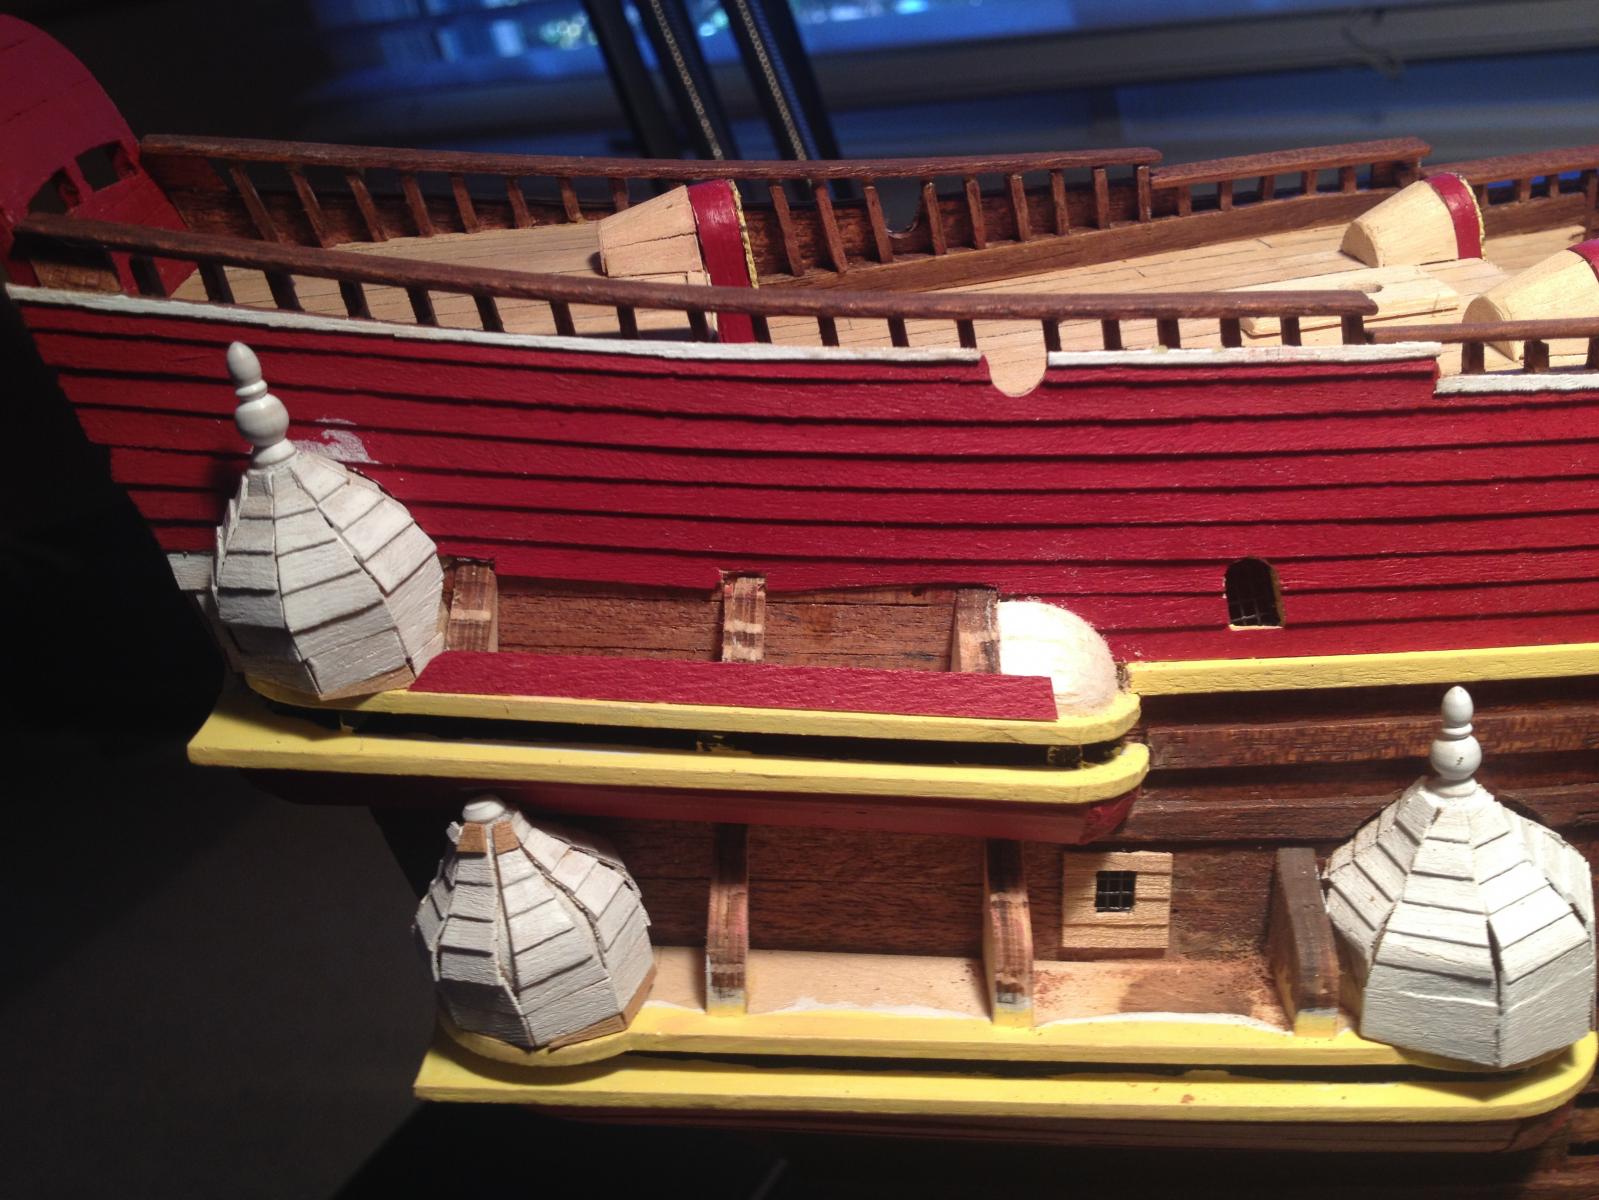
Hola Karl - I expressed myself badly. The sculptures come in two pieces as you say, to make a 3D figure. The back piece is flatter than the front, presumably so it is easier to attach to the hull. I wanted a smooth base to mount it on, rather than the clinkered finish, so I removed a little of the clinker planking. I have a photo of it which I'll post once I catch up to where I am currently in the build. mark
- 249 replies
-
- 1
-
-
- billing boats
- vasa
- (and 1 more)
-
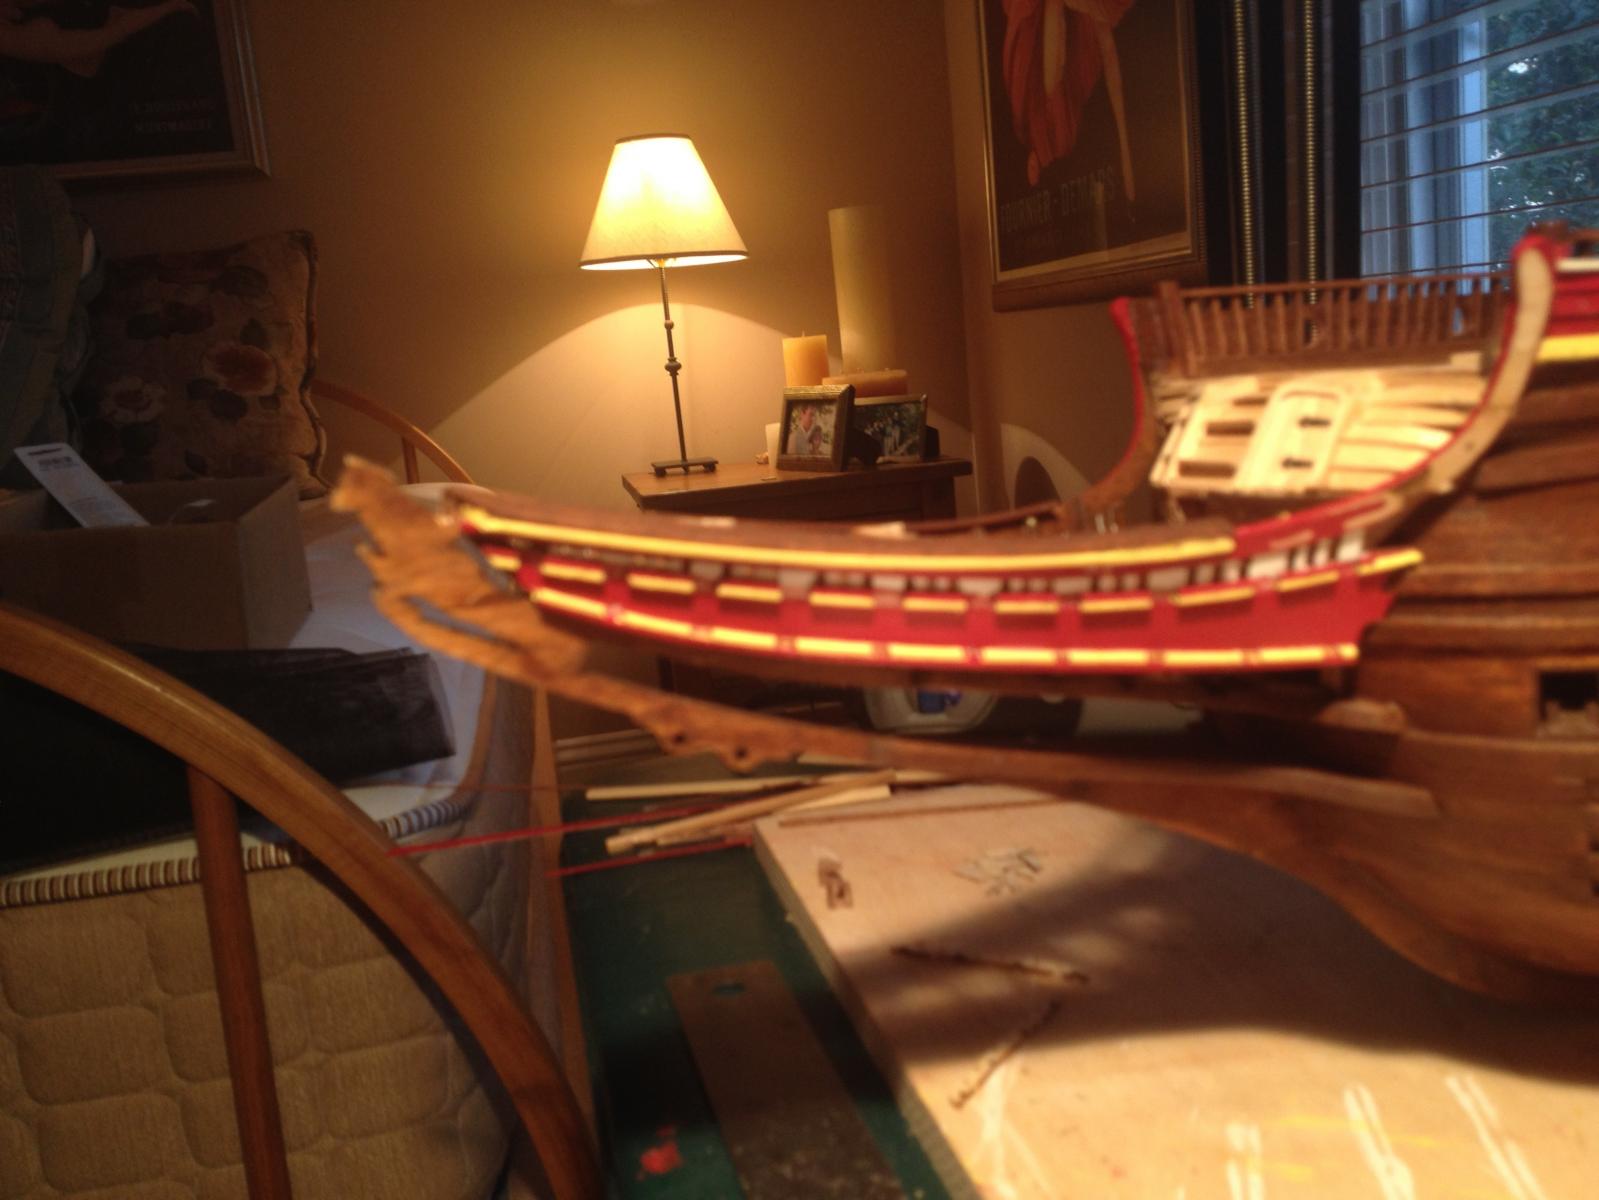
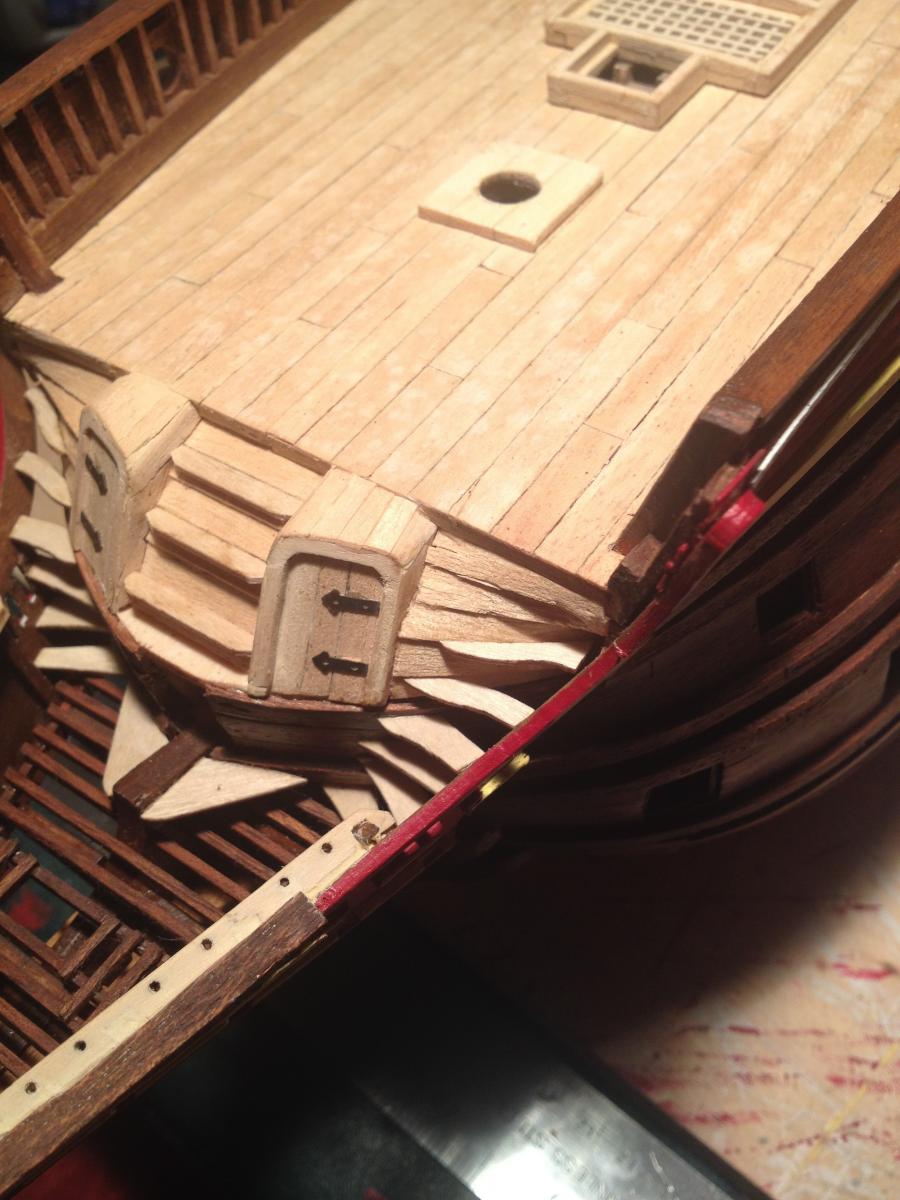
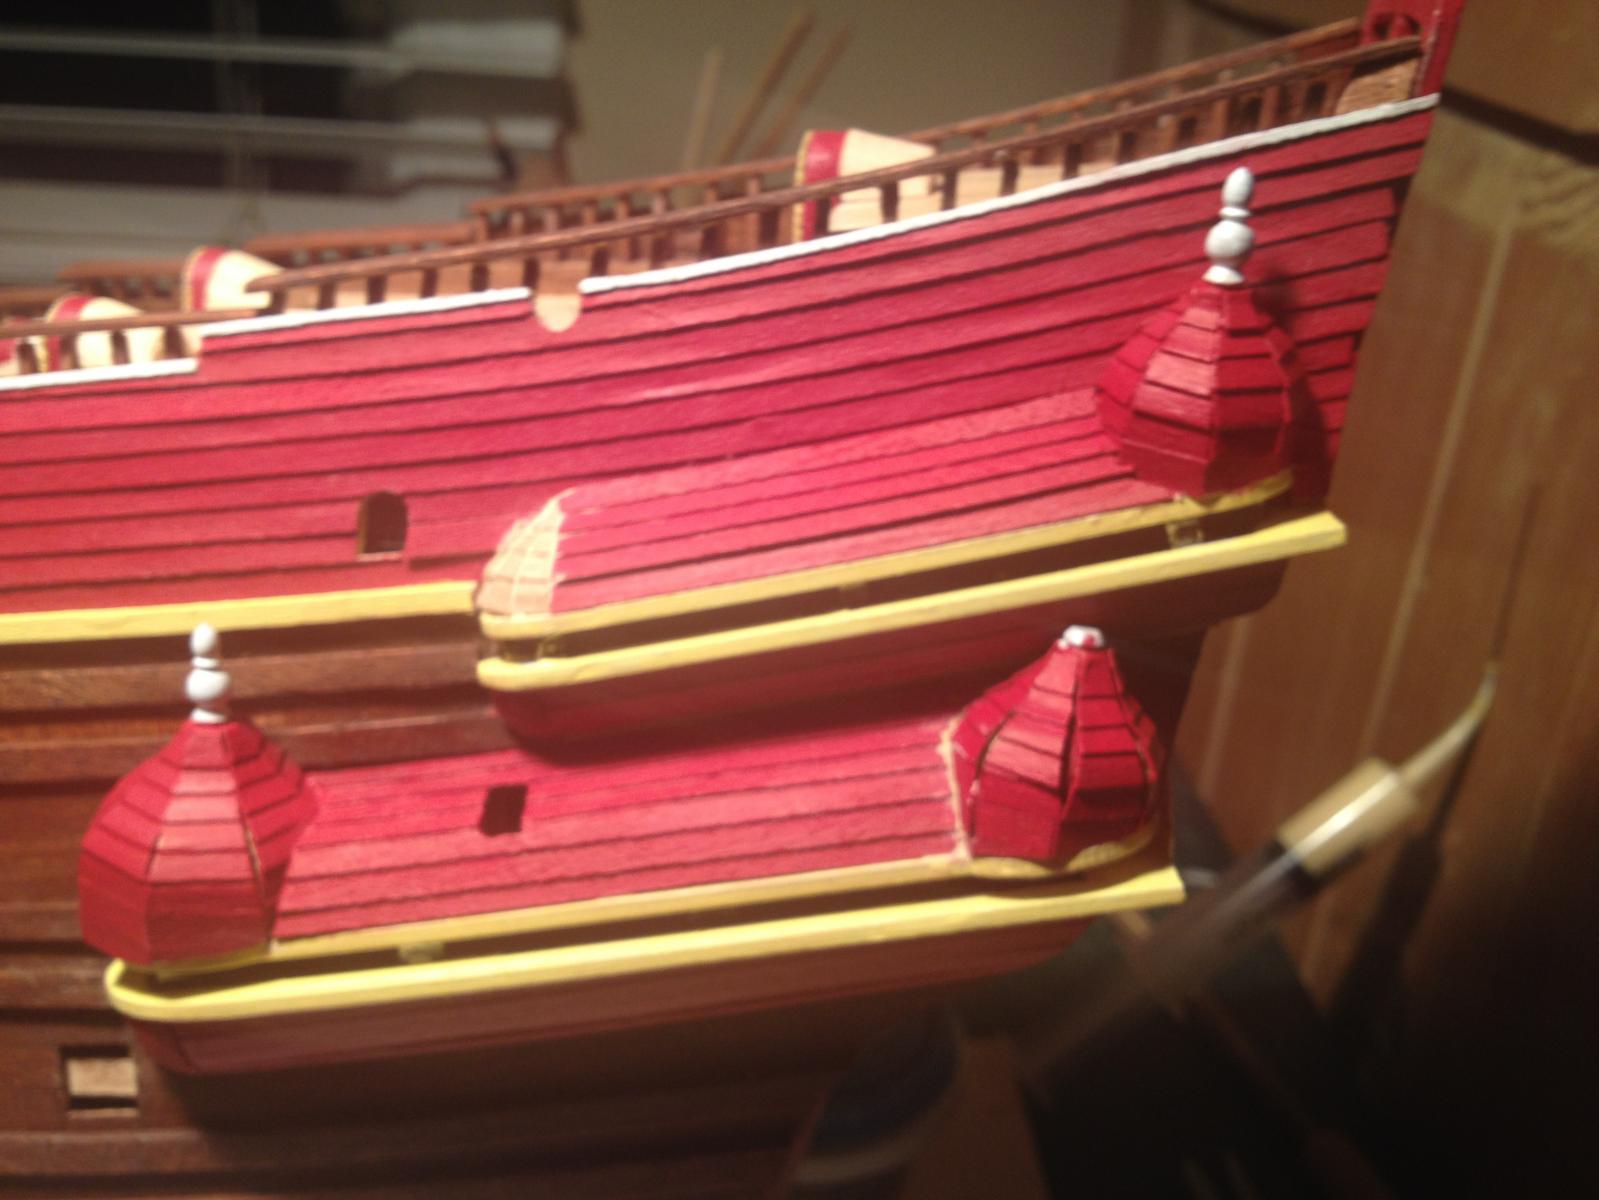
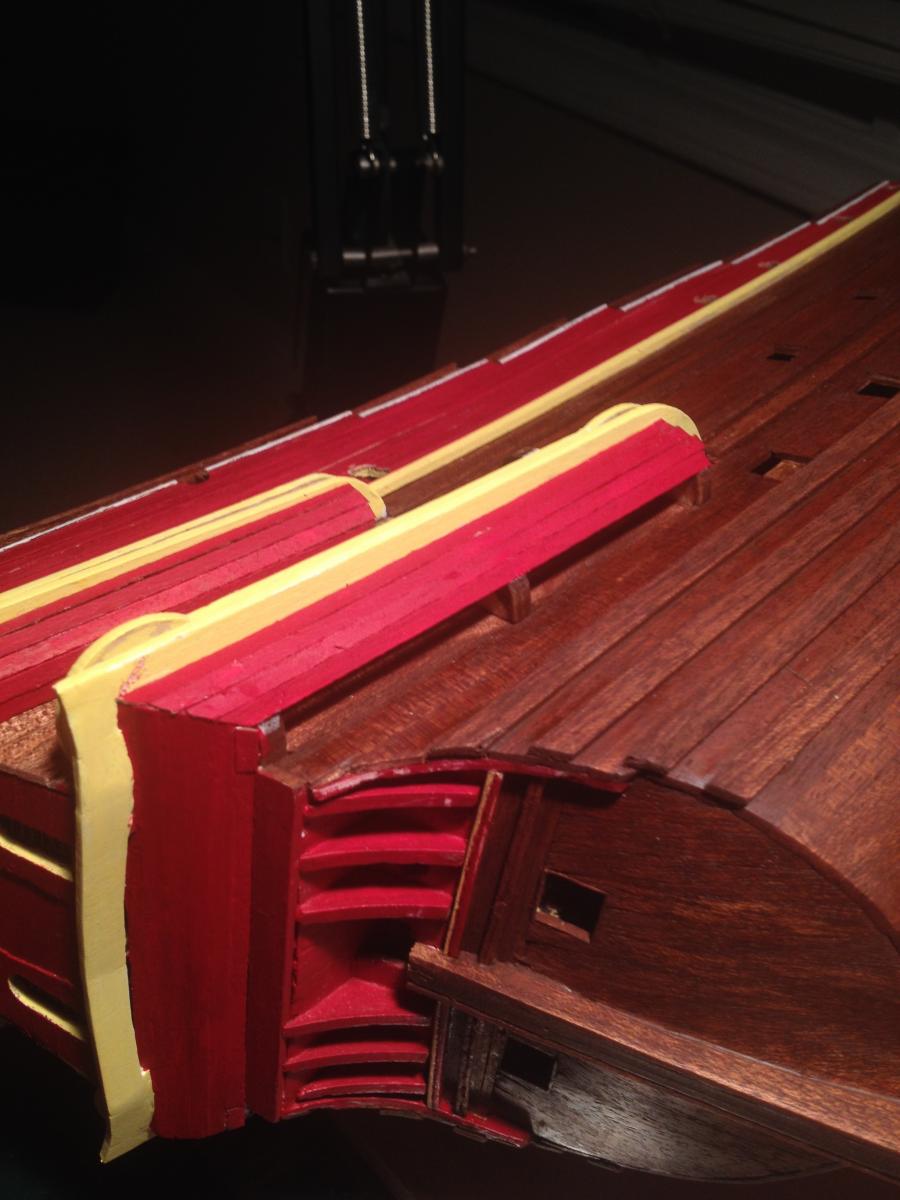
Thanks Matti, and thanks everyone for all the "likes" and positive comments. It's a long build process and all the encouragement helps. Here are a couple of photos of the deck-facing part of the transom. The kit doesn't document very well what should go here, but there are enough photographs floating around the internet that I think I came reasonably close to what it should look like. The kit provides two curved pieces at the bottom, but the top pieces had to be scratched. The wood on the crosspieces is also wider I think than what the kit plans specify. There are two tall sculptures at the back corners of the hull, stacked one on top of the other. I traced the outline of the sculptures and removed bits of clinker planking, leaving a solid base for the sculptures to adhere to. The real ship also has a mounting base for the sculptures extending above the bulwarks, where the kit doesn't provide one. I think I more or less got it right. In any case the sculptures will have something solid to adhere to. I don't have a photo of this, but I painted the extensions red to match the sides of the hull, leaving only the inner face natural wood.
- 249 replies
-
- 2
-
-
- billing boats
- vasa
- (and 1 more)
-
Edwin - the red paint is from a line called Citadel, by Games Workshop. This specific color is called "Mephiston Red" (lots of odd fantasy role playing-inspired paint names in this line). It's a good paint line - matte acrylic, very finely ground, evenly dispersed pigment, dries quickly, mixes well, etc. Your local gaming/hobby shop should have it, or you can order online from www.games-workshop.com. Some more photos of the finished beak area... The economy class toilets... And a less blurry photo of the side panel, with the notches cut out for the Roman emperor sculptures.
- 249 replies
-
- 7
-
-
- billing boats
- vasa
- (and 1 more)
-
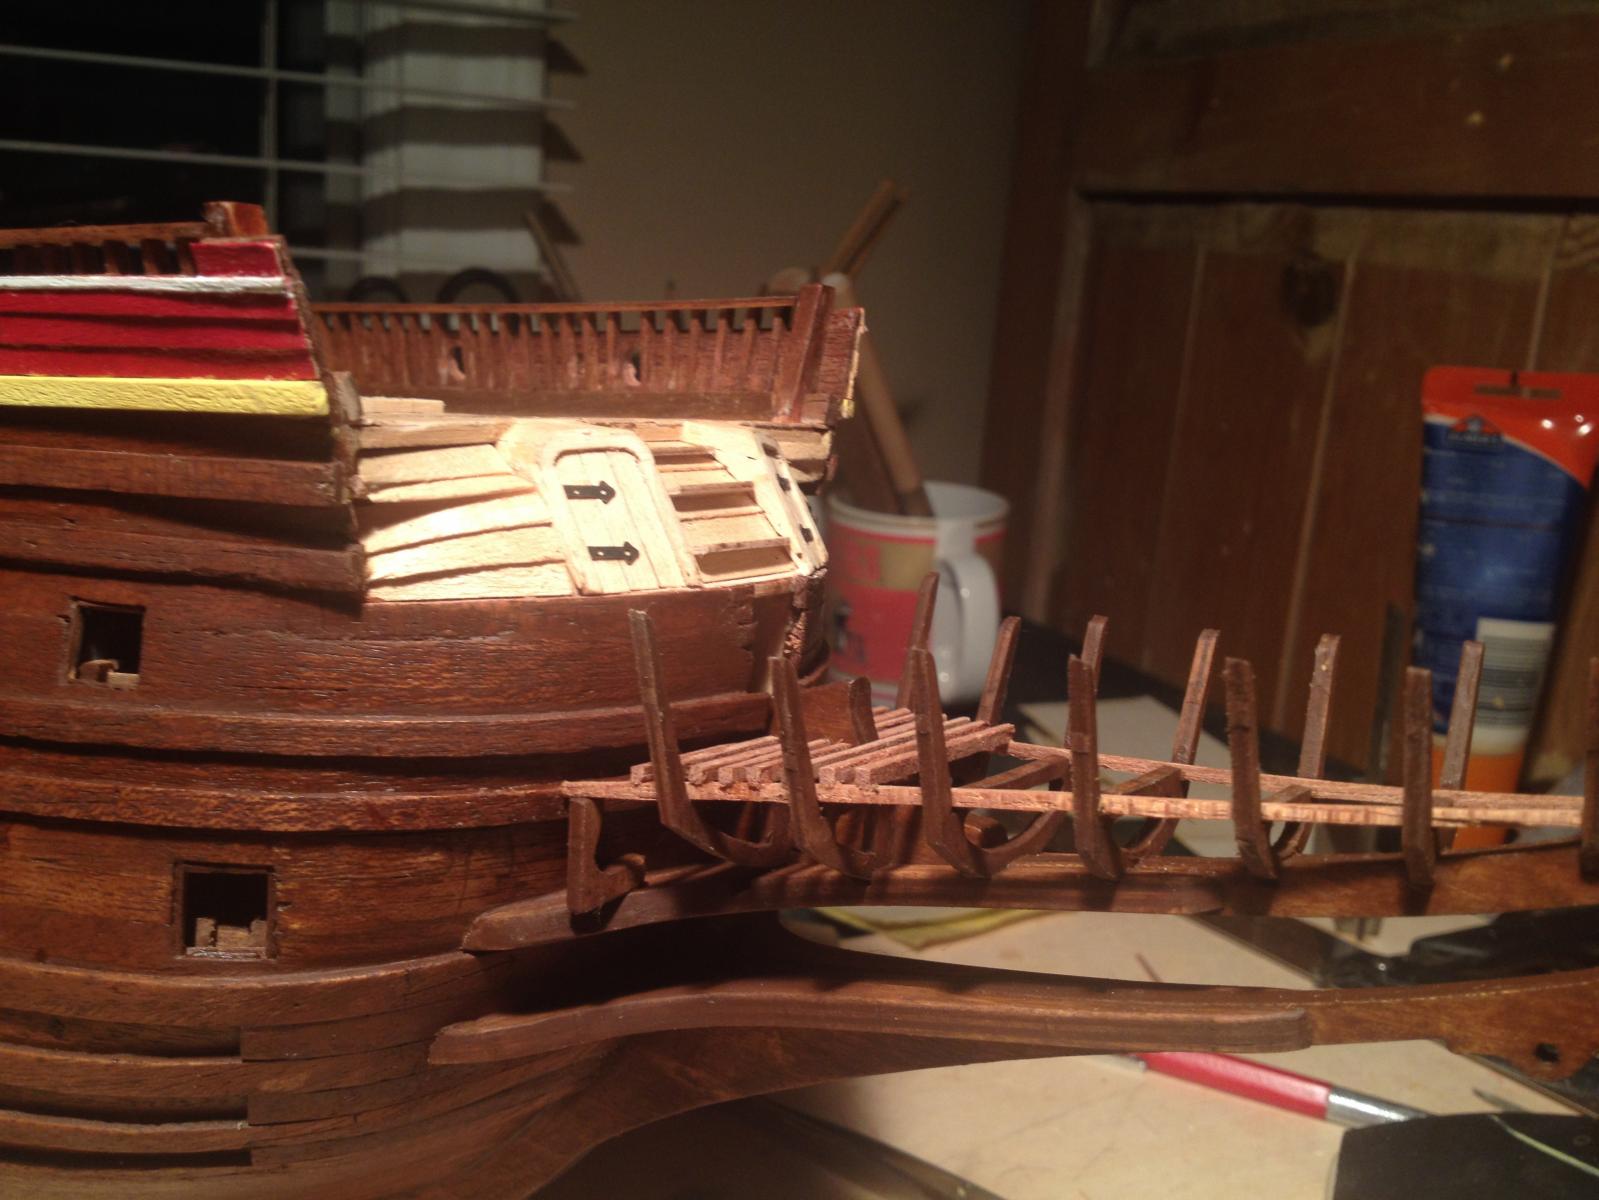
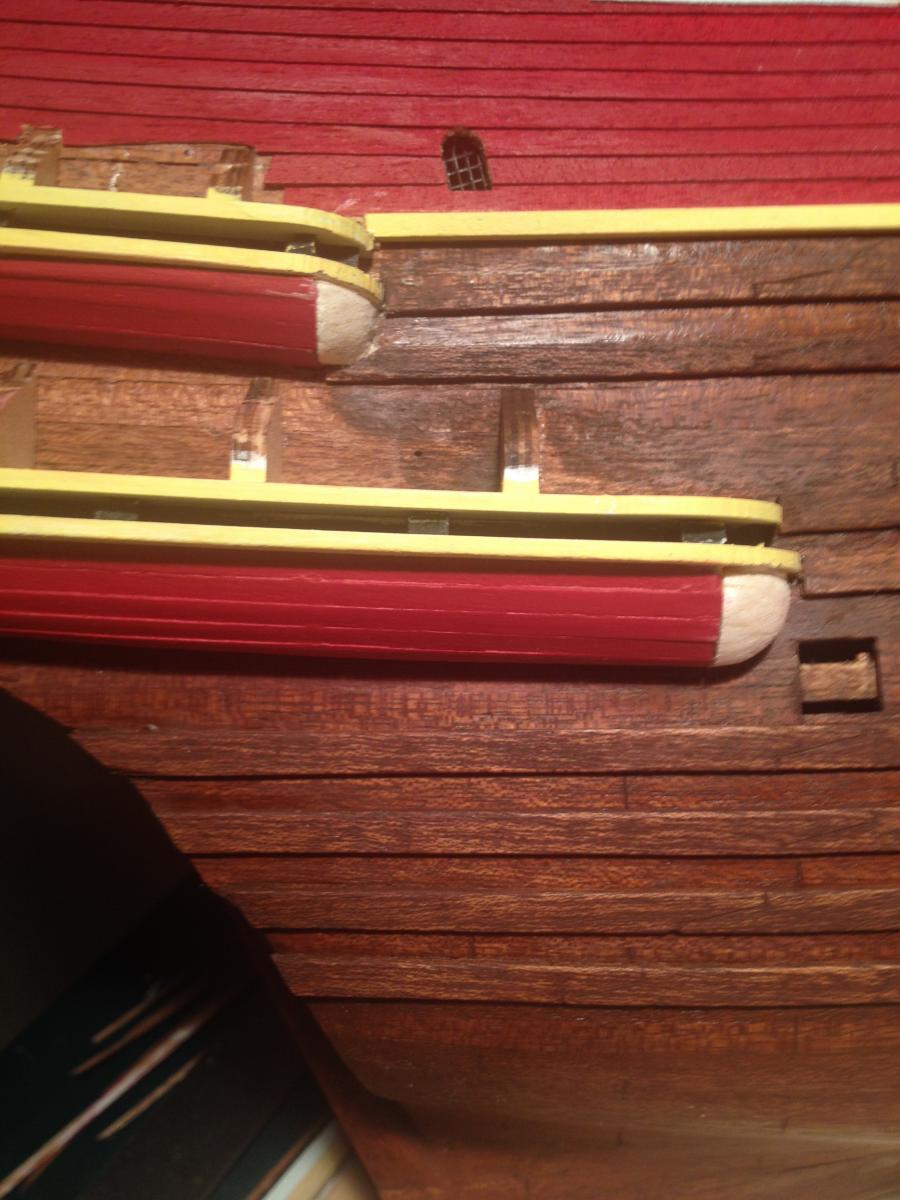
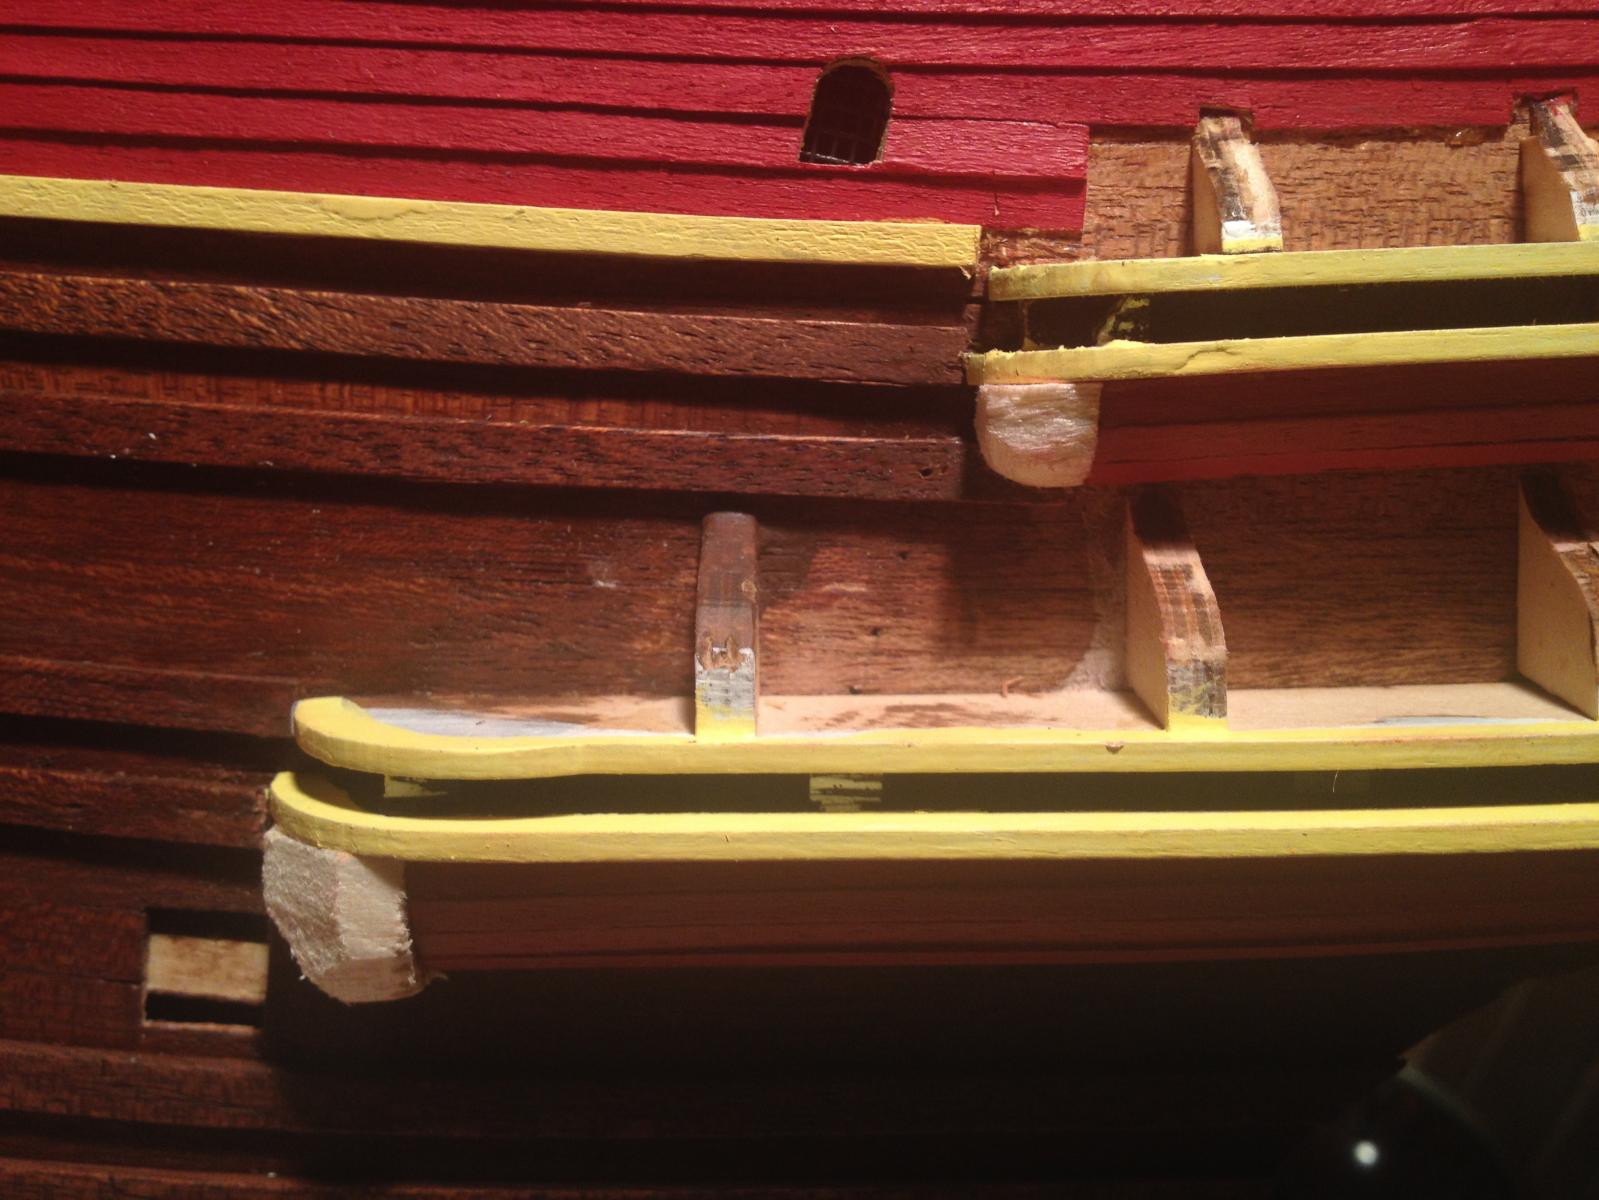
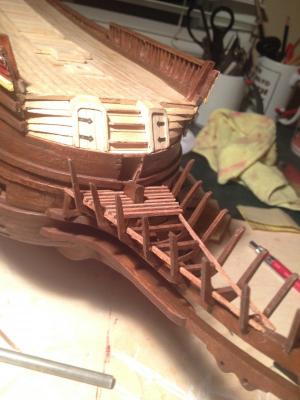
Finishing up the beak - the cap molding is done as well as the two transverse pin rails. The remaining pin rails and the stairs. The stairs were tricky for two reasons. First, each step is differently shaped and the instructions didn't say which went where. Fortunately test-fitting them made it pretty clear for me. Second, the lower stairs are hard to access, even with tweezers. But I attached them eventually and they look pretty good. I also installed the two heads, which are basically small angled boxes that sit almost under the side pin rails. It must have been pretty uncomfortable for the sailors... Close-up of the stairs and the side of the beak. The curve of the side pieces didn't match the curve of the large sculptures that attach to them, so I needed to reshape the wood. That was not difficult - just lay the large sculpture on the wood piece and figure out where to cut. A small piece added in the middle and it matched quite well. And a sadly blurry picture of the beak sides. The lower side was a single pre-cut piece that fit surprisingly well. Only a little fettling was required where the piece meets the wales on the hull. I added some scratched molding detail that matches the 1:10 model pretty well. The gaps in the molding match where the Roman emperor sculptures will go, so they can sit flush with the sides. The ten emperors come in three sizes - small, medium, and large - and they line up pretty well with the changing height of the beak sides. Now a few more hull details, and I started painting sculptures. The beak was surprisingly straightforward after all the challenges with the quarter galleries, and I like the way it looks.


- 249 replies
-
- 4
-
-
- billing boats
- vasa
- (and 1 more)
-
The beak decking was straightforward. I used mahogany instead of the kit-supplied wood because I wanted it to match the hull. Here's a picture where you can see the side supports for the prow in place. It's nice and stable now.


- 249 replies
-
- 8
-
-
- billing boats
- vasa
- (and 1 more)
-
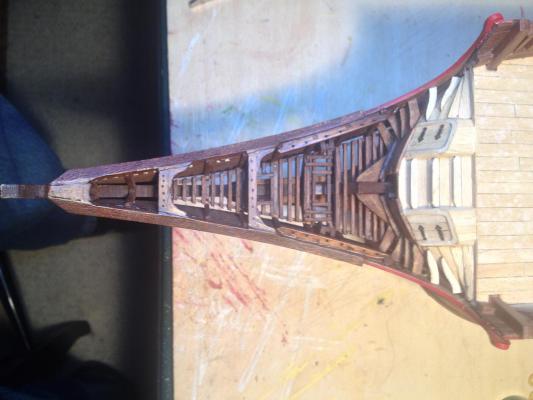
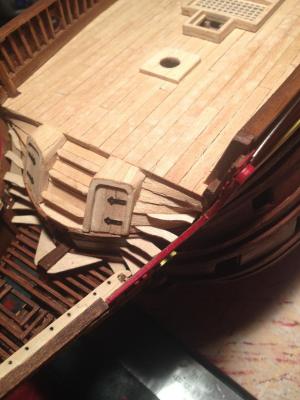
Finally the dreaded quarter galleries are finished! Now it was on to the beak area. There are lots of parts here, but most of them are pre-cut and fit nicely. The only problem I found with the pre-cut parts was that you need to be very careful scribing both the front and the back of the part or it will split - the plywood isn't always well-laminated. I started with the upper and lower braces on each side of the prow, not visible in these photos. Once those were on, it greatly lessened my persistent low-grade concern about breaking the prow accidentally. Then I had to install the nine frames making up the structure for the beak deck. Again, pretty straightforward. And here they are after staining and the addition of the lateral supports for the decking.


- 249 replies
-
- 1
-
-
- billing boats
- vasa
- (and 1 more)
-
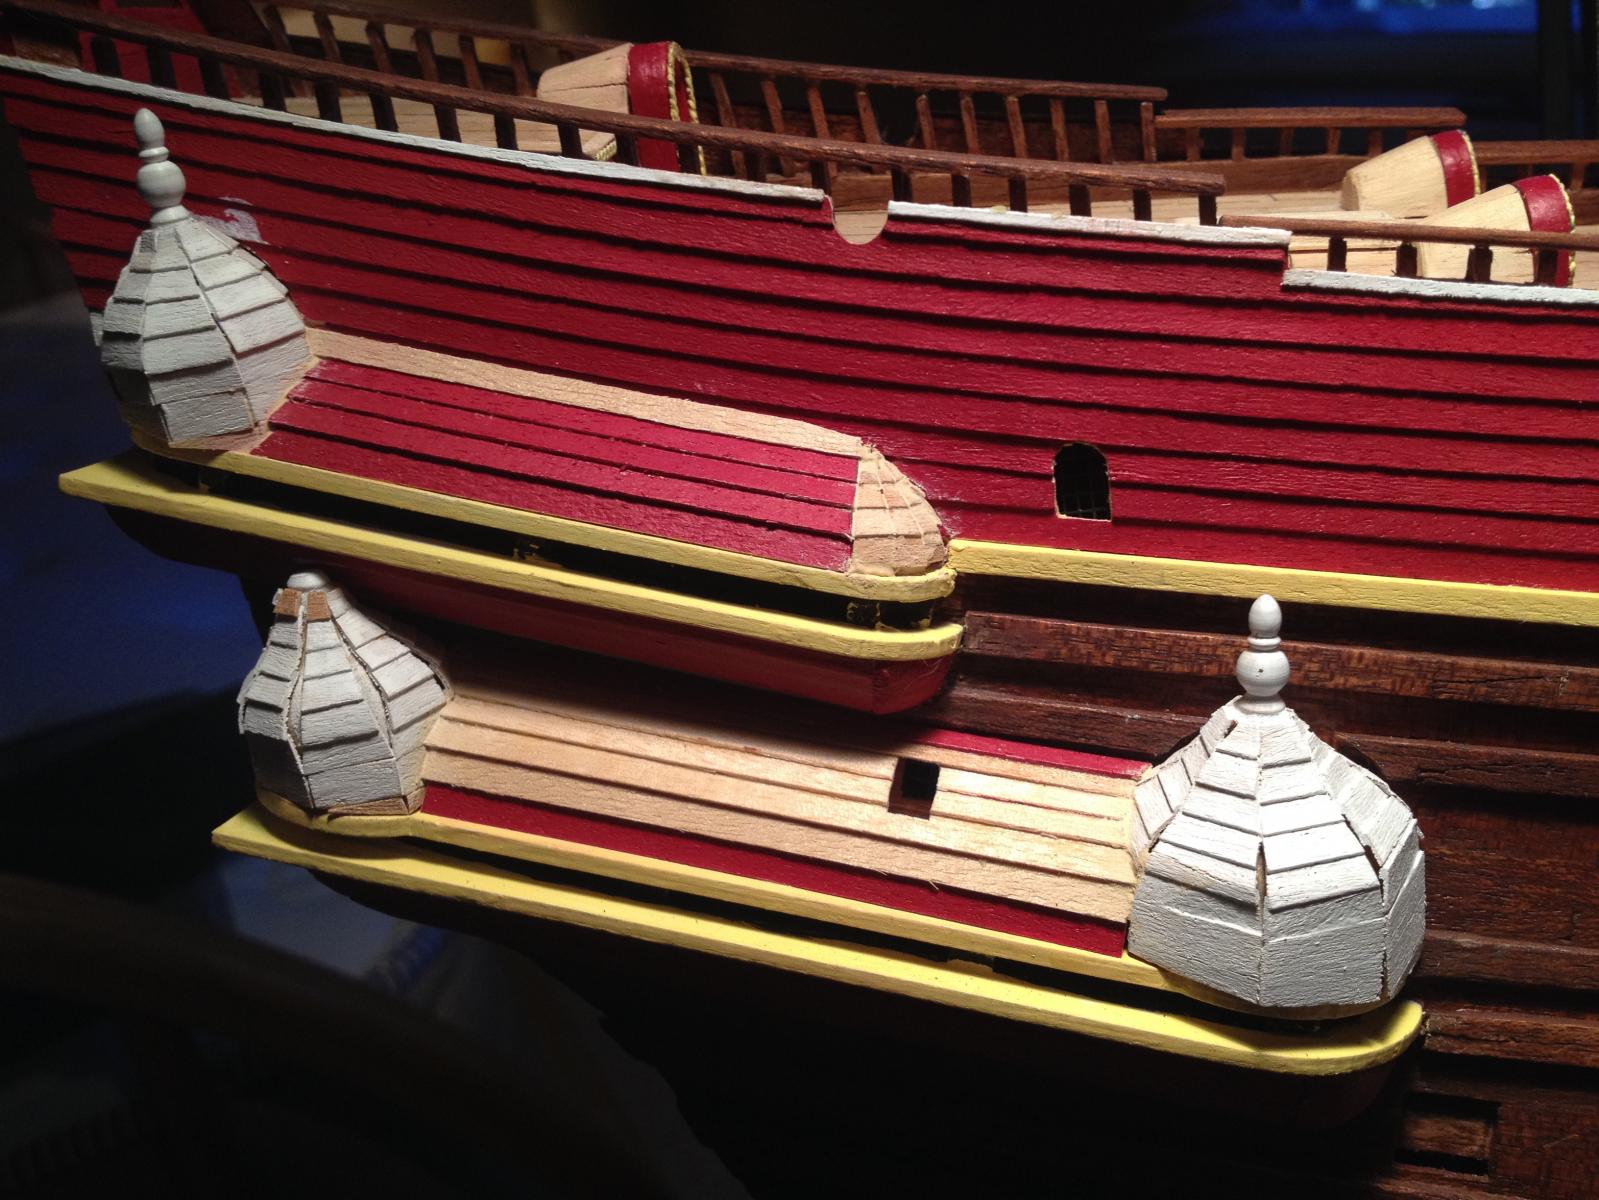
With the towers in place, it was time to plank the upper parts of each gallery. Each plank needed to be cut slightly differently because of the tower curves. I pre-painted the pieces to preserve a nice clean line with the yellow below. Note the clinker planking around the gallery window. I have no idea what that part of the real ship looks like, but I figured you should see something reasonably finished if you looked through the gallery opening. Here the upper and lower galleries have been planked, and the opening for the window cut into the lower gallery. You can also see what I did with the front of the upper gallery. There are three vaguely triangular panels of shingles that together round the curve of the front. A little wood filler here and there to clean things up, and it looks pretty good. The front tower overhangs the gallery base, which is because of the shingling. I'm going to add an extension around the base so it's flush with the tower. One side almost finished, with a little more wood filler for some small gaps between the towers and the gallery planking. And a look at the finished gallery. The borders at the front of the galleries will be covered with sculptures. This is from later in the build when I had started adding some sculptures, so you can see bits of them in the background. You can also see how I've extended the base of the gallery floor so it's flush with the tower, rather than the tower overhanging. I was very happy to have finished this part of the project! Now on to the beak area...


- 249 replies
-
- 7
-
-
- billing boats
- vasa
- (and 1 more)
-
Your build is beautiful; don't worry about inaccuracies after the fact. I am in the middle of painting sculptures and I finally had to stop going back over them as I discovered more details. "Wait, there are subtle gold highlights on the warriors' kilts..." If the museum eventually releases the perfect kit, with 3D printed sculptures from scans of the real thing, then we can all buy it and start another build. Meantime, we do the best we can.
-
Hola Karl - I think it's the angle and the lighting. There are a lot of optical illusions at the stern because of all the angles. I was very happy to be done with this part of the project. The towers are such an important part of the ship, so I tried hard to get them right, but it was very challenging. I'm hoping the sculptures will hide any imperfections. mark
- 249 replies
-
- 1
-
-
- billing boats
- vasa
- (and 1 more)
-
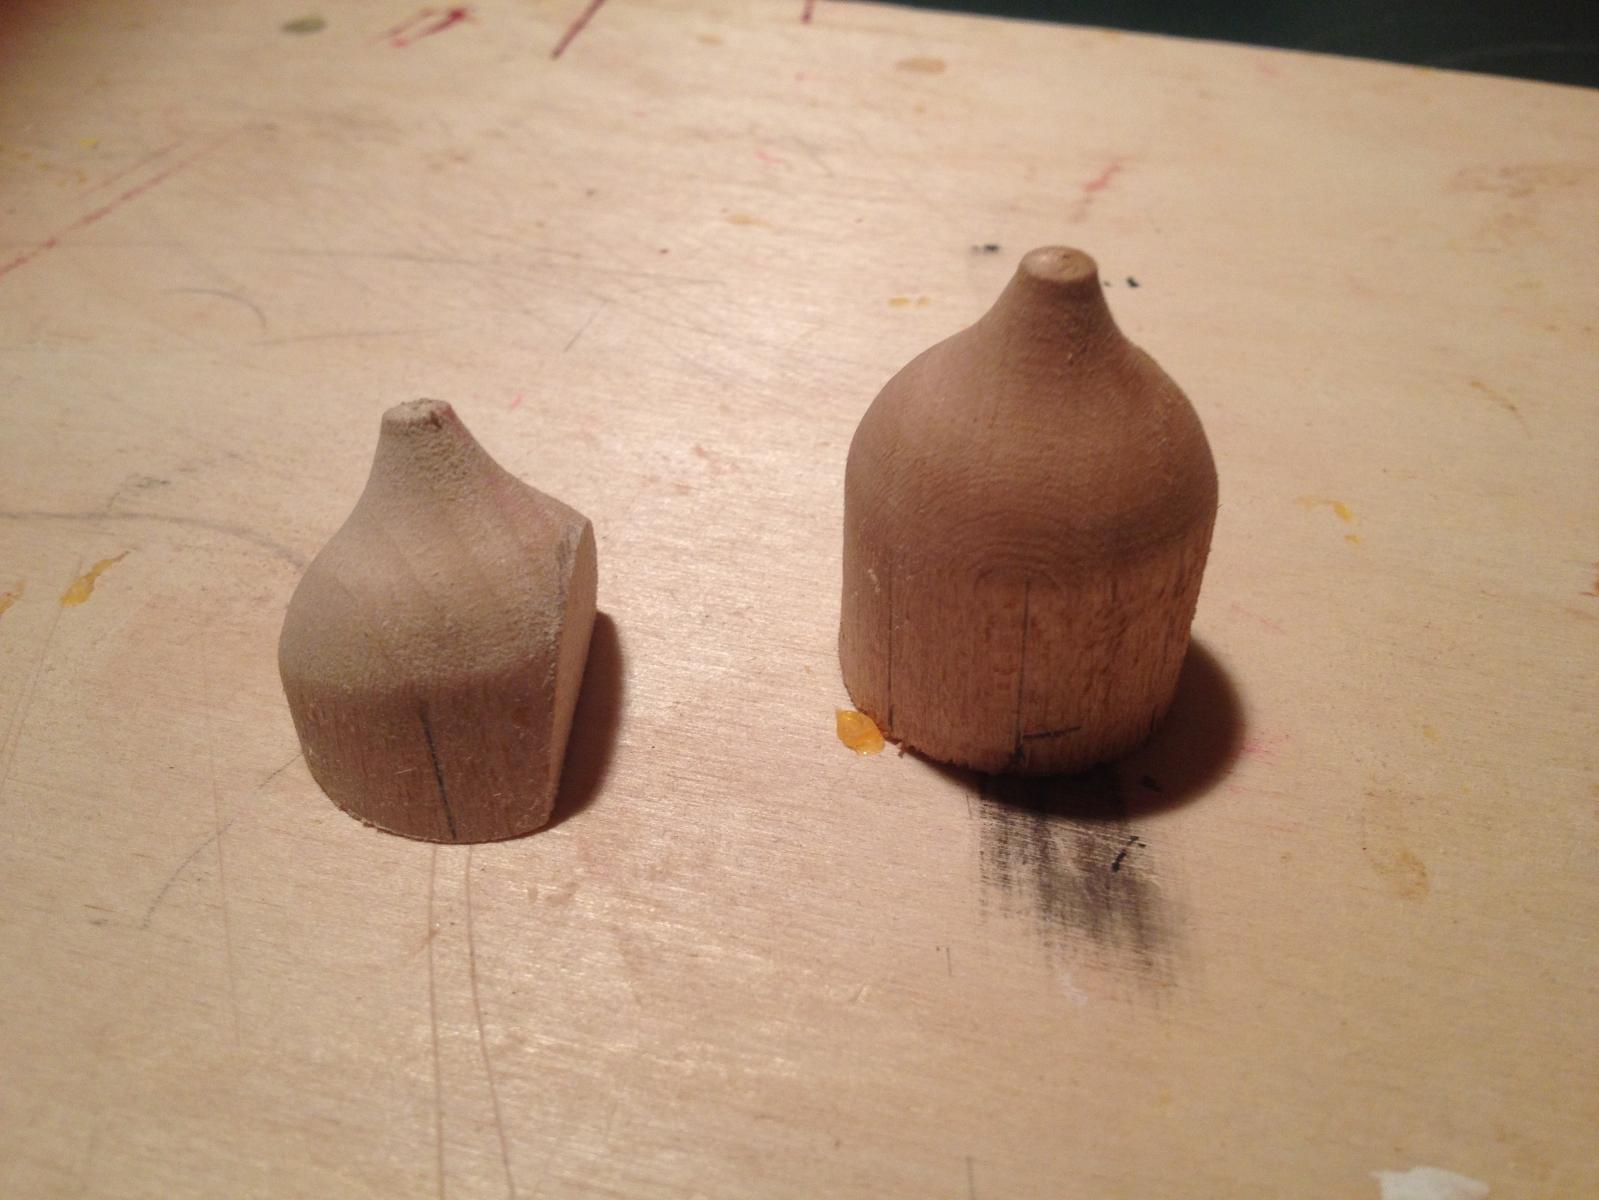
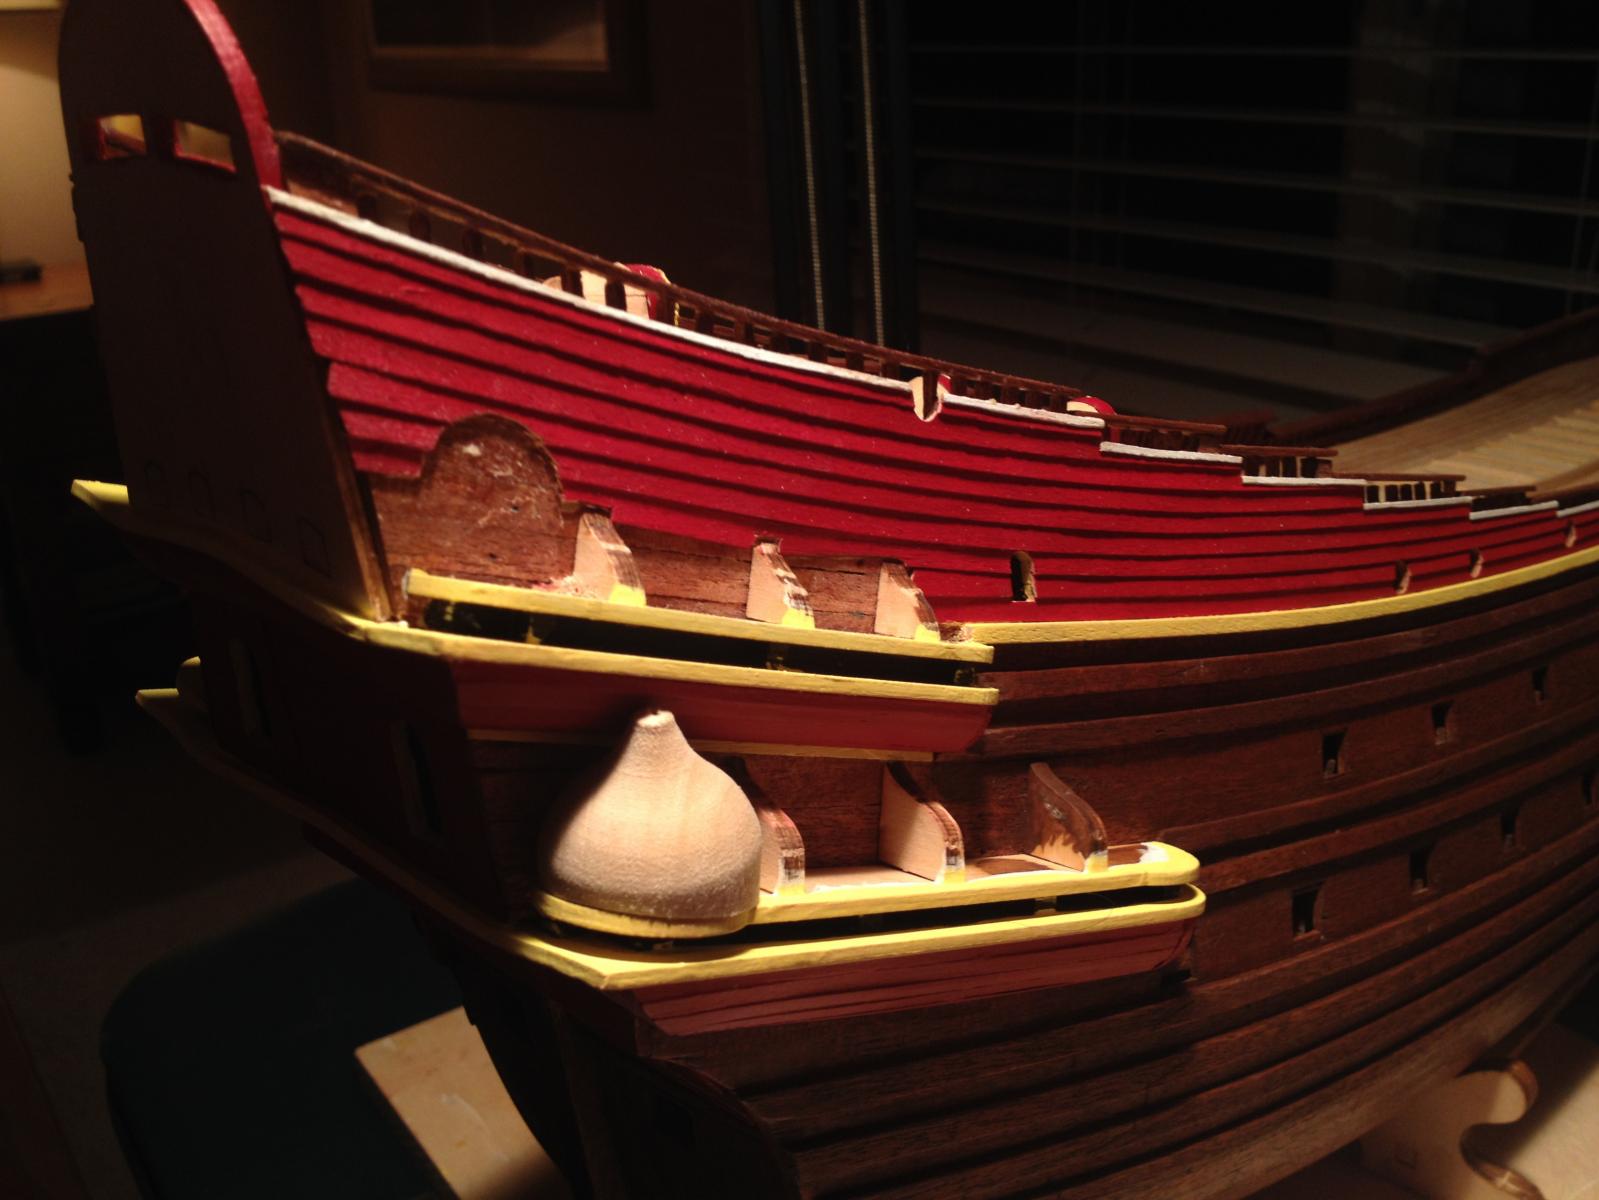
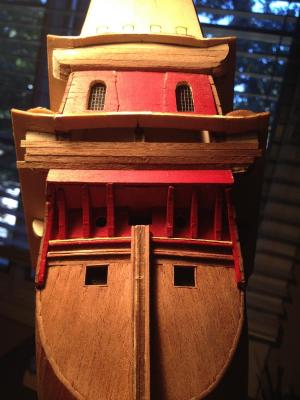
The three towers in place, together with their finials. The hapless lower rear tower needed its finial truncated in order to fit underneath the upper gallery. The gaps in the shingling panels occur because the curved tower profile is not quite regular, but the gaps will be covered by sculptures, so it won't matter. The very front of the upper gallery is a little tricky. The kit provides balsa as it does for the front of the gallery bottom, but it doesn't match well with the clinker planking. I ended up creating three shingled panels to go over the balsa, and they looked pretty good. A view from the stern. Bad lighting, but you can see the sides of the tower bases are fairly vertical, which was surprisingly hard to get right. There are lots of angles conspiring against you here. The towers all primed and ready to paint. What you don't see is that the sides facing the hull also need shingling, and you can't really do that until the towers are in place, making the job quite fiddly. Beginning to paint the towers. The horizontal plank is a test fit. Note the window below it - there will be a corresponding square cut into the gallery planking.


- 249 replies
-
- 4
-
-
- billing boats
- vasa
- (and 1 more)
-
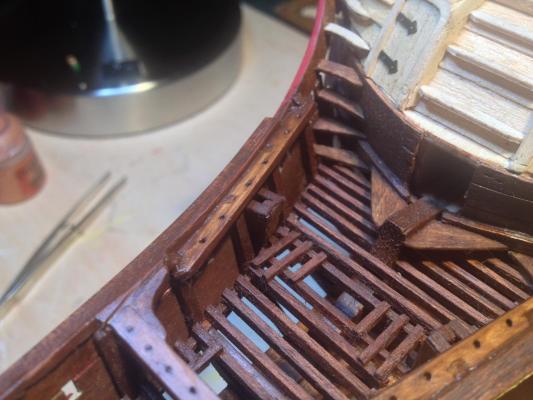
I had to break off the bulkhead tops before I started the scratched bulwarks. I had already thinned them down when I tried using the kit's precut bulwarks, and the result was too fragile to provide adequate support as the scratched bulwarks were built up. Instead, I built some temporary thick balsa support frames across the width of the deck, rising to the height of the bulwarks. I curved the outside of the supports to match the bulwark profile, and then removed the supports once I was done. If I had thought it through earlier, I would just have used the frame tops as supports.
-
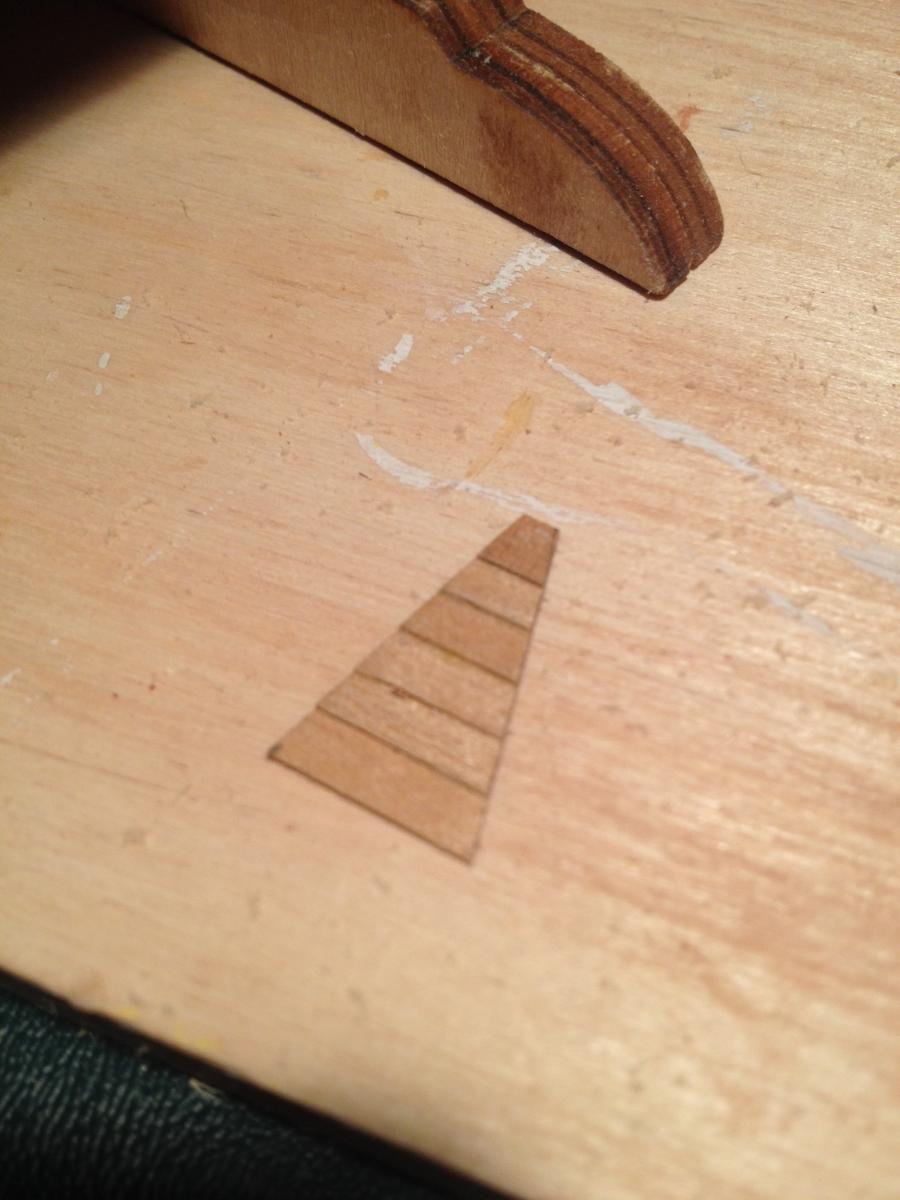
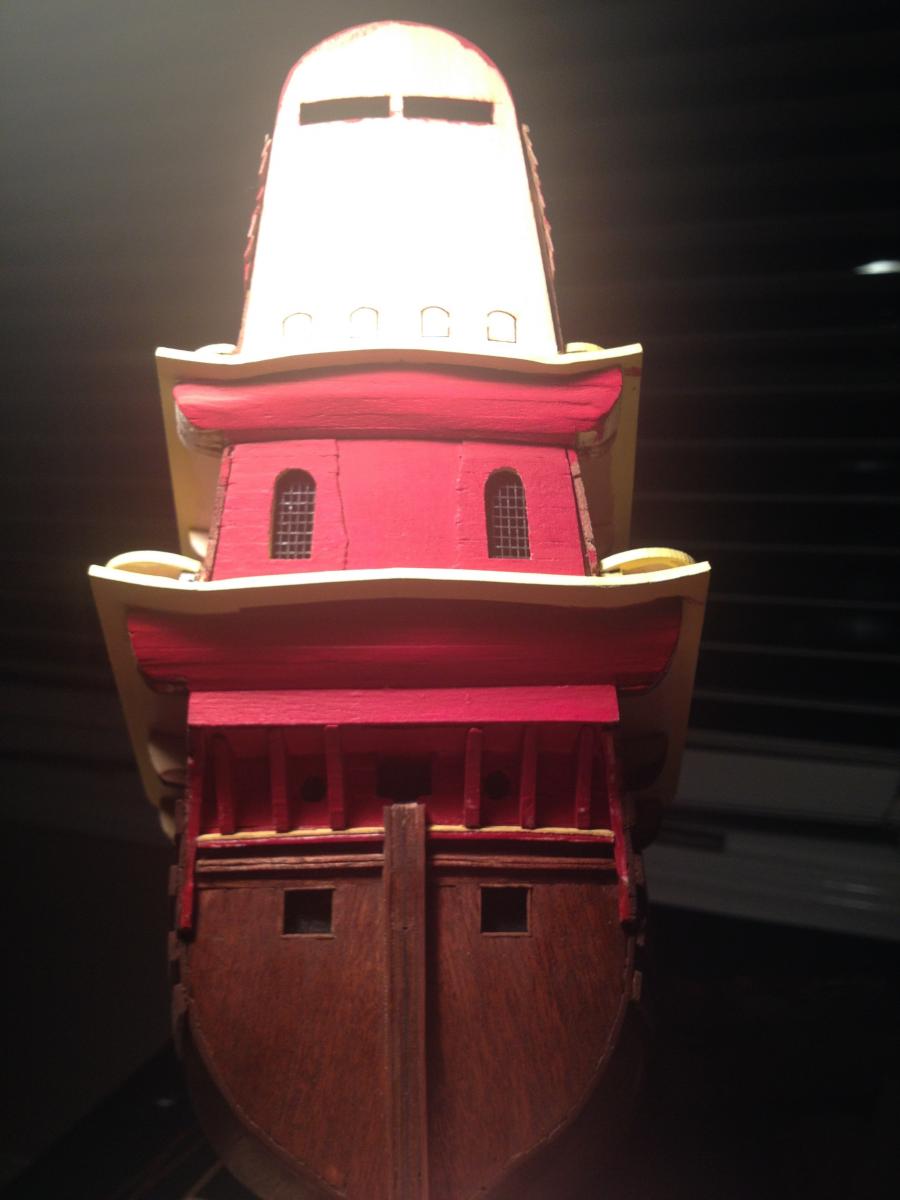
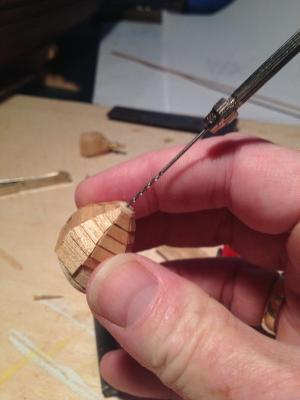
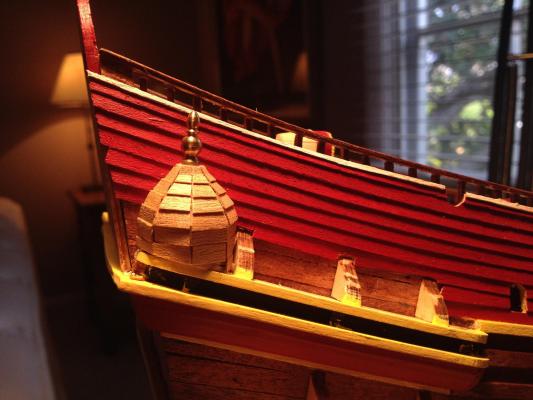
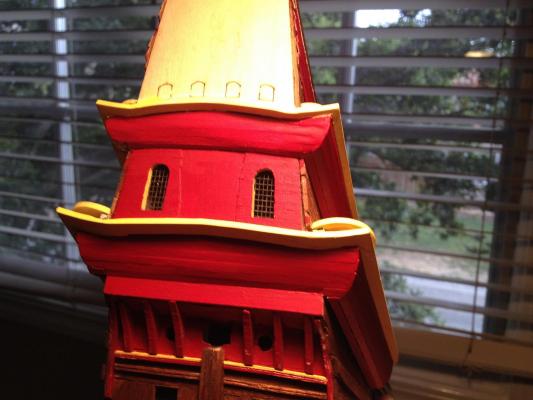
My next problem was figuring out how to put overlapping shingles on the towers like on the real ship. The kit makes no provision for this - all they expect you do to is scribe some lines on the towers. I thought shingles would look better. The kit-supplied towers are continuously curved, but the real ship's towers are more complex. As far as I can tell they are octagonal, with eight panels, each curved to form a dome together. The kit's contour for the dome was basically correct, so I started by marking the points of an octagon at the base, and then making lines from each point to the top of the tower. The next problem was attaching the shingles. I didn't want to mess with the towers too much (the rear lower ones were a notable exception) since the curve profile looked pretty good out of the box. So I ended up flattening the cylindrical lower part of each tower only. Then I constructed a set of triangular pieces similar to the photo below, composed of shingles laid over one another: Eight triangular pieces comprised the shingling for a single tower. The shingles were thin veneer, so it was pretty easy to bend them to follow the curve of the dome. Getting the edges to meet up was tricky, and there were a few gaps, but they will be covered with sculptures, so no problem there. Here's a photo of one of the towers once it was shingled. I then needed to drill a small hole in the top for the finial, which is a turned piece of brass. The real ship had different shaped finials for each tower, since as far as I can tell they had an unlimited supply of labor to do that sort of thing. The kit's finials are all the same, so I'll differentiate them with paint. And here is a tower dry-fitted in place. The shingles extended the size of the tower slightly, so I needed to cut away the clinker planking on the hull where it met the tower. I think the result turned out pretty well - the bottom part is nicely octagonal, and the top part curves nicely. Repeat five more times for the remaining towers...


- 249 replies
-
- 5
-
-
- billing boats
- vasa
- (and 1 more)
-
And on to the gallery towers. I assumed that the lower rear one would be the most difficult and I was right. I don't know why that caused me to tackle it first. The towers start as cylindrical turnings, and need angled cuts in three dimensions to fit them to the galleries. The kit supplies dimensions, but I found them to be pretty useless. I needed to roughly shape the towers and then keep testing the fit until I liked it. Here are pictures of the lower rear tower before and after I used the kit-defined measurements to shape it. Alas, this tower just didn't fit properly. The relationship between the upper and lower galleries forced the tower to be canted to the outside and with its base swelling over the edge of its gallery in order to clear the gallery above. This was either to a greater or lesser extent depending on whether I added the finial and wanted it too to clear the upper gallery. I think the kit design just doesn't have quite the right setup for the galleries, since the kit photos also show a poorly fitting lower rear tower. You can see what it looks like here, when you make the cuts in each dimension but do no other reshaping: I ended up doing a bunch of reshaping such that the tower was able to clear the upper gallery while keeping its sides still vertical. It was a little tricky to do this and at the same time prevent a gap between the tower and the side of the hull. And I needed to truncate the finial - no amount of reworking would make it clear the upper gallery. All in all a thankless task, but the result was reasonably good.

-
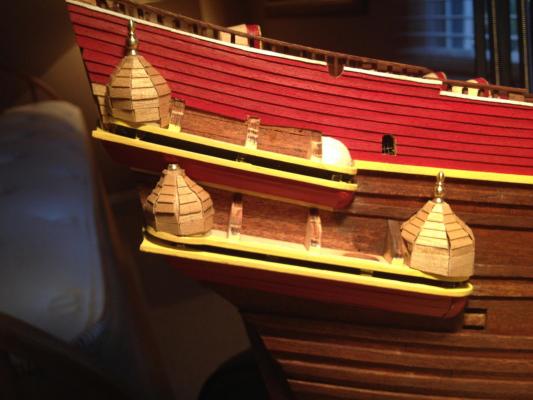
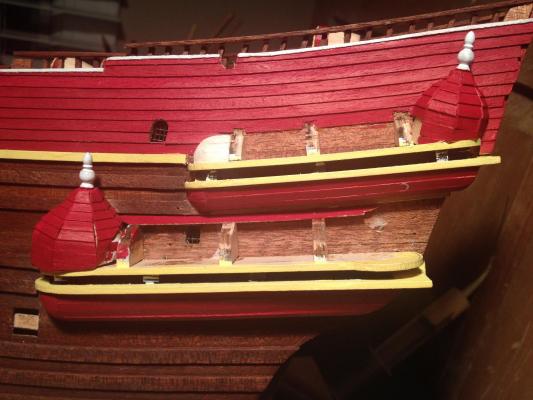
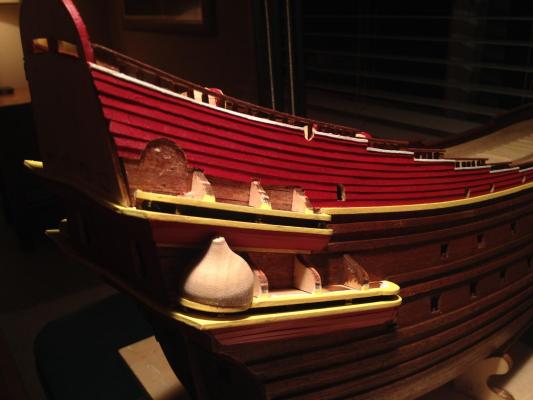
The quarter galleries were the most challenging part of the build at that point. Lots of curves meeting each other, requiring earlier framing to be aligned very carefully. If the early parts are off, I suspect it would be almost impossible to make the galleries look right. I started by planking the curved parts of the stern out to where they meet the lower parts of each quarter gallery. In order to get the edges mitred properly I needed to make balsa support blocks at each corner and very carefully shape them to the desired curved corner profile. Then I used 3mm veneer as the planking, starting at the base and working upward. The topmost piece of each level is curved to match the lip of the gallery. I then painted the planked areas - you can see the result in the following two pictures. It turned out reasonably well -- once all the sculptures are mounted there, you won't see much of the base. Again the color for some reason looks pinkish. The actual color is a dull red. Once the stern planking was finished, I needed to plank the lower half of each quarter gallery and get it to meet at the back with nice mitered curve. The balsa support block really helped here; the only other tricky part was that the gallery curves slightly, so various planks needed a little edge bending to line up properly. I figured this would happen so I started at the top where the joints are visible, and worked my way down. By the time I got to the bottom I needed an oddly shaped plank but it's basically hidden at the very bottom of the gallery. Finally I needed to make the front nose of the quarter gallery bottoms. The kit supplied balsa, and I couldn't think of a better solution so I used it. I glued a block into place and then shaped it in situ until it looked reasonable. The texture's different from the strip wood but it's not that noticeable. The joint will be covered with a sculpture And with that I moved to the turrets, something I was not looking forward to, but which turned out quite well in the end.


- 249 replies
-
- 3
-
-
- billing boats
- vasa
- (and 1 more)
-
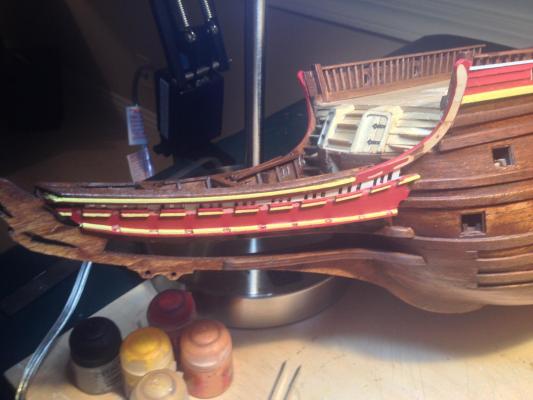
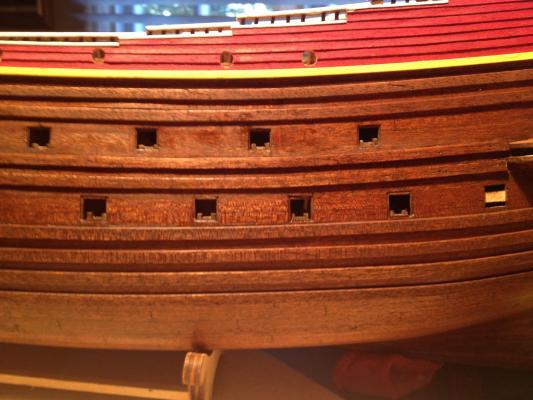
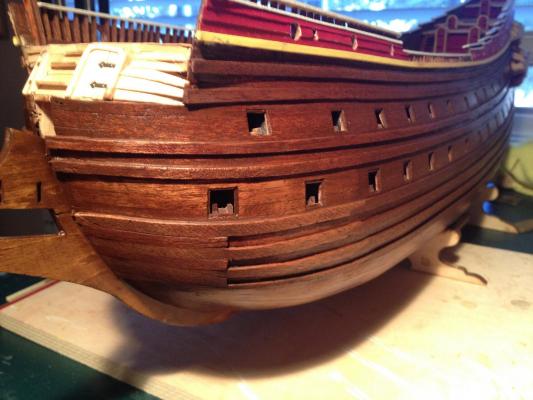
Here are some photos of the wales. Most of the job was straightforward, particularly since the sweep of the hull planks was correct, so the wales just needed to follow the planking. Another good reason to have scratched the bulwarks. The compound curves at the front meant spiling planks for the wales, just as for the hull planks. I used scarf joints for the wales though, and then scribed joints at regular intervals along the rest of each wale. The rear of the wales as they hit the quarter gallery framing. Next up was the quarter galleries, which were...difficult.

- 249 replies
-
- 4
-
-
- billing boats
- vasa
- (and 1 more)