harlequin
-
Posts
747 -
Joined
-
Last visited
Content Type
Profiles
Forums
Gallery
Events
Everything posted by harlequin
-
well, so much for getting lots of work done on Bellona. Several things have conspired to halt any progress not least my car pressing the self destruct button. Lets see what the next few days bring.
-
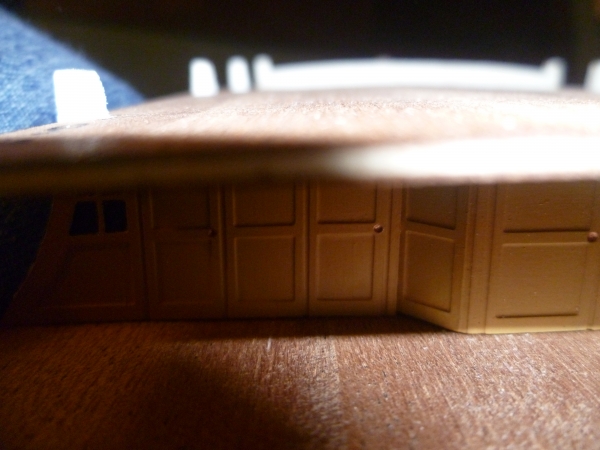
Hi Hamilton, took the liberty of uploading my transom. I used the hideous metal part supplied and turned it into this. Its by far from perfect but doesn't look too bad.

-
Hi Hamilton......I used the metal supplied transom, with your permission I'll post a pic of what I did with mine. Anyway your Greyhound / Blandford is coming along splendidly.
-
I've not done a great deal on Bellona just lately as I have been doing some repair work on my HMS Victory. That has now been completed and the first planking on Bellona is well underway. Few days of work now so will see the planking progress at a rapid rate of knots. Pics to follow.
-
Hi Hamilton, looking good. I never bothered with the tree nails on my Greyhound ( probably because I would not have made a neat job) You are over the real difficulties with this kit now. I am trying to remember other pitfalls you may encounter. Its funny how you soon forget the angst of a particular model once you have completed it. The boat will take a bit of work if you go with the supplied one, but all ships boats are a bit like that. Just be careful with some of the soft metal fittings like the rudder hinges and the shroud chains, they are very fragile. I used the transom supplied and the windows. May replace the windows to something more realistic but it doesn't look too bad on mine. Also if you use the flags make sure you soak them in water to remove all the starch from them, that way they hang more naturally.
-
Landlubber Mike, check out my finished Greyhound in the completed kits forum. Although the kit was not as good as corels usual standard, it still produced a decent finished model.
-
Corel on the whole are quality kits.......I have completed a few although HMS Greyhound was not so hot.
-
normally i would use water based, but now need to find an oil based one just for this specific job. On another note Brian, the Lions are on their way.....personally I dont think it is a strong lions side despite the win in Hong Kong. I think the Aussies will take the series.
-
Thanks Brian C, i dont have the original varnish but I think you are correct. The original varnish would have been oil based polyurethane, I had completely forgotton about that. That is what is great about this site, there is always an answer.
-
I am currently doing some remedial work on my corel1:98 scale HMS Victory involving some of the second planking. The varnish I have is a clear satin finish but is just not quite golden enough in colour to make a perfect match with the old varnish I must have used. I am looking for a clear satin finish varnish that dries slightly golden once dried. The second planking is walnut and from the original kit. Any ideas?
-
Is morope available in the UK ? or can I order it from the states?
-
Hi again Robbyn.........a word on the ratlines and shrouds.......on my Greyhound build I removed the entire shrouds and ratlines......................TWICE....because I was not happy with them. At the time it is a decision only you can make, but i'm glad I did it because as the way it was, when I looked at Greyhound my eyes fixed straight on what I didnt like.
-
Hi Robbyn, just read your entire build log.......all I can say is its fantastic and your first build too......You also throw yourself out of aircraft too which is what I do for fun. I was in the Parachute Regiment for several years and continued throwing myself out of all sorts of aircraft after i left the army, I also flew micro-light aircraft for several years, but the most frightening thing I did in my life was to be a passenger on a motorcycle, very scary with no feeling of being in control. 140 MPH plus on a motorway in England was enough for me. I have jumped from balloons, helicopters, and at night in the pitch dark but the motorbike thing was by far the worst. Good luck on the remainder of your build. I also liked your comments on being a bad patient when you lanced your hand. A well known explorer from the UK, Sir Ranulph Feinnes was also a bad patient. On a trip to one of the Poles he went throught the ice and ended up with frostbite in a couple of his fingers on one hand. His surgeon told him he had to wait untill the remains of his fingers were opperable which would be some considerable time. The finger ends were now exposed red painful stumps and rendered his hand extremely painful at even the slightest touch. Feinnes had had enough and went to his workshop one night, secured his hand in a vice and promptly hacksawed his painful stumps off. Needless to say his surgeon was not impressed.
- 773 replies
-
- 1
-

-
- san francisco ii
- artesania latina
- (and 1 more)
-
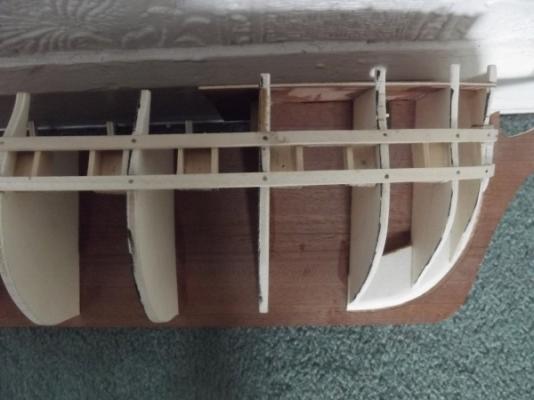
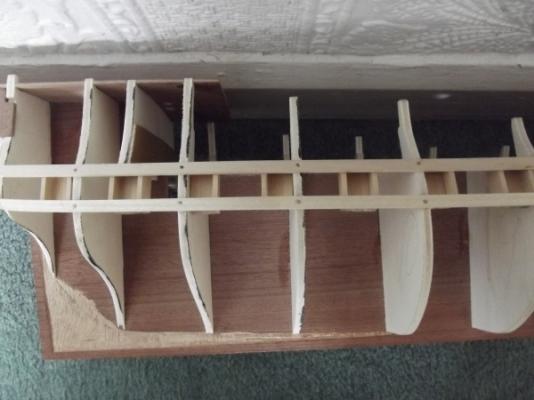
Hi Hamilton, no the bulkheads were a perfect fit, when you start Bellona you will notice the vast difference between the quality of this kit compared with the Greyhound. Very little shaping required, indeed its a pleasure to work with. Even the sometimes difficult transom area appears, after a dry fit, to be matched perfectly. Ive started to bend some of the 4x2 mm walnut second planks so everything at this stage is going to plan.
-
Enamle vs Acrylic
harlequin replied to Timothy Wood's topic in Painting, finishing and weathering products and techniques
I find enamel paint covers ca glue far better than acrylic paint. -
Replanking
harlequin replied to harlequin's topic in Building, Framing, Planking and plating a ships hull and deck
Cheers Billl.....I thought that would be the best method. If I remember some of the hull is attached using contact adhesive and to get that off would be a nightmare. -
Replanking
harlequin posted a topic in Building, Framing, Planking and plating a ships hull and deck
Anybody ever removed planking from a ship to replank. There are several flaws on my HMS Victory that I would like to remove. It would involve removing approx a quarter of the planking from below the waterline. This model I completed 18 years ago and although the flaws are not too bad they are winding me up. Should I attempt this or not? -
Hang in there Hamilton, it is worth it in the end. I know how awkward this build is, indeed there used to be a couple of build logs of Greyhound on the old site that were started but abandoned because of this awkwardness, and that is to say nothing of the changes you are making to the kit yourself. It will be interesting to compare the two Greyhounds of yours and mine as yours progresses. I said before this kit is of high risk of being launched prematurely against the nearest wall, but ultimately looks great on completion. ( just keep a bottle of the strong stuff on hand (not glue ) Lagavulin in my case) and remember softly softly catchy monkey. The colours are looking great by the way.
-
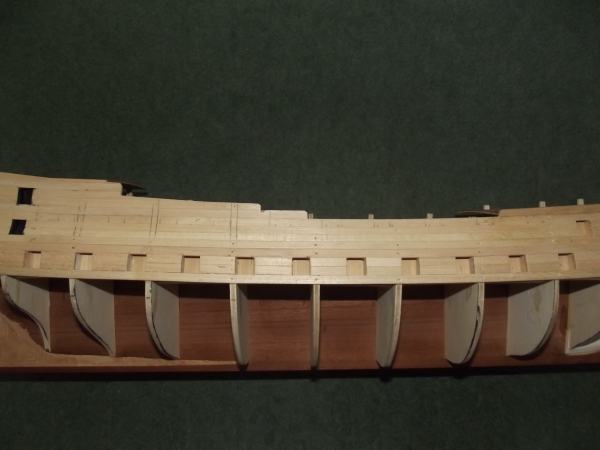
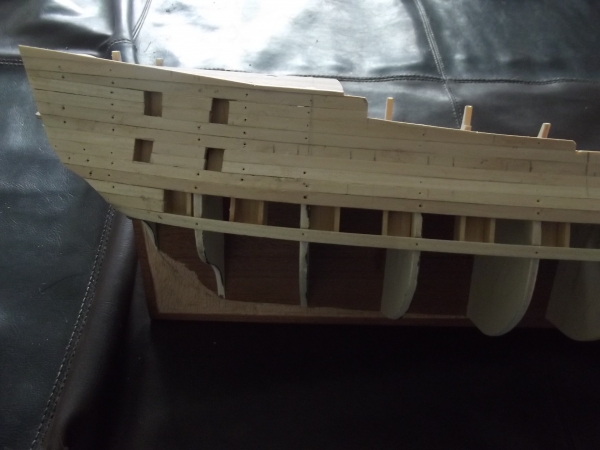
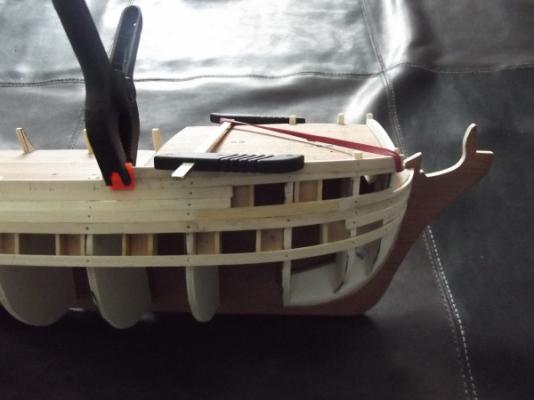
Just a couple of pics on some small progress. The first planking is underway and the blind gun ports are in position. You can see the pinholes on the first planking that I have used to secure the plank till the glue is dry and then the pins are removed. The stern gunports you can see still need to be finished to a nice square. No real difficulties with the build so far, unlike Greyhound when at this stage there was much scratching of my balding head. I will post some pics of Greyhound soon in the finished ships forum.

-
Great looking planking. I dont know about you but once I start with the planking thats when the ship starts to take its first breath. You are starting to put meat on the bones and the whole thing starts to grow.
-
Now where have I seen that hull before?...........looking good Hamilton.
-
starboard blind gun ports completed. They will be coloured black before the addition of the second planking.