

scratch
-
Posts
86 -
Joined
-
Last visited
Reputation Activity
-

 scratch reacted to EdT in Young America 1853 by EdT - FINISHED - extreme clipper
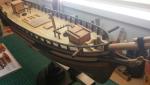
Young America - extreme clipper 1853
Part 100 – Rails and bulwark continued
Work continued this week on the topside rails, planking and channels. The first picture shows the forward starboard upper channel being installed.
These are 6” thick. Note that the main rail sections are missing in this photo – being only temporarily fitted at this stage.
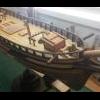
In the next picture the mizzen and main lower channels have been installed.
Note that – unlike the uppers - these are “streamlined” at the ends. I believe these lower channels spent a good deal of time in the water. The main rail sections are positioned only in this picture. The stack of planks on the deck are destined for the starboard side down to the wale.
In the next picture the entranceway has been cut into the upper strakes.
The last section of topside planking is being glued in the next picture – held by pins and a couple of screw clamps.
The next picture shows the topside planking completed – except for treenails.
The toptimbers have been cut off flush. The next picture shows the run of planking from almost directly forward.
Planking of the starboard side down to below the waterline is next on the agenda. This will take some time with the narrow planks used on these ships. The model will be inverted to make this work possible around the stern. Planking on the port side will go just a few strakes below the lower channels – leaving the framing on that side open below that height.
Ed
-
 scratch got a reaction from captgino in Flyer by captgino - FINISHED - Constructo - 1/100 - Pilot boat - first build
Fine looking model you have built As for fuzzy lines , you can run the rigging line through a block of wax or if the rigging is already on , a 50/50 mix of water and white glue . Dip a cotton ball into the solution , squeeze out the excess and run it over the rigging .
David
-
scratch reacted to Remcohe in HMS Kingfisher 1770 by Remcohe - 1/48 - English 14-Gun Sloop - POF
A long overdue update, be it small is more than one way
The tiller hole was repositioned and the hoops were added
The pintles are browned, bolted & screwed to the rudder, (okay I simulated the screws.....)
Next up the Gudgeons, any ideas how long they need to be? TFFM only shows one, are #2 to #5 all the same length?
Remco
-
scratch reacted to Dan Vadas in HMS Vulture 1776 by Dan Vadas - FINISHED - 1:48 scale - 16-gun Swan-class sloop from TFFM plans
Thanks for looking in Michael and Jan .
Futtock Shrouds
Preparations for installing the Futtock Shrouds begins with making the Futtock Plates which hold the deadeyes. I made these from 0.7mm brass wire rolled around a 3.3mm drill bit, clamped up with needle nose pliers, and silver soldered at the bottom end. A 0.7mm hole was drilled into the lower end and the upper end was stretched back out so the deadeye could be inserted :
After blackening the plate was closed up around the deadeye :
4mm hooks were bent from 0.5mm wire, silver soldered and blackened. The futtock shroud was then seized to it :
The futtock plates go through the oval holes in the mast top and the shrouds are hooked to them :
The lower end of the shroud wraps around the futtock stave and is seized to the lower shroud :
Danny
-
scratch reacted to tlevine in HMS Atalanta 1775 by tlevine - FINISHED - 1:48 scale - from TFFM plans
I have proclaimed the lower hull planking finished! In the end I applied three coats of sanding sealer and one coat of flat finish. This was sanded to 1200 grit. The finish coat adds luster without shine and is a harder finish than the sanding sealer. The upper planking will be finished with Watco's to match the rest of the Costello after the channels, moldings, etc. have been installed. I repainted the wale and put her back in the cradle.
-
scratch reacted to Trussben in HMS Pegasus 1776 by Trussben - 1:48 - Swan-class sloop based on TFFM
thanks for the likes and comments.
Framing in the Waist continues, 21 frames to go!
Ben
-
scratch reacted to Alex M in HMS Sphynx 1775 by Alex M - Scale 1/48 - English 20-Gun Frigate
Hello guys and many thanks for warm words!
It's time for update. Have prepared my Unimat to turn and mill the spindle for capstan. The images show the proces.
Have also turned the stantions, as they served also to hold the pump handle, I will complette the pumps as next.
Alex
-
scratch reacted to Dan Vadas in HMS Vulture 1776 by Dan Vadas - FINISHED - 1:48 scale - 16-gun Swan-class sloop from TFFM plans
I was unhappy about the thread color and the stark contrast for the crowsfeet, so I'm re-doing them with black line :
This is not entirely accurate, as to the best of my knowledge they weren't tarred, but the visual aspect is far better.
Danny
-
scratch reacted to DocBlake in Battle Station by DocBlake - FINISHED - NRG
Just finished the breeching line. My research says it should be about 3 times as long as the barrel of the cannon. My cannon measure 4 inches and the breeching line is 12 inches. It think it may look a little sloppy. Should I shorten each side by 1" to 1-1/2" or leave it as-is?
-
scratch reacted to tlevine in HMS Atalanta 1775 by tlevine - FINISHED - 1:48 scale - from TFFM plans
I have decided to use a finish that will not yellow the holly. In TFFM David mentions a solvent-based sealer for his finish. For those of you who own his Comet book or have seen the photos, that is the look I am trying to achieve. The bottle of solvent-based sanding sealer I have was quite a few years old so I purchased some from Midwest Models, as well as a bottle of flat finish. I have not decided whether to stick with just the sealer or put a coat of finish on as well. The pictures are taken after two coats of sealer, the first sanded down to 320 grit and the second sanded to 400. Later this week I will test applying a coat of the finish on some scrap wood. One of the nice things about the sealer is that the drying time is very fast but as this is solvent based the smell is pretty strong. Unlike a oil based finish, the odor dissipates quickly.
-
scratch reacted to gjdale in Bomb Vessel Granado 1742 by gjdale - FINISHED - 1/48 - Cross-Section
Thanks Mobbsie, Augie and Ben. Mobbsie - the overheating problem hasn't been solved as such, but I'm keeping an eye on it and if necessary will do my sanding in shorter bursts to avoid the problem. I figure that the worst case is that I will need to get the motor rewound at some point.
Resumption of Play
Testing of Frame Bolts
Jeff’s drawings indicate large bolts/treenails either side of the chocks on the double frames. The drawings in AOTS show a significant number of additional bolts on these frames. Having seen these additional bolts added on Spanien’s build log on MSB, I decided that I would also add these. As far as I can tell from the scantling list in AOTS, these bolts would be one inch in diameter. At scale that translates to 0.53mm. Compromising between accuracy and aesthetics, I have chosen to use copper wire of 0.9mm diameter. I stretched the wire to breaking point to work harden it as well as to straighten it, giving it a final diameter of 0.8mm. I’ll call that the diameter of the bolt head, not the shaft!
These were inserted into pre-drilled holes in the frames and secured with epoxy. Once the glue had set, the frames were sanded to remove excess glue and set the bolt heads flush. My dilemma now is whether to leave these as bright copper, or to blacken them (which I think would be a more accurate representation of iron). I tested this with my Test Frame D1/D2, leaving one side “natural” and the other blackened. The good thing about using copper in lieu of brass is that copper can be blackened with Liver of Sulphur (LoS), which can be painted on in situ and the excess cleaned off with water, without staining the surrounding timber. Here’s a few pics of the test pieces.
Here is an overall shot of the natural copper bolts:
And for comparison, an overall shot of the blackened bolts:
A close-up of the natural copper:
And a close-up of the blackened bolts:
I’m leaning towards the blackened bolts, but am not yet decided. Opinions welcome!
Here’s a couple of shots of the test frame in the jig:
All looks good to proceed, so it's back to making frames and fitting chocks - properly this time! -
scratch reacted to tlevine in HMS Atalanta 1775 by tlevine - FINISHED - 1:48 scale - from TFFM plans
Thanks, everyone for the comments and the likes. I have finished the treenails. I estimate that the whole process consumed about 25 hours of my life. So my ugly duckling is now in the process of becoming a swan (class). Sorry, couldn't help it. I removed the hull from the board for the sanding process. I find it easier to sand a curved object while holding it in my lap. This gives me easier access to the various rabbets and the intersection with the wing transom. In the process, despite using masking tape, the main wale has gotten fairly scuffed up and will require another coat of paint. In the pictures the hull has been sanded down with 100 grit. The treenails are hard to see because no finish has been applied yet.
-
scratch reacted to Dan Vadas in HMS Vulture 1776 by Dan Vadas - FINISHED - 1:48 scale - 16-gun Swan-class sloop from TFFM plans
Crowsfeet
The Crowsfeet prevent the topsails from chafing the lower stays, and also stop them from getting snagged in the tops.
I used Gutermann Quilting Cotton for these. It's not quite the same color as Chuck's running rigging line, but it is the closest match they make. This stuff is made from cotton and has a polyester coating which makes it a little more rigid than normal cotton - this makes threading it through tiny holes a lot easier. It also has NO fuzzies at all .
The line starts on the strop at the top of the euphroe and passes over the forward edge of the top and through the middle hole. Then it comes back up through the adjacent hole on the port side, down to the uppermost hole in the euphroe and through the top on the starboard side. These steps are repeated for the remainder. The last line is tied off to it's adjacent partner underneath the top.
It was a difficult job to get even tension on all the loops of line. I had to go back over all the loops a few times to get an acceptable result :
The euphroe tackle :
Danny
-
scratch reacted to Dan Vadas in HMS Vulture 1776 by Dan Vadas - FINISHED - 1:48 scale - 16-gun Swan-class sloop from TFFM plans
Thanks very much George, Mark, Maury, John, Nils and David. Your comments are appreciated.
Yes they are Mark. You may be confusing them with the Futtock Shrouds, which do have hooks.
Euphroes
The Euphroes are used to attach the lower parts of the Crowsfeet to the stays. They are only 12mm long for the fore and main masts, and 10mm for the mizzen mast. This is slightly longer than the ones described in TFFM (by 20%) but with the slightly larger thread I'm using for the Crowsfeet I had to make the holes a bit bigger (0.45mm) to get the thread through. There are 11 holes in the fore and main and 9 holes in the mizzen.
I started by cutting the stock for all three to width and thickness from English Box. I ran the stock through the table saw to cut the grooves for the strops. Then I drilled all three pieces in my mill :
Then I cut the three pieces to length, tapering each one first. Final rounding was done with a sanding stick :
Final job was to attach the strops and a 4" block for the tackle. This is a rarely seen detail on models :
Danny
-
 scratch got a reaction from Jeronimo in LE BONHOMME RICHARD by Jeronimo - FINISHED
Like every-one else Karl , this is absolutely stunning work .
Dave
-
scratch reacted to Jeronimo in LE BONHOMME RICHARD by Jeronimo - FINISHED
Hi Friends.
Construction of the main-top.
Karl
T e i l 5 6
-
scratch reacted to mobbsie in Bomb Vessel Granado 1742 by mobbsie - FINISHED - 1/48 - cross-section
Hi Guys,
Time really flies and boy am I due an update.
Thanks for all the comments guys and for those that hit the like button.
I've experienced a bit of aggro fitting the frames into my jig, the jig seemed to be too big and the frames flopped around inside when fitted.
It turned out to be two things, firstly the top cut outs on the jig were deep and so did not hold the frames as it should, secondly my centre line on the jig was out of alignment, bearing in mind this was my first practice piece it's hardly surprising.
I was also having a bit of trouble with my glue, it just wasn't holding the 9 parts of each frame together. Following advice from my build partners I changed the glue and although it's early days this new glue seems to be doing the job.
The glue I was using was Ever Build 502 which stood me in good stead for the time I was building the Agamemnon, this glue only has a life of 12 months after the date of manufacture and unfortunately there is no date on it, anyway I got some Evo-Stik weatherproof wood adhesive, seems to be good stuff.
The long and short of it is that a new Frame Jig was made, this time properly and it's now doing the business.
Both Grant and I differ on this next area, it's only athetics, I wont go into what Grants doing but I am not putting treenails in the frames. Looking at AOT's there are bolts around the bottom section of each frame, I decided to use 0.7mm oval head brass pins for these bolts with 0.7mm flat head brass pins on the revers side. I decided to leave these brass colour, you know me, that's the look I like.
Enough chat, I have a few pics showing you where I'm at, please, if you have any comments / remarks don't be afraid to ask or make suggestions. I'm here to learn.
The first two pics are of the new jig
These are the first 5 frames 0, A, B, C and D, 0 and D frames are doubles
This is the 0 frame showing the bolts.
This is the jig with the 5 completed frame in position
So your right up to date now guys, destructive then constructive comments are always welcome.
Be Good
mobbsie
-
scratch reacted to Dan Vadas in HMS Vulture 1776 by Dan Vadas - FINISHED - 1:48 scale - 16-gun Swan-class sloop from TFFM plans
Thank you Eamonn, George, Maury and Jan.
Catharpins
A rather tricky step in the rigging, I've fitted these before starting the ratlines as it gave me better access.
Some careful measuring was needed (along with a bit of trial and error) to ensure that the catharpins would just slightly pull the shrouds together when fitted. They also had to all be EXACTLY the same length. The eye splices also had to be taken into account.
First job was to serve the 8 pieces needed, leaving some extra length in the serving line that would act as a "splice". Then the eyes were "spliced" in a similar fashion to others I'd done before. The seizing lines were tied to each eye :
One end was loosely seized near the bottom of the shroud where it was a bit easier to do :
Then the unit was raised into position. I used a self-closing tweezer to hold the opposite side in position while I finished off the seizing. The foremast catharpins fitted :
Danny
-
scratch reacted to Maury S in Mast from Admiralty Models Workshop
Bib and cheek mated. I'm building up the head of the mast, then they will be tapered to the plan dimensions.
Maury
-
scratch reacted to Maury S in Mast from Admiralty Models Workshop
The cheeks are tapered in both dimensions. Chiseled close to the line then finished on a sanding board. The notches for the bibs are cut carefully with a #11 blade (pic. out of order). I cut these before installing the cheeks as I had more control for the detailed cut on a flat surface. They got cleaned up with a swiss file (not shown).
Maury
-
scratch reacted to Maury S in Mast from Admiralty Models Workshop
Cheeks: I did this in a different order than presented. First I cut the concave underside at the bottom of the cheeks since there was more "meat" to hang onto. I do not have a good gouge of that shape, so I marked off the arc by holding the cheek up against the shoulder cut in the mast, set the length of the cut and shaved it out with a very sharp 1/4" chisel, working from the outer edge in to the center. Once close, I sanded to clean it up.
Next is tapering, both the length and width.
Maury
-
scratch reacted to pompey2 in Design and Build a Custom Work Station
To continue
I put a rail around the base for bulkier/heavier items
I want to have a shelf that i can use for reference material - ship manual for instance.
I am going to have it sit on top of the fixed shelf and it will still slide out.
This is the shelf with a lip on front to hold a book.
The guides above the shelf have a 'special' shaped cut away.
That allows the shelf to slide out and close snuggly
And then when pulled out can drop down and be held securely
All the trays/shelves have finger cut out below
I have compartmentalised the other trays.
Which pretty much completes the design stage.
Here is the finished item
With trays slid out
And with the top tray removed to allow use of the cutting mat surface
Now to get onto the Building.
That will be my xmas project
So I will follow up here once there is progress to show
Nick
-
scratch reacted to Dan Vadas in HMS Vulture 1776 by Dan Vadas - FINISHED - 1:48 scale - 16-gun Swan-class sloop from TFFM plans
Thanks for that Grant. I might just try that method next time .
Berthing Rail
A slight departure from the masts/rigging while I remember it. Before I get too much more rigging around the Head it was time to make and fit the Berthing Rail. This is an iron rail supported by a stanchion in the middle. It fits into a small eyebolt at each end (I'd fitted these earlier) :
Danny
-
scratch reacted to tlevine in HMS Atalanta 1775 by tlevine - FINISHED - 1:48 scale - from TFFM plans
I am not sure which is more tedious, treenailing a hull or tying ratlines. At this point I am over halfway done with an estimated time so far of 15 hours. This includes marking the locations for the treenails, drilling the holes (#75 bit), drawing the treenails (hole 20 on the Byrnes drawplate) and finally inserting the treenails. I have used bamboo for these to give me the least color contrast with the holly. I usually dry-fit treenails but for extra strength these are all dipped in dilute yellow glue. I hope to finish them up next weekend and then start sanding the hull. Right now it is pretty ugly, covered in lines and holes and little bumps which make it look more like a plucked chicken than a ship.
-
scratch reacted to Dan Vadas in HMS Vulture 1776 by Dan Vadas - FINISHED - 1:48 scale - 16-gun Swan-class sloop from TFFM plans
Top Stanchions and Railings
The final things to add before attaching the Tops are the Stanchions and Railings. TFFM advise against doing it at this stage as they may get damaged whilst rigging, but I found them difficult enough to fit on the bench let alone when they are on the ship. I'm confident that they will stand up to any punishment later on .
I made the stanchions from 1.0mm brass rod and 1.6mm brass tube. The tube's ID was only 0,8mm so every piece had to be drilled. I did this on the lathe, and also cut the pieces of tubing from the stock using the parting tool held about 1mm from the chuck. They are a rather tight fit, and didn't really need soldering so I didn't bother :
The stanchions were also a tight fit in the previously drilled holes in the tops so I glued them in with CA. I drilled the rails 3/4 of the way through, and once again they were a good fit. I glued them on to the stanchions with PVA :
Danny