


RodR
-
Posts
26 -
Joined
-
Last visited
Reputation Activity
-

 RodR got a reaction from Aussie048 in Perseverance 1807 by Rodr - Modellers Shipyard - Scale 1:48 - Colonial Brig - first build
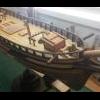
Finally managed to find some time to continue with my hull planking.
After doing the "easy" planks I had to begin the tapering process.
I divided the remainder of the hull up into three sections using a planking batten as suggest in the article on MSW and this seemed to make it a bit easier.
After what seemed like 5 hours I had completed a grand total of 10 planks!
I hope I get faster at this!
Anyway, I'm pretty happy with the way its turning out. After a good sand it should come out pretty smooth.
If its raining tomorrow, I wont be going fishing so hopefully can finish off this side of the hull, so long as the better half doesn't find a whole lot of other jobs for me.
Cheers
Rod
-
 RodR got a reaction from ringbolt2013 in HM Colonial Cutter Mermaid by olliechristo - FINISHED - Modellers ShipYard -
Awesome, simply awesome!
-
 RodR got a reaction from Bindy in HM Colonial Cutter Mermaid by olliechristo - FINISHED - Modellers ShipYard -
Awesome, simply awesome!
-
 RodR got a reaction from olliechristo in HM Colonial Cutter Mermaid by olliechristo - FINISHED - Modellers ShipYard -
Awesome, simply awesome!
-
 RodR got a reaction from WackoWolf in Perseverance 1807 by Rodr - Modellers Shipyard - Scale 1:48 - Colonial Brig - first build
Didn't get to go fishing today. My wife had other ideas so in between lots of household chores, I managed to finish the second planking on the starboard side of the hull.
I ran into a bit of trouble as I neared the end and the last plank had so many undulations in it to fit the final gap, that it looked more like a snake than a plank!
I cant believe how long this took me. Either I'm just very slow or there is a simpler way that I'm yet to figure out.
I've given it a rough sand but will wait until I've done the other side before doing a final sand.
In the DVD instructions it says to give the whole hull and deck a spray coat of satin estapol.
Should I do this before adding the wales, stanchions and deck railing caps or after they are all glued on?
I'm really enjoying building this model but cant wait to get to the deck fittings etc. This planking caper is hard work!
Cheers
Rod
-
 RodR got a reaction from scratch in Perseverance by scratch - Modellers Shipyard -1:48 - Colonial Brig
Hi David,
I will be watching closely to see how you deal with the plastic boats.
I hope you don't mind if I copy your companionways. They look so much better than the way the instructions say to do it.
Also how did you simulate the caulking on your deck planking? It looks very neat, especially the butt joins.
I did mine with a 6B pencil but I found that the graphite got into the grain on the timber. I guess it gives it a more weathered appearance but the rest of the boat will look brand new.
Cheers
Rod
-
 RodR got a reaction from egkb in HM Colonial Cutter Mermaid by olliechristo - FINISHED - Modellers ShipYard -
I still cant believe that this is your first model!
Your workmanship is simply outstanding.
What's your next model Ollie?
Cheers.
Rod
-
RodR got a reaction from ringbolt2013 in HM Colonial Cutter Mermaid by olliechristo - FINISHED - Modellers ShipYard -
I still cant believe that this is your first model!
Your workmanship is simply outstanding.
What's your next model Ollie?
Cheers.
Rod
-
 RodR got a reaction from Sjors in HMS Agamemnon by mobbsie - FINISHED - Caldercraft / Jotika - 1/64
Hi Mobbsie,
Your ship is simply stunning.
I have this kit but it will be a while before I have the skills and experience to make a start on it.
I have printed out this entire build log for when I do start it. (just in case all the site content is lost again).
Who needs instructions when you have a build log like this.
THANK YOU.
Rod
-
 RodR got a reaction from mobbsie in HMS Agamemnon by mobbsie - FINISHED - Caldercraft / Jotika - 1/64
Hi Mobbsie,
Your ship is simply stunning.
I have this kit but it will be a while before I have the skills and experience to make a start on it.
I have printed out this entire build log for when I do start it. (just in case all the site content is lost again).
Who needs instructions when you have a build log like this.
THANK YOU.
Rod
-
 RodR got a reaction from PMG in HMS AGAMEMNON by PMG - Caldercraft
Beautiful workmanship Pierre,
I will be watching closely as I have this kit and hope to start it once I get a few more easier models under my belt.
Cheers
Rod
-
 RodR reacted to Sjors in HMS Agamemnon by Sjors - FINISHED - Caldercraft/Jotika - 1:64
Because it's almost time to go back to the Aggy I post a picture from the reorganised workshop .
Also from the chisels that I have bought for my lathe.......
Now I have to find a excuse to use them.....
Maybe a little scratch in the future ?
-
 RodR got a reaction from Brian the extraordinaire in Perseverance 1807 by Rodr - Modellers Shipyard - Scale 1:48 - Colonial Brig - first build
Didn't get to go fishing today. My wife had other ideas so in between lots of household chores, I managed to finish the second planking on the starboard side of the hull.
I ran into a bit of trouble as I neared the end and the last plank had so many undulations in it to fit the final gap, that it looked more like a snake than a plank!
I cant believe how long this took me. Either I'm just very slow or there is a simpler way that I'm yet to figure out.
I've given it a rough sand but will wait until I've done the other side before doing a final sand.
In the DVD instructions it says to give the whole hull and deck a spray coat of satin estapol.
Should I do this before adding the wales, stanchions and deck railing caps or after they are all glued on?
I'm really enjoying building this model but cant wait to get to the deck fittings etc. This planking caper is hard work!
Cheers
Rod
-
RodR got a reaction from Bindy in Perseverance 1807 by Rodr - Modellers Shipyard - Scale 1:48 - Colonial Brig - first build
Didn't get to go fishing today. My wife had other ideas so in between lots of household chores, I managed to finish the second planking on the starboard side of the hull.
I ran into a bit of trouble as I neared the end and the last plank had so many undulations in it to fit the final gap, that it looked more like a snake than a plank!
I cant believe how long this took me. Either I'm just very slow or there is a simpler way that I'm yet to figure out.
I've given it a rough sand but will wait until I've done the other side before doing a final sand.
In the DVD instructions it says to give the whole hull and deck a spray coat of satin estapol.
Should I do this before adding the wales, stanchions and deck railing caps or after they are all glued on?
I'm really enjoying building this model but cant wait to get to the deck fittings etc. This planking caper is hard work!
Cheers
Rod
-
 RodR got a reaction from riverboat in Perseverance 1807 by Rodr - Modellers Shipyard - Scale 1:48 - Colonial Brig - first build
Didn't get to go fishing today. My wife had other ideas so in between lots of household chores, I managed to finish the second planking on the starboard side of the hull.
I ran into a bit of trouble as I neared the end and the last plank had so many undulations in it to fit the final gap, that it looked more like a snake than a plank!
I cant believe how long this took me. Either I'm just very slow or there is a simpler way that I'm yet to figure out.
I've given it a rough sand but will wait until I've done the other side before doing a final sand.
In the DVD instructions it says to give the whole hull and deck a spray coat of satin estapol.
Should I do this before adding the wales, stanchions and deck railing caps or after they are all glued on?
I'm really enjoying building this model but cant wait to get to the deck fittings etc. This planking caper is hard work!
Cheers
Rod
-
RodR got a reaction from riverboat in Perseverance 1807 by Rodr - Modellers Shipyard - Scale 1:48 - Colonial Brig - first build
Finally managed to find some time to continue with my hull planking.
After doing the "easy" planks I had to begin the tapering process.
I divided the remainder of the hull up into three sections using a planking batten as suggest in the article on MSW and this seemed to make it a bit easier.
After what seemed like 5 hours I had completed a grand total of 10 planks!
I hope I get faster at this!
Anyway, I'm pretty happy with the way its turning out. After a good sand it should come out pretty smooth.
If its raining tomorrow, I wont be going fishing so hopefully can finish off this side of the hull, so long as the better half doesn't find a whole lot of other jobs for me.
Cheers
Rod
-
RodR got a reaction from olliechristo in Perseverance 1807 by Rodr - Modellers Shipyard - Scale 1:48 - Colonial Brig - first build
Didn't get to go fishing today. My wife had other ideas so in between lots of household chores, I managed to finish the second planking on the starboard side of the hull.
I ran into a bit of trouble as I neared the end and the last plank had so many undulations in it to fit the final gap, that it looked more like a snake than a plank!
I cant believe how long this took me. Either I'm just very slow or there is a simpler way that I'm yet to figure out.
I've given it a rough sand but will wait until I've done the other side before doing a final sand.
In the DVD instructions it says to give the whole hull and deck a spray coat of satin estapol.
Should I do this before adding the wales, stanchions and deck railing caps or after they are all glued on?
I'm really enjoying building this model but cant wait to get to the deck fittings etc. This planking caper is hard work!
Cheers
Rod
-
 RodR got a reaction from BANYAN in Perseverance 1807 by Rodr - Modellers Shipyard - Scale 1:48 - Colonial Brig - first build
Didn't get to go fishing today. My wife had other ideas so in between lots of household chores, I managed to finish the second planking on the starboard side of the hull.
I ran into a bit of trouble as I neared the end and the last plank had so many undulations in it to fit the final gap, that it looked more like a snake than a plank!
I cant believe how long this took me. Either I'm just very slow or there is a simpler way that I'm yet to figure out.
I've given it a rough sand but will wait until I've done the other side before doing a final sand.
In the DVD instructions it says to give the whole hull and deck a spray coat of satin estapol.
Should I do this before adding the wales, stanchions and deck railing caps or after they are all glued on?
I'm really enjoying building this model but cant wait to get to the deck fittings etc. This planking caper is hard work!
Cheers
Rod
-
RodR got a reaction from BANYAN in Perseverance 1807 by Rodr - Modellers Shipyard - Scale 1:48 - Colonial Brig - first build
Finally managed to find some time to continue with my hull planking.
After doing the "easy" planks I had to begin the tapering process.
I divided the remainder of the hull up into three sections using a planking batten as suggest in the article on MSW and this seemed to make it a bit easier.
After what seemed like 5 hours I had completed a grand total of 10 planks!
I hope I get faster at this!
Anyway, I'm pretty happy with the way its turning out. After a good sand it should come out pretty smooth.
If its raining tomorrow, I wont be going fishing so hopefully can finish off this side of the hull, so long as the better half doesn't find a whole lot of other jobs for me.
Cheers
Rod
-
RodR got a reaction from Aussie048 in Perseverance 1807 by Rodr - Modellers Shipyard - Scale 1:48 - Colonial Brig - first build
Didn't get to go fishing today. My wife had other ideas so in between lots of household chores, I managed to finish the second planking on the starboard side of the hull.
I ran into a bit of trouble as I neared the end and the last plank had so many undulations in it to fit the final gap, that it looked more like a snake than a plank!
I cant believe how long this took me. Either I'm just very slow or there is a simpler way that I'm yet to figure out.
I've given it a rough sand but will wait until I've done the other side before doing a final sand.
In the DVD instructions it says to give the whole hull and deck a spray coat of satin estapol.
Should I do this before adding the wales, stanchions and deck railing caps or after they are all glued on?
I'm really enjoying building this model but cant wait to get to the deck fittings etc. This planking caper is hard work!
Cheers
Rod
-
RodR got a reaction from WackoWolf in Perseverance 1807 by Rodr - Modellers Shipyard - Scale 1:48 - Colonial Brig - first build
Finally managed to find some time to continue with my hull planking.
After doing the "easy" planks I had to begin the tapering process.
I divided the remainder of the hull up into three sections using a planking batten as suggest in the article on MSW and this seemed to make it a bit easier.
After what seemed like 5 hours I had completed a grand total of 10 planks!
I hope I get faster at this!
Anyway, I'm pretty happy with the way its turning out. After a good sand it should come out pretty smooth.
If its raining tomorrow, I wont be going fishing so hopefully can finish off this side of the hull, so long as the better half doesn't find a whole lot of other jobs for me.
Cheers
Rod
-
RodR got a reaction from olliechristo in Perseverance 1807 by Rodr - Modellers Shipyard - Scale 1:48 - Colonial Brig - first build
Finally managed to find some time to continue with my hull planking.
After doing the "easy" planks I had to begin the tapering process.
I divided the remainder of the hull up into three sections using a planking batten as suggest in the article on MSW and this seemed to make it a bit easier.
After what seemed like 5 hours I had completed a grand total of 10 planks!
I hope I get faster at this!
Anyway, I'm pretty happy with the way its turning out. After a good sand it should come out pretty smooth.
If its raining tomorrow, I wont be going fishing so hopefully can finish off this side of the hull, so long as the better half doesn't find a whole lot of other jobs for me.
Cheers
Rod
-
RodR got a reaction from scratch in Perseverance 1807 by Rodr - Modellers Shipyard - Scale 1:48 - Colonial Brig - first build
Finally managed to find some time to continue with my hull planking.
After doing the "easy" planks I had to begin the tapering process.
I divided the remainder of the hull up into three sections using a planking batten as suggest in the article on MSW and this seemed to make it a bit easier.
After what seemed like 5 hours I had completed a grand total of 10 planks!
I hope I get faster at this!
Anyway, I'm pretty happy with the way its turning out. After a good sand it should come out pretty smooth.
If its raining tomorrow, I wont be going fishing so hopefully can finish off this side of the hull, so long as the better half doesn't find a whole lot of other jobs for me.
Cheers
Rod
-
RodR got a reaction from scratch in Perseverance by scratch - Modellers Shipyard -1:48 - Colonial Brig
Hi David
I'm building the same kit but for me it's a first build so it's great to see your photos and how you've deviated from the kit instructions.
Your model looks really nice.
Cheers
Rod
-
RodR got a reaction from Aussie048 in Perseverance 1807 by Rodr - Modellers Shipyard - Scale 1:48 - Colonial Brig - first build
Thanks Matt.
In the end I decided to plank the stem, keel and stern post. It's not as good as solid timber but looks a lot better than the plywood parts that came with the kit.
It has also given me a pseudo rabbet into which I can butt the second layer of planking as the instructions just say to epoxy the keel, stem and stern posts on after the second layer of planking is completed.
Because I had already faired the false keel at the stern I had to add some filler to ensure that the 2nd planking layer will be level with the veneer I just added on.
I haven't had much time to do much work on her this week due to work commitments but I have most of the day set aside tomorrow to make a start on the second layer of planking. Hopefully I will get most of it done tomorrow.
Thanks for the tips.
Rod