robnbill
-
Posts
841 -
Joined
-
Last visited
Content Type
Profiles
Forums
Gallery
Events
Everything posted by robnbill
-
 I need some advice. I have mounted the ship on the two pedestals. However the ship lists slightly to port. How do I correct this? Should I shim or grind down the pedestal base? What is the best approach to making this level. Bill
- 335 replies
-
- 1
-

-
- Constitution
- Mamoli
- (and 3 more)
-
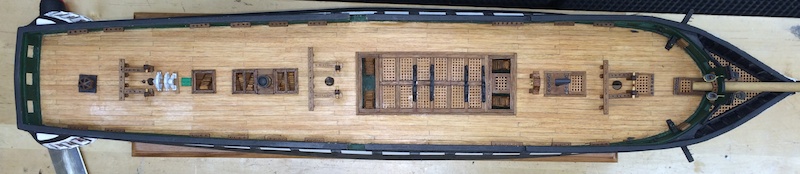
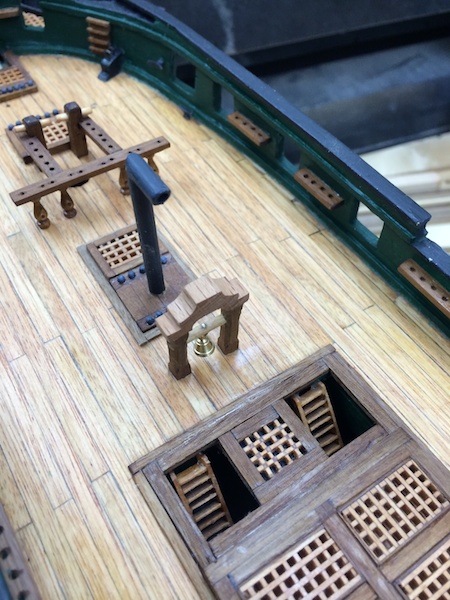
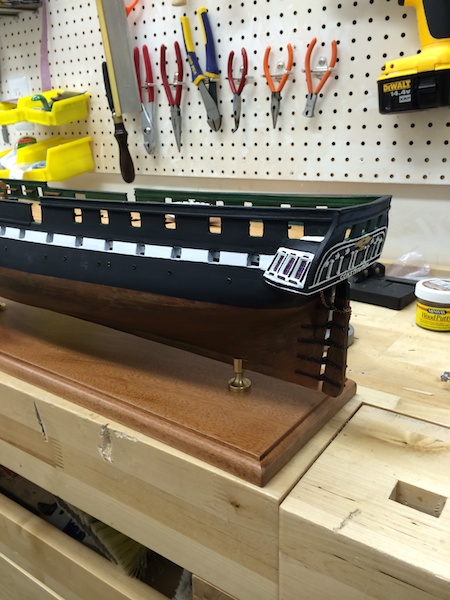
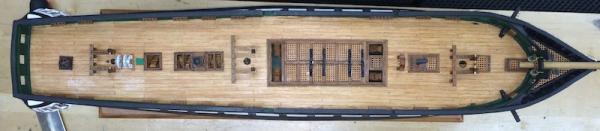
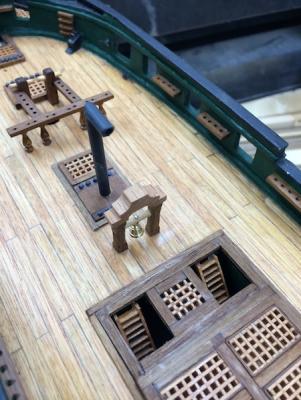
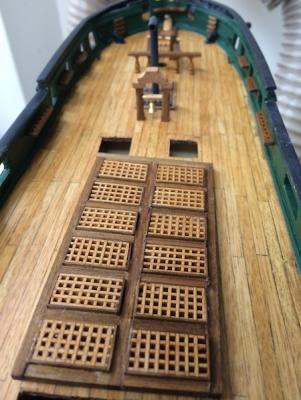
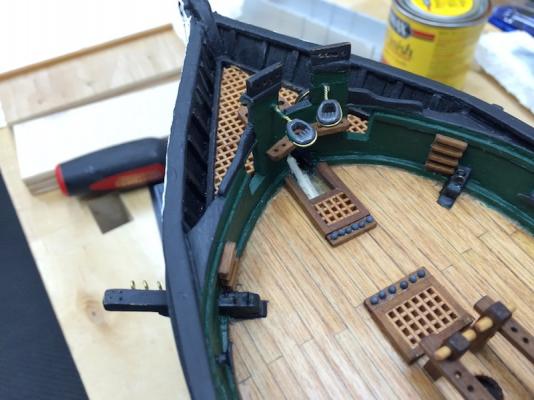
Installed the Commodores Barge cradles over main hatch. Installed the Main and Mizzen Fife Rails. This time, I glued the stanchions to the deck first, then glued the transverse rail, then drilled holes and mounted the smaller rails. This still proved challenging with a number of holes that I had to patch, however, this was still preferable to the way I built the forward Fife Rail. I drilled the ships wheels out to fit the 1.5 pins and glued the assembly together. I will paint it tomorrow before I install it on the deck. The last major assemble to be put on the deck will be the ships’ wheel. I will need to also put the compasses and ammunition passing scuttles. Lastly, I need to mount the skylight to the aft deck. I also figured out a manner to correct most of the skew in the Fore Fife Rail. When I installed this rail I built it completely then drilled the holes and installed it onto the ship. I ended up with a slight but noticeable skew in it. Since I was concerned about having the additional wood, I waited until the the remaining rails were installed. Tonight I cut/broke the connections between the transverse rail and the longitudinal rails. This allowed me to move the longitudinal rails to a correct position. While the transverse rail is still slightly skewed, it is no longer noticeable and once rigged should not be at all. I ordered the additional blocks and brass wire to rig the cannons today. Mort Stoll who built this model before told me these blocks were not accounted for in the kit. I also noticed the ships compass is not part of the plans. I will build those and install them as well. The photo attached shows the deck to date. The forward fife rail is not corrected in this photo so you can see the skew. The ships wheel assembly is not installed yet and is only sitting on the deck still in prime paint. The skylight is also just sitting on the deck. It will be installed tomorrow. Also, the angle from the camera shot made the stairs appear to be out of line. They are not.
-
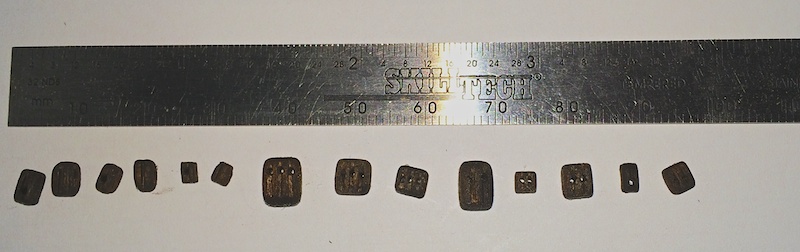
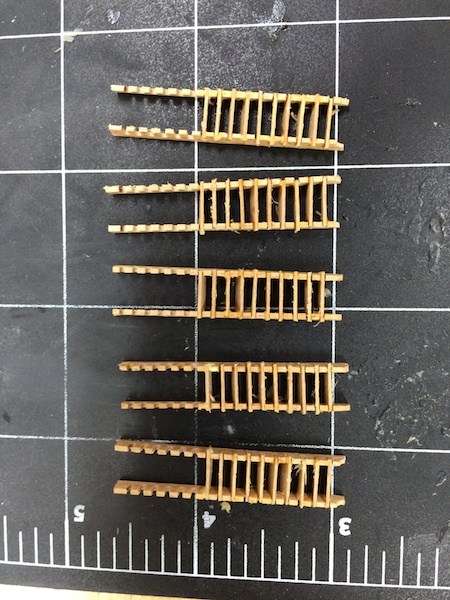
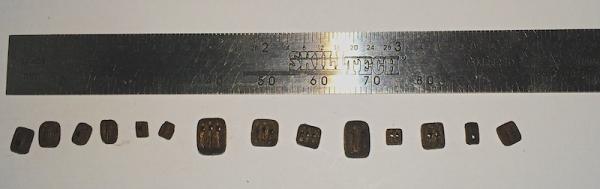
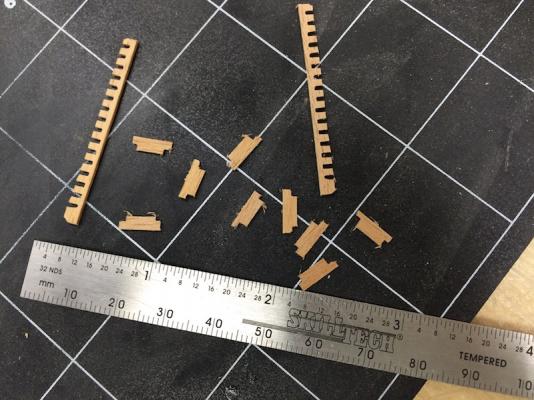
That is bad making me go to the shop before I have my morning espresso! Anyway, here is a set of each along with a scale. I went dark, so they are a bit hard to see. Bill
-
So I stained the blocks this afternoon. I tried a few different methods. First, I tried rolling them around and rubbing them with a paper towel soaked with stain. Unfortunantly, this also proved to be pretty messy and if the towel was not soaked, it did not get into the grooves. The larger blocks I just dipped individually then rubbed the excess off with a towel. The smaller ones I ended up taking a large spoon and putting them all in the bowl, then using a dropper added enough stain to it to coat them all. Then I scrapped them off onto a paper towel and rubbed the excess off. All in all, I did not find a method that wasn't messy, but I got them all done. Than you all for your assistance. Holding my hand made all the difference.
-
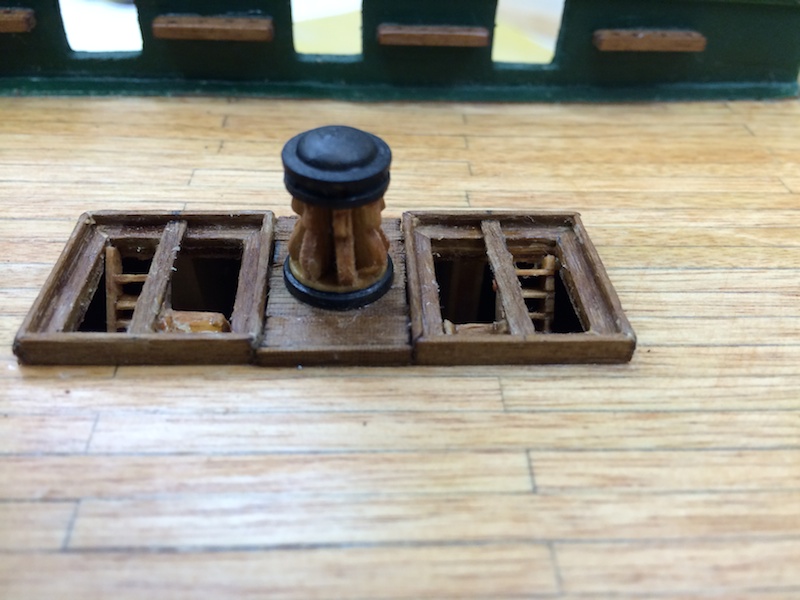
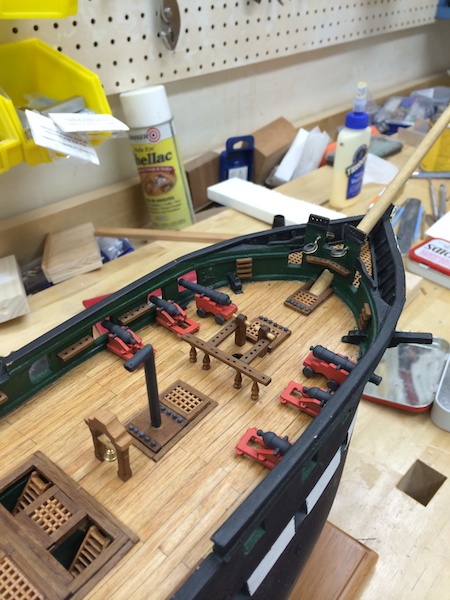
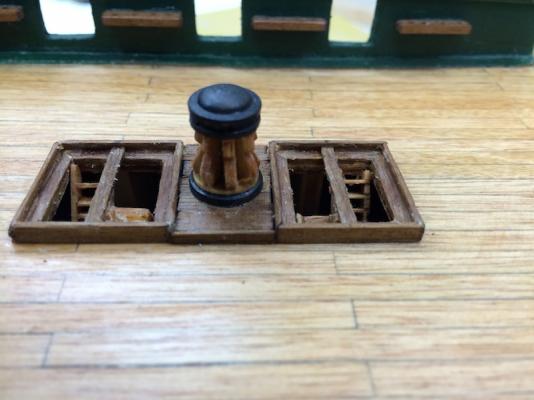
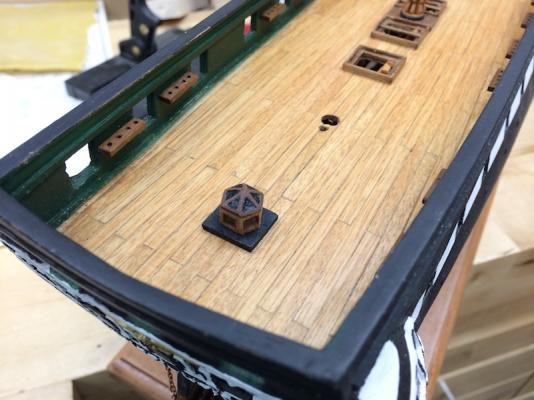
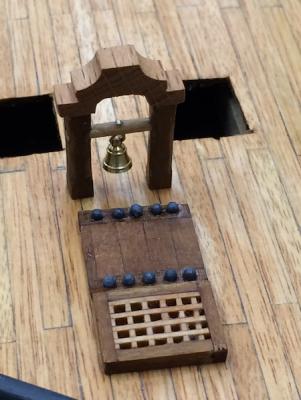
I made more progress on the deck furniture today. I built both the capstan and skylight. The skylight in the kit consisted of a square base, a 6 sided plain base and a flat metal piece with the skylights imprinted on them. I did not like this. So after shaping the base to be equal sided, I used the rotary tool to inset the panels around the base. Then I carved the six sided top and used the rotary tool to inset where the glass would be. These I painted black. The capstan had nothing in the plans other than a drawing with no dimensions. I pulled the Constitution plans for the capstan and used them to assist in shaping the 8 insets. The kit only supplied the spindle with the domed top and bottom. Since the real capstan has a brass top, I decided to paint mine black along with the lower band. Then the middle I stained. I completed the deck assembles around all the hatches and installed the stairs and platform for the capstan. Then I glued everything up. I have not yet installed the Main and Mizzen fife rails, the ships wheel and skylight (small square one), and the various cannonball holders. These should all be completed tomorrow, I hope. I also stained all of the blocks. After consulting the forum, I tried a number of different methods. First I tried to put the stain on a paper towel and roll the blocks in it. This was not satisfactory since it did not get the stain into the grooves. I tried dipping the blocks in the stain, then wiping them off on a towel. This worked but only for the larger blocks. The small ones would take forever to do this way and I would probably end up dropping one or more in the stain or on the floor. Finally for the small blocks, I put them all into a large spoon. Then used a dropper to add the stain. This allowed me to move the blocks around until they were all coated well. Then I raked them onto a paper towel and rubbed the excess stain off. No clean way of doing this but it is wall done. Finally, I airbrushed a second coat of black onto all the cannon barrels. I also painted the carriages of the 24 pound bow chasers red. I planted the wheels black and glued them onto the carriages. Tomorrow, I will clean up the glue and sand the stairs and capstan where needed. The skylight is placed but not glued in the photo. I will glue it up once I work my way back to the aft deck. One of the shots below shows a test placement of the forward cannons. Overall, the ship was better tonight than it was this morning. A successful day. Bill

- 335 replies
-
- 4
-
-
- Constitution
- Mamoli
- (and 3 more)
-
Thanks. Any particular colors or types of stains work best?
-
Okay, I have tumbled my blocks into a nice shape. Now I think I need to stain them so they have time to cure before I use them. What would be the color recommendation for the USS Constitution's blocks? Also, what is the best method for staining them. My current thought would be dipping them all in a jar and rolling them out in paper towels to get excess off and dry. Is there a better type of stain to use? Bill
-
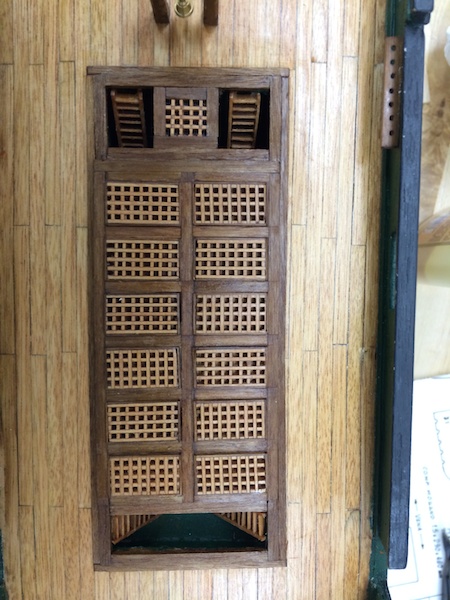
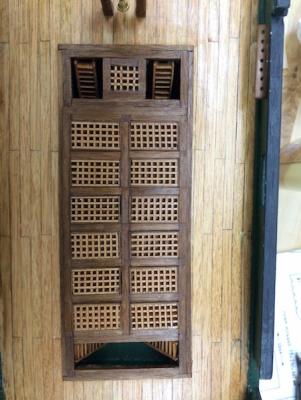
I added a bit of black wash to the Eagle boards this morning. I believe it adds a bit of depth to the carvings. These are metal fittings from Mamoli. In addition, I completed the main hatch today. This was more complicated than it seemed initially. Given the deck camber and the many part to be cut and fitted, it took longer but I am pleased with the results. I modified the plans for the forward ladders. I ran them fore to aft rather than side to side. This is in line with the AOS. I led the midships side to side since the deck had a large opening already cut in it to allow for that. I also decided to paint the lower decks around the stairs the bulwark green. Since these really do not show and are left un-planked, this keeps them from looking unfinished and highlights the lighter stairs which are the feature that is important. I also painted the deck black under the forward small hatch since the deckle would have shown through the grates since these were basically right on top of the deck. I still have to mount the ships boat cradles but will do this a bit later. Again, I think the ship is in better shape than it was when I started this morning so today was a success. Bill

- 335 replies
-
- 4
-
-
- Constitution
- Mamoli
- (and 3 more)
-
I painted the gun ports black today. I used masking tape to protect the white gun stripe. There was a slight bleed under the tape where the tape crossed but easily touched up with white paint and a detail brush. I also threw the whaleboat into a jar of acetone to strip the paint and fittings from the whaleboat. I was not happy with the way it turned out. The hull was carved out nicely, but it didn't look light. The paint was too thick and I want to change the fittings around a bit. I did not think the build was up to the standards of the rest of the ship. Try try again! Anyway, I used the evening hours to set up a spreadsheet with the line sizes from the kit and compare them to the rigging sizes on the real ship. Then used scaling to see how they mapped. I ordered a couple more sizes from Model Expo to cover the ranges that were too far out. I ordered more black line. The line that came in the kit will need to be dyed. I was planning on using minwax, I will have to see how it matches to the Model Expo black. Suggestions? Bill
-
I just tumbled all of my blocks for the Constitution (Mamoli Kit). I used the block buster from Ship Expo. The difference it made to the blocks was nothing short of amazing. They went from fuzzy, squarish blocks into nicely rounded clean blocks. I tumbled each set around 1 ½ minutes, then looked them to see if they needed more. The instructions tell you to use the drill at high speed. Since the paddles are spinning the centrifugal force keeps the blocks spinning against all the sanding surfaces (which is everything but the very top of the container. Bill
-
Thanks. I am using Minwax light pecan stain on all the wood that is not painted. The deck is tanganyika so it already had some of the color. The thin hardwood strips are brittle. Some of this maybe just the wood but most is probably the age. I found that on pieces that I need to drill such as the belaying pin racks or the cannon ball racks, if I coat the wood with thin CA and let it dry, it allows me to do pretty much whatever I need to it without breaking or splintering. Then a light sanding allows me to stain it or paint it.
-
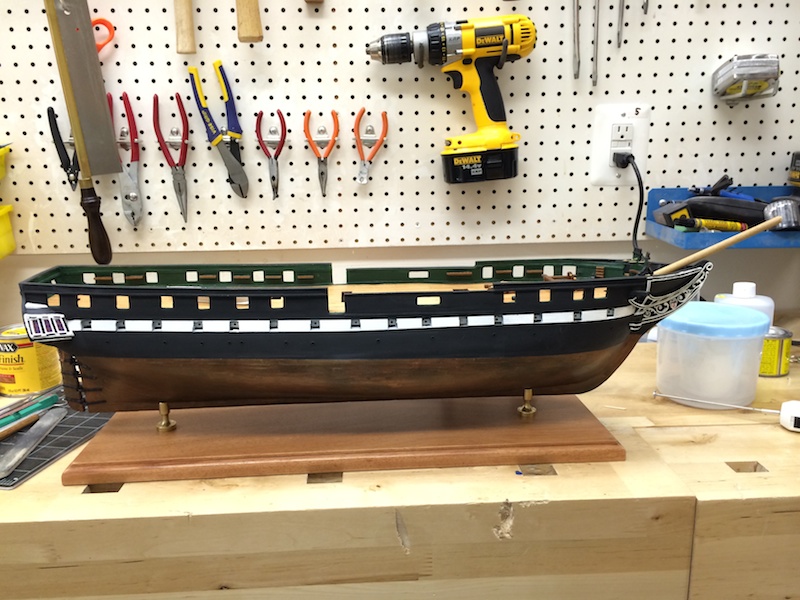
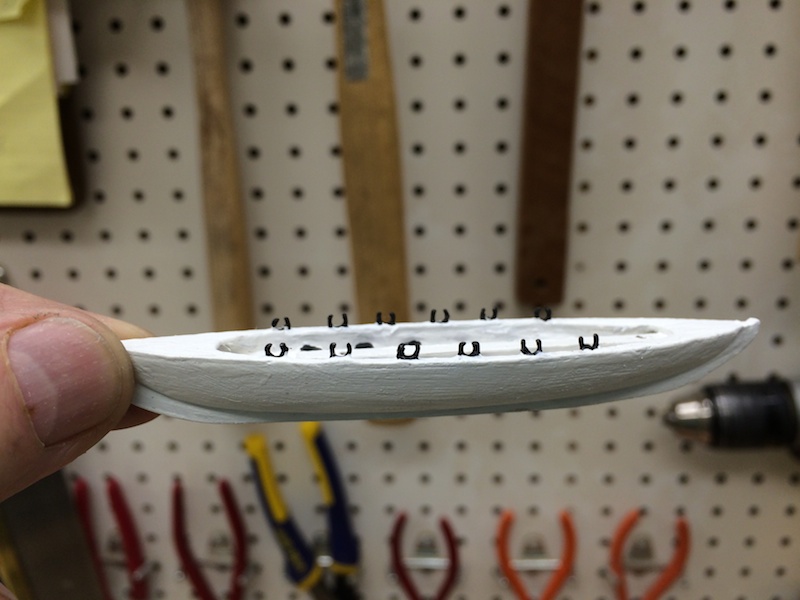
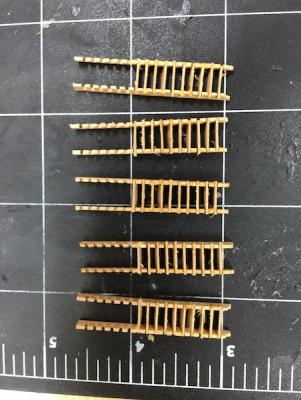
So the ship has progressed. I have tightened the port gun stripe. I also ordered some very small brushes to add the details to the bow and stern. These have helped tremendously. I have been working on the deck furniture starting at the bow and working aft. At the same time, I have been touching up the interior bulkhead paint. I found that the number of cannon balls supplied was short. I decided to add the balls to the racks prior to glueing them into position. I mounted the ship with two mounts the same size. I ordered a replacement mount for the bow mount since it needed to be 9mm taller in the bow. I also decided to try my hand at carving out the ship's boat blanks Mamoli supplied with the kit. I planned on a planked ship's boats but since I had the blanks in hand wanted to try out my new carving tools with the Foredom tool. I took the whaleboat down to 1.5 MM. Then added deck stringers, a band around the sides to mount the seats on. I also added the longitudinal bar for the mast mounts. To make the oarlocks, I drill pairs of holes and put small pieces of brass wire then after the glue set bent the wires around a mandrel. I am still not sure I like the color scheme I used. I did find that the plan called for wood boat mounts for the midships boat. These were not supplied, nor was the wood. They did supply 4 metal mounts, that were the correct size, although still way too thick. I found these down to the 3mm thickness required to fit into the midship assembly. I also put the larger of the ladders together since I plan on installing the first group tomorrow.


- 335 replies
-
- 4
-
-
- Constitution
- Mamoli
- (and 3 more)
-
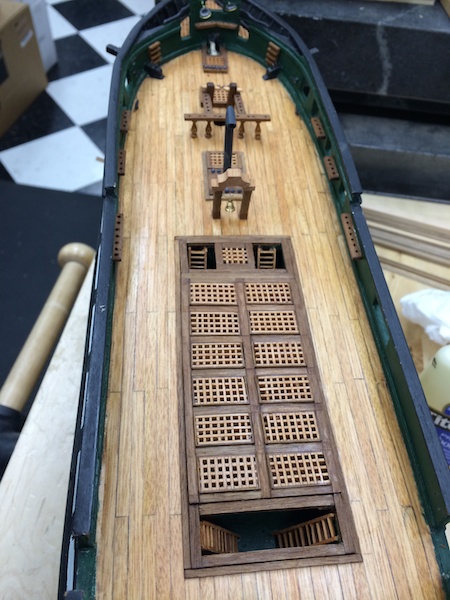
Here are some more recent photos of the stern gallery. I still will be sharpening the gallery painting details a bit. I was on deck furniture today. The grating amidships is just sitting there in the photos. I just glued up the ladders so will complete the frame out for this section tomorrow if all goes well. The one thing that I found was shorted in the kit I received (so far) was the number of cannon balls. I ordered some more from Model Expo. Hopefully they will look very similar. Bill


-
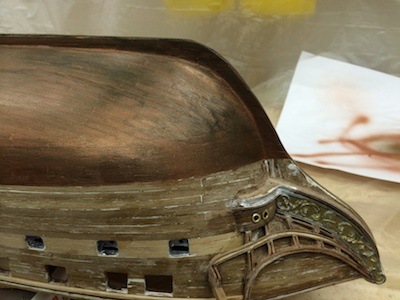
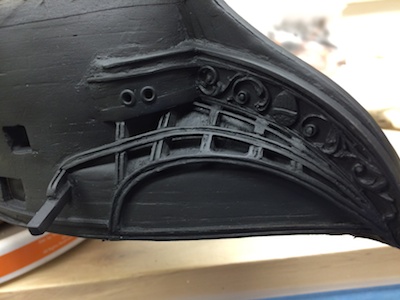
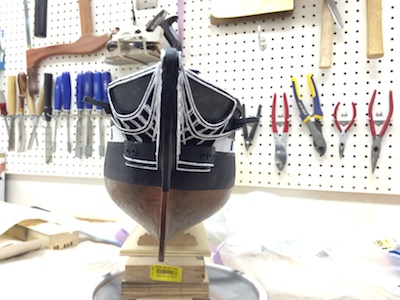
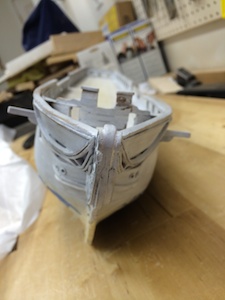
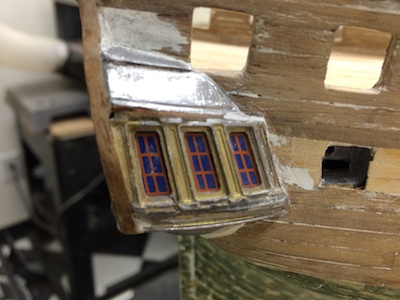
Hey Rich, I am currently building this model as well. I am a bit ahead of you but not much. When I tried to gently bend the stern galleries, they both broke. I ended up using epoxy paste to fill the gaps. They both, as well as all the other metal fittings, needed much fitting and shaping. Since I am painting my model, this did not matter as much. That said, getting the stern galleries in place and well detailed has proved a challenge. I am almost there. Attached are two photos. The first of the starboard gallery before I primed and the send of the hull after priming. You can see the bashing I did on the hull (adding strakes) as well as the bow for the scrollwork. I will try to get more photos of the gallery tomorrow. I have the painting almost done on them. Bill

-
I am currently building the Mamoli Constitution. I do not have a great deal of experience and am learning a great deal as I go through the build. What demonborger said is very true. I would add that the instructions are pretty meager compared to those of the MS version. There are many cast parts, however there are also many that must be built from scratch. The woods used in the Constitution kit are such that should you choose, you could leave the wood the natural color. I chose to paint it to be more in line with the historic ship colors.
-
This is great timing. I am building the Mamoli Constitution and have what looks like the same for for ships boats. I too am planning on replacing them with plank on form boats. I had not sen the MS lists other than the bead and butter style which I did not want use. I was given plans for a Planked ships boat years ago that I was planning on adapting to the size and styles required for the Connie. Some of them are flat ended and some of them are pointed on both ends. I look forward to following your progress so I can make the decision to either buy these and adapt or make from scratch. Bill
-
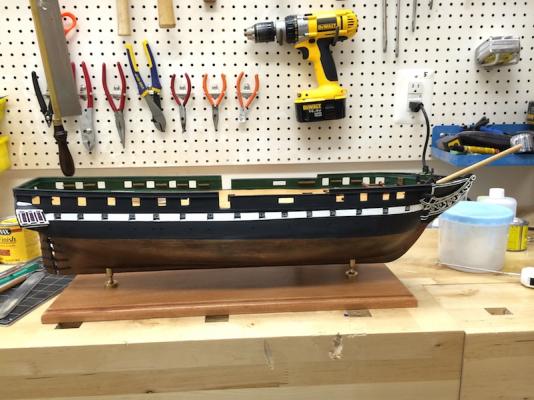
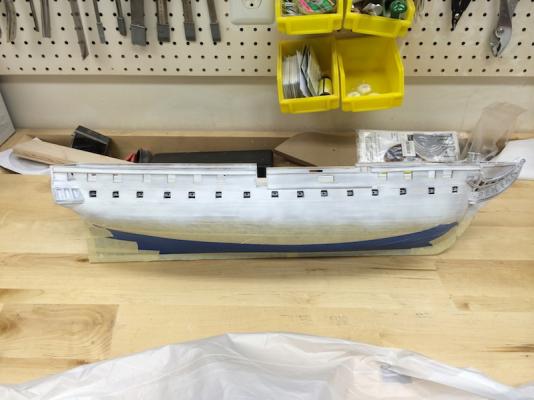
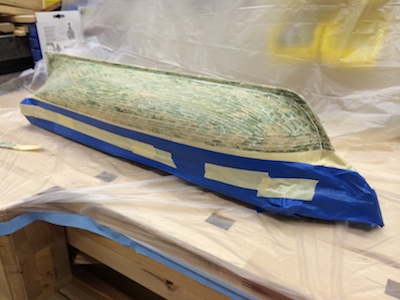
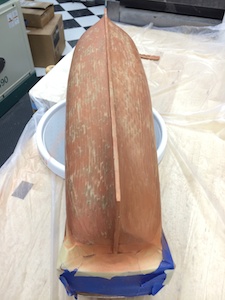
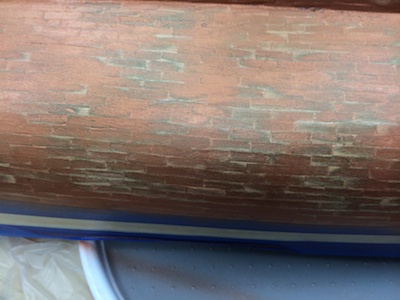
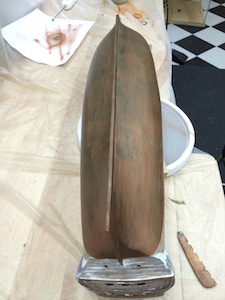
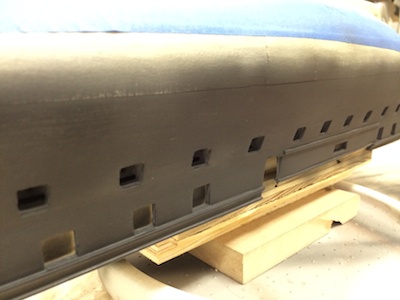
Hull Paint Prep Since I was painting the hull, I used spackle to smooth the hull and sanded using 220 grit. Once satisfied, I masked the hull at the waterline. Since the waterline was established when I put the faux copper plates on the hull, this was easy. I used standard masking tape at the waterline, then the blue tape to cover the rest of the hull. I used a light pecan to stain the spar deck and left it to cure overnight. Copper Bottom Since this model uses a faux copper bottom I had to buy copper and green paint since these were not part of the Model Shipyards paint set for the Constitution. I took a green tile with me to the model store to match the color. The instructions called for painting the hull below the waterline with copper paint. I airbrushed the copper on and once this dried, sanded it lightly to remove the paint in some areas to expose the wood and green paint below the copper. I used a microfiber cloth slightly dampened with Mineral Spirits to wipe the hull down. Then I airbrushed the green paint onto the hull and immediately used a soft cotton cloth to rub the green into the hull. I did this in overlapping sections since the paint needed to be wet when I rubbed it. This turned out great. I removed the masking tape when the paint was dry then left it overnight to cure. I masked the hull below the waterline, as well as the spar deck and interior bulkheads up to, but not including the handrail. Below is the Faux Copper bottom. The green plates have all been installed and lightly sanded on the hull. From here on I used the model shipyards instructions on painting from their Constitution instructions. Unless otherwise noted, all paint was applied using an airbrush. I used the Model Shipways primer to paint all the exposed surfaces and lightly sanded after the second coat. Then painted the hull black. After the first coat, I cleaned up the base of the gallery where it still was a bit rough. Since I took the primer off the metal in doing this, I used a can of Tamiya primer to spot prime those areas. After a light sanding a applied two more coats of black letting the paint dry between each coat. After two coats I would let the paint cure overnight. After the past paint cured overnight, I removed masked the hull to paint the gun port stripe. I debated priming again in that area but decided against that and chose instead to paint the white directly over the black. My current plans are to have the gun ports closed in the final model so I did not worry about white getting into the port. With the paint curing, I used some time to take the assembled grates and sand them down to 2.5mm. When I assembled the grates I soaked them in water with wood glue. This seemed to set the grates but once I started working on thinning them I found the grates would not hold up. I used thin CA to re-glue the grates then once dried continued to sand them down to the correct thickness. Once it dried 2 hours, I removed the masking tape on the outside of the hull. I did have to correct a bit of white overspray, but that was easy with the airbrush. 2/05/14 I thinned some white and black paint slightly but not as much as that needed to airbrush, the goal being to allow it to flow from a brush. I used this to paint the scrollwork on the bow with white. I used the black to correct any over brushing. This took a great deal of back and forth since my painting skills are not the best. Once the bow was done, I painted the additional decorative details I added on the stern. This I allowed to dry overnight. 2/06/14 I touched up the white and black details all around. I spent a good portion of the day removing the white metal columns, cleaning them up, priming and painting. I learned the hard way that these need to be cut from the casting armature. I broke one. The plans show the three lower stern windows have the two part plate with the cannon hole. I counted the plate pairs and there were just enough for the side cannons. However the book shows Anatomy of a Ship, shows these to be a one piece plate or at least no cannon hole with air ports at the top. There are port covers that are single covers with the ports in the top included in the plan. The plan was incorrect. I also decided to go off plan and paint the Eagle Gold. I just think it looks great that way. I used the sticky side of a small strip of masking tape to stick the small stars to so they could be primed and painted. I realized after painting the stern nameplate white it needed to be black. Then after it dried I came back to paint the letters with white. Before painting I had to do quite a bit of thinning. I did this on all the white metal pieces. Otherwise they would be very bulky. The windows in the stern are slightly large for the window plates so I thought I would glue the columns to each side of the plates prior to putting them on the stern. This did not work well and I ended up soaking them in acetone to remove the CA, then had to clean all the pieces over and repaint. I found on these pieces it was easier to use a 00 brush and paint them after they were attached to the hull. After these were fitted and painted and the surrounding stern touched up with black, I fitted the Eagle. This required me cutting the lower of the double scrollwork above the Eagle. I looked at the photos and this is actually what seems to be on the real ship. I marked where the scroll needed to be removed and used a wood chisel to remove the portion under the Eagle. Then I painted the area black and let it dry. The plans also called for the three port covers to be white. In reality they are black. I think it makes the columns stand out better. So I painted them black. I fit the rudder to the hull and glued the hinges onto both. Prior to mounting the rudder on the hull I drilled the hole for the rudder chains to affix to the rudder. I dry fit the rudder then started adding the pins to the hinges from the bottom up. These proved challenging to find if they fell onto the floor (which they did several times). The hinges were the first part that I actually did not have enough to complete the assembly in the kit. I used a brass rod to make a 5th one. The ballpeen hammer and mini-anvil worked great to make a head on the pin. I touched up the faux copper bottom and the rudder hinges. Then I glued the rudder into position. After the rudder glue set, I added the chains to the stern. I still need to go back to the bow and touch up/smooth the scrollwork paint. Okay, this gets things caught up. Only 22 years to get to this point!

- 335 replies
-
- 4
-
-
- Constitution
- Mamoli
- (and 3 more)
-
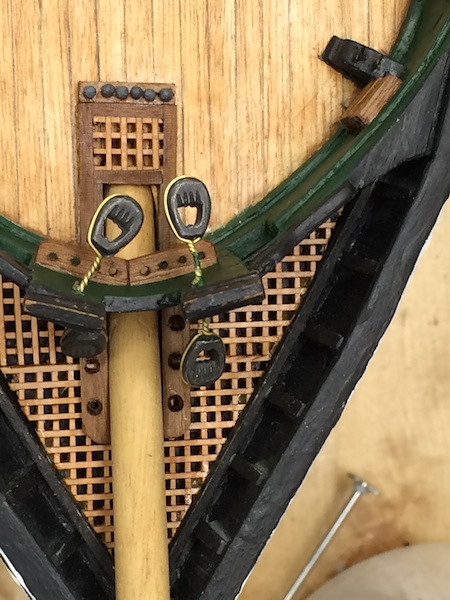
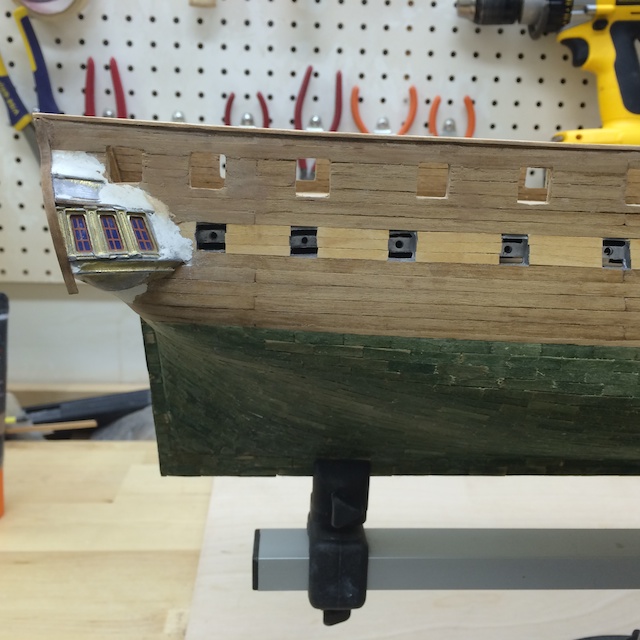
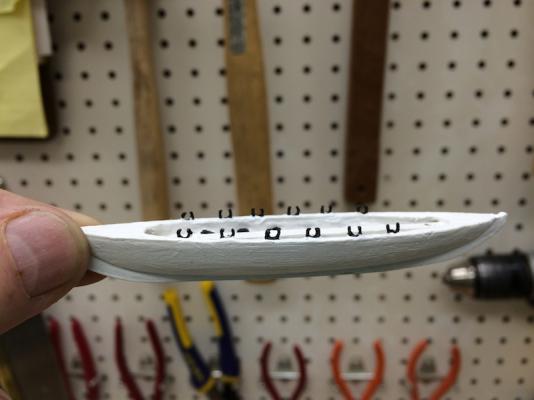
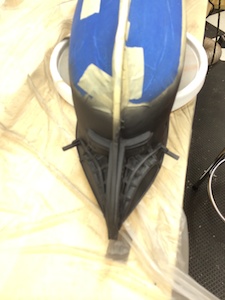
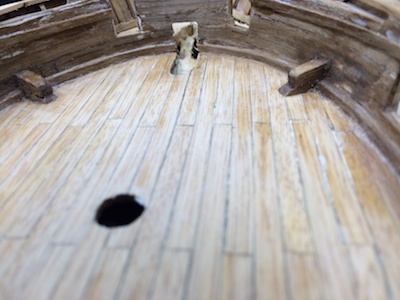
Bow I used 3x1.5mm walnut strips and 2x1.5 basswood to created beams for the bow construction. I decided to construct beams which were already U shaped so I could make the scroll work stand out. Given the smaller scale of the Mamoli kit I did not feel I could just use paint to smoothly to add the double stripes. By using the 1.5mm strips I could construct beams curved to fit the bow as well as straight beams that I could shape with the file for the 5 vertical beams. The first thing I did was take the white metal fiddle plates and shaped them to fit the bow. These required significant thinning before adding to the bow. The plan called for using 9 strips walnut to create the piece that connected the fiddlehead plates to the bow. I did not like this arrangement. The instructions were also very sparse on the shape of these pieces/ Instead I took a small piece of pine and shaped two pieces that would fit the bow leaving just enough room to add walnut planking on the three exposed sides. This also allowed me to extend the top and bottom plates in a similar method as the other scrollwork. The method worked pretty well. I was able to glue the beams to the hull using CA glue and using the bending iron to set up the glue quickly. This also allowed me to add more or less curves as I glued them to the bow. This was critical to make sure the two sides mirrored each other when viewed from the bow. Hull The kit only included the strakes outside the hull just below the waist and below the gun ports the full length. I added the strakes above the gunports as well based upon other models as well as a review of the available plans. I liked the look when they were added. Since I was painting the hull, I also could use basswood (I acquired from the local RC Model shop) to make the strakes rather than matching the walnut. On the interior, I added the strakes but choose not to follow the plan and add the 4 fittings, the belying pin racks and the line blocks on the forward bulkhead since they were to be stained. I also added the molding strip where the sides met the deck. Cathead Placement of the forward cathead was very sketchy in the plans. I used tracing paper to sketch the angle of the cathead rom the centerline. Then I estimated the angle needed for the cathead to end up 2mm above the spar deck where it penetrated the deck. There was a shaped piece that was added under each of the catheads the mount it to the deck. The key was it needed to enter just above the coming. I used an adjustable square to catch the angle from the tracing paper. Then place the square along the centerline of the deck and marked the place it crossed the handrail. Once both sides were marked and triple checked, I used a square to mark the side hull from this mark. Then I scribed a line where the cathead needed to be when it penetrated the inner bulkhead. I used the plans to guesstimate the slope and the difference (higher) the cathead would be when it exited the hull. This was the second line I scribed above the first line. This was the bottom of the cathead. Since the cathead is a 4x4mm, the actual entry point was 2mm above the second line. I took a very small drill and chucked it into the power drill. I know that the advice I had received was to not use a power tool, but I am very comfortable with the drill and using it allowed me to easily adjust the holes once they were drilled. Used the two marks as my guide and slowly more the hole through the hull on both sides. I added a small drop of CA to both holes to keep the walnut from splintering. The cathead came through the forward bulkhead and it was very thin. Once the glue was dry, I gradually increased the size of the holes until I could stick toothpicks into both. This allowed me to adjust each to mirror each other as well as being the correct angles. Once I was satisfied with the placement, I continued to increase the drill diameter until the holes were slightly smaller than the 4mm required. Then I took a brand new Xacto blade (the thin pointed one) and used it to carve both the entry and exit holes square and fitted the catheads through the hull. Lastly, I carved the small blocks that were the base of the cathead on the deck. I performed a final review of one cathead then glued it in place with CA. Then I did a final adjustment of the second cathead to mirror the first one. The goal was to get both very close, then exactly match the placement of the second to the first. This would keep any errors from being readily apparent when viewed. The photos below show the final position of the catheads. The bottom one showing the mounts where the catheads mount on the spar deck.
- 335 replies
-
- 2
-
-
- Constitution
- Mamoli
- (and 3 more)
-
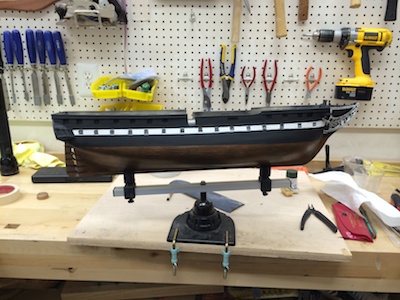
January 2014 – After 21 years of sitting in a large box of packing peanuts I decided to resurrect the Mamoli Constitution. Luckily I had packed everything carefully. The ship’s hull and some of the tools were in the box, the remaining wood and parts were taped up in the original kit box. The scale of the model is 1:93. I pulled the plans and started to review where I left the build off. I had completed the outer hull (which is double planked on bulkheads), including the green tiles representing each of the copper plates. The main deck was not planked and the forward bulkhead while started only had one plank on one side. I completed the forward bulkhead and proceeded to plank the deck. According to the instructions, each piece of Tanganyika needed to be cut to 80mm, then using a No.2 pencil you color the edges on both sides and the butt ends. I used white wood glue to glue the pieces down. I marked with pencil each of the deck penetrations, which were already done in the plywood. Then I carefully cut the wood and sanded/filed the edges back to the original hole size. This is an area where I see a fairly significant difference in the Mamoli plans and the Model Shipyards. The MS builds the hull in the bow into what becomes the forward bulkhead. The Mamoli construction includes the bow in the planking and adds the forward bulkhead once the hull is complete. This also means the bow is approached differently. I will get to that later. Once the deck was completed I put on the handrails. At this point, I decided a couple of points. First, my plan was to paint the model using the Constitution plaint set from MS and secondly, I wanted to modify the bow and the stern ornamentation to be more closely aligned with the looks of the MS model. This meant creating a method to add the scrollwork since the Mamoli did not include it other than two white metal plates to be affixed to the bow for the fiddlehead design. Secondly the stern did not have the two boards that ran from the lower stern over the windows and back down producing a nice double curve. These I created using 2x2mm walnut strips I bent with the heat bender. As a note, I found out that adding CA to the sides of the strip before I bent it allowed me to control the splintering which the walnut was prone to do. This might have had something to do with the wood strips being over 21 years old. Stern Galleries The kit came with two white metal pieces for the windows in the stern galleries. One was curved almost correctly, the other was straight. Unfortunately, when trying to bend the metal for the gallery, it broke along the central vertical piece between the windows. I was afraid to heat it before I bent it. I found both of the gallery pieces required much work in sanding and shaping before they could be glued into the model. Since I was painting the ship I could use sandable epoxy putty to add to smooth the pieces to the hull. I did end up having to remove more of this than planned since I thought the top of the gallery was more curved than flat. I used my Foredom Rotary tool, rilflers, sand paper, and dental tools to carve the gallery sides and put the modeling details back into it where I either ended up sanding them out, or they needed to be made to extend through the putty. I then added the 2x2 walnut strips around the stern and completed the stern with the side strips running down the gallery aft sides. These I extended 2 mm to match the 2x2s I added around the windows. The attached photo shows the Starboard Gallery. You can see the frame break on the bottom of the leftmost window. This was patched before painting.
- 335 replies
-
- 1
-
-
- Constitution
- Mamoli
- (and 3 more)
-
Positioning Cathead
robnbill replied to robnbill's topic in Building, Framing, Planking and plating a ships hull and deck
Thanks all. I used the advice to take it slowly and start with a small drill bit. I had studied the plans and looked at it nine ways and drew it out on the hull sides. I did however use the power drill with VERY sharp bits that were new. Once the hole was enlarged enough, I stuck toothpicks through the holes and compared the results and adjusted the holes accordingly. After removing the toothpicks I added superglue to the holes inside and out to prevent splintering since the interior bulkhead was very thin. After I progressed through larger and larger bits until it was slightly smaller the the 4mm hole size. Then I used a very sharp xacto blade to square the holes up and test fit the cathead. Once I was pleased with the fits of both, I glued the first one up then the second and matched it to the first. I am quite proud of the results. Thank you all for your advice and giving me the courage to put the holes into the hull. I am almost ready to start painting the hull. It is really coming along. Bill -
I am working on my first boat. A Mamoli Constitution. Does anyone have any advice as to how to position and drill the hole to put the cathead through? I have reviewed all the plans, looked at the photos, and reviewed the angles in Marquardt's "The Anatomy of a 44 Gun Frigate". It just makes me really nervous to drill holes through the hull. I know it has to be done, I just want to make sure I do it correctly to minimize issues. Once I have correctly located the hole, what is the best procedure to actually drill the hole. I have everything from a hand drill to a floor standing drill press. That or I could use the Foredom rotary tool. Any advice is appreciated. Thanks Bill