HOLIDAY DONATION DRIVE - SUPPORT MSW - DO YOUR PART TO KEEP THIS GREAT FORUM GOING! (83 donations so far out of 49,000 members - C'mon guys!)
×


robnbill
-
Posts
841 -
Joined
-
Last visited
Content Type
Profiles
Forums
Gallery
Events
Everything posted by robnbill
-
 Rich - Thanks. As I had mentioned, I had not planned on putting the hammocks on the ship, but once I saw the look I could not resist. Mike - Thank you. The ship is coming together. Slowly but surely. What part of DC are you from. We are out near Dulles.
 -
I second Chuck's blocks. I bought the blocks and line from Chuck to rig my guns. He also was nice enough to review a photo of my planned rigging and gave me some great feedback. Looking at the photos you put in from your instructions it also appears that you may want to solder a ring to the top end of the carronades for the breeching line. I added it to mine. The two bow chasers were rigged with the breeching line wrapped around and seized to the cascabel per the AOS. I will have to say I was VERY happy once I got all of my cannon rigged and on the ship. Happy day!
- 1,756 replies
-
- 3
-

-
- constitution
- constructo
- (and 1 more)
-
Thanks. I am happy the way they turned out. The process I used was to take some white disposable guest towels, the kind that are paper, but hold up to water. I took one of those and stained it using a coffee/tea mixture. I played with ti a bit to see how long it took to get the color I wanted. Then I rinsed it and dried simulate the it in the microwave. After that I calculated the size a 6' x 4' hammock would be. Since I was rolling them, neither dimension was critical as long as I was in the ball park. After testing it a bit, I found I could cut a strip that was as wide as the 4' section would be at that scale and as long as about 6 hammocks. Again since they were being rolled and shaped into a U with the ends down, I did not have to be exact. To roll the hammocks, I would take the cloth, dip my fingers in my beeswax/turpentine mix and roll them up. Then I used the nipper to cut the length more or less to the 6' length. I took each small piece and rolled it through my fingers a bit to get the final rolled dimension I was looking for and bent it into a U and placed it in the hammock rack netting. Since only the end hammocks could possibly be seen ( and this only through a magnifying glass), I only wrapped the end most hammock with cording to simulate the binding that each sailor did with his hammock prior to inserting it into the rack. Using this method the real critical dimension was the thickness of the rolled hammock. This was easily taken care of my how tightly I rolled the hammock as long as they were all cut to roughly the same dimension. I used tweezers to place them and do all the final shaping once I had a rack fully stuffed. Then it was just a matter of letting the turpentine evaporate. This made the hammocks stiffen up and stick to each other and locking them into the netting.
- 335 replies
-
- 3
-
-
- Constitution
- Mamoli
- (and 3 more)
-
I understand totally. When I was creating the deck furniture there were a number of Mamoli fittings I threw out and made myself because I thought they were not up to the quality I was aiming for. I know you will be able to find or produce what you need. I have seen your work!
- 1,756 replies
-
- 1
-
-
- constitution
- constructo
- (and 1 more)
-
I tried to find a source for cleats and even emailed Mamoli. Their cleats were great, but I had just enough. I was concerned if I broke one I would be screwed. No one was able to tell me where I could find any replacements. The 1:93 scale makes it a bit difficult. Hopefully you will not be as challenged with your scale. There were a number of threads where people built their own cleats that looked good. That was going to be my fall back position if I needed to find anymore since I never heard anything back from Mamoli.
- 1,756 replies
-
- 1
-
-
- constitution
- constructo
- (and 1 more)
-
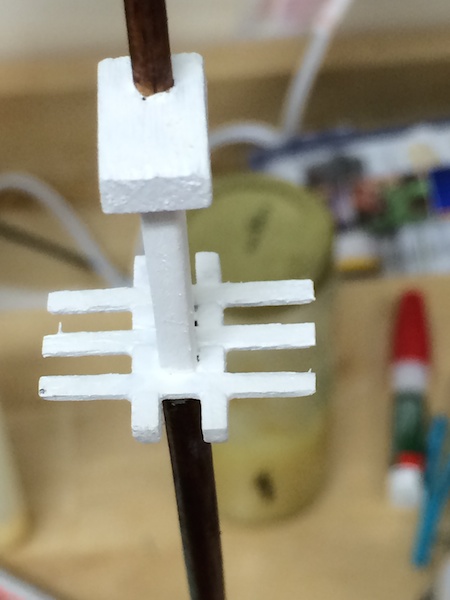
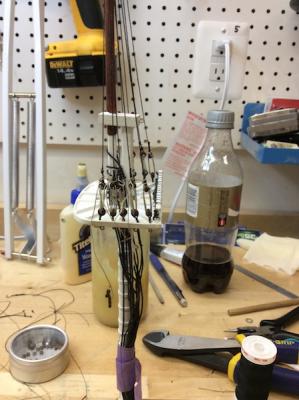
Update: I used a cut off disk in the Foredom tool to cut the cross tree from the Main Mast. I was able to get the pieces off easily. When I did, the mast cap also came off so the top of the mast came loose. This made it easier to change the cross trees. So instead of building the tree on the mast, I glued it up off the mast and then placed it when I glued the assembly back together. I will need to touch up the paint now but the Main Mast is now completed. Tomorrow I plan on fabricating and installing the mizzen tree. This one is a bit smaller so it might be a bit more of a challenge. Hopefully, the top of the mizzen will also come loose as easily as the Main's did.
- 335 replies
-
- 1
-
-
- Constitution
- Mamoli
- (and 3 more)
-
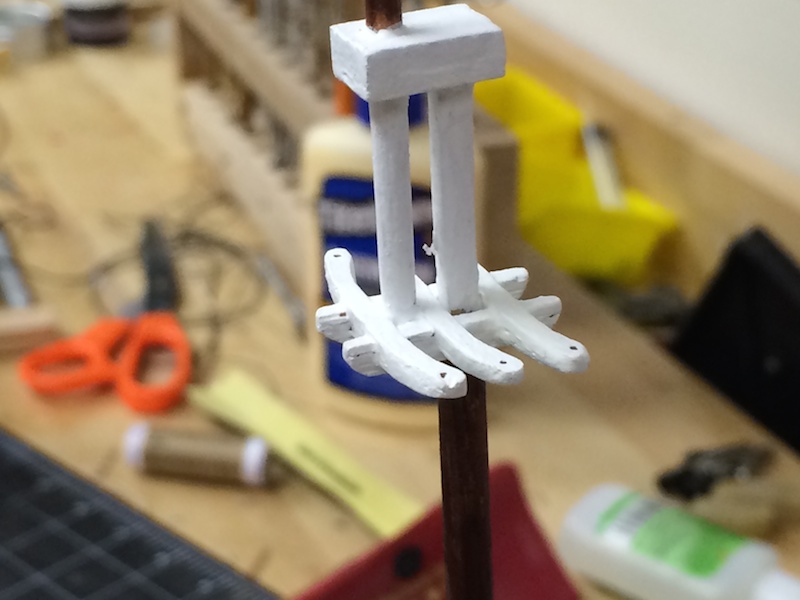
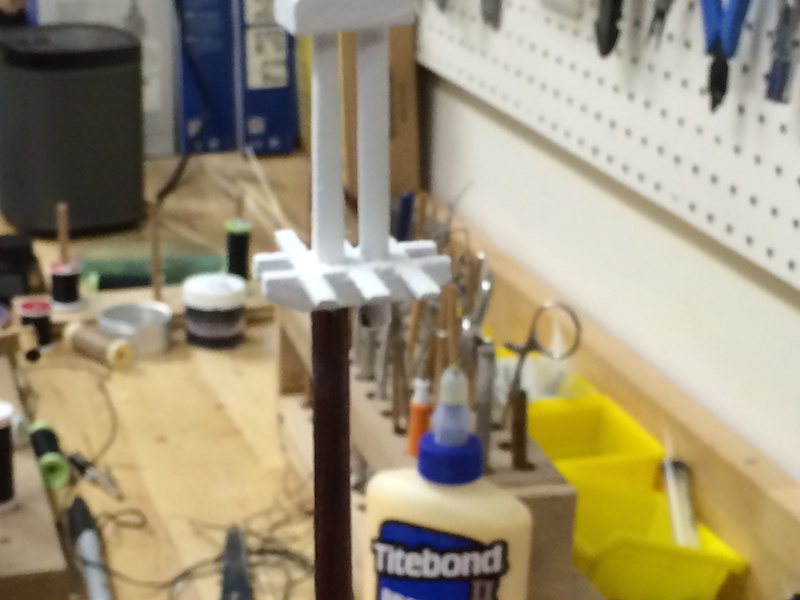
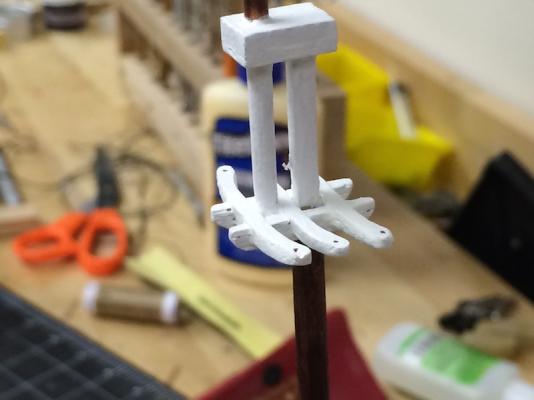
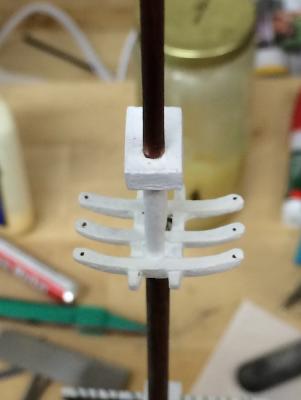
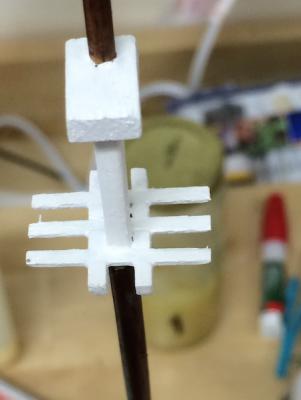
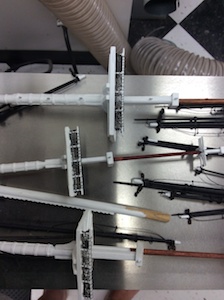
I completed the fore mast cross trees and reassembled the mast and corrected the twist. I like the way they have come out. I touched up the paint and tomorrow once the paint has had a chance to dry sufficiently, I will reinstall the rigging. Below are photos of both the old and new cross trees. The old are square and flat, the new ones are curved and based upon the dimensions and shapes from the AOS and Navy plans. Rather than take the remaining masters totally apart, my plan is to cut the old cross trees from them and install the new ones around the masts.

- 335 replies
-
- 4
-
-
- Constitution
- Mamoli
- (and 3 more)
-
Years ago as I built out my first workshop, I found Cocobola. I loved the wood. I could take a rough piece of it, and mill it down and smooth it and finish it with just a bit of wax. Very hard, nicely figured. I made all sorts of things large and small out of it. On an extended trip to Europe I started developing a rash. It continued to get worse, spreading all over my body and very itchy everyday. No creams would do anything to it. When I got home I saw a specialist and he told me that since the rashes were symmetrical, I was ingesting what ever I was allergic too. What I found it to be after some experimentation was the Cocobola. I had been using a pen I made on the lathe out of the wood. Since I only polished it, the natural oils in the wood were soaking into my skin every time I used it. Then I found out Cocobola is considered a sensitizer. You start out fine, but the more you breath the dust, the more sensitive you become. I had breathed a great deal of the dust and had become highly allergic to the wood. I had to have Rob come into my shop and clean it down thoroughly wiping everything down, vacuuming everything that could be accessed. I could not use any of the tools until they had been thoroughly cleaned. It was a real pain to do. So you should be aware if the types of wood you are working with. For me, I can never pick up another piece of Cocobola again. If I had worn the proper gear when. I was using it, I would be fine. The information on these I types of wood characteristics are widely available now via the web. Just do,a search and you will find if there are any handling things you need to be aware of when working with it. Bill
-
It depends on the period you are going for. My understanding was the Connie in 1812 had lines rather than chain for the anchors. In "The Anatomy of a ship: The 44-Gun Frigate Old Ironsides" it said that the anchor in 1812 was connected by a strong hemp line. The anchor chain was introduced into the British Navy in 1817 and Humphery's papers do not indicate there was any use of chain yet. Not sure when the chains were introduced to the Connie.
- 1,756 replies
-
- 2
-
-
- constitution
- constructo
- (and 1 more)
-
One last thing about the Foredom, maintenance parts are available to replace the brushes in the motor, or maintenance on the flexible drive. These are also easily replaceable should the need arise. This might also be true for Dremel, I don't know since I don't use one. However, with the Foredom, this extends the life of the system quite a bit.
-
Lot’s of grumbling today in the old shipyard. QA did an inspection on the forward mast and rejected it due to a twist in the mast resulting in the mast caps not aligning. I removed the rigging and took the mast apart and used the opportunity to redo the cross trees. The Mamoli plans did not include the dimensions of the traverse members of the tree but supplied the fore and aft frames to put them in. Nor were the transverse members the correct curved shape. Originally I left them straight per the kit plans and guessed on the transverse members length. For the new effort I decided to use the AOS to draw up the correct cross trees. I scanned the page from the AOS and pulled it into DeltaCAD to draw up each of the trees. There is still some confusion on the sizing of the mizzenmasts tree since the AOS is not clear on the dimensions (at least clear to me) for the mizzen's trees. The Mamoli plans called for a smaller one but there was confusion on part numbers resulting in nothing carrying over correctly between the part numbers shown in the plans, but the precut tree beams supplied in the kit (not the transverse members) were the same length on all the masts so that is what I did originally. After drafting up the drawings I tried some rough cuts and came up with a method to shape them and replace them. I will cut and shape the new cross trees tomorrow. Perhaps this has been corrected in the newer kits, however, I have attached a printable PDF of my new trees drawings, if anyone wants to use it. If you print this out full size it should be exactly what you need for the Mamoli scale. Edit: I used the Navy Plans for calculating the size of the Mizzen's cross tree. I updated the attached pdf to include all the cross trees. I also added reference lines for assistance in lining up the top and side silhouettes. If this is printed out full size it can be used as a template for cutting and shaping all of the cross trees. Constitution Cross Trees.pdf
-
Your stern looks great! Sounds like more holes. On the Mamoli model small brass fittings were inserted in the holes, if I recall the same size as the air ports. The end of the chain was inserted and glued. Still something you could do to your model as long as you do not mindour stern looks great.
- 1,756 replies
-
- 1
-
-
- constitution
- constructo
- (and 1 more)
-
Today I rigged the top of the foremast shrouds. I tied these to the topgallant shrouds. I tightened the topgallant shrouds. If they are still tight tomorrow I plan on fixing the lines at the deadeyes. I still will have some play if I need to tighten them a bit since I can pull down on the futtock plates. I also decided I liked the look of having the lower stunsail booms that are lashed to the hull stained the same color as the mast stain rather than black. So I removed them from the ship, sanded the black off, stained them and remounted them. I believe it looks better. It breaks up the black not he side of the ship a bit. I think at this point, I will start working on performing the same operations on the other masts. Then I can start looking at actually stepping them and rigging the lower shrouds to the chainplates.
- 335 replies
-
- 1
-
-
- Constitution
- Mamoli
- (and 3 more)
-
If you see any splintering then put a small amount of CA over the area you are going to drill through. It really helps on that. Of course start small and work your way up. When I drill my air port holes, the drill was sharp and they went in with no problem. Of course I had drilled a bunch of various holes already when I go around to those. So I had already gotten over the issue of "punching holes" in my hull. The best advice I have on the air holes is make sure they follow the same line on the hull. If they are off a small amount forward or aft it will not show up but up or down out of plane will.
- 1,756 replies
-
- 2
-
-
- constitution
- constructo
- (and 1 more)
-
Geoff - Thanks. I am sort of excited to start this new phase. Now that it is actually underway, it seems more doable. Before I started it, it was just so nebulous. Now it is a matter of chipping away at everything one step at a time. Just like all the other phases. Just new and different. Rich - Thanks. I appreciate your looking at my build log.
- 335 replies
-
- 1
-
-
- Constitution
- Mamoli
- (and 3 more)
-
I have a suggestion on where you should mount your old stern lantern. If you can get your cat to still still long enough!
-
So now I can say the rigging has officially started. I know I have been serving lines, and serving the shrouds to the mast, but I did not feel that I actually had started rigging until I had rigged my first shroud. Today I rigged the topgallant shrouds on the forward mast. The plan called for the lower set of deadeyes to be attached to a line threaded through the fighting top then attached to the lower shrouds. I will do this, but instead of using a line, I used blackened brass wire to create futtock plates. These I will attach to the lower shrouds with a combination of catharpins and Bentinck shrouds. The lines are not yet glued/affixed. I will wait until later in the process. Currently the lines are terminated in two half hitches above the deadeyes. This will allow me to adjust them later.

- 335 replies
-
- 2
-
-
- Constitution
- Mamoli
- (and 3 more)
-
The ship is looking great! It worked me to no end the first time I had to drill a hole for the Cathead placement in my hull. I had spent too long getting a smooth hull to mess it up. Just take your time, measure several times and drill. It is wood. If you are painting the hull the Connie colors then you also can pretty easily patch and cover any mistakes. FYI, I am using wood from a 20+ year old ket. When I have to drill several holes in a row in a strip, the walnut is very prone to cracking. Even drilling small and going larger gradually. What I found worked well with the walnut was to coat the outside of the wood with thin CA and letting it dry. This stiffens up the wood enough to drill without cracking. Anyway, great job on your Connie.
- 1,756 replies
-
- 1
-
-
- constitution
- constructo
- (and 1 more)
-
mamoli or aresania latina - moved by moderator
robnbill replied to michael101's topic in Wood ship model kits
I can't speak regarding any Mamoli kit other than the USS Constitution, but it was fully double hulled. -
So she sound like she is already pretty demanding. Is this developing into a co-dependent relationship? Is this the right basis to set up your future relationship? Perhaps you three need to go see some counseling ( perhaps a dry "doc") to make sure your relationships are starting on an even keel. Okay, I have run out of similes. Enjoy.
- 382 replies
-
- 4
-
-
- stadacona
- sylvan scale models
- (and 1 more)
-
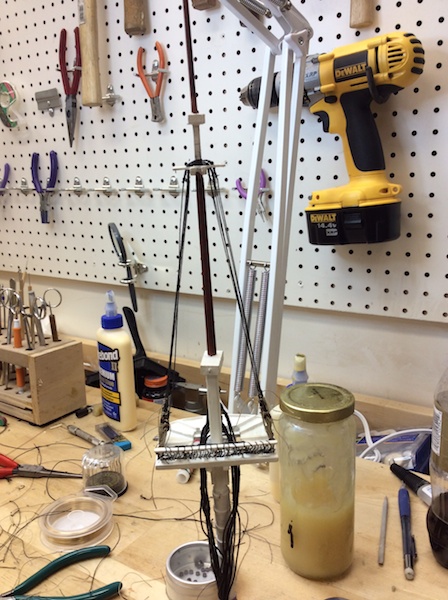
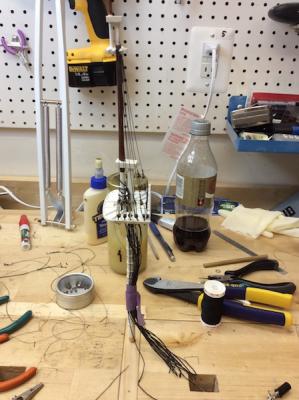
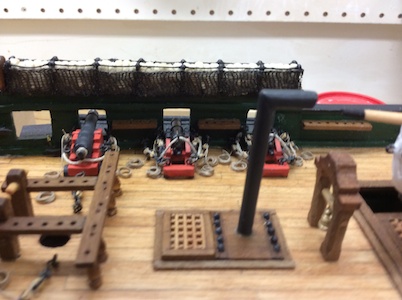
Today I spent a bit of time building the wooden mast step rings. These are not on the Mamoli plans ( that I could find) but are on the ship and ironically are on the Mamoli Constitution cross section model of the same scale. Since I did not find anything in the AOS specifically around the sizing of the ring, I looked at the photos of the current ship. I only had photos of the mizzen mast ring. It appeared to be anywhere from 9 to 12". 9" would equate to 1.4 mm on this scale. So I took sheet of Bass wood and center punched points where I wanted the centers to be. Then I used a compass to lay out the rough circle. I put a thin coat of CA glue on one side to keep it fro splitting then drilled the correct size holes on the centers. I cut the rough pieces out on the band saw then cut the outer circles out on the scroll saw. The Mizzen mast was tear dropped shaped since I included spanker mast in the single ring. I may modify this tomorrow to keep the rings separate. I have to look at it more closely. To round the rings outsides evenly, I placed them on a dowel the same size as the mast. I held the Foredom tool in the table vise with the sanding head 2.5 mm in from the edge. Then I was able to hold the dowel against the table edge and roll the ring against the sander to smooth the ring as I spun it. Sounds more complicated than it was and it worked well. Once these had a final clean up with some sand paper, I painted them white. I also took some hardwood strips and made the bi-pod mast alignment jig Cap'n Rat Fink described so well in his post http://modelshipworld.com/index.php?/topic/1985-mast-alignment/page-2?hl=bipod . Now I am almost completely through with all the hull work. I still need to fit the gallery davits to the hull although I still do not plan on attaching them yet.
-
I'd you go to http://www.foredom.net you will be able to find out more information on the tools and accessories.
-
I have the Foredom tool. I bought it years ago when doing inlay work and needed a good reliable rotary tool. It is more expensive than the Dremel. Bill Short discusses the pros and cons of these and more rotary tool options in his book on carving. Basically his recommendation for carving would be a dental drill since the handle is very small and light. However, if you are like me, you are looking for something more general purpose. I have found with the Foredom tool that the combination of high high the tool is hung along with the handle I use makes a hole world of difference. This is primarily due to the flexible drive tube. If I move too far from the motor I find I am having to hold on to the tool very tightly since it wants to be closer to the motor. This is not bad, but if I am going to be using the tool for an extended period of time, I just need to make sure I arrange my work to be cognizant of that. The various tools I use are from Dremal, Foredom and others since they are interchangeable. I did replace the handle with one with a chuck in it. Makes tool changes much faster. I would think the Foredom probably has more interchangeability between the various tools than Dremel since the latters smaller chuck would preclude some of the Foredom tools. I do love the veritable speed food pedal. I use that a lot. It is also reversible which can be important with some bits - especially in carving. Full disclosure, I did have a minor disaster one day with the Foredom. I had not been paying attention to the hanging motor mount on the arm. The mount is attached to the ceiling in my workshop and allows me to adjust the height of the tool. However the hanging motor clips to the lower rod. This clip had worked to the end of the rod and I had not noticed it. When it fell of course, it landed on my ship model. It broke a couple of things but could have been MUCH worse. This was not the tools fault but mine since I should have noticed the motor clip position. Now I am very cognizant of ANYTHING hanging near or around my model.
-
I will have to say Chick's one is great. However, I have a mixed bag of line, some from Model Expo, some from Mamoli, some from Chuck, and some from the local fabric store. I have been following this thread and after having read this from other sources as well decided to try dissolving Beeswax in turpentine. What I read was shave the beeswax, put it in a jar, and put turpentine in it. Use as much wax as the turpentine will dissolve in 48 hours. Then you can filter any unmelted wax out. I tried this and what I ended up with was a very thin paste. The wax dissolved well. So far I have used it on my shrouds which are being made with Mamoli supplied thread. After I cut the thread to length I dye it with India Ink. Once this dries, I place the thread in the serving machine and run the beeswax solution over it. This soaks into the thread very well. Then I serve the area to be served and run a bit more wax solution over this. Then I hang the served line to dry overnight. What happens is the turpentine evaporates leaving the beeswax completely throughout the thread. When I was making my hammocks yesterday I was using disposable hand clothes which are paper but feel a bit like cloth. after staining the cloth with a tea/coffee to make it less than bright white, I rolled small pieces up . I coated my fingers with the beeswax solution which soaked into the cloth and made it roll easier. 24 hours after installing the hammocks in the cranes, the turpentine is completely gone leaving the fabric soaked in wax and firm. So in my limited experience, I like the beeswax/turpentine solution. It cuts down on the fuzzies, and leaves the line totally saturated with the wax. It looks and feels better than just running the thread through the wax and penetrates much better and more evenly than using a lightbulb and heat. On a side note, the article discussing the deterioration of models in airtight cases that I read was discussing the deterioration of lead. They were attributing the breakdown of the lead to be from the acidic environment caused by the glues and other chemicals used in model making. Their recommendation was that all cases have ventilation. This seems to fix the problem. Not sure if this was the same article being referred to above, but it seems like a common issue that ventilation fixes.
-
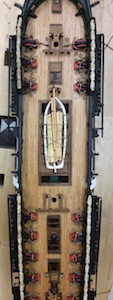
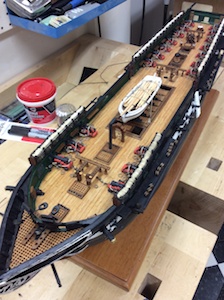
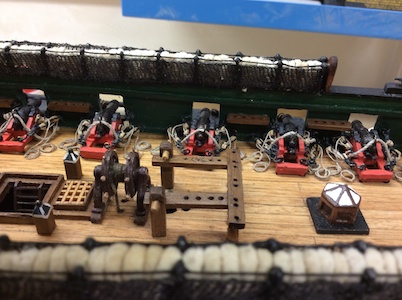
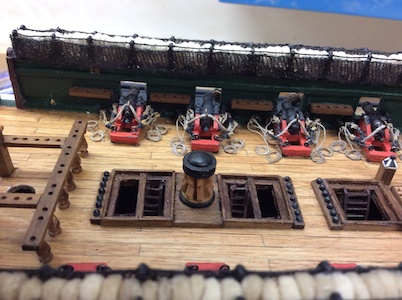
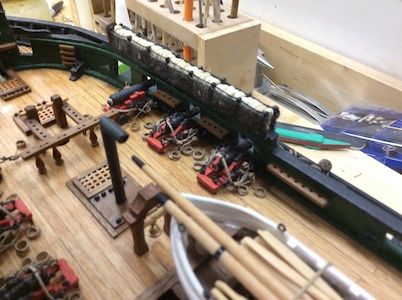
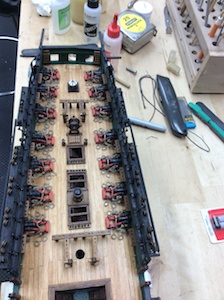
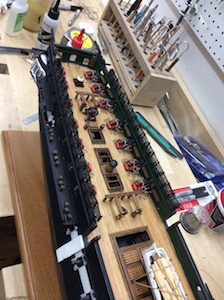
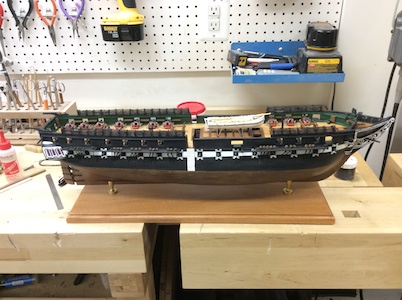
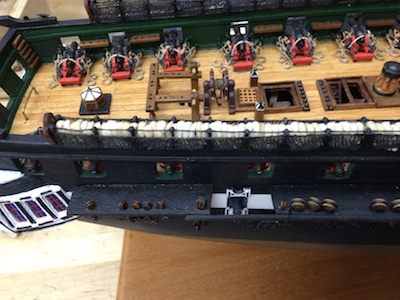
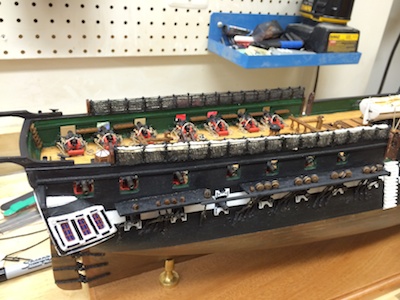
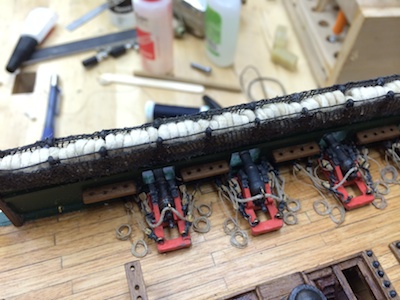
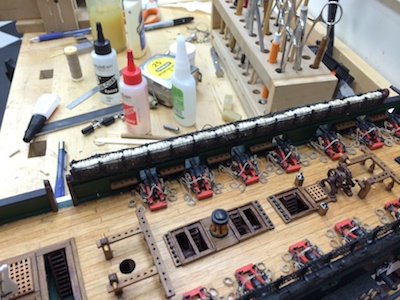
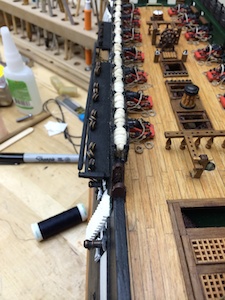
Today I completed the hammock crane installation. After completing the netting on all the frames I built and installed end boards. I also decided to try adding some hammocks to see how it looked. I had not planned on putting hammocks on the ship. I calculated the scaled down size of the hammocks, this ended up being 15mm x 10mm after rounding. I used the paper hand towels that are strong and cloth like. I dyed the cloth with a stain made up of tea and coffee. A minute in this solution and I could wring it out, rinse it and dry it. This gave me the color I was looking for. I cut a few hammocks out and rolled them using the beeswax/turpentine mixture to make it hold it's shape and cut down on fuzzies. After rolling a few, I tried them out on the ship. I did not want to lay them down. I tried standing them on end and did not like that. I bent them in a U and placed them in the rack with the bend up (or U upside down). This was a look I liked. So I started a batch process to cut, roll and roll all the hammocks I would need. This was approximately 260. I placed them from the forward and aft closed ends toward the waist. When I reached the waist, I bound the last hammock with thin thread and glued it in place. This makes the most visible hammocks look bound like the hammocks would have been. The beeswax/turpentine mixture will stiffen up the hammocks as the turpentine evaporates. They will also lighten up slightly as the dry. During breaks on the hammocks, I installed the netting on the remaining fighting tops. At this point, I still need to build the three mast rings and mount the gallery ship's boat davits. Then I will return to the rigging in earnest. I will use breaks on the rigging to build the three remaining ship's boats. Thee are a few photos below showing the progress.

- 335 replies
-
- 11
-
-
- Constitution
- Mamoli
- (and 3 more)